
Authenticators
What's on this page
About Authenticators
Sometimes you need all the benefits of a unique survey link without actually creating or sending out a unique link. Authenticators allow you to do just this, letting you collect responses that are connected to contact list information without generating unique links. Authenticators make this possible by having respondents “log in” to take a survey. This means that you can copy the Anonymous Link to a website or into an email and still track who has responded. Only people who are listed in your contact list can take the survey, so you won’t collect unwanted responses even when using the Anonymous Link.
Qtip: To learn how to set up an authenticator that checks a third-party service instead of a contact list (e.g., a university login system or Facebook login), refer to our SSO Authentication page.
Warning: We strongly recommend disabling Allow respondents to finish later in the survey options if you are using an authenticator. If you choose to distribute via this method, a respondent may be able to begin the authenticated section on different devices and then return and complete multiple responses.
Warning: We strongly recommend not using an authenticator with personal or individual links, as it may cause respondent funnel contact events and reminders to not work as expected. Additionally, sending your authenticated survey via the individual link can be redundant and will not double protect your survey. If you choose to use both individual links and authenticators in the same survey, we recommend using the same mailing list for authentication and distribution.
Authenticator Functionality
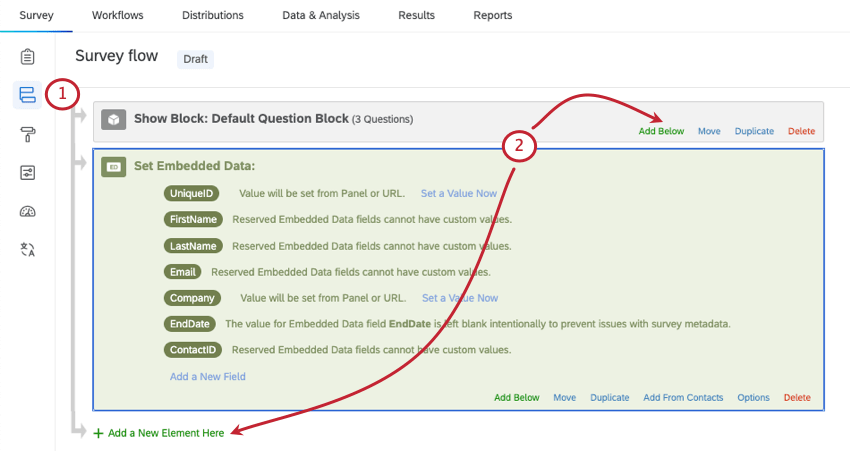
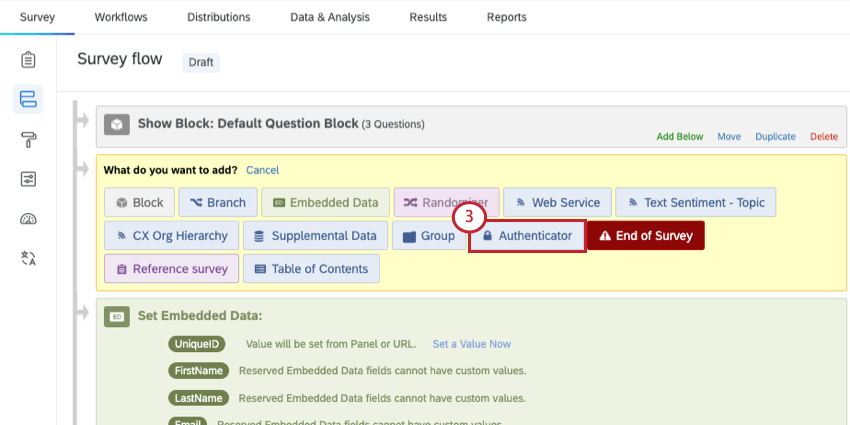
Authenticators are elements in your survey flow, just like branch logic or randomizers.
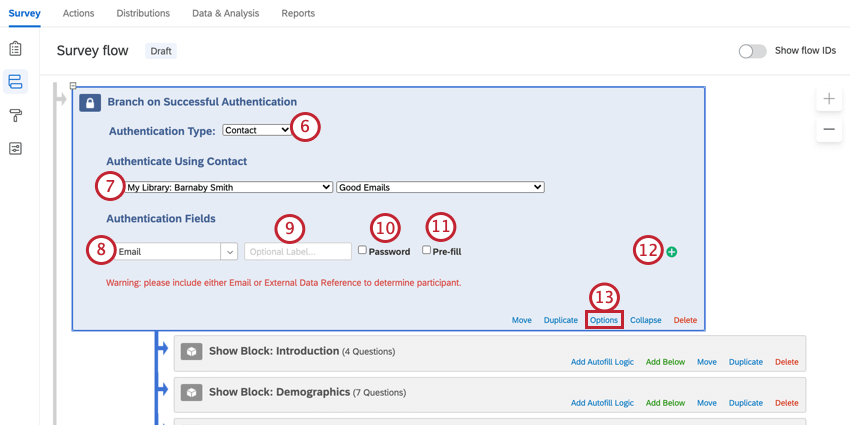
When a respondent reaches an authenticator, they are prompted to input certain pieces of information, like an email address or password (you determine the exact field when you set up the authenticator). Once they enter the information, Qualtrics checks one of your contact lists (you specify which one) to see if the provided information matches any of those contacts. If there is a match, the authentication is successful and the respondent proceeds into the authenticated section of the survey.
Qtip: Only the Email or ExternalDataReference contact list fields can be used to authenticate. If you would like to authenticate using a value other than a respondent’s email, make sure to include these values in the ExternalDataReference column of your contact list. You can only use an Embedded Data field if you also authenticate with the Email or ExternalDataReference fields.
If the information is incorrect, the authentication fails and the respondent is prompted to re-enter the information. If the respondent continues to fail, they will be skipped past the authenticated section of the survey. If there is not anything after the authenticated section, the survey will continue to the end of survey message and their response will be recorded.
Qtip: Make sure that the respondent has the information they need to log in to the authenticator.
Qtip: Failed authentications are recorded as responses. The Progress will still be marked as 100% and Finished as True, because these fields only identify whether a respondent made it to the end of the survey, not the items authenticated into or answered along the way. Instead, to tell if an authentication failed, you’ll see that the answers in the authenticated part of the survey are empty.
Setting Up an Authenticator
Qtip: Before you follow these steps, make sure you’ve created your contact list first!
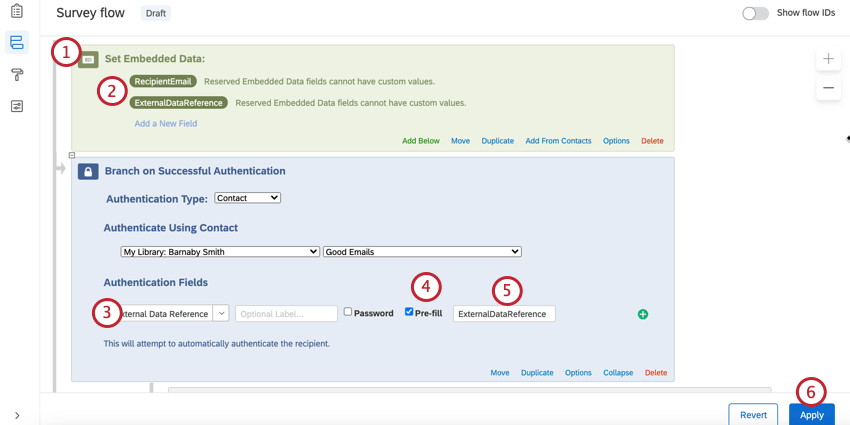
Qtip: Any embedded data you want to pull from the contact list must be underneath the authenticator.
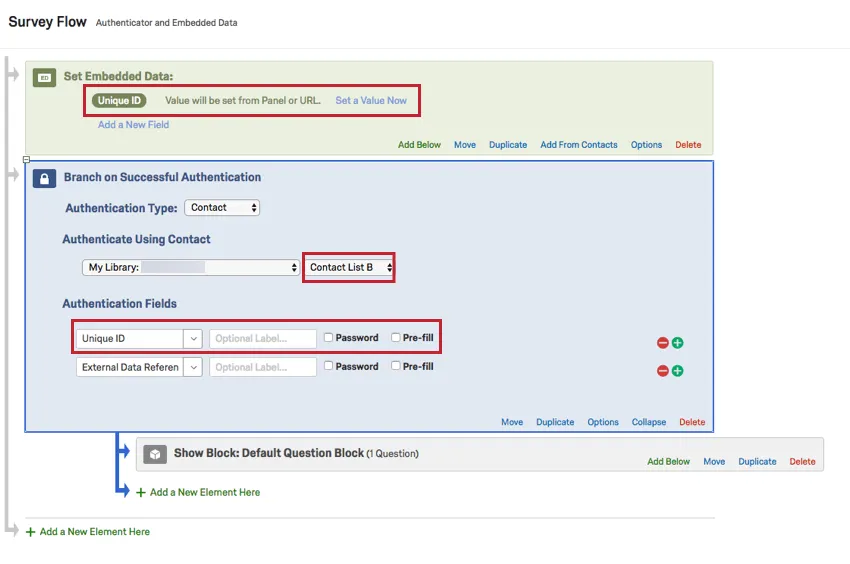
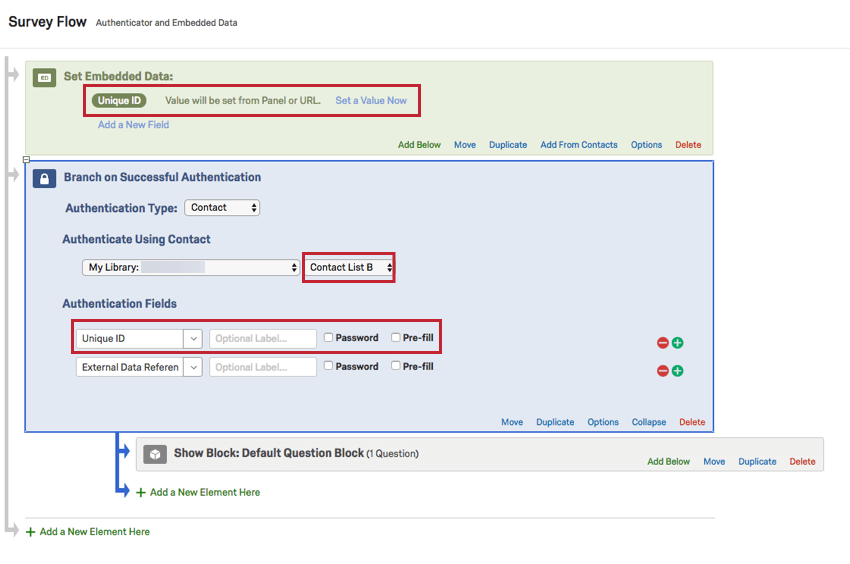
Qtip: When capturing embedded data from a contact list and using an authenticator, the order of survey flow elements is extremely important. In the below example, the values for embedded data field Unique ID are set from Contact List A which was used to distribute the survey. Respondents need to authenticate into the survey using the Unique ID field, but the authenticator is set to authenticate against a different contact list called Contact List B. Because the authenticator comes after the embedded data in the survey flow, the response will have the value for Unique ID from Contact List B. The survey flow reads elements from top to bottom, so values may be overwritten if defined in multiple places. You can find more information about the importance of survey flow element order on the survey flow page.
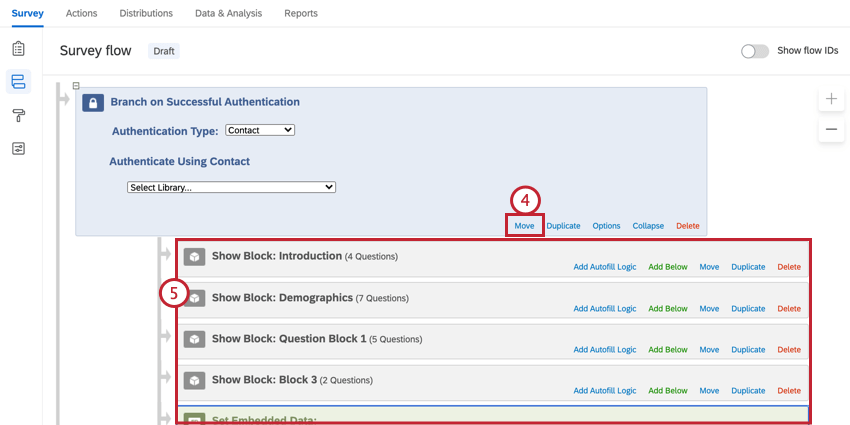
Qtip: Make sure all blocks that you want authenticated are nested under the authenticator element. This means they are not on the same outside tier as the authenticator in the survey flow, but are indented or nested under the authenticator.
Qtip: If you want to authenticate based on SSO instead, check out SSO Authenticator.
Qtip: The contact field used for authentication needs to contain unique values for each contact, such as an email or an ID number. If you authenticate based off of a common value like first name, the contacts with duplicate values will not be able to authenticate.
Authenticator Options
Authenticators have a number of options for you to customize the authentication process.

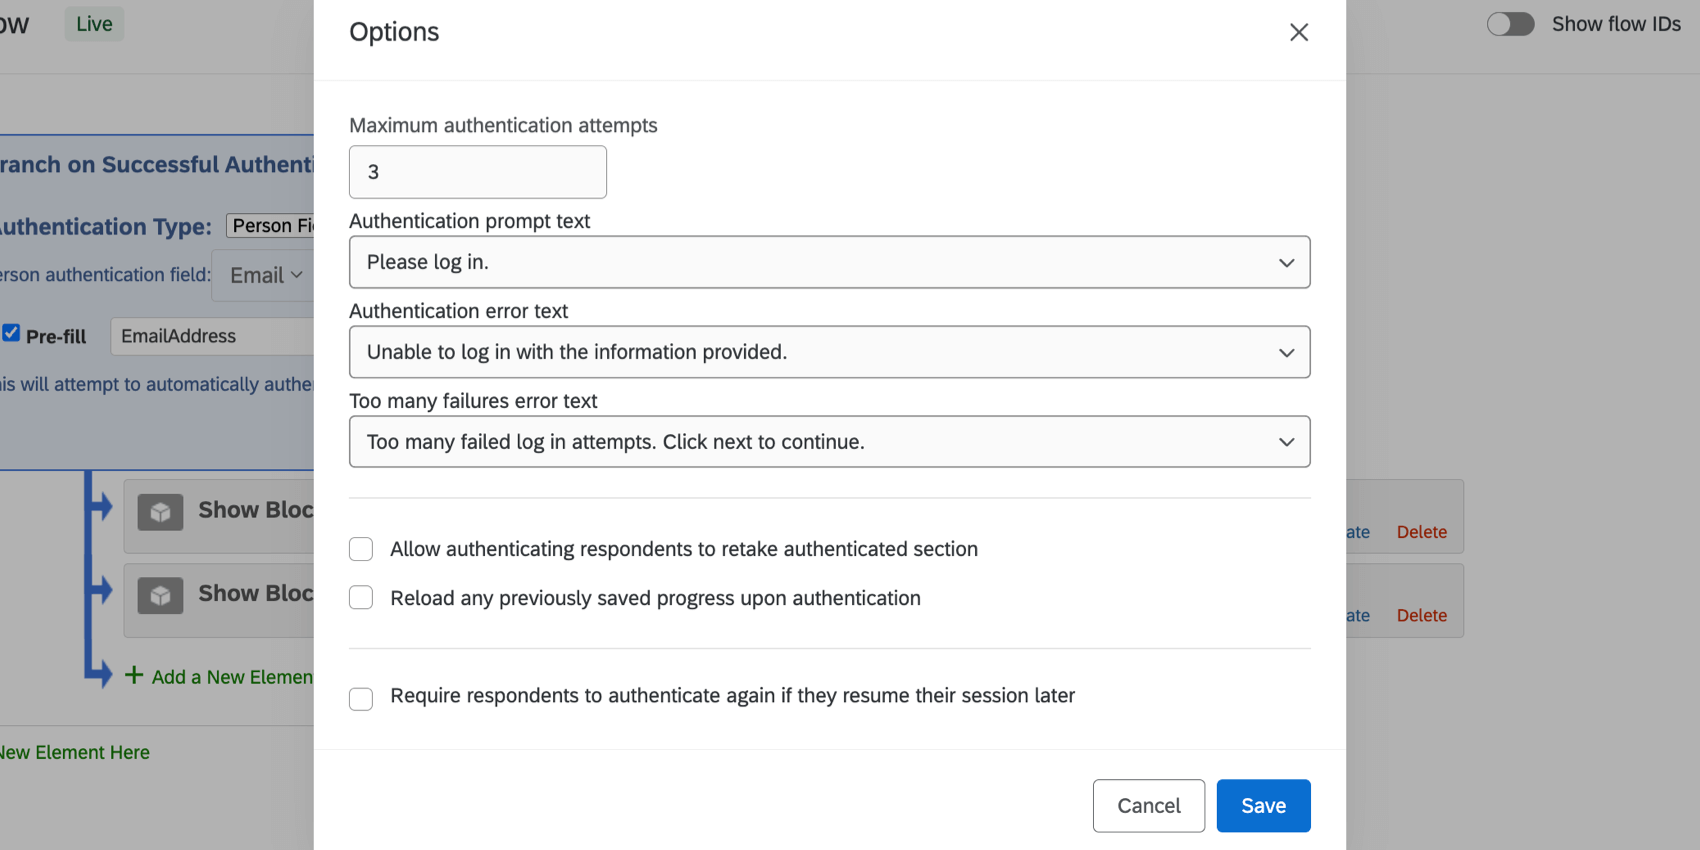
Maximum Authentication Attempts
Enter the number of times a respondent can attempt to authenticate before they are skipped out of the authenticated section in your survey (if all of your survey is within the authenticator, the respondent will be skipped out of the survey entirely).
Authentication Prompt Text
Change the text your respondents will see when prompted to authenticate by selecting a message from your library or creating a new one.
Qtip: Authentication messages are saved under General Messages in your Library.
Authentication Error Text
Change the text your respondents will see when they fail to authenticate message by selecting a message from your library or creating a new one.
Too Many Failures Error Text
Change the text your respondents will see when they reach the maximum number of authentication attempts.
Allow authenticating respondents to retake authenticated section
Let your respondents complete the authenticated section more than once (i.e., they can finish the survey and then retake it).
Qtip: By default, respondents can authenticate only once. So if a respondent successfully authenticates and completes the survey, they will not be able to take the survey again.
Warning: Be careful if you change which contact list is used in the authenticator. If the contact list in the authenticator changes and the contact is in the new list, then the contact will be able to take the survey. This is because the authenticator checks if there are any responses connected to the contact in that particular contact list.
Reload any previously saved progress upon authentication
Prevent respondents from starting multiple simultaneous survey sessions by reloading any saved progress each time they authenticate.
Warning: If you select this option, you must only have one authenticator at the beginning of your survey flow. Also, it is strongly recommended that you disable Allow respondents to finish later in the survey options. Otherwise, a respondent is able to begin the authenticated section on different devices and then return and complete multiple responses.
Require respondents to authenticate again if they resume their session later
If a respondent has authenticated with this authenticator and then leaves the survey, they must authenticate with the same credentials again if they wish to continue the survey later. Authentication with the same credentials is required even outside of the authenticator flow branch. Respondent identifying info will not be captured again.
Qtip: Resuming on a later authenticator does not require re-authentication.
If a survey has multiple authenticators, the authenticator the respondent will have to log into again will be the last one that the user saw that has the Require respondents to authenticate again if they resume their session later option enabled.
Example: A survey contains two authenticators. The first has the Require respondents to authenticate again if they resume their session later option enabled, but the second doesn’t:
- A respondent trying to resume before the first authenticator will not have to re-authenticate, because they haven’t authenticated yet.
- A respondent trying to resume after the first authenticator will have to re-authenticate against the first authenticator.
- A respondent trying to resume at the second authenticator will only have to authenticate against the SECOND authenticator.
- A respondent trying to resume at any point after the second authenticator will have to re-authenticate against the FIRST authenticator.
Prefill Authentication Field

The Prefill option allows you to auto-authenticate a user. This means that if they have the right credentials, they never even see the authenticator! They’re just logged right in.
There are two ways of distributing a survey with Prefill turned on:
- An anonymous link with a query string attached
- Emailing an invite to a contact list
In both cases, you still need to set up your contact list first!
The authenticator reads information saved in the emailed individual link or the query string and authenticates accordingly.
Setting Up your Survey Flow
If you’re using Prefill, you need to make sure you have the appropriate options selected in the survey flow.

Setting Up your Query String
If you would prefer to use a query string, you will still need to give each user their own unique link. (Unless there’s only one person in your contact list, and you have Allow authenticating respondents to retake turned on.)
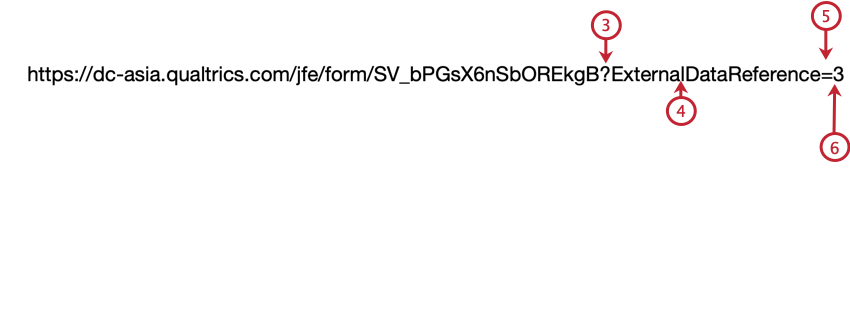
Qtip: Email addresses contain special characters, such as the @ symbol and the period. Be sure to replace these with HTML URL encoding. There are guides and text to encoded converters online if you search “URL encoding.”
Qtip: Need additional help troubleshooting your query string? Check out the Passing Information via Query Strings support page.
Removing an Authenticator
To remove the authenticator, move all blocks out from under the authenticator and only then click Delete. If you delete the authenticator without moving the blocks so they are no longer nested underneath it, all the associated blocks will be deleted. If you accidentally delete your blocks, click Cancel at the bottom of your survey flow and all of the changes you made will not be saved.
If you accidentally saved after deleting your blocks, check out this page on adding blocks to the survey flow to get them back.
Testing with an Authenticator
If you are going to be testing out your authenticator, make sure you add extra dummy contacts to your contact list so you can log in to the authenticator yourself while testing. You might also want to enable Allow authenticating respondents to retake authenticated section in the authenticator options so you can take the survey as many times as necessary (though be sure to disable it before you launch!).
If you don’t want to test the authenticator itself, but the survey, you can bypass you authenticator by selecting Ignore Validation in the Survey Preview. Alternatively, you can wait to put your survey elements under the Authenticator until you are done testing.
Types of Projects this Feature Is Available In
The survey flow can be customized in many different types of projects. However, not all survey flow features are available in all types of projects.
Authenticators can be used in the following projects:
Qtip: Authenticators exist in a few more project types, but their functionality is different from what’s described on this support page. For Engagement, Lifecycle, Ad Hoc Employee Research, or Pulse projects, please see Authenticator (EX).
FAQs
How can I make sure the participant only takes the survey once?
How can I make sure the participant only takes the survey once?
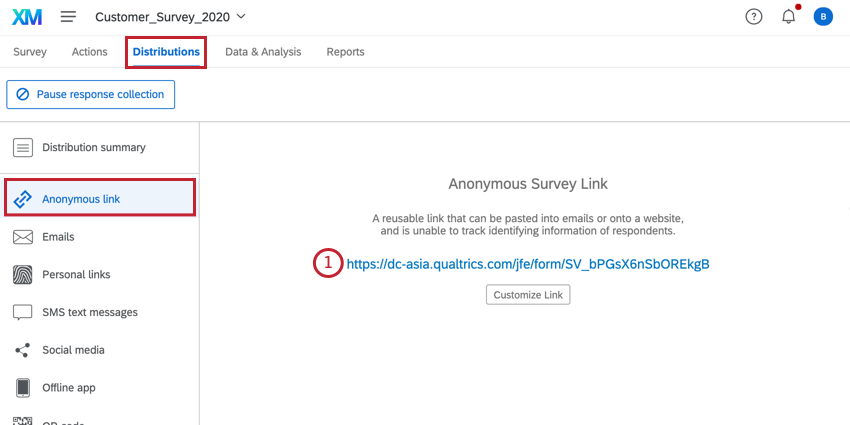
If you are distributing your survey through the Anonymous Link, there are 2 options to prevent participants from retaking the survey:
- Prevent Multiple Submissions: You can enable Prevent Multiple Submissions in your Survey Options. This option will place a cookie in the participant’s browser that will restrict them from retaking the survey on that browser. However, the participant could still clear their cookie cache, use a different browser, or use a different computer in order to take the survey again.
- Authentication: You can use the Authenticator element in the Survey Flow. This option will require the participant to be a member of a contact list you have previously set up within your account. The Authenticator options will allow you to prevent contacts from retaking the survey by using the contact list as an authentication database.
That's great! Thank you for your feedback!
Thank you for your feedback!