
Library Messages
What's on this page
About Library Messages
You can use the library to store and manage any messages used for your surveys, such as email invites and end of survey messages. Each time you make a message in Qualtrics, such as a reminder email or custom validation message, it’s saved in your library. You can also create messages directly within the library for later use.
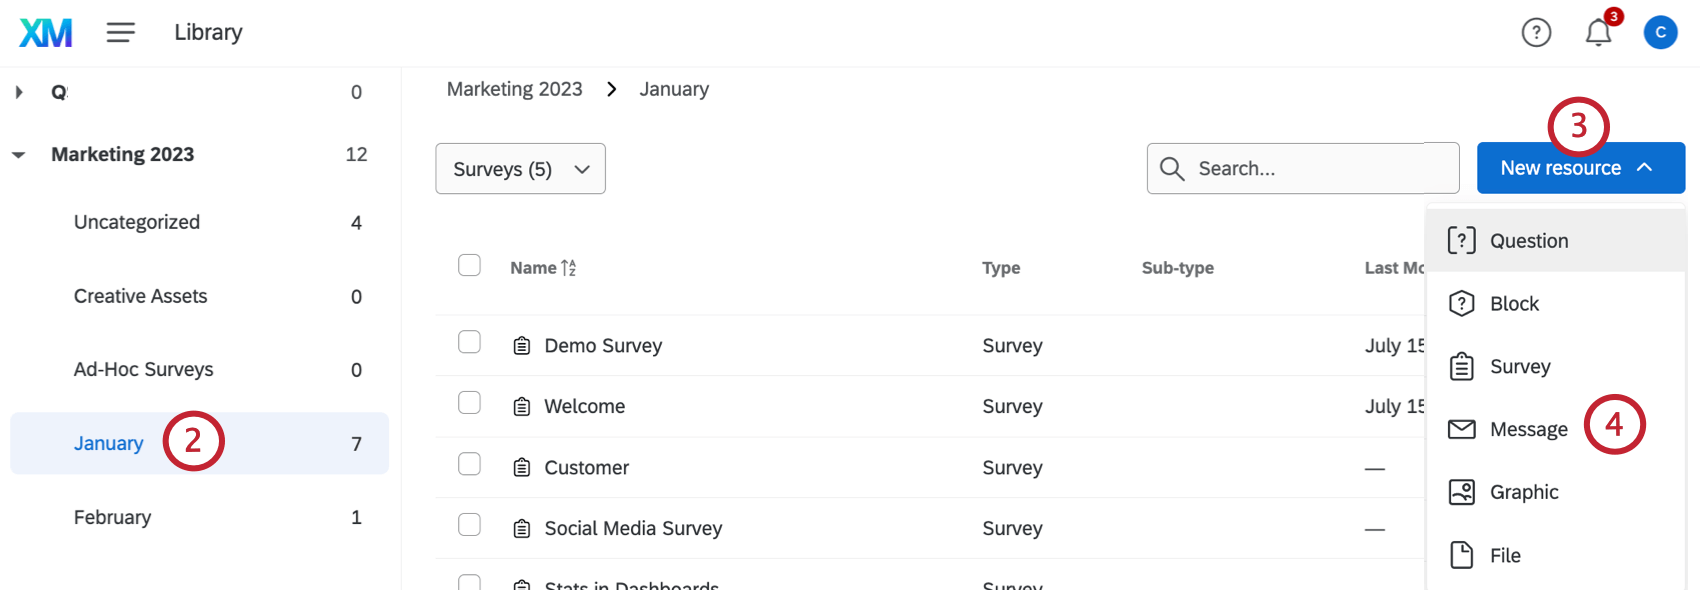
Creating a Message in a Library
Qtip: For help accessing group libraries, please contact your Brand Administrator as they are the only ones who can edit or create groups.
Qtip: Validation messages work as a set of customized error messages and are created differently than the other message types. To learn how to create validation messages, visit our Validation page.
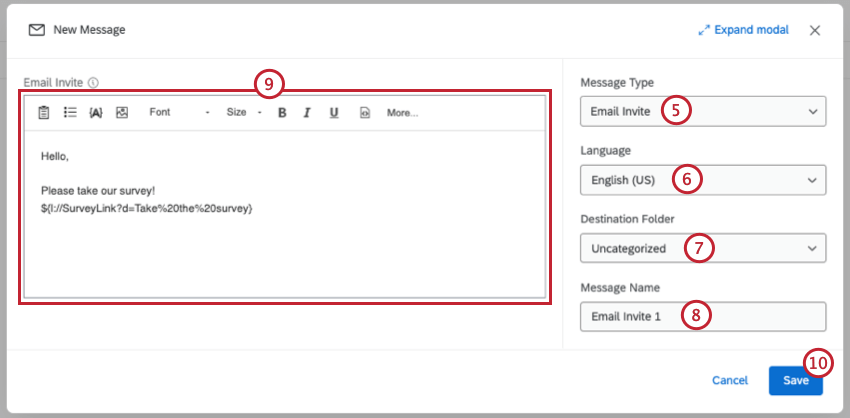
Qtip: You can use the rich content editor to change the size, color and format of your text.
Copying Messages From Your Library to a Group Library
See Copying Content From Your Library to a Group Library for instructions on how to copy graphics from your library to a group library.
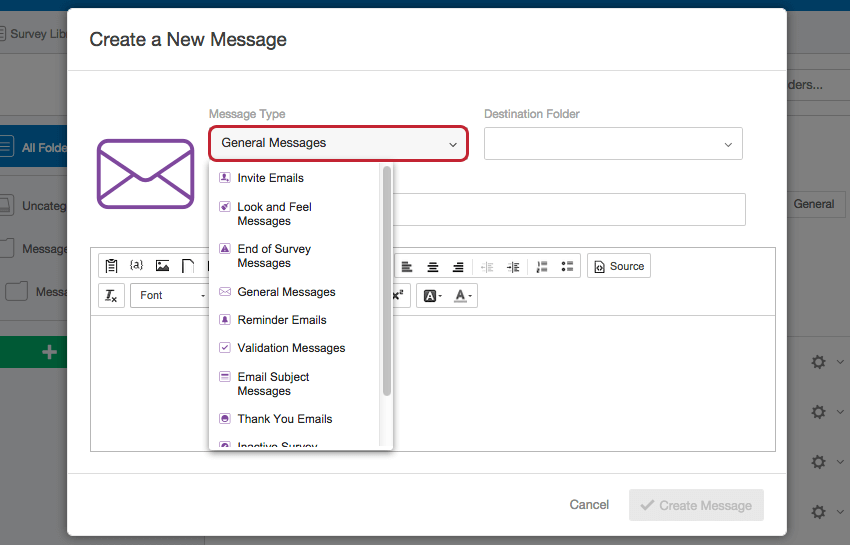
Message Types
There are 10 types of messages you can make. Creating the right type of message will help you when trying to find or use the message later.
- Email Invites: Email messages sent in an email distribution to invite participants to take your survey. In addition to the library, you can access or create these messages in the Emails section in the Distributions tab.
Look and Feel Messages: Usually short phrases used as Next or Back button text or as header or footer text. In addition to the library, you can access or create these messages in the Look and feel menu in the Survey tab.

Qtip: If you set up look and feel text as messages (instead of just typing the text directly into the available fields in the menu), you can add translations or edit the message and have all instances update automatically.
- End of Survey Messages: The message participants see when they’ve completed their survey. In addition to the library, you can access or create these messages in either the survey options or the survey flow in the Survey tab.
General Messages: Messages used in features like authenticators, the table of contents, and email tasks. In addition to the library, you can access or create these messages in the survey flow in the Survey tab when using an authenticator or table of content, or in the Workflows tab when setting up an email task.
Qtip: Opt-out links only work in messages made for survey invitations, reminders, and thank you emails. They will not work with email tasks.
- Reminder Emails: Email messages sent to remind participants in an email distribution to take your survey. In addition to the library, you can access or make these messages in the Emails section in the Distributions tab.
- Validation Messages: Explanatory messages participants see when they fail specific validation requirements (e.g., not answering a question that has force response or inputting text in a question that has numeric content validation). In addition to the library, you can access or create these messages in the survey option or any question’s custom validation menu.
- Email Subject Messages: Subject lines for emails sent in an email survey invitation. In addition to the library, you can access or make these messages in the Emails section in the Distributions tab.
- Thank You Emails: Emails sent to participants who have completed a survey in an Email distribution. In addition to the library, you can access or create these messages in the survey options menu within the Survey tab.
- Inactive Survey Messages: The message participants see when they open a link to an inactive survey. In addition to the library, you can access or create these messages in the survey options menu in the Survey tab.
SMS Invites: Text messages to invite participants to take the Anonymous Link of your survey. In addition to the library, you can access or create these messages in the SMS section in the Distributions tab.
Qtip: SMS access is an add-on feature for your Qualtrics license and will need to be enabled for you to use it. Contact your Brand Administrator for more information.
- SMS Reminder: Text messages to remind participants to complete your survey. Only those who have not started or have not yet submitted their responses will receive the reminder.
- SMS Thank You: Text messages to thank participants for completing your survey. Only those who have submitted their responses will receive the thank you message.
- Ticket Messages: An email you can send to follow up on a ticket task.
Subscription Messages: Emails sent to participants who opt-in to or opt-out of a mailing list or the entire directory.
Qtip: Subscription messages are part of the XM Directory platform, which will need to be enabled on your Qualtrics license to use this message type.
Qtip: If you’re using an Employee Experience project, see the Library (EX) page for more message types.
Message Options
See Library Options for information on the resource item menu.
Qtip: If you modify the source message of a scheduled email invitation before your invitation has sent, the most recently saved message will appear in the survey invitation.
Warning: Deleting the source message in the library will remove the file from any survey or invitation that the message is being used in.
Translating Messages
Qtip: If you’re using a library message as an end of survey message, please make sure your messages translation matches the default language or existing translations for that survey project. If the translation of the message does not match the survey’s, users will be shown the default end of survey message.
You can translate any type of message directly from the library. There are 3 methods available for translating messages:
- Manual: Translate your message manually.
- Import: Import a text file that contains your translation.
- Automatic: Use a third-party service to generate a translation.
Once you’ve translated your message, read Specifying the Participant Language to ensure your survey respondent sees the message in the proper language.
Qtip: When you open the translations page, the message will be loaded in your account language, so long as that message is available in that language. If the message is not available in your account language, it will default to another language the message is available in.
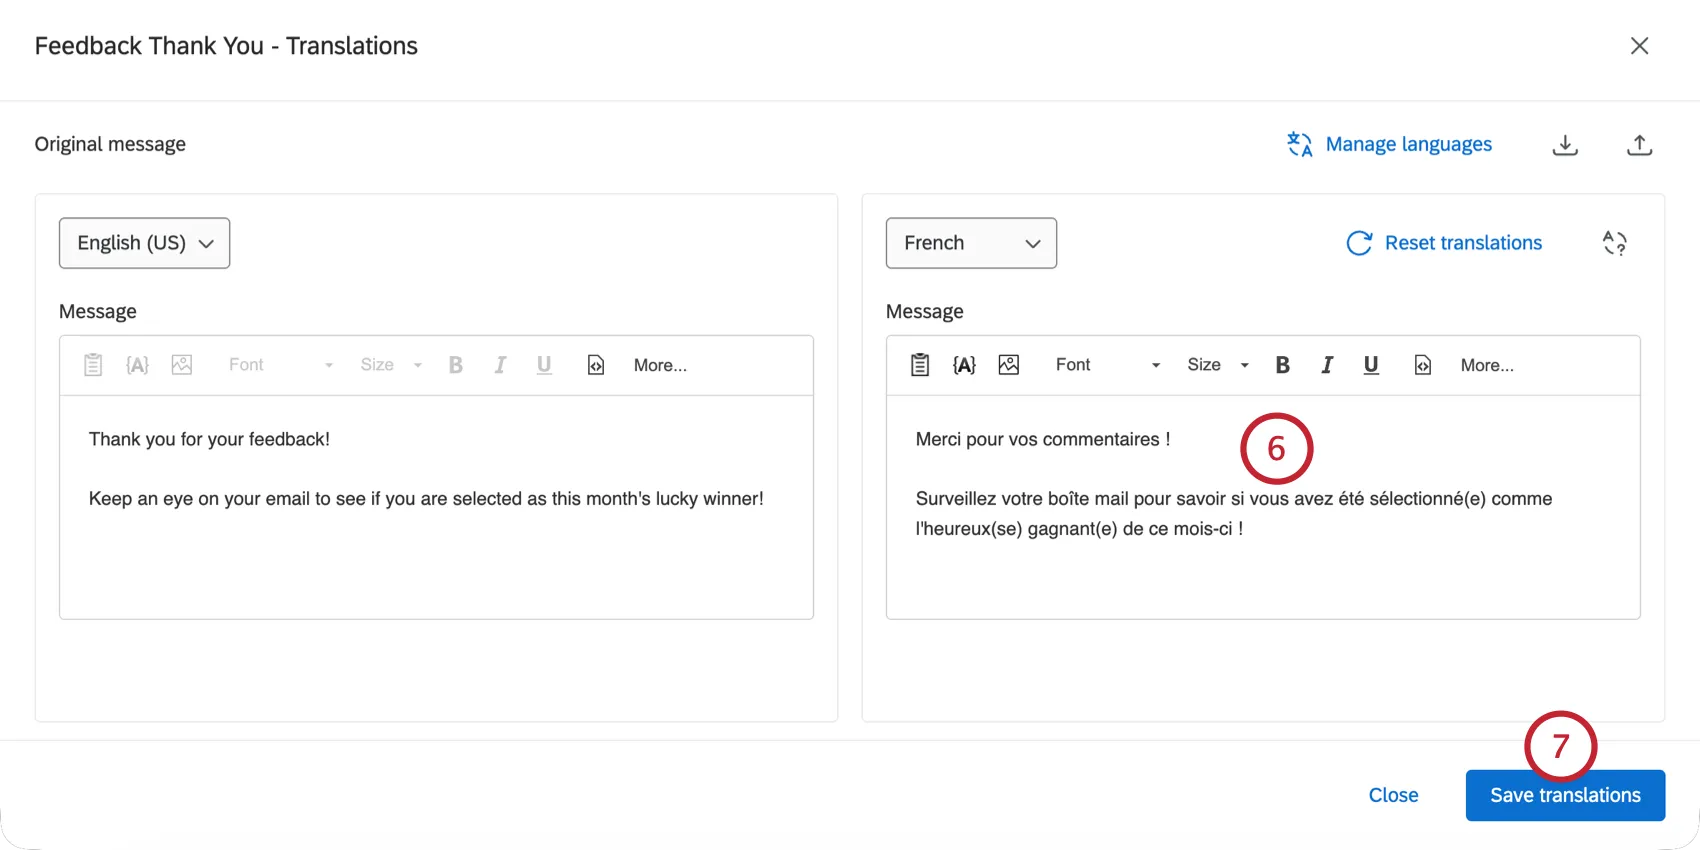
Adding Translations Manually
Select Translate Message in the message option menu.
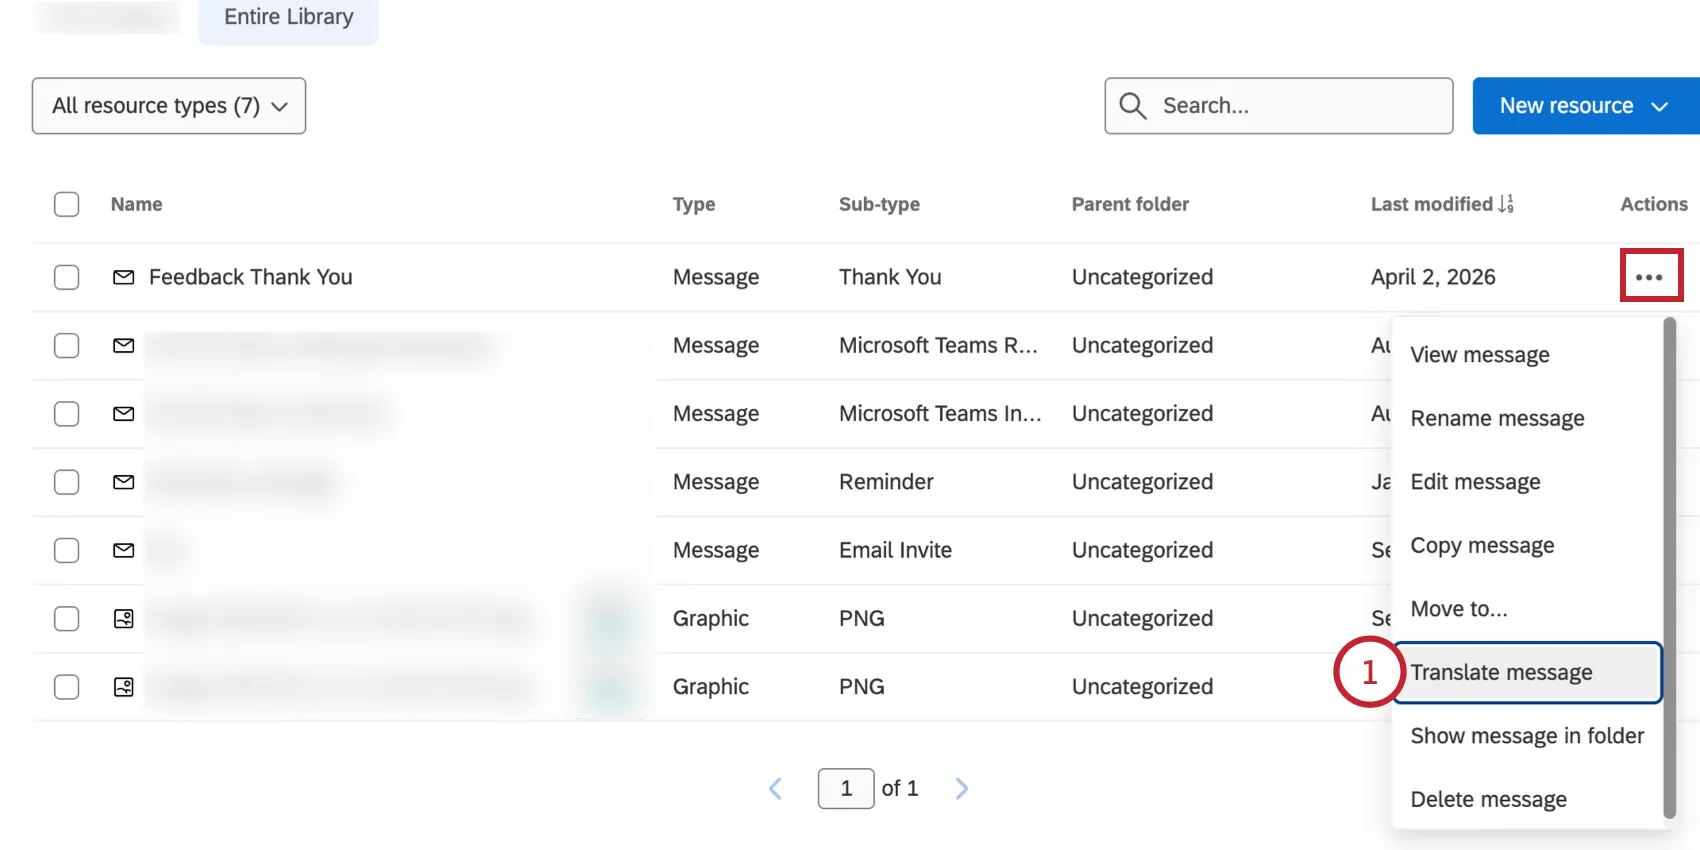
Use the language dropdown on the right-hand side of the screen to choose the language you’d like to add a translation for.
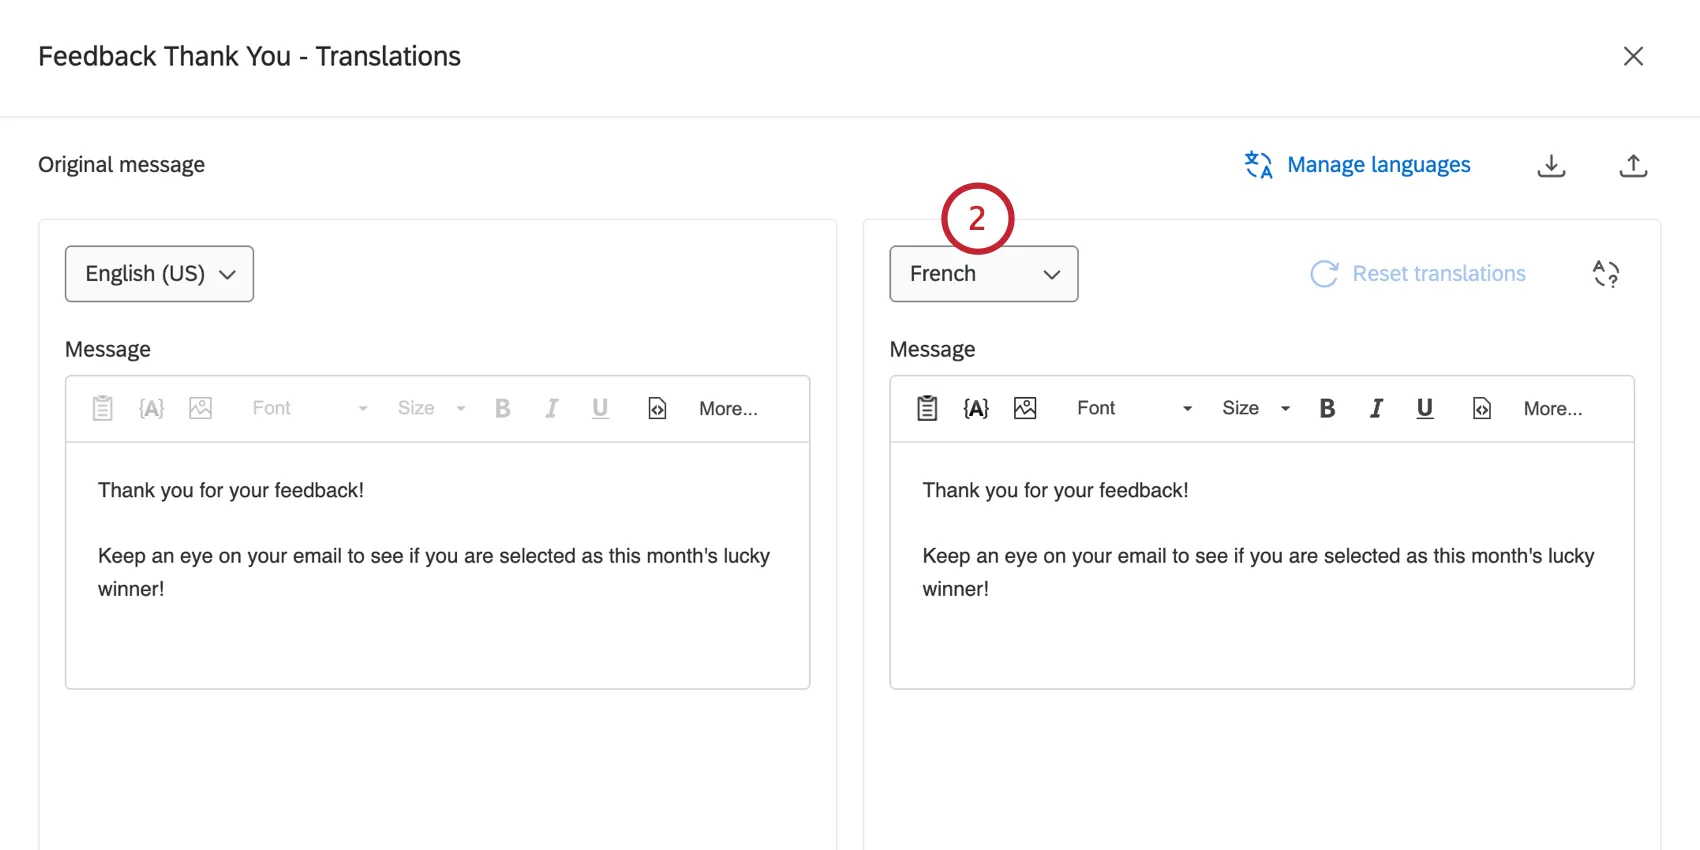
To add more languages for translation, click Manage languages and then enable the language(s) you’d like to add.
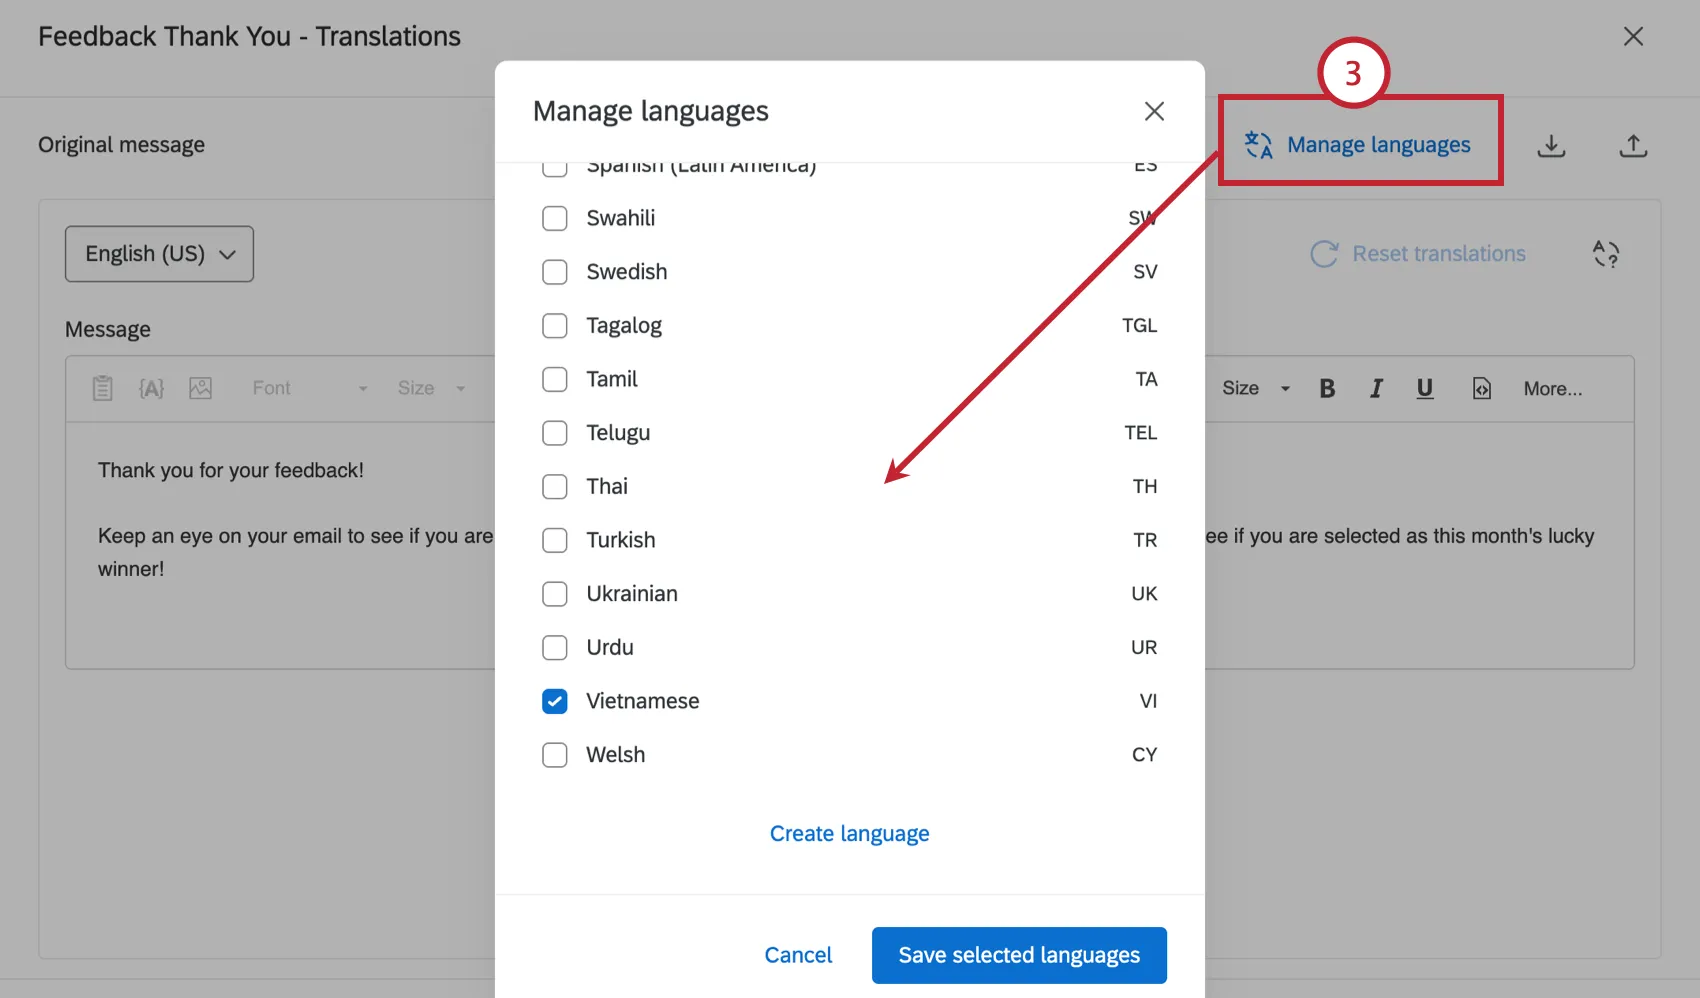
Qtip: If you don’t see the language you want to use, you can add a custom language by clicking Create language.
In the rich text editor on the right-hand side of the page, type your translated message.
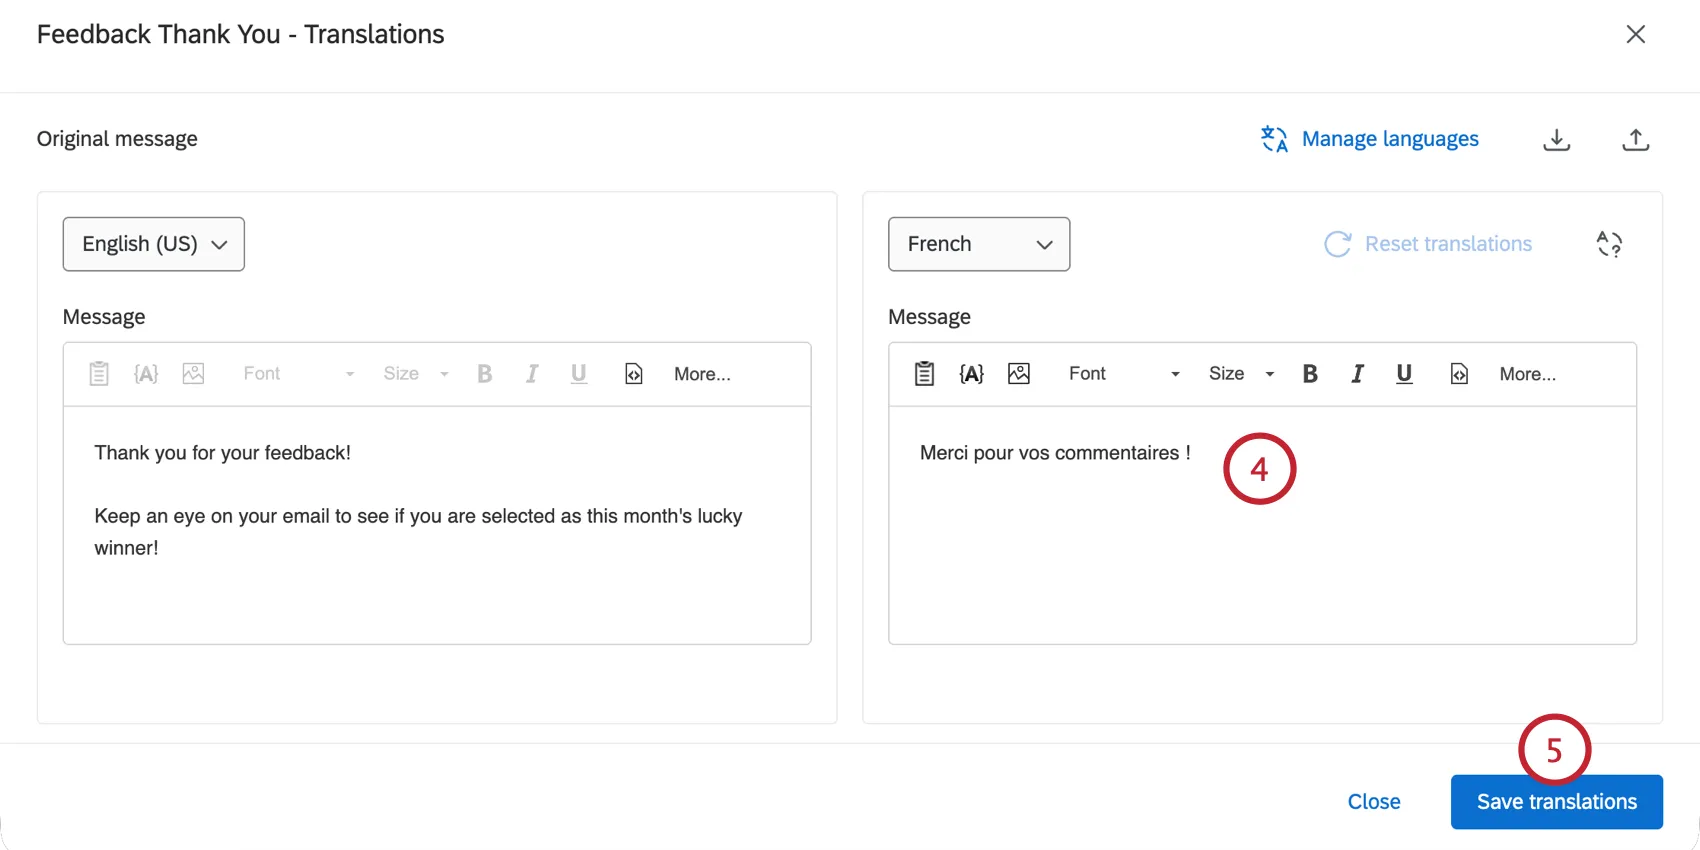
Click Save translations.
Importing a Translation
Sometimes you may find it convenient to manage your translations via a text file. This can be particularly useful if you have many translations to update, or if you are coordinating with a third-party vendor to help translate messages. Importing a translation file allows you to update multiple translations at once.
Qualtrics accepts translation files in the following formats:
- XML
- Unicode text (Excel)
- Unicode (CSV)
- Unicode (TSV)
Follow the instructions below to export a translation file from Qualtrics, add your translations to the file, and then upload it back into Qualtrics.
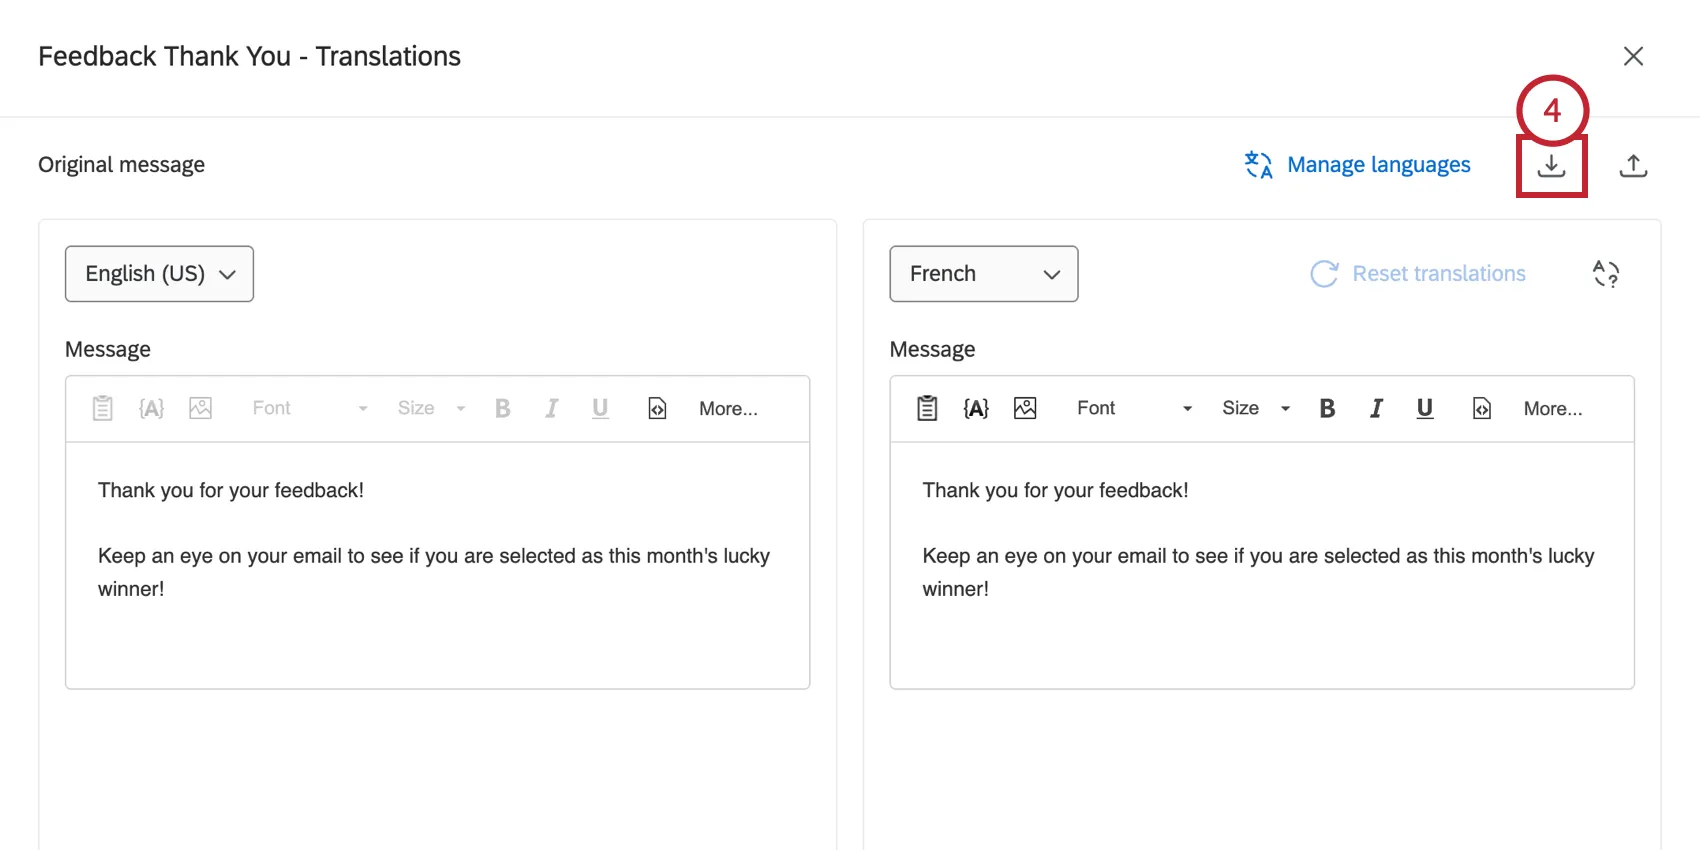
Select Translate Message in the message option menu.
Use the language dropdown on the right-hand side of the screen to choose the language you’d like to add a translation for.
To add more languages for translation, click Manage languages and then enable the language(s) you’d like to add.
Qtip: If you don’t see the language you want to use, you can add a custom language by clicking Create language.
Click Export Translations.
Choose the language(s) you’d like to include in the export file. You can choose to export a single language or all available languages.
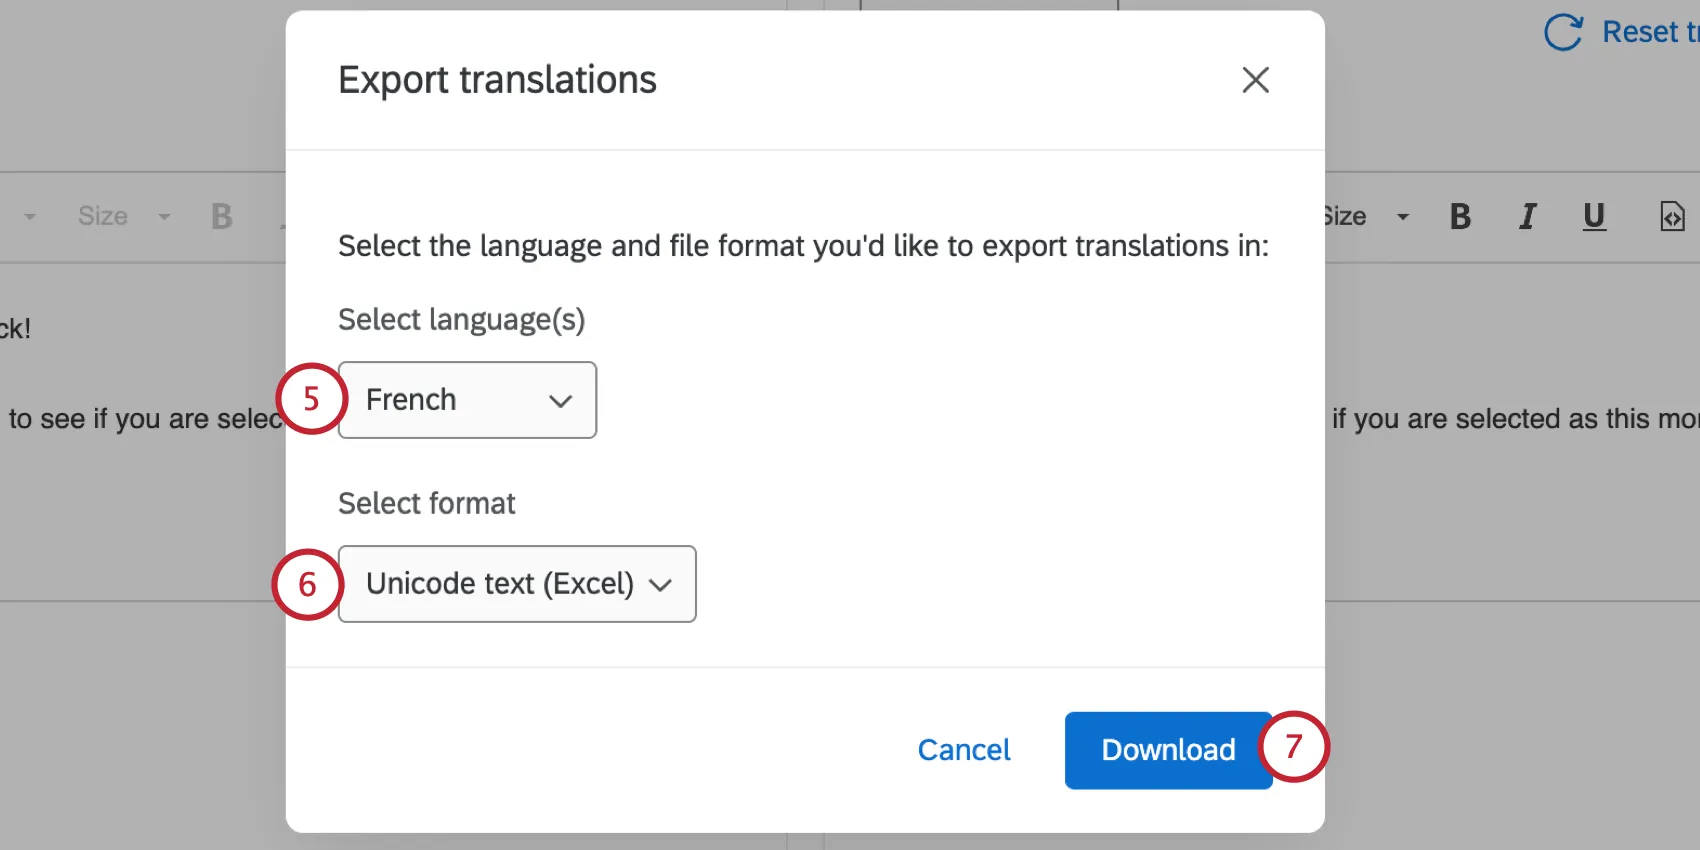
Choose the file format: XML, Unicode text (Excel), Unicode (CSV), or Unicode (TSV).
Qtip: In most cases, we recommend the Unicode Text (Excel) format. Like Unicode CSV, this can be opened in Microsoft Excel. However, unlike Unicode CSV, Unicode Text understands and preserves non-ASCII characters (for example, 是 or ñ) when saved in Excel.
Click Download.
Open the file in your preferred text editor.
Qtip: Unicode Text (Excel) will open in a text editor by default. You will want to open the file in Microsoft Excel, if available.
Add your translation(s) under the Message Translation column (the third column).
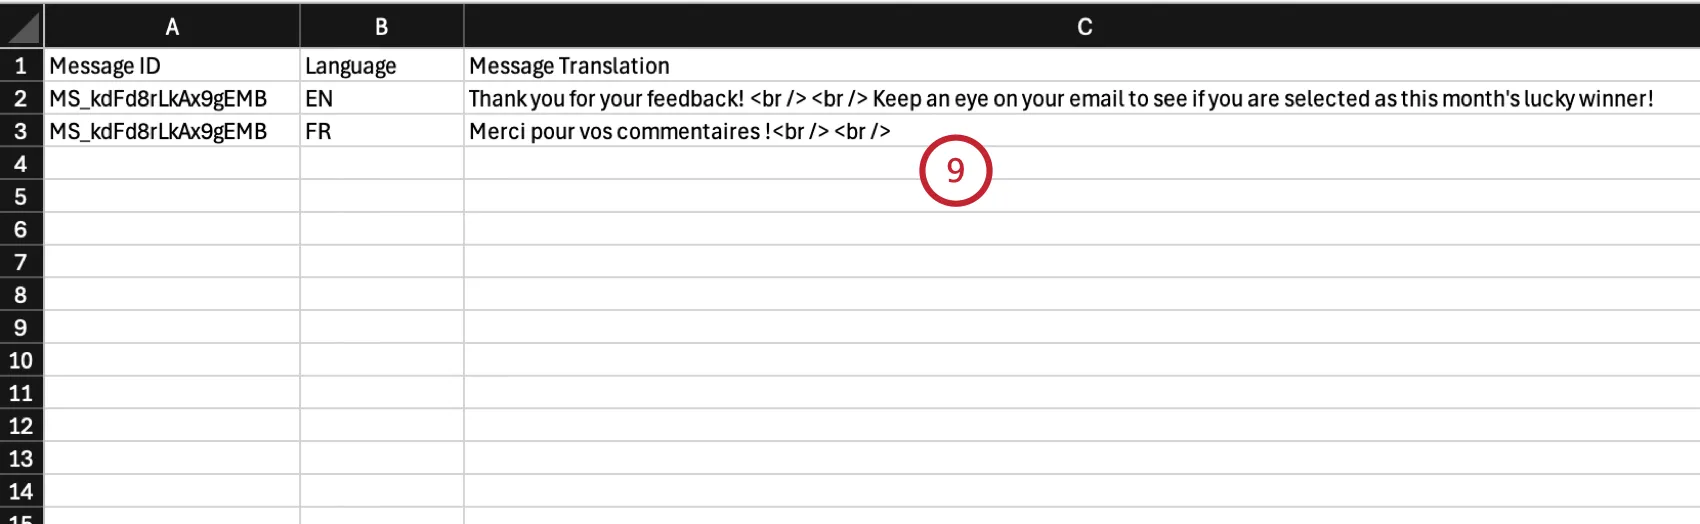
Qtip: You can add more languages to your file by copying the Message ID to another row in the “Message ID” column, and then adding your desired language code in the Language column.
Save your file as UTF-16 Unicode Text (.txt).
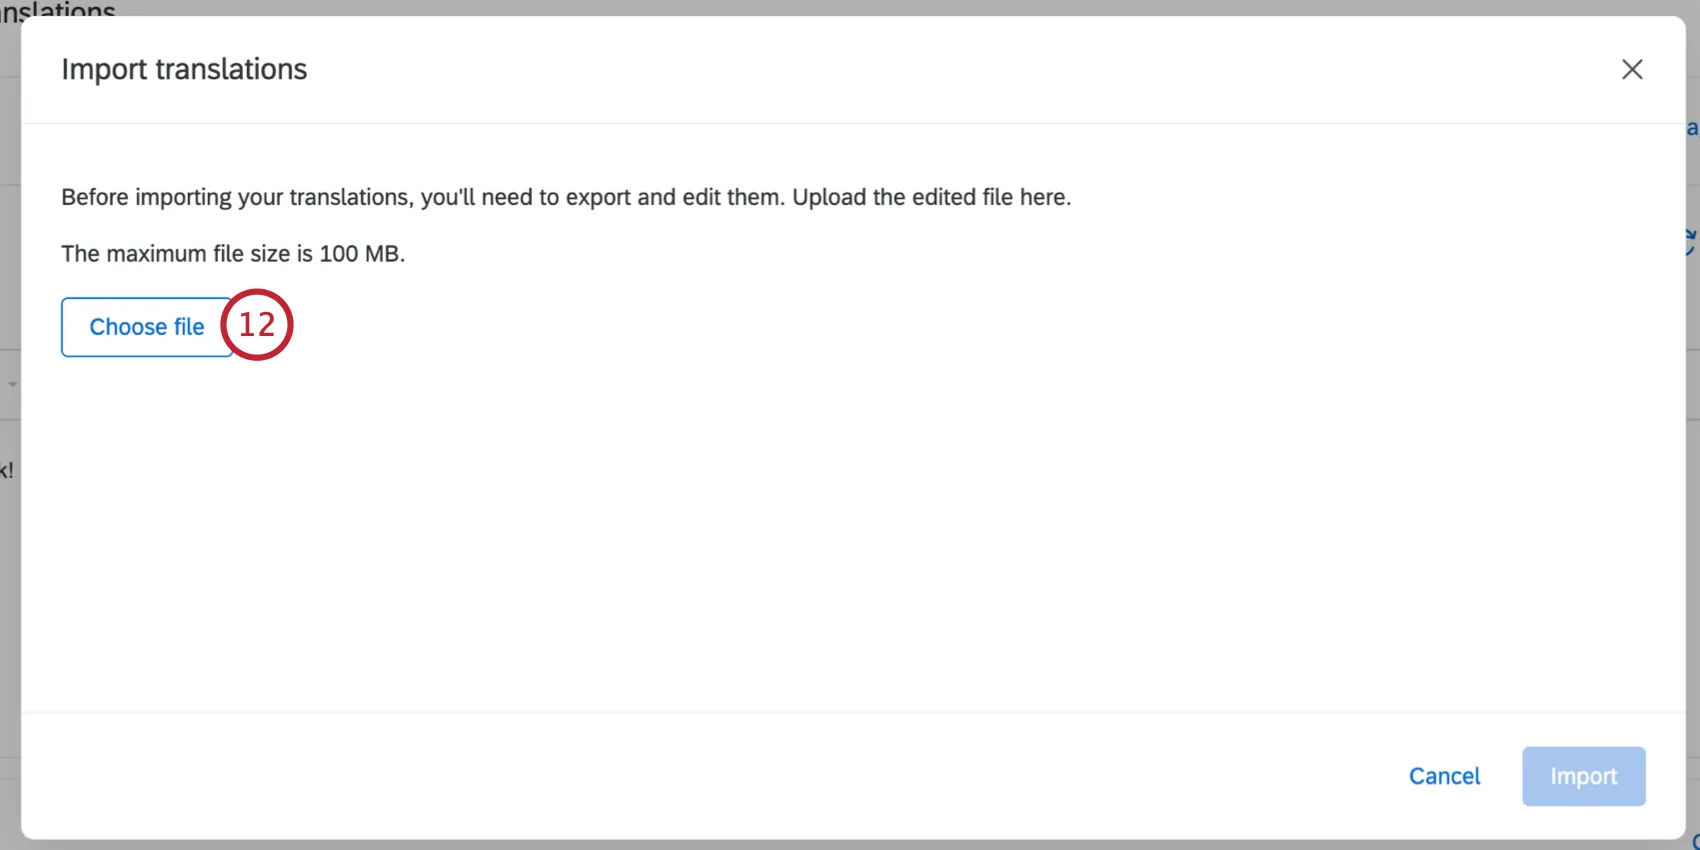
In Qualtrics, click Import translations.
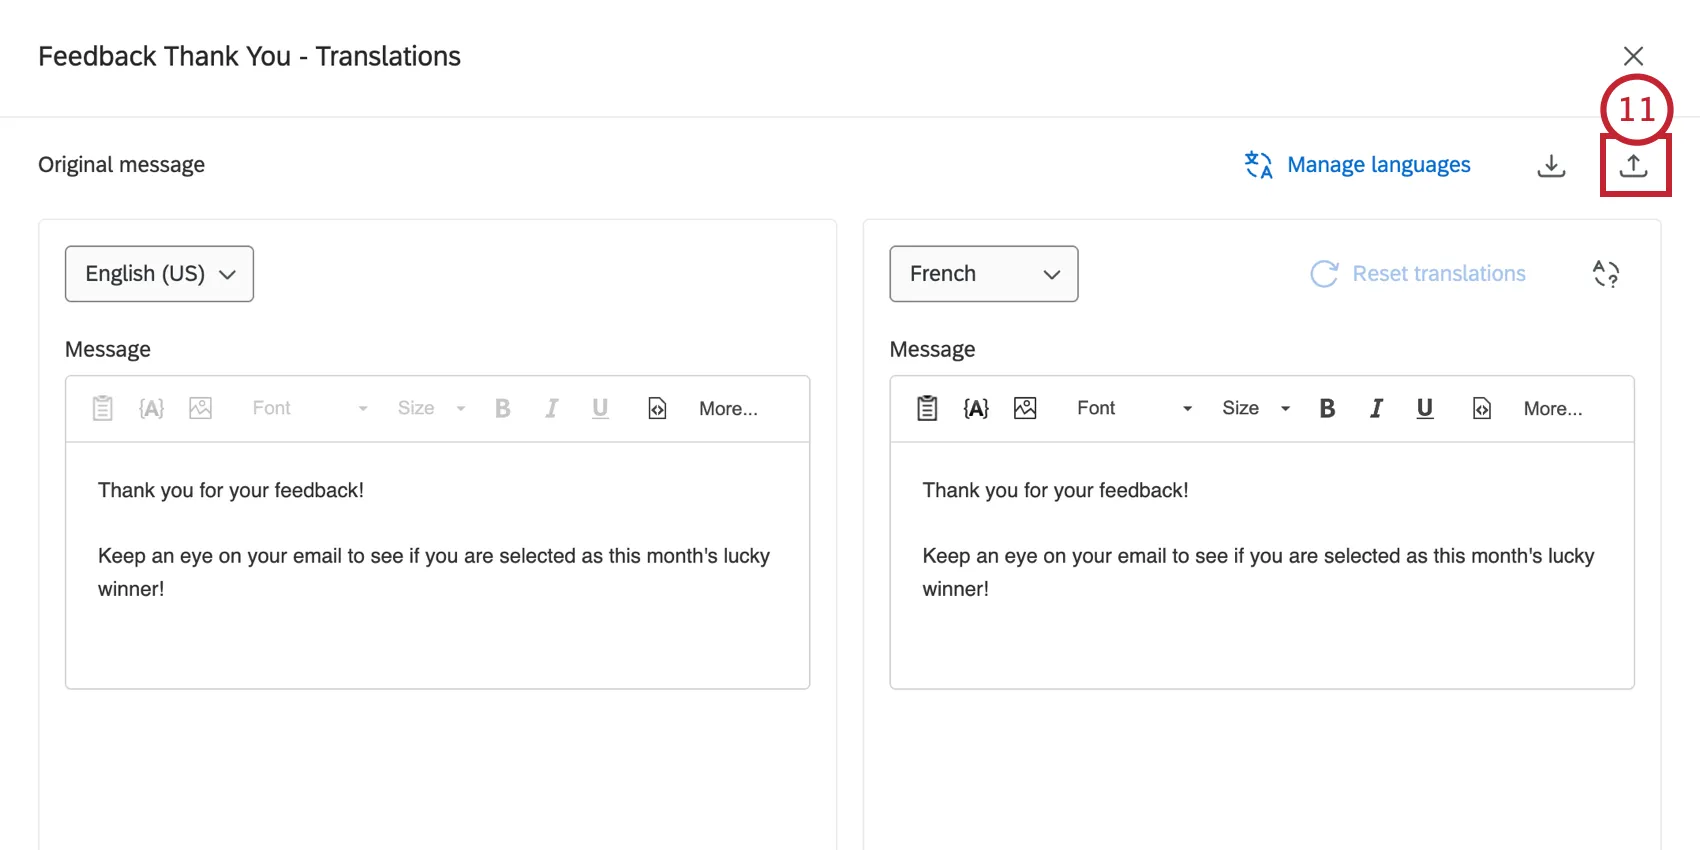
Click Choose file and select the translation file saved on your computer.
Review your translations. You can use the Language dropdown to switch between different languages in your file.
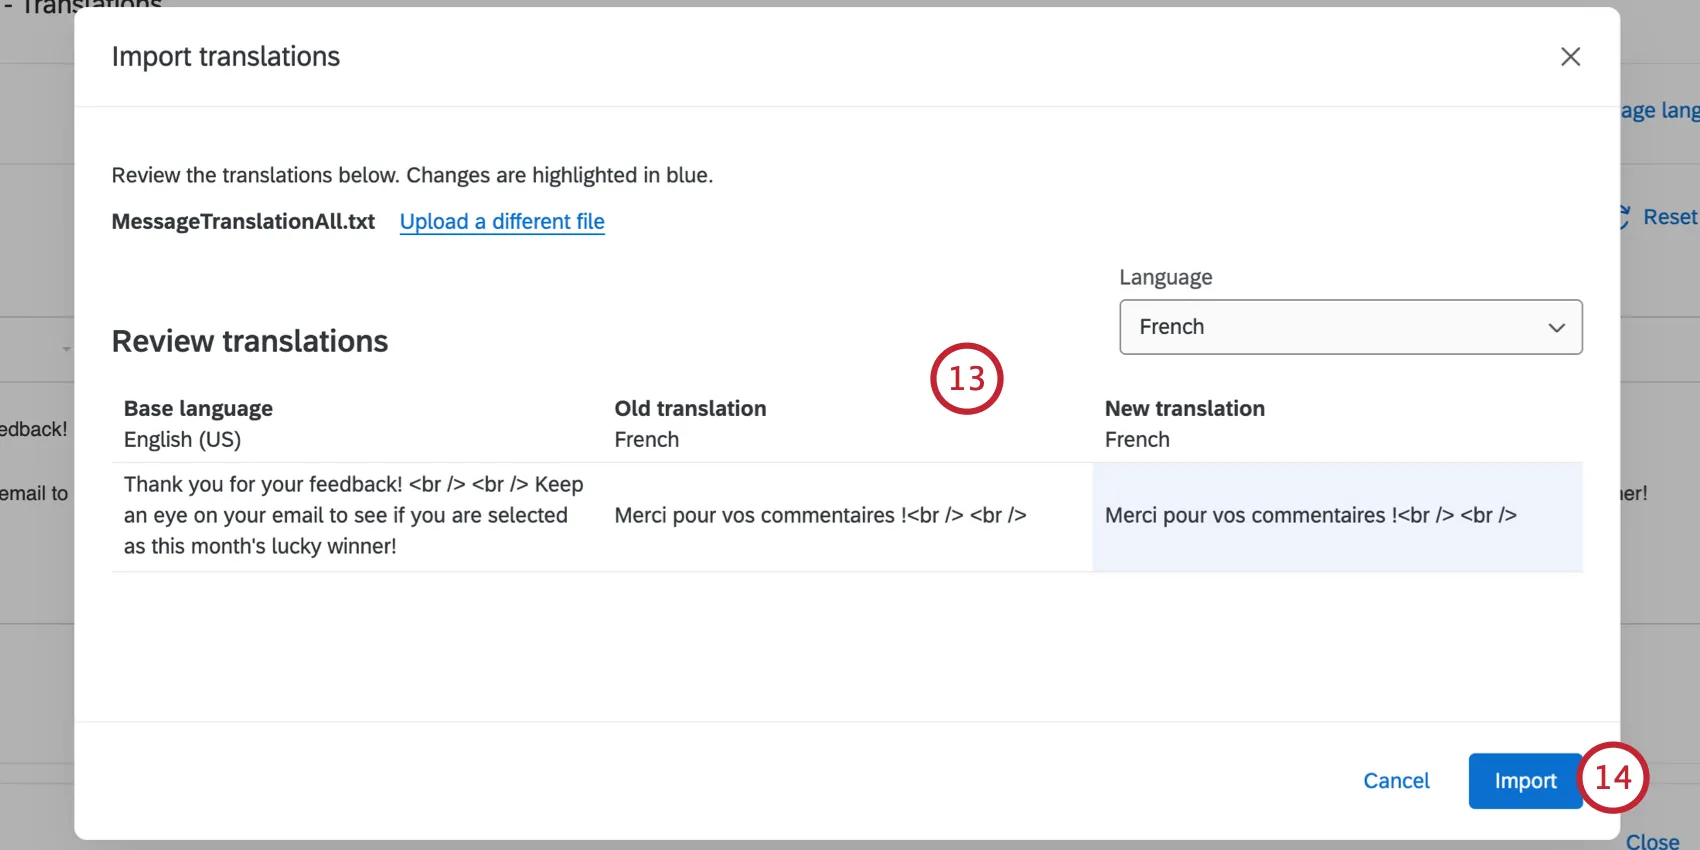
Qtip: If you see any mistakes in your translations, fix them in your file and then click Upload a different file to choose the corrected file.
Click Import.
Click Save translations.
Having problems uploading the file? Visit our CSV/TSV Upload Issues support page for troubleshooting tips.
Automatic Translations
Qtip: Brand Administrators can adjust which third-party providers are available for auto-translation. For steps, see Organization-Wide Control for Third-Party Auto-Translators.
You can use third-party providers to quickly translate your messages. Because machine translations are prone to error, we don’t recommend using this as your final translation. Rather, this feature can save time when working with a professional translator, as they will only need to edit this existing translation rather than starting from scratch.
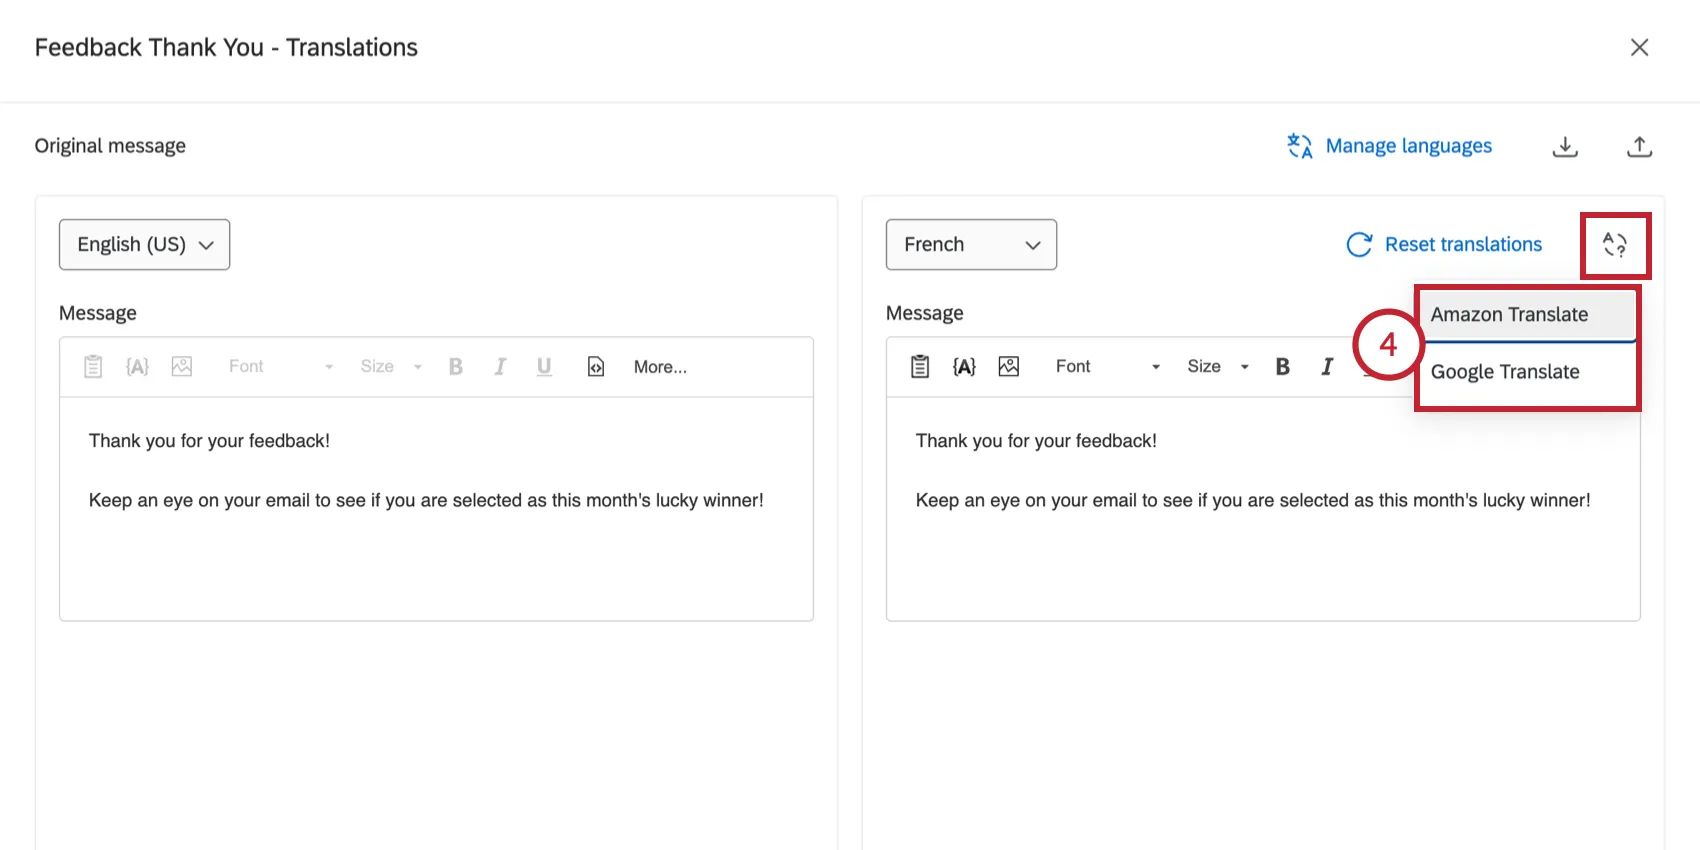
Select Translate message in the message options menu.
Use the language dropdown on the right-hand side of the screen to choose the language you’d like to add a translation for.
To add more languages for translation, click Manage languages and then enable the language(s) you’d like to add.
Qtip: If you don’t see the language you want to use, you can add a custom language by clicking Create language.
Click Auto-translate and then choose the translation service you’d like to use. Some services may be unavailable based on your organization settings.
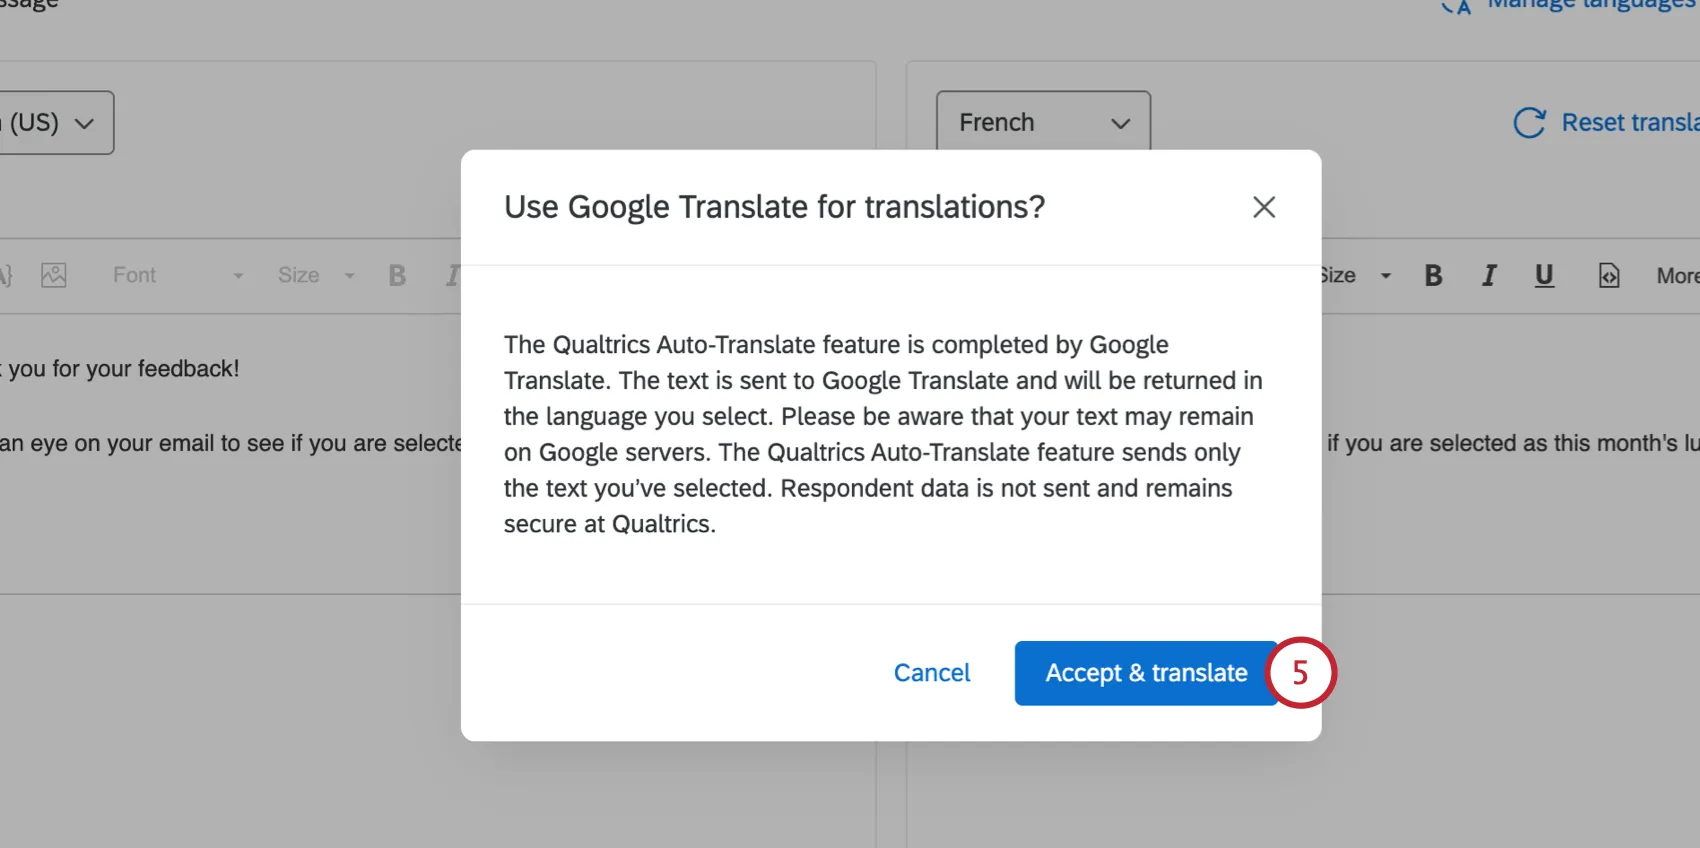
Click Accept & translate to confirm you’d like to use the third party service.
Qtip: If your selected language is not directly supported by the third-party provider, then you will have the option to choose a fallback language for any text that could not be translated.
Review the generated translation. You can directly edit the translation using the rich text editor.
Click Save translations.
Attention: The Qualtrics auto-translate feature is completed by third-party providers. The text of your message is sent to them (Google or Amazon) and will be returned in the language you select. Please be aware that your message text may remain on Google/Amazon servers. The Qualtrics auto-translate feature sends only your message text. Respondent data is not sent and remains secure at Qualtrics.
Editing Translations
You can also add or edit translations by clicking Add / edit translations while editing the original message.
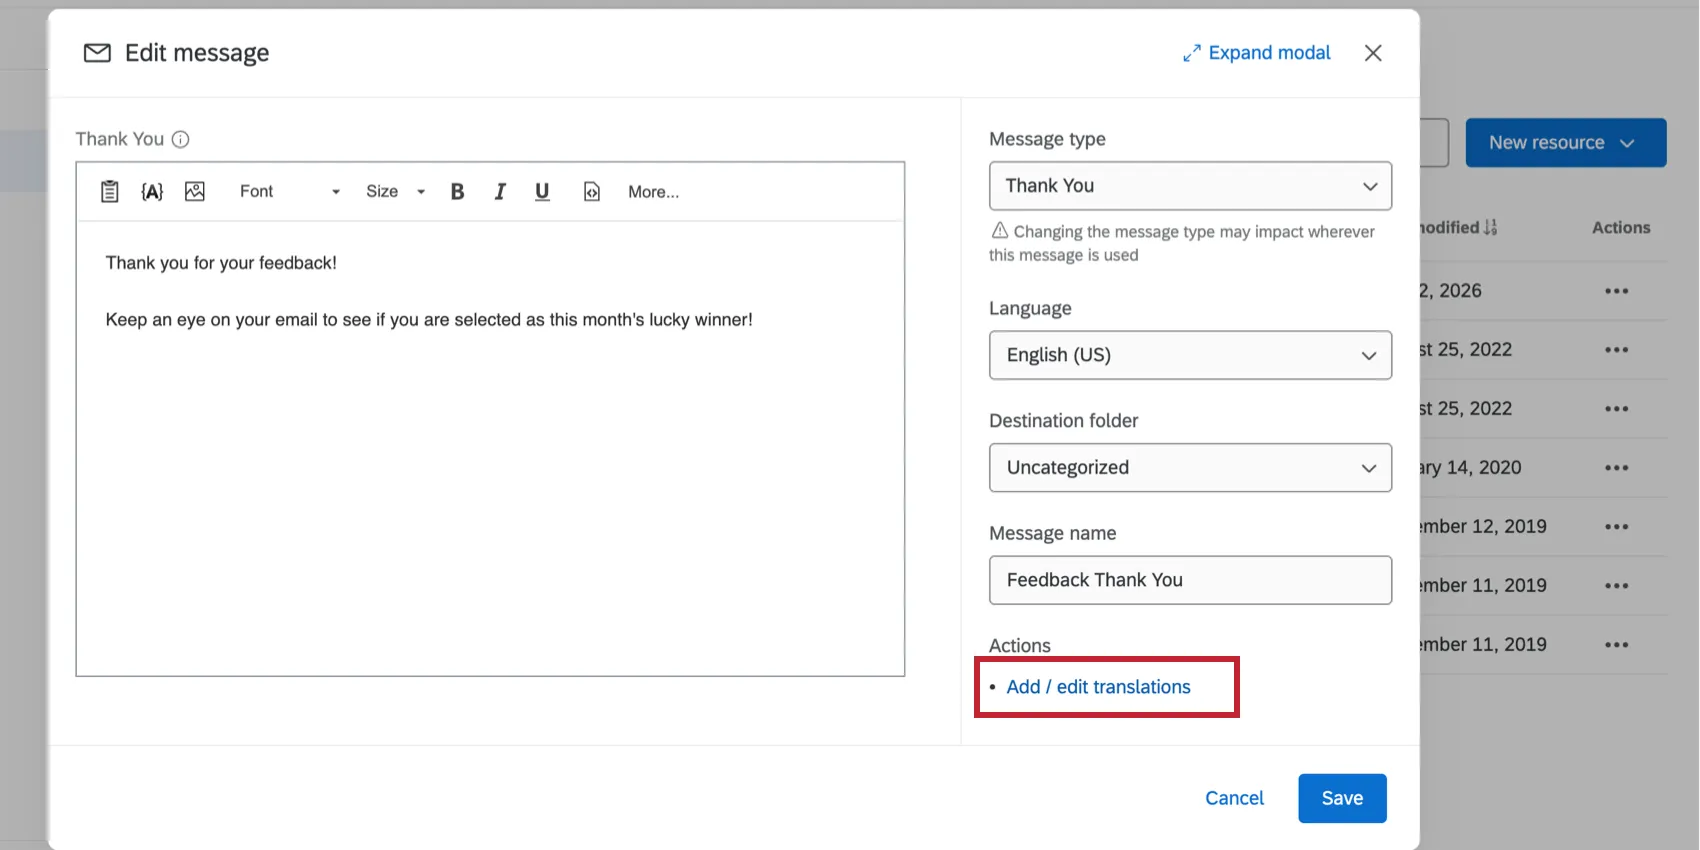
Edit your translations using the rich text editor. After making your edits, click Save translations at the bottom of the page to save your changes.
If you’d like to undo your edits and return the translation to the previous version of the message, then click Reset translations. Please note that this is irreversible and all reverted edits will be lost.

Edits to Library Messages and Impact Elsewhere
The main benefit of library messages is to reuse pre-written messages as needed. Another benefit of using a library message in certain distributions is that you can schedule out multiple emails or messages, and any edits you make in the library will be reflected in connected distributions. If you’re running a program with similar messaging across projects, this can be an easy and fast way to make large-scale changes. The same can be said for using library messages in other parts of the platform.
Qtip: If you want similar functionality in the form of survey questions instead of messages, see Reference Surveys.
However, not all areas of the product update to match edits to library content; instead, these messages serve as initial templates, with individual distributions acting independently.
Qtip: If messages are edited in the user account language, they will not be available in surveys with a different base language.
Features that will reflect edits made to the library message:
Qtip: Make sure no distributions are about to go out when you edit library messages. If you make edits too close to the distribution, the library might not have time to sync with the distribution, and your message edits might not show up in the next distribution.
- Survey emails.
- XM Directory emails.
- Email task.
- Send a survey via email task.
- SMS invites sent from surveys, XM Directory, and Employee Experience projects.
- Messages in Engagement emails, Lifecycle emails, and Ad Hoc employee research emails, so long as messages haven’t been unlinked from the library.
Features will not reflect edits made to the library message:
You can use library messages with the features listed below. However, as soon as you add a library message to one of these features, it becomes independent of the library. Edits to the library will not be reflected in these features below.
FAQs
I cannot find a message in my Messages Library. Where is it?
I cannot find a message in my Messages Library. Where is it?
That's great! Thank you for your feedback!
Thank you for your feedback!