When managing a project team, it’s tempting to start assigning tasks and setting deadlines right off the bat. You have a rather clear understanding of the project and how it should be completed. And you’re sure that your vision is so clear and simple that stakeholders and your team members will follow through easily.
However, experience has shown that you can't manage a project team without proper planning and outlining. More technically speaking, starting a project without defining project goals and objectives, deciding on the project scope, setting up the right project management software tools, anticipating means for progress measurement and quality control, defining risks and predicting ways to avoid them, etc. is practically doomed to fail.
As a project manager, your responsibilities start with conceptualizing the overall value of a project, which is before a project team is assembled, and end with procuring a roadmap for the future based on the current project's learnings. Team management is only the middle part of your job.
In this guide, we’re outlining 5 steps for successfully managing a project team according to the Project Management Institute’ the Project Management Body of Knowledge.
Step 1 - Develop a project initiation document
The first thing you should do when assigned to manage a project team is develop a project initiation document. In this stage, you’re trying to translate the raw ideas of the client into a structured project to get both client and project team buy-in.
In simple terms, project initiation is the process of identifying a project initiative. You need to identify why the project is important for your business (or your client's business), what is the general goal of the project, what are the key parameters, who is involved in the project, and what are some constraints and risks associated with it. You don't need to obsess over the project details yet.
There are seven parts you need to include in your project initiation document:
1.1 - Context of the project
In this part, you need to identify some of the business drivers of the project. Some of the questions you need to answer are:
- Why is the project important for your business?
- What’s the main problem the project is trying to solve?
- What are the business goals of the project?
- How is success defined? Or what are success metrics?
Outlining these in your project initiation document would make sure that project stakeholders and team members are on the same page regarding the overall goals and objectives of the project.
1.2 - Project parameters and specifics
Project parameters determine the scope, budget, schedule, and quality of the project. Defining these parameters alongside requirements and deliverables will make it easier for team members to collaborate and deliver the project as expected. Some of the questions you need to answer are:
- What’s the budget for this project and how is it broken down?
- What’s the deadline for delivery and what’s the timeline?
- What are the project requirements? What features and functions should the end product have?
- What are the deliverables?
- What is the scope of the project?
- What are the boundaries your team should not cross?
- How should team members communicate with stakeholders?
1.3 - The roles involved
Who is involved in the project? Who are the stakeholders and who are the team members? What are the roles of each of these people? Who’s responsible for what? Who should be reported to? Who should approve deliverables before forwarding them to clients? Answering these questions will make team management quite easy during the project execution.
1.4 - Risks, assumptions, issues, and dependencies
Your team should know the risks and constraints associated with the project. Work with your team to anticipate some of the potential risks and constraints, and some ways to deal with them. Some examples of these constraints and risks are:
- Budget constraints
- Possible technical issues
- Scope creep: unrealistically expanding the scope of the project
- New requirements/tasks/roles/expectations/deadlines after the project begins
Prepare a project initiation document that includes these four parts and share it with your project team to keep on the same line during the project.
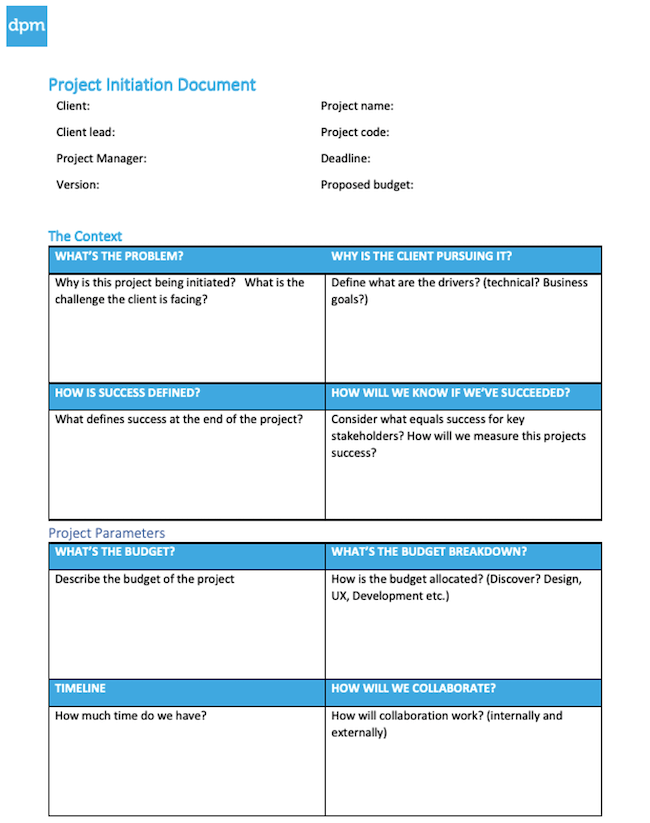
Image credit: TheDigitalManagerProject.com
Step 2 - Write a project plan
The second step for managing project teams is deciding more rigorously how you’re planning to execute your project.
With a project initiation document (explained above), your goal is to brainstorm ideas and have an estimate of what needs to be done. It’s a rather tentative document that allows you to get approval from clients and see if the project scope is feasible for your project team.
Project planning is a document where you lay down every phase and activity necessary for delivering the project. Your aim is to design a plan that could be followed rigorously (if you’re using a waterfall approach), or anticipate room for change in it.
Using a project plan, you can determine resource requirements, that is how much time/money/workforce the project needs to be perfectly delivered. A project plan typically includes the following project details:
- phases of a project
- activities or tasks in each phase
- task start and end dates
- interdependencies between tasks
- milestones
To write a project plan, you can follow these 10 steps:
2.1 - Design your general workflow
What does the overall workflow of your project look like? What are the phases that your team needs to go through to produce the deliverables?
In this step, you don’t need to list precisely all the tasks that need to be done – just the phases and the subsets of work within each project phase.
Doing this step right will make it easier for you to fill in the tasks within your workflow and assign them to your team members in the next steps. Use suitable workflow software to make this process easy.
It’s also important that you have a good understanding of project goals, milestones, and deliverables before designing your workflow. What are you going to achieve in each phase? What are the milestones for each phase? How will the team get to those milestones? This makes team management quite a breeze.
Your goals should be SMART, that is they should be:
- Specific
- Measurable
- Achievable
- Relevant
- Time-bound
Image credit: TheDigitalProjectManager.com
2.2 - Break down phases into tasks
Once you have your workflow ready, it’s time to break your phases into smaller tasks that take no more than a few days for your team to complete.
Take every phase in your workflow and divide it into subtasks. Repeat the same process on your sub-tasks to make sure every big phase or task is broken into the smallest tasks possible.
After doing this, you’re able to assign tasks to people in your team and estimate a time scale for each of them.
2.3 - Consult with your team to determine a viable timescale
You shouldn’t rely on guesswork when defining tasks and subtasks and assign timescales to them. You need to consult with your team members to have a more realistic understanding of the resources needed here.
Make sure you understand your planning horizon. Plan for as much as you know of your roadmap and don’t over-commit your team to bigger uncertain plans.
Make shorter plans if needed and only after achieving a particular goal and getting approval, start planning the next stages of your project. This is an incremental and interactive approach to project management.
You should also keep in mind that your job as a project manager is to help the project team have a better understanding of project objectives.
Interrogate your team on their decision for the timescale they’ve proposed for completing a task. Make them see things from different perspectives and pay special attention to dependencies for the task at hand.
2.4 - Define baselines and milestones
A baseline is a base plan that includes the expected scope/deliverables, timeline, and cost of a project. It helps you keep an eye on your team’s performance by comparing it to the baseline expectations, and taking necessary actions when you’re not meeting these expectations.
Since the baseline is more or less a decisive plan with predefined expectations that must be met throughout the project otherwise the project is a failure, you need to design it carefully. The three main aspects of a project baseline are:
- Scope and deliverables: this includes project goals and outcomes, any deliverables, problems they solve, etc.
- Timeline: the duration of the project as well as when the project (or some parts of it) should be delivered.
- Cost: how much you’re planning to spend on the project. This includes all the expenses including the project team’s hourly salary, cost of tools, etc.
By defining these aspects of the project, a baseline helps prevent the project from growing out of hand and frustrating your project team.
Milestones are the significant points you’re planning to reach throughout your project to measure the project’s progress. Some examples are when a phase or a task should begin or end, when a review/performance check should be performed, when a deliverable should be submitted for approval, when a meeting should be held, etc.
It’s important that you use numerous milestones in your project plan to make sure your team knows what they’re trying to achieve in the short term and what progress looks like.
2.5 - Write a communication plan
How do you expect your team to communicate during the project? Who should they reach out to if there are any issues on the way? How do the stakeholders expect you to report progress to them? Leaving these questions unanswered would only lead to confusion and frustration.
As Dmytro Okunyev, the founder of Chanty, explains, “there’s no agreed-upon etiquette in the teams which were forced to go remote and this is something that should be addressed. If you have driving rules, why not develop a set of rules for remote team communication? These rules will add clarity to any team.”
Make room for a communication plan in your project plan and define this information in it:
Communication methods: phone calls, emails, SMS, Slack, project management tools, and meetings are some channels your team can communicate with each other. Also, determine the preferred channels for stakeholders and clients.
Communication type and style: there are different types of communication during a project. Weekly check-ins, email reports, status updates, and different kinds of meetings are some communication types. Communication styles could be broken down into casual and formal. Do your stakeholders prefer casual or formal communications?
Communication frequency: how often do you expect your team to report to you? How often are you planning to hold meetings? When should you send email reports to stakeholders? Determine the timeline and frequency of communication among different people in the project.
Messages and goals: what kind of information do you expect to be communicated? What aspects of their progress should your team report to you?
Also determine what kind of information you need stakeholders to communicate to you (any kind of feedback, request, etc.). Define the goals of each communication to make sure people know what they’re getting and how they should respond.
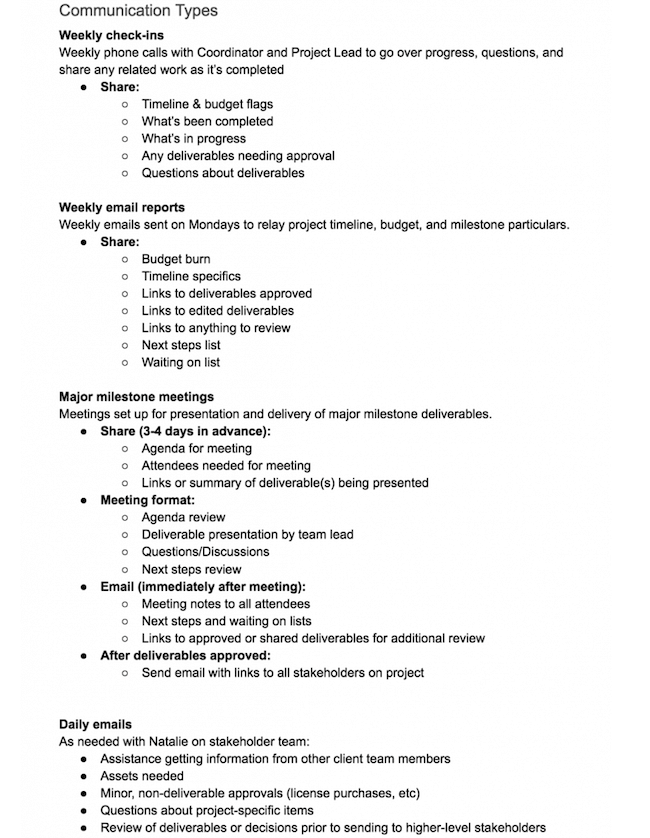
Image credit: TheDigitalProjectManager.comCreate an inclusive employee experience program with our guide
2.6 - Plan out your finishing process
Finishing a project the right way demands rigorous planning. You need to make sure all the milestones and objectives are met and deliverables are tested and ready to be submitted to the stakeholders for approval.
Evaluation is a process that runs alongside project execution so as your team meets major milestones, it’s your job as a project manager to do a quality assessment and approve deliverables. You should also track the scope and cost during project completion to avoid scope creep and overspending.
At the end of the project, hold a meeting with your project team and give the project a test drive. Run through the objectives, requirements, and goals to make sure every one of them is met. Always consider room for minor failures, miscalculations, or changes of plan.
Alongside your original plan, consider devising plan B and plan C in case some of the probable risks actually happen.
Even after the project is delivered, it’s probable that your clients might find issues with the end product and ask you to make revisions. In other words, your project does not end with delivery. Post-delivery optimization and maintenance is a separate phase you should make room for in your project plan.
Step 3 - Project execution
Once you have your project plan ready and approved, it’s time to execute it. Project execution is the phase where your project team gets active and produces deliverables.
It’s worth noting that in the project execution phase, your job as a project leader shifts from planning and documentation to team leadership and quality control. So you basically manage two things:
- people and their communications
- processes and deliverables
Here are some steps you should take to pull off project execution right.
3.1 - Use the right project management software
Today, it’s almost impossible to manage a project team and expect serious results without using project management software. You can’t keep track of all the activities and processes in your project manually on boards and sticky notes, and then personally remind every member of your team to submit their work for approval.
To ease out managing a project team, project managers use dedicated tools. Project management software tools offer these benefits:
Better communication and collaboration: a suitable project management software tool keeps track of all communications among team members for future reference. They provide you with instant chats, comments in documents, and even voice calls and video chats for holding meetings. They allow you to delegate tasks to the right people in your team and facilitate project teamwork through file-sharing, progress tracking, visualizing timelines and milestones, etc.
Simpler project reporting and analytics: through different dashboards, reports, and charts, project management software tools provide you with insights on your project progress, upcoming deadlines, budget spending, team productivity, etc. Using these insights you can improve your current processes and reduce time and budget needed, plan out your next move, and keep stakeholders informed and satisfied.
Better resource management: managing resources during a project is extremely easy using a proper project management tool. You can allocate tasks to specific team members and track their progress, you can keep track of their work hours and billable time, you can manage your budget and avoid overspending, and more importantly, you can practice time management.
Some people are interested in using Excel for project management. It could be a good solution, but if you're looking for more serious solutions with better features and functionalities, here’s a list of top project management software tools you can choose from.
3.2 - Give autonomy to project team members
As a team leader, you’re responsible for your team’s work quality. But that’s not all. You also need to ensure employee satisfaction and wellbeing.
Pressuring your project team to strictly follow your instructions and frequently check with you for every decision will only frustrate them. In time, this might reduce the quality of your team’s output.
What you need to do instead is give your team a level of autonomy to complete the work they’re good at. Creating a culture of trust and collaboration among team members is the key to effective team management.
So instead of micromanaging your team, clarify the tasks and objectives you assign them and let them decide how to do the best.
Put more value on the outcome of their work rather than processes, and conduct quality control and timeline management to make sure every team member is on the same line with you. You can also reward them for their work. Employee of the month (or similar concepts) could be a good help here.
Measure the satisfaction of your employees with our free survey template
3.3 - Encourage communication
There are many ways to encourage communication among members of project teams. If you have a communication plan outlining different communication channels and how they should be used (see above), then each team member knows what to do.
Meetings have great potential for encouraging communication. In Scrum, an agile project management approach, there are 6 different kinds of meetings you should hold throughout your entire project: Sprint planning meetings, daily Scrum meetings, Sprint review meetings, Sprint retrospective meetings, and backlog refinement meetings.
Even if you’re not following Scrum’s meeting routine, it’s a good idea to schedule meetings with different purposes to check on your team and see if they need any help or guidance. You should also determine how team members should reach out to you when there’s an issue they need to discuss with you.
3.4 - Measure progress and ensure quality
Although there’s a dedicated step for managing project performance in PMI’s Project Management Body of Knowledge, it doesn’t mean that progress measurement and quality control should be done after project execution.
In fact, most of your job as a project manager is keeping the project’s progress in check and making sure it goes according to the plan.
To monitor and manage a project’s progress, your job is two-fold:
- First, capturing the data from reports, timesheets, and completed tasks, to track the progress against the original plan.
- And second, analyzing the data and finding out where you stand compared to the original plan. Task completion rate, budget spending, and timeline are among the metrics that you need to control according to your original plan.
3.5 - Document bugs in an issue log
Typically there are lots of issues and bugs during project execution. Keeping an issue log is a great way to make sure these issues are addressed and resolved by the right people. It also helps you to plan the roadblocks ahead and avoid them in the future.
In an issue log, include the name of the issue you encountered and a description of it, its priority, the name of the person who reported it, the name of the person who’s responsible to resolve it, and the date and time of its reporting and final resolution.
Step 4 - Project performance
Measuring project performance and keeping its quality in check is a task that is done during project execution. If the project team is not performing as planned (or if they're going beyond the project scope), it’s your job to offer guidance or training, and think of pivoting when necessary.
To ensure high-quality performance, there are some steps you can take:
4.1 - Cost and time management
You have an approved cost and timeline estimate in your project plan. And one of your main responsibilities as a project manager is to make sure that your project does not exceed these estimates.
Probably the best way to manage costs during a project is by reviewing the expense reports provided by your project team. Ask your team members to fill in an expense report every day and mention the hours they’ve put in and the resources they used.
Review these reports rigorously and keep your team updated on the actual spending and how it compares with the projected spending. Keep the project sponsor updated regarding the actual spending.
Generally, time management follows the same routine. You have planned your team’s workflow and timeline before so now you need to make sure they’re followed. You need to ask your project team to fill in their timesheets for their workdays so that you can review them.
Using tools makes your work extremely easy here. Resource management tools help you manage timesheets and give you reports on your timeline.
They provide you with Gantt charts so that you can visualize every task and when it should be done. They have features that enable more collaboration among team members so that your team can save time while collaborating on tasks.
Here’s a list of free resource management software tools you can use for better cost and time management.
4.2 - Quality Management
It’s one thing to make sure a task is done on time, it’s another to make sure it has the expected quality. As a project manager, it’s your responsibility to make sure your team’s deliverables have high quality to guarantee project success.
The first step would be making sure stakeholders and your project team have quite the same understanding regarding the expected quality of deliverables.
This goes both ways: aside from instructing your team to keep quality high, it’s your responsibility to ensure stakeholders and clients have realistic quality expectations. This happens through various meetings with clients and also consultations with your project team.
Review deliverables frequently. Take reports and meetings seriously, and ask your project team to raise and discuss the issues they encounter. Employee evaluation software tools can help you assess each team member's performance and offer ways to enhance it.
4.3 - Risk Management
No matter how rigorous your planning and execution are, there are still risks that might blemish your project performance. As a project manager, it’s your responsibility to take an active stance toward possible risks in your project and try to address them in the best way possible.
A risk is any situation related to people, processes, resources, and technology that could have a negative effect on your project. You’re not certain any of these risks might happen to you but you need to be prepared in case they do happen. To do this, you need to have a risk management plan.
Work with stakeholders and your team to identify and categorize all the risks involved with a project. Evaluate the situation in which the risk might happen and brainstorm ways to deal with the situation. Eventually, you need to create a risk management template like the one below and fill in all the necessary information for each risk you identify.
4.4 - Change Management
Change management is the process of introducing and advocating necessary changes to ensure high project quality. Now because a plan establishes guidelines and expectations for your stakeholders and project team, it’s difficult to introduce new changes in your plan.
You need to hold extra meetings with team members to assess the situation, present the situation with enough evidence to the stakeholders and get their sign-off, and offer new strategies to implement the new change.
Agile methodologies to project management are known for a high level of change incorporation in the course of the project. Among their principles, “responding to change over following a plan” is an important one.
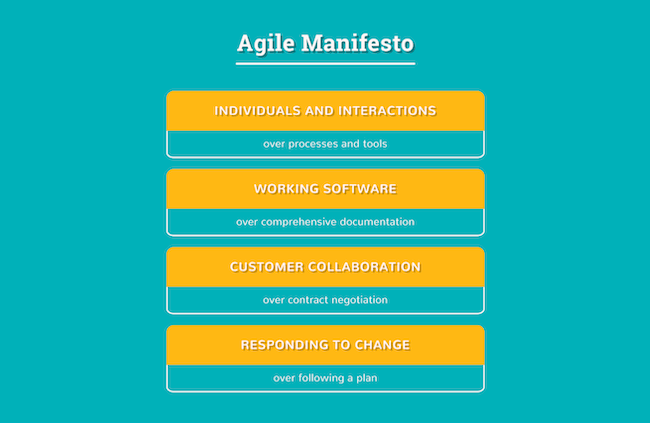
Image credit: TheDigitalProjectManager.com
An agile methodology uses some strategies to ensure responding to change: deliverables are actually completed and delivered in shorter periods (or sprints) and for each sprint, the team needs to do planning and ideation separately.
When a batch of deliverables is delivered to the client, the project team holds a special meeting with the stakeholders to receive their feedback. They use this feedback when planning for the next sprint.
The goal is to find ways to produce better deliverables in a shorter period and with lower cost as the team progresses in the project and learns from their mistakes. If you want to learn how to use agile in your project management, check out The Agile Manifesto And How To Apply It To Your Projects by Suzanna Haworth.
Step 5 - Project closure
As the final phase in the project lifecycle, project closure is when you officially end the project. Contrary to what most people think, project closure goes beyond simply delivering and launching the final product.
As Patrice Embry explains you have done the following before reaching the project closure phase:
- Your team has done QA and performed testing on the deliverables
- You’ve delivered the project, and the client has reviewed and approved it
- The thing you’ve delivered is live
The aim of project closure is to make sure all the possible post-launch bugs and errors are fixed, the documents are delivered and signed, and your team has learned the lessons for future projects.
So there are basically three steps for project closure:
1. Taking care of loose ends and formalities
Start with monitoring the live product for 24 to 48 hours as a lot of bugs actually happen in this time frame. Set up alerts on Pingdom or any other monitoring tools, and check out analytics frequently to make sure you get notified if any possible errors happen.
Go through your plan and timeline and look for possible forgotten items. Any features you forgot to include in the final product? Any issues or bugs you failed to address accordingly? It would be perfect if you could provide personalized feedback for each one of your project team members.
Check out all your contracts with numerous people (suppliers, designers, programmers, etc.) and make sure all the requirements are met, payments are received, and all parties involved are happy. If anything out of the project scope is required by the client, make sure to update the contract and add the extra costs. Eventually, archive all the documents for future reference. A safe cloud storage service such as Internxt is a good option here.
2. Learning, feedback, and review
Every project is a learning opportunity for you and your team members if you know how to solicit feedback and encourage your team to learn from it. The first step would be explaining your closure plan to your team.
Hold a retrospective meeting (or send them an email) and analyze your project’s performance. What are the strengths and weaknesses? What parts of the project didn’t go according to the plan? What parts are missed? Who did exceptionally good during the project? Outline the lessons you could learn from this project.
Next, you need to properly close the project with your client. Organize a wrap-up meeting with your client and give them all the information they need to keep the final product running (any links, documents, login information, recommendations, lingering issues, etc.).
Ask them for feedback about different aspects of the project (send them a questionnaire if they’re more comfortable). Share your findings with your project team.
Finally: project management at its best
Following the steps above will guarantee the success of your project. However, experience plays an important role here. As you go on through your project, you realize there was a lot that needed to be envisioned -- you should have created a better plan. Make note of these shortcomings and discuss them with your team.
Image credit: TheDigitalProjectManager.com
Gauge your employees’ satisfaction with a free Qualtrics survey template