Uso de dados de localização em painéis
O que há nesta página
Sobre o uso de dados de localização em painéis
Você pode usar os dados de localização em seus painéis, unindo-os aos dados do projeto. A união dos dados garante que todos os dados de localização de que você precisa sejam combinados com as respostas pesquisa ou avaliações da Web que você deseja relatar. Além disso, você só precisa mapear um campo de identificação para vincular todos os seus dados de localização.
Atenção: Cada fonte de dados localização (ou seja, um diretório individual) só pode ser adicionada a um limite de 8 painéis. Depois disso, você não poderá copiar esses painéis/conjuntos de dados ou criar novos com a mesma fonte.
Escolha de um campo de identificação de local
Ao criar uma união, você precisa de alguma forma de identificar cada local específico para que possa associar suas informações adicionais a uma resposta pesquisa relevante. Esse campo de identificação é crucial para vincular essas informações e é chamado de chave de junção. Essa chave de união pode variar de acordo com as informações que se deseja combinar, mas deve ser sempre um ID exclusivo para cada local.
As chaves comuns de união de locais incluem o ID do local e os IDs do Google Place. Se você tiver um ID interno para locais em sua empresa, também poderá tentar o LocationExternalReference. Veja todos os campos de localização suportados.
Exemplo: Você carrega seus locais em um diretório de locais. No seu pesquisa, você usa lógica de ramificação para atribuir IDs de local a cada resposta. Você usaria o campo ID do local como chave de união.
Exemplo: Você criou uma pergunta de seleção de local e um diretório de local . Você junta o seletor de local e o ID do local.
Exemplo: Sua pesquisa solicita avaliações do Google. Você deseja combinar esses dados com um projeto de gerenciamento de reputação no qual você se conectou ao Google. Você se inscreve usando o ID do Google Places.
Campos correspondentes em cada fonte de dados
O Qualtrics oferece uma variedade de maneiras de coletar feedback em diferentes locais. Para aproveitar ao máximo essas informações, convém combiná-las em um único conjunto de dados. Para ajudar nesse processo, esta tabela mostra alguns dos campos semelhantes que suas possíveis fontes podem compartilhar.
Na última linha dessa tabela, mostramos onde você pode armazenar essas informações em seu pesquisa, caso elas não estejam incluídas por padrão e você não queira usar as perguntas especializadas de localização ou revisão. Lembre-se de que dados integrados e as perguntas pesquisa são personalizados por você e podem variar em nome e tipo.
| ID de localização | ID do Google Place | Texto de revisão | Nome avaliador | |
|---|---|---|---|---|
| Projeto de gerenciamento de reputação (qualquer versão) | subjectReferenceId | N/A | Conteúdo | authorName |
| Solicitar avaliações pesquisa | Não incluído por padrão | Dados integrados (consulte as etapas recomendadas) | Não incluído por padrão | Pergunta sobre Dados integrados ou campo de formulário |
| pesquisa seleção de local | Pergunta sobre o seletor de local | Não incluído por padrão | Pergunta Entrada de texto | Pergunta sobre Dados integrados ou campo de formulário |
| Pesquisa (outros) | Dados integrados | Dados integrados | Pergunta Entrada de texto | Pergunta sobre Dados integrados ou campo de formulário |
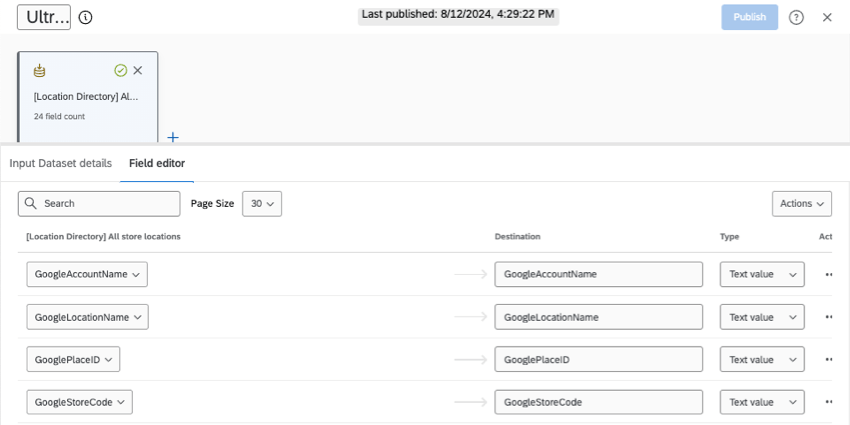
| Diretório de localização | _recordId | GooglePlaceID | N/A | N/A |
Qdica: com as perguntas solicitar avaliações e de seleção de local, você pode usar fontes de dados suplementares para obter informações de local não incluídas por padrão. Além de ser uma ótima maneira de expandir os dados de localização do seu pesquisa, se você fizer isso antes de coletar respostas, não precisará juntar os dados de localização no conjunto de dados dashboard!
Configuração de dados de localização com um mapeador de dados
Nesta seção, mostraremos como você pode usar um mapeador de dados para configurar seus dados de localização.
Mapeamento de dados de localização para um Dashboard

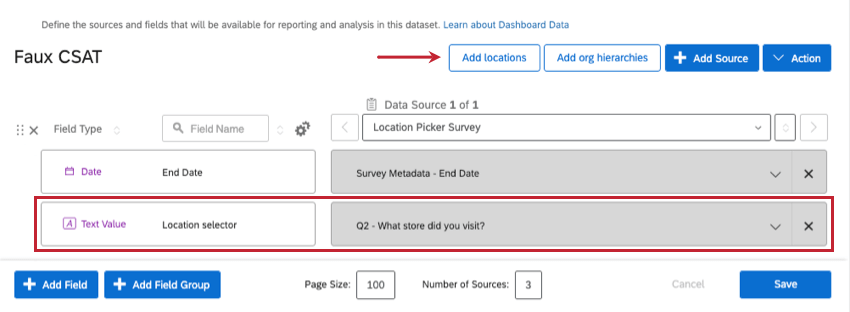
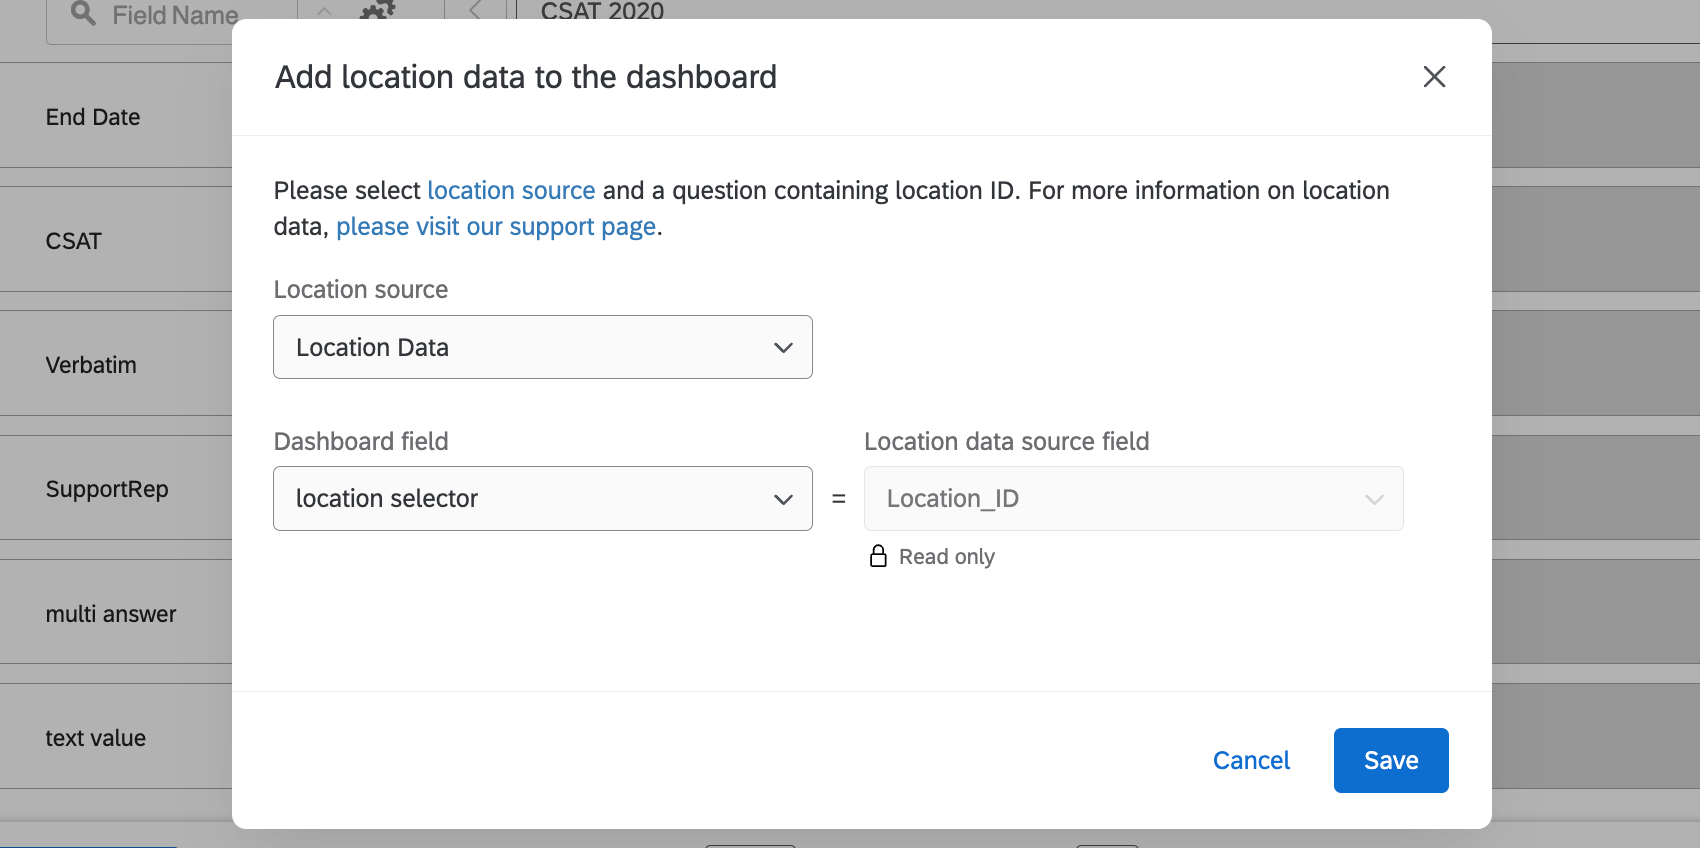
- Pergunta sobre o seletor de local: Escolha a pergunta do seletor de local.
- Gerenciamento da reputação na Web: O campo em que você armazena o código da sua loja. Por exemplo, uma ID do Google Place.
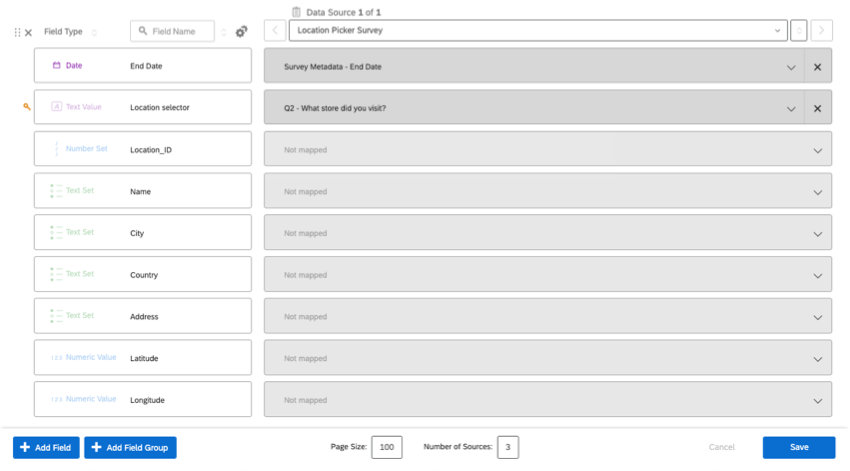
Depois que você adicionar o identificador de local, todos os campos de local serão mapeados automaticamente para o dashboard.
Aviso:Não tente mapear esses campos por conta própria. Embora os campos digam “not mapped” (não mapeado), os dados diretório serão extraídos automaticamente.

Edição do conjunto de dados Dashboard
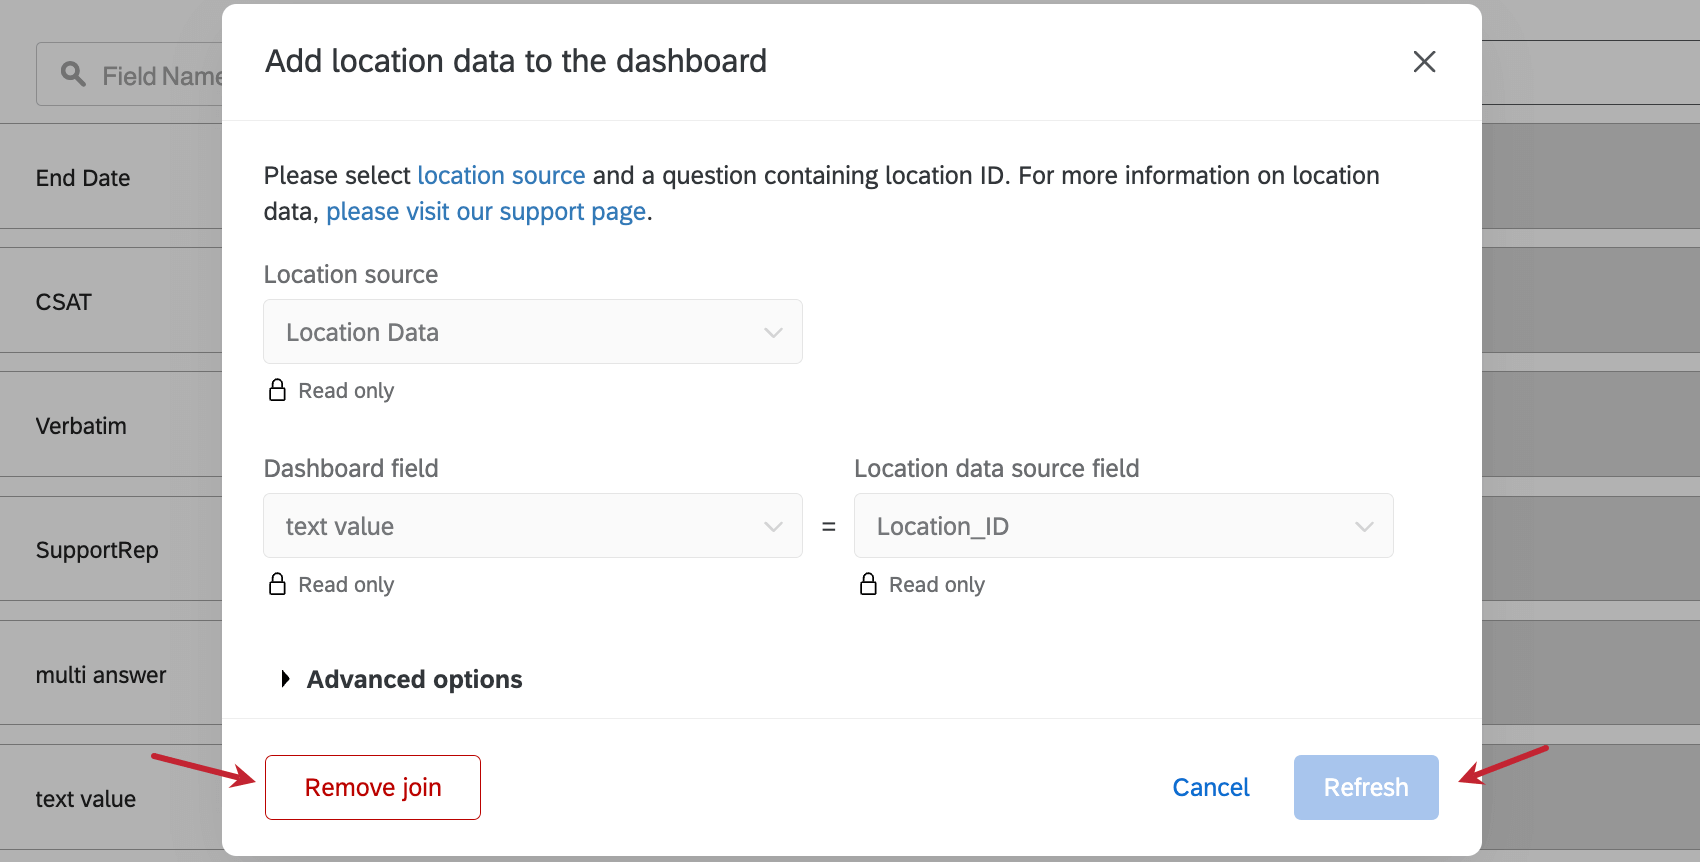
Você pode alterar a configuração do local clicando novamente em Add locations (Adicionar locais ).

Na janela que se abre, você terá as seguintes opções:
- Remover união: Remover os dados de localização. Se você quiser alterar o mapeamento para um campo diferente, deverá primeiro remover a união existente.
- Atualizar união: Clique nesse botão sempre que alterar o tipo de campo de campo dos dados de localização ou adicionar novas colunas (por exemplo, adicionar um campo de endereço que não existia antes). Você não precisa usar esse botão sempre que adicionar um novo local.
Para editar os tipos de campo dos dados de localização, abra o projeto de dados importados que contém o diretório localização e vá para a guia Data & Analysis (Dados e amp; Análise). Nessa guia, você pode editar seus campos no Field Editor. Para obter instruções, consulte Dados e análise em Projetos dados importados. Depois de alterar o tipo de campo, você precisará clicar em Refresh (Atualizar ) em seu dashboard.
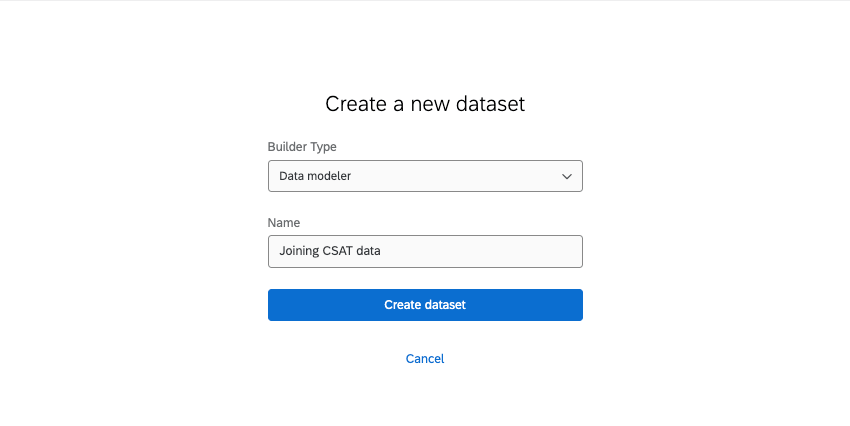
Configuração de dados de localização com um modelador de dados
A vantagem de um modelador de dados é que você pode criar várias uniões, até mesmo usando chaves de união diferentes para identificar locais. Você não só pode fazer tudo o que pode fazer no mapeador de dados de dados no modelador de dados, como também pode criar conjuntos de dados potencialmente maiores e mais abrangentes. Nesta seção, discutiremos como usar o modelador de dados de modo geral para combinar dados de localização de várias fontes.
Atenção: Antes de começar a criar modelos de dados, recomendamos a leitura de Understanding Left Outer Joins. Este breve exemplo explica como os dados são combinados em uma união e ajuda você a começar a pensar em como deseja configurar seu próprio conjunto de dados.
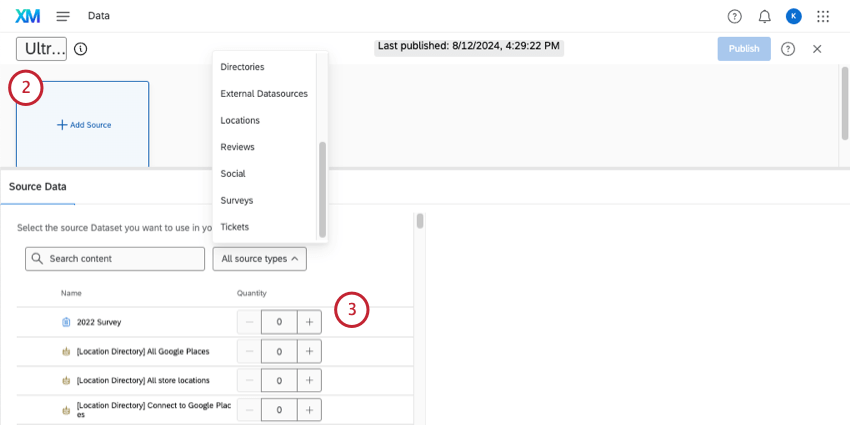
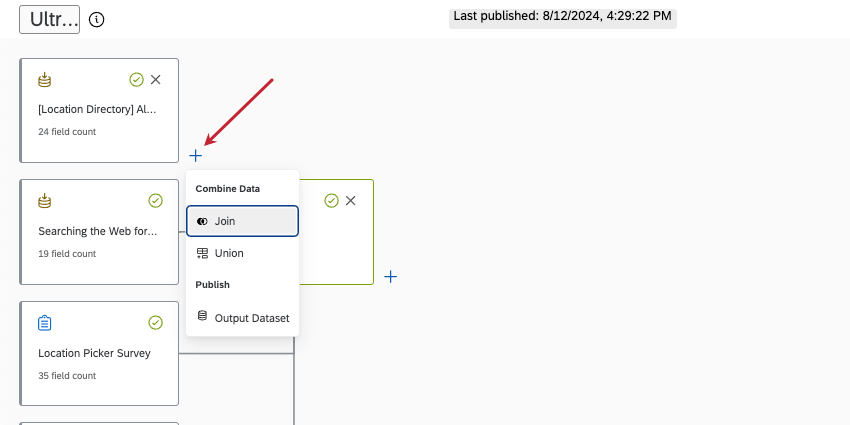
Qdica: você encontrará diretórios de locais em Locations (Locais). Também é possível adicionar outras fontes conforme necessário, como diretórios contato, projetos dados importados, pesquisas e projetos de gerenciamento de reputação.

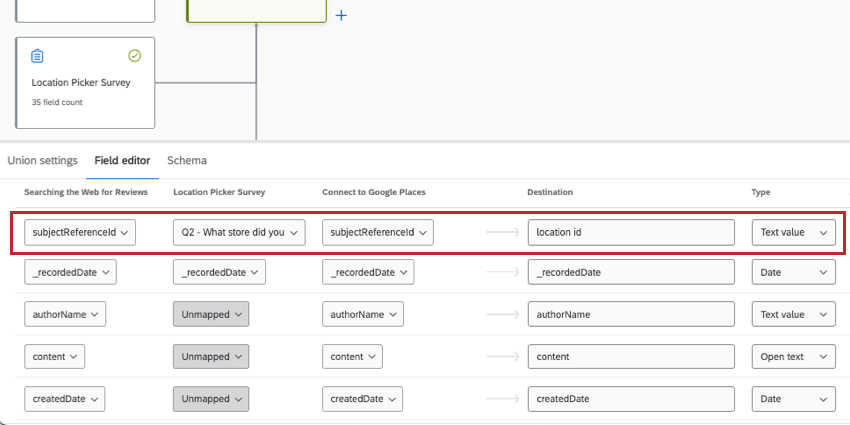
Qdica: os campos nem sempre terão os mesmos nomes em cada fonte. Por exemplo, o ID do local é Location ID em diretórios de locais, mas subjectReferenceId em projetos de gerenciamento de reputação. Consulte nosso guia sobre campos correspondentes.
Atenção: Cada fonte precisa ter dados para a chave de união que você escolheu, ou a união não funcionará.
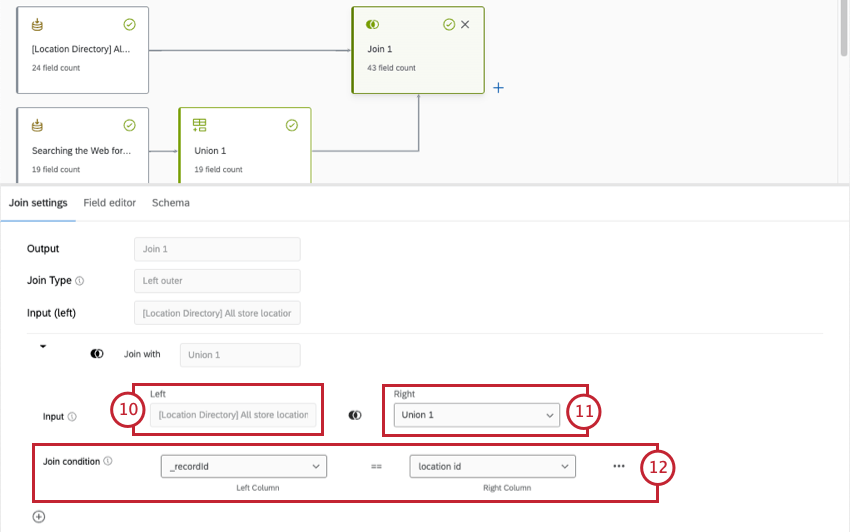
Qdica: nesse caso, “_recordId” e “location id” contêm dados de ID de local.
Qdica: com base nos recursos que você está usando, suas junções exatas podem variar. Por exemplo, esta seção mostra vários exemplos diferentes com chaves de união diferentes, como ID do local e ID do Google Place. Se você tiver várias fontes para combinar, talvez nem sempre esteja claro quais fontes devem ser combinadas e em que ordem.
Perguntas frequentes
O que é uma junção?
O que é uma junção?
Isso é ótimo! Obrigado pelo seu feedback!
Obrigado pelo seu feedback!