Uso de datos de ubicación en los paneles
Contenidos de la página
Acerca del uso de datos de ubicación en los paneles
Puedes utilizar datos de ubicación en sus paneles de control uniéndolos con los datos de su proyecto. Al unir los datos se garantiza que todos los datos de ubicación que necesita se combinarán con las respuestas de la encuesta o las reseñas web sobre las que desea informar. Es más, sólo tienes que asignar un campo de identificación para vincular todos tus datos de ubicación.
Atención: Cada fuente de datos de ubicación (es decir, una directorio individual) solo se puede agregar a un límite de 8 paneles. Después de eso, no podrás copiar esos paneles/conjuntos de datos ni crear otros nuevos con la misma fuente.
Elección de un campo de ubicación de identificación
Cuando crea una unión, necesita alguna forma de identificar cada ubicación específica para poder hacer coincidir su información adicional con una respuesta de encuesta relevante. Este campo de identificación es crucial para vincular esta información y se llama clave de unión. Esta clave de unión puede variar según la información que se desee combinar, pero siempre debe ser una identificación única para cada ubicación.
Las claves de unión de ubicación comunes incluyen: Identificación de ubicación y Identificadores de lugares de Google. Si tiene una identificación interna para las ubicaciones en su empresa, también puede probar la UbicaciónReferencia externa. Ver Todos los campos de ubicación admitidos.
Ejemplo: Subes tus ubicaciones a un director de locacióny. En su encuesta, utiliza lógica de ramificación para asignar identificadores de ubicación a cada respuesta. Utilizarías el campo de ID de ubicación como clave de unión.
Ejemplo: Has creado un Pregunta sobre el selector de ubicación y un directorio de ubicaciones. Unes el selector de ubicación y el ID de ubicación.
Ejemplo: Su encuesta solicita reseñas de Google. Quiere combinar estos datos con un proyecto de gestión de reputación en el que ha… conectado a Google. Te unes usando el ID de Google Places.
Campos coincidentes en cada fuente de datos
Qualtrics ofrece una variedad de formas de recopilar opinión sobre diferentes ubicaciones. Para aprovechar al máximo esa información, deberás combinarla en un solo conjunto de datos. Para ayudar con ese proceso, esta tabla muestra algunos de los campos similares que sus posibles fuentes podrían compartir.
En la última fila de esta tabla, mostramos dónde puedes almacenar esta información en tu encuesta si no está incluida de forma predeterminada y no deseas utilizar la ubicación especializada o revisar preguntas. Tenga en cuenta que los datos embebidos y las preguntas de la encuesta son personalizados por usted y pueden variar en nombre y tipo.
| ID de ubicación | Identificación de lugar de Google | Texto de revisión | Nombre del evaluador | |
|---|---|---|---|---|
| Proyecto de gestión de reputación (cualquier versión) | ID de referencia del sujeto | N/C | Contenido | nombredelautor |
| Solicitud de reseñas encuesta | No incluido por defecto | Datos embebidos (ver pasos recomendados) | No incluido por defecto | Pregunta sobre Datos embebidos o campos de formulario |
| encuesta de selección de ubicación | Pregunta sobre el selector de ubicación | No incluido por defecto | Pregunta de Entrada de texto | Pregunta sobre Datos embebidos o campos de formulario |
| Encuesta (otras) | Datos embebidos | Datos embebidos | Pregunta de Entrada de texto | Pregunta sobre Datos embebidos o campos de formulario |
| Directorio de ubicaciones | _recordId | Identificador de GooglePlace | N/C | N/C |
Consejo Q: Con las preguntas solicitud de reseñas y selección de ubicación, puede Utilice fuentes de datos complementarias para obtener información de ubicación que no se incluye de forma predeterminada. No solo es una excelente manera de ampliar los datos de ubicación en su encuesta, sino que si hace esto antes Recopila respuestas, ¡no tendrás que unir datos de ubicación en el conjunto de datos del Tablero !
Configuración de datos de ubicación con un mapeador de datos
En esta sección, le mostraremos cómo puede utilizar un mapeador de datos para configurar sus datos de ubicación.
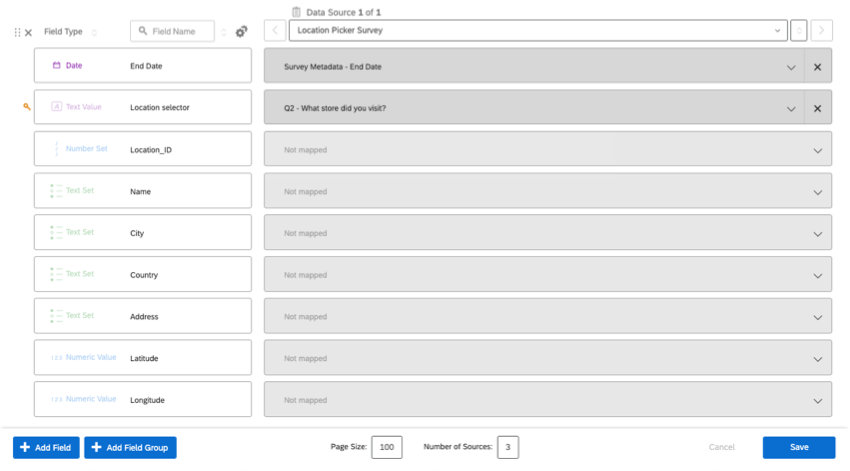
Asignación de datos de ubicación a un Tablero

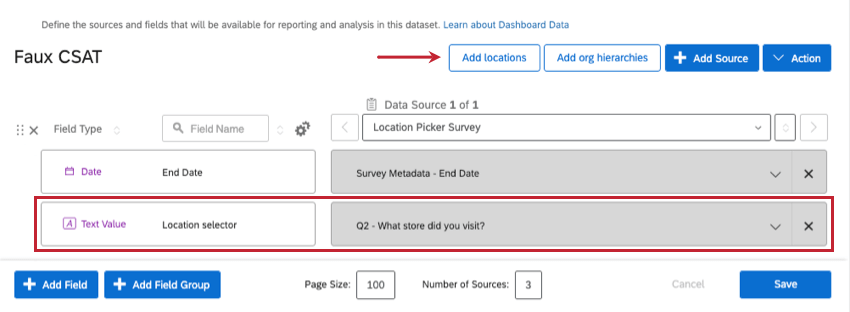
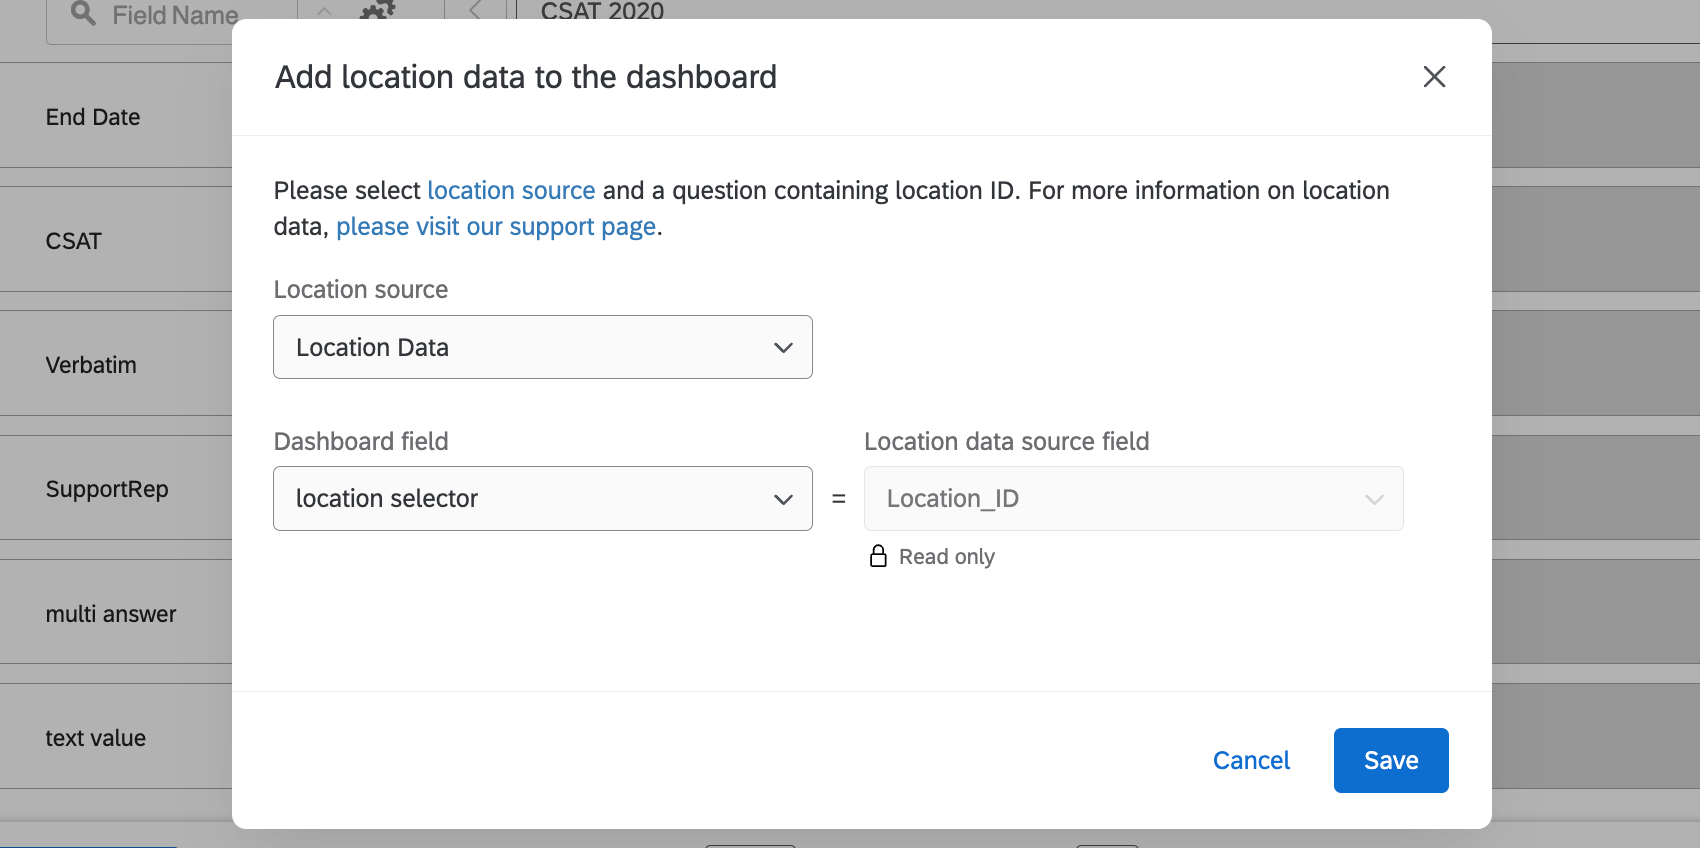
- Pregunta sobre el selector de ubicación: Seleccione la pregunta del selector de ubicación.
- Busque en la web la gestión de la reputación: El campo donde almacena el código de su tienda. Por ejemplo, un ID de Google Place.
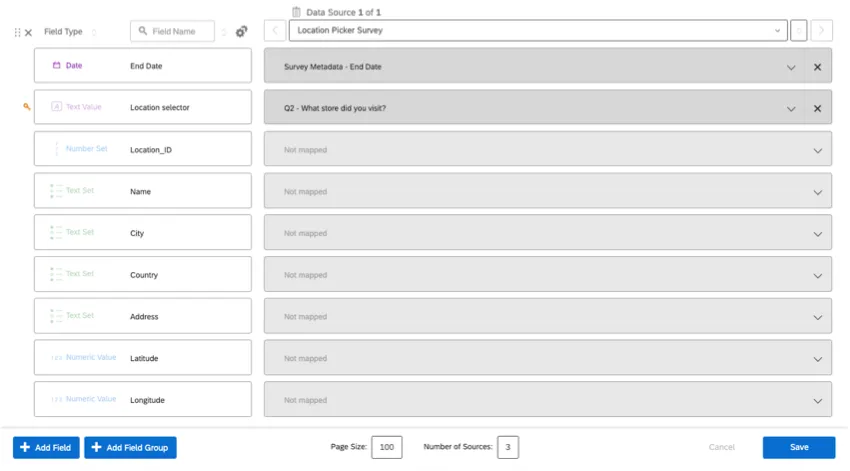
Una vez que agregue el identificador de ubicación, todos los campos de ubicación se asignarán automáticamente al Tablero.
Advertencia: Hacer no Intente mapear estos campos usted mismo. Aunque los campos digan “no asignado”, los datos del directorio se extraerán automáticamente.
Edición del conjunto de datos del Tablero
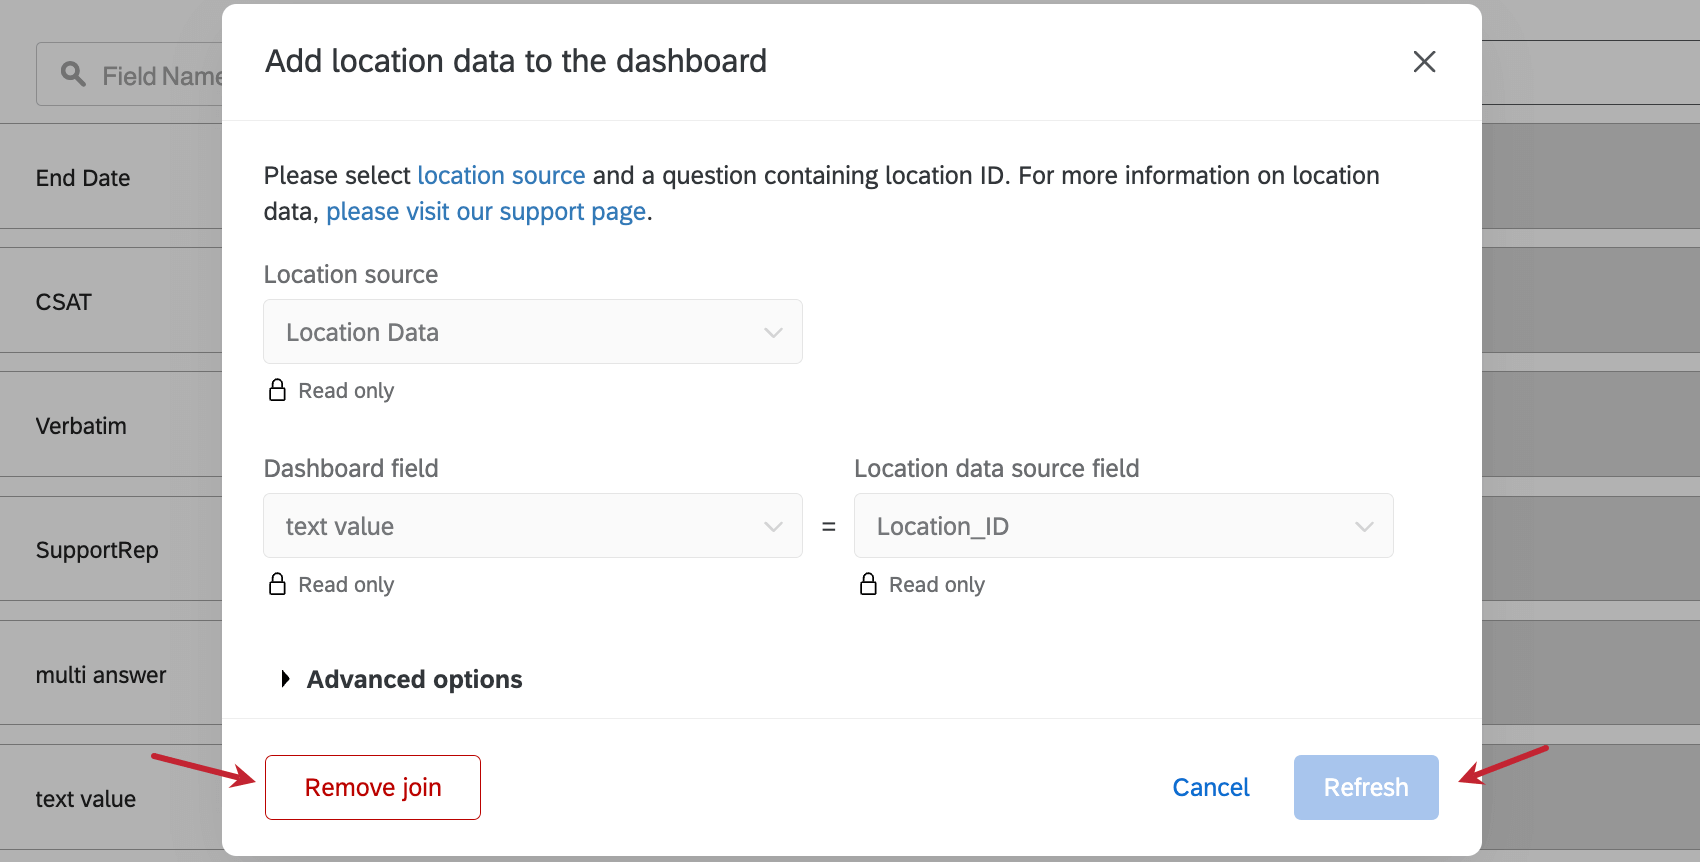
Puede cambiar la configuración de su ubicación haciendo clic en Agregar ubicaciones de nuevo.

En la ventana que se abre, tendrás las siguientes opciones:
- Eliminar unión: Eliminar los datos de ubicación. Si desea cambiar la asignación a un campo diferente, primero debe eliminar la unión existente.
- Actualizar unión: Haga clic en este botón cada vez que cambie el tipo de campo de datos de ubicación o agregue nuevas columnas (por ejemplo, agregar un campo de dirección que antes no existía). No es necesario utilizar este botón cada vez que agregue una nueva ubicación.
Para editar los tipos de campos para sus datos de ubicación, abra el proyecto de datos importados que contiene su directorio de ubicación y vaya a la pestaña Datos y análisis. Dentro de esa pestaña puedes editar tus campos en el Editor de campos. Para obtener instrucciones, consulte Datos y análisis en Proyectos de datos importados. Después de cambiar el tipo de campo, deberá hacer clic en Refrescar dentro de su Tablero.
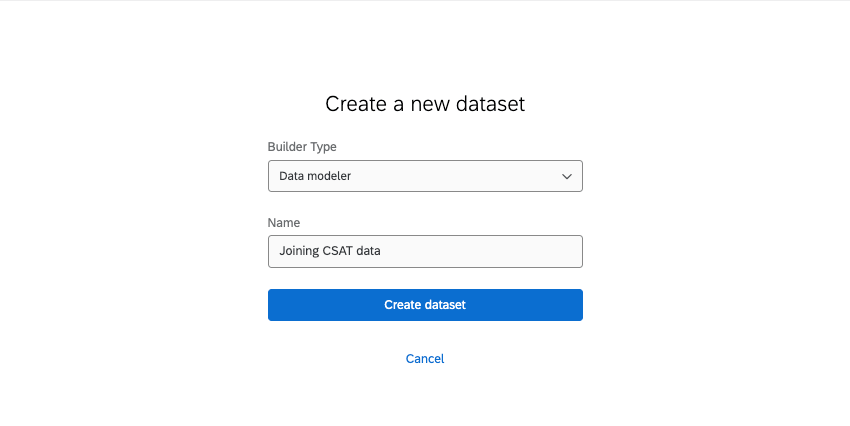
Configuración de datos de ubicación con un modelador de datos
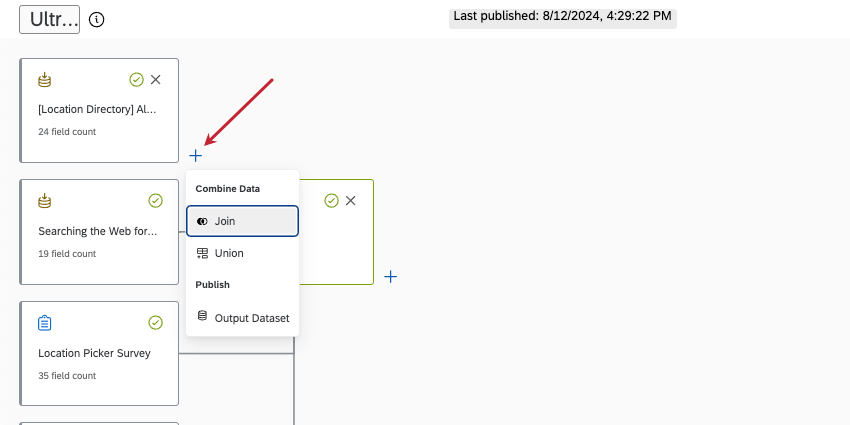
La ventaja de un modelador de datos es que puede crear múltiples uniones, incluso utilizando diferentes claves de unión para identificar ubicaciones. No solo puede hacer todo lo que puede hacer en el mapeador de datos en el modelador de datos, sino que también puede crear conjuntos de datos potencialmente más grandes y más completos. En esta sección, analizaremos cómo utilizar de forma general el modelador de datos para combinar datos de ubicación de varias fuentes.
Atención: Antes de comenzar a construir modelos de datos, recomendamos leer Comprensión de las uniones externas izquierdas. Este breve ejemplo explica cómo se combinan los datos en una unión y le ayudará a comenzar a pensar en cómo desea configurar su propio conjunto de datos.
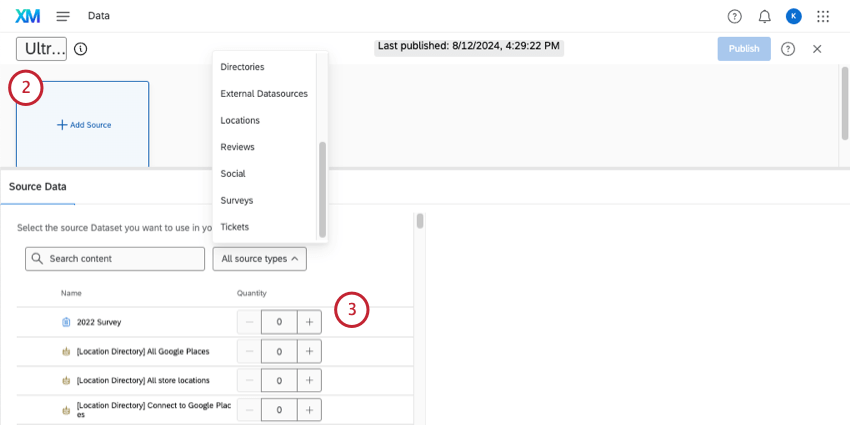
Consejo Q: Encontrará directorios de ubicaciones en Ubicaciones. También puede agregar otras fuentes según sea necesario, como directorios de contacto , proyectos de datos importados, encuestas y proyectos de gestión de reputación.
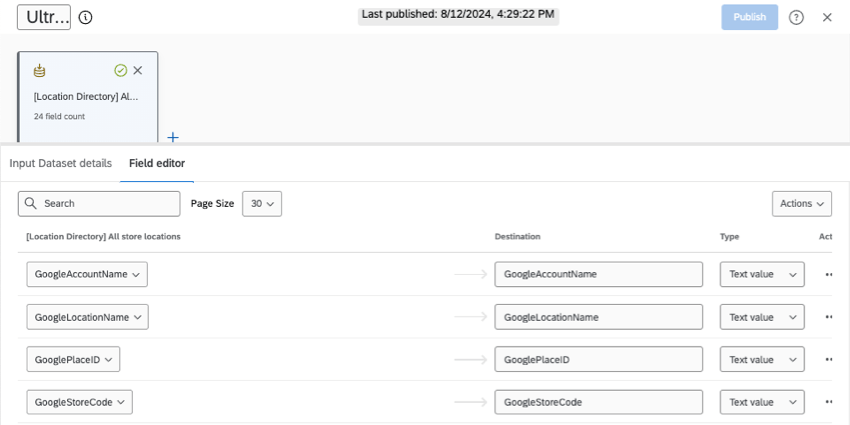

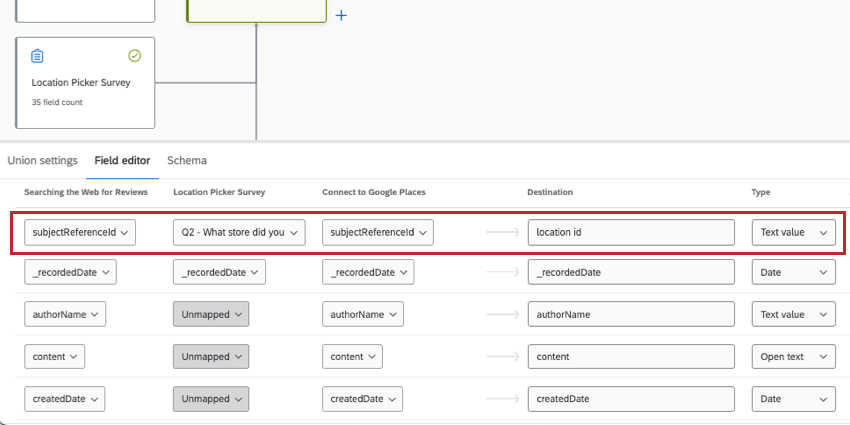
Consejo Q: Los campos no siempre tendrán los mismos nombres en cada fuente. Por ejemplo, el ID de ubicación es Location ID en los directorios de ubicación, pero subjectReferenceId en los proyectos de gestión de reputación. Ver Nuestra guía para hacer coincidir campos.
Atención: Cada fuente debe tener datos para la clave de unión que usted eligió, o la unión no funcionará.
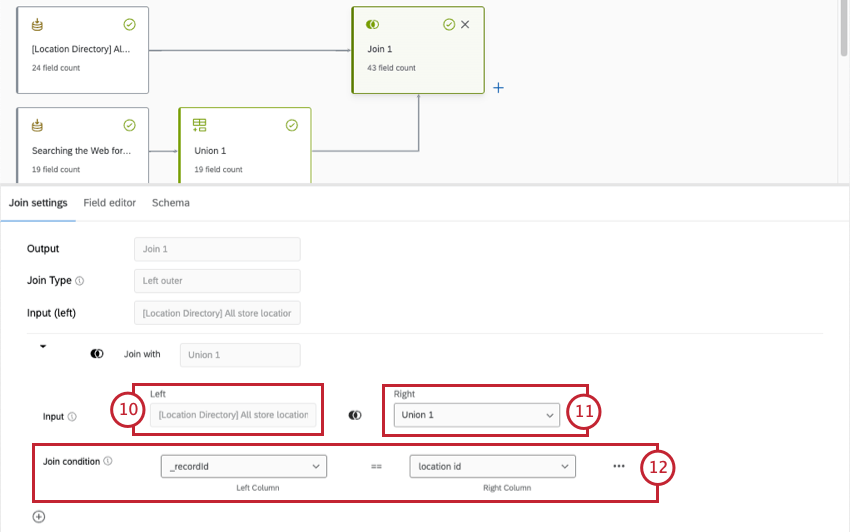
Consejo Q: En este caso, “_recordId” y “location id” contienen datos de ID de ubicación.
Consejo Q: Dependiendo de las funciones que estés utilizando, tus uniones exactas pueden variar. Por ejemplo, Esta sección muestra varios ejemplos diferentes con diferentes claves de unión, como ID de ubicación e ID de Google Place.. Si tiene varias fuentes para combinar, es posible que no siempre esté claro qué fuentes unir y en qué orden.
Preguntas frequentes
¿Qué es una combinación?
¿Qué es una combinación?
¡Genial! ¡Gracias por tus comentarios!
¡Gracias por tus comentarios!