
Common API Use Cases
What's on this page
About API Use Cases
This page highlights the ways other Qualtrics clients are leveraging the Qualtrics API. Below you’ll find a list of common API requests that our clients are using and the use cases associated with each request.
Attention: API extensions may require programming knowledge to implement. Our support team does not offer assistance or consultation on custom coding. You can always try asking our community of dedicated users instead. If you’d like to know more about our custom coding services, please contact your Qualtrics Account Executive.
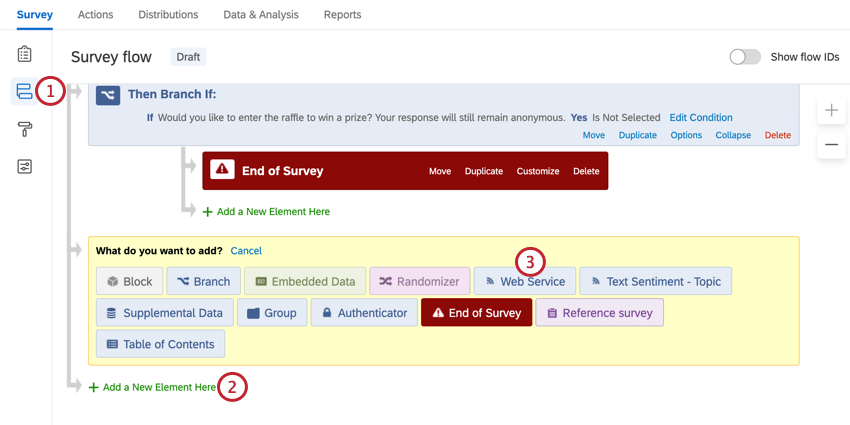
Common Methods
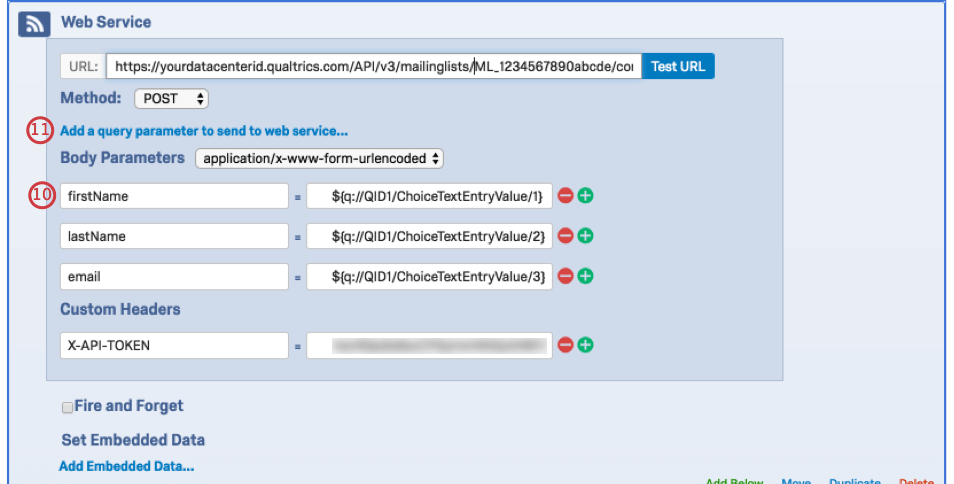
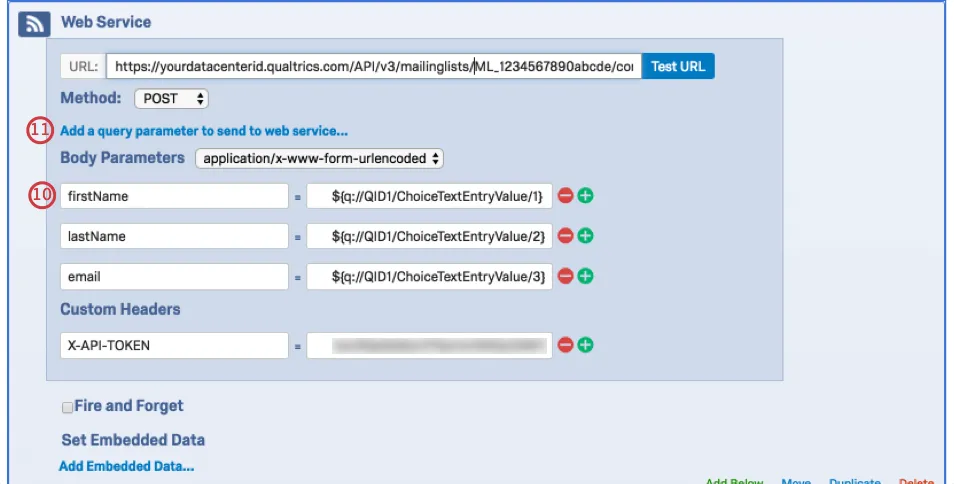
Web Service
Automating API request construction is commonly done by an IT specialist at your organization, as this process requires the implementation of custom code. In some cases though, you can use a Qualtrics survey to automate instead of custom code. The steps below demonstrate how to accomplish this process.
Qtip: To automate API request construction from within Qualtrics, you’ll need to be familiar with constructing an API request and with Web Services. In addition, you’ll need to include a survey question that collects a participant’s necessary personal information (e.g., a Text Entry – Form question).
Follow the below steps once your survey has been constructed:
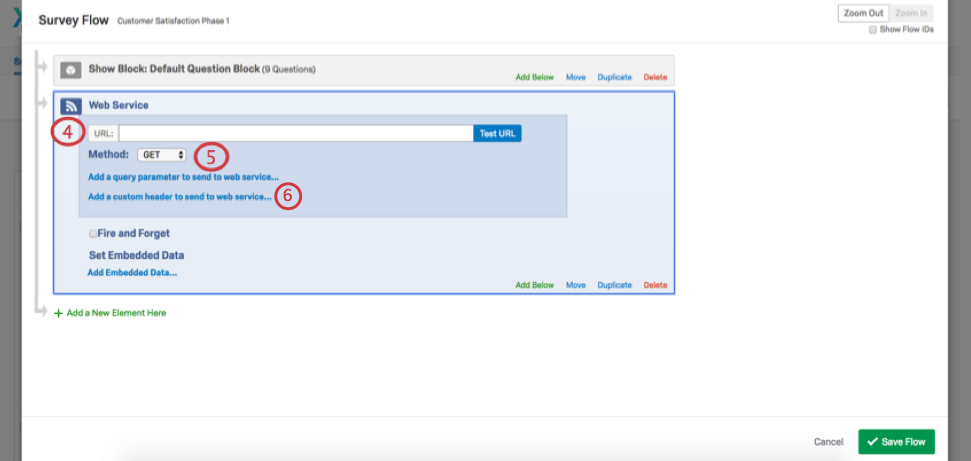
Attention: Although PATCH is available in the Web Service element, it cannot be used with the Qualtrics API.
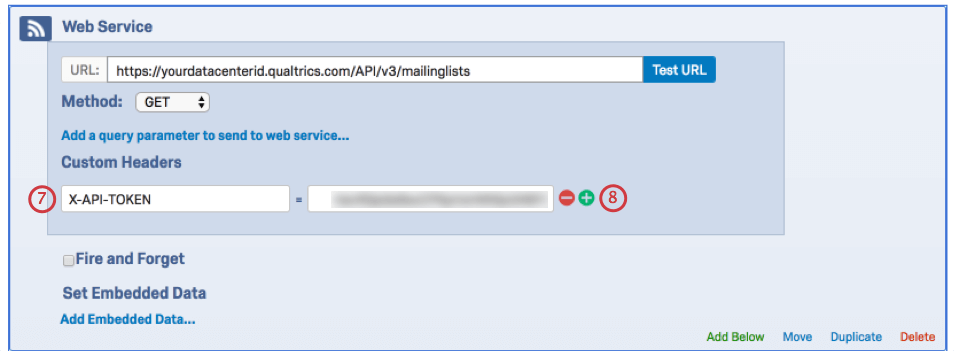
Qtip: You’ll want to use Piped Text for values with dynamic data, such as First Name, Last Name, and Email.
JSON
You can pass your parameters as JSON through the body of the request. Note that when using this method, you must specify a Content-Type (i.e., application/json or text/json). This method is commonly done by an IT specialist at your organization, as this process requires the implementation of custom code.
Query String
Attention: Please note that our API v3 requests cannot be formatted as query strings as the token and other parameters need to be passed through the headers and body of the request. You can pass your API request parameters through standard query string syntax if you are using API v2.x. You start with the root URL and append each of your required parameters to the end.
Root URL:
https://survey.qualtrics.com/WRAPI/ControlPanel/api.php For the first parameter that is added to the root URL, include a “?” followed by the name of the parameter, an equal sign, and the parameter’s value (e.g., ?Version=2.4). Add all subsequent parameters with a leading ampersand “&” (e.g., &Request=importPanel).
Root URL + Required Parameters:
https://survey.qualtrics.com/WRAPI/ControlPanel/api.php?Version=2.4&Request=importPanel
&User=kathleenb_gen&Token=12345678901234567890&Format=XML
Continue adding or appending any other additional parameters to your URL by following the same process described above. Once you’ve include all your desired parameters, you’ll have a completed request.
Root URL + Required Parameters + Additional Parameters:
https://survey.qualtrics.com/WRAPI/ControlPanel/api.php?Version=2.4&Request=importPanel
&User=kathleenb_gen&Token=12345678901234567890&Format=XML
&LibraryID=UR_12345678901234567890&ColumnHeaders=1&Email=3&URL=https%3A%2F%2Fco1.qualtrics.com
%2FWRQualtricsControlPanel%2FFile.php%3FF%3DF_3IeSPPh9HjXwaj3%26download%3D1&Name=Test
&FirstName=1&LastName=2&AllED=1
You can find more information on query strings on our support page Passing Information via Query Strings.
Survey Platform
Automating importing a contact list
You can use the Create Contacts Import request to import batches of contacts into your Qualtrics account. Through this request you can import JSON lists of individuals from your CRM into Qualtrics. These contacts can be imported by either uploading a JSON file and setting the Content-Type header parameter to multipart/form-data, or by including the contacts in the request body and setting the Content-Type to application/json.
Automating creating a contact
Rather than manually updating contact lists with new contact members, you can automate the process by using the Create Contact request. This request adds a new contact to an existing contact list. For this request you will need the Mailing List ID and any other fields you would like to add to the contact. These will need to be passed through the request body, setting Content-Type to application/json.
Generating your own Individual Links
You might need to distribute your survey through an internal mailer rather than the Qualtrics mailer. With the Qualtrics API, you can construct Individual Links that track a respondent’s personal information without having to use the Qualtrics mailer.
To accomplish this task, you’ll need to use two API requests: Create Distribution and Distribution Links. Before you begin, you’ll need to import a contact list to Qualtrics either manually or by using the API request Create Contacts Import.
The parameters of interest for the Create Distribution and Distribution Links request are:
- Mailing List ID (each distribution is linked to a mailing list)
- Survey ID
- Description (the name of the distribution)
- Action (the value here needs to be CreateDistribution)
Attention: If an expiration date is not specified (this is an optional parameter), then the links will expire after 60 days.
Automating your data download in preparation to import into your CRM
If you find yourself needing data from many surveys on a daily basis, you can use our API to get responses. The API v3 uses a series of three requests to get data:
- Create Response Export: This request starts the export process and is used to specify the file format and other preferences. This will return a Response Export ID.
- Get Response Export Progress: This request is used to check on the progress of the export using the Response Export ID provided in the first request. Once percentComplete gets to 100, you can use the last request to get the file.
- Get Response Export File: Once the file is ready, you can use this request to download it. It will export as a compressed file. Please note that although most API requests will work when the datacenter ID is not correct in the URL, this request will not. Please ensure that you use the correct datacenter ID in this request.
This sequence of requests downloads your raw data, making it easier for you to obtain your data and then import those responses to your CRM, data warehouse, etc.
XM Directory
Updating a contact (List Directory Contacts and Update Directory Contact)
Sometimes you may want to update a contact through the API. In order to do so, you’ll need the contact’s Contact ID. The List Directory Contacts API request allows you to look up a contact’s Contact ID, which you can then use for later API requests. We’ll first explain the API request List Directory Contacts and then Update Directory Contact.
All you will need for the List Directory Contacts request is the Directory ID. The result for the List Directory Contacts request will be to receive the contact’s Contact ID so you can then use it for requests like Update Directory Contact.
There are then two main parameters of interest for the Update Directory Contact request: Directory ID and Contact ID. As a result of the Update Directory Contact request, the specified contact will be updated with whatever information you’ve changed based on the parameters of your request.
API Solution Guides
You can find various solution guides for Managing Surveys, Managing Users, Managing User Groups, and Getting Survey Responses on our v3 API Documentation website.
That's great! Thank you for your feedback!
Thank you for your feedback!