-

Qualtrics Platform -

Customer Journey Optimizer -

XM Discover -

Qualtrics Social Connect
Response Requirements & Validation
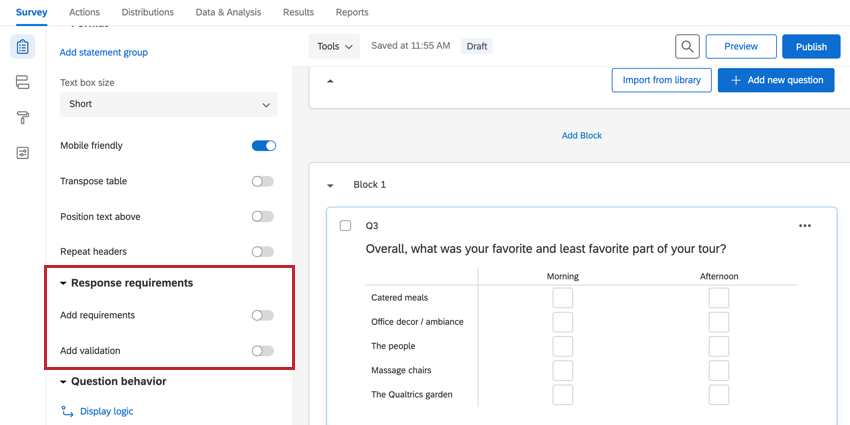
About Response Requirements & Validation
Response requirements & validation are used to alert respondents about questions they may have missed, or they can be used to solicit a specific kind of answer from respondents. To add validation to your question, navigate to the Response requirements section of the survey builder.
The following validation types are available for all questions:
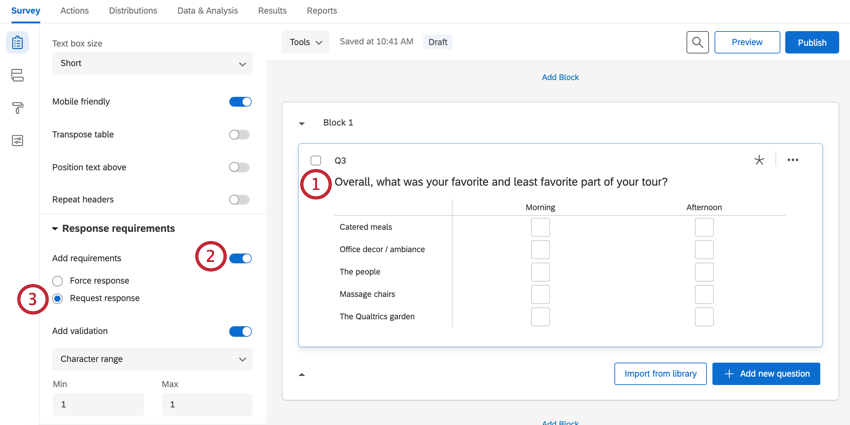
- Add Requirements: After enabling Add requirements, the following options become available:
- Force response: Requires the respondent answer the question before they can continue the survey.
- Request response: Alerts the respondent about any unanswered questions, but allows the respondent to continue the survey without answering if they choose.
- Add Validation: After enabling Add validation, the following options become available:
- Custom validation: Used to force a certain type of response (for example, making sure a respondent selects the right amount of answer choices in a multi-select question).
Additionally, extra validation options appear under certain circumstances in the Add validation menu:
- Content validation: Used to force a certain response based on a certain type of content (such as when you want a respondent to enter a valid email address). This validation is used in questions that allow free response.
- Question-specific validation: Certain questions have built-in validation options. For example, constant sum questions have an additional option to require the question to total to a specific value.
Qtip: For more information on each question type’s unique validation options, visit our question types page and select the question type you would like to learn more about.
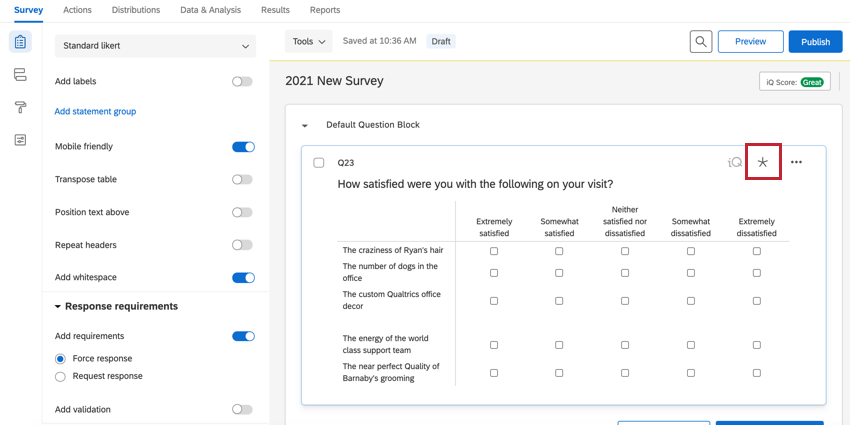
When any of the validation options are enabled, an asterisk icon will appear in the top right corner of the question, indicating that the question has some form of validation.
Force Response
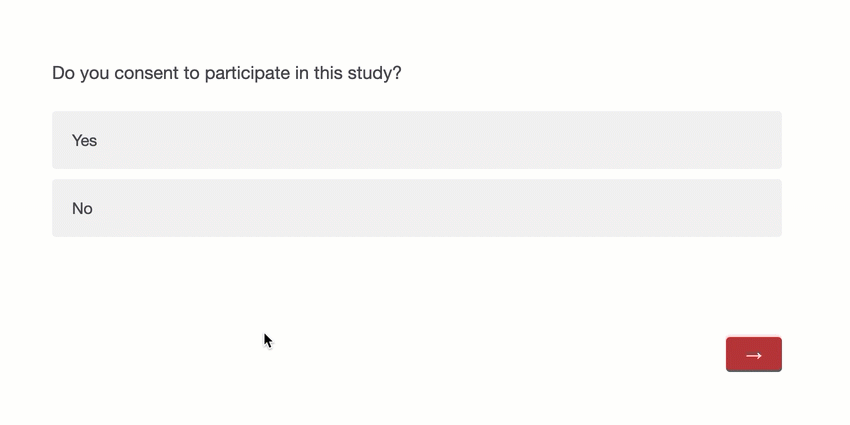
When enabled on a question, Force response makes it so that a respondent must answer the question before being able to continue to the next page of the survey. If certain questions in your survey are more important than others, or if survey logic depends on them, you may want to enable force response. If respondents try to progress without answering the question, they will see a message letting them know they must answer the question to proceed.
To Enable Force Response on a question
- Select your desired question.
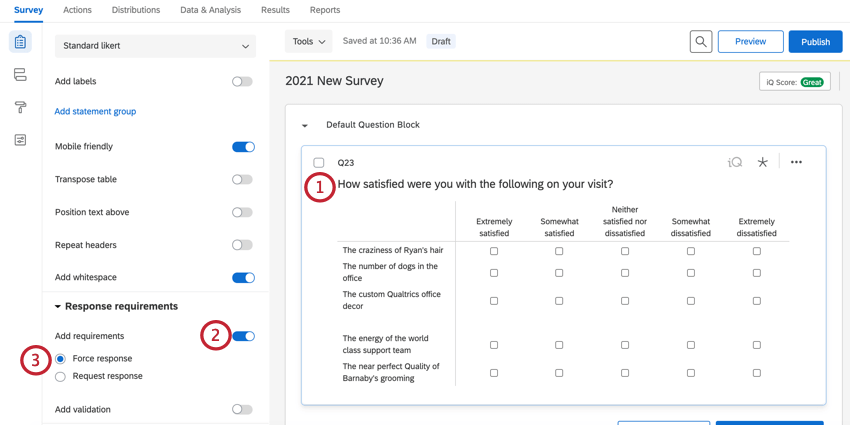
- Enable Add requirements.
- Select Force response.
Qtip: To set force response on multiple questions, select all of the questions and then choose Force response. For more information on how to select multiple questions, view editing multiple questions.
Request Response
When enabled, Request response allows you to remind respondents that they missed a question without requiring that they go back and answer it. This can be a tactful way to increase question response rates without violating privacy guidelines that apply to many studies.
When request response is selected, and a respondent skips the question, Qualtrics will ask if the respondent would like to go back and answer the skipped question before they move to a new page.
To Enable Request Response on a question
- Select your desired question.
- Enable Add requirements.
- Select Request response.
Qtip: To set request response on multiple questions, select all of the questions and then choose Request response. For more information on how to select multiple questions, view editing multiple questions.
Content Validation
Content validation is used when you need your respondent to answer a question in a specific way according to a content type. For example, you may want them to enter a valid email address or postal code in a text box.
There are seven different types of content validation available for text entry questions:
- Email Address: Answers must include an email in a correct format. The entered email address must include an “@” symbol and a valid domain format (e.g., “qualtrics.com” / “university.edu” / etc.). For example, “barnaby@qualtrics.com” would pass this content validation.
- Phone Number: Respondents must enter a valid phone number without a country code. You can select to validate based on US, Canada, UK, Australia, New Zealand, or the Netherlands phone numbers by using the additional dropdown that appears after selecting phone number.
- US State: Answers must be valid US States, and they can be formatted as either full state names (e.g., “New York” or “Washington”) or abbreviated names (e.g., “UT” or “TX”).
- Postal Code: Answers must be a valid postal code, either in the 5-digit or 9-digit format. You can select to validate based on US, Canada, UK, Australia, New Zealand, or the Netherlands postal codes by using the additional dropdown that appears after selecting postal code.
- Date: Respondents must enter a valid date. You can specify the format of the date (e.g., mm/dd/yyyy) in the dropdown.
- Number: Answers must be numeric (answers cannot contain any textual characters).
- Text-only (Non-numeric): Answers must contain only text (answers cannot contain any numeric characters or punctuation).
To set Content Validation on a question
- Select your question.
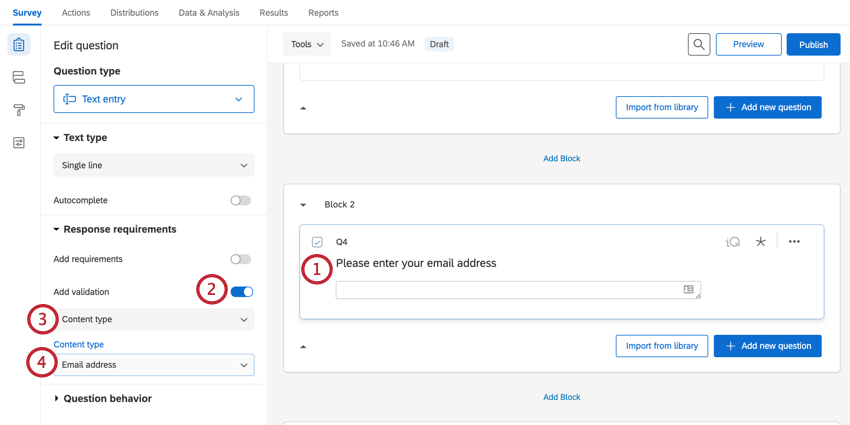
- Enable Add validation
- Select Content type.
- Choose your content type to base the validation on.
Response Clarity Validation
When enabled on a text entry question, response clarity validation analyzes the respondent’s answer using AI, and prompts them to give a fuller response if their answer is vague or only partially addresses the question. This prompt will appear when the respondent clicks the “Next” button to continue to the next page in your survey.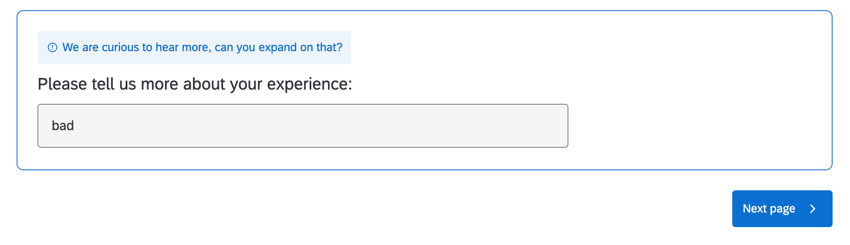
Response clarity validation uses Qualtrics’ internal large language model for AI capabilities.
Qtip: While we have guardrails in place and are continually refining our products, artificial intelligence may at times generate output that is inaccurate, incomplete, or outdated. Prior to using any output from Qualtrics’ AI features, you must review the output for accuracy and ensure that it is suitable for your use case. Output from Qualtrics’ AI features is not a substitute for human review or professional guidance.
Enabling Response Clarity Validation
- Select a text entry question.
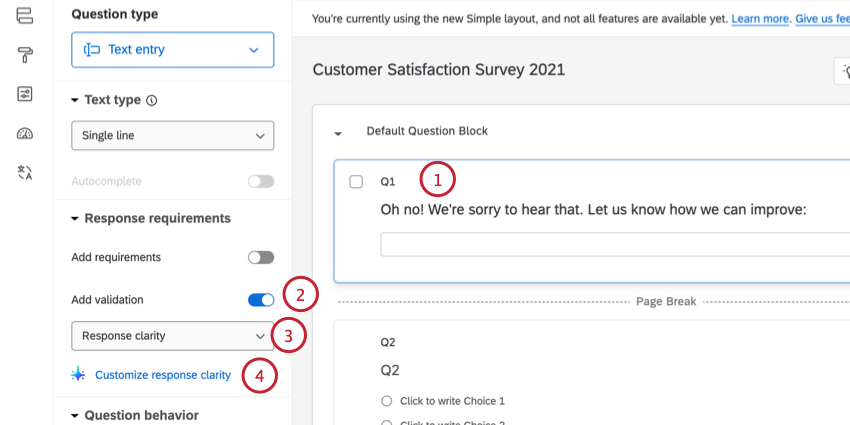
- Enable Add validation.
- Choose Response clarity.
- To customize the prompts that appear to survey takers, click Customize response clarity.
- There are 5 different criteria that are used to evaluate the response’s clarity:
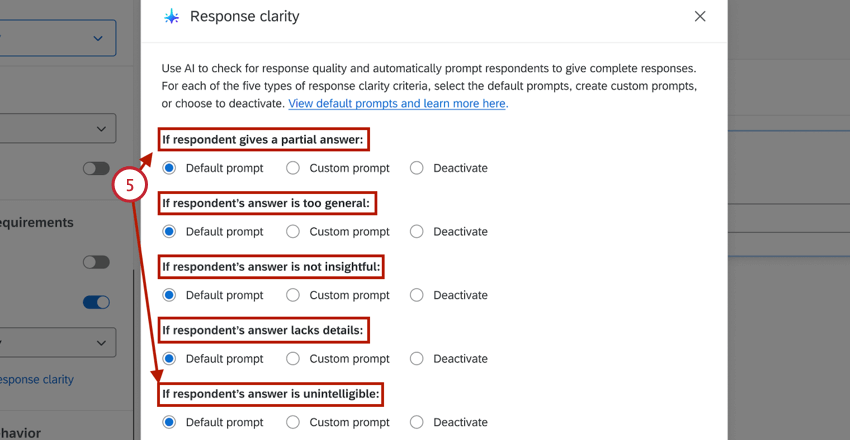
- Partial answer: The respondent’s answer did not fully answer the question or only answered parts of it.
- Too general answer: The respondent’s answer was too vague.
- Not insightful answer: The respondent’s answer does not provide any insights when it is reasonable to have an opinion on the question asked.
- Lacks details: The respondent’s answer did not provide any meaningful details.
- Unintelligible answer: The respondent’s answer does not make sense or does not contain real words.
- Select Default prompt if you’d like to use the default prompt messages for a given criteria. The default messages are:
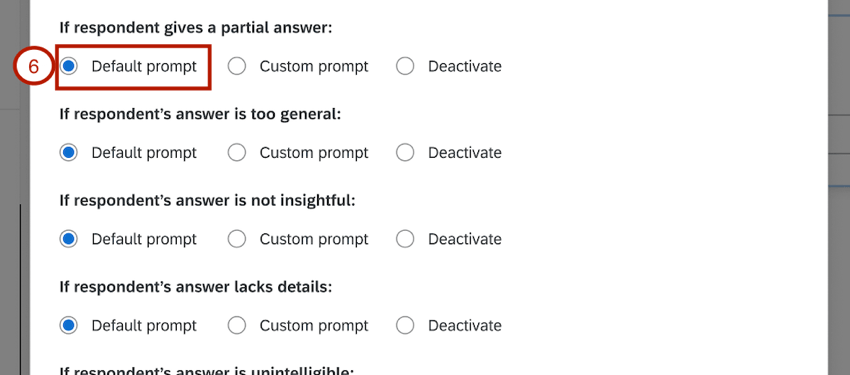
- Partial answer:
- We appreciate your response. Can you answer all parts of the question.
- That’s helpful. Can you review the question and answer all parts?
- Thanks for the feedback. Can you add additional information to fully answer the entire question?
- Too generalized answer:
- We’d like to hear more about that. Can you add additional detail to your response?
- Can you please explain that in a bit more detail?
- Can you tell me more about that? What makes you say X?
- Non-insightful answer:
- We value your opinion. Is there anything else you can share?
- Your input is valuable. Anything else to add?
- We’d like to get more specifics. Is there anything else you’d like to add?
- Lacks details:
- This is helpful. Can you tell us a little more about that?
- Can you provide more detail about your answer or give an example?
- We are curious to hear more, can you expand on that?
- Unintelligible answer:
- Your response was hard to understand. Can you try answering the question again?
- Your response is unclear. Could you clarify what you mean?
- Your response is important to us. Can you try answering the question again?
Qtip: When a response fits into one of these criteria, only 1 of the possible prompt messages will be displayed to the respondent. - Partial answer:
- To use custom prompts for a criteria, enable the Custom prompt option.
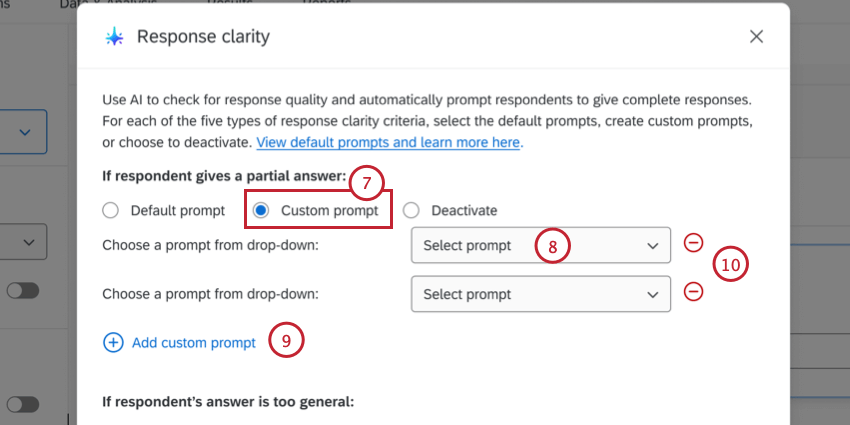
- Use the Select prompt menu to choose a message from any messages library you have access to. You can use any general message as the prompt. Select New Message to create a new message instead.
- You can add up to 3 possible messages for a criteria by clicking Add custom prompt.
Qtip: When a response fits into one of these criteria, only 1 of the possible prompt messages will be displayed to the respondent.
- To remove a custom prompt, click the minus sign ( – ) next to it.
- To disable prompt messages for a certain criteria entirely, select Deactivate for that criteria.
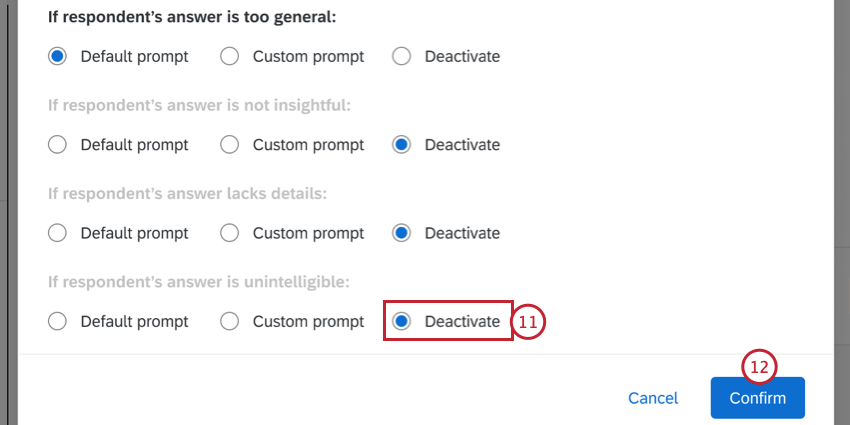
- When finished, click Confirm.
Response Clarity Embedded Data
When you enable response quality validation on a question, there are additional embedded data fields available in your dataset to help track response clarity. These fields include:
- <QID>_AICategory: The category the original response was classified as. Possible values include:
- Passed – Good Answer: The respondent’s answer was sufficient and did not trigger response clarity validation.
- Passed – Not Applicable: The respondent understood the question and put in an effort to answer it, but the question did not apply to them
- AIError: There was an error analyzing the response.
- AITimeout: The AI analysis request timed-out.
- UnsupportedLanguage: The response was in an unsupported language.
- Gibberish: The response matched the “unintelligible answer” criteria.
- Insufficient Detail: The response matched the “lacks detail” criteria.
- Non-Insightful: The response matched the “non-insightful answer” criteria.
- Overly Generalized Answer: The response matched the “too generalized answer” criteria.
- Partial Answer: The response matched the “partial answer” criteria.
- <QID>_OriginalResponse: The user’s original response.
- <QID>_FollowUpPrompt: The exact prompt that was displayed to the user. This will be blank if the response passed the response clarity validation without triggering it.
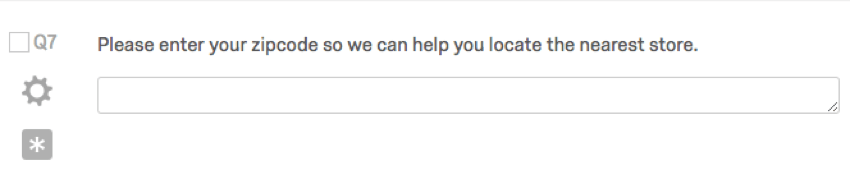
Content Validation Example: Using Zip Codes to Find City and State
When you set a text entry question’s validation type to content validation and your content type to US Postal Code, you can use the zip codes your respondents provide to also record their city and state! This works by running the entered zip code against a database, and then saving the returned city and state as embedded data with their response. Note that this only works using the standard text entry question type.
- In the question asking for zip code, enable Add validation.
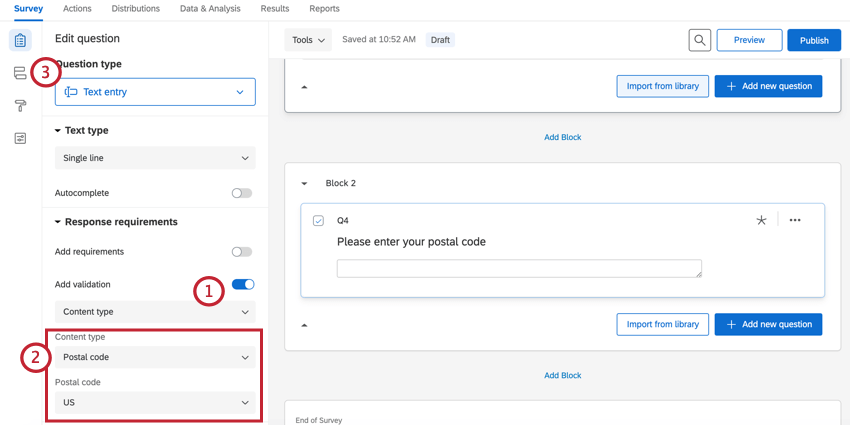
- Select Postal code and US.
- Navigate to the Survey Flow.
- Click Add a New Element Here.
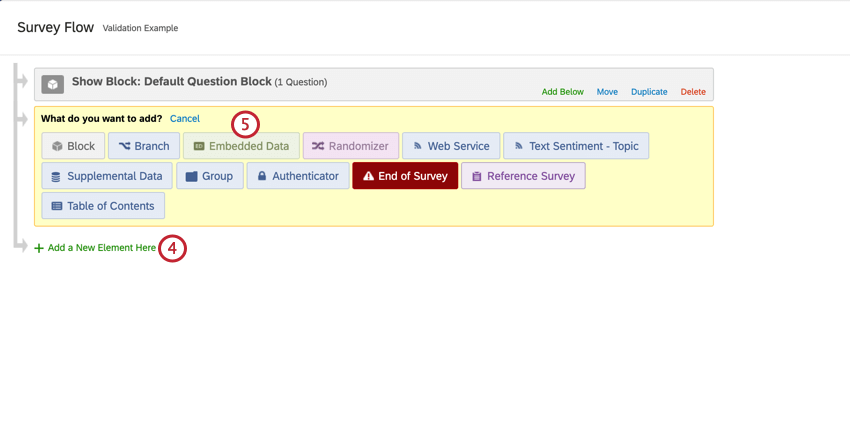
- Select Embedded Data.
- For any state or city you want to pull from a zip code, add a field named QState_ExportTag for states or QCity_ExportTag for cities. You need to replace the ExportTag with the question number of the question where you collect the zip code, e.g., Q32.
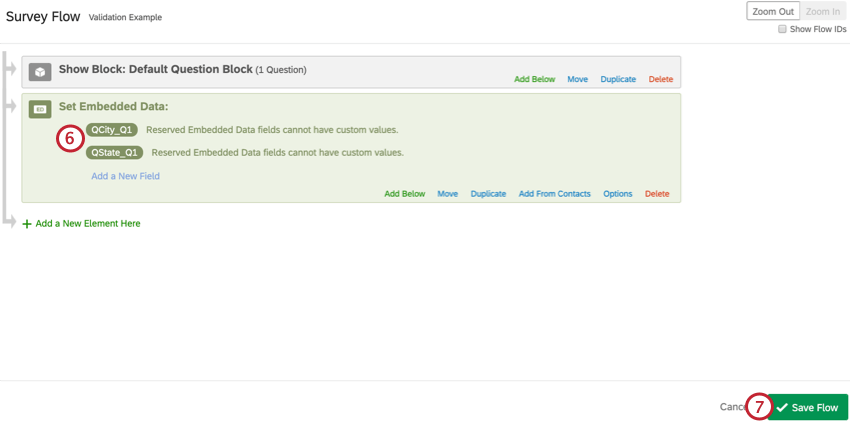 Example: For example, if you wanted to find the city for question seven, you’d call the Embedded Data QCity_Q7.
- Click Save Flow.
Qtip: This embedded data can be added anywhere in the Survey Flow. If you forget to add it before collecting content validated responses, that’s also fine – adding this element will retroactively add this data to your responses. However, if you want to use the city and state values in logic, you will need to move this element above the other elements that use the fields in logic.
Custom Validation
Custom validation is used when you need your respondent to answer a question in a specific way. For example, you may want them to enter a valid email address in a text box, or make sure your respondents are selecting the right number of answer choices.
Custom validation is not compatible with request response and acts similar to force response by requiring the respondent answer the question. You cannot use custom validation on a question while simultaneously making answering the question optional.
To set Custom Validation on a question
- After selecting your question, enable Add validation.
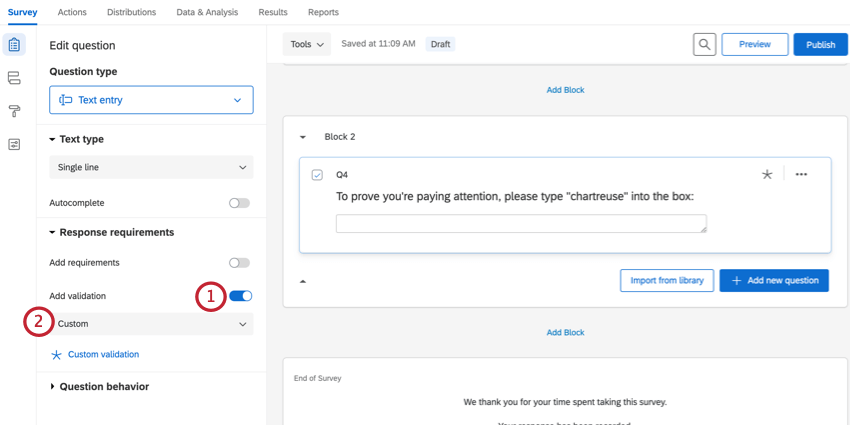
- Select Custom.
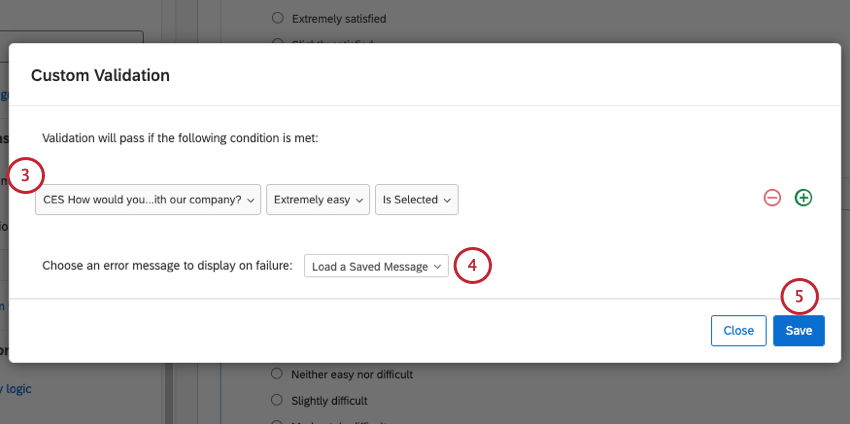
- Create your validation logic. This logic can only be based on survey questions. For help building your logic, see logic based on a question.
 Qtip: Text entry questions will have an “Ignore case” option not shown above. If you don’t have a preference for whether respondents answer using capital or lowercase letters in their response, select Ignore Case.
 - Click Load a Saved Message to choose the error message that appears when respondents fail the validation. For help choosing a system default message or creating your own, see custom validation messages.
- When finished, click Save.
Once you’re finished creating your custom validation logic, you’ll need to select a custom validation message. Read the following section on custom validation messages for more information.
Custom Validation Messages
Whenever you add custom validation to a question, you need to provide a message to display to your participants if they fail your validation conditions. This message usually lets participants know why they failed or what they need to enter in order to proceed in the survey.
There are 2 types of custom validation messages you can create: modified Qualtrics error messages, where you take a system default message and change the text, and completely new error messages, where you create your own message from scratch.
Using a System Default Validation Message
- After creating your custom validation logic, click Load a Saved Message.
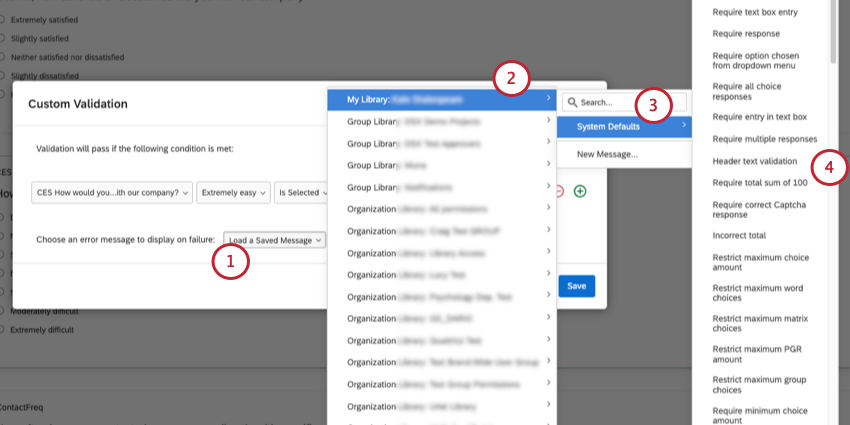
- Hover over My Library.
- Hover over System Defaults.
- Select the error you’d like to use.
Qtip: Preview your survey to make sure you like the validation message you’ve chosen.
Creating a New Validation Message
To create your own validation message:
- After creating your custom validation logic, click Load a Saved Message.
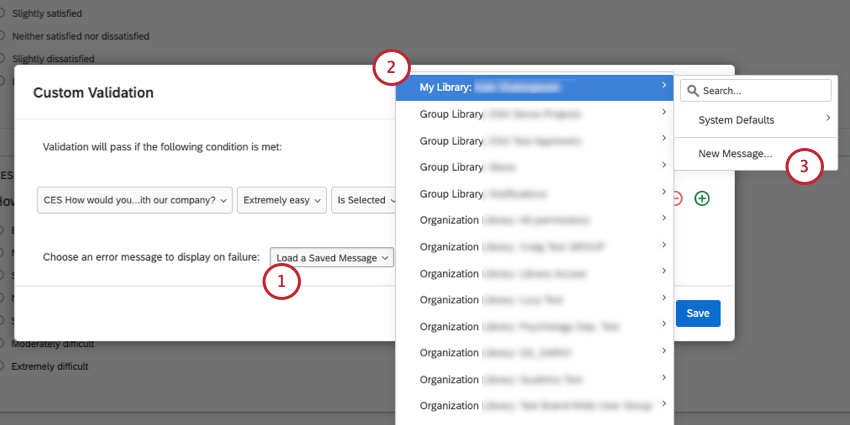
- Select a library where you want to save your message.
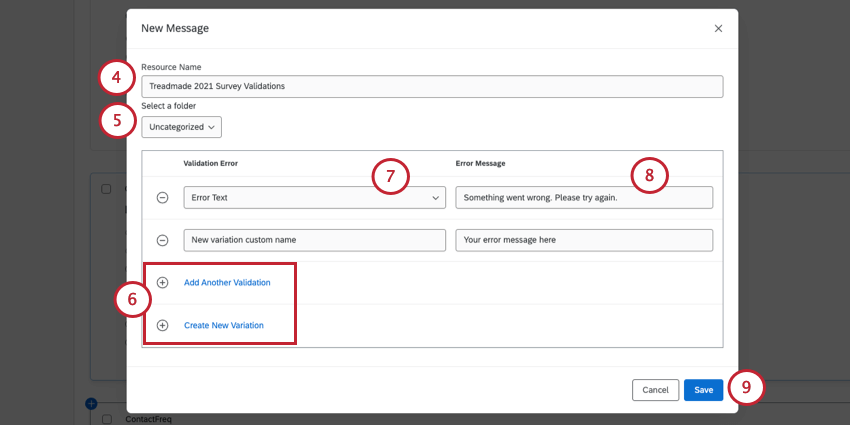
- Select New Message.
- Name your message.
 Qtip: After creating a new message, it will be available when you click Load a Saved Message and select your library.
 - Select what folder from your library the validation message will be saved in.
- Do one of the following:
- If you would like to use a Qualtrics error message as the base of your message, click Add Another Validation, then select the base error message you’d like to use.
- If you’d like to create your own error from scratch, click Create New Variation.
- Select a Validation Error. You can think of this as the “type” of message, allowing you to link a few different validation messages to the same library entry. You select from an existing list of validation errors if you’re adding another validation; however, you can type a custom error type if you’re creating a new variation.
- Enter the Error Message. This is the text that respondents will see when they fail the validation.
- When finished, click Save.
If you need to delete your error, use the minus sign ( – ).
Custom Validation Example: Verifying an Email Address
You can use validation to ensure that 2 text fields are the same. This is useful when you need a respondent to verify information, such as confirming their email address. Follow the below steps to set up an email verification question.
- Create 2 text entry questions, 1 asking for the respondent to enter their email address, and 1 asking to confirm their email address.
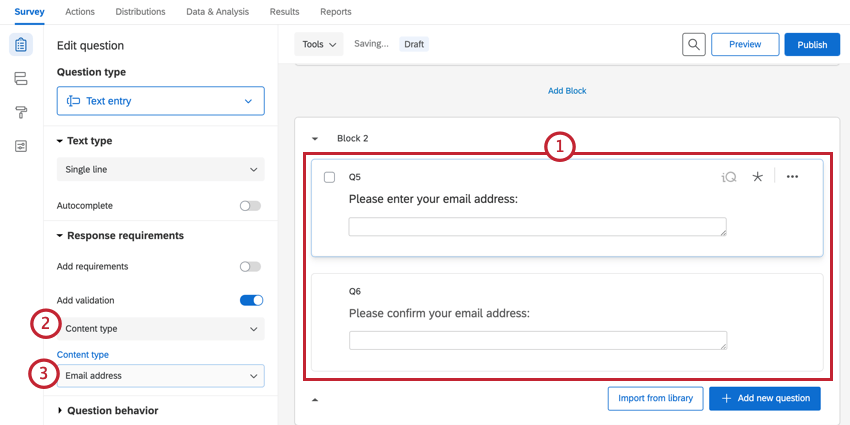
- On the first text entry question, enable Content type as the validation.
- Select Email address as the content type for the first text entry question.
Qtip: This step ensures that the respondent will only be able to enter an email address.
- Click the question text of 1 of your questions and select Piped Text.
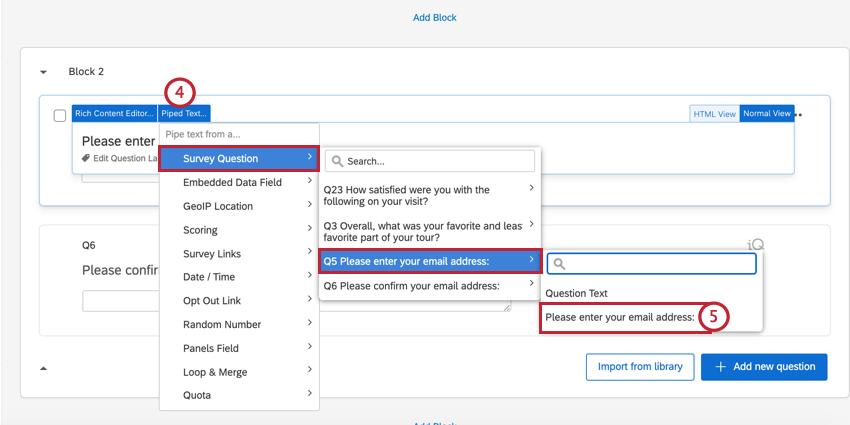 Qtip: Piped text code can only be generated in areas where the rich content editor is accessible. That does not mean, however, that it cannot be used in other locations. We’ll use this piped text to set up custom validation on our second text entry question.
 - Select the text field of the first text entry question.
- Copy the piped text code.

- On the second text entry question, select Custom for the validation type.
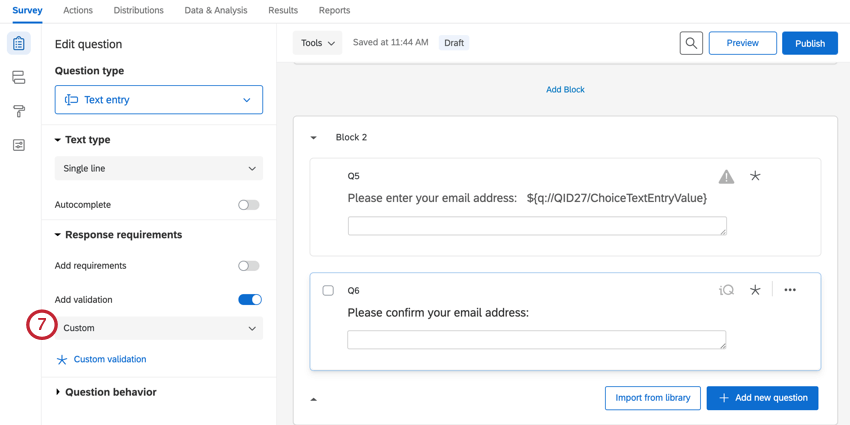
- Create a logic statement to require the second text entry field to equal the first text entry field. You will do this by selecting the text entry response from the second question and setting it equal to the piped text for the first question’s response.
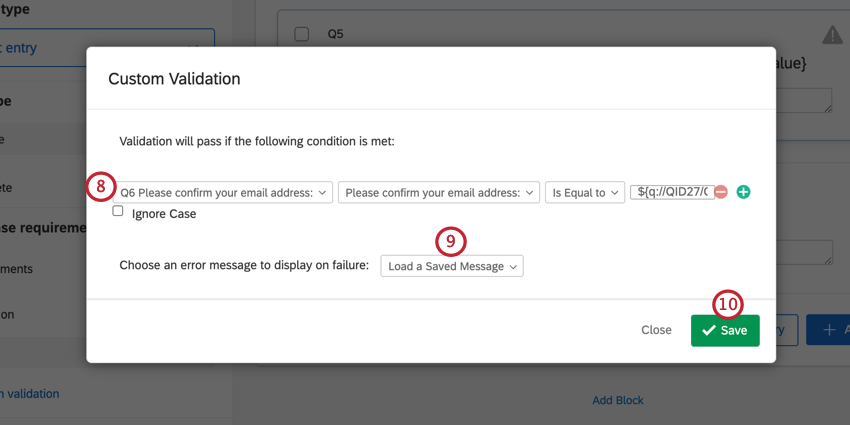
- Click Load a Saved Message and choose the message to show respondents if they fail the validation. See custom validation messages for more information.
- Click Save.
Response Requirements and Validation in Different Project Types
This feature is available in just about every type of project where you customize a survey. This includes: