
Configuring Conjoint Questions
What's on this page
About Configuring Conjoint Questions
Attention: You can only have 1 conjoint block per project.
Conjoint analysis is dependent on properly setting up the features and levels into coherent questions respondents can easily choose between. From this tool, you will also be defining exclusions, choosing the format of the conjoint questions’ presentation, and more.
Qtip: If you would like directions for editing the whole conjoint survey’s look and feel, its demographic questions, or anything not directly related to the features and levels of a conjoint, see the Building Additional Survey Content support page.
Attention: If you want to go to the next section, do not click Save – click the section’s name instead. If you are editing an existing conjoint, do not click Save unless you have made vital changes and want to reset your conjoint analysis, erasing all previous data! See Editing an Active Conjoint for more details.
Where Conjoint Questions are Configured
There are 2 different ways to get to the conjoint attributes and start editing them.
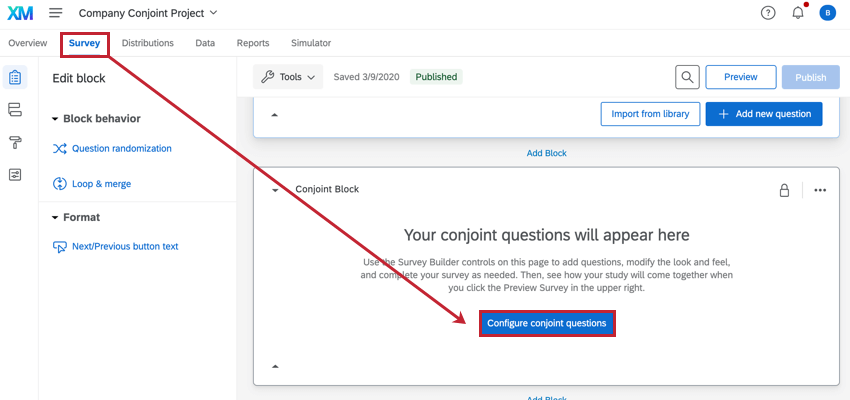
From the Survey tab, you can select Configure Conjoint Questions in the Conjoint Block.

On the Overview tab, you can click Define Features to get to this page.
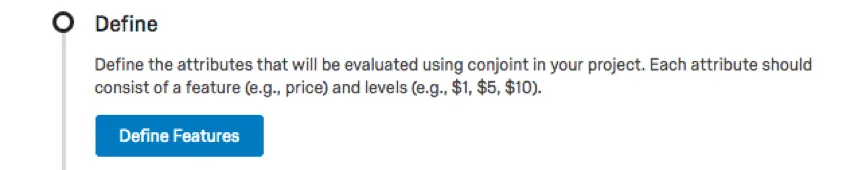
If you’ve already defined features, the button will change to a link that says Modify Features.

Features
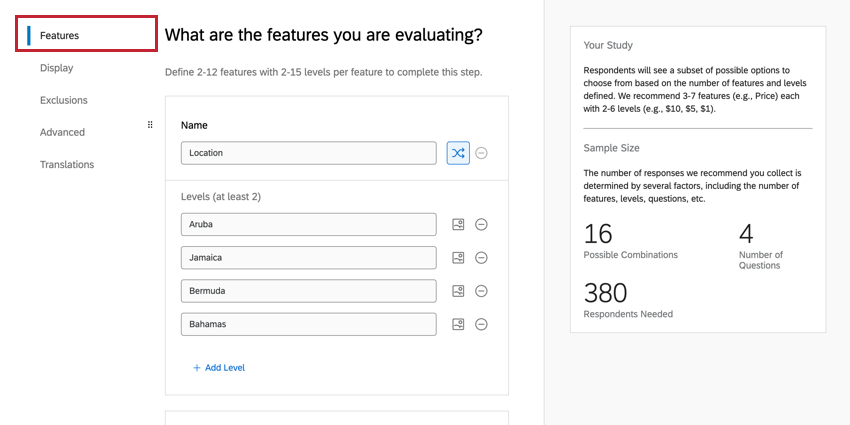
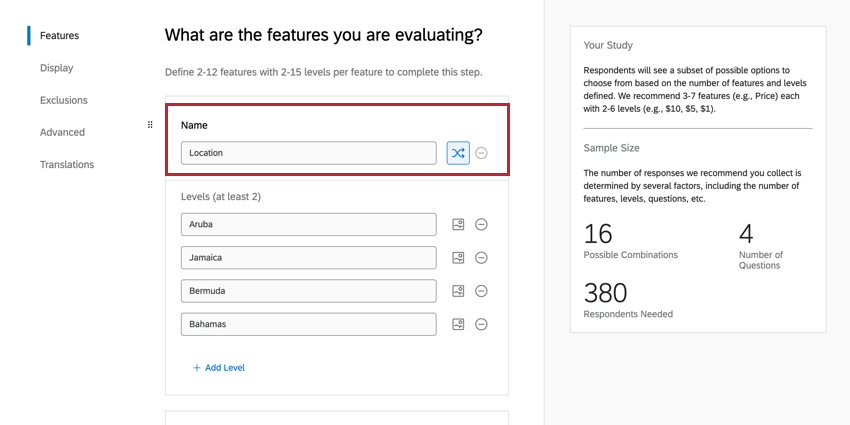
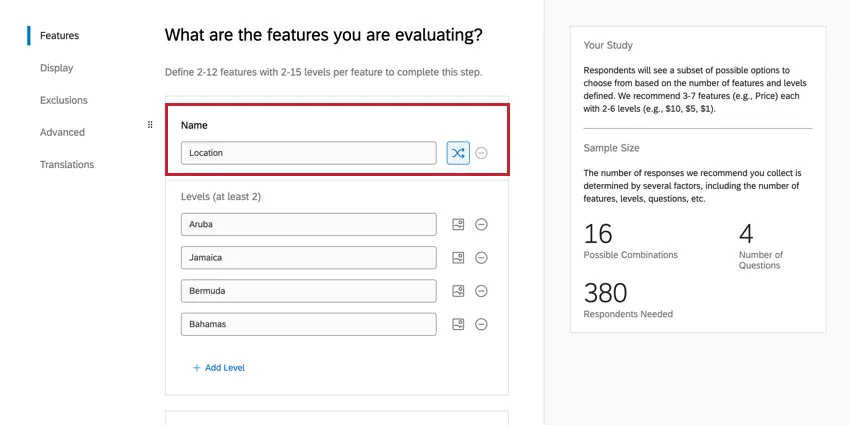
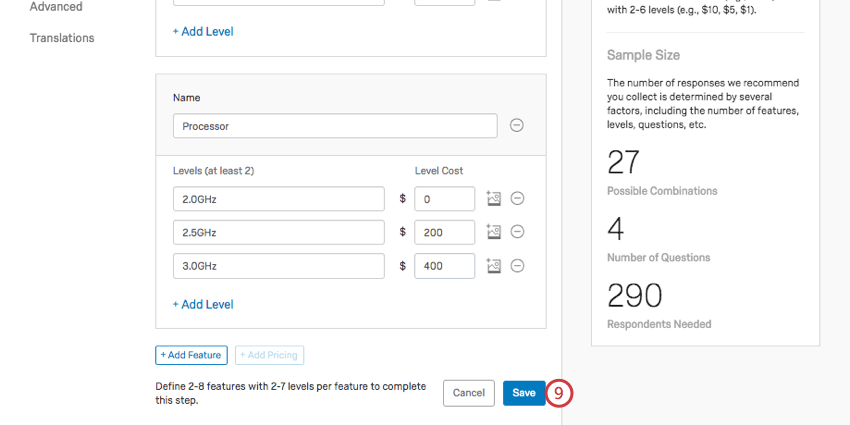
The first section you end up on is features. Here, you’ll define your features and their levels.
Qtip: If you see the message that “An error occurred, please try again” when defining your features, this means you need the Allow JavaScript user permission enabled. Contact your Brand Administrator to have this permission enabled.
Qtip: You can use HTML in the feature name and level fields to add links. While Qualtrics Support cannot provide support on custom coding, you can always consult our community of dedicated users.
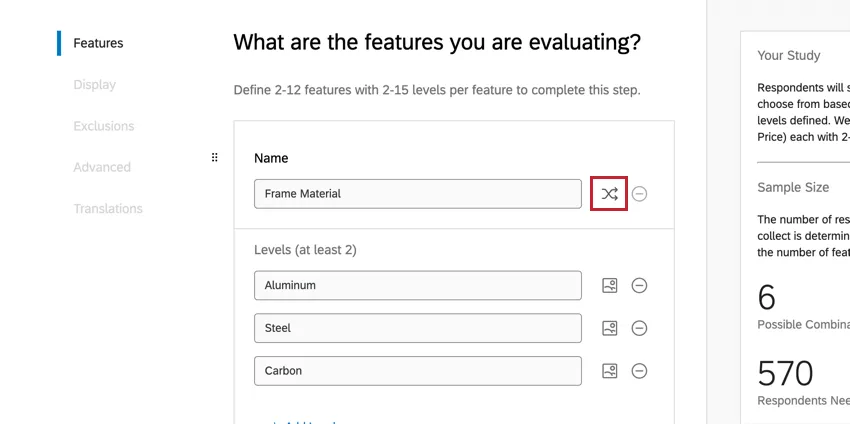
Features
Features are the broader categories of feature you are investigating for each product, package, or bundle. If you are looking to determine the best vacation to offer, features might include duration, location, and price.
Enter the feature in the feature name field.
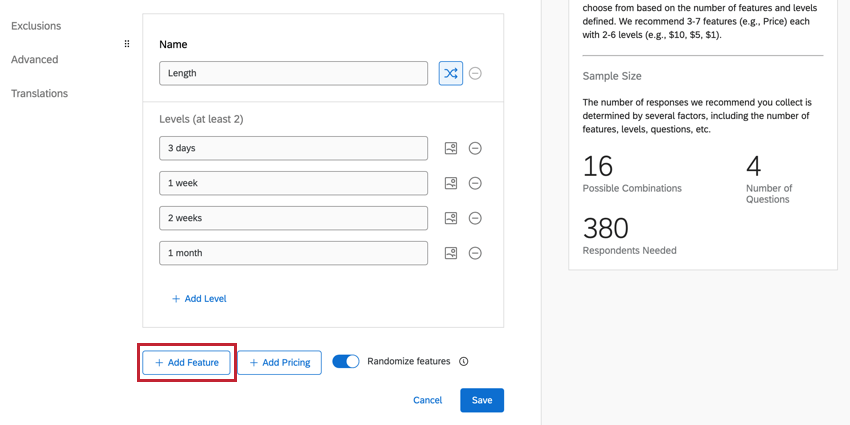
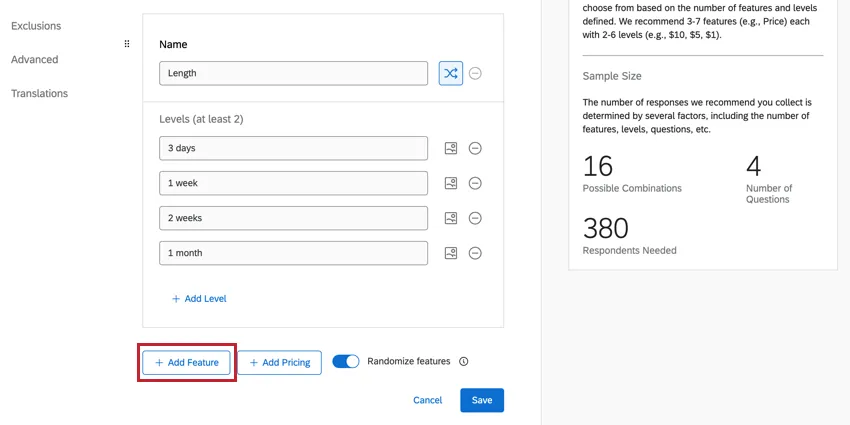
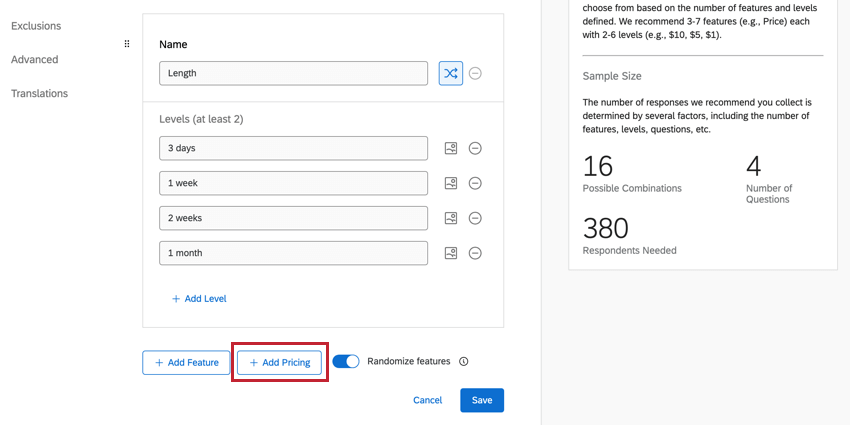
To add another feature, click Add Feature.
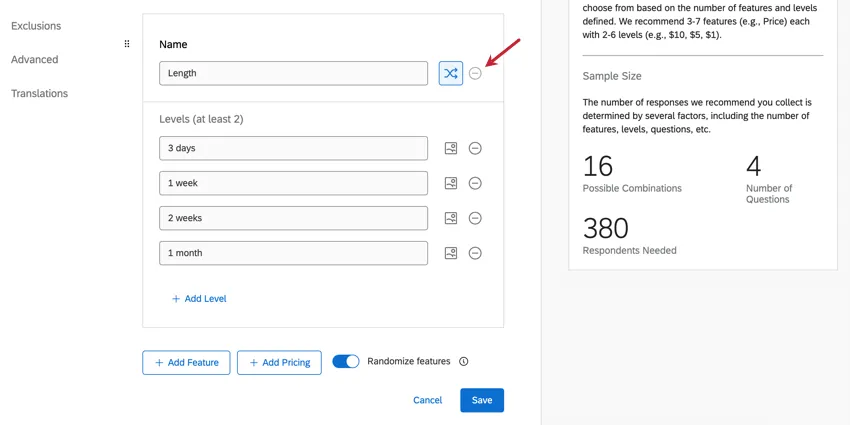
To remove a feature, click the minus sign ( – ) next to the feature’s name.
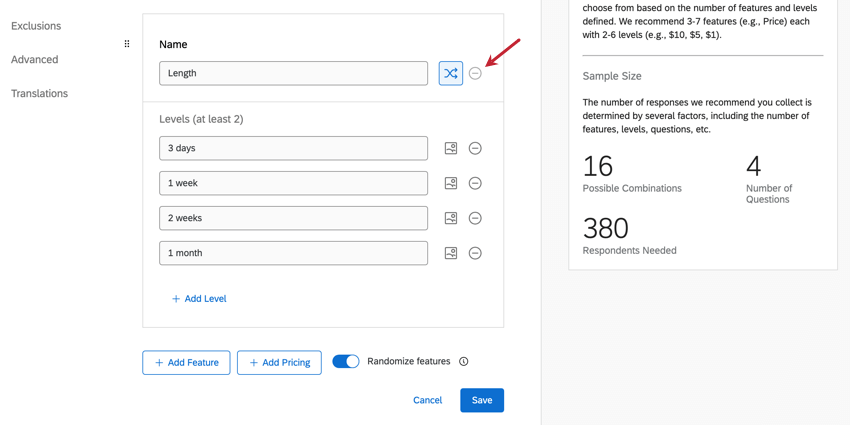
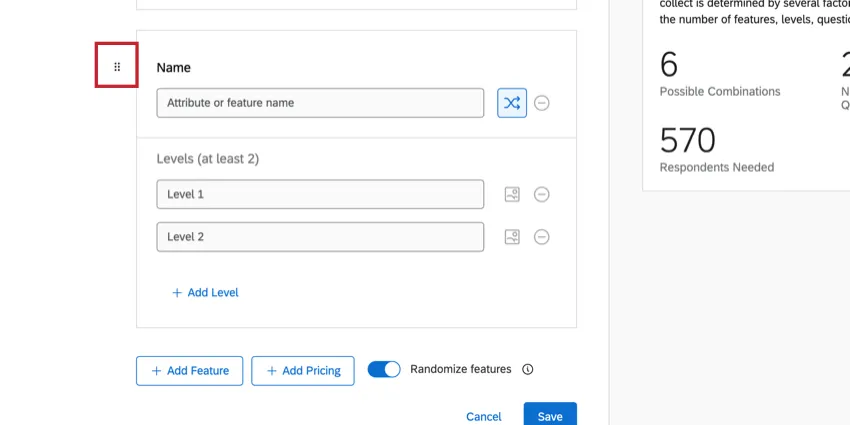
To move a feature, click the dots to the left of the feature name and drag it to a new location.
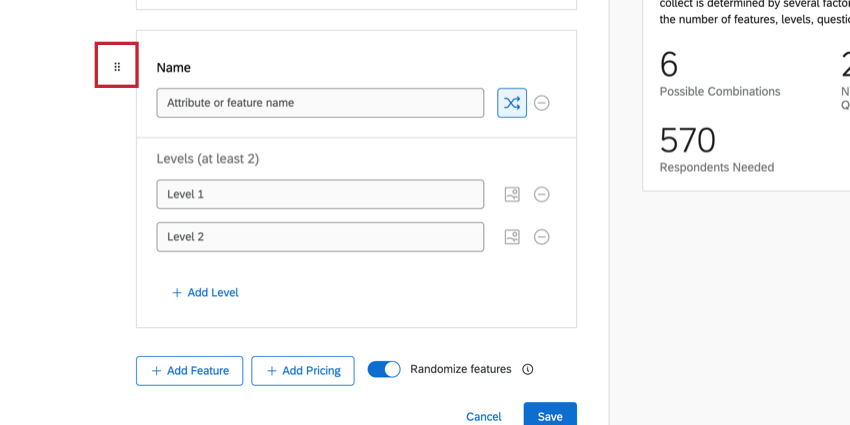
Qtip: Make sure if your feature is pricing options to use the Add Pricing button instead.
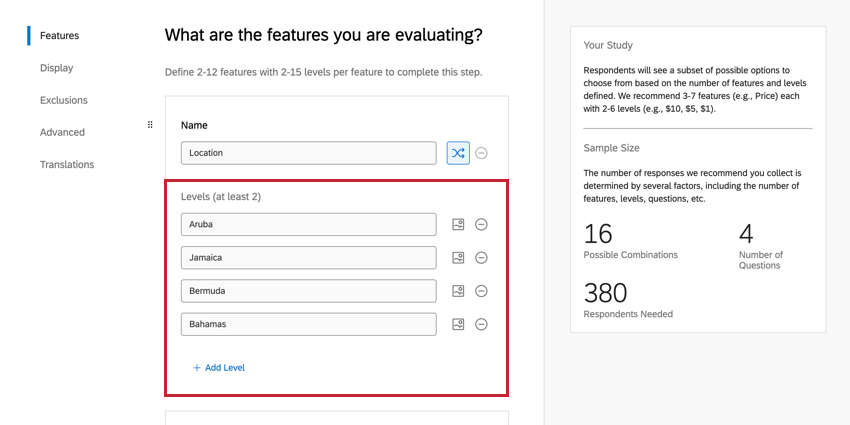
Levels
Once you define a feature, it’s time to add its levels! Levels are the different choices for each feature. If location is your feature, possible levels include Bermuda, Jamaica, and the Bahamas.
Enter the levels below the feature name.
Click Add Level to add another level, or click the minus sign ( – ) to remove a level.
Qtip: You should not have just 1 level. If a feature only has 1 option, there’s no need to include this feature in a conjoint analysis.
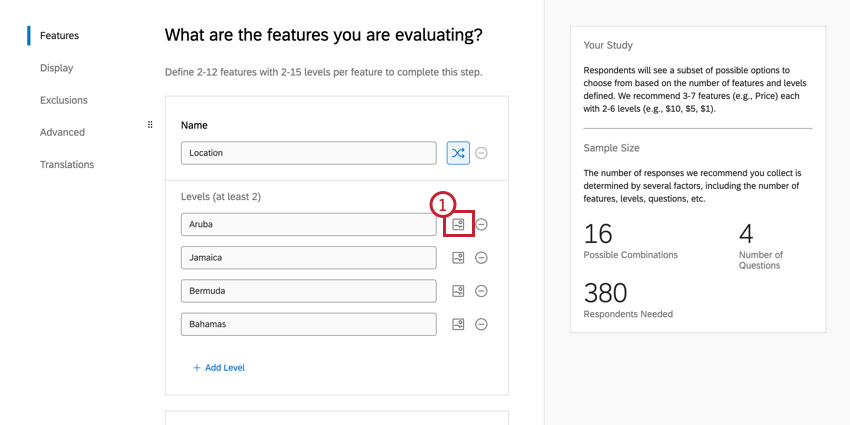
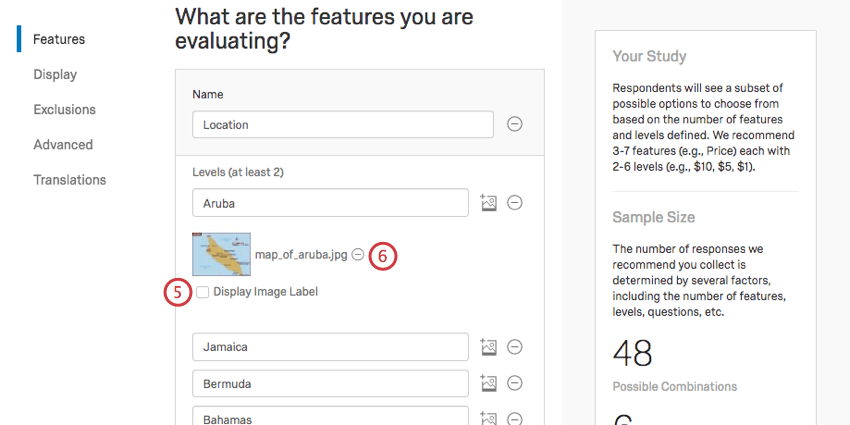
Adding Images to Levels
Adding images to your conjoint can help your respondents visualize the experience and make more accurate trade-offs. You can add images to individual levels to display what each option comprises. Note that these images will replace the text description of a level; e.g., you will no longer get “Aruba” as an option, but a map of Aruba, which you can display the file name for if the image is clearly named.
To show a specific image that represents a package as a whole, instead of just specific feature levels, see Package Images.
Qtip: The Save button will take you out of this page back to the Overview. Do not click save unless you are ready to finish editing your attributes. Instead, click a section on the left to proceed to the next section.
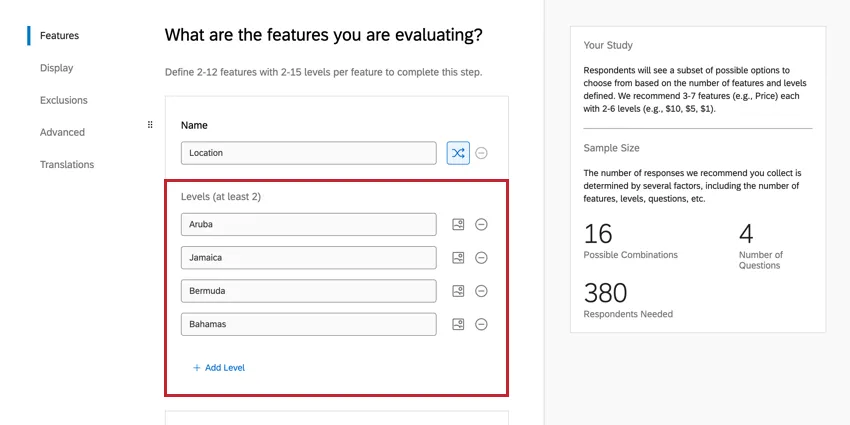
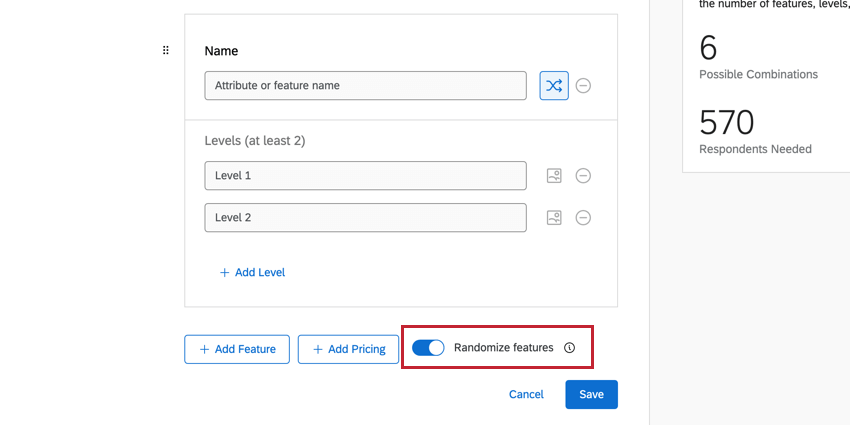
Randomize Features
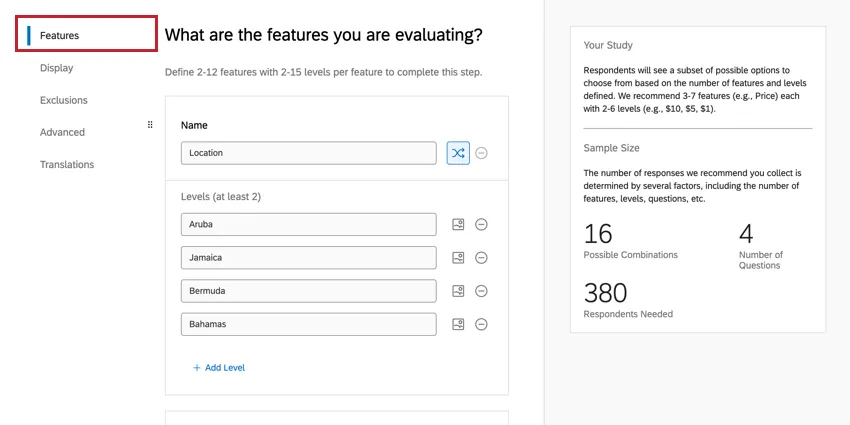
Randomization is an important research technique used to help overcome the bias that can result from the order items are presented in. The position that features are shown in the survey is randomized for each respondent by default.
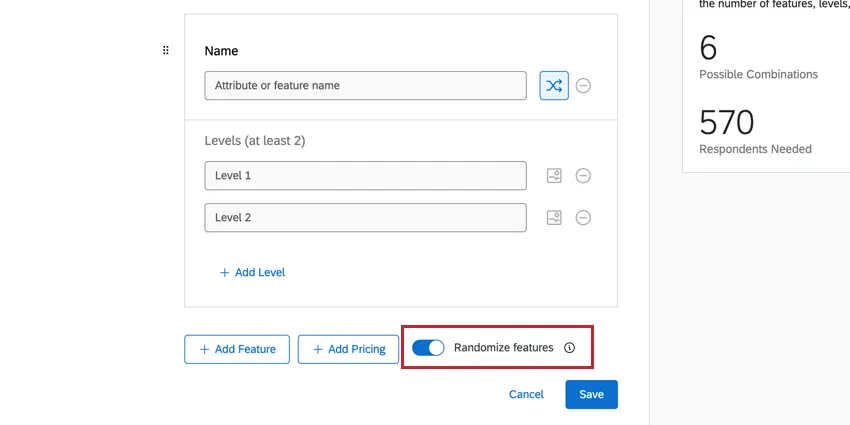
To disable randomization for the entire conjoint, click the Randomize Features switch to turn it off.
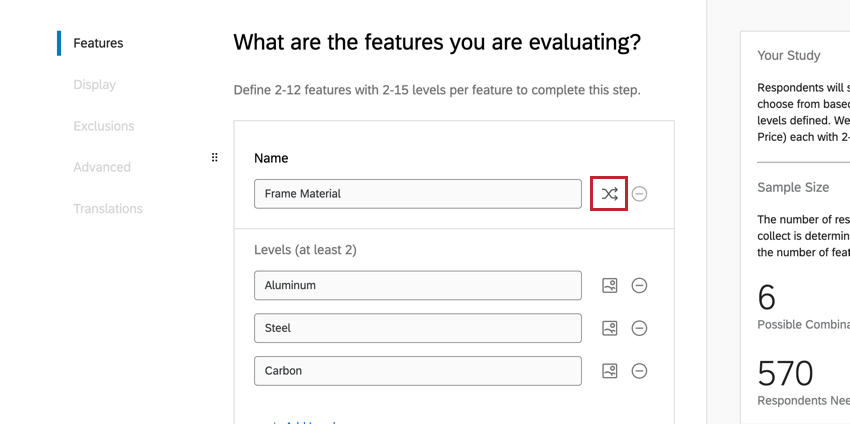
To disable randomization for 1 feature, click the randomization icon to the right of the feature name. When you disable randomization, the feature will be shown in the order in which it is configured.
Example: You may want 1 specific feature to always be shown to respondents first. To accomplish this, move the feature to the top of your features list then turn off randomization for that feature. This way, all participants taking the conjoint will see that feature first, while the rest of the features will be randomized.
Add Pricing
If Price is one of the features you’d like to investigate with your conjoint, we do not recommend using the Add Feature button. Instead, you should use the Add Pricing option. This allows you to set a currency symbol, and to calculate Willingness to Pay as you collect responses.
Qtip: This feature is not the same as Conditional Pricing. While conditional pricing lets you set different prices for different attributes (e.g., charging more for a larger size or more expensive material), Add Pricing makes your respondents choose between flat prices randomized amongst your packages just like any other feature.
Add Pricing is helpful if you want to see the trade-offs respondents will make against different price offerings, and gauge the importance of price compared to other features of your package.
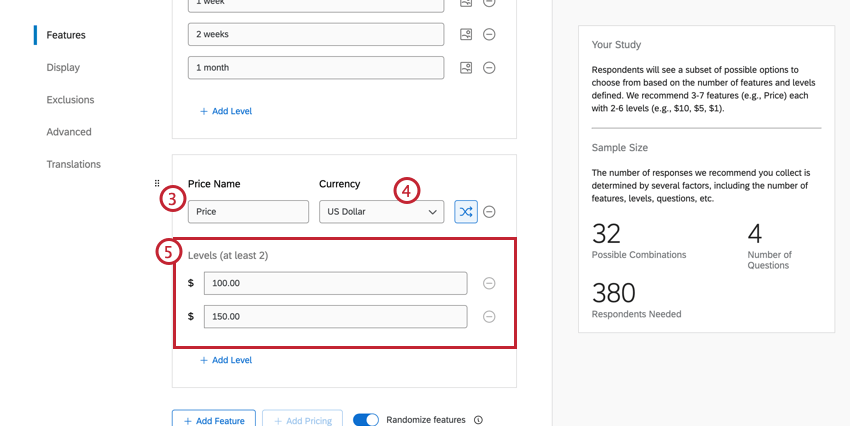
Qtip: Changing the currency will reformat or round up the number based on whether that currency allows decimals or not. Note that changing the currency does not do a price conversion, but just a format conversion; for example, 100.00 USD will become 100 Yen, when 100 USD is actually equal to 10831 Yen.
Qtip: If running a pricing study, we recommend you include a none or dual choice option in your project.
Qtip: If you use the price feature in your project, you will have access to the Demand Estimation, Revenue Projection, and Profit Projection reports. See the linked pages for more information about the project requirements for each graph.
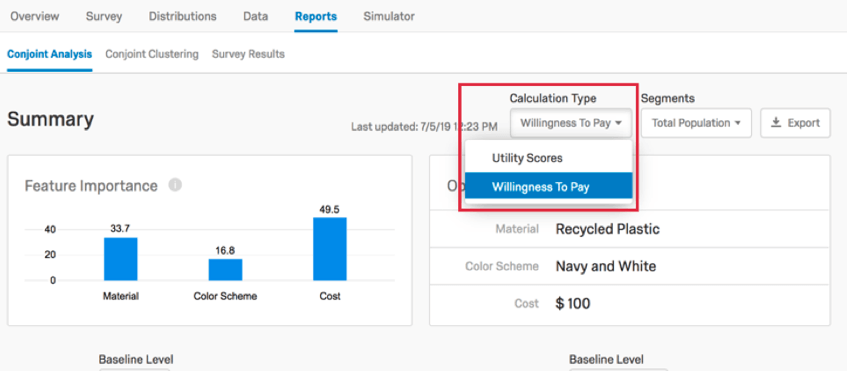
Reporting on Willingness to Pay
Once you’ve collected enough responses for your Simulator and Report to show results, you will be able to switch your Calculation Type to Willingness to Pay.

Feature Importance and Optimal Package are calculated the same for Willingness to Pay. But while the Relative Utility Value and Average Level Utility options disappear, Willingness to Pay adds new reports.
See Willingness to Pay to learn more about how this option affects simulators, and see Price Difference for more on how this option affects reports.
Package Images
Qtip: This tab is only available within Conjoint Dynamic Images projects.
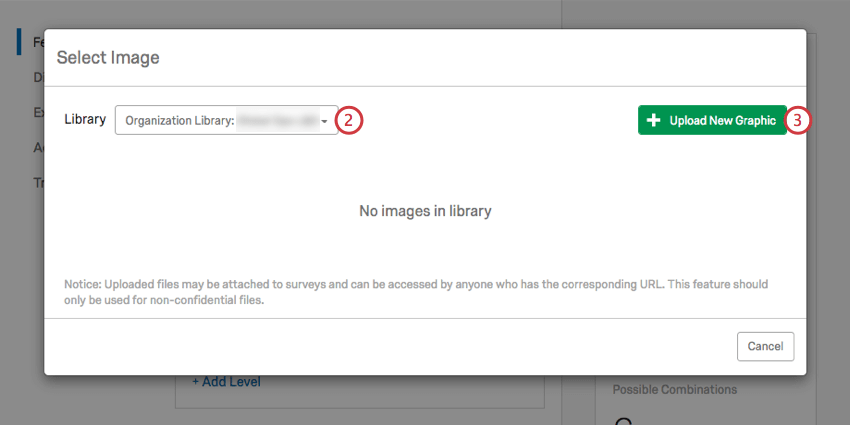
After you have defined the features of your Conjoint, you can upload images to associate with each feature within the Package images tab.
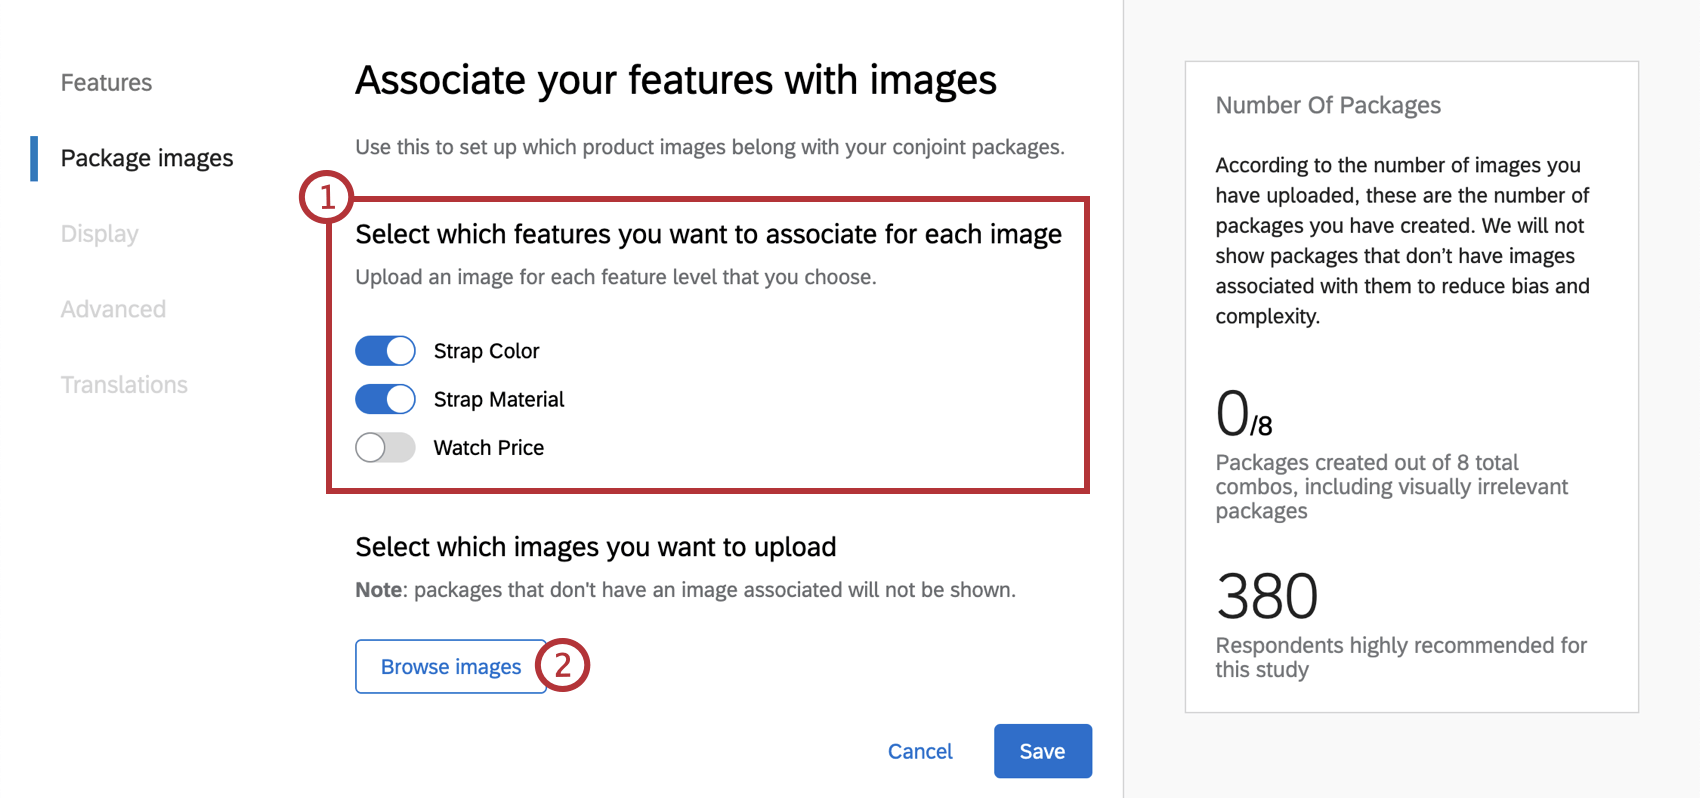
Example: When creating a conjoint dynamic images project for watches, you may want to upload images that showcase different band colors and materials. You are also interested in comparing different prices, but since price is a non-visible attribute, it doesn’t make sense to associate it with any of your images.
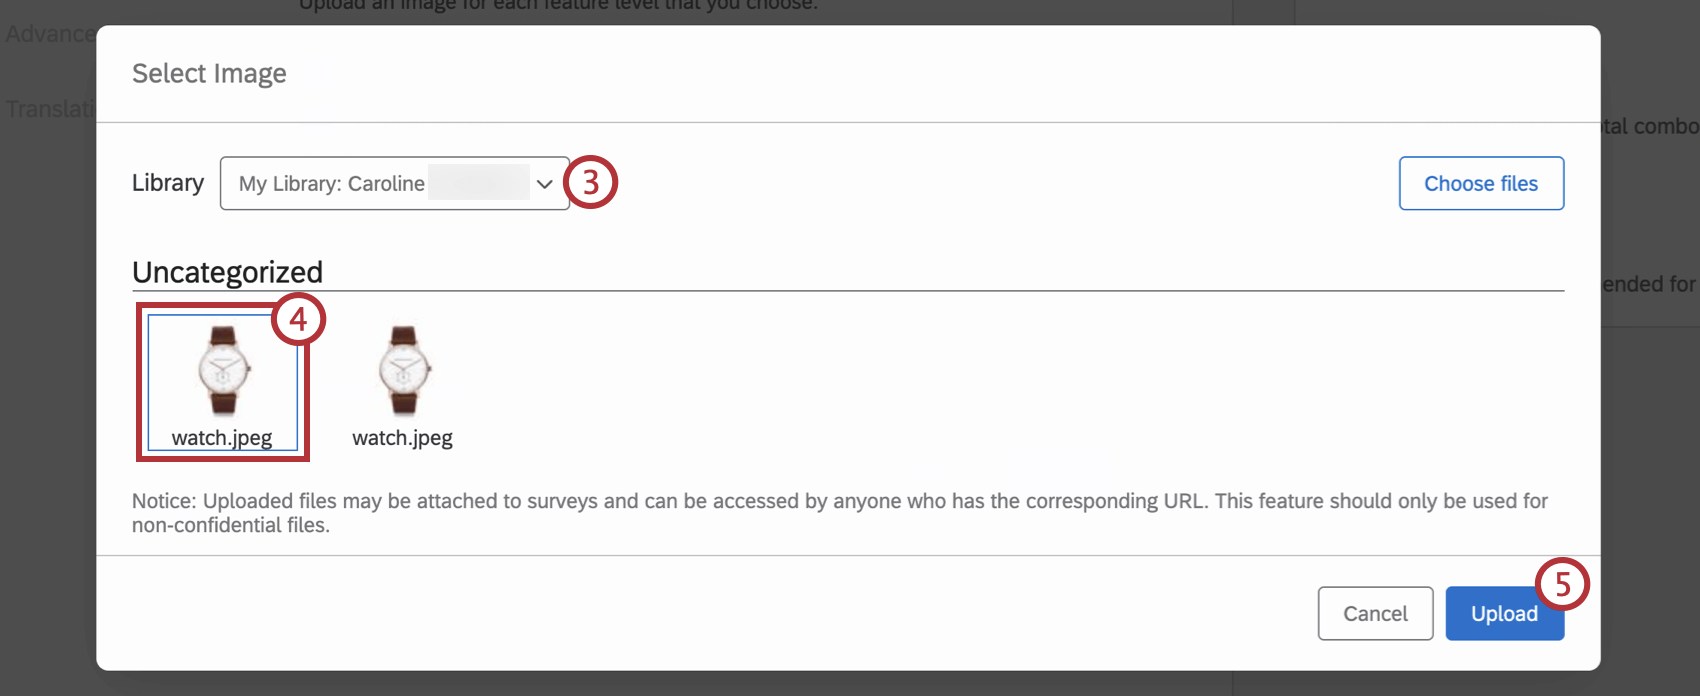
Qtip: Alternatively, you can click Choose files to upload an image directly from your computer.
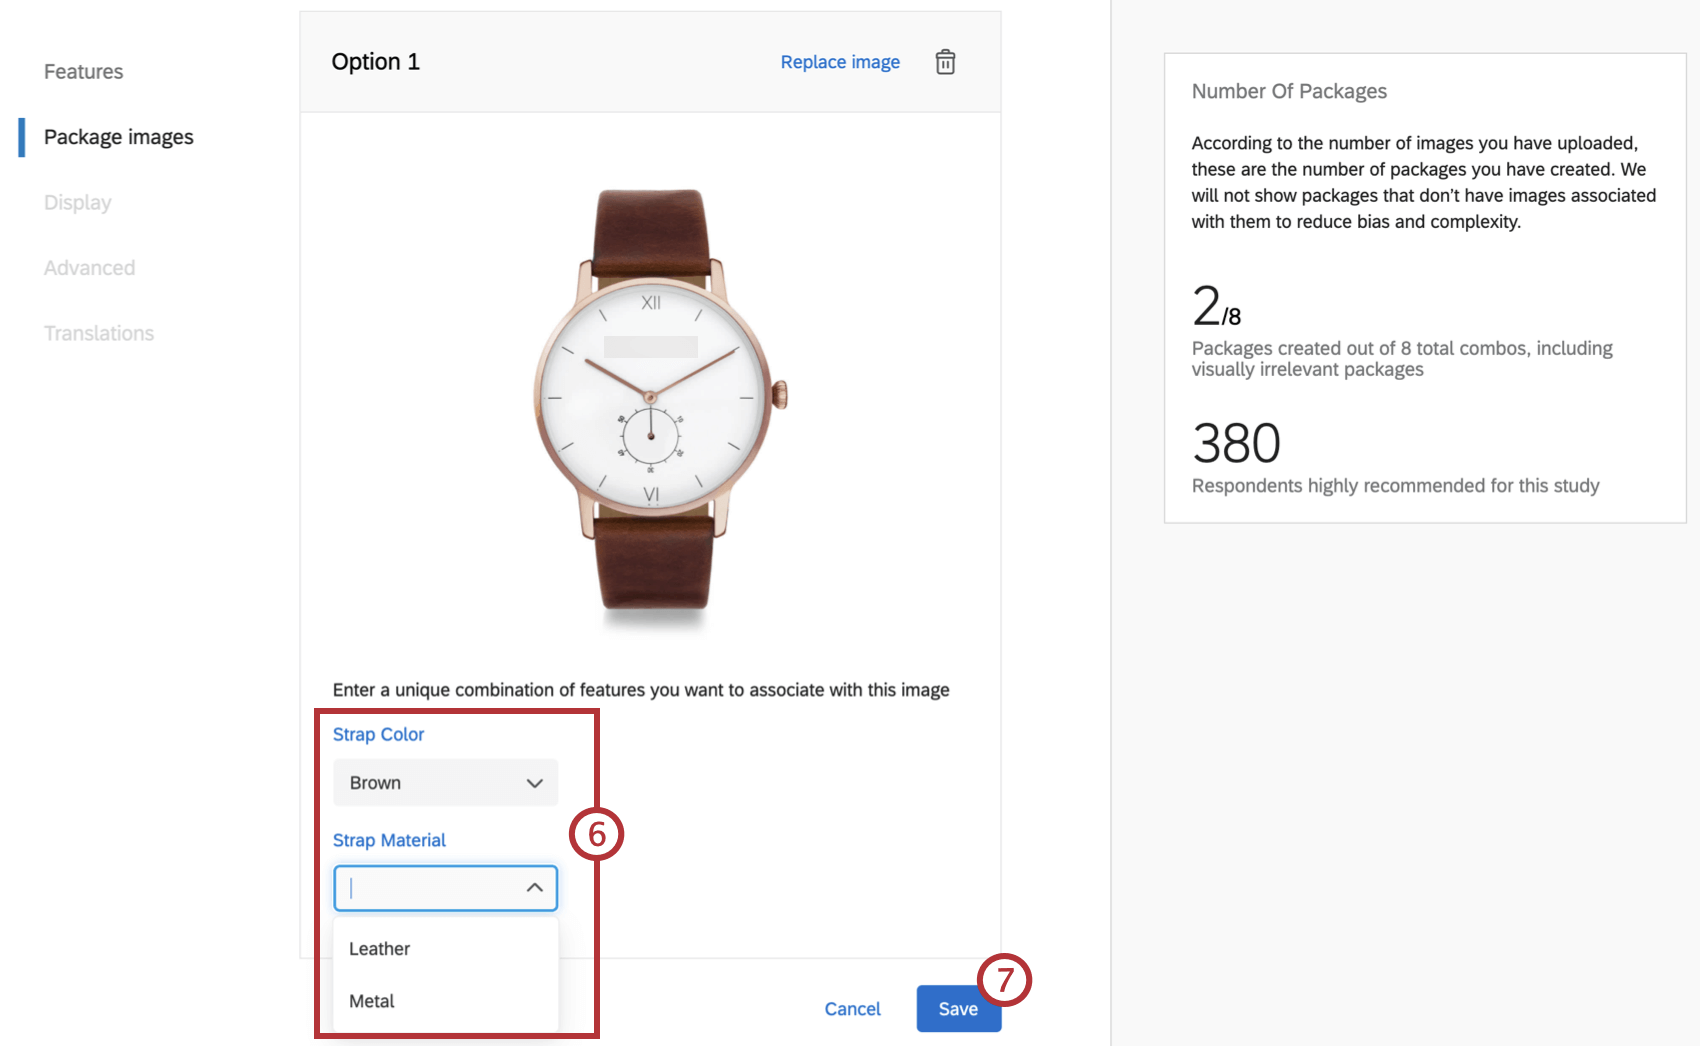
Attention: Make sure each combination of features you select has not already been associated with another image in the project.
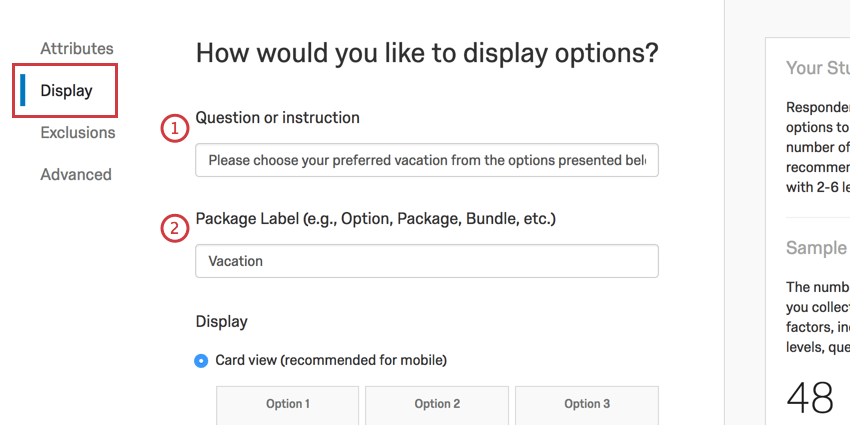
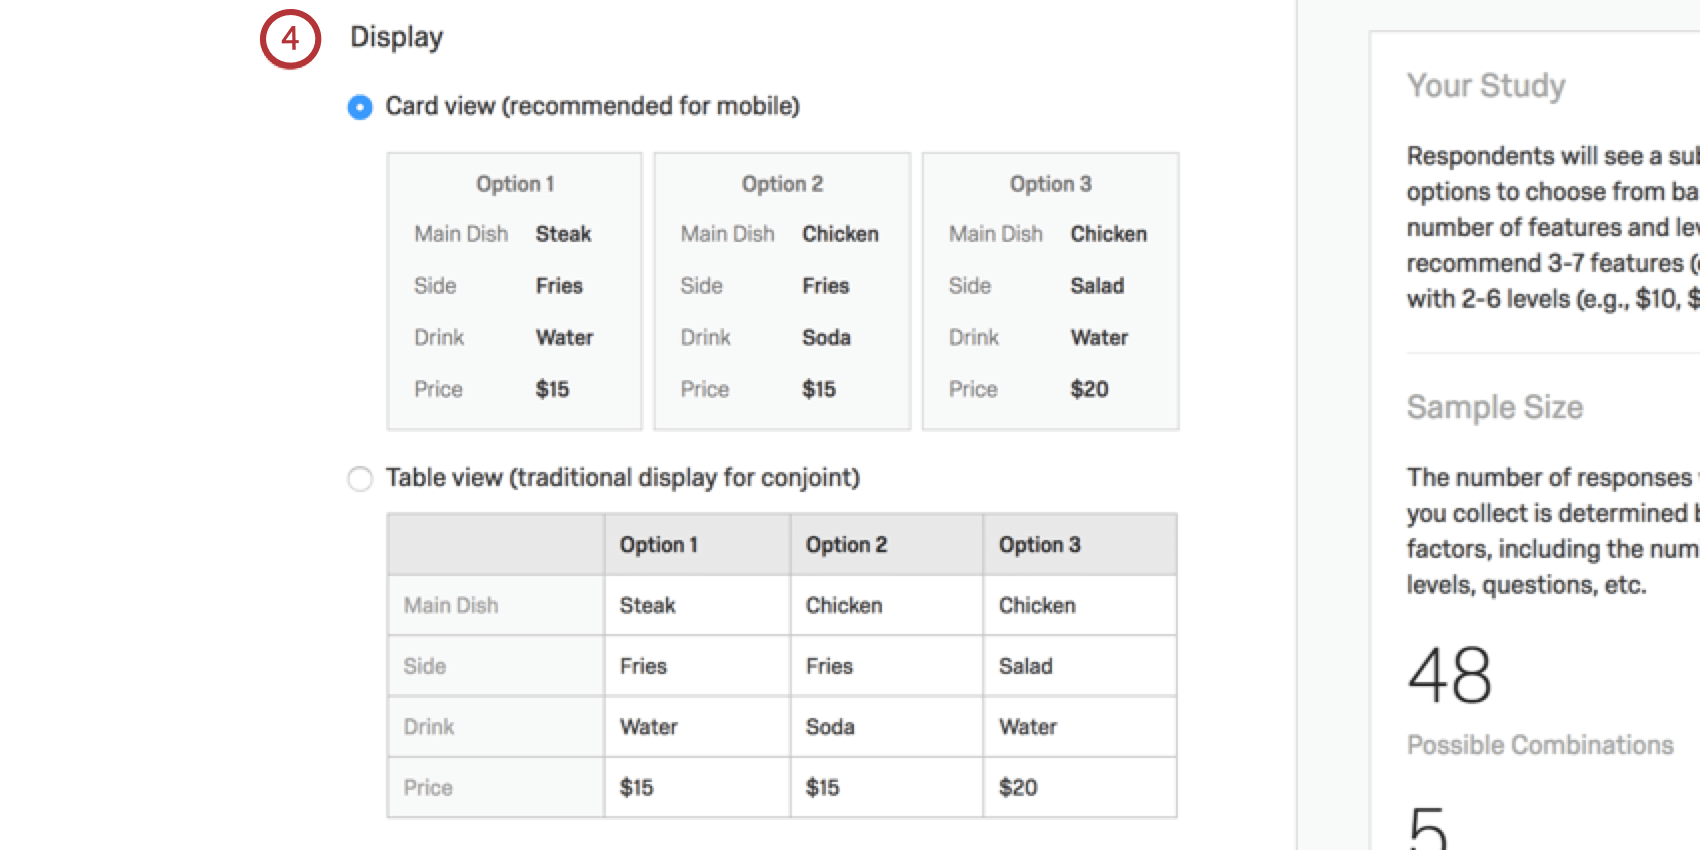
Display
The Display section contains options for how conjoint questions are presented to respondents.
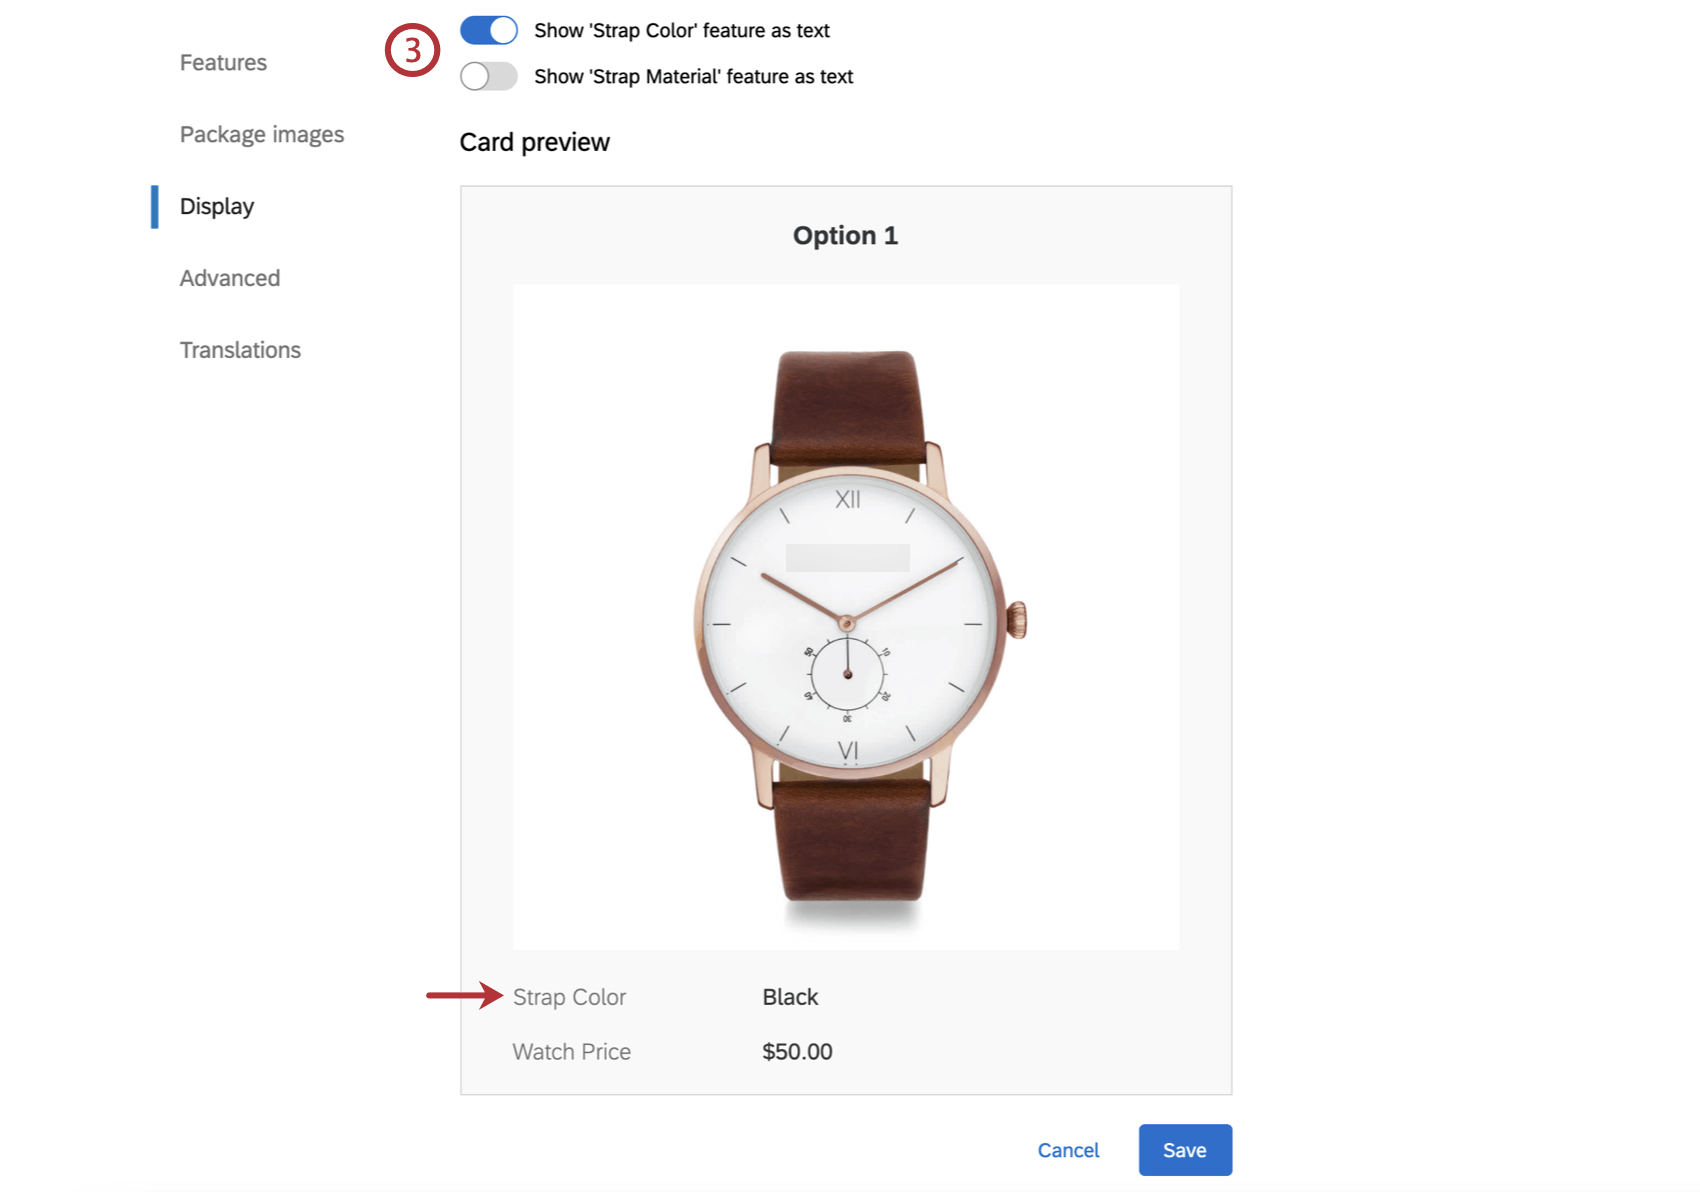
Qtip: This option is only available within Conjoint Dynamic Images projects.
Exclusions
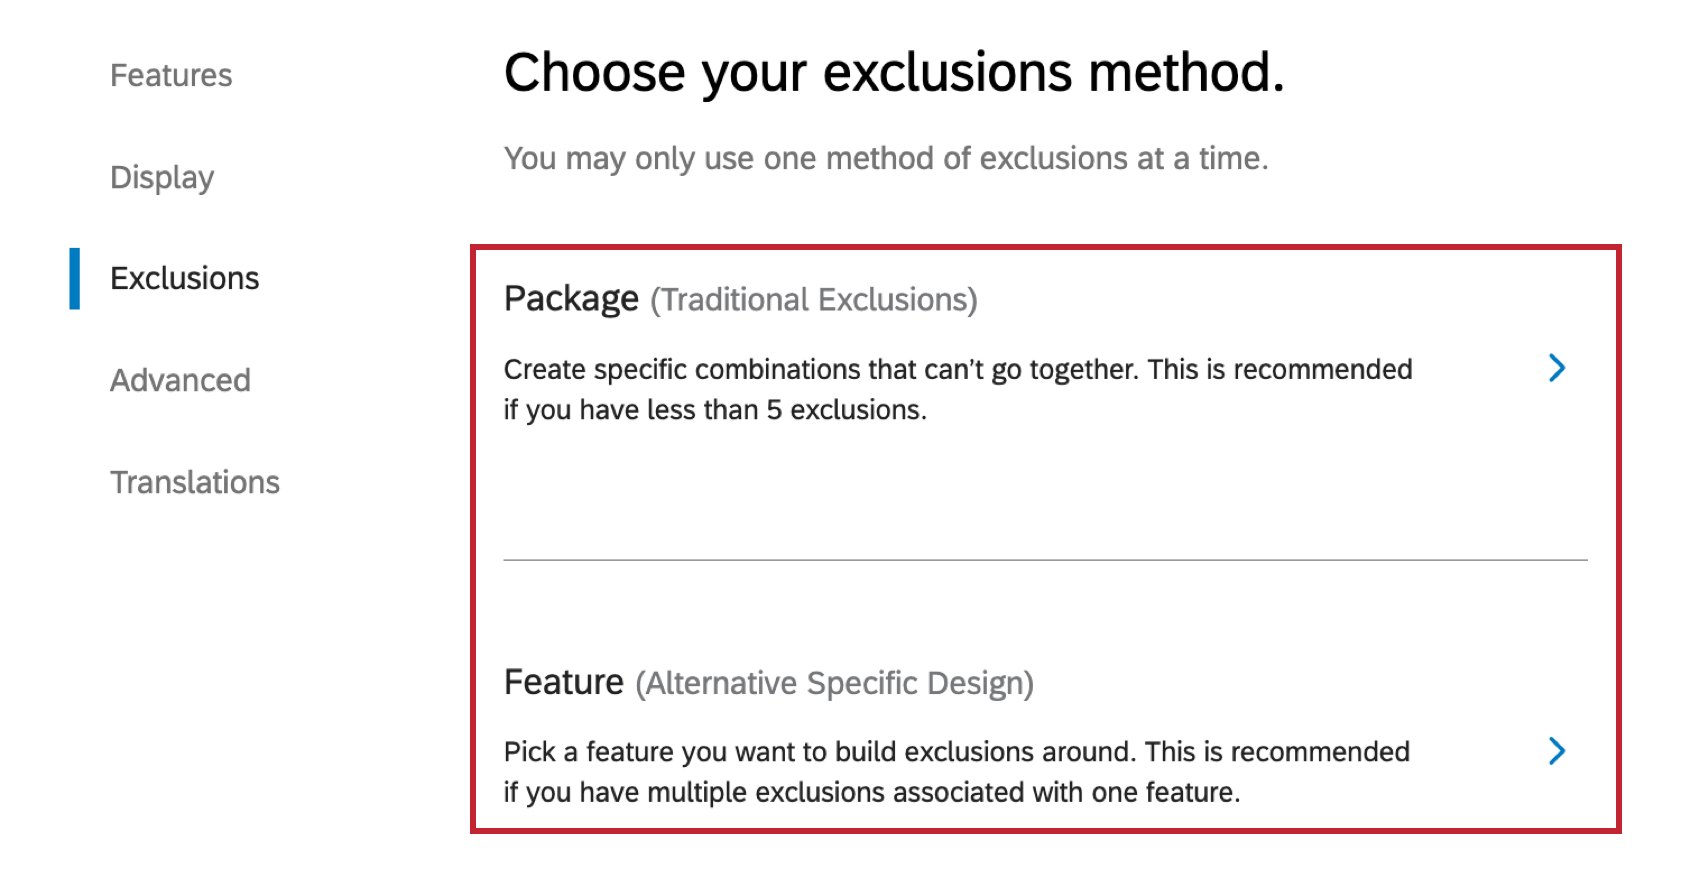
Exclusions are combinations of attributes that cannot be presented in packages together. For example, certain vacation locations may have different prices, and some resorts may not be able to promise the same duration of stay. You have 2 options for creating exclusions: Package (Traditional Exclusions), and Feature (Alternative Specific Design).
Qtip: To learn more about each exclusion type, read the subsections below.
You can only use 1 type of exclusion at a time. Select the type of exclusion you want to use to turn it on.

Qtip: The conjoint will keep your old exclusions if you switch between types until you save the whole conjoint configuration. Remember that saving edits to an active conjoint will overwrite any data you’ve saved.
Package
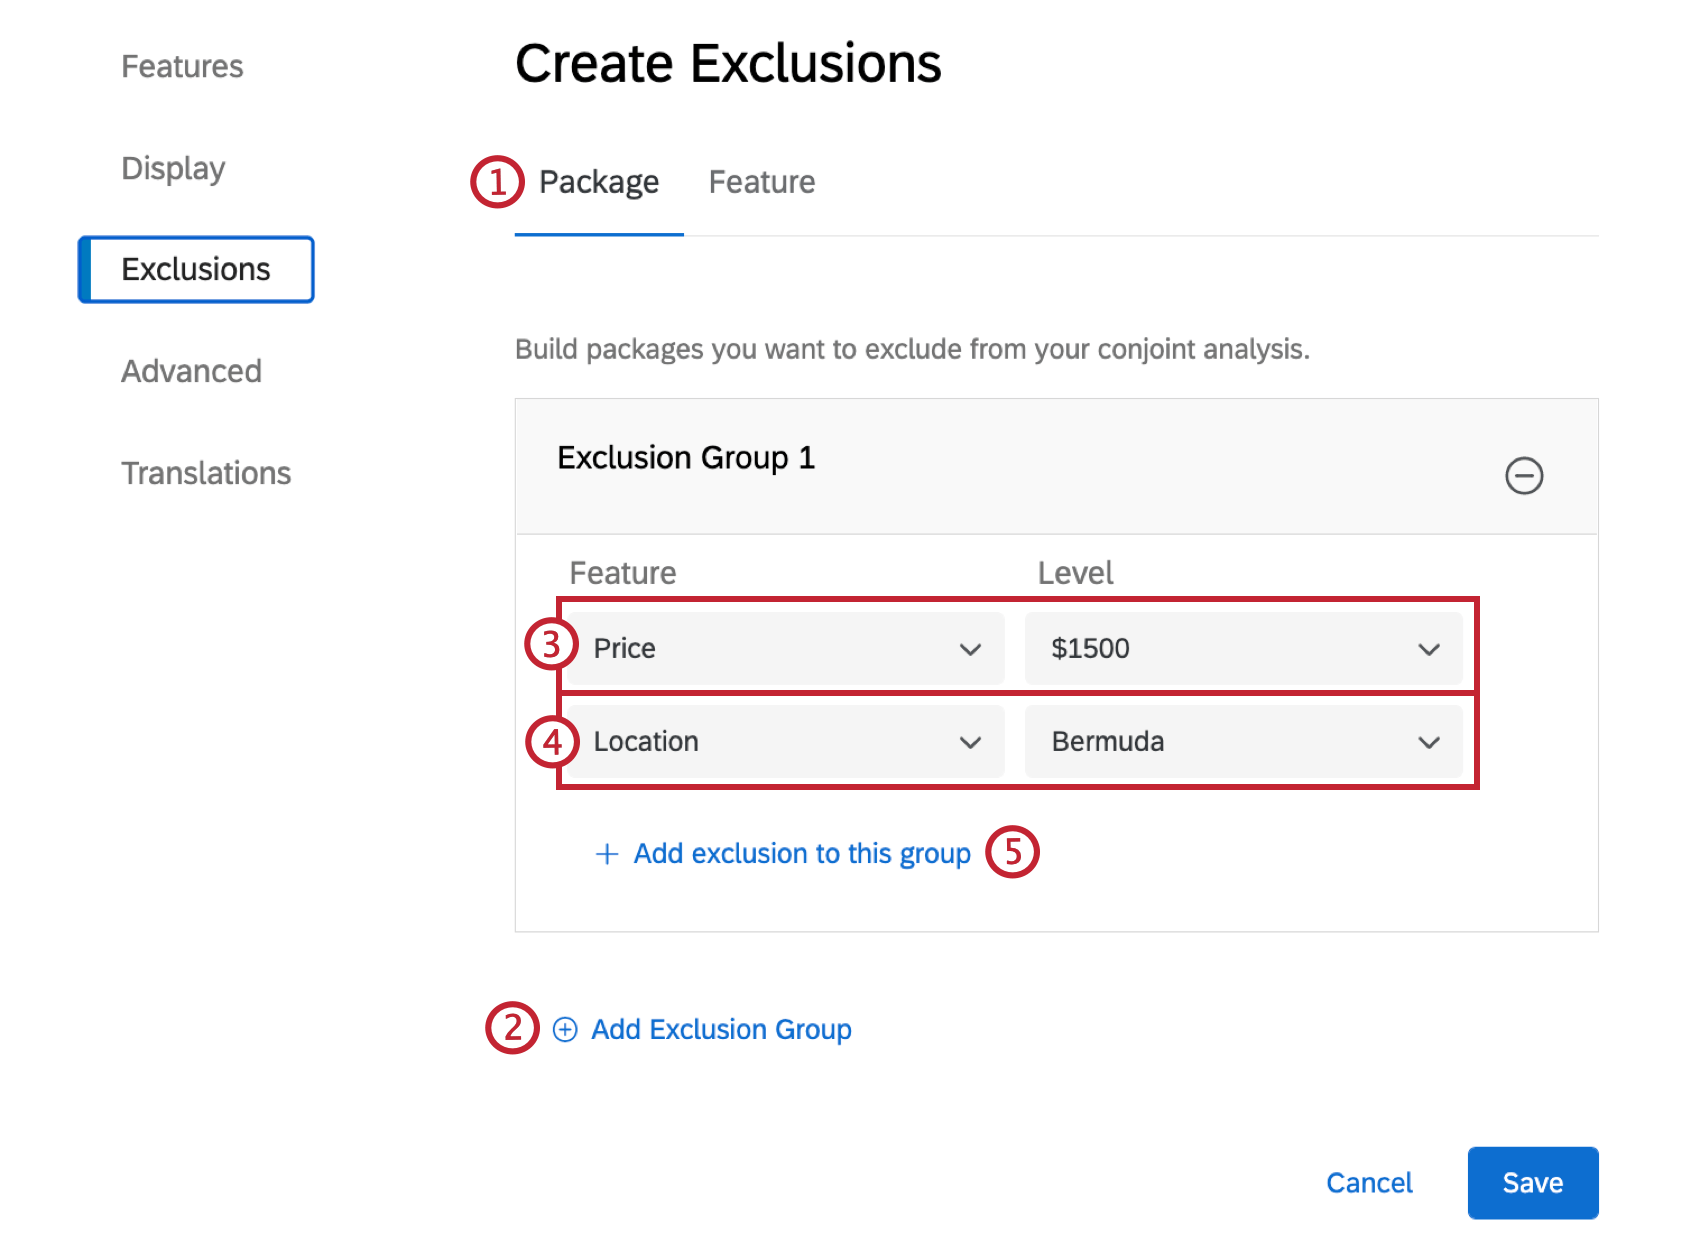
Package exclusions allow you to select specific package combinations that cannot go together. This is the best option if you don’t have many exclusions, if your exclusions don’t follow a pattern related to 1 primary attribute, or if you need to get deeply specific about packages where more than 2 feature’s level can’t be combined.
Qtip: You may have up to 10 exclusion groups in 1 conjoint project.
Example: Maybe $1500 is a price available for the Bahamas and the Jamaica vacation, but is too little to afford Bermuda. You could indicate that Price $1500 and Location Bermuda can never occur together as an option.
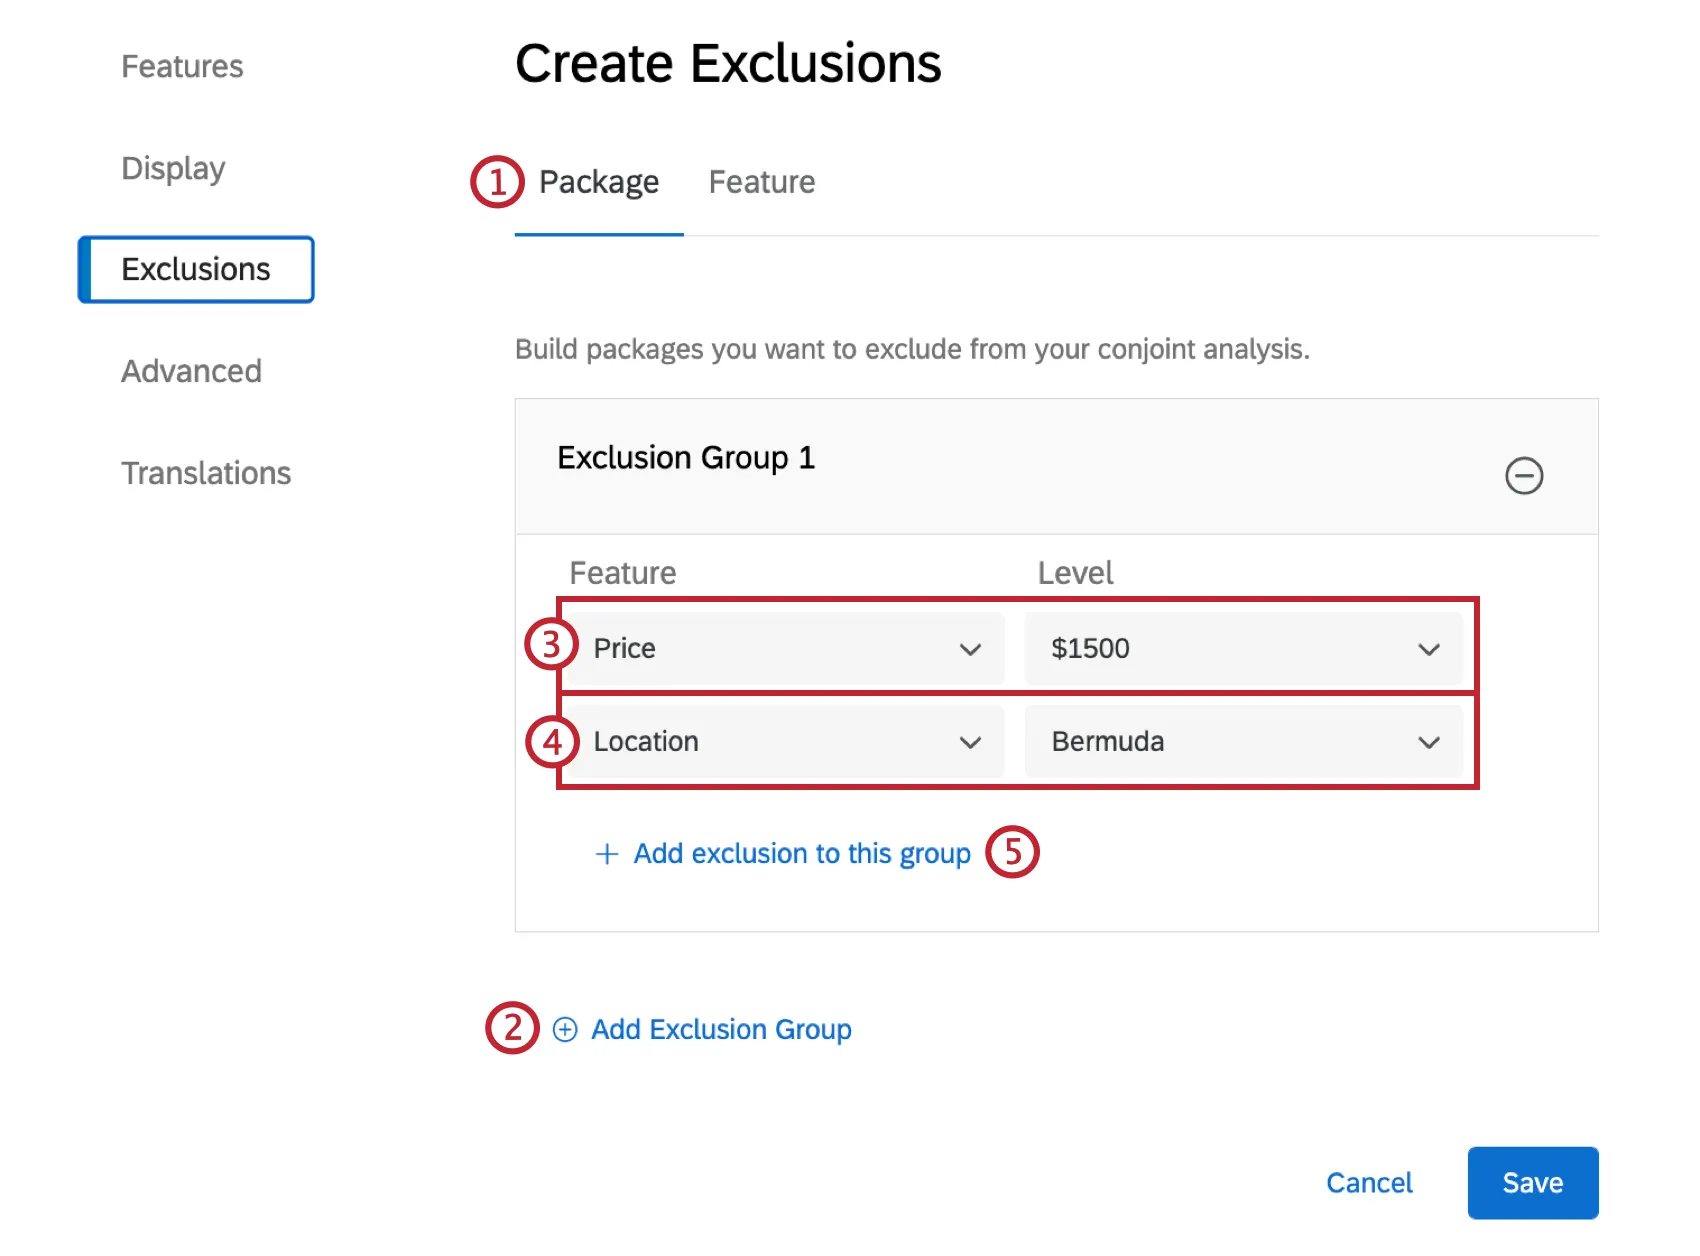
Qtip: If you need to enter a new, separate exclusion, click Add Exclusion Group instead.
Feature
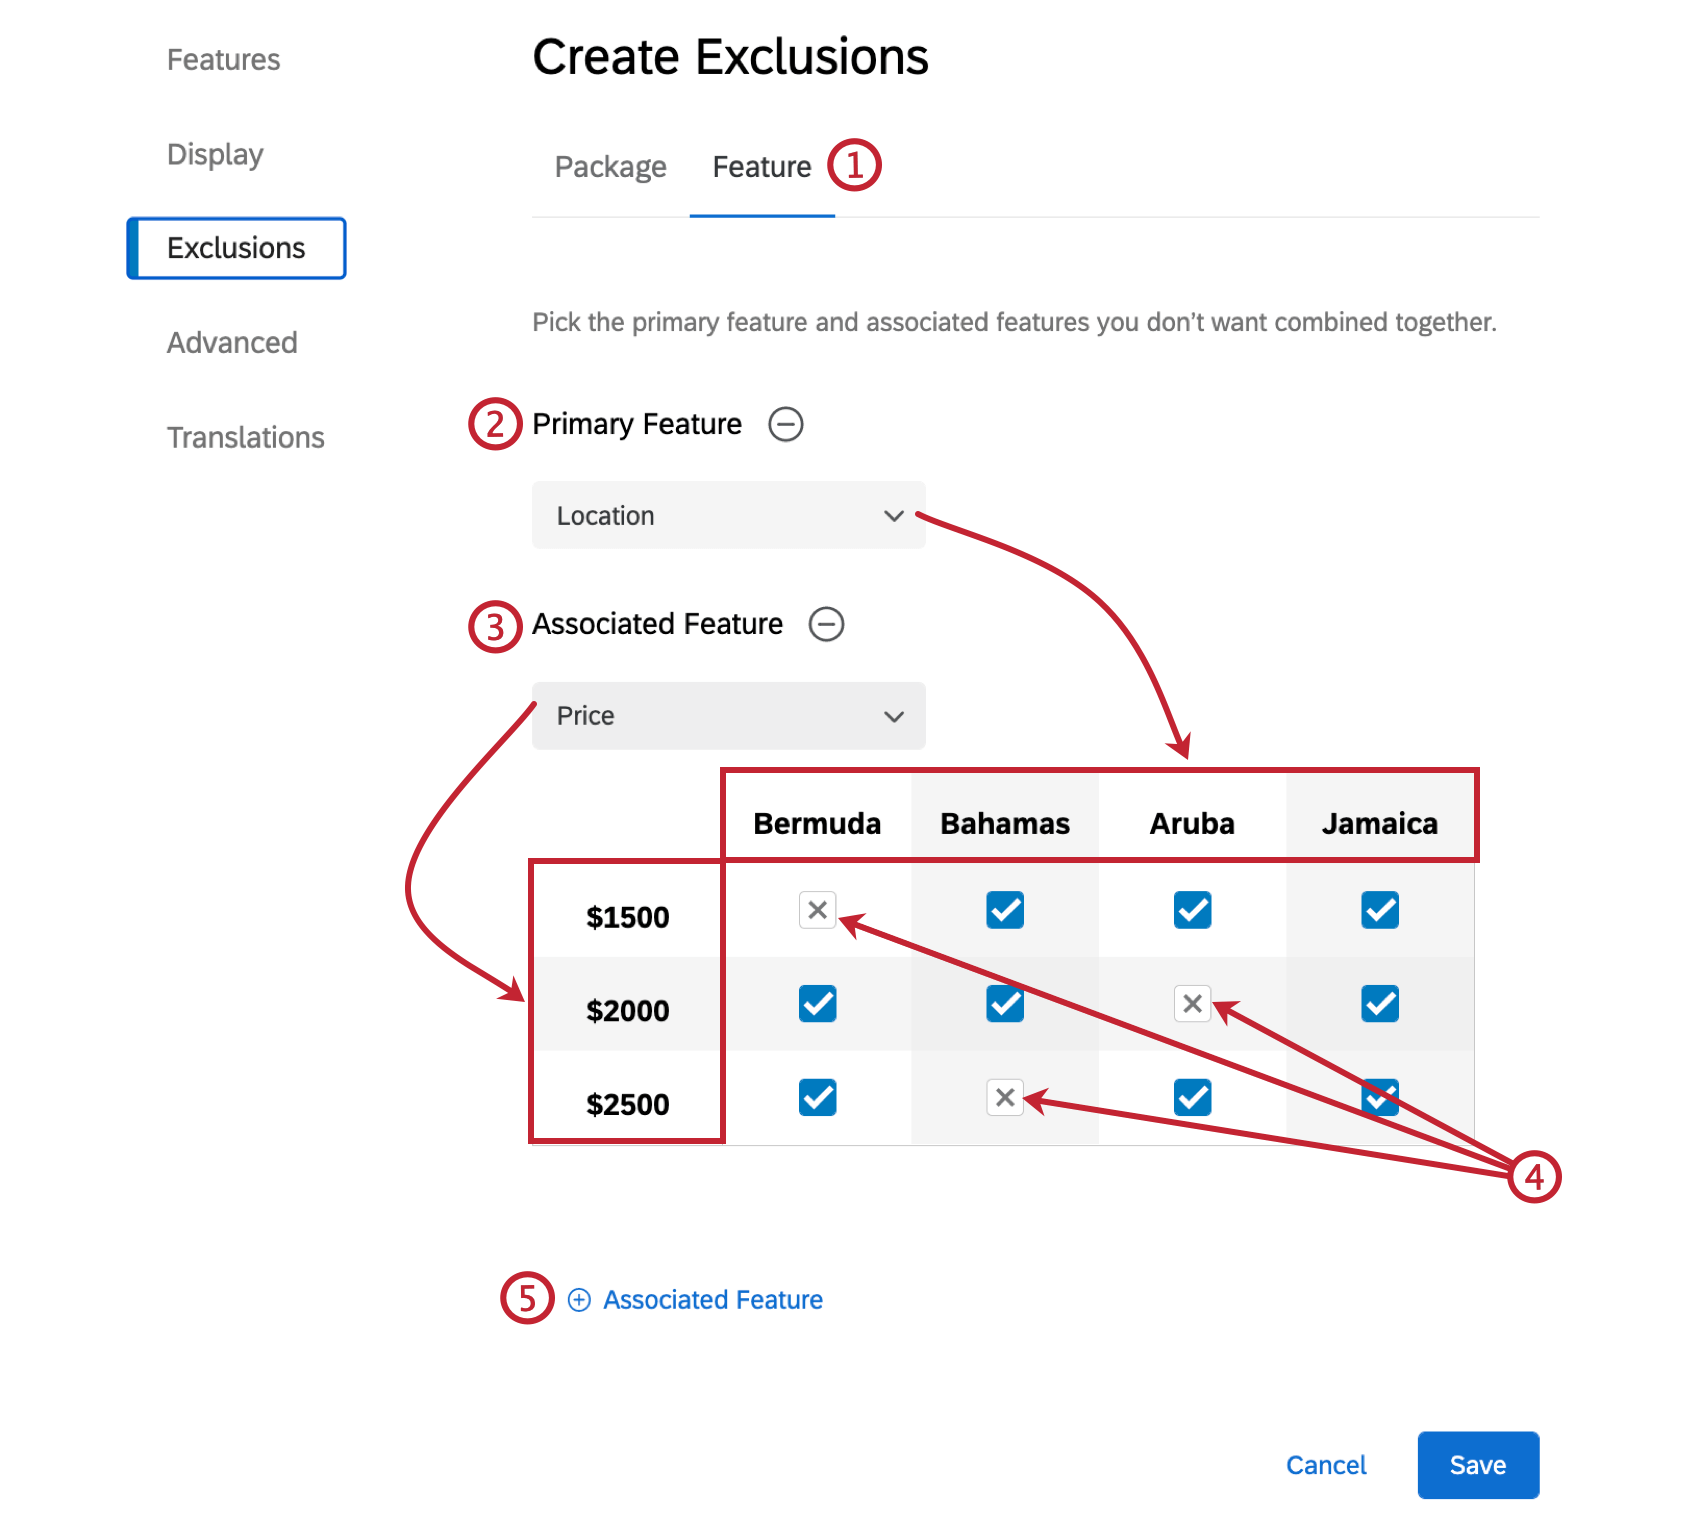
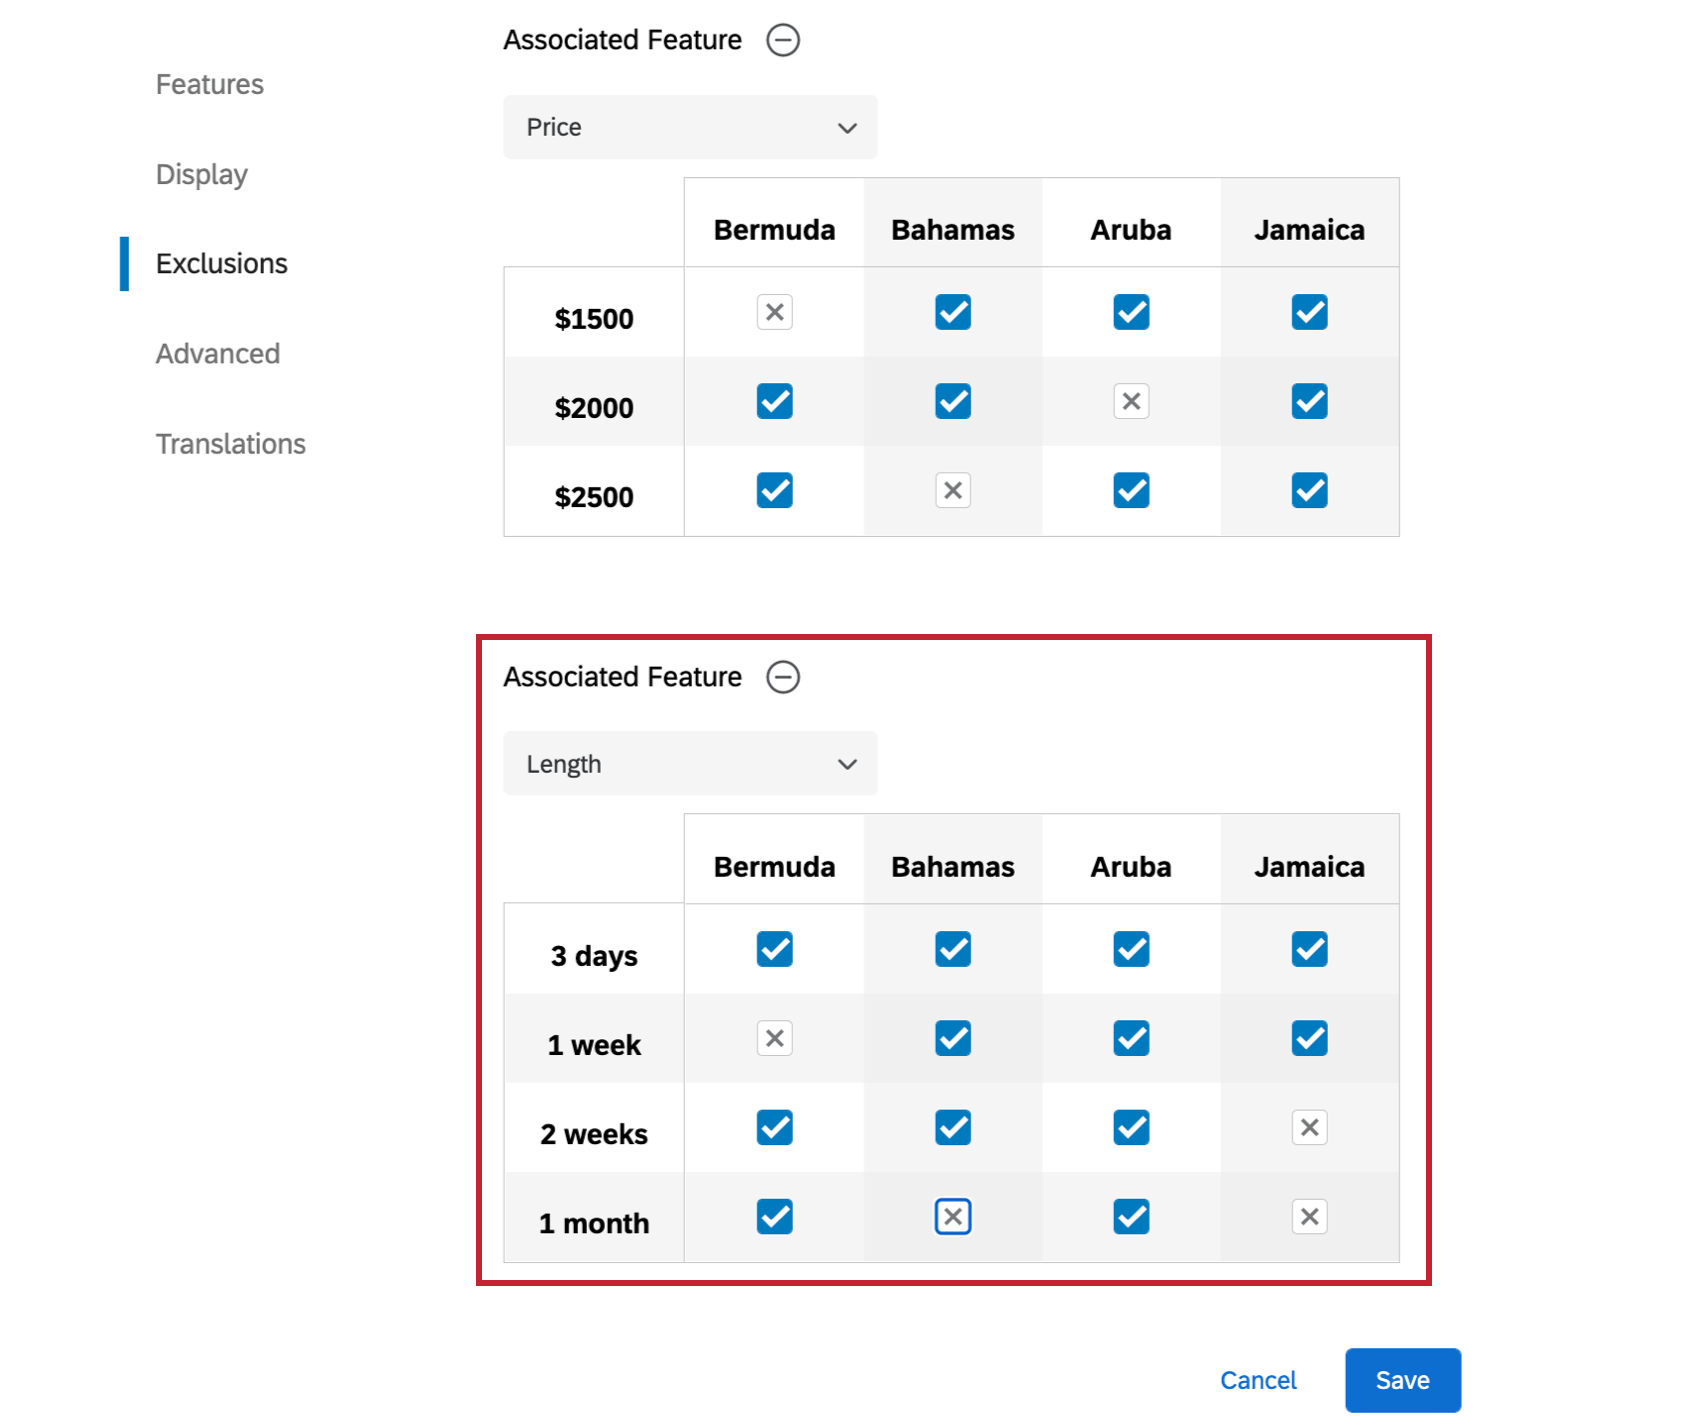
Feature exclusions are best if you have a primary feature around which certain exclusions may apply, or if your exclusions are centered around the intersection of 2 features’ levels. After you choose a primary feature and an associated feature, a chart will appear where you can quickly select many exclusions at once.
Example: You sell vacation resort packages. Your features include location and price. However, locations vary a lot by price, so you need to set up multiple exclusions, preferably all at once.

Example: In this screenshot, Aruba trips cannot cost $2000, Bermuda trips can’t cost $1500, and the Bahamas can’t cost $2500.

Attention: If your exclusions are too restricting, the optimal package may contain the excluded features.
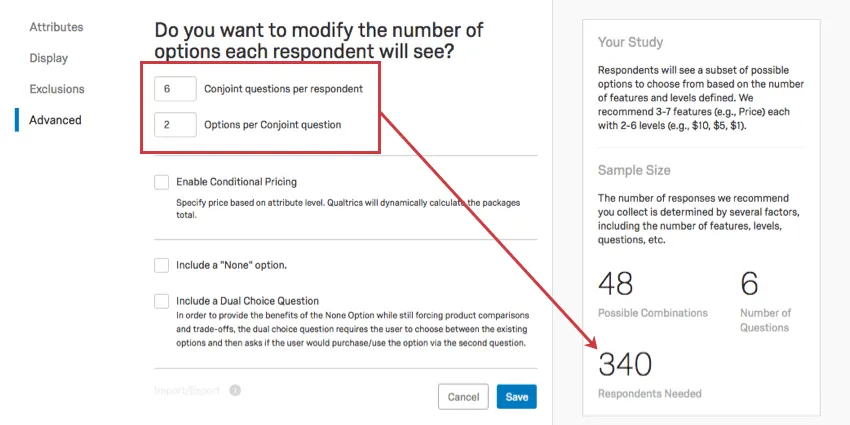
Advanced
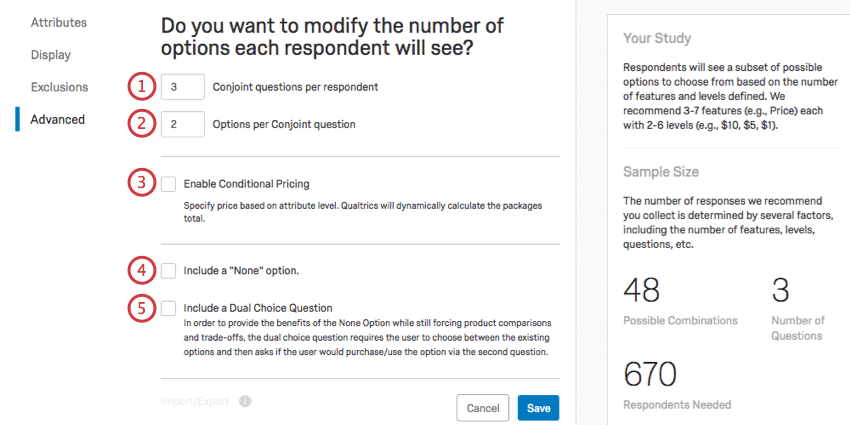
In the Advanced section, you get to decide how many packages respondents have to choose from at a time or if there’s a “None” option. You can also import and export experimental designs.

Qtip: Curious when to include a “None” option? Check out the Customizing your Conjoint Getting Started page.
Qtip: As you adjust the number of questions or choices each respondent is presented with, the suggested number of respondents will change.
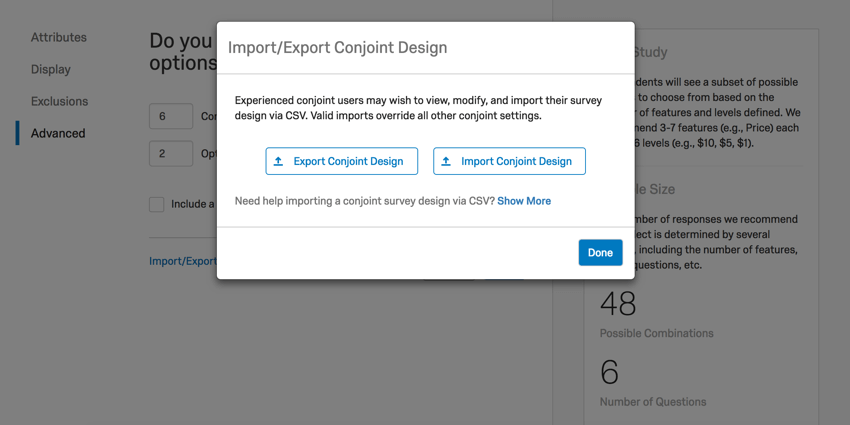
Import/Export
The Import/Export option allows you to export a conjoint design for importing into another project. For more, see the Exporting & Importing Conjoint Designs support page.

Qtip: This option will not be available if you’ve made changes that need to be saved. Save your changes to get this option. Be cautious that you are not editing a conjoint that is actively collecting responses.
Qtip: This option has nothing to do with importing response data.
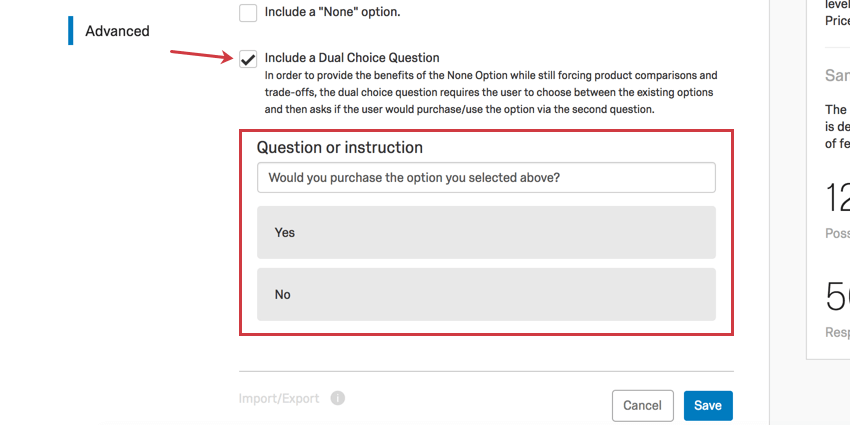
Include a Dual Choice Question
When you select Include a Dual Choice Question, then the respondent will be asked if they’d purchase the package they just selected. This purchase question appears after every conjoint question.
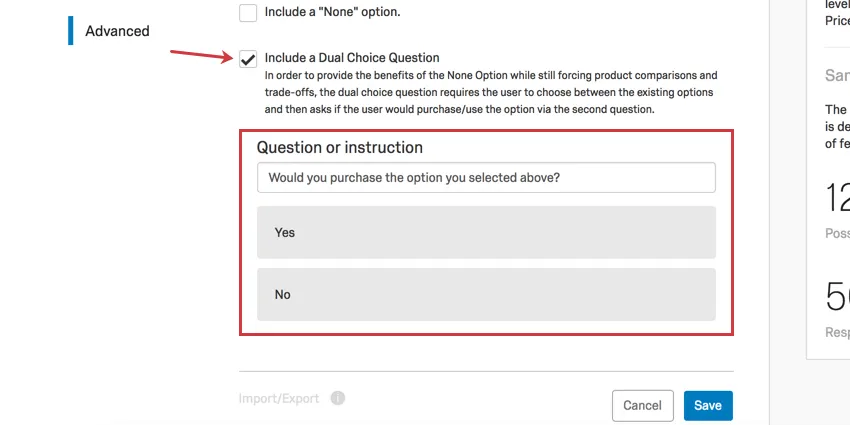
Qtip: This has to be a Yes / No question. You can change the wording of the question, but not the answers.
The purpose of a dual choice question is to make the conjoint a dual choice (also called 2-stage) conjoint instead of a choice-based one. Dual choice conjoints are similar in structure to choice-based conjoints, but with the goal of getting a more realistic estimate of a respondent’s preference for a given package. When choosing between packages, respondents will make trade-offs where they have to, but packages they’re not willing to purchase cannot be realistically described as their top preference.
Simulator
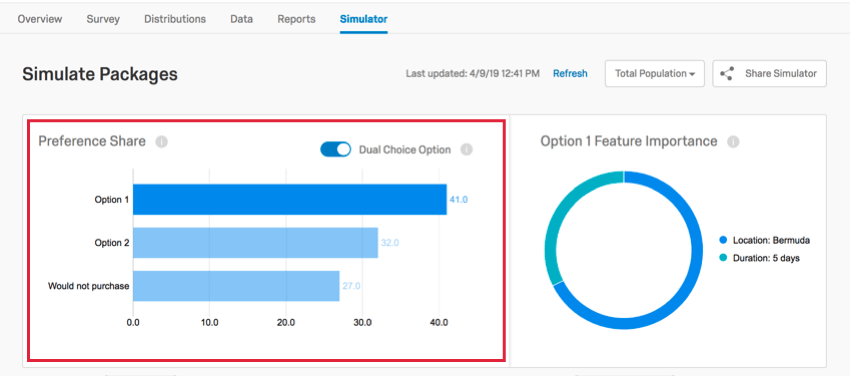
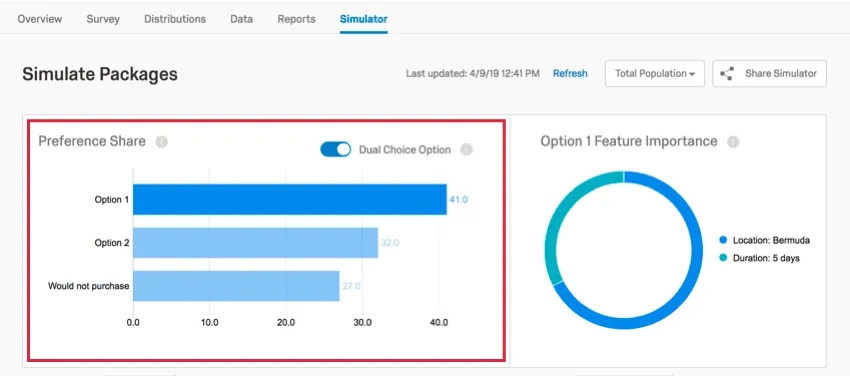
If you include a dual choice question, the simulator will have an additional option when it calculates Preference Share.
When Dual Choice Option is selected, the preference towards your top options will be recalculated. There will also be an additional option called Would not purchase, which represents the likelihood that customers would not purchase any of the options offered. If this number is high, chances are you need to reevaluate the attributes being offered.
Conditional Pricing
The traditional approach to pricing in a conjoint study is to add an attribute for Price. However, some packages with the best features could be shown to the respondents at the lowest prices, while more basic packages will be presented with higher prices. These combinations seem illogical because there is no correlation between the features in the package and the price, leading to obvious preferences for the respondent. (After all, if you can get all the perks of the premium product for the most basic product’s price, wouldn’t you?) It is common in the final result to see the overall best package has all the best features with the lowest price, which is not very realistic.
With conditional pricing, we associate a price to each level to determine actual prices to show in the questionnaire, based on the levels chosen for each package.
Example: Let’s say we wanted to make price conditional on RAM, Hard Drive, and Processor. We first start by choosing price premiums associated with those attribute levels. These premiums will not be explicitly shown to respondents next to each attribute level, but will be used just to determine the overall price. Only a single total price is shown within the product concept.
Setting Up Conditional Pricing
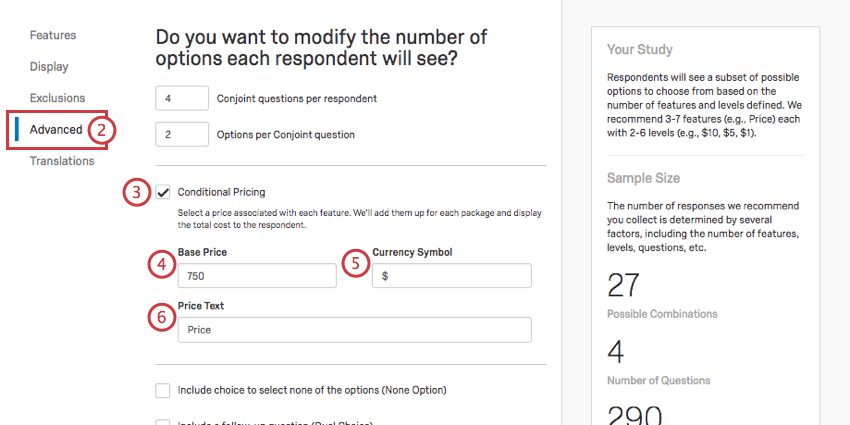
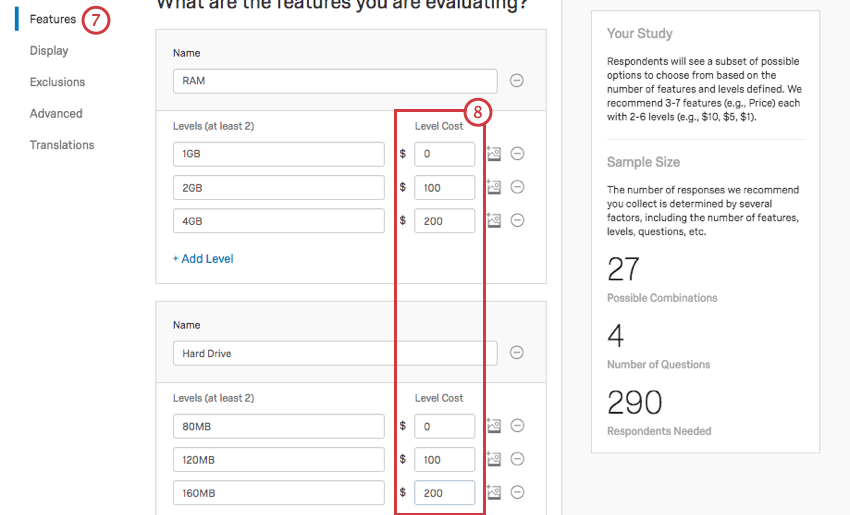
Example: Here, 1GB is presumably the minimum amount of RAM this computer can have. Therefore, the price for 1GB RAM is $0, since it doesn’t cost extra. However, you can raise the overall computer’s price $100 to get 2GB, or raise the price $200 to get 4GB.
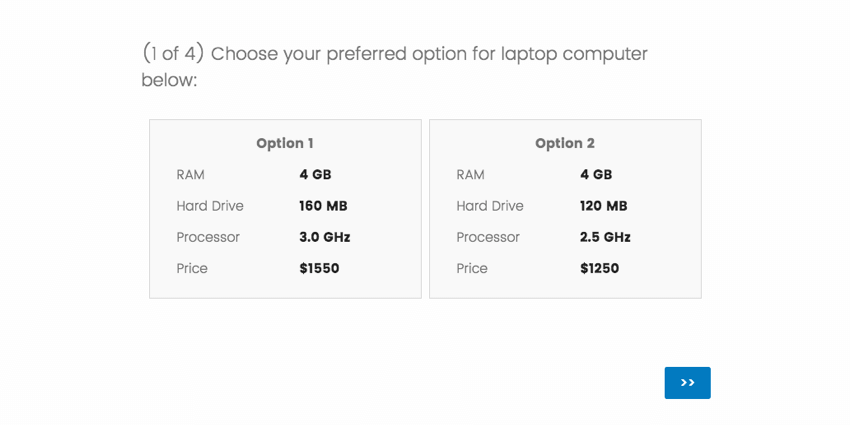
Example: Option 1 is $1550 because the base price is $750, 4GB of RAM is $100, a 160MB hard drive is $200, and a 3.0 GHz processor is $400. ( 750 + 100 + 200 + 400 = 1550)
This total price will be displayed to the respondent on the survey, in the simulator, and on the conjoint analysis report page.
Qtip: It’s fine to combine translations with conditional pricing, so long as the segments you are targeting will be paying the same prices in the same currency.
Conditional pricing is best conducted with 1 currency at a time. Currencies are not interchangeable in market research, since there are cultural and resource-related factors you may have to consider when switching from a segment that uses one currency to a segment that uses another.
Qtip: If running a pricing study, we recommend you include a none or dual choice option in your project.
Using Price Variation
When running your conjoint study, you may want to know how the price of your package affects how likely respondents are to purchase it. Price variation allows you to test how price affects preference share. To use price variation, enable the Vary prices to get feedback on price sensitivity in the conditional pricing section.
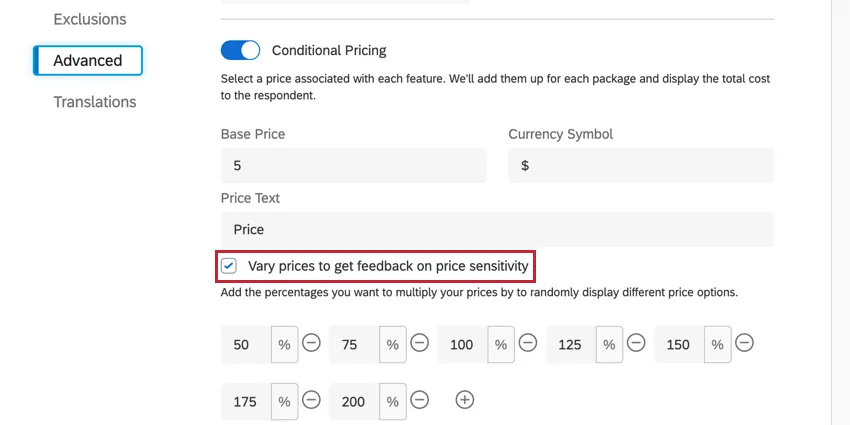
After enabling this option, you can determine the different price multipliers. These multipliers are randomly applied to your package’s price in order to test how respondents react to price variation. This happens on the backend and the respondent does not know that the price is being altered by a multiplier.
Example: For example, let’s say you enter 50%, 100%, and 200% as your price multipliers. If a package is $1000, then the cost displayed to the respondent will be either $500, $1000, or $2000 depending on which multiplier is randomly applied to them.
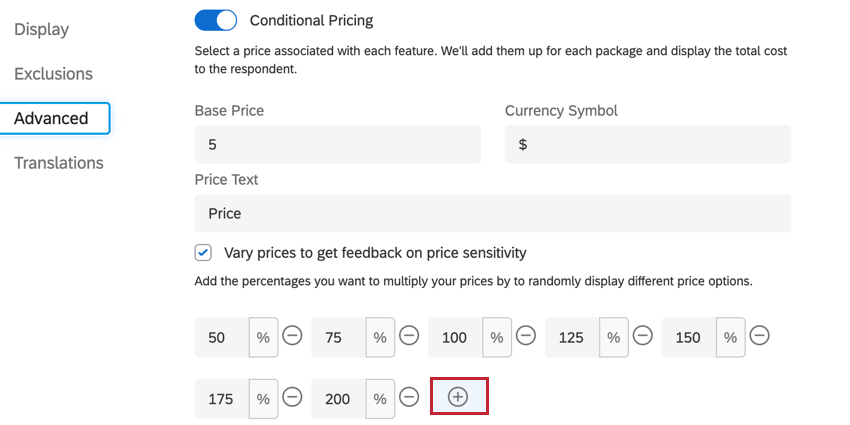
To add a price multiplier, click the plus (+) sign and enter your desired multiplier in the box. To remove a multiplier, click the minus sign next to the multiplier.

Qtip: You may have anywhere between 2 to 15 multipliers.
Qtip: You may enter any positive number as your multiplier.
To remove a multiplier, click the minus (–) sign next to the multiplier you want to remove.
Editing an Active Conjoint
If you are collecting data in your conjoint, it is best not to save edits to your attributes. As soon as you save changes – even aesthetic changes, such as question-wording – the conjoint analysis will reset. You will then have to collect more data to access your reports and simulator again.
The conjoint resets to accommodate for changing levels, features, question numbers, or choices. Changing question and choice numbers drastically changes the number of responses you need for your data to be valid, whereas changing the offerings themselves invalidates your previously collected responses because your respondents were making decisions based on something else. Thus, this feature helps ensure your data is top quality.
Once a conjoint analysis is reset, the previous data is irretrievable. Do not edit active conjoints unless it is absolutely necessary!
That's great! Thank you for your feedback!
Thank you for your feedback!