Appointment & Event Registration Surveys
About Appointment / Event Registration Surveys
Do you want to use Qualtrics for appointment sign-ups? Maybe you’re scheduling an event, and want there to be a finite number of people at each time. You can create Multiple Choice questions where the choices disappear as they are selected. That way, only one person at a time can select a time slot.
Quotas save automatically as you make changes. A timestamp will appear along the top next to the quota’s name to show the last time it was saved.
Setting Up the Question
- Click Add a new question.
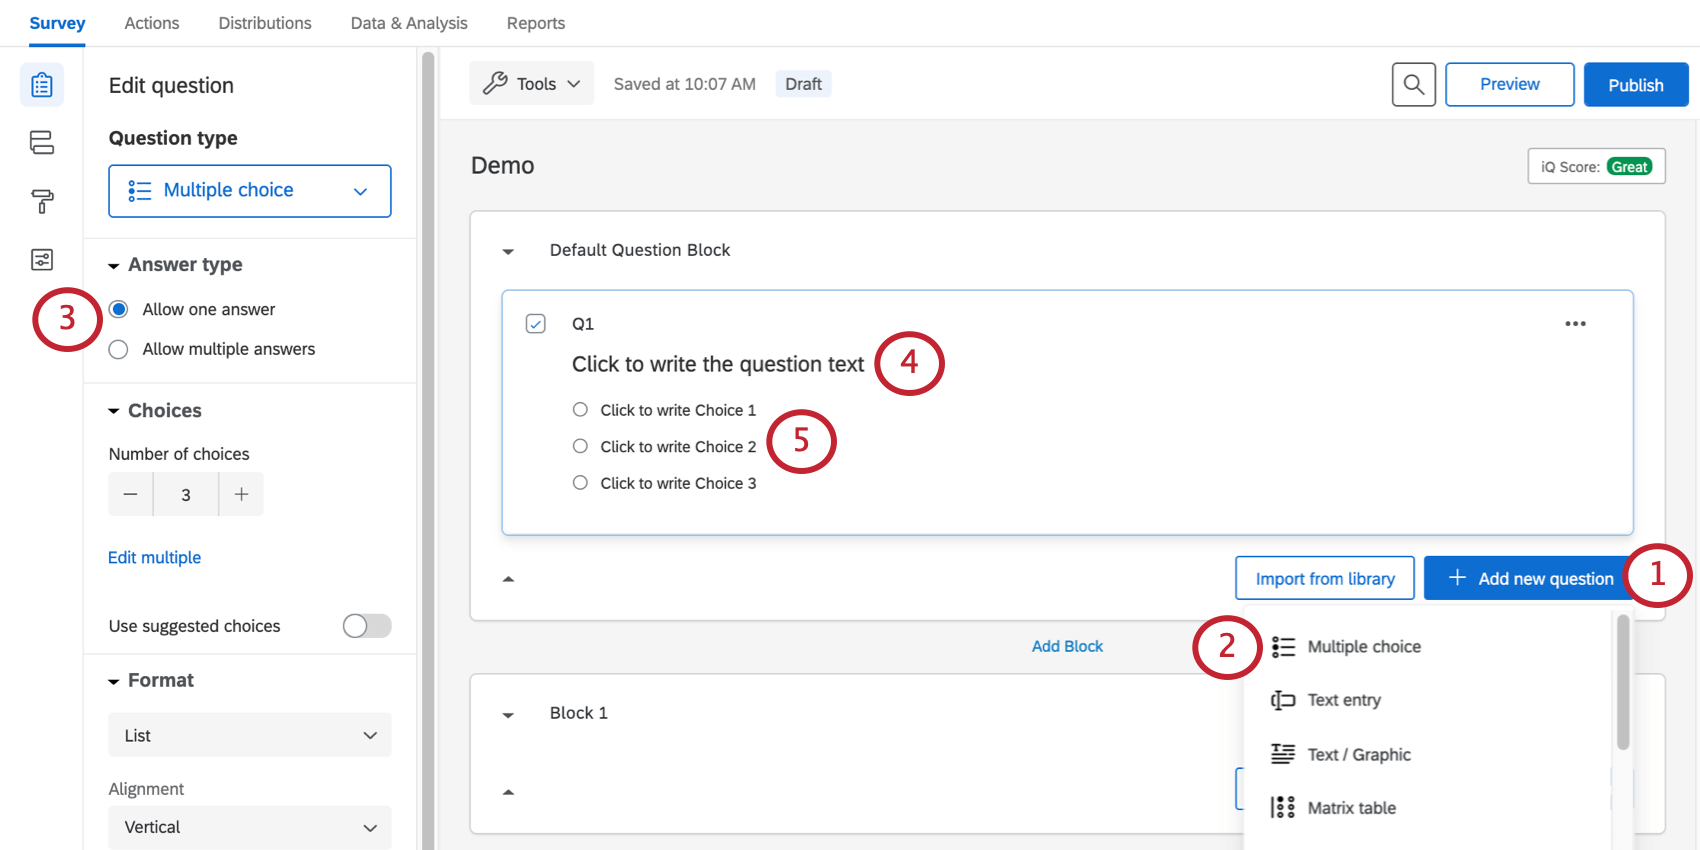
- Select Multiple choice.
- Under Answer type, make sure Allow one answer is selected. This ensures that each person only chooses one time slot.
- Type the question.
- Type the choices.
Qtip: If the Edit multiple button appears on the question editing pane, then you can use this to enter all of the choices, separated by line breaks. Make sure you have no blank lines between choices.
- Go to Quotas.
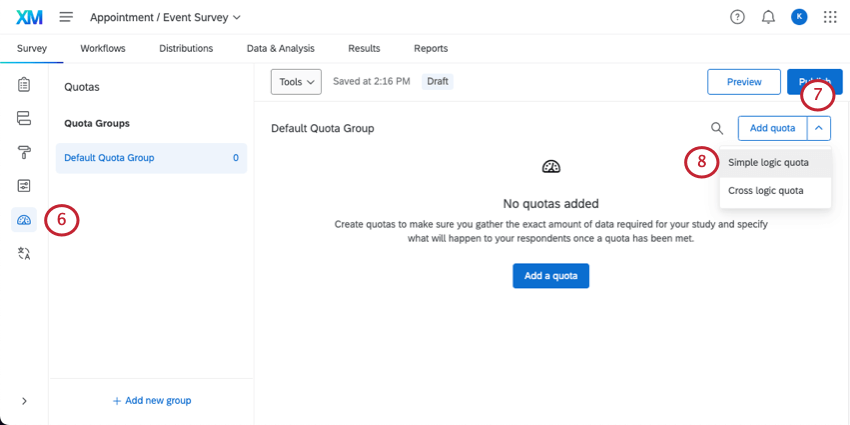
- Click the dropdown next to Add quota.
- Select Simple logic quota.
Qtip: If you are not given a choice, any quota you create will be simple logic.
- Select your question.
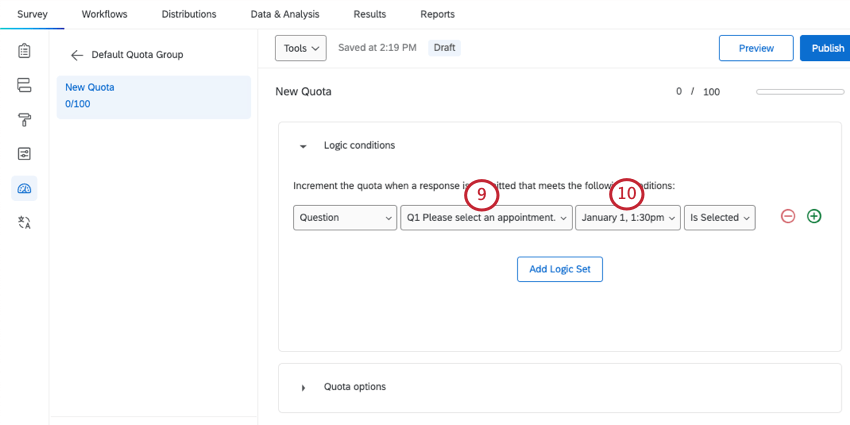
- Select the first time slot.
- Name the quota after the time slot.
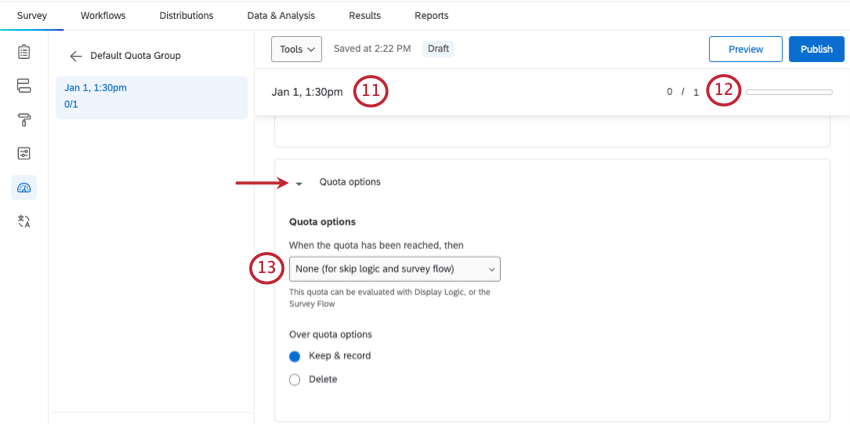
- If these are meant to be appointment slots, change the Count to 1. If you are hosting an event, type the number of people allowed to each event.
- Go to Quota options and select None (for skip logic and survey flow).
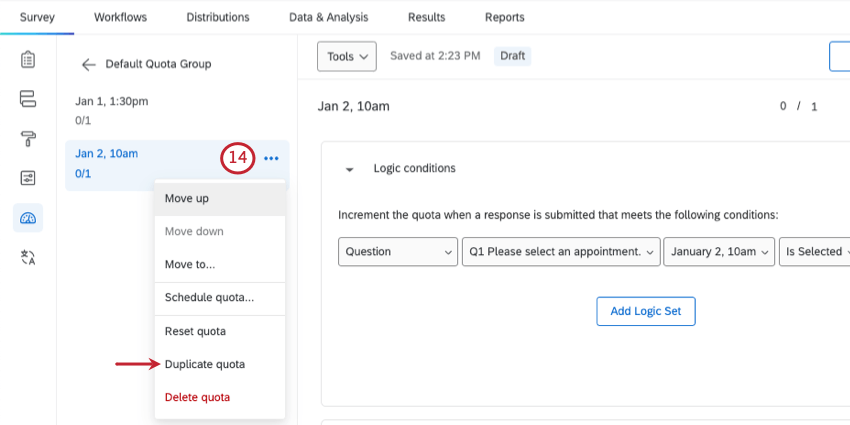
- Repeat steps 6-14 to create a quota for each appointment slot. You can duplicate quotas to make them faster.
- Select the first choice in your question, and click the dropdown arrow.
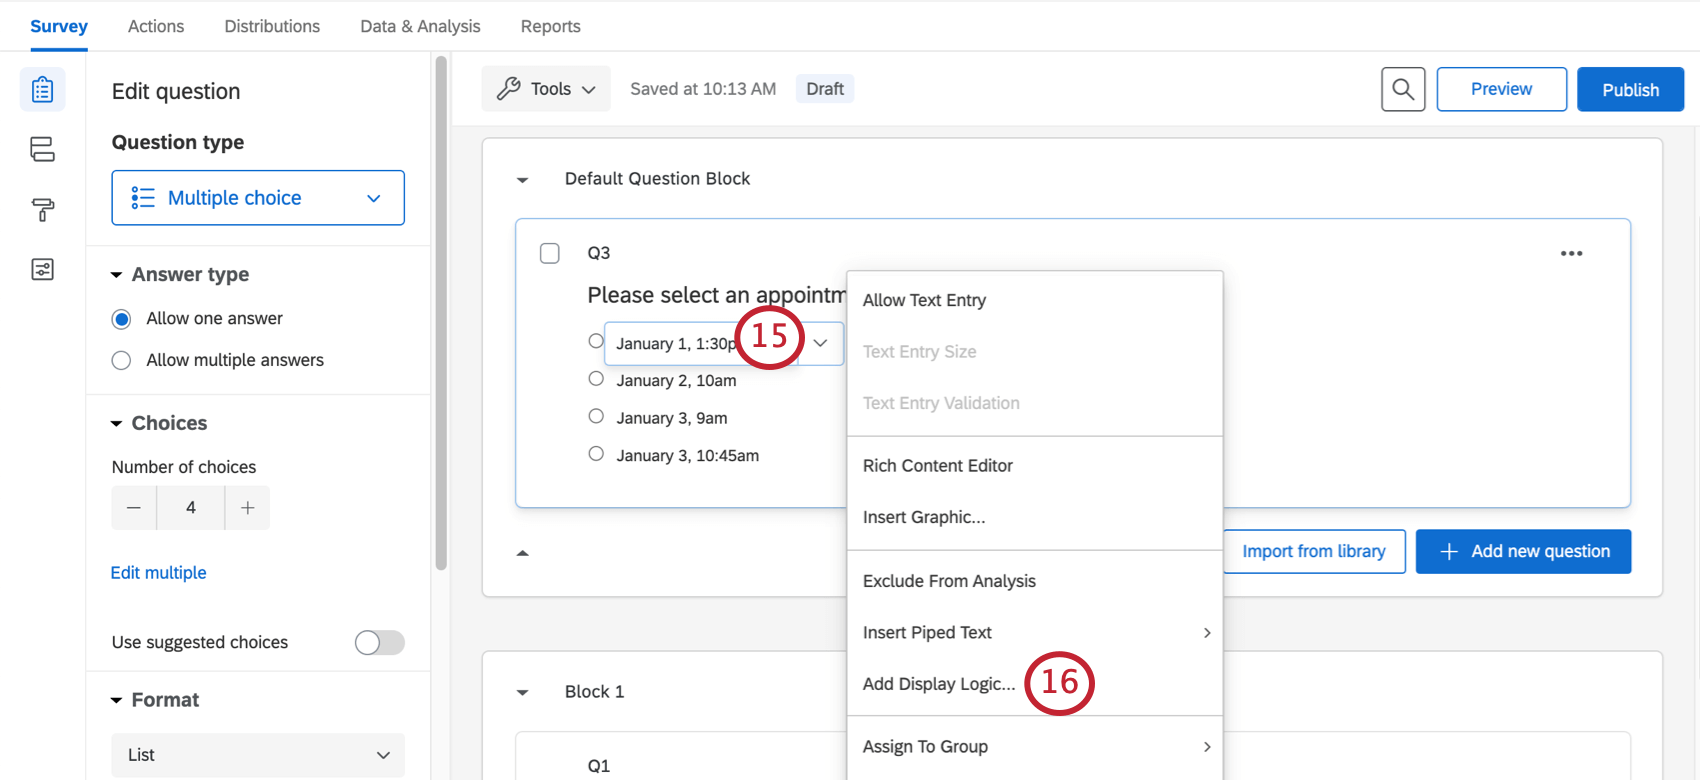
- Choose Add Display Logic.
- Change the first field to Quota.
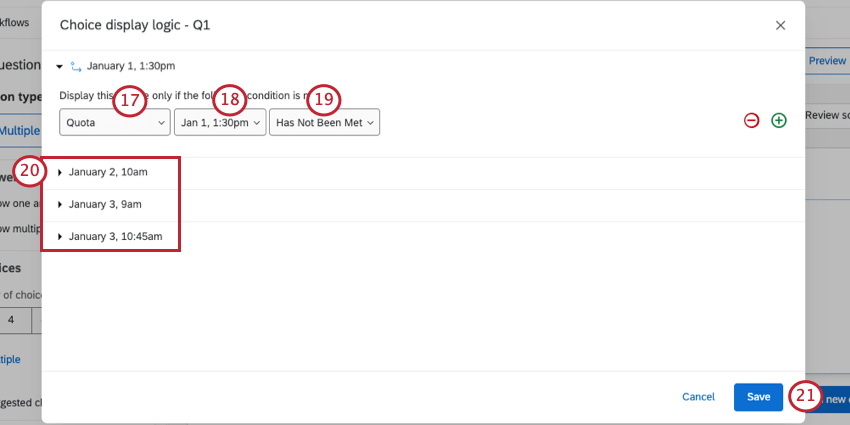
- Select the quota that matches the choice. For example, the first choice here is January 1, 1:30pm, so the Quota has the same name.
- Select Has NOT Been Met.
- Repeat steps 17-19 for every choice in the question. This ensures the choices only appear if someone hasn’t selected them yet.
- Click Save.
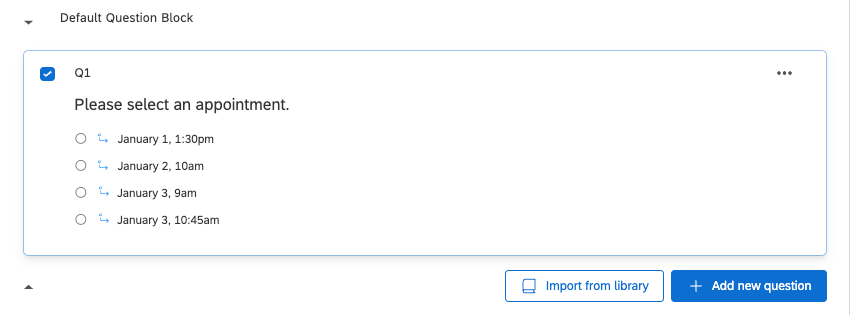
When finished, your question should have arrows next to each choice, like in the following screenshot.
Email Confirmation
As an extra step, you can send an email to the recipient confirming what time they signed up for.
- In your survey, go to Workflows.
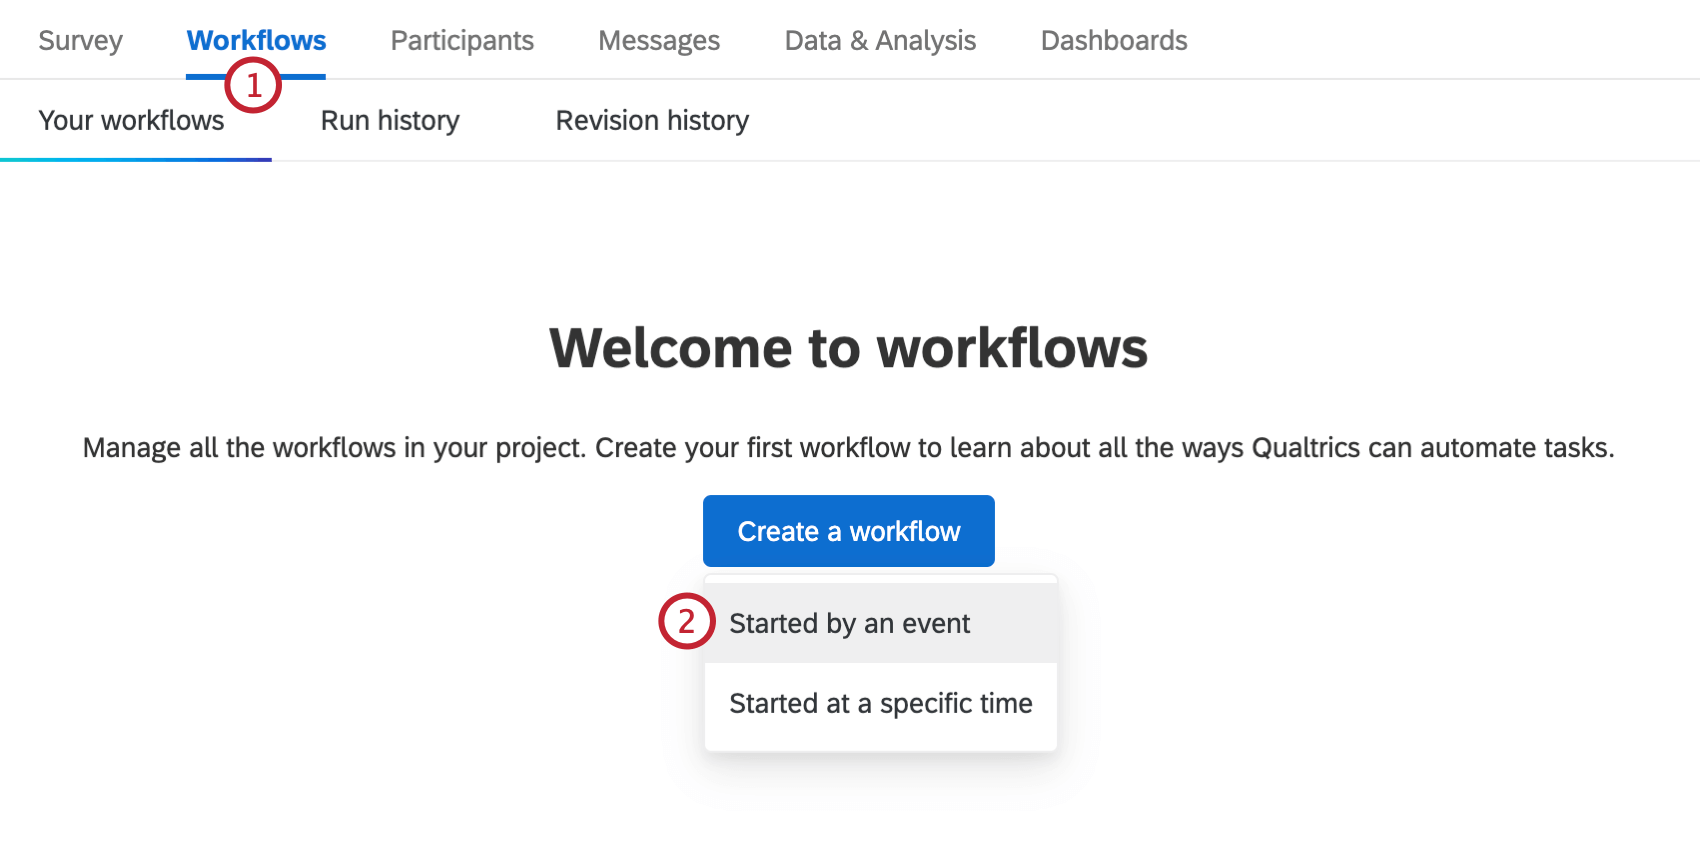
- Create an event-based workflow.
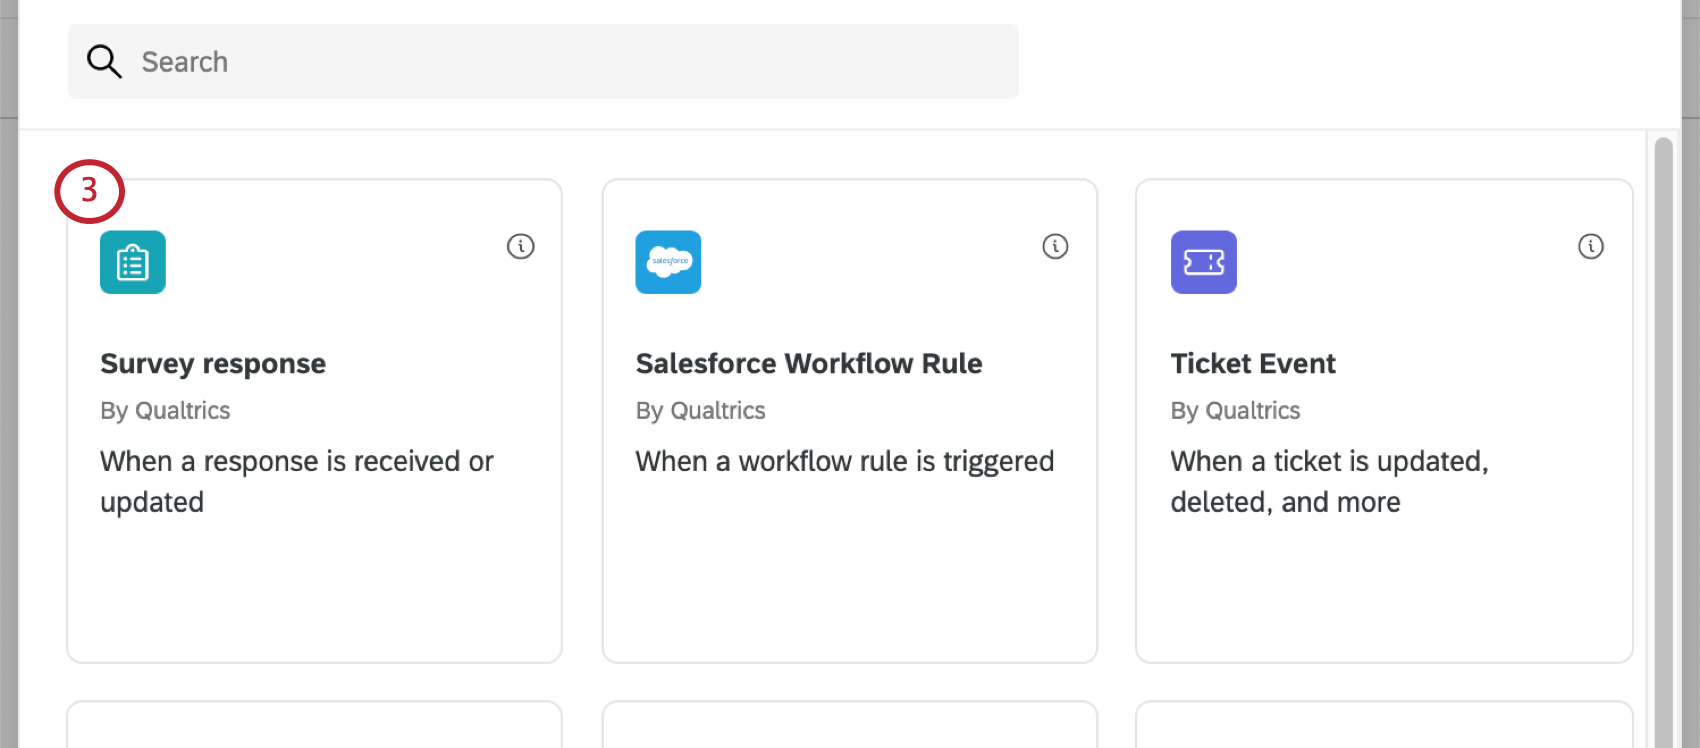
- Select the Survey response event.
- Choose Newly created responses.
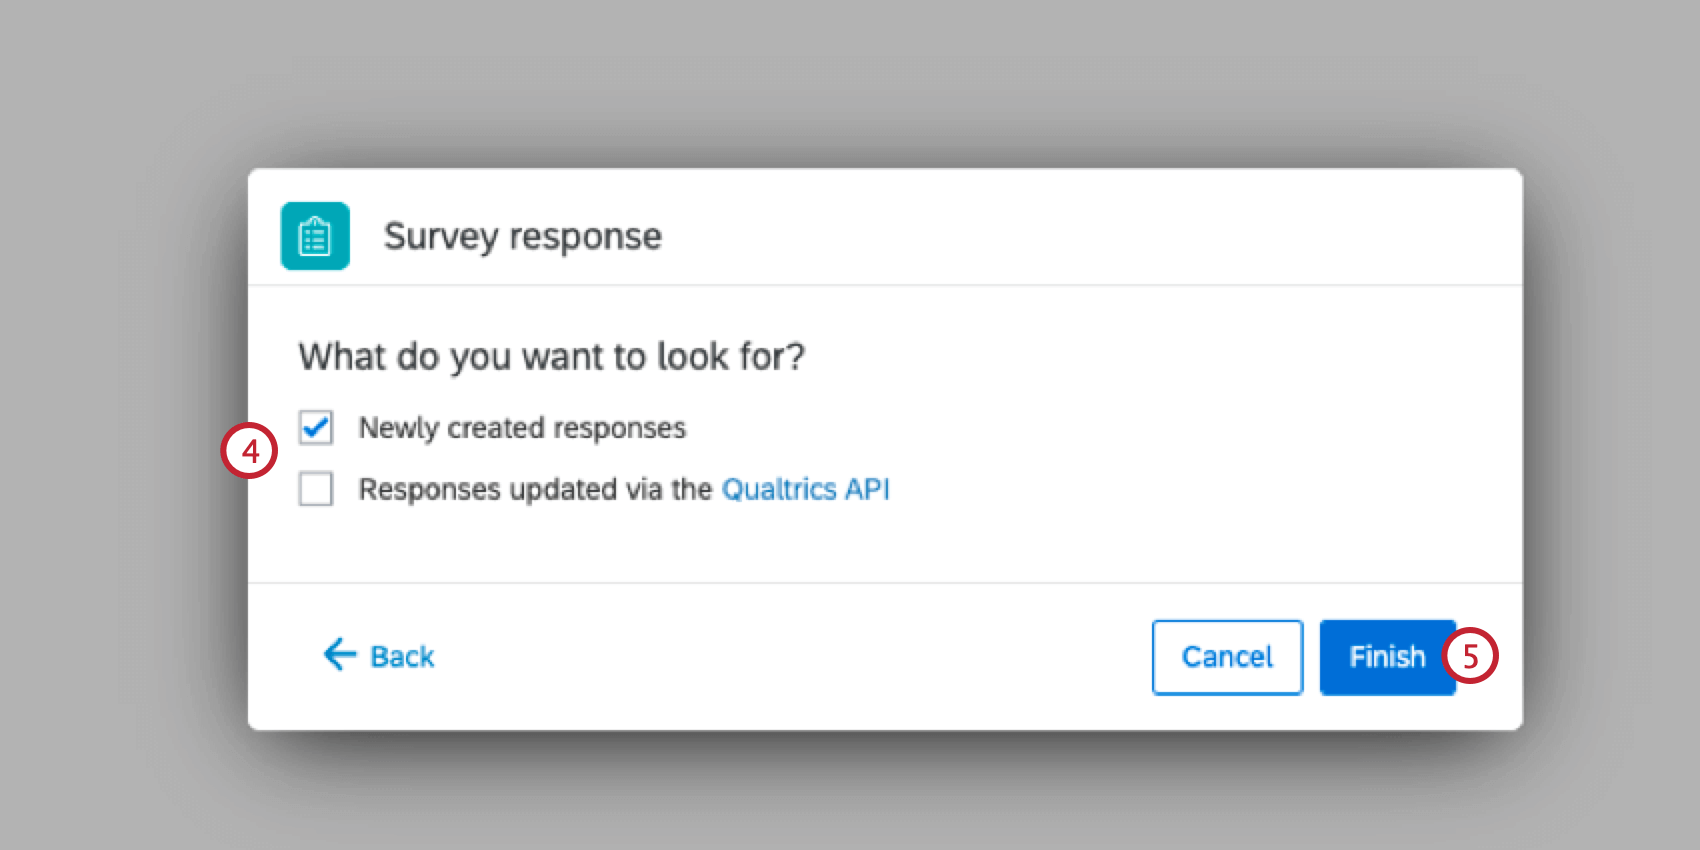
- Click Finish.
- If desired, rename your workflow.

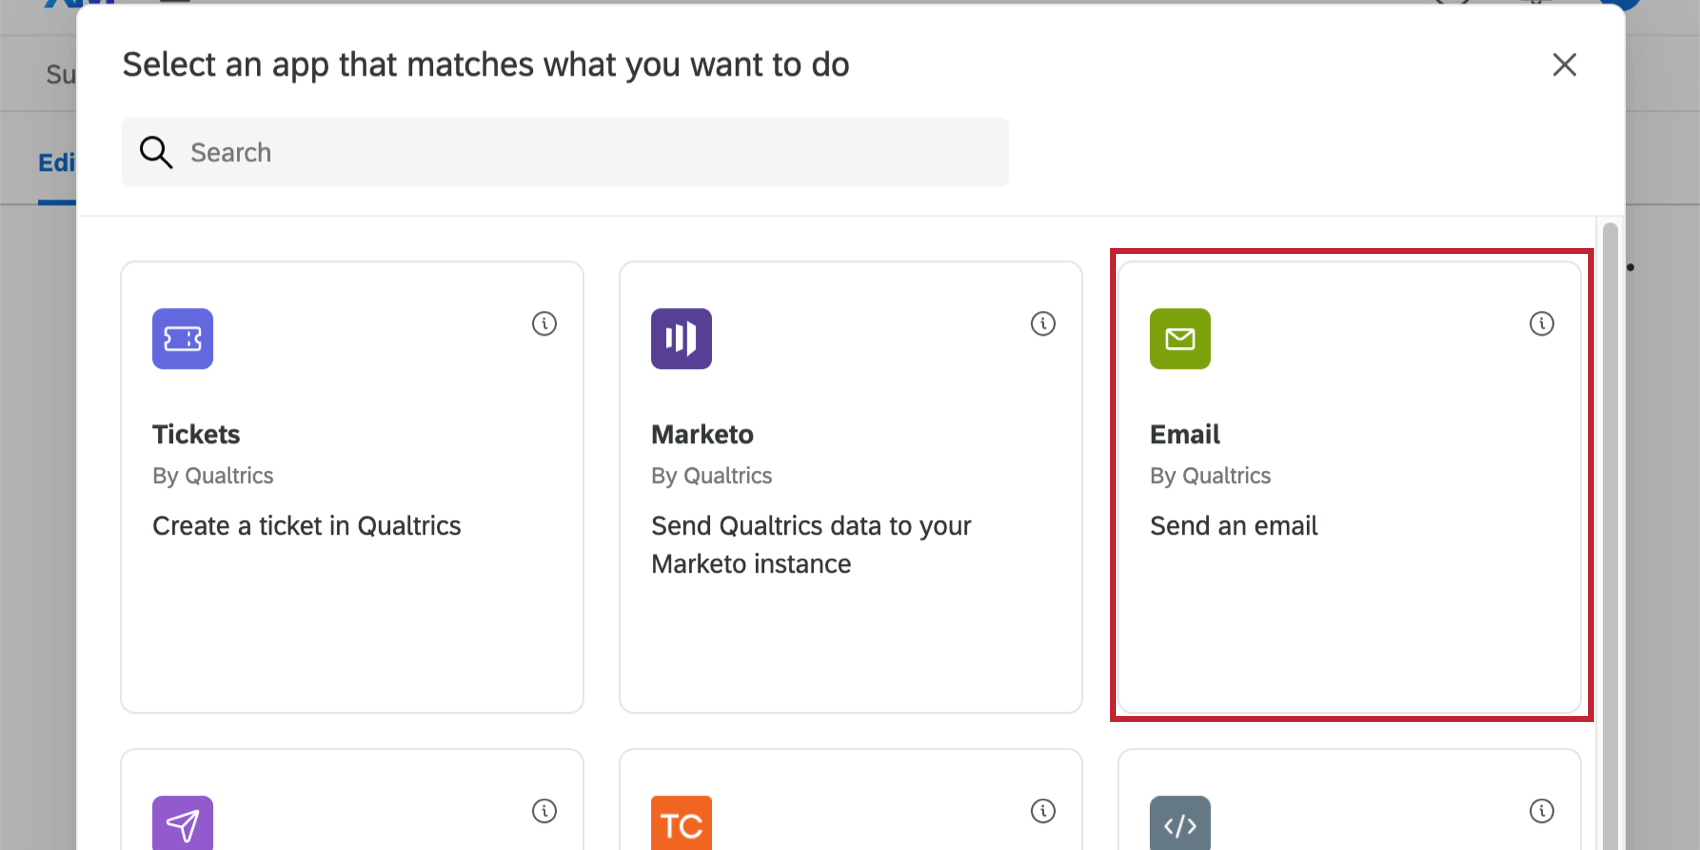
- Add a task.
- Select Email.
- Click the piped text icon, {a}, next to the “to” field.
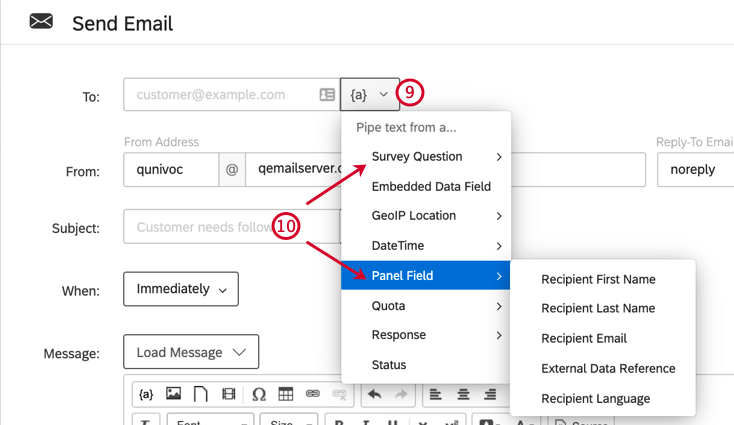
- If you emailed the survey out, highlight Panel Field and select Recipient Email. If you asked the respondent to type their email, highlight Survey Question and select the text entry question where you asked for an email address.
- Customize the From Address, From Name, and Reply-To Email for the email. For more information about what these fields are, see Setting up an Email Task.
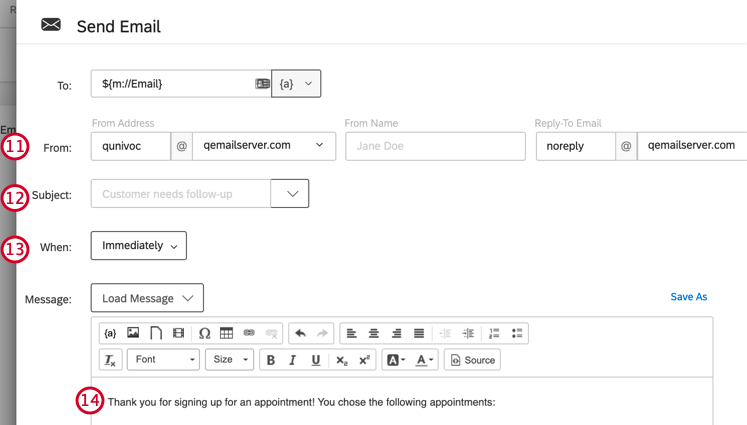
- Enter the Subject for your email.
Qtip: If you click the dropdown next to the subject field, you can choose a subject saved in your library (which can have translations), or add piped text.
- Choose when your email will send.
- Type your message.
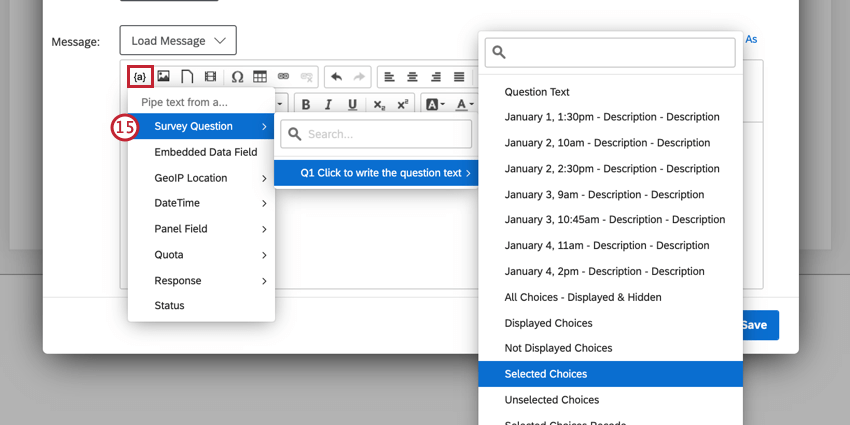
- Click the piped text icon, {a}, and highlight over Survey Question and choose Selected Choices for the question where you ask respondents to select their time slot.
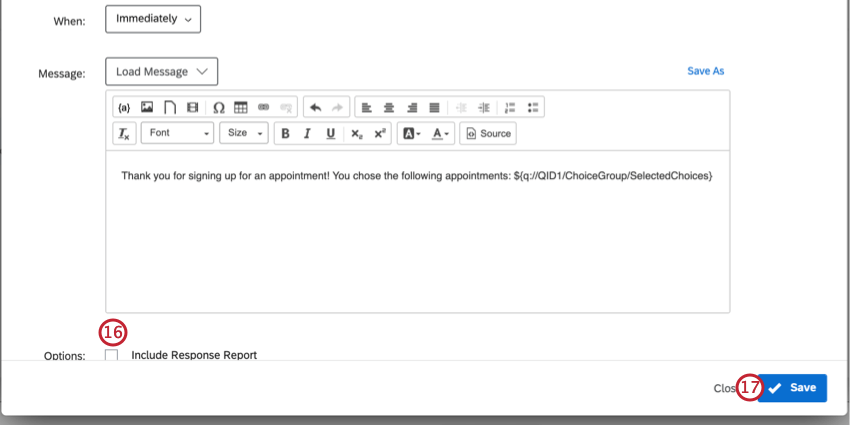
- Deselect Include Response Report. The Include Response Report option adds a summary of all survey questions and the respondent’s answers to the body of the email. Disable this option so your email body only contains the content that you entered.
 Qtip: Feel free to add whatever details you want to this email, such as a special Reply-To or From Name. Learn more on the Email Task page.
 - Click Save.
Preventing Repeated Responses
If your respondents can take the survey more than once, they will be able to select more appointment slots. In order to prevent respondents from answering your survey more than once, you will want to be mindful of how you are distributing your survey.
Anonymous Links
If you are using an anonymous link (for example, you want to post a link on your website), then go to the Survey options and select Prevent multiple submissions.
Email and Personal Links
If you’re emailing your survey through Qualtrics, make sure you are using the default link setting, called the individual link.
If you are using personal links, then no further action is necessary.
Authenticators
If you are using an authenticator, go to the options and ensure that Allow authenticating respondents to retake authenticated section is not selected.
Changing Appointment Selections
Sometimes a respondent may reach out to you later asking to change their response. Since there are quotas involved in your responses, you want to be careful how you edit the responses so that the correct choices are available to your other respondents.
Changing the Answer
You can send the respondent a retake link to allow them to change the response. This will increment the quota for the new response so other people can’t select it, but it won’t decrement the old response, so no one will be able to choose the new response. This means you have to edit one quota.
If you choose to response edit, the new response’s quota won’t be incremented, and the old quota won’t be decremented. This means you have to edit two quotas.
Editing the Quota Count
The quota “count” is the number of people who have matched the quota and completed the survey. In the event you need to change some responses, you can edit this number to be whatever you want.
The Setting Quota Counts page explains how to edit quotas. Use this method to fix your quota counts if a user retakes the survey or if you edit their response.