
Qualtrics & GDPR Compliance
What's on this page
About Qualtrics GDPR Compliance
Qualtrics is GDPR (General Data Protection Regulation) compliant and provides technology that enables our customers to be GDPR-compliant also. This support page discusses how users can manage data subject requests using the Qualtrics platform, in particular focusing on how a user can modify and delete data.
While Qualtrics provides technology that enables our customers to be GDPR-compliant, Qualtrics customers should seek their own legal advice as to how to comply with GDPR.
For more details about Qualtrics and GDPR, visit this page. If you have additional questions about GDPR compliance, please reach out to Account Services or contact Qualtrics Support by logging into your Customer Success Hub.
Data Modification
A survey response may be edited if the user has the appropriate account permission – Edit Survey Responses, which can be enabled or disabled by Brand Administrators. This permission enables the user to edit collected responses directly inside Qualtrics.
However, response editing will not permanently change data in API or Legacy exports. To edit responses so that data is permanently modified in all means of retrieval, you will need to:
Deleting Data by Email Address
A Brand Administrator can use an email address to remove all survey responses, contacts, contact lists, user accounts, and tickets linked to this same email address. Both the Survey Platform and XM Directory contacts and lists will be removed. If respondents want you to delete all of their data, it is best to contact your Brand Administrator with a list of email addresses and have them follow the instructions in this section.
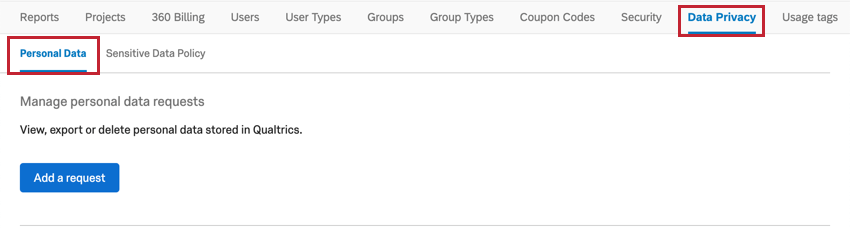
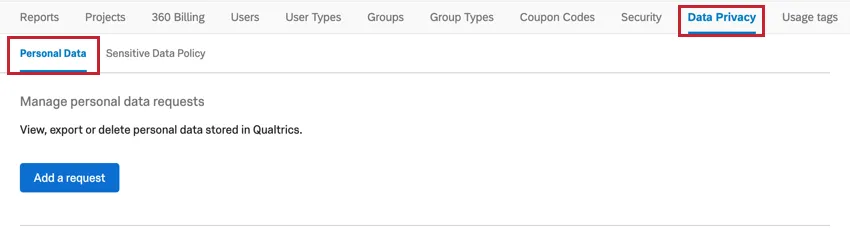
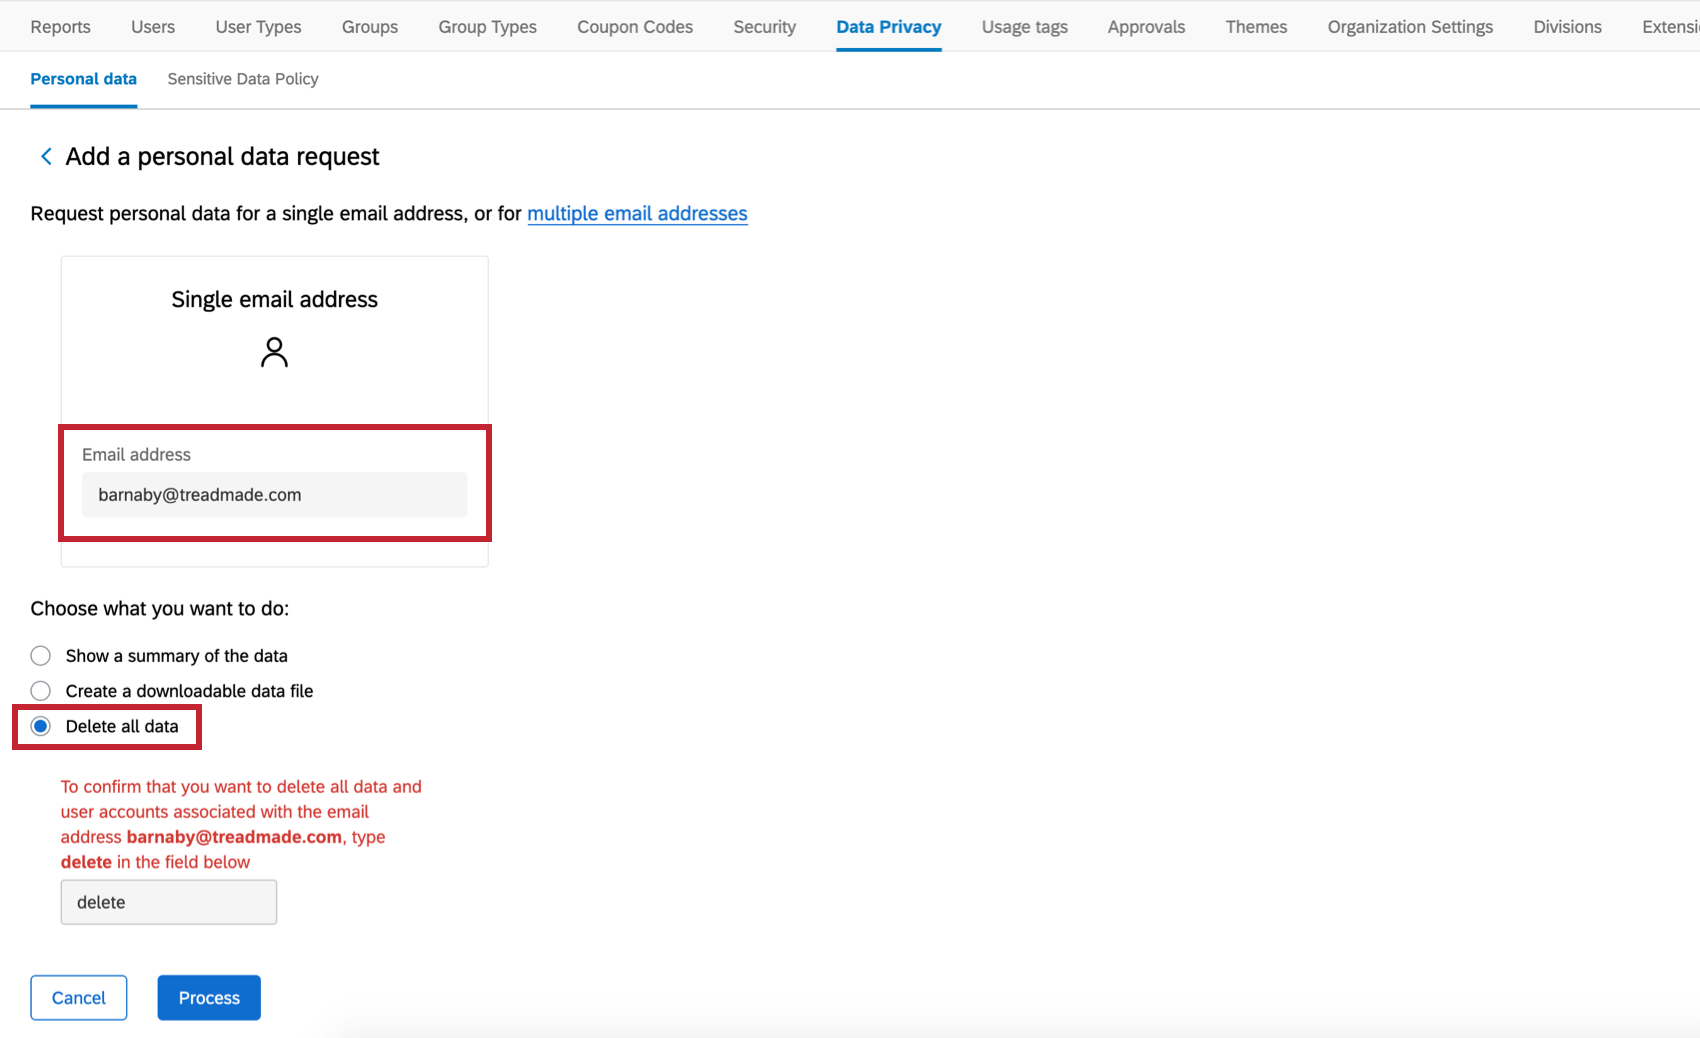
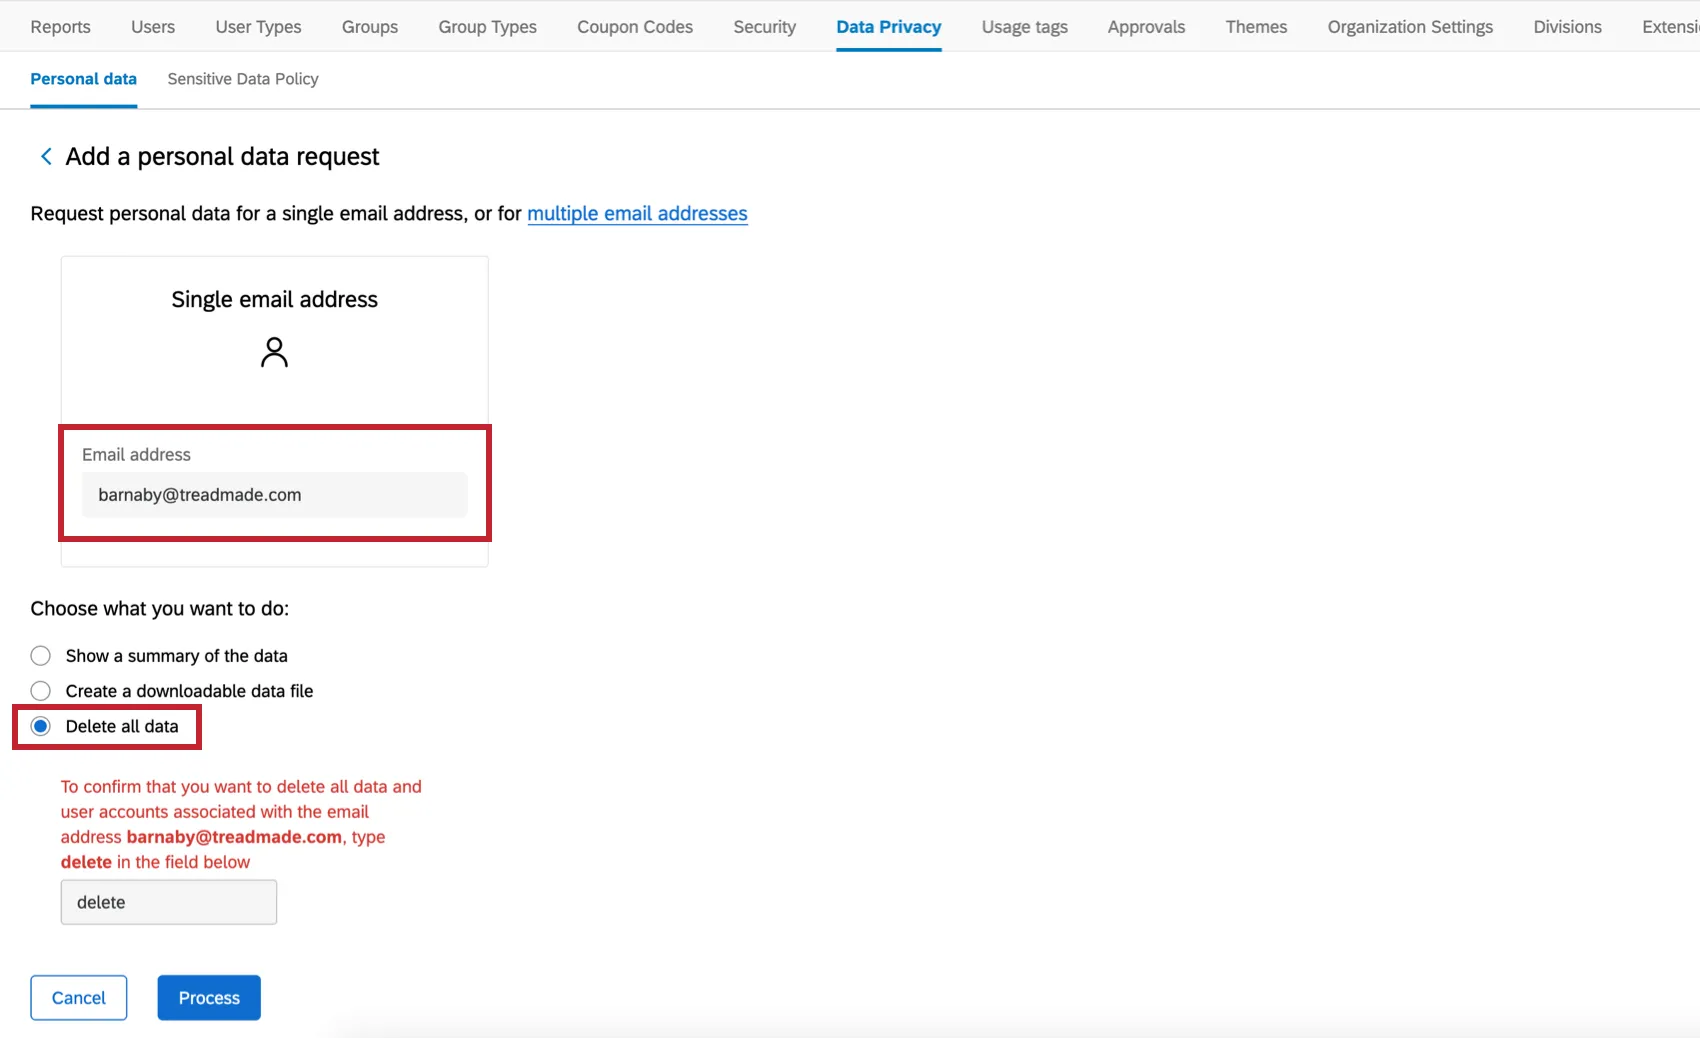
The Brand Administrator can go to the Admin page, select the Data Privacy tab, and make sure you are in the Personal Data section.

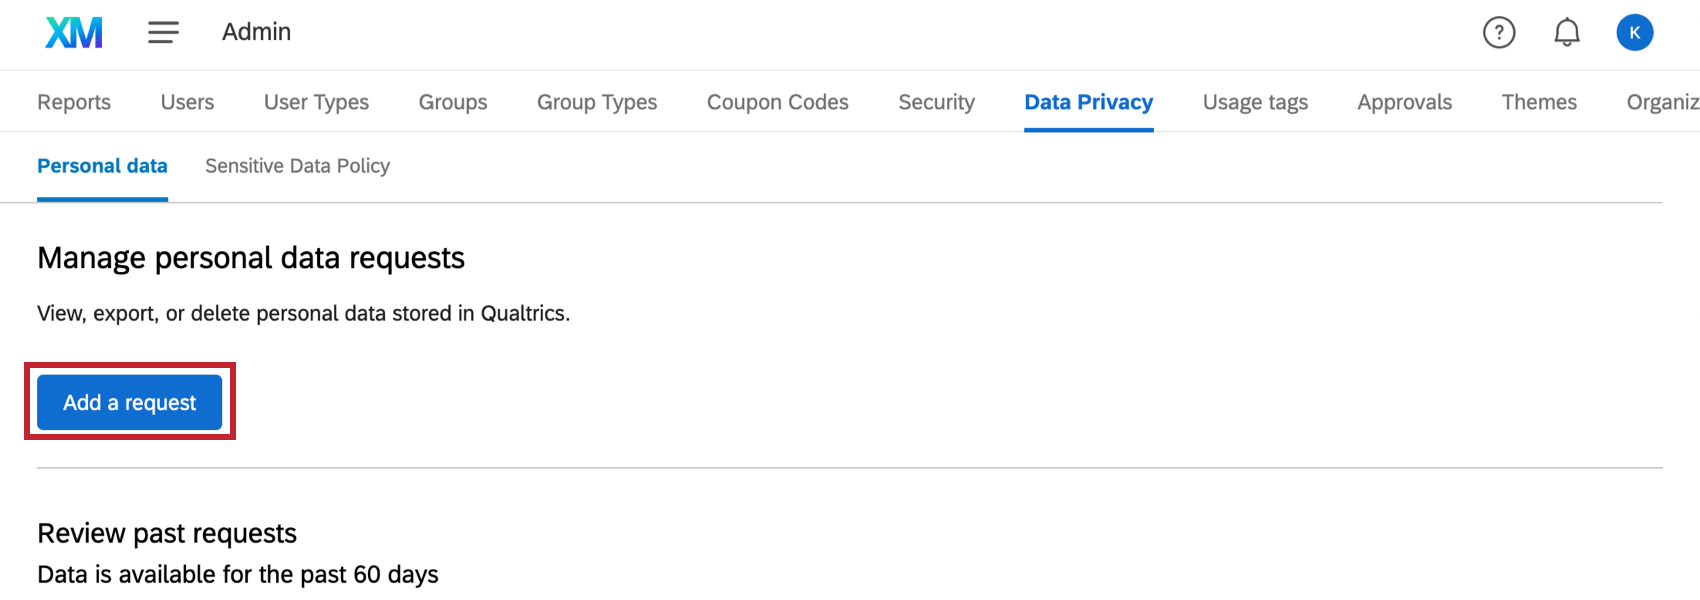
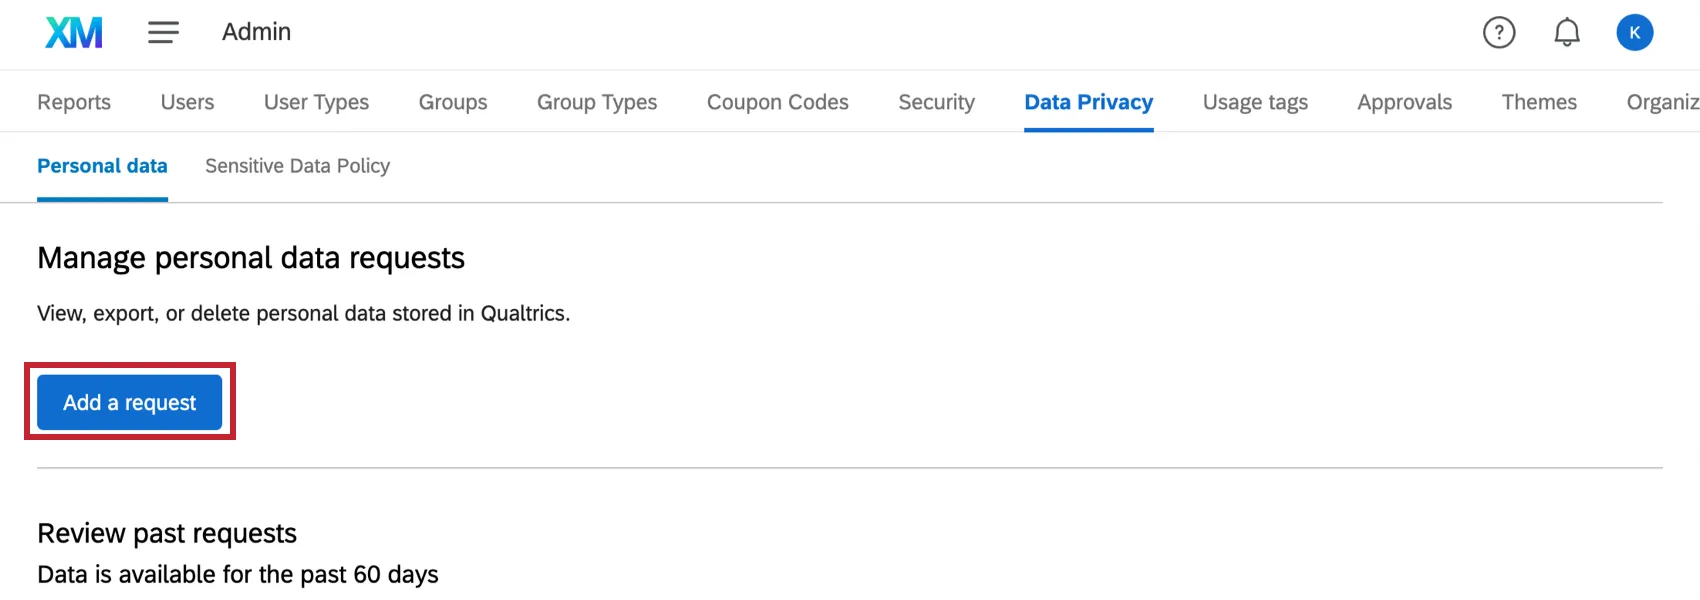
Then click Add a request.
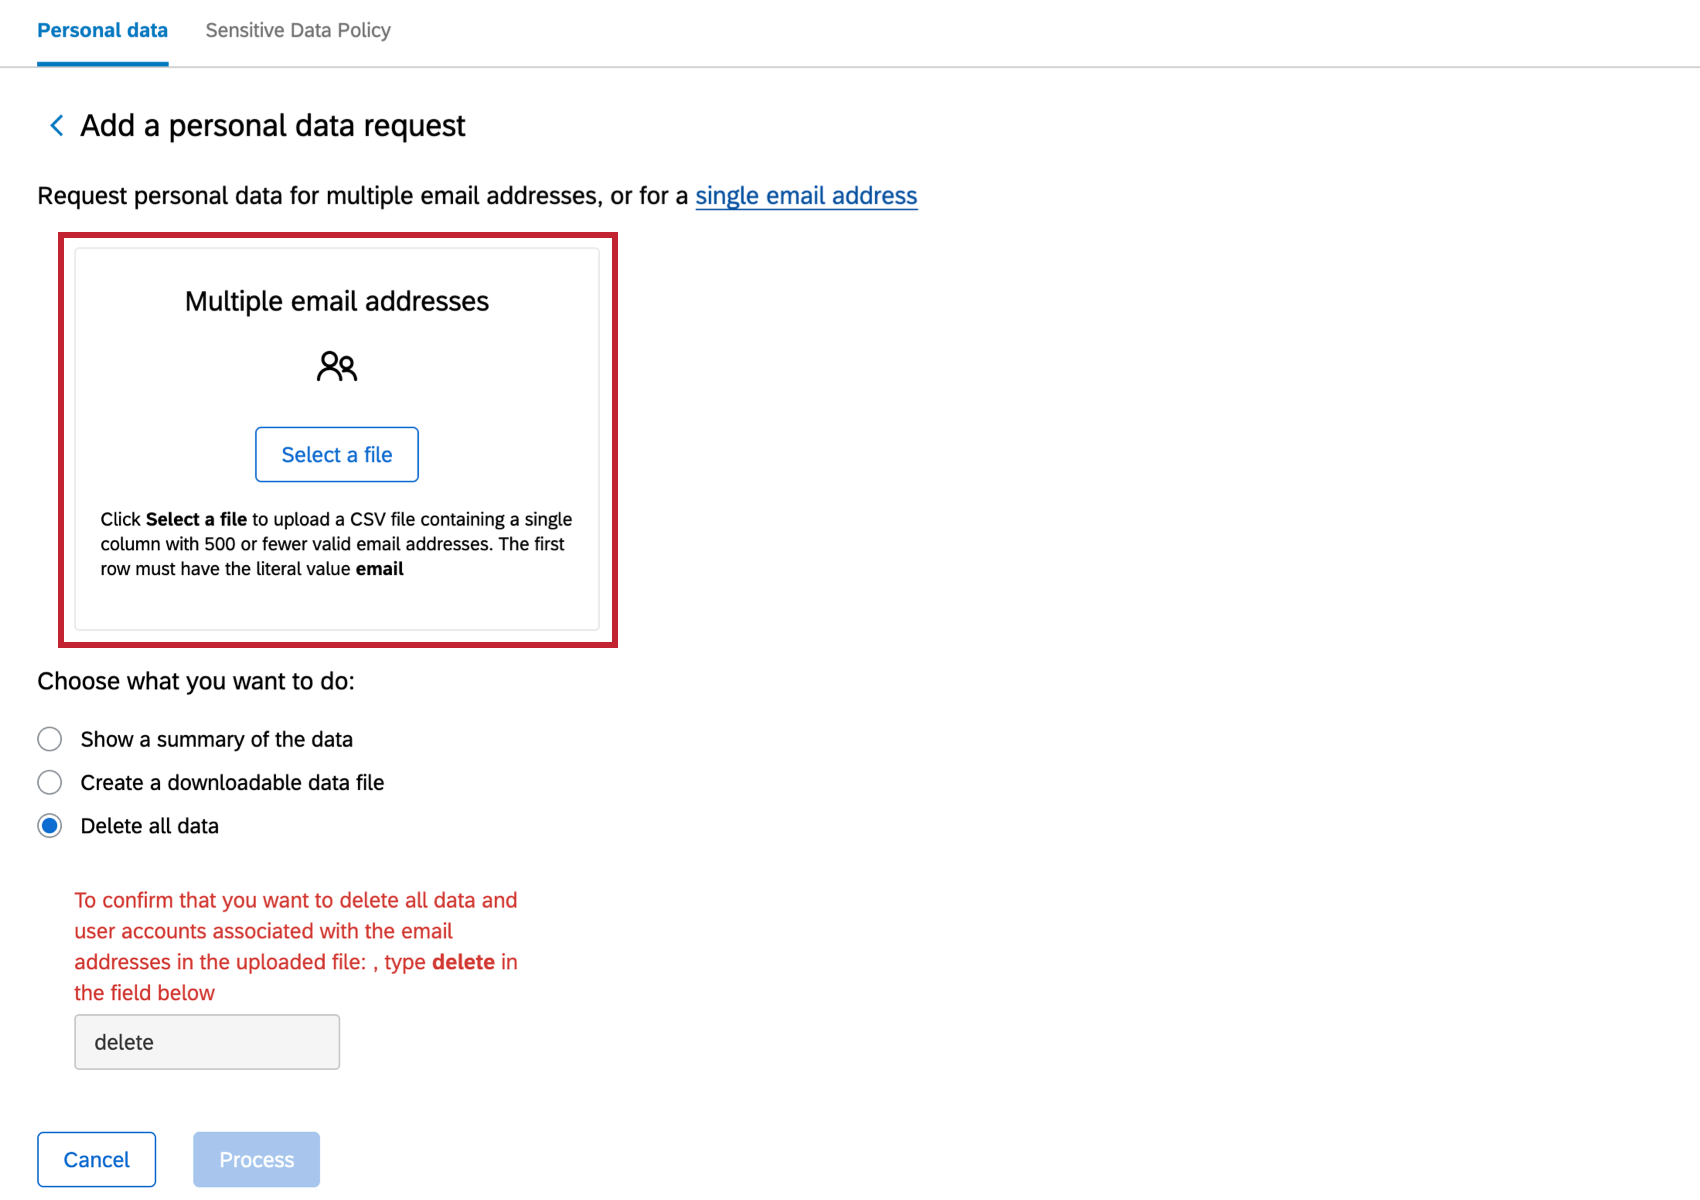
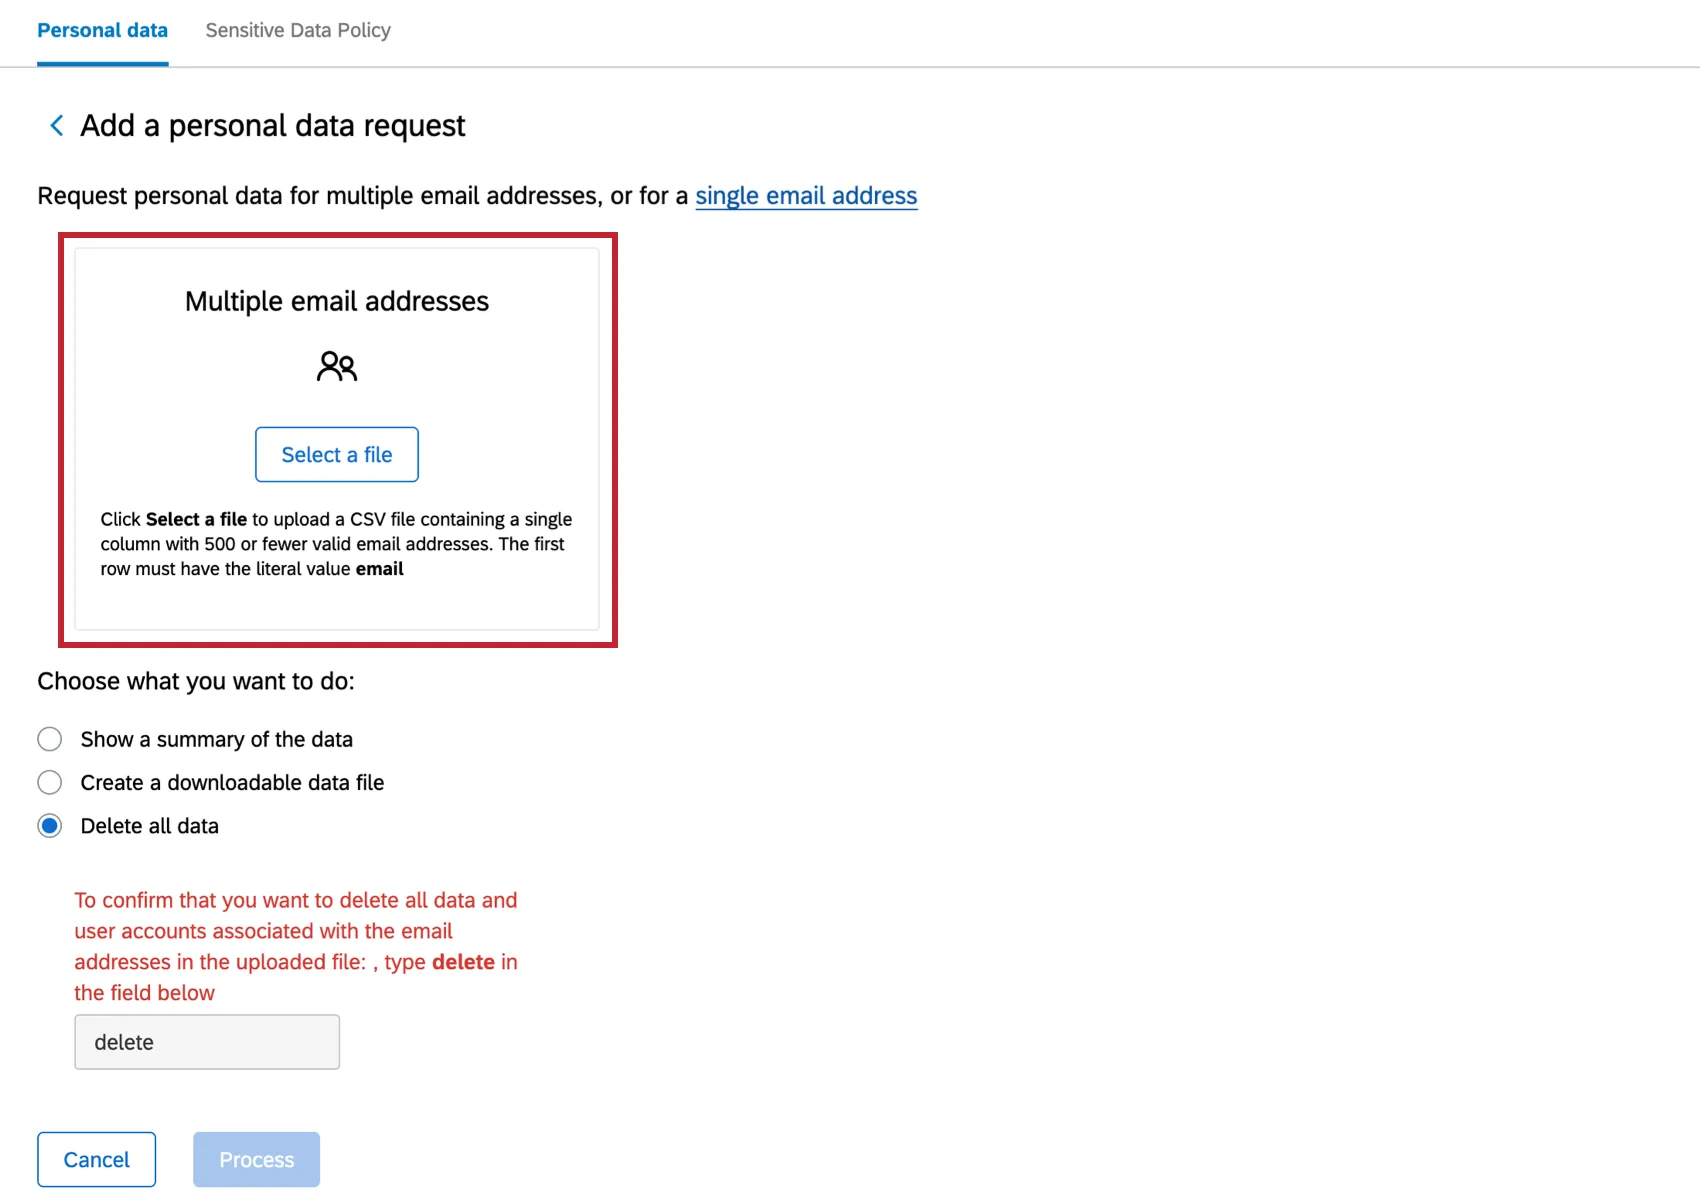
Enter the email address for the person whose data you’d like to remove, then select Delete all data.
You can also search all records associated with an email instead, if you would like to first know how many records are going to be removed by this action. This will also break down the records by whether they are survey responses, tickets, contacts, or users.
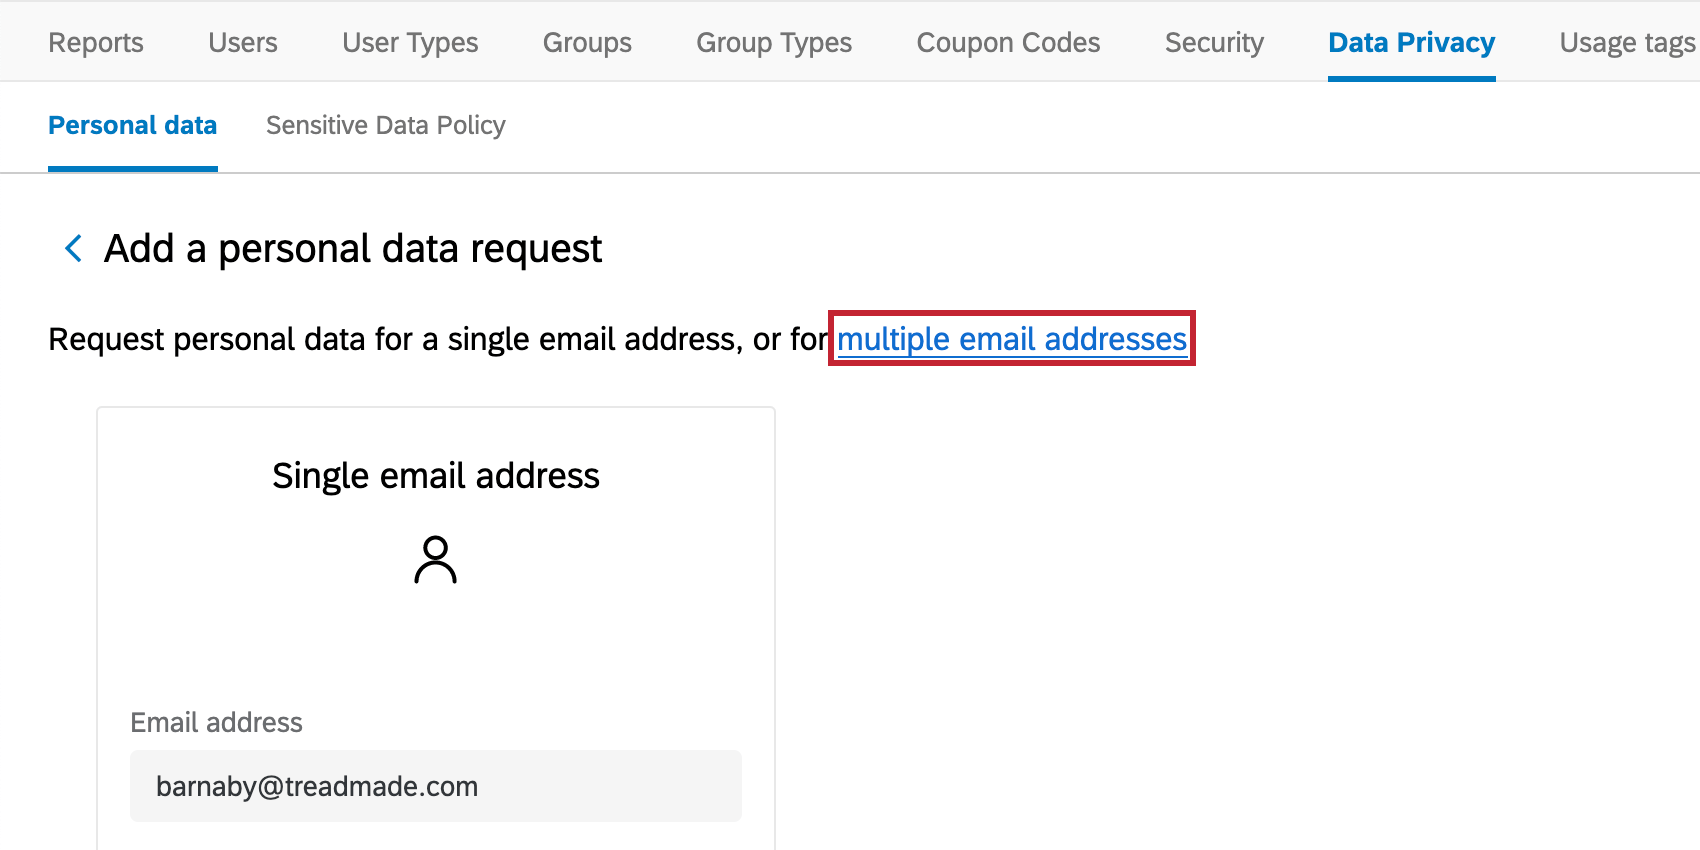
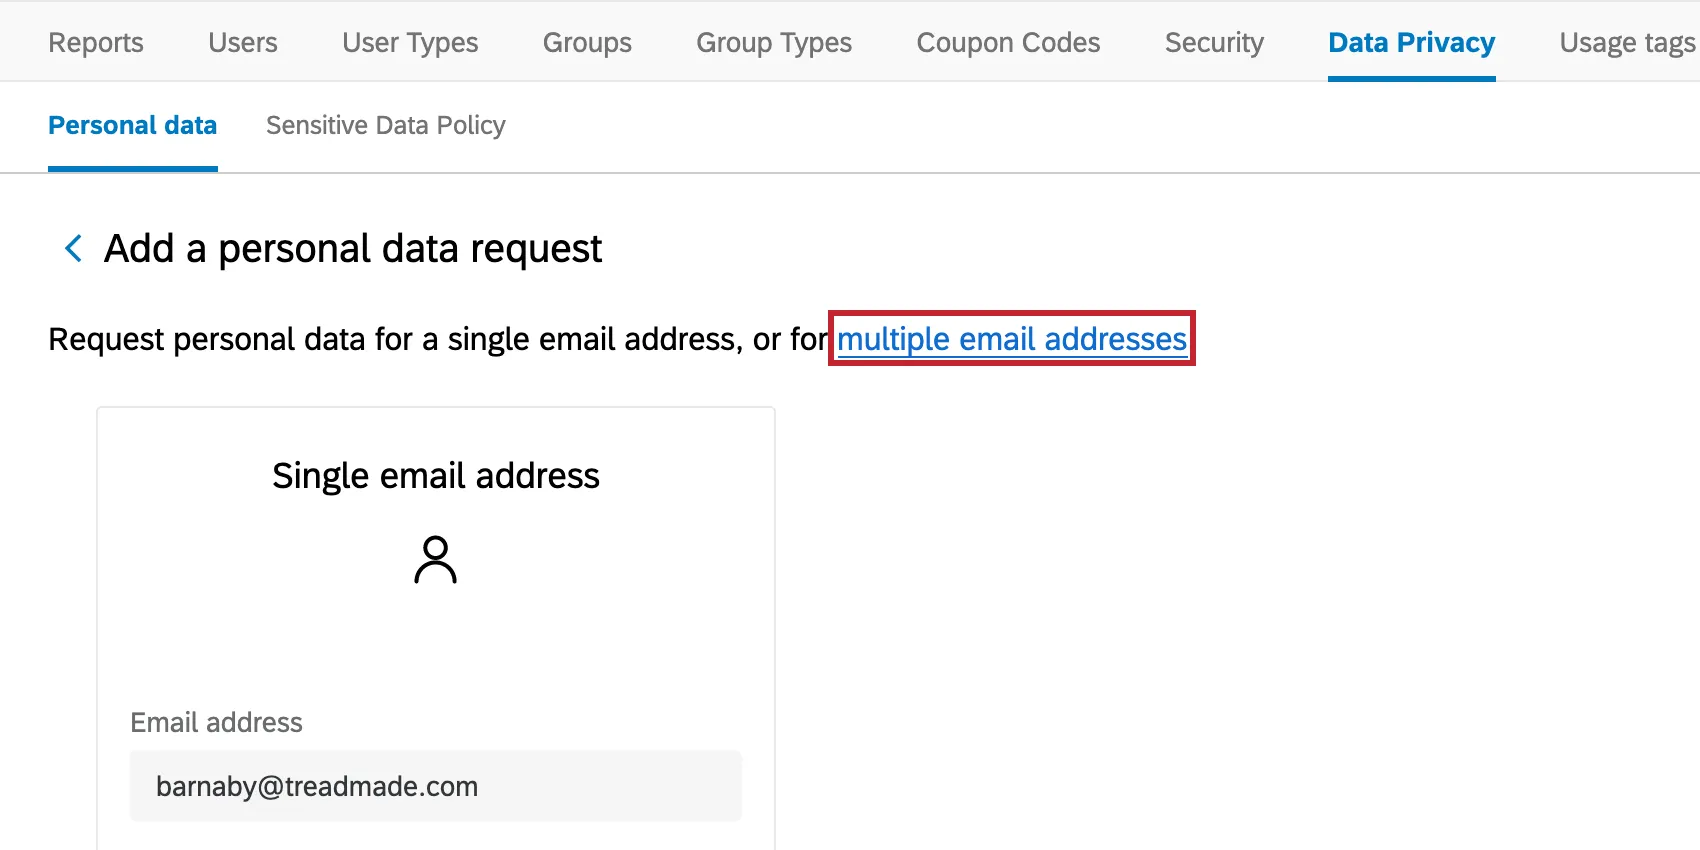
If you have many email addresses to search for and delete data for simultaneously, select Multiple email addresses when you create a request, then upload a CSV of all the email addresses for which you want to delete (or search) the corresponding records. You must ensure the file is not UTF-8 encoded. You may only list up to 500 email addresses in one file.
Qtip: This solution does not delete responses in progress in the offline app, entire surveys, or SFTP server data. It also does not refresh Stats iQ data (although does remove the data so that when Stats iQ is refreshed, the data will be gone). See the following sections for instructions on removing the listed data.
Attention: This tool only catches records that are clearly connected to a contact in the XM Directory. This means, for example, if an email was typed into a text entry question asking for email address in a survey distributed via anonymous link, that response will not be deleted by the deletion request since the response is not associated with a contact. In this scenario, you’d want to filter your data by the email in question, and then delete the response.
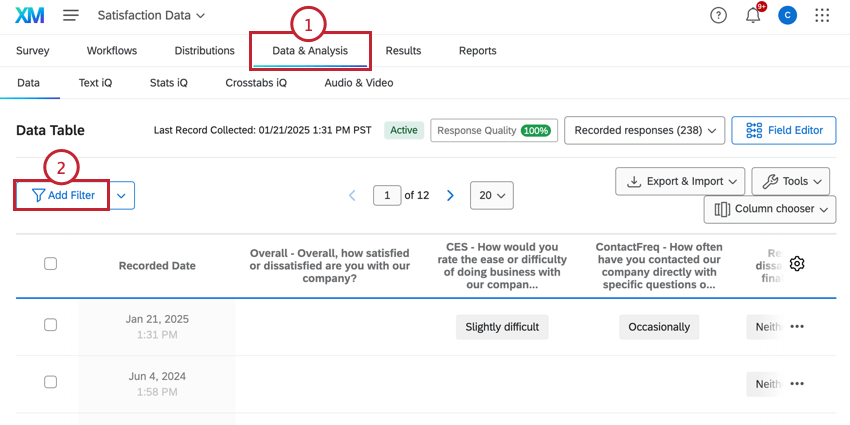
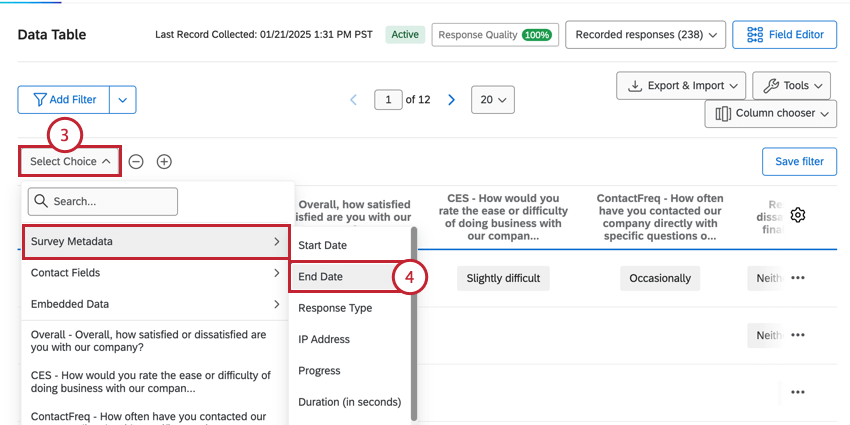
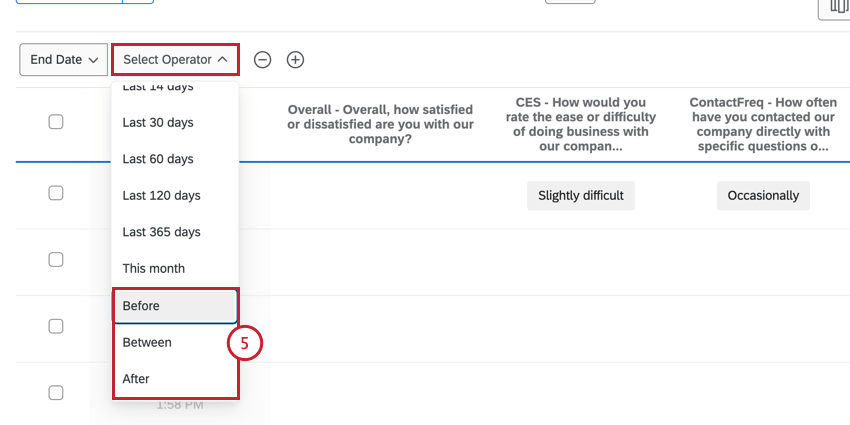
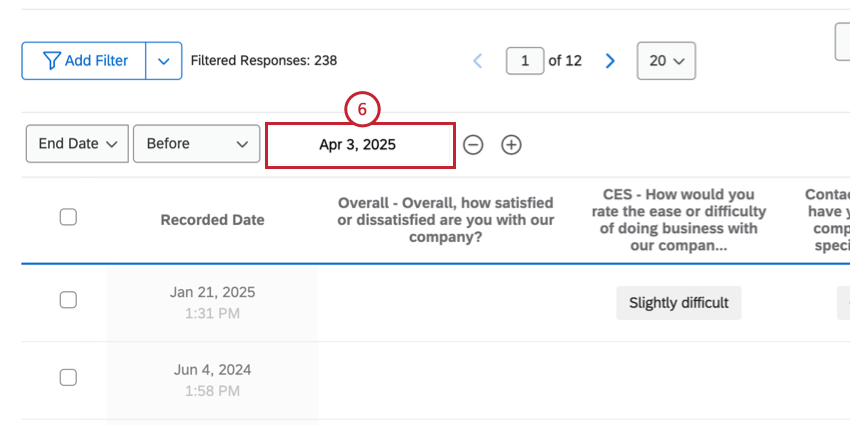
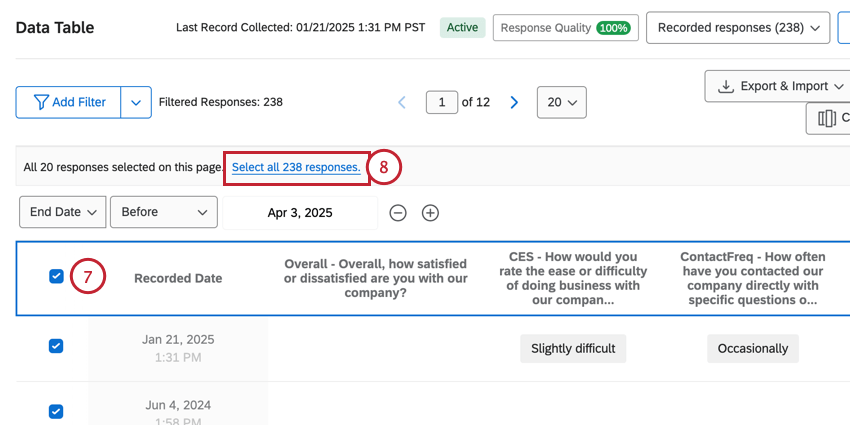
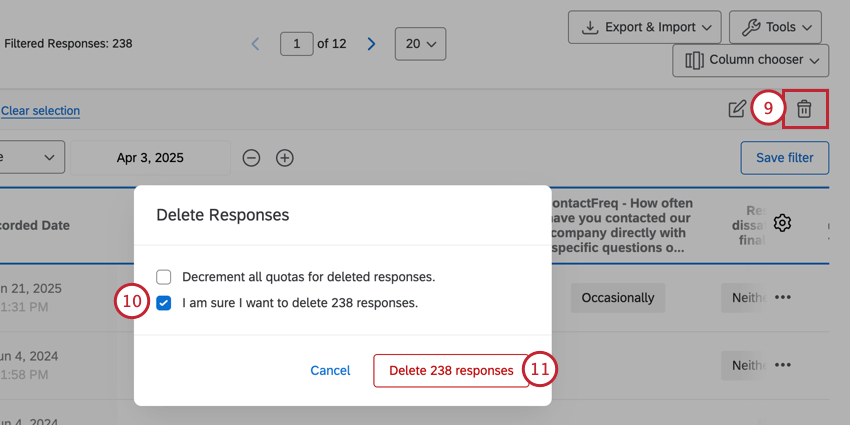
Deleting Responses by Date
You can delete responses based on their end date. When filtering by end date, you can choose to include responses from before, after or between specific dates.
Data Deletion: Survey Platform
This section details how a standard user can delete individual data points. You may delete:
- The entire survey response, multiple responses, or all responses
- The entire survey project (including all related data)
- A contact, multiple contacts, the entire contact list, or multiple contact lists
- Admin data
- Content in add-ons such as Stats iQ, the offline app, and tickets
If you have access to more than the Survey Platform, the sections below will cover how to remove this data.
Deleting Response Data
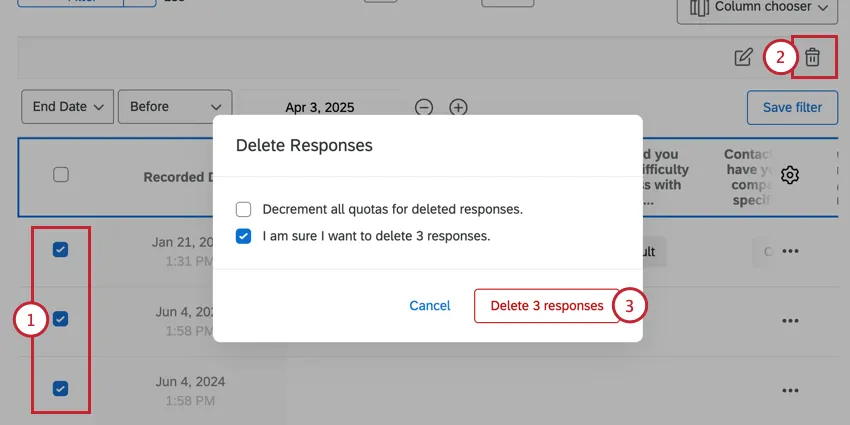
For more details, check out the Deleting Responses support page.
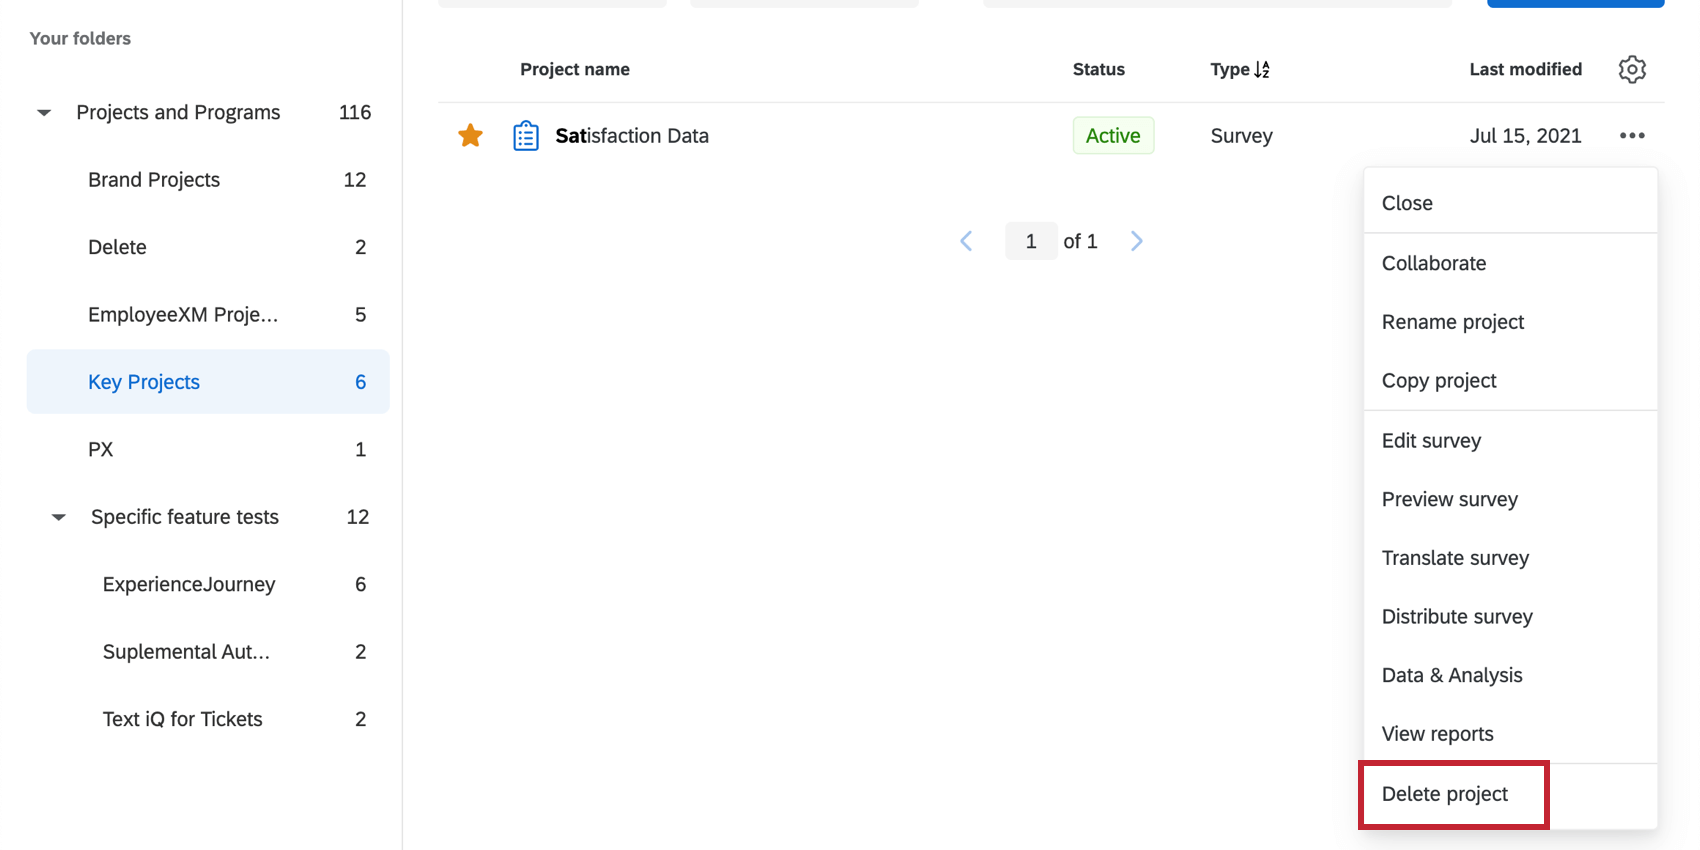
Deleting Entire Projects
Deleting a project deletes all the response data inside it. It does not delete contacts, contact lists, or offline app responses still cached on your device.

Click the dropdown next to the project you want to delete and select Delete Project at the bottom of the list.
Once a project is deleted, your Brand Administrator can make sure it is deleted permanently. If you are a Brand Administrator and are unsure how to do this, see Deleting Admin Data subsection below to learn how.
Qtip: If this option is grayed out, this is a survey owned by another user. Contact the owner to get this survey deleted. You can find the owner’s name by displaying the Owner column in your Projects page.
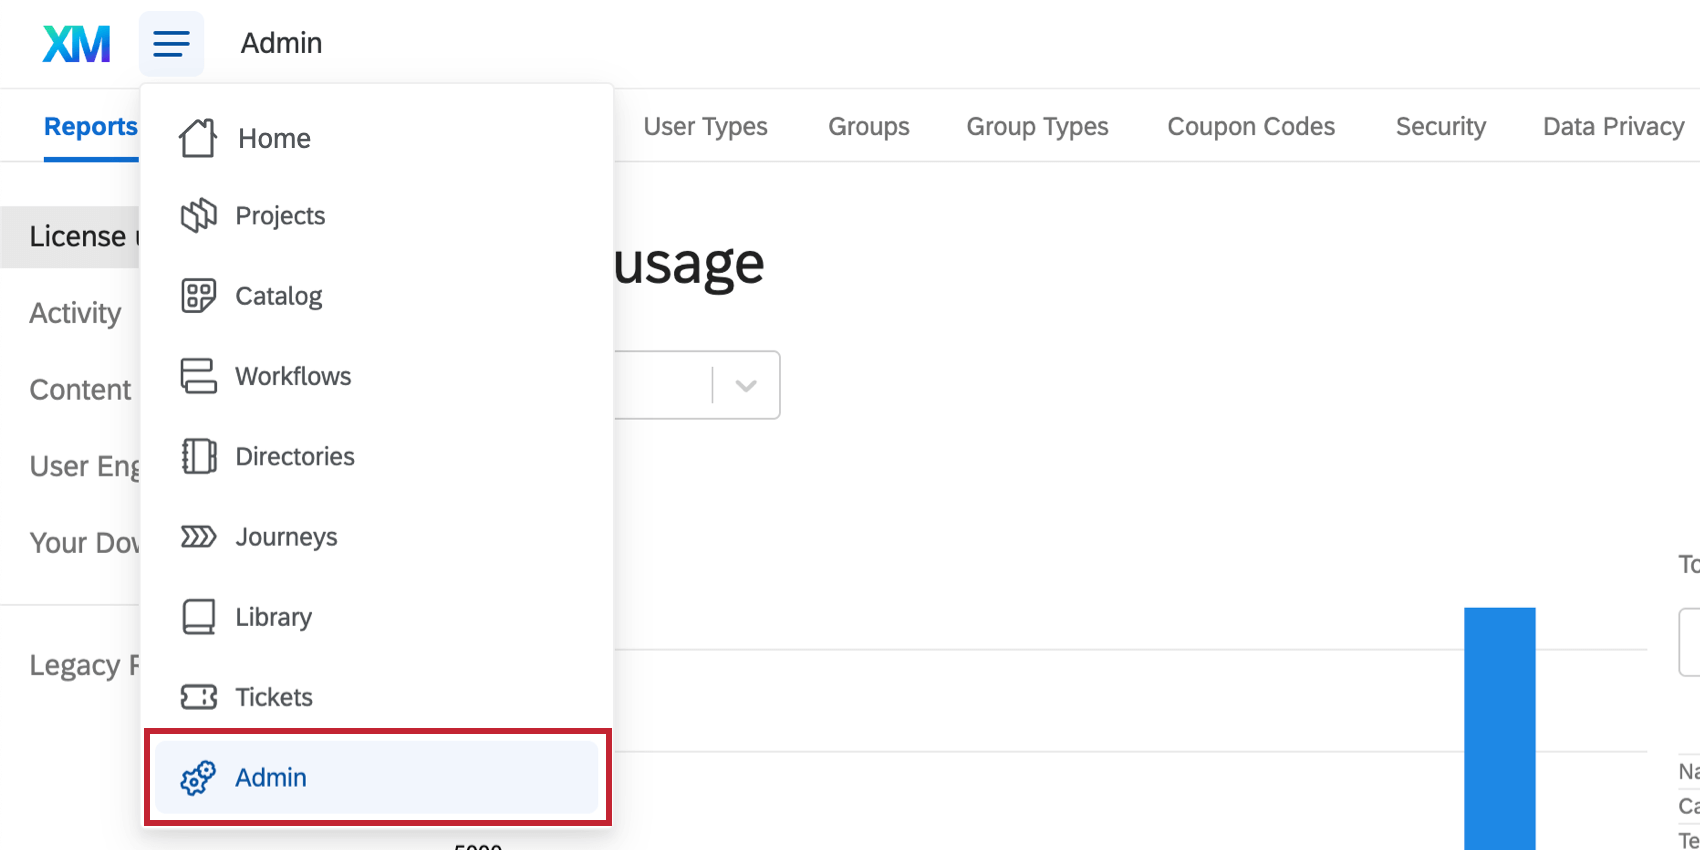
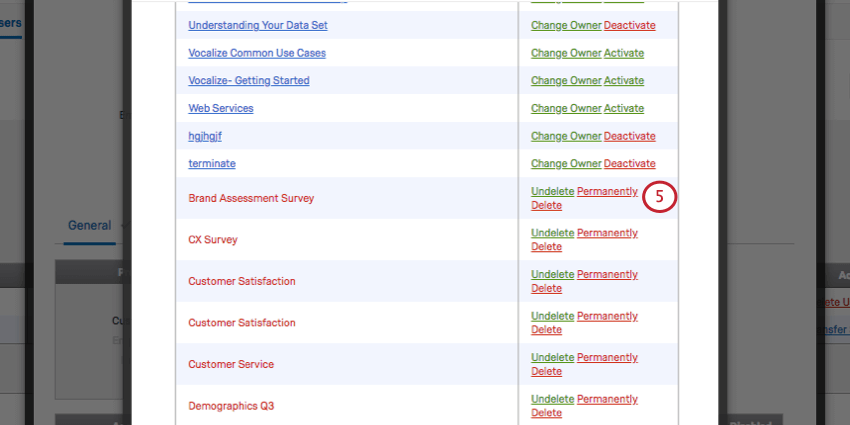
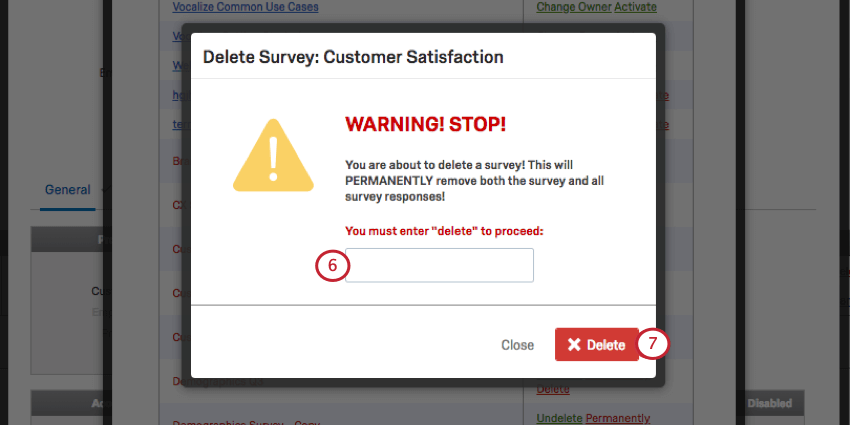
Deleting Admin Data – Surveys
To delete a project permanently from a user’s account, the user must first delete it themselves. Then the Brand Administrator must do the following:
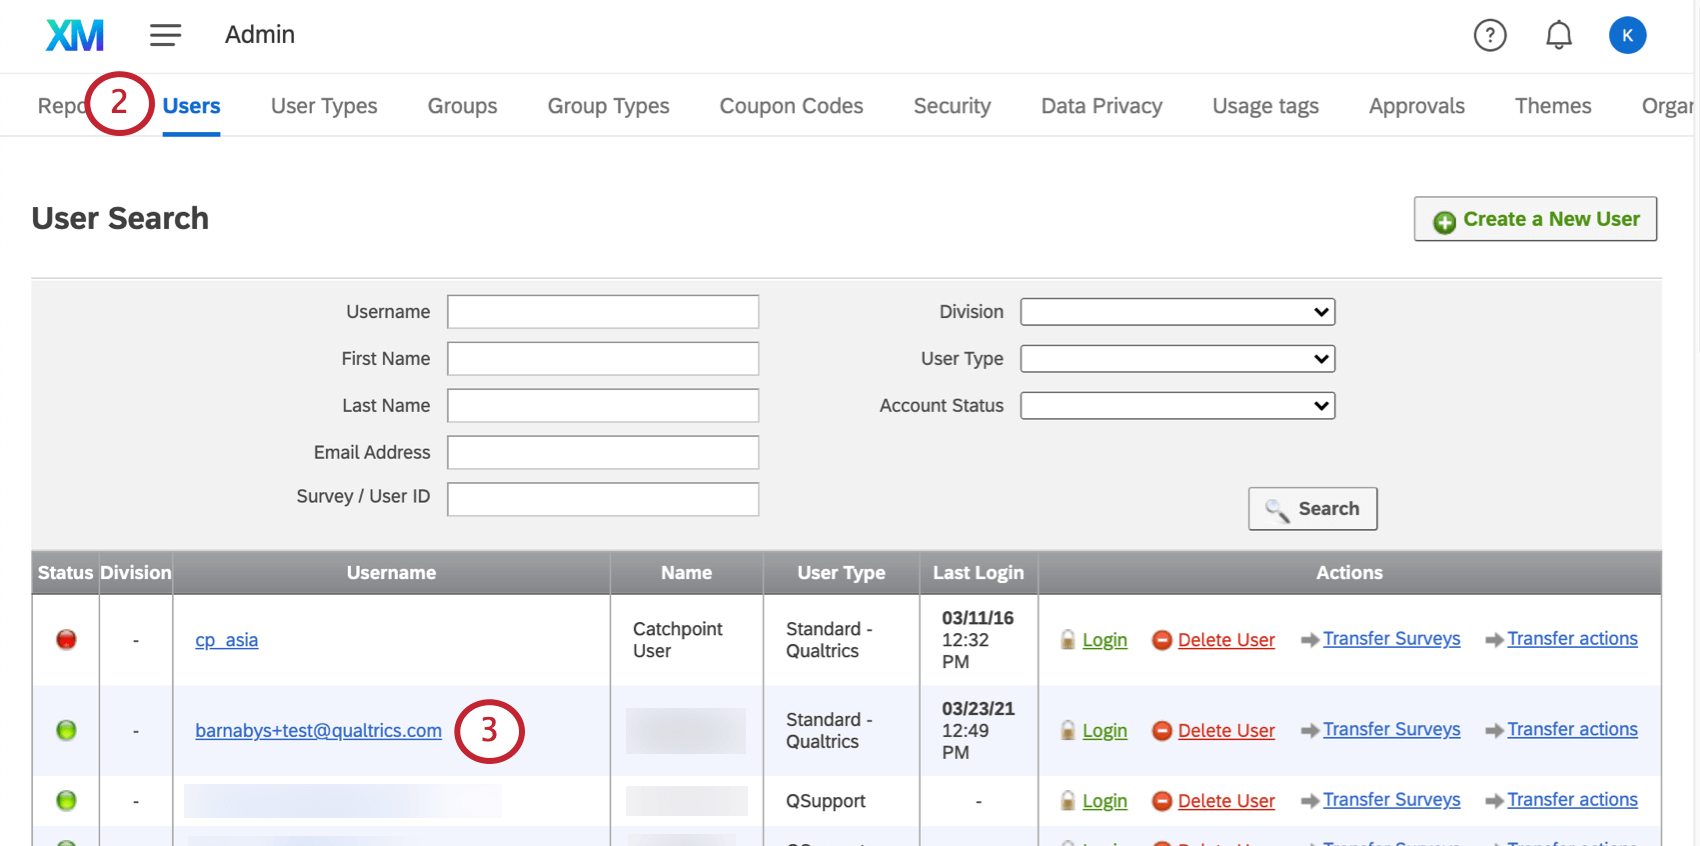

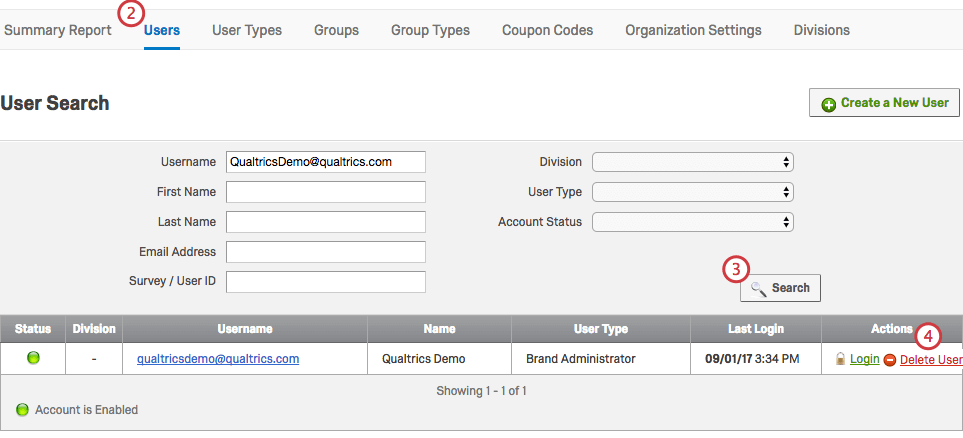
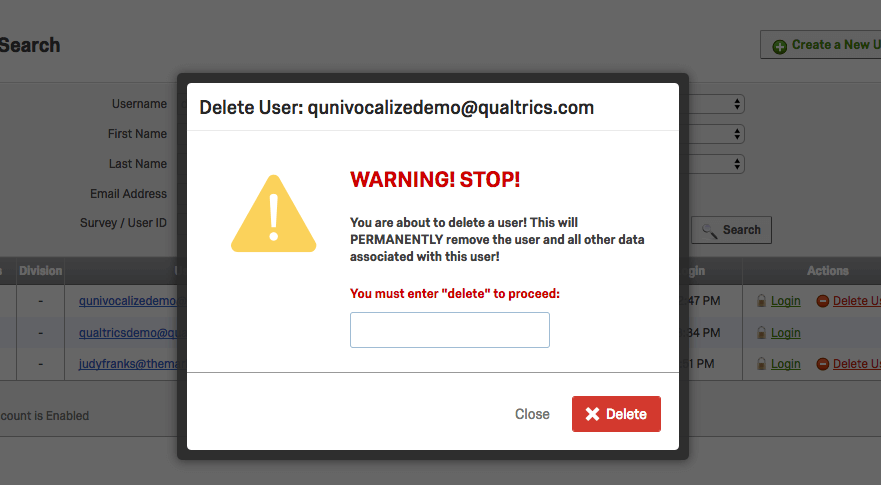
Deleting Admin Data – Users
Deleting a user deletes all their data, including responses, contact lists, and anything else in the account. To delete a user/multiple users, the Brand Administrator must do the following:
Deleting from Stats iQ
Once data is deleted from the Data & Analysis tab (described in the Deleting Response Data subsection above), you will need to remove the data from Stats iQ. You can do this by refreshing the data.
Click Settings and select Import Latest Data on the upper-right.

Deleting from the Offline App
If you have responses in progress on your offline app, you can either upload them to Qualtrics so you can delete them from Data & Analysis, or you can delete them from your device.
Delete responses straight from your device by doing the following:
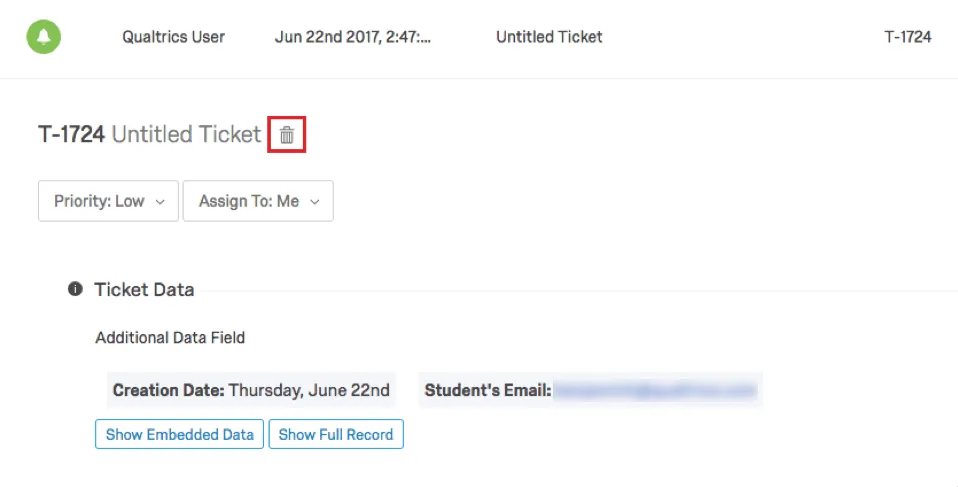
Deleting Tickets
Sometimes your tickets program will include response data or embedded data with the tickets created from survey responses. If you are a Brand Administrator, you will be able to delete tickets by clicking on the trashcan icon, as per below.
Data Deletion: XM Directory
Any contact deleted from the directory will automatically be deleted from all other mailing lists and any distributions that were sent to those lists. However, all contact information will remain in the survey response. See the Data Deletion: Survey Platform section above for details on deleting these responses.
Deleting Contacts from the Directory
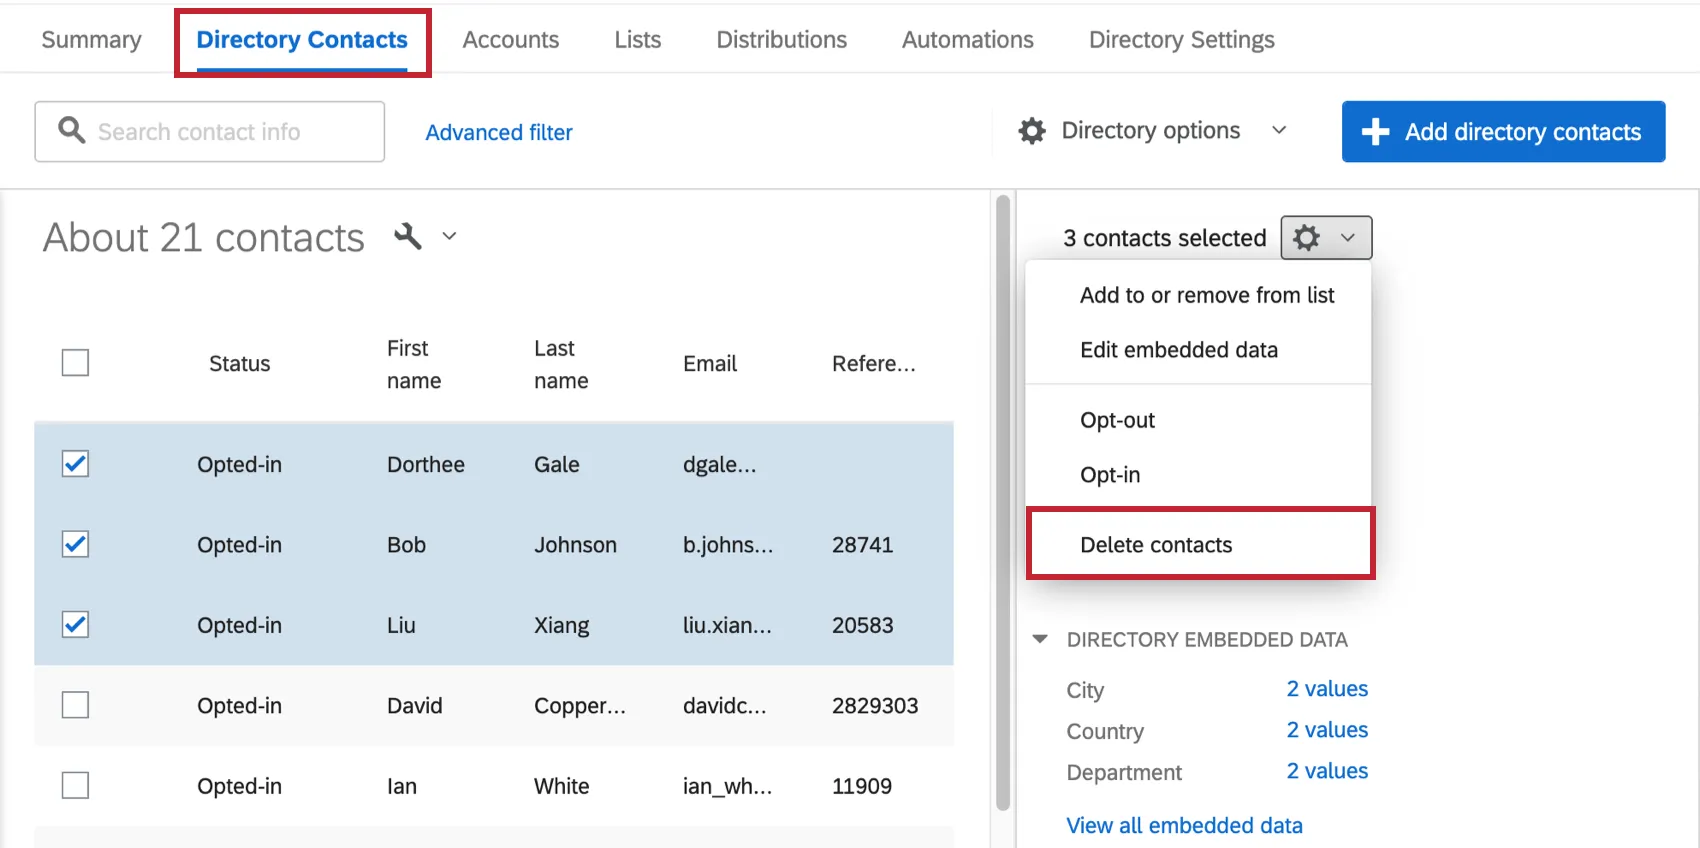
Go to the Directory Contacts tab and check the box next to each contact you’d like to delete. Once you’ve selected the contact(s) you wish to delete, click the dropdown and select Delete contact(s).
Deleting Mailing Lists
Deleting a mailing list will not delete the contacts. You will need to delete the contacts from the directory.
Data Deletion: CX Dashboards
Deleting Data Originating in a Survey
If you delete the survey responses or the survey itself according to the directions in Data Deletion: Survey Platform, the data will automatically be deleted from the dashboard.
Deleting Ticket Data
If you delete the tickets according to the directions in the Data Deletion: Survey Platform, the data will automatically be deleted from the dashboard.
Deleting Distribution Data
If you are reporting on Distribution data in your dashboard, you can use the Data Privacy tool to get this data and any additional Qualtrics data from the same email addresses removed.
Data Deletion: Employee Experience
For 360, Employee Engagement, Employee Lifecycle, and Ad Hoc Employee Research projects, you can delete all information connected to a respondent in one place. Once you delete a participant in the directory, you delete:
- Their response in every project
- Their metadata
- All their reports and dashboard data
- The participant’s account
There are two ways to delete a participant from the directory.
The first way is individually. Click the dropdown menu next to a user, and then select Remove from Directory.
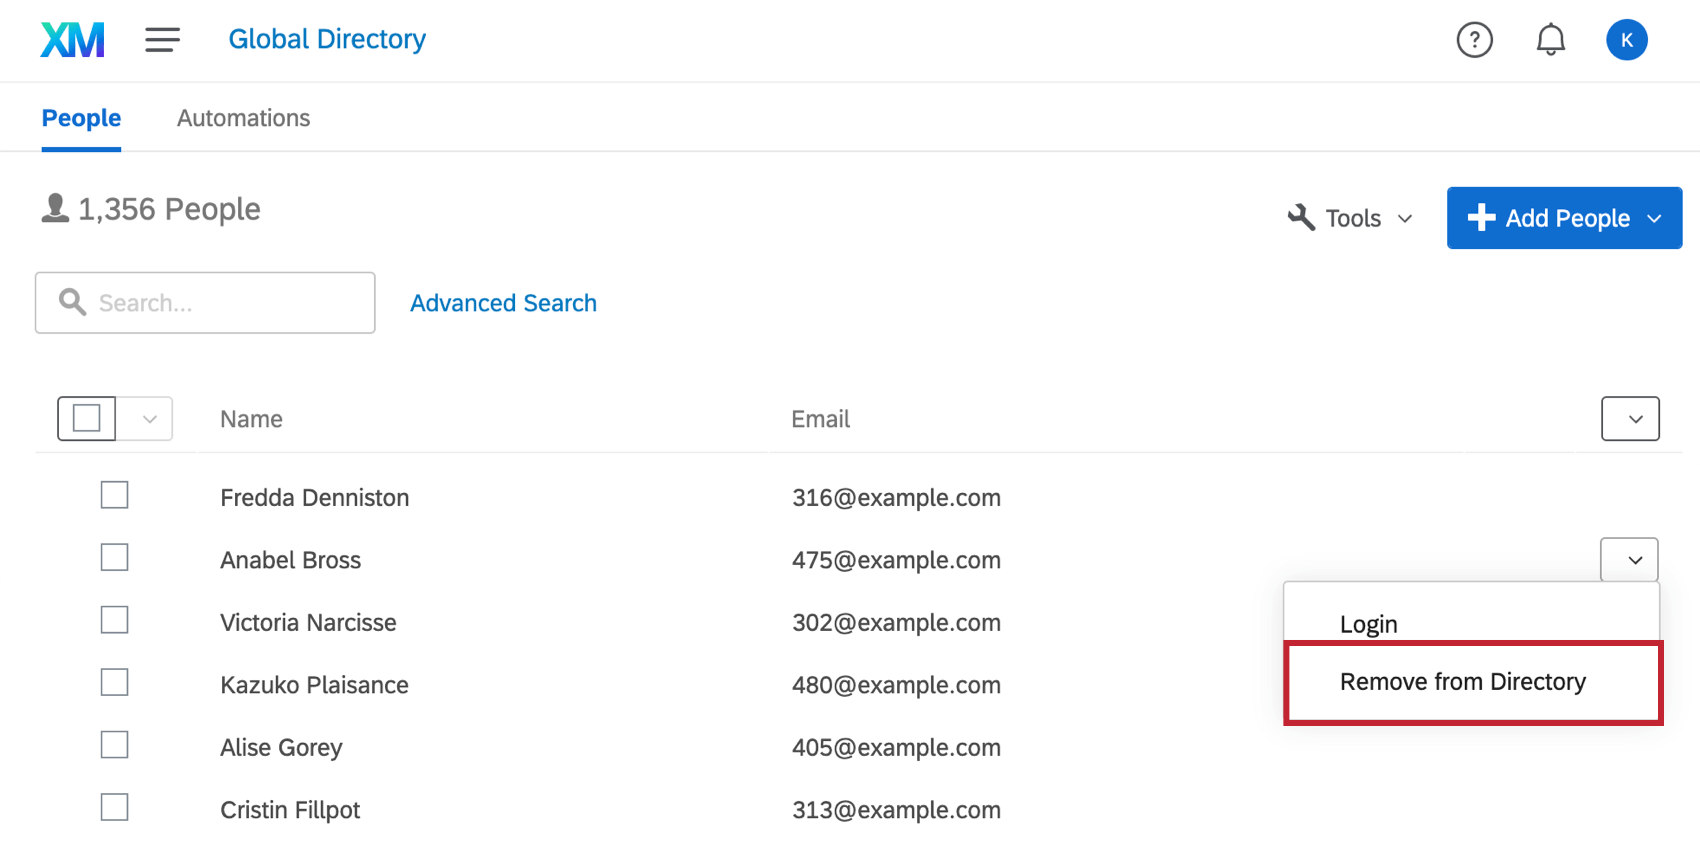

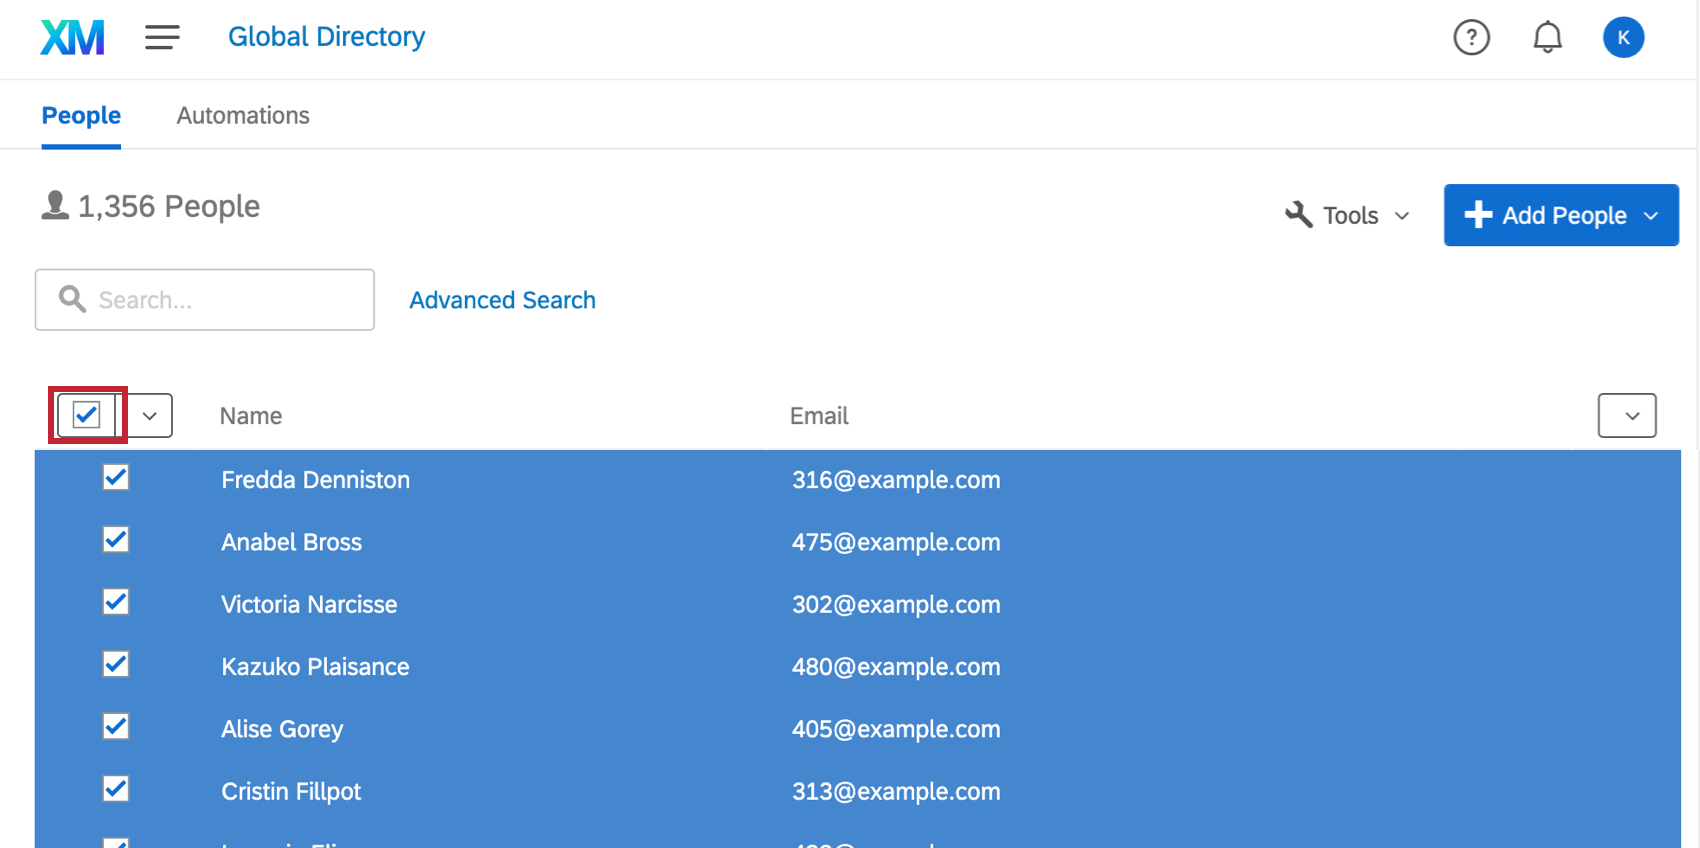
The second way to remove users is by removing multiple users at a time. If you check the box next to each person you want to remove, you can delete them by clicking the dropdown menu on the left and choosing Remove from Directory.
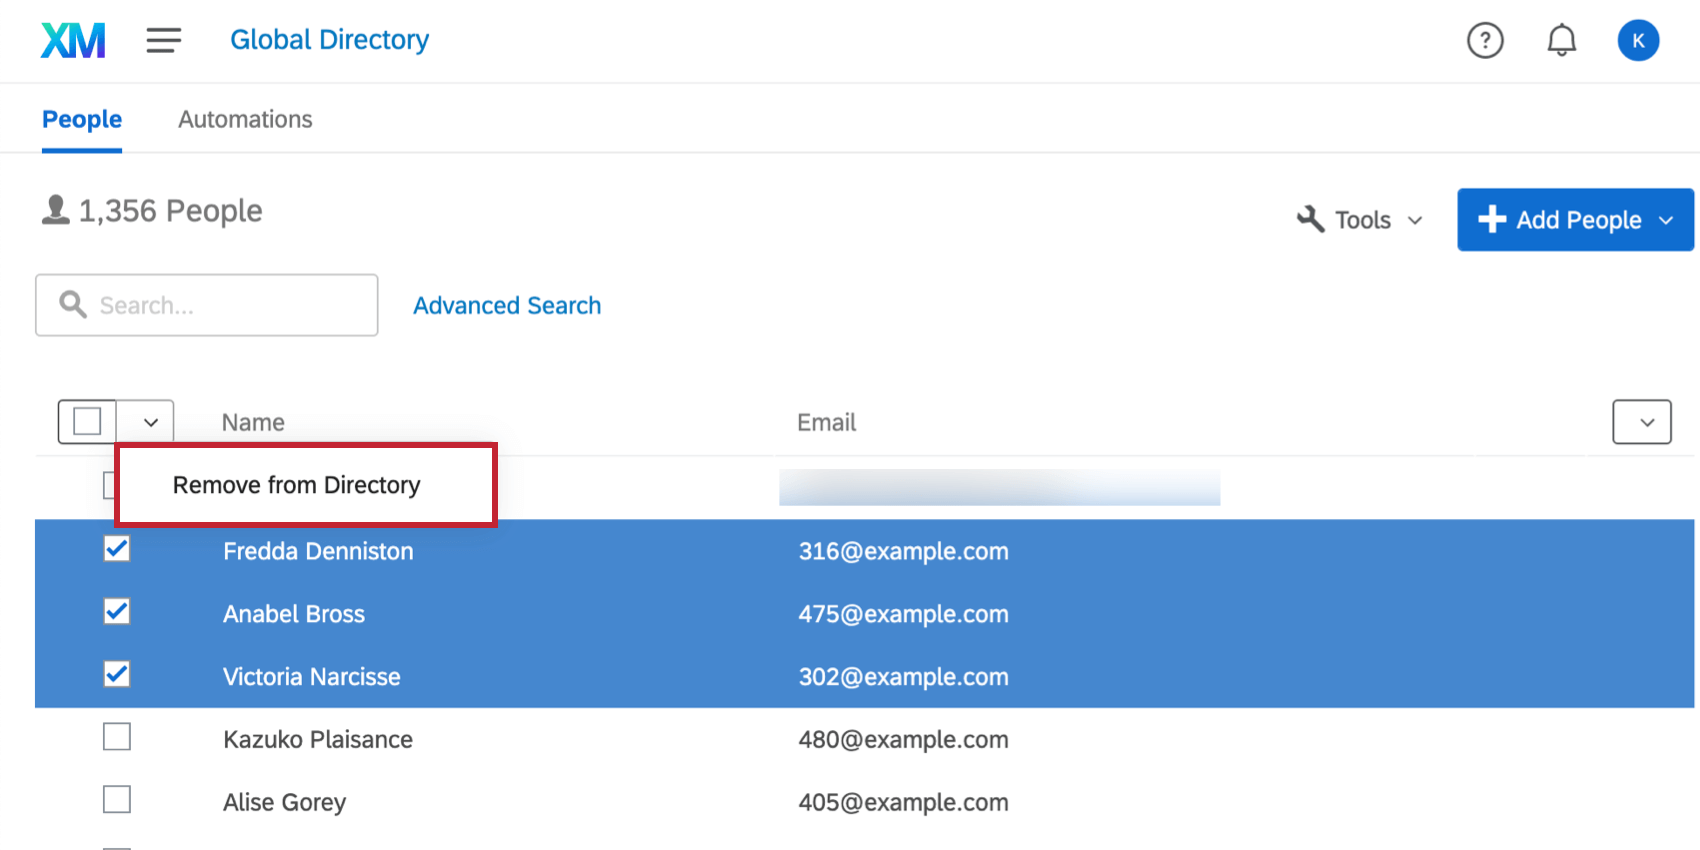
Qtip: Be careful! Next to the dropdown menu is a Select All option. If you click this, it will select all the people on that page of your directory!

Data Deletion: Custom Solutions
There are some additional considerations if you have opted for a custom solution.
SFTP Server
If you are utilizing an SFTP server, then after you remove data in the Qualtrics platform, you will also need to remove all personal data from the SFTP server.
Data Deletion: Session Replay
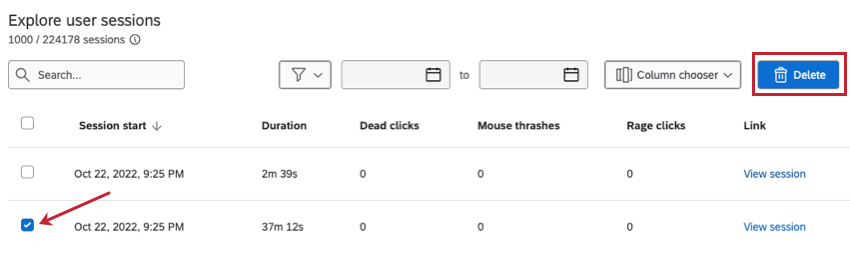
For Website Insights projects using session replay, you can delete sessions and their associated data in the Session Replay tab.
If you want to delete a session for any reason, click the checkbox to the left of the session and select Delete.
You can also select multiple checkboxes to delete multiple sessions at the same time, or select the checkbox at the top of each page to select all sessions on that page.
Qtip: You can search for identifying visitor details to find responses associated with a certain individual.
For more information on data security and privacy while using session replay, see Data Security & Privacy for Digital Experience Analytics.
Attention: Deleting data by email address, which deletes all contacts, responses, tickets, and other Qualtrics information associated with an email address, will not delete sessions that may have been captured for the individual associated with that email address. Instead, you will need to search for and delete all sessions associated with that individual.
Backup & Data Retention
This section pertains to data in the Services, not Qualtrics internal company retention procedures. All respondent data are backed up by Qualtrics using two methods: automatic propagation across servers (immediate upon collection) and daily complete off-site encrypted backups. However, customers are responsible for routine back-up of their data in case of accidental deletion/modification caused by one of their users, and for their own archive/data retention policies. Qualtrics backups data for disaster recovery purposes only. It is the customer’s responsibility to enforce any required retention periods that apply to their data. For information on how to delete responses recorded before a certain date, see the Deleting Responses by Date section above.
FAQs
What responses actually count toward my license?
What responses actually count toward my license?
Licensed responses are any completed responses that are not Survey Previews or Survey Tests. Completed responses can include imported responses, finished surveys, and partial surveys that were moved out of responses in progress and recorded. If you ever want to know the exact number of interactions you’ve used, reach out to your Brand Admin. You can also view your response usage by going to Account Settings to view the legacy Account Usage report.
Contact Account Services or your Account Executive prior to importing historical responses, as this may require an update to your license.
How does account usage differ from recorded responses?
How does account usage differ from recorded responses?
Think of recorded responses as the total number of complete responses collected for a survey. This can include individual responses, anonymous responses, imported responses, and more.
Imported responses are billable under the new simplified pricing and packaging plans. If your license is on the new pricing plan, you can check your license’s usage with the Interaction Usage Report. If you are on multiple suites, imports are not currently included in the usage report. If you are not on a new plan, imports are not included in your usage report. Contact Account Services if you have questions about your license.
Account Usage shows you how many responses you’ve collected, labeled as “Allowed Responses.” This excludes imported responses because they are considered separate. If you have questions about pricing for imported responses, reach out to your Account Executive.
That's great! Thank you for your feedback!
Thank you for your feedback!