-

Qualtrics Platform -

Customer Journey Optimizer -

XM Discover -

Qualtrics Social Connect
Using Your Own SMS Provider
About Using Your Own SMS Provider
With SMS distributions, you can send surveys or survey links directly to your respondents’ phones through text. Many customers elect to use Qualtrics’ preconfigured setup, but if your company has a preexisting relationship with an SMS provider, you can use that to send SMS distributions in Qualtrics instead.
Qualtrics does not recommend any provider over another, but we do recommend that customers research the best service provider for their business. All providers listed on this page can be integrated with Qualtrics, but coverage and feature availability may vary in different regions and countries.
Where in the Platform You Can Use Your Own SMS Provider
You can set up your own SMS provider for just about any project or feature compatible with SMS. This includes:
- SMS in a survey project
- XM Directory
- XM Directory Lite
- Compatible Employee Experience projects
Required Admin Setup in Qualtrics
- SMS distributions are an add-on feature not included in the standard Qualtrics license. Make sure your license has SMS. You can confirm this with Account Services.
- Contact Account Services and ask them to send you the plugin for your chosen SMS provider. The providers we currently support include:
- Twilio
- Link Mobility
- Sinch
- Infobip
- MessageMedia
- Vonage
- MessageBird
Attention: If you are interested in using an SMS provider that is not listed, please talk to Account Services about enabling your preferred service provider.
- Log into your Qualtrics account.
- Use the navigation menu to go to Admin.
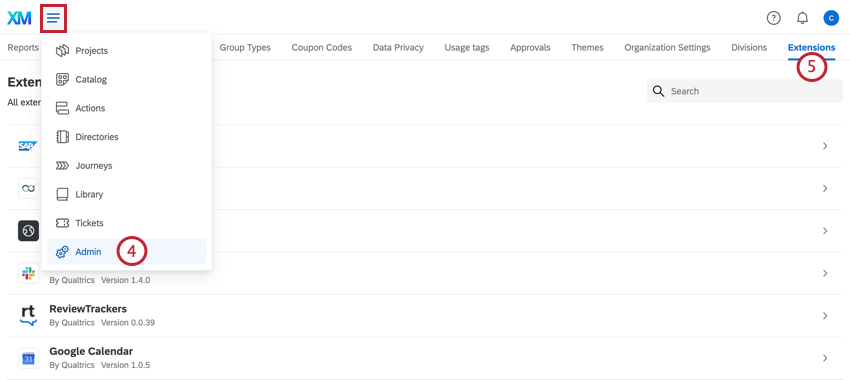
- Click Extensions.
- Use the search bar to find your SMS provider.
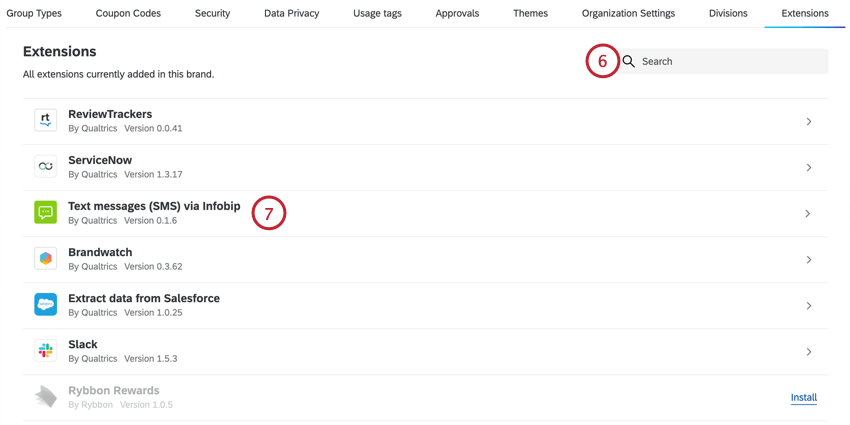
- Click the name of the extension.
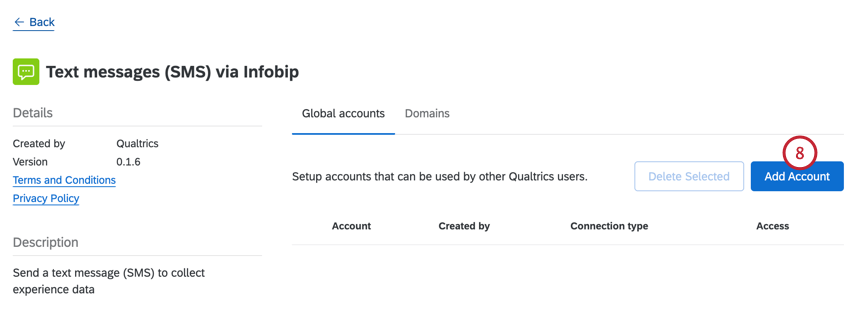
- Click Add Account.
- Fill out all the fields required to connect your account to Qualtrics. See the following guides for fields specific to your SMS Provider:
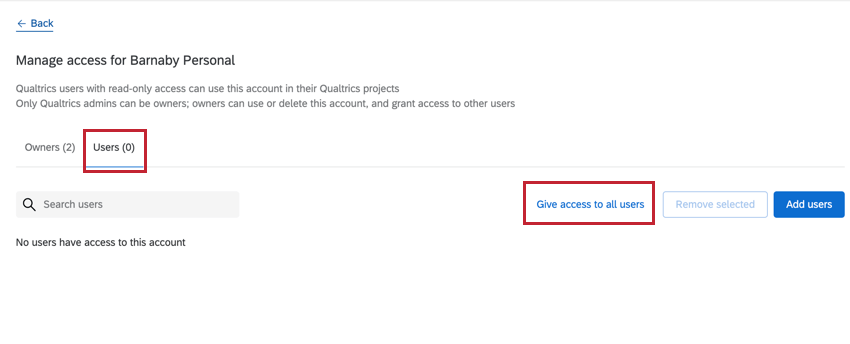
- After setting up the connection, you must give access to all users for the connection to be available. Click the Give access to all users link in the Users section of the extension to enable the connection.
 Qtip: If you’d like to remove access for certain users in your license, you can edit user or group permissions. The permission “Use SMS Distributions” controls who can use SMS distributions.
Twilio
This section describes steps to take to connect your Twilio Account to Qualtrics.
Steps in Qualtrics
Have a Brand Administrator complete the Required Steps in Qualtrics.
These are the fields your Brand Administrator will need to fill out to connect a Twilio account.
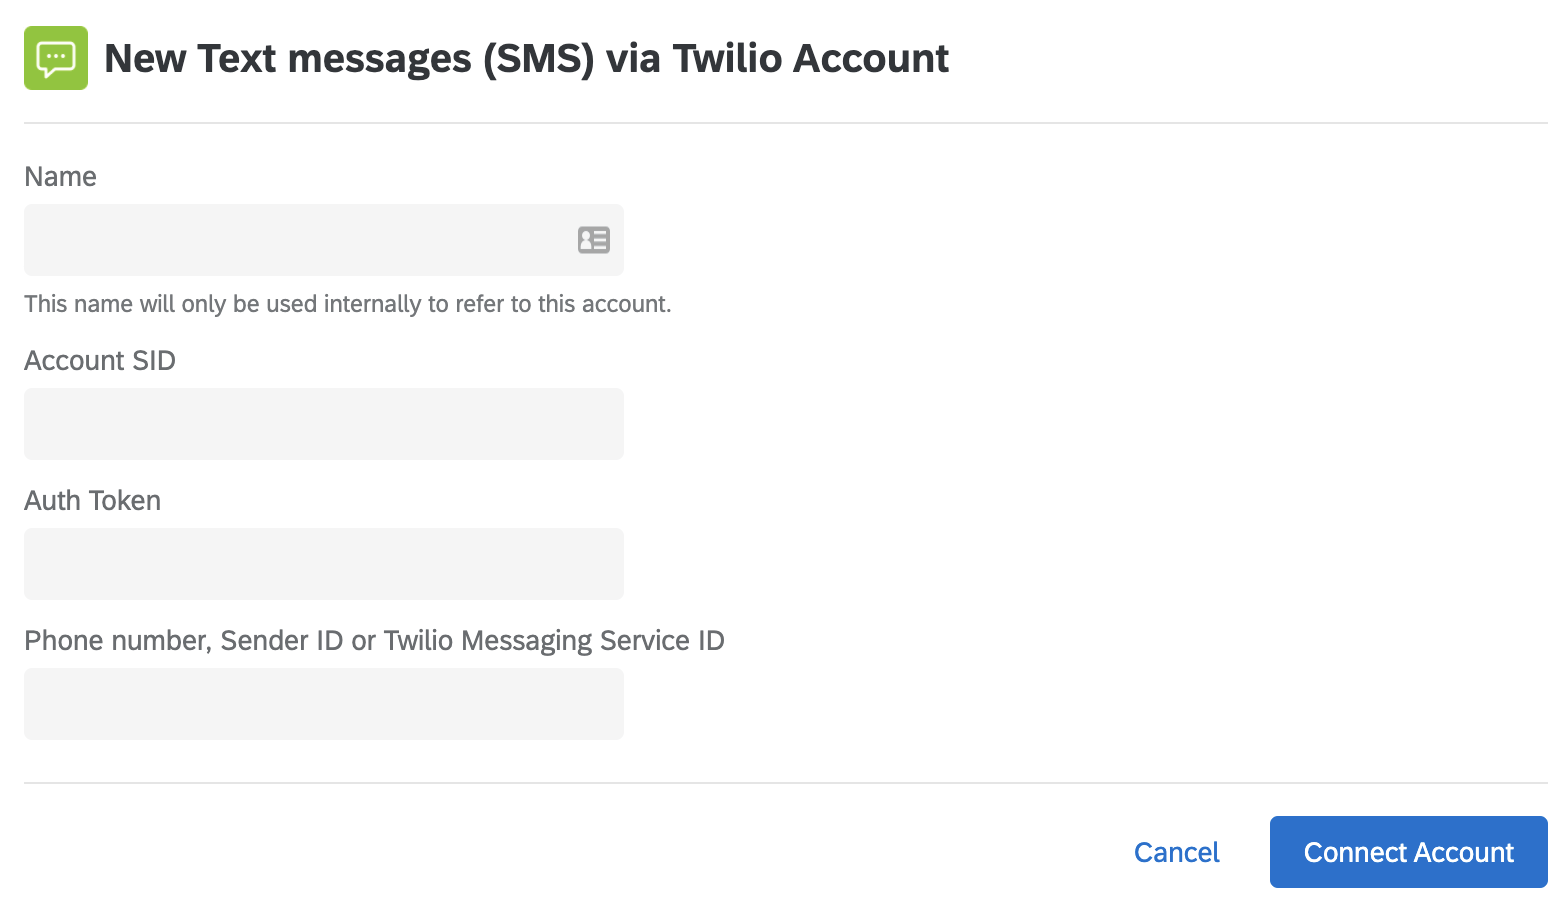
- Name: Enter any name that will help you later identify what this connection is / what it’s for.
- Account SID: Twilio Account SID used for API access. You can find this on the dashboard after logging into Twilio.
- Auth Token: Twilio Auth Token used for API access. You can find this on the dashboard after logging into Twilio.
- Phone Number, Sender ID or Twilio Messaging Service ID: The number or ID that will be used as the ‘FROM’ number when sending an SMS message. This may be 1 of the following:
- A specific number, e.g., 13531234567. This must be a number purchased in your Twilio account. Always include the country code at the beginning of the number.
Qtip: You can also use short codes. See Twilio’s documentation for more details.
- An Alphanumeric senderId, e.g., Qualtrics. Please note this must be set up in Twilio to be supported. Please see Twilio’s documentation.
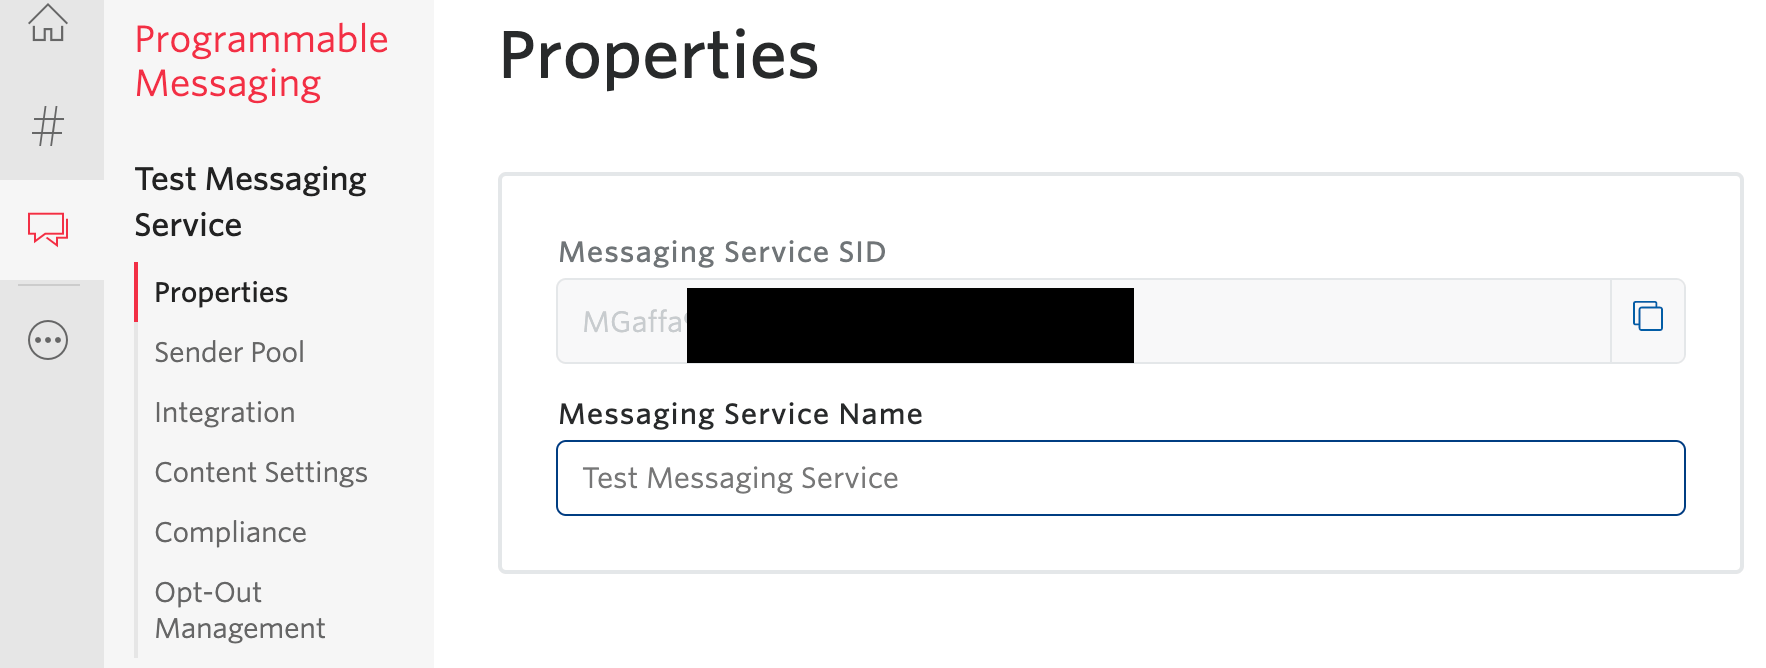
- A Twilio Messaging Service ID. Please see Twilio’s documentation on Messaging Services. Messaging Service Ids start with MG and are found under the Properties section of the Messaging Service tab after logging into Twilio.
 Qtip: The Twilio Messaging Service ID gives you the most control over regional numbers and smart routing.
- A specific number, e.g., 13531234567. This must be a number purchased in your Twilio account. Always include the country code at the beginning of the number.
After connecting a Twilio account, follow these steps and select Give access to all users.
Steps in Twilio
You will need to set up webhooks for your numbers or messaging services. Please see additional information on webhooks from Twilio here.
Configuring Webhooks
The URL for your webhook takes the following form. Note that several parameters must be edited with information from your Qualtrics license / brand.
https://<DatacenterID>.qualtrics.com/distribution-providers/v1/receive/distribution/message/twilio-sms/<OrganizationID>
The method should be HTTP/POST.
Configuring Webhooks for Numbers
To configure the webhook in Twilio for a number:
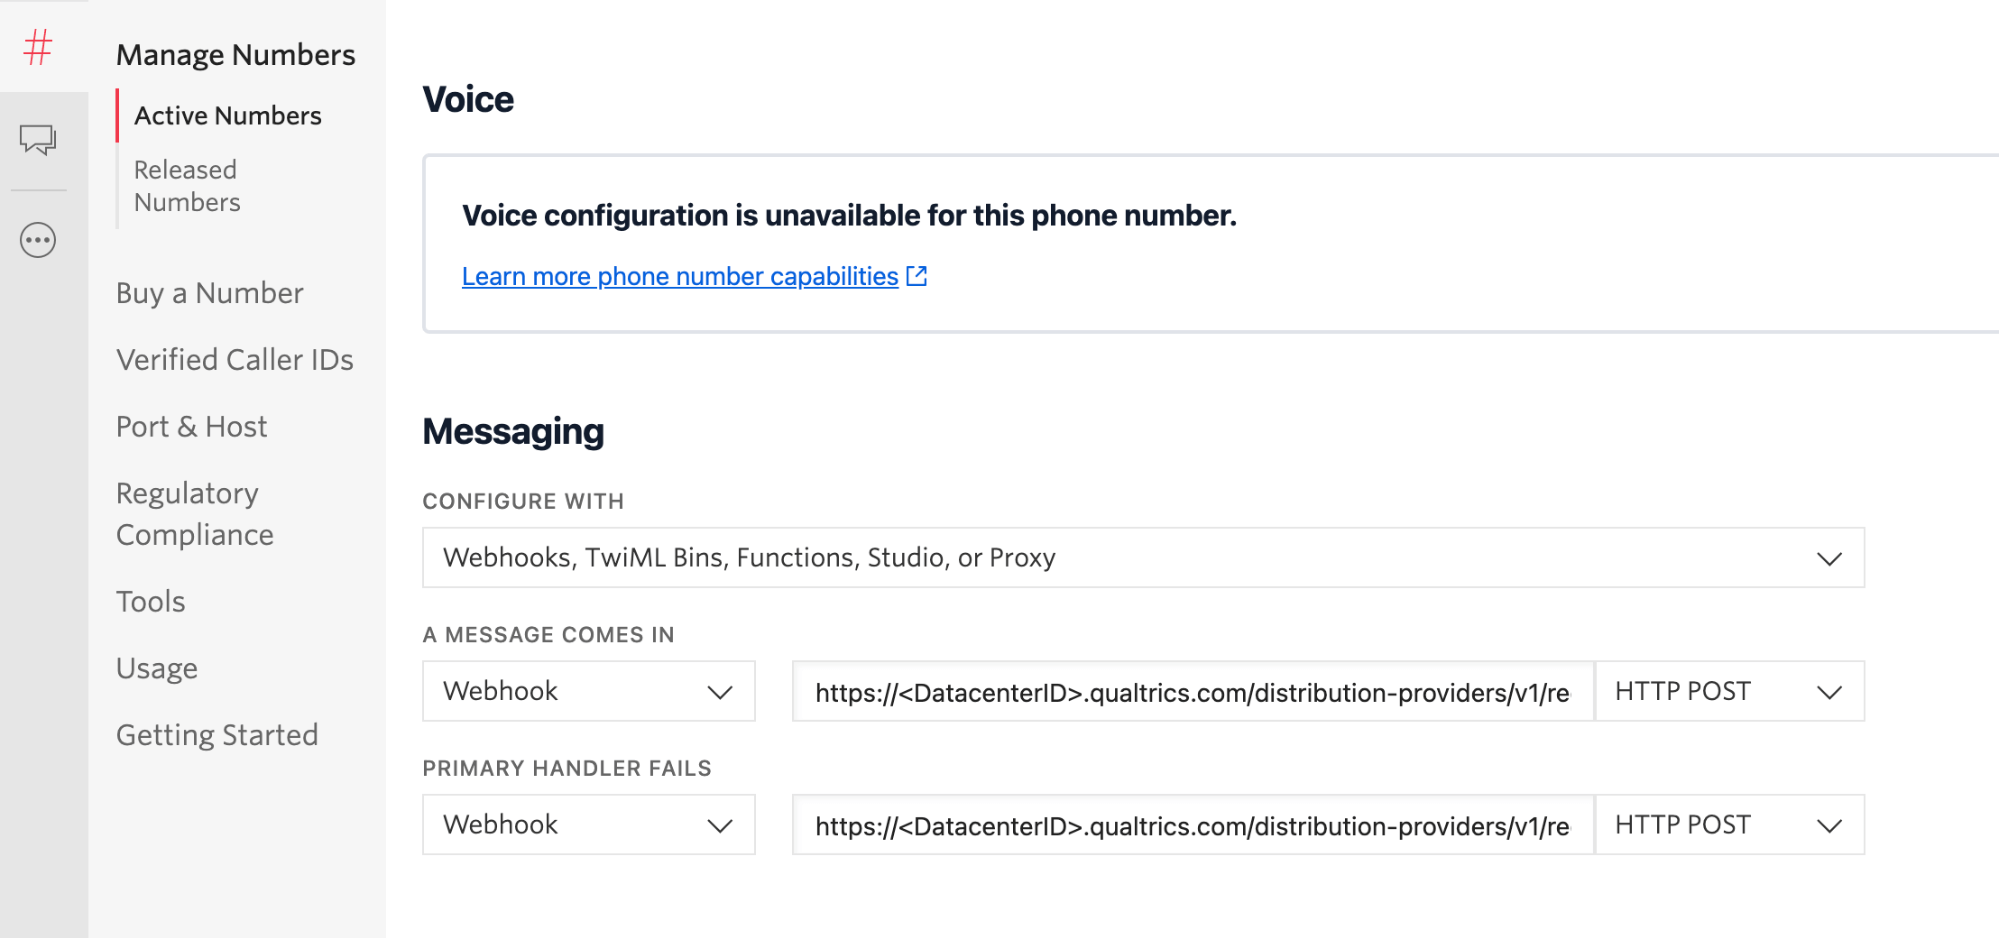
- Select Manager Numbers.
- Got to the Active Numbers section.
- Select the number you wish to configure.
- Under the Messaging header, choose to configure with Webhooks.
- Set the message to Webhook, set the URL to the following, with the < > and everything inside replaced with you organization’s parameters:
https://<DatacenterID>.qualtrics.com/distribution-providers/v1/receive/distribution/message/twilio-sms/<OrganizationID> - Ensure it is marked as a HTTP/POST method.
- You can also specify the backup URL (what to do if “Primary handler fails”) to be the same URL and method.
Configuring Webhooks for a Messaging Service
If you have configured your numbers to use a Messaging Service, you’ll add webhooks differently than you would for a single number.
In the Twilio Console:
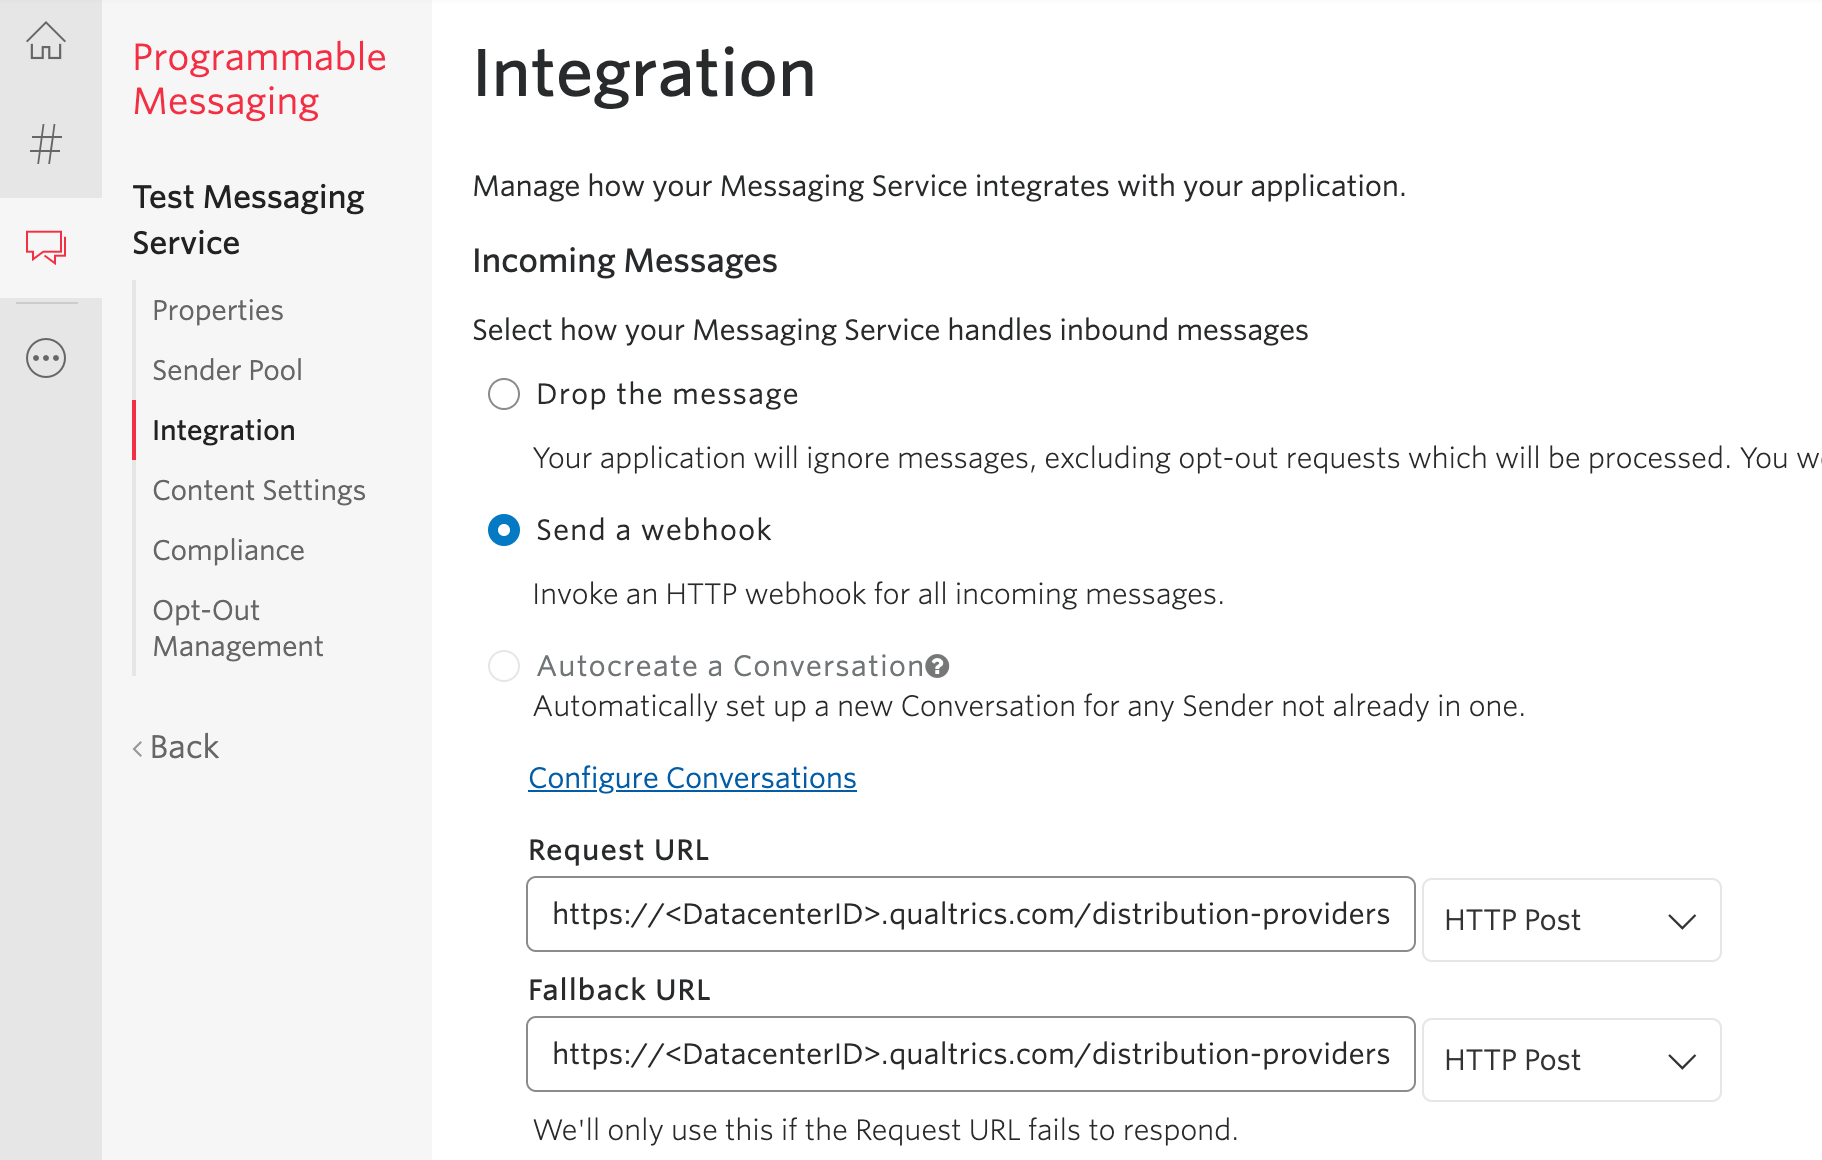
- Select Programmable Messages.
- Select the Messaging Service you wish to configure or create a new one. Please see the Twilio Support documentation for more details.
- When you have selected your Messaging Service, select the Integration section.
- You must configure the Incoming messages to include the URL above with your organization parameters.
- Ensure it is marked as a HTTP/POST method.
- You can also specify the backup URL to be the same URL and method.
Link Mobility
This section describes steps to take to connect your Link Mobility account to Qualtrics.
STEPS IN QUALTRICS
Have a Brand Administrator complete the Required Steps in Qualtrics.
These are the fields your Brand Administrator will need to fill out to connect a Link Mobility account.
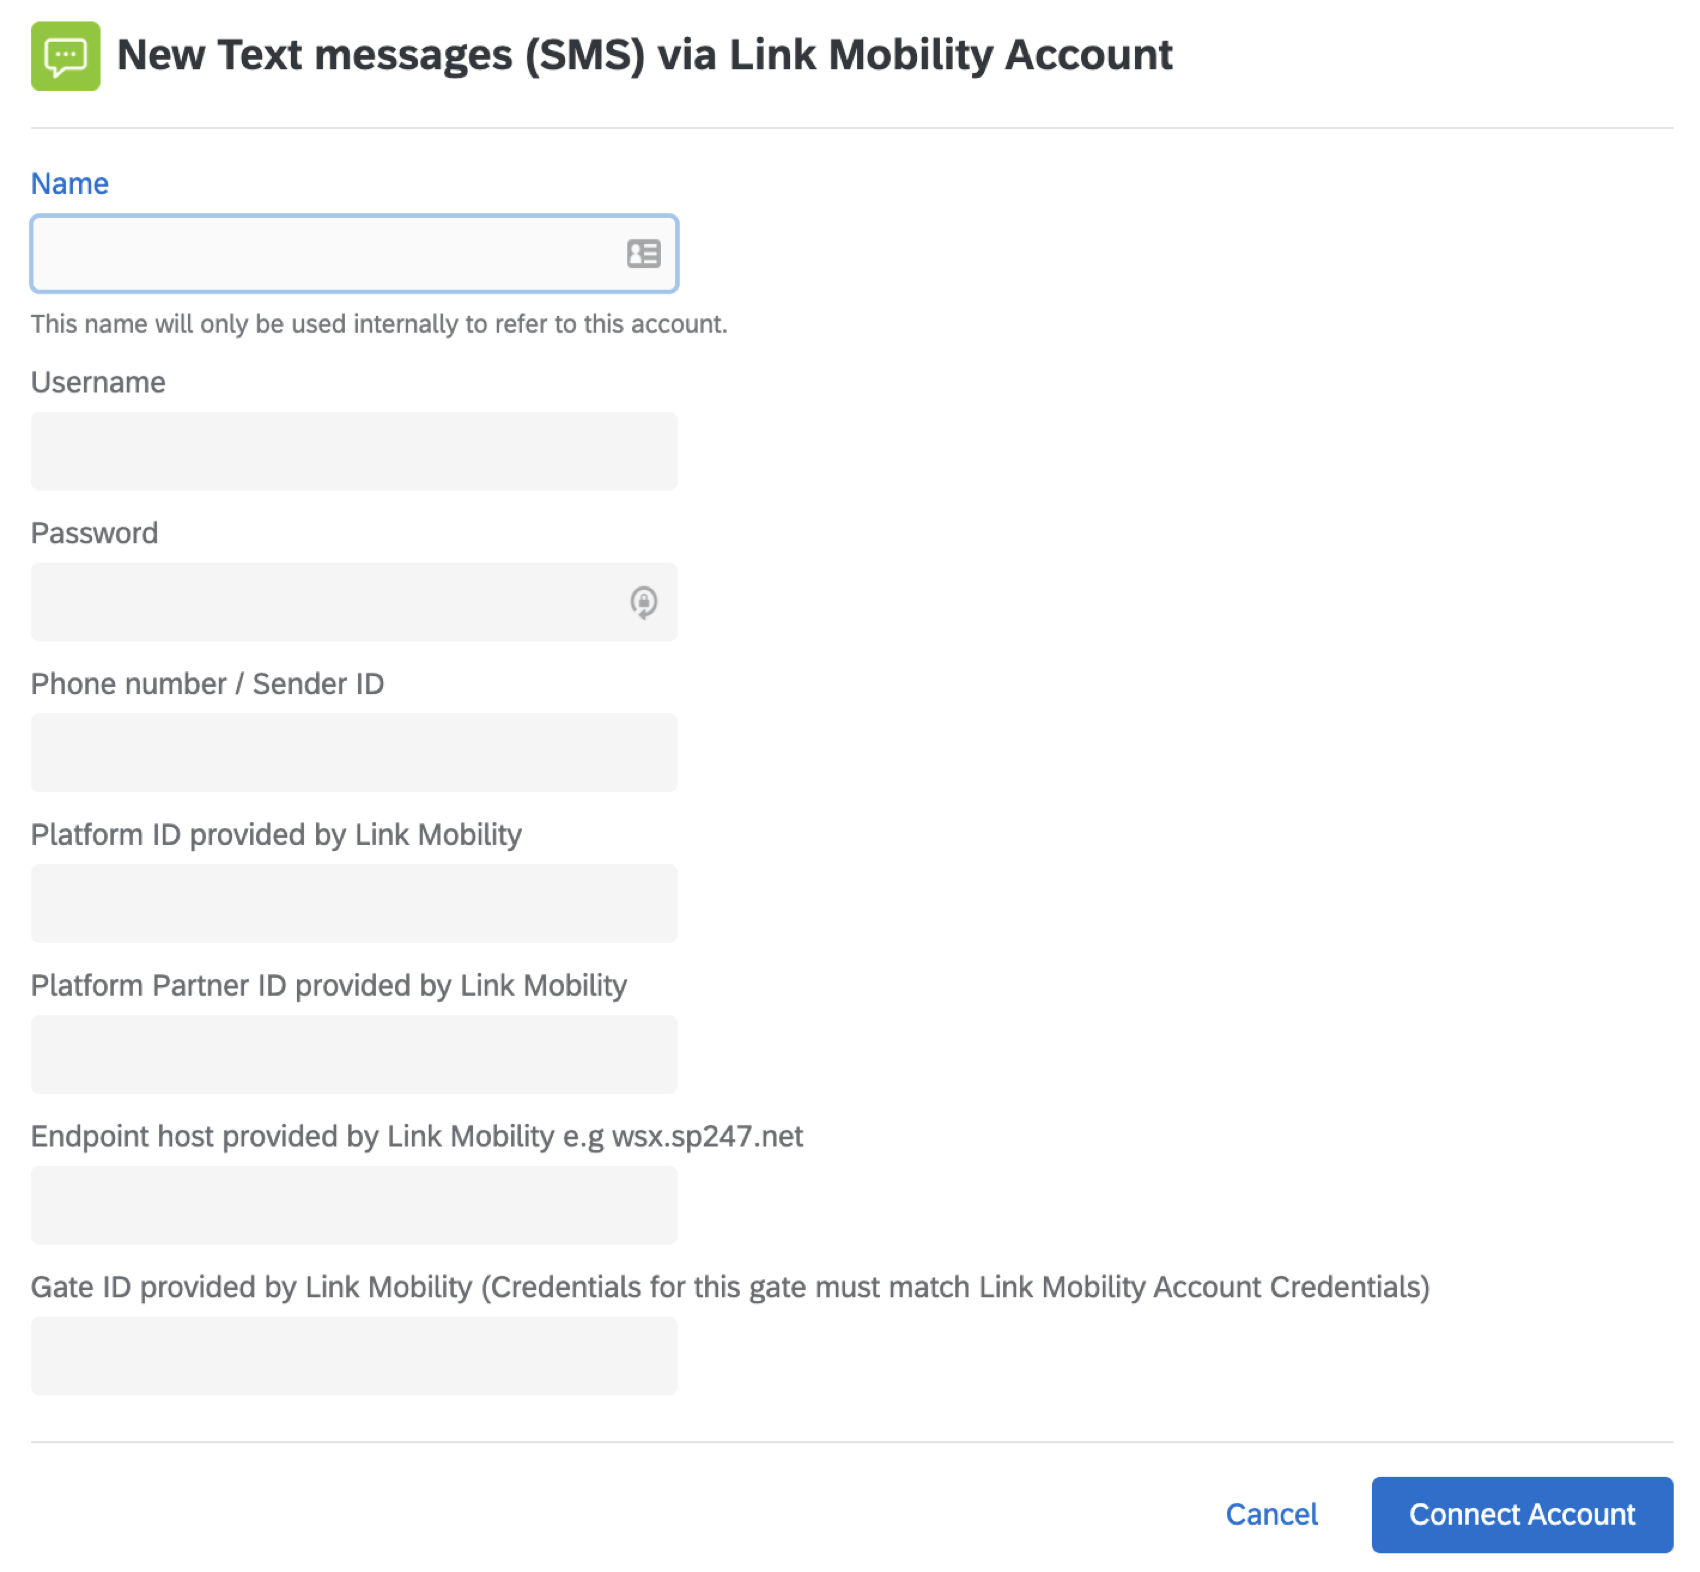
- Name: Enter any name that will help you later identify what this connection is / what it’s for.
- Username: The username of your Link Mobility account.
- Password: The password of your Link Mobility account.
- Phone number / Sender ID: The number or ID that will be used as the ‘FROM’ number when sending an SMS message. This may be 1 of the following:
- A specific number, e.g., +35312345678. Always include a plus sign ( + ) and the country code at the beginning of the number.
- An Alphanumeric sender id, e.g., Qualtrics. Please note this must be set up in Link Mobility to be supported.
- Platform ID provided by Link Mobility: The Platform ID provided to you by Link Mobility.
- Platform Partner ID provided by Link Mobility: The Platform Partner ID provided to you by Link Mobility.
Qtip: If you need help findings these IDs, we recommend reaching out to Link Mobility’s support team.
- Endpoint host provided by Link Mobility: The endpoint host that is provided to you by Link Mobility. Only include the base host of the url. For example, https://wsx.sp247.net/sms becomes wsx.sp247.net.
- Gate ID provided by Link Mobility: The Gate ID provided to you by Link Mobility. The credentials for this GateID must match your Username and Password for authentication purposes.
After connecting a Link Mobility account, follow these steps and select Give access to all users.
Sinch
This section describes steps to take to connect your Sinch account to Qualtrics.
SETTING UP THE QUALTRICS EXTENSION
Have a Brand Administrator complete the Required Steps in Qualtrics.
SETTING UP YOUR SINCH ACCOUNT
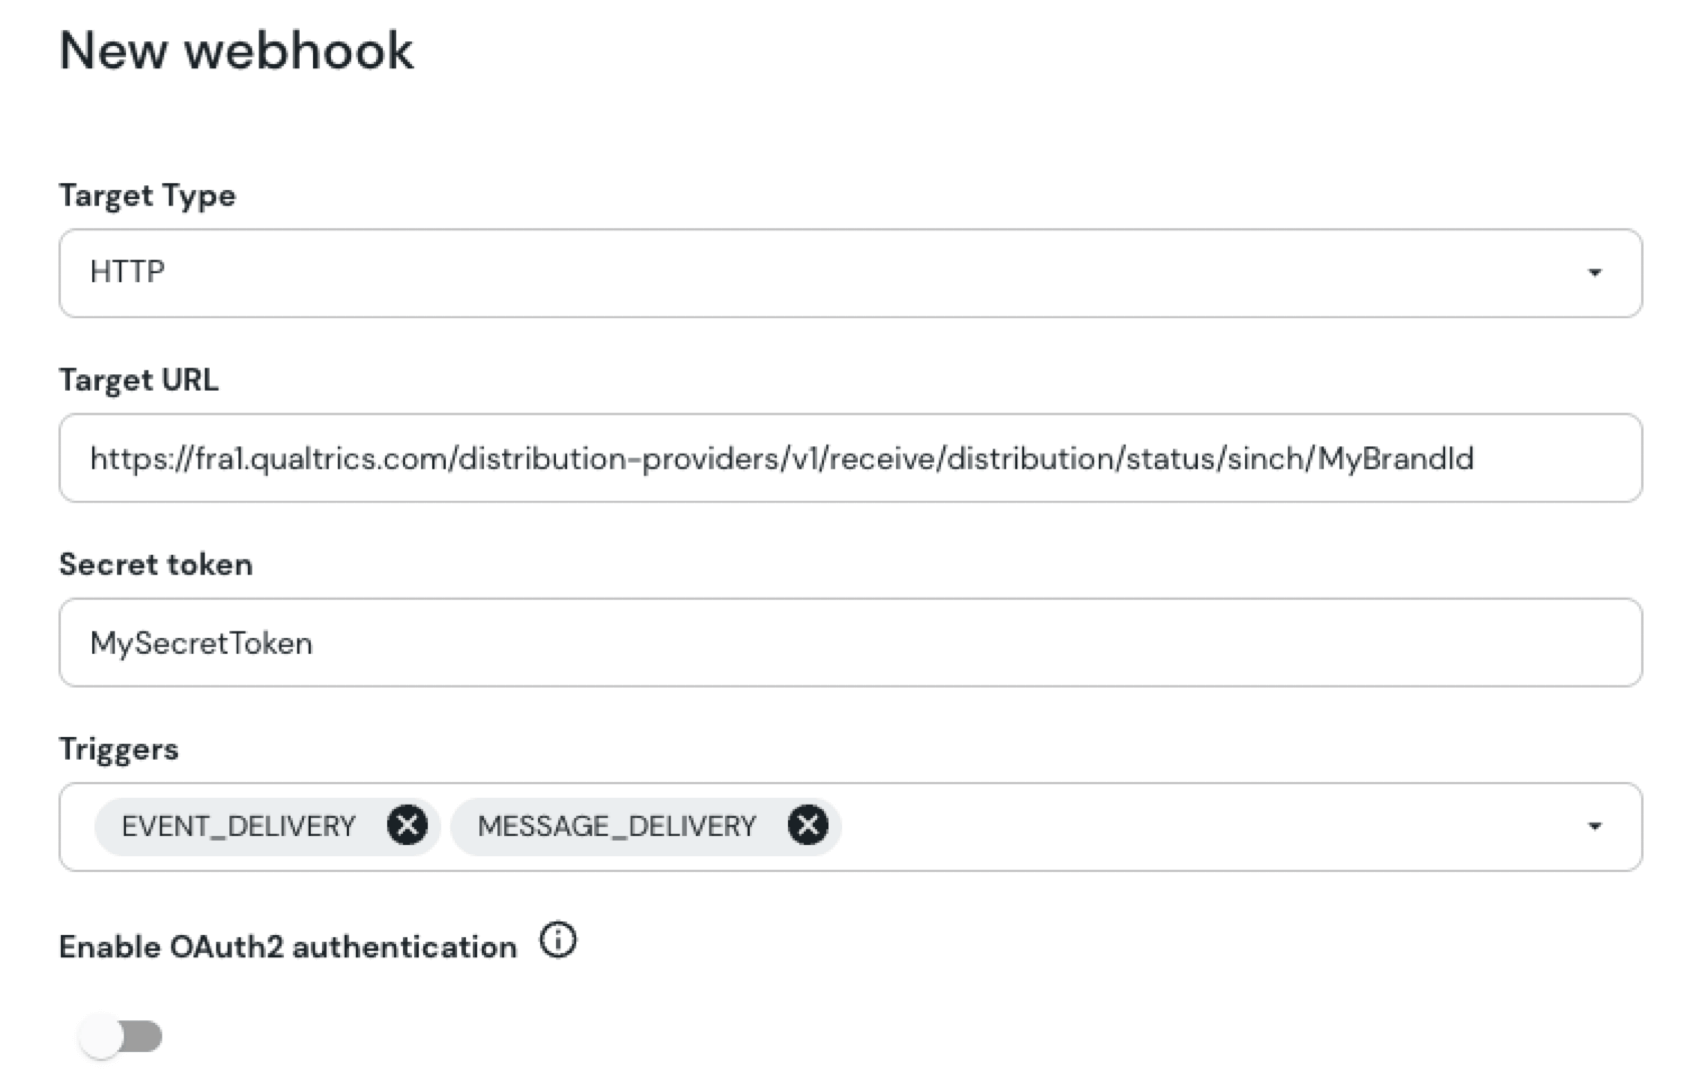
To enable status reporting, go to the webhooks section of your Conversation API App and select ‘Add Webhook’.
- Target Type should be HTTP.
- Target URL should be in the format “https://<DatacenterID>.qualtrics.com/distribution-providers/v1/receive/distribution/status/sinch/<OrganizationID>“
- Secret token should be a secret which you should generate and use for both status reporting and 2-way SMS. Keep a note of this as you will need to use it when configuring your extension in Qualtrics.
- Triggers should be EVENT_DELIVERY and MESSAGE_DELIVERY
- Enable OAuth2 authentication should be disabled.
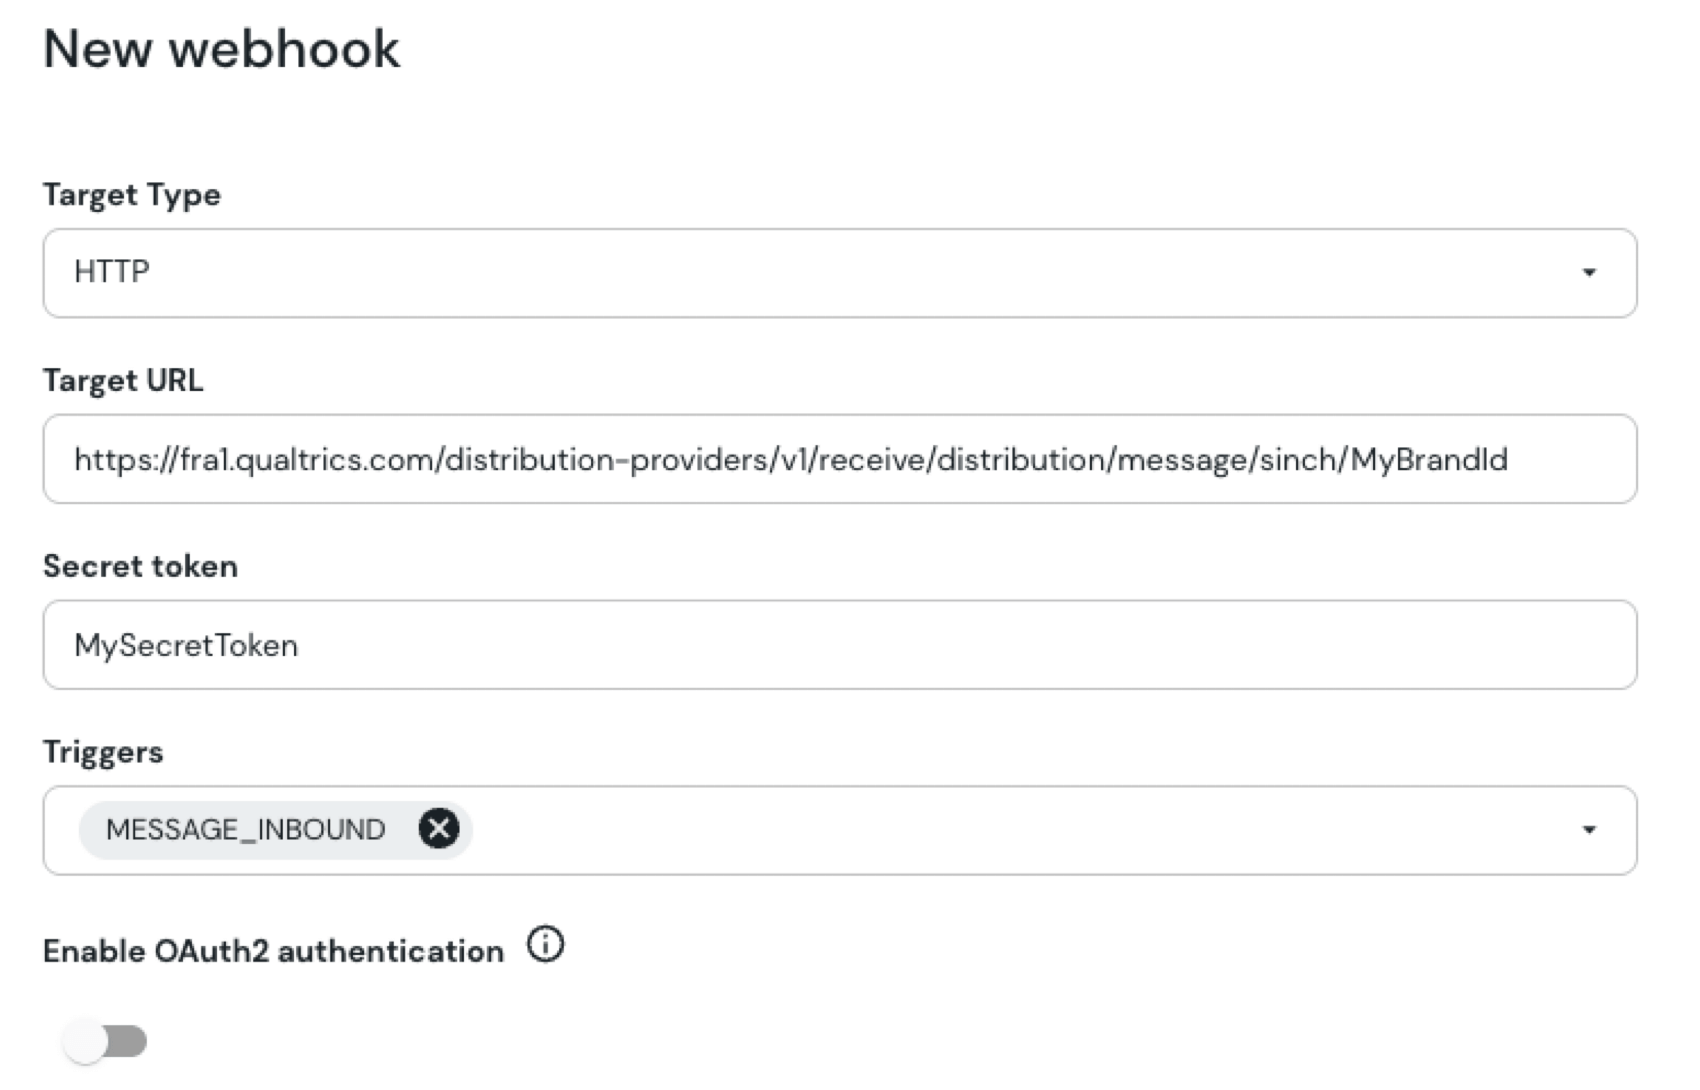
To enable 2-way sms, go to the webhooks section of your Conversation API App and select ‘Add Webhook’
- Target Type should be HTTP.
- Target URL should be in the format “https://<DatacenterID>.qualtrics.com/distribution-providers/v1/receive/distribution/message/sinch/<OrganizationID>”
- Secret token should be a secret which you should generate and use for both status reporting and 2-way SMS. Keep a note of this as you will need to use it when configuring your extension in Qualtrics.
- Triggers should be MESSAGE_INBOUND
- Enable OAuth2 authentication should be disabled.
CONNECTING YOUR SINCH ACCOUNT TO QUALTRICS
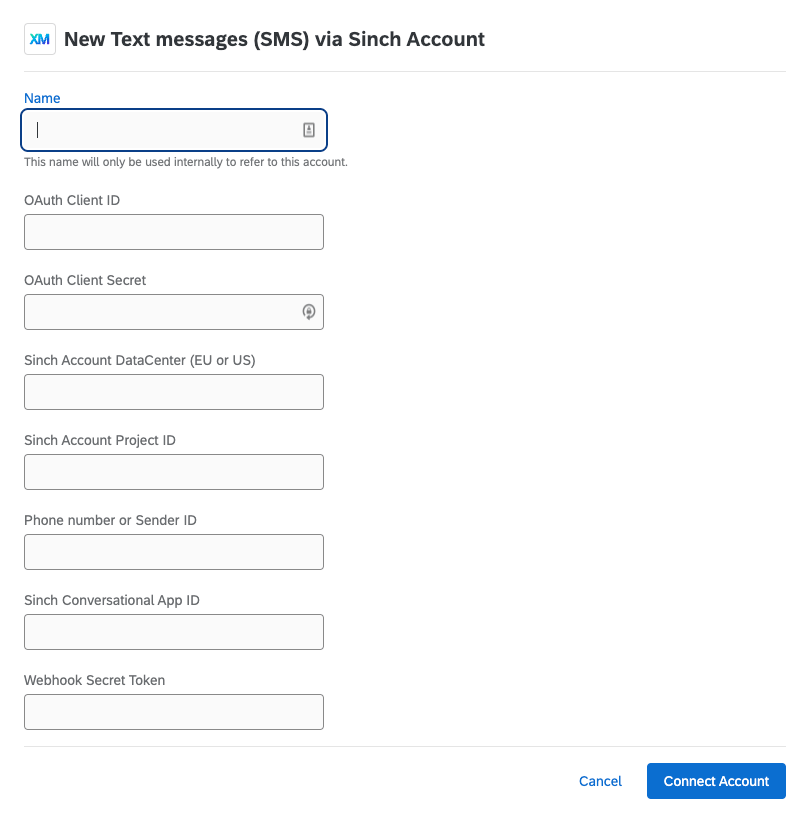 These are the fields your Brand Administrator will need to fill out to connect a Sinch account.
- Name: Enter any name that will help you later identify what this connection is / what it’s for.
- OAuth Client ID: This can be created on the dashboard after logging into Sinch. You will create a client ID and Secret pair, the client ID should be put here, and the secret below.
- OAuth Client Secret: The secret from the client ID/secret pair created above.
- Sinch Account DataCenter (EU or US): The region your Conversation API App is located in. This can be found on the dashboard after logging into Sinch.
- Sinch Account Project ID: Your Sinch Account Project ID. You can find this on the dashboard after logging into Sinch.
- Phone number or Sender ID: The number or ID that will be used as the ‘FROM’ number when sending an SMS message. This may be 1 of the following:
- A specific number, e.g. 35312345678. Always include the country code at the beginning.
- An alphanumeric sender ID, e.g. Qualtrics.
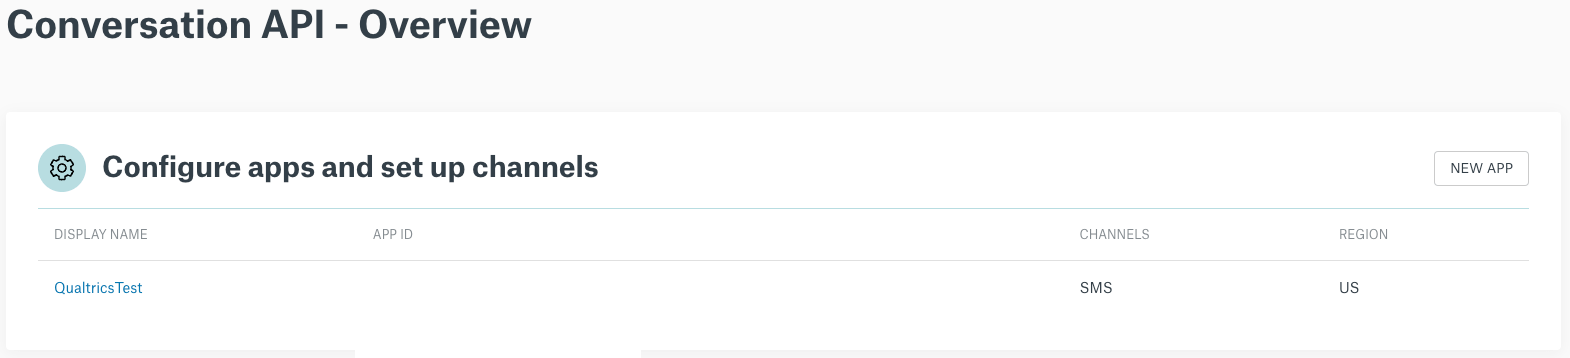
- Sinch Conversational App ID: The ID for your Conversation API App. You can find this on the dashboard after logging into Sinch.
- Webhook Secret Token: This is the secret that you created when setting up your webooks for status reporting and 2-way messages.
After connecting a Sinch account, follow these steps and select Give access to all users.
Infobip
This section describes steps to take to connect your Infobip account to Qualtrics.
Steps in Qualtrics
These are the fields your Brand Administrator will need to fill out to connect an Infobip account.
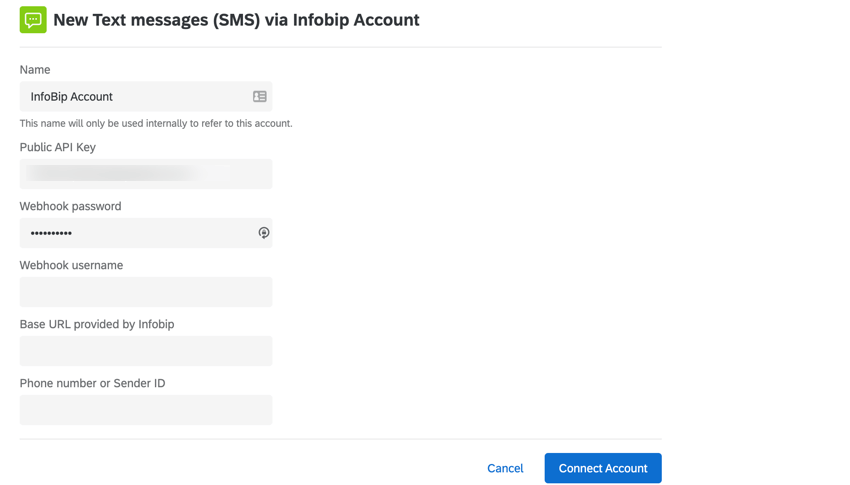
- Name: Enter any name that will help you later identify what this connection is / what it’s for.
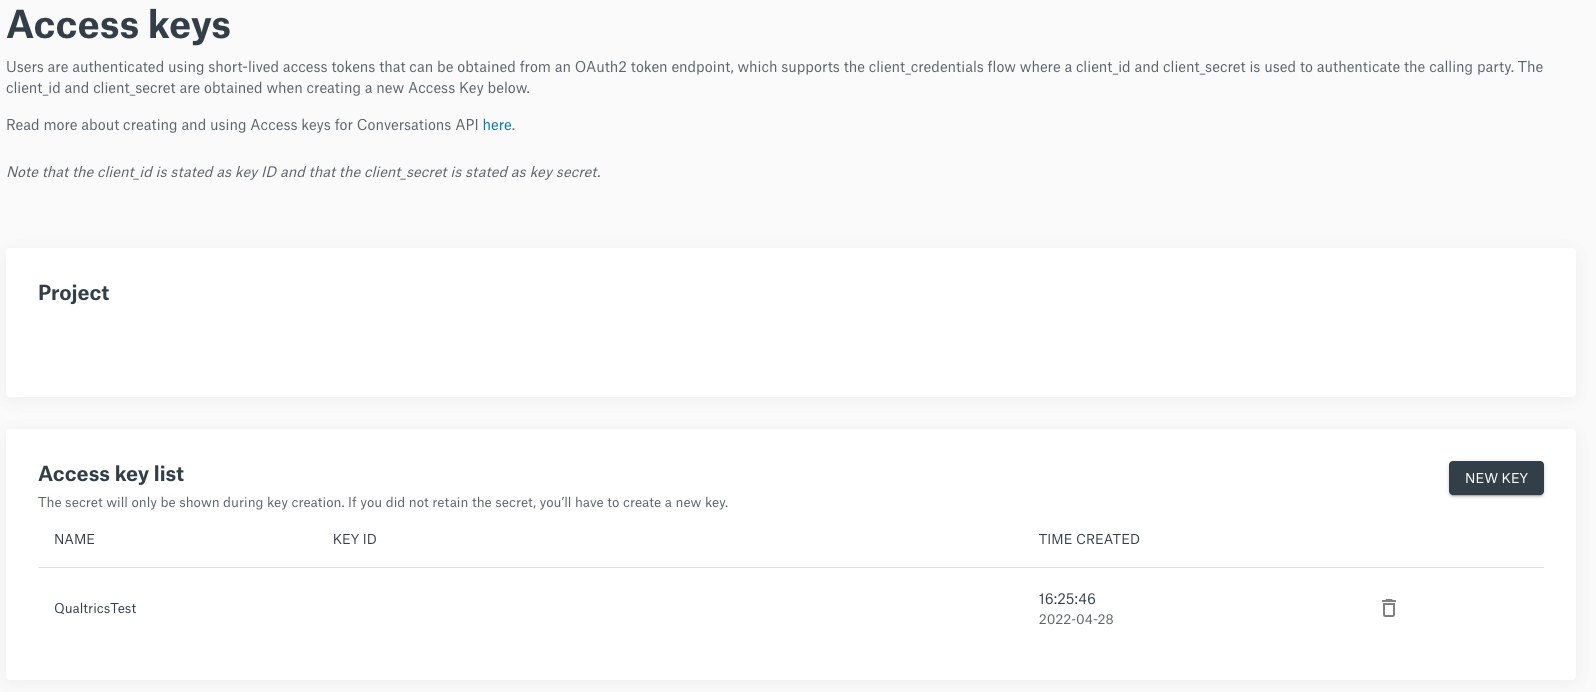
- Public API Key: Your Infobip API key. To generate a key, log in to your Infobip portal and click New API Key. If you already have an API key, copy the existing key instead of generating a new key.

- Webhook password: Please provide your Infobip username and password on the Webhook password and username fields. After you finish this setup, please contact Infobip support and ask them to set Basic Authentication for your webhook. You’ll need to provide them a username and a password to use. Do not use special characters in your username.
- Webhook username: See webhook password above.
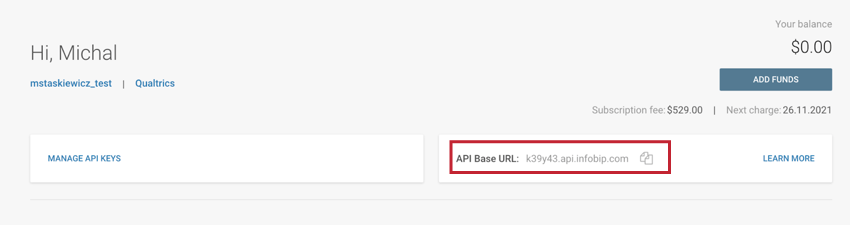
- Base URL provided by Infobip: Your Infobip base URL. To find your URL, log in to your Infobip portal and copy the API Base URL. When pasting your URL into Qualtrics, remove the https:// portion of the URL.
- Phone number or Sender ID: The number or ID that will be the “FROM” number when sending SMS. To find your phone number / sender ID, log into your Infobip portal. When adding your number or ID, do not add any prefixes (+ or 00). This may be 1 of the following:
- A specific number, e.g., 13531234567. This must be a number purchased in your Infobip account. Always include the country code at the beginning of the number.
- A unique sender ID, either alphanumeric or numeric, e.g., QUALTRICS or 868686.
Qtip: If you intend to use 2-way SMS, you’ll need to use a specific number or numeric shortcode, and not an alphanumeric ID.
When contacting Infobip support you will need to provide them with the webhook URL(s). To enable status reporting the webhook URL will be in the format:
- https://<DatacenterID>.qualtrics.com/distribution-providers/v1/receive/distribution/status/infobip-sms/<OrganizationID>
To enable 2-way SMS the webhook URL will be in the format:
- https://<DatacenterID>.qualtrics.com/distribution-providers/v1/receive/distribution/message/infobip-sms/<OrganizationID>
After connecting an InfoBip account, follow these steps and select Give access to all users.
MessageMedia
This section describes steps to take to connect your MessageMedia account to Qualtrics.
Setting up your MessageMedia Account
In order to get important credentials that will let you connect you Qualtrics, you must first create a new key in your MessageMedia account.
Follow these steps to create your key under Basic Authentication.
Save the API key and secret. The key will act as your username and the secret will act as your password when you connect to Qualtrics.
Setting up the Qualtrics Extension
Have a Brand Administrator complete the Required Steps in Qualtrics.
These are the fields your Brand Administrator will need to fill out to connect a MessageMedia account.
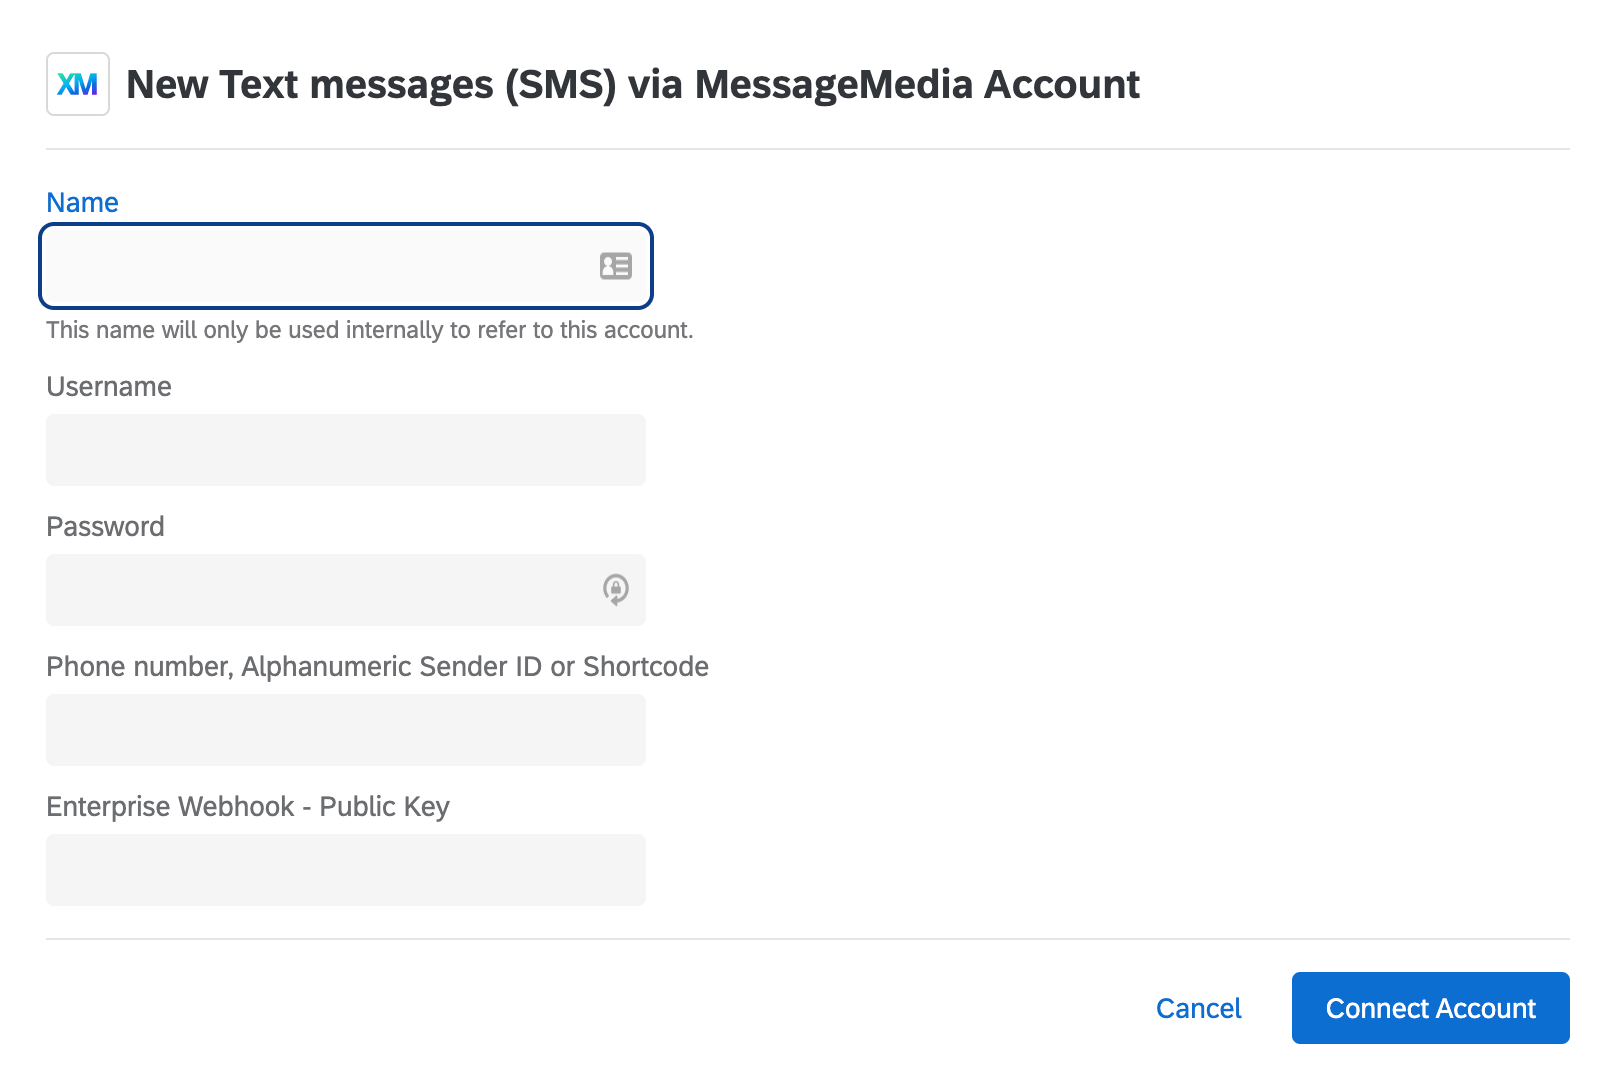
- Name: Enter any name that will help you later identify what this connection is / what it’s for.
- Username: Your MessageMedia API Key.
- Password: Your MessageMedia API Secret.
- Phone number, Alphanumeric Sender: The number or ID that will be used as the ‘FROM’ number when sending an SMS message. This may be 1 of the following:
- A specific number, e.g. 35312345678.
- An alphanumeric sender ID, e.g. Qualtrics.
Qtip: If you want to use 2-way SMS (Interactive SMS), you’ll need to use a specific number and not an alphanumeric sender ID.
- Enterprise Webhook – Public Key: The public key used to verify callbacks and 2-way SMS. To get this key, reach out to your MessageMedia representative.
After connecting a MessageMedia account, follow these steps and select Give access to all users.
Vonage
This section describes steps to take to connect your Vonage account to Qualtrics.
Steps in Qualtrics
These are the fields your Brand Administrator will need to fill out to connect a Vonage account.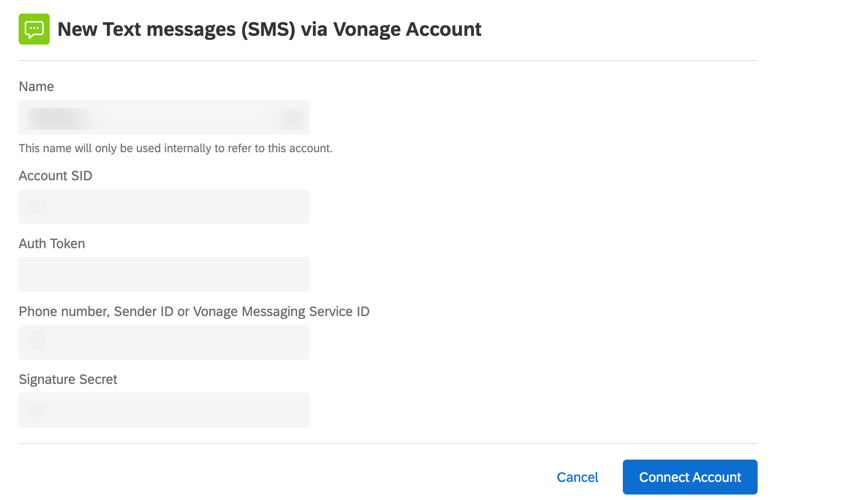
- Name: Enter any name that will help you later identify what this connection is / what it’s for.
- Account SID: Your Vonage account ID.
- Auth Token: Vonage Auth Token used for API access. You can find this on your dashboard after logging into Vonage.
- Phone number, Sender ID or Vonage MessageService ID: The number or ID that will be used as the ‘FROM’ number when sending an SMS message. This may be one of the following:
- A specific number, e.g., 35312345678. Always include the country code at the beginning, but do not include other prefixes (+ or 00).
- An alphanumeric sender ID, e.g., Qualtrics.
Qtip: If you intend to use two-way SMS, you’ll need to use a specific number and not an alphanumeric sender ID.
- Signature Secret: The secret that is used to generate your webhook signature.
After connecting a Vonage account, follow these steps and select Give access to all users.
MessageBird
This section describes steps to take to connect your MessageBird account to Qualtrics.
Steps in Messagebird
A MessageBird administrator will need to perform the following steps before you connect your MessageBird account.
- Log into Messagebird.
- Go to the Developers tab.
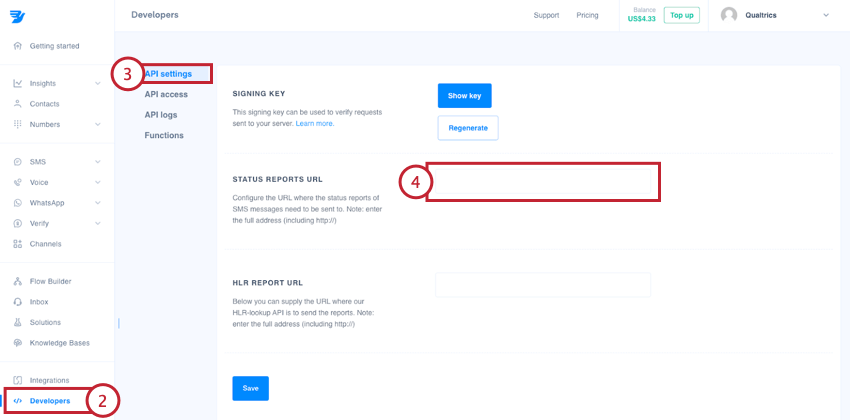
- Click API settings.
- Enter your Status Reports URL. The URL should be in the following format: https://DatacenterID.qualtrics.com/distribution-providers/v1/receive/distribution/status/twilio-sms/OrganizationID.
Qtip: To find your datacenter and organization IDs, see Finding Qualtrics IDs.
If you plan on using 2-way SMS, then you must complete the additional steps below:
- Go to the Flow Builder tab.
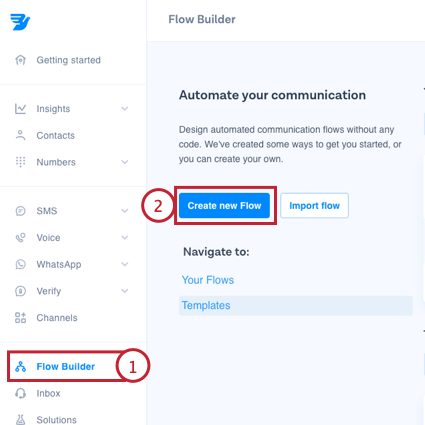
- Click Create new flow.
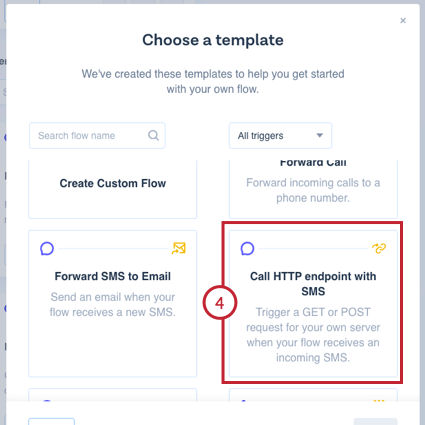
- Select Templates.

- Choose the Call HTTP endpoint with SMS template.
- For the Method, choose POST.
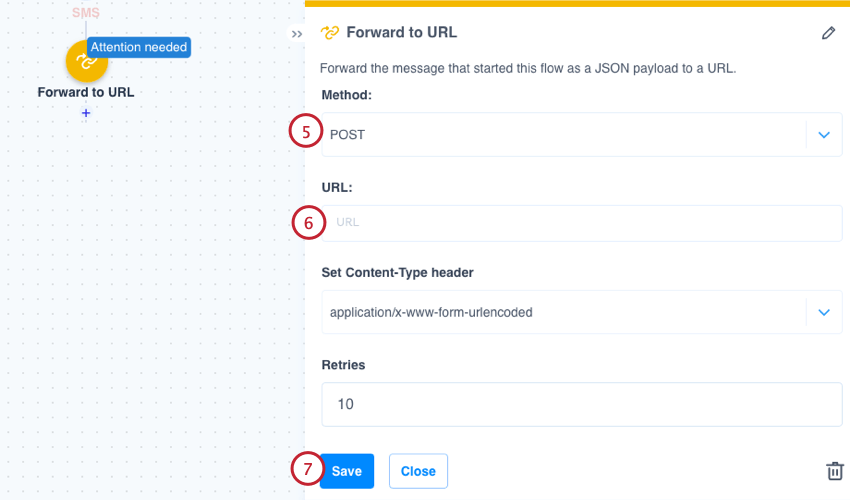
- For the URL, enter your URL in the following format. https://DatacenterID>.qualtrics.com/distribution-providers/v1/receive/distribution/message/twilio-sms/OrganizationID.
Qtip: To find your datacenter and organization IDs, see Finding Qualtrics IDs.
- Click Save.
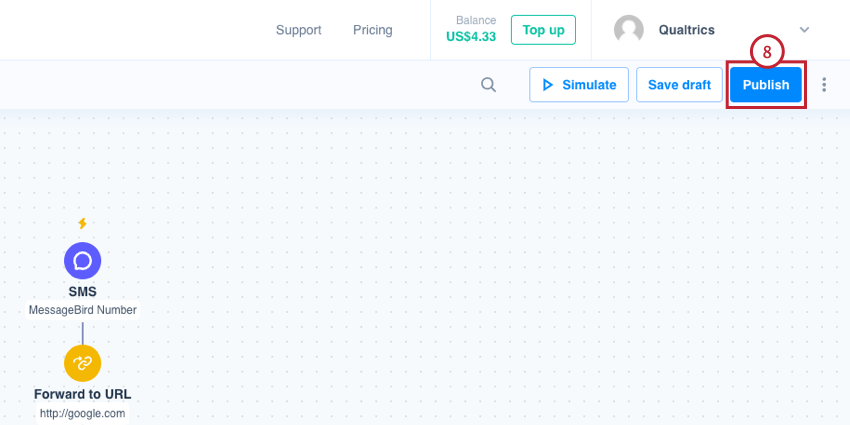
- Publish your flow.
Steps in Qualtrics
These are the fields your Brand Administrator will need to fill out to connect a MessageBird account.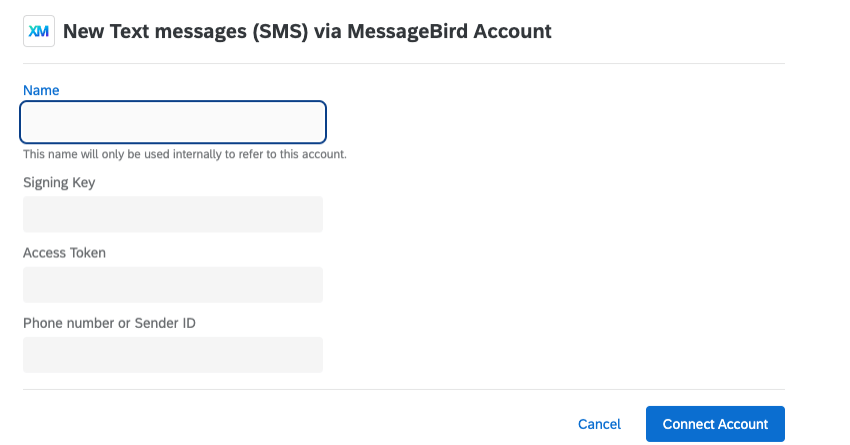
- Name: Enter any name that will help you later identify what this connection is / what it’s for.
- Signing Key: MessageBird Signing Key used for verification of incoming messages. You can find this in the Developer section of your MessageBird account.
- Access Token: MessageBird Access Token used for API access. You can find this on your dashboard after logging into MessageBird.
- Phone number or Sender ID: The number or ID that will be used as the ‘FROM’ number when sending an SMS message. This may be one of the following:
-
- A specific number, e.g., 35312345678. Always include the country code at the beginning, but do not include other prefixes (+ or 00).
- An alphanumeric sender ID, e.g., QUALTRICS.
Qtip: If you intend to use two-way SMS, you’ll need to use a specific number and not an alphanumeric sender ID. -
After connecting a MessageBird account, follow these steps and select Give access to all users.