-

Qualtrics Platform -

Customer Journey Optimizer -

XM Discover -

Qualtrics Social Connect
Mobile Site Exit Surveys
About Mobile Site Exit Surveys
Exit surveys are surveys that respondents are presented with when they leave your site. To collect overall feedback from your website, we recommend asking questions once you know your website visitors have finished their visit completely and have left the website. This ensures that the feedback you get is about their entire experience, from start to finish. On this page, we’ll cover how to create an exit survey specifically for the mobile experience.
Desktop Site Exit Surveys
If you’re looking for information on how to create exit surveys for desktop visitors, check out the below resources:
- Opt-in on site exit: An initial invite is displayed and asks if the visitor would be interested in giving feedback once they leave the site. If they agree, a separate pop under creative loads. This pop under hides behind the web page until they exit the site. Once the visitor exits, the survey invitation window comes forward. Visit Opt-In Survey Upon Site Exit for more information on setting this up.
- Exit intent: When using this option in your intercept options, the intercept will display as soon as the visitor has moved their cursor outside of the viewing area of the browser. Visit Display Intercept for more information on how to set this up.
- Engagement: Using your own web analytics data, determine how long an average person spends on your web site. Using “Time spent on site” or “Page count” logic, you can set up your intercept to display around the time that most people are close to finishing their session.
Mobile Site Exit Surveys Overview
For mobile web visitors, exit surveys are a little bit more difficult to set up. It is not possible to load a window underneath a mobile browser, so opt-in on site exit can’t be an option here. Additionally, there’s no way to track mouse movement since the visitor is using their fingers to navigate. In order to still ask visitors questions when they exit the website, we have to build the intercept differently. The below steps summarize the process for creating a mobile exit survey. We’ll go into more detail for each step in the following sections.
- Create a contact information collection survey: In addition to your overall website feedback survey used for Desktop visitors, we recommend building a separate survey for mobile web visitors. This will include only one question and asks for their email address or phone number.
- Set up a distribution workflow: Use the Workflow platform to create a task if an email or phone number is entered. If one is entered, send the anonymous link to the overall website experience survey. This can be done over email or SMS (if available).
Qtip: If you’re interested in SMS distribution, reach out to Account Services.
- Build your mobile creative and intercept: Build a responsive dialog creative to show the survey, and configure your intercept logic to separate desktop web visitors from mobile web visitors. This ensures that the individuals see the correct content.
Step 1: Creating a Contact Information Collection Survey
The first step to building a mobile exit survey is to create a survey to collect your mobile visitors’ contact information.
- In your account, create a new survey project.
- Change the question type to Text Entry.
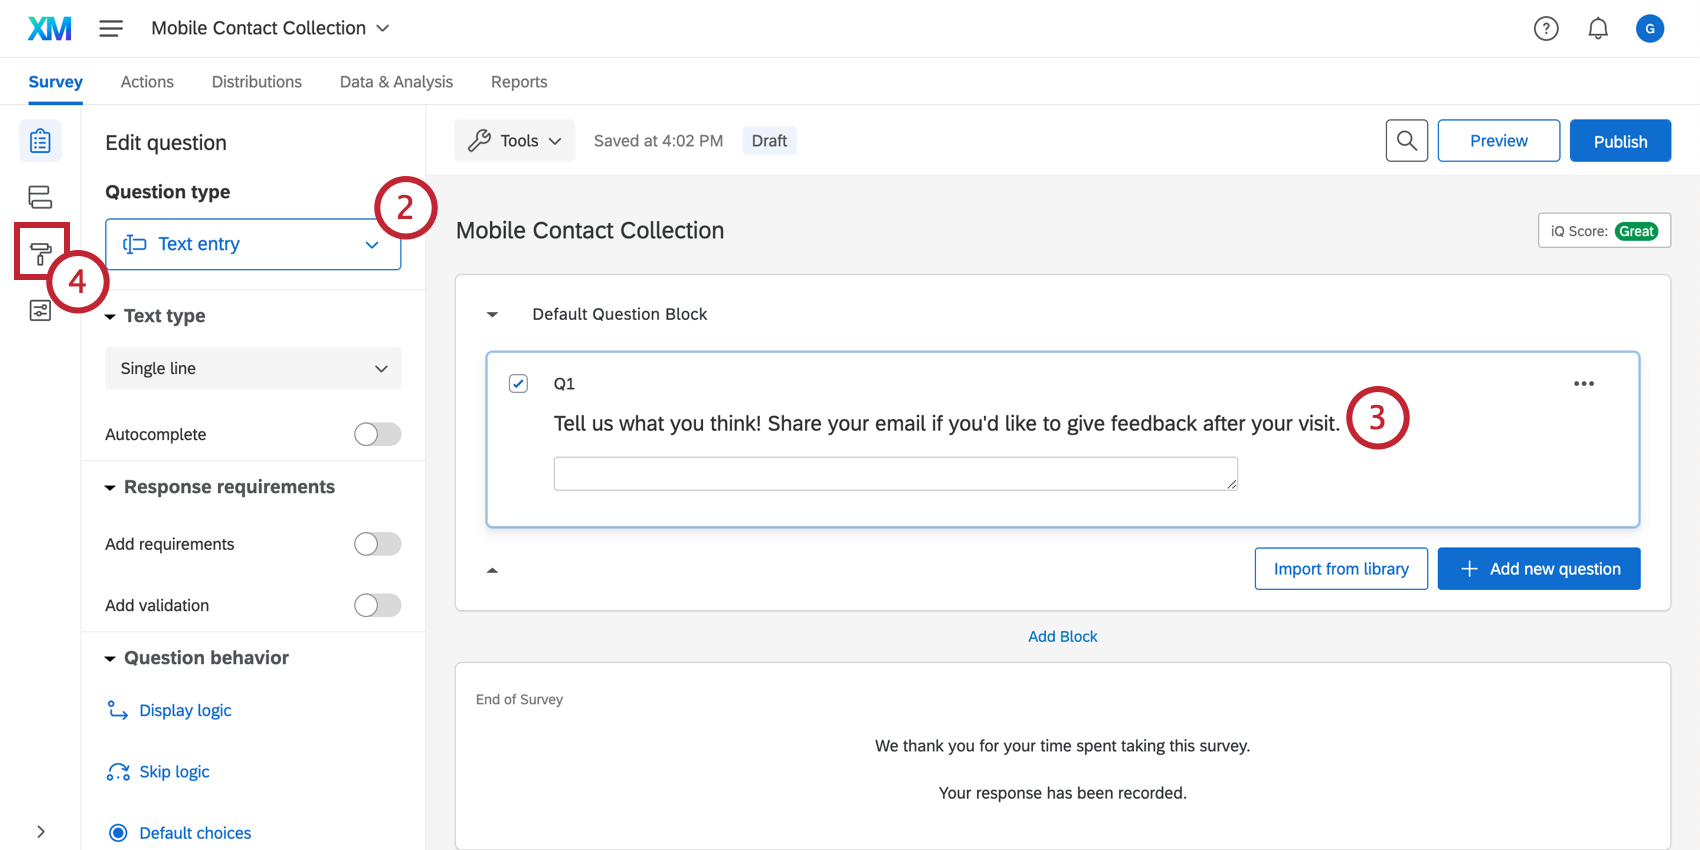
- Edit the question text to request either an email address or phone number that you can send an invite for feedback once they’ve completed their visit. We recommend only choosing email or phone number.
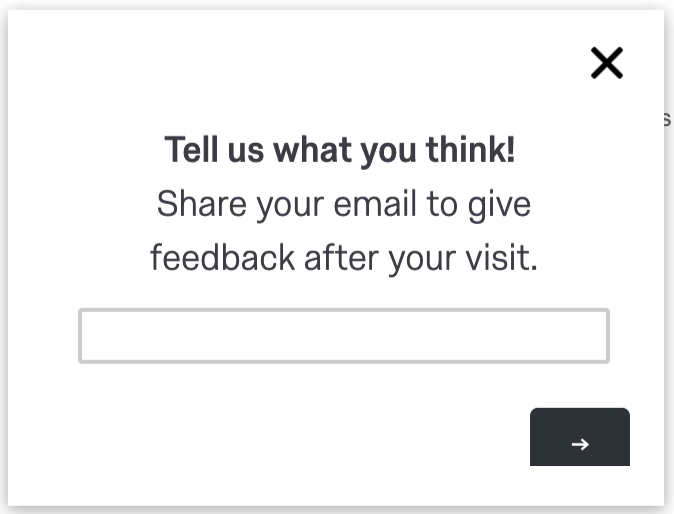
Example: For email, you can use, “Tell us what you think. Share your email to give feedback after your visit.” For SMS, you can use, “Share your phone number to receive an SMS feedback questionnaire after your visit.”
- Navigate to the Look and feel menu to update the survey theme to be very minimal and plain. This will ensure that only the question and no extra content are displayed in the intercept.
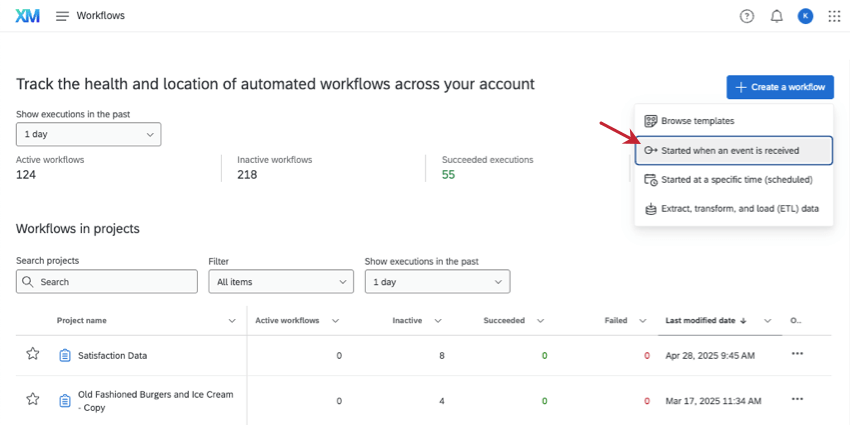
Step 2: Set up a Distribution Workflow
Next, you’ll need to create a distribution workflow to send the respondent your feedback survey.
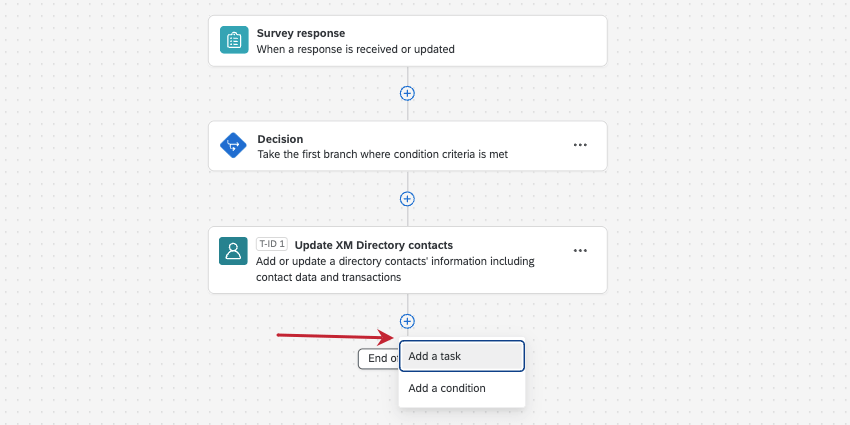
- Create a workflow started by a Survey response event.
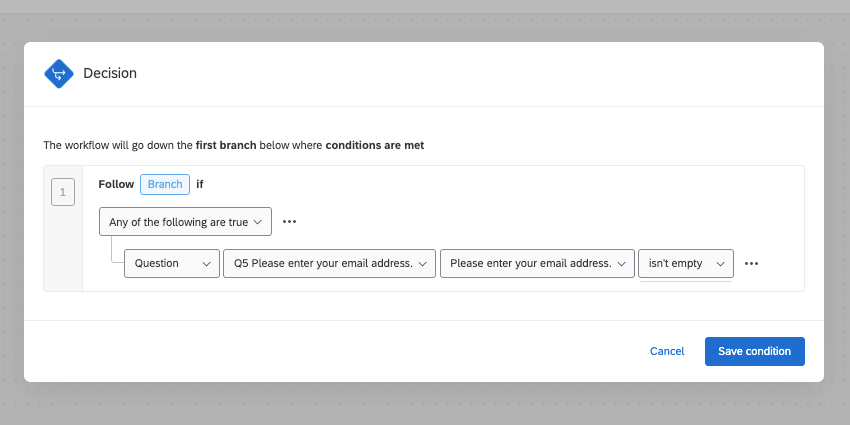
- Add a condition so that the workflow will only trigger when the question asking for contact information is not empty.
- Add a Task.

- Select the Update XM Directory contacts task.
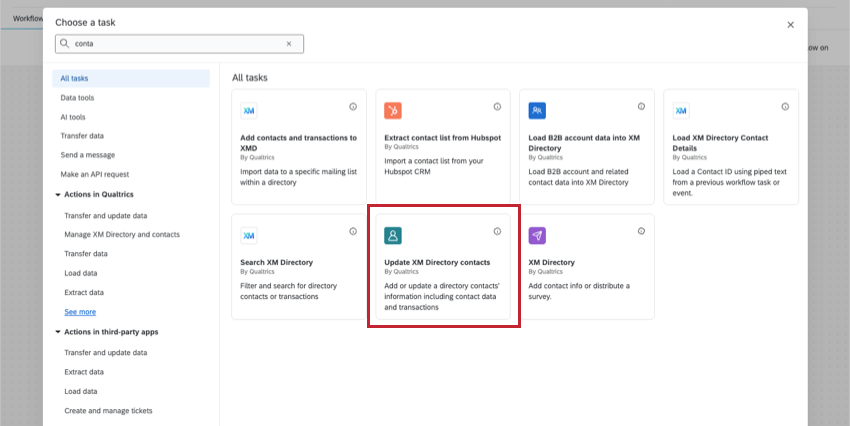
- Follow the steps to set this task up. For your fields:
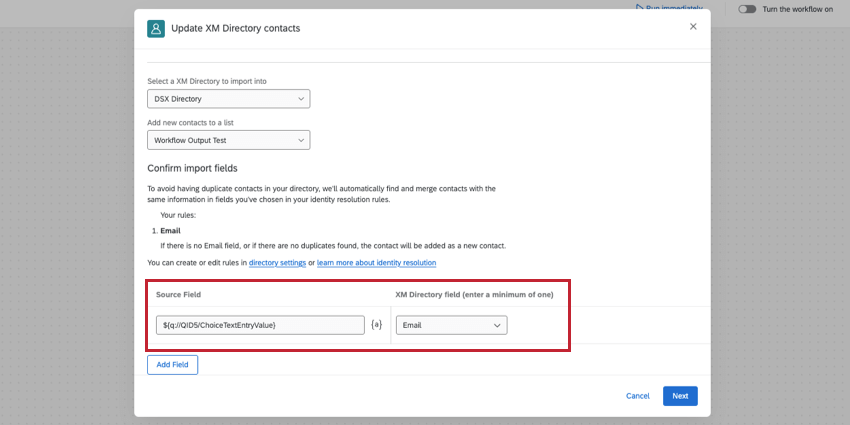
- Regardless of your distribution type, your directory may have rules that require you to fill out certain fields, such as the email, external reference ID (unique ID number for the contact), or a last name.
- If distributing via email, use piped text in the Email field to save the respondent’s contact information as the email address they provided in the survey.
- If distributing via SMS, use piped text to save the phone number provided in the survey as their Phone number.
- Add other contact info fields as desired.
- When you’re finished, add another task.
- Depending on whether you’re sending the survey by email or SMS, select one of the following:
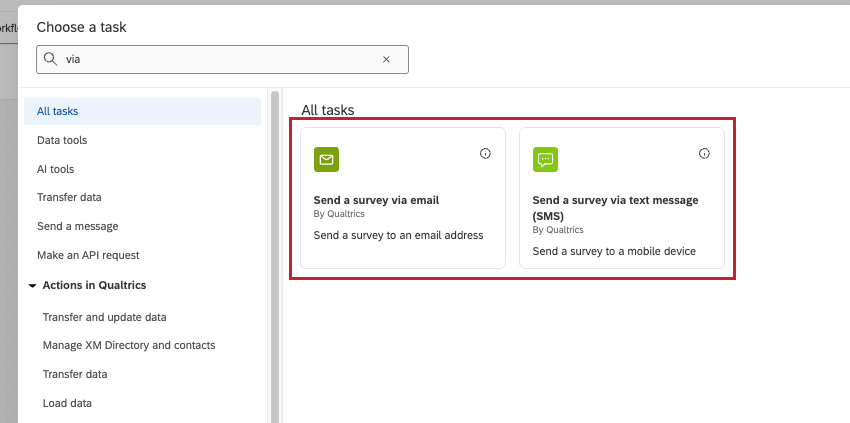
- For the Survey, choose your website’s feedback survey.
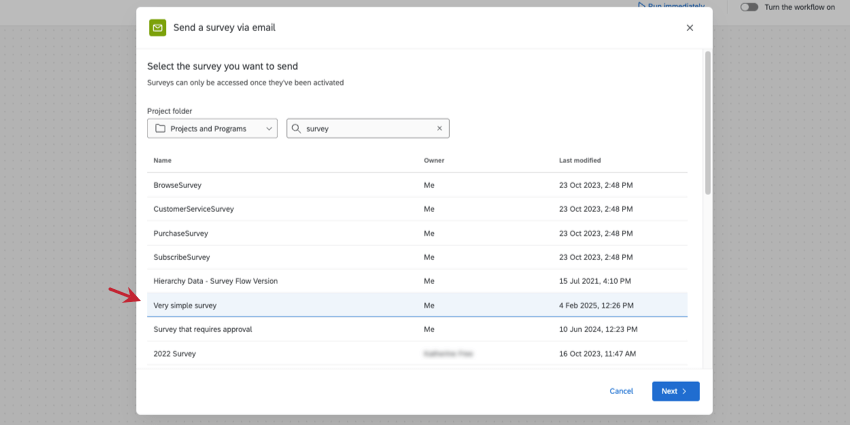 Qtip: This is the survey where you’ll collect feedback after mobile site exit. This is a new, separate survey from the one you created in step 1.
 - Under Source, switch it to your Update XM Directory contacts task.
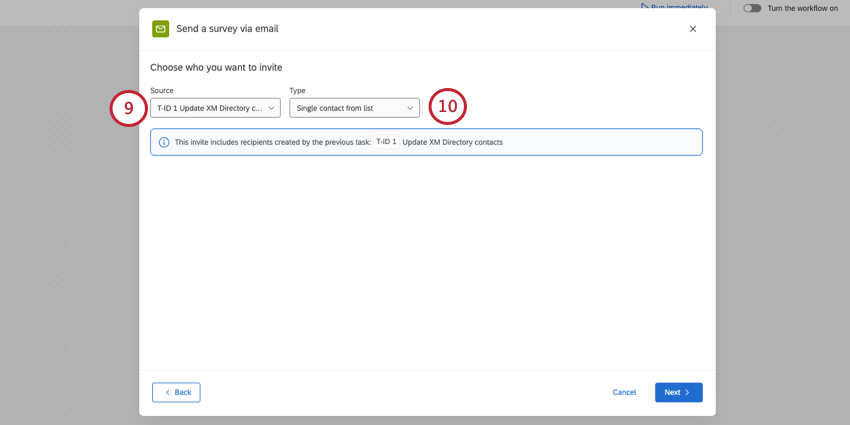
- Under Type, select Single contact from list.
- Here are some other options you’ll need for a mobile site exit survey. If an option is not listed here, then you can customize it however you wish.
- Enter you or your team’s details for the From Address, From Name, and Reply-To Email.
- Do not schedule a reminder.
- Set up your subject and message using the template below.
- When finished, Save your task.
Recommended Subject & Message:
Below is a template subject line and message for your XM Directory task. Feel free to modify it as needed.
Subject Line: Please share feedback about your recent visit to {{COMPANY NAME }}
Message:
We are continually trying to improve the website experience and your opinions and feedback are very important to us. Please take 2 minutes and share your feedback about your recent visit to {{WEBSITE NAME}}.
We appreciate your thoughtful response.
${l://SurveyLink?d=Click here to begin}
Follow the link to opt out of future emails:
${l://OptOutLink?d=Click here to unsubscribe}
Step 3: Building the Mobile Creative and Intercept
Now that the survey and workflow are created, we now need to create the creative and intercept that will display to mobile visitors.
- Build a Responsive dialog creative with the option to display the survey directly in the dialog.
- Build an intercept. Add logic to only show for visitors where DeviceType is Mobile.
- Select the creative that invites users to take the survey. This was the responsive dialog creative you just made.
- Select the target to display in the creative. This is the survey that should display when the invite appears. This is the contact information collection survey you created in Step 1.