
Load Users into CX Directory Task
What's on this page
About the Load Users into CX Directory Task
Attention: To use this feature, your license must have unique identifiers and CX user admin enabled. If your license does not have these features and you would like to learn more, contact Account Services.
The Load Users into CX Directory task is used to save CX user data to Qualtrics. This task allows you to keep your CX user data up-to-date on a regular basis. To use this task, you must first load data into Qualtrics using a data extractor task.
Qtip: For information on general limits that apply to ETL workflows, see Workflow Limits. For any task-specific limits, refer to the information on this page.
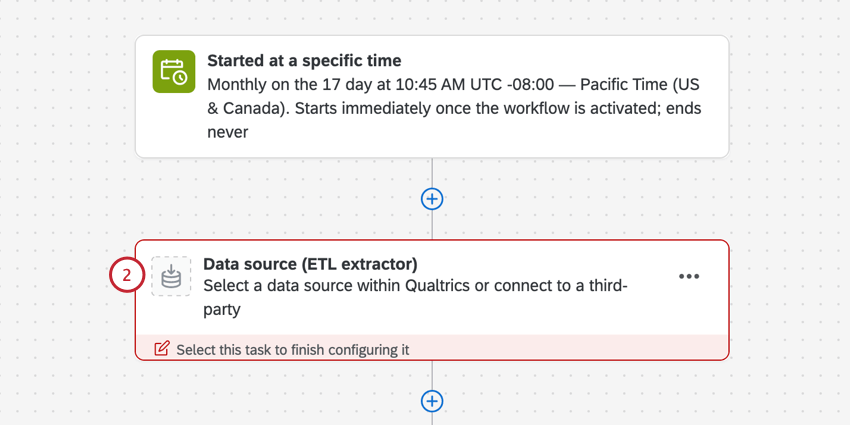
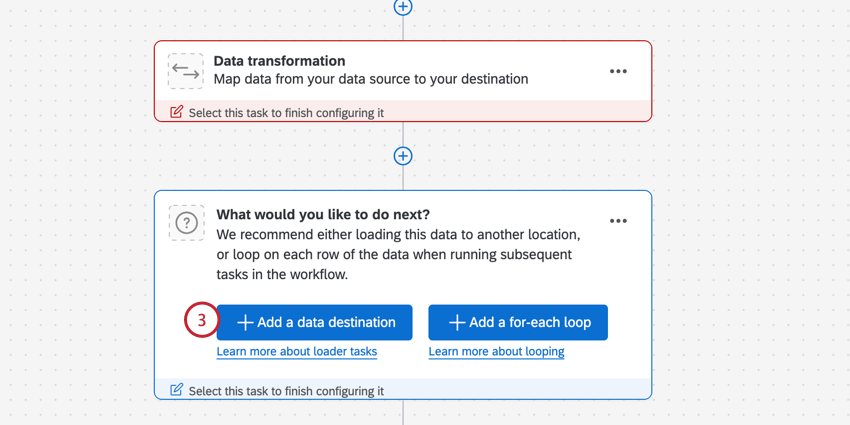
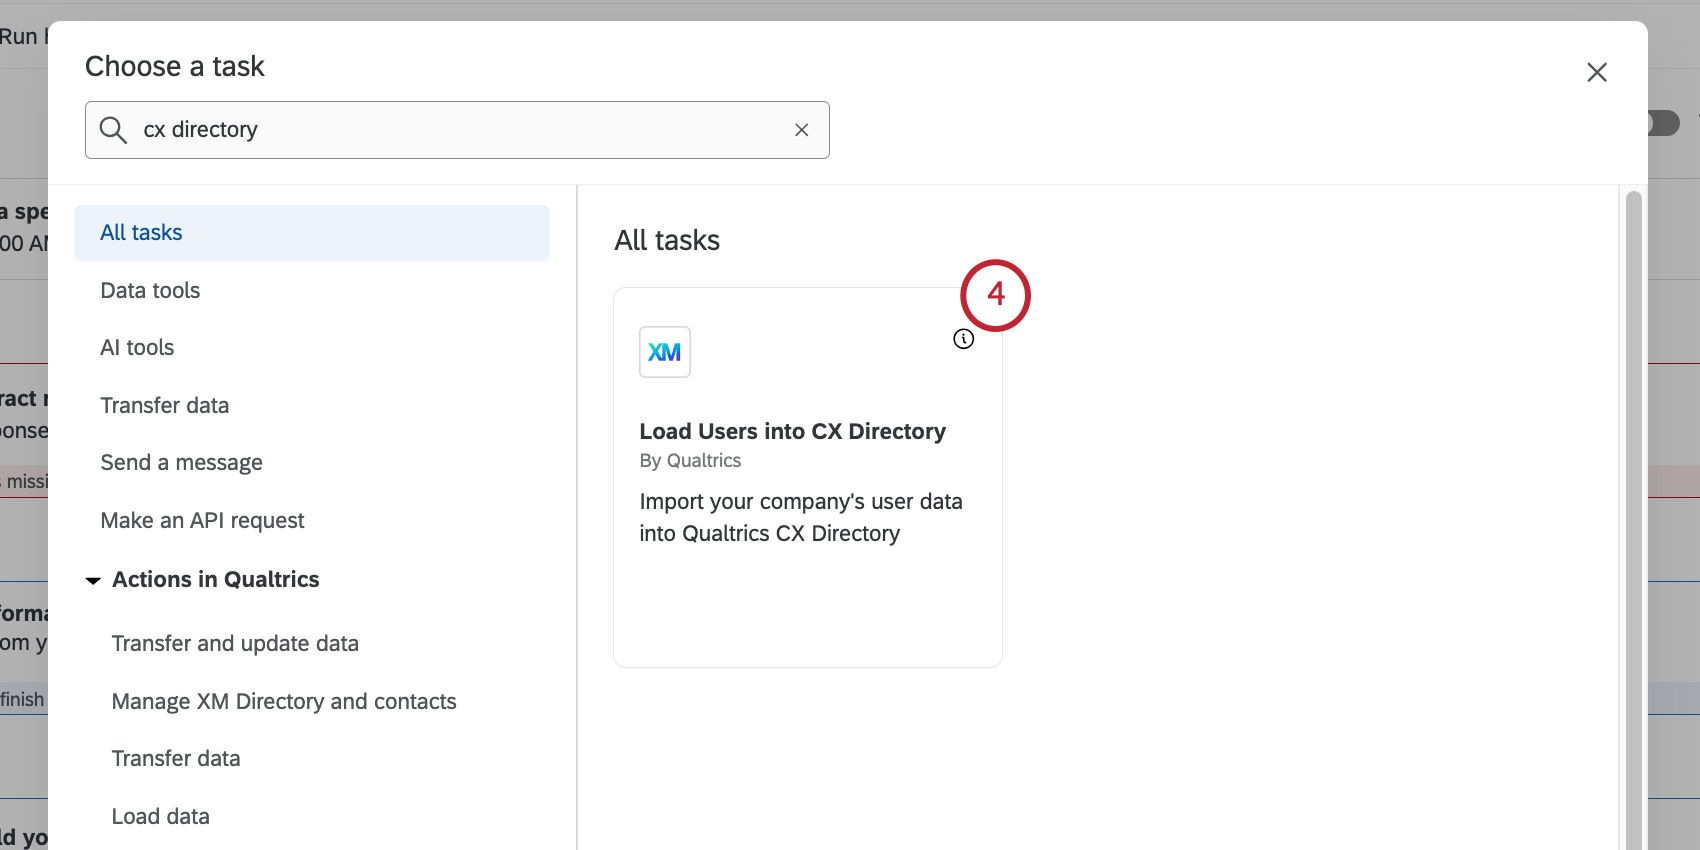
Setting Up a Load Users into CX Directory Task
Attention: If this is your first time using this task, verify that you have access to unique identifiers and CX user admin.
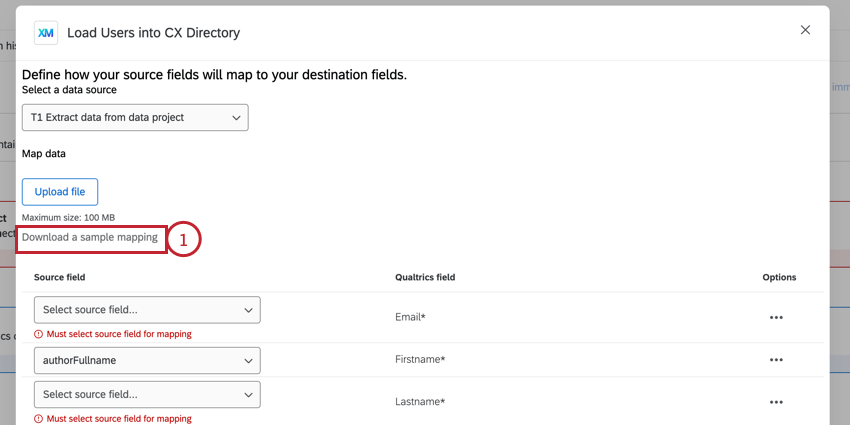
Your task must import the following fields:
- Unique Identifier
- FirstName
- LastName
- Email. Qtip: We recommend using the extract data from SFTP files task. The user data example file is configured for use with this task.
 Qtip: There is a maximum file size of 100 MB.Qtip: If your organization uses SSO, include a Username column to be filled in with the values from your Active Directory that you are passing us for the username attribute. The #brandID will be appended to the username automatically upon upload of the file. If your organization doesn’t use SSO, this column should generally match the email column.
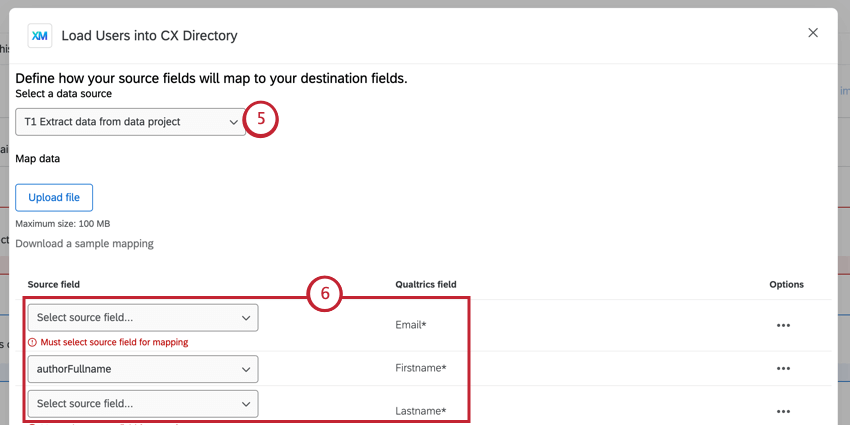
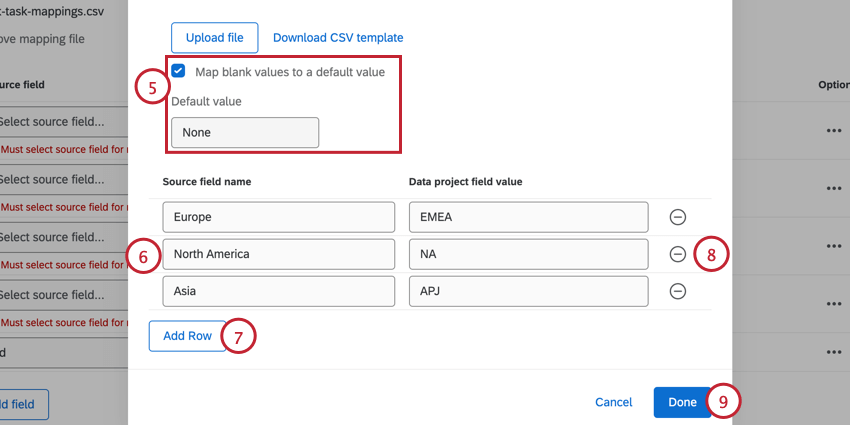
Qtip: By default, all existing CX user attributes in your license will be included in your mapping. You can remove any unneeded fields by clicking Delete row in the Options menu next to the field.
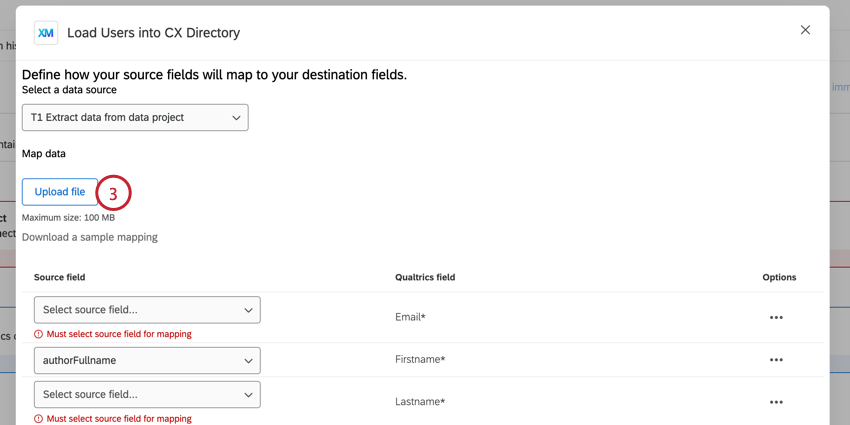
Qtip: If your source field and CX directory field names match exactly, then they will be automatically mapped for you!
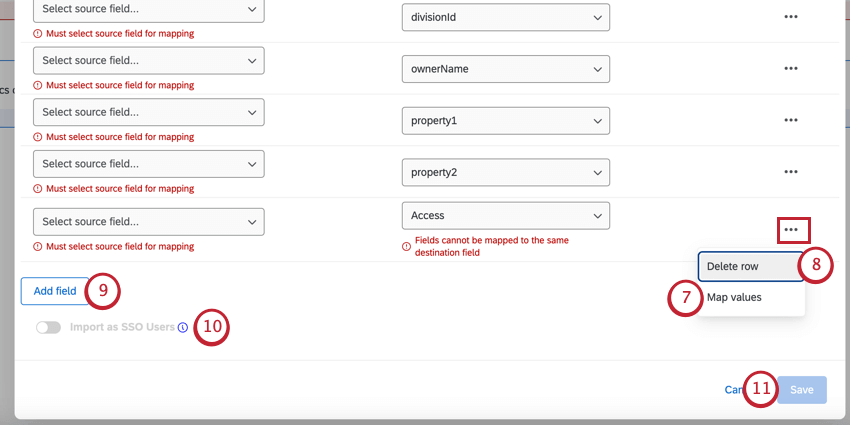
Example: In our imported data file, we have the value “Europe” but want this saved as “EMEA” in Qualtrics. This can be done by mapping values.
Qtip: You must remove any unmapped CX user attributes.
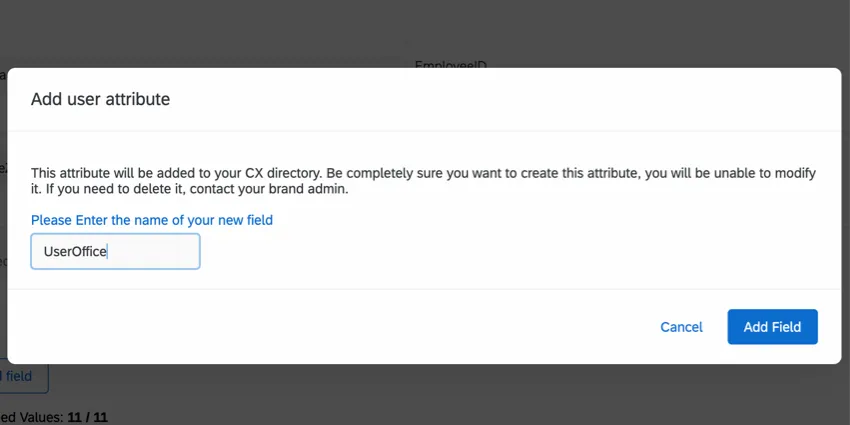
Qtip: If creating a new field, you must give the field a name. Be careful when naming your field, as you cannot edit or delete it without contacting your Brand Administrator.
Qtip: The task will not let you save if your mapping is incomplete. If the Save button is grayed-out, then double-check your mapping.
When the workflow runs, your users will be imported to Qualtrics and saved in your CX user admin.
Qtip: When this task runs successfully, you’ll see the message “There were no files available when this task was run,” in your workflow run history. This is because the processed data is based on the extractor task earlier in your workflow, not a separate file.
Mapping Fields and Values
When setting up this task, you can map your imported data fields via a file upload. This section covers how to map fields and individual field values using a file.
Mapping Fields
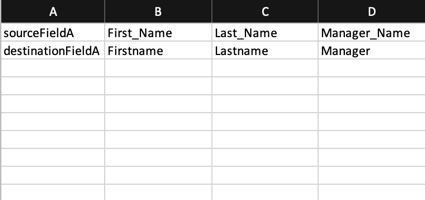
- Each column in the file is 1 field mapping.
- The value in the first cell in the column is the source field name.
- The value in the second cell in the column is the Qualtrics field name.
- Your file cannot exceed 100MB.
- Save your file as a CSV file.
Mapping Values
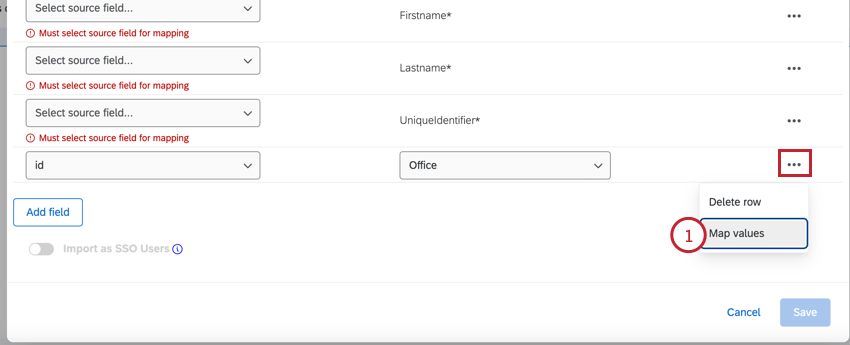
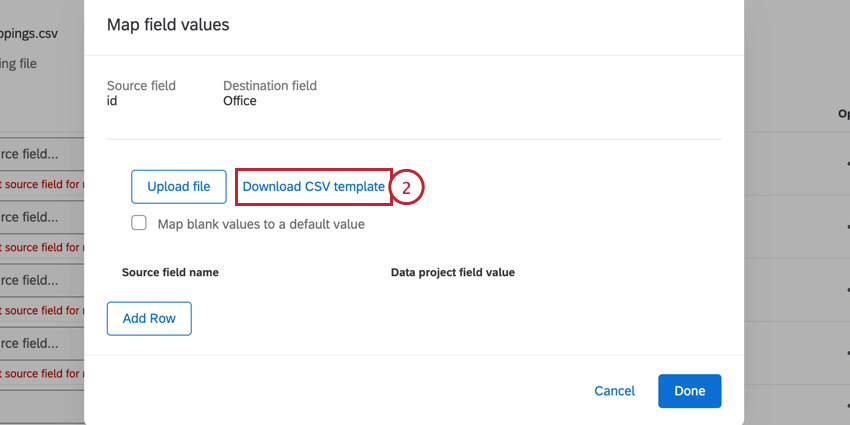
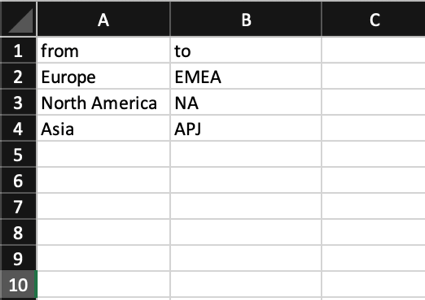
- The imported field values should go in the “from” column.
- The field values you want saved in Qualtrics should go in the “to” column.
- You can include up to 1000 mappings in your file.
- Save your file as a CSV file.

Example: Let’s say I’m importing employees and we have a field for “Office Location.” Some employees are remote and therefore do not have a value for this field. Instead of skipping this field for employees without a value, I can specify a different value, such as “Remote” to be imported for these employees.
Troubleshooting Tips
This section covers common issues that can appear when setting up this task.
- After selecting the task, you may see the error Directory not found, try reloading the page. This error appears if your license does not have access to CX user admin. To enable CX user admin, contact Account Services.
- After selecting the task, you may see the error Unique ID is required to be enabled to use this extension. This error appears when your license does not have unique identifiers. To enable unique identifiers, contact Account Services.
- If the Save button is grayed-out, then that means your mapping is not complete. Make sure that any fields included in the task are completely mapped.
- All fields must be added to the task in order for them to be updated. If a field is not added via Mapping Fields and Values, it will not be added or updated.
FAQs
Do I have access to all extensions available through the Workflows templates?
Do I have access to all extensions available through the Workflows templates?
Is there a link to all Workflows events and tasks?
Is there a link to all Workflows events and tasks?
What are Workflows templates?
What are Workflows templates?
What are workflows? / Where are actions?
What are workflows? / Where are actions?
There are no changes to workflow functionality as part of this update.
How do I add or remove an extension from my Qualtrics account?
How do I add or remove an extension from my Qualtrics account?
That's great! Thank you for your feedback!
Thank you for your feedback!