
Project Approval
What's on this page
About Project Approval
The project approval process allows administrators to set up rules for when surveys require approval before they are published. This lets administrators review their license’s usage and review what information their company is gathering.
With this tool, administrators can specify which users need approval before publishing surveys. They can also designate which users or groups are allowed to approve surveys for specific groups of users, allowing large organizations to set up fine-grained approval processes to make sure the right approvers are reviewing the right surveys.
Qtip: Surveys aren’t the only type of project affected by approval settings. Many other survey-based projects, like Conjoints, MaxDiff, XM Solutions, and Employee Experience projects will also be included in the approval processes you create.
Brand vs. Division Approvals
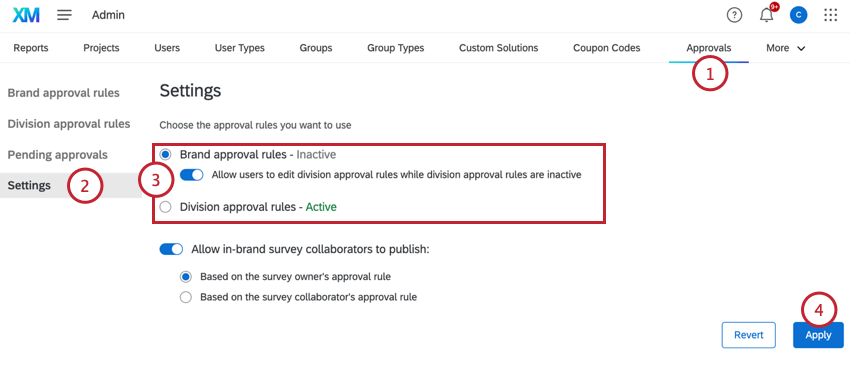
By default, project approvals are applicable to all surveys in your license that meet the approval rule criteria. If desired, Brand Administrators can change how approvals work in your license by allowing approval rules to be managed at a division level instead of a brand-wide level.
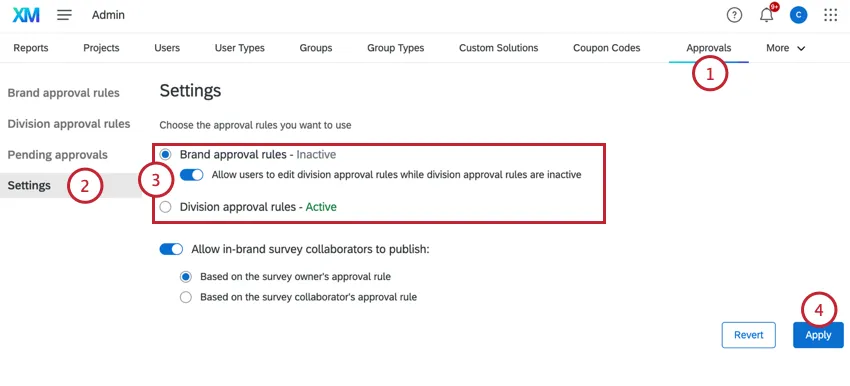
- Brand approval rules: Allows Brand Administrators to create rules that apply to all surveys within your license. If this setting is enabled, you can also choose to enable the Allow users to edit division approval rules while division approval rules are inactive This option allows division admins to create division approval rules, even while the division level rules are disabled. Qtip: The Allow users to edit division approval rules while division approval rules are inactive option is particularly useful when switching from brand level rules to division level rules since it allows the brand level rules to remain in place while division admins create division level rules. Once the division level rules are in place, a Brand Administrator can enable division level rules, preventing a transitional period where no rules are in place.

- Division approval rules: Allows division administrators to create rules that apply to surveys for users within their division.
When switching between approval methods, keep in mind the following:
- This setting controls who can create approval rules. When at a brandwide level, Brand Administrators create approval rules. When set at a division level, division administrators create rules, but only for their division.
- If approval rules are set at the division level, Brand Administrators will not be able to create division level rules, even if they are a division administrator. However, Brand Administrators can view approval rules for all divisions.
Creating A Default Approval Rule
When creating a survey approval workflow, it’s important to configure your default rule. This rule will always take effect if none of your custom approval rules are met.
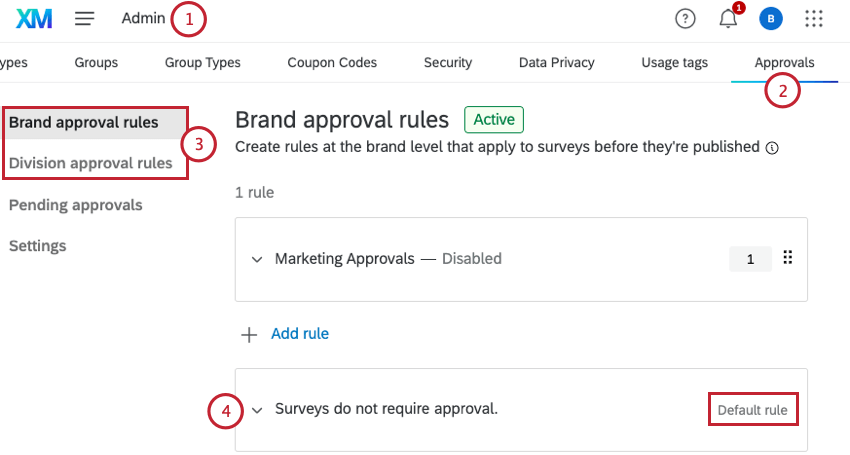

- Always (every time published or updated): Surveys require approval every time they are published. This includes edits made to a live survey that are published.
- First time published: Surveys require approval the first time they are published. After being approved, survey owners can modify and republish the survey without approval.
- Never: Surveys do not require approval by default.
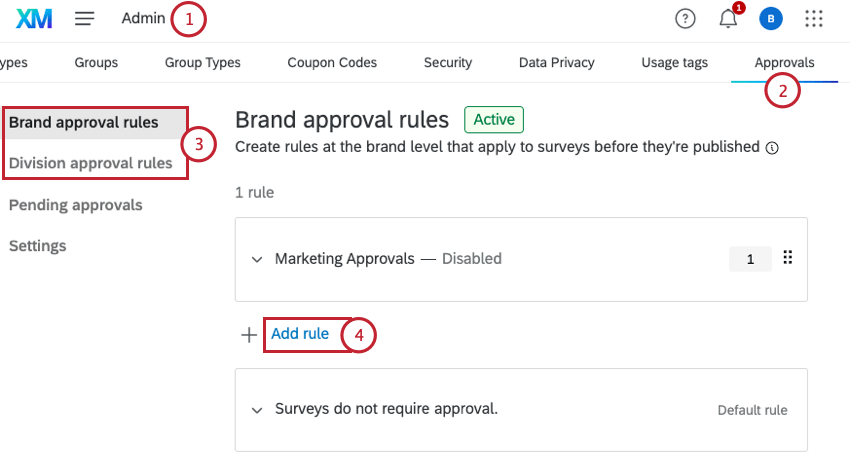
Creating Custom Approval Rules
You can create additional approval rules depending on who the survey owner is. This allows you to create a network of survey approvers and approvees based on your company structure.
Depending on your license’s selected approval method, custom approval rules are created by either Brand Administrators or division administrators.
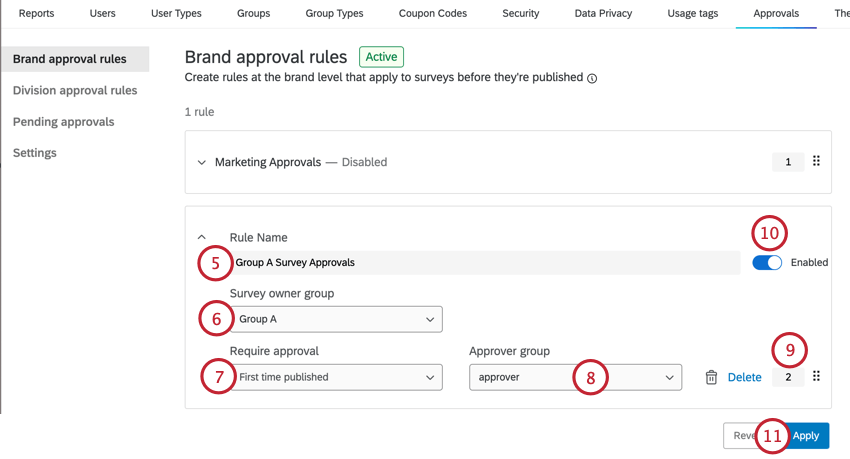
Qtip: You can find these group permissions in the Groups tab of the Admin page. If a group has the Available to All Users permission set to For this brand, and this group is selected as the Survey owner group, then all users in the brand will have to have their surveys approved before they can publish a survey. If a group has the Available to All Users permission set to No, and this group is selected as the Survey owner group, then only users in this group will have to get approval for surveys.
- Always (every time published or updated): Surveys require approval every time they are published. This includes edits made to a live survey that are published.
- First time published: Surveys require approval the first time they are published. After being approved, survey owners can modify and republish the survey without approval.
- Never: Surveys do not require approval by default.
Qtip: The permissions configured for the Approver group will affect which users appear in the Select approver list when publishing a survey. You can find these group permissions in the Groups tab of the Admin page. If a group has the Available to All Users permission set to For this brand, and this group is selected as the Approver group, then all users in the brand will appear in the Select approver list when publishing a survey. If a group has the Available to All Users permission set to No, and this group is selected as the Approver group, then only users in this group will appear in the Select approver list when publishing a survey.
Repeat the steps above to create additional custom rules. You can create up to 250 custom rules.
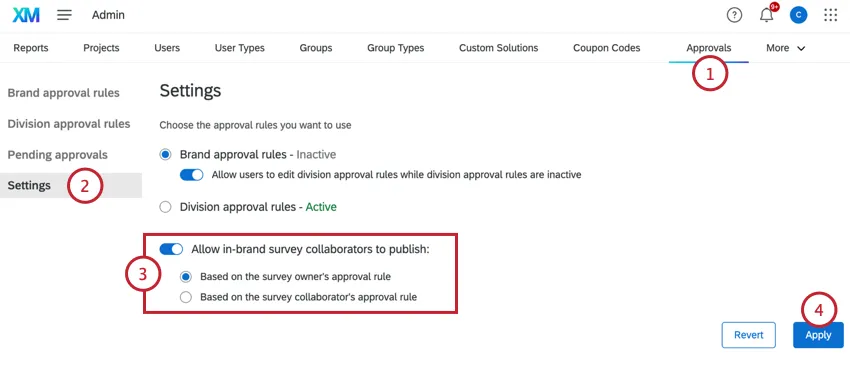
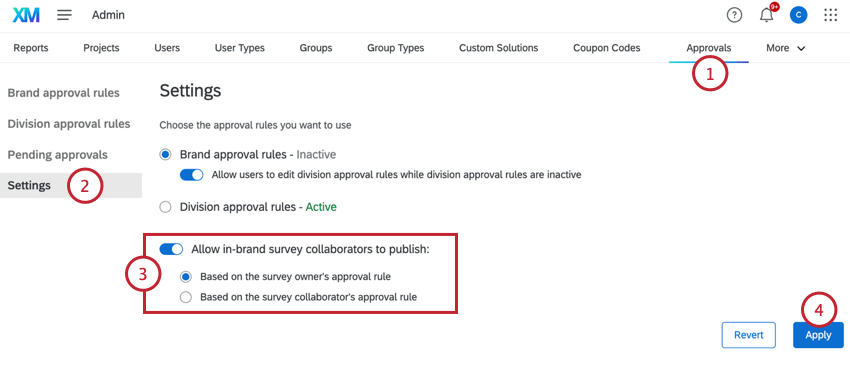
Allowing Collaborators to Request Approval
Qtip: These settings only apply to collaborators in the same brand. Collaborators in other brands cannot request approval.
By default, survey collaborators are not allowed to request approval for surveys; only the survey owner can request approval to publish changes to the survey. However, an admin can change this behavior to allow collaborators to request approval:
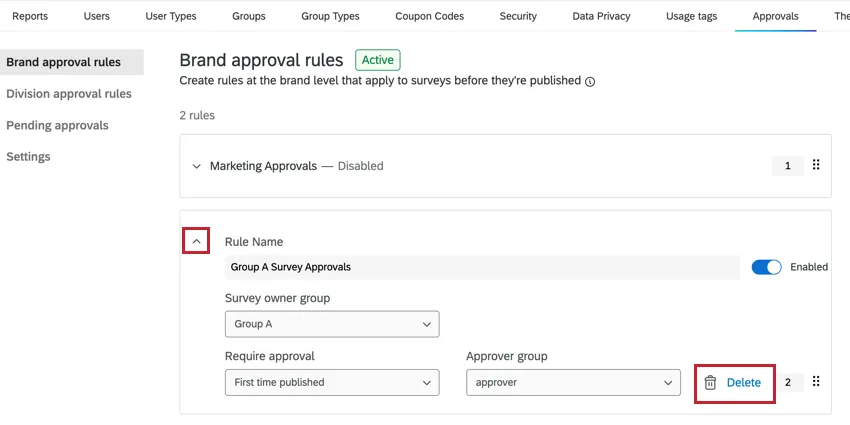
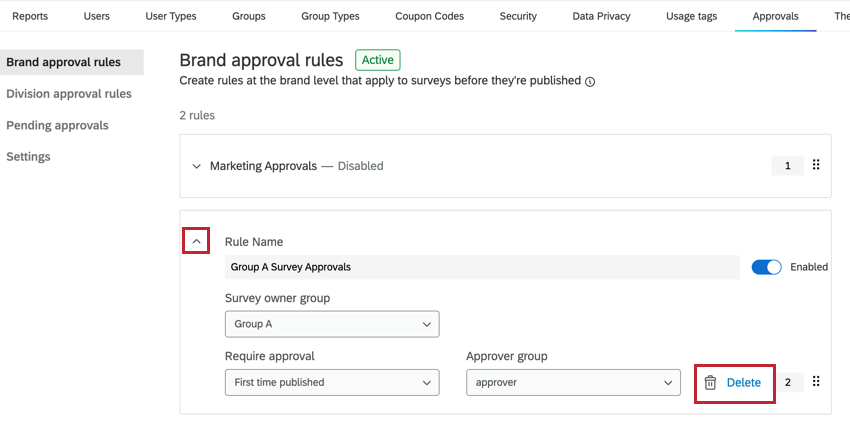
Deleting Rules
Custom Rules
You can delete custom rules by expanding the rule and clicking Delete within the rule.
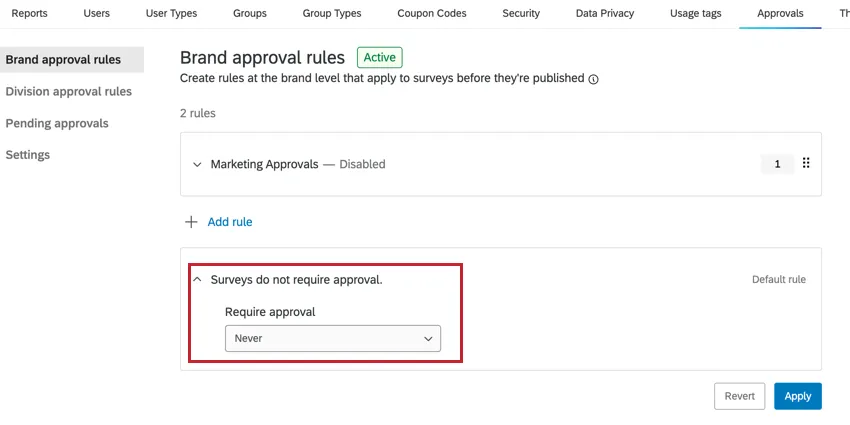
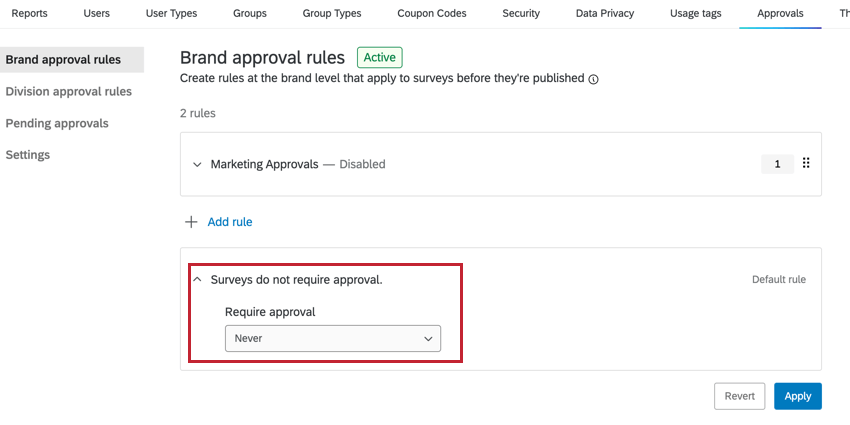
The Default Rule
You cannot delete the default rule. However, you can change it so that surveys never need approval.
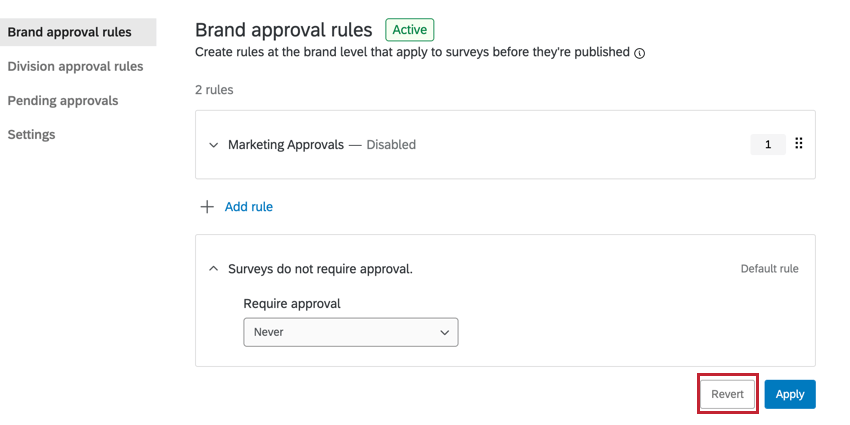
Reverting Changes
If you’ve made changes to your survey approval rules that you’d like to discard, you can click Revert to reverse these changes. This will revert your rules to how they were the last time you clicked Apply.

Attention: Any edits that are discarded by clicking Revert are irretrievable!
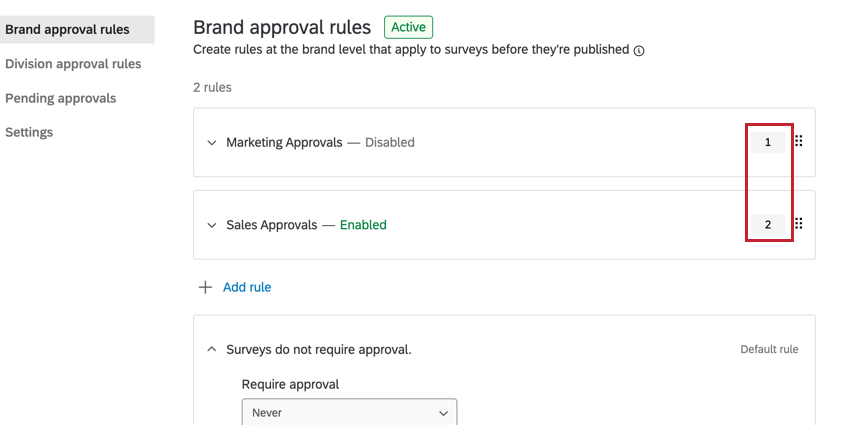
How Rules Are Evaluated
Whenever a survey owner publishes a survey, the survey approval rules are checked. The rules are evaluated in order according to their rule number (with rule number 1 first, rule number 2 second, and so on). A rule’s number can be found on the right-hand side of the rule.
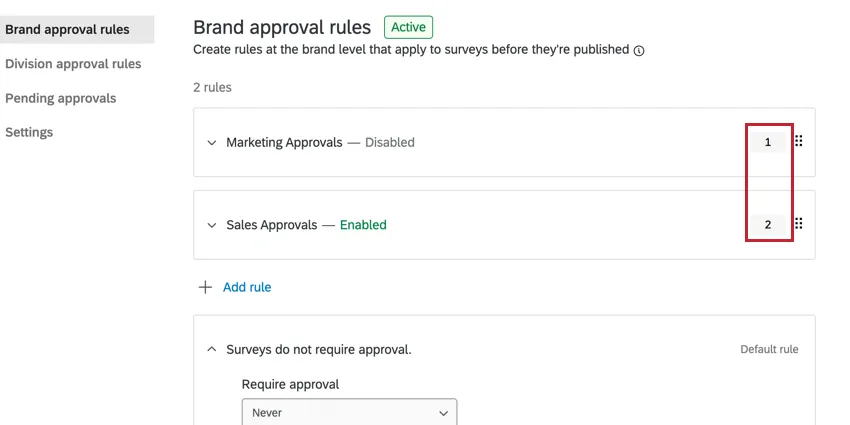
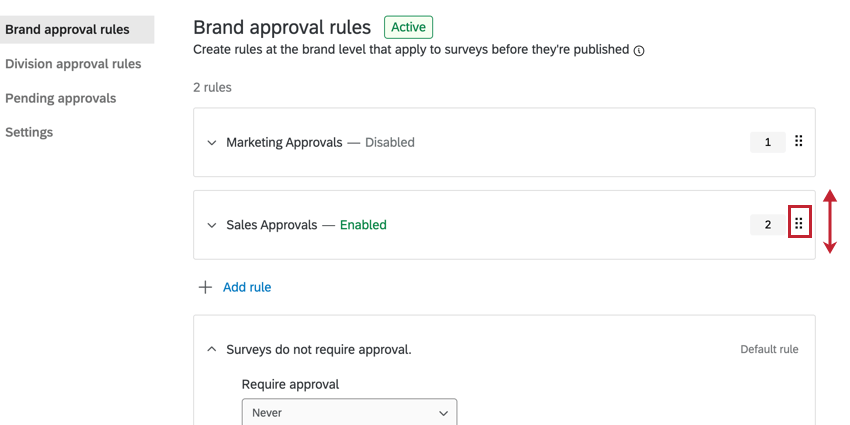
You can reorder your custom rules by clicking and dragging the six dots on the rule. Alternatively, click on the number and type a new number into the box.
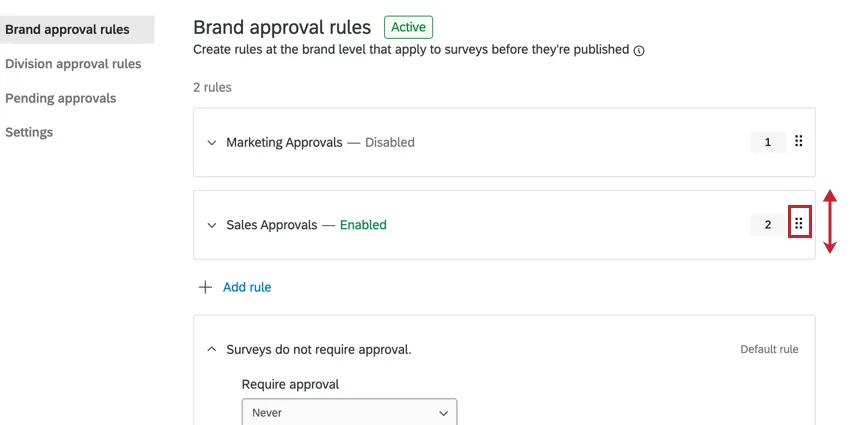
Once a rule is evaluated and is true, then the survey will follow that approval rule. If none of the custom rules are true for this survey, then the default rule will take effect.
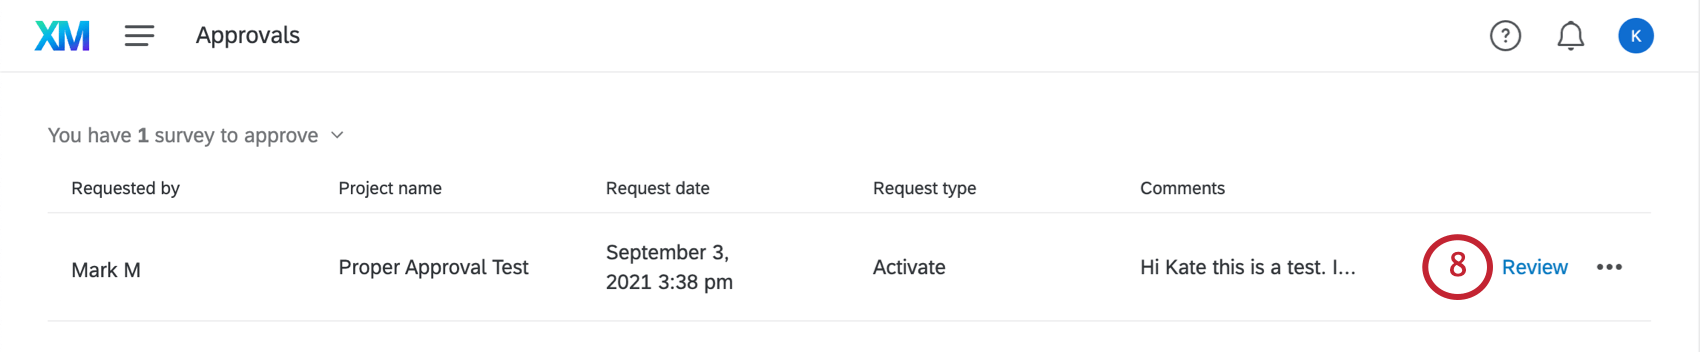
The Approval Process
This section will walk through the full approval process.
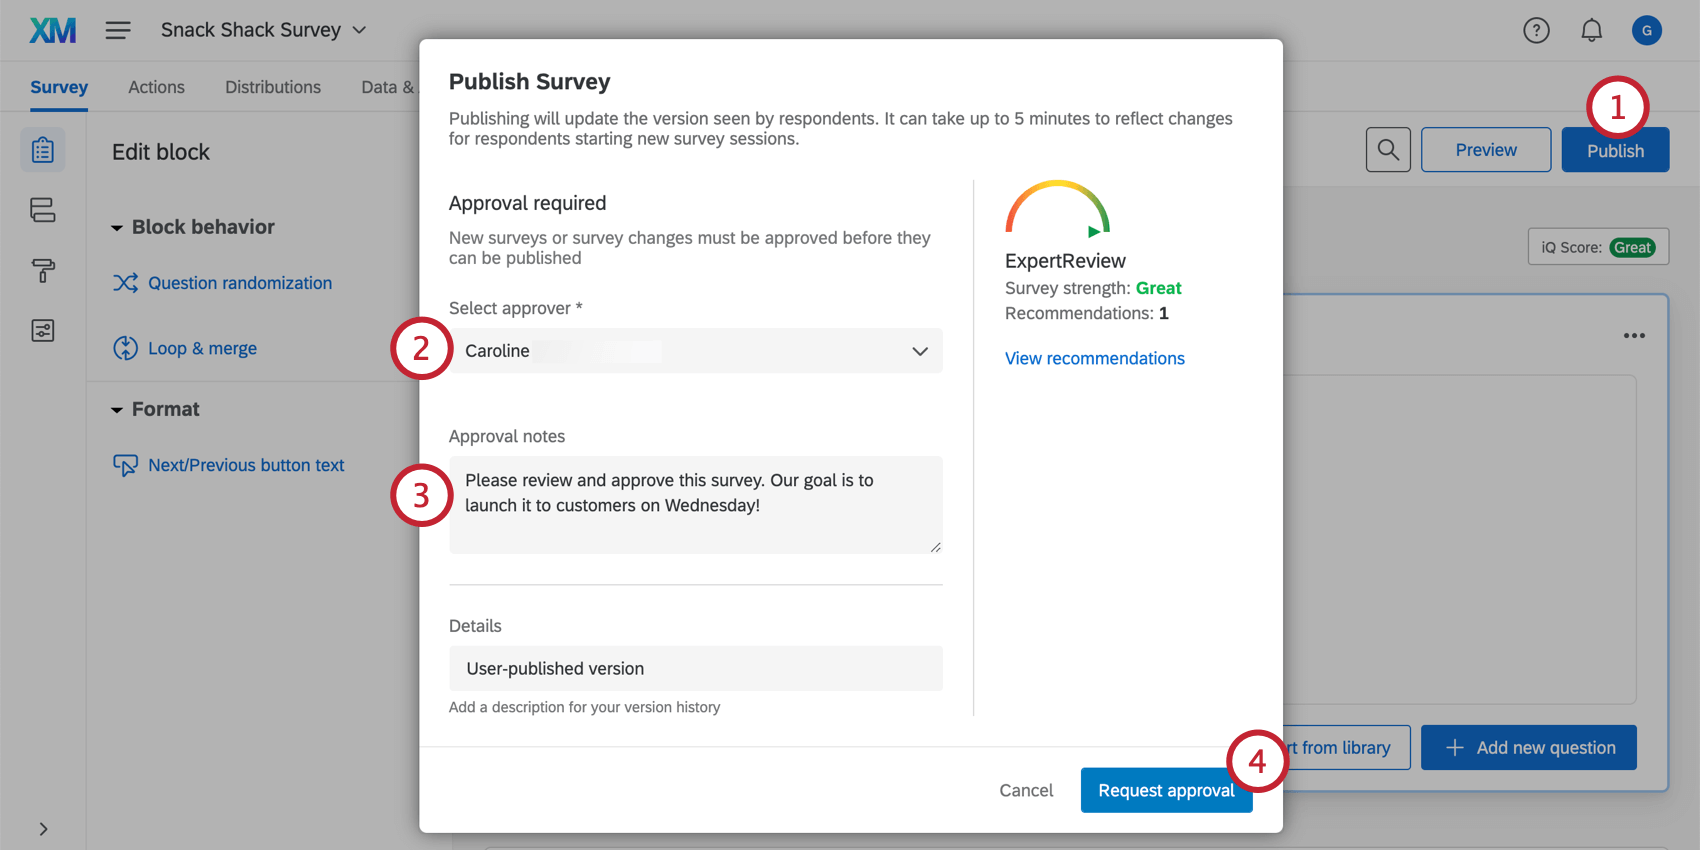
Qtip: While it’s possible for a brand administrator to set approver groups when creating an approval rule, when an individual goes to publish the survey, they must select an individual approver for their survey.
Qtip: The survey is automatically collaborated with the approver. The survey will not show up in the approver’s project list, but the approver name will appear in the collaboration window for the survey.
Qtip: Check out the notifications feed to determine the channel of notification you receive, such as email, mobile, or in-product. Make sure you are not unsubscribed from all notifications or from “Approvals.”
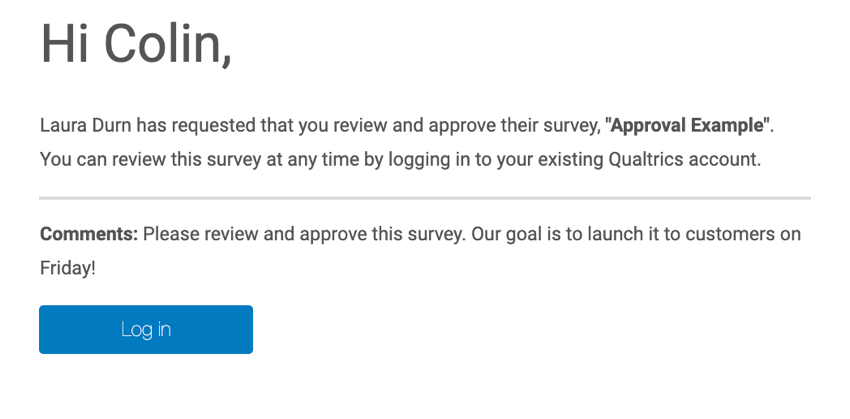
Attention: If your organization has set up a unique Qualtrics URL, you will need to login using that URL. If you do not know this URL, you can search it online, ask a colleague, or call support.
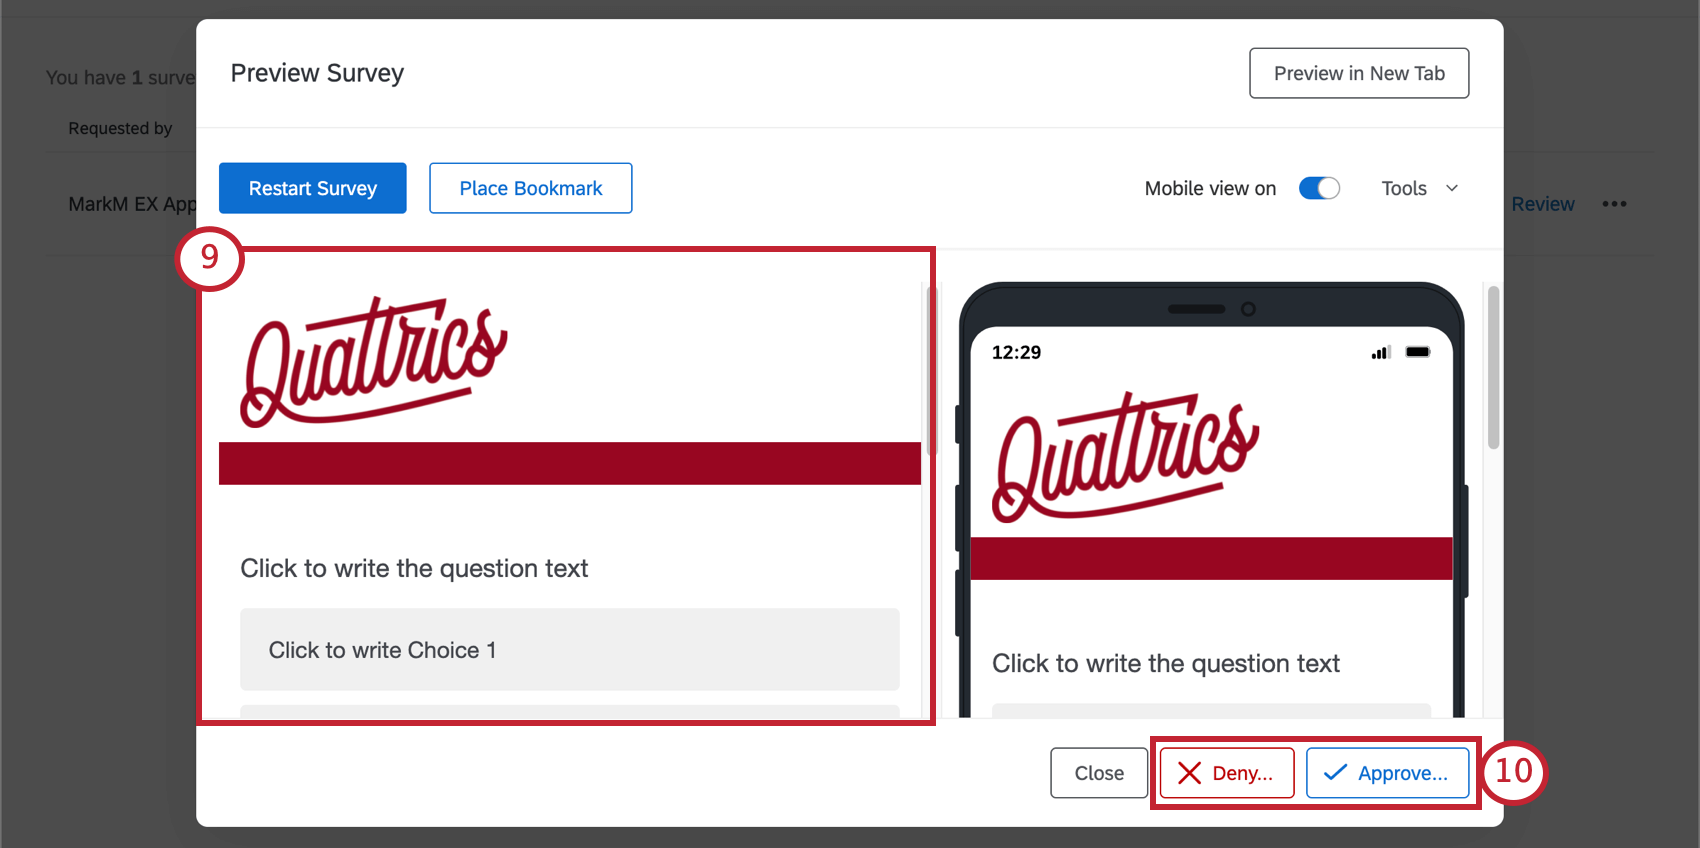
Qtip: If the approver denies the survey, they’re given the option to provide feedback to the survey owner for any suggested changes.


Qtip: After approving or denying the survey, the survey is automatically unshared with the approver since they no longer need to review it.
Qtip: There are some parts of the survey you cannot inspect this way – for example, you cannot view the survey flow without testing out all the iterations, or look at a list of the survey options and question settings. If you want to inspect the survey closer, ask the owner to invite you to collaborate on the project and to give you edit access.
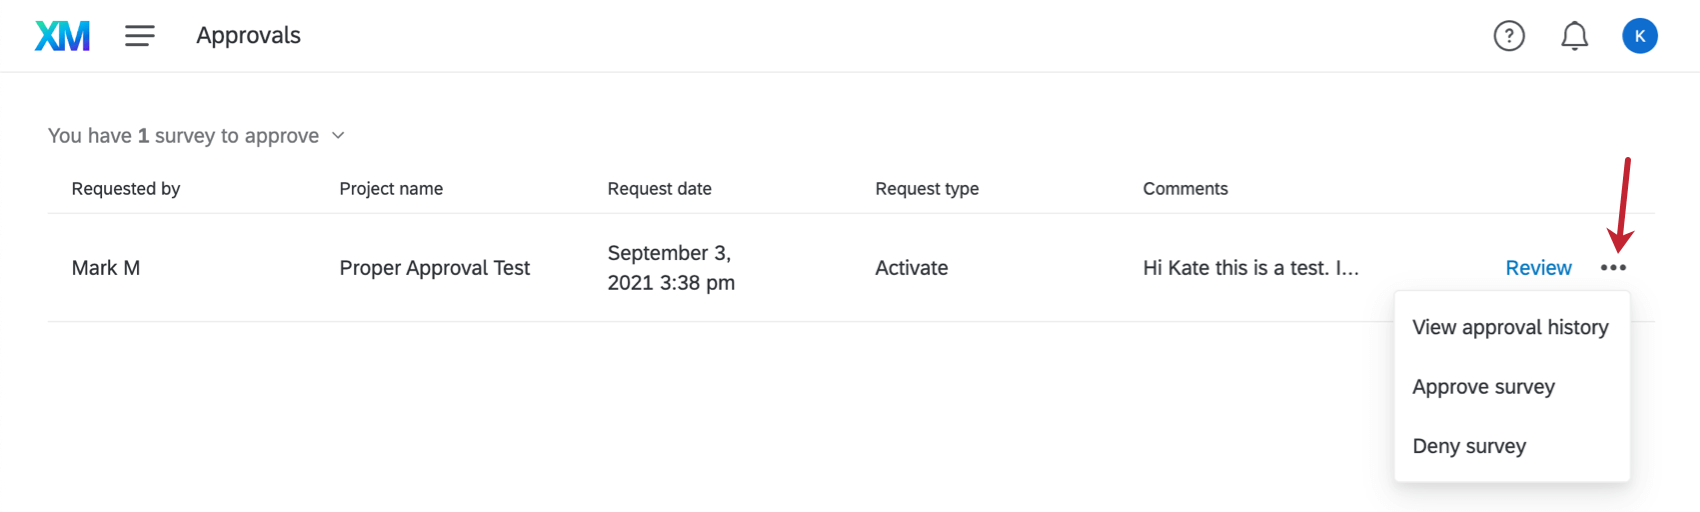
Additional options on the approvals page
When you click the dropdown next to an item waiting for approval, you will have the following options to choose from.
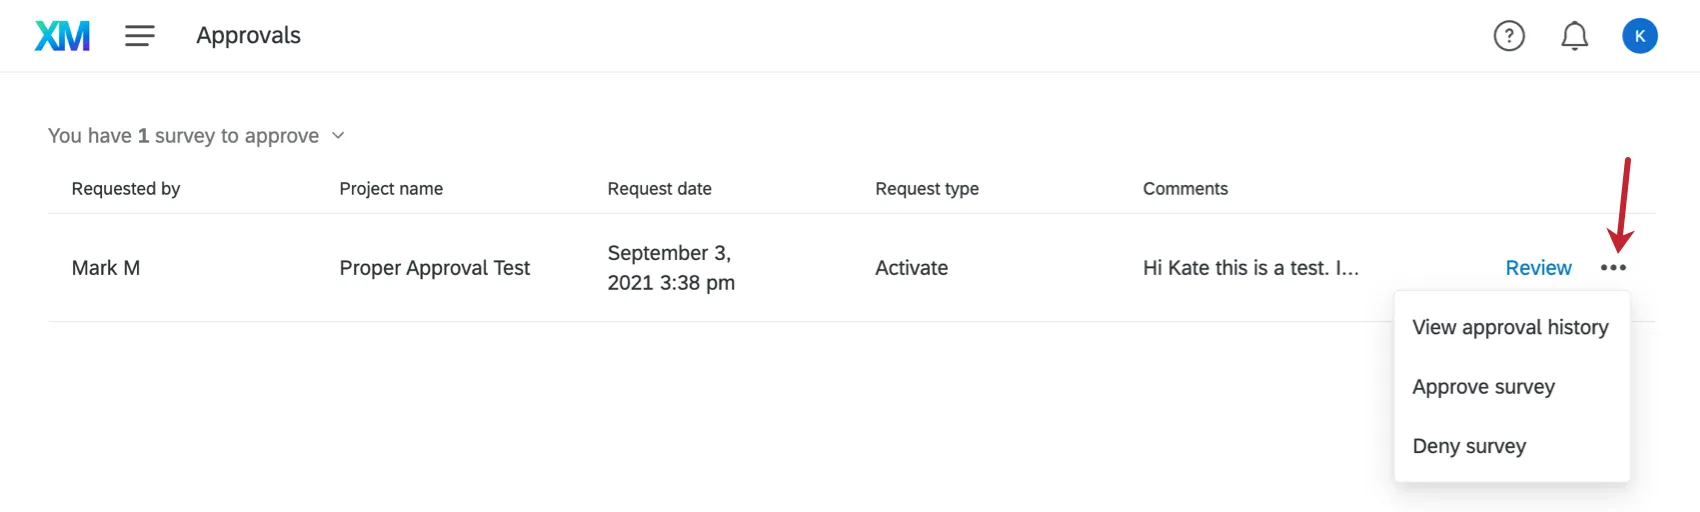
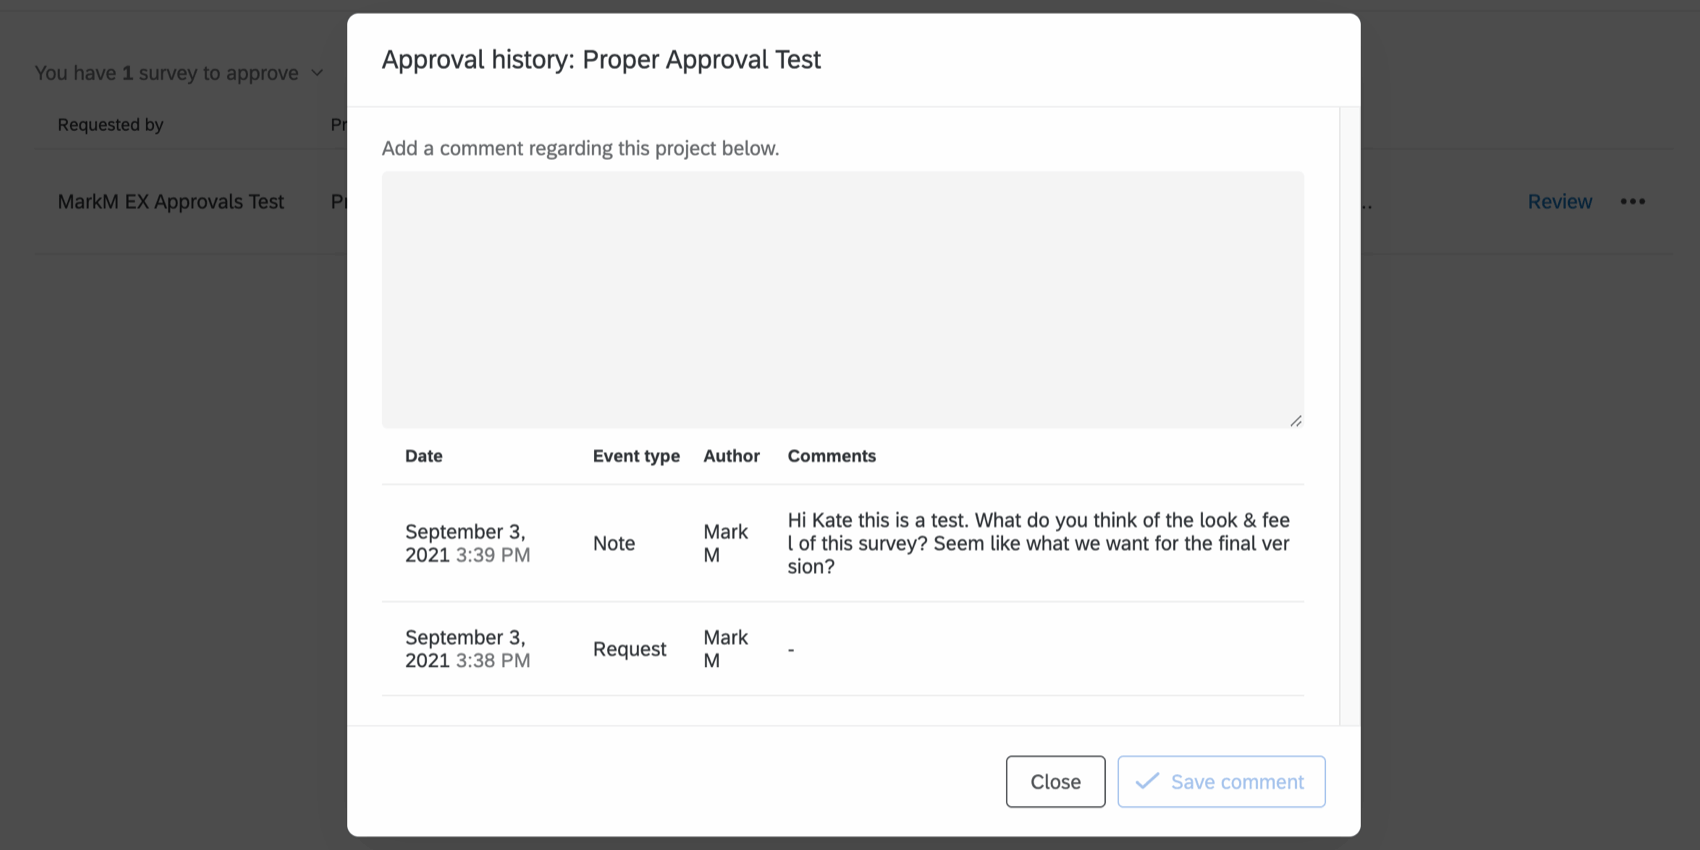
- View approval history: See the history of comments on this project, or leave some of your own. When you click this option, the window shown below will appear.

- Approve survey: Approve the survey.
- Deny survey: Deny the survey.
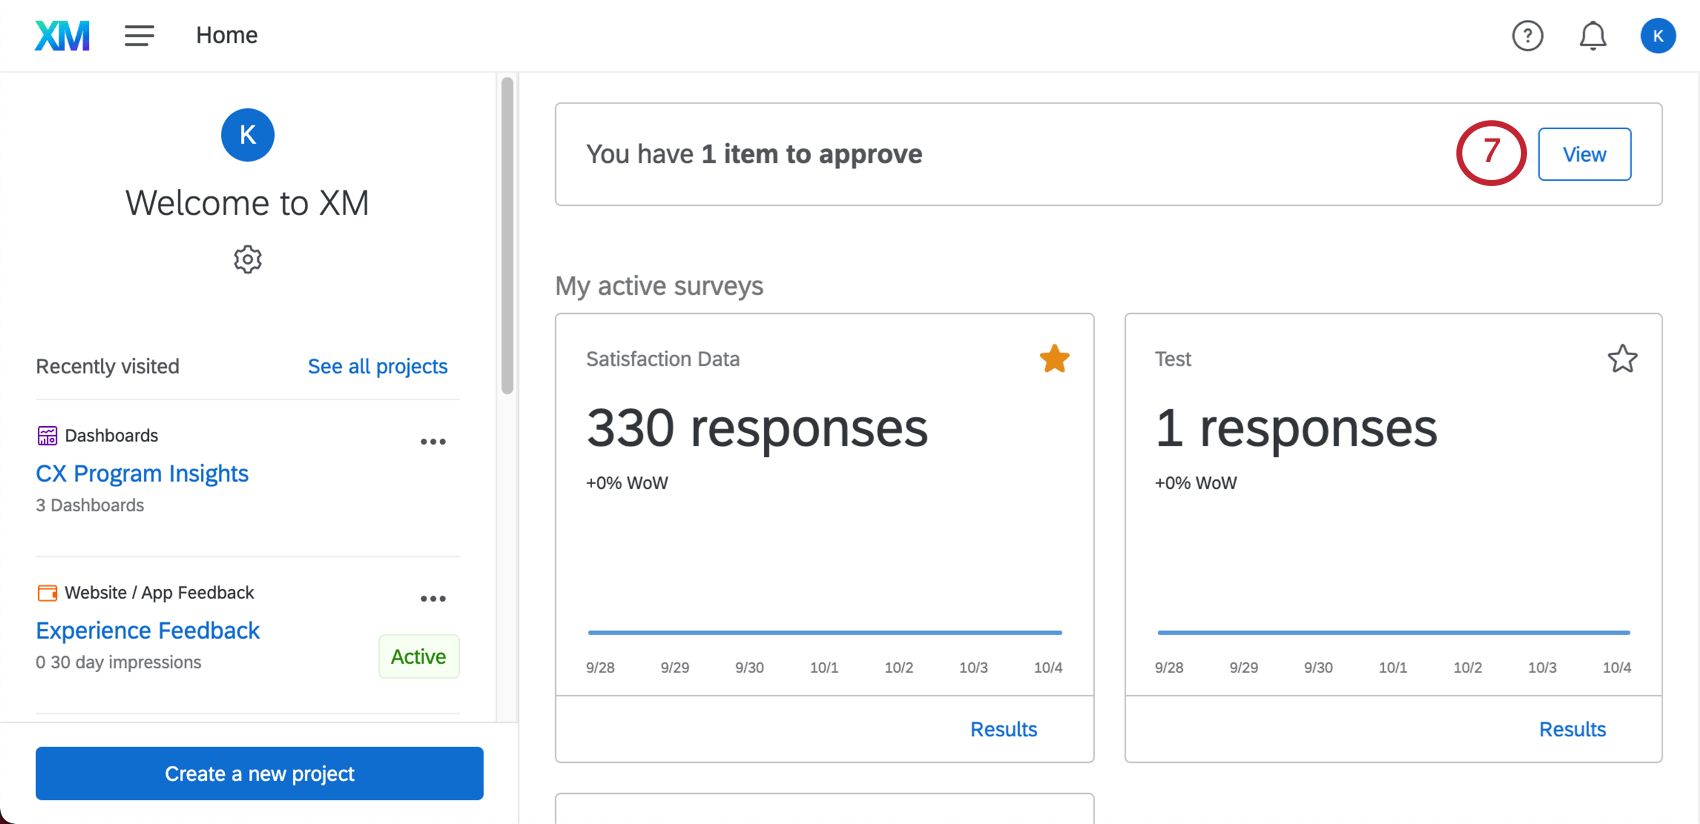
Pending Approvals
Brand Administrators can see all surveys that are currently waiting for approval in the Pending approvals tab.
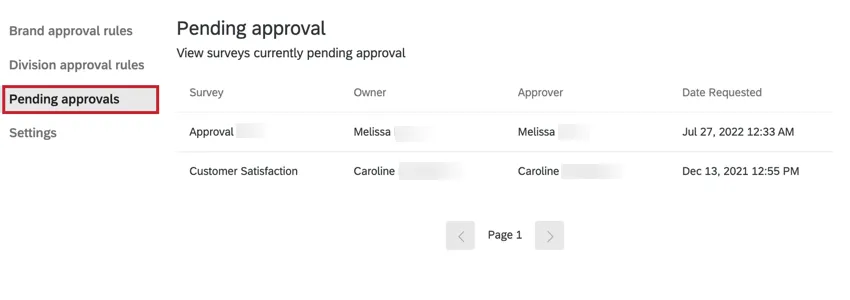
In this tab, you’ll see the following information about the surveys waiting for approval:
- Survey: This is the name of the survey.
- Owner: This is the name of the survey owner.
- Approver: This is the name of the user chosen to approve the survey.
- Date Requested: The time and date the survey owner requested approval.
FAQs
How does the approval process affect survey collaboration?
How does the approval process affect survey collaboration?
All edits to the survey are automatically saved, but they are not live to survey takers until they are approved and published.
By default, only the survey's owner can submit survey edits for approval. However, an admin can change this behavior to allow collaborators to request approval.
That's great! Thank you for your feedback!
Thank you for your feedback!