-

Qualtrics Platform -

Customer Journey Optimizer -

XM Discover -

Qualtrics Social Connect
Autocomplete Questions
About Autocomplete Questions
Autocomplete is a text entry question type that can guess the answer a respondent’s going to give. It draws on a list of preexisting answers, which it may provide as options as the respondent types their answer. You may choose to only let the respondent provide a predetermined answer, or to provide their own if none apply.
In addition to drawing on a static list of options, your autocomplete can provide suggestions from Google Maps, or a file you uploaded to Qualtrics. Drawing from a file is known as using a supplemental data source.
Setting Up Autocomplete Questions
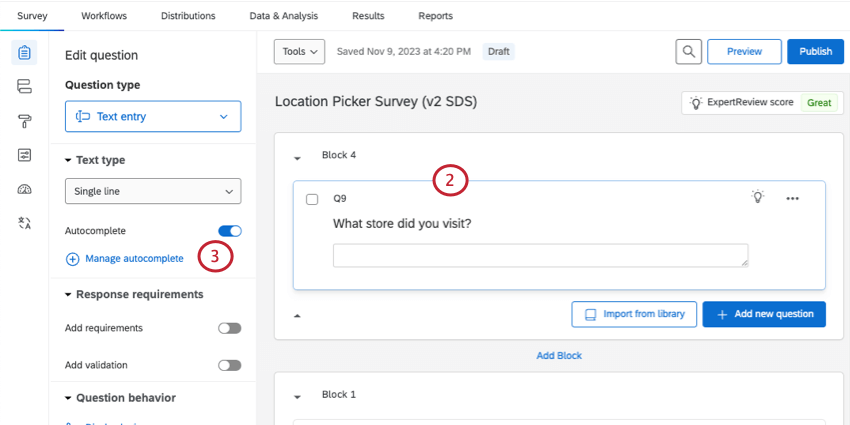
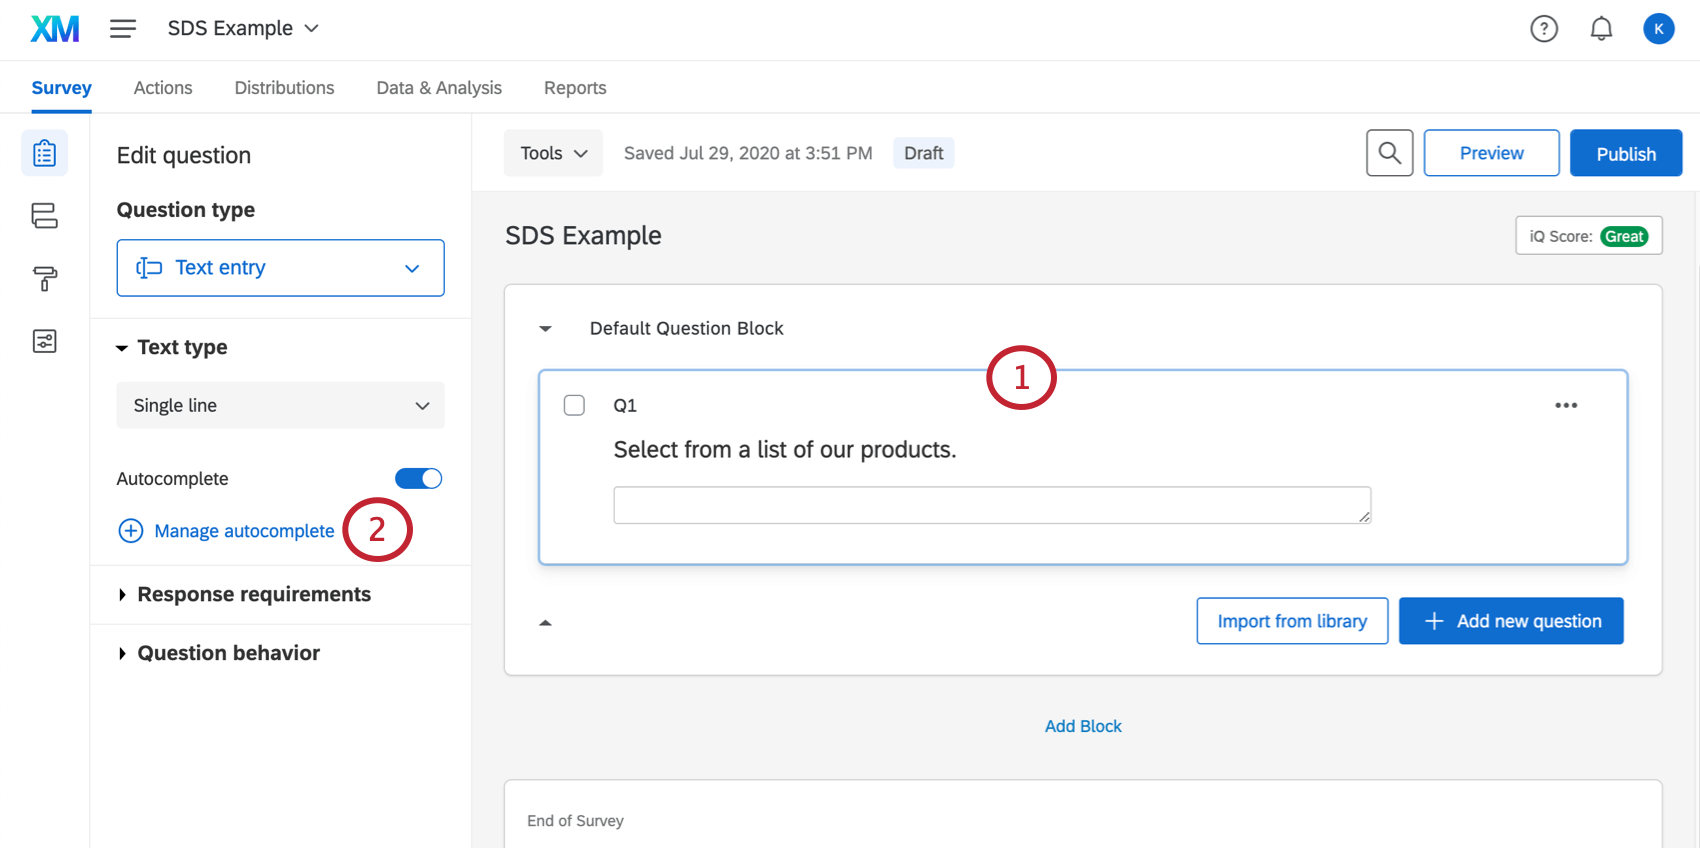
- Click Add new question.
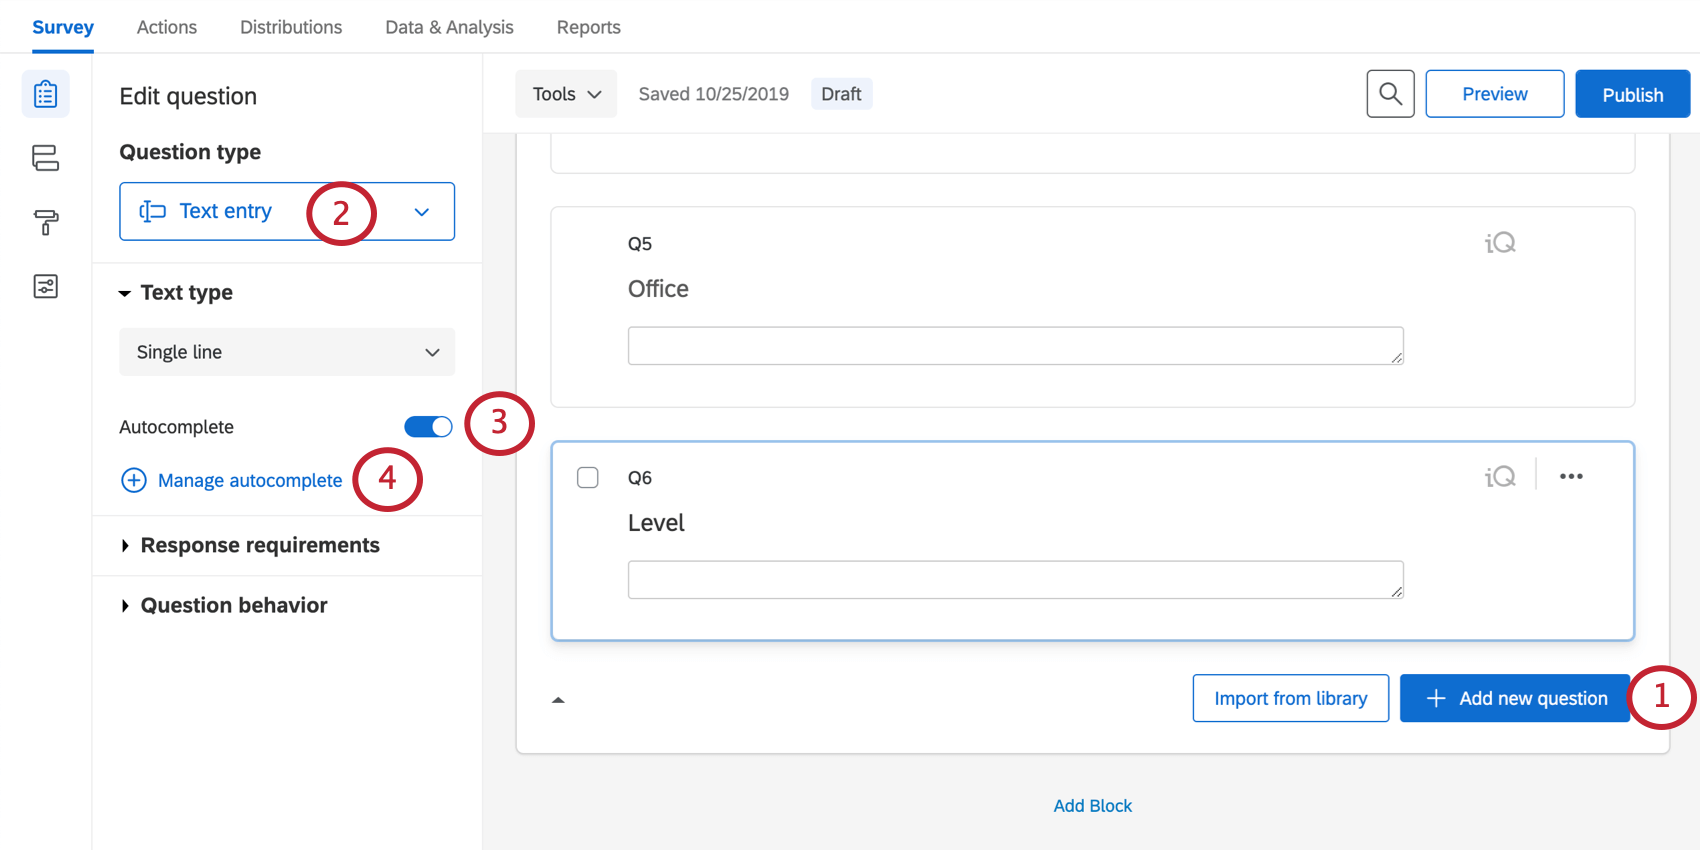
- Change the question type to Text entry.
- Under Text type, enable Autocomplete.
- Select Manage autocomplete.
- Select an Autocomplete data source. The options are:
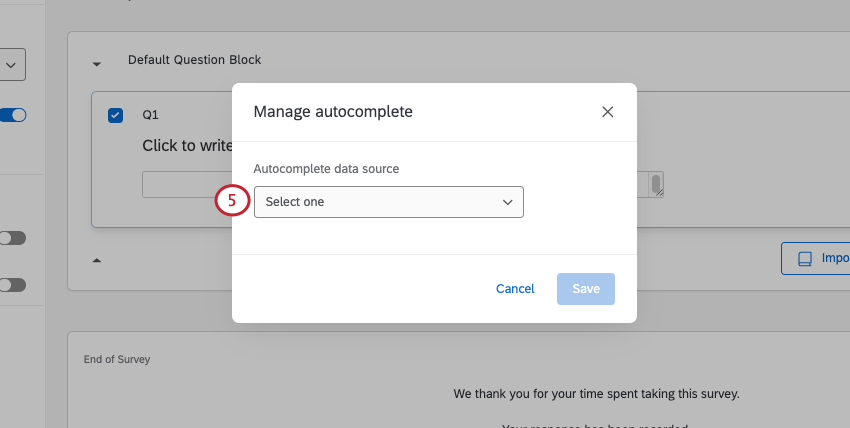
- Supplemental Data: The autocomplete fills in with data from another source in Qualtrics. Great for when you want to draw data from a large store of data. See Autocomplete with Supplemental Data for a detailed list of steps.
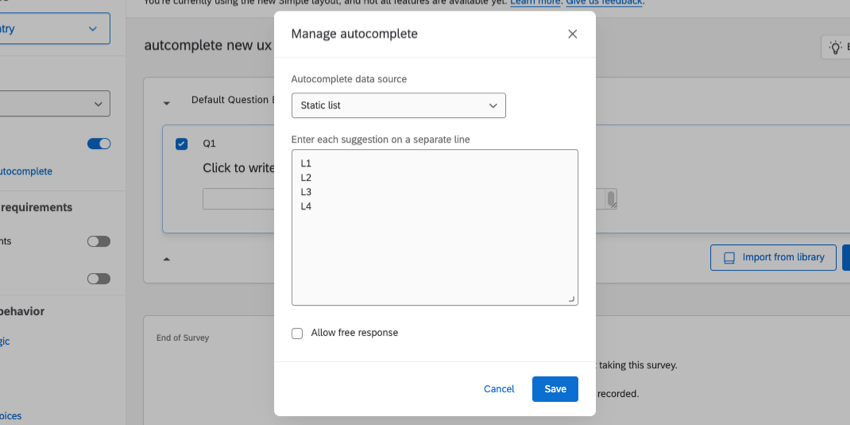
- Static List: Write out the list of options your autocomplete question should have. Each option in the list should be separated by 1 line. If you already have a line-separated list in another document, you can copy and paste the options into the box.
 Qtip: If you have a small list of answers and are looking for a simple setup, choose Static List as your Data Source.
 - Google Maps: The autocomplete question make suggestions from Google Maps. See Google Maps Place Types for an explanation of the options available.
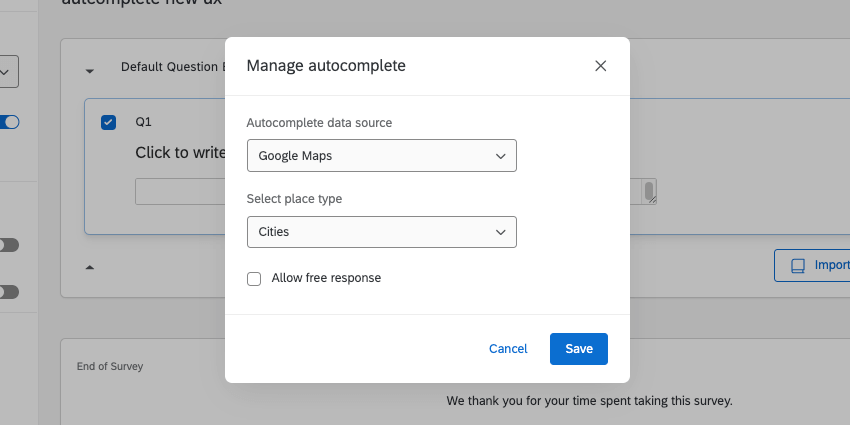
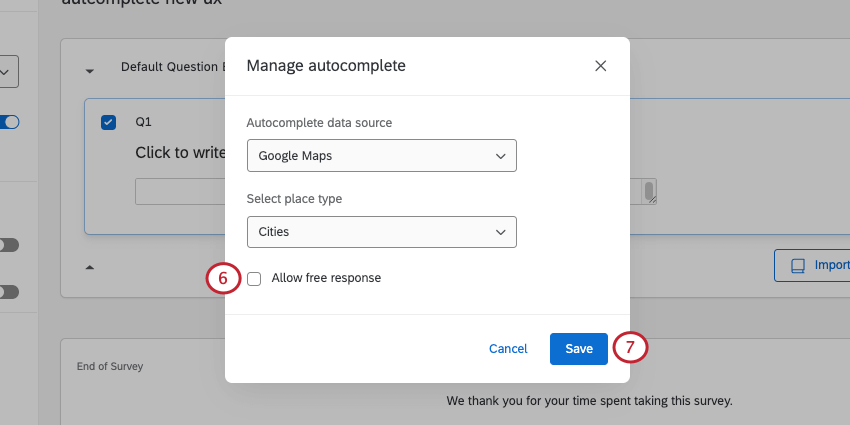
- Select Allow Free Response to allow respondents to submit answers that aren’t from the set source.
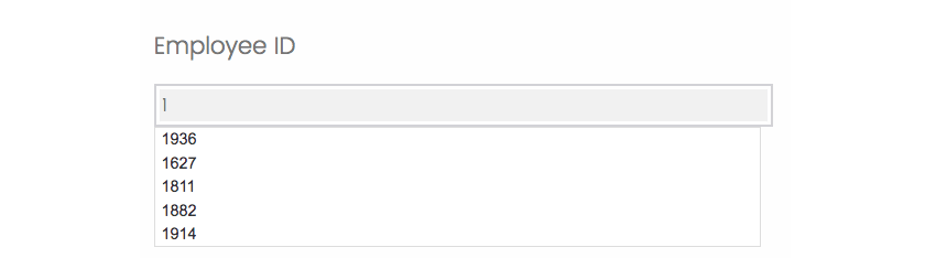
 Qtip: You can still set a Validation Type for this free response, meaning you can still restrict what kind of answer is given. For example, for numeric Employee IDs, you probably only want a respondent to give numbers. In that case, select Content Validation and then Number.
 - Click Save.
Google Maps Place Types
You can draw answers from Google Maps in your autocomplete questions. Below is an explanation of the different place types you can select.
- All Types: Draw anything from cities to places of business.
- Addresses: Pull exact addresses. This can be helpful to ensure respondents give the correct shipping or contact information.
- Regions: While cities and states are included, this is useful to draw on other regions such as Counties and Provinces.
- Cities: Draw information from specific cities.
- Establishments: Places of business, with everything from restaurants to grocery stores to amusement parks.
Autocomplete with Supplemental Data
Supplemental data sources are useful when your autocomplete question is going to give recommendations on large data sources.
- Create a supplemental data source in your library.
- Create an autocomplete question.
- Select Manage autocomplete.
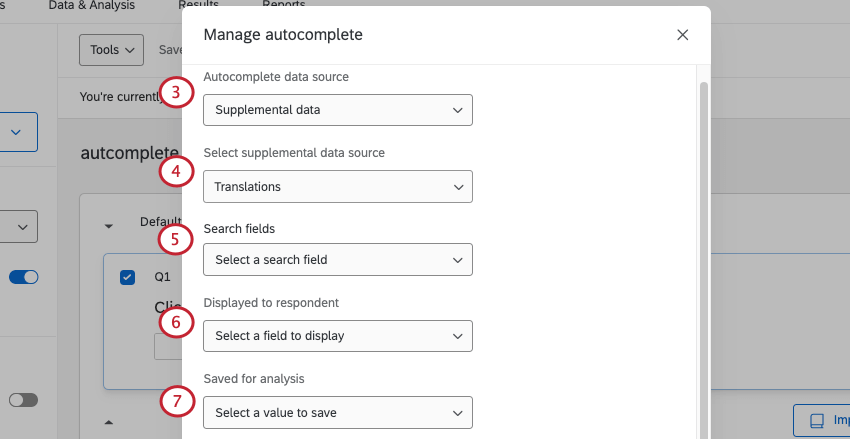
- Under Autocomplete Data Source, select Supplemental data.
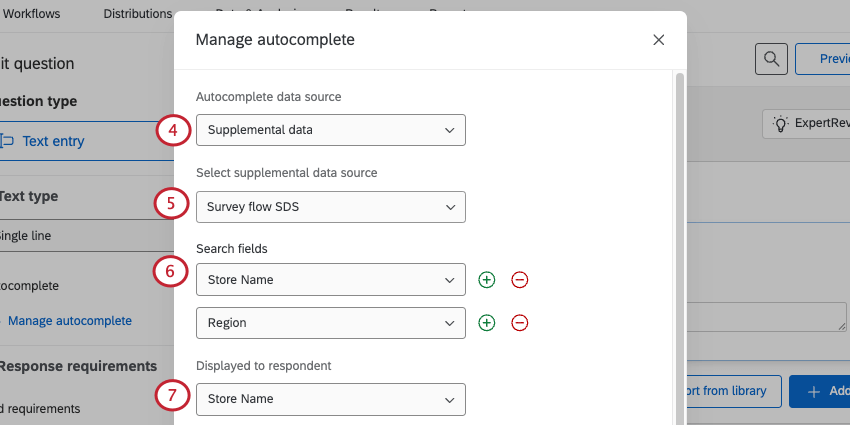
- Under Select supplemental data source, select the SDS you made in the library.
Qtip: You can also select Create new supplemental data source to create a new SDS. This SDS will be saved in your library if you ever want to edit it later.
- Under Search fields, set the field in the SDS that should be searched.
Qtip: You can add up to 5.
- Under Displayed to respondent, select the field that displays as you search.
- Under Saved for analysis, select the field to be saved with the data based on the other selections.
 Qtip: Normally, all of these fields should be the same value. However, there are some use cases where this can differ. For example, Display and Search would be different if you want someone to search their Last Name in order to find their Employee ID. If you want to analyze data using Divisions instead of Roles, the Search and Display fields may be Role, while the value saved is the corresponding Division the Role belongs to.
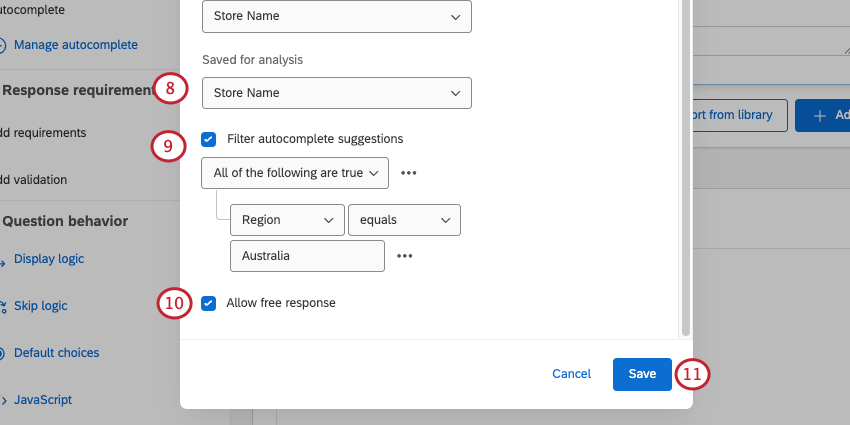
 - To limit the data that can appear in the suggestions, select Filter autocomplete suggestions.
Example: Your SDS has international store data, but your surveys vary by region. Filter the autocomplete in your Australian survey to only show Australian stores.Qtip: For help building filters, see Basics of Building Conditions, New Conditions and Condition Sets, and All vs. Any.
- Select Allow free response to let respondents submit answers that aren’t from the set source.
- Click Save.
Setting Up Survey Translations
When working with a translated survey, you will want to make sure the data your respondents see is translated to provide the best survey experience possible. To do this, you’ll need to create and translate a supplemental dataset.
Translating Your Supplemental Data
In order to display translated data to your survey respondents, you’ll need to add the following to the data you want to import:
- A new row for each translation.
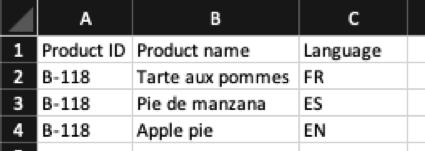
Example: 1 of your products is an apple pie. You are surveying English, French, and Spanish-speaking customers. Instead of just 1 row that says “Apple Pie,” you have 3 rows – Apple Pie, Tarte aux pommes, and Pie de manzana – 1 for each translation.
- A Language column that specifies what language the option is. Make sure to use the Available Language Codes, not the name of the language.
Example: We’ll display “Product Name” to our customers in either English (EN), French (FR), or Spanish (ES). We’ve identified the “Language” of each row in our supplemental dataset file.
Each of our example products also has a unique “Product ID” regardless of the translated value for “Product Name.” As we bring this data into the survey for our respondents, we’ll display “Product Name” to them, but we can use the “Product ID” to tie all responses about a specific product together for analysis regardless of the language the survey-taker spoke.
When you’re ready, upload the file as an SDS to your library.
Autocomplete Question
Set up your autocomplete question source to pull from the translated Supplemental Dataset.
In our example, we want to both display and let respondents search by “Product Name.” For our analysis, we want the “Product ID” instead. This makes sure we can group responses for the same product together, regardless of what the translated value was for our respondents.
To make sure French respondents only see “Product Names” in French, we need to apply a filter. In Qualtrics surveys, there’s an automatic embedded data field created called “Q_Language”. This field is set to whatever language the respondent is taking the survey in. We can filter our options using the “Language” field from our supplemental dataset and the “Q_Language” field in the product survey.
- Go to your autocomplete question.
- Select Manage autocomplete.
- Make sure you have Supplemental Data selected under Autocomplete Data Source.
- Select the SDS you uploaded with the translations inside.
- Set the Search fields to the Product Name.
- Set Displayed to respondent to the Product Name.
- Set the Saved for analysis to the Product ID.
- At the bottom of the window, select Filter autocomplete suggestions.
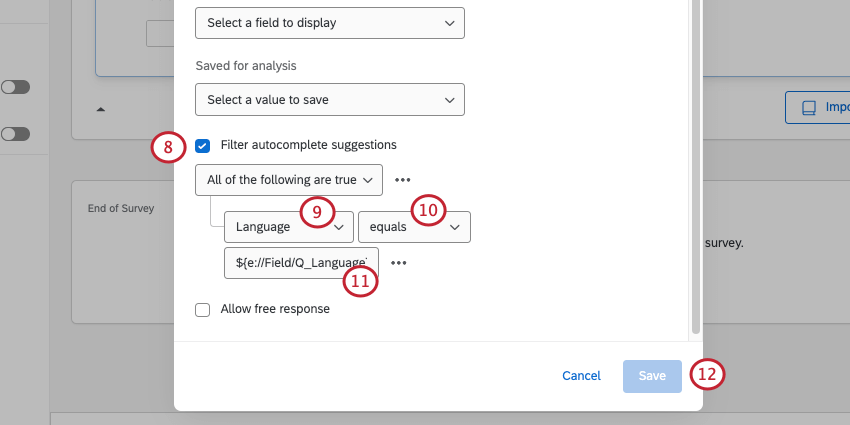
- Select the Language column you added to your supplemental data.
- Select equals.
- Add the piped text for the Q_Language embedded data field:
${e://Field/Q_Language} - Click Save.
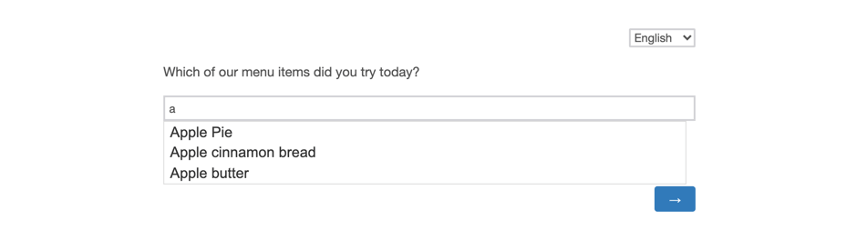
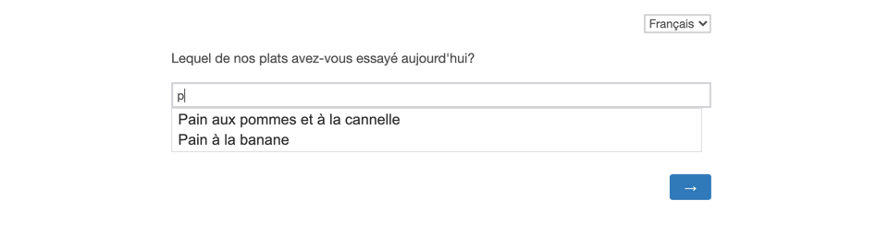
Now when customers take the survey, they will be presented with translated Product Names.
In English:
In French:
Finding Values Using the Supplemental Data Element
In some cases, you may need to find the value of a field in your supplemental data by searching on 1 or 2 other fields you already have saved. For instance, you may want to display the value of a field in your survey. The supplemental data element in the survey flow can be used to search and pull in these values.
- Go to your Survey flow.

- Add a Supplemental Data element.
- Under Database, select the project where the supplemental data is stored.
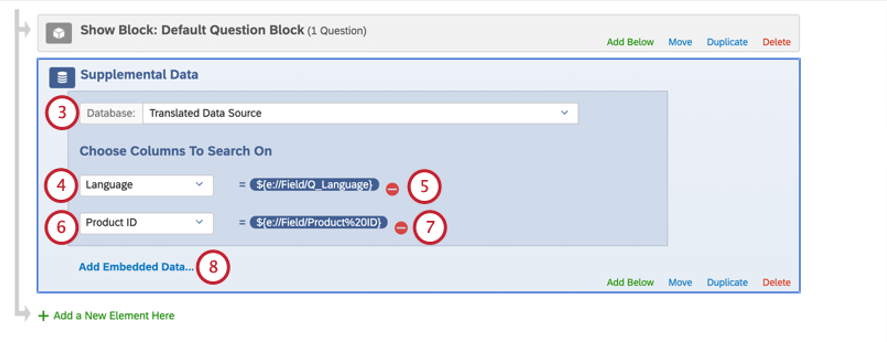
- Under Choose Columns to Search On, add the field for Language.
- Set the value equal to the Embedded Data called Q_Language.
- Add the name of the other field you’re using to search for additional fields. In our example, this is Product ID.
- Set the value equal to the field in the supplemental data that this gets its data from. In our example, this is also called Product ID, and is an Embedded Data field.
- Click Add Embedded Data.
- Select the field you want to pull in. In our example, this is Product Name.
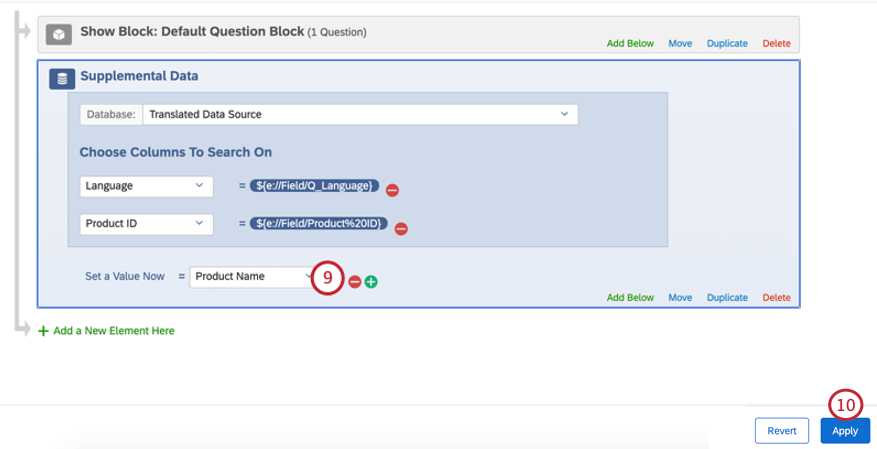
- Apply changes to your survey flow.