-

Qualtrics Platform -

Customer Journey Optimizer -

XM Discover -

Qualtrics Social Connect
Unit Tools (CX)
Qtip: CX Hierarchies are only available to CX licenses with ticketing included. If you’re interested in this feature, reach out to your Account Executive.
Qtip: CX Hierarchies and EX Hierarchies are very similar, but have some key differences. If you are an EX client, please see Unit Tools (EE) instead.
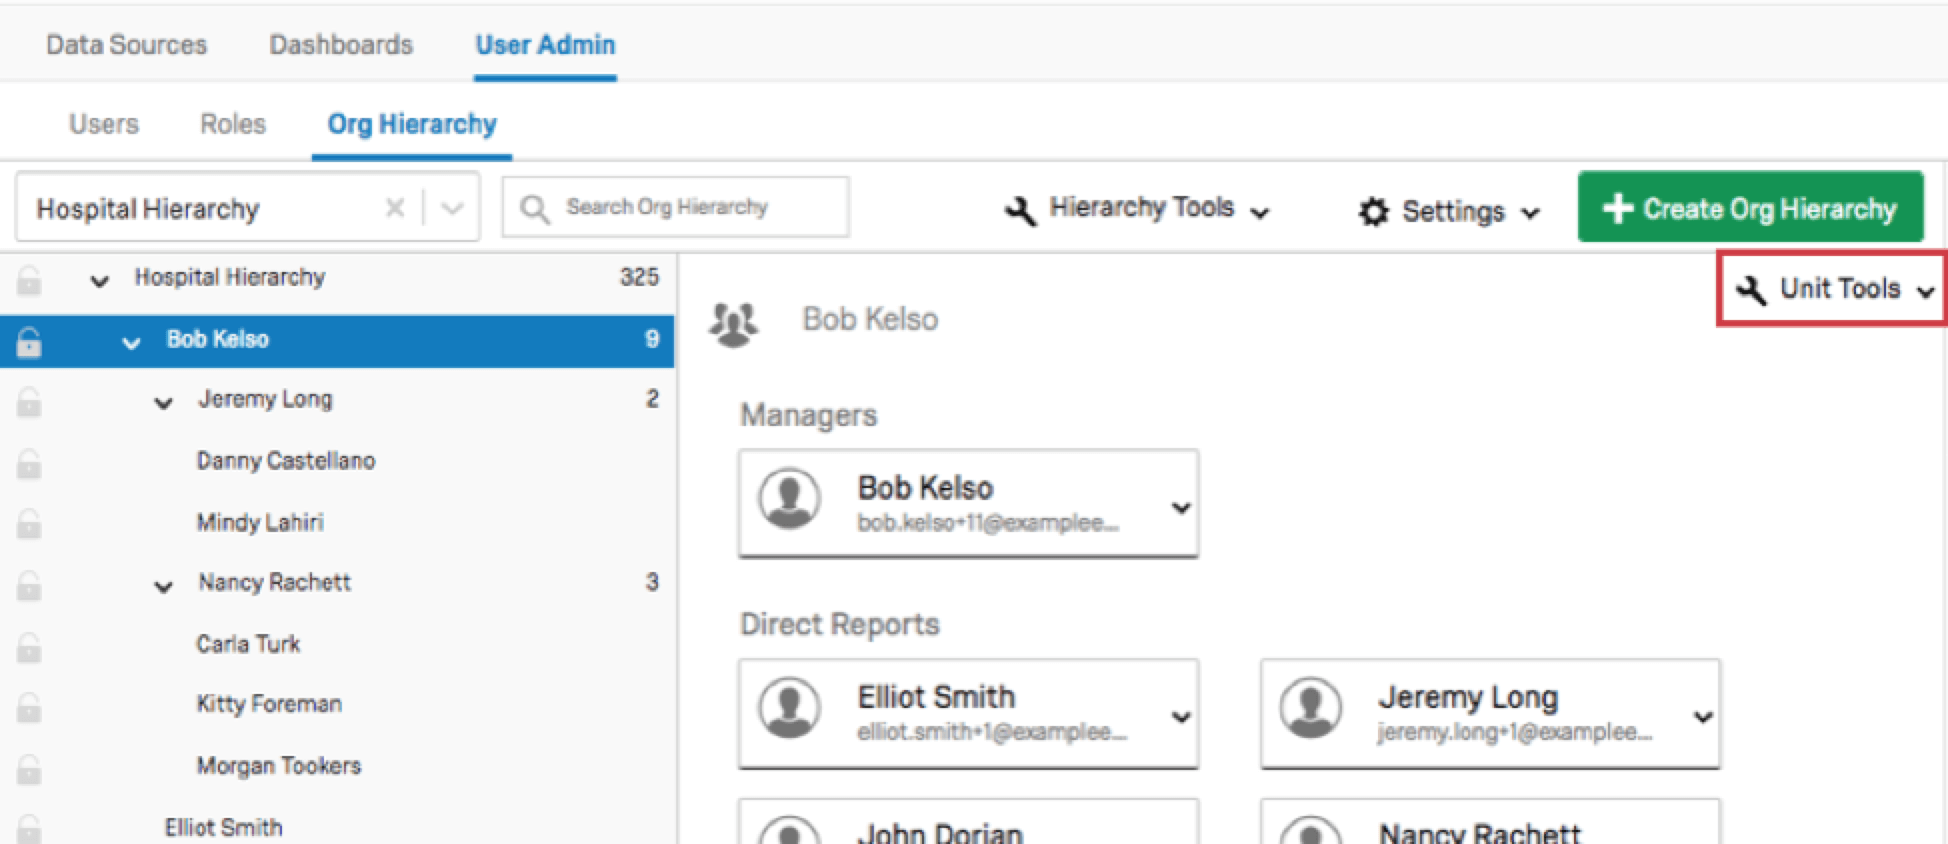
About Unit Tools
Unit Tools allow you to adjust your units on a unit level. These can be found in the upper right-hand corner of a selected unit when in the Org Hierarchy section of the User Admin tab.
Adjusting Units
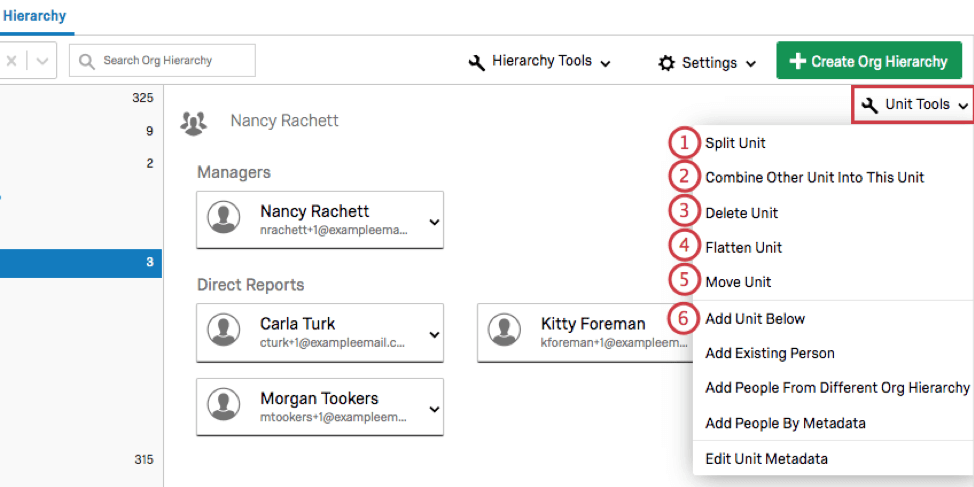
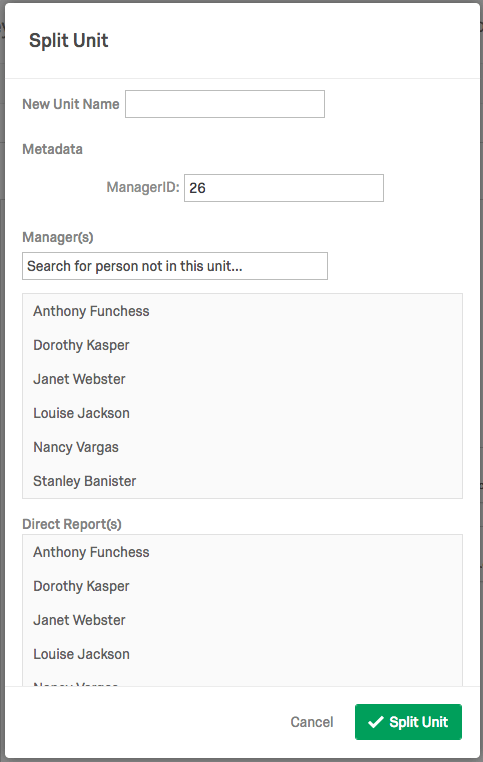
- Split Unit: Splits the selected unit into two. For Level-Based hierarchies, give the new unit a name, choose the manager(s) and direct report(s), and click Split Unit. For Parent-Child hierarchies, give the new unit a name, specify the ManagerID for the unit, choose the manager(s) and direct report(s), and click Split Unit.
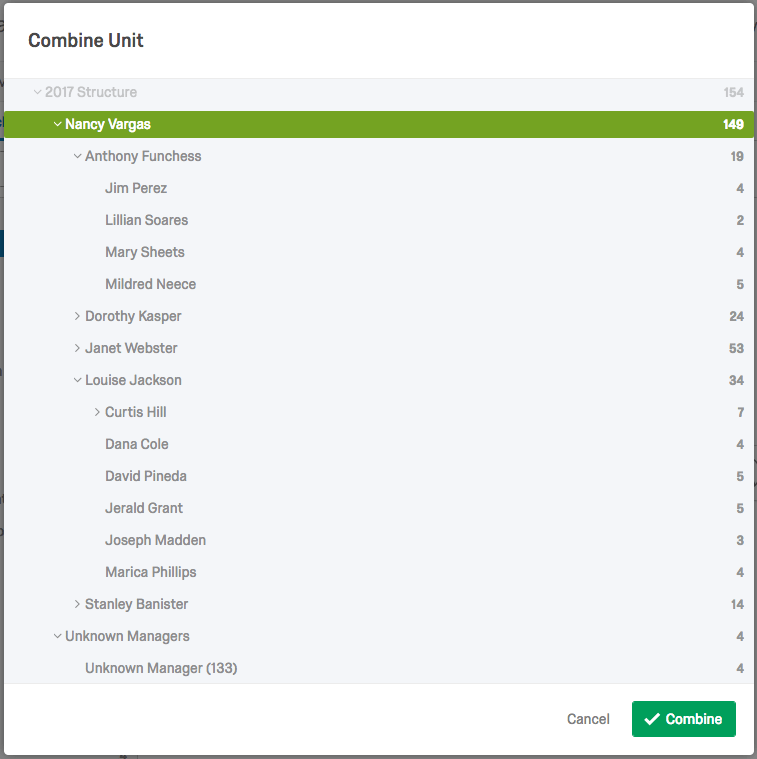
- Combine Other Unit Into This Unit: Merges another unit into the selected unit. The selected unit will appear in green. Click on another unit name and click Combine to merge that unit into the selected unit.
- Delete Unit: Deletes the selected unit. The unit users (and their responses) will remain in the hierarchy, however, they will not be a part of a unit.
- Flatten Unit: Deletes all units below the selected unit and moves people from the deleted units to the selected unit.
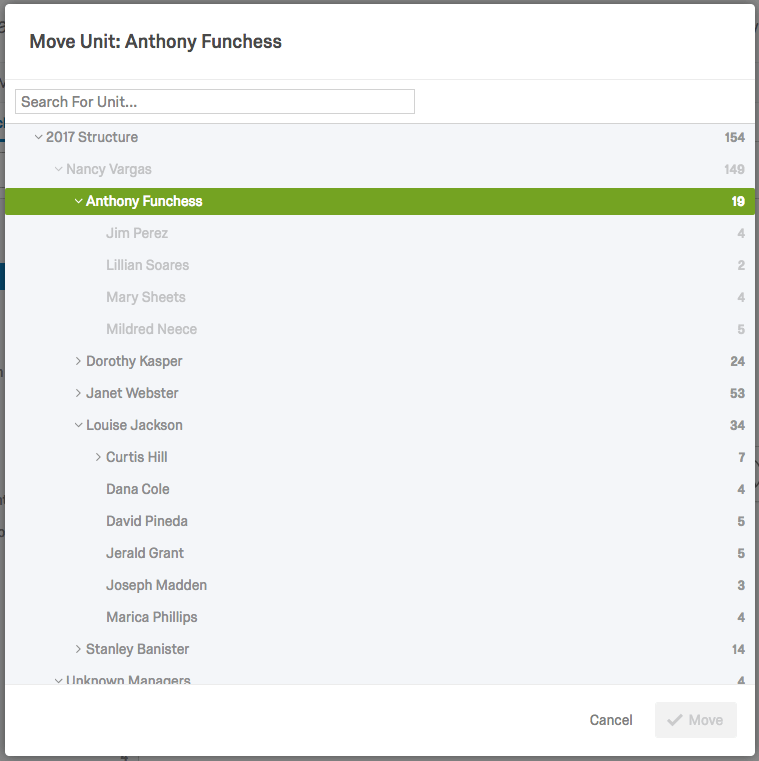
- Move Unit: Moves the selected unit to a different position in the hierarchy. This is the same as using drag and drop in the navigation sidebar. The selected unit will appear in green. Click on another unit name and click Move to move the selected unit under your chosen unit. Note that for Level-Based hierarchies, you will be unable to move Level 1 units.
 Warning: This manual approach is discouraged because the hierarchy in the Org Hierarchy section and the hierarchy constructed when you imported your users will be different. If you were to later import your user list again to update metadata or for some other reason, this could potentially revert the hierarchy to what it was before you made any manual changes. The import must contain all of the metadata fields used to generate the original hierarchy (e.g., EmployeeID, ManagerID, Unit Name, etc.) in order to trigger a hierarchy update. Therefore, Qualtrics recommends that when editing your hierarchy, you should re-import users instead of manually adjusting the hierarchy.
 - Add Unit Below: Creates an additional unit below your selected unit. For Parent-Child hierarchies, give the unit a Name, select the Manager, specify the ManagerID, and select Save. For Level-Based hierarchies, give the unit a name in the Level field and select Save.
Qtip: For Level-Based hierarchies, you will be unable to add units beyond your current levels (e.g., if your hierarchy has two levels, you won’t be able to add a unit under your Level 2 unit).Qtip: For Parent-Child Hierarchies, if you select a person who is already in the hierarchy to be the Manager of the new unit, a duplicate entry will be created. To make an existing person the Manager of the new unit, you should Add Unit Below, leave Manager and ManagerID empty, and create the unit. Then, you can Move Unit to move the existing person to the newly created unit and then select Make Manager to make them the Manager of the new unit.
Adjusting Unit Members
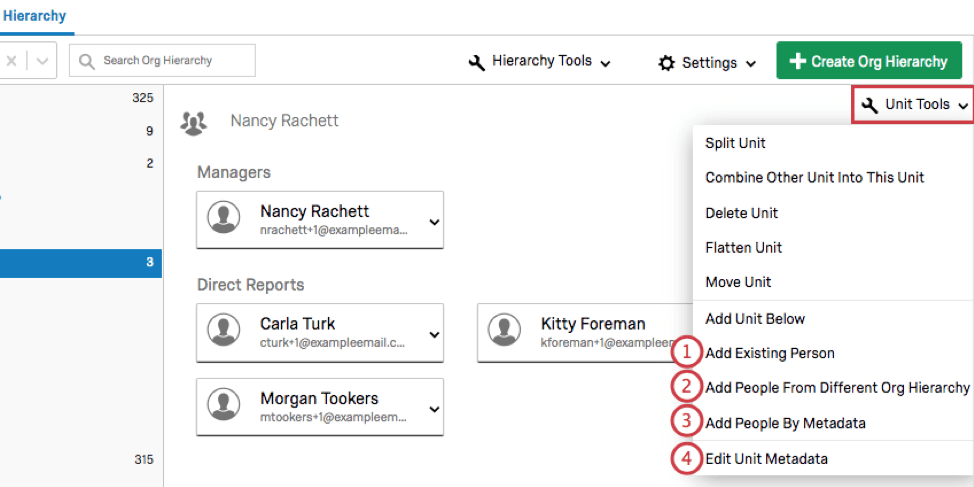
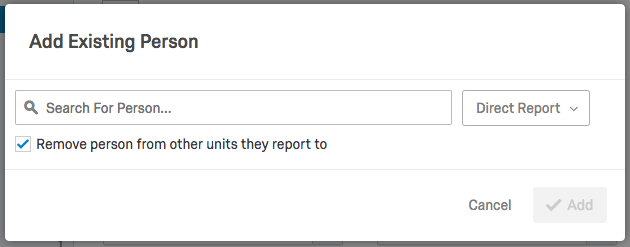
- Add Existing Person: Adds a user that is already in the project into the selected unit. Search for a user in the project, choose whether they should be a Direct Report or a Manager in the selected unit, and click Add. If the option to Remove person from other units they report to is not checked, then the user will appear in two units in the hierarchy. Note that their response will not be duplicated, but will be included in the dashboard when filtering down to either of those units.
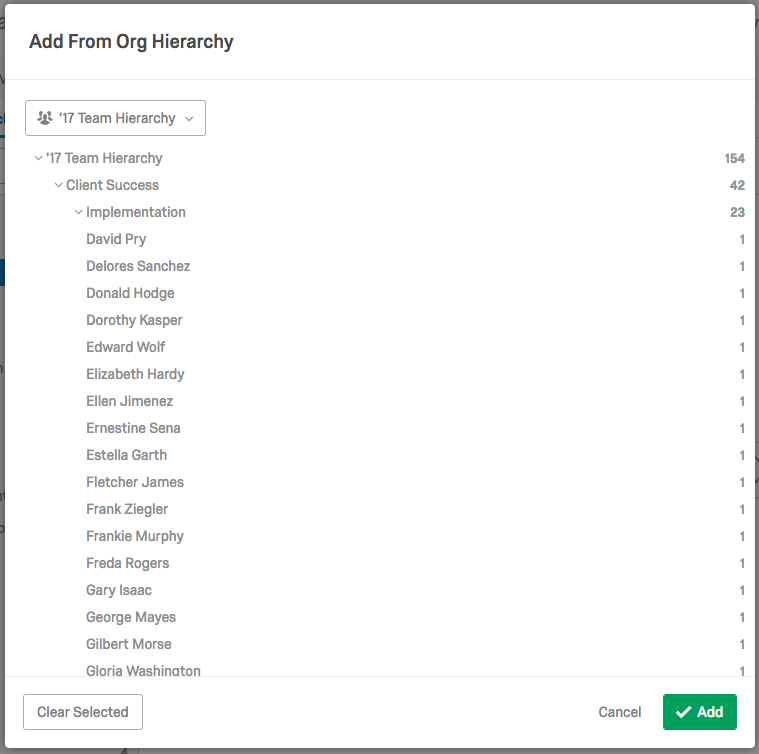
- Add People From Different Org Hierarchy: If you have another hierarchy added to your project, you can add additional people or units to your selected unit by specifying a hierarchy and locating the units or users you would like to add. Note that you can select multiple units and/or individuals at a time.
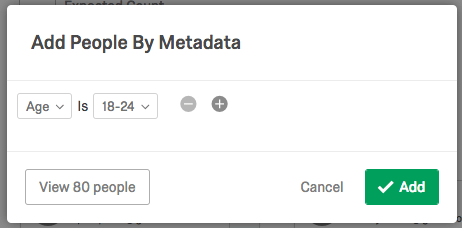
- Add People By Metadata: Adds users already in the project into the selected unit based off of metadata. Select the person field and value for your metadata condition. Add additional conditions by selecting the plus and minus signs. When all desired conditions have been added, select Add.
Qtip: Before selecting add, you can view and verify all individuals that your conditions are filtering for by selecting View [#] People.
- Edit Unit Metadata: Allows you to change and add unit metadata for the selected unit. While Qualtrics strongly advises against changing existing unit metadata here (instead, re-upload your users with the correct unit metadata), you can freely add additional unit metadata, if desired. Metadata fields added here can be used in Advanced Searches in the User Admin section.
Qtip: Edit Unit Metadata will only be available for Parent-Child hierarchies.