
Navigating Hierarchies & Restructuring Units (EX)
What's on this page
Qtip: This page describes functionality available to Engagement and Pulse projects, but not Lifecycle or Ad Hoc Employee Research projects. For more details on each, see Types of Employee Experience Projects.
How to Read Your Hierarchy
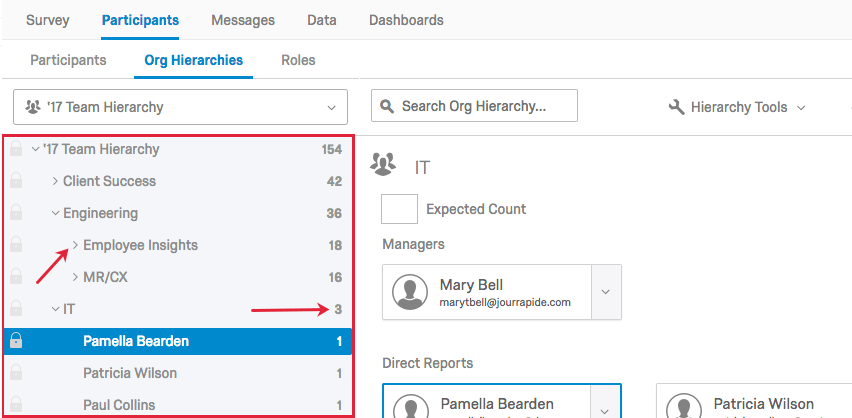
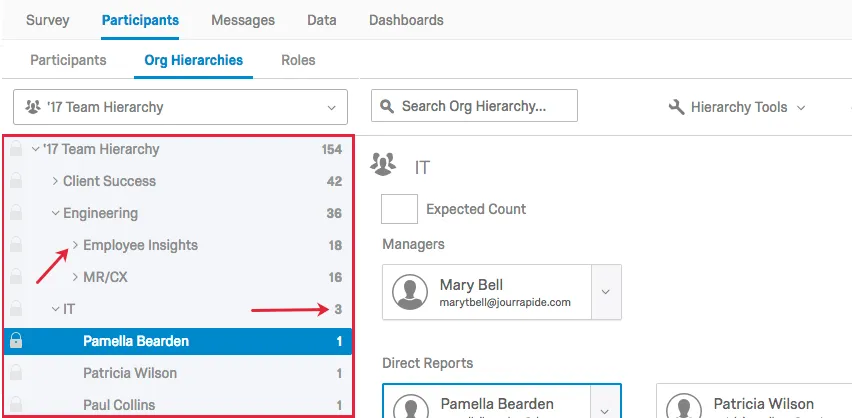
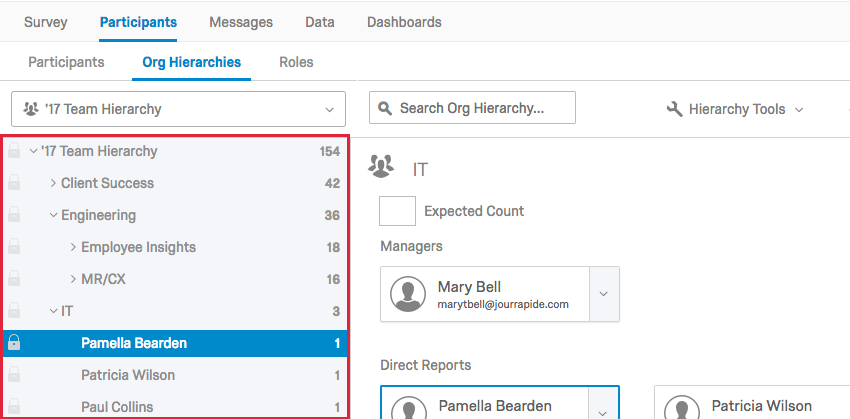
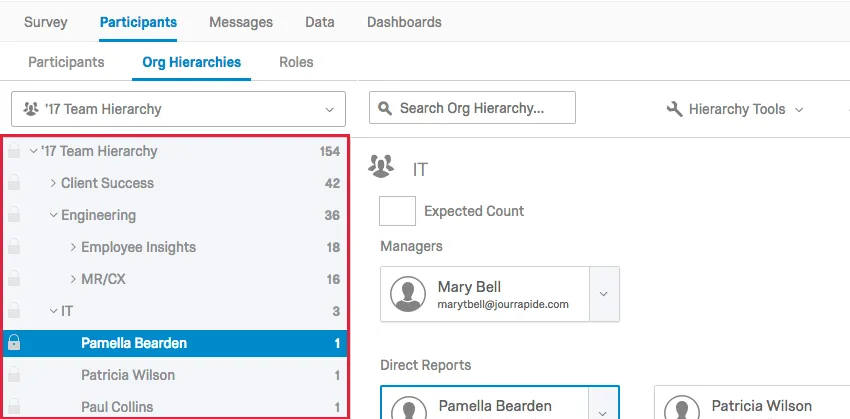
Once you generate your hierarchy, it is important to understand how to read your hierarchy in the Org Hierarchies section. On the left-hand side will be the navigation sidebar that contains the breakdown of your hierarchy. You can click the arrows next to each unit to either collapse or expand the units. By default, the numbers to the right of each unit in the navigation sidebar specify the number of participants in and below that unit.
Qtip: If you are using a Parent-Child hierarchy, the unit name often matches the manager’s name. If you are using a Level-Based hierarchy, the unit name often matches the functional breakout of your hierarchy – usually a department name.
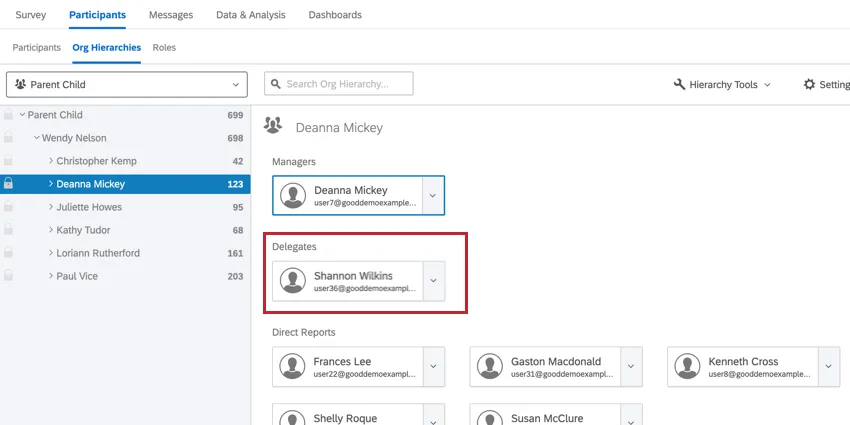
If you click on a unit in the navigation sidebar, the participants who make up the unit will display to the right of the sidebar.
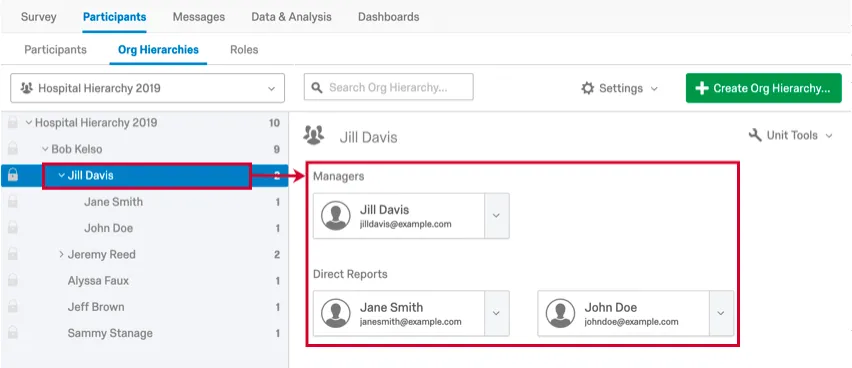
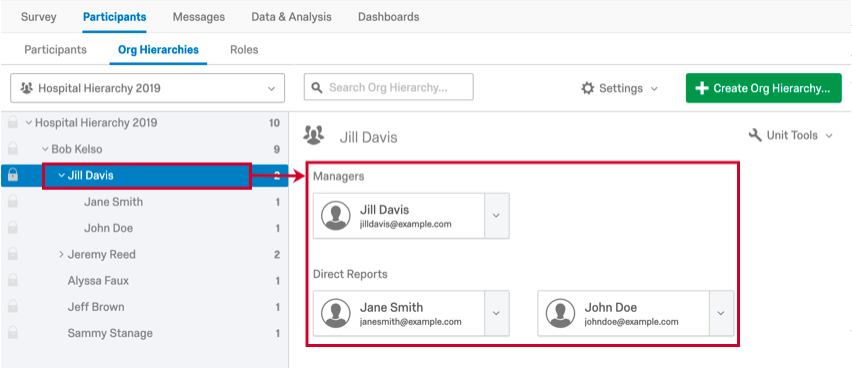
Any delegates added to the hierarchy unit will be displayed here as well.
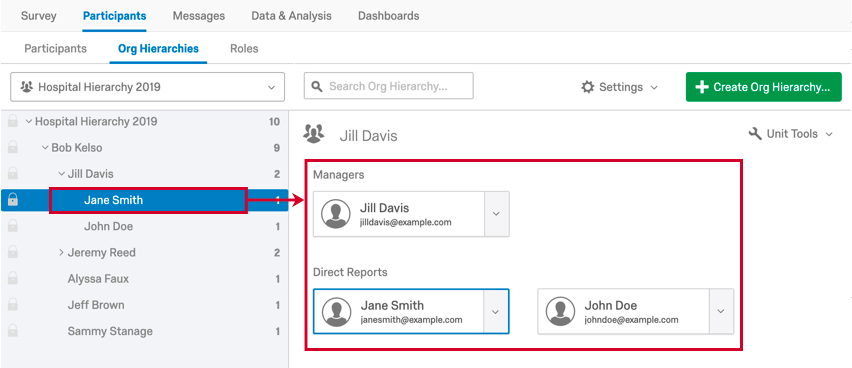
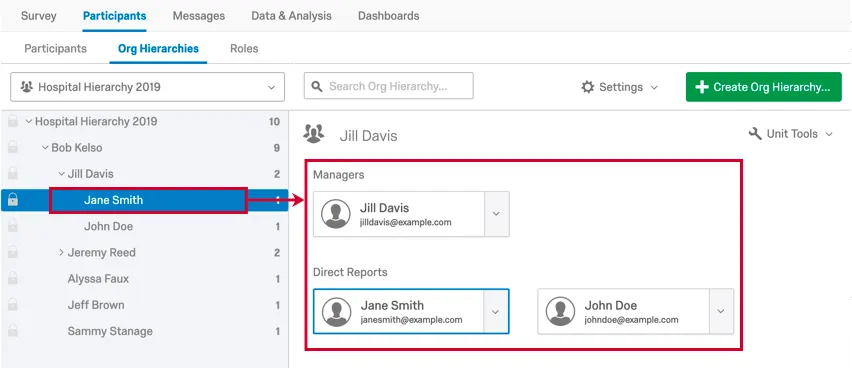
If you click on a single participant in the navigation sidebar and not a unit, it will display the participant’s unit on the right and highlight the participant you selected.
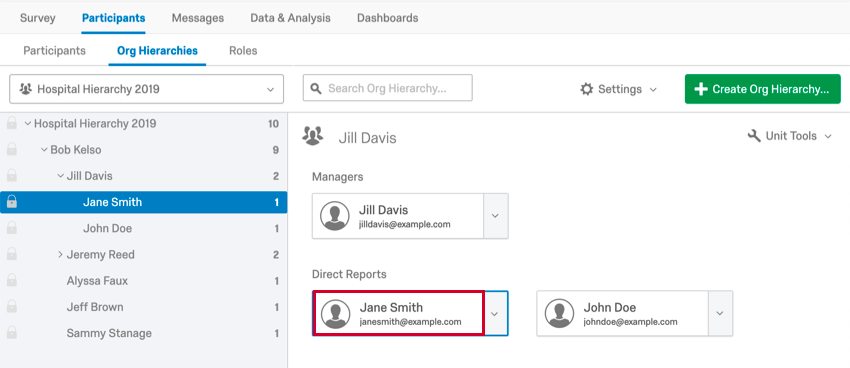
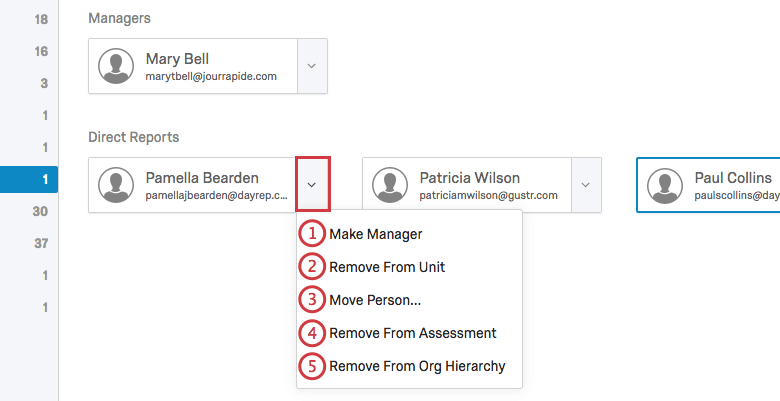
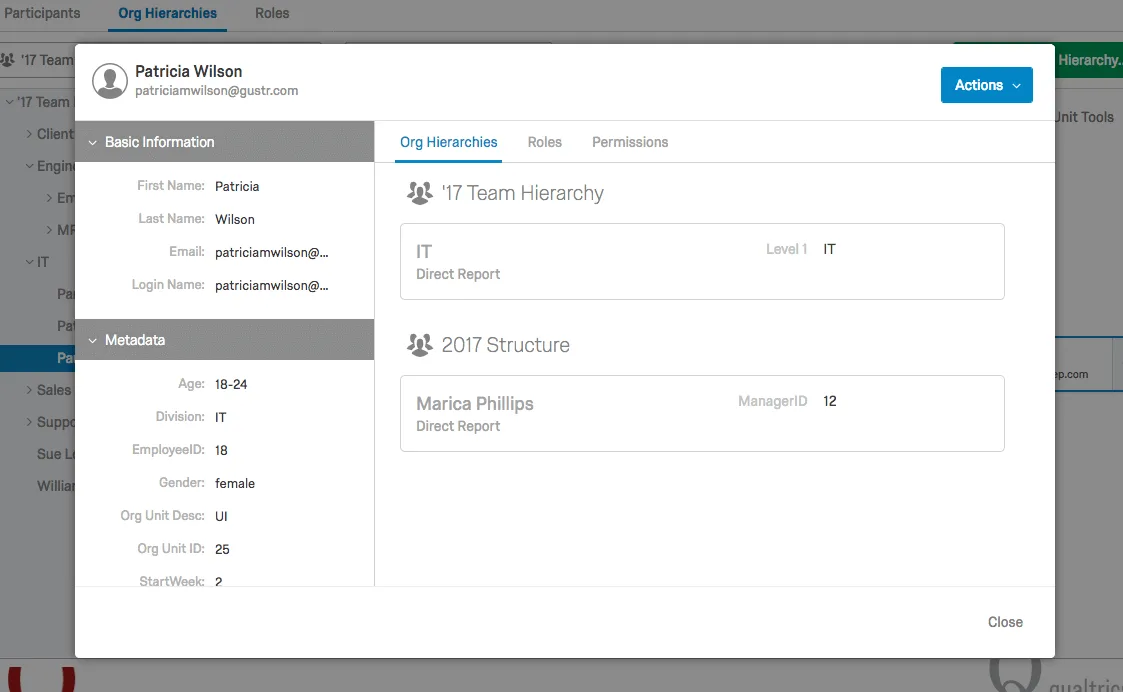
If you click on a participant’s name on the right, it will bring you to the participant information window where you can make edits to the selected participant only.

Expected Count
If using an Anonymous Link, an Expected Count box will appear in your hierarchy under the unit’s name so you can set the expected number of people in a unit. These expected values can be edited/added manually by selecting a unit, and then entering the value in the box that appears between the unit name and unit managers. These values are used in the Response Rates widget to calculate the assessment’s Invited Counts. You can also use a participant metadata field to set the expected number of people in a unit.
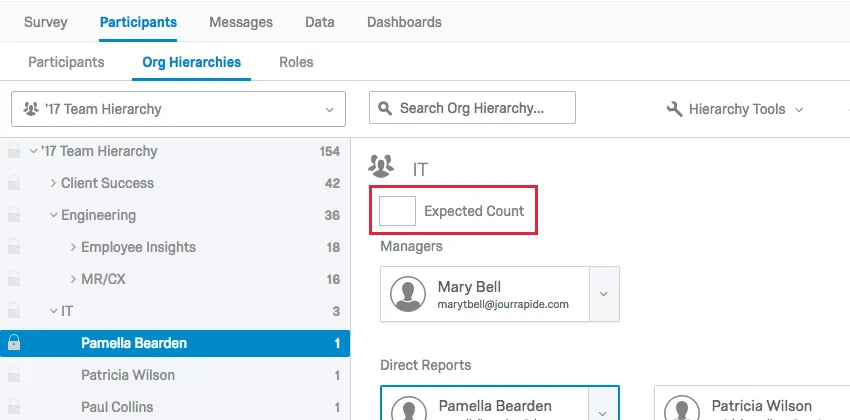
The Expected Count should be set to the total number of participants you expect to be in that unit. So if you are combining anonymous and invited responses, it is important to make sure this number adds up to the total number of invited participants + the number of expected anonymous responses.
Example: I am using an Org Hierarchy question to build my org hierarchy and using anonymous links completely. I expect 10 people to choose that hierarchy, so I would set Expected Count to 10.
Example: I am building an org hierarchy, but also expect some anonymous responses. We need to set the Expected Count to be how many anonymous responses are expected in that unit, plus how many direct reports we added to the unit when building the hierarchy.
Qtip: Need to set the expected count, but have a lot of units? You can speed up the editing process by uploading a CSV with all of your expected counts into your hierarchy. Note that this method works best if you have not made manual edits to your hierarchy.
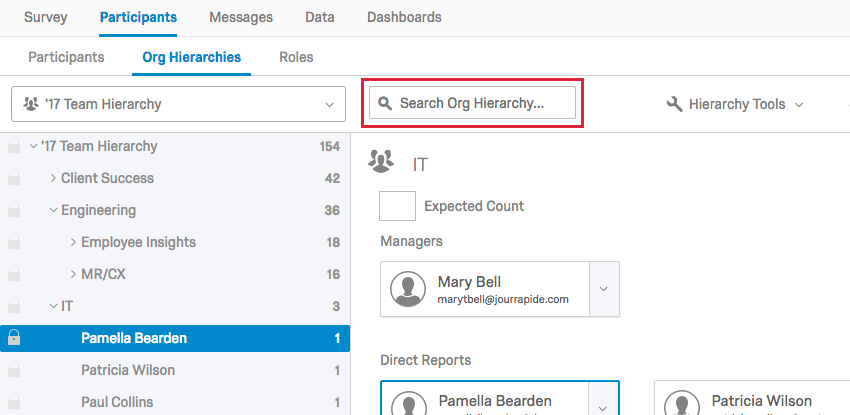
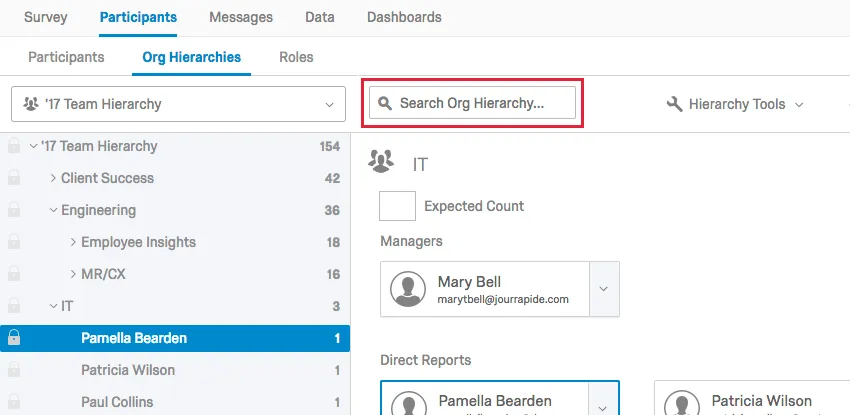
Searching Your Hierarchy
You can easily and quickly search your hierarchy by using the Search bar. You will be able to search by the participant name, participant email, or unit name.
Qtip: If you are searching a Parent-Child hierarchy, the unit name often matches the manager’s name. If you are searching a Level-Based hierarchy, the unit name often matches the functional breakout of your hierarchy – usually a department name.
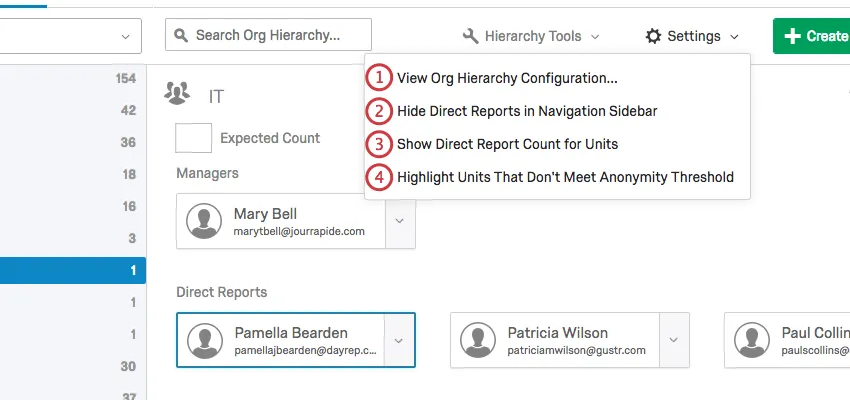
Hierarchy Settings
Warning: This will only function correctly if the project has one dashboard.
Navigating Between Hierarchies
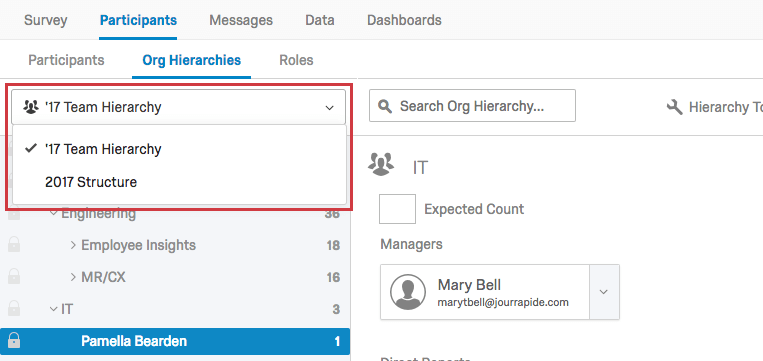
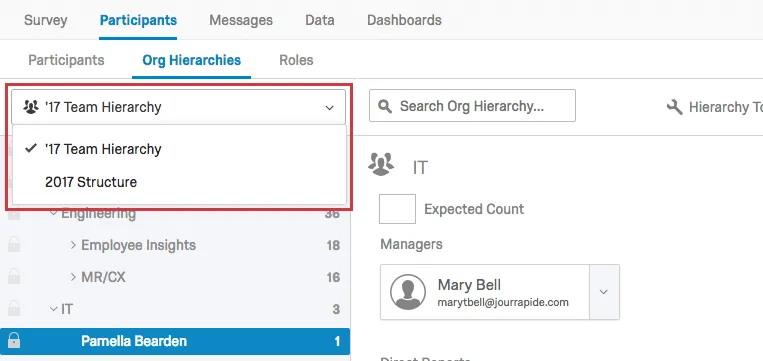
You can add multiple hierarchies to a single project. To navigate to a different hierarchy in your project, click the hierarchy selection dropdown menu and choose the hierarchy you would like to view.
Deleting Hierarchies
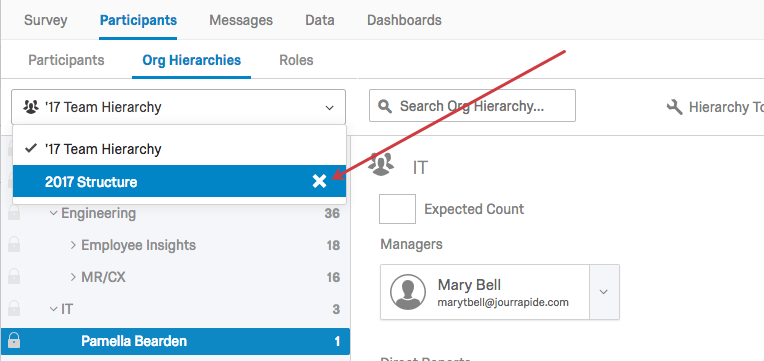
To delete a hierarchy, select the Org Hierarchy dropdown menu, hover over the hierarchy you would like to delete, click the X next to the hierarchy’s name, and confirm the deletion.
Warning: Make absolutely sure that you want to delete your hierarchy. Once you delete a hierarchy, it is irreversible and you will have to create it again from scratch if you decide you need it again.

Qtip: When a hierarchy is deleted, metadata used to configure the hierarchy will return to person metadata and can be used to create a new hierarchy.
Attention: If you delete a hierarchy that is used in dashboard data permissions or roles, then you must either update the permission to use a new hierarchy or remove the restriction entirely.
Manually Adjusting & Locking Units
You can manually adjust your hierarchy by dragging and dropping units or direct reports in the navigation sidebar. This manual approach is discouraged, however, because the hierarchy in the Org Hierarchies section and the hierarchy constructed when you imported your participants will be different. If you were to later import your participant list again to update metadata or for some other reason, this could potentially revert the hierarchy to what it was before you made any manual changes. Your hierarchy will regenerate any time you reimport participants that contain hierarchy metadata, even if you’re importing only one participant. The import must contain all of the metadata fields used to generate the original hierarchy (e.g., EmployeeID, ManagerID, Unit Name, etc.) in order to trigger a hierarchy update. Therefore, Qualtrics recommends that if you need to edit your hierarchy, you should re-import it instead of manually adjusting it. You can find instructions on how to do that in the Adding Participants support page.
In order to make sure you don’t unintentionally adjust a unit’s settings, you can lock a unit by selecting the lock icon to the left of the unit’s name. When you lock a unit, all units below the unit will also be locked. You will be unable to make changes to a unit until you unlock the unit by selecting the lock icon again.
Qtip: Want to lock your entire hierarchy? Select the very top lock icon on the left to lock all of the hierarchy’s units.
Editing Individuals Within a Unit

Qtip: You can add multiple managers to the same unit. To learn more, see Multiple Managers in a unit.
If you click on a participant’s name on the right, it will bring you to the participant information window where you can make various edits. For more information, visit the Participant Information Window support page.
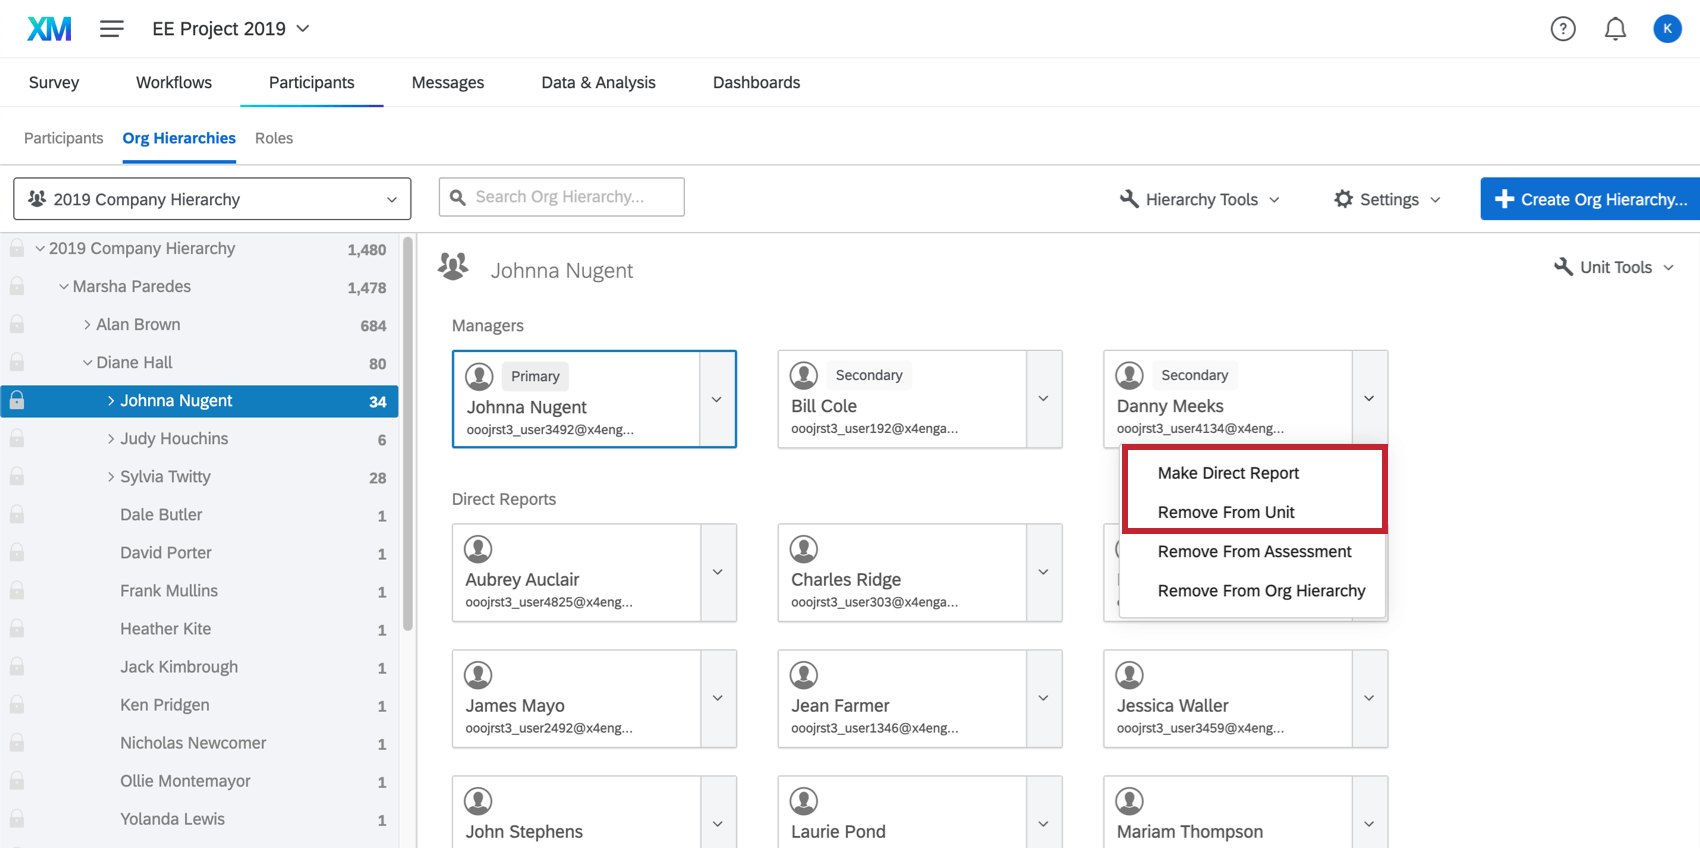
Multiple Managers in a Unit
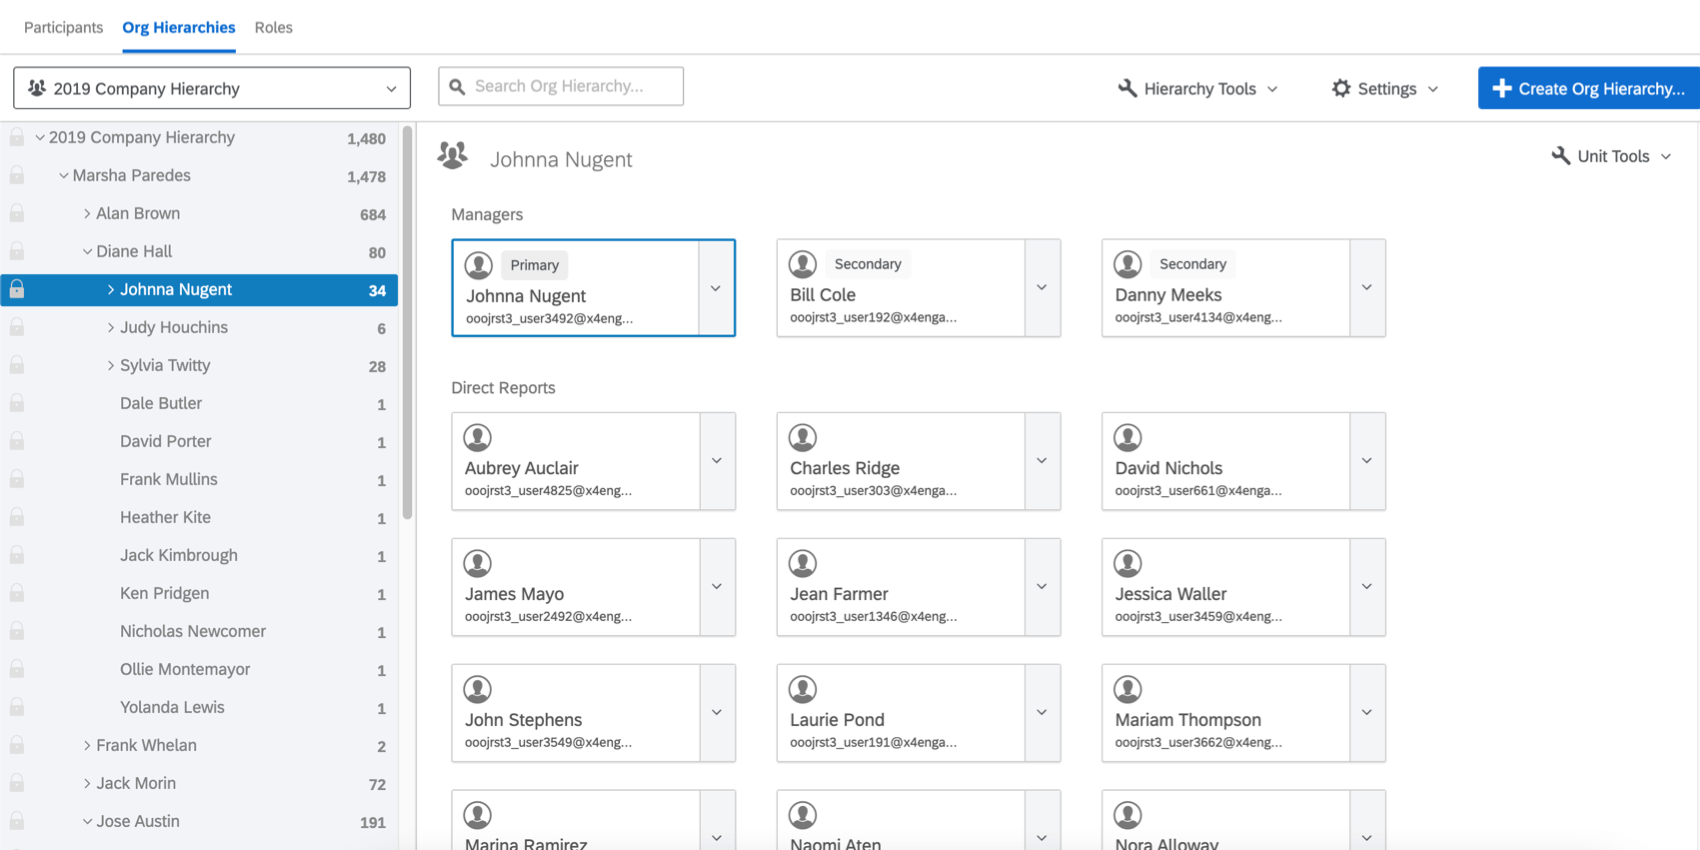
You can make more than one person the manager of the same unit. When this happens, the unit is assigned a primary manager and a secondary manager.

The primary manager is the person who all the direct reports have listed under their manager metadata. Other than this, the secondary manager still has all the same privileges as the primary manager, and will see the same dashboard data depending on roles or filters you have set.
You can add multiple secondary managers in the same unit.
All org hierarchy types allow you to add multiple managers to a unit, but Parent-Child is the only hierarchy type that will specify a primary or secondary manager. This is to determine who can view data restricted by roles and filters.
Changing the primary manager of a unit
Qtip: These steps are recommended if you want to make one or two small changes to a hierarchy. To make many changes, we recommend importing participants with updated information.
To follow these steps, use the options explained in the Editing Individuals Within a Unit section.
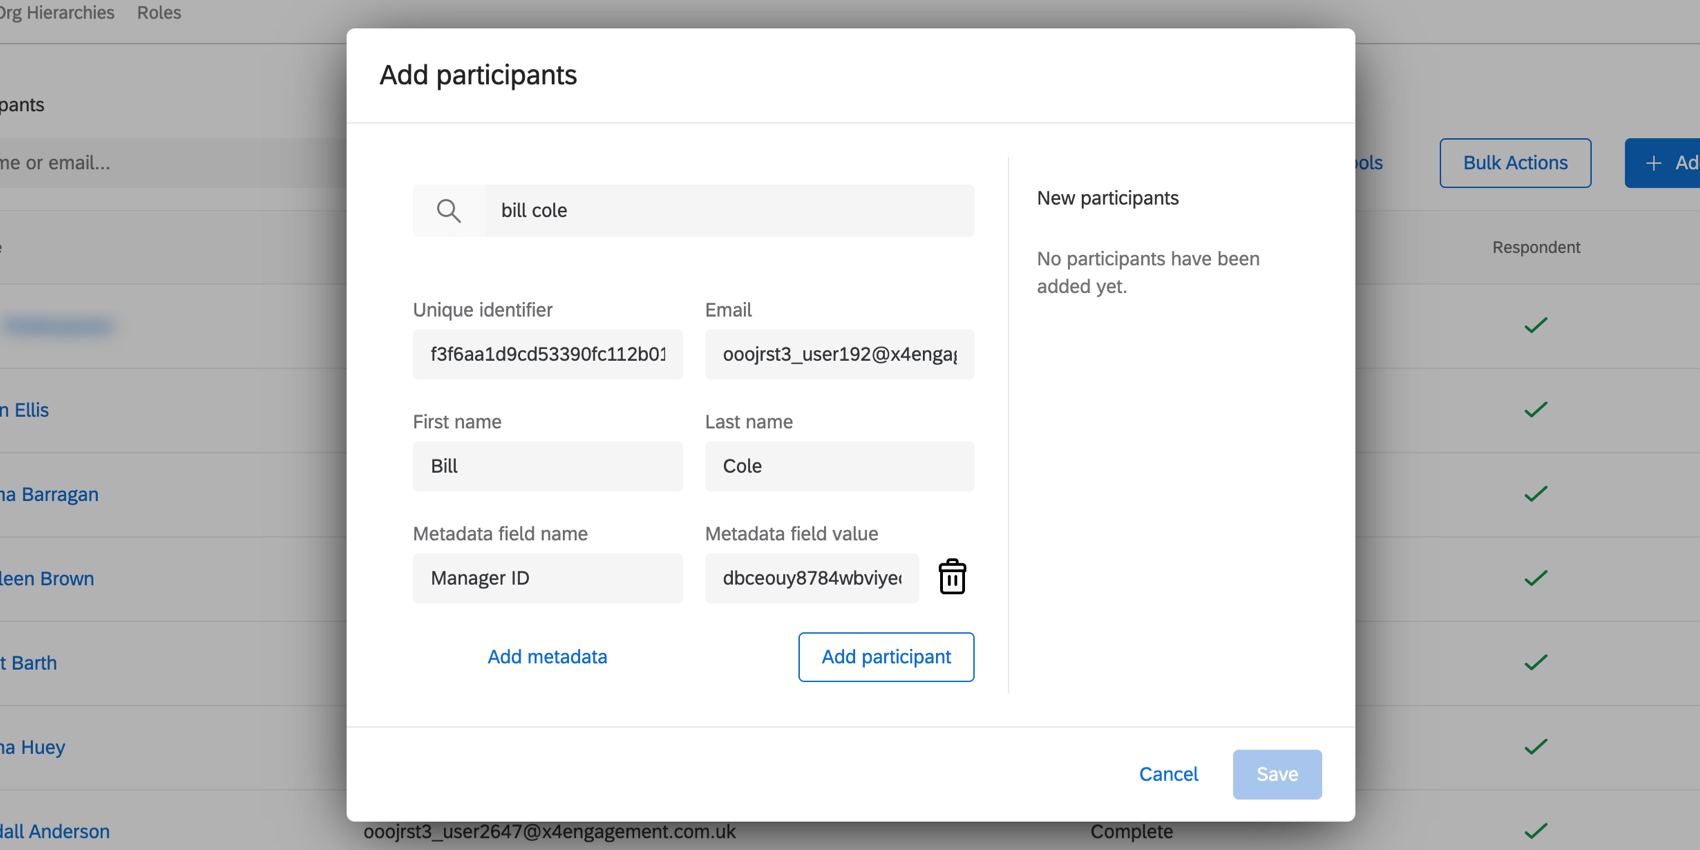
Example: I want Bill to be the new manager of Johnna’s team. If I’m working with a parent-child hierarchy, I add Bill and use metadata to indicate Johnna is his manager so they’re in the same unit. If I’m working with a level-based hierarchy, I use metadata to add him to the same level as Johnna, but I don’t mark him as a manager yet.
Qtip: To remove a participant from a project entirely, see Removing Participants.
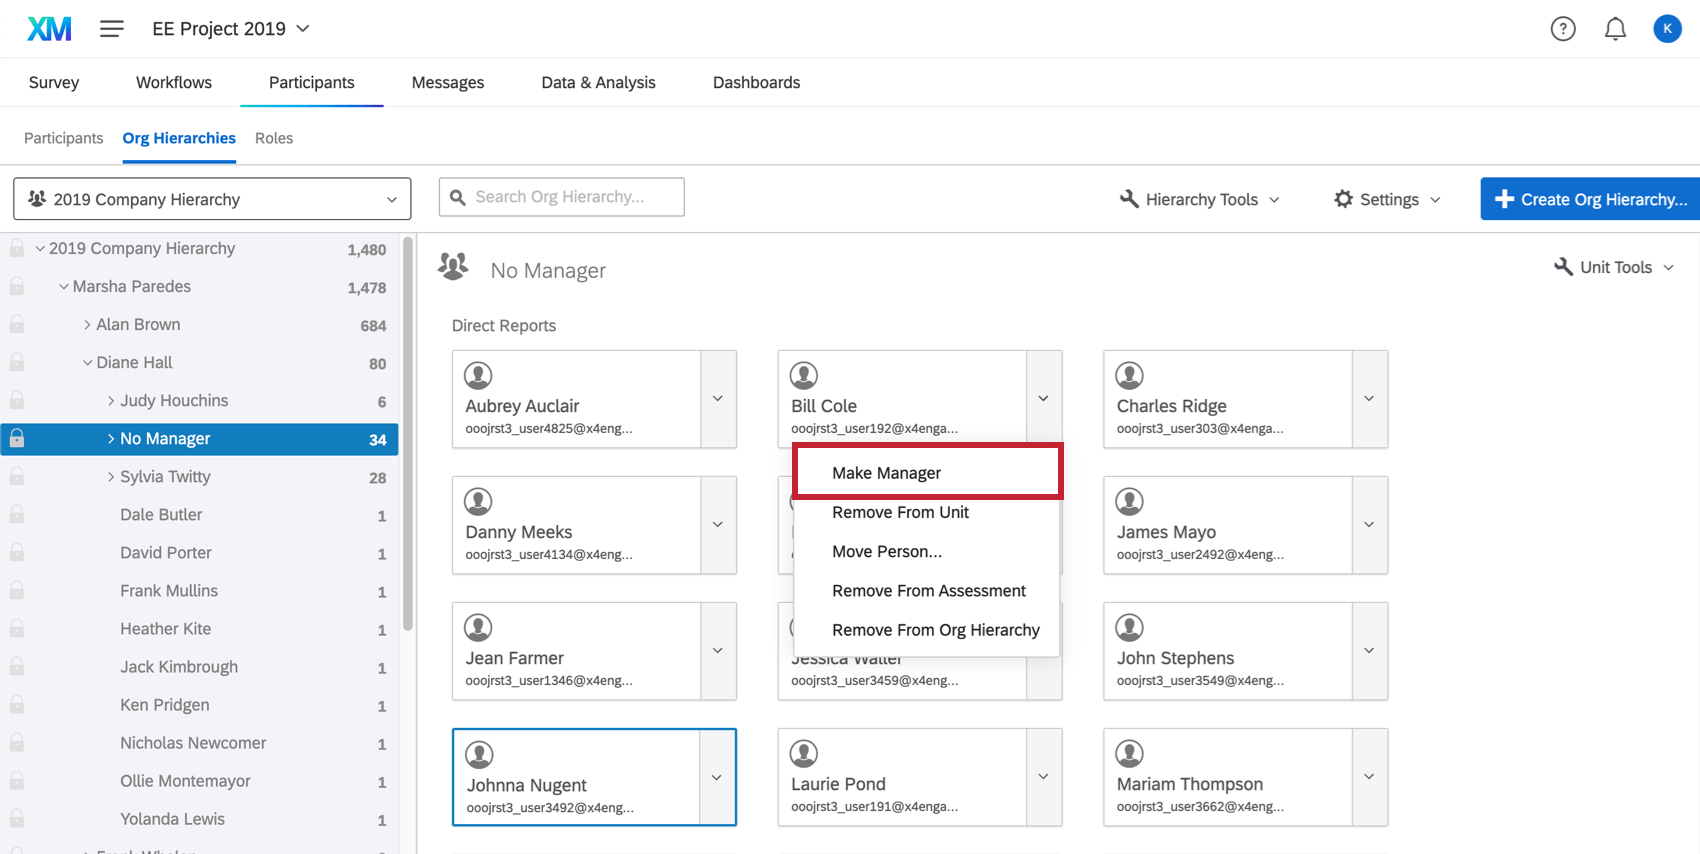
Once a new person becomes the primary manager, all the direct reports in the unit will be updated so their manager metadata reflects this new person.
FAQs
I've already uploaded my participant file and collected data, but I need to make a change to my hierarchy. How do I do this?
I've already uploaded my participant file and collected data, but I need to make a change to my hierarchy. How do I do this?
I want to set up my Parent-Child hierarchy to use unit names rather than assigning manager names to hierarchy units. How do I do this?
I want to set up my Parent-Child hierarchy to use unit names rather than assigning manager names to hierarchy units. How do I do this?
I uploaded my participant list and generated a Parent-Child hierarchy. I received an error message that reads “Circular Dependencies.” Why did I receive this message and how do I fix this?
I uploaded my participant list and generated a Parent-Child hierarchy. I received an error message that reads “Circular Dependencies.” Why did I receive this message and how do I fix this?
I uploaded my participant list and generated a Parent-Child hierarchy. Why do I see some units labeled “Unknown Manager” and how do I fix this?
I uploaded my participant list and generated a Parent-Child hierarchy. Why do I see some units labeled “Unknown Manager” and how do I fix this?
Can I automate changes to my Engagement org hierarchy?
Can I automate changes to my Engagement org hierarchy?
To learn more about automating employee directory changes, see Load Users into EX Directory.
That's great! Thank you for your feedback!
Thank you for your feedback!