-

Qualtrics Platform -

Customer Journey Optimizer -

XM Discover -

Qualtrics Social Connect
Workflows Run & Revision Histories
About Workflows Run & Revision Histories
After you set up your workflows, you’ll probably want to check on their status and evaluate changes that were made to them. The Run history and Revision history sections in Workflows let you see the past runs of your workflows, the details about those runs, and changes that were made to any workflow. This section is particularly useful for evaluating why a workflow may have failed. Reporting will contain information about why the workflow failed or if a change was made, helping identify and fix the issue.
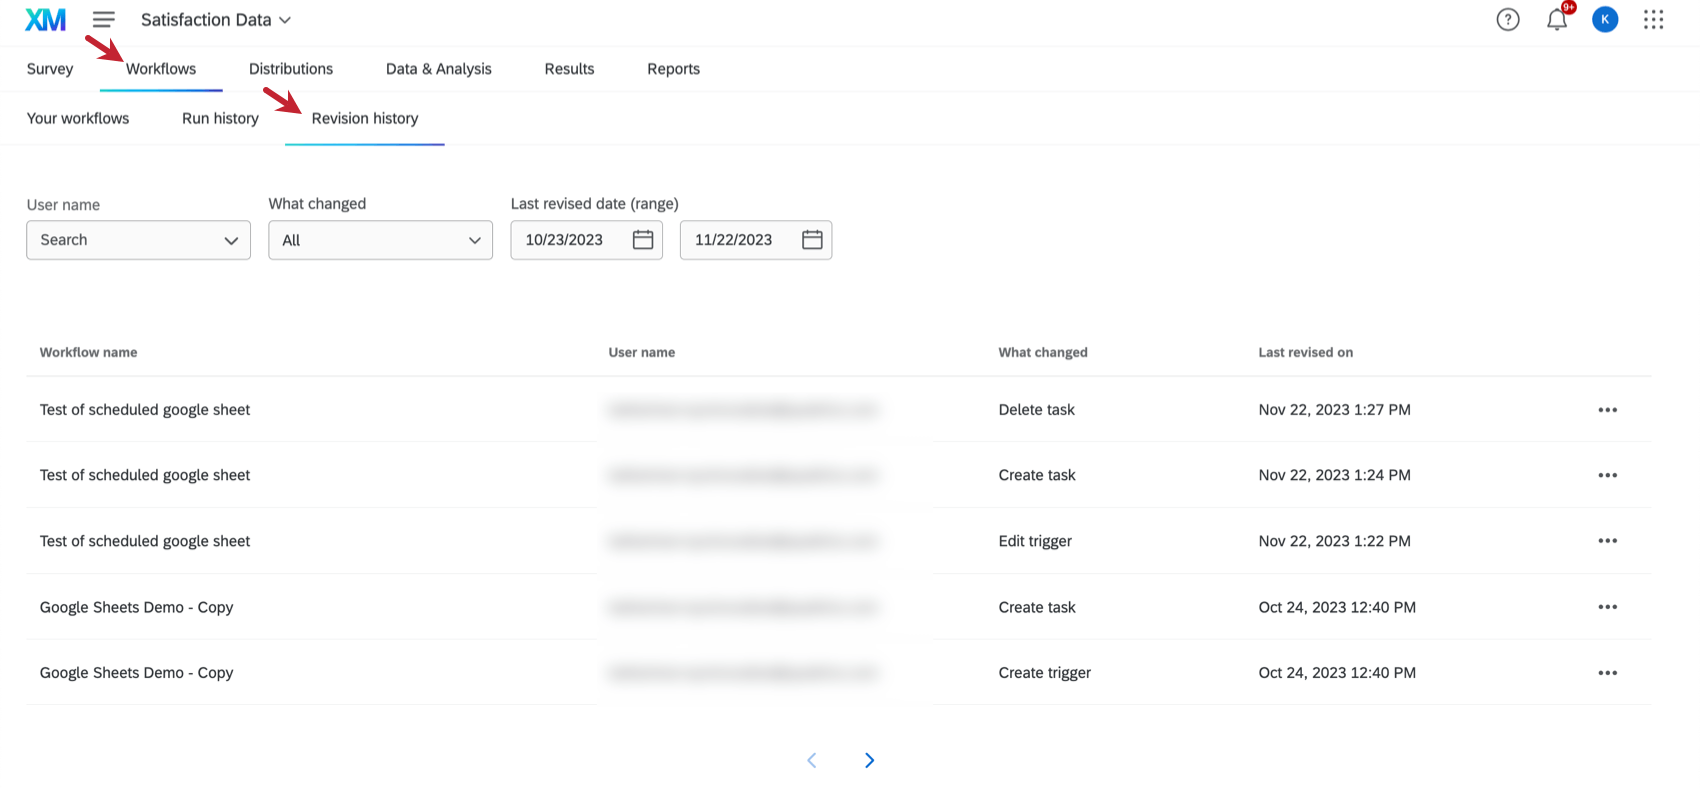
You can view the Run history and Revision history for a specific workflow by clicking into the workflow and then going to the section you’re interested in.
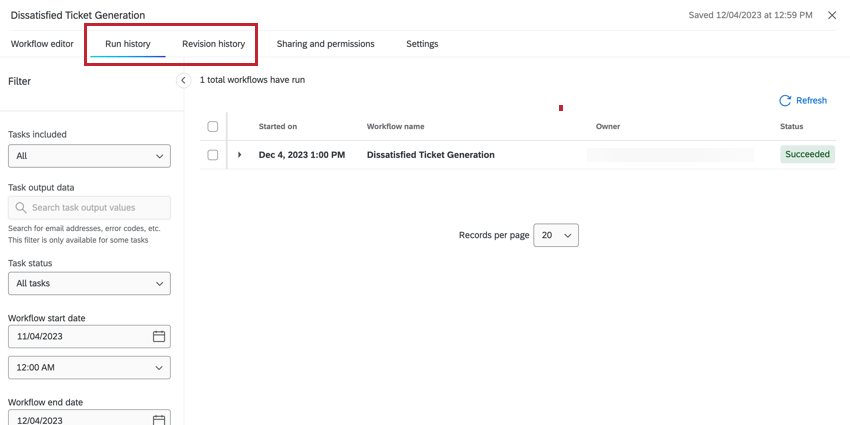
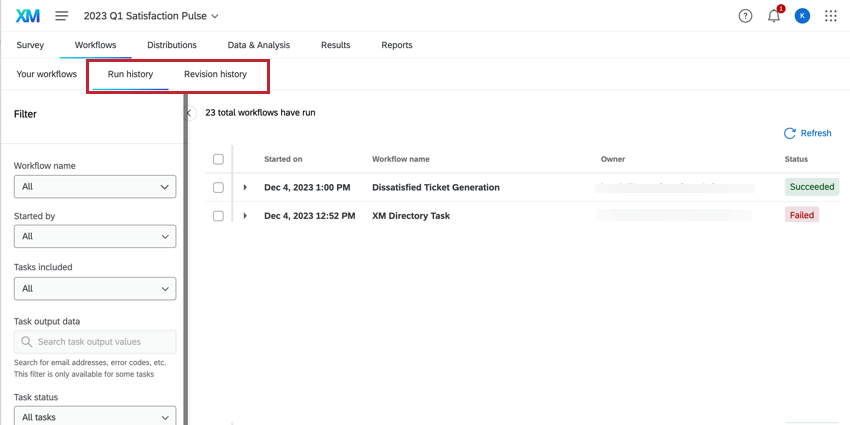
You can also view the Run history for all workflows within a project by going directly to Run history from the project’s workflow tab.
Run History
The Run history page allows you to view additional information about the workflow runs that you’ve triggered. This page can help you monitor your workflows, diagnose issues, and get an overview of which workflows have been completed successfully and which ones have failed.
When viewing workflow run history, you can switch between 2 different reporting views by using the dropdown menu at the top of the page: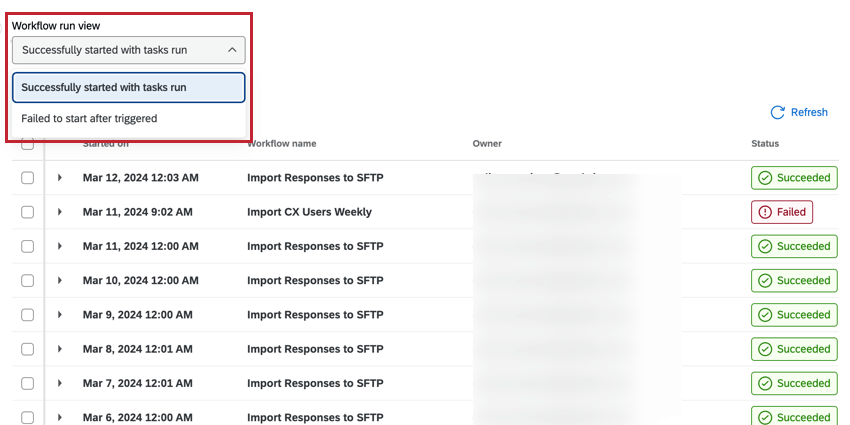
- Successfully started with tasks run: View workflow runs that triggered successfully.
- Failed to start after triggered: View workflow runs that failed to trigger.
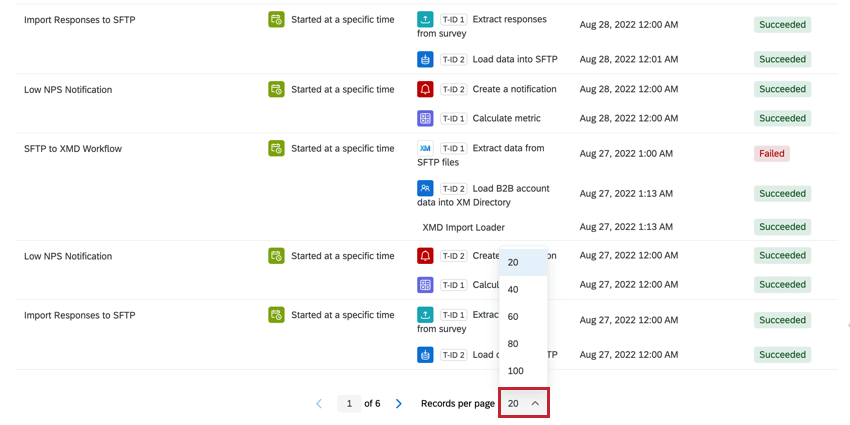
Each time your workflow is triggered, it will be added as a new entry in the workflow run history page. This page contains a table that displays the following information about your workflow runs:
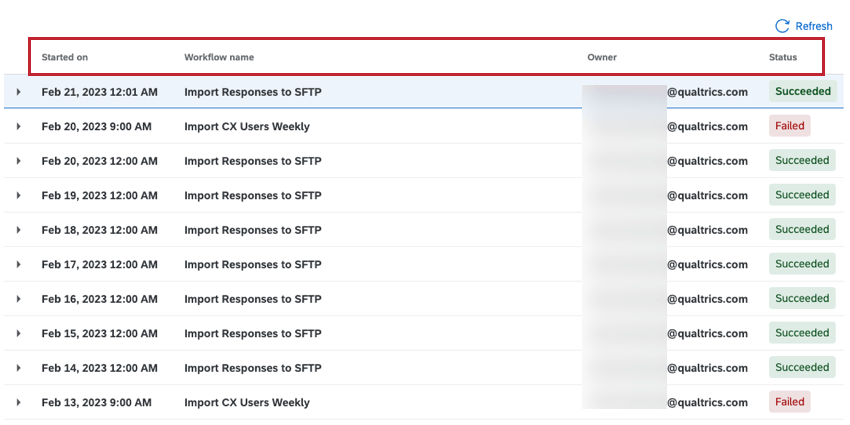
- Started on: The date and time that the workflow began running.
- Workflow name: The name of the workflow.
Qtip: If you see statuses for a workflow named “Deleted Workflow,” chances are you deleted the attached workflow. Be careful when you do this – the records are still there, but the workflow itself is irretrievable.Qtip: This column is excluded if accessing the run history for a specific workflow.
- Owner: The username of the user who created the workflow.
- Status: The status of the workflow.
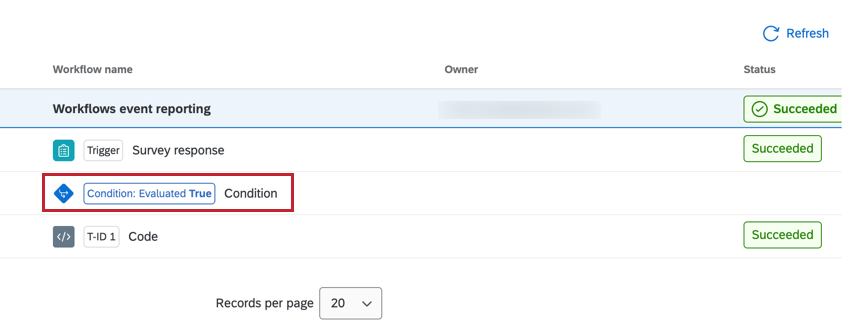
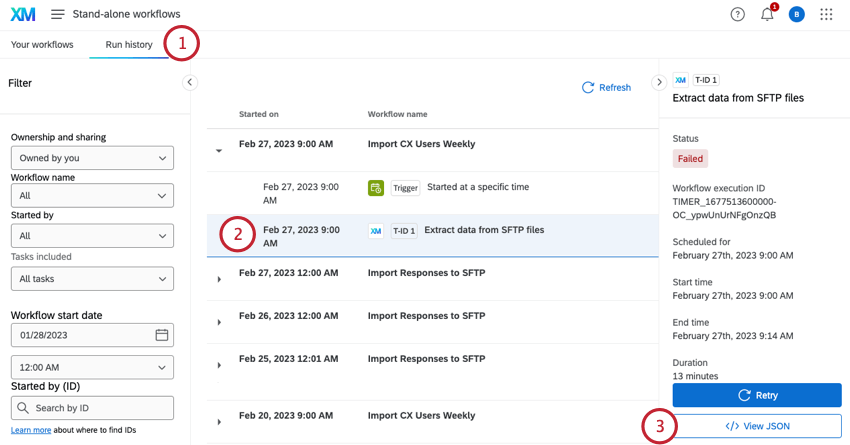
You can view more granular information about each workflow run. Click on a workflow run to expand it and see information about each component of the workflow.
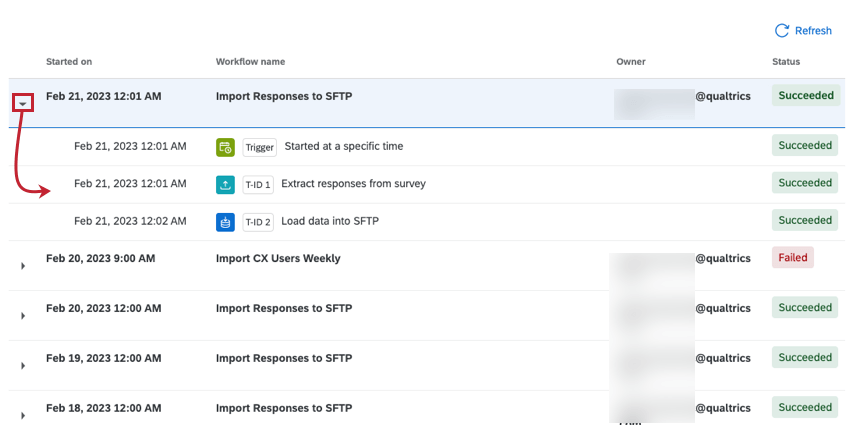
The event that starts the workflow is labeled a “trigger” while the different tasks in the workflow are labeled “T-ID 1” for the first task, “T-ID 2” for the second task, and so on. For more information about task order and labels, see The Order of Tasks in a Workflow.
You can then click on the different components of your workflows to learn more about it. The information and actions available to you will depend on the workflow component type and if the workflow was successful or not. See the following sections for more information:
- Viewing Successfully Triggered Workflow Runs: Workflows that triggered successfully. Tasks can either be successful or have failed.
- Viewing Failed Workflow Runs: Workflows that did not trigger successfully due to a problem with the event trigger or false workflow conditions. Tasks did not run because they were not triggered.
Searching Run History
Run history comes with pre-configured filters allowing you to easily find the workflow you’re interested in. You can also use the search bar to search for task output values.
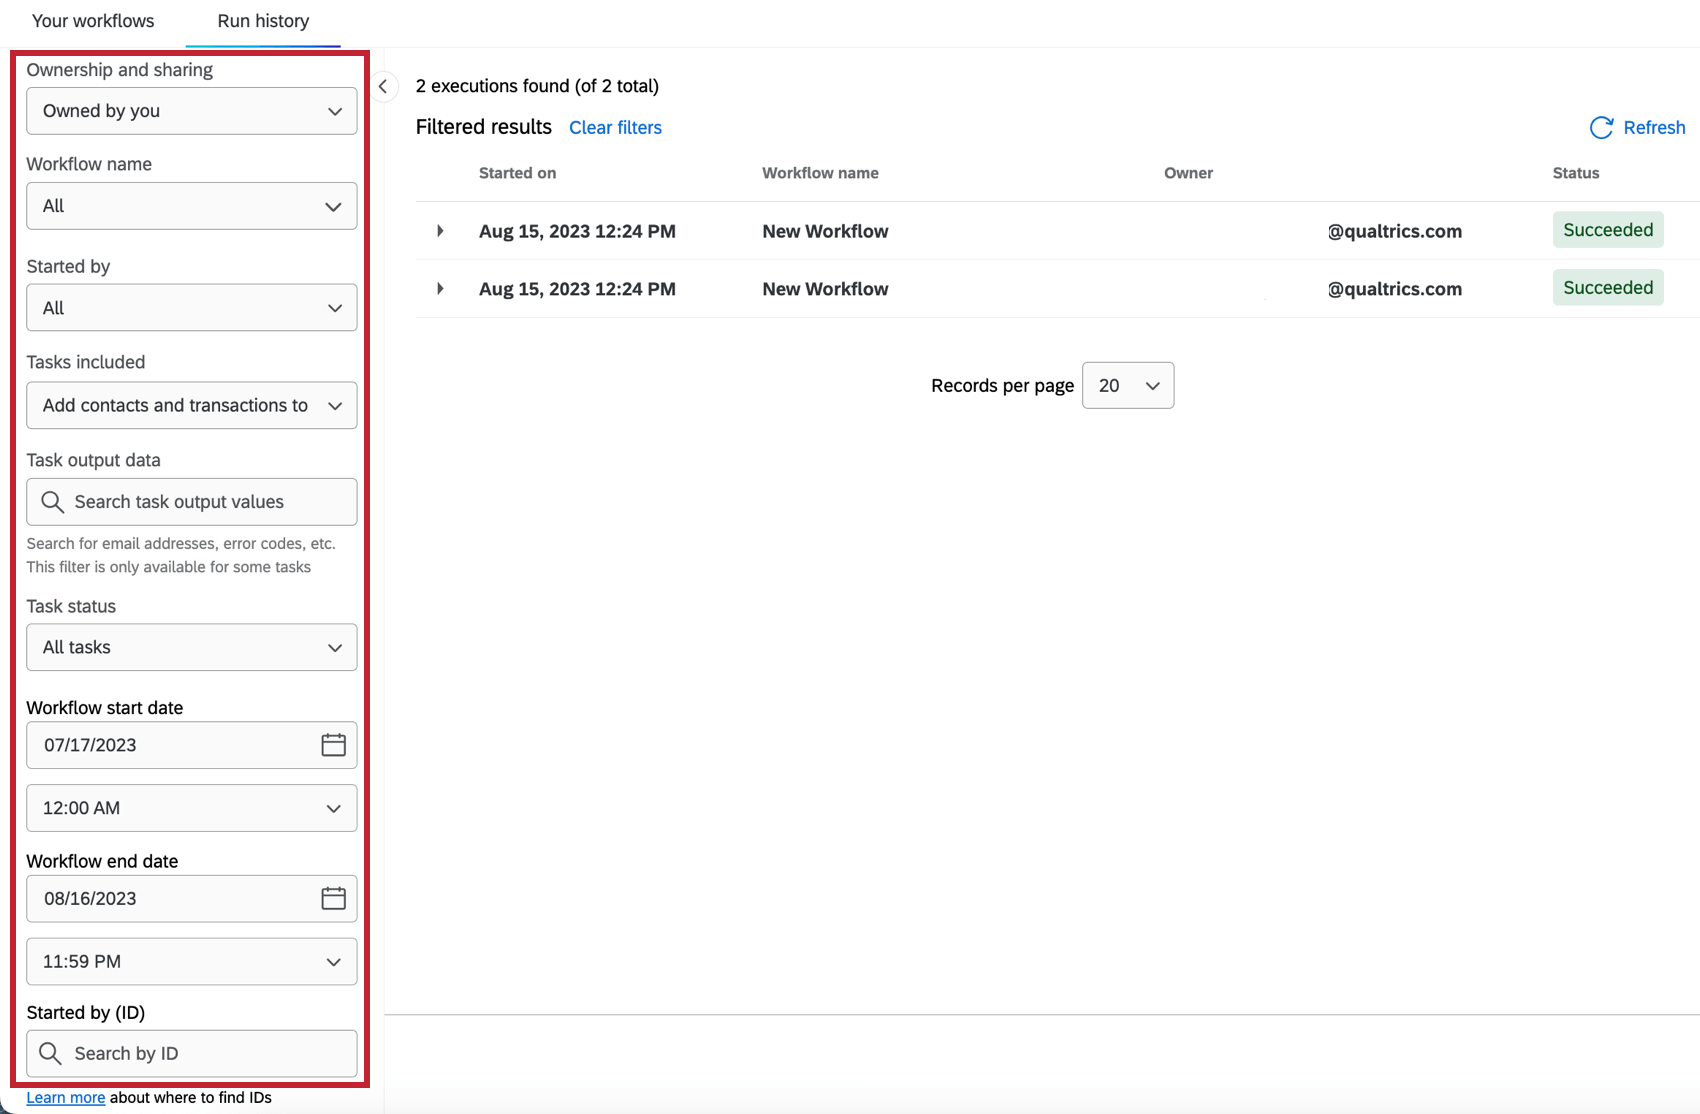
- Use the Ownership and sharing dropdown to filter by workflows that you own, workflows that have been shared with you, or all workflows you have access to.
Qtip: This filter is excluded if viewing the run history in a survey project.
- Use the Workflow name dropdown to filter by workflow name.
Qtip: This filter is excluded if viewing the run history for a specific workflow.
- Use the Started by dropdown to filter by what starts the workflow, either a schedule or a specific workflow event.
- Use the Tasks included dropdown to filter by the tasks that result from the workflow.
- Use the Task output data search bar to search for task output values within the workflow. When you enter a specific keyword or value in the search bar, the list of workflow runs will only display runs that contain that keyword or value.
Qtip: This filter is only available when you select a specific task from the Tasks included dropdown.Attention: This filter is not currently available for all task types.
- Use the Tasks status dropdown to filter by the workflow task’s status.
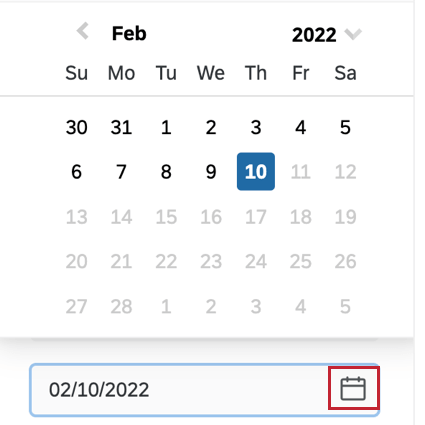
- Use the Workflow start and end dates fields to filter by when the workflow was triggered. Click the calendar icon to view a calendar to choose a date.
- Use the Started by (ID) dropdown to filter by a specific workflow’s trigger ID. See the Finding a Trigger ID section below for more information on retrieving the trigger ID.
Qtip: Searching by ID will only return the latest 10,000 results. If a workflow run doesn’t appear, try using the filters for start and end date instead.
Viewing Successfully Triggered Workflow Runs
The Successfully started with tasks run page displays workflows that triggered successfully. These workflows can have tasks that were either successful or failed. When viewing these workflows, you can click on any of the tasks to open a side panel containing more information about the task:
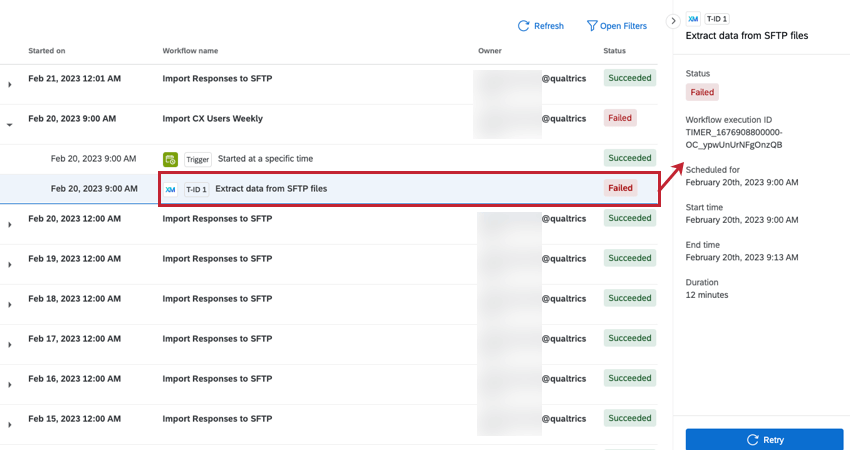
- Status: The task’s status.
- Workflow execution ID: Each time a workflow runs, each aspect of the workflow is assigned a unique execution ID. You can use this ID to filter your workflows, or provide to Qualtrics Support if you need help troubleshooting why a workflow failed.
- Scheduled for: The date and time that the workflow was scheduled to run. This will only appear for scheduled workflows.
- Start time: The date and time that the workflow started running.
- End time: The date and time that the workflow finished running.
- Duration: The total time the workflow took to execute.
- Settings: The workflow’s rerun and failure settings at the time of execution.
- Files: If the task processed any files, then you can download the files in this section. See Downloading Data Files for more information.
Qtip: If your selected task doesn’t process files, then this field will be hidden.
In addition to the above information, you can view how an individual task was configured at the time that the workflow ran:
- Click View task to view the task in the task editor. This window contains the configuration this task had at the time the workflow ran. Any edits you make here will not be saved.
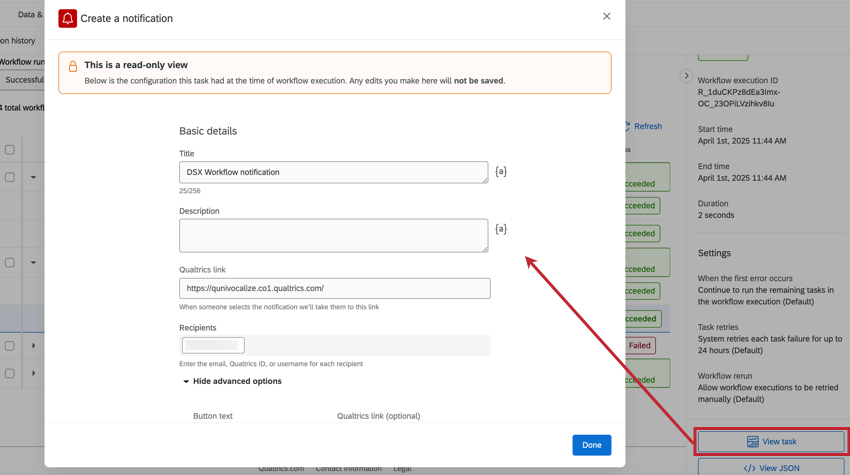 Qtip: This view is unavailable for the following tasks: email task, XM Directory task, tickets task, Salesforce task, and old configurations of the Tango Card task.
 - Click View JSON to view the JSON payload of the task. The JSON payload can be useful for troubleshooting your workflows, particularly ETL workflows. The Input tab shows the information and data received by the task, while the Output tab shows the result of the task.

Viewing Conditions
You can also view how your workflows conditions were evaluated. This includes conditions after the workflow trigger and conditions between individual tasks. Click on a condition to view more information about it.

Each condition will be visible in this window. You can see what the condition was, the value used to evaluate the condition, and how the condition was evaluated.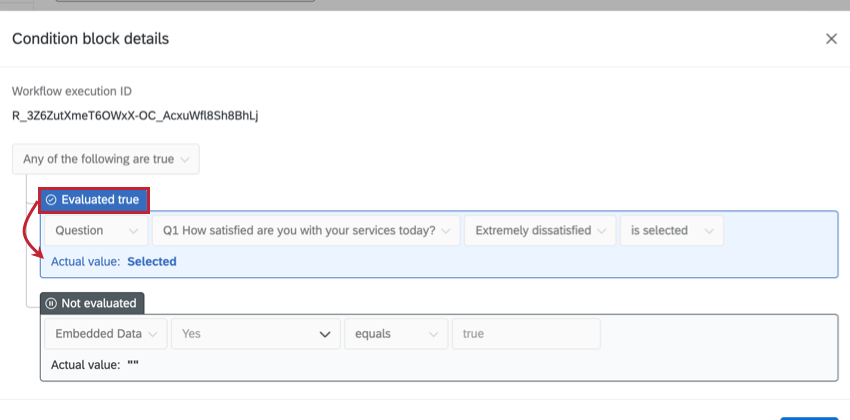
A condition can be evaluated as one of the following:
- Evaluated true: The condition was met and was evaluated as true.
- Evaluated false: The condition was not met and was evaluated as false.
- Not evaluated: The condition was not evaluated because the logic was already passed by a different condition in the workflow (for conditions separated with “any” logic).
Viewing Failed Workflow Runs
The Failed to start after triggered page displays workflows that failed to trigger successfully. This includes workflows whose event triggered successfully but the workflow failed because the conditions were not met.
Failed Trigger Conditions
You can view how the condition logic was evaluated for any workflow. Both true and false conditions appear on the run history page. Condition failure information is available for all workflows.
For workflows that triggered successfully but did not run due to unmet conditions that follow the trigger, you can click on the workflow’s conditions to see exactly which values were used to evaluate each condition.
This opens a window showing your condition logic and the actual values used to evaluate the conditions:
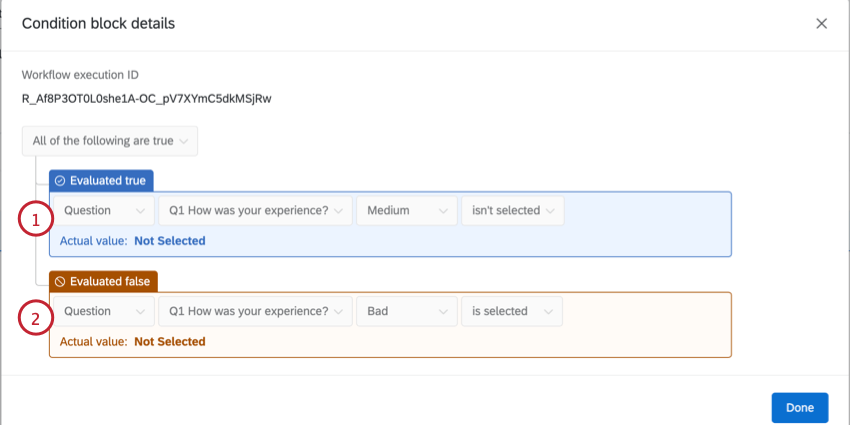
- Conditions that were successfully met are labeled with Evaluated true.
Example: In the above screenshot, the answer “Medium” wasn’t selected, so the condition was true.
- Conditions that were not met are labeled with Evaluated false.
Example: In the above screenshot, the answer “Bad” wasn’t selected, so the condition was false.Qtip: If you see “Actual value unavailable,” then this means that the field to be evaluated was absent entirely. One common scenario is when a condition is based on a JSON event property and that property is excluded from the JSON payload for a given event.
Workflow Statuses
Workflow tasks can have a variety of statuses to let you about the workflow’s progress:
- Queued: The task is scheduled to execute next.
- In-Progress: The task is currently executing.
Example: You have two tasks that run sequentially in a workflow. Before execution, the first task will be set to “Queued.” While it is being executed, the first task’s status will be “In-Progress” while the second task will not be displayed. On completion of the first task, the second task will appear as “Queued.”
- Succeeded: The task was executed. For an email task, this means it left the Qualtrics server.
- Failed: The task did not trigger. This is usually caused by an error in the set-up of the task. For example, if you enter an invalid email into the email task.
Qtip: Non-ETL workflows have a 60 second timeout. This means the workflow will fail if it takes more than 60 seconds to execute.Qtip: You can retry a workflow if 1 or more tasks in that workflow have failed. See the retrying workflows section for more information.
- Auto-retrying: One or more tasks in the workflow have failed, and it is being retried. See Workflow and Task Failures for more information.
- Delayed start: The workflow didn’t run because it has delayed start settings applied. There are 1 or more instances where the workflow would have been triggered, which are now being held in a queue until the time interval ends.
- Not Run: The workflow was triggered, but did not run because it did not meet the workflow’s conditions.
- Blocked: This status means your brand has exceeded the limit of workflows it can run in a single day. Qualtrics limits each customer to 300,000 workflow executions per brand per day. Each time a workflow is triggered, 1 workflow execution is counted. (The number of tasks in the workflow is irrelevant.) Failed workflows still count as a workflow execution. Workflow limits reset every 24 hours at midnight based on your datacenter’s time zone. Workflows that trigger after the limit has been reached will report a status of “Blocked” and can be manually re-attempted the following day when the limit resets. See troubleshooting tips for advice on decreasing blocked workflows, including options for changing daily limits.
Qtip: A workflow that starts with a decision (as the first step) won’t count if the decision criteria is not met. For example, if you have a workflow that only executes if a ticket has a status of “closed,” your open and in progress tickets won’t execute the workflow, and thus won’t count towards the limit.Qtip: We intend to start enforcing the 300,000 daily workflow execution limits starting on September 10, 2025. Qualtrics may, in its sole discretion and without liability, change the timing of any product feature rollout, change the functionality for any in preview or in development product feature, or choose not to release a product feature or functionality for any reason or for no reason.
Revision History
The Revision history allows you to view changes that have been made on any workflow you have access to. This means that you can view when exactly a workflow was disabled/enabled, when condition changes were made, and who edited your workflow.
Revision history is available both for specific workflows, and for all workflows in a project. Below, you’ll see a screenshot of the revision history for a single survey, showing all workflow edits in order.
The Revision history contains the following information about your workflows:
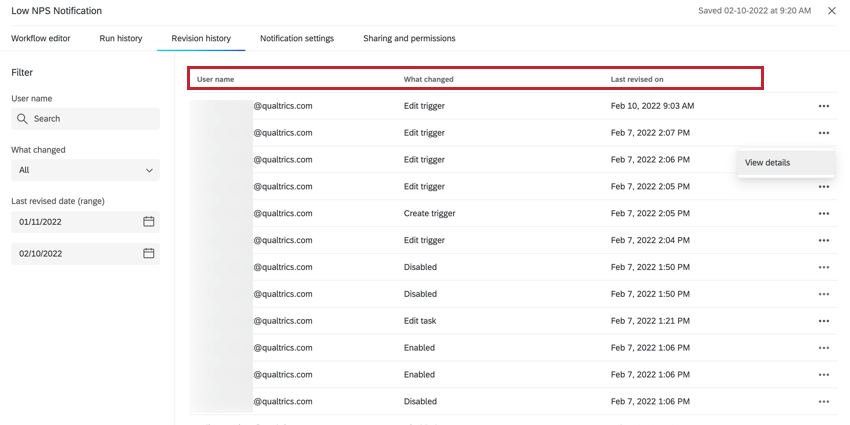
- Workflow name: The name of the workflow that was edited. Only appears if you’re looking at the revision history for an entire project.
- User name: The username of the user who made the edit.
- What changed: A description of the edit made to the workflow.
- Last revised on: The date and time that the workflow was edited.
There are additional options to view the task configuration before and after the changes: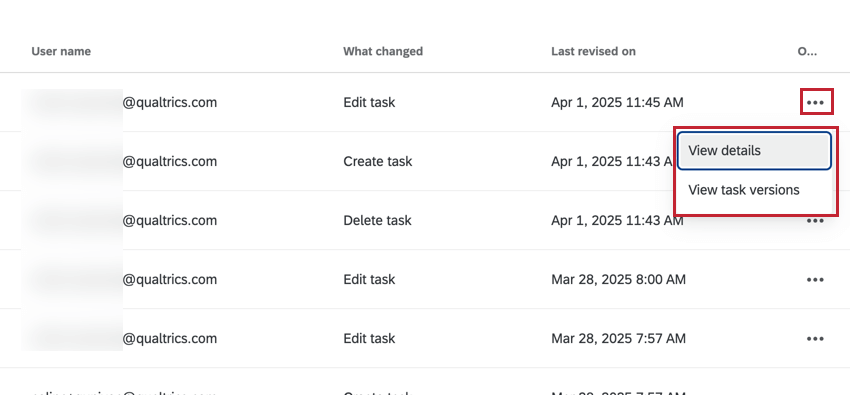
- View details: View the JSON input payload for your task before and after the changes. The JSON payload can be useful for troubleshooting your workflows, particularly ETL workflows.
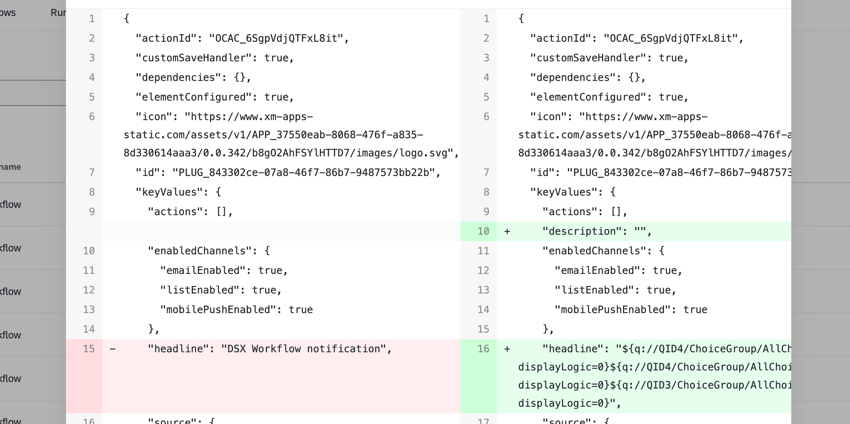
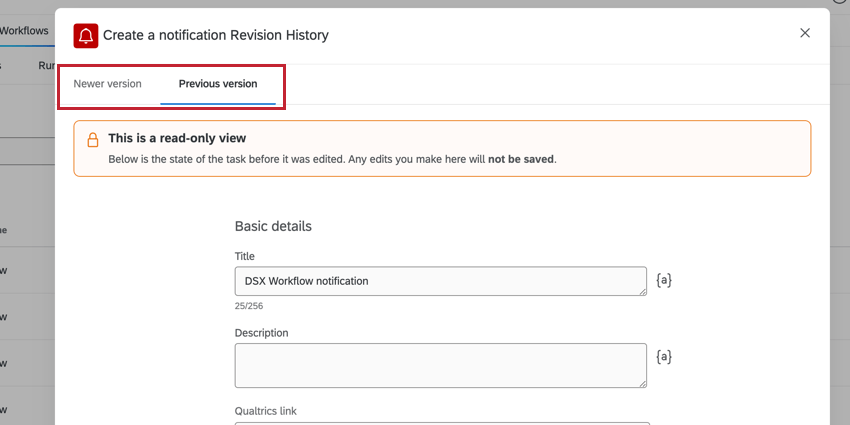
- View task versions: View the task configuration in the task editor window. You use the tabs at the top of the window to switch between the Newer version and Previous version of the task.
 Qtip: This view is unavailable for the following tasks: email task, XM Directory task, tickets task, Salesforce task, and old configurations of the Tango Card task.
Searching Revision History
Run history comes with pre-configured filters allowing you to easily find specific changes to your workflow.
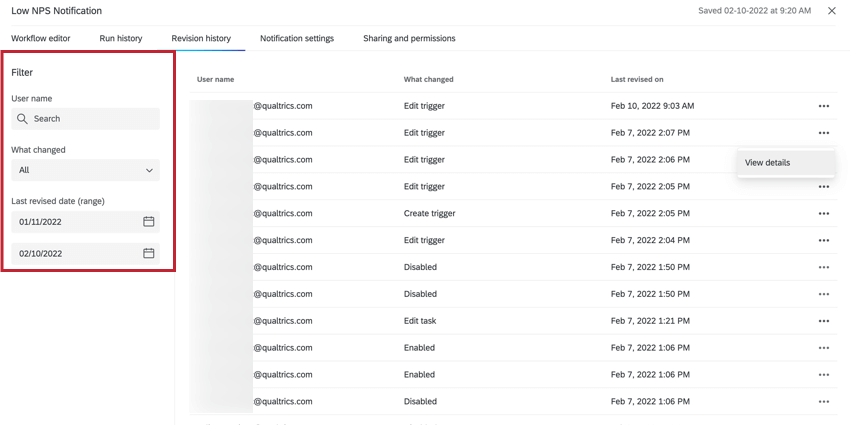
- Use the User name dropdown to filter by the user who made the change.
- Use the What changed dropdown to filter by the type of edit that was made to the workflow.
- Use the Last revised date (range) filters to choose a date range when the edit was made. Click the calendar icon to view a calendar to choose a date.
Rerunning Workflows
From the run history page, you can rerun workflows to complete them again. Select the workflows you’d like to rerun then click Rerun workflows.

If you choose to rerun a failed workflow, you will be asked if you want to start from the first failed task or to start from the beginning of the workflow.

Workflows cannot be run under the following scenarios:
- The workflow and task failures settings do not allow for workflows to be retried, or do not allow for workflows to be retried outside a certain period of time.
- The workflow selected to be rerun is currently in progress, in queue, or already rerunning.
- The workflow was in a delayed start when it originally ran.
- Rerunning the selected workflow(s) will exceed the maximum limit of workflows able to be run.
Retrying Workflows
If a task in a workflow fails and you’d like to retry the entire workflow, click Retry. Note that the retry button will only appear if a task fails. Clicking the retry button will re-run the entire workflow.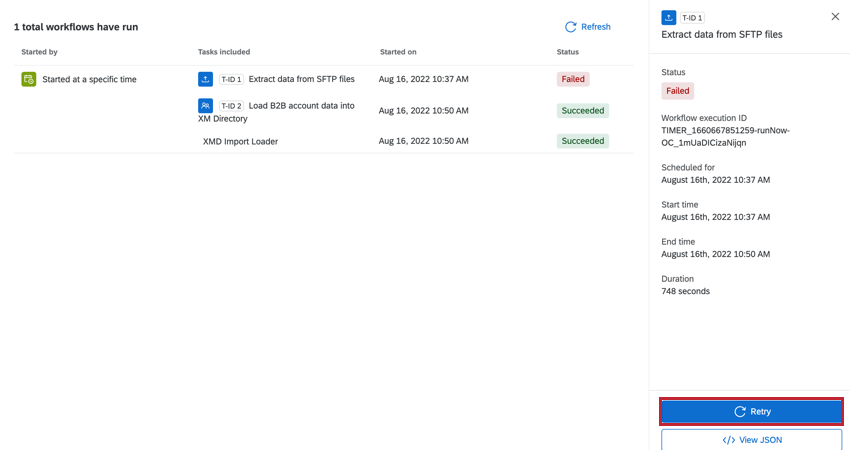
Retrying a workflow will rerun the task with the exact same setup as its initial run. You should retry a workflow when:
- A task times out due to an internal Qualtrics error.
- A task fails due to an issue originating with a third-party system.
Example:I want to import employees from SuccessFactors, but I haven’t set up my SuccessFactors account with the correct permissions. When the workflow runs in Qualtrics, it fails since my SuccessFactors account doesn’t have permission to view employee data. However, if I update my SuccessFactors permissions, I can retry the task in Qualtrics and the task will be successful.
Retrying tasks that failed due to configuration errors will cause the retry to fail again. Instead, you should initiate a new workflow run after fixing the configuration errors.
Finding a Trigger ID
Each time a workflow runs, every task component of that workflow is assigned a unique trigger ID. You can use this ID to search for a workflow’s specific run, or provide to Qualtrics Support if you need help troubleshooting why the workflow failed.
- Navigate to the Run history section of the workflow you’re interested in.
- Click on the specific task and run you’d like to find the trigger ID for.
- Click View JSON.
- Perform a text search for “uniqueId”. On Mac, this is CMD + F and on PC this is CTRL + F. A box should appear in your web browser allowing you to search.
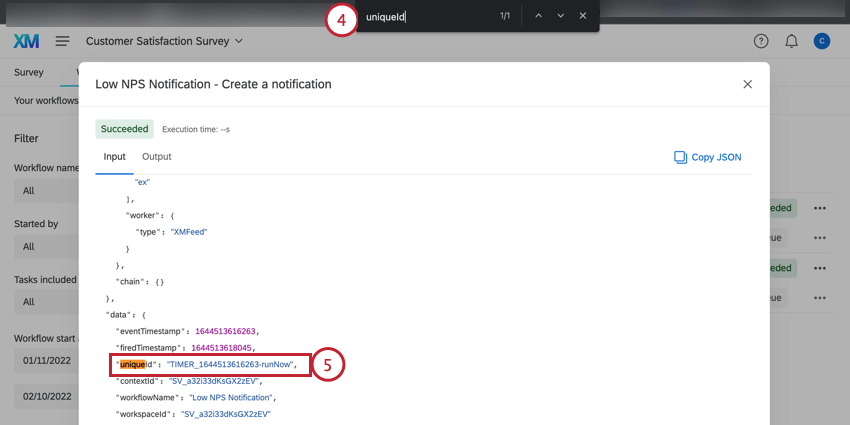
- Copy the value for your uniqueId (also known as the trigger ID).
The trigger ID can be used to search for specific workflow runs in your reporting.
Downloading Data Files
Certain workflow tasks allow you to download a file of the data that was processed by them. This is helpful for troubleshooting and understanding what data you are passing between Qualtrics and other third-party systems.
To download your data file, click the download button in the Files section when viewing a specific task. This will download your data as a CSV file on your computer, which you can open using any spreadsheet editing software.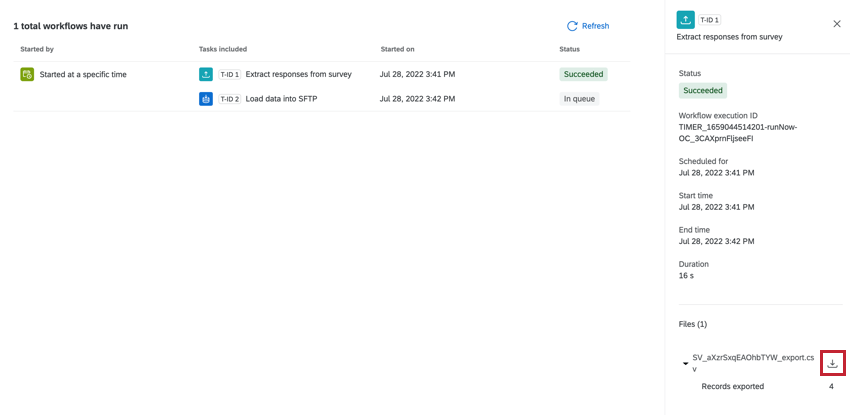
You can download data files for some ETL tasks, such as:
- Extract data from SFTP files task
- Load Data into SFTP Task
- Extract data from Google Drive task
- Extract Responses from a Survey task
- Add Contacts and Transactions to XMD task
Qtip: Some tasks may show the message “There were no files available when this task was run” even if there was a successful run with a processed file.
Troubleshooting Blocked Workflows and Execution Limits
When a workflow is blocked, this means your brand (i.e., Qualtrics organization) has exceeded the limit of 300,000 workflows executions in a 24 hour period. This is a limit collectively shared by all users in your organization.
If your organization often hits the execution limit, there are some things you can do as a Brand Administrator and that you can encourage your userbase to do when making workflows.
- Understanding execution limits: The daily limit applies to workflow executions. Each time a workflow is triggered, 1 workflow execution is counted. The number of tasks in the workflow is irrelevant. Failed workflows still count as a workflow execution.
Qtip: A workflow that starts with a decision (as the first step) won’t count if the decision criteria is not met. For example, if you have a workflow that only executes if a ticket has a status of “closed,” your open and in progress tickets won’t execute the workflow, and thus won’t count towards the limit.
- Remove outdated or failing workflows: The Workflow execution section of Admin reports shows frequently executed workflows for all users in your organization. Here, you can find workflows that may be running too often, and perhaps even failing every time they run. The report shows the workflow’s owner so that you can either contact them or proxy log into their account to change the workflow.
- Determine default behavior when a workflow fails: Even failed workflows count towards total executions. Encourage your users to set workflow and task failure behavior. These settings can decrease how often failed workflows are retried.
- Decrease workflow frequency: When you create workflows, carefully consider the schedule. If your workflows tend to trigger often, consider adding delays; this option is available for all types of workflows, including event-based and scheduled ones.
- Use ETL workflows to trigger in batches: When you create a new workflow, consider using ETL workflows. ETL workflows process multiple files in a batch instead of triggering for each file, which can drastically decrease the number of workflow executions.
Example: Your survey collects contact information, which you want to upload to XM Directory. Instead of making a new contact after each survey submission, you can make a workflow that checks for new contacts and uploads them in batches on a regular schedule. See contact import workflows and extracting data from surveys.
- Manually retry blocked workflows: Workflow limits reset every 24 hours at midnight based on your datacenter’s time zone. Workflows that trigger after the limit has been reached will report a status of “Blocked” and can be manually re-attempted the following day when the limit resets.
- Set up threshold notifications: Set up alerts for workflow consumption. As your organization gets closer to the limit, you or other key team members can be alerted. See Alerts for Workflow Limits, located in the workflows executions report.
- Request a limit increase: Before you request an increase in your daily allowed workflows, make sure you’ve followed the advice above to clean up your workflows. If you still feel you need an exemption, a Brand Administrator can contact their Technical Success Manager. This representative will submit a request for a limit increase for your organization.