
Building ETL Workflows
What's on this page
About Building ETL Workflows
The Qualtrics Workflows platform contains a series of tasks to assist in importing data from third-party destinations into Qualtrics or exporting data from Qualtrics to third-party destinations. These tasks follow the Extract, Transform, Load (ETL) framework. Using ETL tasks, you can create automated and scheduled workflows to bring data from third-party sources into Qualtrics as well as export data from Qualtrics to third-party destinations.
To create an ETL Workflow, you must create 1 or more extractor tasks and 1 or more loader tasks. You are only limited by the overall limit for tasks in 1 workflow.
Qtip: ETL tasks can take up 24 hours to execute. If the task doesn’t succeed within 24 hours, the task will fail.
Qtip: ETL workflows can only run 1 workflow at a time. Simultaneously running workflows may fail.
General Setup for Extractor and Loader Tasks
Qtip: For a general guide on using workflows, see Workflows basic overview.
From the stand-alone Workflows page or the Workflows tab in a project, click Create a workflow.
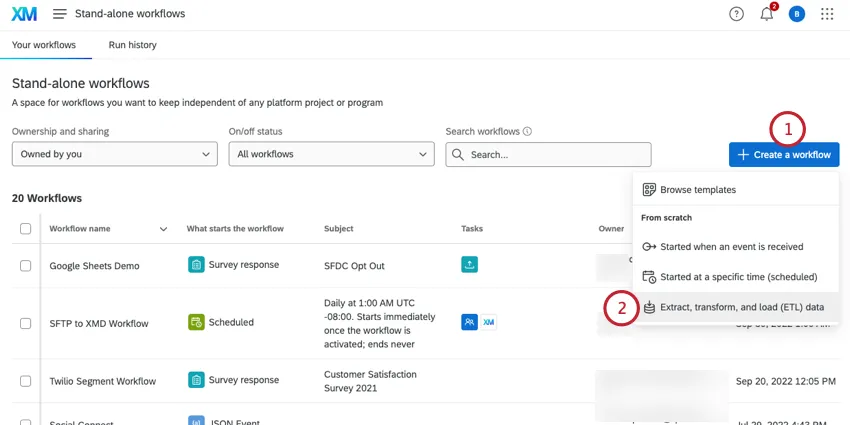
Select Extract, transform, and load (ETL) data.
ETL workflows usually run on a recurring schedule. Choose a schedule for your workflow. See Scheduled Workflows for more information about setting a workflow’s schedule.
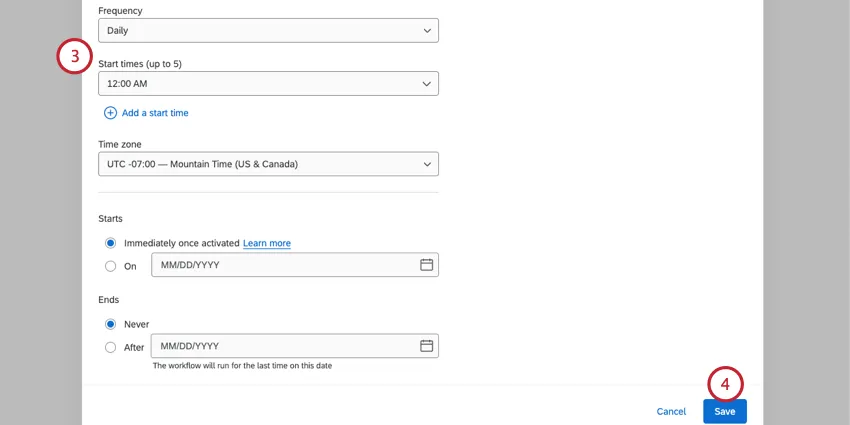
Click Save.
Click Data source (ETL extractor) to choose an extractor task to use. See Available Extractor Tasks for a list of tasks you can use. You can add multiple extractors in 1 workflow.
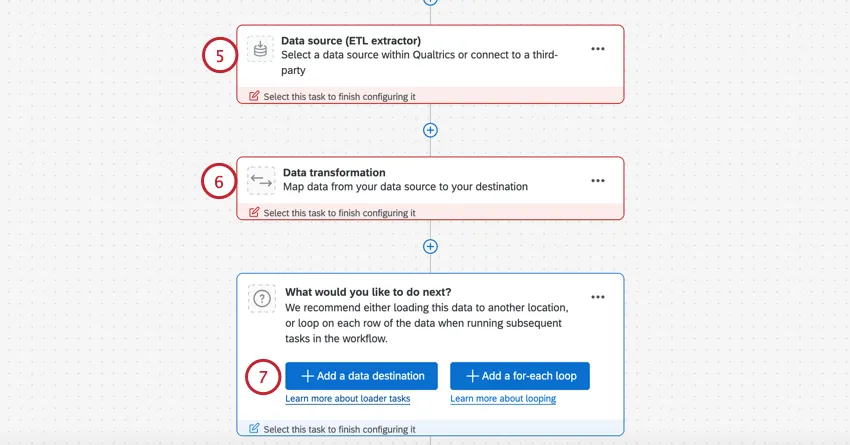
If you’d like to transform data before you load it, click Data transformation. This step is optional. See Basic Transform Task for more details.
Click Add a data destination to choose a loader task to use. See Available Loader Tasks for a list of tasks you can use. You can add multiple loaders in 1 workflow.
This step is optional, but useful for alerting you if something goes wrong with your workflow. Go to Settings to set up workflow notifications to get notified if your workflow ever fails.
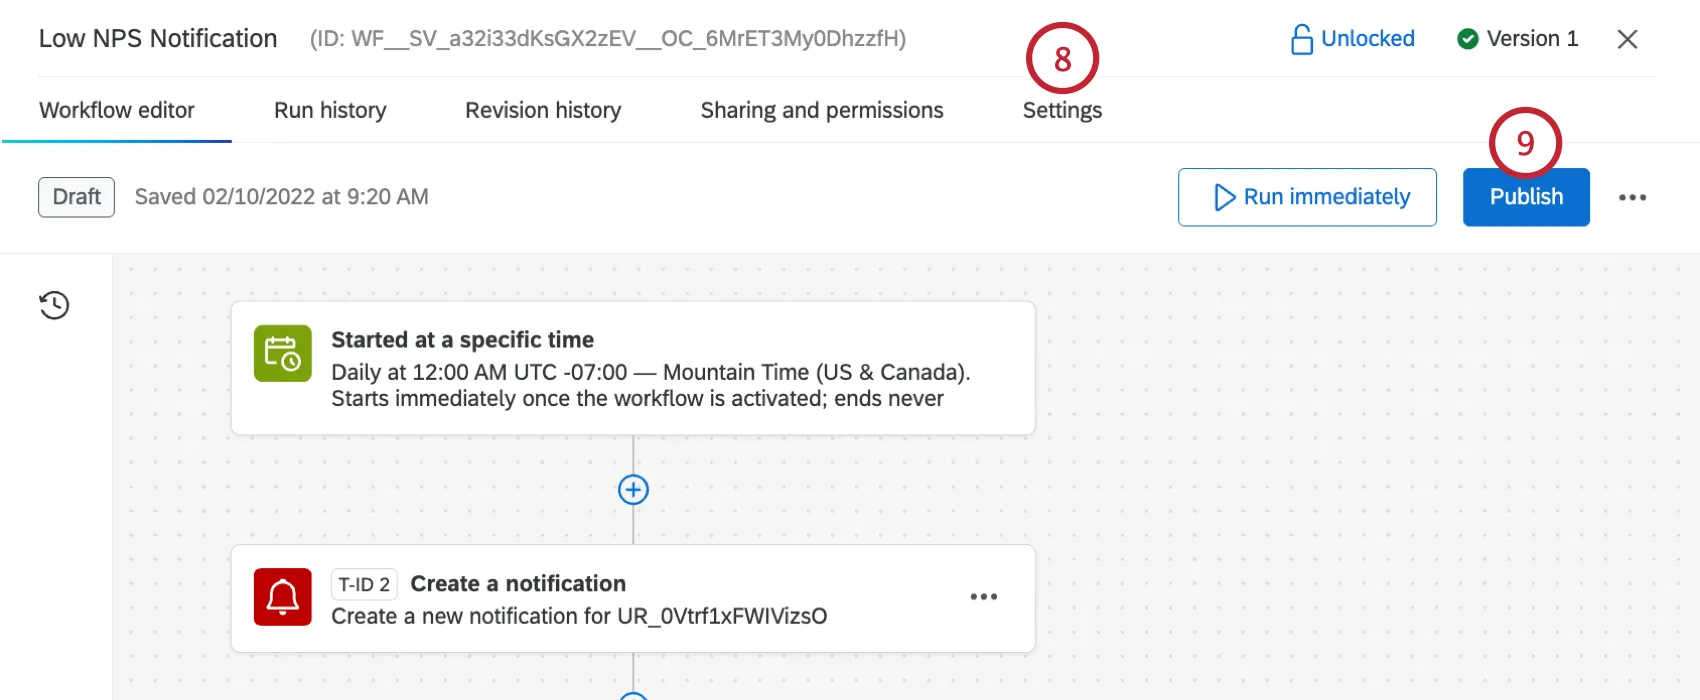
Publish your workflow once it's fully built.
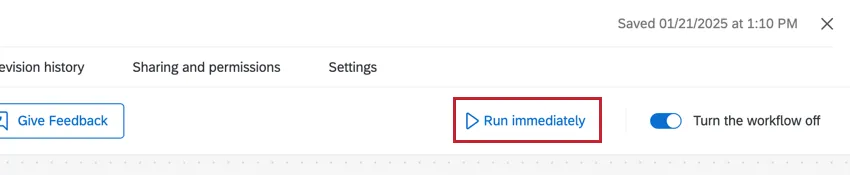
Qtip: After setting up your workflow, click Run Immediately to to test your ETL workflow and ensure it’s working.
Qtip: You can add additional tasks to your ETL workflows. For example, add a web service task to post to a webhook.
Reloading Data
When there’s been a configuration change between ETL tasks that depend on each other, a button will appear to reload all data with the new configuration. Click Reload the data if you’d like to reprocess the old data.
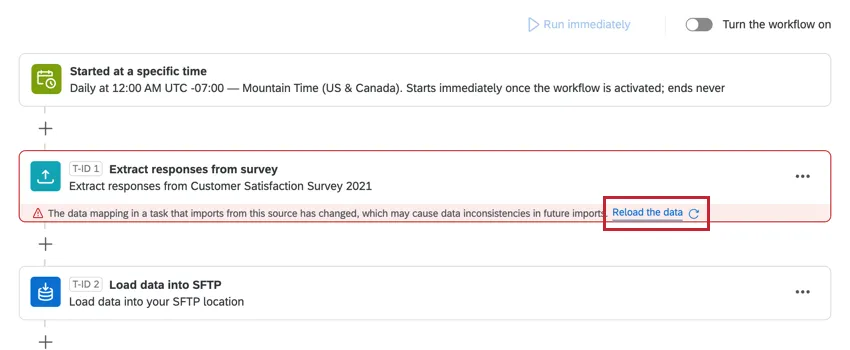
Attention: This will reload all data from the task that was edited. Normally, ETL workflows only process new data since the last run. However, if this option is selected, then the next time the workflow runs, all data since the workflow was created will be processed.
Example: When an extract responses from survey task normally runs, only new responses since the last run will be processed. However, if data is reloaded, then the next time the workflow runs, all responses in the survey will be processed.
Extracting Data from a Specified Date Range
With certain ETL workflows, you can extract data from a specific date range. This can be a great way to reprocess data that has been extracted before, or test that your setup is working.
Extracting data from a specific range does not impact other scheduled runs.
Example: A ticket was already processed by your workflow. Since then, though, the data on it has changed. To reprocess the ticket, you use this function.
Qtip: This feature is only available for scheduled ETL workflows.
Supported Extractor Tasks
You can only extract data from a specified date range if you use one of the following tasks:
Qtip: Date range extraction will only work if you have 1 supported extractor task in your workflow.
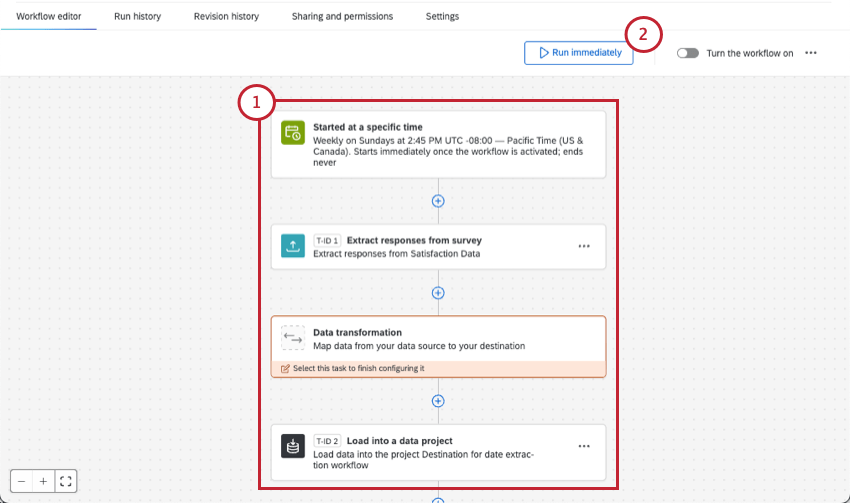
Run a workflow with a custom date range
Follow these steps to extract data only from your chosen date range.
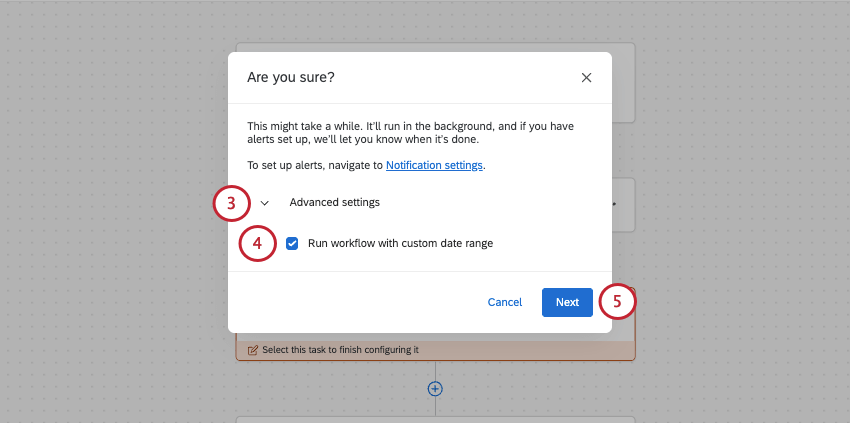
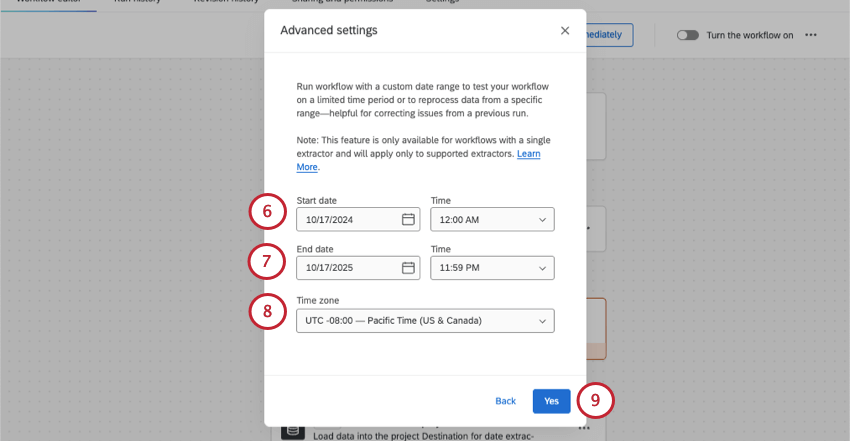
Qtip: The earliest start you can select is January 1, 1970.
Qtip: The latest end date and time you can choose is the current one. So long as it’s activated, your workflow will extract future data as it continues to run on its schedule.
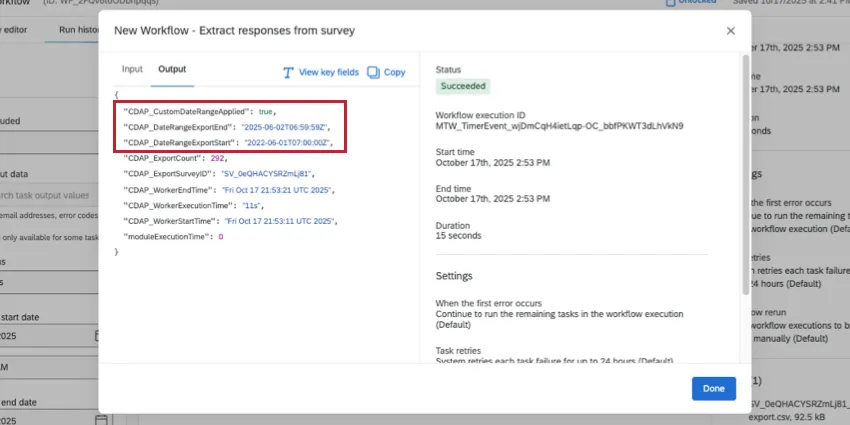
Troubleshooting a run
Go to your workflow run history. Click the extraction task and view the JSON. In the Output, the CDAP_DateRangeExport fields should reflect the date range you chose. (The CDAP_Worker fields, on the other hand, will show when you ran the test.)
Available Extractor Tasks
Here are some of the extractor tasks available at this time:
- Extract data from Qualtrics File Service task: Take data you’ve stored to the Qualtrics File Service and save it elsewhere in the platform, such as XM Directory.
- Extract data from SFTP files task: Extract data from your SFTP server and import it into Qualtrics.
- Extract data from Salesforce task: Extract data from your Salesforce instance and import it into Qualtrics.
- Extract data from Google Drive task: Extract data from your Google Drive account and import it into Qualtrics.
- Extract responses from a survey task: Extract data from your Qualtrics surveys and upload it elsewhere, such as an SFTP.
- Extract employees from HRIS task: Extract employee data from popular HRIS like Workday to import into your Qualtrics EX directory.
- Extract data from data project task: Extract data from your Qualtrics imported data project and upload it elsewhere, such as your own external database.
- Extract employee data from SuccessFactors task: Extract employee data from your SuccessFactors instance and import it into Qualtrics.
- Extract recruiting data from SuccessFactors task: Extract your recruiting data from SuccessFactors to import into Qualtrics.
- Extract data from Snowflake task: Extract data stored in Snowflake to import into Qualtrics.
- Extract data from Amazon S3 task: Extract data stored on Amazon S3 to import into Qualtrics.
- Extract run history reports from workflows task: Extract reports about your past workflow runs to import elsewhere, such as an SFTP.
- Extract data from tickets task: Extract Qualtrics tickets data to import into another source, such as an SFTP.
- Extract data from Discover task: Extract data from your Discover account and import it into Qualtrics.
- Salesforce Extractor task: Extract data from Salesforce to import into Qualtrics. You can import Salesforce objects, emails, and report data with this task.
- Extract data from Genesys task: Extract chat and email data from Genesys and import it into Qualtrics.
- Extract data from Zendesk task: Extract live chat data from Zendesk and import it into Qualtrics.
Qtip: You can also view a list of extractors using the site menu to the left.
Available Loader Tasks
Here are some of the loader tasks available at this time:
- Add contacts and transactions to XMD task: Save imported data and transactions to your XM Directory.
- Load users into EX directory task: Save imported employee data in your EX directory or EX project.
- Load users into CX directory task: Save imported CX user data.
- Load data into a data project task: Save imported data from a data extractor task into an imported data project.
- Load into a data set task: Save imported data into a dataset to use with a merge task.
- Load data into SFTP task: Save imported data to a SFTP server.
- Load data to Amazon S3 task: Save imported data to an Amazon S3 bucket.
- Load responses to survey task: Save imported data into a Qualtrics survey dataset.
- Load to SDS task: Save imported data into a Qualtrics supplemental data source.
- Load data to location directory task: Save imported data into a Qualtrics location directory.
- Load data to Discover task: Save imported data in Discover.
- Load data to Conversational Analytics: Load chat and email data into a Chat Data project or Email Data project to analyze within Qualtrics.
Qtip: You can also view a list of loaders using the site menu to the left.
Available Data Transformation Tasks
The following tasks are available to you for transforming the data you process in your ETL workflows:
- Basic transform task: Change the format of strings and dates, calculate the difference between dates, perform math operations on numeric fields, and more.
- Merge task: Combine multiple datasets into a single dataset.
- Redact and substitute data task: Redact data within your workflow based on regex or substitution rules.
Workflow Limits
ETL workflow runs have the following limits:
- Each run can process up to 200 files
- Each run can process up to 10GB of data in total
- Tasks can process files up to 5GB in size
Qtip: Note that each run includes all tasks that are being run within the workflow.
Make sure to also check the documentation for the specific task you are using as some tasks have smaller limits.
Troubleshooting Data Extracting and Loading Tasks
Attention: An ETL workflow is automatically disabled if it meets any of the following criteria in the past 13 days:
- Every attempted execution has been a failure.
- There have been at least 10 failures.
- Every execution is failing for the same reason.
- The first and last execution were at least 10 days apart.
Incomplete Workflows
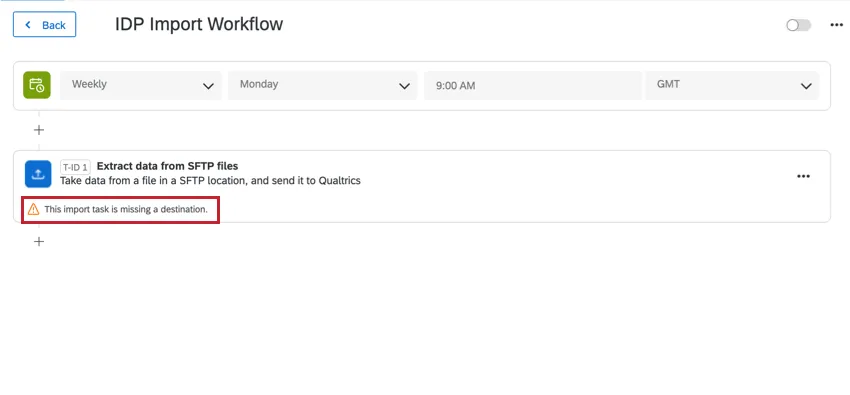
Data extractor and loader tasks must be used together. If you are missing a piece of their setup, the workflows editor will alert you.
Example: In this example, we are missing our data loader task. The workflows editor alerts us that our “import task is currently missing a destination.”
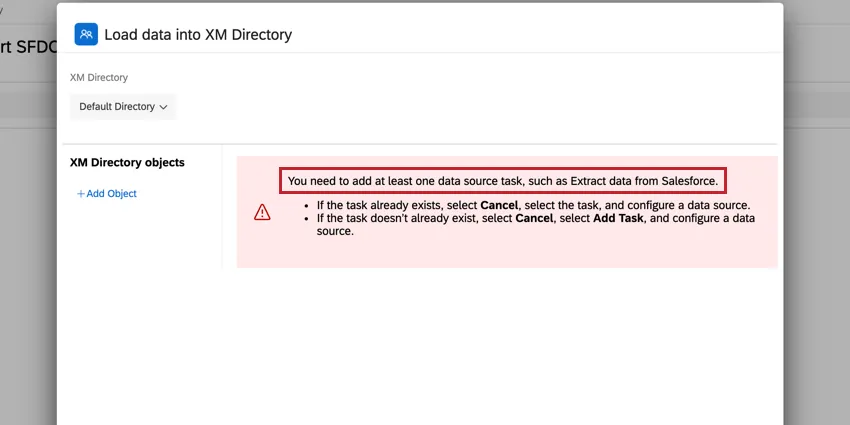
Example: In this example, we are missing our data extractor task. The task editor alerts us that “you need to add at least one data source task.”
Workflows Failing
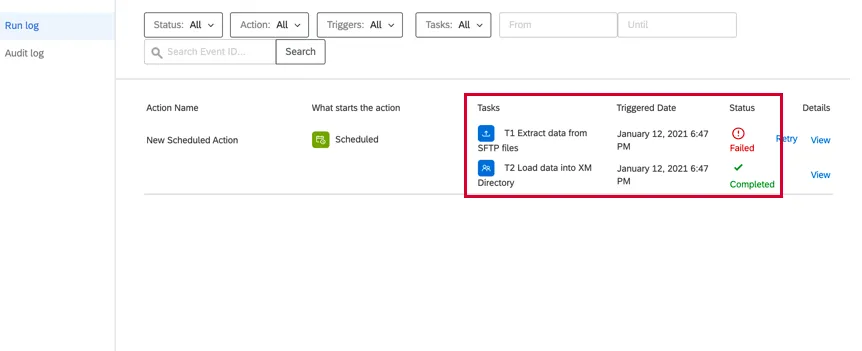
If your tasks are failing or not firing properly, the first place you should look is Workflows reporting & history. This will contain information about every time your workflow fired and the results of that workflow.
In reporting & history, each piece of your workflow will have its own entry, making it easy to pinpoint where things went wrong.
Example: In the below example, we are using an extract data from SFTP files task and a add contacts and transactions to XMD task. We can see that the extractor task failed but the loader task succeeded. This means our extractor task is misconfigured, but our loader task is OK.
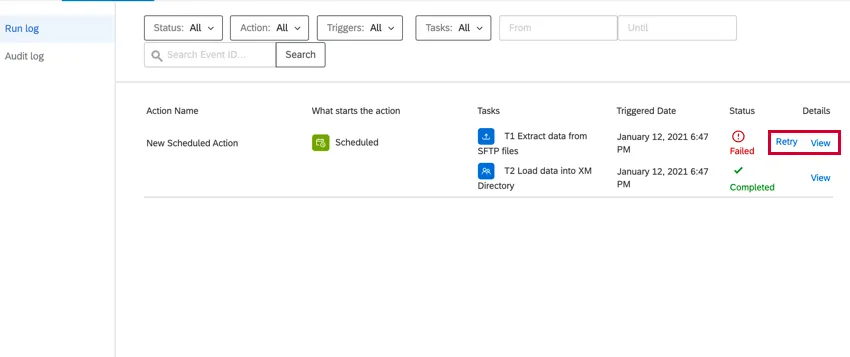
After identifying the problem, you can click View under Details to see more information to help you diagnose how to fix the problem. This will pull up the JSON payload for the task. Scroll down to the Task Output section to find any errors.
Example: In this example, we see that the task failed because the connection had invalid parameters for an extract data from SFTP files task.

After editing your workflow and fixing the problem, you can return to reporting & history and click Retry to rerun the workflow.
FAQs
Do I have access to all extensions available through the Workflows templates?
Do I have access to all extensions available through the Workflows templates?
Is there a link to all Workflows events and tasks?
Is there a link to all Workflows events and tasks?
What are Workflows templates?
What are Workflows templates?
What are workflows? / Where are actions?
What are workflows? / Where are actions?
There are no changes to workflow functionality as part of this update.
That's great! Thank you for your feedback!
Thank you for your feedback!