
Editing Responses
What's on this page
About Editing Responses
Perhaps you’d like to remove profanity, spelling errors, or sensitive information from a respondent’s text entry response. Maybe a respondent told you they answered a few questions incorrectly before they submitted their response. Response editing allows you to revise survey responses inside the Data & Analysis tab. Qualtrics even maintains the original data so you can revert to the original responses any time.
Qtip: If you have a respondent that needs to change many answers, try sending them a retake link instead. Note that while you can also export and import edited data, importing edits won’t change the original response, instead it will upload duplicates with different Response IDs and Recorded Dates; it’s also worth noting that imported responses are billed separately from the original response and can impact your interactions consumption. Contact Account Services or your Account Executive prior to importing historical responses, as this may require an update to your license.
Changes made with response editing will be reflected in Results Dashboards, Results, Advanced-Reports, and in CX Dashboards. You can also export raw data with response edits using the default (Data Table) format.
Attention: Response editing changes won’t be reflected in Crosstabs, but can be retrieved by API if you use Start Response Export, Get Response Export Progress, and Get Response Export File calls.
Editing Individual Responses
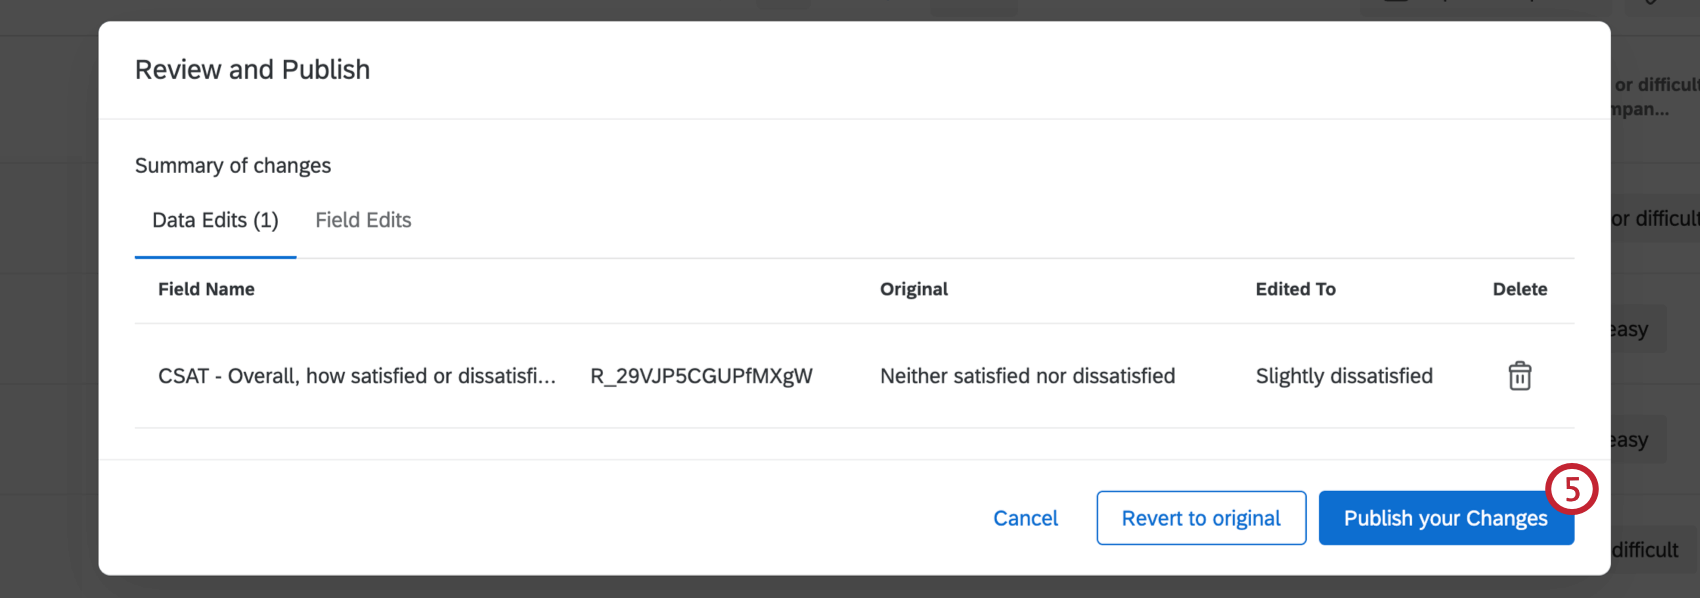
This workflow describes how to edit a single response. You can also make edits to multiple responses before reviewing and publishing your changes.
Qtip: If you want to edit a certain question or embedded data field, you must add its column in the Data & Analysis tab. Columns may already be added by default.
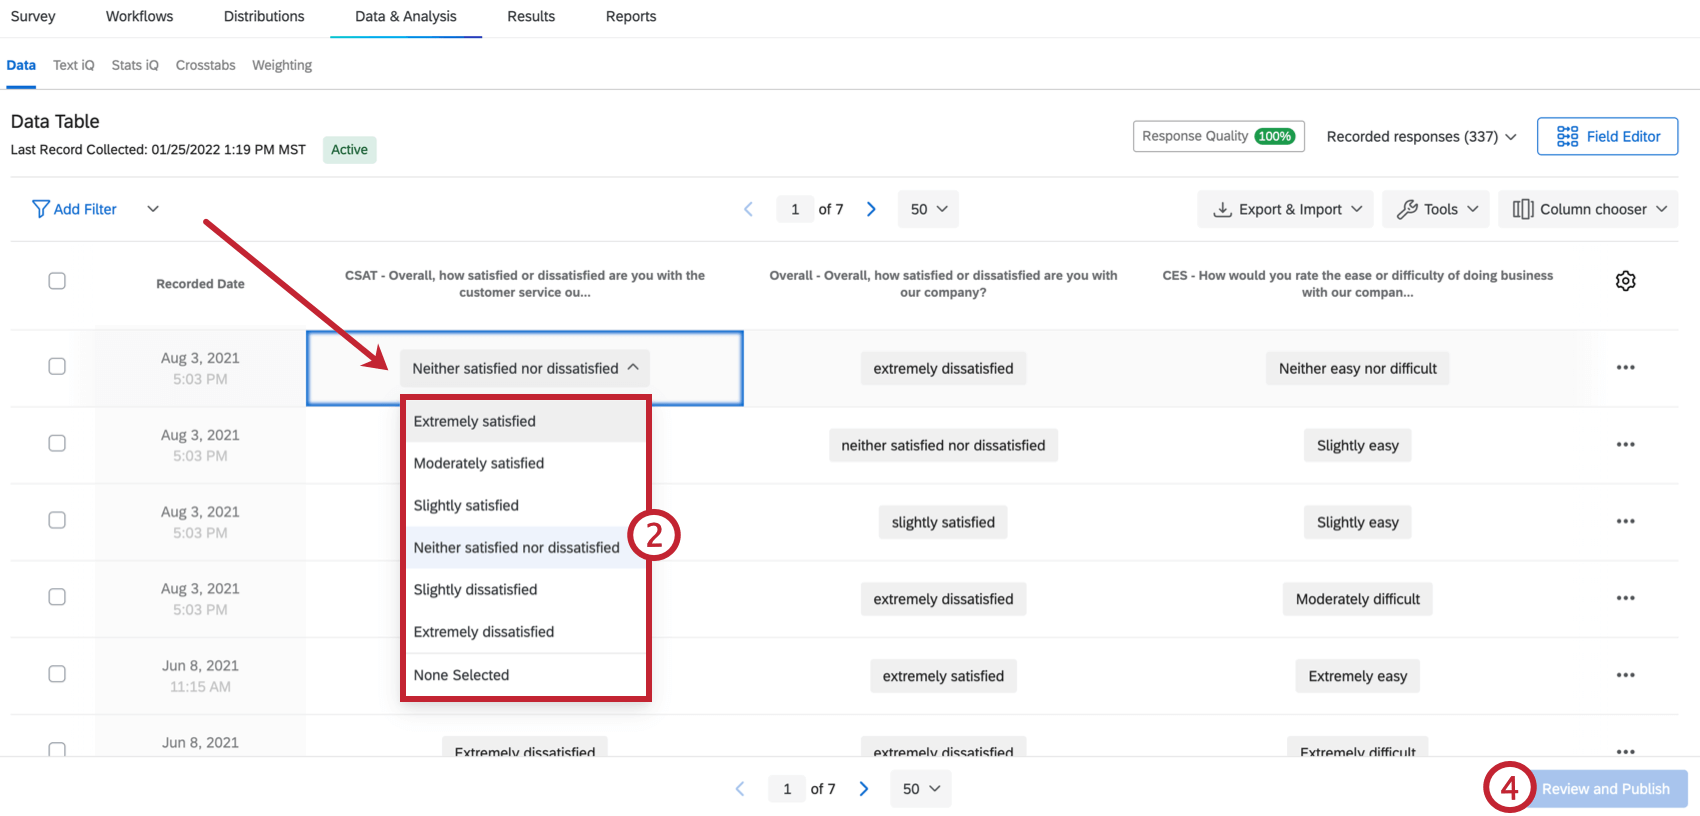
Qtip: When making edits, you can only input data that matches the field’s data type. For example, if you’ve created a text entry question with Numeric Validation, you’ll only be able to type in a numeric answer.
Attention: Response edits won’t be saved automatically. You must publish your edits for them to be reflected in your dataset.
Qtip: Your changes may take a couple minutes to appear in the data table. While they are processing, they’ll appear as pending requests.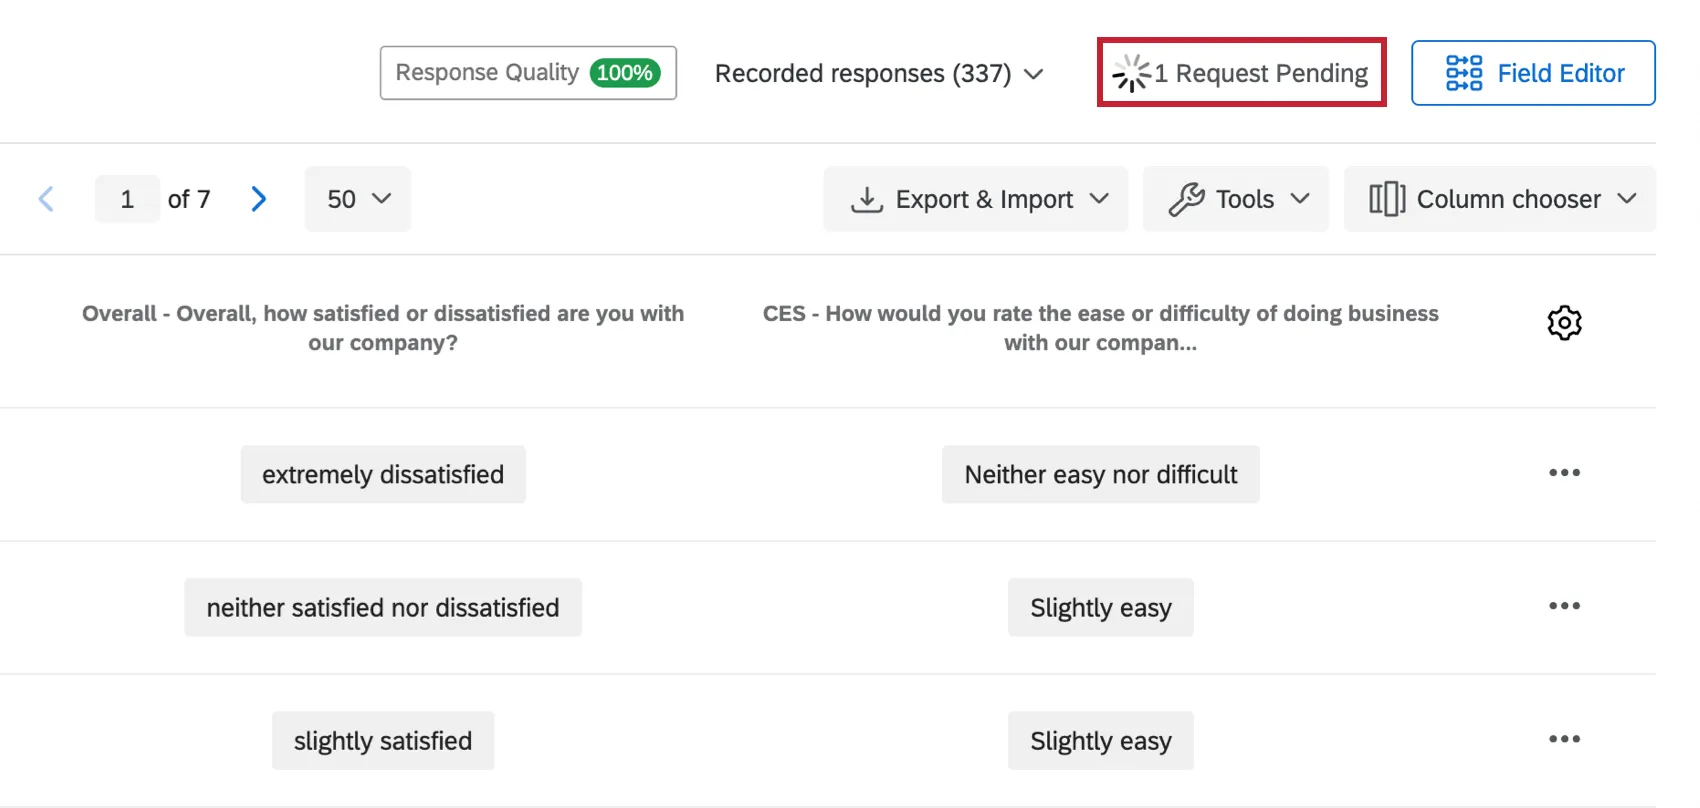
Qtip: When making edits, you can only input data that matches the field’s data type. For example, if you’ve created a text entry question with Numeric Validation, you will only be able to type in a numeric answer.
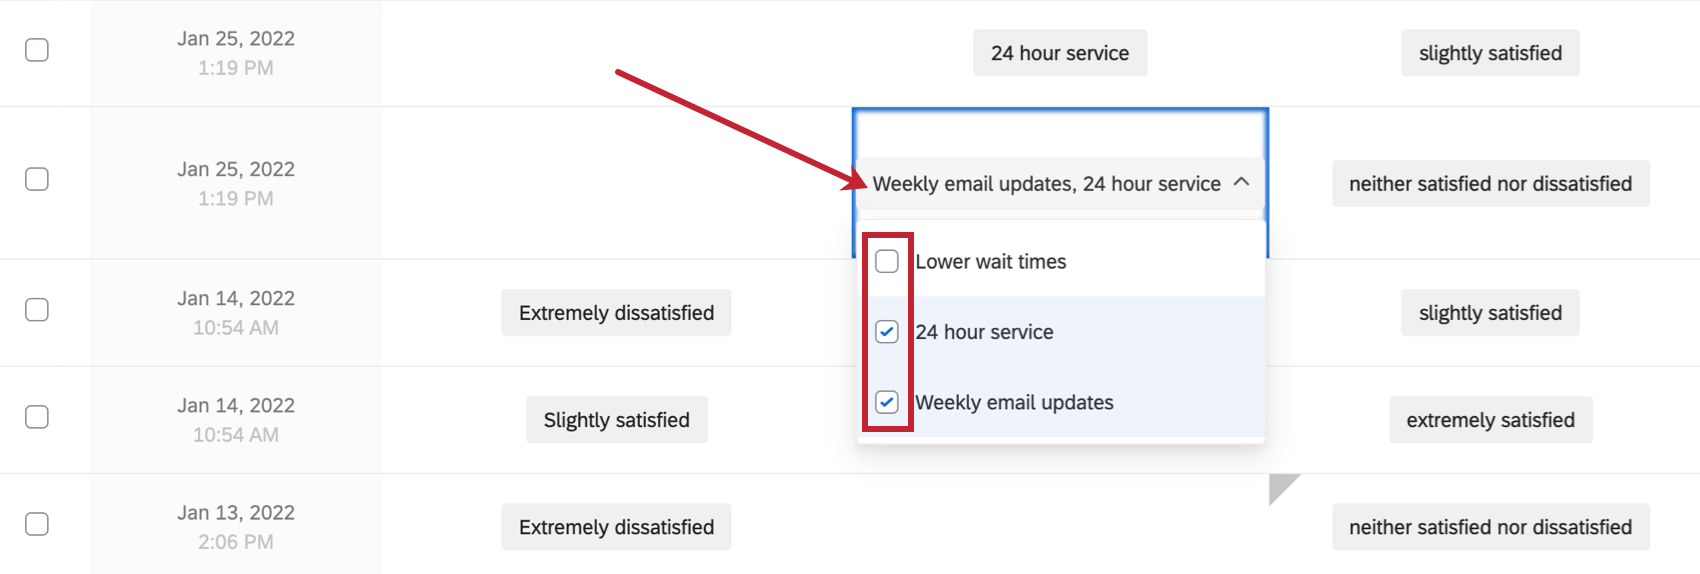
Editing Multi-Answer Questions
Some questions allow respondents to select multiple answers. To begin editing these fields, click on the answer. You can then use the checkboxes to edit and remove answer choices.
To remove an answer, uncheck the answer choice you want to remove. To add another answer, select the checkbox next to the answer choice you want to add.

Editing Multiple Responses
This option allows you to edit the same field for multiple responses at a time.
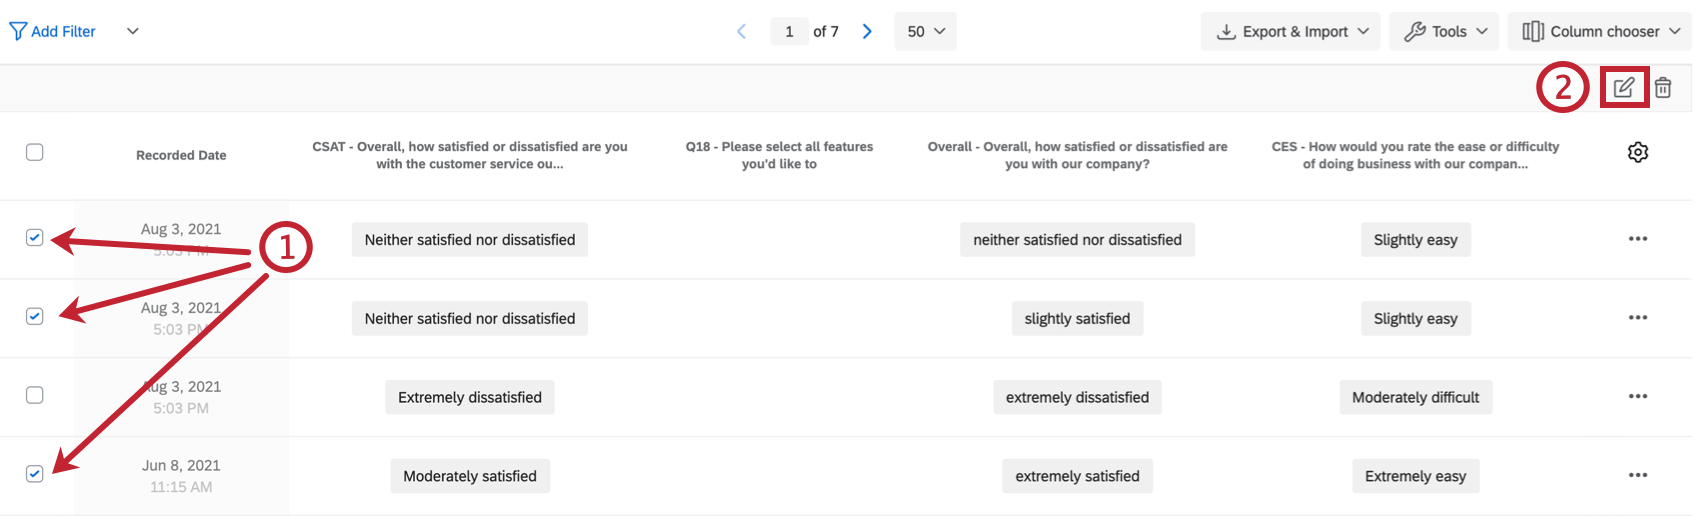
Qtip: Adding filters to your Data & Analysis tab can help you narrow down what responses you want to select for editing. See our Filtering Responses page for instructions on building filters.
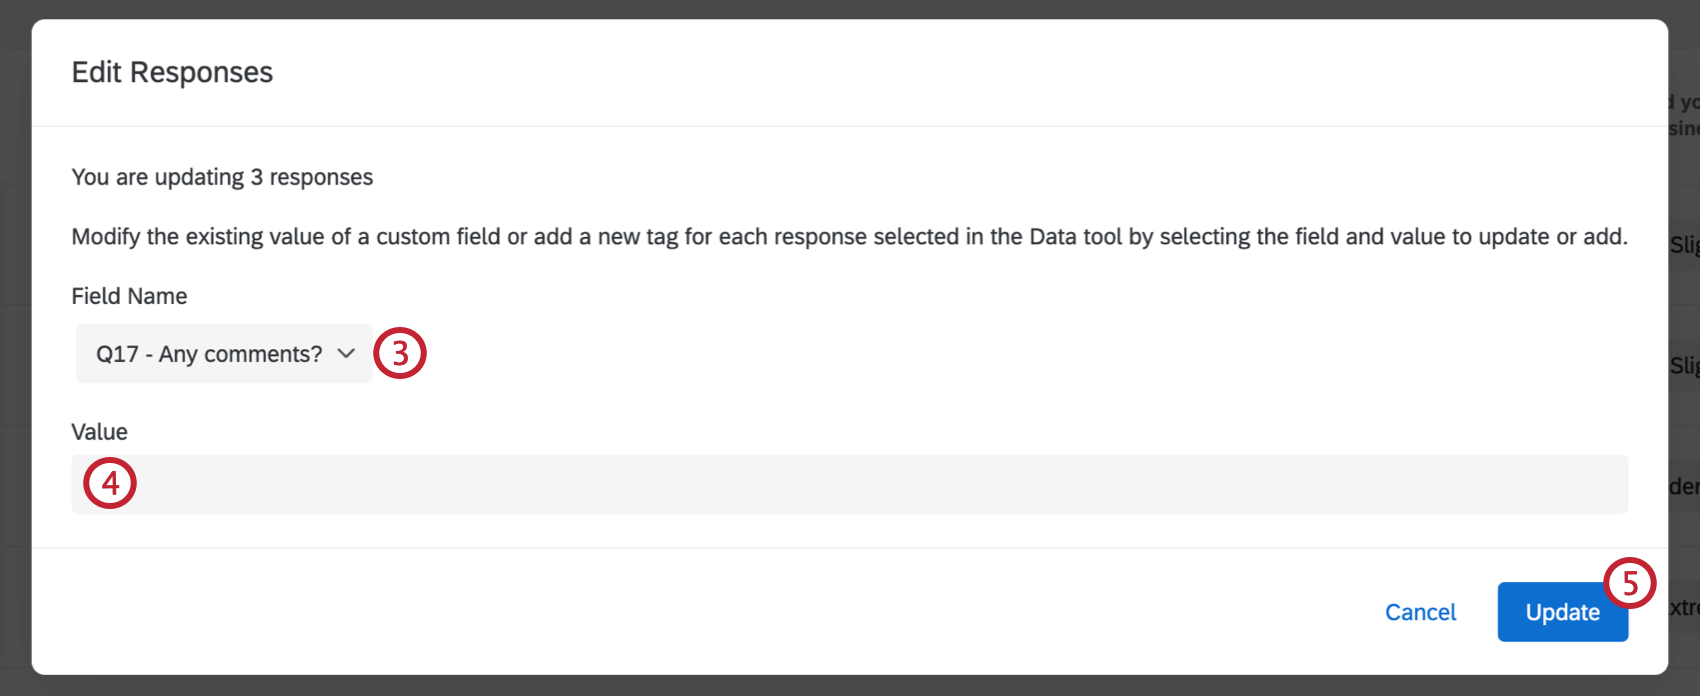
Qtip: If you see a “replace existing values?” option, then you are editing a custom field.
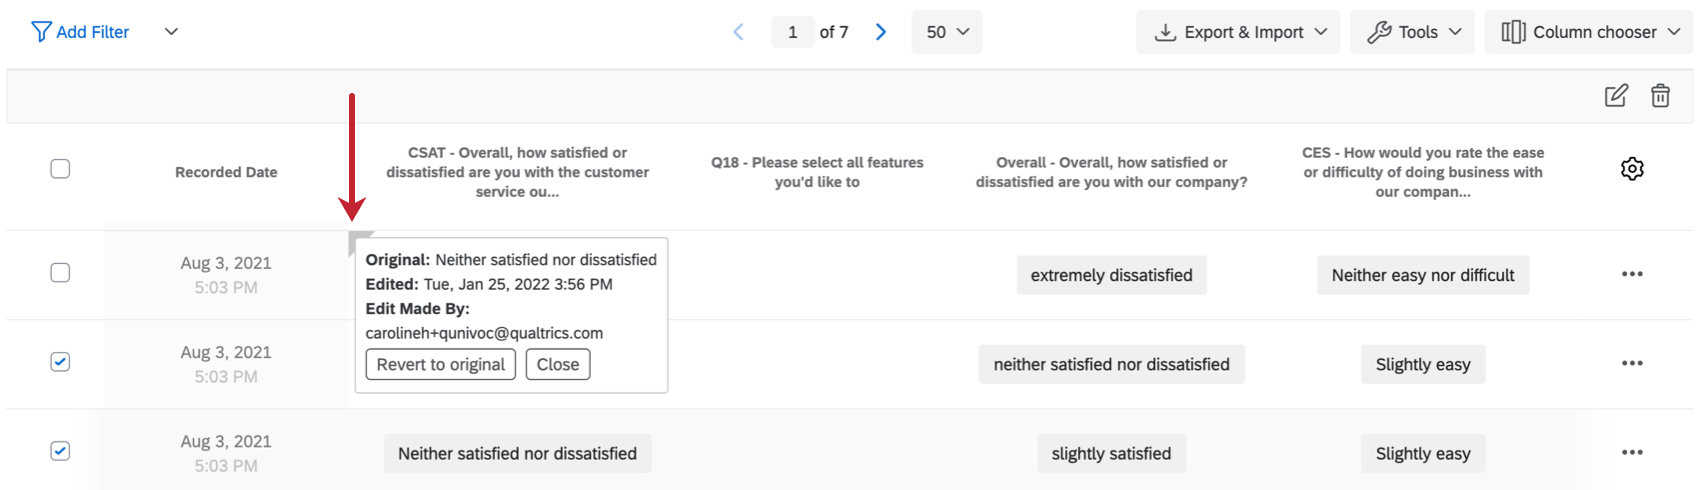
Restoring Original Data
Restoring Data for a Single Response
A gray triangle will appear in the upper-left corner of any response you’ve edited. Clicking this triangle will tell you when the data was edited and by whom.
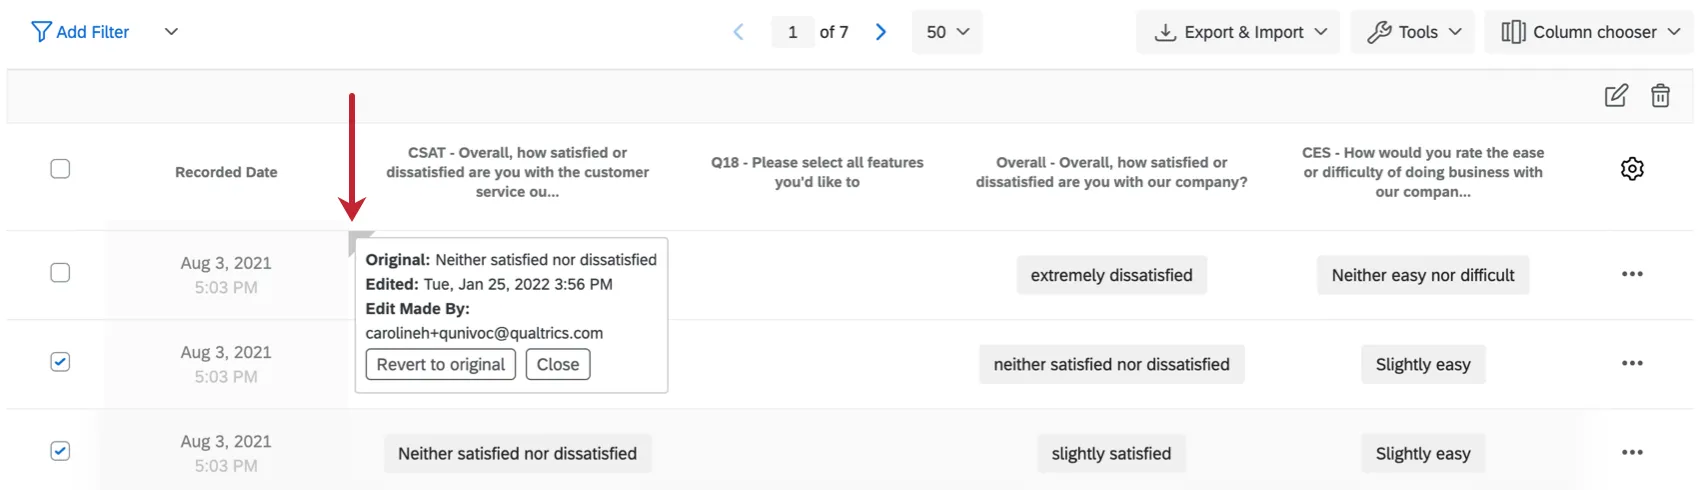
Clicking the field also gives you the option to restore data.
Warning: Once you revert your fields to the original data, your edits aren’t retrievable.
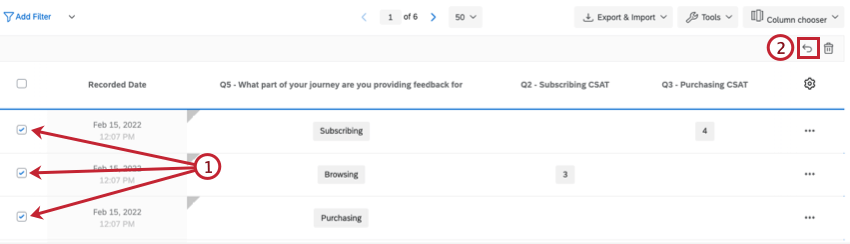
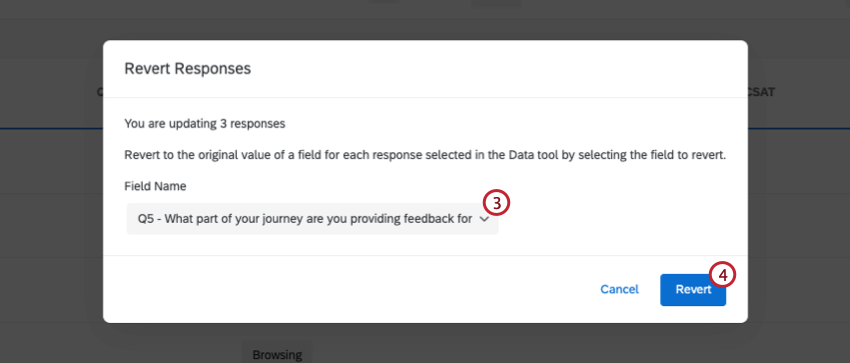
Restoring Data for Multiple Responses
It is also possible to restore data for multiple edited responses at once.
Qtip: Adding filters to your Data & Analysis tab can help you narrow down what responses you want to select for editing. See Filtering Responses for instructions on building filters.
Fields That Cannot Be Edited
Nearly all question types and fields are editable via the response editing tool, including text entry questions, multiple choice questions, slider questions, and embedded data fields. However, the following types of data aren’t editable:
- Survey metadata, such as response ID, start date, and other fields Qualtrics records automatically for your survey Qtip: The only exception is User Language, which can be edited.

- The Distribution Channel contact field
- Viewing order data of randomized choices, questions, or elements
- Heat map questions
- Pick, group, and rank questions
- File upload questions
- Signature questions
- Timing questions
- Meta info questions
- For Net Promoter® Score questions, groups can’t be edited, but you can change the numeric value, which will assign the Group accordingly.
- Scores and scoring categories
- The outcome of formulas and fields created through bucketing can’t be edited directly. However, if you edit the questions the custom variable is derived from, the outcome of the custom variable will change, too. Notice that when the height is modified in the example below, BMI changes to fit the new data.
Projects Where You Can Edit Responses
Data & Analysis is available in many different types of projects. You can edit responses within Data & Analysis in the following kinds of projects:
- Survey projects
- XM Solutions
- Imported data projects
- 360 projects Qtip: See Managing Response Data (360) for more details.
- Conjoint
- MaxDiff Qtip: You cannot edit conjoint- or MaxDiff-specific data. Only additional survey content.
While the functionality is technically available in other types of Employee Experience projects, it works a little differently. See Response Editing (EX) for more details.
FAQs
What responses actually count toward my license?
What responses actually count toward my license?
Licensed responses are any completed responses that are not Survey Previews or Survey Tests. Completed responses can include imported responses, finished surveys, and partial surveys that were moved out of responses in progress and recorded. If you ever want to know the exact number of interactions you’ve used, reach out to your Brand Admin. You can also view your response usage by going to Account Settings to view the legacy Account Usage report.
Contact Account Services or your Account Executive prior to importing historical responses, as this may require an update to your license.
Can a participant retake their survey?
Can a participant retake their survey?
Note that in Retake Survey links, all of the participant’s original answers are prepopulated. If new questions have been added to the survey in the meantime, those questions will be blank.
Can I edit or add information to a response after it has been submitted?
Can I edit or add information to a response after it has been submitted?
If you would like an individual to retake their response instead, you can find instructions for this on the Retake Survey Link support page.
How do I get a retake link for a response so a respondent can change their answer or fill out a question they missed originally?
How do I get a retake link for a response so a respondent can change their answer or fill out a question they missed originally?
How does account usage differ from recorded responses?
How does account usage differ from recorded responses?
Think of recorded responses as the total number of complete responses collected for a survey. This can include individual responses, anonymous responses, imported responses, and more.
Imported responses are billable under the new simplified pricing and packaging plans. If your license is on the new pricing plan, you can check your license’s usage with the Interaction Usage Report. If you are on multiple suites, imports are not currently included in the usage report. If you are not on a new plan, imports are not included in your usage report. Contact Account Services if you have questions about your license.
Account Usage shows you how many responses you’ve collected, labeled as “Allowed Responses.” This excludes imported responses because they are considered separate. If you have questions about pricing for imported responses, reach out to your Account Executive.
That's great! Thank you for your feedback!
Thank you for your feedback!