-

Qualtrics Platform -

Customer Journey Optimizer -

XM Discover -

Qualtrics Social Connect
Ask the Experts Tickets Queue
About Ask the Experts Tickets Queue
At our X4 Summit in 2023, we ran Ask the Experts, a feature where we brought some of our top support team members and support team alumni from across the company, and had them answer your most burning Qualtrics questions face-to-face.
We at Qualtrics offer a lot of different products, from Stats iQ, to Employee Engagement, to advanced survey-building. In order to ensure every customer was paired with the specialist best equipped to answer their questions, we designed a close-the-loop program we could use to assign tickets to experts, and then alert customers when it was time to come over.

This page explains how to build every step of this close-the-loop process, from the survey where tickets are submitted, to the proper assignment of tickets, to automated emails following up on customer satisfaction.
Building a Check-In Survey
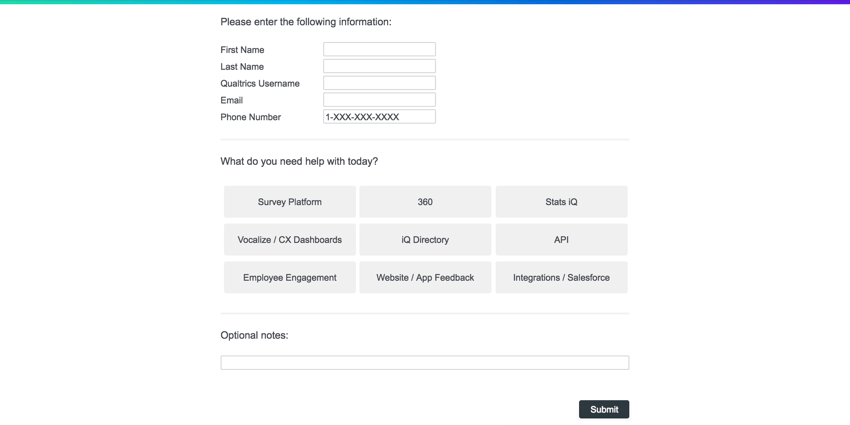
At Ask the Experts, we had two check-in desks where volunteers filled out a short survey that would enter our customers into the queue where Experts picked up tickets. Filling out this form would add vital information to tickets so Experts knew who they were helping, and for what subject matter. This section explains the process of customizing that survey’s questions.
Questions to Include
This survey should be as short as possible, so it’s important to only ask for the most relevant information.
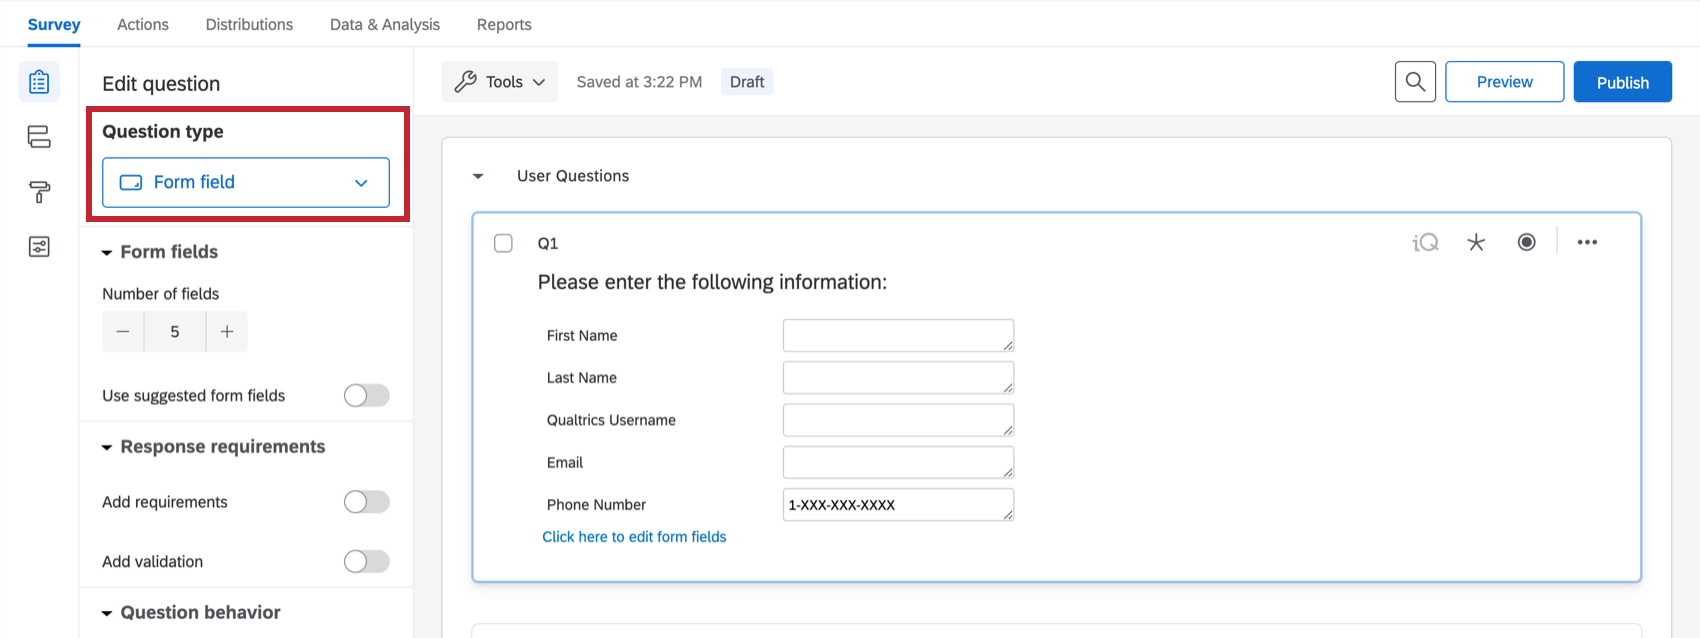
- A form field question requesting the customer’s name, email address, phone number, and Qualtrics username.
- A multiple choice question asking what product the customer needs help with.
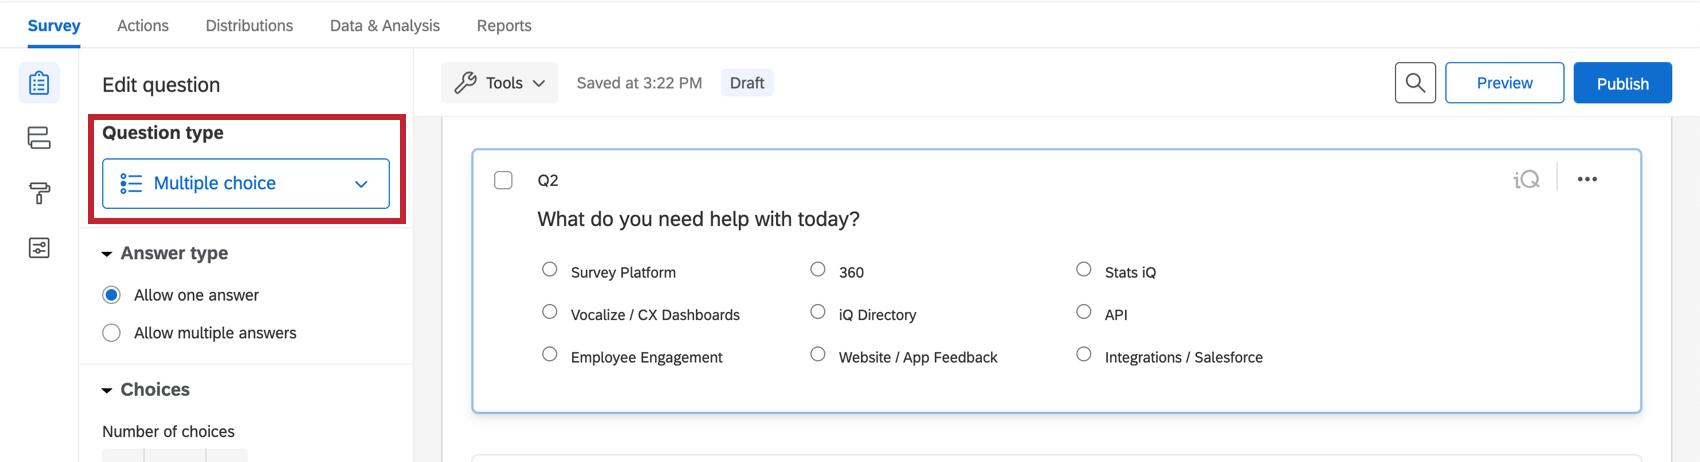 Qtip: After we build our tickets and queues, this question will ensure the customer is assigned to an expert who is specialized in that particular product.
 - A text entry question for additional comments.
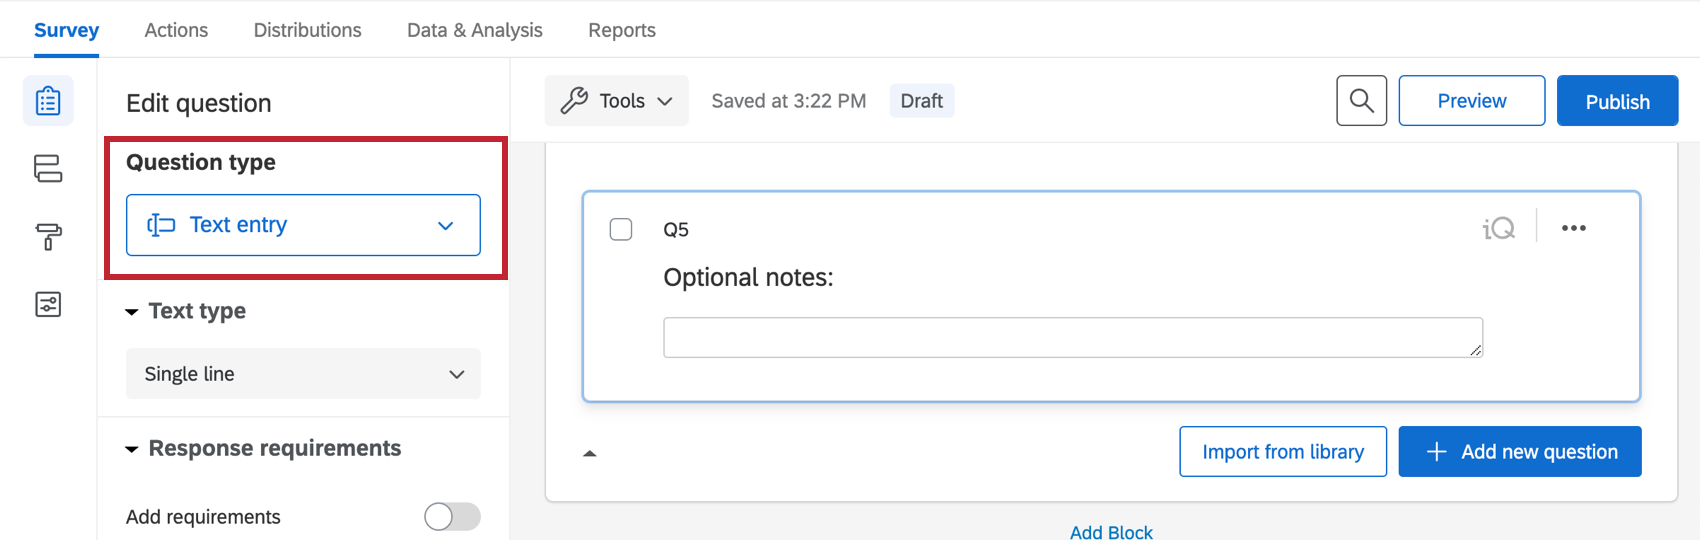 Qtip: This can be used to notify experts of time constraints, customer pain, and any other specifics that may help with the consultation.
Question Validation / Response Requirements
Adding validation to your questions can ensure text is entered in the correct format, and that particularly important questions aren’t skipped.
- Add force response to questions the person responsible for check-in should never skip.
- Add Valid Email Address custom validation to questions requesting this information.
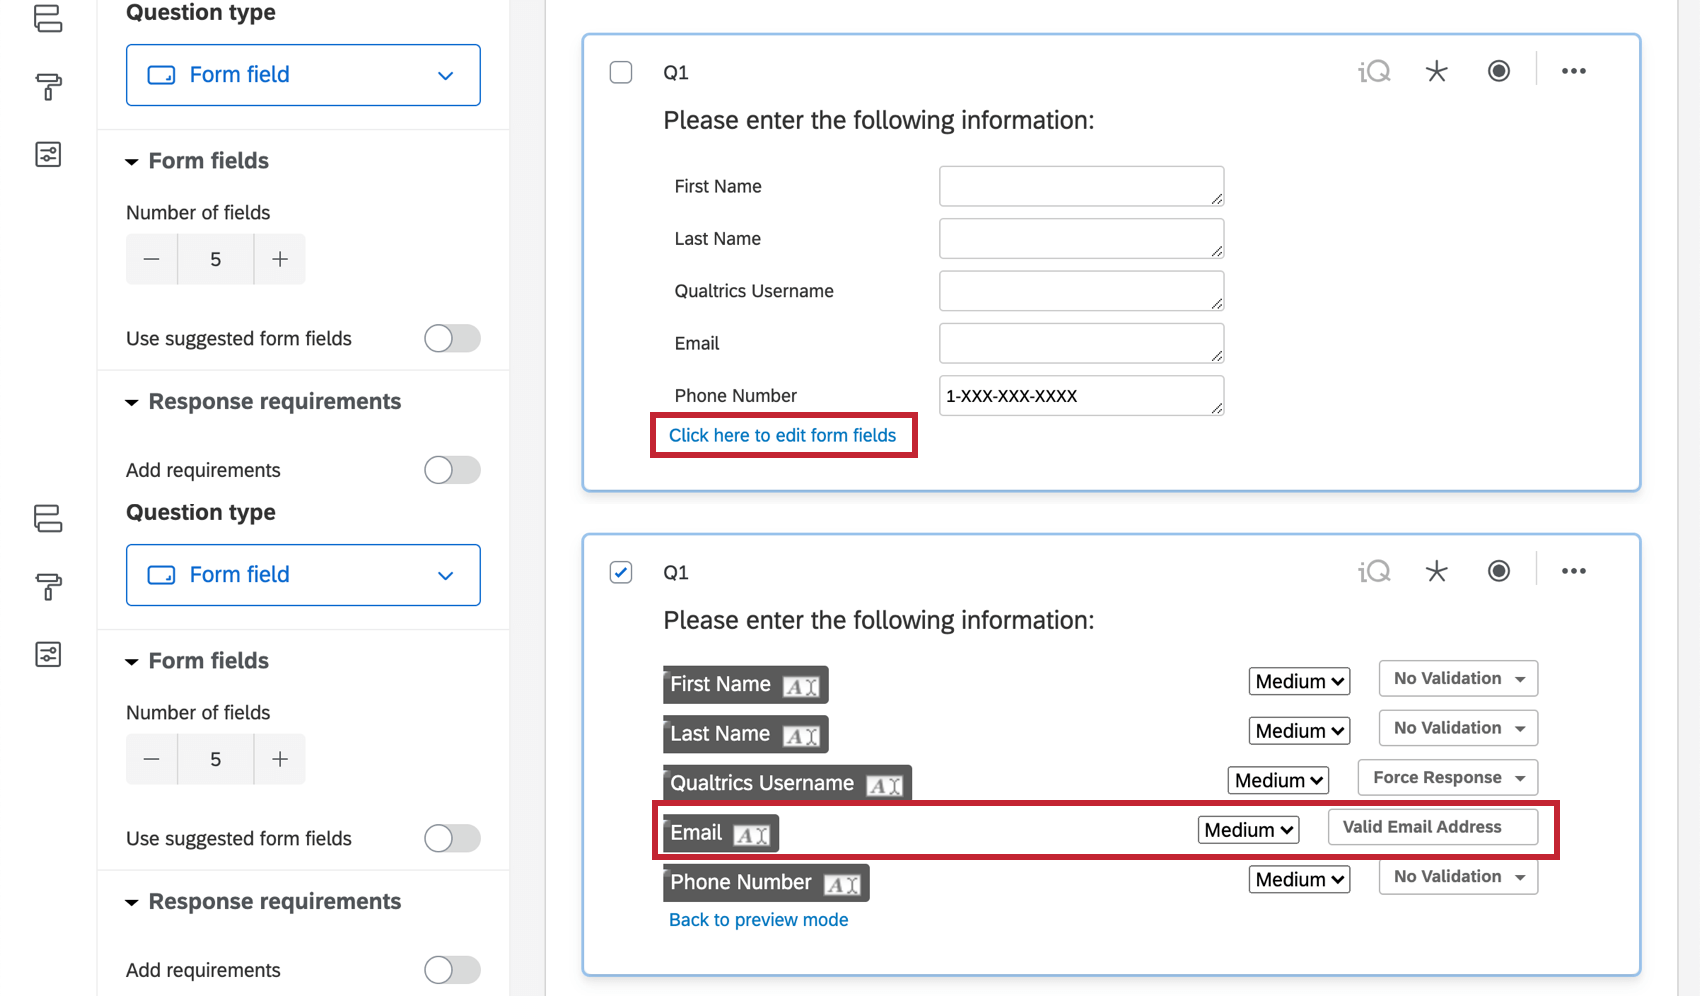
- Set the Phone Number field so that it must match a US Phone Number’s format.
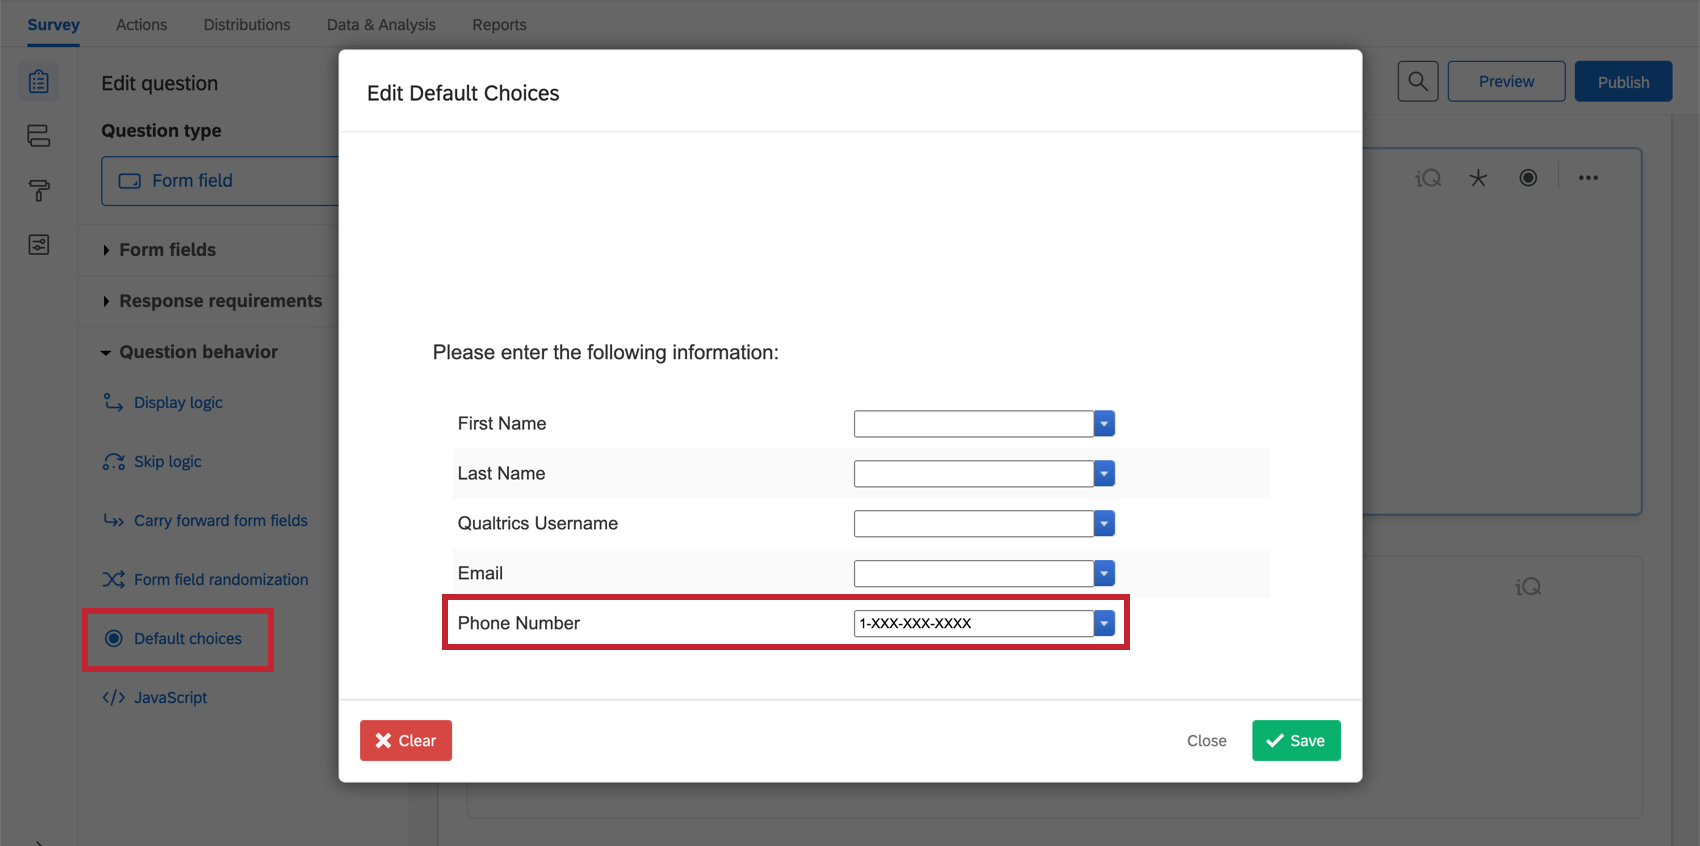
Qtip: Instead of custom validation, you can use default choices to show your volunteers what format the answers should take. For example, US numbers are usually in 1-XXX-XXX-XXXX format, country code and area code both included.
Questions to Exclude
In order to keep the survey streamlined, there are also questions you shouldn’t ask.
- Superfluous details answered by the other fields. For example, your company may not need to ask for both username and email if they are supposed to always be the same.
- Satisfaction questions. These may annoy the customer into giving lower scores if you are slowing down their path to support.
Qtip: This support page will also go over how to trigger CSAT emails and the like after the ticket has been resolved.
- Questions targeting uncommon scenarios. You can cover all exceptions and edge cases with the inclusion of an “Additional Notes” Text Entry question.
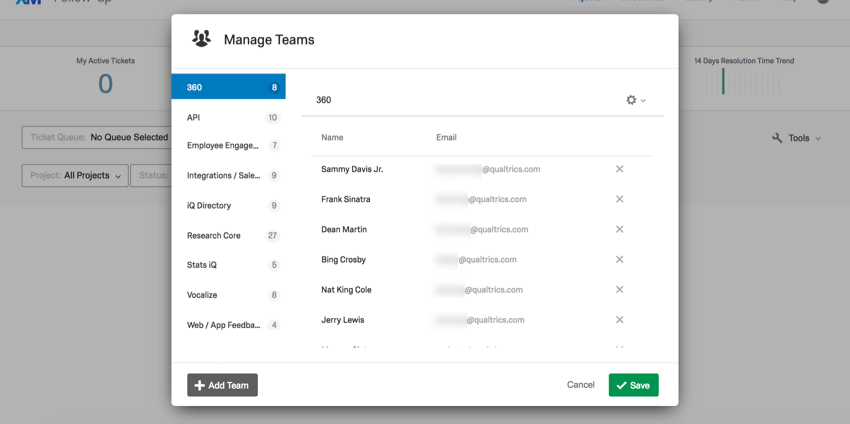
Creating Ticket Teams
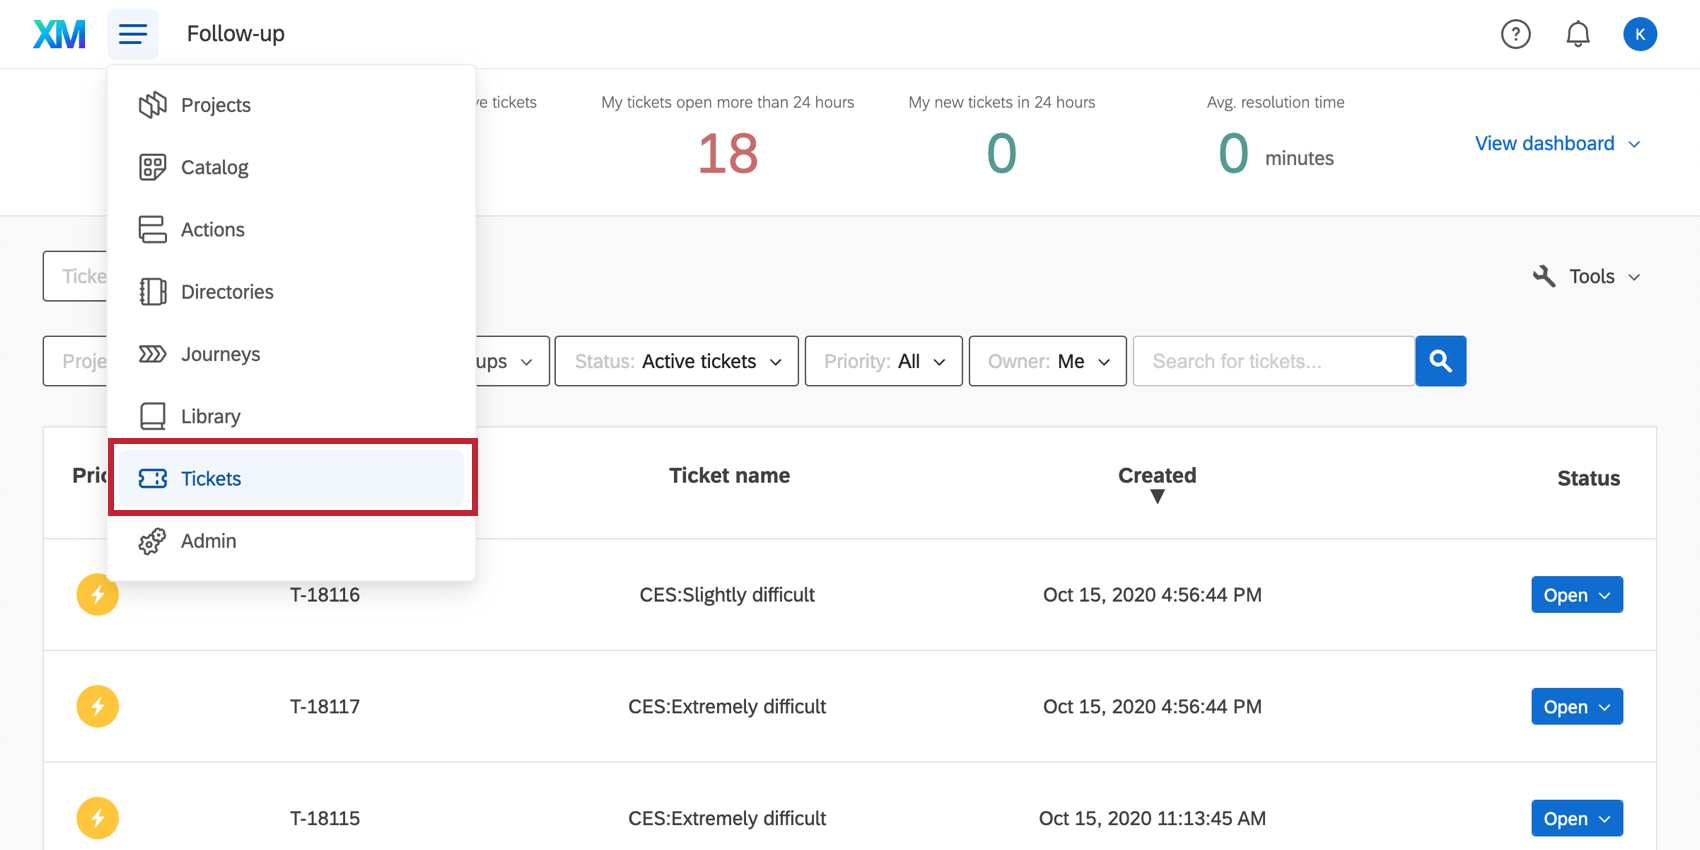
Let’s leave our survey for a second and head over to Tickets.
To ensure tickets are going to the right experts, we need to make sure Qualtrics knows who is specialized in what. A great way to do this is to create a different team for each product, and add the appropriate users to those teams. For X4 in 2019, we offered coverage for 9 different products: Survey projects, 360, Stats iQ, Employee Engagement, XM Directory, CX Dashboards (Vocalize), API, Extensions, and Website / App Feedback.
Setting Up Tickets
Now that we have our Ticket Teams, it’s time to decide how tickets are created and get them to the right teams! Below, we will explain the conditions you need for each ticket, and how to format them.
Remember, in our example, tickets are assigned based on the product an expert is specialized in. You will repeat the steps below for as many ticket teams exist, meaning this example would require you to set up 9 workflows.
- Go to the Workflows tab of your check-in survey.
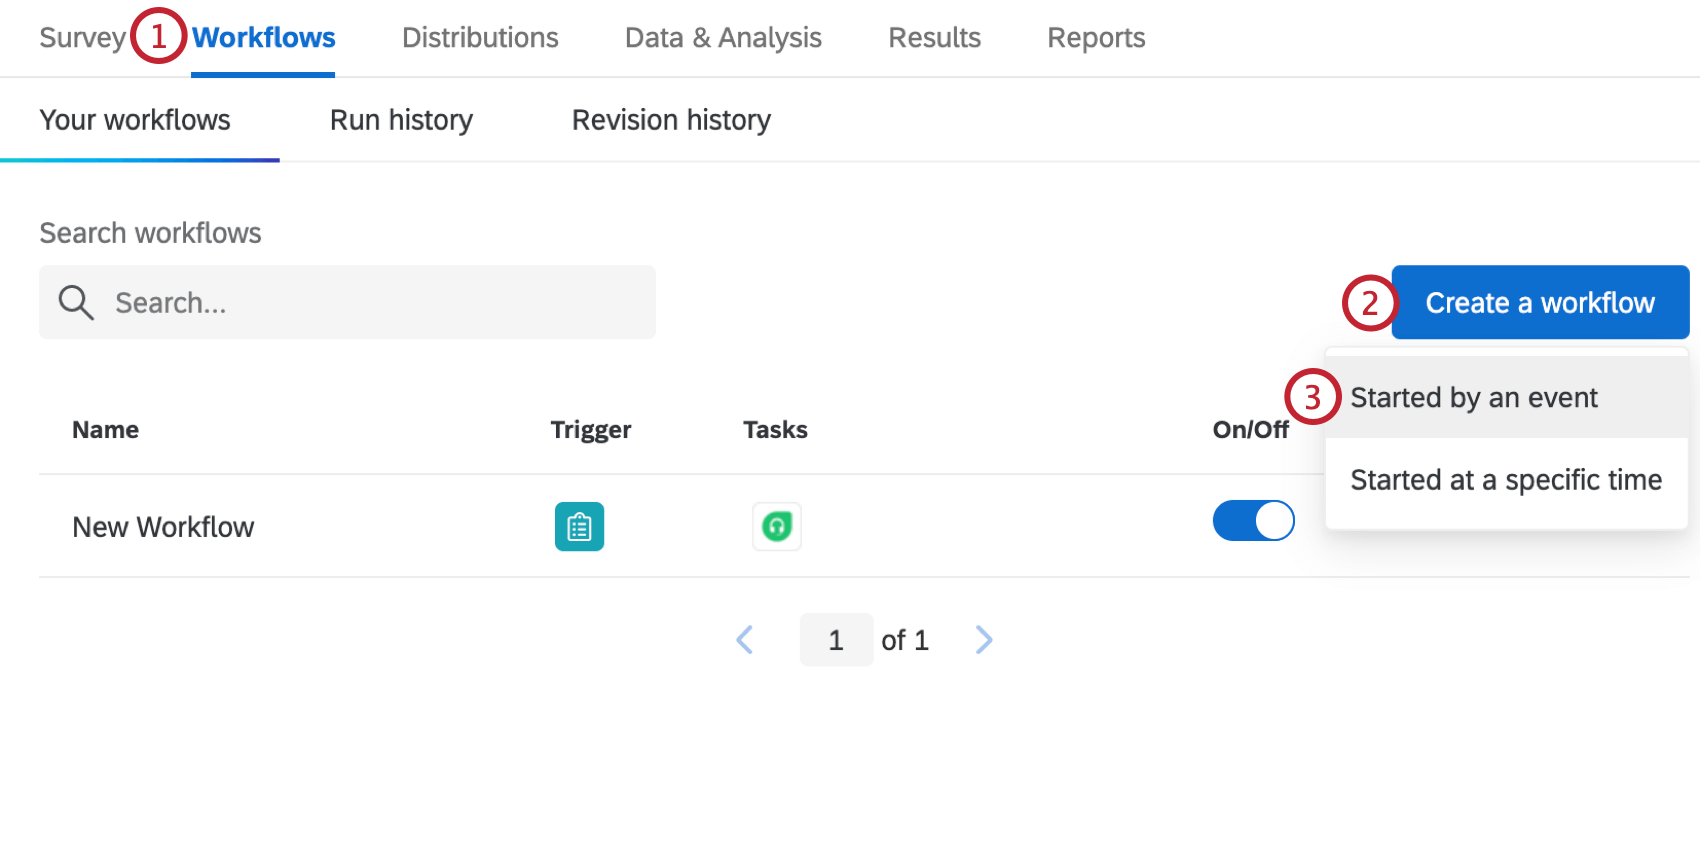
- Click Create a workflow.
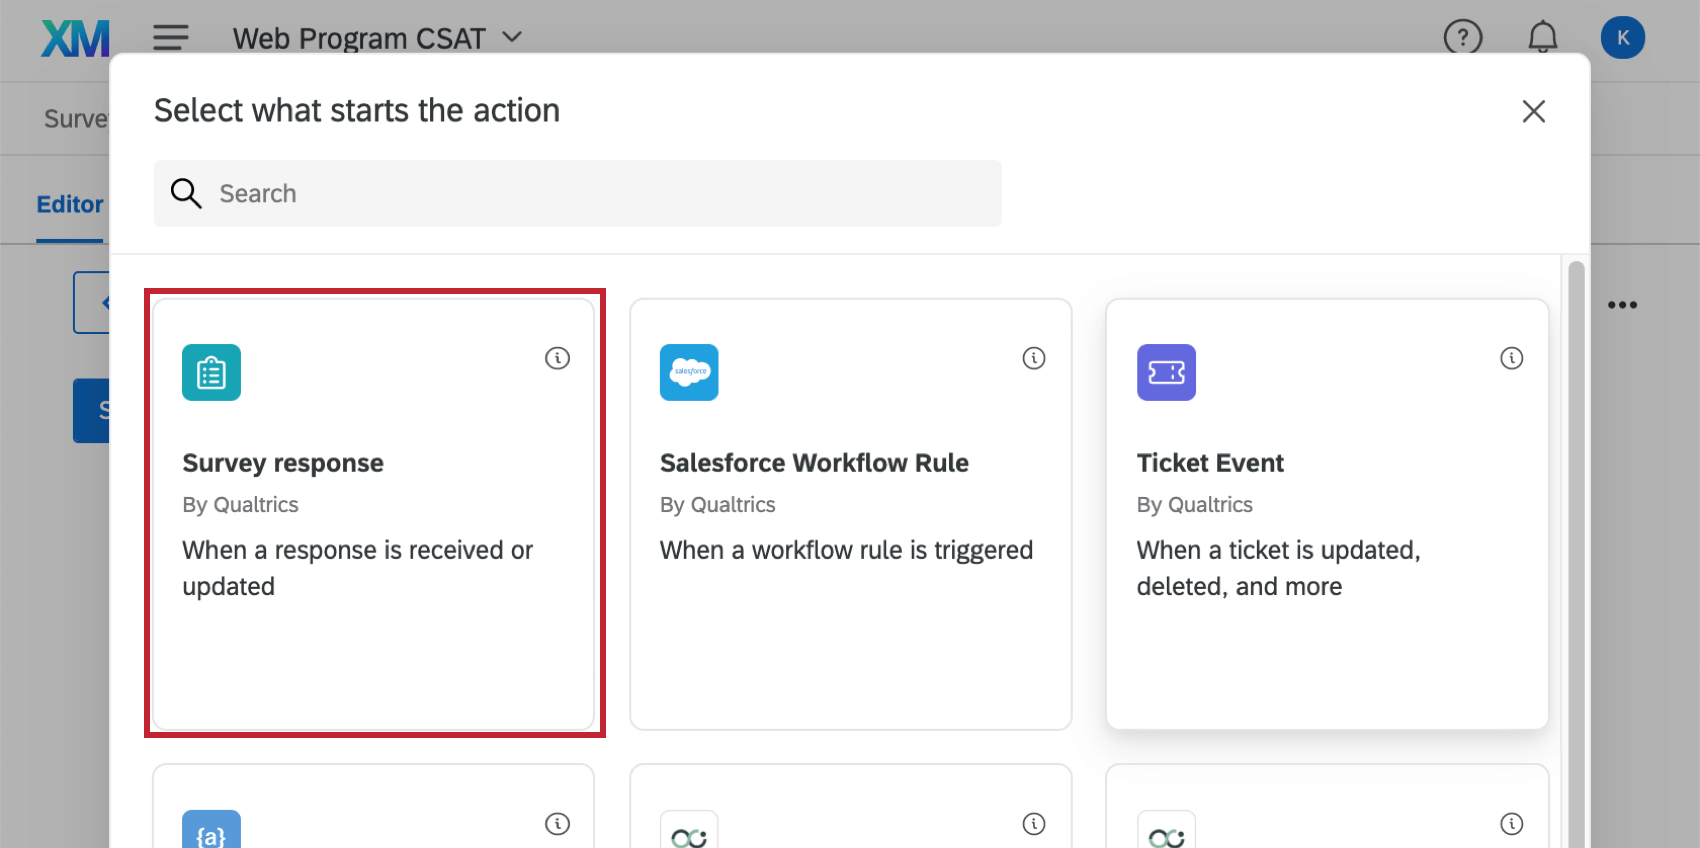
- Select Started by an event.
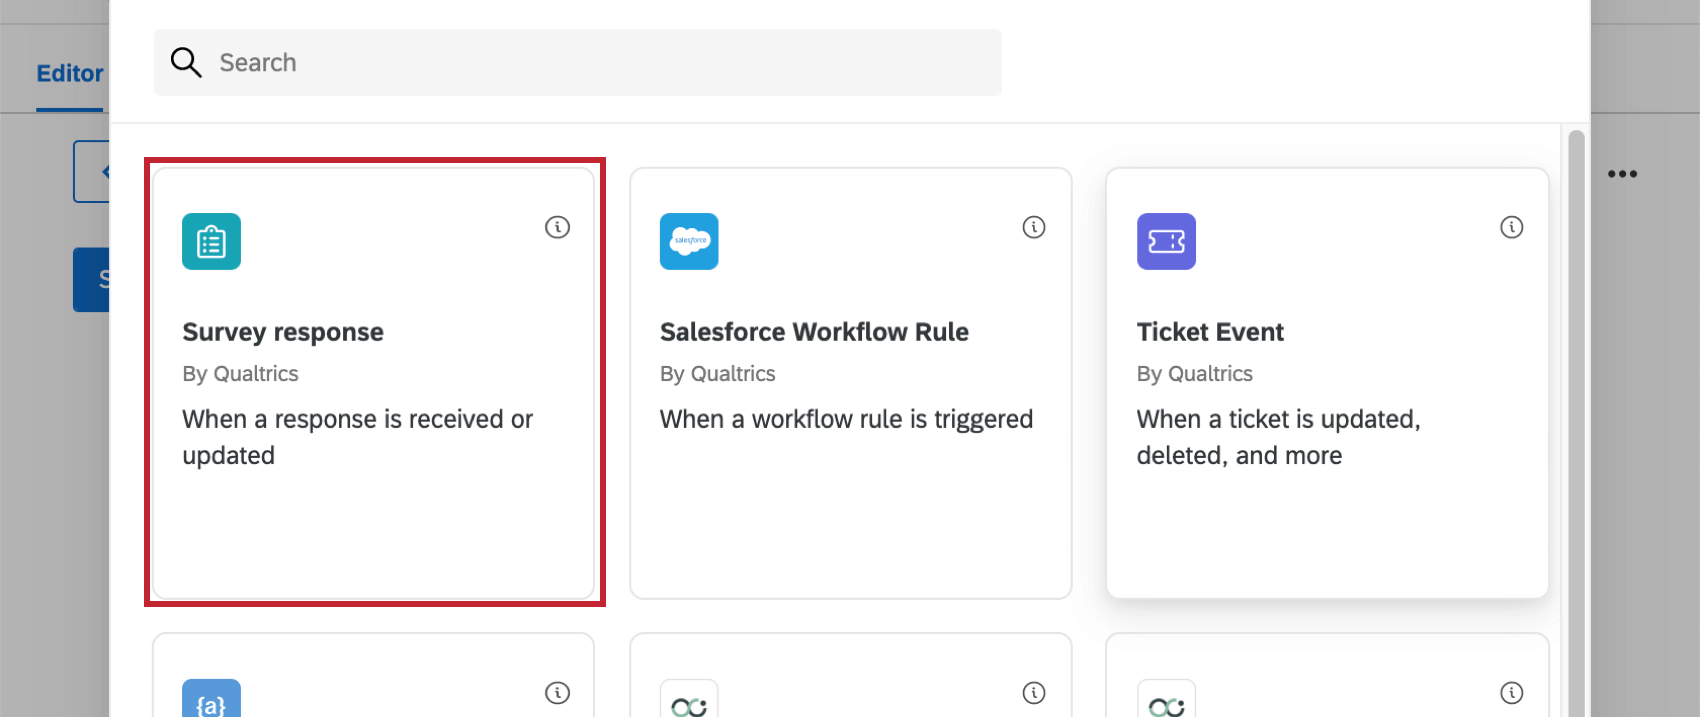
- Select the Survey Response event.
- Choose the types of responses that you want to trigger the workflow. See types of survey response events for more information about these options. Most of the time, you’ll choose Newly created responses.
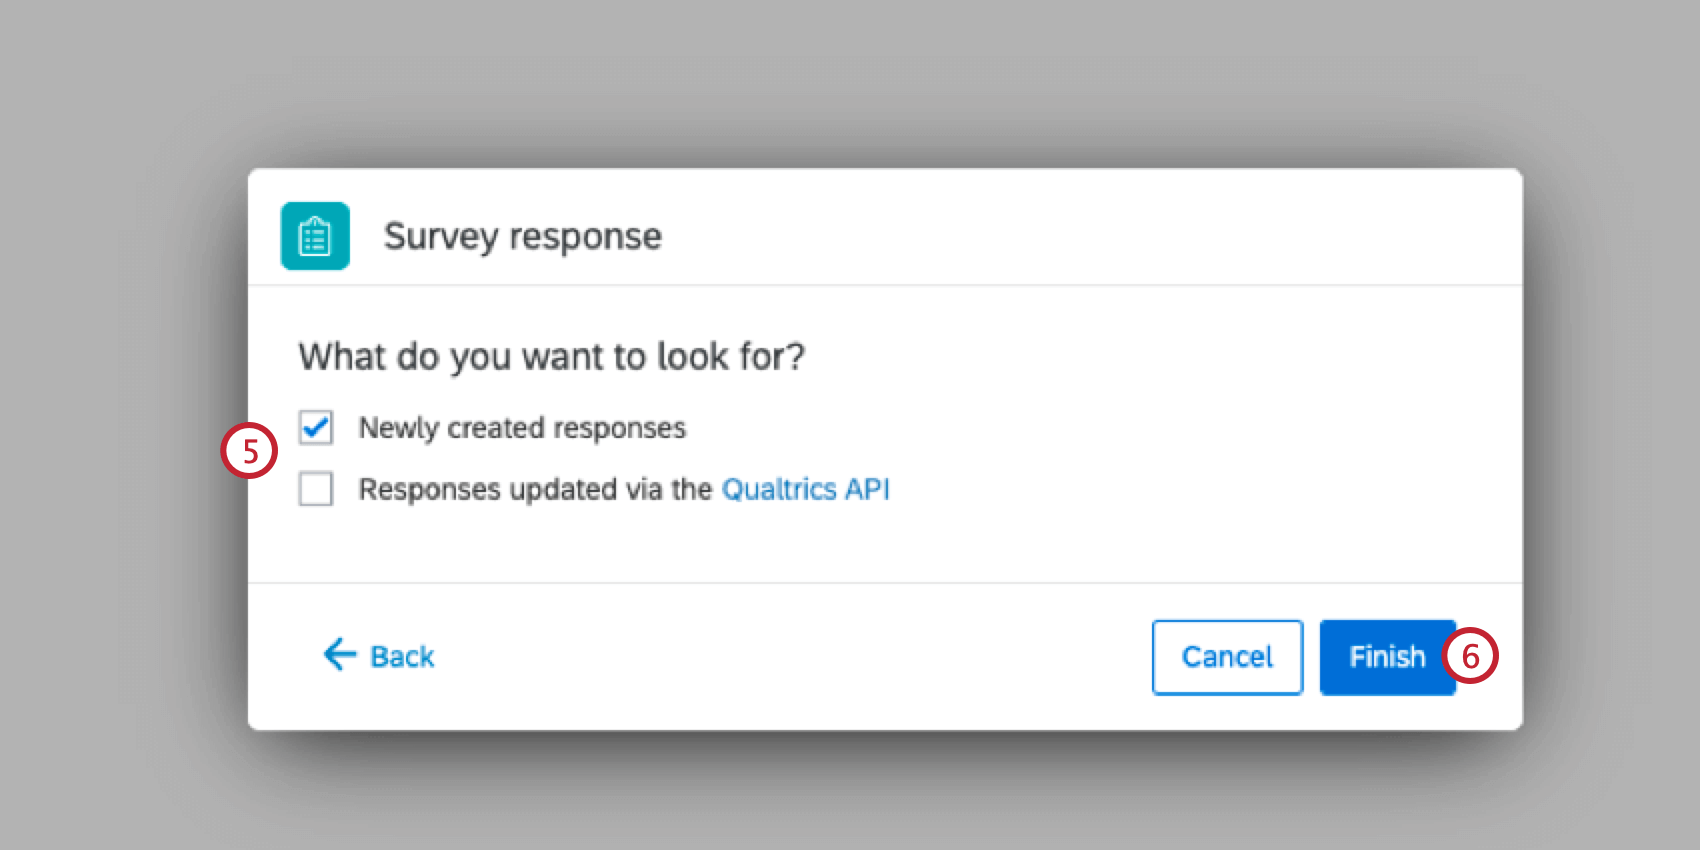
- Click Finish.
- Name your workflow according to the team it’s for.
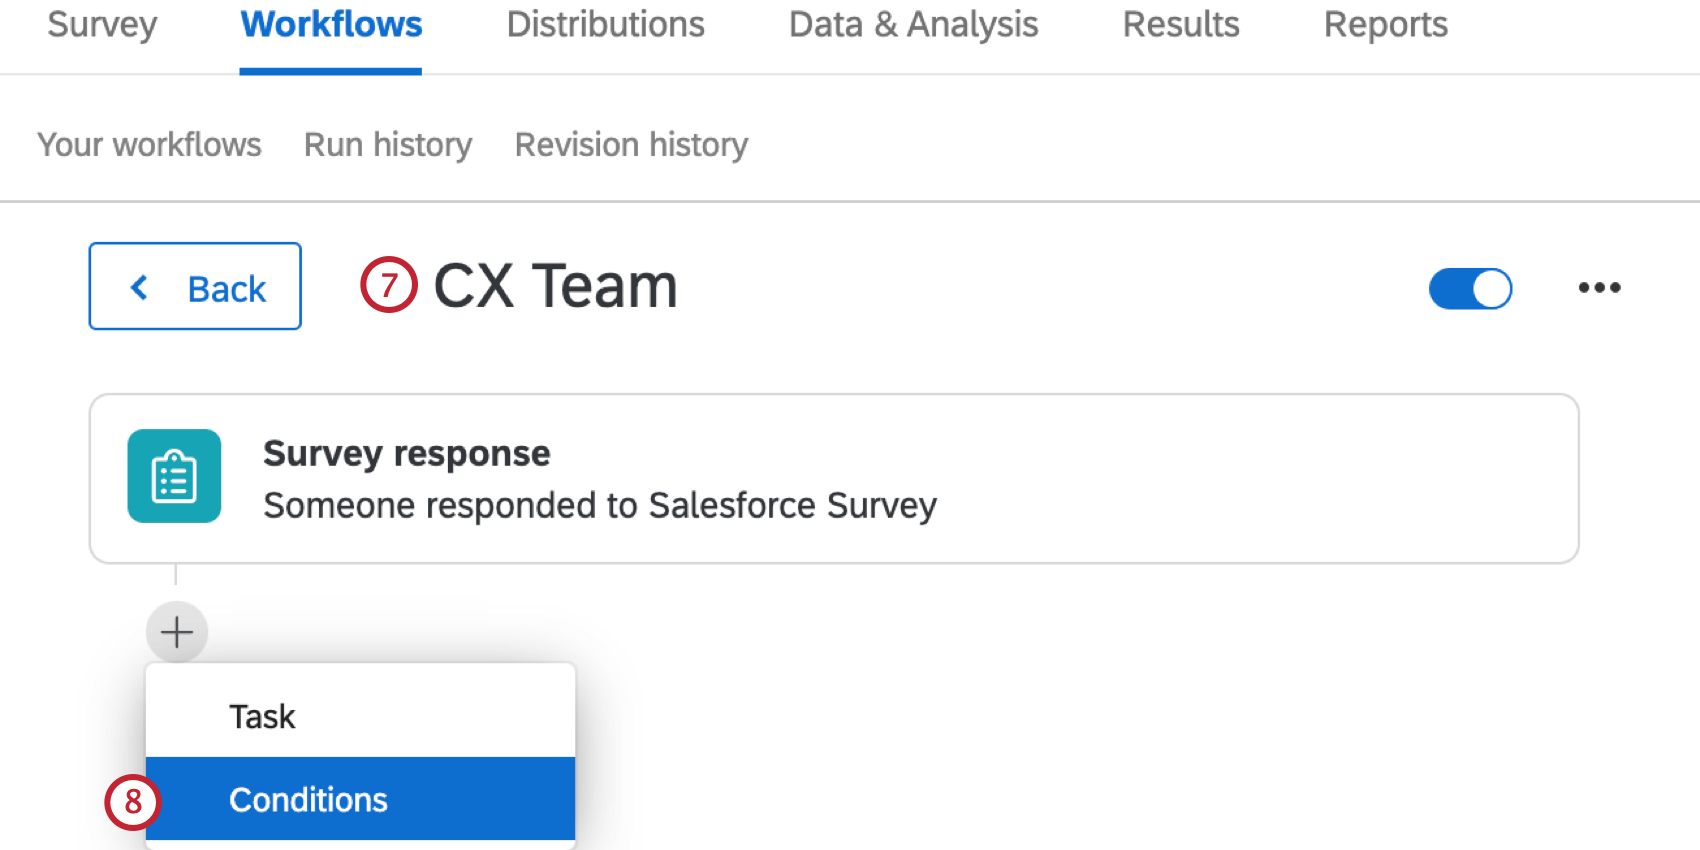
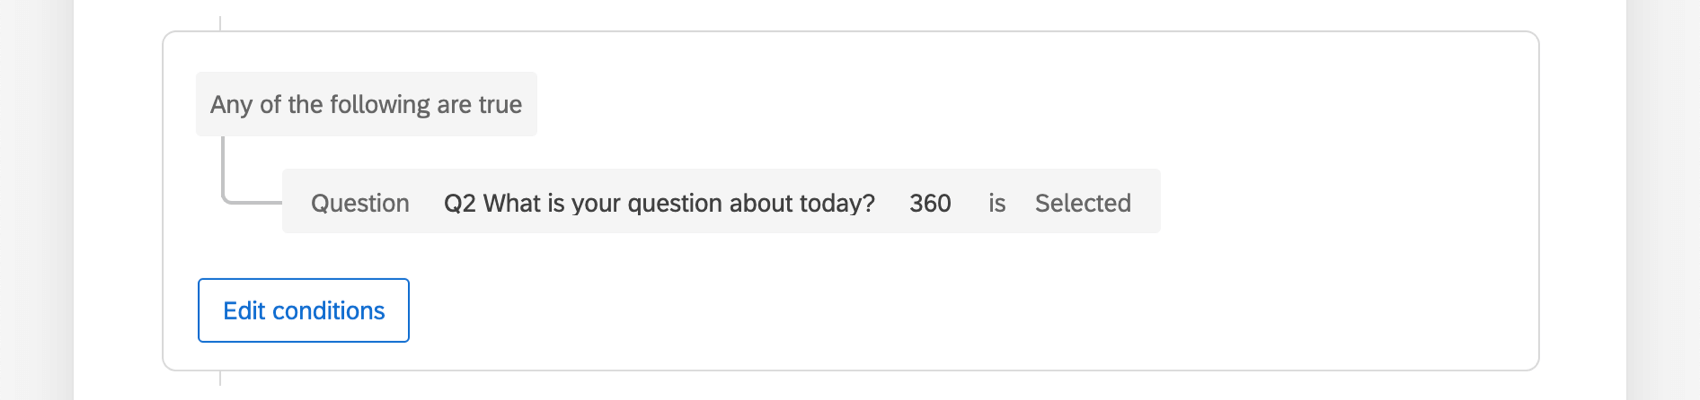
- Set a condition.
Example: This ticket determines what product the customer needs help with, so the condition is based on the question in the check-in survey where the product is specified. For our workflow named 360, that means the condition is, “What product do you need help with?” “360” is “Selected.”
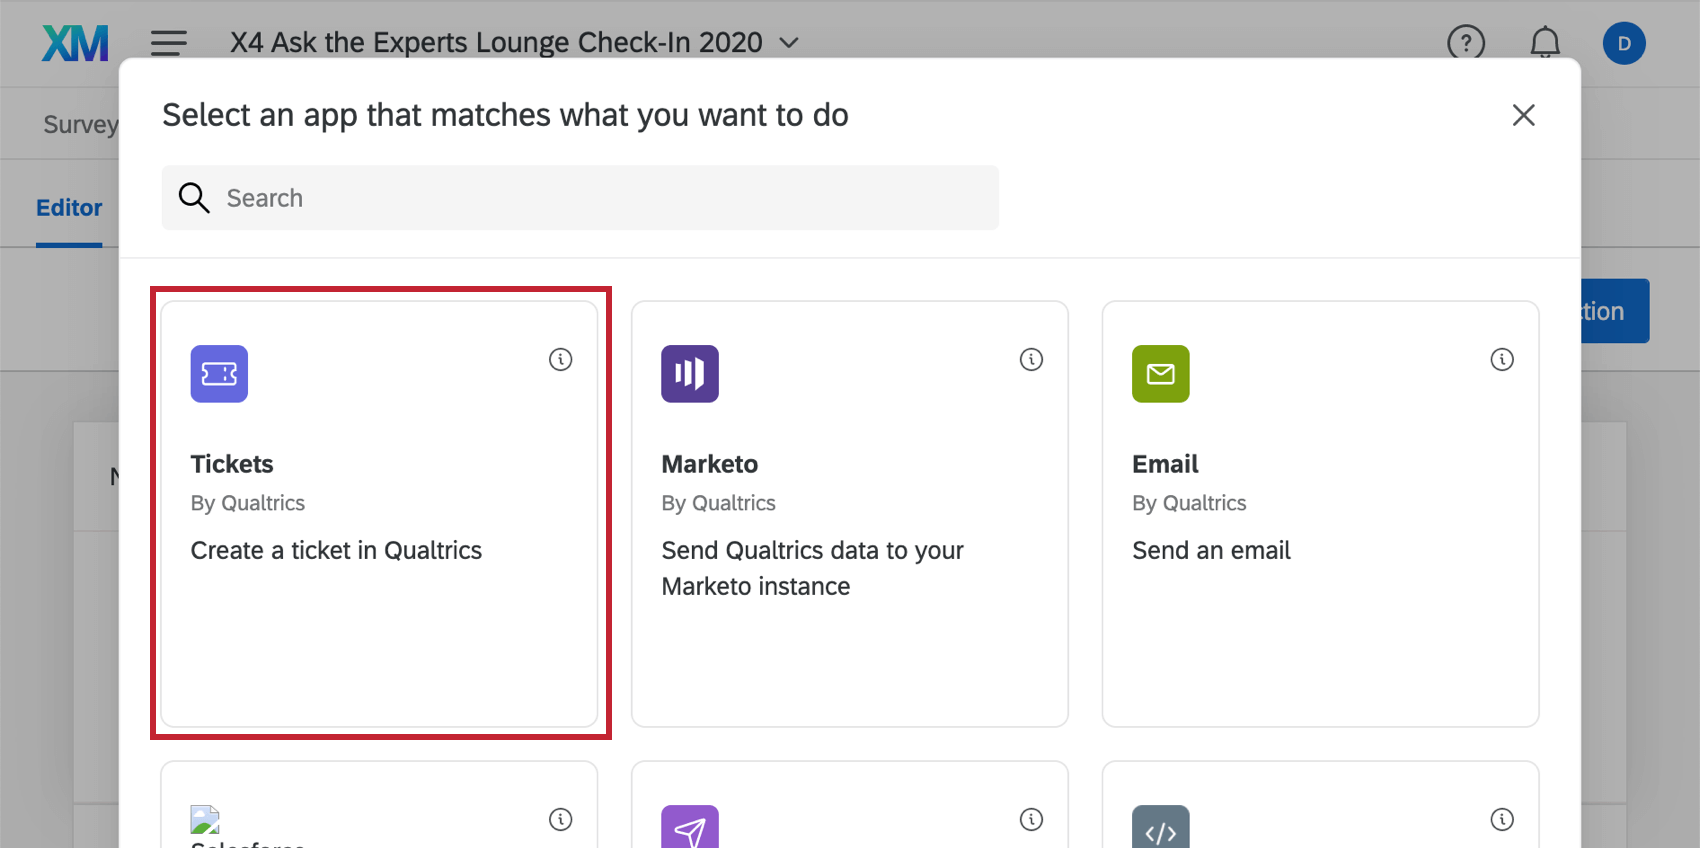
- Click Add Task.
- Select Tickets.
- Give the ticket a name format.
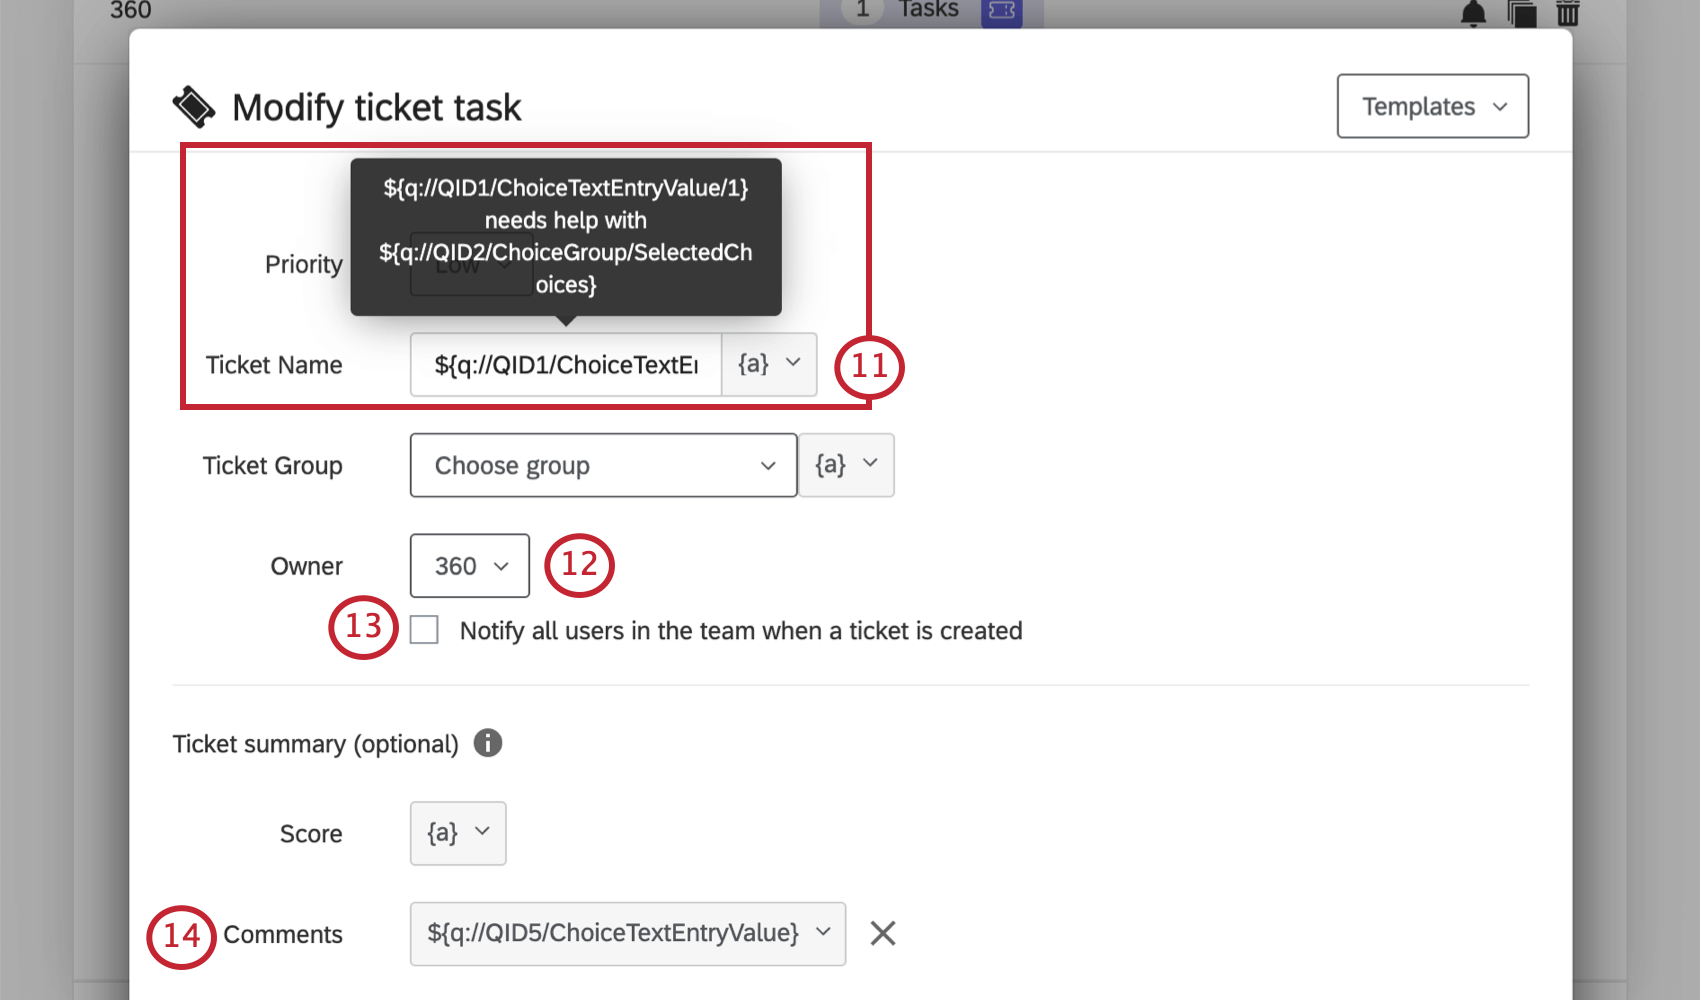 Example: We chose to make the ticket title “[Customer Name] needs your help with [Selected Product].” We did this using the {a} button to pipe in the customer’s first name and the product they said they needed help with.
 - Select an owner. This should be the same team mentioned in the ticket’s name and in its condition. Here, it’s 360.
Qtip: You may need to type a team’s name and press Enter on your keyboard before it appears in the dropdown.
- Make sure Notify all users in the team when a ticket is created is NOT selected. Otherwise, an email will go to every member of that team every time a ticket is created.
- Under Comments, select the catch-all text entry question (“Optional Notes”) you created in the check-in survey.
- Now it’s time to set up some ticket data. This is information you collected in the check-in survey that you think will help your experts resolve their client’s issue, such as the customer’s name, username, and contact information. Use the box to the left to name the field, and the dropdown on the right to select the corresponding field in the survey.
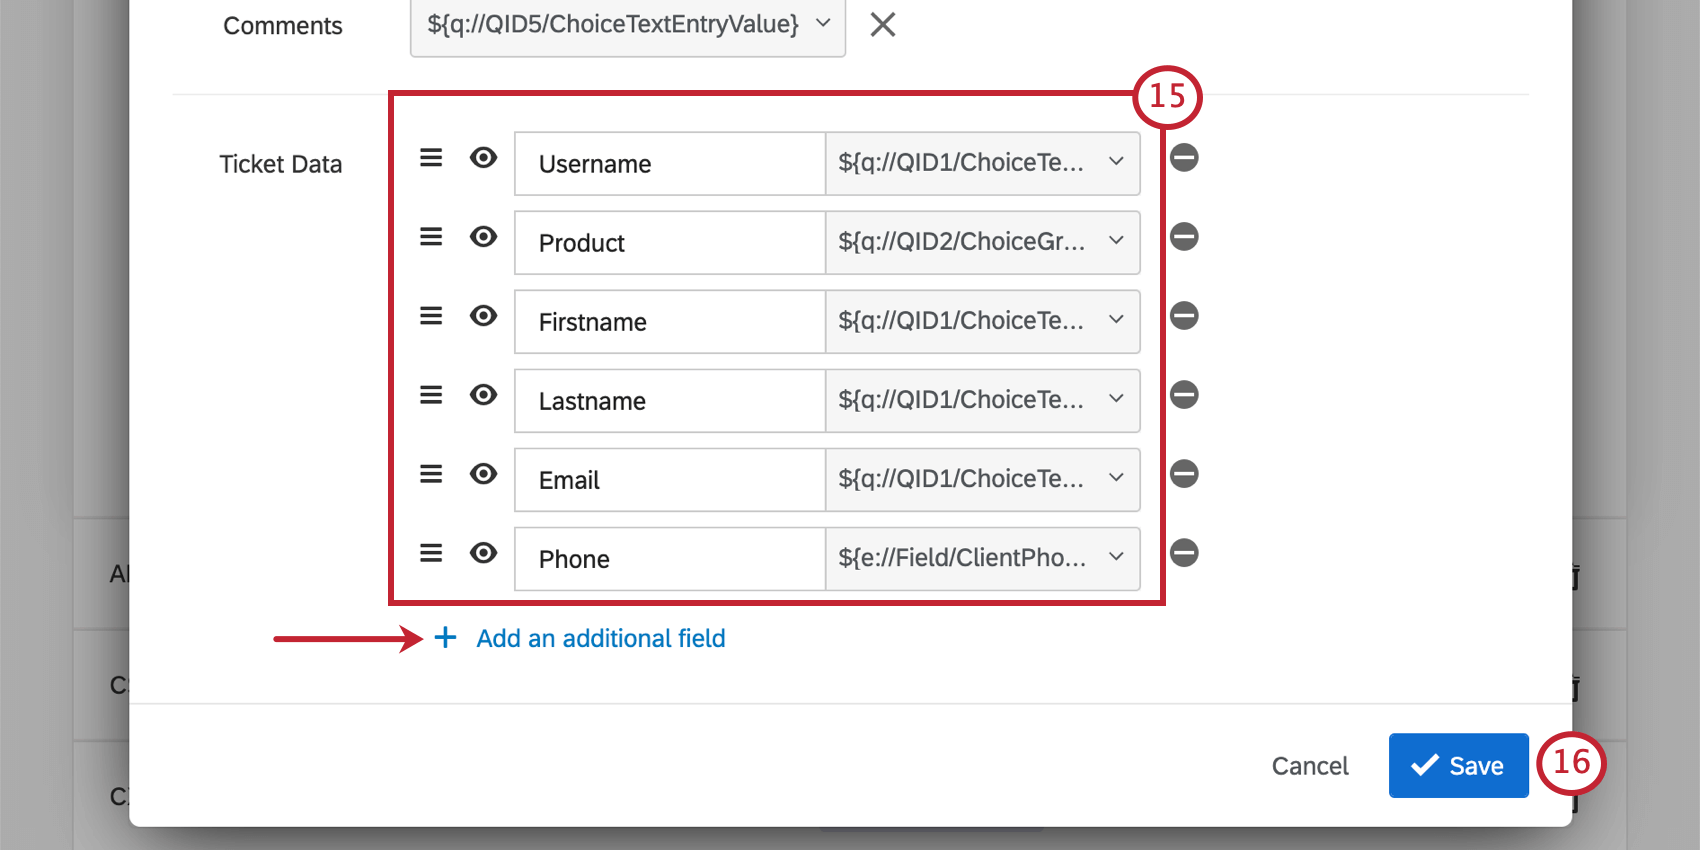 Qtip: Take note of what ticket data you use here, and how these fields are spelled and capitalized. You will be using them later on the page!Qtip: You can move ticket data, so don’t worry about adding it in the correct order. See Using Ticket Data for more on moving ticket data and the order it will appear in when it becomes live.
 - Click Save.
Creating Ticket Queues
Now that we have teams and tickets set up, it’s time to create queues. Queues allow the experts to take tickets they’re specialized in with the simple click of a button.
Just as you made a team for each product, you have to make a queue for each team. For our example, you would repeat these steps 9 times.
- Go to Tickets.
- Click Tools.
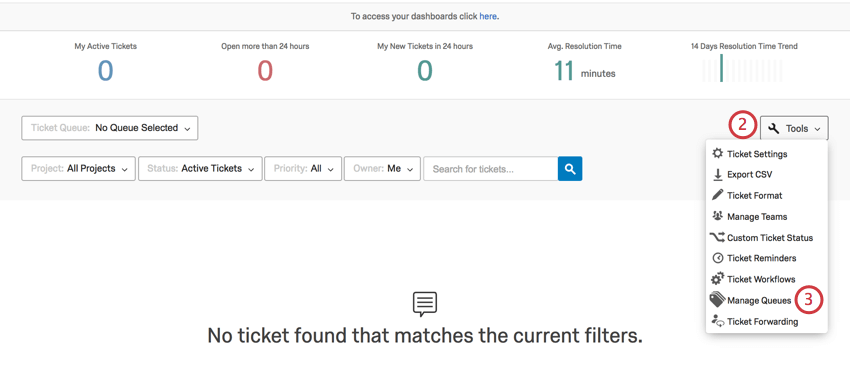
- Select Manage Queues.
- Click Add Ticket Queue.
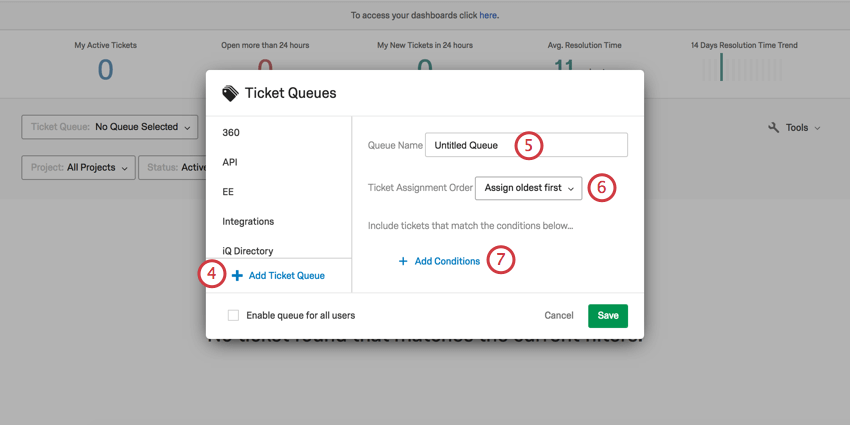
- Name your queue after the team it’s for. In this example, the queue is 360.
- Select Assign oldest first.
- Click Add Conditions.
- Set the first condition so that the Team must be the one matching the queue’s name. In this example, it’s 360.
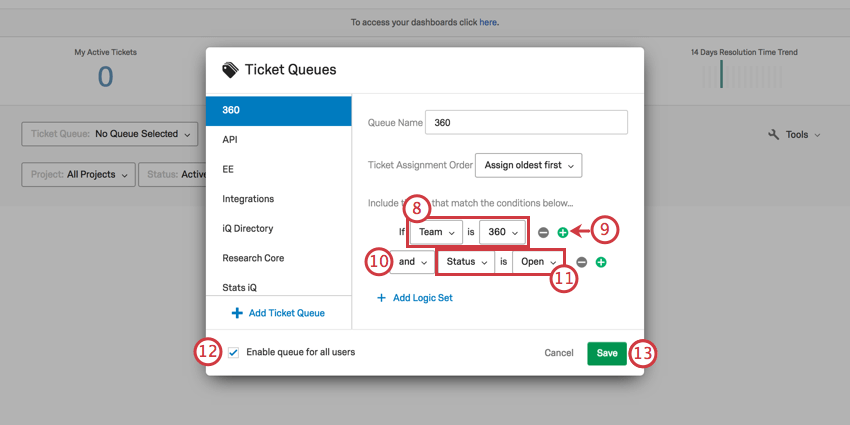
- Click the plus sign ( + ).
- Make sure the conjunction is and.
- Set the second condition so that the Status must be Open.
- Select Enable queue for all users.
- Click Save.

Alerting Customers Through Text & Email
At Ask the Experts, we encouraged customers not to wander too far from our area after they submitted their ticket. But given the sights and attractions at X4, it was reasonable to expect they might still step away. To make sure customers knew when we were ready to help them, we made sure they got a text the moment an expert took their ticket, including the name of the expert in the text.
Text Alerts
- Go to the Workflows tab of your check-in survey.
- Click Create a workflow.
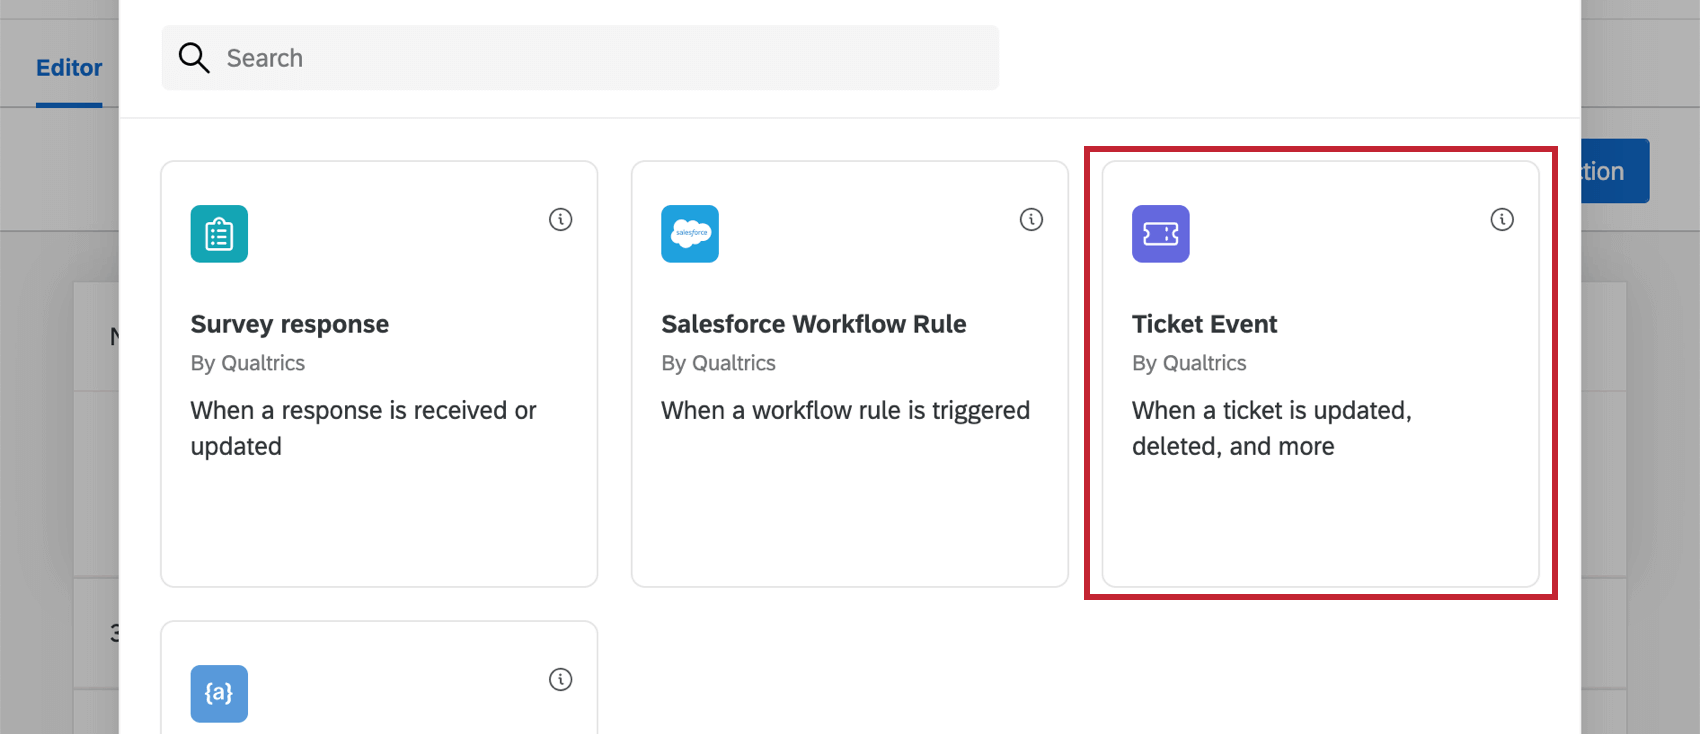
- Choose Started by an event.
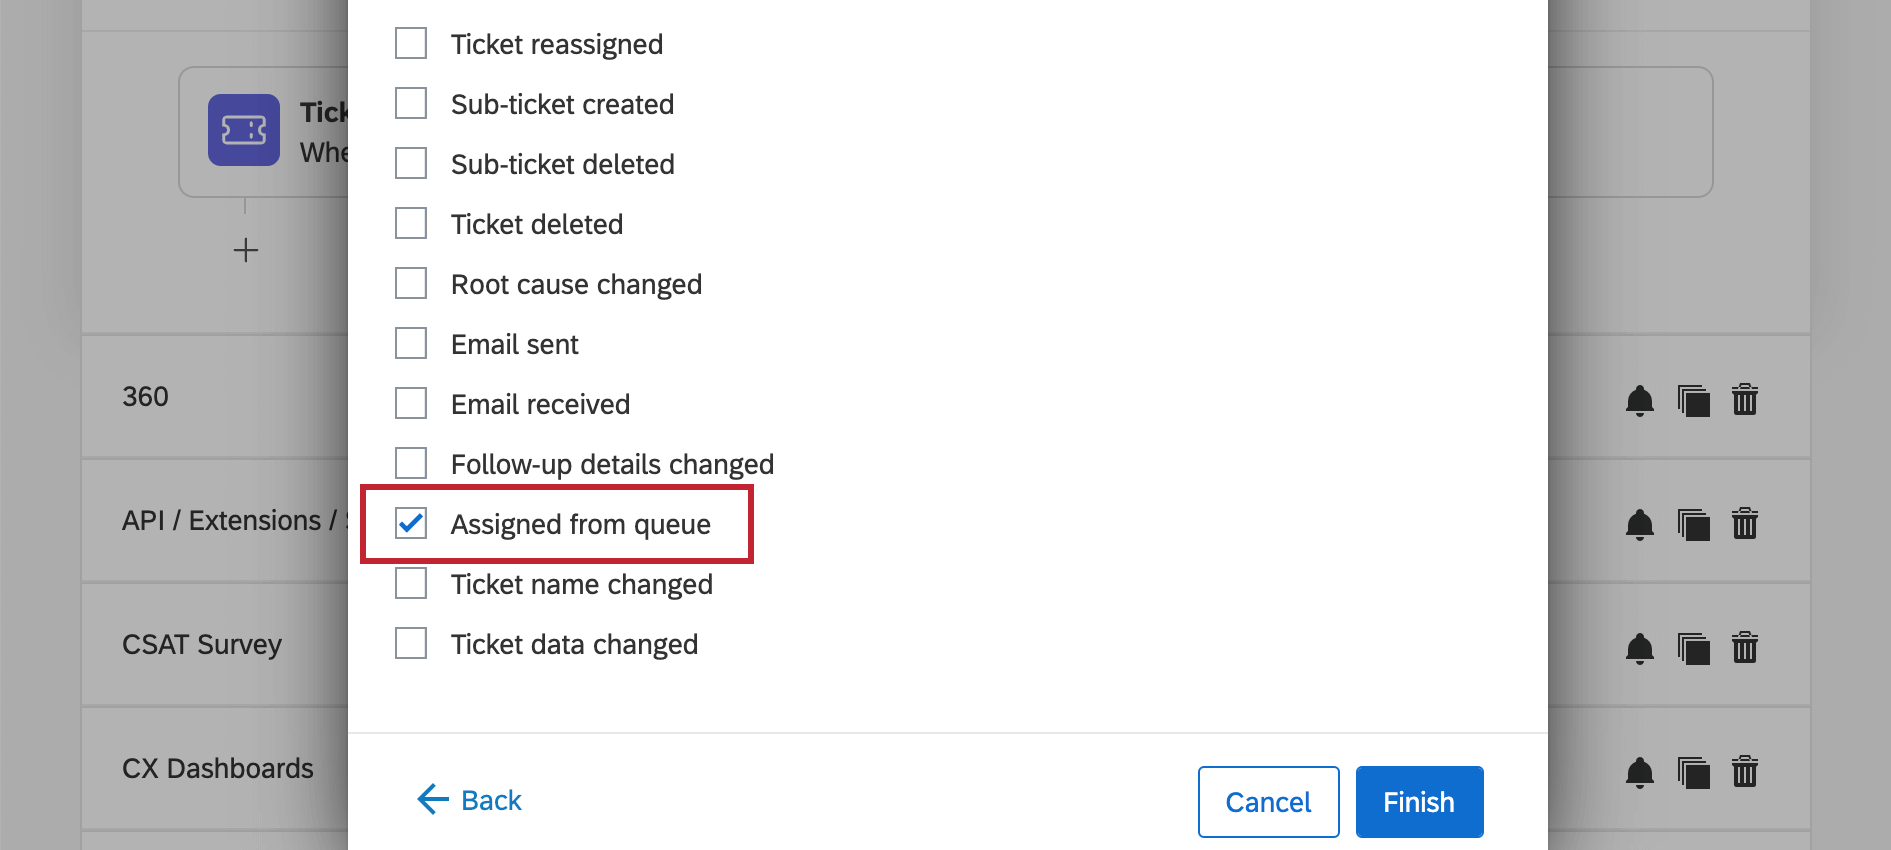
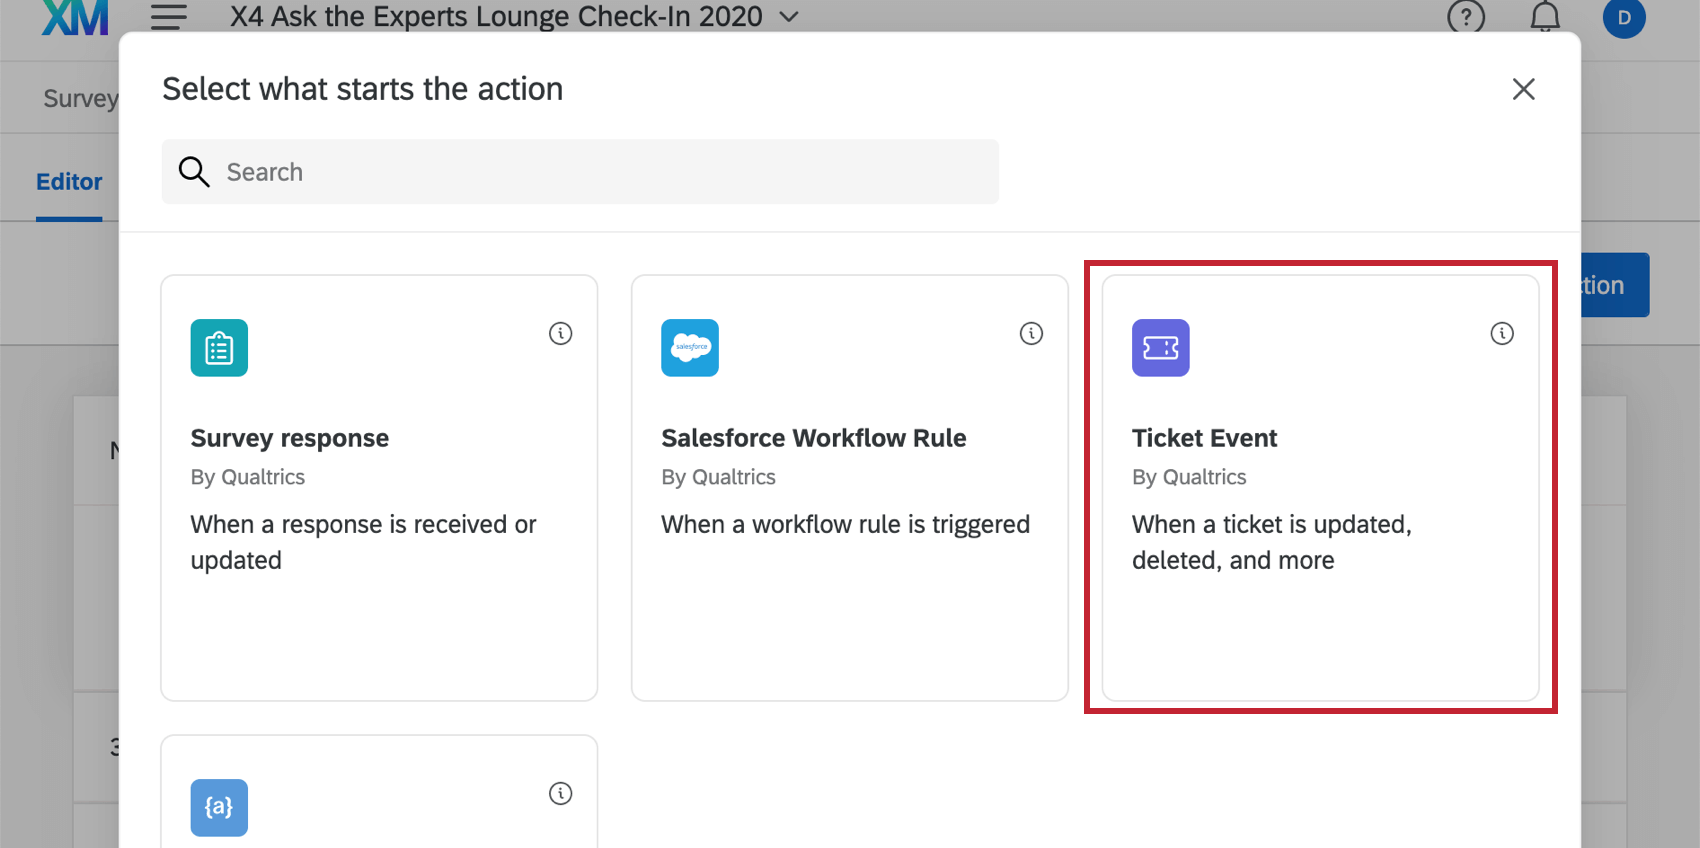
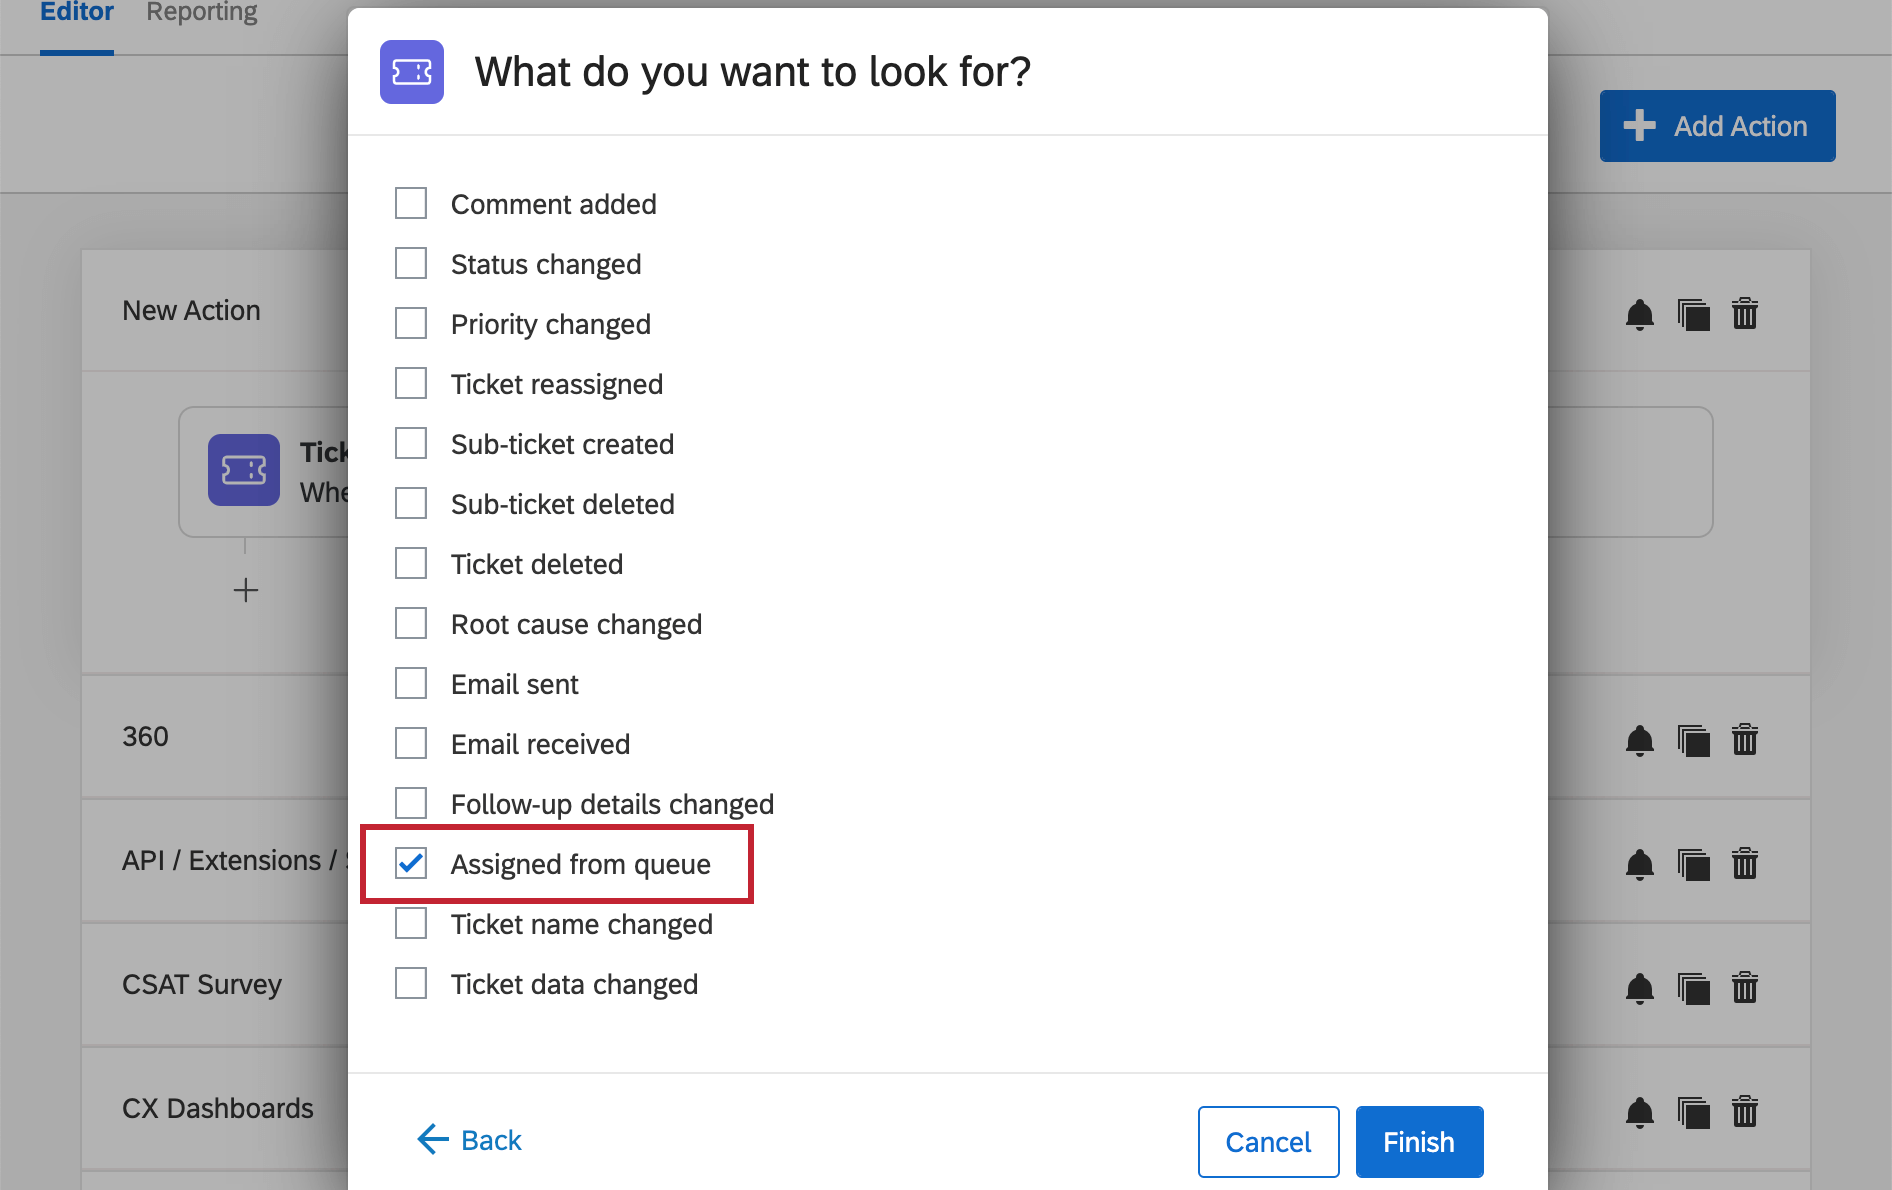
- Set the event to Ticket Event.
- Select Assigned from Queue.
- Name your workflow so you know it’s for text notifications.
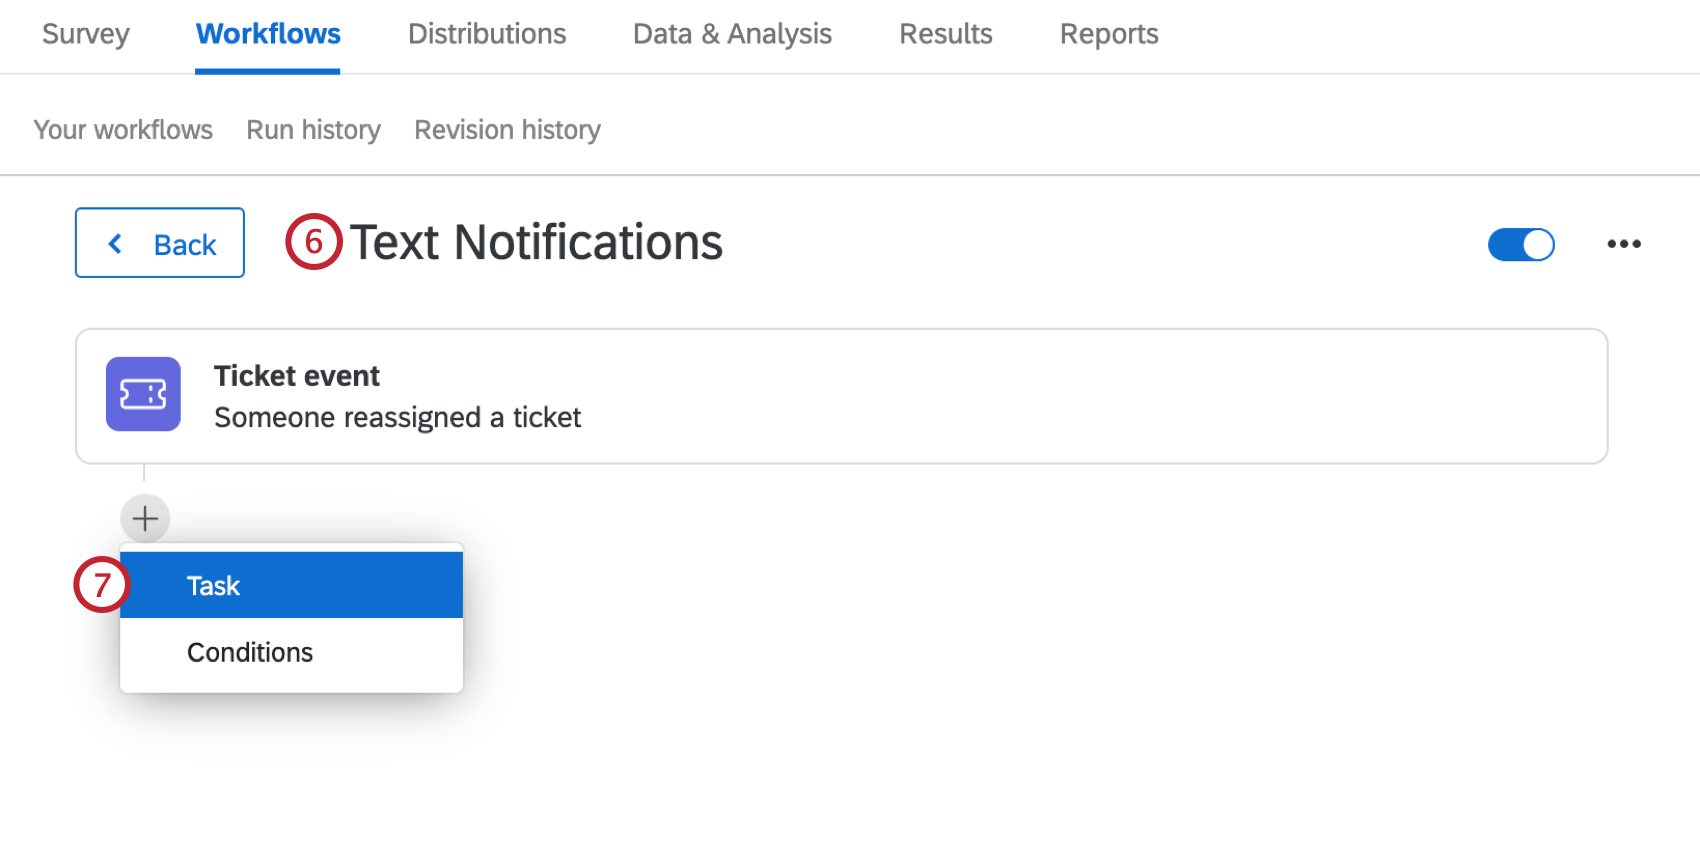
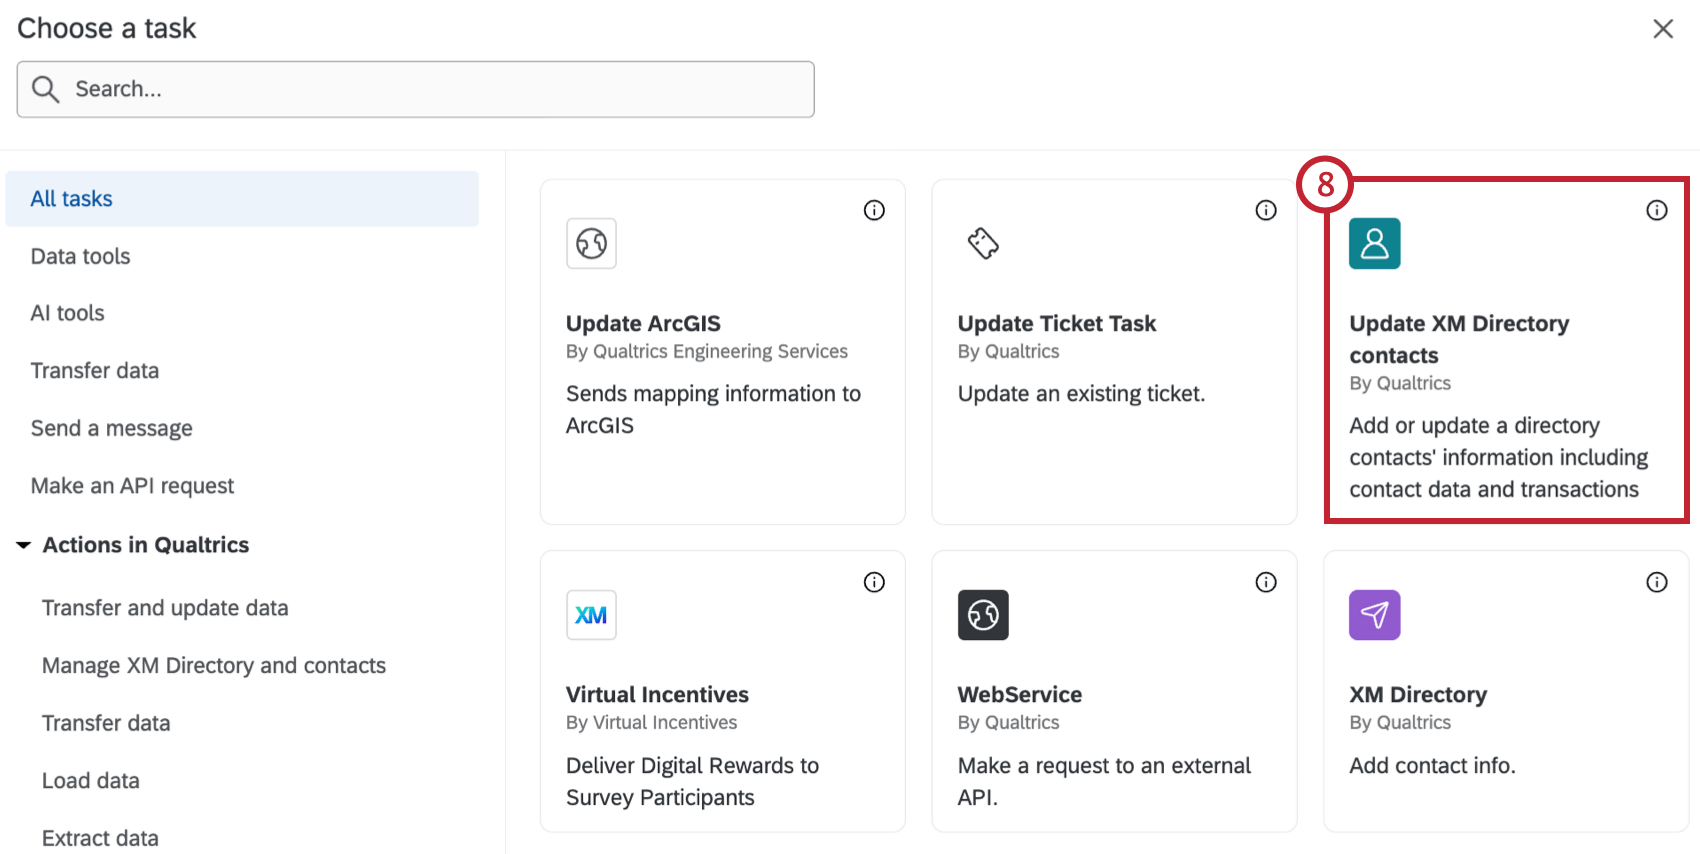
- Add a task.
- Select Update XM Directory contacts.
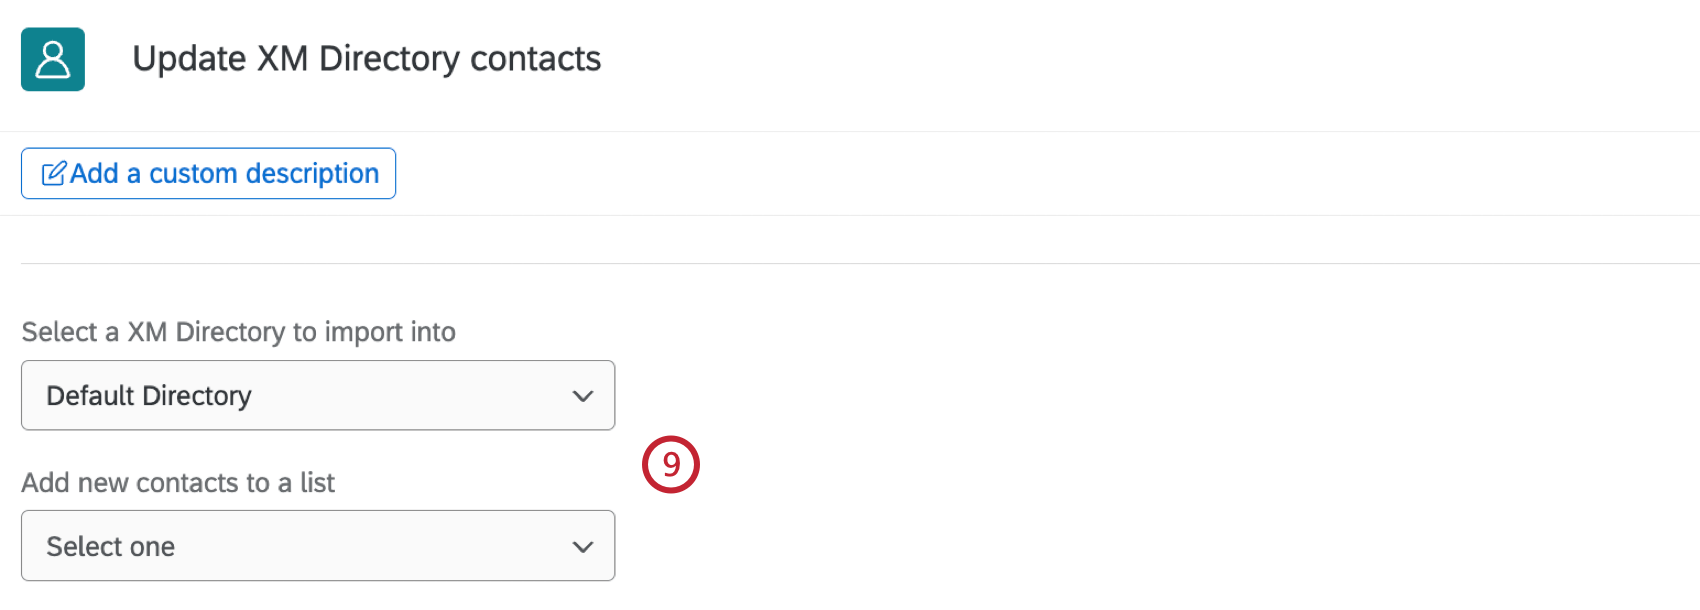
- Select a directory and contact list (Directories | Contacts) to save respondents’ information to.
- Use the piped text dropdown ( {a} to set the respondent’s first name ticket data, last name ticket data, and email address ticket data.
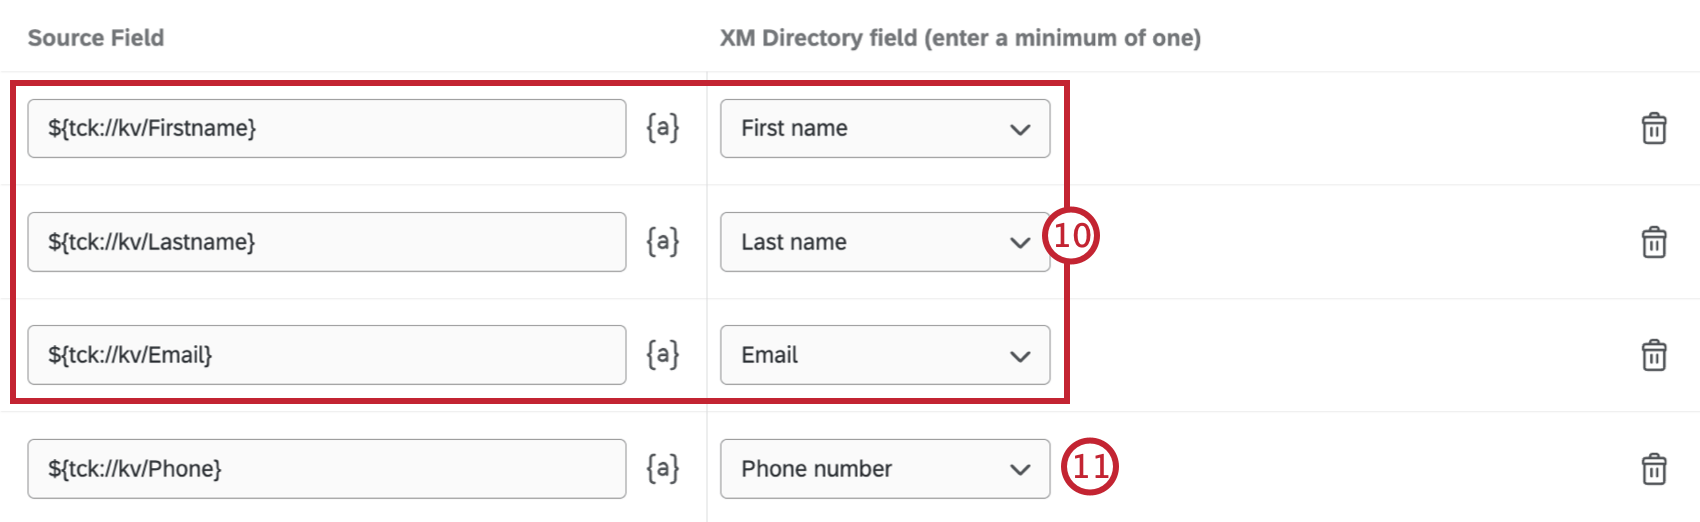 Qtip: Make sure the ticket data is spelled the same as when you created the tickets task.
 - Use the piped text dropdown to set the recipient to the ticket data for phone number.
Qtip: Make sure the spelling and name of this field match what you wrote when setting up your tickets task.
- Save your task.
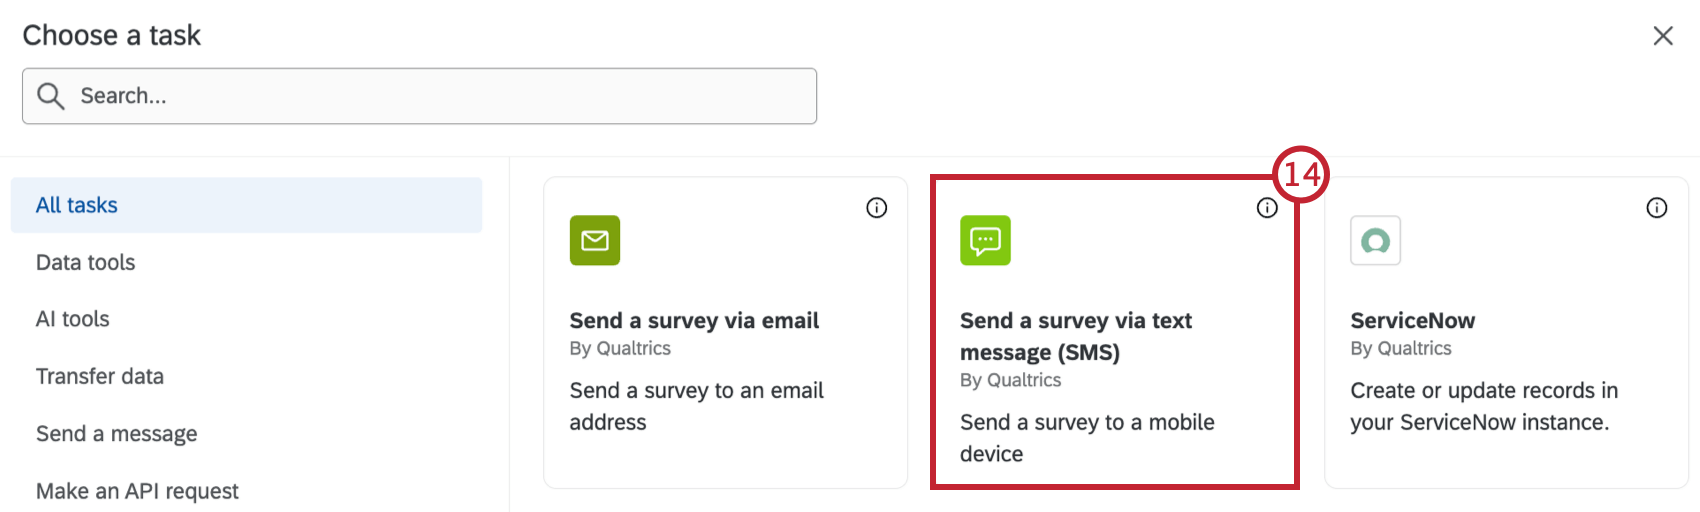
- Add a task.
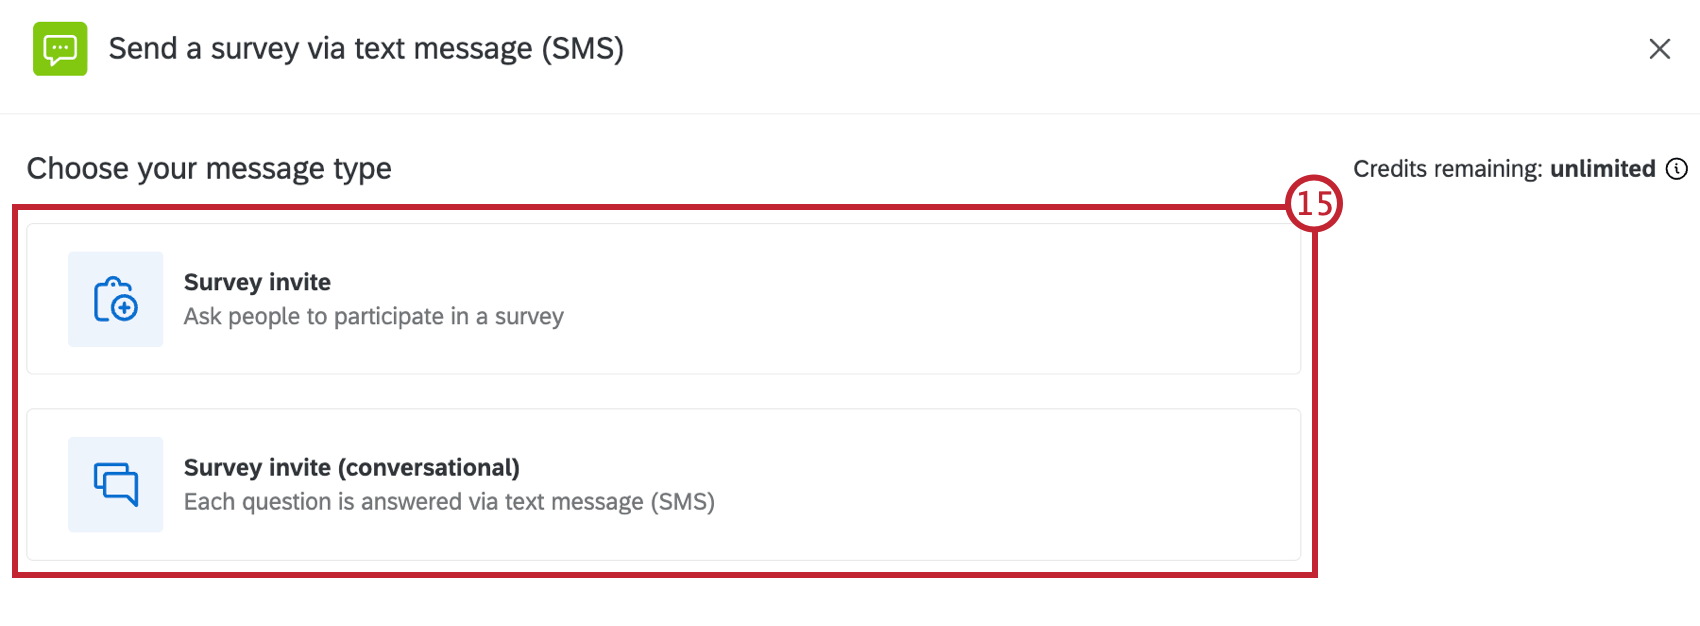
- Select Send a survey via text message (SMS).
- Select a message type.
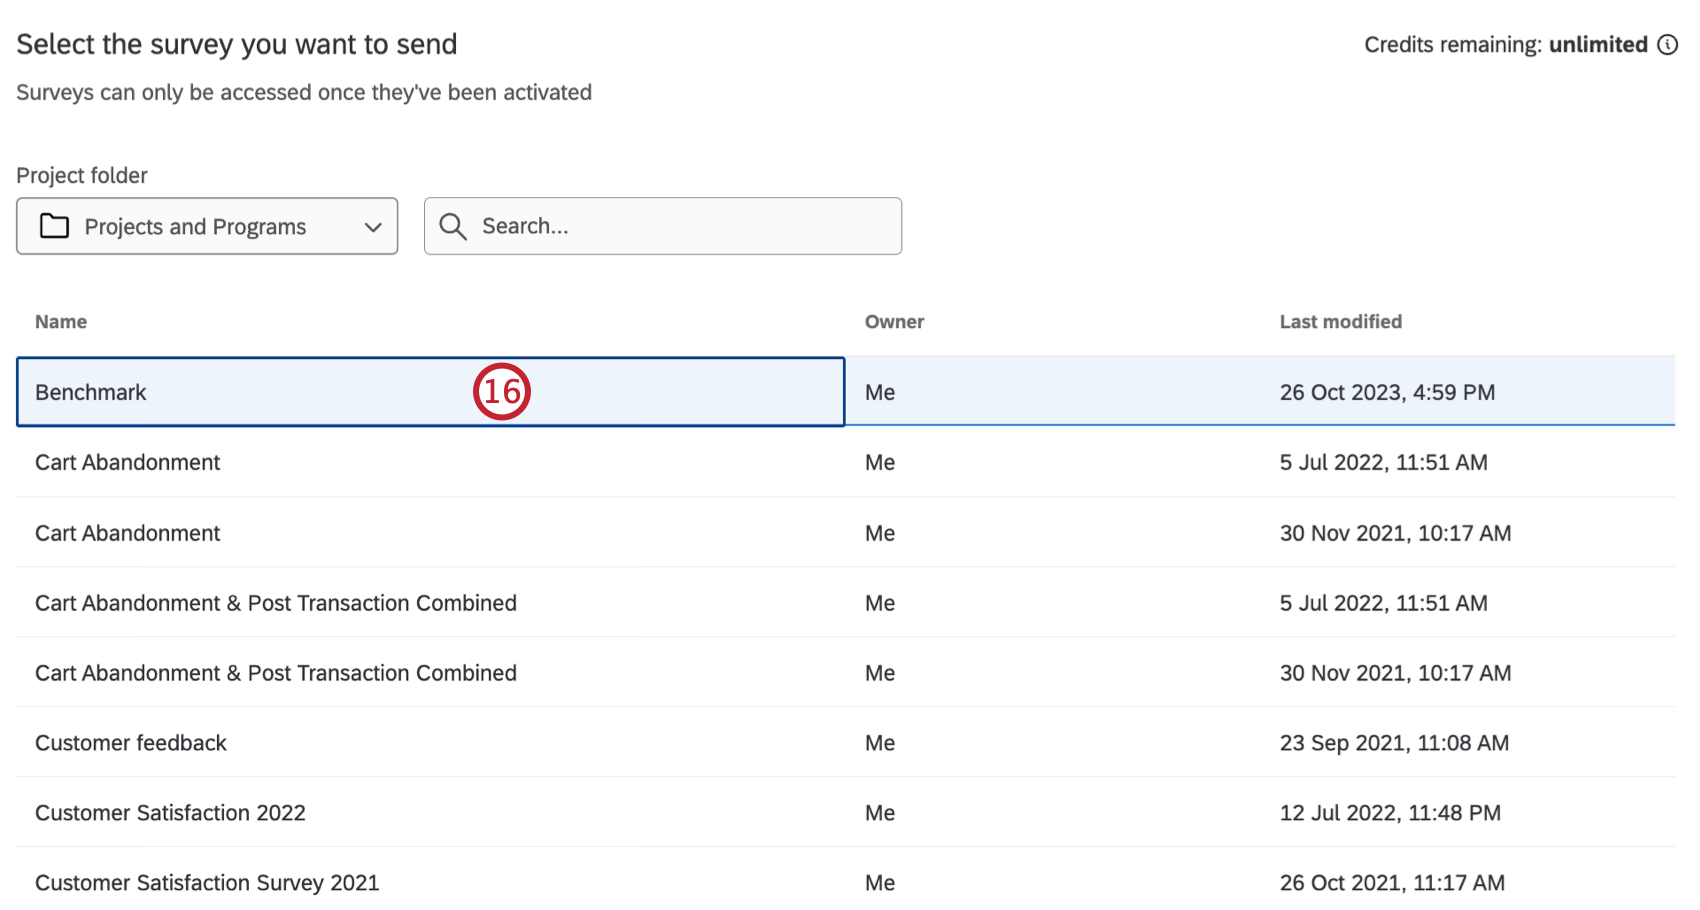
- Choose a random survey. This will not be distributed.
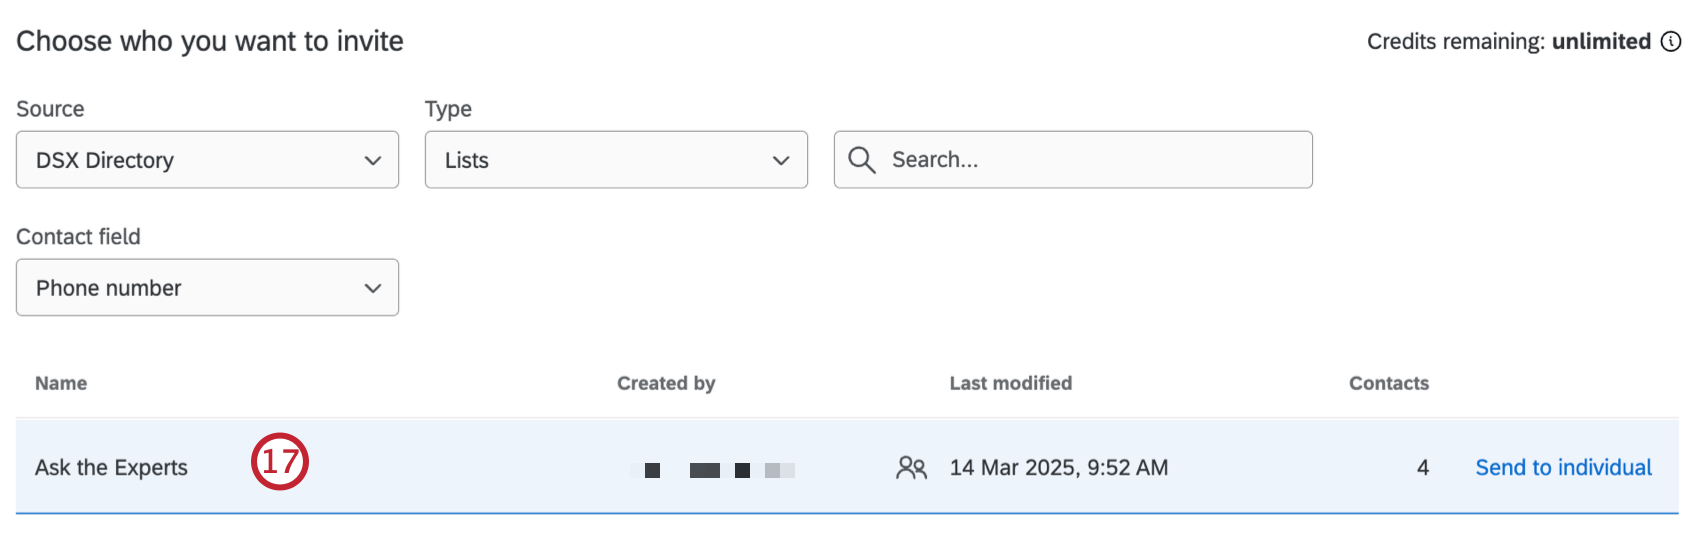
- Select the contact list you configured in step 9.
- Erase the entire message. We do not want to include the piped text for the survey link, survey URL, or opt-out link.
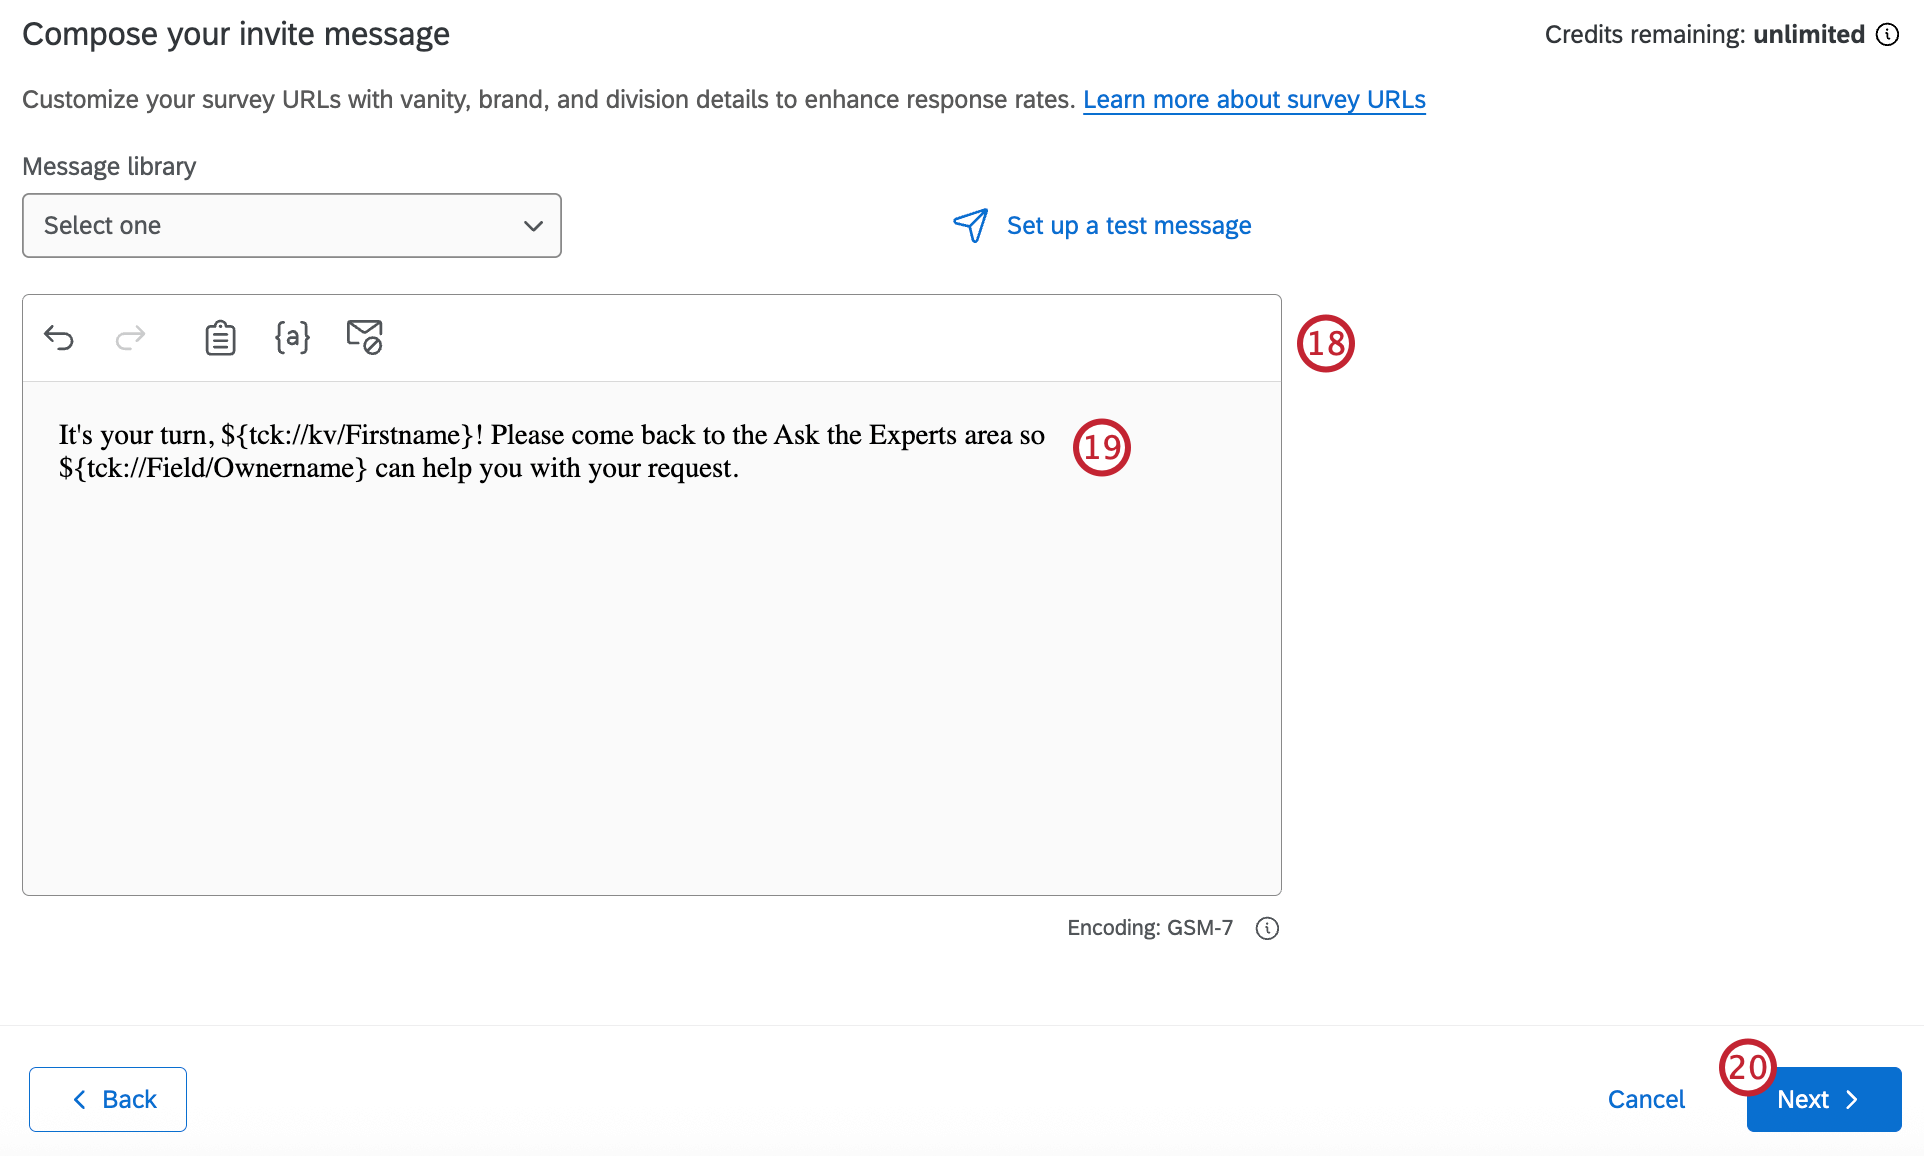
- Write your own message. You can use the piped text dropdown to insert the customer and / or the expert’s name.
- Click Next.
- If desired, customize your delivery options. This includes setting a link expiration, delivery window, or delivery delay. For more information see Sending a Survey Invite with a Link.
- Review the details of your invite.
- Click Save.
Email Alerts
- Go to the Workflows tab of your check-in survey.
- Click Create a workflow.
- Choose Started by an event.
- Set the event to Ticket Event.
- Select Assigned from Queue.
- Name your workflow so you know it’s for Email Alerts.
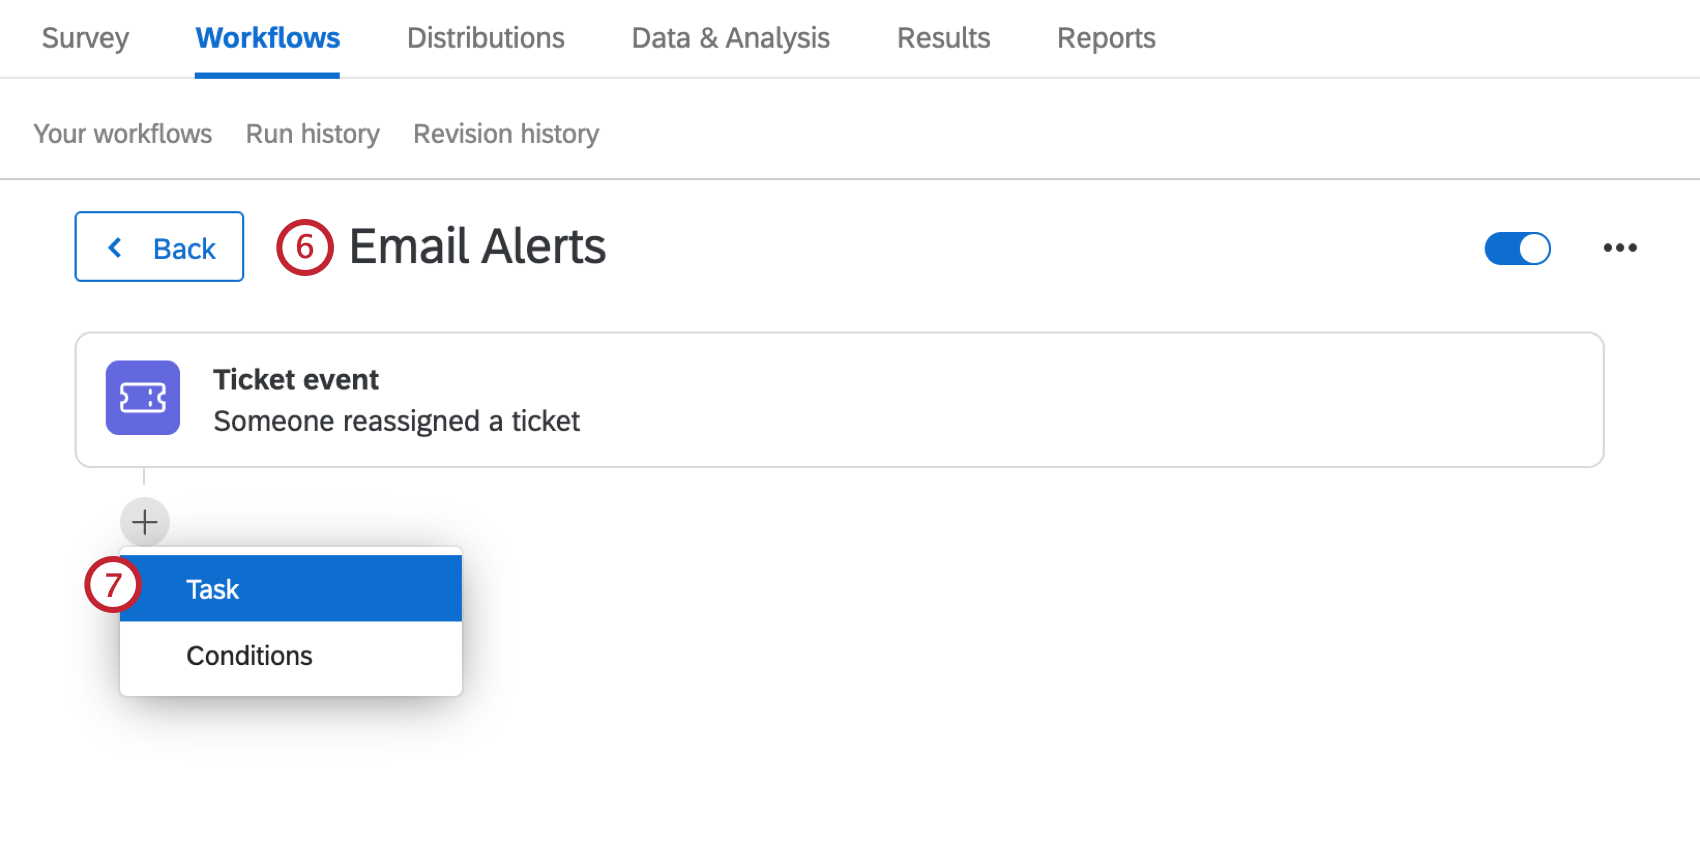
- Add a task.
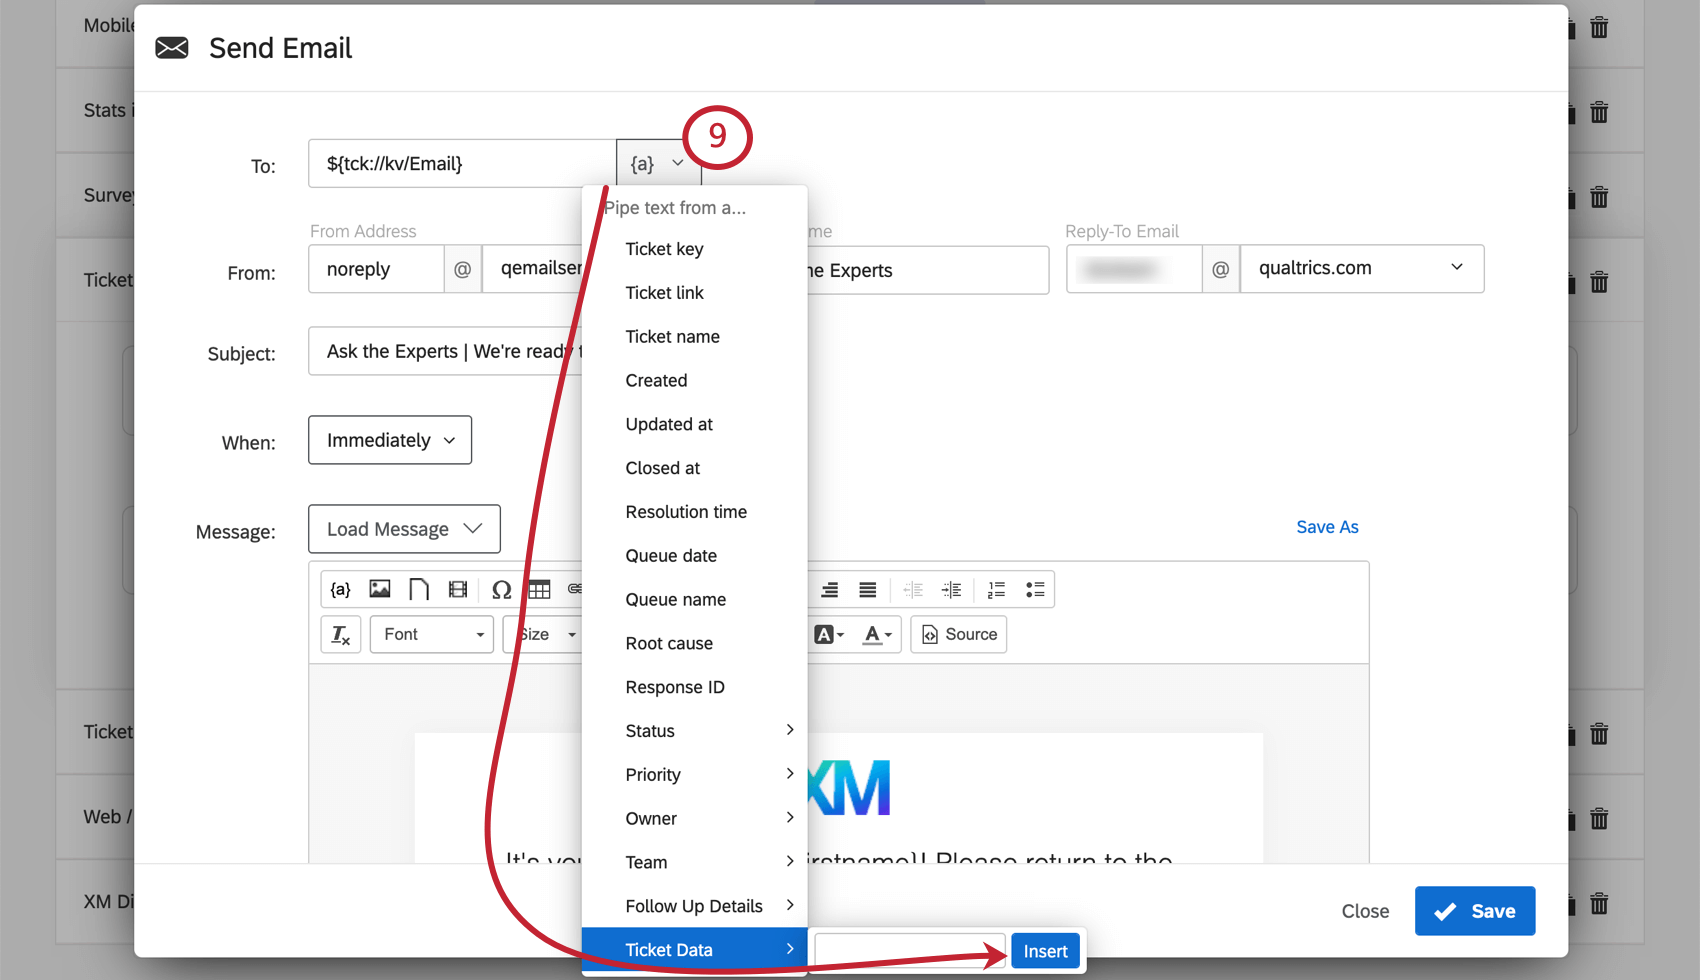
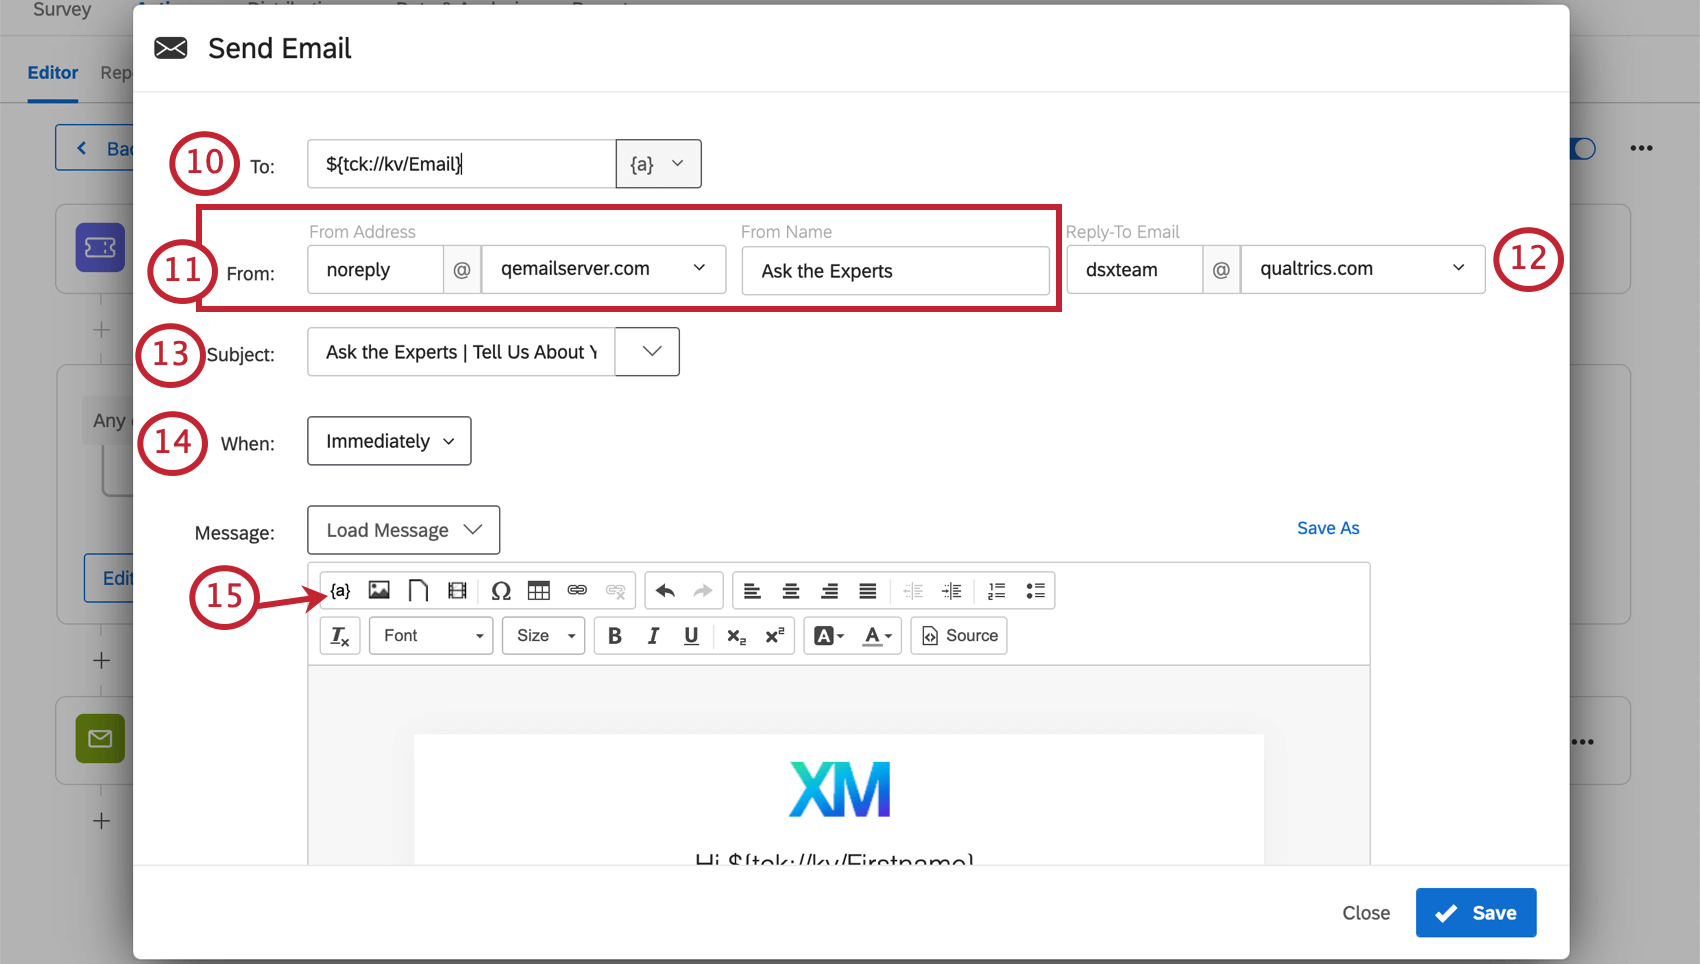
- Select Email.

- Use the piped text dropdown to set the recipient equal to the ticket data for the customer’s email.
 Qtip: Make sure the spelling and name of this field match what you wrote when setting up your tickets task.
 - Enter a “From” Address.
 Qtip: You can use any username you want, but you can only choose domains your brand is allowed to use. See Custom From Address for more on distributing emails from Qualtrics using different domains.
 - Type the username and select the domain of the Reply-To Email. This is the email address that receives your respondents’ replies to the message. If you do not want to receive replies, you can use any of the default Qualtrics email domains. Otherwise, you can select a domain connected to your Qualtrics account.
Qtip: The email you use doesn’t have to be real. For example, if you don’t want to receive replies but want the address to look official, you can set the Reply-To to YourCompany@qemailserver.com.
- Add a Subject to your email.
- Choose how long after an expert takes a ticket that the customer should we receive a text. We chose Immediately for the quickest results.
- Write your own message. You can use the piped text dropdown to insert the customer and / or the expert’s name.
- Click Save.
Soliciting Feedback
After an expert has helped your customer out, it’s important to solicit feedback in order to determine staffing decisions, event setup, and the overall experience went. This section goes over how to trigger CSAT emails to customers after their interaction with a representative has ended.
CSAT Survey
When creating our CSAT survey, we started by adding the following embedded data to the top of the survey flow. This embedded data represents the information we want to pass from the ticket to the survey:
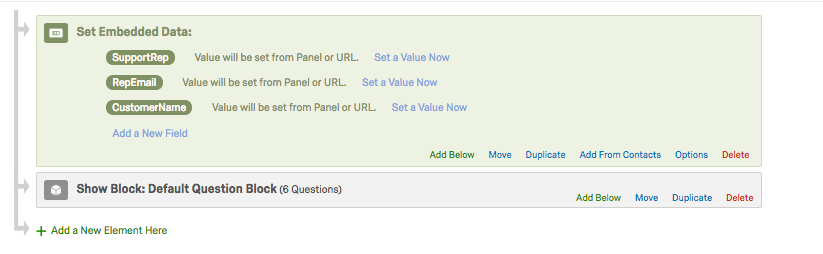
- SupportRep
- RepEmail
- CustomerName
When building the survey itself, we kept our CSAT short and sweet, focussing on the following:
- Satisfaction with the expert
- Ease of pursuing support
- NPS
- Satisfaction with overall Ask the Experts experience
- Text entry question for additional feedback or comments
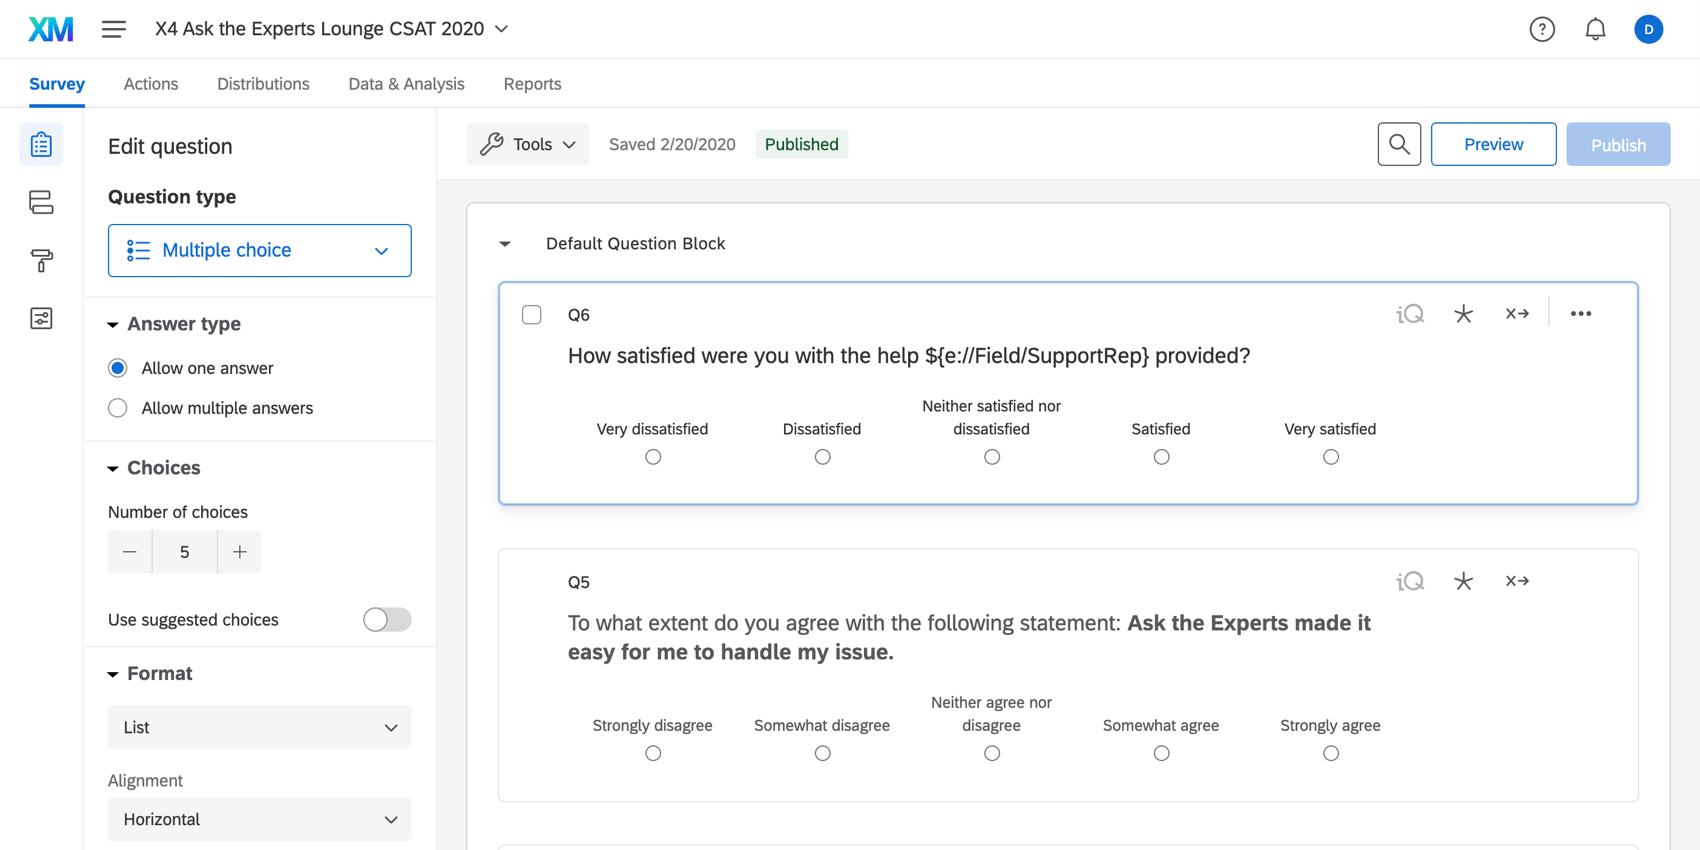
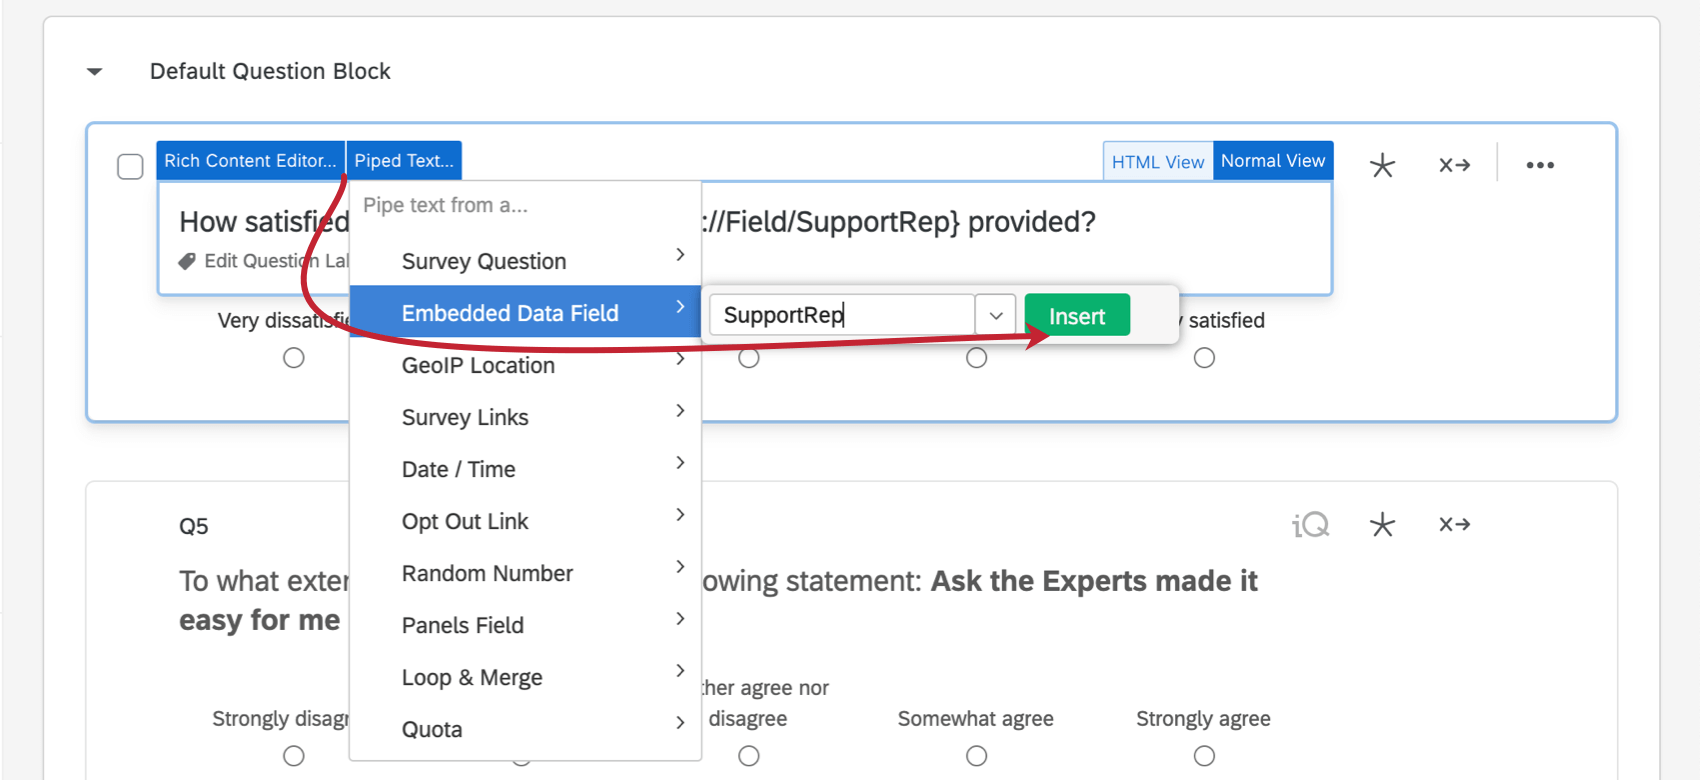
We also added piped text to the questions so we could insert the expert’s name. To do this, we added the piped text for Embedded Data named SupportRep, taking care not to change the spelling, spacing, or capitalization from what we put in the survey flow.
CSAT Link
Once the survey is created and published, we need to prepare the link that’ll go out in our CSAT email to capture certain information. Namely, we want to make sure we’re collecting data on the right customer and the expert who helped them.
- Get your CSAT survey’s anonymous link.
- If there’s no question mark in the link, add a question mark ( ? ) at the end. Otherwise, add an ampersand ( & ).
- Set the ticket data piped text equal to the corresponding embedded data names. For your convenience, we’ve included them here:
SupportRep=${tck://Field/ownerName}&RepEmail=${tck://Field/ownerEmail}Qtip: You can get ticket data piped text from any workflow where the event is set as a ticket event. - This step can vary depending on how you’ve formatted the customer’s name when setting up the tickets task. We separated into a first name and last name ticket data, named Firstname and Lastname, respectively. And we need to add a space ( %20 ) between those two separate values to indicate where one name ends and the other begins, without breaking the link up. So we added the following onto our URL:
&CustomerName=${tck://kv/Firstname}%20${tck://kv/Lastname} - The final URL should look something like this:
https://xx1.qualtrics.com/jfe/form/SV_XXXXXXXXXX?SupportRep=${tck://Field/ownerName}&RepEmail=${tck://Field/ownerEmail}&CustomerName=${tck://kv/Firstname}%20${tck://kv/Lastname}
CSAT Email
- Go to the Workflows tab of your check-in survey.
- Click Create a workflow.
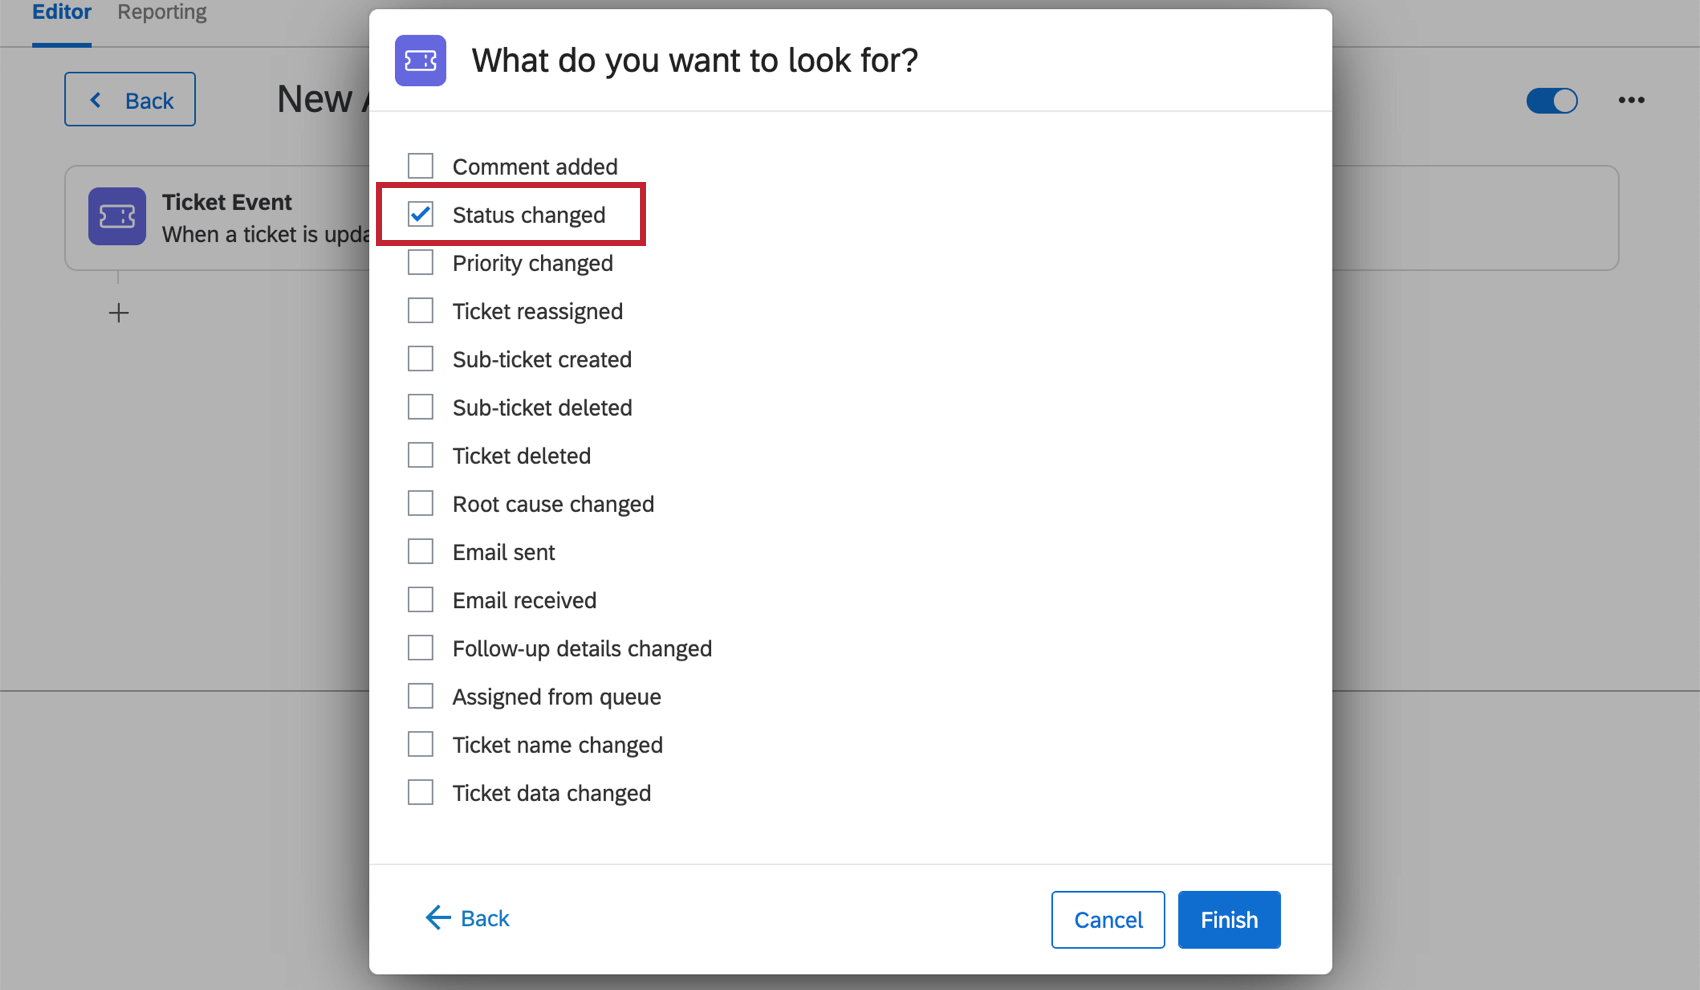
- Choose Started by an event.
- Set the event to Ticket Event.
- Select Status Changed.
- Name your workflow so you know it’s for CSAT Emails.
- Set the condition to Status is Resolved.
- Add a task.
- Select Email.
- Use the piped text dropdown ( {a} ) to set the recipient to the ticket data for the customer’s email.
 Qtip: Make sure the spelling and name of this field match what you wrote when setting up your tickets task.
 - Enter a “From” Address.
Qtip: You can use any username you want, but you can only choose domains your brand is allowed to use. See Custom From Address for more on distributing emails from Qualtrics using different domains.
- Type the username and select the domain of the Reply-To Email. This is the email address that receives your respondents’ replies to the message. If you do not want to receive replies, you can use any of the default Qualtrics email domains. Otherwise, you can select a domain connected to your Qualtrics account.
Qtip: The email you use doesn’t have to be real. For example, if you don’t want to receive replies but want the address to look official, you can set the Reply-To to YourCompany@qemailserver.com.
- Add a Subject to your email.
- Choose how long after an expert takes a ticket that the customer should we receive a text. It doesn’t hurt to add a delay.
- Write your own message. You can use the piped text dropdown to insert the customer and / or the expert’s name.
- Add the CSAT link you built.
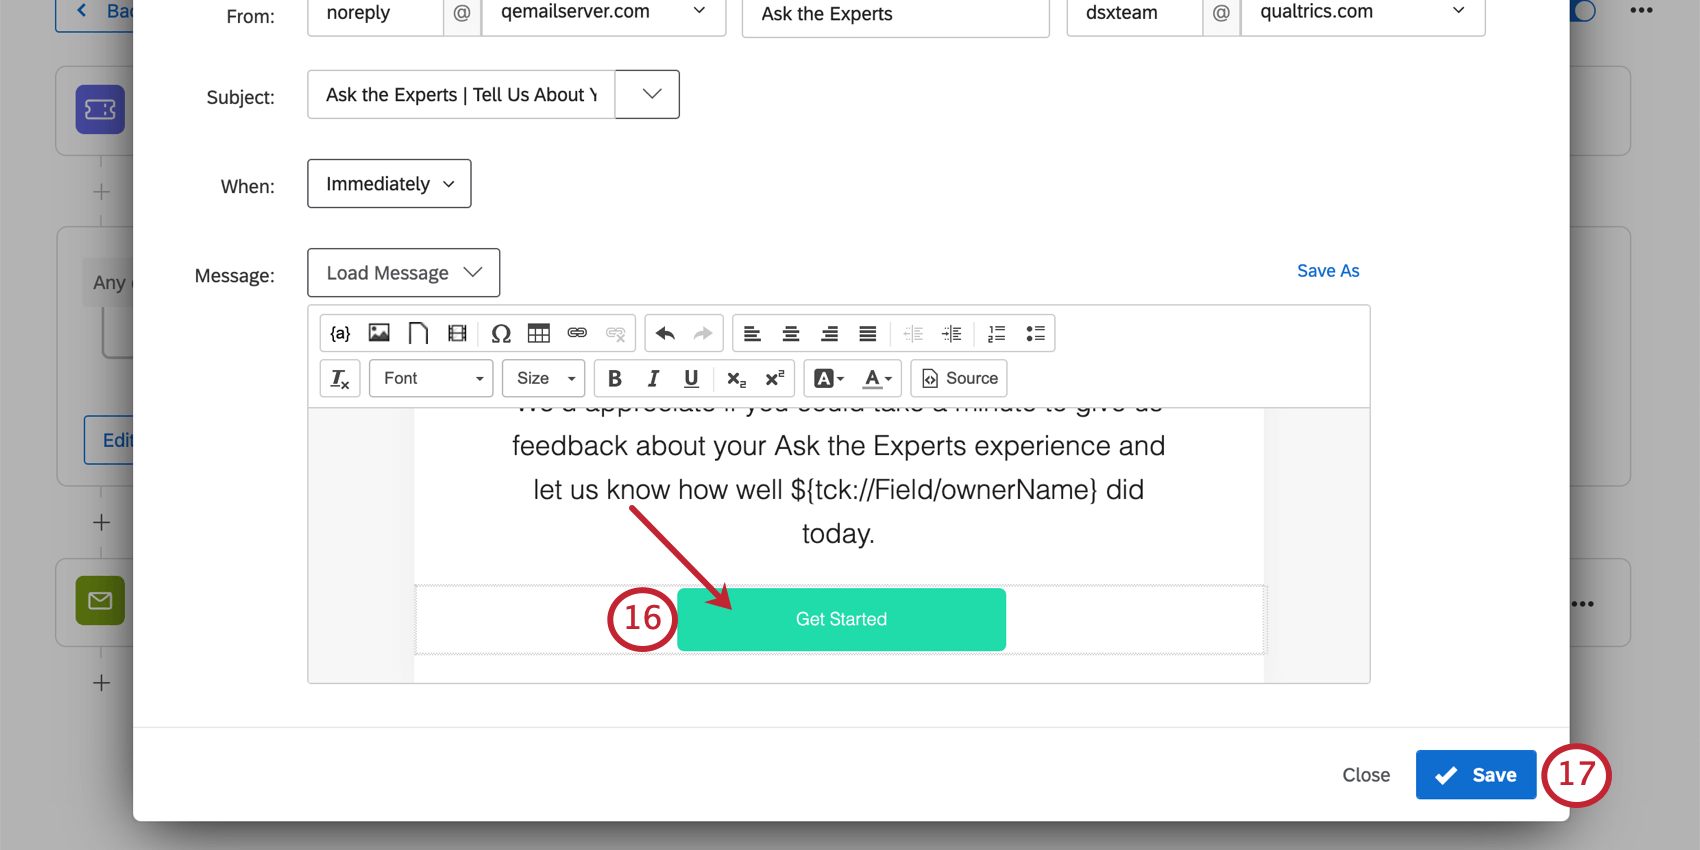 Qtip: You can make an image act as a button by inserting an image into the email, highlighting the image, and adding a hyperlink. See more about adding and formatting hyperlinks on the Insert a Hyperlink support page.
 - Click Save.
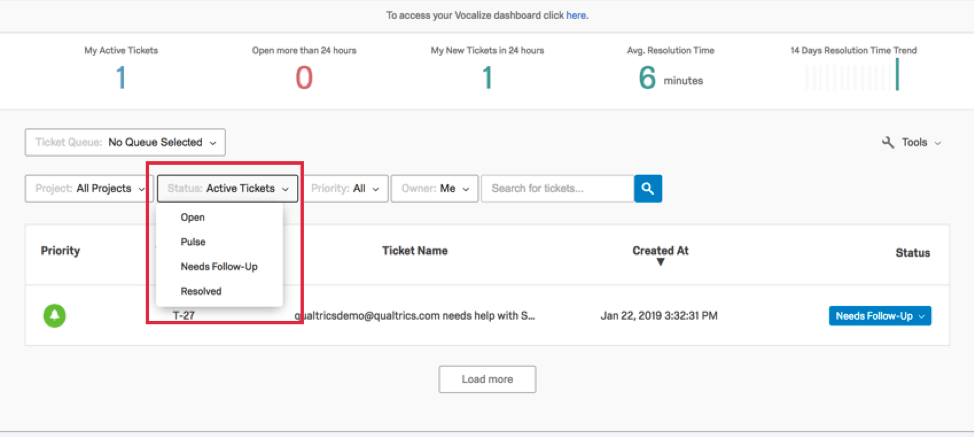
Ticket Dashboard
Although we had texts and emails to alert our customers that an expert was ready to talk to them, we also provided a visual aid to let customers know where they were in the queue and when they were assigned to an expert by using a dashboard. In this example, our dashboard sorts tickets by most recently updated, so that every time an expert claims a ticket, it jumps back to the top of the list. This dashboard also excludes resolved or escalated tickets, to create room for new customers on the list.
- Create a dashboard.
- Create a ticket reporting data set.
- Add it to your dashboard.
- Create a ticket reporting page in your dashboard.
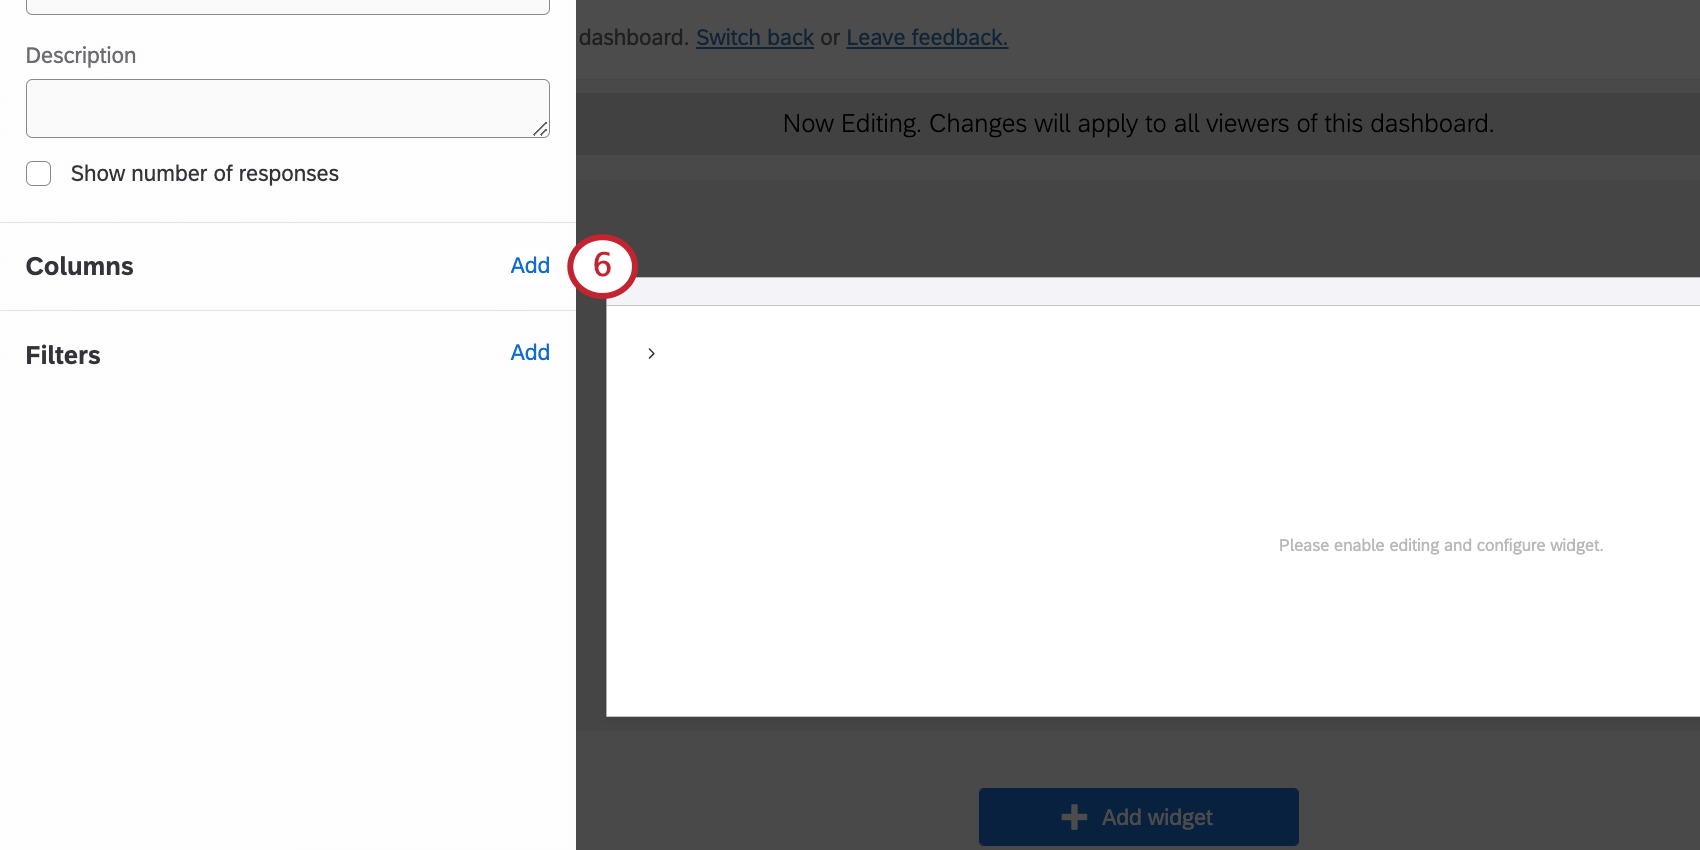
- Add a record table widget to your ticket reporting page.
- Under Column, click Add, and add the following ticket data:
- Customer Name Ticket Data
- ownerName
- Selected Product Ticket Data (optional)
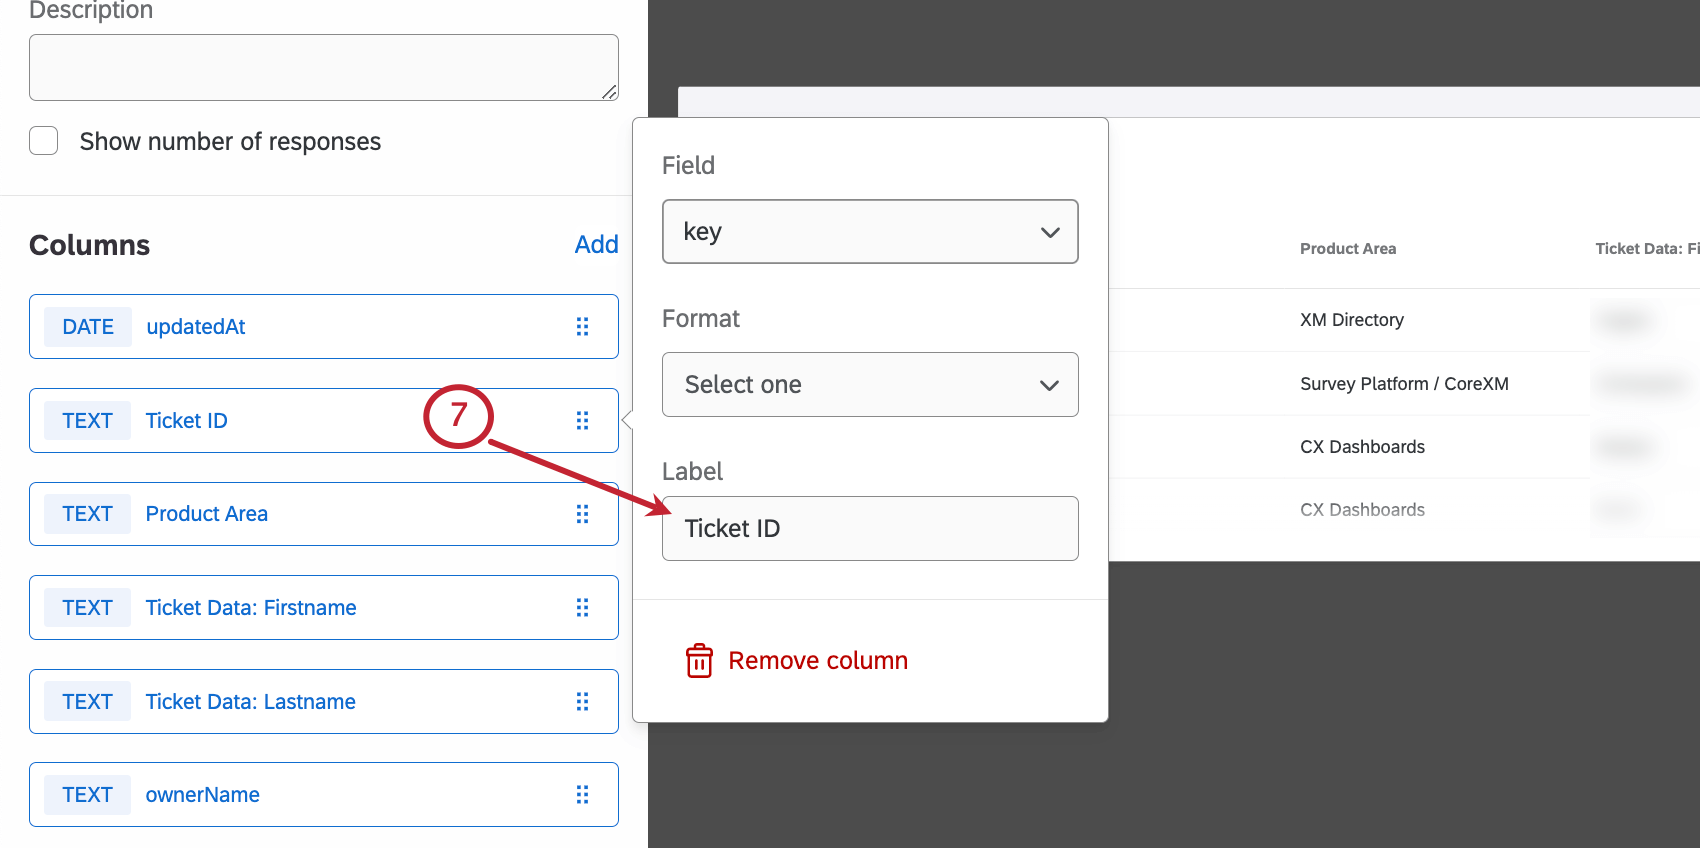
- key
- updatedAt
- Click the ticket data to the right to rename the column.
- Next to Filter, click Add.
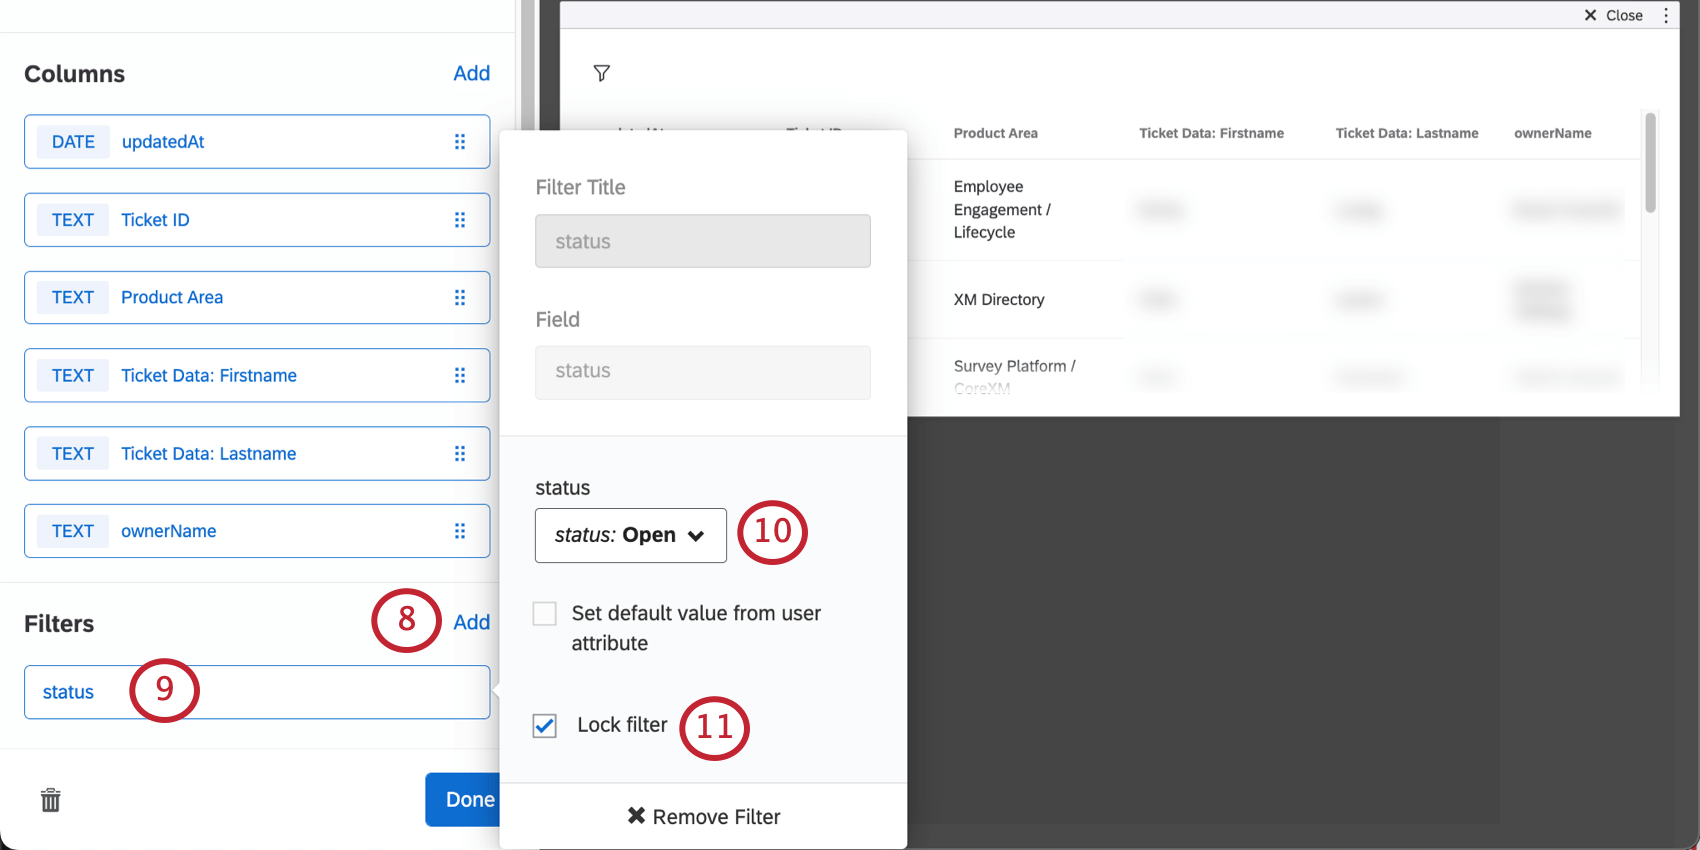
- Select status.
Qtip: You may need existing tickets with different statuses to set this filter. Run some tests with your colleagues using the check-in survey and trusted contact information. Don’t forget to have a Brand Administrator delete the old tickets when you’re done setting up your dashboard!
- Set the status to Open.
- Select Lock Filter.
- Click the Date column so most recently updated tickets appear on top.
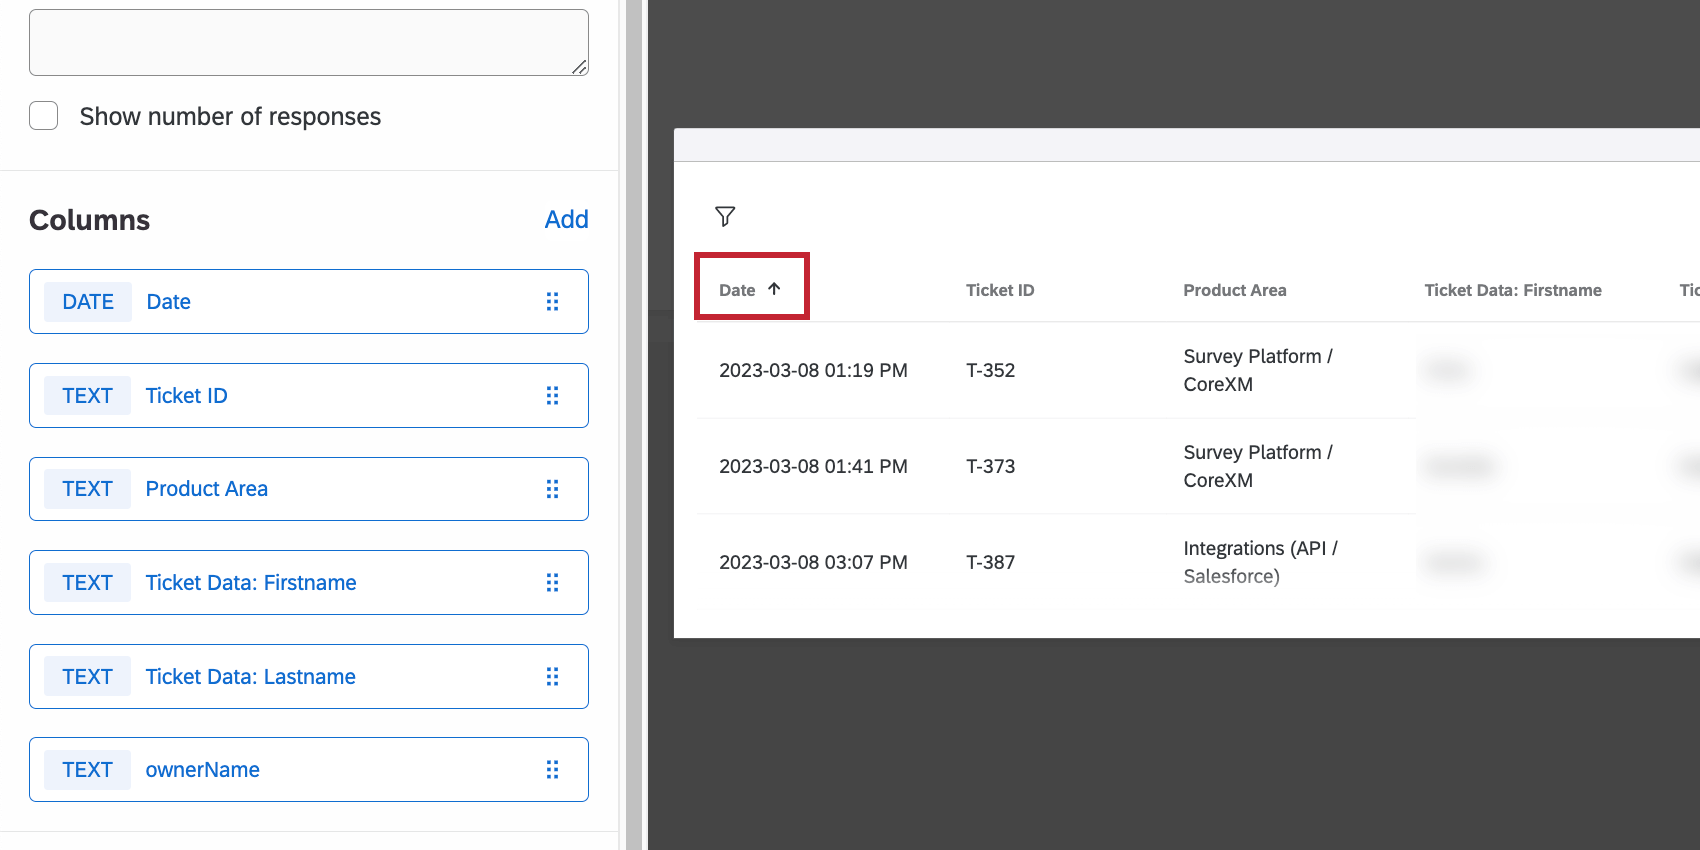 Qtip: Make sure you are still in editing mode. If you see the widget editing pane to the right (and your widget appears like these screenshots), you have done it correctly. If you are not in your dashboard’s edit mode, then sorting the columns is temporary.
How Experts Take Tickets
Once the mechanisms for assigning tickets are in place, it’s time to explain the workflow to our experts. This section goes over the process of taking tickets from queues and resolving them.
Taking Tickets from Queues
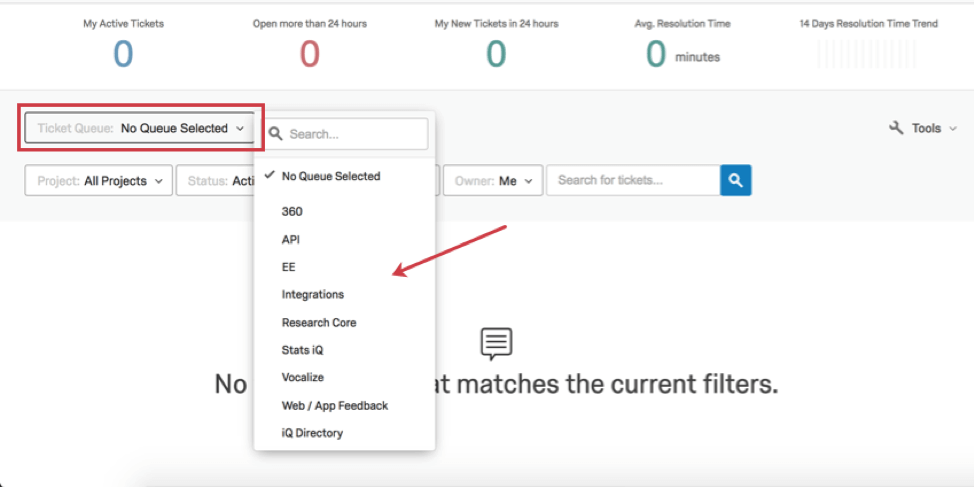
Each expert will be able to see every ticket queue you’ve created. However, they can only successfully take tickets for teams they’ve been assigned to. So if your 360 expert who doesn’t know Stats iQ accidentally clicks the button to take a Stats iQ ticket, the system won’t let them.
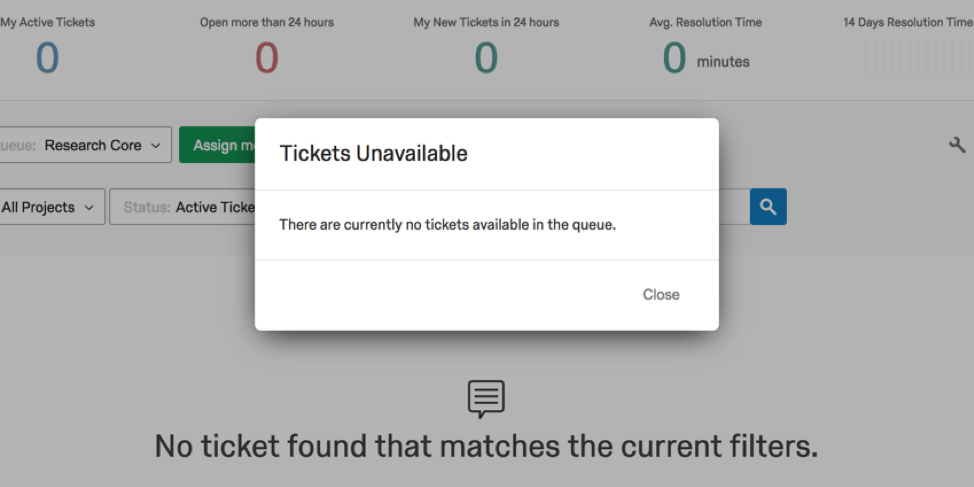
Once inside the desired queue, the expert can take a ticket by clicking Assign me a ticket from queue.
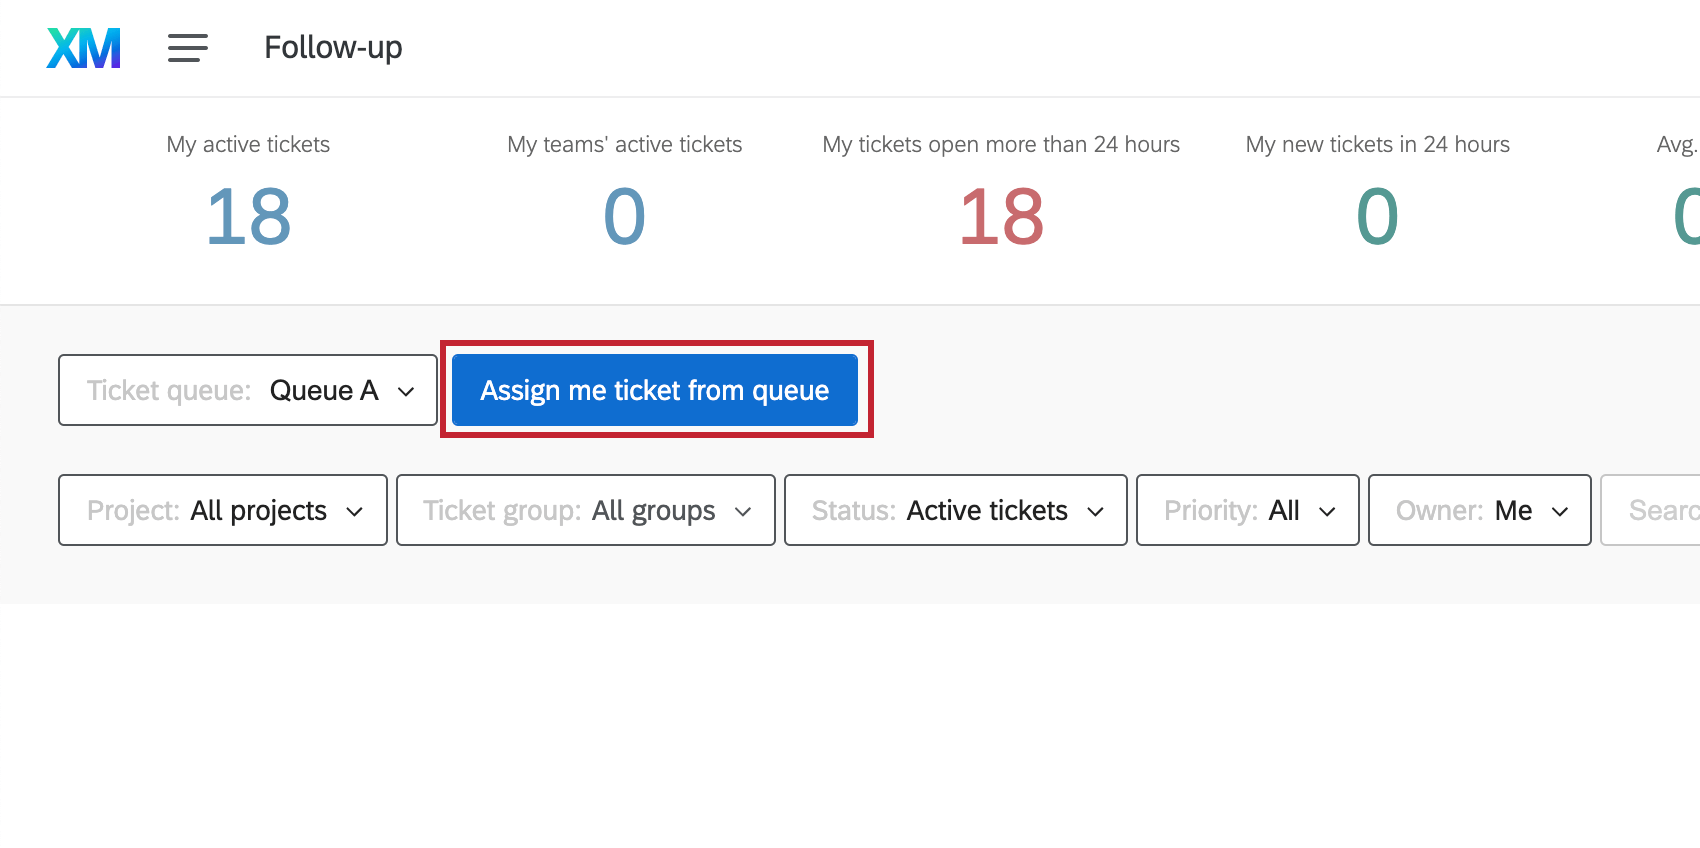
If there is a ticket in the queue, it will appear on the page after the button’s clicked. If there’s no ticket or if the user is unauthorized to take tickets from the queue, they will receive a warning.
Resolving Tickets
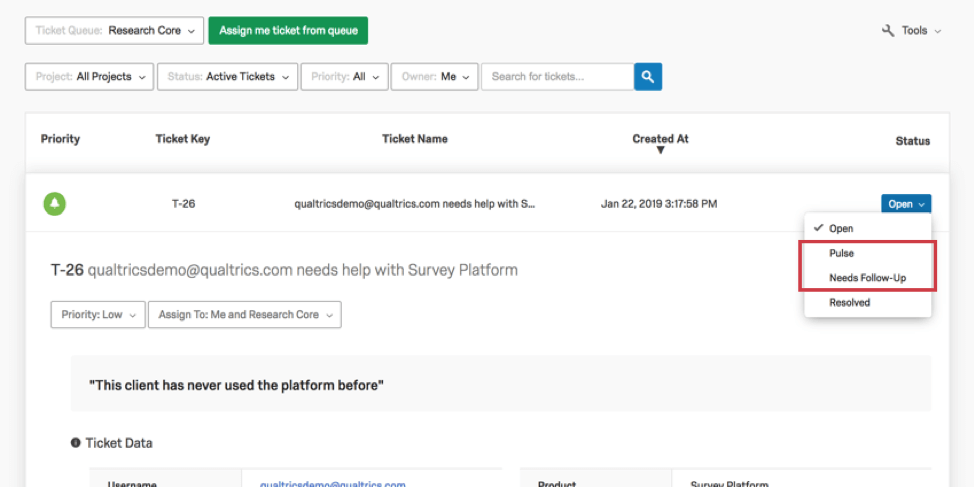
Experts can resolve a ticket by changing the status in the upper-right to Resolved.
Custom Statuses
A Brand Administrator can create custom statuses to further refine the tickets system.
We created a custom status for tickets that needed to be reported to an escalation team, and another if they required deeper troubleshooting and the expert would have to follow up with the client later.
Experts could change the status of tickets to avoid resolving and sending a CSAT. They could also filter for particular tickets to work on, when they had free time.