
XM Directory Integration with Digital Intercepts
What's on this page
About XM Directory Integration with Digital Intercepts
Attention: To use this functionality, your Qualtrics brand needs to have both XM Directory and Website / App Insights. If you’re interested in this feature, contact Account Services.
XM Directory is an organization-wide contact directory that tracks each customer's many points of interaction with your company. Integrating Website / App Insights with XM Directory allows you to utilize the benefits of XM Directory with your website visitors. With omni-channel contact frequency, you can ensure your website visitors don’t receive an email invite if they’ve already received a web intercept, and vice versa. You can also target the display of website and app intercepts to specific segments of users, as well as obtain segment- and journey-specific insights.
Before you can use this feature, you need access to the following:
- Access to XM Directory.
- Access to Website / App Feedback.
- Contacts or segments within 1 of your directories.
Setting Up the Integration
XM Directory
The integration with website intercepts will use your existing XM Directory configuration. If you have not set up your directory yet, see Getting Started with XM Directory.
Qtip: In order to use this integration, you must have an identity resolution rule set up in XM Directory that merges duplicate contacts based on an identifying field, like Email or External data reference.
Qtip: Website insights work with many different identity resolution rules, so long as there is just 1 field used. Mobile only work with identity resolution based on External Data Reference.
To get the most out of the integration, follow these best practices:
Keep your contacts up to date. This allows Qualtrics to distinguish whether your website visitors are existing contacts or new visitors.

Example: Set up a workflow that keeps XM Directory synced with your customer lists, or work with your development team to create contacts using the create a new contact and update a contact API calls.
- Automatically merge duplicate contacts. You can merge only newly created contacts, or all existing contacts. See Merging Duplicate Contacts in XM Directory for more information.
Attention: The External Data Reference / External Reference ID is case sensitive when integrating XM Directory with intercepts.
Identifying Visitors
Attention: The following documentation requires programming knowledge to implement. We recommend passing this information to the team that will be implementing your deployment code. Our support team does not offer assistance or consultation on custom coding. You can always try asking our community of dedicated users instead. If you’d like to know more about our custom coding services you can commission, please contact your Qualtrics Account Executive.
To access the benefits of XM Directory from your Website / App Insights project, you’ll first need to make sure Qualtrics knows who is visiting your website or app, and can match that information with your existing contacts. To do this you will need to specify the JavaScript expression that is evaluated in the user’s logged in session to obtain
In the examples below, we'll focus on a scenario where you identity resolution is based on External Data Reference. We'll show how to set an External Reference ID, which needs to match the External Data Reference in the XM Directory.
Attention: The integration between XM Directory and digital intercepts works best when your contacts are unique, and you must use an identity resolution rule in XM Directory to avoid duplicate contacts. The value you tie to each user should be unique and identifying for all your website contacts. To avoid many duplicate contacts, don’t use a placeholder value for unknown values, and only use static values in testing.
Example: Storing the External Reference ID field through JavaScript, a cookie, or HTML on your site allows you to match each visitor based on the External Data Reference stored in XM Directory.
Next, you’ll need to pass information about your visitors to Qualtrics. The steps are different if you are using a website vs. a mobile app.
Website Intercept Setup
If you are using a website, work with your web development team to add the below code snippet to your website, in addition to the project deployment code. See the Connecting with XM Directory API documentation for additional help.
The below snippet passes the externalReference ID of the user to Qualtrics to associate the website visitor with a contact in XM Directory. Put this code snippet on page load, making sure the value of the ID has already been retrieved.
if(typeof QSI === "undefined") {QSI = {};QSI.config = {externalReference: extRef};}
Attention: The code snippet for setting the externalReference ID should be above the project deployment code JavaScript in your site code. This snippet should be included on each page of your site where you target visitors with intercepts.
Attention: Make sure that instead of extRef you specify the JavaScript expression that needs to be evaluated to obtain the appropriate External Reference ID (for example “UserID”). This expression may be as simple as a JavaScript variable or a JavaScript expression to evaluate a specific cookie.
Mobile App Intercept Setup
If you are using a mobile app, work with your mobile app development team to integrate with the latest version of the Qualtrics Mobile App SDK. See the API documentation for more information.
Qtip: If an end-user logs on to your site with an External Reference ID that is not currently in XM Directory (i.e., this user’s record is not yet in XM Directory), then the intercept will not appear for this user. You can use Automatic Contact Creation to add this user to the directory.
Linking Digital Experience with XM Directory
You can link XM Directory with your digital experience on a project and intercept level. You must first link XM Directory to your project before being able to link it to a specific intercept.
Each individual Website & App Insight project can only link to 1 directory. This helps ensure there are no issues with contact frequency rules, especially if the same contact exists in different directories with different frequency rules. It also consolidates all digital touchpoints into a single place to organize and maintain.
Example: You recently ran an event you want to collect feedback on, both over email and through your website. But your website also has other intercepts you want to run that are completely unrelated. Linking with XM Directory and then applying contact frequency rules ensures that customers don't get asked for feedback twice for the same event, without impacting other feedback opportunities on your website.
Example: Building on the previous example, if visitors come to your website who weren’t previously in your directory, you'll want to collect their info. You can turn on contact frequency rules for just one intercept, but enable XM Directory for the entire project so you can collect more contact information.
When Link with XM Directory is enabled at either the intercept or project level, contact embedded data for users will automatically be added to their survey response. For more information, see Using Embedded Data with XM Directory.
Additionally, an event in your visitor’s XM Directory touchpoint timeline will be created each time your intercept is displayed to them.
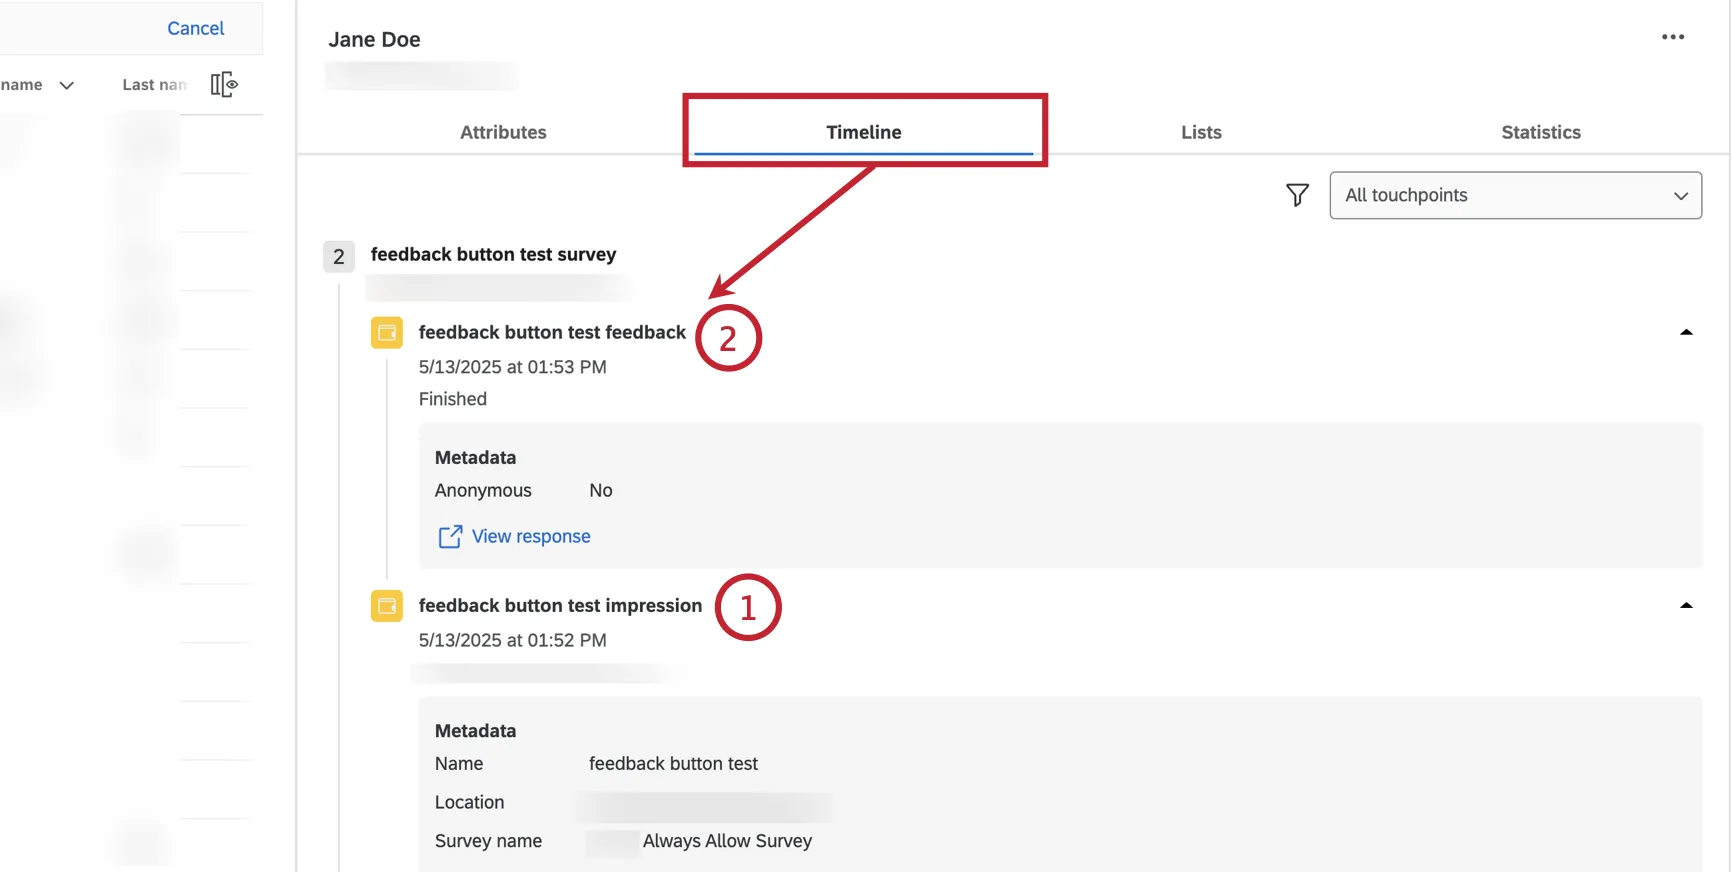
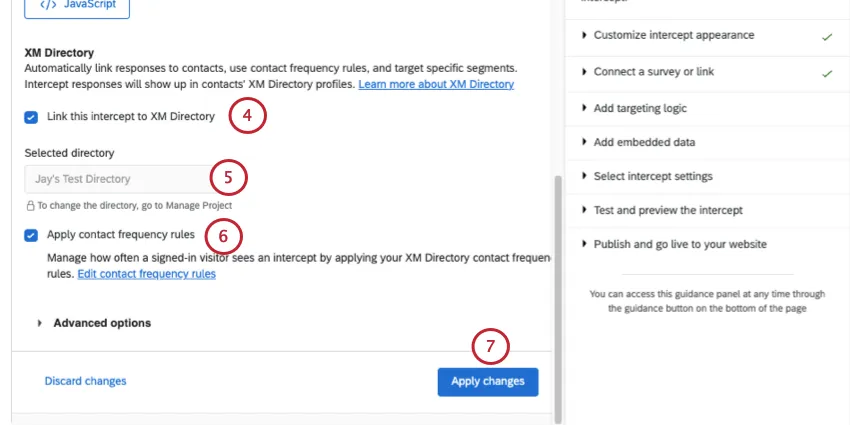
In the above example:
Linking an entire Website & App Insights Project
To link an entire Website & App Insights project to a directory:
Ensure you have already created an XM Directory identity resolution rule.
Qtip: You can ask a Brand Administrator to make changes to identity resolution, or to give you the user permissions to edit them yourself. See our page on merging duplicate contacts for associated permissions.
Qtip: External data references are supported in both web and mobile intercepts. However, all other identity resolution rules are currently only supported in web intercepts.
Go to Manage project.
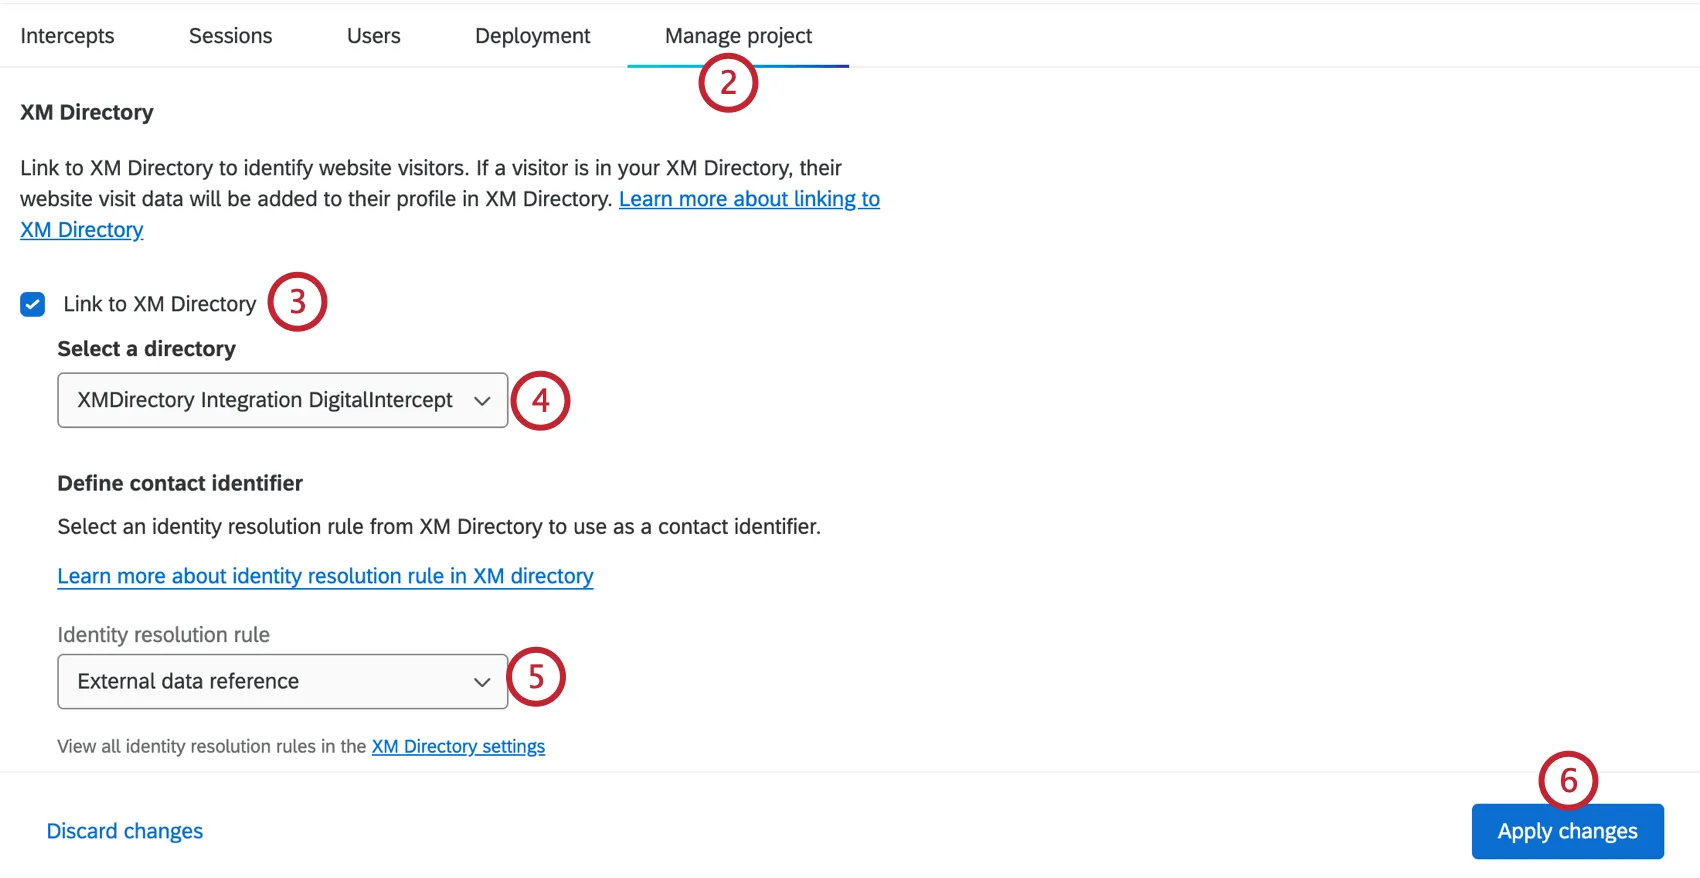
Enable Link to XM Directory.
Select your directory, if you have multiple.
Choose the field used in your identity resolution rule (i.e., External data reference).
Click Apply changes.
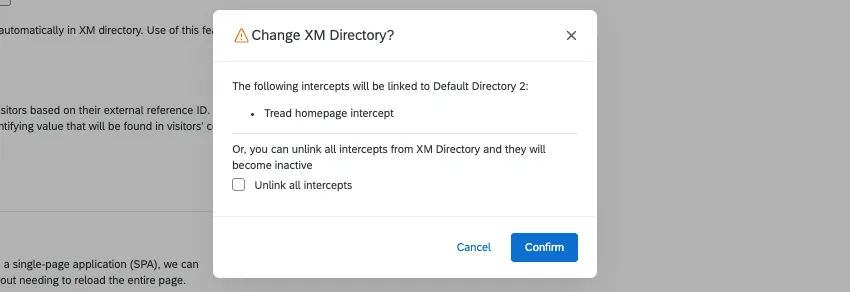
Attention: As of May 2024, projects cannot be linked to multiple directories.
Qtip: If you try to switch an intercept and the overall project to 2 different directories, you won’t be able to save that change, and will be prompted to either match them or unlink them from directories altogether.
Linking a guided intercept
- Open the guided intercept.
Go to Settings.
Go to XM Directory.
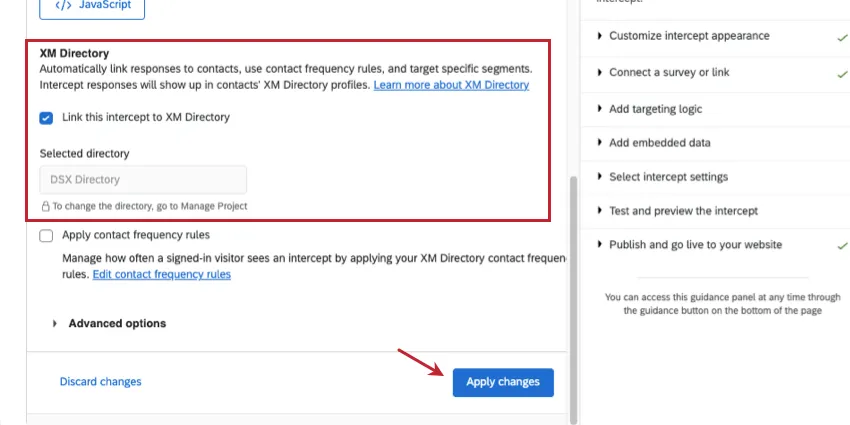
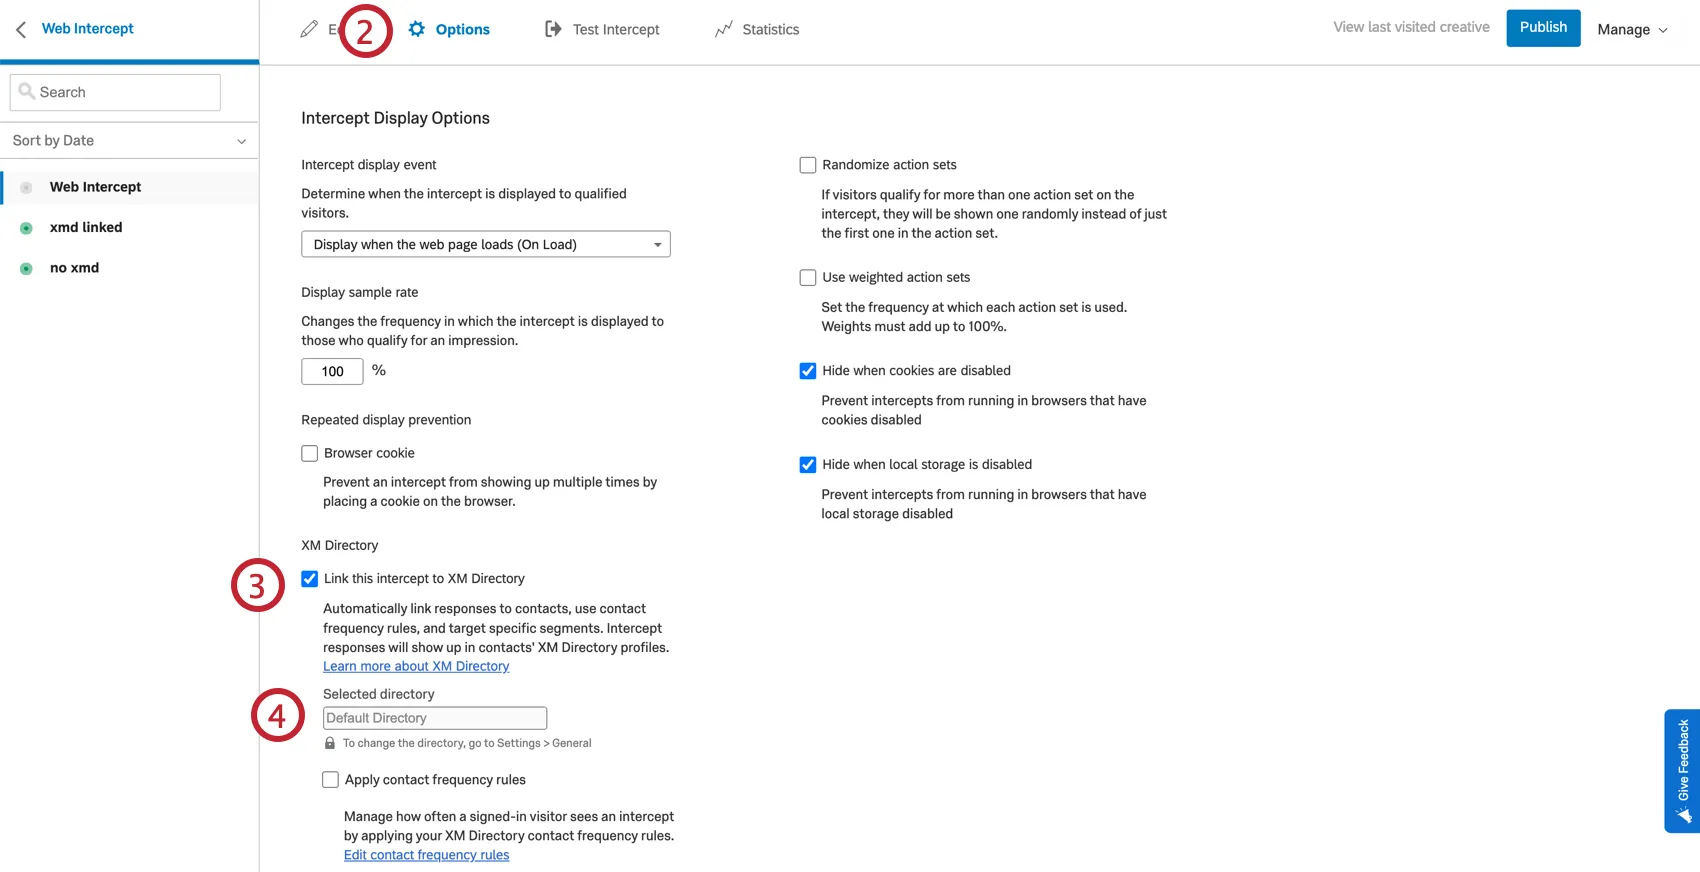
- Select Link this intercept to XM Directory.
- Because the identity resolution rules are already set at a project level, you don't need to set any such rules here. You also don't need to set the specific directory, since this is also set at the project level.
- If desired, apply contact frequency rules.
- Click Apply changes.
Linking an individual intercept
Automatic Contact Creation
Attention: You will need to work with your website development team to add code in order to send contact information into the directory using API. For more information, see our API documentation on creating a directory contact, or creating a contact in a mailing list.
XM Directory contacts can be created each time users visit web pages with Qualtrics Website & App Insights project deployment code on them. This option enables adding contacts automatically when Website & App Insights project deployment code runs on the webpage, eliminating the need for manual file uploads or SFTP-based automations.
Attention: The XM Directory integration with digital intercepts can only be used to create new contacts. It does not update existing contacts. If your intercept displays a survey, you could create a workflow to update the contact information based on the site visitor’s submitted survey response.
Qtip: An intercept does not have to be displayed for contact creation to work; only the deployment code must run on the page. Please note that your intercept may take a few extra seconds to display if a contact is to be automatically created along with the session. For more information on how the deployment code runs on your site, see Page Views.
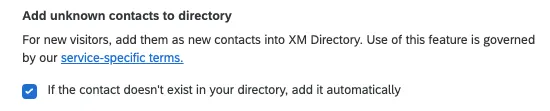
To enable automatic contact creation, first link your Website / App Insights project and XM Directory, as described earlier. Then, enable the setting Add unknown contacts to directory. Remember to apply your changes.
For each new web user (i.e., visitor to your website), you can capture the following contact fields using your web setup:
- First Name
- Last Name
- External Data Reference
- Phone
- Language
Additional key value pairs (e.g. “Location”:”Seattle”,”Gender”:”Female”). Each key-value pair is limited to 50 characters, and the total combined length of all pairs can be up to 400 characters.

Qtip: If the directory has multiple XM identity resolution rules, a contact created via this flow must be unique across every resolution rule on the directory (i.e., it must not match any existing contact field under any resolution rule).
Qtip: For mobile apps, contacts can only be created with External Data Reference.
Setting up Contact Frequency Rules for Intercepts
Attention: In order to maintain the proper service levels across all clients, Qualtrics may restrict traffic to our servers in rare cases when unexpectedly large spikes occur.
Contact Frequency rules can limit how often an intercept is shown. You can use general directory rules as well as custom rules for specific surveys.
For surveys that may be seen across many devices or browsers, such as passive feedback intercepts, we do not recommend using contact frequency.
Attention: At this time, custom contact frequency rules that apply to Lists are not supported.
Attention: If multiple intercepts on the same page use contact frequency rules, we will only show 1 of those intercepts. The displayed intercept will be the oldest one.
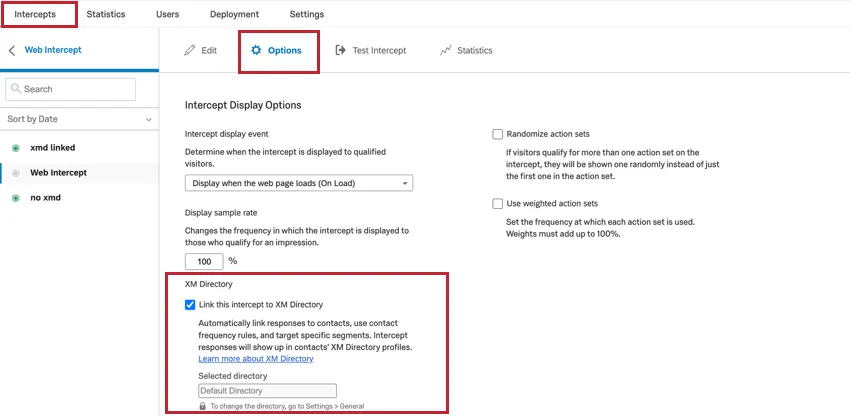
Make sure the Website / App Insights project is linked with XM Directory.
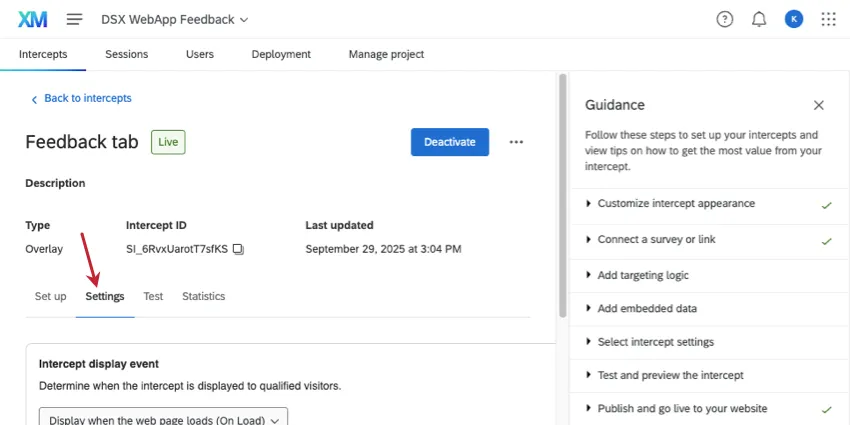
Open a specific intercept.
Go to Settings.
Select Link With XM Directory.
Qtip: When this option is selected, the contact's embedded data will automatically be added to their response when they fill out this survey. See Using Embedded Data with XM Directory.
Confirm the directory selected.
Enable Contact frequency rules.
Apply your changes.
The next steps differ based on whether you are implementing this functionality on a website or a mobile app:
- Website: On the website where you'll launch the intercept, specify the JavaScript expression that will be evaluated in the user’s logged in session to obtain an identifier for the contact, such as External Data Reference. This is used to look up the visitor in the XM Directory and track if they’ve seen your intercept. For more, see Setting Up the Integration.
- App: On the app where you'll launch the intercept, update your mobile app SDK to retrieve the reference ID. See the API documentation.
Qtip: If you don’t retrieve a reference ID, the intercept will behave as if contact frequency rules are not enabled. If you retrieve a reference ID that does not match any IDs in your directory, the intercept will not be displayed.
Setting up Segments for Intercept Targeting
Attention: In order to maintain the proper service levels across all clients, Qualtrics may restrict traffic to our servers in rare cases when unexpectedly large spikes occur.
Attention: Segments can only be created and edited by users who have the Manage Directory permission enabled. Any user with the Access Contacts permission can distribute to existing segments.
Once you’ve created segments in XM Directory, you can use them across Qualtrics in many of the same places that mailing lists and samples can, including with Website / App Insights. The combination of XM Directory and Website / App Insights allows you to target the display of website and app intercepts to specific segments of users, as well as obtain segment and journey-specific insights.
Qtip: If the intercept displays to your website’s visitor, then this touchpoint will also show in the XM Directory touchpoint timeline.
Example: While contacts opted out of the Directory will not see any additional emails, they may still see intercepts. To ensure opted out users aren’t shown any intercepts, use opt-out status when setting up your segment criteria, and then use segment targeting logic.
Make sure the Website / App Insights project is linked with XM Directory.
Open your intercept's Options.
Qtip: The steps are the same on mobile app intercepts, but you will see fewer intercept options.
Enable Link with XM Directory by selecting the checkbox.
Return to your intercept editor, and add targeting logic that contains your XM Directory segment.
Example: For example, XM Directory Segment Is High-Value-Users.
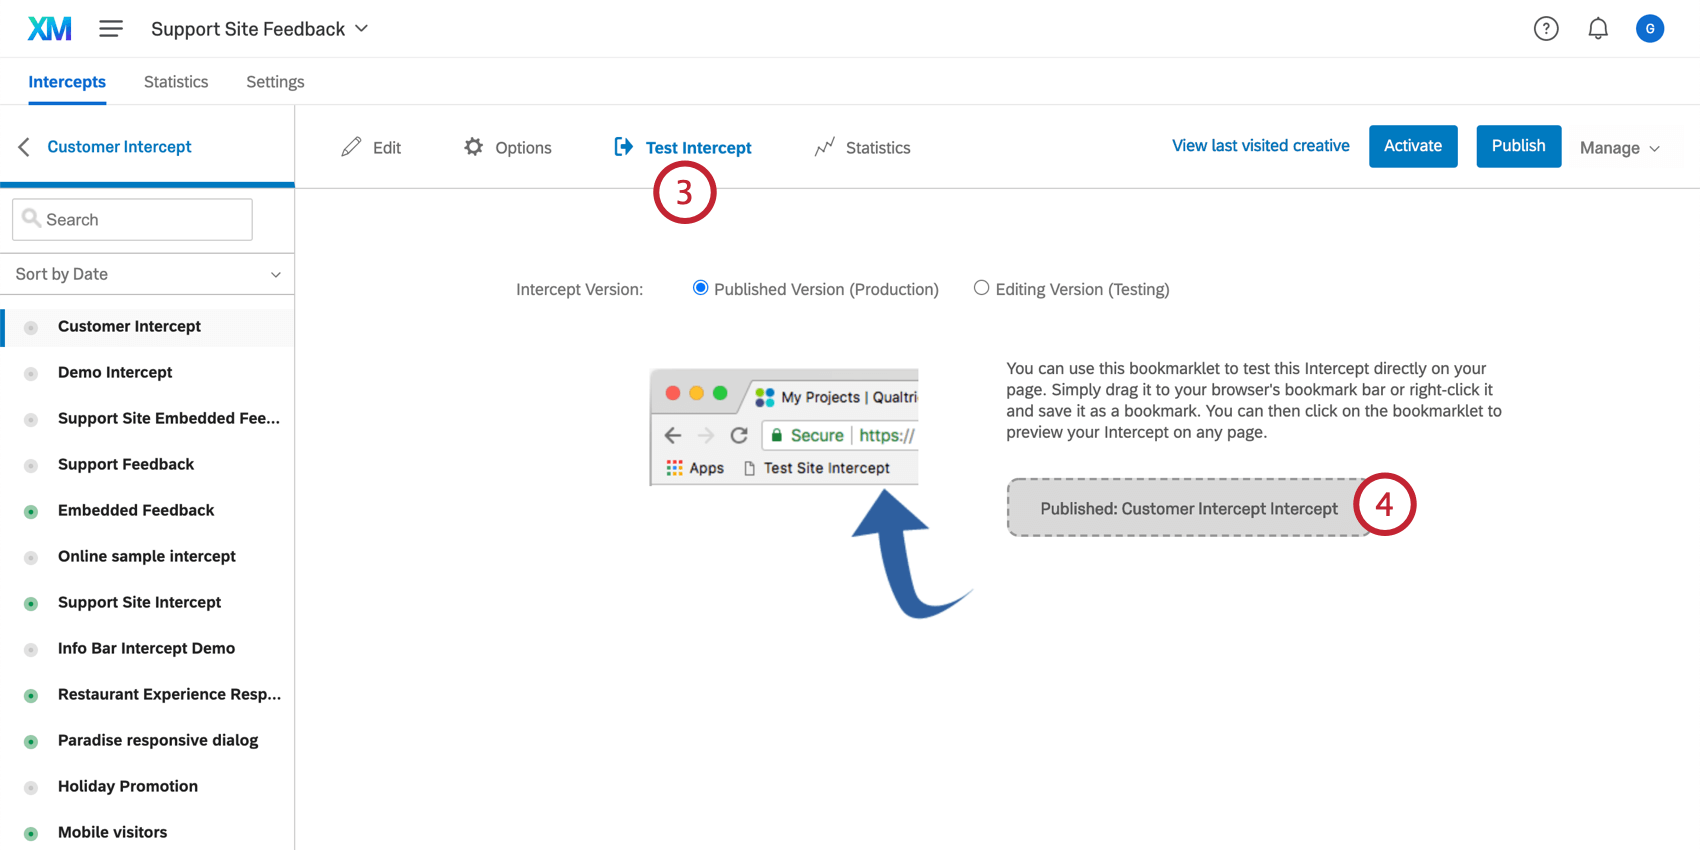
Qtip: On website intercepts, you can test the intercept using the bookmarklet both with contacts that are in the segment and with contacts that are not in the segment. During testing, you’ll have to mimic the setting of the External Reference ID within your browser so Qualtrics can identify the contact.
The next steps differs based on whether you are implementing this functionality on a website or a mobile app.
- Website: On the website where you'll launch the intercept, specify the JavaScript expression that will be evaluated in the user’s logged in session to obtain an identifier for the contact, such as External Data Reference. This is used to look up the visitor in the XM Directory and track if they’ve seen your intercept. For more, see Setting Up the Integration.
- App: On the app where you will launch the intercept, you will need to make an update to your mobile app SDK in order to retrieve the reference ID. See the API documentation.
Testing the XM Directory Integration with Website Intercepts
Before launching your intercept on your website, you should test it to make sure the contact frequency, segment targeting, or contact creation has been implemented correctly.
While you can identify contacts using a number of fields, in the examples below, we'll focus on a scenario where your identity resolution is based on External Data Reference. In your real deployment, your site visitor’s External Reference ID will be available in the context of their logged session through a JavaScript expression or a cookie.
The steps below show how to perform an end-to-end scenario using test data and web browser workarounds.
Testing Contact Frequency
Example: We’ll be using aaa123 as our example Reference ID. Any time you see the ID number in these steps, replace it with the Reference ID you specified.
- Google Chrome: In the Chrome menu bar, go to View → Developer → Developer Tools. In the window that appears, go to the Console
- Apple Safari: Ensure the Develop menu is enabled for Safari. To do this, go to Preferences → Advanced → Show Develop menu in menu bar. Click Develop in the Safari menu and select Show Web Inspector. In the window that appears, go to the Console
- Mozilla Firefox: Click the menu icon and then select Web Developer. In the Web Developer menu, select the Console
- Microsoft Edge: In the menu bar, go to Tools → Developer → Developer Tools. In the window that opens, go to the Console
- Internet Explorer: Click the Gear icon and select Developer Tools. In the window that opens, go to the Console
UserID="aaa123"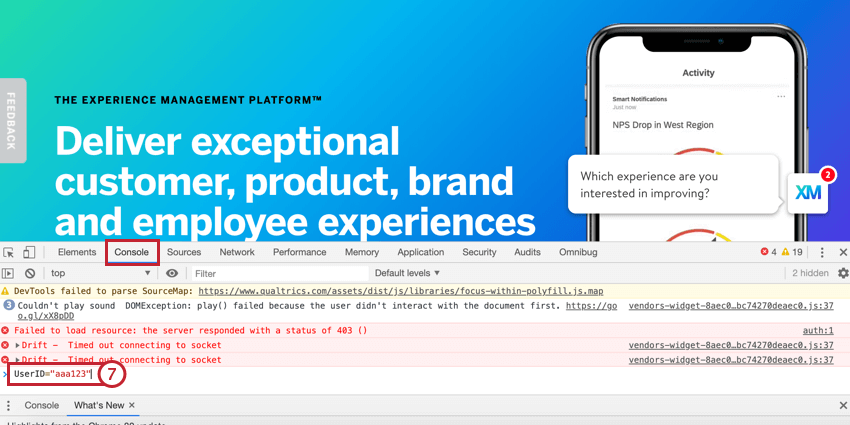
Qtip: aaa123 is our example Reference ID value and should be replaced with the value you assigned to the contact in step 1.
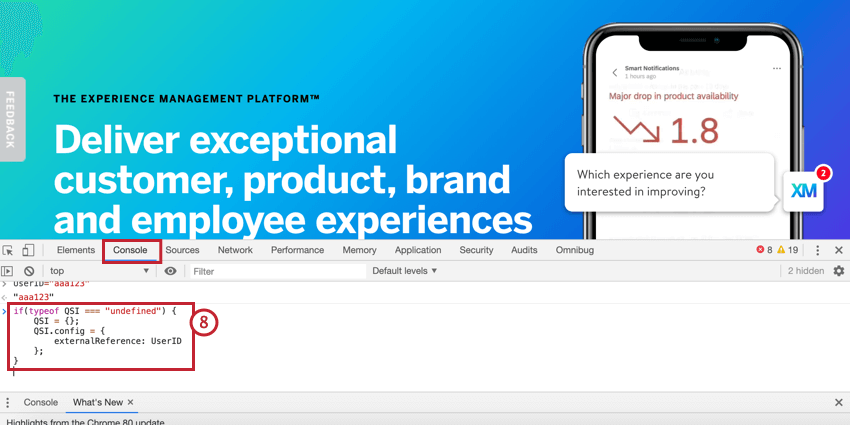
if(typeof QSI === "undefined") {
 QSI = {};
 QSI.config = {
 externalReference: UserID
 };
}Qtip: For security purposes, the targeting logic line that includes the segment will only include the segment ID. To match a segment ID to a segment name, navigate to XM Directory and edit your segment. The URL will have the segment ID, which is bolded in the following example URL: https://dxdemo.co1.qualtrics.com/iq-directory/#/POOL_2QRmx18nJXf6kuR/segments/SG_1hHhxvjX3PAZ34k
To repeat these steps for additional testing, please do the following between tests:
TESTING CONTACT CREATION
- Google Chrome: In the Chrome menu bar, go to View → Developer → Developer Tools. In the window that appears, go to the Console
- Apple Safari: Ensure the Develop menu is enabled for Safari. To do this, go to Preferences → Advanced → Show Develop menu in menu bar. Click Develop in the Safari menu and select Show Web Inspector. In the window that appears, go to the Console
- Mozilla Firefox: Click the menu icon and then select Web Developer. In the Web Developer menu, select the Console
- Microsoft Edge: In the menu bar, go to Tools → Developer → Developer Tools. In the window that opens, go to the Console
- Internet Explorer: Click the Gear icon and select Developer Tools. In the window that opens, go to the Console
QSI = {config: {externalReference:"test123", contactEmbeddedData: {"Location":"Seattle"}, language:"English", firstName:"Jane", lastName:"Smith"}} 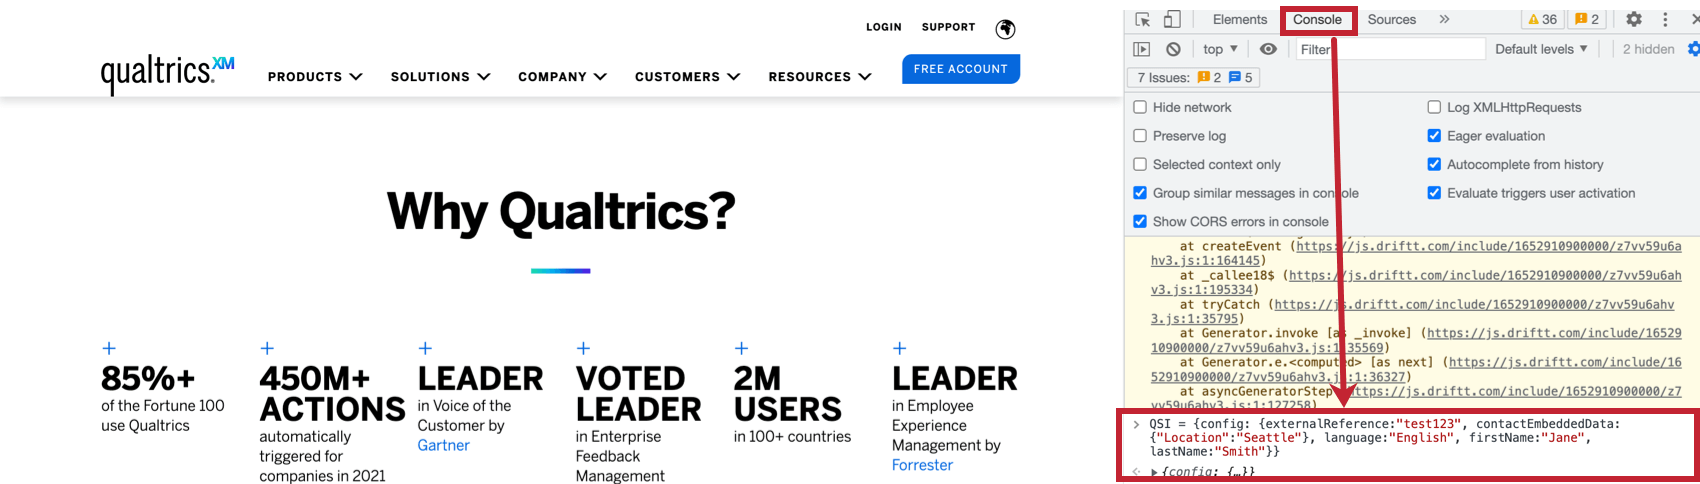
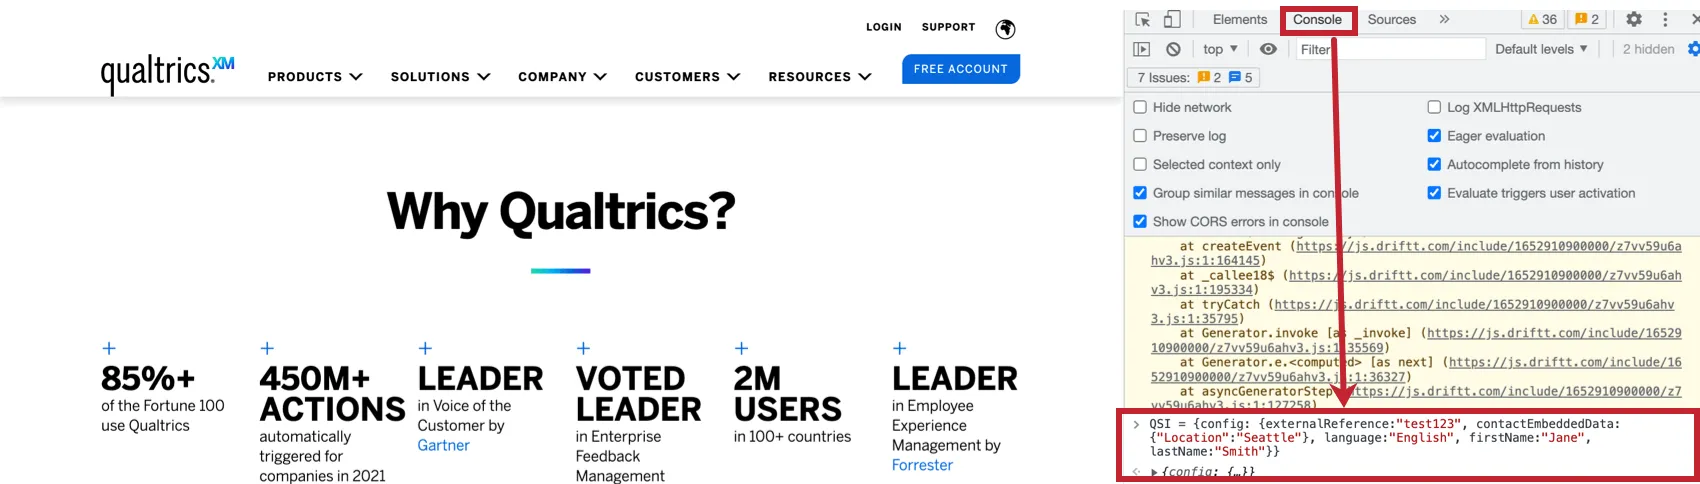
Qtip: The values in this expression are examples for contact values that will be added to the test contact’s XM Directory profile. You can change these values to whatever you would like.
Attention: We do not support email addresses as profile attributes in order to preserve highly secure web intercepts. You can add email addresses manually through the directory or by file uploads and automated contact import workflows.
Qtip: The intercept does NOT have to be displayed in order for the contact creation to work. It just has to be evaluated on the page.
Qtip: Other XM Directory functionality such as segment targeting or contact frequency rules will not work as part of the same page load as the one where the contact profile was created. However, once the contact is created, any subsequent intercepts will evaluate contact frequency and segment targeting rules.
Qtip: On website intercepts, you can test the intercept using the bookmarklet both with contacts that are in the segment and with contacts that are not in the segment. During testing, you’ll have to mimic the setting of the External Reference ID within your browser so Qualtrics can identify the contact.
Digital Experience Analytics and XM Directory
The sessions you record for Digital Experience Analytics (DXA) can be reflected in your XM Directory contact profiles. This data enriches your understanding of which customers are most impacted by your website’s experience, and can help you decide how to prioritize gaps you identify in the digital experience.
Qtip: Session replays saved in XM Directory do not support the Personal Data deletion-by-email feature. Instead, see our guide on Session Replay and GDPR.
Setting up DXA and XM Directory
The integration between DXA and XM Directory is the exact same as linking a Website Insights project to XM Directory!
Qtip: If you already completed the steps below for your Website Insights project, you don’t have to repeat these steps.
Qtip: For help with deploying Website Insights project code to a website, IT teams can refer to our Technical Documentation.
Viewing contact data on a session replay
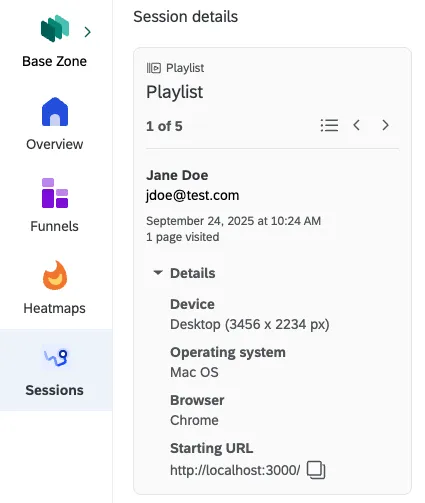
To see session replays, open Digital Assist. Instead of “Anonymous user,” you’ll see the contact’s name as it appears in the directory.
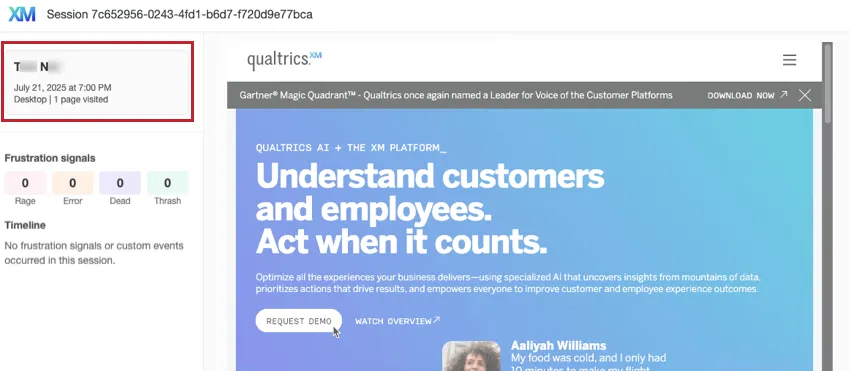
You can expand the contact’s name to see other identifying information for the contact, such as device metadata and email.
Viewing session replay data on a contact
Web visit experiences can appear on a contact’s timeline to indicate either interactions with an intercept or session recordings. If a session was captured, the entry will come with a button called View session replay.
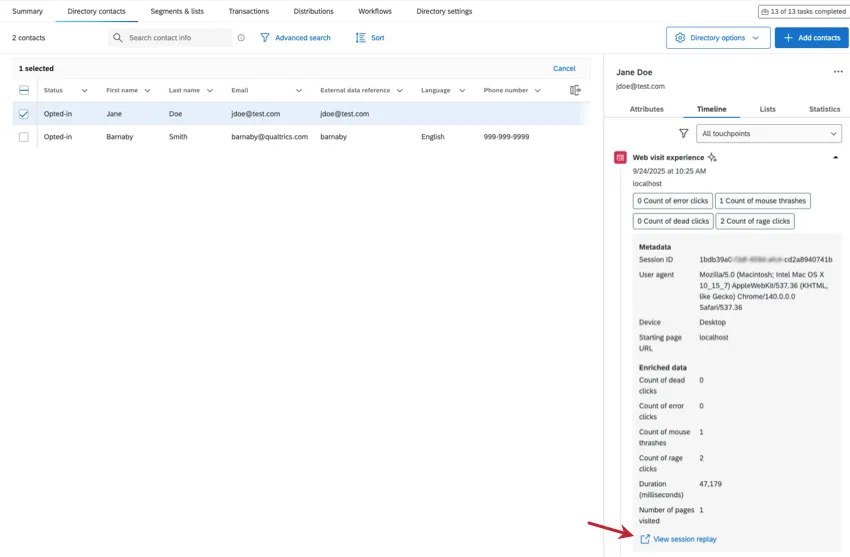
You’ll also see a summary of frustration signals detected during the session.
Troubleshooting Tips
A new user was added to segments, but doesn’t see an intercept that was targeted at their segment.
Segments are rebuilt daily in XM Directory. Therefore, there is a possibility the new user was not yet accounted for as a member of the segment.
The intercept debugger window does not show segment names.
For security reasons we do not show the segment name in the debugger window for any targeting logic that has segments. We will show the segment ID. To map a segment ID to the segment name, edit your segment in XM Directory and look at the URL. The URL will have the segment ID, which is highlighted in the following example URL: https://dxdemo.co1.qualtrics.com/iq-directory/#/POOL_2QRmx18nJXf6kuR/segments/SG_1hHhxvjX3PAZ34k
Alternatively, you can directly open up an Intercept and examine the targeting logic to see what segments are being targeted.
The intercept is slow to show up for first time users.
For performance reasons, we temporarily store segment membership in-memory and only update it as needed. If a user is not yet in our temporary storage, then that user’s intercept may take a bit longer to display initially.
That's great! Thank you for your feedback!
Thank you for your feedback!