
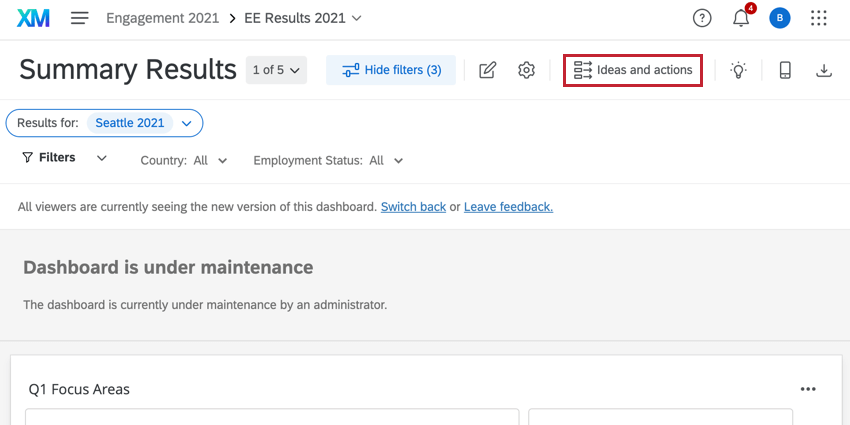
Creating Action Plans (EX)
What's on this page
About Action Plans
Action Plans are initiatives you can create based off your lowest areas of engagement. This support page is intended to help action plan users find, create, update, and export action plans.
Qtip: This page describes functionality available to Engagement, Pulse, and Lifecycle projects. For more details on each, see Types of Employee Experience Projects.
Attention: If org hierarchies are modified or created after creating action plans, the action plans will not update with the new org hierarchy information unless you navigate to Participant Tools and select the Update all action plans with current metadata option.
Attention: This feature is not compatible with Data Isolation.
Viewing Action Plans
You can view your own action plans, or filter by org hierarchy to view the action plans of other people in your organization.
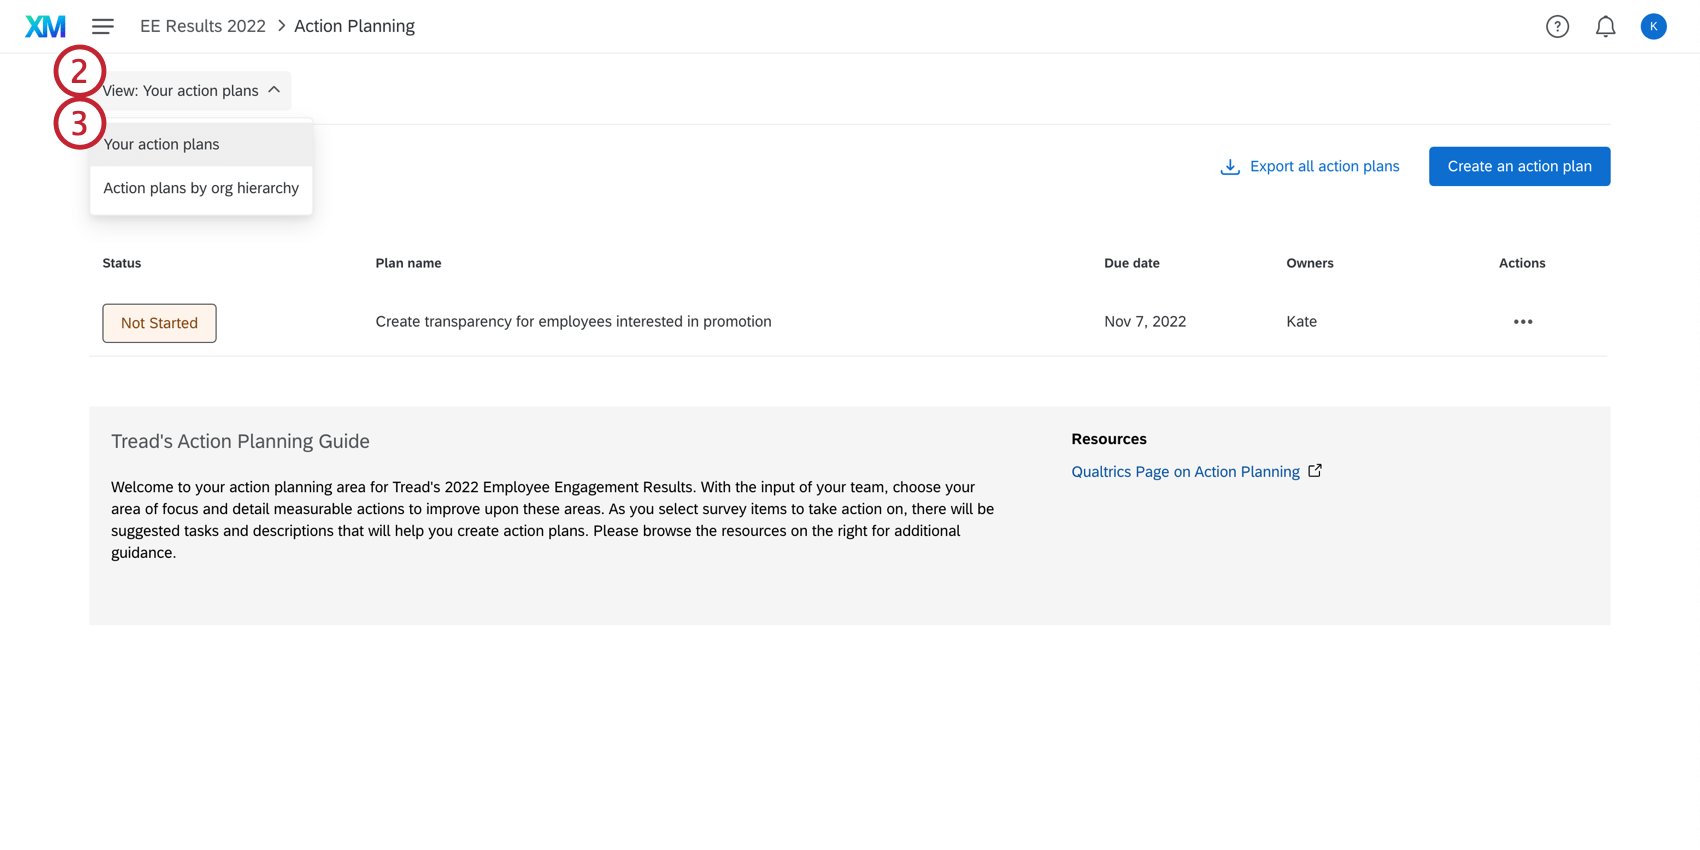
Attention: If the action plan owner is a delegate, then the action plan will not appear here. The action plan must be assigned to a project participant or manager instead.
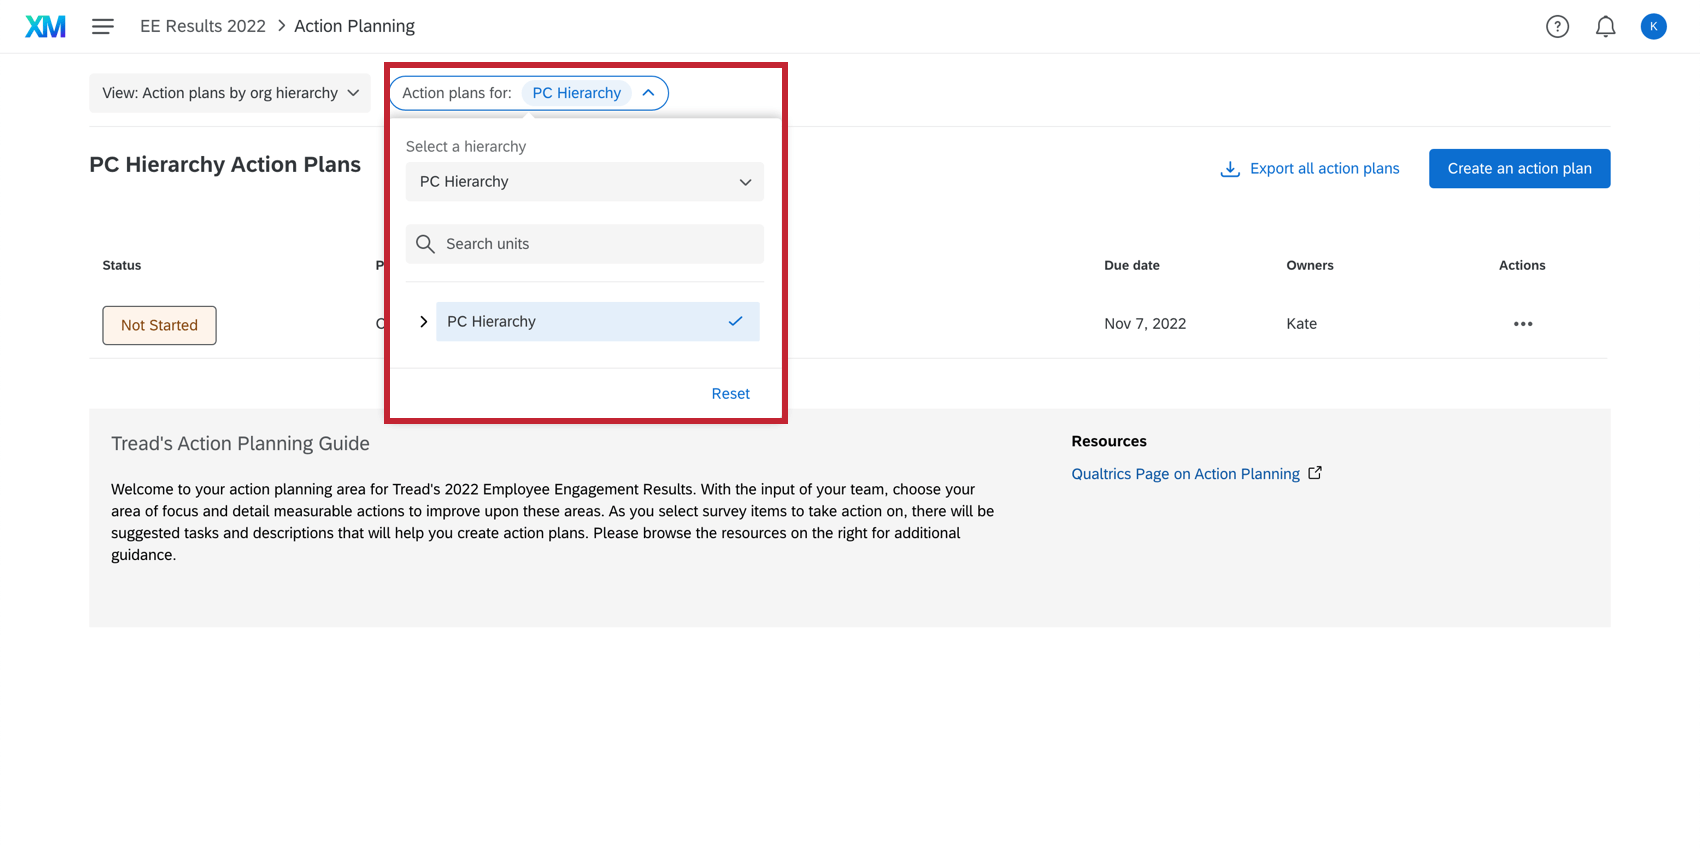
Qtip: Selecting an org hierarchy unit will display action plans that belong to that unit. There is no roll up of action plans in the Action Planning modal, which is different from the org hierarchy filter in dashboards. For example, if you had the org hierarchy structure North America > United States of America > Utah, and the action plan existed in the Utah unit, selecting the North America unit wouldn’t show you Utah’s action plan. You would have to select the Utah unit in the Org Hierarchy filter to see Utah’s action plans.
Qtip: To determine what parts of the hierarchy the participants can filter by, adjust their dashboard permissions. See the Permissions page for data restriction options.
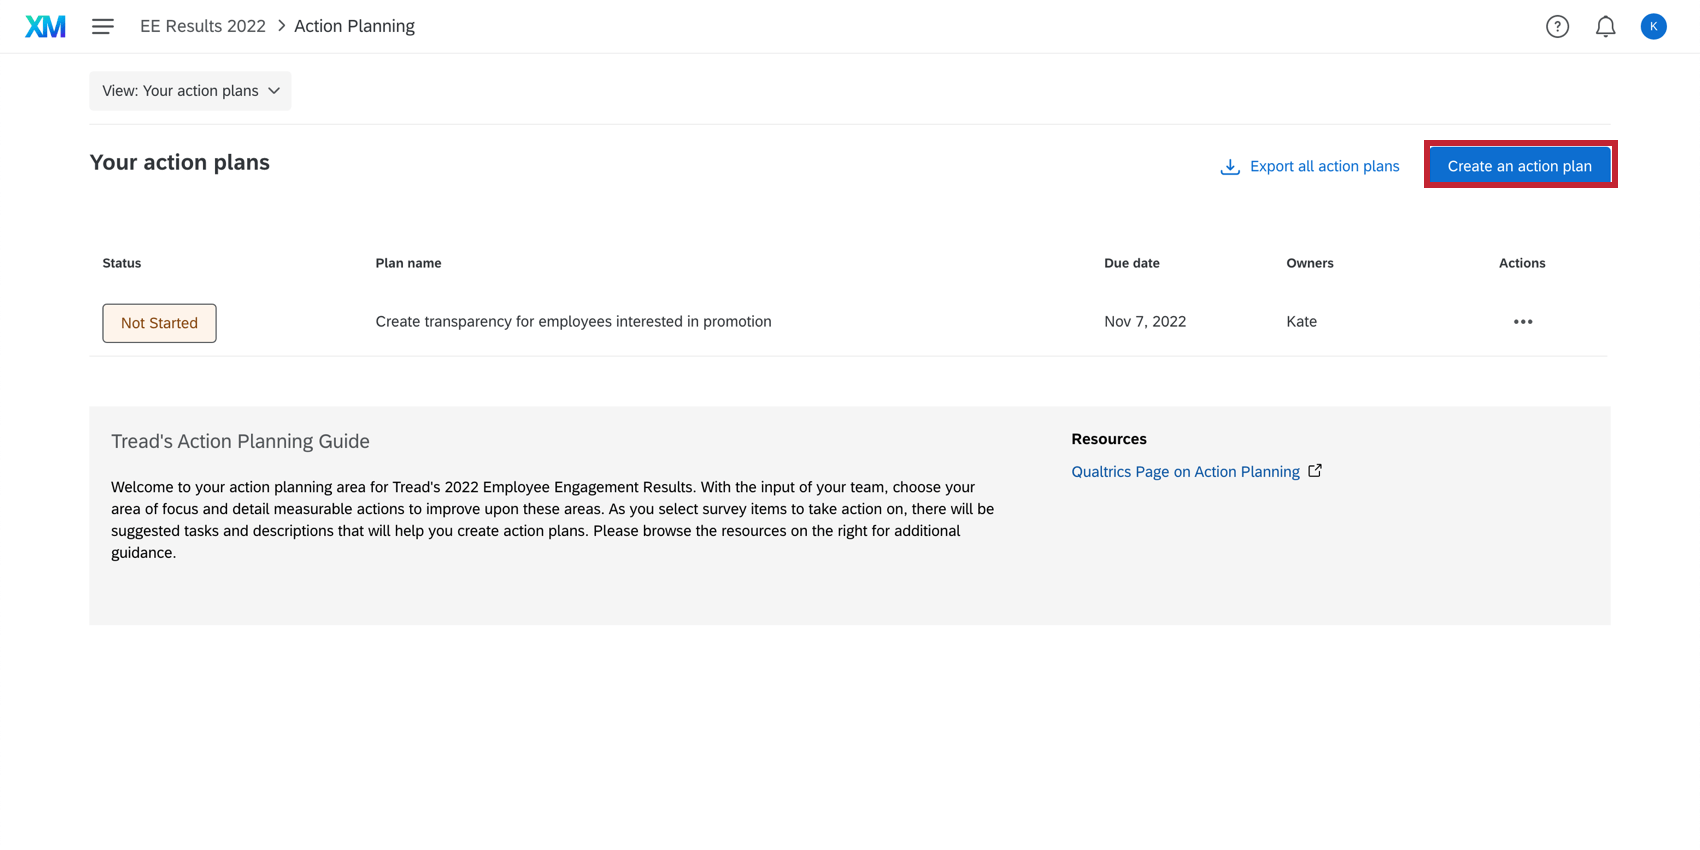
Creating Action Plans
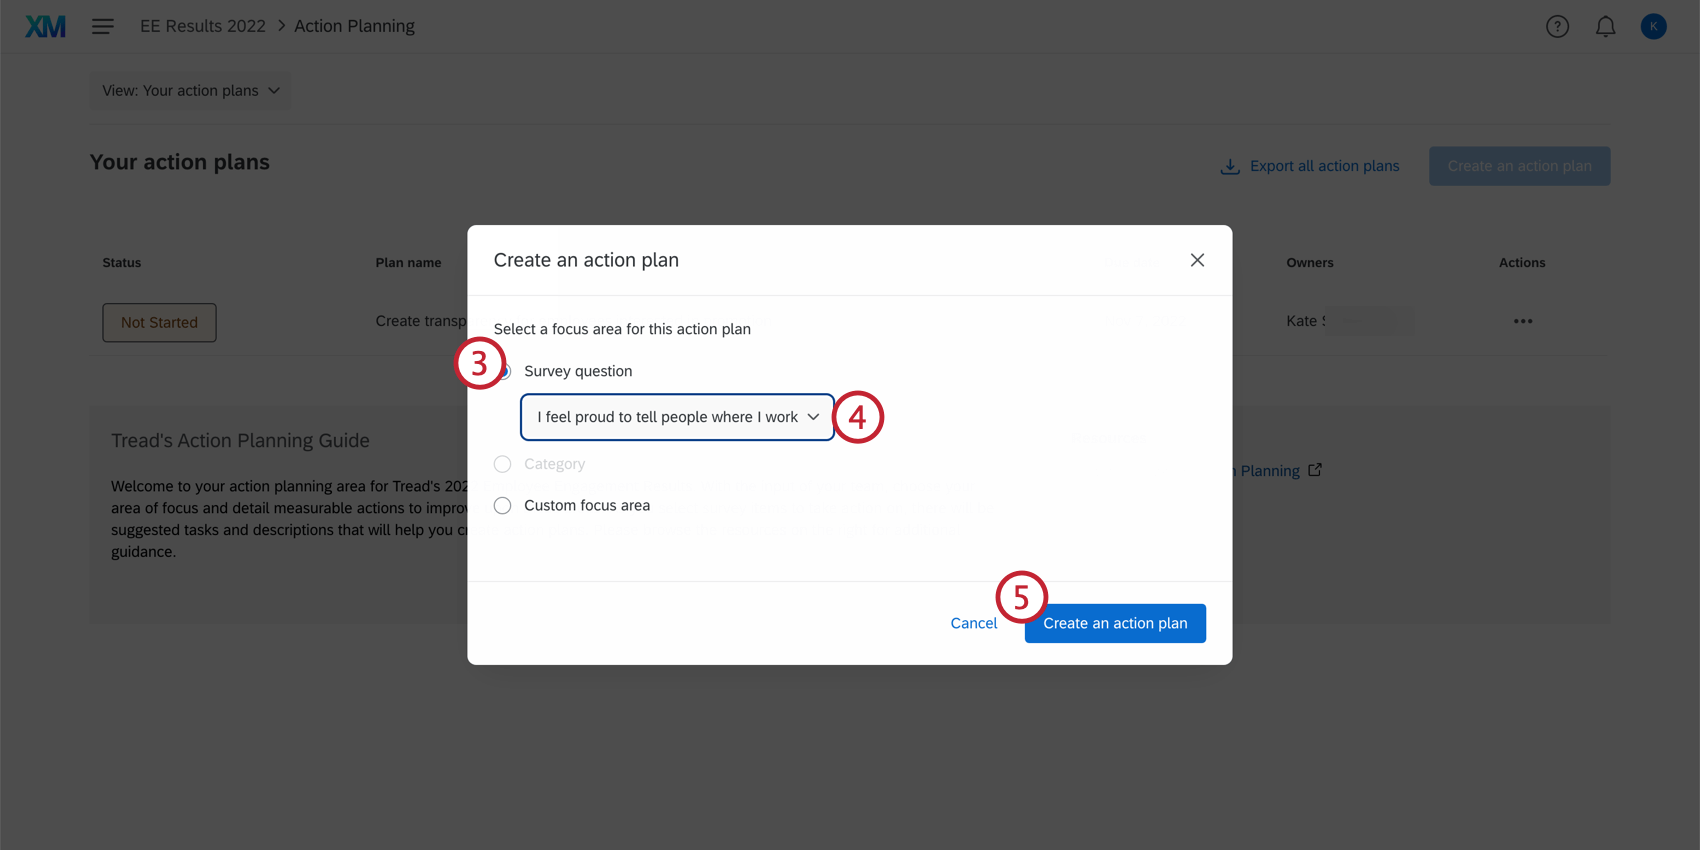
Qtip: If you chose a question or category with Specific Guidance filled out, you will see guidance in the action plan, including suggested tasks and resource links. Managers can edit these suggested tasks, title, and description after they create the action plan.
Attention: The character limit for an action plan’s title as well as for the title of an individual action is 255 characters.
Qtip: The org hierarchy is automatically set based on the action plan owner. For example, any action plan owned by Jane Smith will show up when selecting “Jane Smith” in the hierarchy filter.
- Title
- Description
- Due Date
- Owners
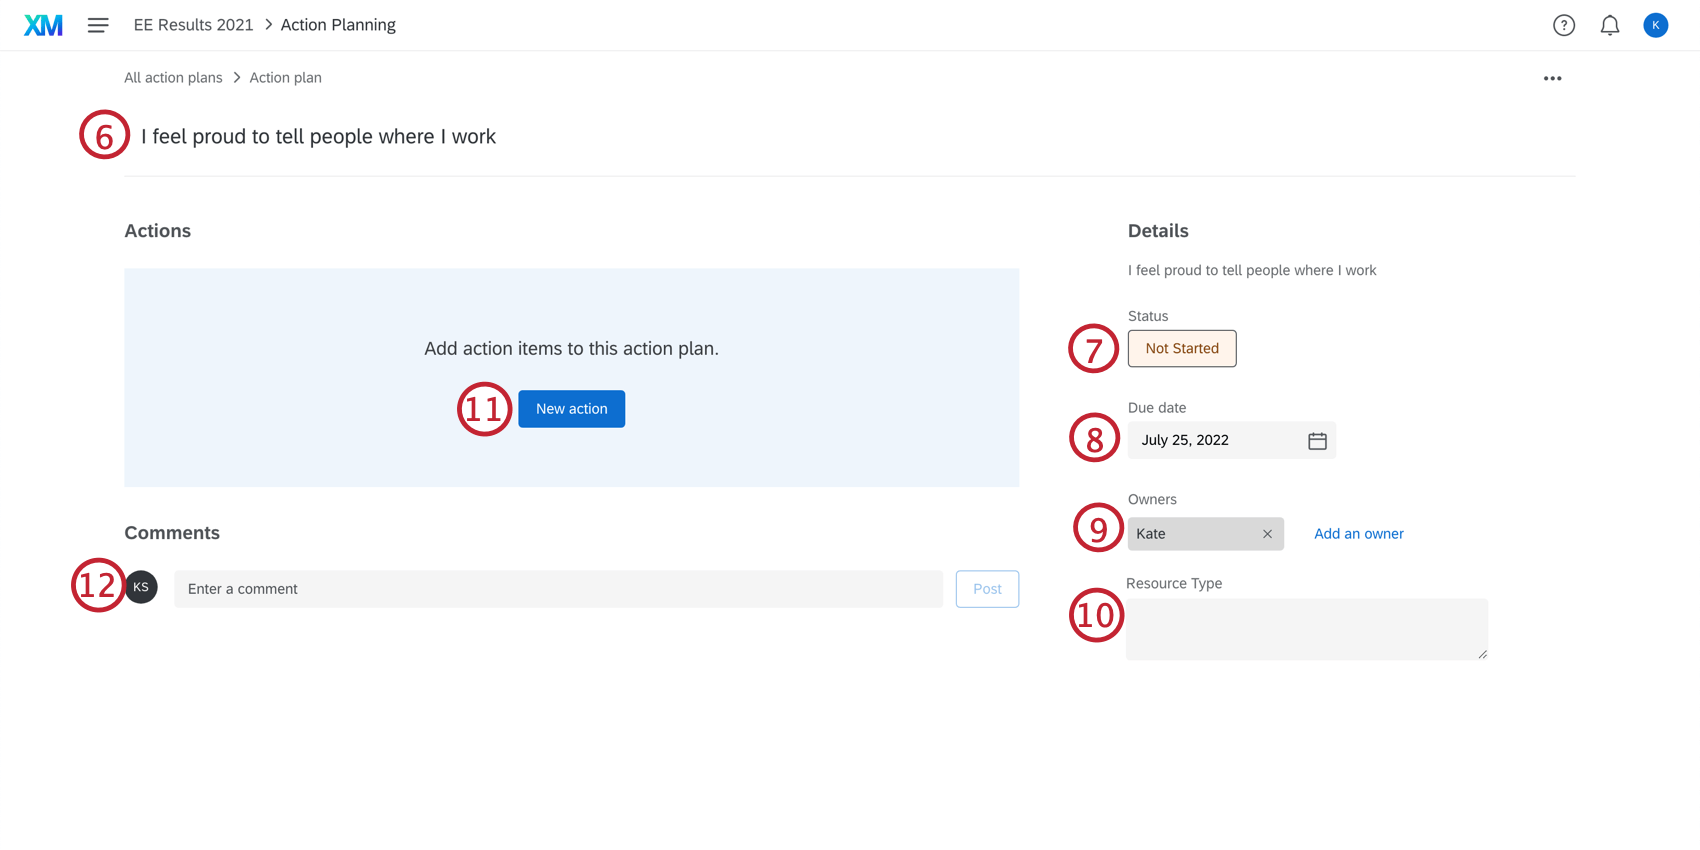
Qtip: To edit or delete a subtask, click the dots in the upper-right corner.

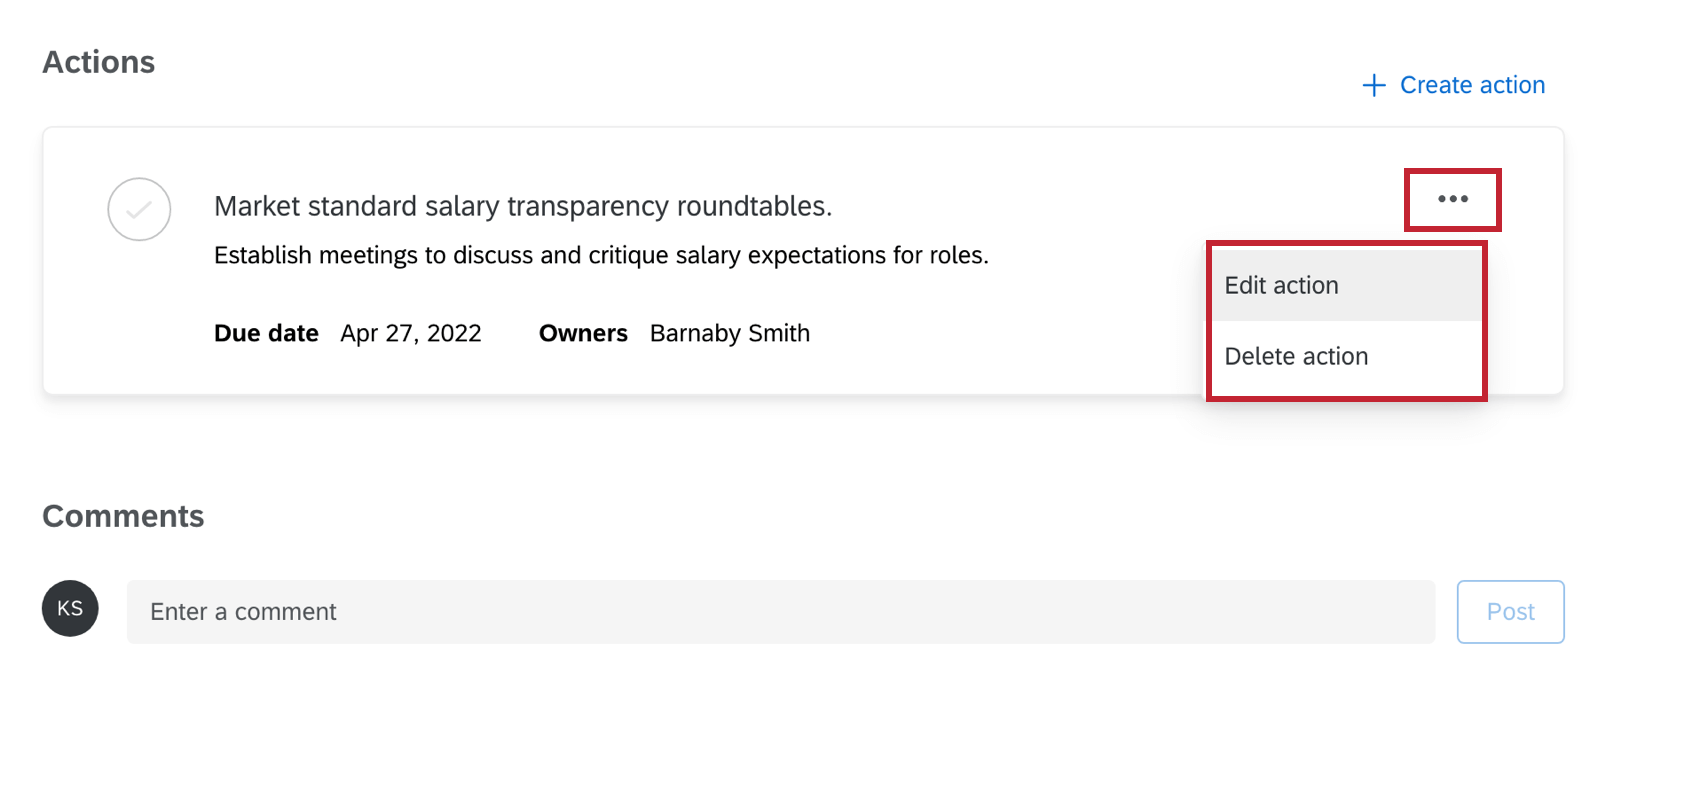
Qtip: If you click the dots in the upper-right of the action plan, you can copy, delete, or export the action plan.

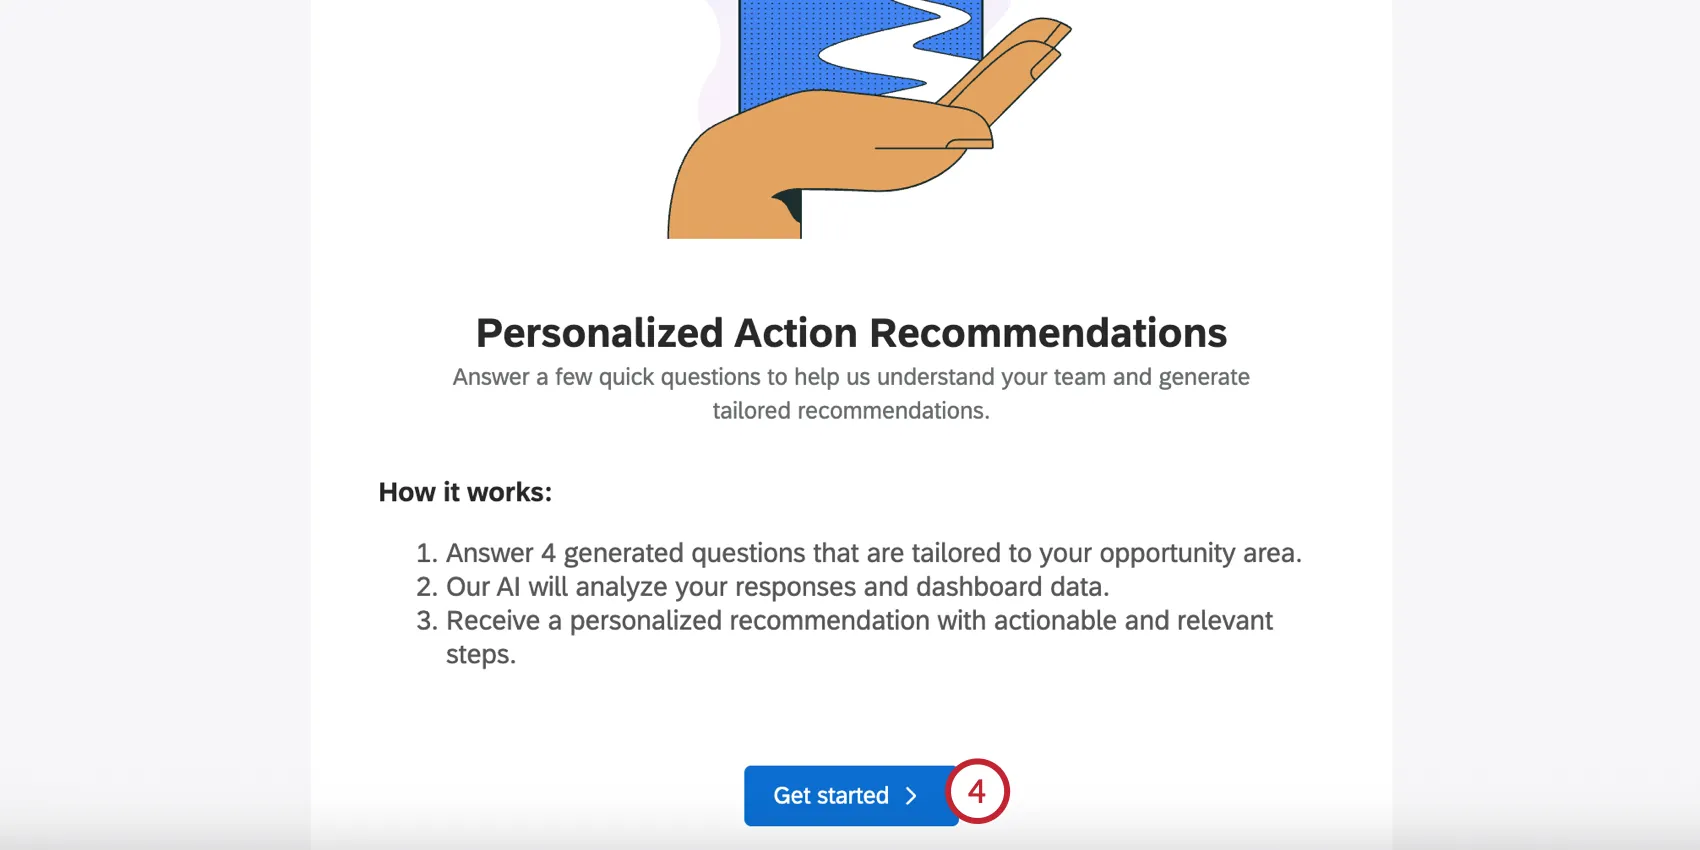
Personalized Action Recommendations
Qtip: This section describes functionality available to Engagement and Pulse projects. For more details on each, see Types of Employee Experience Projects.
Have you ever received EX results and been unsure about how to make a meaningful impact? Personalized action recommendations use AI to help managers and leaders identify areas of improvement, take action, and understand the impact on their team. This is accomplished by analyzing survey scores, open-text comments, and profile information to deliver data-driven suggestions specific to each team’s context. Additionally, personalized action recommendations leverage your organization’s established practices and resources already within your dashboard’s guided action planning to provide highly relevant and tailored suggestions that align with your company’s strategy.
Setting Up Personalized Action Recommendations
You must complete all of the following steps, in order, to use this feature:
Your brand must have the EX Personalized Action Recommendations organization setting enabled. A Brand Administrator must turn this on.
Your account must have the EX Personalized Action Recommendations user permission enabled. A Brand Administrator must turn this on.
Qtip: This permission will be enabled by default for the Participants, Brand Admins, Employee Insights Admin and EX Administrator user types. For information on editing and configuring user types, see Creating a User Type.
In the participants tab, enable the Use personalized action recommendations dashboard permission for your participant role.
In the Dashboard AI settings, enable Personalized Action Recommendations.
Additionally, your dashboard must have the following items configured in order to use personalized action recommendations:
- Your dashboard must have action plans and/or idea boards.
Qtip: Any guidance added to the action planning section of the dashboard settings will be used to create recommendations. Additionally, any resource links will be displayed alongside the personalized action recommendations. For more information on customizing guidance, see Customising Action Plan Guidance.
- Your dashboard must have at least 1 of the following widgets:
Qtip: Personalized action recommendations are not compatible with the legacy versions of the scorecard and question list widgets. You must update your widget to the newer version by clicking "Update now" to use personalized action recommendations.
Using Personalized Action Recommendations
Follow these steps to use personalized action recommendations in your dashboard:
Make sure the Personalized Action Recommendations option is enabled in the Dashboard AI settings.
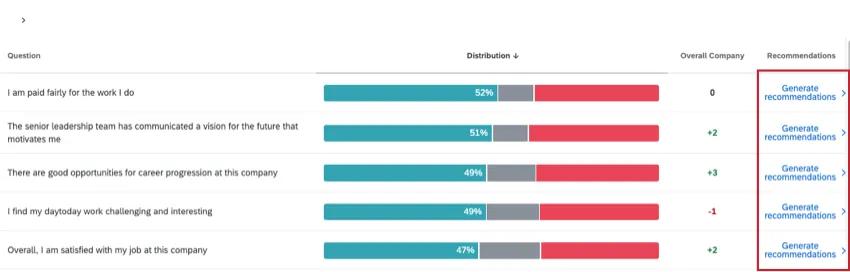
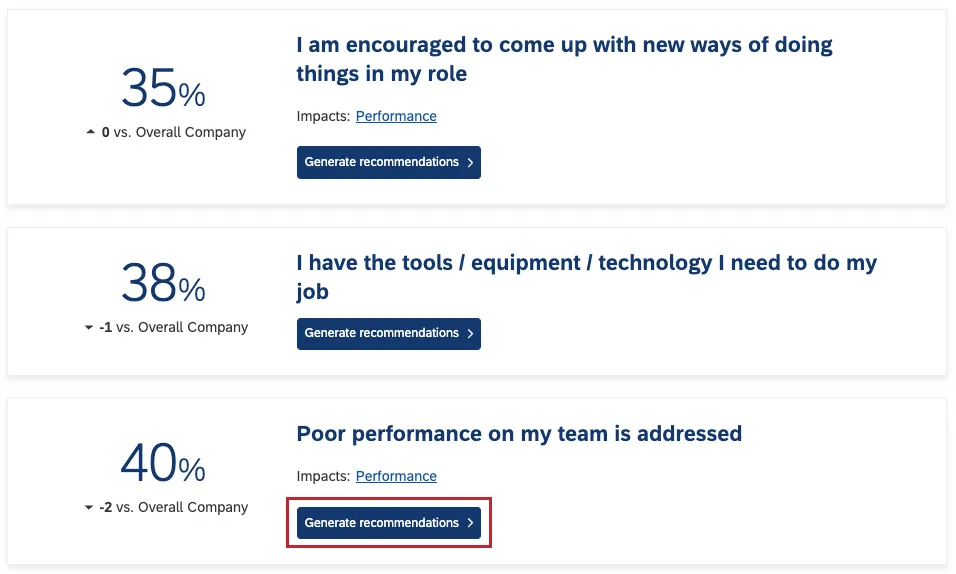
Navigate to the widget (scorecard, question list, or engagement headlines) that contains the opportunity area you’d like to base recommendations on.
Qtip: The widget must have the “Show action planning” option enabled in the widget settings.
Click Generate recommendation.
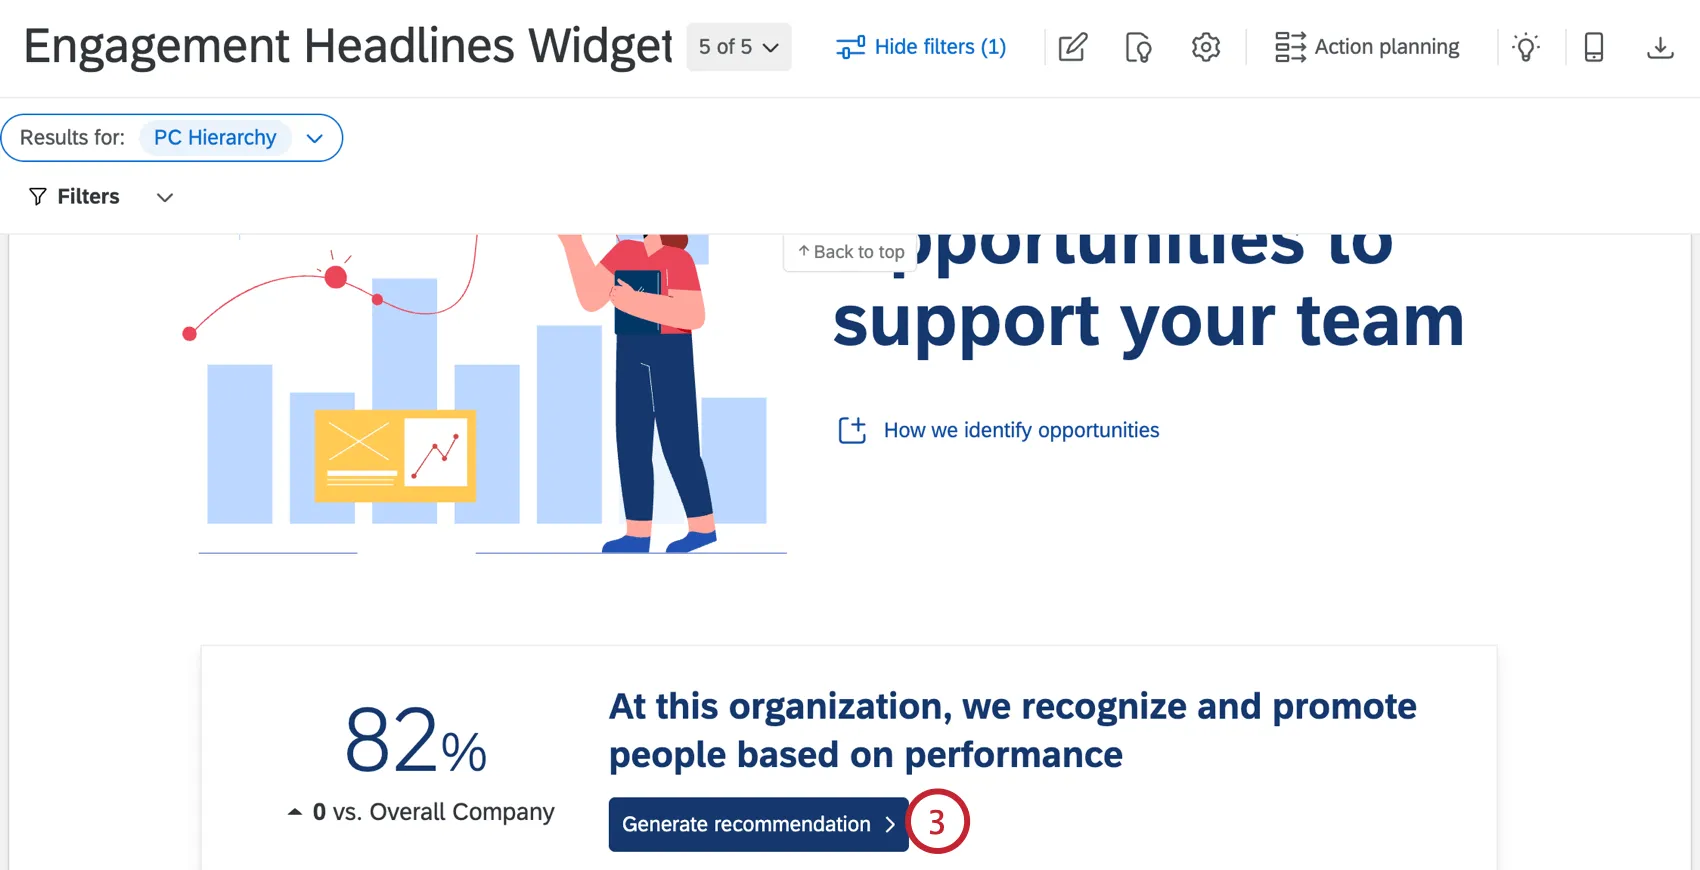
Qtip: If this button says “Improve” instead, then personalized manager action recommendations is disabled in the dashboard settings. Contact the dashboard owner to request it be enabled. If all required permissions are enabled, then check that you are not using a legacy version of the widget.
Click Get started.
Qualtrics will generate a personalized 4-question multiple-choice survey to help better understand your team context. This survey is generated based on your survey scores, open comment responses, and survey response count. You can select multiple answers for each question.
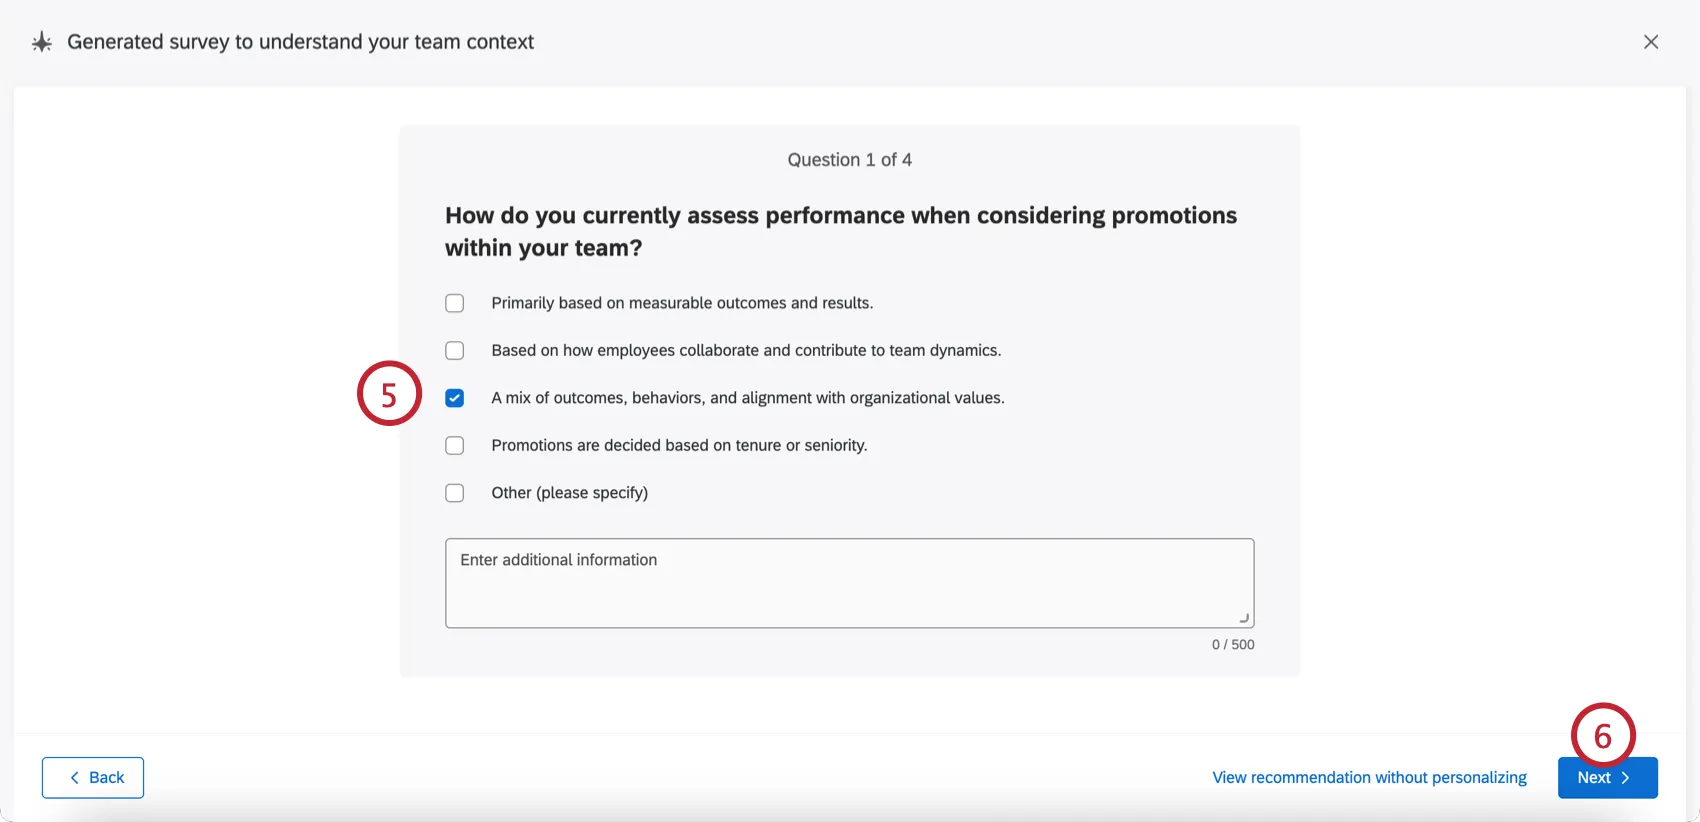
Qtip: If desired, you can skip the survey by clicking View recommendations without personalizing, but this is strongly discouraged. The personalization questions help ensure your recommendations are as targeted as possible.
Click Next to continue through and complete the survey. Your recommendations will generate, which may take a minute.
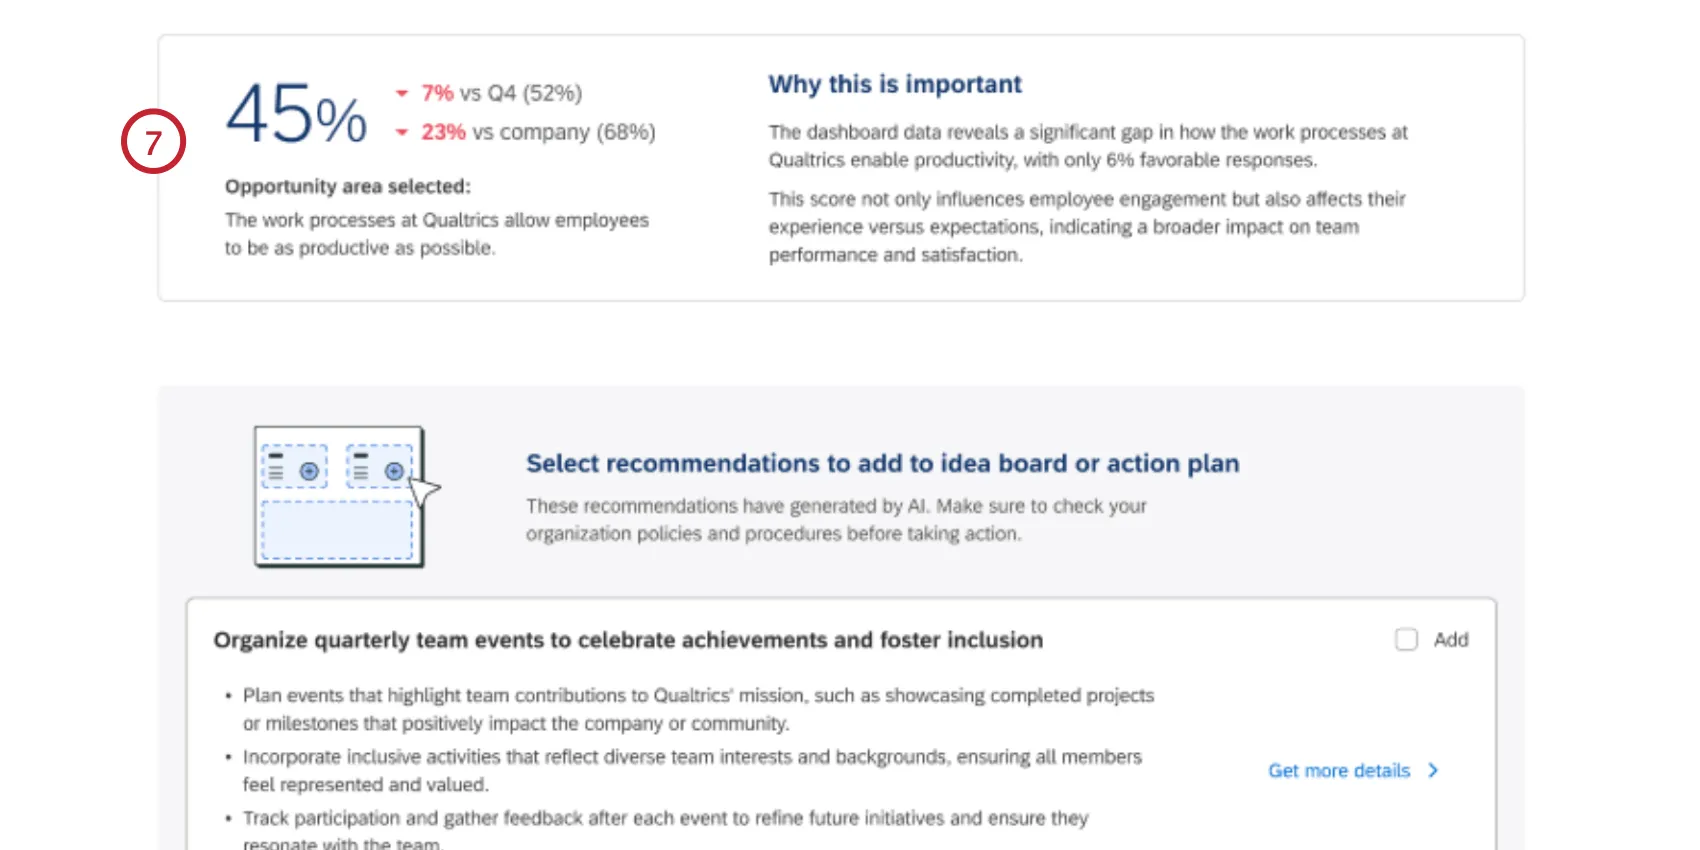
Once the recommendations are generated, you’ll see an overview of your selected opportunity area, its benchmark scores, and an explanation of why the area is important.
Qtip: Recommendations are lost if you refresh or navigate away from this page. To save specific recommendations, either download them as a PDF or add them to your action planning or idea boards (covered in the following steps).
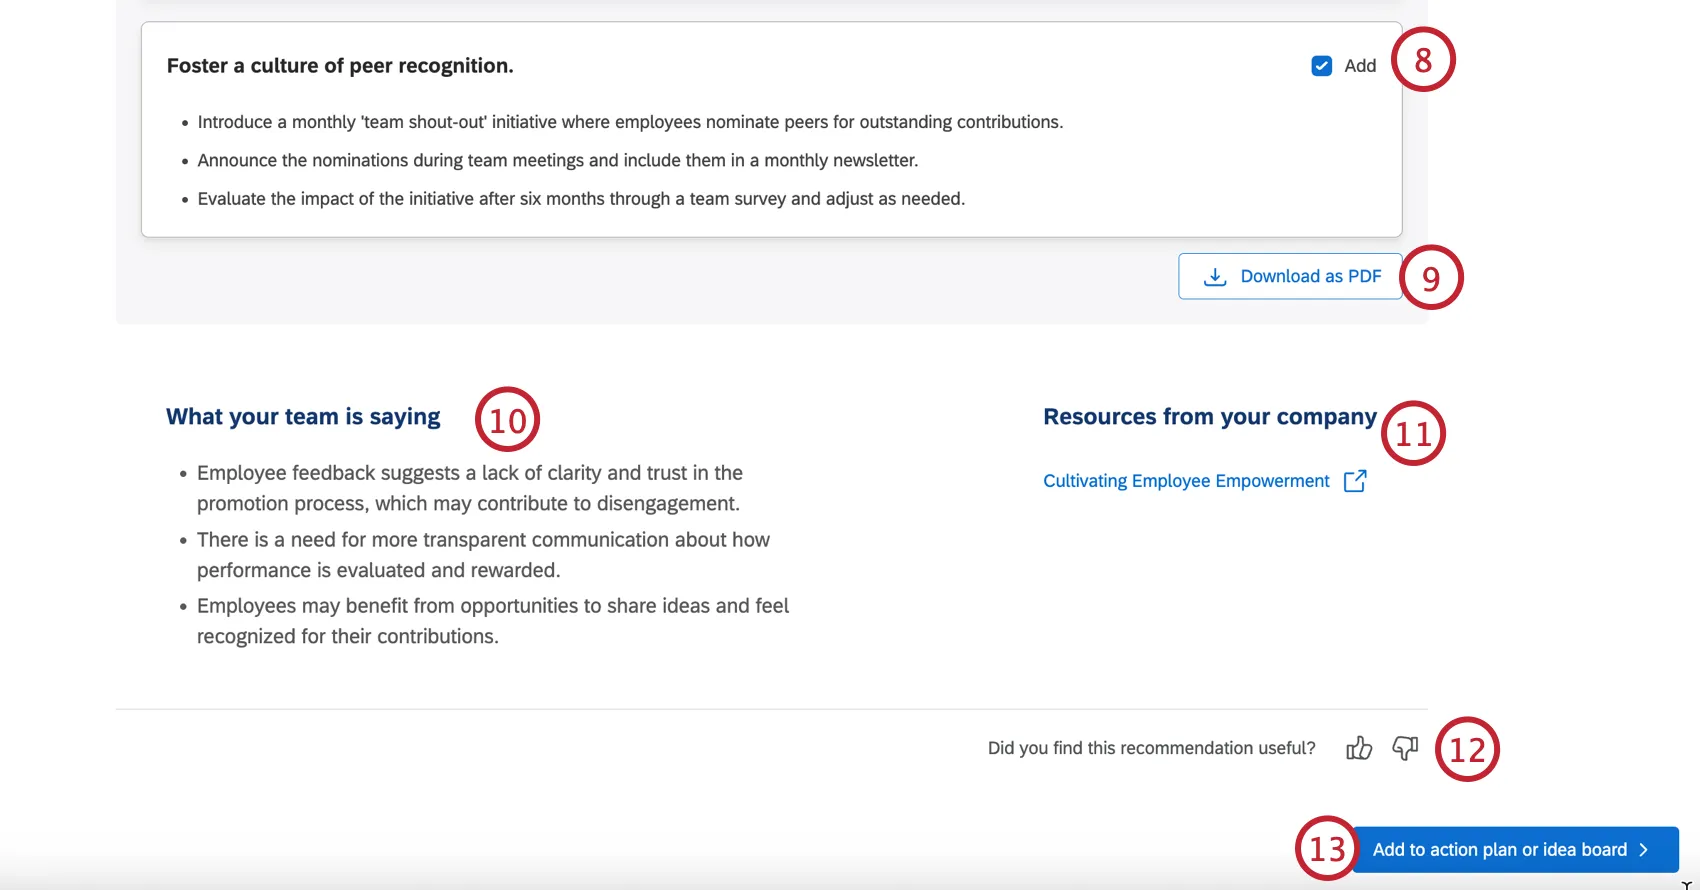
Below this are 3 action recommendations designed to provide actionable steps to improve the opportunity area. Click Add next to any recommendations you’d like to use in an action plan or idea board.
Qtip: To generate additional guidance for a recommendation, click Get more details to open a side panel with step-by step-instructions on how to implement this recommendation. Please note that these additional steps do not transfer to action plan or idea boards, so if you’d like to keep them, click the Download as PDF button at the top of the side panel.
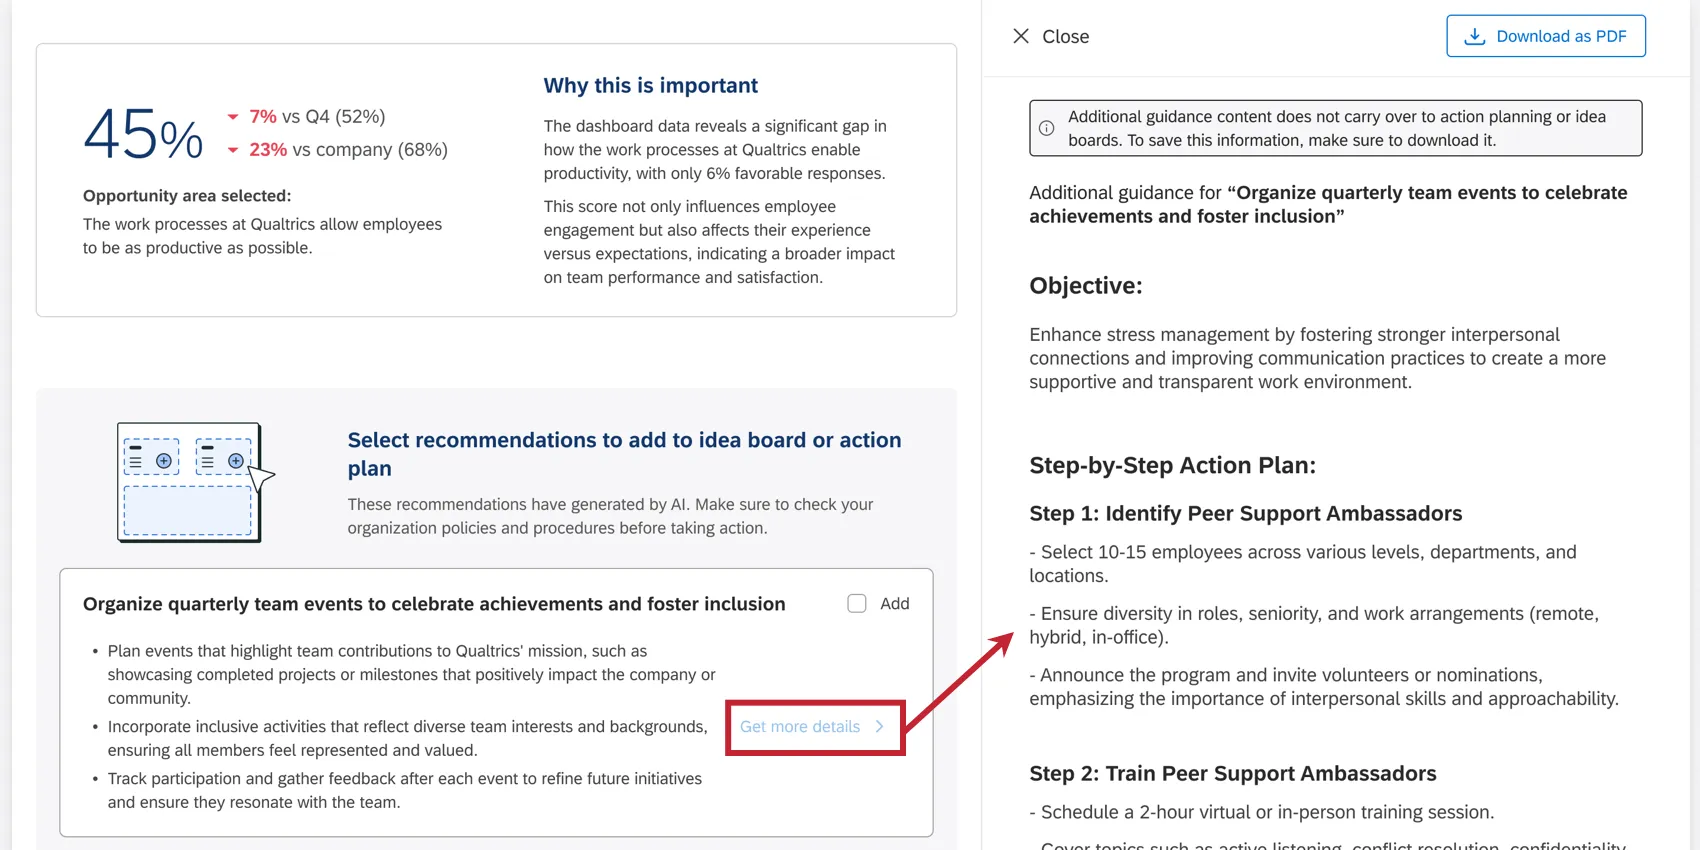
If desired, you can export your 3 recommendations by clicking Download as PDF.
The What your team is saying section provides an overview of your team’s feedback regarding this opportunity area.
The Resources from your company contains any resource links that were added as part of guided action planning, if they are available.
You can give feedback about your recommendations by using the thumbs up/down icons at the bottom of the page.
Click Add to action plan or idea board once you’ve selected the recommendation(s) you’d like to keep.
Choose if you’d like to add the recommendations to an idea board or to create a new action plan. Depending on your user permissions and dashboard access, you may only have access to one of these.
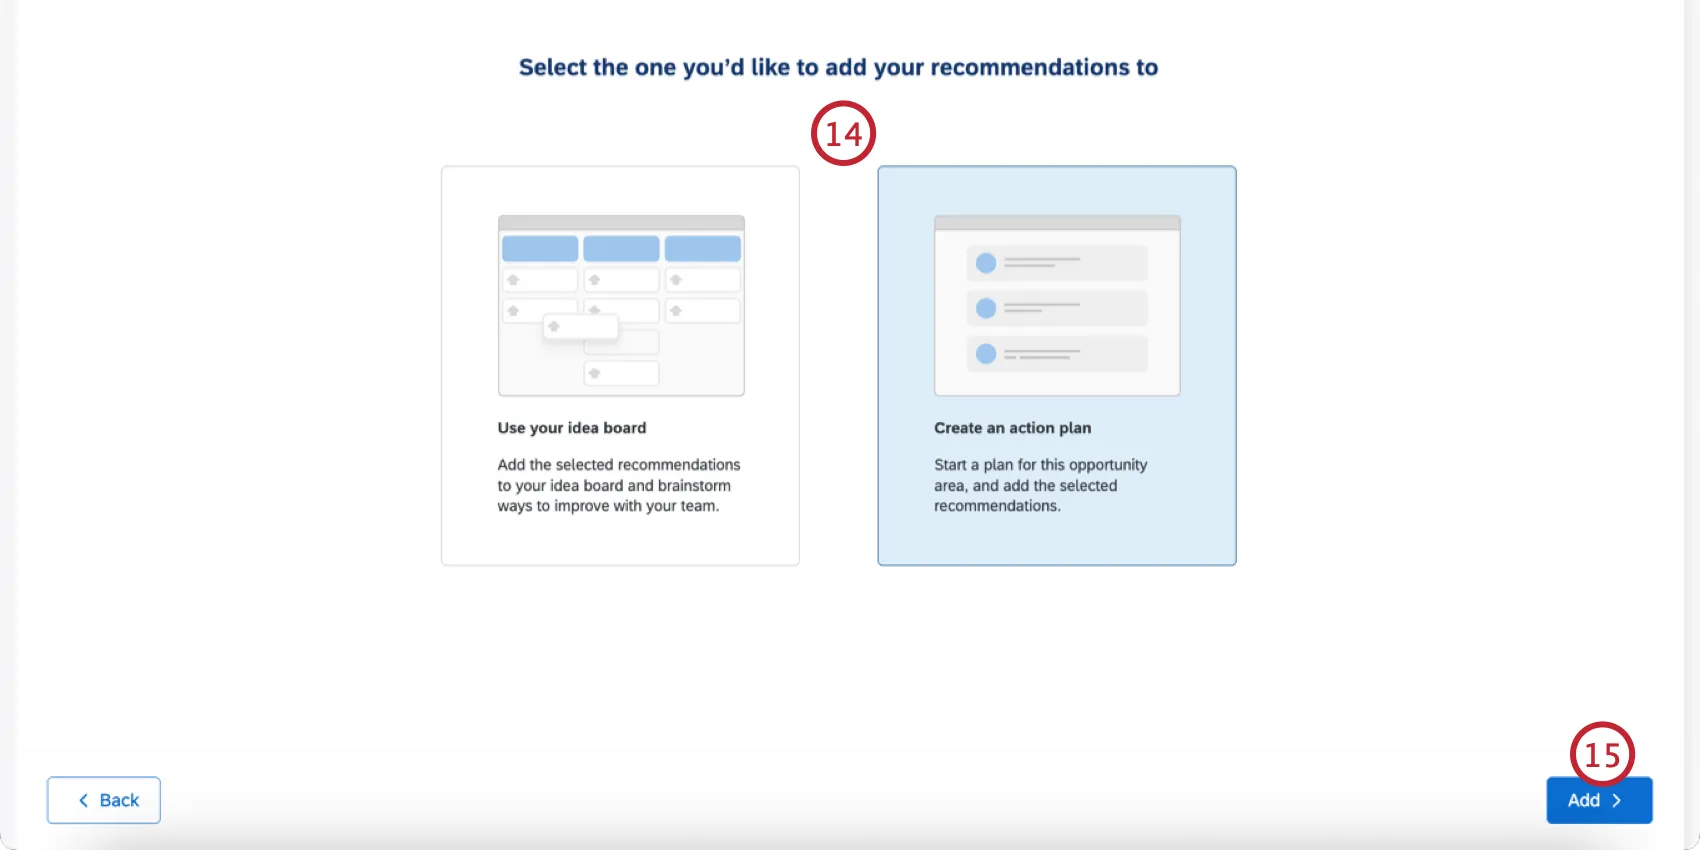
Click Add.
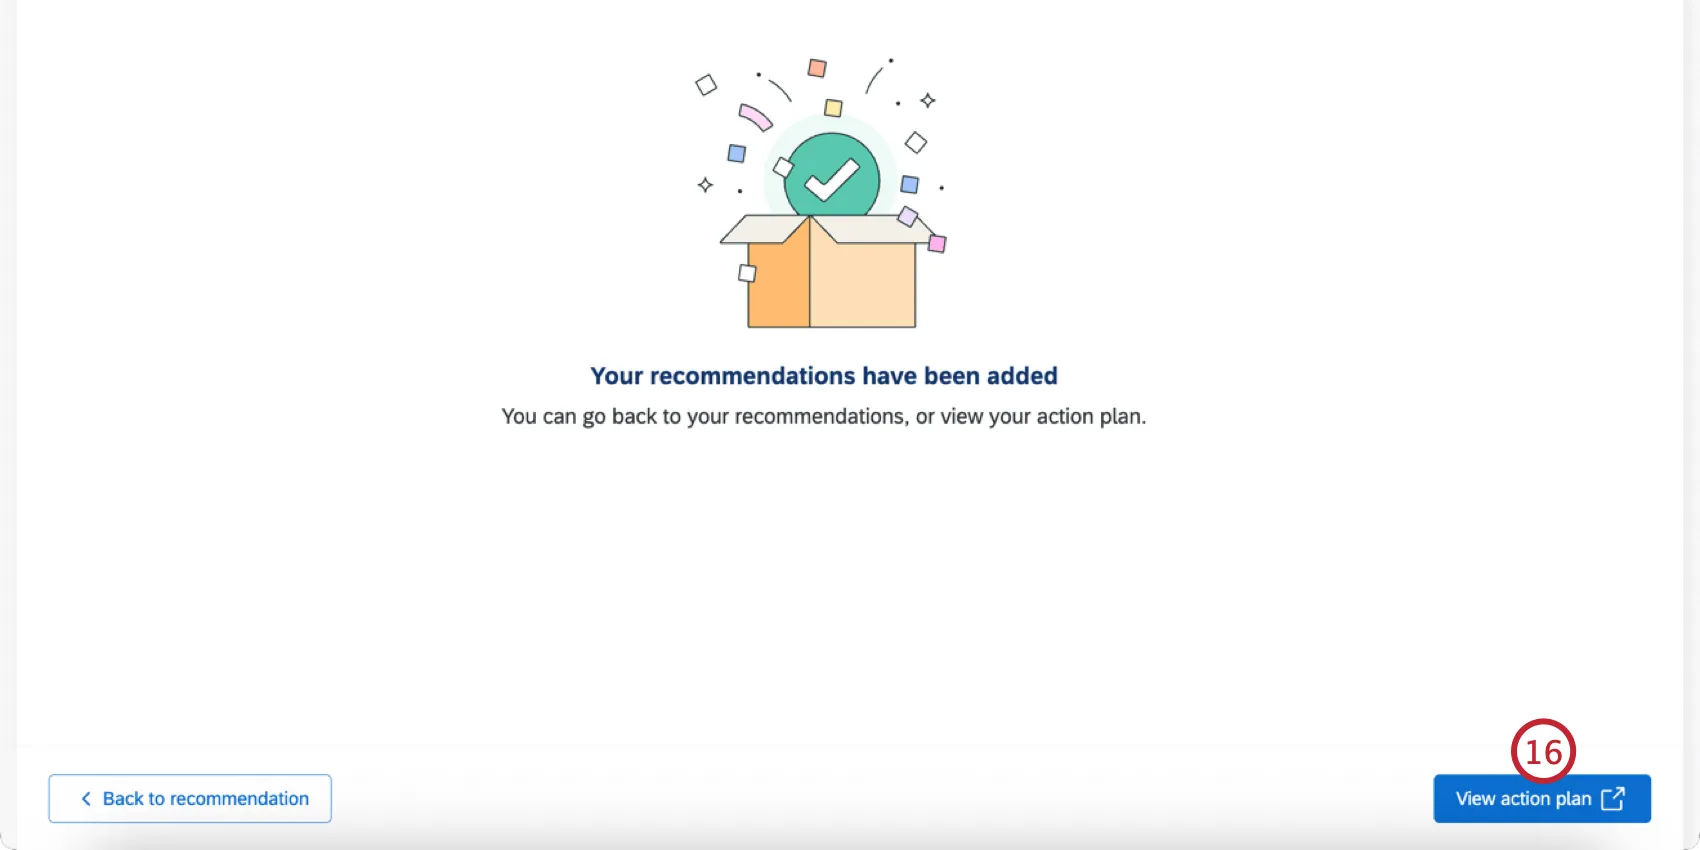
You’ll see a confirmation message that your recommendations have been added. Click View action plan/View idea board to be brought to the recommendation. You can then edit and update it like any action plan or idea.
See the following pages for additional guidance:
Qtip: If you see a “Something went wrong” error, then please try generating recommendations again later.
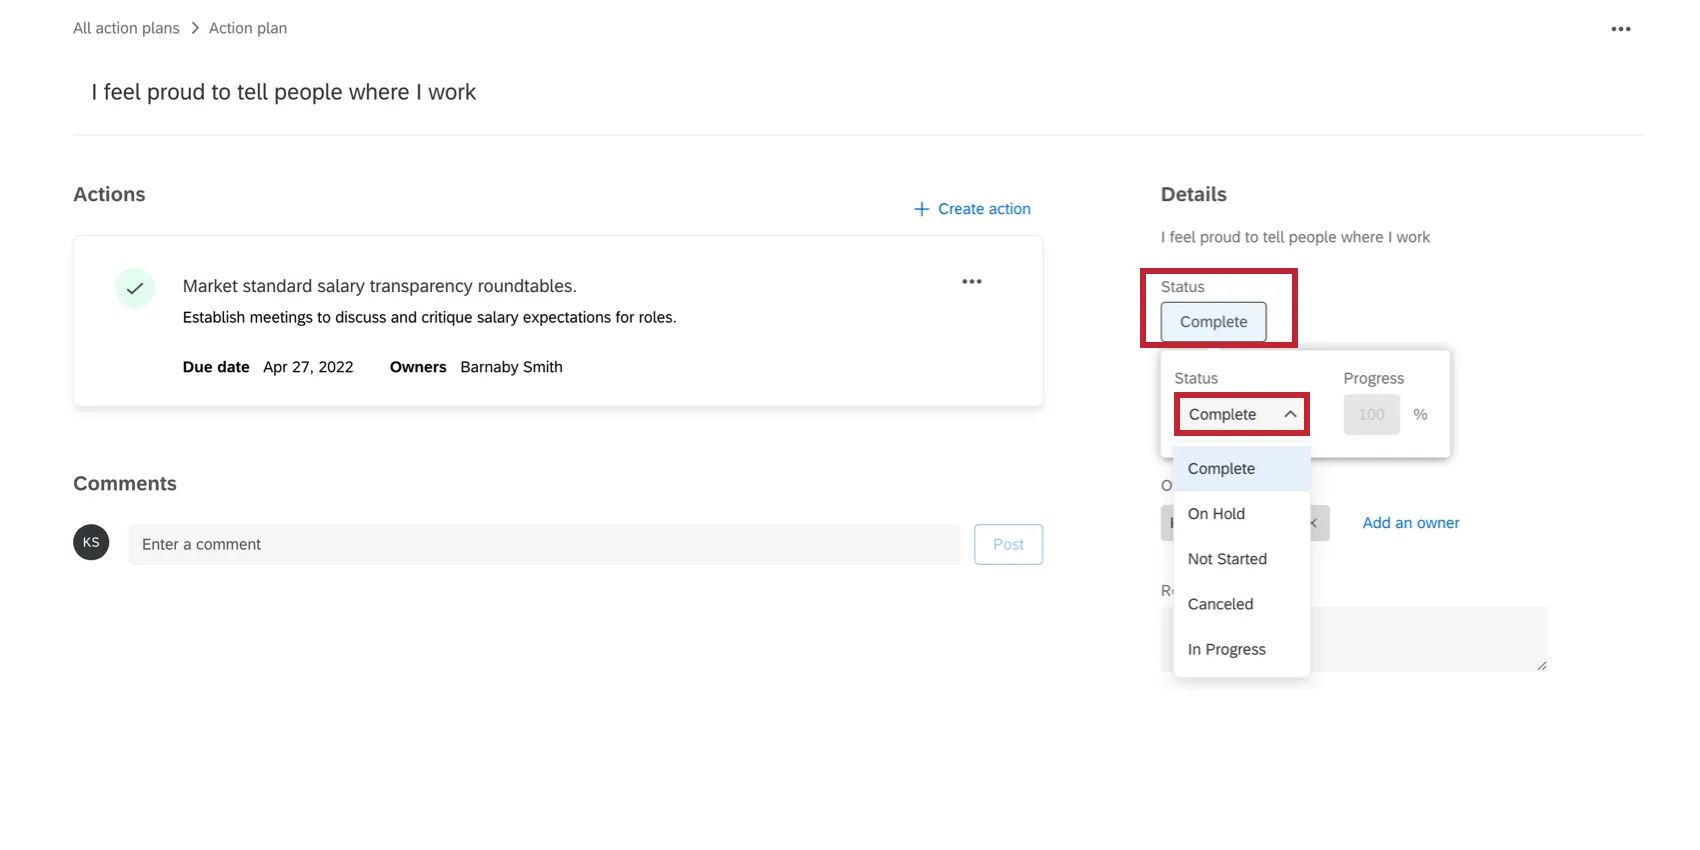
Updating Action Plan Statuses
You can indicate the completion of a subtask by clicking the checkbox on the left. This will automatically update the status and percentage completion for the entire action plan.
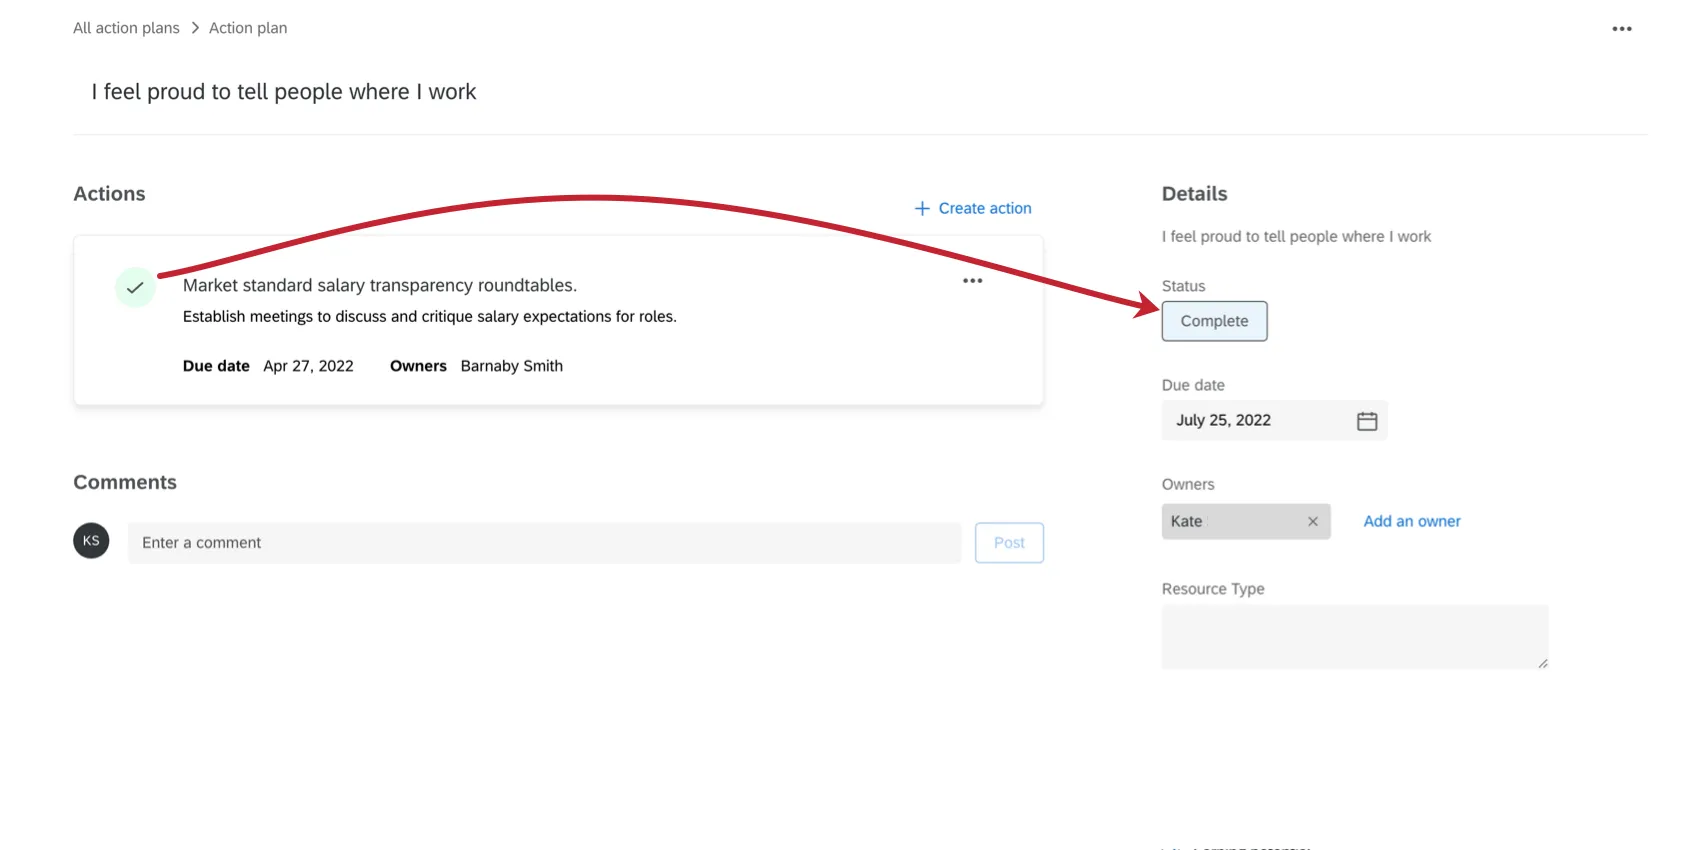
The action plan status can be manually overridden by clicking the Status and changing the Status and Progress fields.
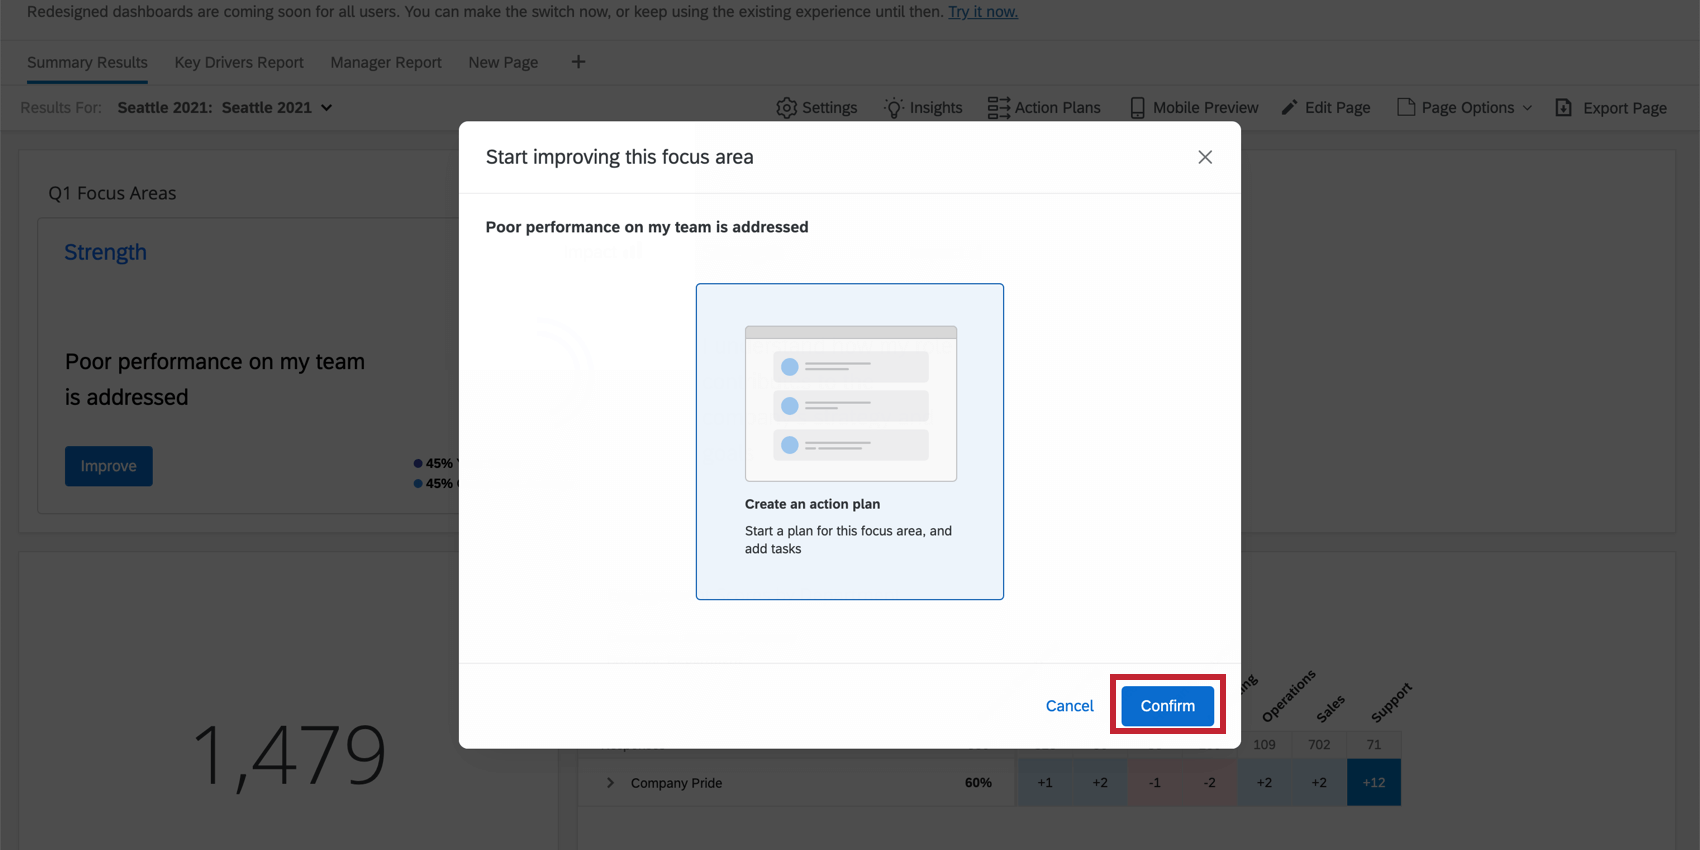
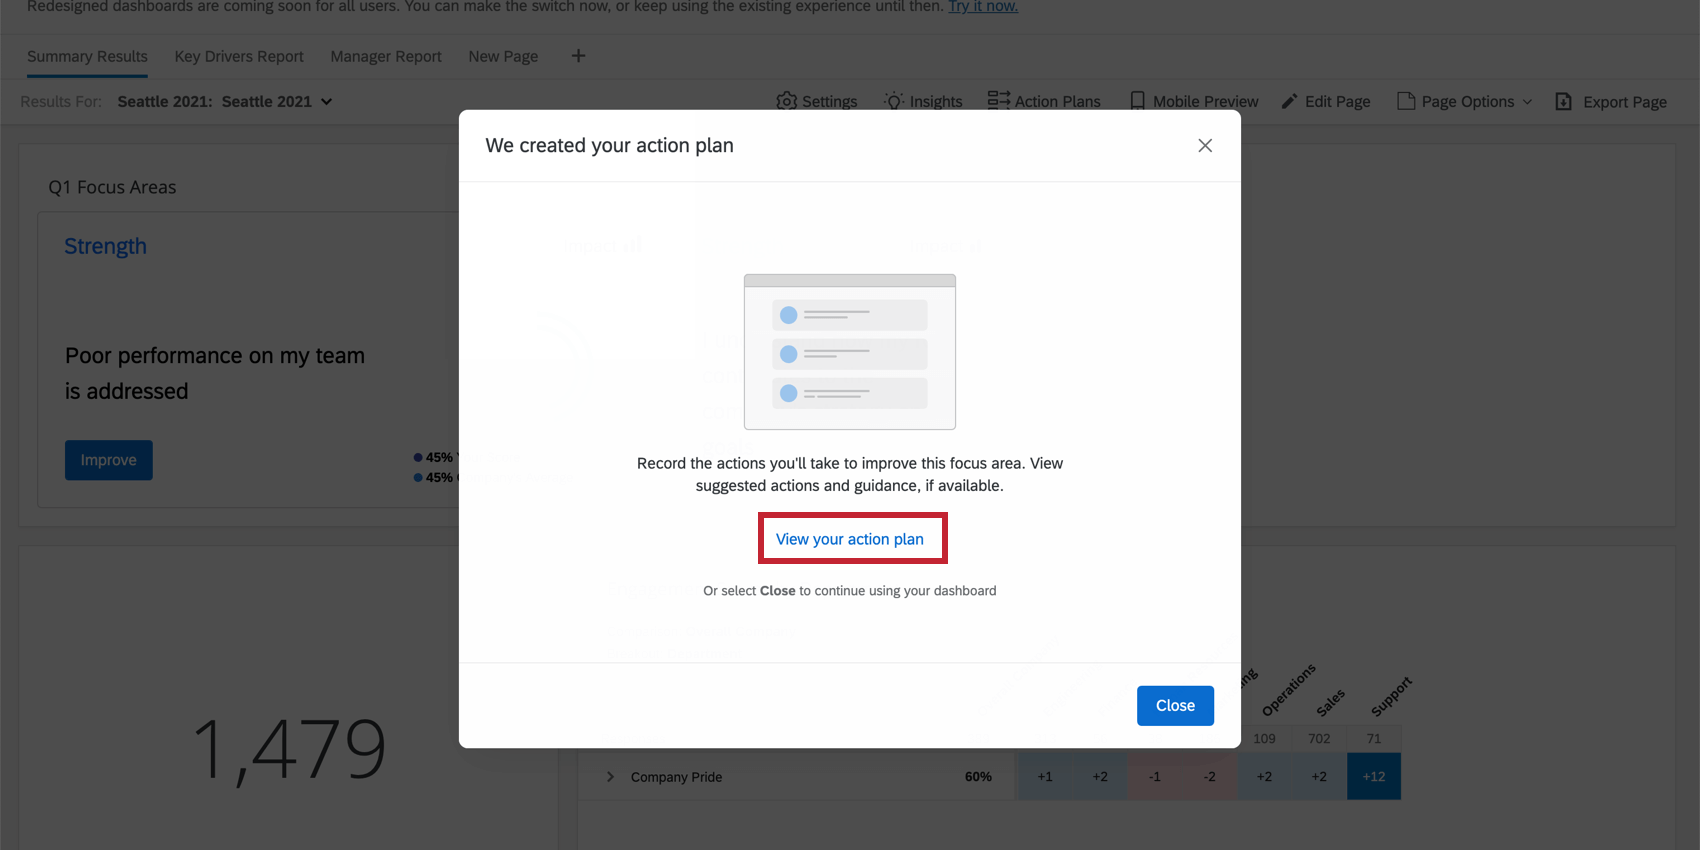
Adding Action Plans from Focus Areas
Attention: The Upgraded Focus Areas widget currently cannot be used to create action plans. Instead, you can use the Action planning section of your dashboard to create new plans.
You can create an action plan directly from a focus areas widget in the main dashboard.
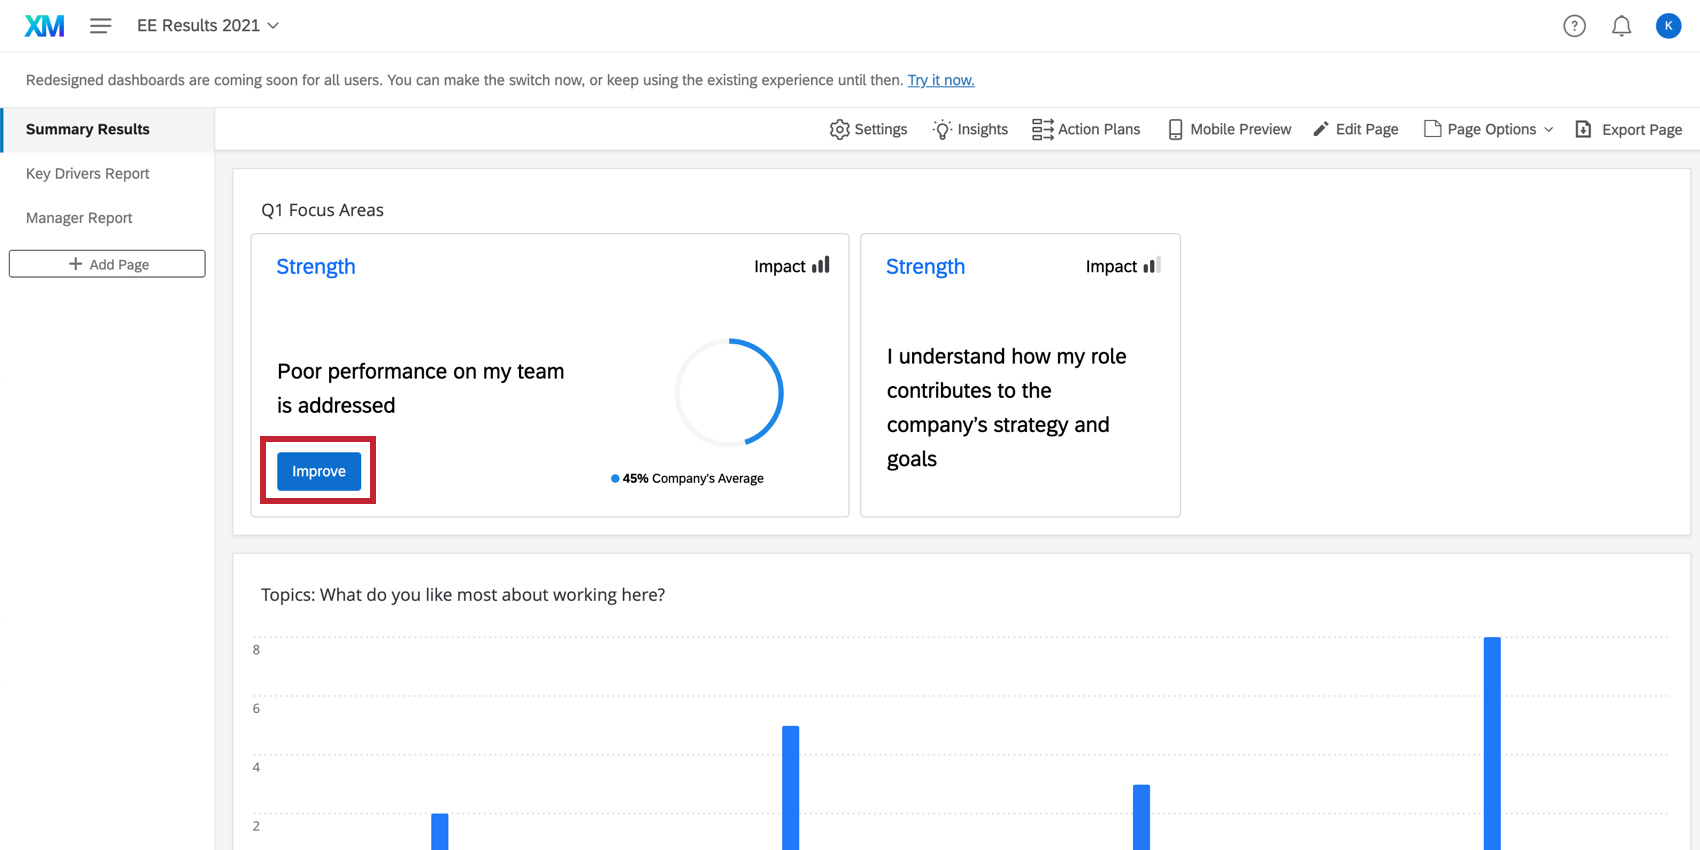
Qtip: The details and title of the action plan will automatically populate with the area you took action from in the widget.
If the Improve button is not displaying in the focus area widget, ensure that you have made that item available for action planning.
Adding Action Plans from Other Widgets
Some dashboard widgets let you create action plans directly from the widget. Just click Improve or Generate Recommendations to start creating an action plan.
Example: Instead of users having to remember what they want to focus on while they move from the dashboard to the action planning page, they can create a plan as soon as they see a result they want to improve on.
Qtip: If you're a dashboard editor who'd like to make these widgets available for users to create action plans, see our documentation on action planning setup.
Exporting Action Plans
Administrators can export all action plans to a CSV file directly from the Action Plans page.

The exported document contains columns for action plan data including action plan ID, title, progress, status, due date, action owners, and all participant metadata related to the action plan owner. Each row is a different action, identified by the Action ID column. There can be multiple actions associated with the same action plan, which is identified by the Action plan ID column.

FAQs
How is action planning affected by confidentiality settings?
How is action planning affected by confidentiality settings?
Action planning-specific fields, including the default ones listed here and any custom fields you create, cannot be marked sensitive.
You can create action plans based on any items you'd like on the action planning page. However, if confidentiality settings are hiding items from a widget, like a question list widget, you won't be able to create action plans for those items from the widget itself.
That's great! Thank you for your feedback!
Thank you for your feedback!