-

Qualtrics Platform -

Customer Journey Optimizer -

XM Discover -

Qualtrics Social Connect
Managing the Qualtrics App in Salesforce
About Managing the Qualtrics App in Salesforce
The Qualtrics App on the Salesforce AppExchange has certain capabilities that are managed by Salesforce administrators. The steps on this page must be completed by users with Salesforce administrator permissions.
Installing the App
- Navigate to the Salesforce AppExchange.

- Search for Qualtrics – Customer Experience Management for Salesforce.
- Click Get It Now.
- Select the Salesforce account where you want to install the app.
- Click Install in Production.
- Review the information, then click Confirm and Install.
- After you’re automatically redirected, login to the Salesforce account you selected in step 4.
- Select Install for Admins Only.
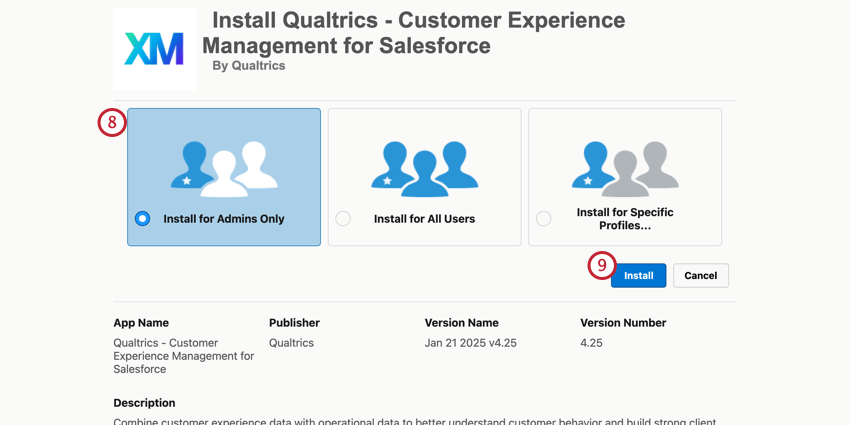 Qtip: You can grant other users access to the app by enabling the Qualtrics Admin permission set for them.
 - Click Install or Upgrade.
- Approve third-party access by clicking the checkbox next to Yes, grant access to these third-party web sites.
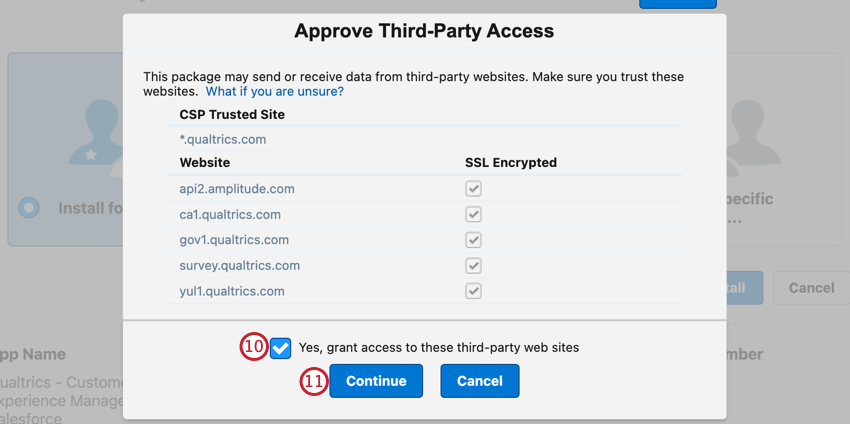
- Click Continue.
Setting Up the App
After downloading the Qualtrics XM app in the Salesforce App Exchange, follow the steps below to set up the app.
- In Salesforce, open the App Launcher.
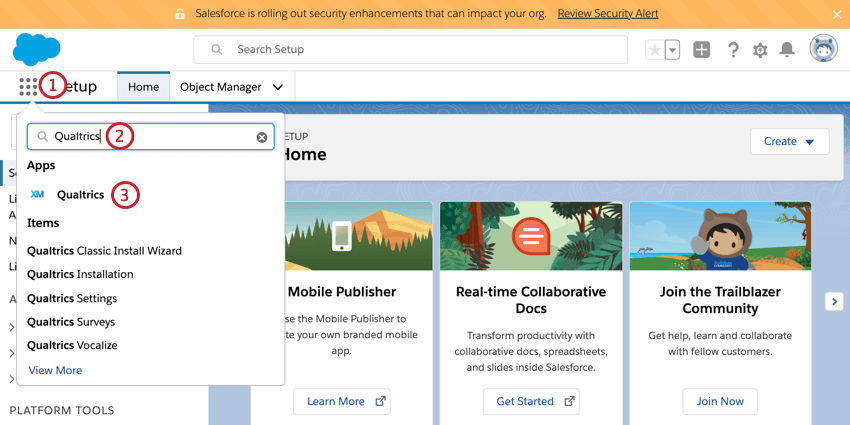
- Search for Qualtrics.
- Select Qualtrics.
- Choose the users who you’d like to have access to the app.
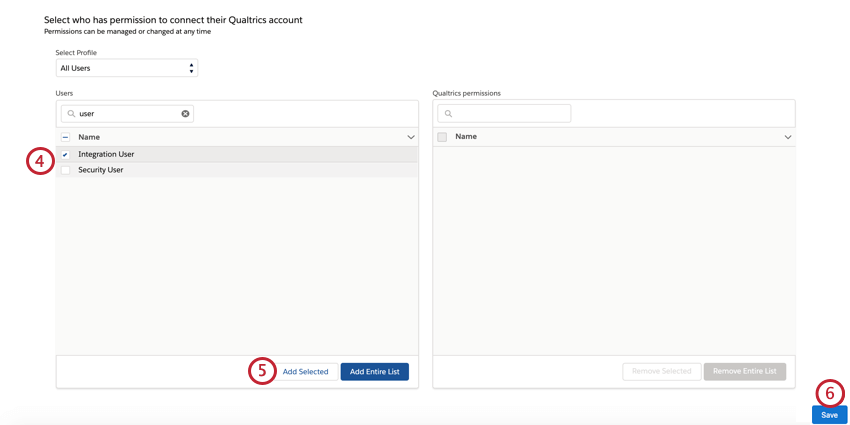
- Click Add Selected.
Qtip: Click Add Entire List if you want to give access to every user in your Salesforce instance.
- Click Save.
The installation setup is now complete! You can re-launch the installer at any time to change these settings.
Connecting Your Account
Qtip: Users must have the Enable SFDC App user permission enabled to set up the connection.
Before you can send surveys via Salesforce or view responses & CX dashboards, you need to connect your Qualtrics and Salesforce accounts.
- In the Qualtrics app, navigate to Qualtrics Settings.
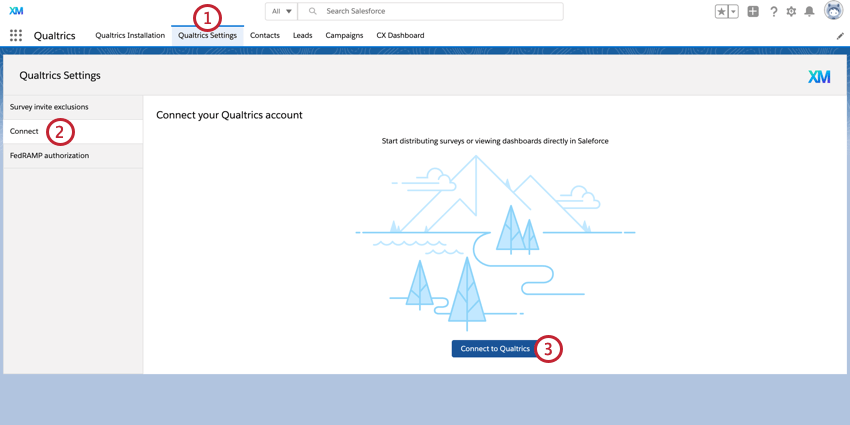
- Go to the Connect tab.
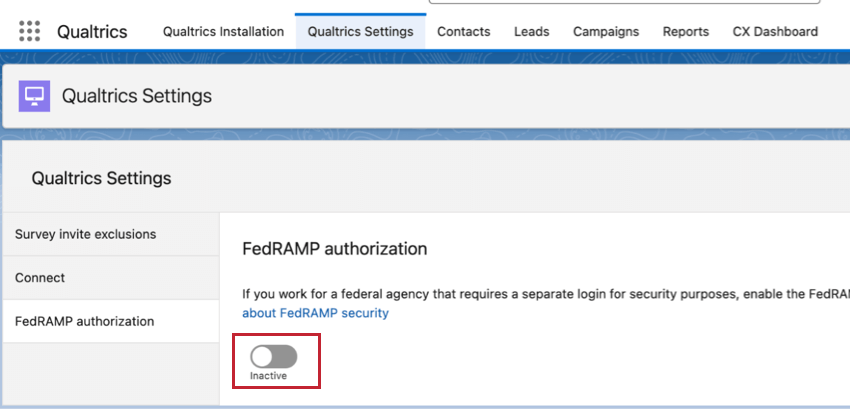
Qtip: If you are securing your data with FedRAMP, you must turn on the FedRAMP option in the FedRAMP authorization tab.
- Click Connect to Qualtrics.
- Enter your username and password.
 Qtip: If your license uses Single Sign On (SSO), click Sign in with SSO and enter your organization ID. More information about logging in with your organization ID can be found on this support page.
 - Click Sign In.
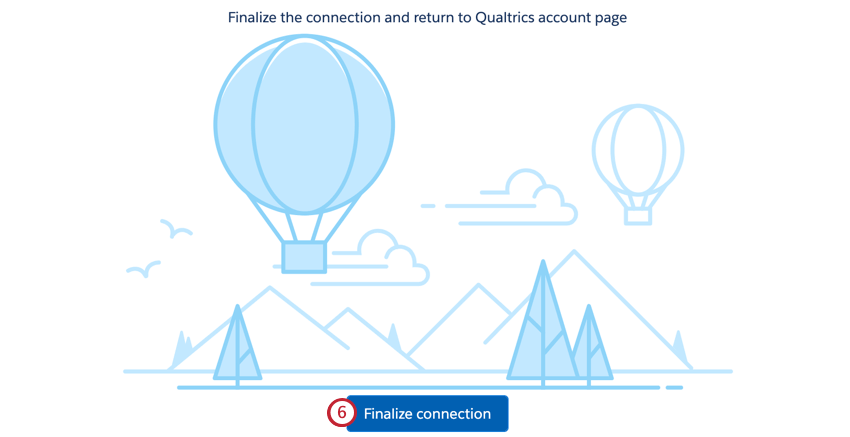
- Click Finalize connection.
Custom Features
The Qualtrics App in Salesforce comes with custom features that help with the usage and administration of the app.
Custom Permission Sets
The app has two custom permission sets that are determined when the app is installed. These permissions give different levels of access to features within the app.
- Qualtrics Admin: Provides access to administrative tools within the app. Users with this permission can distribute surveys and edit them, as well as read and edit survey records and survey response records.
- Qualtrics User: Provides access to distribute existing surveys but cannot edit or create new ones. Additionally, users with this permission can read permissions on survey responses, and read and create permissions on surveys.
Custom Objects
The app has two custom objects that can be used in Salesforce.
- Survey Responses: This object stores each survey response with the record of the survey taker.
Qtip: This object comes with many fields that can be hidden, deleted, or added by a Salesforce administrator.
- Surveys: This object tracks surveys that have been distributed through the Qualtrics app. Each time a survey is sent, a new record is created in this object. This object allows you to track survey responses for each distribution sent.
Custom Tabs
- CX Dashboard: If your license currently has CX Dashboards enabled, this tab allows you to view dashboards that you have access to.
Distributing Surveys Using a Custom “From” Address
By default, emails sent through the Qualtrics App in Salesforce come from the noreply@qemailserver.com email address. You can configure a custom domain, allowing surveys from Salesforce to be sent using your own email domain.
- Follow these steps to configure a new custom domain in Qualtrics. You must have your custom domain created in Qualtrics before you can use it in Salesforce.
- In the Qualtrics App in Salesforce, navigate to the Qualtrics Settings.
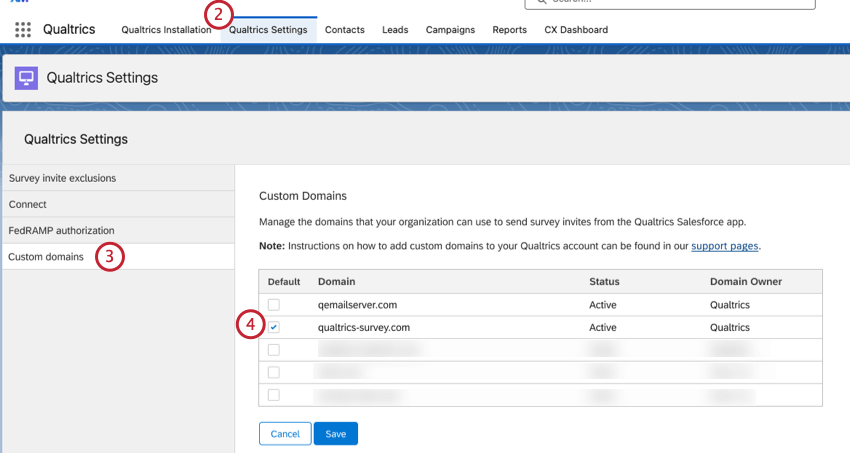
- Select Custom Domains.
- Select the new domain from the list of Active domains by clicking the checkbox.
- Click Confirm.
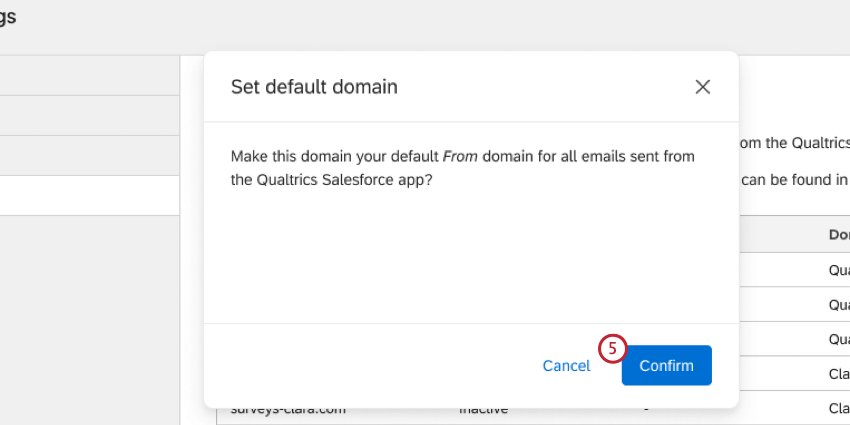
- Click Save.
Adding Widgets to Salesforce Record Pages
With the Qualtrics App in Salesforce, you can embed widgets from your CX dashboard onto a record page within Salesforce. In order to see the widgets when viewing a record page, a Salesforce user must meet the following conditions:
- Their Salesforce and Qualtrics accounts are connected.
- The user has access to the dashboard containing the widget.
Troubleshooting
This section covers the most common issues that arise when working with the Qualtrics App in Salesforce. When troubleshooting this app, you should work with your IT team, implementation partner, or administrator in order to resolve.
“You Don’t Have Access To This Page” Error Message
If you receive the “You don’t have access to this page” error message, it likely means that you do not have the Enable SFDC App, Embedded Widgets, and Embedded Dashboards user permissions enabled. Your Qualtrics brand administrator must enable those permissions in order to access the app in Salesforce.
App Not Displayed in Salesforce
If the Qualtrics application is no longer available in your Salesforce organization, the license could have expired. Ensure that the Enable SFDC App user permission is turned on in Qualtrics.
Update the Qualtrics App in Salesforce
- Login to the Salesforce AppExchange.
- Click your profile icon in the top-right corner.
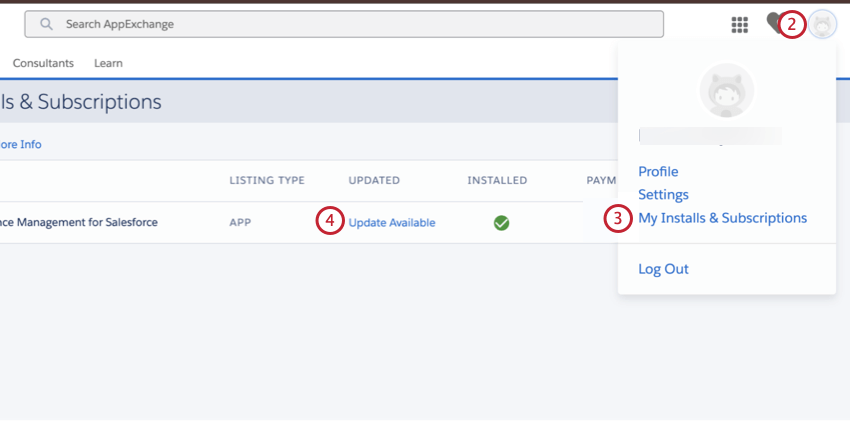
- Select My Installs & Subscriptions.
- Next to the Qualtrics app, click Update Available.
- Click Install for Admins Only.

- Click Upgrade.
- Complete steps 4-6 in the Setting Up the App section.
Dashboards and/or Widgets Do Not Display Correctly
The CX Dashboard tab may contain an error after updating the Qualtrics app due to the deactivation of the Trusted URLs setting.
- Click the settings icon.

- Select Setup.
- Select Trusted URLs. You may have to search for these settings by using the search bar.
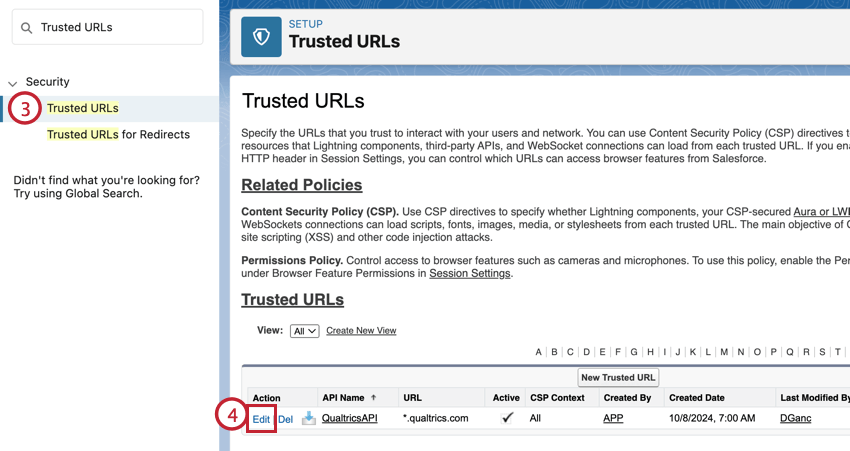
- Next to Qualtrics API, click Edit.
- Check the box next to Active.
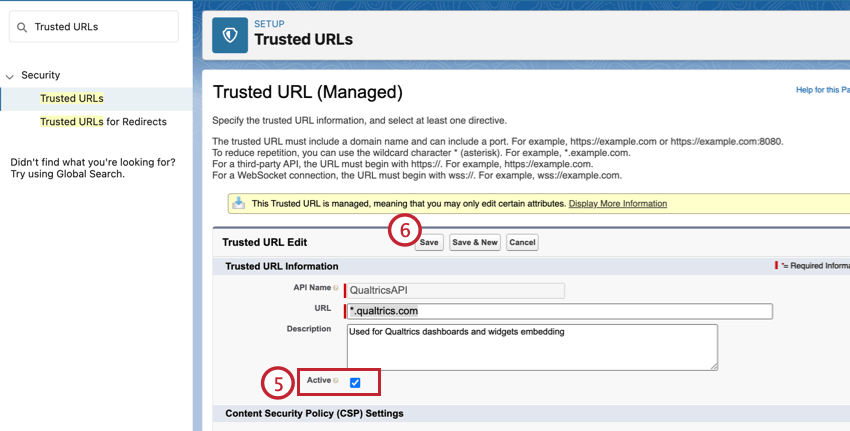
- Click Save.