-

Qualtrics Platform -

Customer Journey Optimizer -

XM Discover -

Qualtrics Social Connect
Editing Directory Contacts
About Editing Directory Contacts
In the Directory contacts tab, you can make changes to any contacts in the directory, as opposed to just contacts in a specific mailing list.
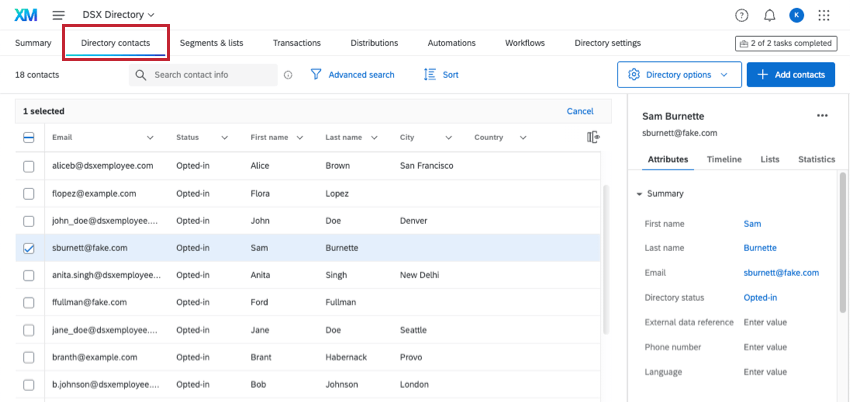
Only users who are admins of a directory can make edits to contacts in this tab, or view this tab at all. Editing contacts right from the directory can be a useful way to search up and edit specific contacts without having to first find a mailing list. This is also a great way to keep the directory’s data clean by opting contacts out of all communications collectively, or by deleting them from the directory permanently.
Editing Contacts in a Directory vs. a Mailing List
Certain changes made to a contact will always be reflected across the directory, no matter whether those edits happen in the directory or a list. For example, if you select a contact in a list, you’ll see directory-wide information about them, include their timeline and statistics. Any edits you make to their embedded data will be reflected wherever the contact appears in the directory.
However, there are some edits in the directory that are extremely different from those same edits in mailing lists. For example:
- Opting Contacts In or Out: When you opt a contact in or out from the directory, you’re changing their subscriptions status for the entire directory. That includes all lists, samples, and segments the contact belongs to in that directory. In contrast, you can also opt contacts out of individual lists, while keeping them opted into the rest of the directory. To opt a contact out of a single mailing list, you need to edit them from that mailing list.
- Deleting a Contact Permanently vs. Removing them from a List: Deleting a contact from the directory deletes them permanently. That means the contact will be removed from all lists, segments, and samples they belong to. You can also remove a contact from an individual list without removing them from the directory altogether. To learn more about removing a contact from a single mailing list, see here or here.
Editing One Contact vs. Editing Multiple Contacts
You can make edits to just one directory contact at a time, or to many contacts at once. Not only can you mass delete contacts or opt them in and out of the directory, but you can even edit many contacts’ information at once, including both core contact information and embedded data.
While the options available to single contact editing and bulk editing can be similar, there are a few differences. For example, you can only export selected contacts if you select more than one.
Editing One Contact
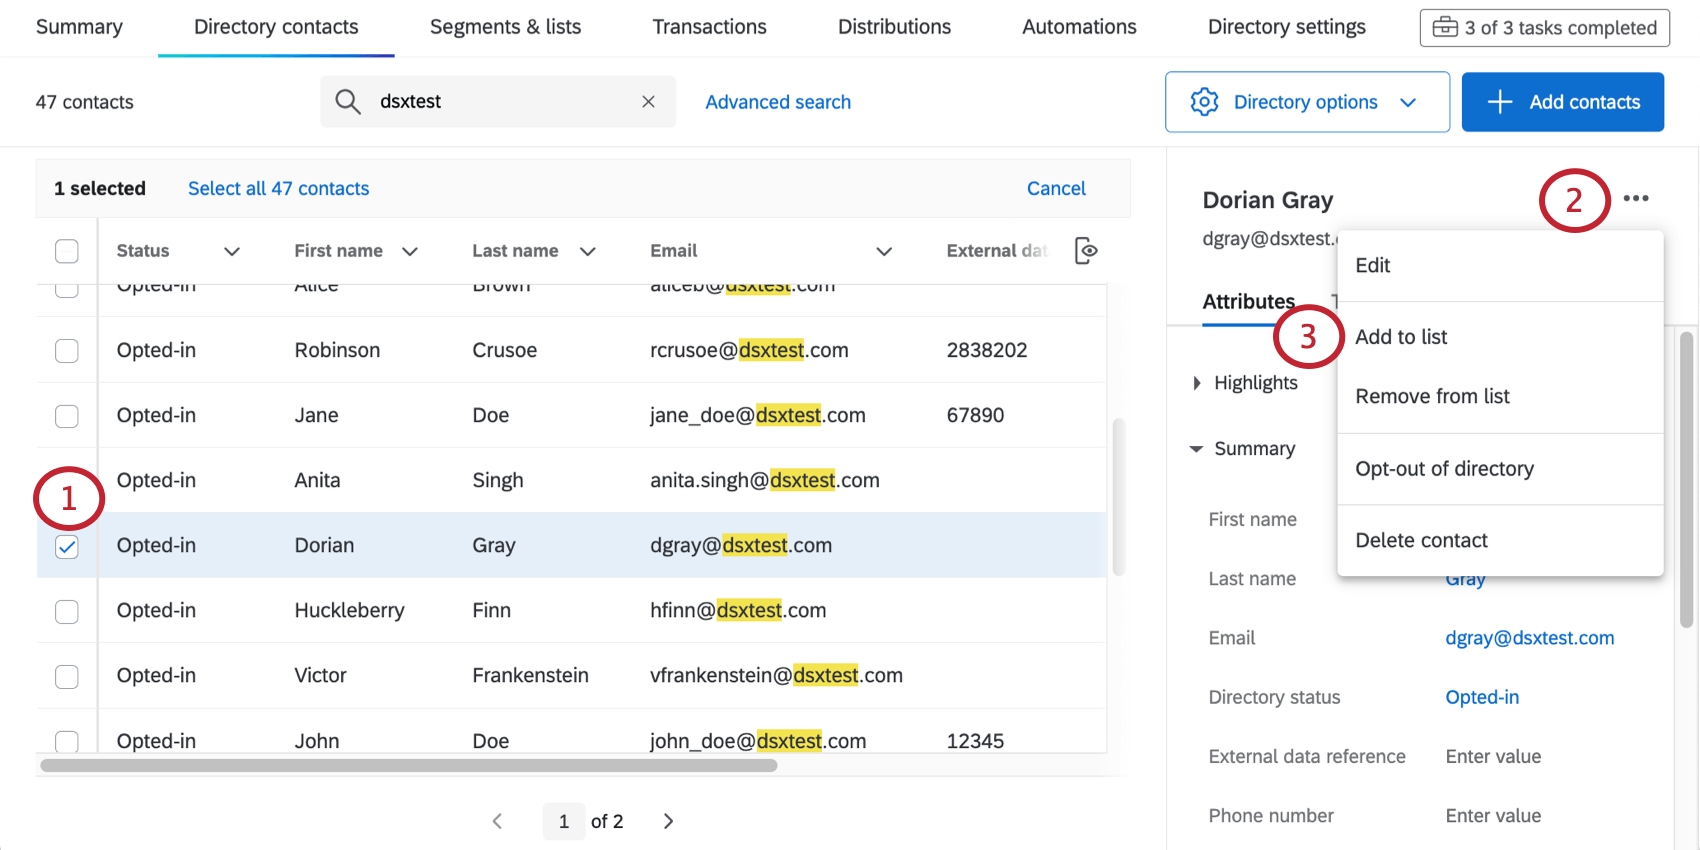
Edit individual contacts by selecting the checkbox to their left. A menu will open to the right with contact attributes, the touchpoint timeline, list membership, and contact statistics.

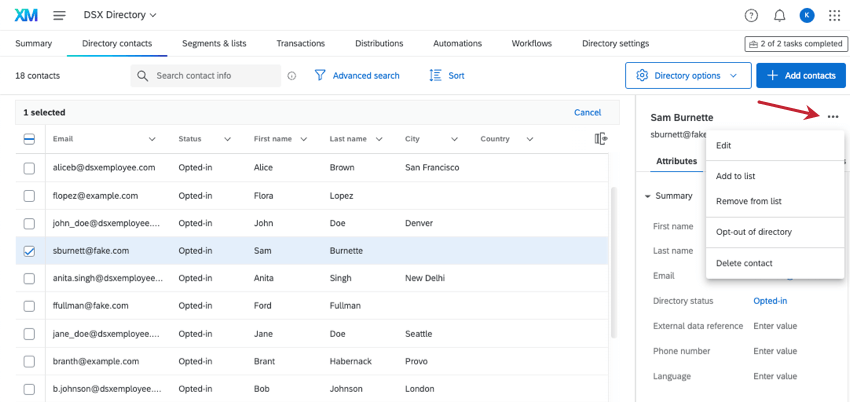
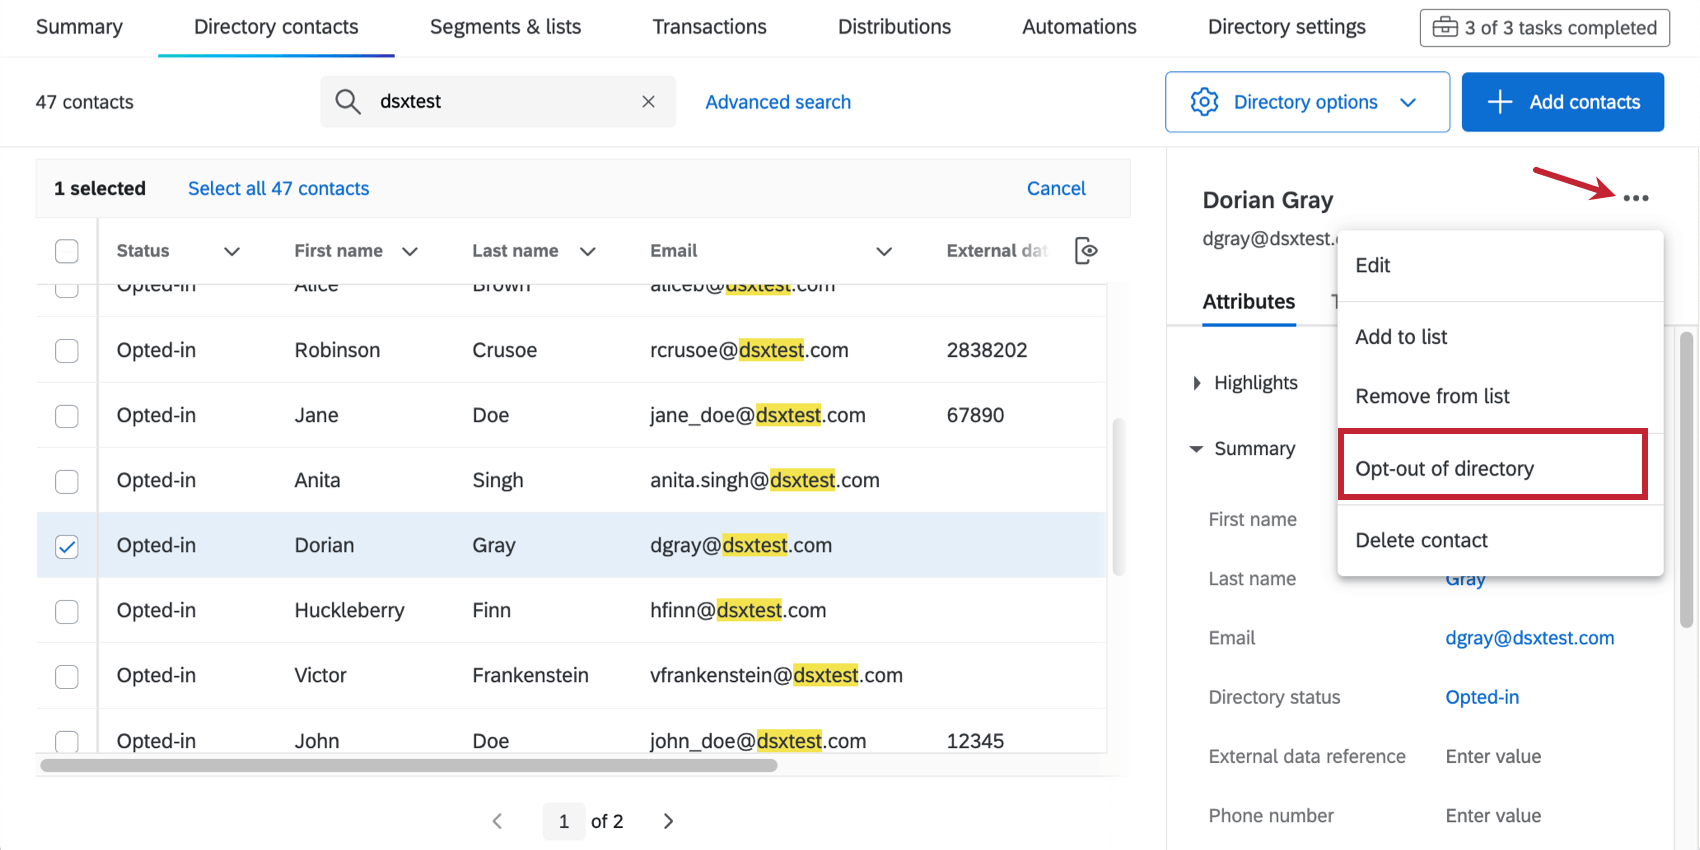
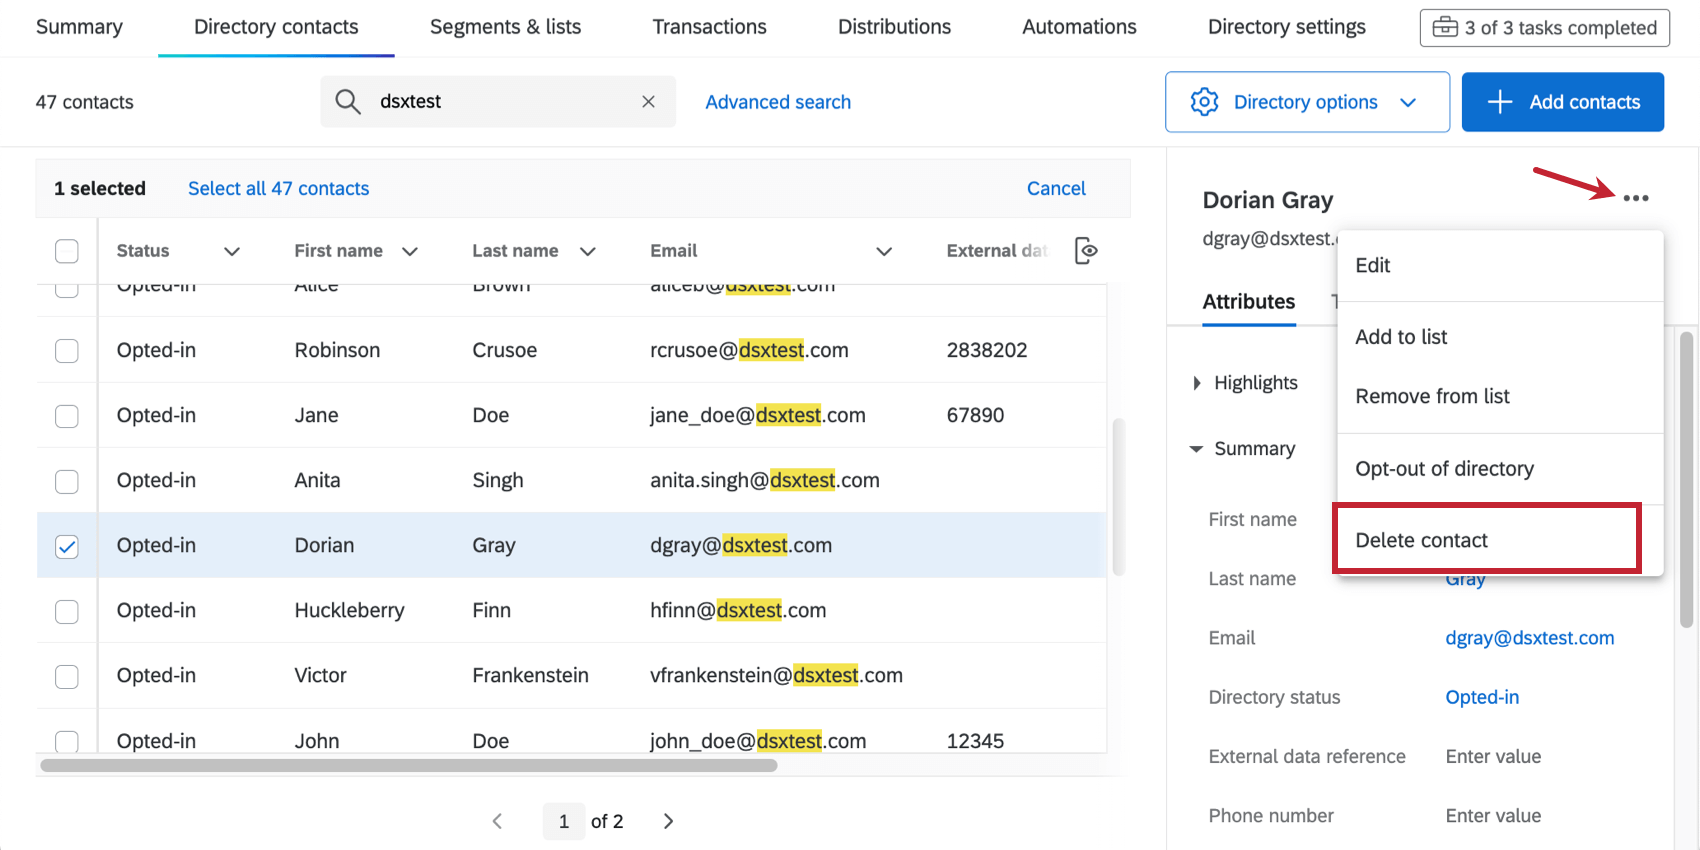
By clicking the 3 dots on the contact, you’ll see the following options:
Editing Multiple Contacts at a Time
You can edit multiple contacts at a time by selecting the checkboxes to their left. You’ll notice the contact information menu will display less information (for example, no timeline), to reflect that the contacts selected don’t have the exact same information or demographics.
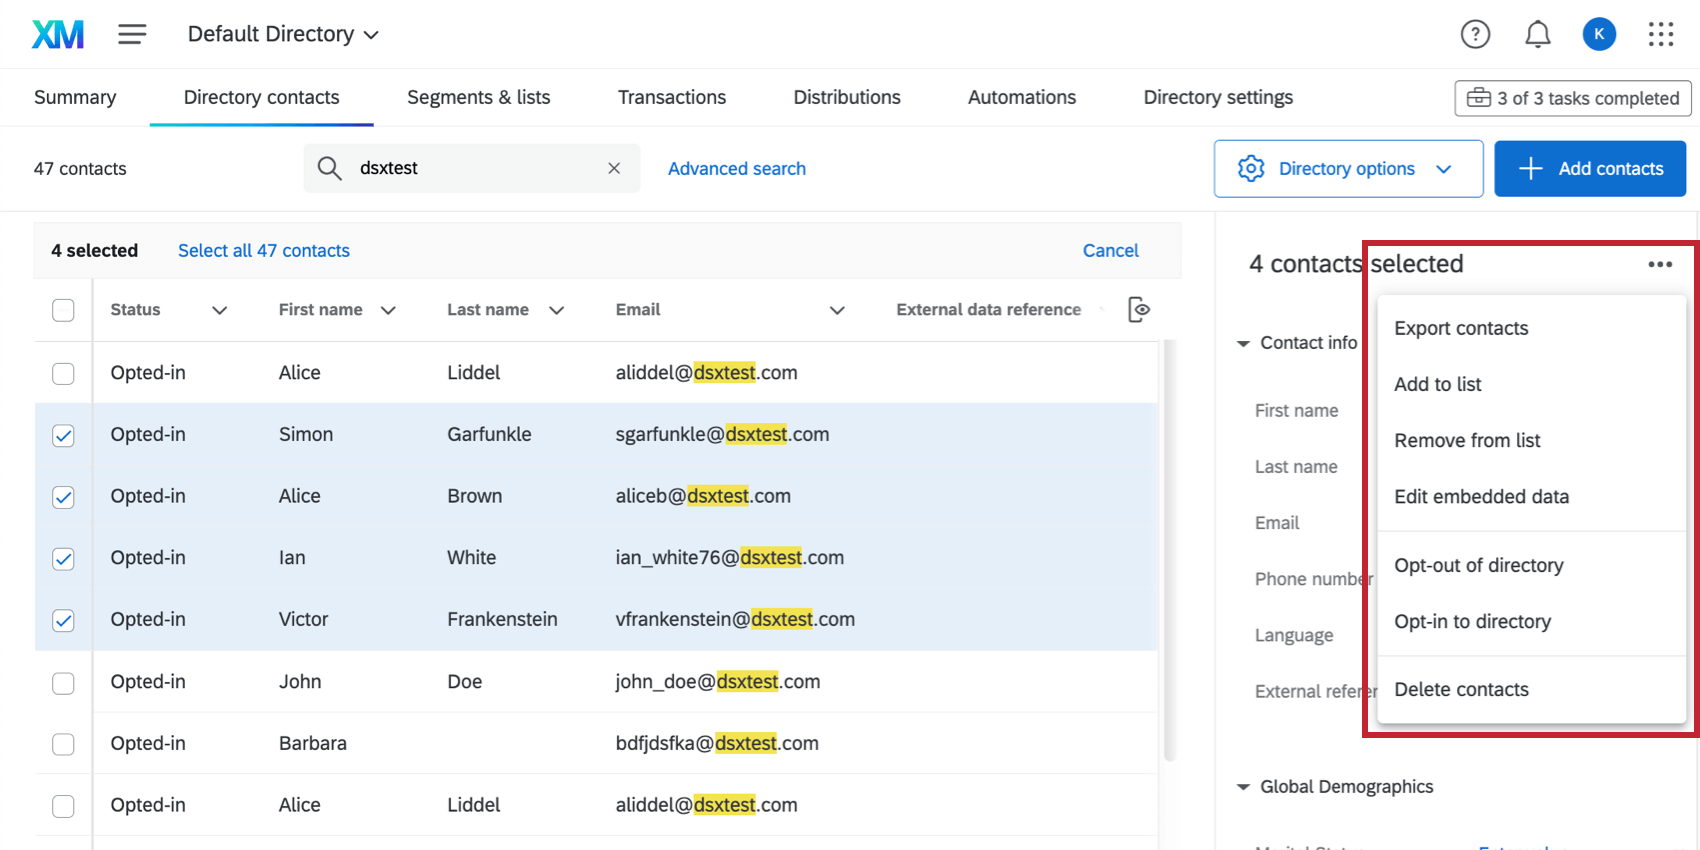
By clicking the 3 dots, you’ll see the following group actions:
Editing Contacts’ Attributes
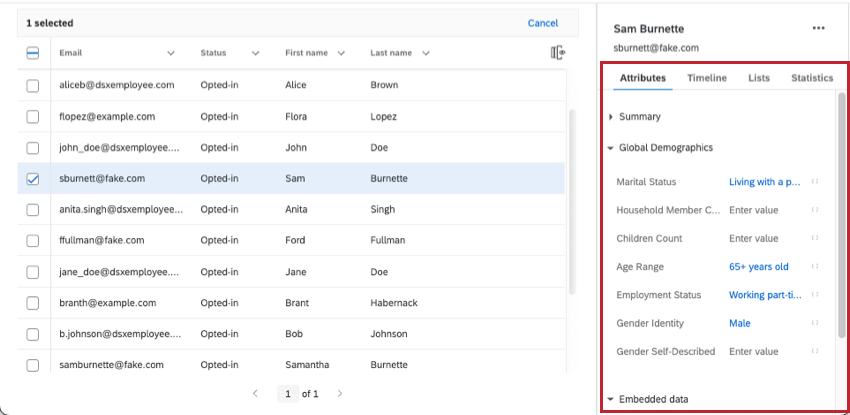
The Attributes section shows information saved to the selected contact. The “Summary” contains basics like name, email, language, and other reserved fields. The “Global Demographics” section can vary based on your directory settings, but usually contains common demographic fields, like age, employment, gender, marital status, and more. The “Embedded data” section displays the embedded data assigned to the contacts.
Editing a Single Contact’s Information
- Select the contact you wish to edit. Make sure only one contact is selected.

- Click the 3 dots.
- Select Edit.
- Enter the desired values for the fields shown. You’ll be able to adjust any contact info from opt-in status, to demographics, to embedded data.

- When finished, click Confirm.
Adding Embedded Data to a Contact
Sometimes, instead of just editing a value, you’ll want to add a whole new embedded data field to the contact. Doing so is quick and easy.
- Select the contact.
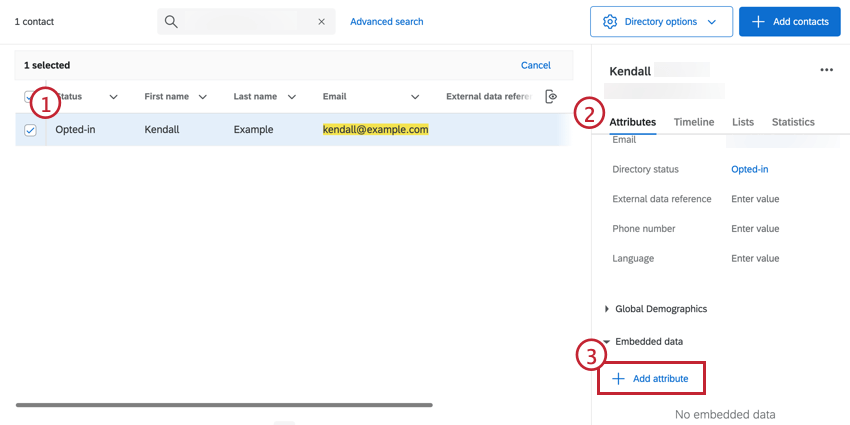
- Navigate to Attributes.
- Under Embedded data, click Add attribute.
- Type a name for the embedded data.
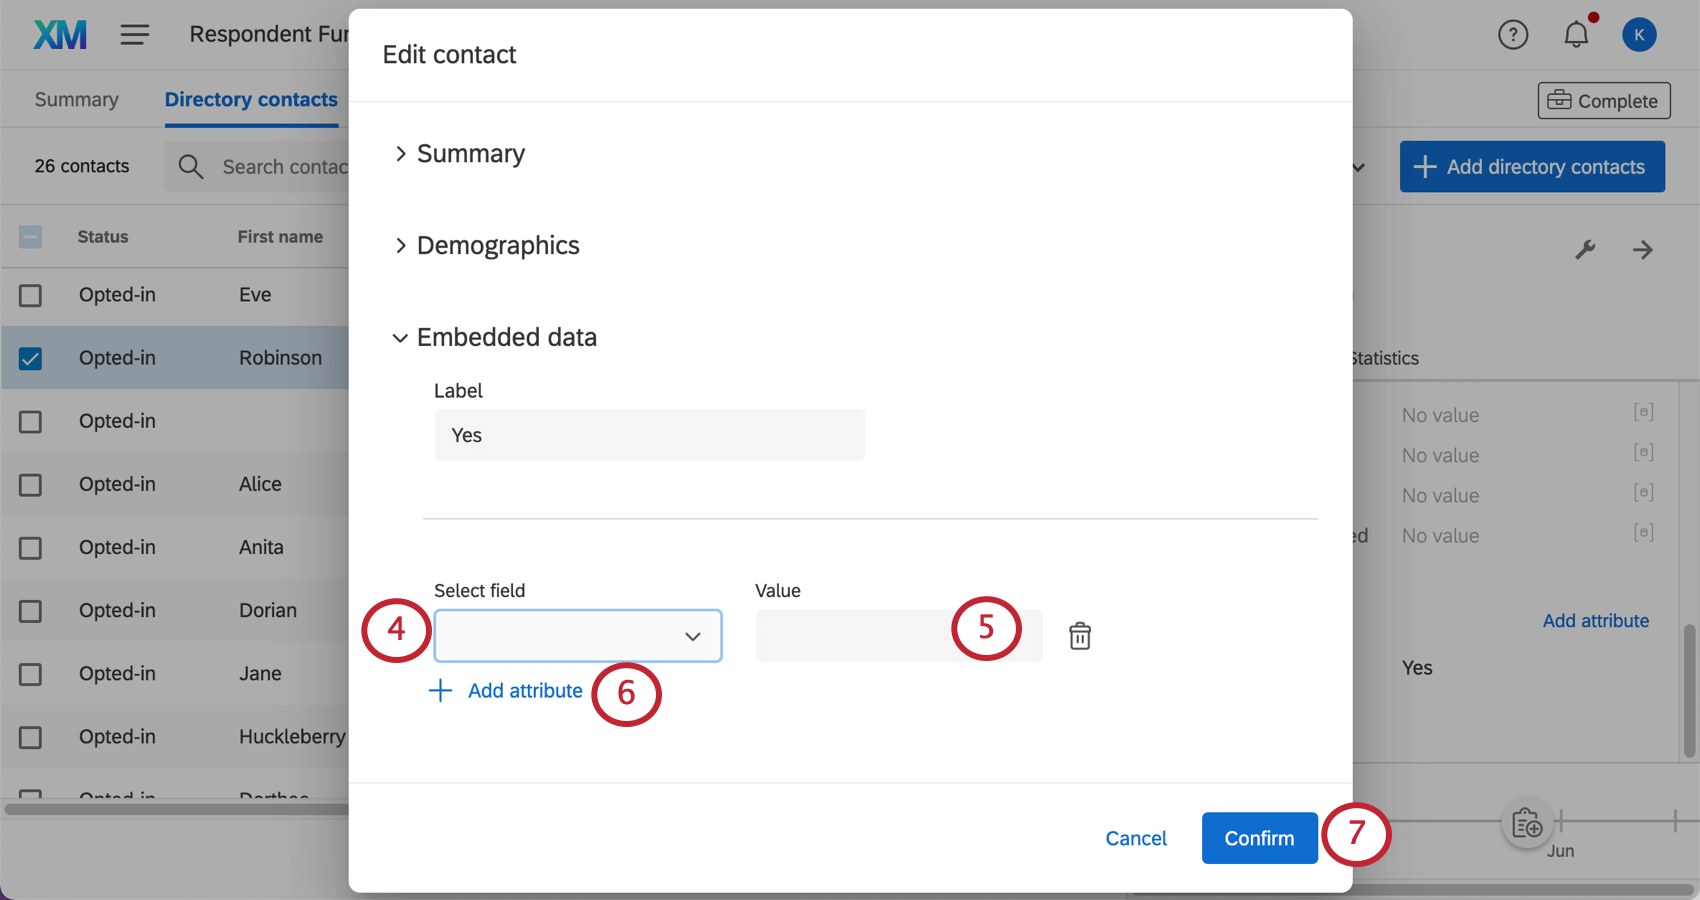
- Type a value.
- If you wish to add more fields, click Add attribute and repeat the steps to name and add a value to your new field.
- When finished, click Confirm.
Editing Multiple Contacts’ Information at Once
- Select the contacts you want to edit.
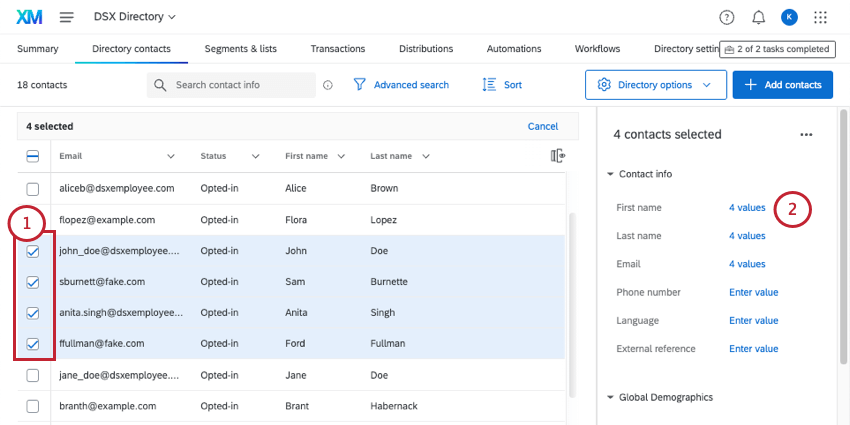
- Click the number of values. (E.g., 4 values)
Qtip: Because several contacts are selected and their information might vary, specific values for each of these fields are not displayed. Instead, the number of contacts given a value for this field are listed.Qtip: You can also edit contacts by clicking the 3 dots and selecting Edit embedded data.

- Edit first name, last name, or email as needed.
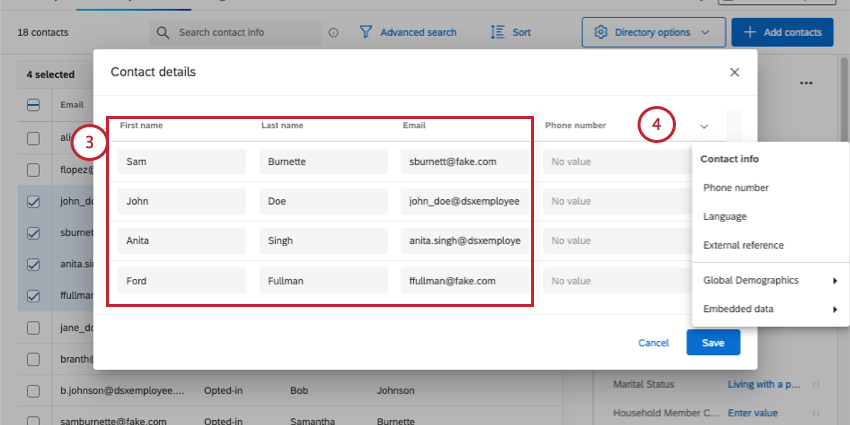
- Select a contact field or embedded data to edit by clicking the arrow on the last header.
- Click into any value to change it.
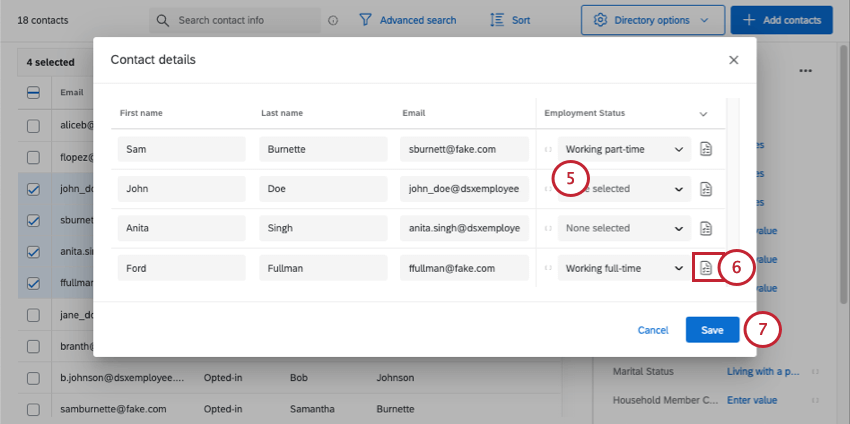
- To apply this value to all of your selected contacts, click the Apply to All Contacts icon.
Qtip: For example, you can mark all your selected contacts as “Employee Status” “full-time employees”. You cannot make identifying fields like first name, last name, or email the same, since these are unique to each person.
- Save your changes by clicking Save.
Understanding the Touchpoint Timeline
You can view a timeline of all of the touchpoints between your directory and a specific contact. This timeline can show not only the times a contact received a distribution, but their survey responses, sentiments, website visits, session replays, and tickets. Thus, the timeline is a great way to get an overall view of a contact’s relationship with your organization.
The timeline is only viewable when you select one contact at a time; selecting multiple contacts will hide this feature.
Accessing the Timeline
Once you select the desired contact, click on the Timeline tab.
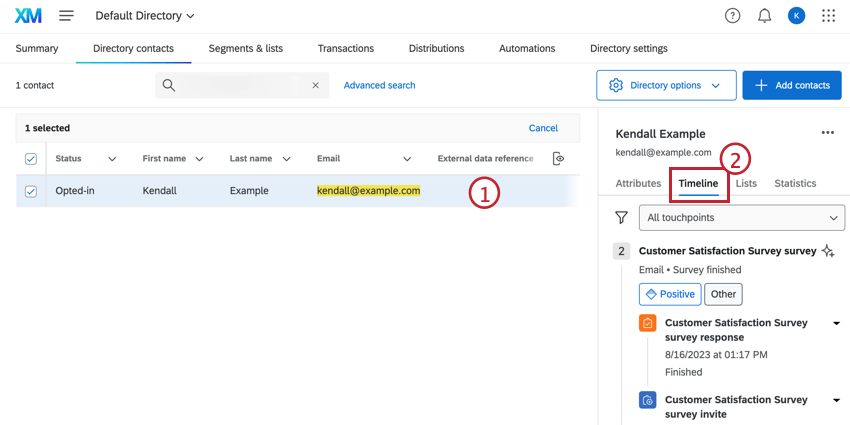
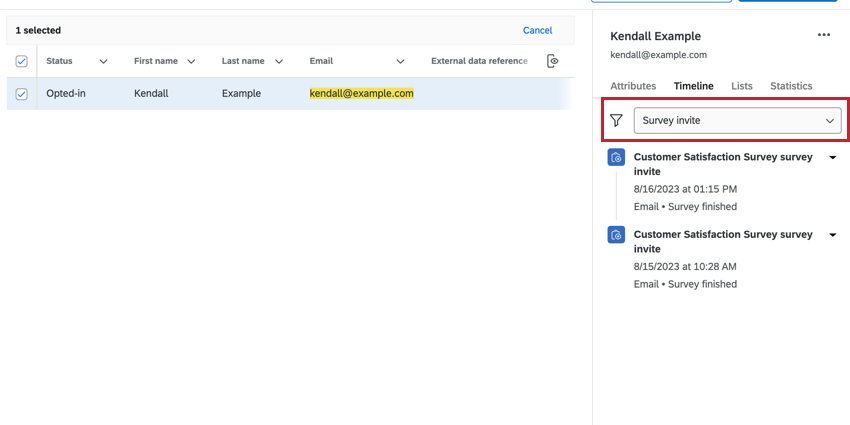
Once in the Timeline tab, you can view the list of interactions from this contact, categorized by project.
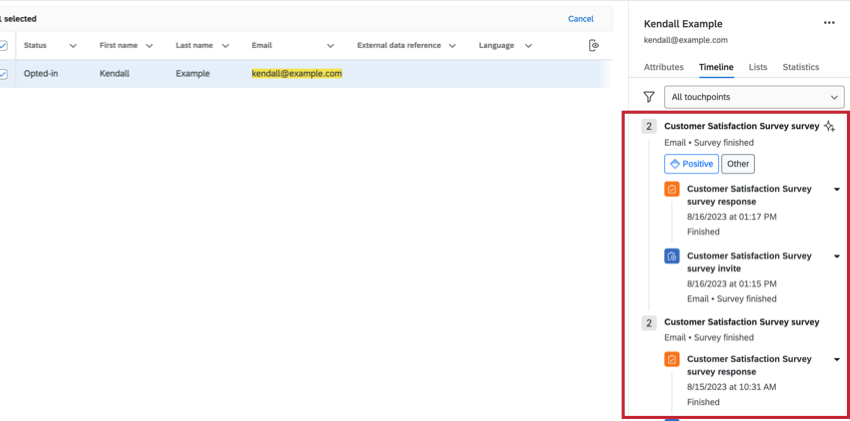
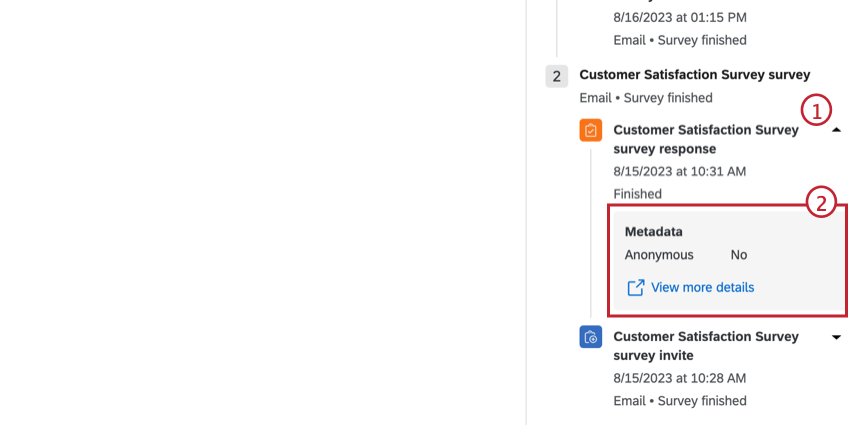
Reviewing a Touchpoint’s Details
Click the arrow next to each touchpoint to view more information on that interaction, including a list of response data. To view the contact’s entire survey response, click View more details.
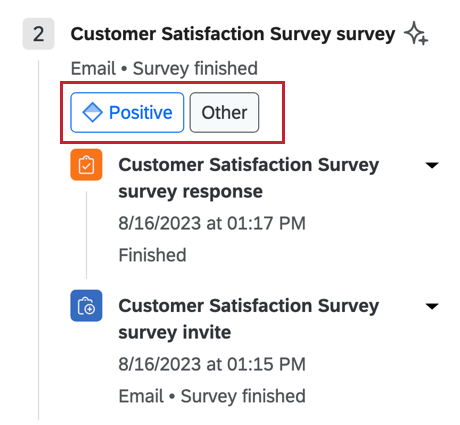
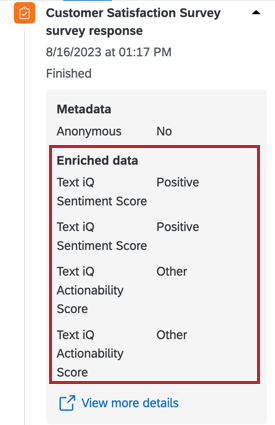
Enriched Data
For projects with Text IQ enabled, the sentiment and actionability data can be seen under the project touchpoint.
To view more details on enriched data, click the arrow next to the survey response and view the Enriched data section.
Viewing a Contact’s List, Segment, and Sample Membership
The Lists section has every mailing list, sample, and segment the contact belongs to.
If you click the 3 dots next to a specific mailing list, you can choose to remove the contact from a mailing list or opt them out from it (or opt them back in).
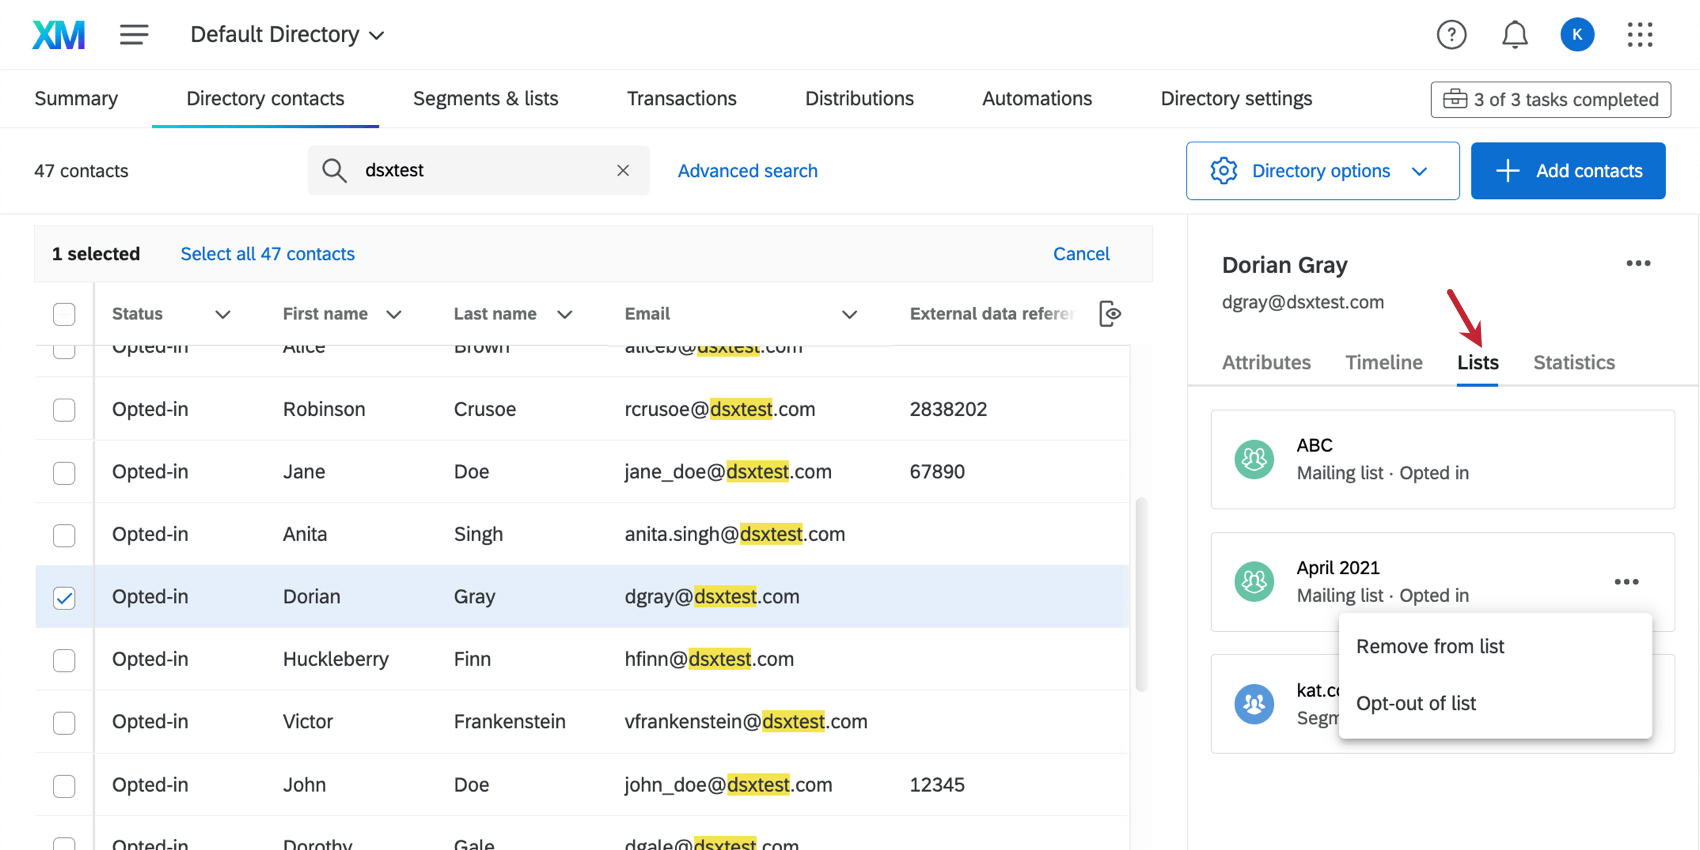
You cannot use this menu to change sample or segment membership.
Managing Contact List Membership
Adding Contacts to a List from the Directory
- Select the contact(s) you wish to add.
- Click the 3 dots.
- Select Add to List.
- Select the list you wish to add them to.
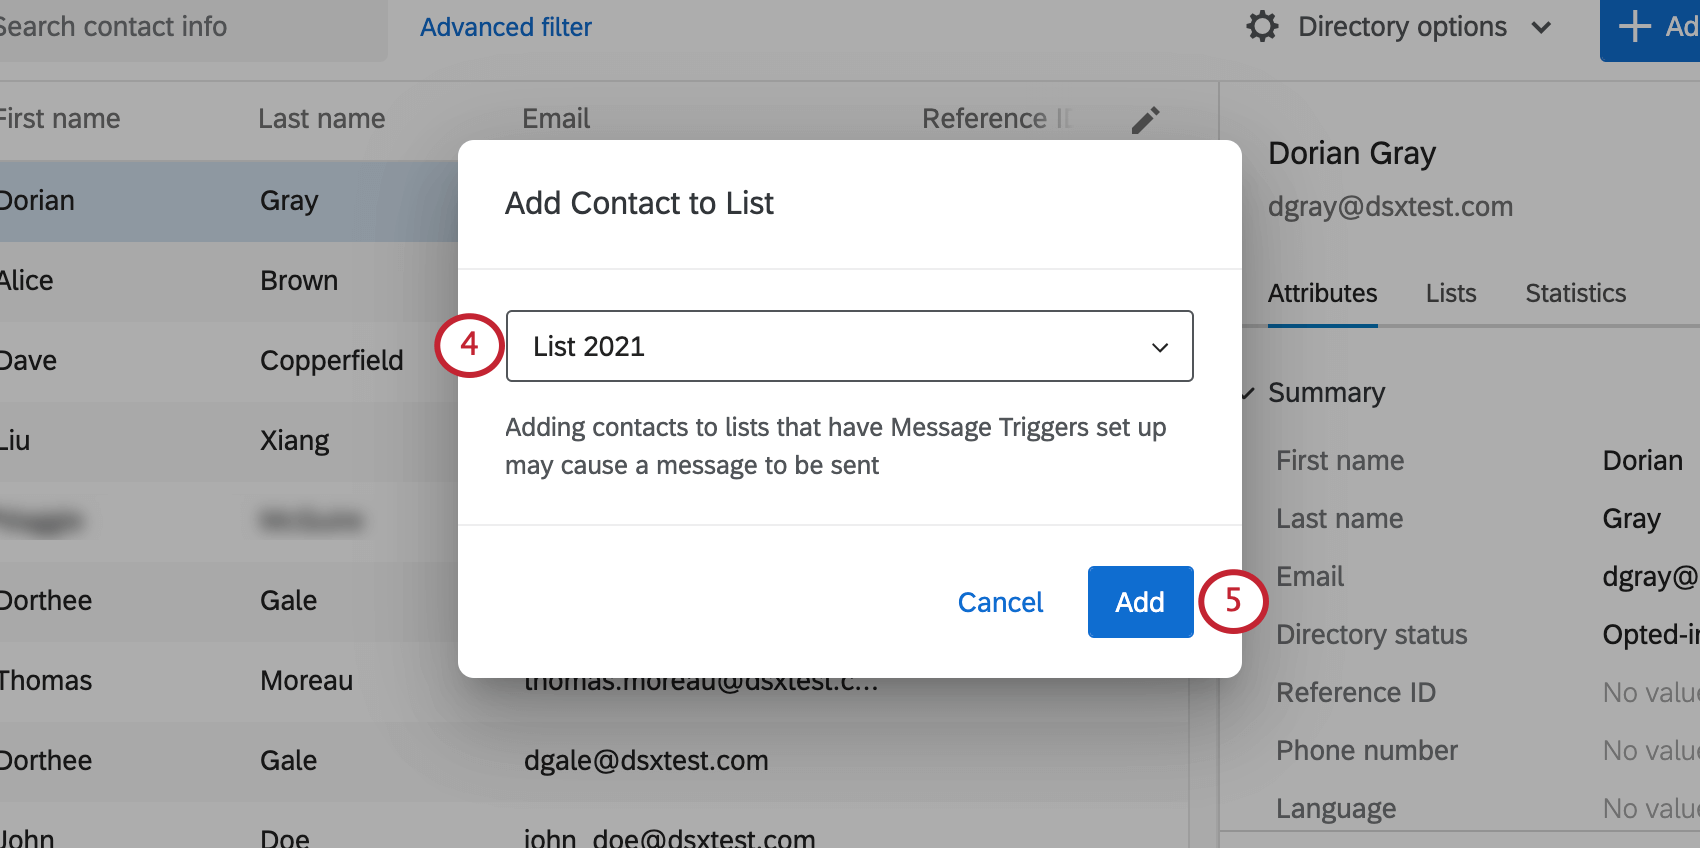
- Click Add.
Removing Contacts from a List while in the Directory
- Select the contact(s) you wish to remove.
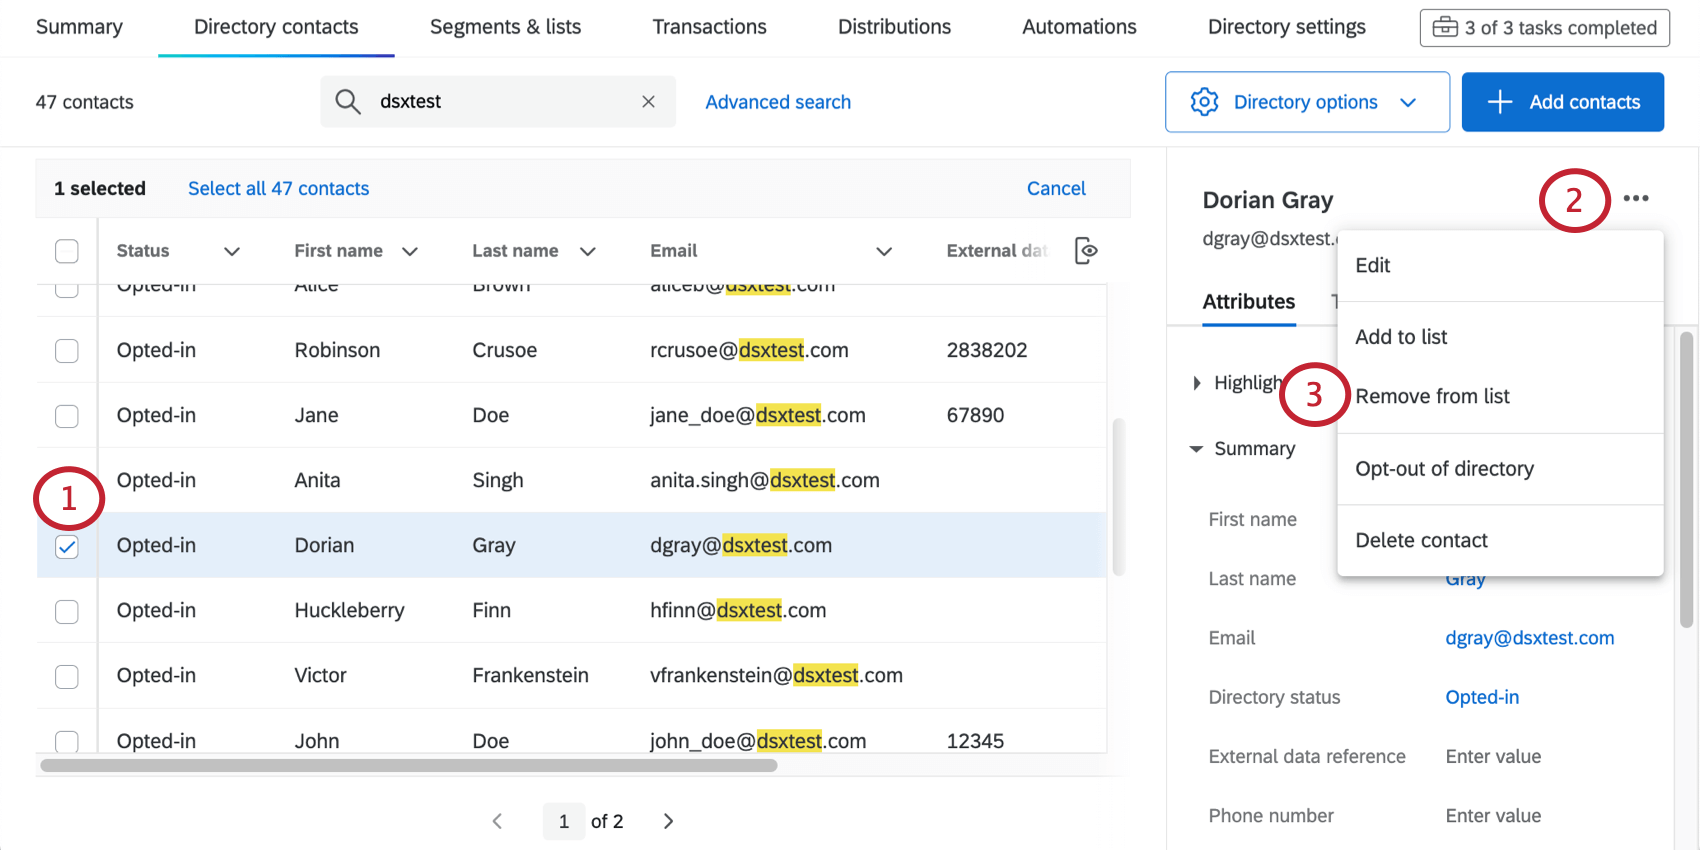
- Click the options icon.
- Select Remove from List.
- Select the contact list (or lists) you wish to remove them from.
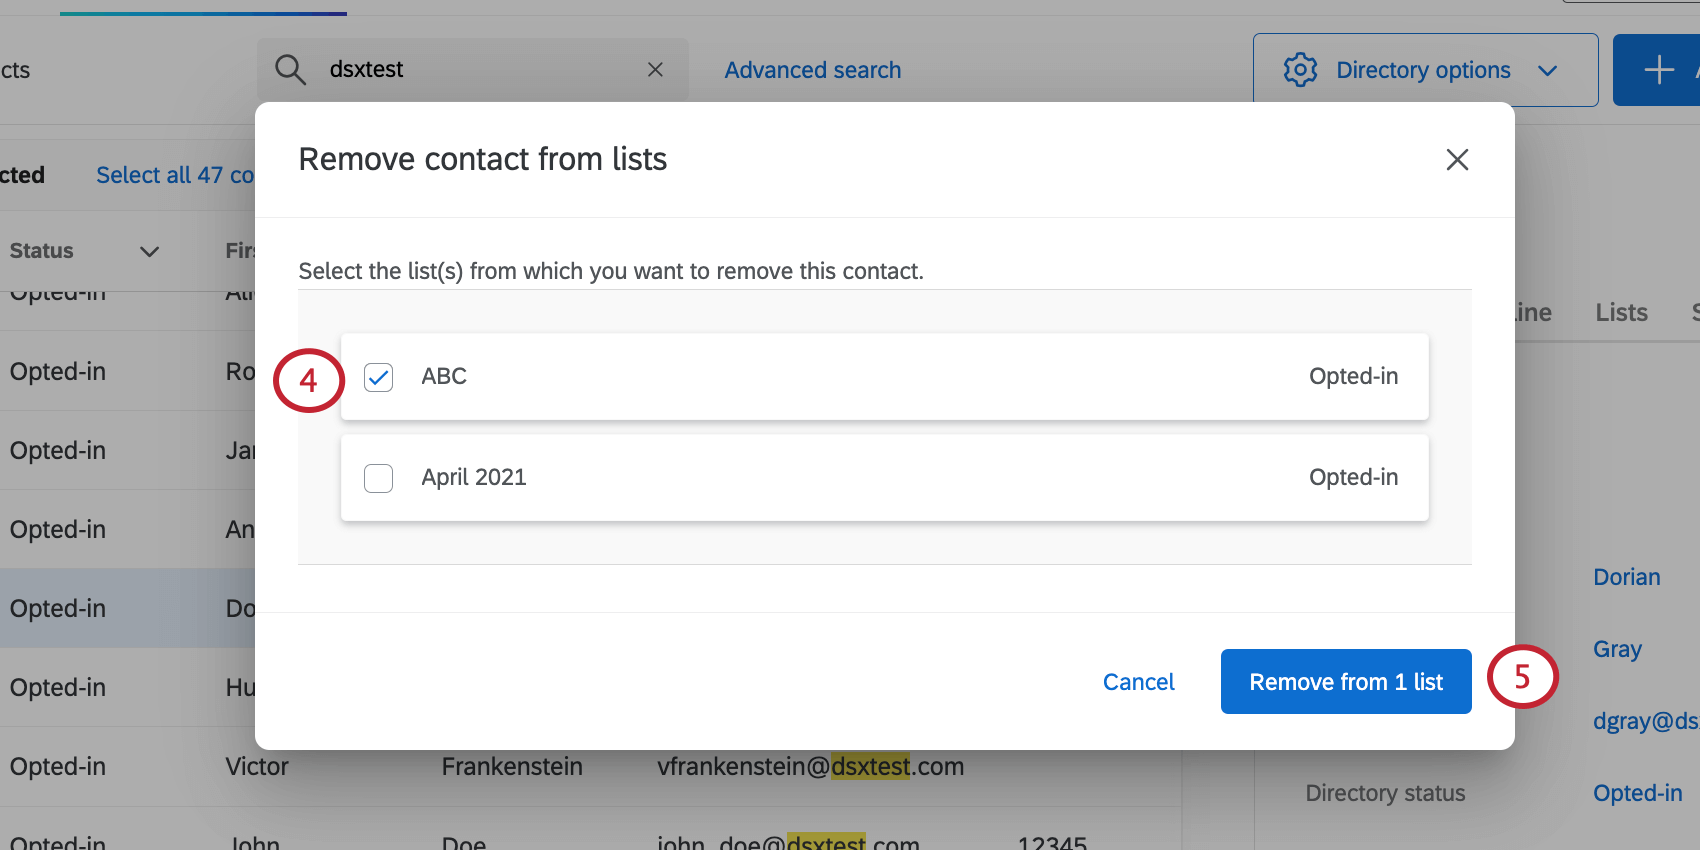 Qtip: If you select multiple contacts, you can only remove them from 1 list. All lists the contacts individually belong to will be available to select, regardless of whether every single selected contact actually belongs to that list.
 - Click Remove from X list(s).
Viewing Contact Statistics
The Statistics section contains information on the number of times the contact has been sent invites, and when.
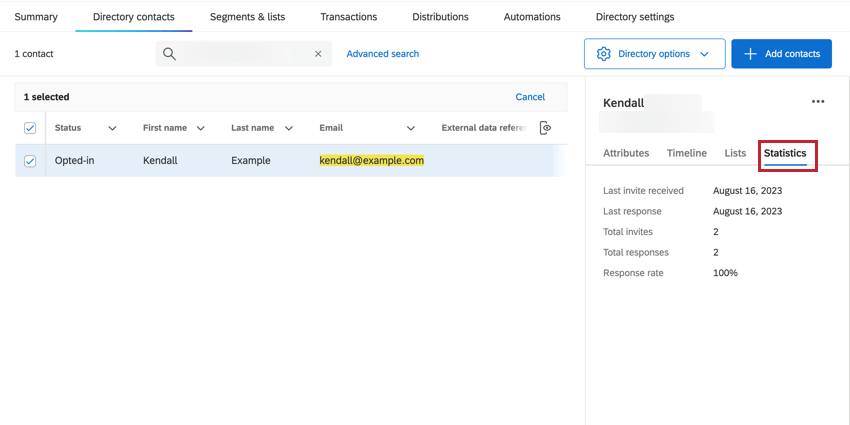
- Last Invite Received: The date of the last invitation received.
- Last Response: The date of the last response the individual completed. Surveys started but not completed do not count here.
- Total Invites: How many invites the contact has received in total, regardless of list or distribution.
- Total Responses: How many responses the contact has given in total, regardless of survey. Surveys started but not completed do not count here.
- Response Rate: The percentage of the time that this contact responds to surveys they are invited to. Incomplete responses are not counted.
Opting Contacts Out of or Into the Directory
Opting a contact out of the entire directory will prevent them from receiving any mailing from any list, sample, or segment they are a part of. They also will not be able to receive emails sent to just them. You can reverse this at any time by opting them back in.
Once you’ve selected the contact(s) you wish to opt out or opt in, click the dropdown and select either Opt-out or Opt-in.
A warning window will ask if you’re sure.
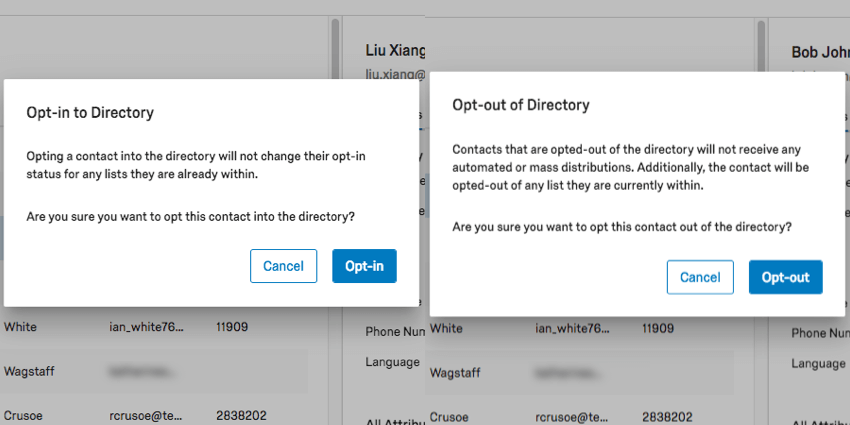
Contacts can be opted-out on multiple different levels. See Opt Out Behavior to see how these levels interact with each other.
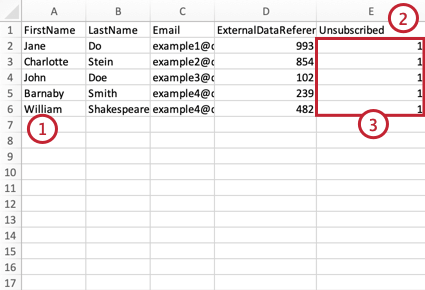
Opting Contacts Out of the Directory Using a Spreadsheet
As noted above, you can opt-out contacts by selecting the contacts in your directory and then the 3 dots to change their opt-out status. However, if you need to update many opt-out statuses at once, you can accomplish this by importing a file to update your contacts.
- Prepare a CSV file with the contact’s information. For help creating this file, see Available Contact Fields and Uploading a File of Directory Contacts.
 Qtip: Remember, you can export an example file for guidance.
 - Add a column with Unsubscribed as the header.
- For all contacts you want to opt-out, put a 1 for their value.
Qtip: If you want the contact to remain opted-in, put a 0 or leave the field blank.
- Save your file as a CSV with UTF-8 encoding.
- Upload the file into your directory.
Opt-out Behavior in Directories and Lists
In XM Directory, contacts can be opted out of messages on multiple levels. This section will explain the various opt-out levels, and how contacts can be opted into or opted out of these levels at any time.
Directory
The directory contains all contacts for your organization. It is the highest level that a contact can be opted-out of.
When a contact is opted-in at the directory level, they will receive messages from you unless they are opted-out on a more specific level (e.g., the contact is opted-out of a mailing list).
When a contact is opted-out on the directory level, they will not receive any messages from you. The contact will even be exempted from messages sent to segments they belong to.
To change the opt-out status of a contact on the directory level, see Opting Contacts into or Out of the Directory.
Mailing Lists and Samples
Mailing lists and samples are collections of contacts in your directory. By default, contacts are opted-in to all mailing lists and samples they are added to.
When a contact is opted-in on the mailing list or sample level, they will receive messages sent to that list. However, the contact will not receive any messages if they are opted-out on the directory level.
When a contact is opted-out on the mailing list or sample level, they will no longer receive messages sent to that list. However, the contact could continue to receive other messages, either sent to the entire directory or to another list that the contact is in. Additionally, the contact could be removed from the list and re-added, causing them to be opted-in again.
To change the opt-out status of a contact on a mailing list or sample level, see Managing Contacts in a Mailing List.
Deleting Contacts from the Directory
Once you’ve selected the contact(s) you wish to delete, click the dropdown and select Delete Contact.
Exporting Selected Contacts
You can export the contacts you’ve selected in a CSV or TSV file, and specify which embedded data you’d like to include.
- Go to Directory contacts.

- Select contacts.
Qtip: Try a search or a filter to narrow down the contacts you see.
- Click the 3 dots on the right.
- Select Export contacts.
- Select a File format. You can select either CSV or TSV.
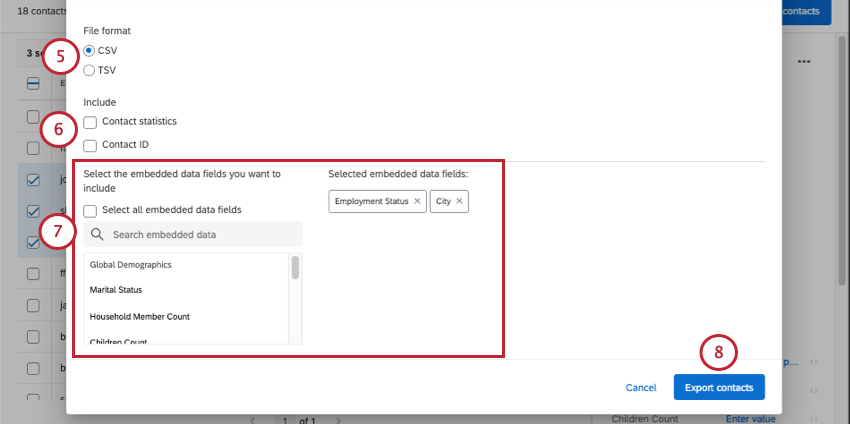
- Select from the following information to include in your export:
- Contact statistics: This includes the invite count, email count, average response time, response rate, last invite date, last response date, and response count. Response count includes incomplete but closed responses. Average response time is in milliseconds.
- Contact ID: Each XM Directory contact has a randomly generated, unique ID. This ID cannot be changed and is used as a unique identifier in API calls.
- Search and select the embedded data you’d like to include with each contact. Selected embedded data appears to the right.
Qtip: Click Select all embedded data fields to include all embedded data in the directory. Keep in mind that depending on how many fields are in your directory, this can drastically increase the file’s size. See our guide on cleaning directory embedded data.
- Click Export contacts.