
Reminder & Thank You Emails
What's on this page
About Reminder & Thank You Emails
After you’ve invited respondents to take your survey, Qualtrics allows you to send special emails reminding these respondents to finish, or thanking them for finishing. The system will recognize who’s finished for you, so you don’t have to worry about setting up a special contact list!
Qtip: Reminder and thank you emails can only be sent to distributions using the individual link! (Individual links are generally the default for emailed surveys.) You cannot set up a reminder if you sent out your survey using the anonymous link, multiple completes links, Personal Links, or any other distribution method.
Sending Reminder Emails
To help increase response rates, you can follow up with respondents who haven’t completed their survey by sending a reminder email. Reminder emails are only sent to participants who have not yet completed their survey and include the same individual link for that recipient’s survey session. If the participants have already started the survey, they will continue where they left off.
Qtip: If your initial distribution received too many complaints, you will not be able to send your reminder, and you will receive an error message.
Qtip: If you are sending a distribution to a segment, contacts must remain in the segment to get a reminder email. If they are removed from the segment they won’t receive reminder emails.


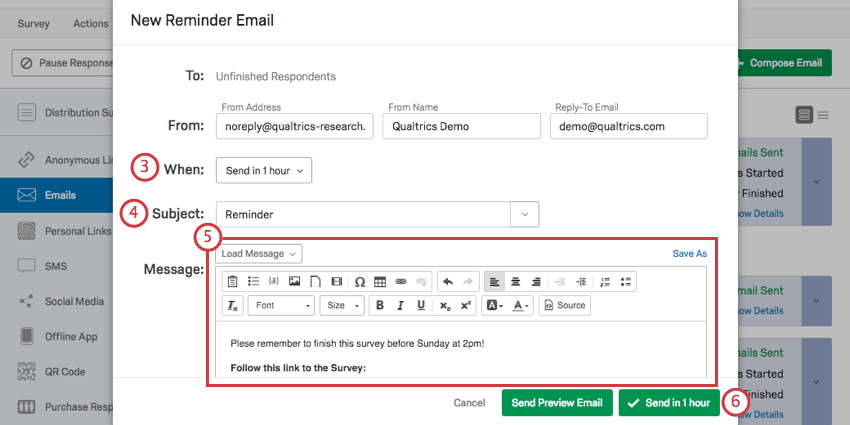
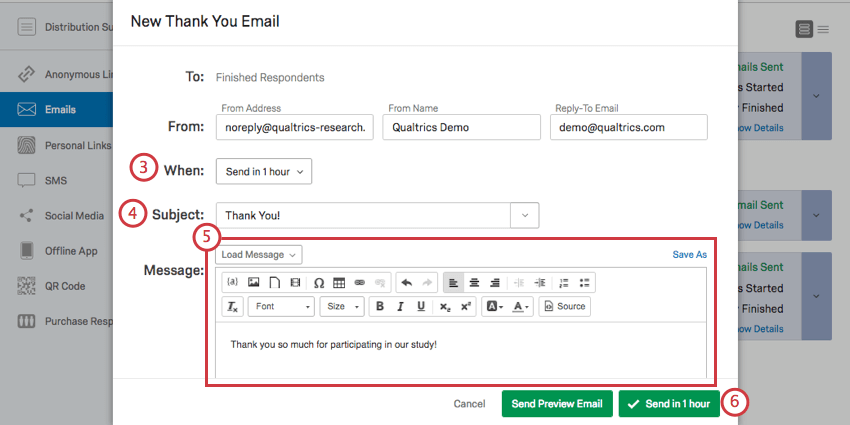
Qtip: By default, your email will be sent 1 hour from when you click Send, but you can choose from a range of common times or schedule a custom time instead.
Qtip: From Address, From Name, and Reply-To Email will be populated by default. Although you can change the From Name without issue, visit our Using a Custom From Address support page to find out how to properly change the From Address and Reply-To Email.
Qtip: For tips on setting up your email, check out the Customizing Your Email Message page.
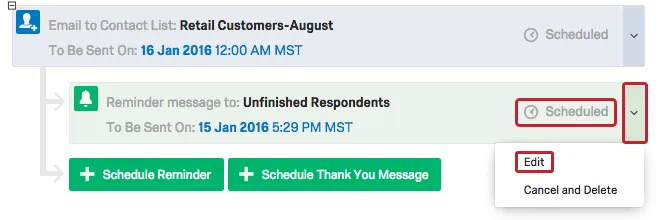
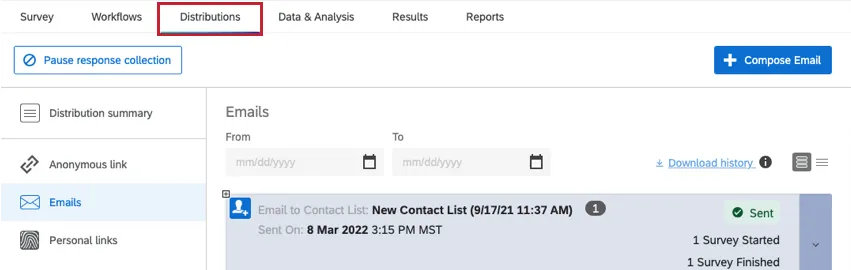
Reminder email status and distribution history
When you click the plus sign ( + ) next to an email distribution, you’ll see more information about the reminders connected to that invite. This reminder information includes status, metrics, and actions.
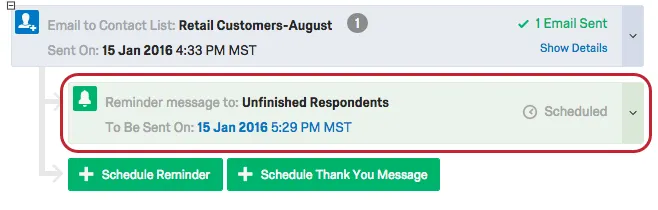
If your reminder emails haven’t been sent yet, you can see the Scheduled status to the right of the block and the exact send time to the left. You can also edit the reminder message and send time by clicking on the dropdown and choosing Edit.
Attention: If you pause response collection prior to the scheduled time of your reminder email, the scheduled reminders will not send.
If your reminder emails have been sent, you can see the distribution statistics to the right and the send time to the left. In addition, you can see what message was sent by clicking on the dropdown and choosing View Distribution. If you have access to XM Directory or the new contacts experience, then you will also have the option to Download History which will allow you to download a file containing the status of each recipient in the distribution.
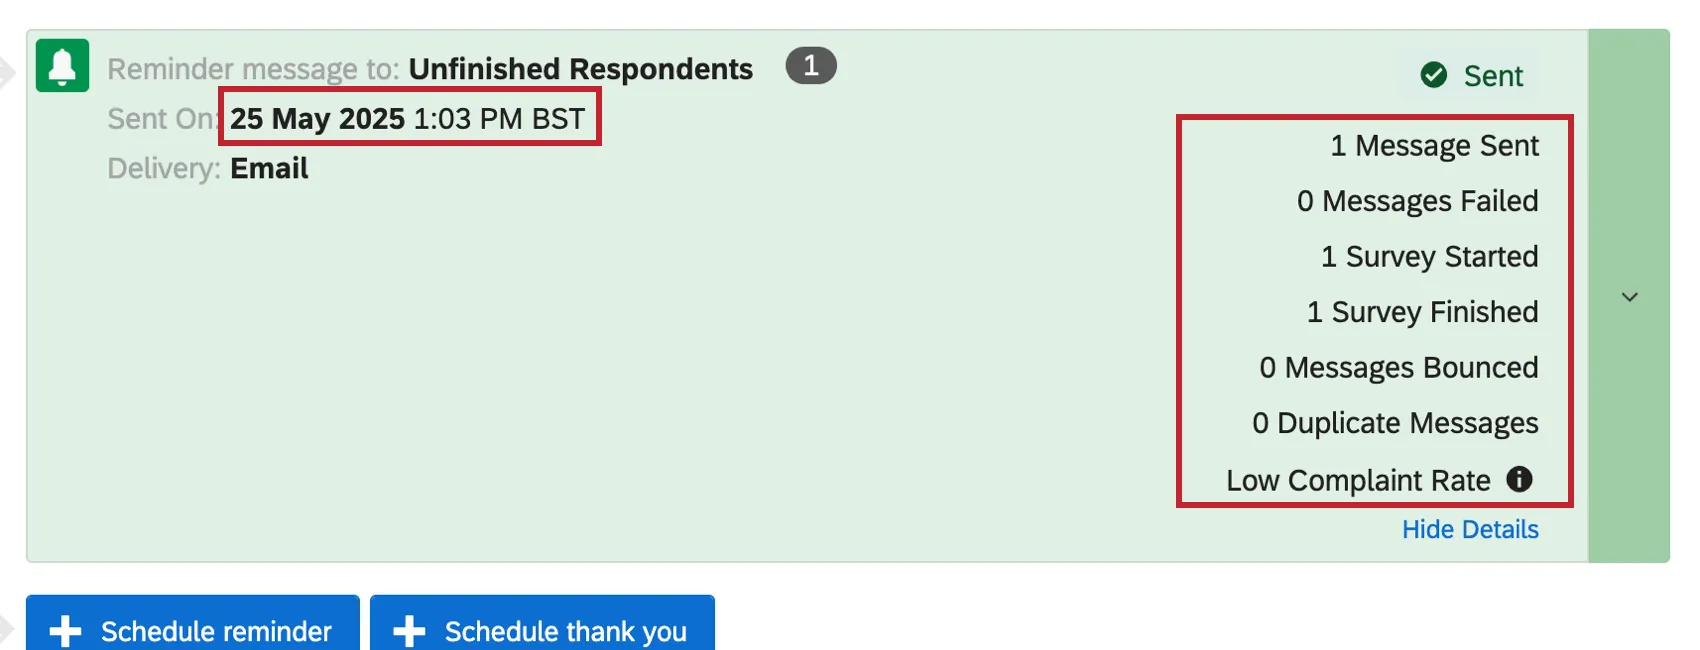
The following statistics are available for reminders:
Number of messages sent

Qtip: Reminder emails will not be sent to email addresses that received a hard or soft bounce status on the initial distribution.
Number of failed messages

Attention: If your reminders fail, then there will be an accompanying error code (e.g., “EQD15”) to help you troubleshoot the failure cause. See Email Distribution Error Messages for a list of errors, their causes, and how to resolve them.
Number of survey responses started.
Qtip: This metric is only available for reminders sent after May 21, 2025. Reminders sent before this date will have a dash (-) instead.
Number of survey responses finished
Qtip: This metric is only available for reminders sent after May 21, 2025. Reminders sent before this date will have a dash (-) instead.
- Number of bounced messages
- Number of duplicate messages
- The complaint rate for the distribution
Qtip: Check out this page if you’re interested in more in-depth definitions of these statistics.
Qtip: Let’s say you add a few people to your contact list after sending out an email distribution. These people never received an invite, so they have not started their surveys. Sending out a reminder email will go to new members of the contact list who have been added since the original distribution. However, if you have XM Directory, this is not the case. If you have XM Directory, your contacts must first receive an initial invitation before they can receive reminders for a survey.
Qtip: If you are sending reminder emails on your survey, it’s best practice to set the incomplete survey response deadline greater than or equal to the length of the reminder period.
For example, if you’re setting up your email invitation to send 2 reminder emails, the first sending after 5 days and the second after 10 days, then you should configure your incomplete survey response option to be at least 10 days as well. With this set-up, users that open the survey on the first invitation but do not complete it will be able to resume their survey session when they receive their second reminder email (because the survey hasn’t expired yet).
Sending Thank You Emails
To show your respondents how much you appreciate their participation, you can send them a thank you email. These emails are only sent to respondents who have a recorded response for your distribution. This includes completed responses as well as recorded incomplete completed responses.
Qtip: Rather than sending all thank you emails at once, you can set up your survey options to automatically send individual thank you emails as respondents complete the survey.
Qtip: Surveys with the anonymize response option enabled in Survey Options do not support thank you messages.
To send a Thank You email


Qtip: From Address, From Name, and Reply-To Email will be populated by default. Although you can change the From Name without issue, visit our Using a Custom From Address support page to find out how to properly change the From Address and Reply-To Email.
Thank You Email status
Thank you emails have their own status block nested beneath the main distribution. Like the main distribution, the thank you block has helpful metrics and actions.
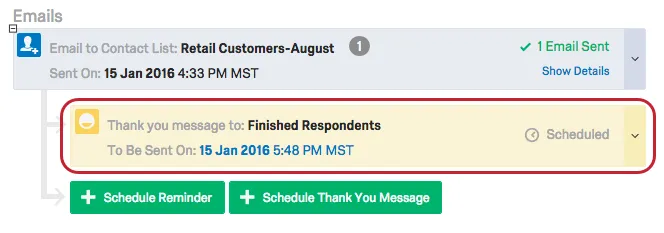
If your thank you emails haven’t been sent yet, you can see the Scheduled status to the right of the block and the exact send time to the left. You can also edit the message and send time by clicking on the dropdown and choosing Edit.

If your thank you emails have been sent, you can see the distribution statistics to the right and the send time to the left. In addition, you can see what message was sent by clicking on the dropdown and choosing View Distribution. If you have access to XM Directory or the new contacts experience, then you will also have the option to Download History which will allow you to download a file containing the status of each recipient in the distribution.

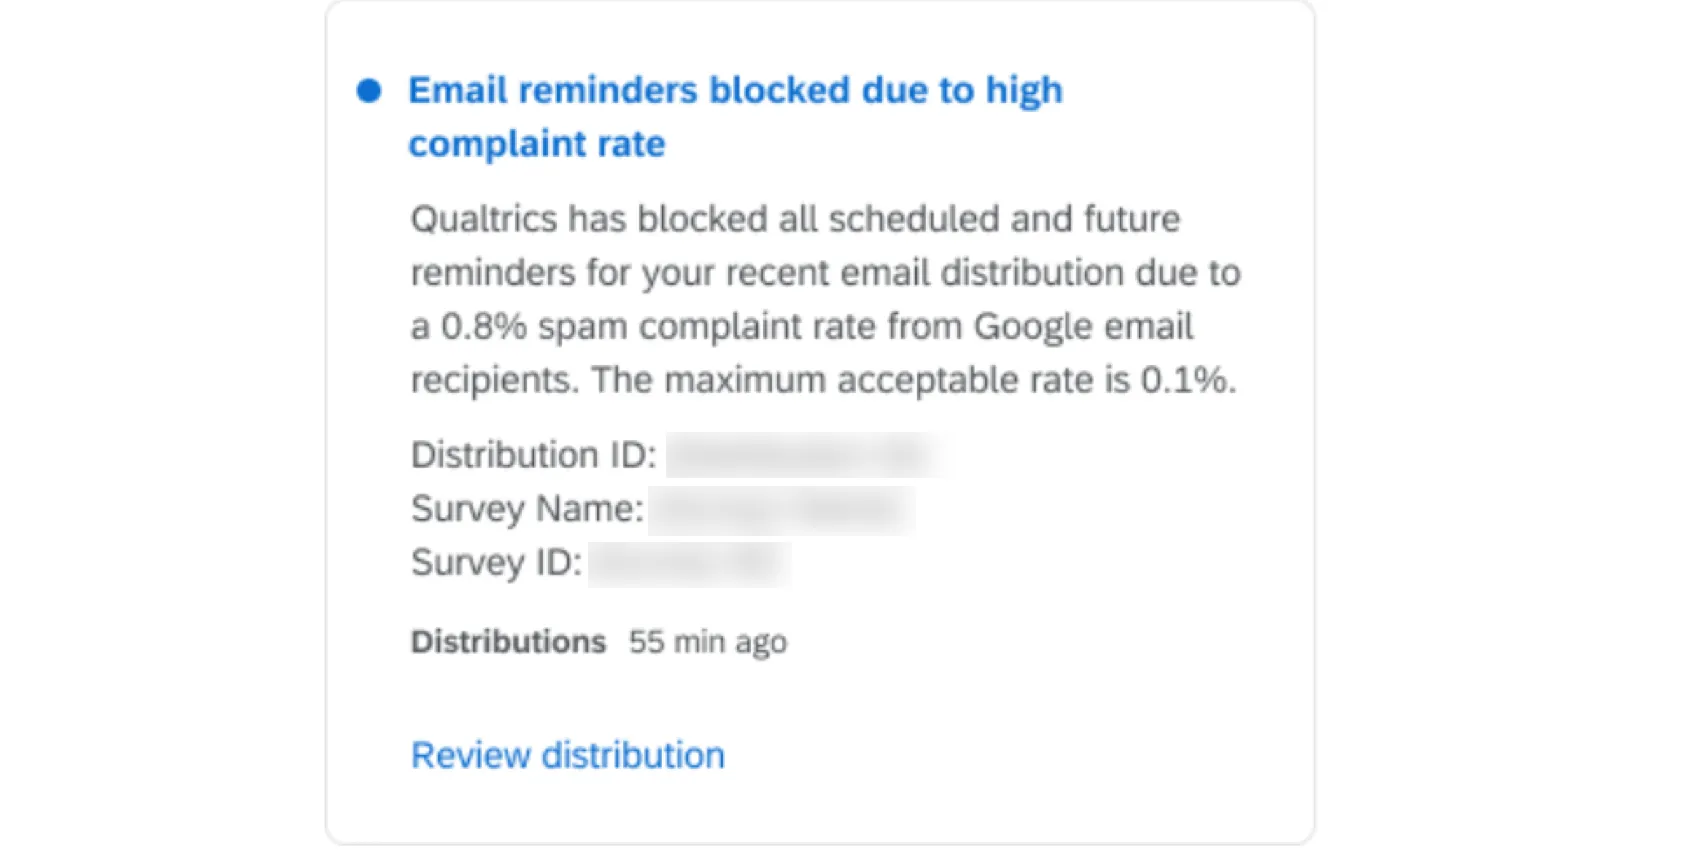
Blocked Reminders
If your initial survey invitation receives a high complaint rate or has a low engagement rate, then reminders will be blocked for that distribution. This helps to maintain a positive sender reputation and ensure high email deliverability for emails sent from the Qualtrics platform. Once a reminder is blocked, there is nothing you or Qualtrics support can do to manually unblock it. All you can do is wait for more responses to come in.
The current thresholds are as follows (please keep in mind these may change in the future):
- High complaint rate: More than 0.1% of emails were marked as spam.
Qtip: This complaint rate is measured by individual email providers. For example, you send survey invites to Gmail, Outlook, and Apple email addresses. If more than 0.1% of the Gmail addresses mark your email as spam, then you will get an alert that your complaints are coming from Google recipients. All reminders will be blocked for that distribution, not just reminders for recipients from that specific provider.
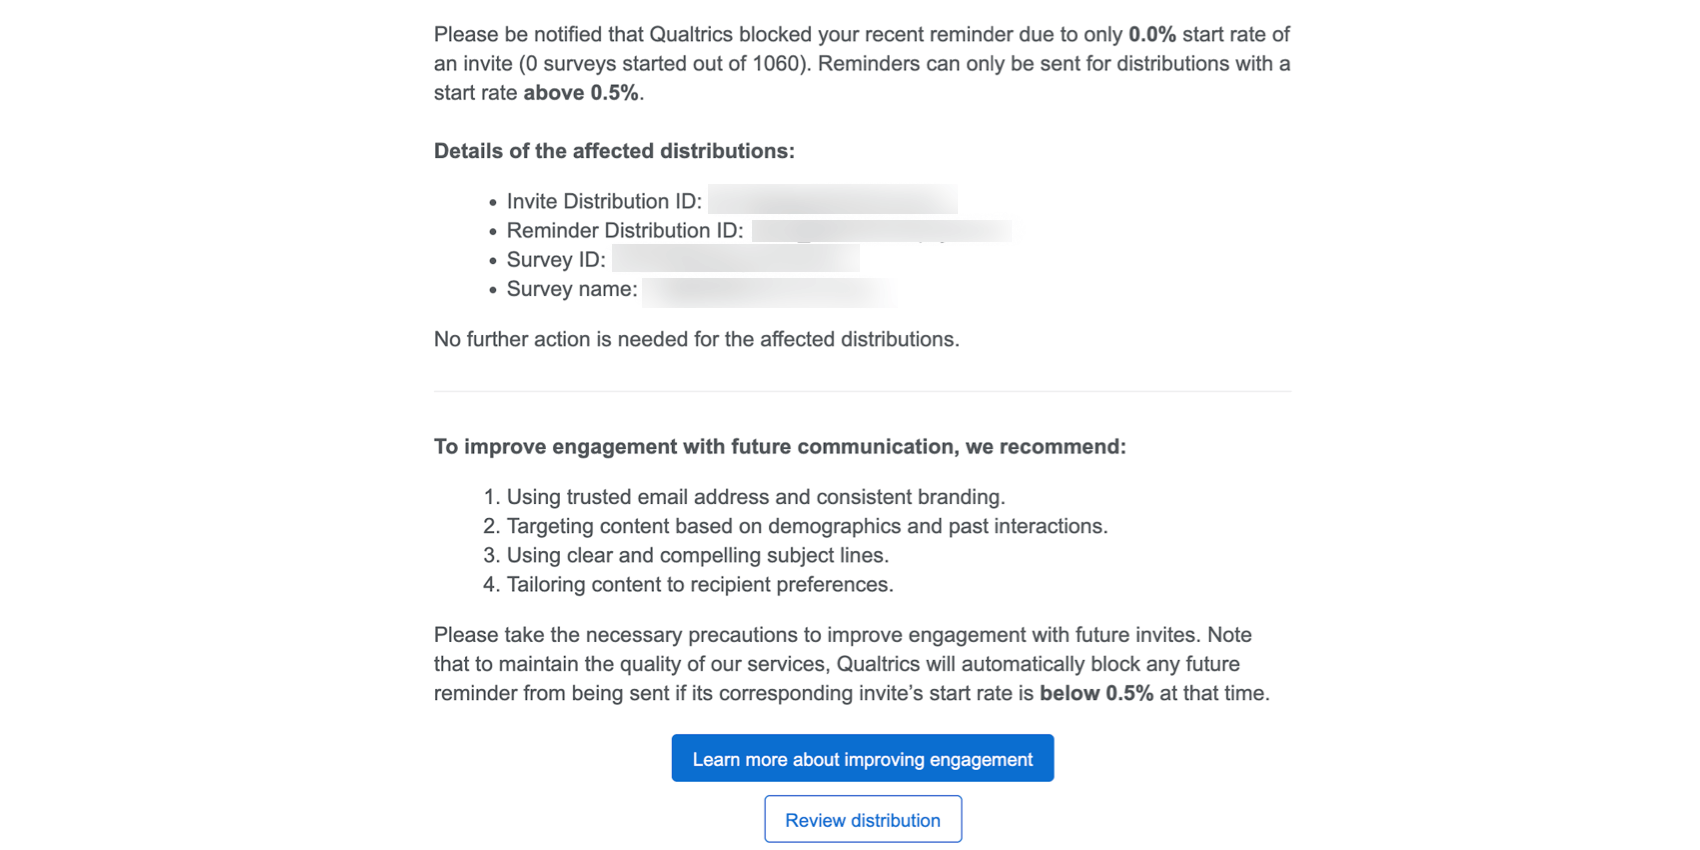
- Low engagement rate: Less than 0.5% of emails resulted in a started survey session (the distribution’s start rate is less than 0.5%). A started survey includes any survey where the recipient lands on the first page of a survey after clicking the survey link.
If your distribution has a high complaint rate or low engagement rate, then reminders will be blocked for that distribution. You will receive an in-product notification and an email notification when a reminder is blocked due to one of these reasons.
If your reminders are blocked due to either of these reasons, it’s important to resolve the underlying causes:
- High complaints: See Avoid Being Marked as Spam for more information on why an email would be marked as spam and how to investigate spam complaint rates to prevent them in the future.
Qtip: If your reminders have been blocked due to too many complaints to the invite, you won't be able to send any new reminders for this distribution. In order to reach your audience, you’ll need to create a new distribution. Before doing that, make sure you follow Email Sender Best Practices to avoid being marked as spam and having your reminders blocked again.
- Low engagement: See Implement Email Sender Best Practices tips on reevaluating your messaging strategies to improve engagement rates.
Qtip: The system checks the invite's start rate at the moment the reminder is scheduled to be sent. If the start rate is below 0.5% at that time, the email reminder will not be sent. Keep in mind that the start rate of your invite can grow over time and that the ability to send reminders for other distributions will remain unaffected.
Attention: If you use a SMTP Relay, reminders won’t be blocked for distributions with a high complaint rate or low engagement. Be aware that these distributions can still negatively impact your IPs and domains, which may affect your deliverability and inbox placement.
Qtip: You can proactively monitor distribution health by Enabling Distribution Health Notifications, which will email you health metrics about your selected distributions weekly.
Types of Projects With Reminder and Thank You Emails
Attention: Not all of the projects and apps described in this section are included in every license. Please contact Account Services if you are interested in getting access to any of these features.
Email reminders and thank-yous work as described on this support page in several types of projects, including:
- Survey projects
- XM Solutions
- Conjoint and MaxDiff projects
The steps described on this page show how to send reminders and thank-yous from the Distributions tab of the project.
If your license includes XM Directory, many of the distribution options described on this page are also available right inside the directory. See Reminders and Thank You Emails for more details.
Types of Projects That Are Not Supported
While you can email invites for other projects, their distributions don’t necessarily match what you see on this support page, and there are many important differences to keep in mind.
- For Pulse, see more on scheduling email invites.
- For Engagement and Ad Hoc Employee Research, see Email Messages (EX).
- For Lifecycle, see Lifecycle Emails.
- For 360 projects, see Email Messages (360).
FAQs
If someone unsubscribes from one of my contact lists, will they automatically be unsubscribed from all my other contact lists?
If someone unsubscribes from one of my contact lists, will they automatically be unsubscribed from all my other contact lists?
I am trying to email my survey, but I keep getting an error message that says my from address/reply-to address is "invalid." What does this mean?
I am trying to email my survey, but I keep getting an error message that says my from address/reply-to address is "invalid." What does this mean?
If you are a Brand Administrator, you can find solutions on Using a Custom From Address.
How can I avoid my emails being marked as spam?
How can I avoid my emails being marked as spam?
How do I send reminder emails to only those participants who have not finished their survey?
How do I send reminder emails to only those participants who have not finished their survey?
How can I insert values from my contact list into the body of my email (First Name, Last Name, etc.)?
How can I insert values from my contact list into the body of my email (First Name, Last Name, etc.)?
How can I see who has received an email or who has finished the survey?
How can I see who has received an email or who has finished the survey?
How can I change my "From" address for email distributions?
How can I change my "From" address for email distributions?
Some of my respondents say that their survey session has expired. Why is this happening?
Some of my respondents say that their survey session has expired. Why is this happening?
How do I opt someone out of a contact list? I don't want them to receive emails from this list anymore.
How do I opt someone out of a contact list? I don't want them to receive emails from this list anymore.
You can also change a contact's subscription status in the product. See this page.
I've been notified about a high complaint rate associated with a specific domain, even though I haven't sent emails directly to this domain. Why is this happening?
I've been notified about a high complaint rate associated with a specific domain, even though I haven't sent emails directly to this domain. Why is this happening?
How is start rate calculated?
How is start rate calculated?
How do I increase my weekly email limit?
How do I increase my weekly email limit?
- The email limit being requested.
- A description of the project(s).
- A general description of who is being surveyed (student body, small business owners in Iowa, purchased panel, etc.).
- How long the limit needs to be in place (one time or multiple times per year).
I’ve been notified about extending the start rate minimum threshold to 1% in future. When will the policy update take effect?
I’ve been notified about extending the start rate minimum threshold to 1% in future. When will the policy update take effect?
Currently, Qualtrics blocks reminders from being sent if its corresponding invite’s start rate is below 0.5% at that time. Although it is planned to raise the threshold in the future, the policy update date has not been specified yet.
If you received this notification, your email invite engagement may be considered relatively low. Our focus is to keep you informed and make sure you have time to improve your rates before the policy is updated. See Implement Email Sender Best Practices for more information on improving engagement rates.
That's great! Thank you for your feedback!
Thank you for your feedback!