
SSO Authenticator
What's on this page
About SSO Authenticators
Authenticators are used to control who can access your survey. With the Single Sign-On (SSO) authenticator, you can authenticate against a third-party system (e.g., verify that they have a legitimate user ID at your university or have a Facebook account). Once you’ve set up your authenticator, you can distribute your survey via the anonymous link, and only people who successfully authenticate will be able to take the survey.
The authenticator feature supports 6 basic types of SSO authentication:
- Token: The third-party generates a secure token that allows the respondent (if validated) to automatically login.
- CAS (Central Authentication Service): Respondents authenticate against a CAS server.
- LDAP (Lightweight Directory Access Protocol): LDAP is used to authenticate users.
- Shibboleth: Respondents authenticate via SAML.
- Google OAuth 2.0: Respondents authenticate with their Google username.
- Facebook: Respondents authenticate with their Facebook username.
Below is a brief description of how to set up each method given a basic knowledge of how to use contact list authenticators. For further details about SSO, view our Single Sign-On Technical Documentation.
Qtip: If you are going to authenticate using Token, CAS, LDAP, or Shibboleth, you will need to contact your IT department to obtain information on your SSO authenticator setup. If you use Google OAuth 2.0 or Facebook as your SSO authenticator type, then you won’t need any extra information; the setup is automatic.
Qtip: When setting authentication values using embedded data, remember that special characters such as period (.) and hashtag (#) are unsupported. See Best Practices and Troubleshooting Embedded Data for more tips on setting embedded data values.
Qtip: Brand Administrators can limit who can access SSO authenticators by configuring SSO connections for the organization.
Token
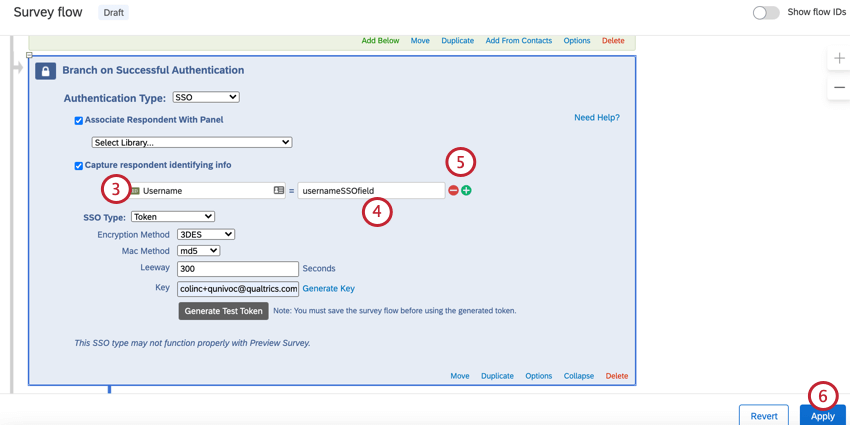
Token authenticators allow you to authenticate using the secure token generated via a third party. Token authenticators can also be used to pass encrypted embedded data into the survey where it is then decrypted and stored as embedded data.
Qtip: This SSO type may not function properly with preview survey.
Attention: For security and data privacy reasons, you must contact your IT department to get the necessary setup information. Qualtrics Support will not be able to distribute Token SSO information.
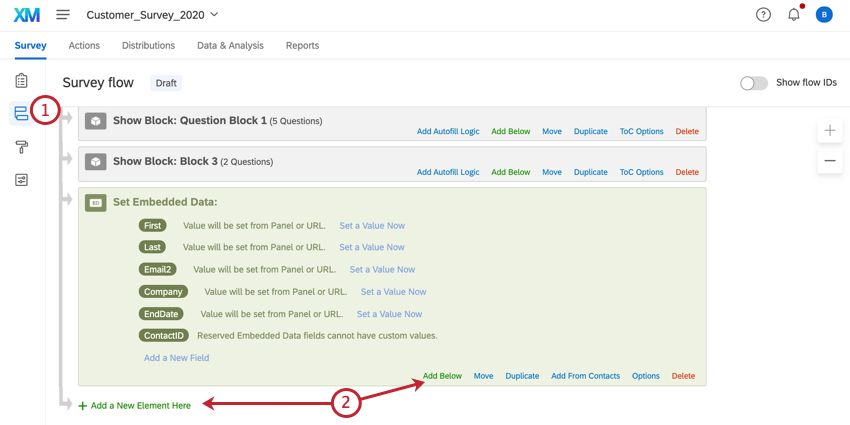
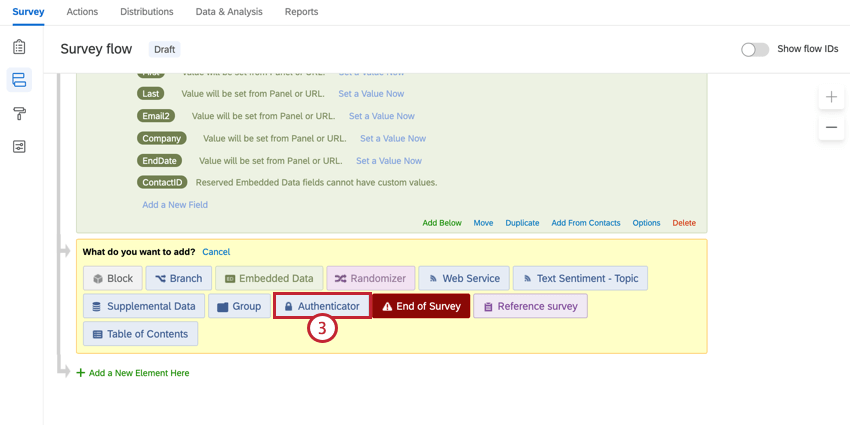
To set up a Token Authenticator
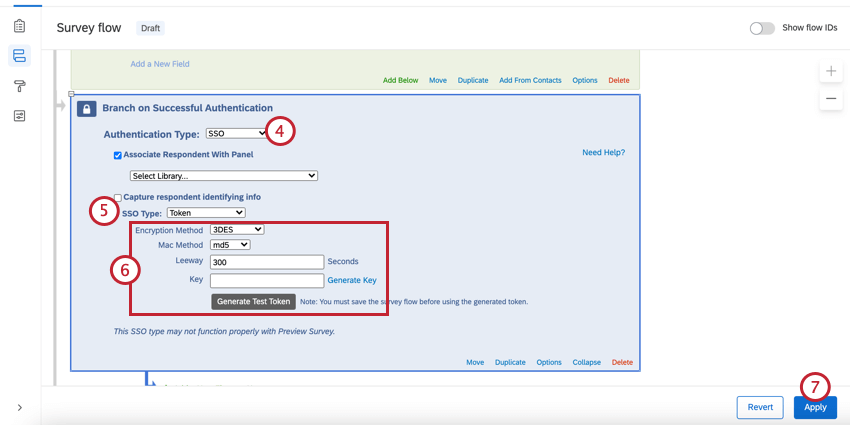
Attention: You must save the survey flow before generating a test token.
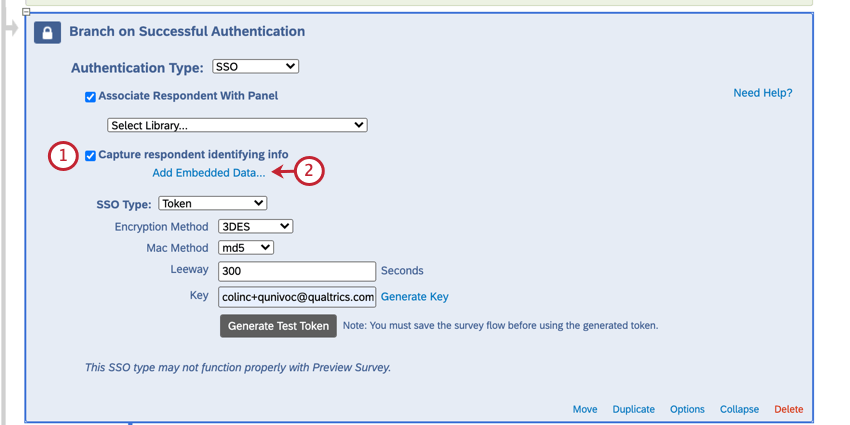
To capture identifying information (Optional)
You will now see the embedded data values in the response results after someone takes the survey.
Qtip: You can go back into the survey flow and generate a test token to try this type of authentication out.
Attention: For more information on generating SSO tokens with embedded data, please contact your IT team.
Qtip: In addition to including the expected personal information, the SSO token must contain a timestamp and expiration.
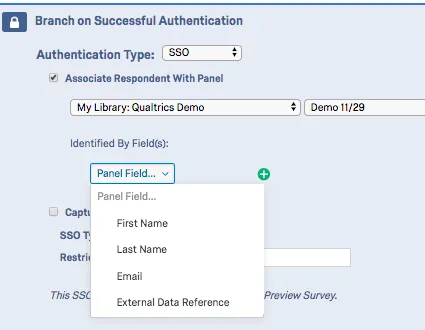
ASSOCIATE RESPONDENT WITH CONTACT LIST (OPTIONAL)
By default, Token SSO authenticators allow participants to take the survey multiple times. You can prevent this behavior and allow participants to only take the survey once by enabling Associate Respondent With Panel. This option forces participants to be a member of the selected contact list in order to take the survey.
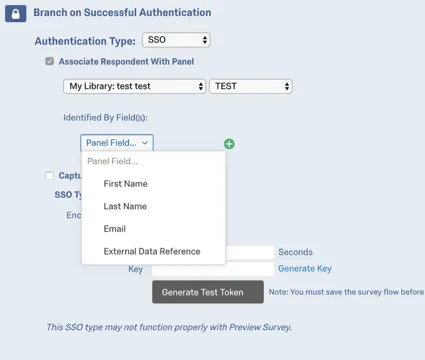
The table below indicates which identifying field from the contact list (specified with the Identified by Fields dropdown) pairs with which Token authenticator attribute.
| Identified By Field | Token Attribute |
|---|---|
| First Name | firstname |
| Last Name | lastname |
| External Data Reference | id |
For example, if the Identifying Field was Last Name and the respondent was passing “Doe” for the lastname attribute, the contact list would need to have “Doe” in the Last Name field.
Qtip: If Associate Respondent With Panel is enabled, you may get an error message that says “Unable to login with information provided.” This means the SSO connection worked, but the information does not match what’s in your contact list.
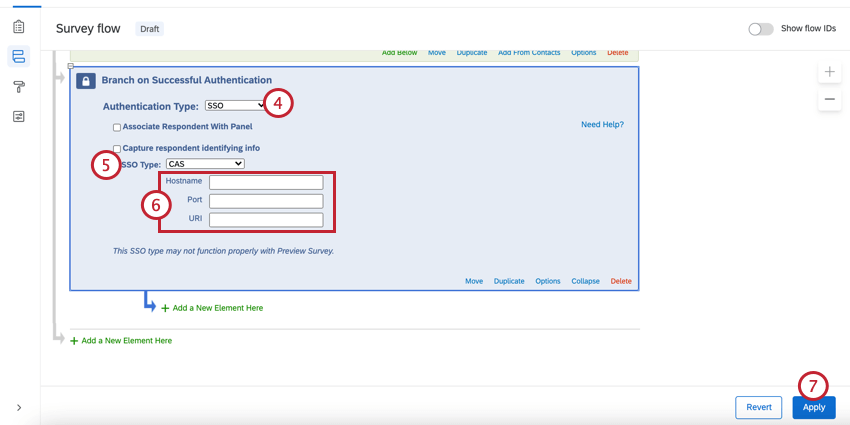
CAS
CAS authenticators allow you to authenticate users against a CAS server. They can also be used to capture and store a participant’s CAS username as embedded data.
Qtip: This SSO type may not function properly with preview survey.
Attention: For security and data privacy reasons, you must contact your IT department to get the necessary setup information. Qualtrics Support will not be able to distribute CAS server information.
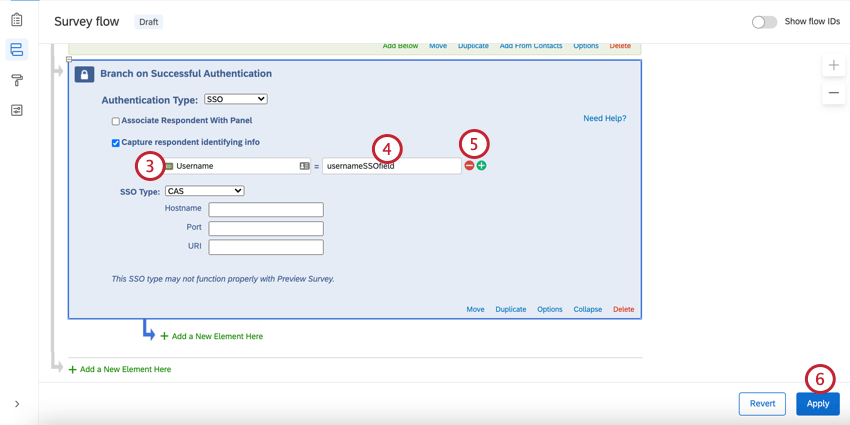
To set up a CAS Authenticator
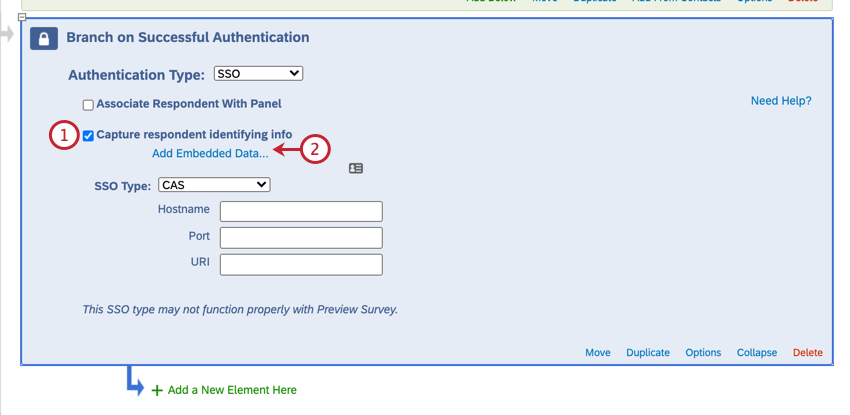
To capture identifying information (Optional)
You will now see the embedded data value in the response results after someone takes the survey.
Qtip: You can take the survey via the anonymous survey link to give it a try.
Attention: For more information on what embedded data can be captured, please contact your IT team.
ASSOCIATE RESPONDENT WITH CONTACT LIST (OPTIONAL)
By default, CAS SSO authenticators allow participants to take the survey multiple times. You can prevent this behavior and allow participants to only take the survey once by enabling Associate Respondent With Panel. This option forces participants to be a member of the selected contact list in order to take the survey.
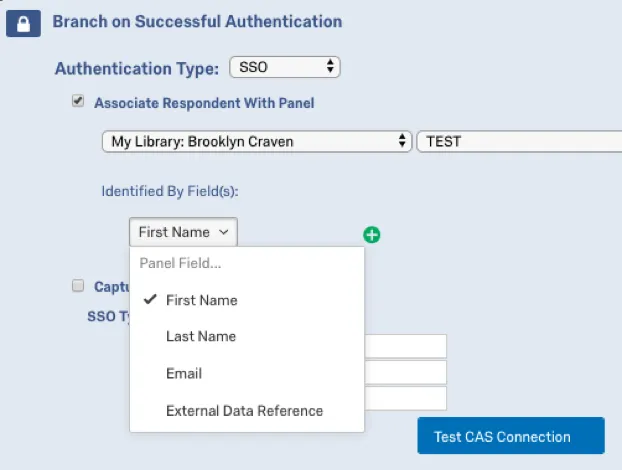
Since only the username can be consumed via CAS authenticators, the contact list field that is selected as the identifying field (using the Identified by Field dropdown) must house the CAS username to properly authenticate users.
For example, if the identifying field was First Name and the respondent was passing “johnd” for the their CAS username, the contact list would need to have “johnd” in the First Name field.
Qtip: If Associate Respondent With Panel is enabled, you may get an error message that says “Unable to login with information provided.” This means the SSO connection worked, but the information does not match what’s in your contact list.
LDAP
LDAP authenticators allow you to authenticate users directly against your LDAP servers. They can also be used to capture and store LDAP attributes as embedded data.
Attention: Due to the sensitive nature of LDAP server information, you must contact your IT department to get the necessary setup information. Qualtrics Support will not be able to distribute LDAP server information.
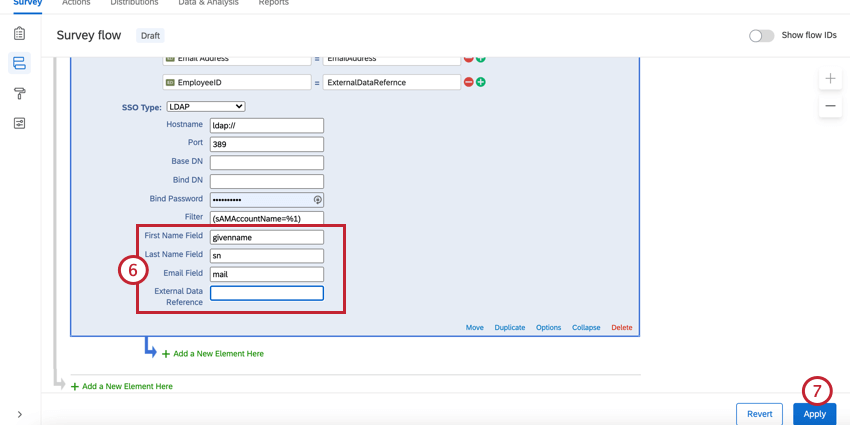
To set up an LDAP Authenticator
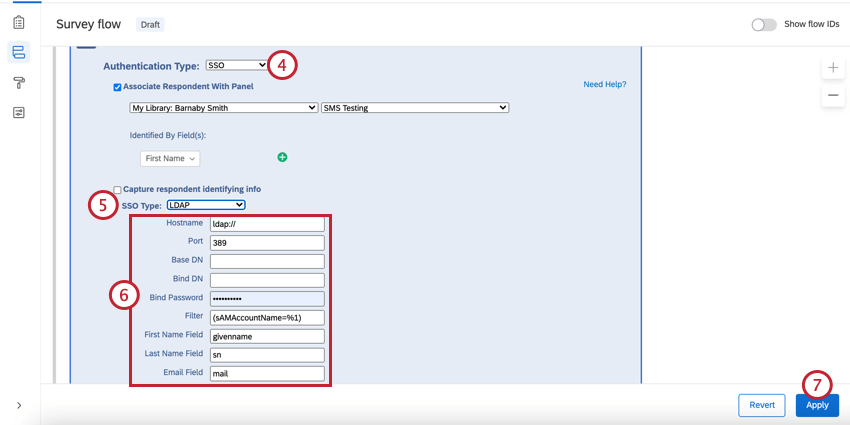
Qtip: The Filter field should be left in the format ([filter]=%1), e.g., (sAMAccountName=%1) or (uid=%1).
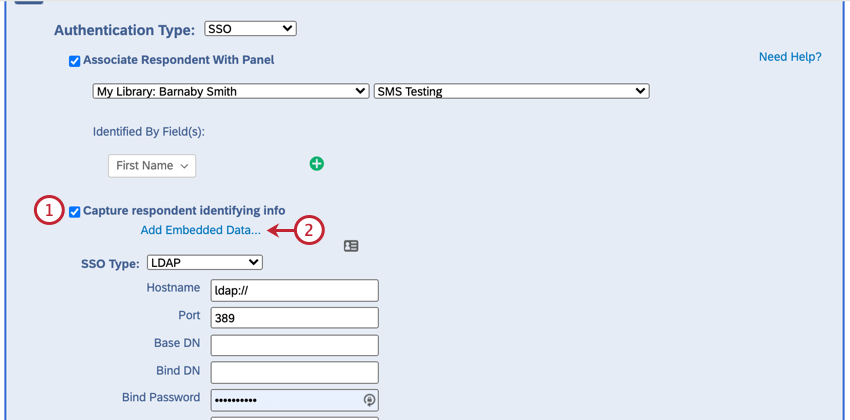
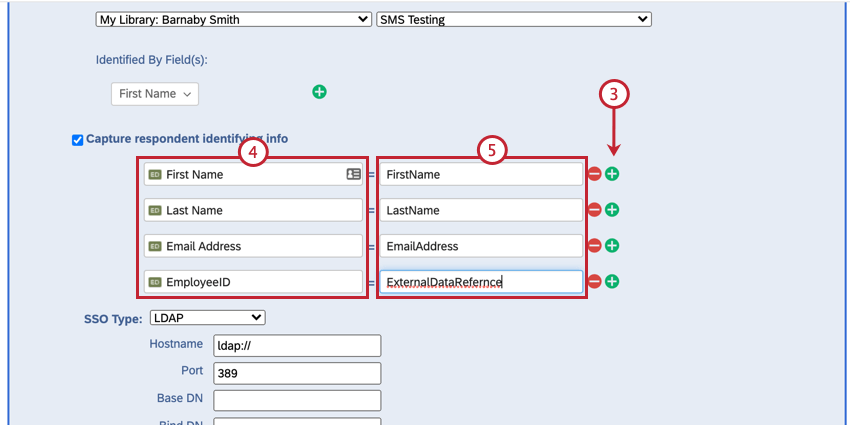
To capture identifying information (Optional)
You will now see the embedded data value in the response results after someone takes the survey.
Qtip: You can preview the survey to try this setup out.
ASSOCIATE RESPONDENT WITH CONTACT LIST
By default, LDAP SSO authenticators allow participants to take the survey multiple times. You can prevent this behavior and allow participants to only take the survey once by enabling Associate Respondent With Panel. This option forces participants to be a member of the selected contact list in order to take the survey.
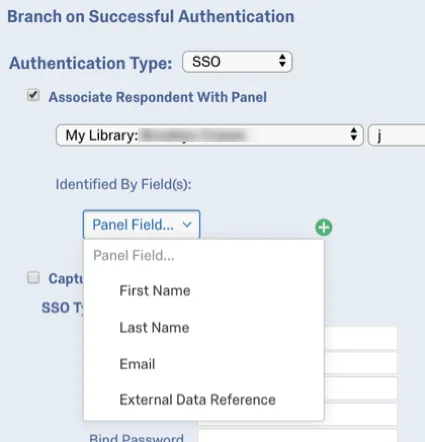
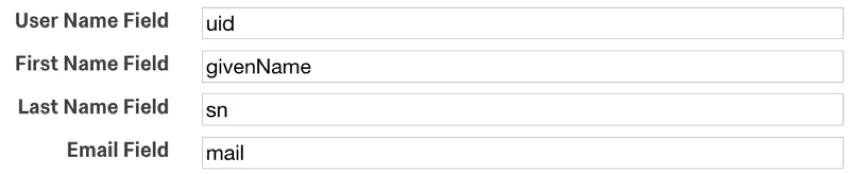
The table below indicates which identifying field (determined in the Identified by Field dropdown) from the contact list pairs with which LDAP authenticator attribute, as specified in the First Name Field, Last Name Field, Email Field, and External Data Reference in the authenticator settings.
| Identified By Field | LDAP Attribute |
|---|---|
| First Name | First Name Field (i.e. firstname) |
| Last Name | Last Name Field (i.e. lastname) |
| Email Field (i.e. mail) | |
| External Data Reference | External Data Reference (i.e. uid) |
For example, let’s say that the identifying field was Email and the following attributes were specified in the LDAP authenticator settings:
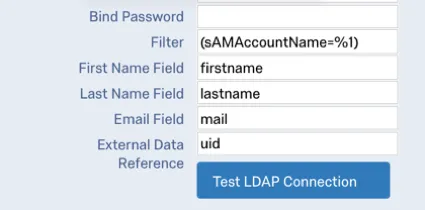
If the respondent was passing “johnd@email.com” for the mail attribute, the contact list would need to have “johnd@email.com” in the Email field.
Qtip: If Associate Respondent With Panel is enabled, you may get an error message that says “Unable to login with information provided.” This means the SSO connection worked, but the information does not match what’s in your contact list.
Shibboleth
Shibboleth allows users to authenticate via SAML. SAML is a 2 way connection, which is why this option is only available to those who already have Shibboleth set up on their brand. To find out if your brand has a Shibboleth SSO setup, contact your Brand Administrator.
Qtip: This SSO type may not function properly with preview survey.
Qtip: The Shibboleth SSO authenticator uses Service Provider initiated logins to authenticate respondents. Please contact your IT team to find out if your Identity Provider supports Service Provider initiated logins.
To set up a Shibboleth Authenticator
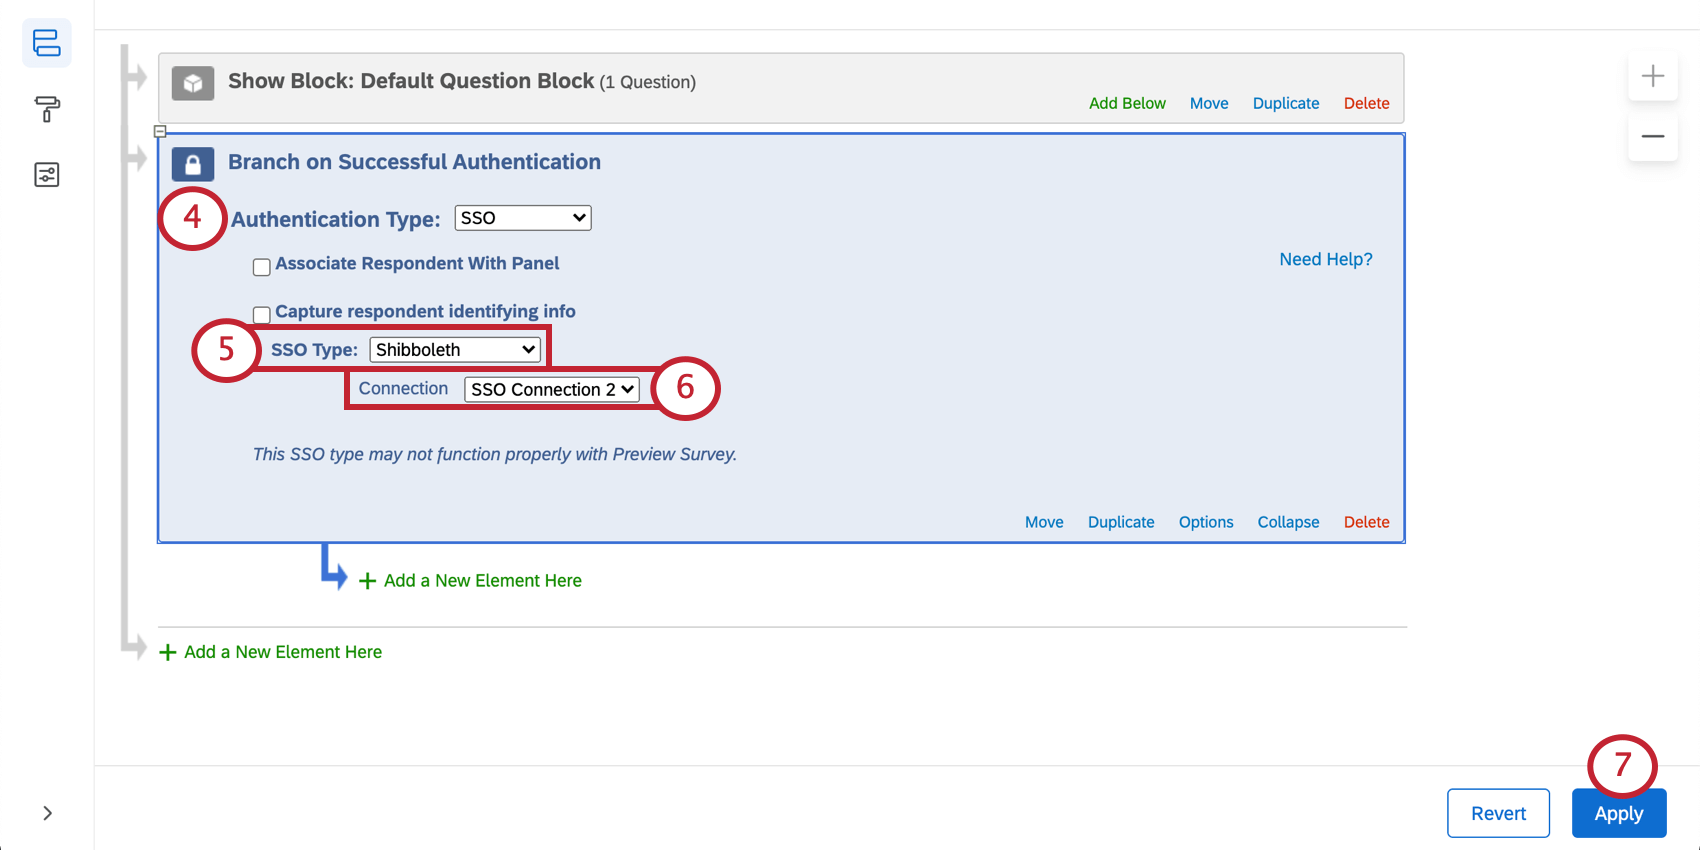
Qtip: Brand Administrators can control which SSO connections are available across the organization. See Managing SSO Connections for Survey Authentication for relevant details and warnings.
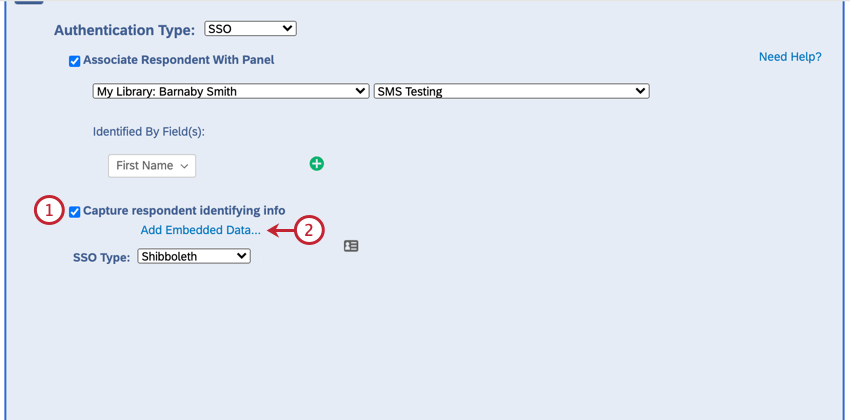
To capture identifying information (Optional)
You will now see the embedded data value in the response results after someone takes the survey.
Qtip: You can test the survey using the anonymous link.
Attention: For more information on what embedded data can be captured, please contact your IT team.
ASSOCIATE RESPONDENT WITH CONTACT LIST
By default, Shibboleth SSO authenticators allow participants to take the survey multiple times. You can prevent this behavior and allow participants to only take the survey once by enabling Associate Respondent With Panel. This option forces participants to be a member of the selected contact list in order to take the survey.
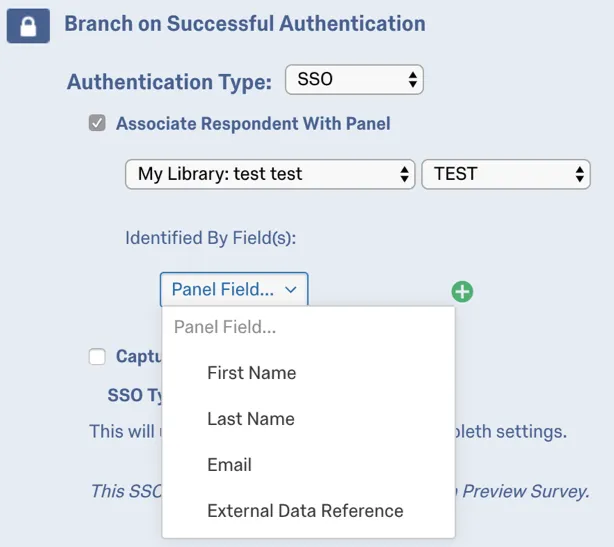
The table below indicates which identifying field from the contact list pairs with which SAML attribute (specified by Identified by Field dropdown), as specified in the User Name Field, First Name Field, Last Name Field, and Email Field in the Qualtrics instance’s SSO settings.
| Identified By Field | SAML Attribute |
|---|---|
| External Data Reference | Username (i.e. uid) |
| First Name | First Name Field (i.e. givenName) |
| Last Name | Last Name Field (i.e. sn) |
| Email Field (i.e. mail) |
For example, if the identifying was External Data Reference and the respondent was passing “johnd” for the uid attribute, the contact list would need to have “johnd” in the External Data Reference field.
Qtip: If Associate Respondent With Panel is enabled, you may get an error message that says “Unable to login with information provided.” This means the SSO connection worked, but the information does not match what’s in your contact list.
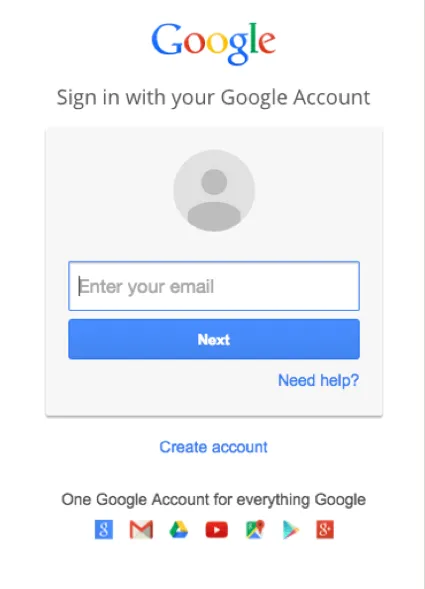
Google OAuth 2.0
Google OAuth 2.0 authenticators allow respondents to authenticate with their Google credentials. They can also be used to capture and store Google account information as embedded data.
Qtip: This SSO type may not function properly with preview survey.
To set up a Google OAuth 2.0 Authenticator
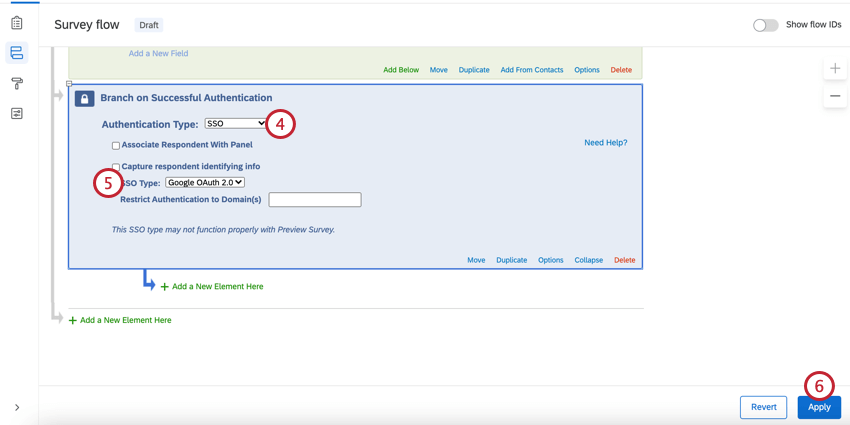
Qtip: By default, Google OAuth 2.0 authenticators will authenticate anyone with a Google account. To restrict who can access your survey, add in approved account email domains to the Restrict Authentication to Domain(s) field. No wildcard is necessary here; you’ll just need to type in your domain without the @ symbol (e.g., “gmail.com” or “qualtrics.com”). To allow multiple domains, enter your domains as a comma-separated list (e.g., “gmail.com, qualtrics.com”). A Brand Administrator can also restrict who can access the authenticator by configuring SSO settings for the organization.
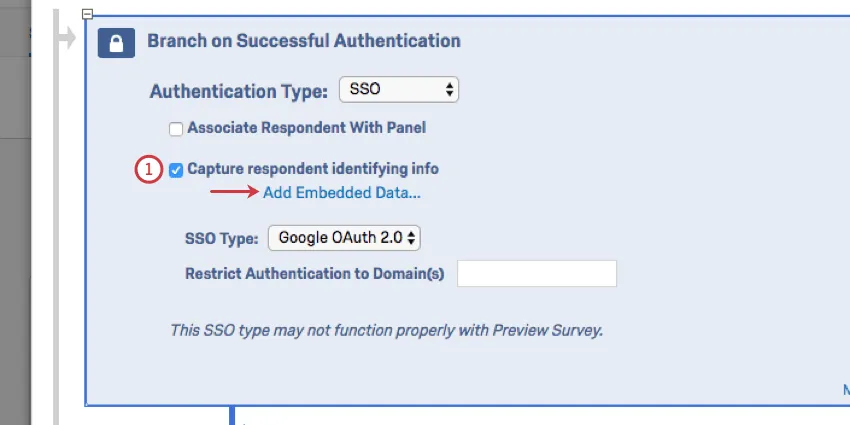
To capture identifying information (Optional)
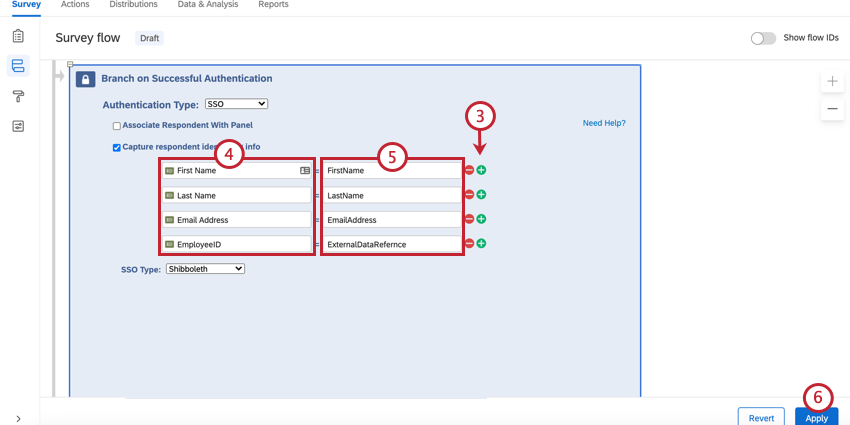
Enable Capture respondent identifying info and click Add Embedded Data.
Use the plus sign (+) to add fields and the minus sign (-) to remove fields.
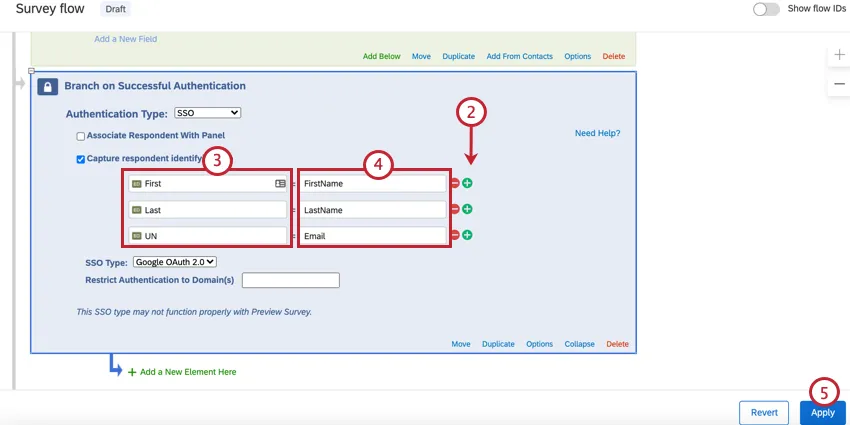
Enter your embedded data field name into the “Embedded Data to Set” text entry box on the left of the equals sign.
Insert the parameter field from Google OAuth 2.0 into the “Field From SSO” text entry box. You can select fields from the following list:
| attribute | value |
|---|---|
| FirstName | John |
| LastName | Doe |
|
Click Apply.
You will now see the embedded data value in the response results after someone takes the survey.
Qtip: You can test this setup using the anonymous link.
ASSOCIATE RESPONDENT WITH CONTACT LIST
By default, Google OAuth 2.0 authenticators allow participants to take the survey multiple times. You can prevent this behavior and allow participants to only take the survey once by enabling Associate Respondent With Panel. This option forces participants to be a member of the selected contact list in order to take the survey.

The table below indicates which identifying field (specified under Identified by Field dropdown) from the contact list pairs with which Google OAuth 2.0 attribute.
| Identified By Field | Google OAuth Attribute |
|---|---|
| First Name | FirstName |
| Last Name | LastName |
| External Data Reference | UserName |
For example, if the identifying field was First Name and the respondent was passing “John” for the Firstname attribute, the contact list would need to have “John” in the First Name field.
Qtip: If Associate Respondent With Panel is enabled, you may get an error message that says “Unable to login with information provided.” This means the SSO connection worked, but the information does not match what’s in your contact list.
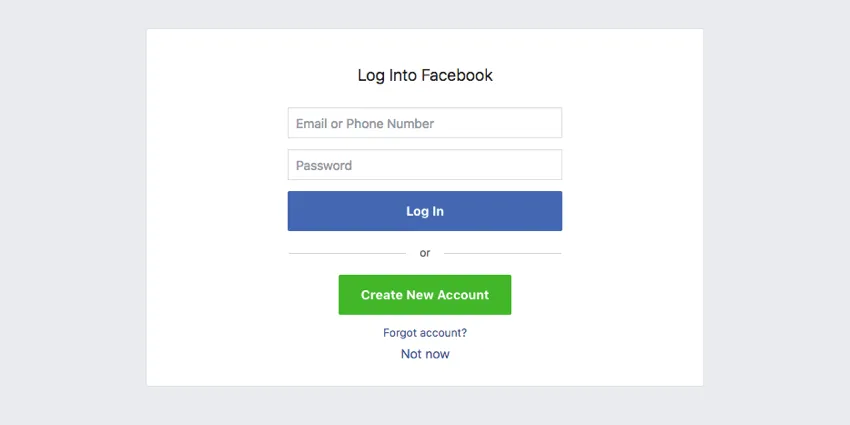
Facebook authenticators allow respondents to authenticate with their Facebook credentials. They can also be used to capture and store Facebook account information as embedded data.
Qtip: This SSO type may not function properly with preview survey.
To set up a Facebook Authenticator
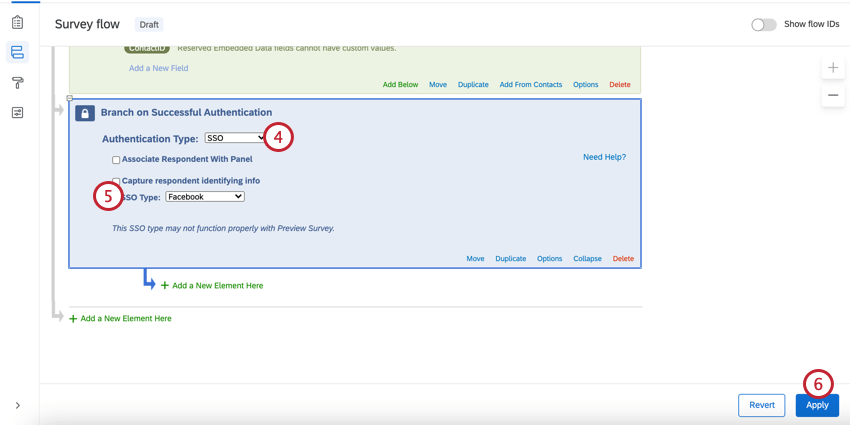
To capture identifying information (Optional)
Enable Capture respondent identifying info.
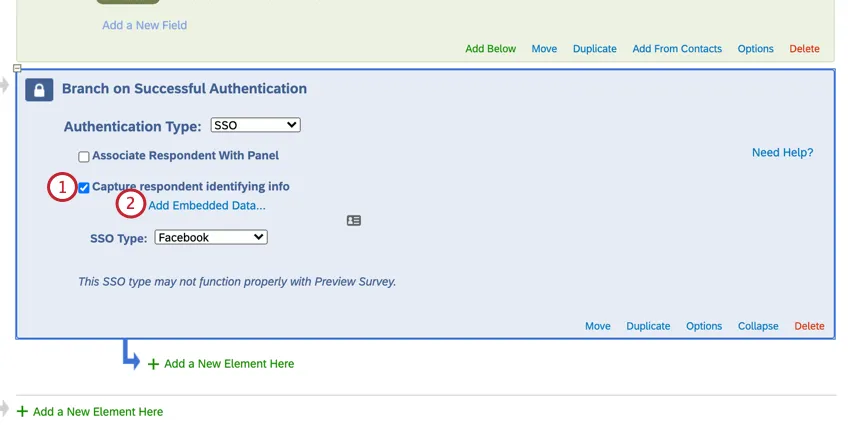
Click Add Embedded Data.
Use the plus sign (+) to add fields and the minus sign (-) to remove fields.
Enter your embedded data field name into the “Embedded Data to Set…” text entry box on the left of the equals sign.
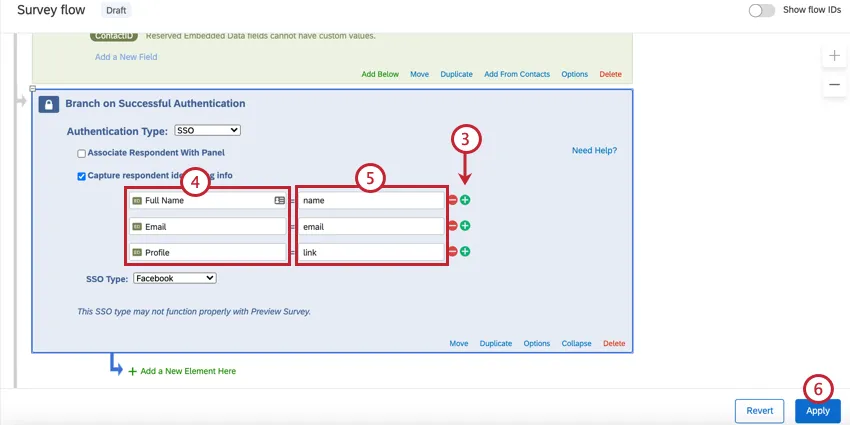
Insert the parameter field from Facebook into the “Field From SSO” text entry box. You can select fields from the following list:
| attribute | value |
|---|---|
| name | John Doe |
| first_name | John |
| last_name | Doe |
| link | http://www.facebook.com/johndoe |
| gender | male |
|
Click Apply.
You will now see the embedded data value in the response results after someone takes the survey.
Qtip: You can test this survey by using the anonymous link.
ASSOCIATE RESPONDENT WITH CONTACT LIST
By default, Facebook authenticators allow participants to take the survey multiple times. You can prevent this behavior and allow participants to only take the survey once by enabling Associate Respondent With Panel. This option forces participants to be a member of the selected contact list in order to take the survey.
The table below indicates which identifying field (specified by the Identified by Field dropdown) from the contact list pairs with which Facebook parameter.
| Identified By Field | Facebook Attribute |
|---|---|
| First Name | first_name |
| Last Name | last_name |
| External Data Reference |
For example, if the identifying field was Email and the respondent was passing “johnd@email.com” for the email attribute, the contact list would need to have “johnd@email.com” in the Email field.
Qtip: If Associate Respondent With Panel is enabled, you may get an error message that says “Unable to login with information provided.” This means the SSO connection worked, but the information does not match what’s in your contact list.
Maximum Authentication Attempts
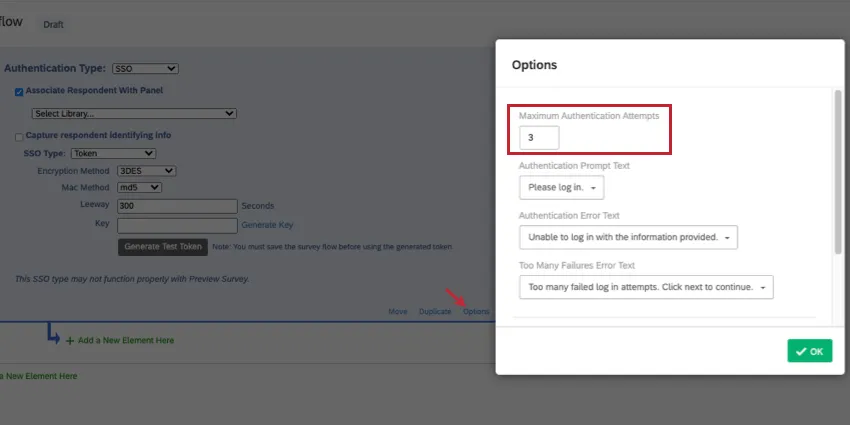
Under Options, you’ll see a setting called Maximum Authentication Attempts. When using an SSO authenticator, the respondent is brought to an SSO landing page to log in, instead of the Qualtrics survey. The Qualtrics survey is unaware of any login failures in that SSO page. That means we generally don’t recommend setting maximum authentication attempts for an SSO authenticator, because it will have no effect.
The only time maximum authentication attempts would benefit a survey with an SSO authenticator is if “Associate Respondent With Panel” is enabled. Then the failure would occur because the user didn’t match the contacts in the connected list.
Qtip: See Authenticator Options for details on other settings.
Errors When Logging into an Authenticator
When a survey taker is trying to log into the SSO authenticator, they may see the following errors. We’ll explain what they mean and how to resolve them.
- AUTHENTICATOR_SSO_CONFIG_DISABLED: A Brand Administrator needs to enable Use for survey authenticator for the SSO connection.
- AUTHENTICATOR_SSO_CONFIG_NOT_FOUND: The SSO connection was not found in the SSO Provider Service. This might be due to data syncing issues, or may occur because the connection was deleted. A Brand Administrator may also need to enable Use for survey authenticator for the SSO connection.
Types of Projects this Feature Is Available In
The survey flow can be customized in many different types of projects. However, not all survey flow features are available in all types of projects.
Authenticators can be used in the following projects:
Qtip: Authenticators exist in a few more project types, but their functionality is different from what’s described on this support page. For Engagement, Lifecycle, Ad Hoc Employee Research, or Pulse projects, please see Authenticator (EX).
That's great! Thank you for your feedback!
Thank you for your feedback!