
Embedded Data in Website / App Insights
What's on this page
Qtip: If you don’t have access to any of the features described on this page, reach out to your Account Executive. For more information about the differences between Digital Feedback and CustomerXM for Digital, see Digital Feedback vs. CustomerXM for Digital.
About Embedded Data in Website / App Insights
Any information that can be tracked by Website / App Insights can also be sent to your target website or target survey. For example, if your target is a website satisfaction survey, you can choose to save information about how long the participant was on the website or how many pages they visited. This information is not saved within the intercept or creative itself, but is passed over to your website or survey.
You can pass information to surveys or your site by setting embedded data. Embedded data are custom variables that can be named and set equal to any values you desire. For example, you may have an embedded data named Location that can have a value of United States, Canada, Ireland, and so on.
When is Embedded Data Captured?
By default, embedded data is captured immediately before the survey is displayed to the respondent.
However, certain creative types and configurations change this behavior:
- Feedback button: Embedded data is collected when the feedback button is clicked by the site visitor.
- Responsive dialog: The “display survey directly in dialog” option changes how embedded data is collected:
- When enabled, the survey is embedded directly in the creative, and embedded data is captured as soon as the creative loads.
- When disabled, the creative displays a button to open a new window for the survey, and data is captured when this new window loads.
- Creative Targets: For custom embedded feedback, pop over creatives, pop under creatives, slider creatives, and info bar creatives, the creative target controls how embedded data is collected:
- Embedded survey: When the survey is embedded in the creative, embedded data will be captured as soon as the creative is displayed.
- Linked survey: When the survey is opened by a link or button, embedded data will be captured when the link or button is clicked. Qtip: For pop under creatives, if the survey session starts on page change or site exit, then embedded data will be captured before the pop under window is opened.

- Templated embedded feedback: As soon as the first question in the templated embedded feedback creative is submitted, embedded data will be captured. For example, an embedded feedback creative that asks a “Was this helpful” question followed by a free-form input question will capture embedded data once the user clicks “Yes” or “No” to the first question.
Updating Embedded Data After Opening the Survey
Pop under creatives and intercepts that open a new window will continuously update embedded data if it is updated on your website while the intercept survey is open. For example, if the intercept triggers a survey to open in a new window, and the site visitor navigates to a new page on your site, then the embedded data that is associated with that open survey session will be updated to reflect that new page.
Additionally, intercepts are not the only way to collect embedded data. Embedded data values are collected in the following order:
If there are any identical embedded data keys in these 3 steps, then the values that are collected last will be recorded in the survey response. For example, if a field called “customerId” is set by the intercept, survey flow, and XM Directory, then the XM Directory contact value will be saved for the “customerId” in the survey response.
Setting Embedded Data
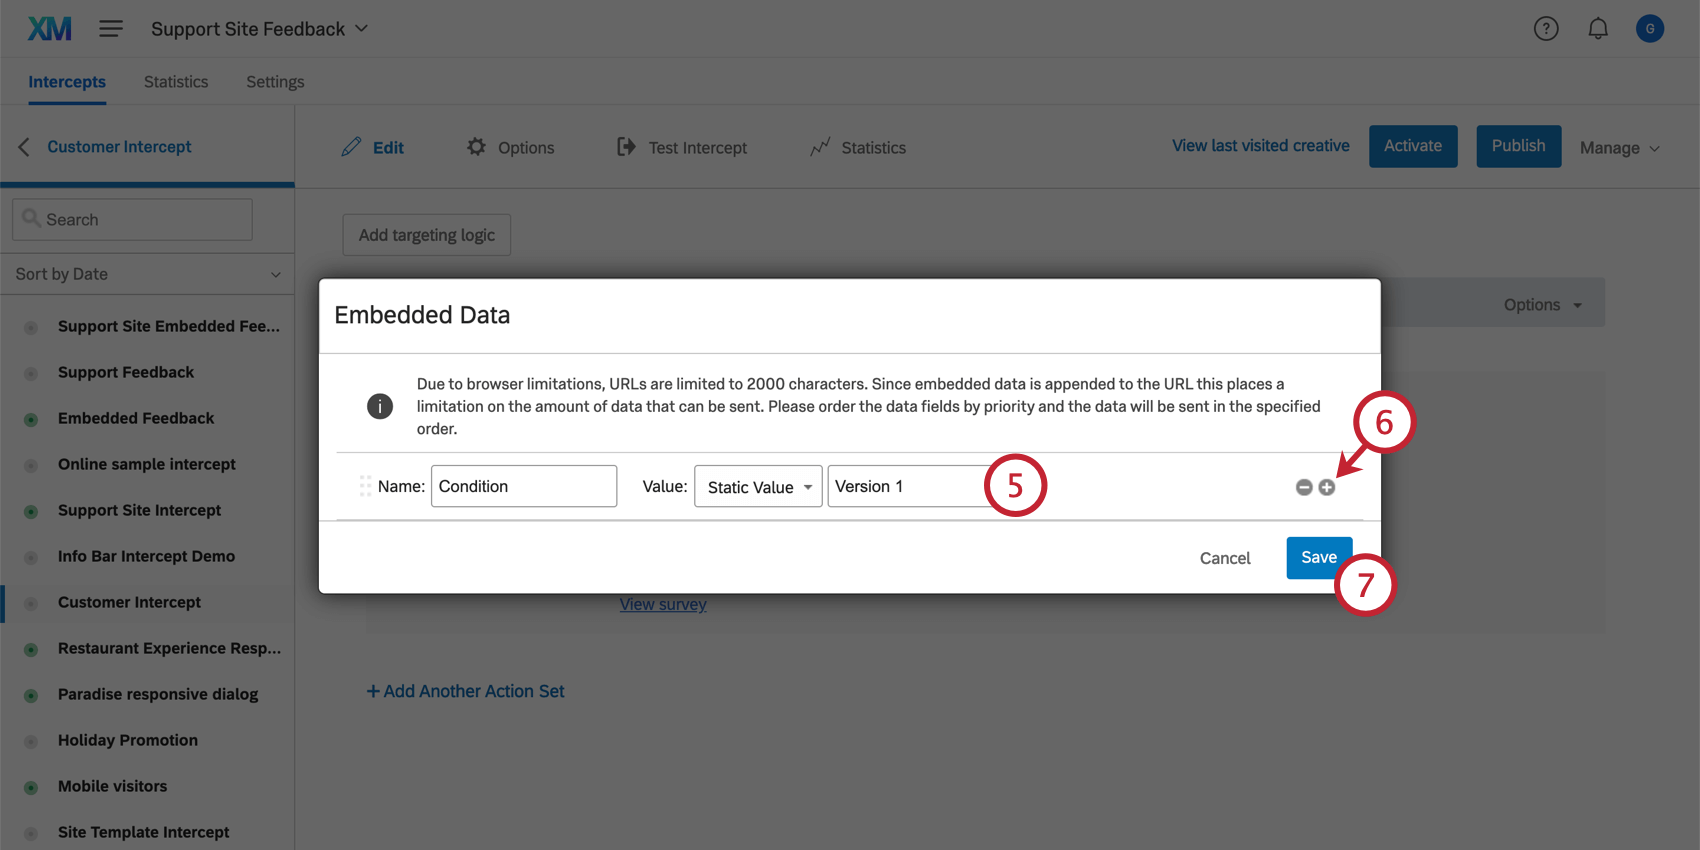
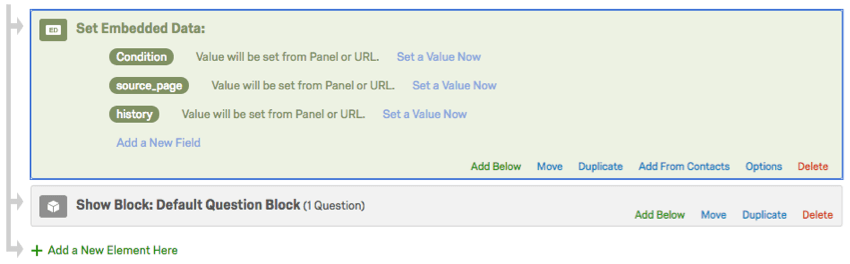
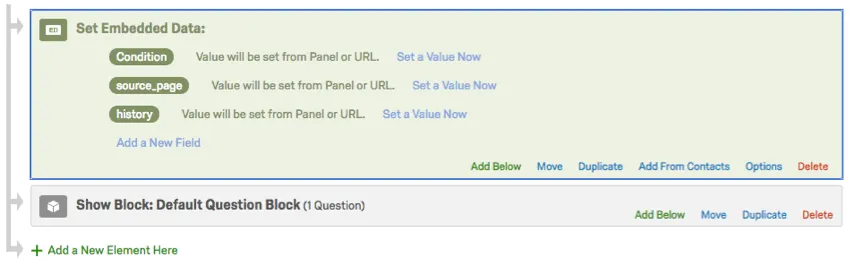
You typically specify embedded data for individual actions in your intercept. For example, let’s say you’re randomizing 2 different action sets. On one action you might add an embedded data field called “Condition” with a value of “Version 1,” and on another action you might add an embedded data field called “Condition” with a value of “Version 2.”
To set Embedded Data on any Action
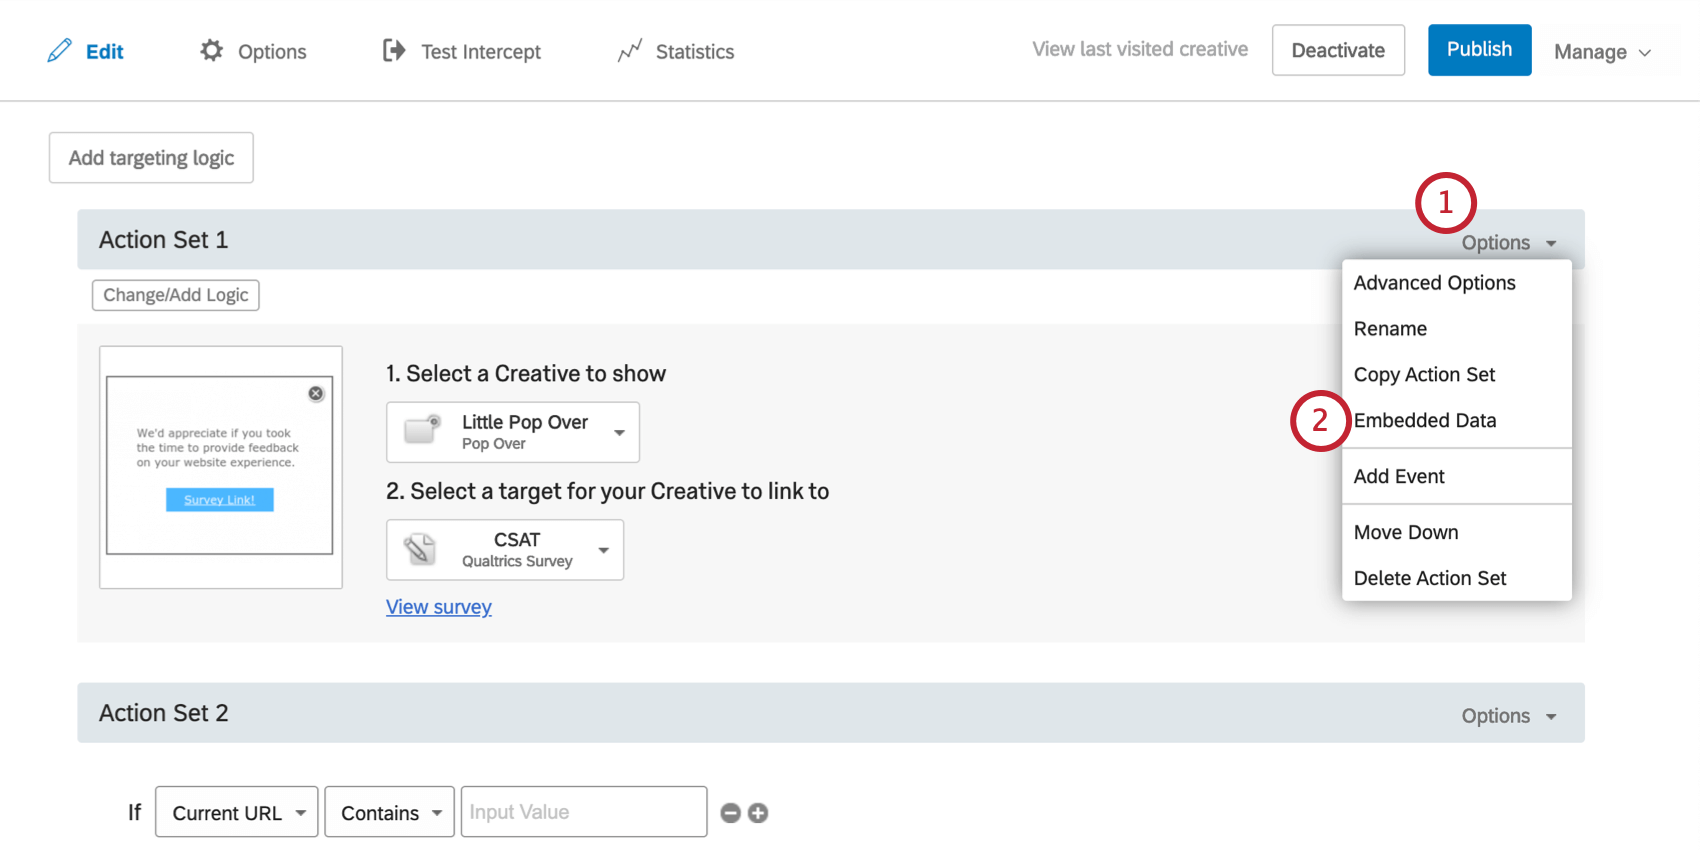
Qtip: A Static Value means the value of the embedded data field will be the same for each visitor who receives this action (e.g., assigning 1 action “Condition” with a value of 1 and the other “Condition” with a value of 2). The other embedded data value options are dynamic, meaning that they’ll adjust depending on the particular visitor (e.g., which page the visitor was viewing when they saw the creative).
Multiple Embedded Data Fields
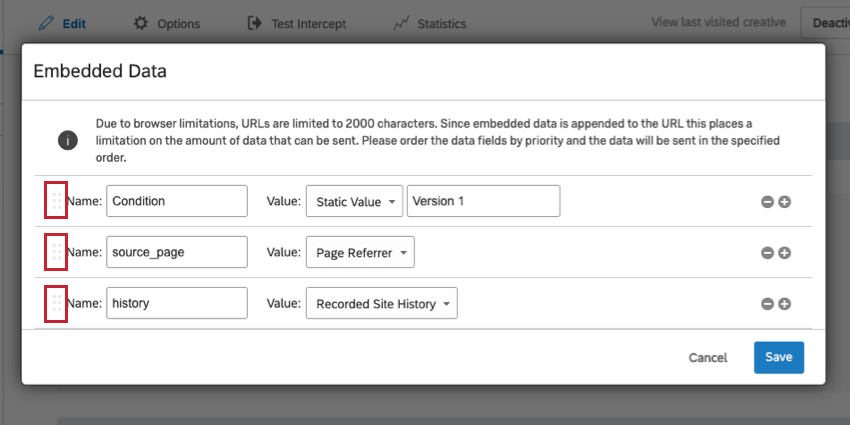
There is a 20KB limit on saving embedded data. Certain fields (such as Recorded Site History) will take more of this space than others. Should there not be enough room to send all embedded data fields to the target website, fields at the top of the list will be prioritized.
You can set the priority of embedded data fields simply by clicking the dots to the left of any field and moving the item up or down the list.

Setting Embedded Data to a Creative
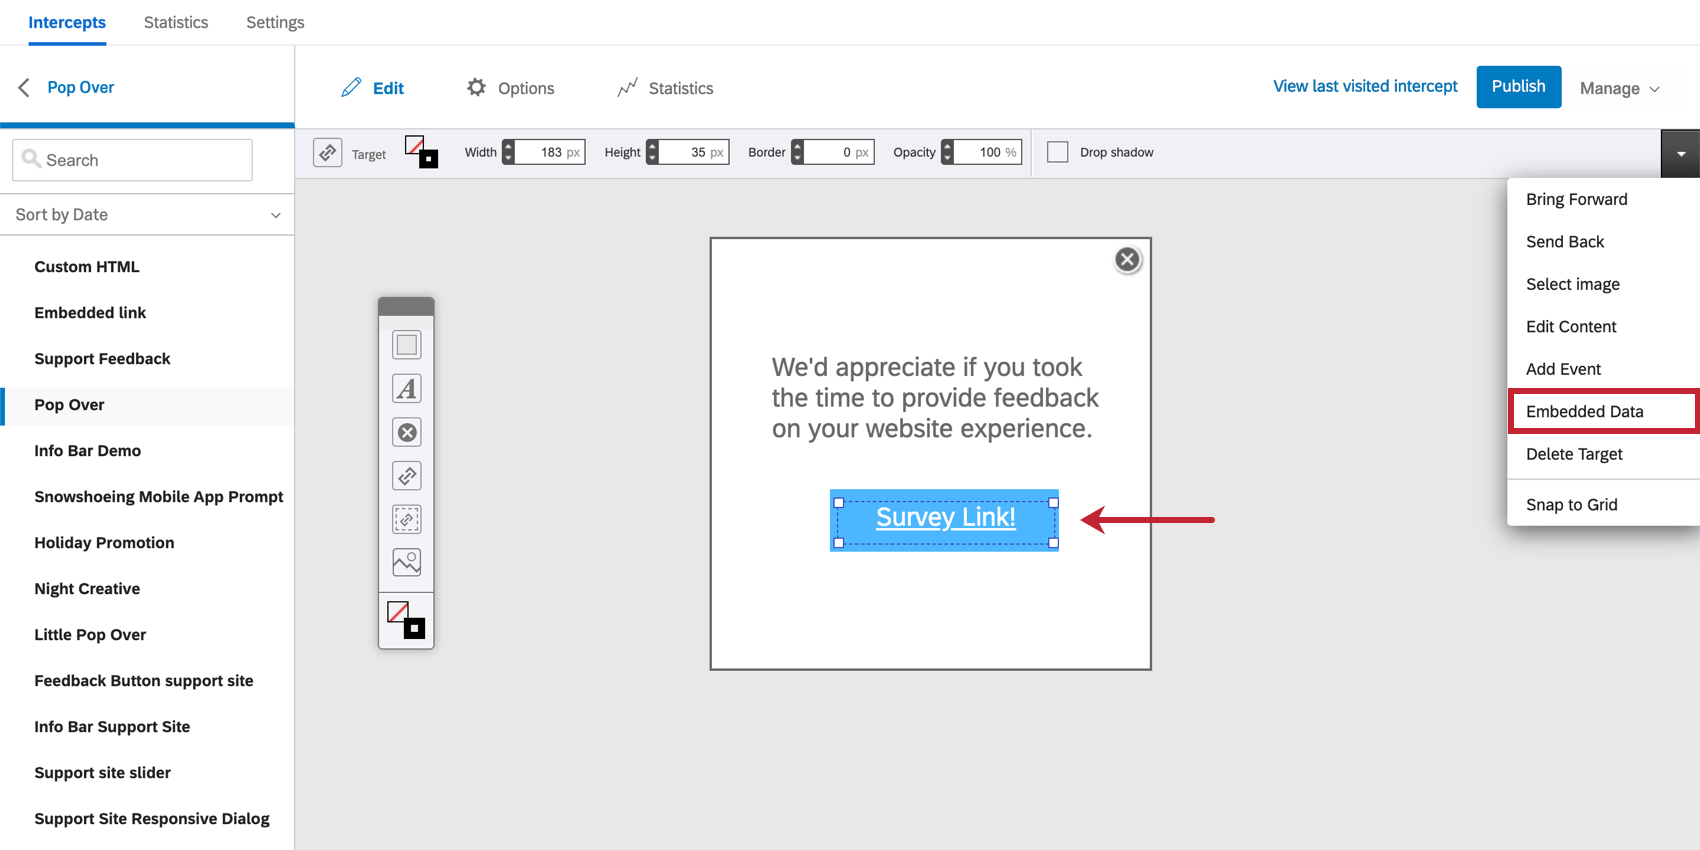
The steps above described how to save embedded data for a specific action. However, if you would like all actions using a given creative to have the same embedded data, you can also set embedded data on the creative itself. The steps will be exactly the same, but you’ll find the embedded data menu by right clicking on your creative’s target, clicking the dropdown arrow in the above toolbar, and selecting Embedded Data.

This can also be found in the Edit section of your creative.
Attention: Setting embedded data to a creative is only available in the following creative types: Custom embedded feedback, Info Bar, Pop Over, Pop Under, Slider.
Setting Embedded Data for Multiple Targets with JavaScript
Attention: Custom coding features are provided as-is and require programming knowledge to implement. Qualtrics Support does not offer assistance or consultation on custom coding. You can always try asking our community of dedicated users instead. If you’d like to know more about our custom coding services, please contact your Qualtrics Account Executive.
Sometimes, you may want to set embedded data values on multiple images or targets within your creative; however, embedded data field cannot have multiple targets in the creative. What you can do to capture and pass along information is use JavaScript to create several embedded data fields that each have their own value.
Example: Let’s say that you have 3 emoticons (the “targets”) in your creative, and you would like to add embedded data to each one (Face=Happy on the smiling emoticon, Face=Meh on the straight-faced emoticon, and Face=Sad on the frowning emoticon). To do so, you can use JavaScript.
<div onclick="window._qLastClicked = 'Happy';">
In order to allow the greatest flexibility when passing embedded data and choosing targeting conditions for displaying intercepts, Qualtrics leverages the browser’s built-in eval functionality for JavaScript expressions. If your site’s security policy does not permit the use of eval, you may see an error like “Refused to evaluate a string as JavaScript because ‘unsafe-eval’ is not an allowed source of script in the following Content Security Policy directive” in your browser console.
If you see that error and you are unable to update your site’s Content Security Policy settings, you’ll need to work with your engineering team to run the following code block before Qualtrics loads:
window.QSI = window.QSI || {};
window.QSI.config = window.QSI.config || {};
window.QSI.global = window.QSI.global || {};
window.QSI.config.enableSecureVariables = true;
window.QSI.global.enableJSSanitization = true;
After you run this code block, you’ll be able to use a limited subset of JavaScript in your targeting conditions and embedded data fields. This subset of JavaScript only permits variable access using dot (“.”) and bracket (“[]”) operators, which will allow you to gather variable context without worrying about security concerns around function execution. You cannot use function calls, such as document.querySelector().
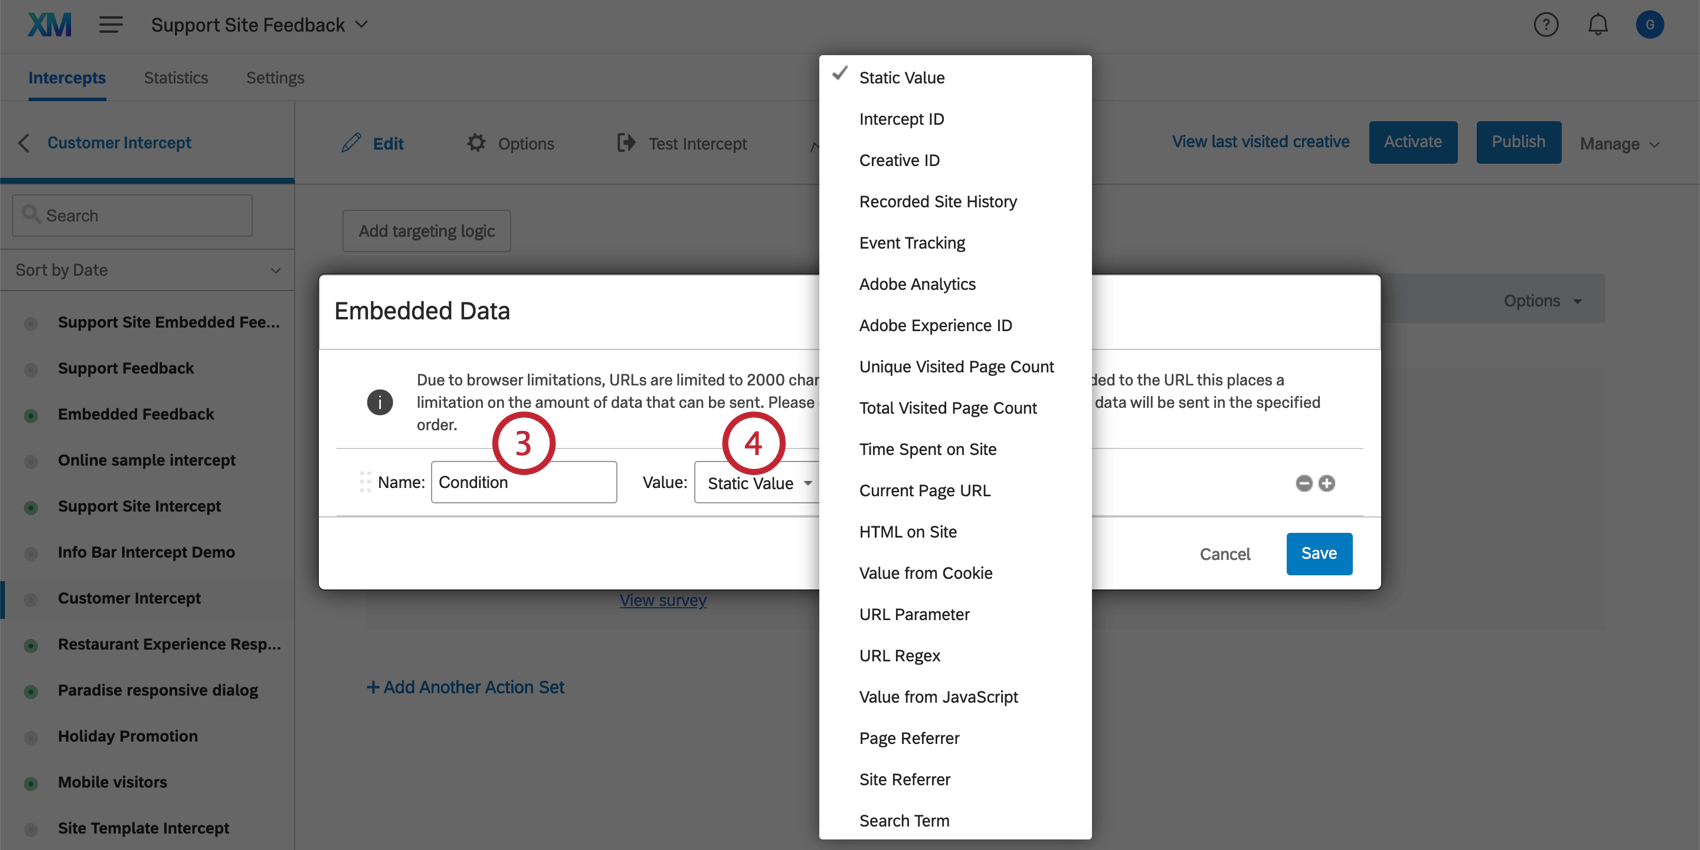
Embedded Data Value Types
When you set the value of your embedded data, you get to choose what kind of variable this embedded data is. Below, you’ll find an explanation of what each type of embedded data captures, and related intercept conditions.
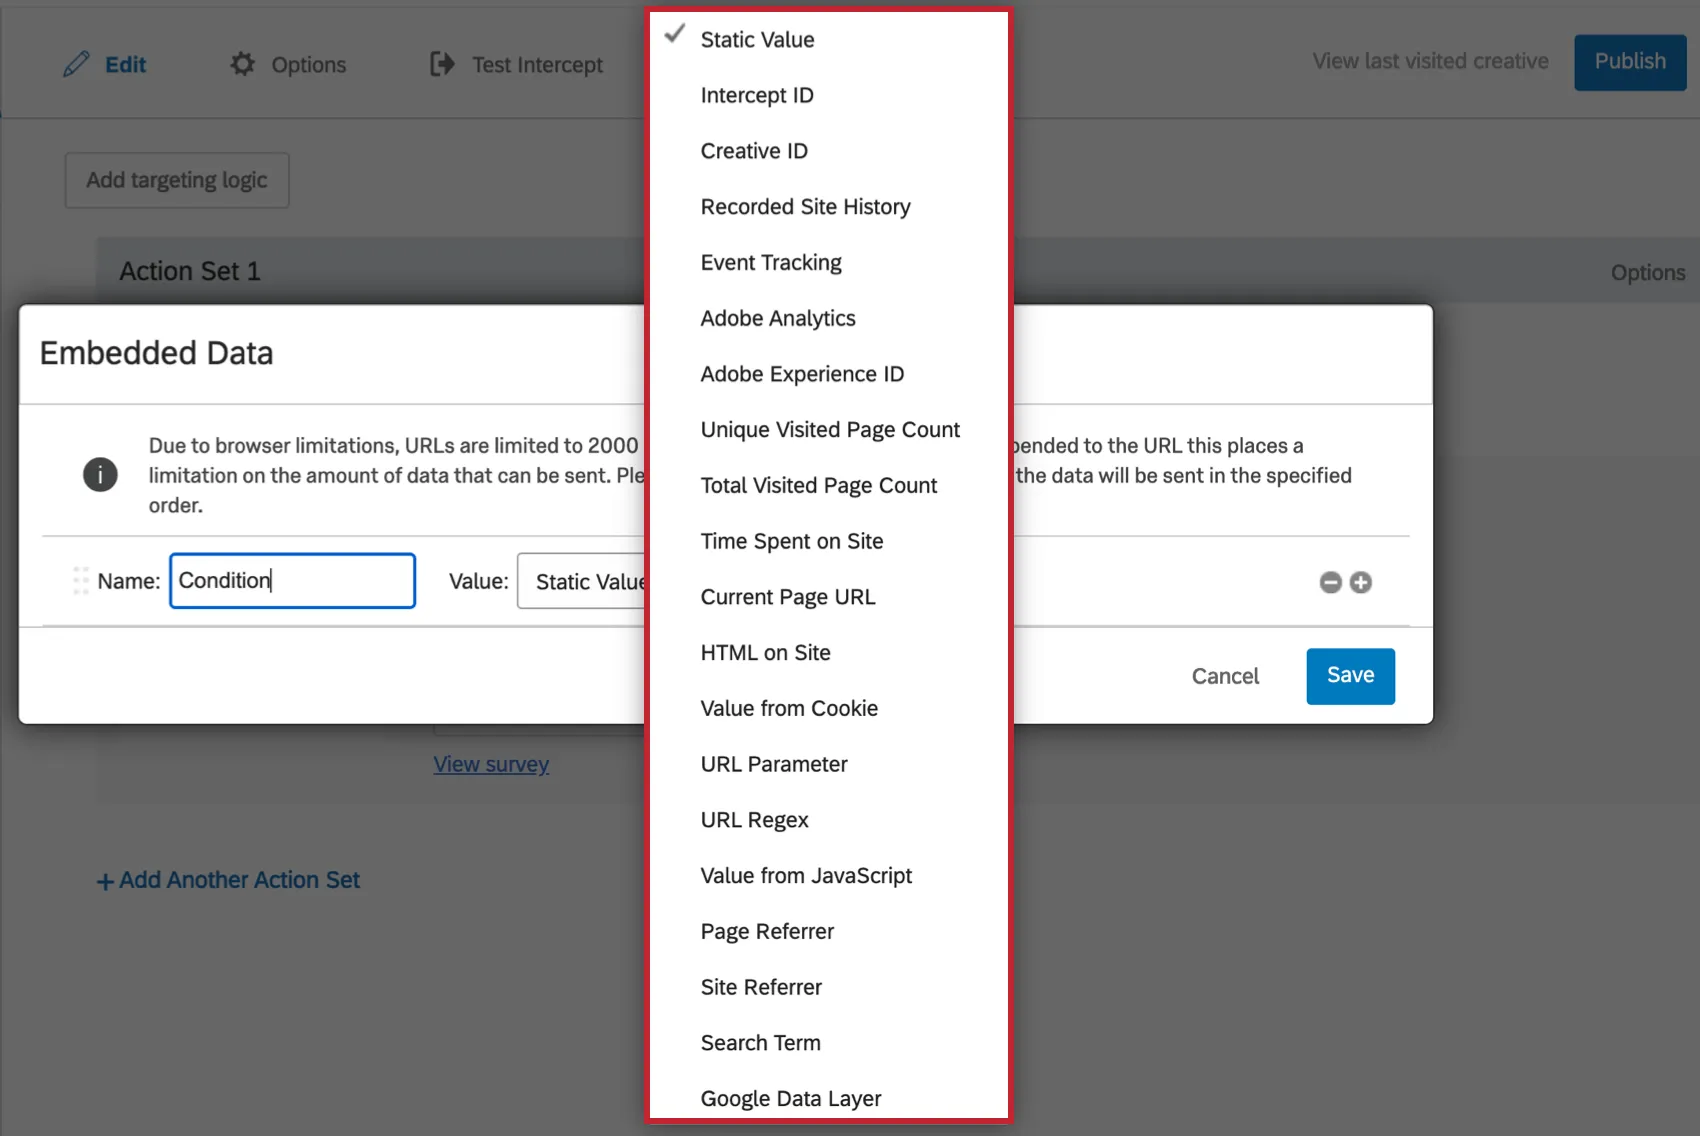
- Static: Create a custom embedded data and define its values.
- Intercept ID: This captures the internal ID of the intercept. This ID can be used to see which intercept a visitor saw if you have multiple intercepts linking back to the same site/survey.
- Creative ID: This captures the internal ID of the creative. This ID can be used to see which creative a visitor saw if you have multiple creatives linking back to the same site/survey.
- Recorded Site History: This captures all the sites your visitor has visited that have the project code on the page. This information is stored in a cookie, which Website / App Insights places on the browser. Qtip: The amount of history recorded is dependent on limits placed on this cookie. The limit is set on the Admin page.
- Event Tracking: Allows you to set up Event Tracking.
- Adobe Analytics: See Adobe Analytics.
- Adobe Experience ID: See Adobe Analytics.
- Unique Visited Page Count: This captures the number of different pages the user visited on your site. For example, visiting the same page twice counts as 1 page. See Page Count Conditions.
- Total Visited Page Count: This captures the number of total pages the user visited on your site. See Page Count Conditions.
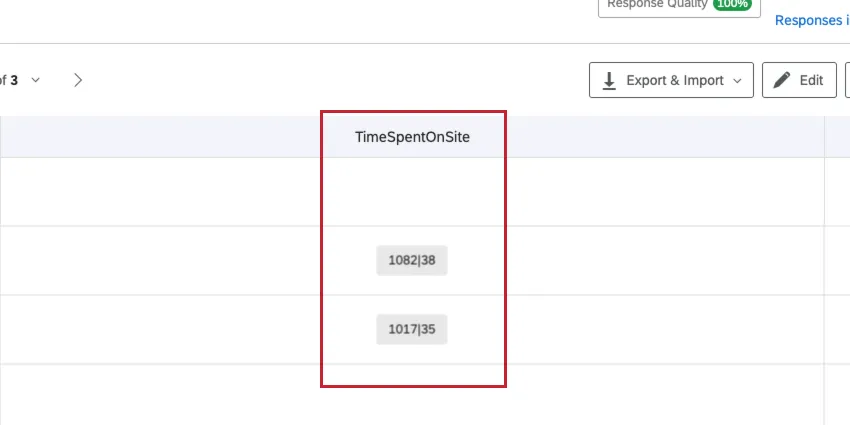
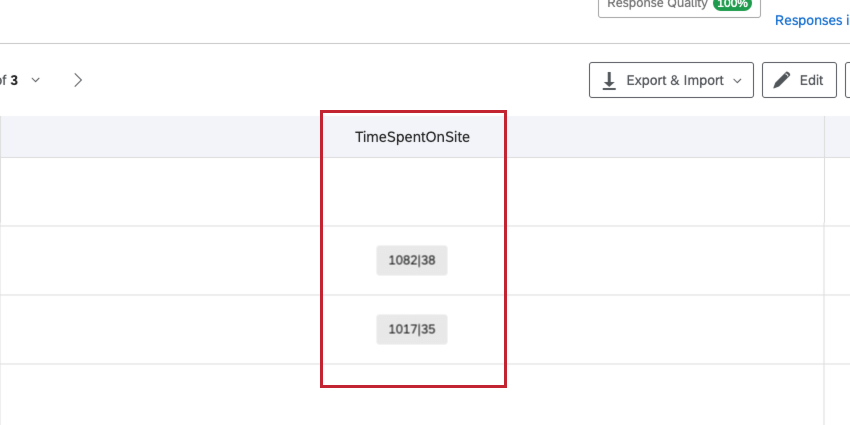
- Time Spent On Site: Time Spent On Site records 2 metrics: the Time Spent On Site and the Time Focused On Site. Time Spent On Site refers to how long the visitor has had your website open in a browser window. Time Focused On Site refers to how long the visitor has had your website open as the front, “in-focus” window on their computer. See Time Spent on Site or Time Focused On Site. Qtip: In your data, the Time Spent On Site and the Time Focused On Site will be saved together as 2 numbers separated by a vertical line. The number on the left side of the line is the Time Spent On Site while the number to the right of the line is the Time Focused On Site.
- Current Page URL: The page the visitor is on when the Intercept appears. See Current Page URL.
- HTML on Site: Specify the HTML on the page you want to capture the value for. For example, you may have an element for your Shopping Cart and want to know how many items are in the visitor’s cart. See HTML on Site.
- Value from Cookie: Capture the value from a specific cookie on your site. For example, you may have a cookie named return_visitor which captures whether someone has visited your site before or not. See Cookie condition.
- URL Parameter: If your website has parameters added to the URLs, this option lets you capture the value of any parameter you want.
- URL Regex: This captures Regex coding. Qtip: Regex is a custom coding feature. Unfortunately, Qualtrics Support cannot advise you on custom coding. You can always try asking our community of dedicated users instead.
- Value from JavaScript: This option captures custom JavaScript from your site. The specified value needs to be a JavaScript expression/call. Qtip: JavaScript is a custom coding feature. Unfortunately, Qualtrics Support cannot advise you on custom coding. You can always try asking our community of dedicated users instead.
- Page Referrer: The page the visitor was on before arriving at the page with your intercept. See Page Referrer.
- Site Referrer: The website the visitor was on before arriving on your website. See Site Referrer.
- Search Term: Captures the term the visitor searched to arrive at your website. See Search Term.
- Value from Google Data Layer: This option captures custom Google Data Layer variables from your site. See Using Google Analytics in Website / App Insights.
Saving Embedded Data in a Qualtrics Survey
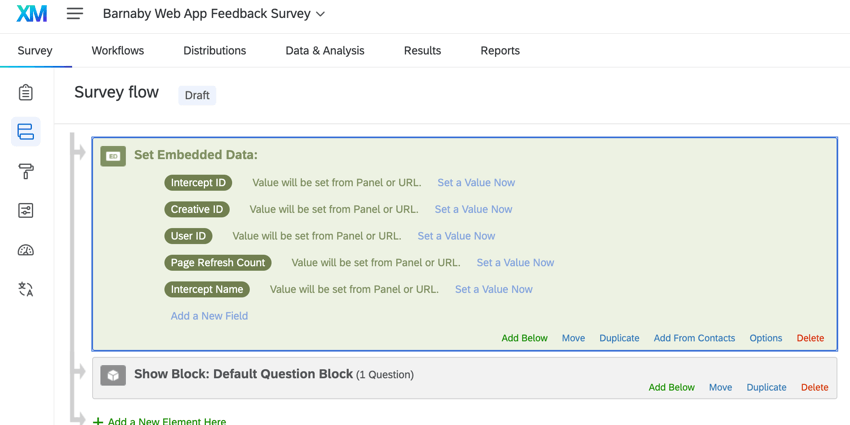
If your target is a Qualtrics survey, embedded data sent to it will be available for use in survey logic with no additional action needed. However, if you want to save this embedded data in the survey results, you’ll need to add it to your survey flow.
Follow the steps on the embedded data support page to add it to your survey flow. For the field’s value, leave it as Value will be set from Panel or URL.
Qtip: Forgot to save embedded data in the survey flow before running a survey? No worries – embedded data can be added retroactively after the survey is finished if you had set the embedded data in Website / App Insights beforehand.
Attention: If a survey-taker copies and revisits the URL directly, the recorded response will not have the embedded data that Website / App Insights originally passed along.
Using Embedded Data with Other Targets
Even if your target isn’t a Qualtrics survey, you can still leverage embedded data and pass the information over, just as you would with a Qualtrics survey. The embedded data will be passed in the request body (POST method), so that you can capture and send multiple embedded data elements to the Qualtrics XM platform without having to see them in the visible survey URL.
Testing Embedded Data Collection
You can test what embedded data has been collected by running this snippet in the developer console when you would expect embedded data values to be collected by the intercept:
window.QSI.EmbeddedData.getEmbeddedData('YOUR_INTERCEPT_ID')
Qtip: Find the intercept ID in your intercept options.
If the values that are collected are not what you expect or are empty, troubleshooting depends on what type of embedded data you expect to collect:
Troubleshooting Empty or Incorrect Embedded Data in Survey Responses
If the variables do appear when testing, but not in the actual survey response, then there could be a timing issue between when Qualtrics grabs the data and when the data is actually available on the page.
Follow the below steps to troubleshoot:
If the correct values are now being passed, then this is likely a timing issue and you will need to trigger your intercept after the data values are populated on your page. This can be done via the QSI.API calls, or through using a tag manager. See Project Deployment Code for more information.
Qtip: Setting a creative delay will not delay when Qualtrics grabs the embedded data of the associated intercept. Please see the When is Embedded Data Captured? section for information on when embedded data is captured for your specific creative.
Displaying Intercept Embedded Data in a Dashboard
You may want to display your Web / App Insights in a CX dashboard. This section covers the general steps on how to display your embedded data in a readable format.
Qtip: See Creating CX Dashboard Pages and Building Widgets for an overview of editing CX dashboards.
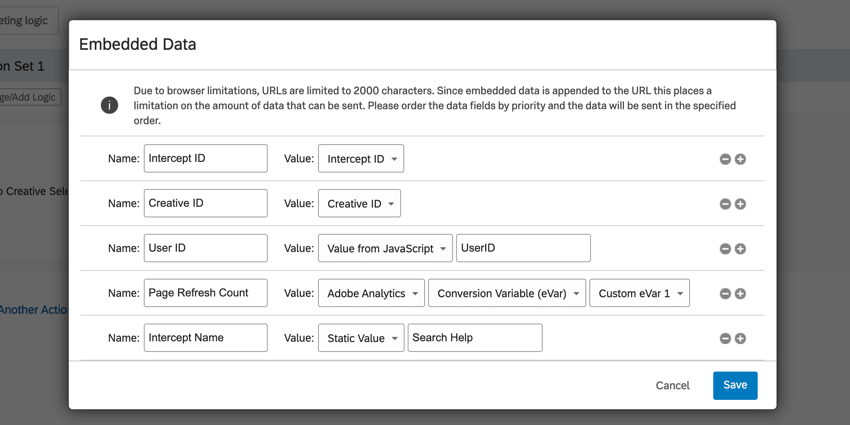
Qtip: Common fields include:
- Intercept ID: For displaying the intercept’s ID or name.
- Creative ID: For displaying the creative’s ID or name.
- Value from JavaScript: For displaying data from a JavaScript expression.
- Adobe Analytics Variables: For displaying data from Adobe Analytics custom eVars.
- Static Value: For passing a custom value, such as the intercept name, creative name, or information about your website.
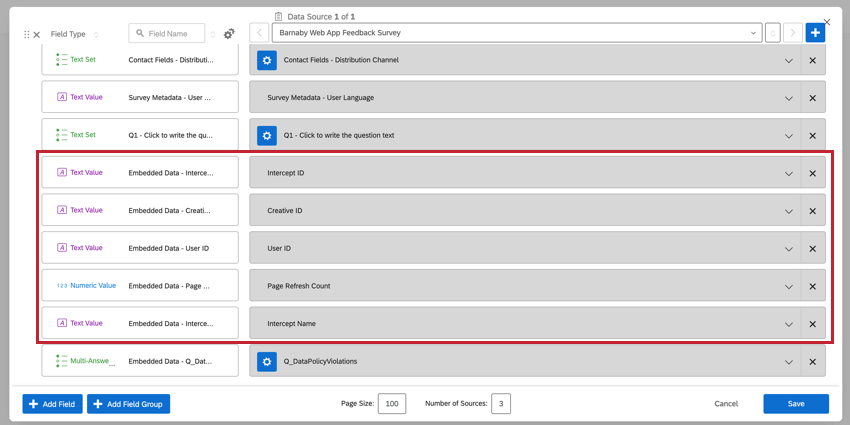
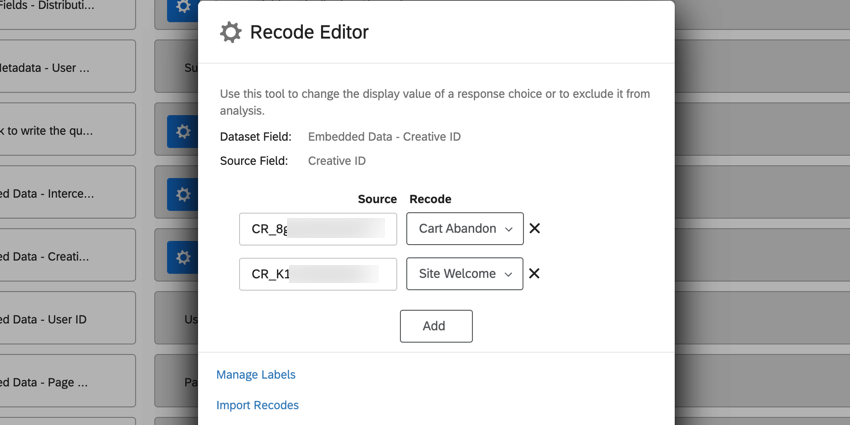
Example: In the above example, we display data from 2 different creatives in the same dashboard. To make viewing data for individual creatives user-friendly, we added Creative ID as an embedded data field and recoded the individual ID values to be the creative names. We can then add this field as a dashboard filter and use this field in widgets.
FAQs
Can I capture information from my website visitors in my intercept's survey? How?
Can I capture information from my website visitors in my intercept's survey? How?
Aside from simply setting a static value that you want carried into the survey, the embedded data menu also comes pre-built with other options that can be carried into the survey. For example, you will be able to automatically capture the ID of both the intercept and creative shown, the URL of the page that displayed the intercept, the person‘s site history, or even how much time was spent on the site. You will even be able to capture information from a cookie that appears on that person‘s web browser or you can write a JavaScript expression that captures a particular variable that you are interested in.
If you are running a survey in Qualtrics, then you can also add the embedded data in the Survey Flow to save this information to the survey response.
That's great! Thank you for your feedback!
Thank you for your feedback!