
JSON Event
What's on this page
Qtip: JSON Events are only available to users who have purchased access to the Qualtrics API. If you are interested in getting this feature, talk to your Account Executive or Account Services.
About the JSON Event
Have you ever wanted a request made on your website to trigger a ticket in Qualtrics? Have you ever wanted to create a seamless integration between Qualtrics and your own internal system? Have you ever wanted to trigger a task in the Workflows tab, but with an event that happens outside of Qualtrics?
JSON events allow external software to start workflows via HTTP request. Instead of waiting for an event in Qualtrics to trigger further action in the platform, you can simply configure a JSON event to receive requests from a third party.
Qtip: You must generate an API token before this feature is available to you. If you already have an API token, you do not need to generate a new one.
Attention: Setting up a JSON event requires advanced programming knowledge. Although our support team is happy to help with the basics of putting information into the event, we cannot provide support on the programming aspects. You can always try asking our community of dedicated users instead.
Limitations
The JSON event is not compatible with the following set-ups and configurations:
- Anything that is not HTTP (e.g., message queue, SMS).
- Outbound HTTP calls.
- Process XML (the XML request body will be ignored).
- Process anything other than JSON.
- Authenticate any way other than an X-API-TOKEN header or our modified HTTP basic auth. Qtip: OAuth and other forms of authentication are incompatible with JSON events.

- Any JSON parsing that cannot be satisfied by using JSONPath queries on the JSON body.
- Calls exceeding the API rate limit of 3,000 per minute.
- Payloads exceeding 100 KB.
- 10 manually input fields. Qtip: Once information is pulled in with event capture, it will be added to the JSON body. Event capture is the only way to add more than 10 fields.
Types of Auth Supported
Token-Based Auth / Header Auth
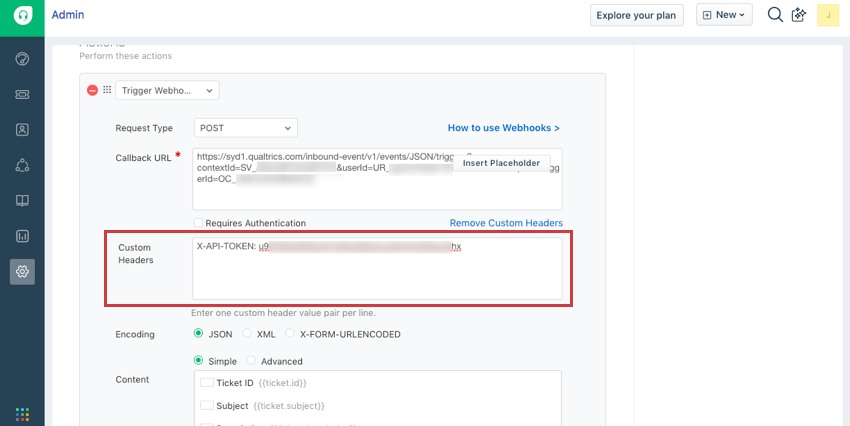
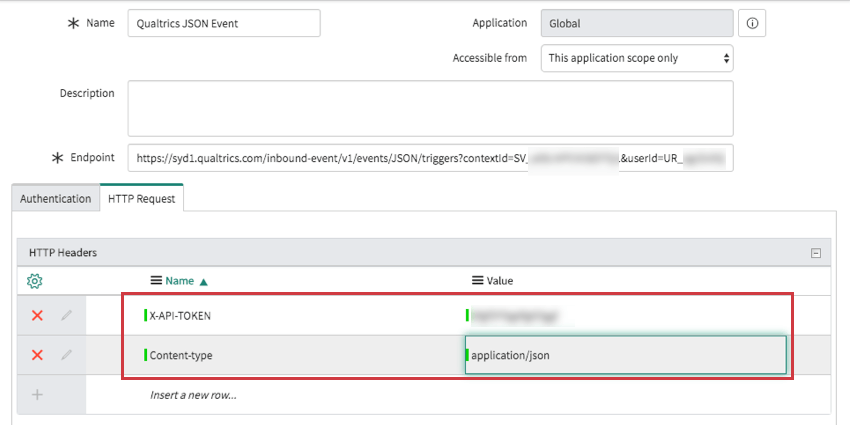
You can authenticate by passing your API token through the header of the request as X-API-TOKEN.
Example: In the following POST example, in cURL we specify the Base URL, the Content-Type, and the Token in the header. The Survey ID and format of export are specified in the body.
curl -X POST -H 'X-API-TOKEN: yourapitokenhere' -H 'Content-Type: application/json' -d '{

    "surveyId": "SV_012345678912345",

    "format": "csv"

}' 'https://yourdatacenterid.qualtrics.com/API/v3/responseexports'
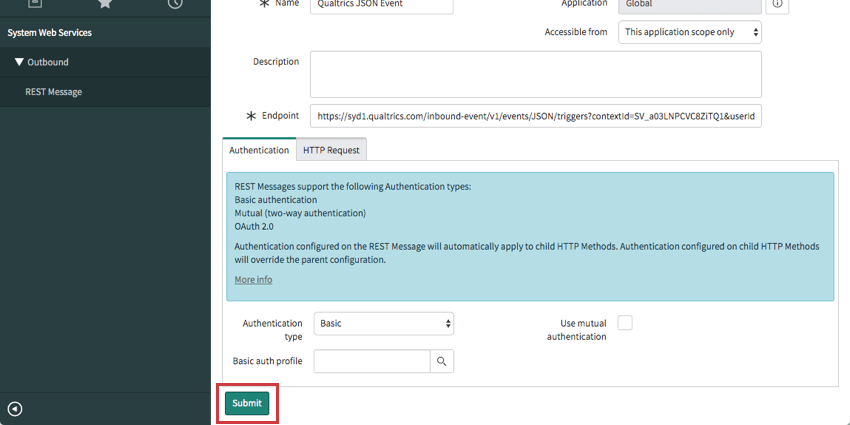
HTTP Basic Auth
Basic Auth is usually a Base64 encoded version of username:password. However, for improved security, Qualtrics uses a Base64 encoded string of username:x-api-token.
To use Basic Auth, you must set headers on the HTTP request. The specific header is Authorization.
Example: Let’s say your Qualtrics username is demo@qualtrics.com and your API Token is f8gIK7G6GFH985Y4. First you’d write,
demo@qualtrics.com:f8gIK7G6GFH985Y4Then after Base64 encoding, this would appear as,
Basic ZGVtb0BxdWFsdHJpY3MuY29tOmY4Z0lLN0c2R0ZIOTg1WTQ=So the Authorization header you add to your HTTP request would have the value Basic ZGVtb0BxdWFsdHJpY3MuY29tOmY4Z0lLN0c2R0ZIOTg1WTQ=.
Qtip: Check out these tools for encoding base64 and decoding base64.
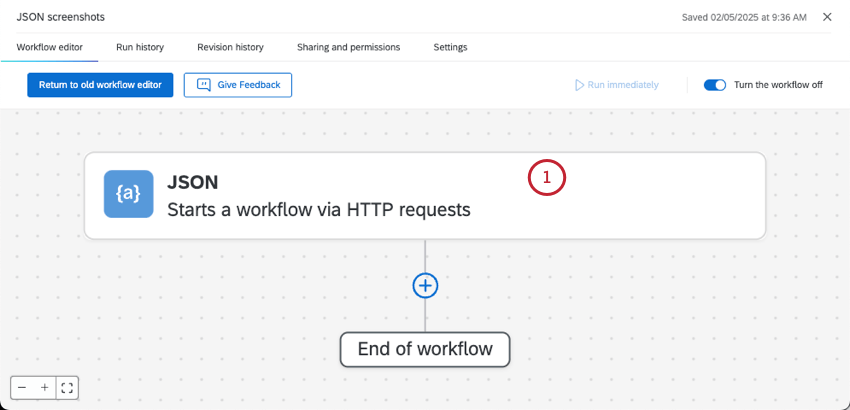
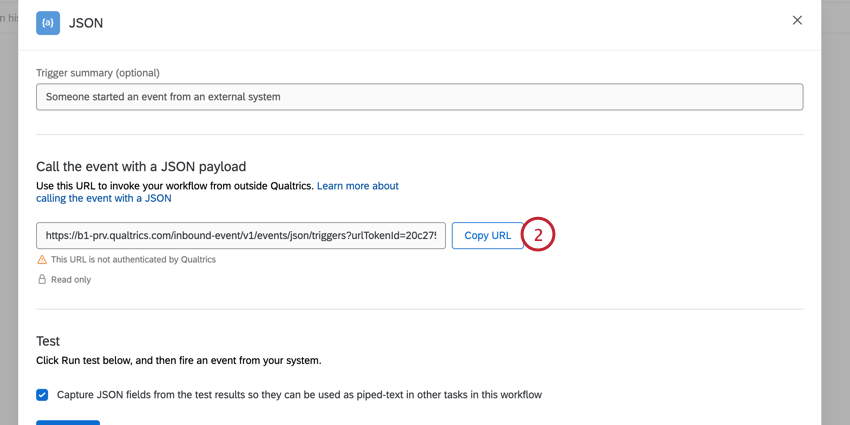
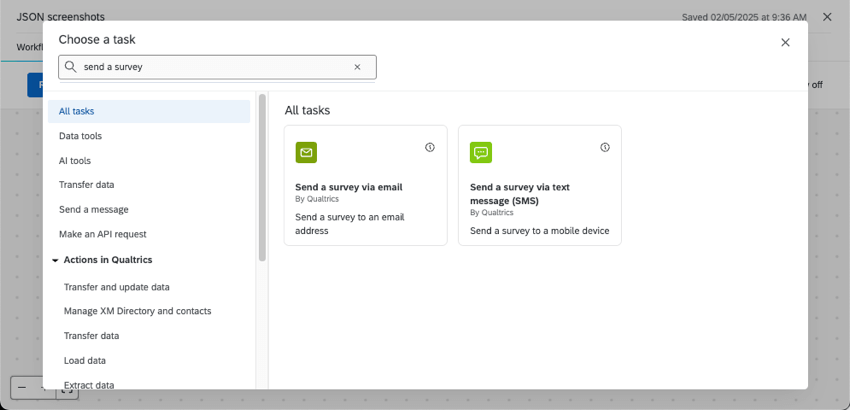
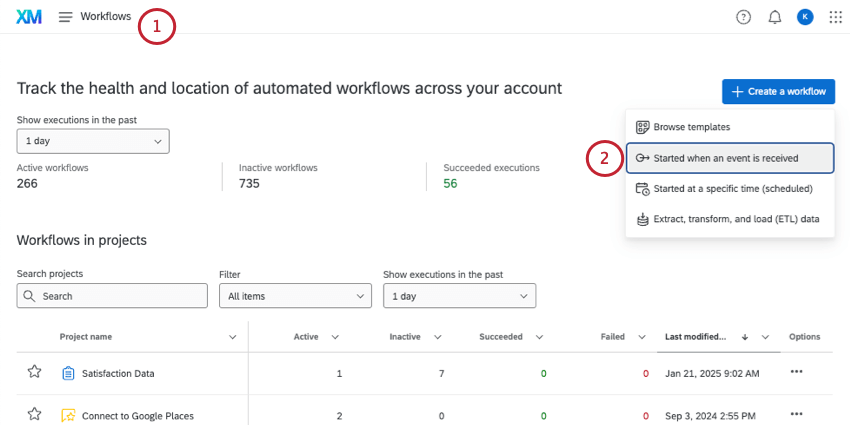
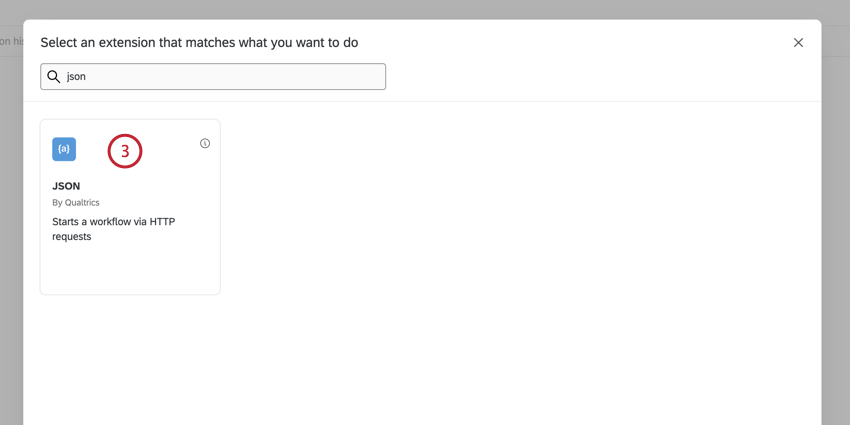
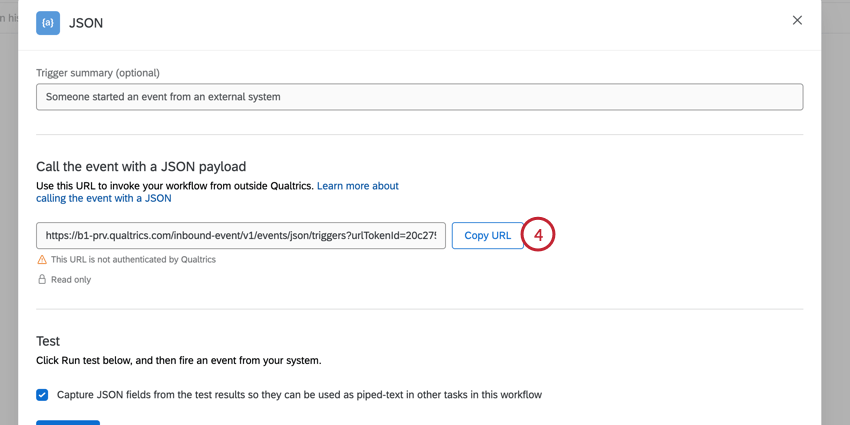
Setting Up a JSON Event
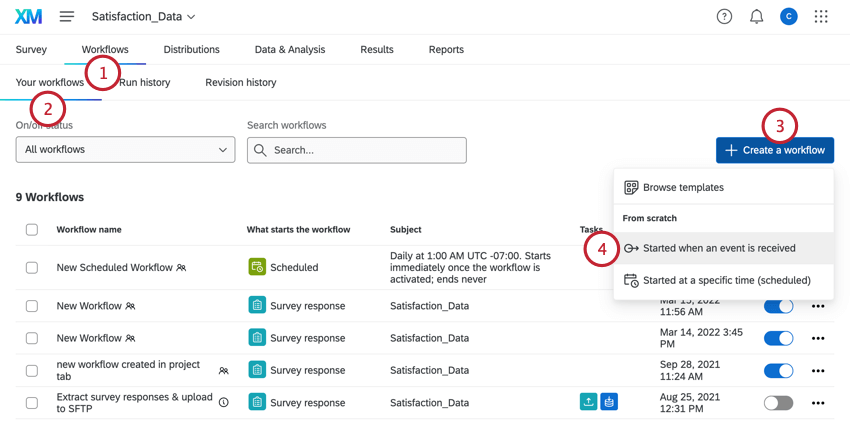
Qtip: You can also use JSON events in the Workflows tab in a project or in XM Directory. We only recommend adding a workflow to a specific project if they’re explicitly related (for example, you are distributing that project with the JSON event). The JSON event can be used in all workspaces except for imported data projects.

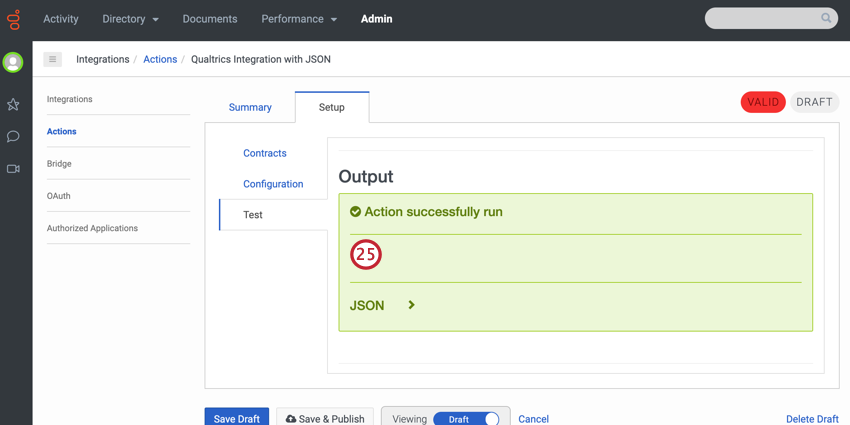
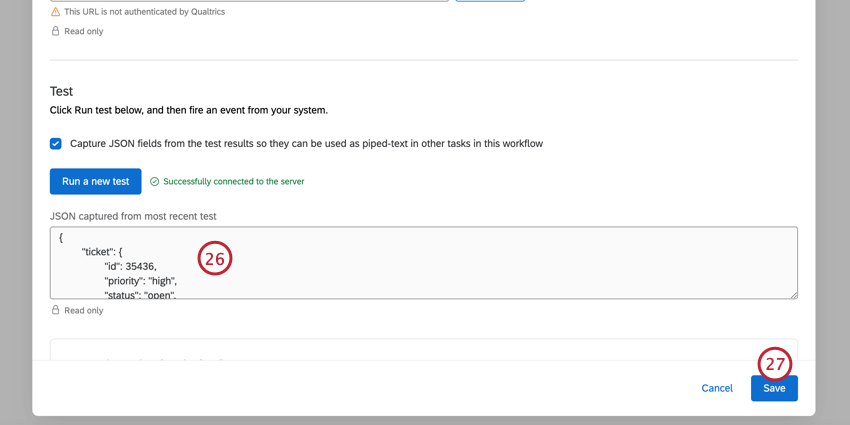
Qtip: For information about the Test section, see Capturing Events below.
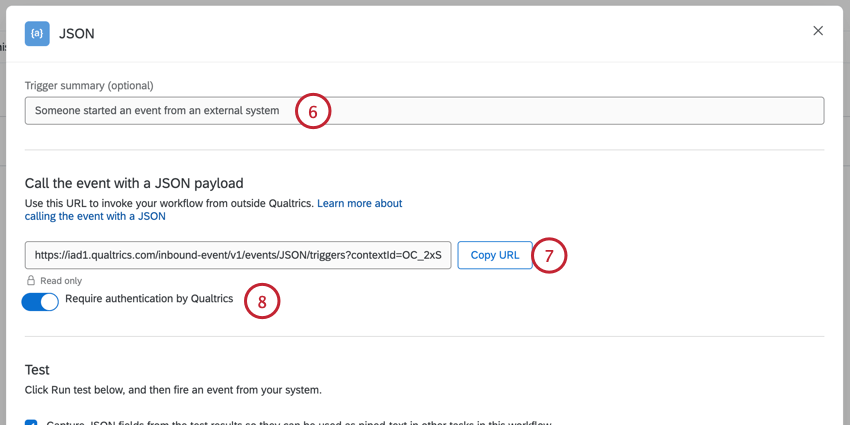
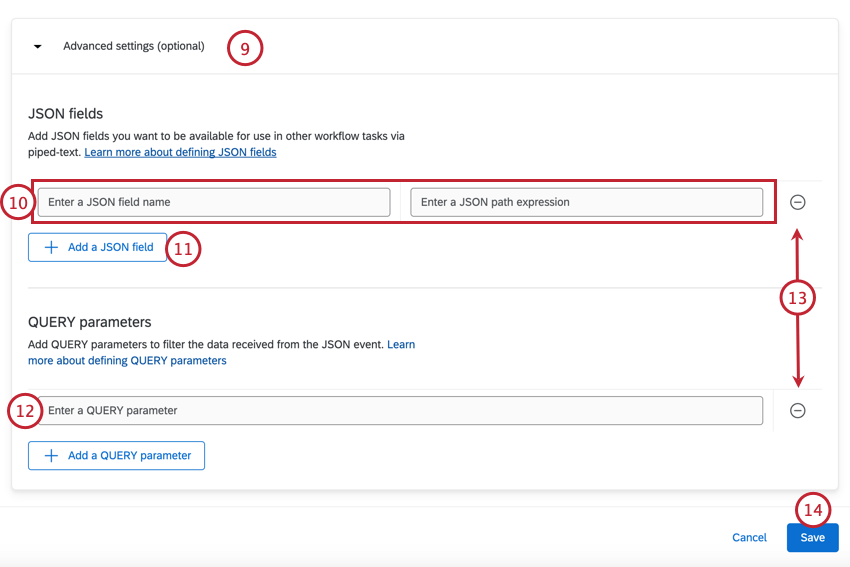
Qtip: The locations must be in JSONPath format! See the table below for a quick guide to JSONPath Syntax.
Warning: It is not advisable to pass personally identifiable data through QUERY parameters. Any personally identifiable information or sensitive data should be passed through the POST body whenever possible, as POST is more secure.
Qtip: Click on your JSON event to change the parameters and JSON fields.
Attention: A JSON event can only be fired via API from the same account that created the event. If a different account is used to fire the API for a JSON event, you may still receive a 202-success API response, however this means that a valid API token was used to make a valid request, but does not necessarily mean that the correct API token was used, or that the JSON event was triggered correctly. If you receive a 202-success API message, you will want to check the platform to confirm the correct API was used.
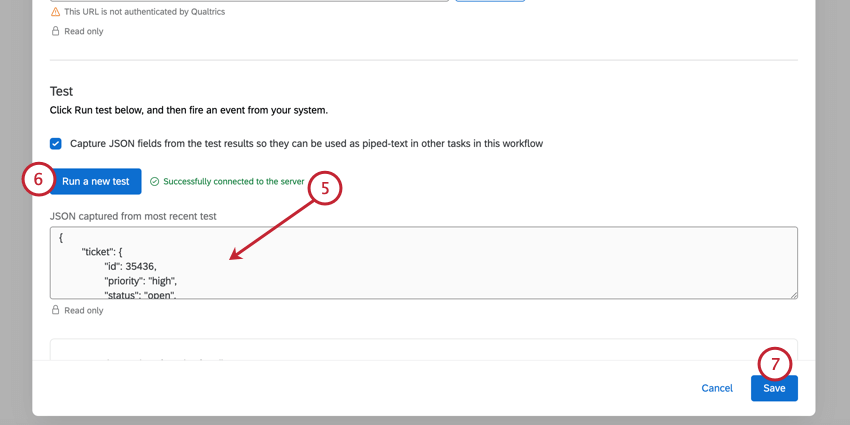
Capturing Events
When you are creating an external API event, you may need to parse data from the post body. However, it can be difficult at times to parse this data. If you want to figure out what your external API is sending, follow these steps.
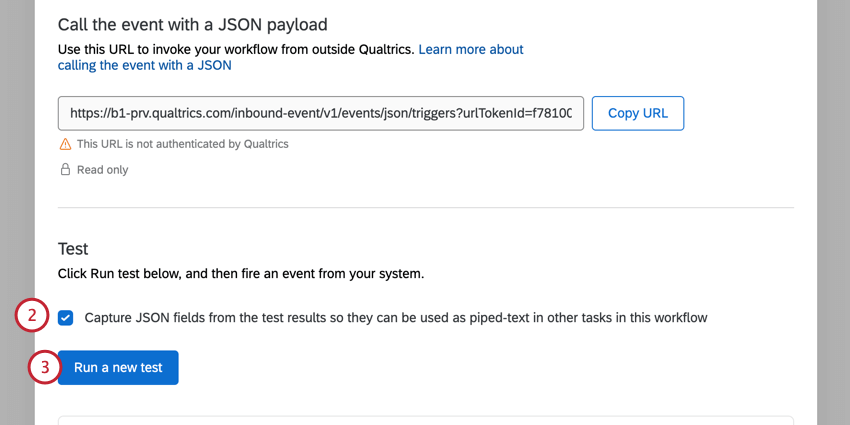
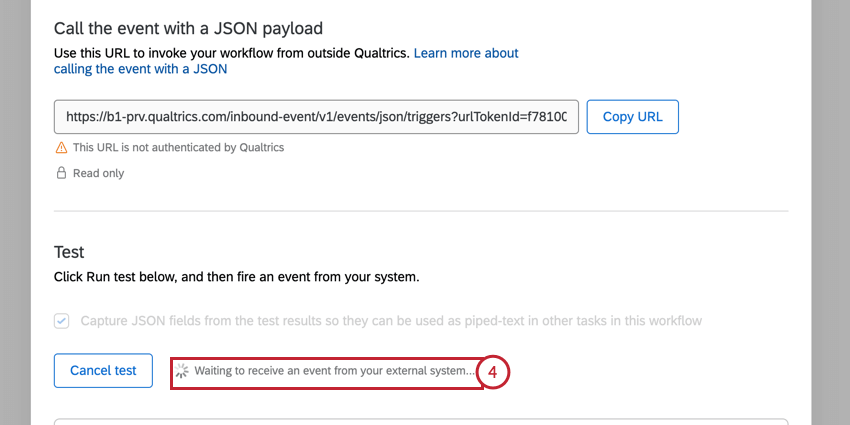
Qtip: To cancel this test, click Cancel test.
JSONPath Syntax
The table below gives some of the basics of JSONPath Syntax. Note that these are not established by Qualtrics, but are standards used with JSON.
Attention: Setting up a JSON Event requires advanced programming knowledge. Although our support team is happy to help with the basics of putting information into the event, we cannot provide support on the programming aspects. You can always try asking our community of dedicated users instead.
| JSONPath | Description | Example |
|---|---|---|
| $ | The root object/element | $.stores[0].name |
| @ | The current object/element | $.stores[?(@.name===”ACME Store”)] |
| . | Child operator | $.eventDescription |
| .. | Recursive descendant operator | $.stores[0]..price |
| * | Wildcard | $.stores[*].name |
| [] | Subscript operator | $.stores[0].name |
| [,] | Union operator | $.stores[0,1] |
| [start:end:step] | Array slice operator | $.stores[0:10:2] |
| ?() | Applies a filter | $.stores[?(@.name==”ACME Store”)] |
| () | Script expression | $.stores[(@.length-1)] |
JSONPath Syntax Example
In this example, we will show you how, given a JSON object, the JSONPath table can be used.
This is our JSON object:
{
"eventDescription": "Monthly Revenue",
"stores": [
{
"name": "Acme Store",
"total": 1000000,
"topItem":

{ "price": "50", "description": "Anvil" }
},
{
"name": "The Banana Stand",
"total": 250000,
"topItem":

{ "price": "4", "description": "The Gob" }
},
{
"name": "Pizza Planet",
"total": 80000,
"topItem":

{ "price": "15", "description": "Pepperoni" }
}
]
}
Now, we should add the return values we see in the JSONPath table to make it more clear.
$ -> Acme Store
@ -> [
{
"name": "Acme Store",
"total": 1000000,
"topItem":

{ "price": "50", "description": "Anvil" }
}
]
. -> Monthly Revenue
.. -> 50

-> ["Acme Store", "The Banana Stand", "Pizza Planet"]
[] -> Acme Store
[,] -> [
Unknown macro: { "name"}
,

Unknown macro: { "name"}
]

**Change [start:end:step]'s Example to be "$.stores[1:3:1]"
[start:end:step] -> [
{
"name": "The Banana Stand",
"total": 250000,
"topItem":

{ "price": "4", "description": "The Gob" }
},
{
"name": "Pizza Planet",
"total": 80000,
"topItem":

{ "price": "15", "description": "Pepperoni" }
}
]

?() -> [{
"name": "Acme Store",
"total": 1000000,
"topItem":

{ "price": "50", "description": "Anvil" }
}]

() -> [
{
"name": "Pizza Planet",
"total": 80000,
"topItem":

{ "price": "15", "description": "Pepperoni" }
}
]
Example API in Node Javascript
The example below is a basic template you can follow when formatting your Event Data.
Attention: Setting up a JSON Event requires advanced programming knowledge. Although our support team is happy to help with the basics of putting information into the event, we cannot provide support on the programming aspects. You can always try asking our community of dedicated users instead.
var request = require('request-promise');
var surveyId = "SV_XXXXXXXXXXXX";
var triggerId = "OC_XXXXXXXXX";
var brandId = "YOUR_BRAND_ID";
var userId = "UR_XXXXXXXXXXXXXXX";
var datacenter = "xx1";
var apiToken = "YOUR_QUALTRICS_API_TOKEN";

var url = "https://" + datacenter + ".qualtrics.com/inbound-event/v1/event/JSON/triggers" +
 "?contextId=" + surveyId + "&userId=" + userId + "&brandId=" + brandId + "&triggerId=" + triggerId;
var payload = {
 "text": "This is some text",
 "object": {
 "number": 4
 },
 "array": ["a", "b", "c", "d"]
};

var options = {
 url: url,
 json: true,
 body: payload,
 headers: {
 "Content-Type": "application/json", // REQUIRED!!!
 "X-API-TOKEN": apiToken
 }
};

request.post(options).then(function (ret) {
 console.log("success:", url, payload);
}).catch(function (err) {
 console.log("error: ", url);
 console.log(err);
});
Example: Integrating with Freshdesk
Qtip: This is separate from the Freshdesk task.
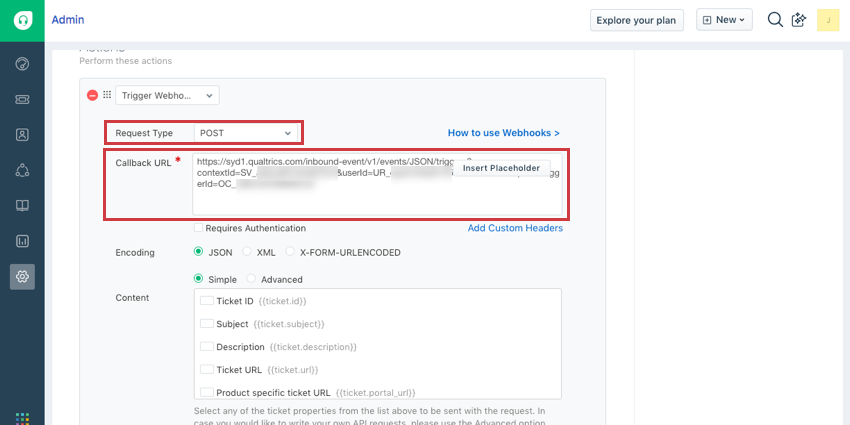
The JSON Event can be used to integrate with Freshdesk as a Webhook rule in the Dispatch’r. That means events in Freshdesk can then trigger tasks in Qualtrics, such as the creation of a ticket, or the distribution of a survey.
Qtip: Qualtrics Support can help you set up your JSON Event and connect it through Freshdesk. However, there might be some questions about Freshdesk functionality they cannot answer. If you have questions about the Freshdesk side, try checking out their documentation about Dispatch’r Rules.
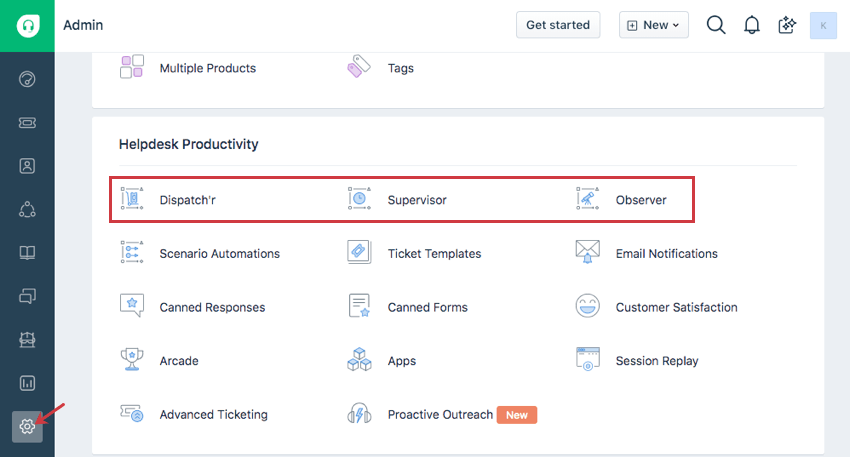
Qtip: Learn the difference between the Dispatch’r, Supervisor, and Observer on Freshdesk’s support documentation.
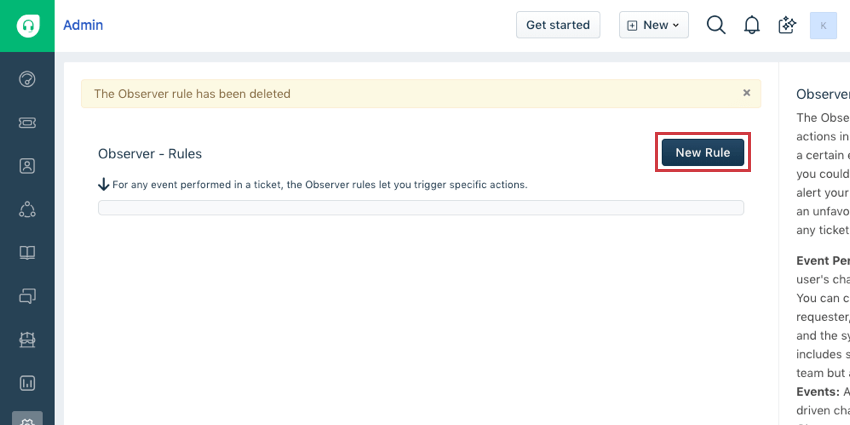
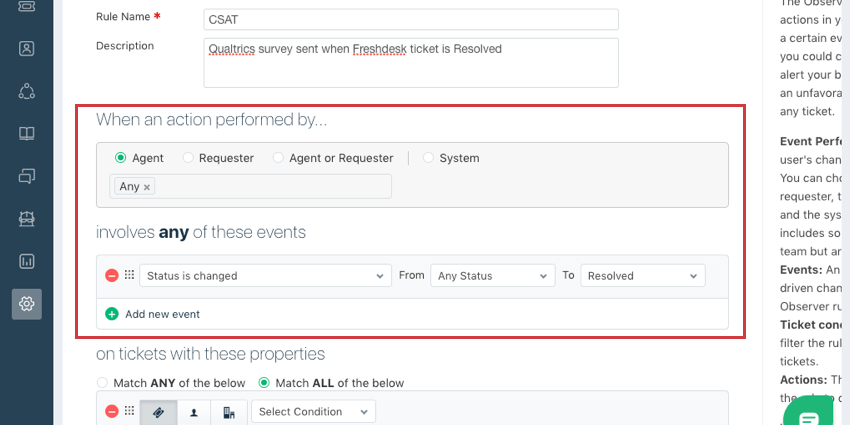
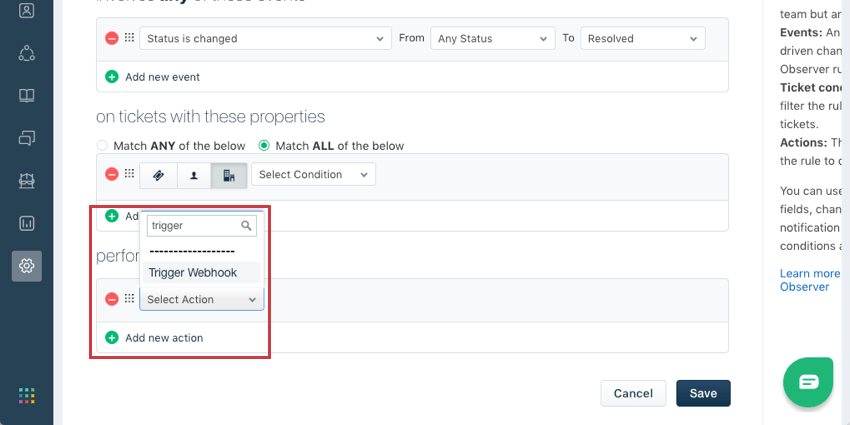
Example: Maybe when a Freshdesk Agent makes it so the ticket’s status is changed from any status to Resolved, you’d like to send a CSAT survey using Qualtrics.

Qtip: For more on Freshdesk’s Webhooks, see the linked documentation on their support site.
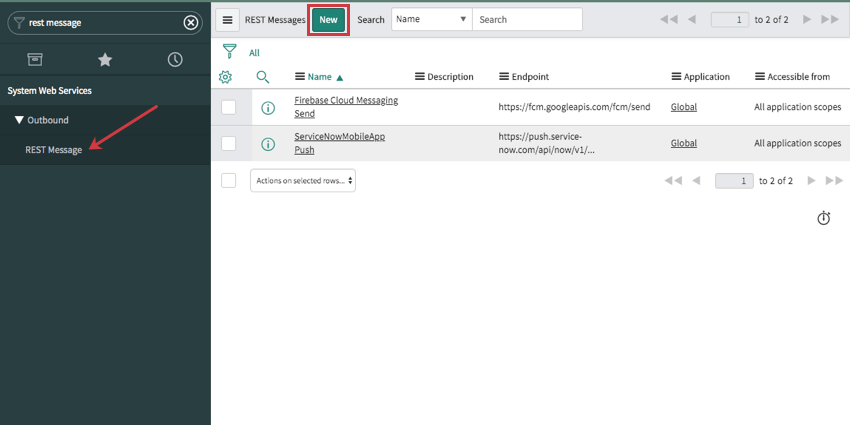
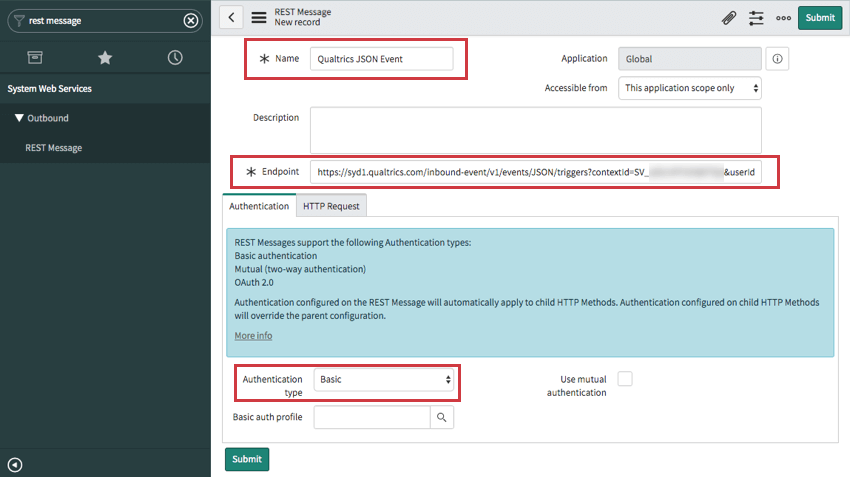
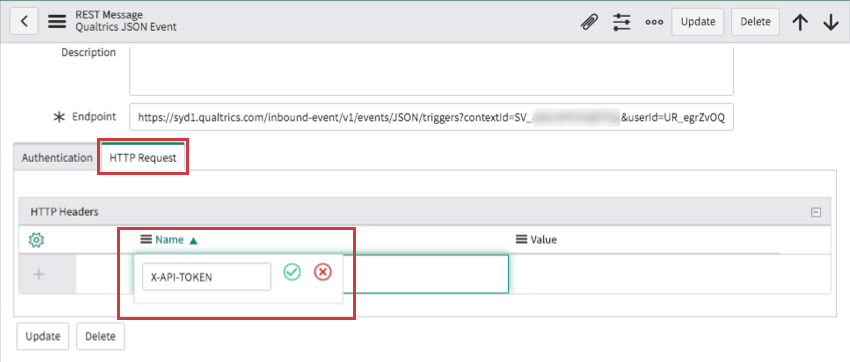
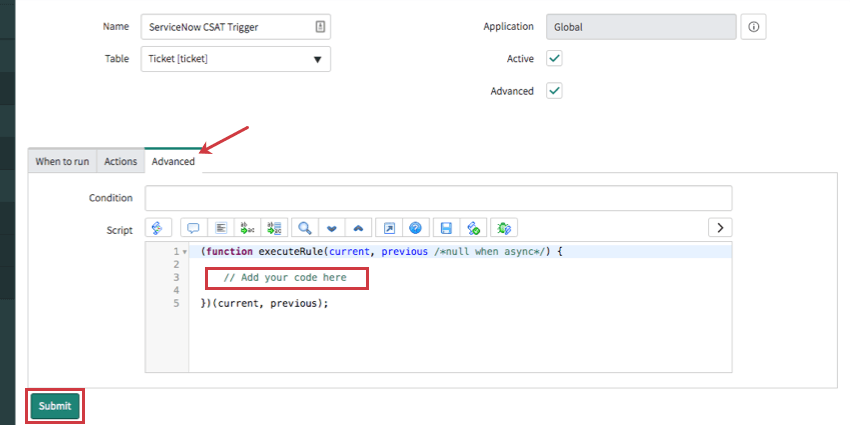
Example: Integrating with ServiceNow
Qtip: This is separate from the ServiceNow Task.
The JSON Event can be used to integrate with ServiceNow. That means events in ServiceNow can then trigger tasks in Qualtrics, such as the creation of a ticket, or the distribution of a survey.
Qtip: Qualtrics Support can help you set up your JSON Event and connect it through ServiceNow. However, there might be some questions about ServiceNow functionality they cannot answer. If you have questions about how to log into and activate your ServiceNow developer instance, try checking out their documentation about Personal Developer Instances.

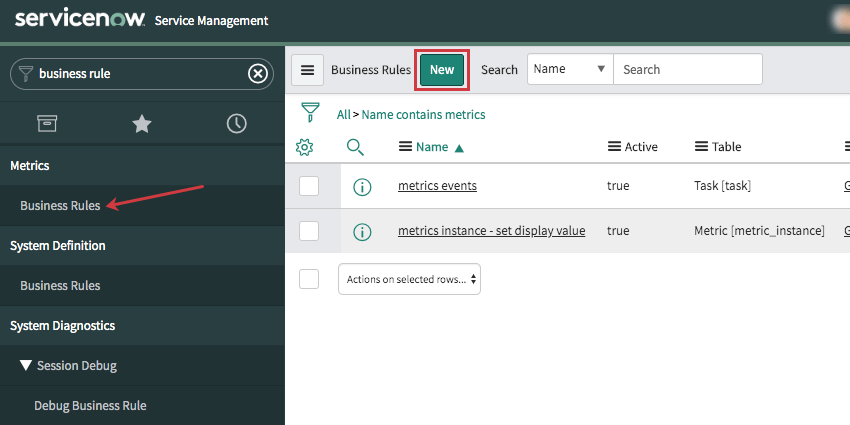
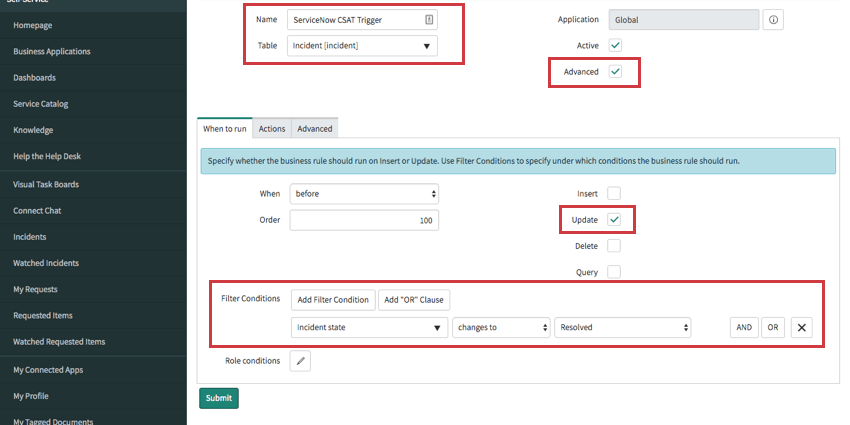
Example: If you have selected Incident for your table, and want to send a CSAT survey for resolved tickets, you could add a condition stating this rule should run when Incident state changes to Resolved.
Qtip: Qualtrics Support can help you set up your JSON Event and connect it through ServiceNow. However, there might be some questions about ServiceNow functionality they cannot answer. If you have questions about how / when business rules run, please see ServiceNow’s documentation on how business rules work.

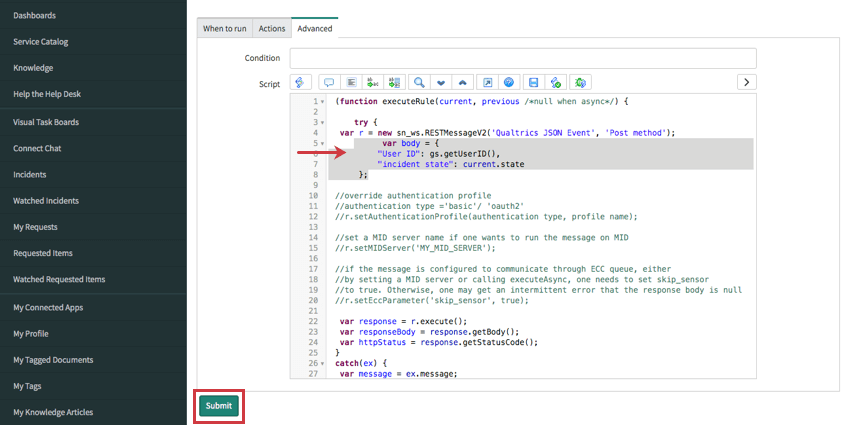
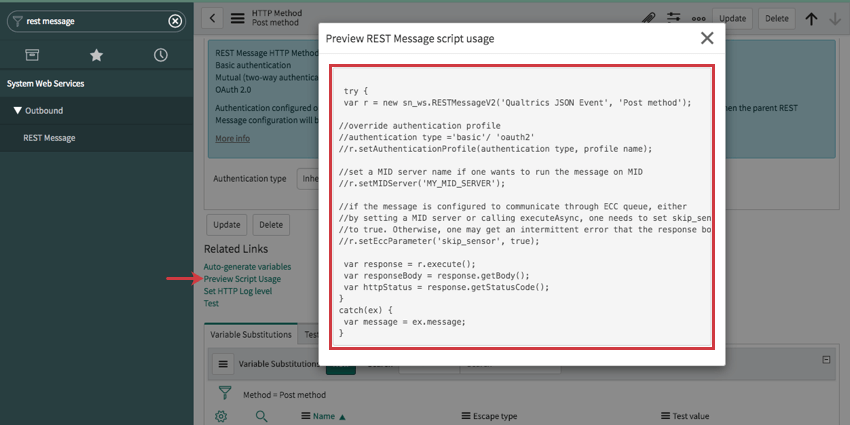
Example: This is an example of the final code you would include in this field. Most of this code is the outbound message provided by ServiceNow and will vary from example to example. Unfortunately, Qualtrics Support cannot help you with any custom coding; if you have issues with your code, please reach out to ServiceNow’s community for assistance.
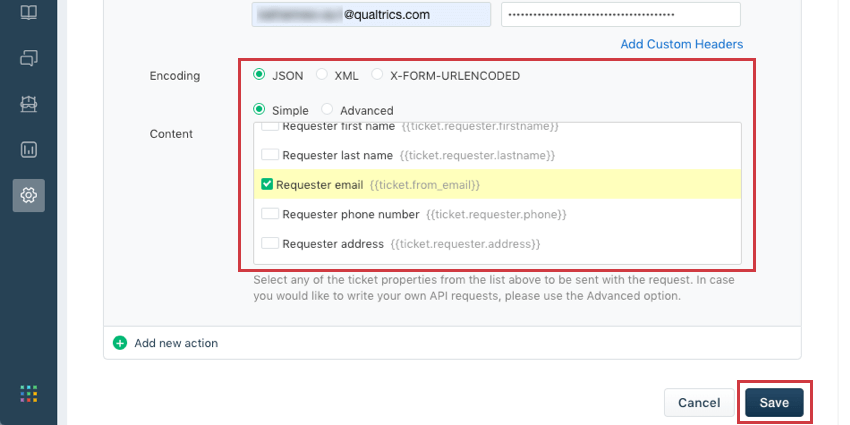
The bolded part of the code includes three additional functions not included in the original code: a JSON body that pulls the User ID and incident state, and a call that retrieves the email address of the incident customer so they can be sent the CSAT (italicized below). See ServiceNow’s documentation and consult their community if you have additional questions.
(function executeRule(current, previous /*null when async*/) {
// Add your code here
try {
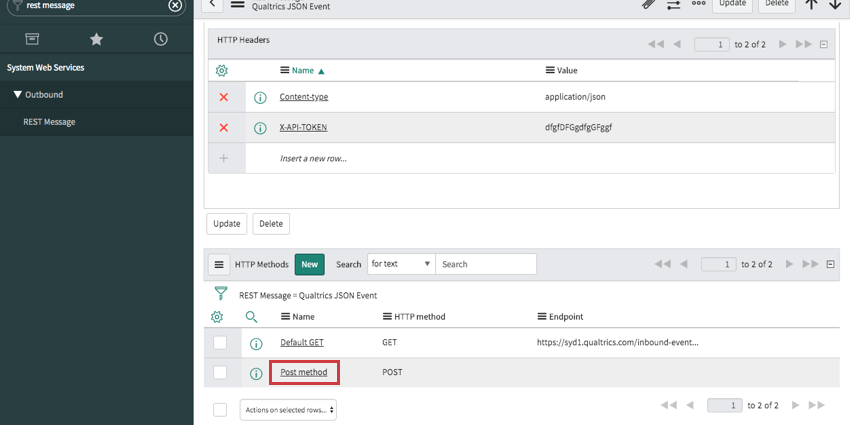
var r = new sn_ws.RESTMessageV2('Qualtrics JSON Event ', 'JSON Event POST');
var body = {
"User ID": gs.getUserID()
"incident state": current.state.getDisplayValue()
};
var target = new GlideRecord('sys_user');
target.addQuery('sys_id', '=', current.caller_id);
target.query();
while(target.next()) {
body["email"] = target.email.getDisplayValue();
}
var response = r.execute();
var responseBody = response.getBody();
var httpStatus = response.getStatusCode();
gs.addInfoMessage(httpStatus);
}
catch(ex) {
var message = ex.message;
gs.addInfoMessage("Error communicating w Qualtrics " + message);
}
})(current, previous);
r.setRequestBody(JSON.stringify(body));
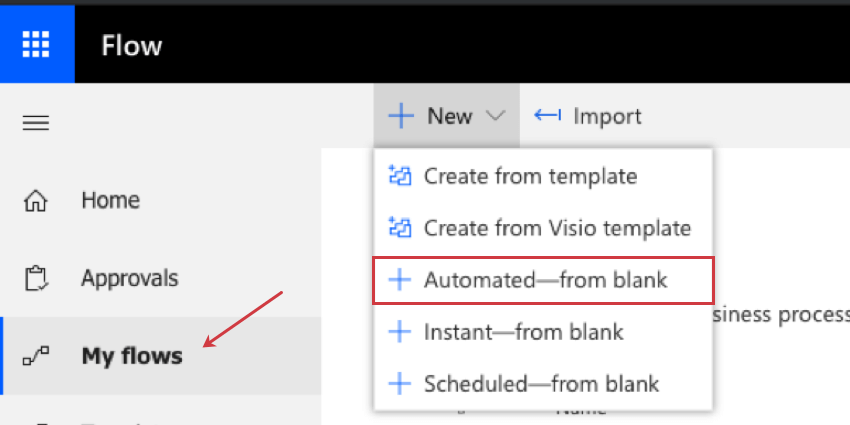
Example: Integrating with Microsoft Dynamics Through Microsoft Flow
Qtip: This is separate from the Microsoft Dynamics Task.
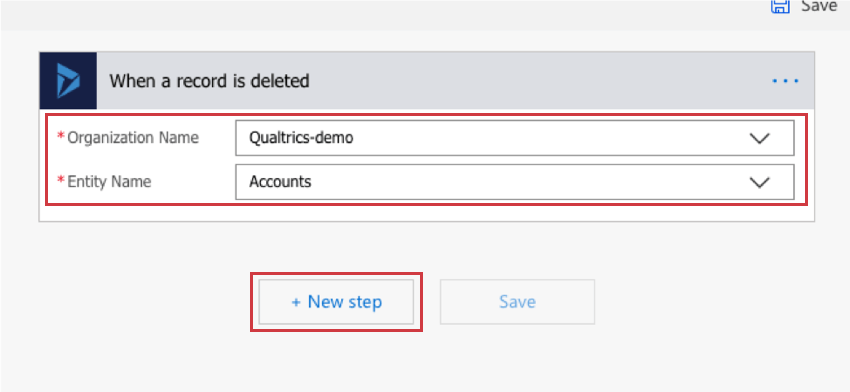
The JSON Event makes it so events in Microsoft Dynamics can then trigger tasks in Qualtrics, such as the creation of a ticket, or the distribution of a survey. For example, whenever you delete an account record in Microsoft, you can distribute a Qualtrics survey to the account owner that asks exit questions. (e.g., We’re sorry to see you go! How was your time with us? How can we improve?)
In order to integrate the JSON Event with actions that occur in Microsoft Dynamics, you actually need to do the set up inside Microsoft Flow instead of Dynamics. Don’t worry – Microsoft Flow comes free with every Microsoft Dynamics account, so you can log into Flow with your Dynamics information here.
Qtip: Qualtrics Support can help you set up your JSON Event and connect it through Microsoft Flow and Microsoft Dynamics. However, there might be some questions about Microsoft functionality they cannot answer. If you have questions about the Microsoft side, try checking out their documentation for Flow and their resources for Dynamics.


Qtip: Use the Add dynamic content button to select Dynamics record fields you’d like to bring over to Qualtrics. Make sure you follow proper JSON format, as displayed in the screenshot. For help troubleshooting dynamic content, please reach out to Microsoft Support.
Qtip: Microsoft Flow is preferred for these steps because it is able to send more information to Qualtrics in the JSON Body. If you set this up inside Microsoft Dynamics instead of Flow, only fields changed during the Dynamics event will be sent to Qualtrics. For example, if you choose to trigger based on a record update, and only an “email” field is changed, the “name” and “address” won’t be sent to Qualtrics, even if you specifically ask for those fields in the body. Flow will send everything you asked for to Qualtrics, regardless of whether that field was changed in the triggering event.
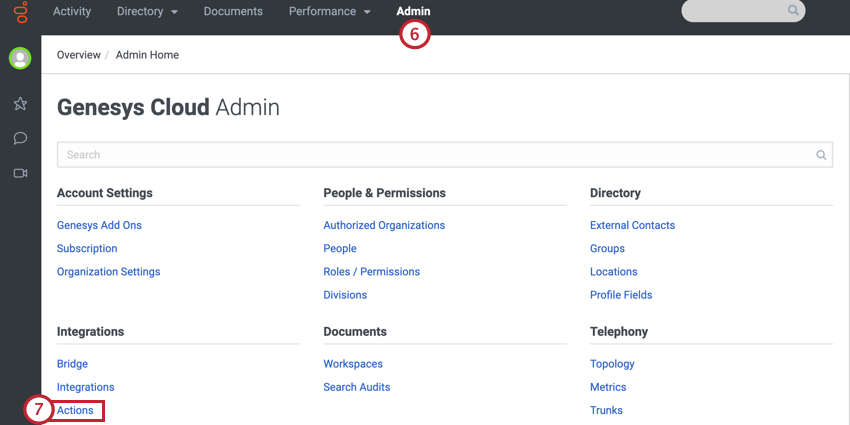
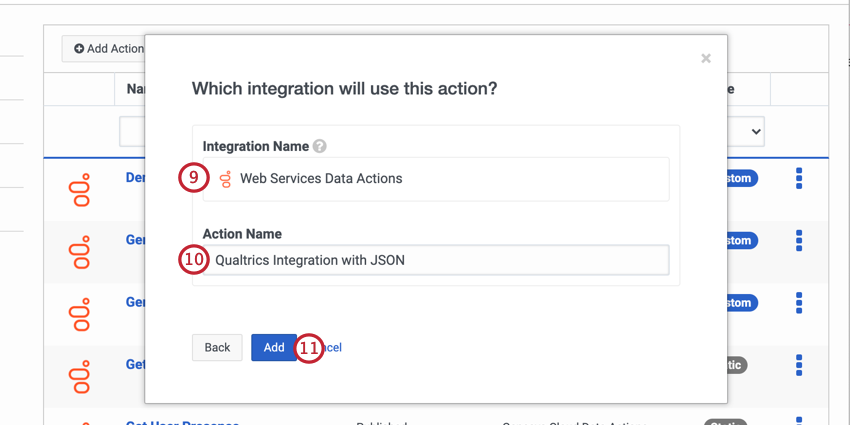
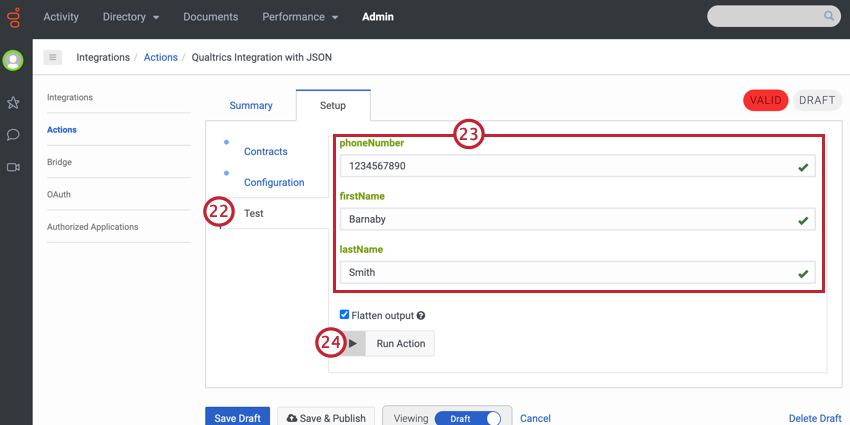
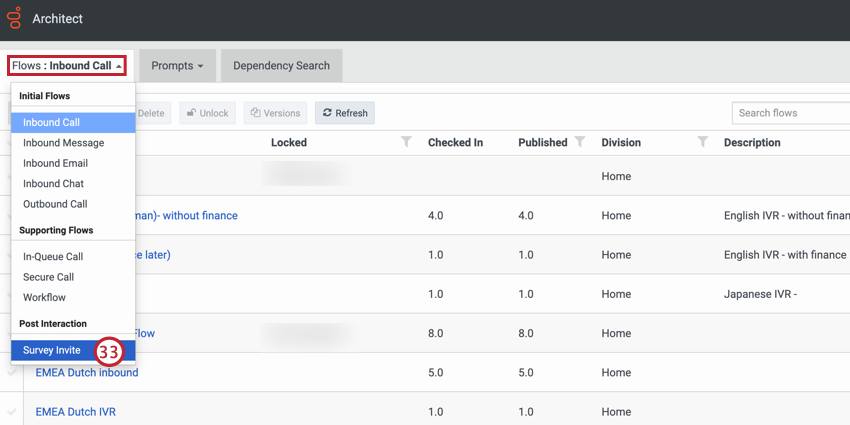
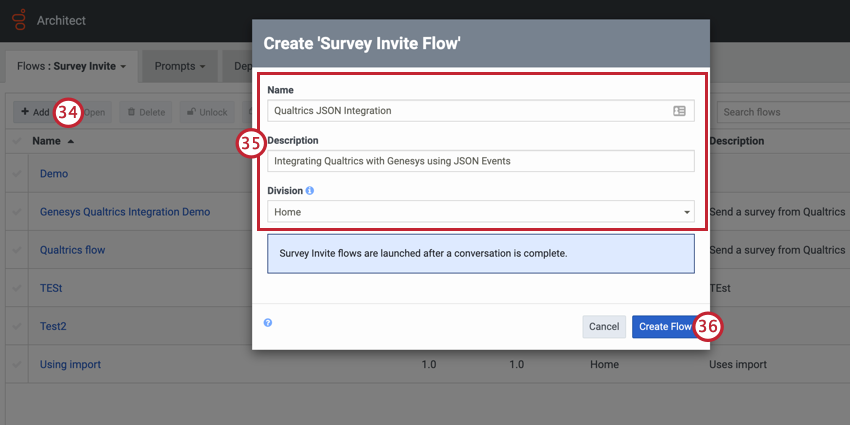
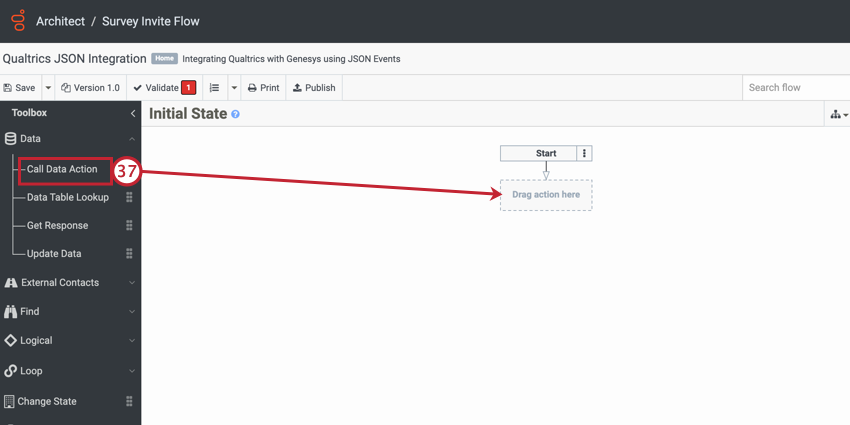
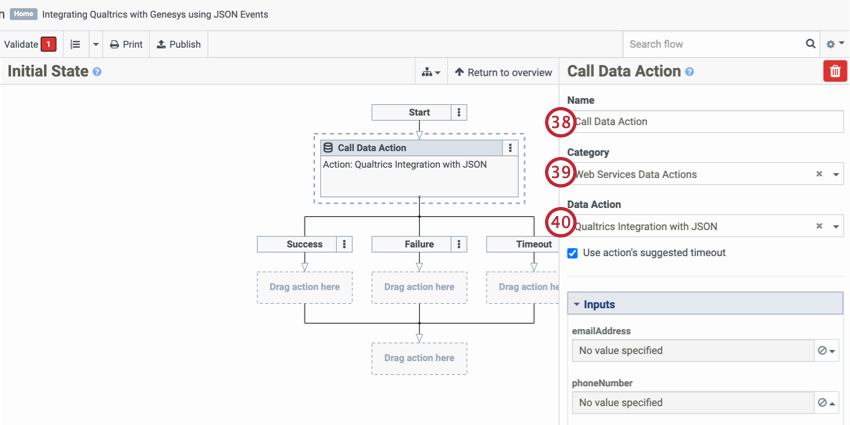
Example: Integrating with Genesys PureCloud
Qtip: To set up this integration, you must have access to Genesys Cloud Architect and Genesys Web Service Data Actions.
Using JSON events, you can integrate with Genesys PureCloud to send customers a follow-up survey after completing a support phone or chat interaction.
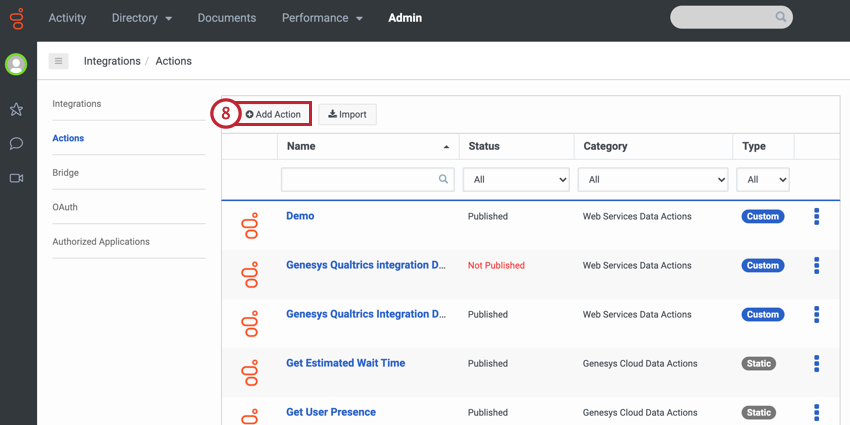
Qtip: If you don’t have the option to select the Web Services Data Actions, then you need to enable the integration. See this page for more information.
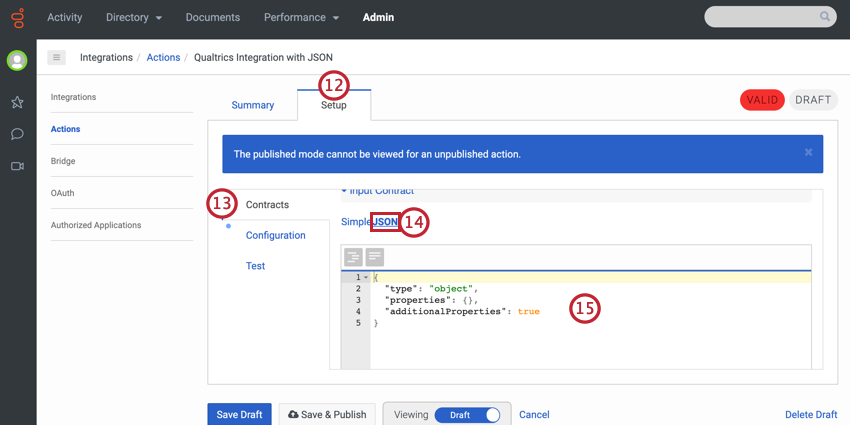
Example: For example, the below code will pass email address, phone number, first name, and last name.
{
 "type": "object",
 "properties": {
 "emailAddress": {
 "type": "string"
 },
 "phoneNumber": {
 "type": "string"
 },
 "firstName": {
 "type": "string"
 },
 "lastName": {
 "type": "string"
 }
 },
 "additionalProperties": true
 }


Qtip: When setting up your task, use the piped text menu to use values passed from Genesys (e.g., customer email, name, etc).

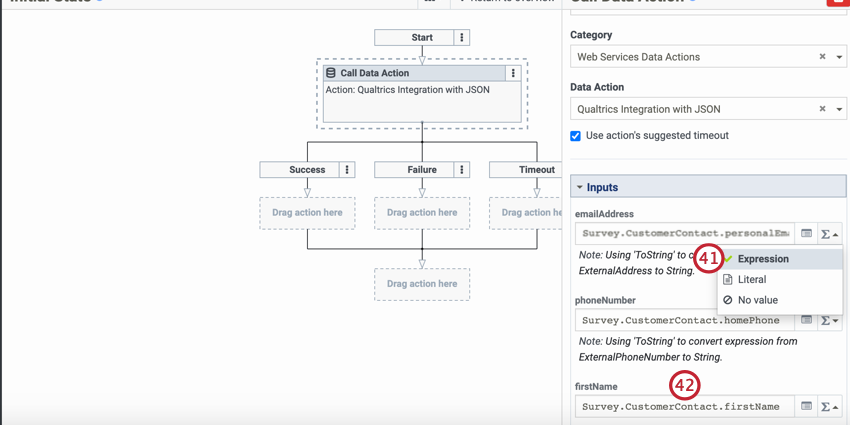
Qtip: This page has every default property included in the survey invite flow. You can also use complex expressions in situations where customer contact information is missing or requires additional formatting.
Qtip: Contact information is prefaced with Survey.CustomerContact.

FAQs
Does the JSON event enable me to integrate with _?
Does the JSON event enable me to integrate with _?
- Can be configured to make outbound HTTP POST calls (e.g. webhooks, custom application)
- Can authenticate by passing a header token
- Sets the Content-Type header to “application/json” and formats the request bodies as valid JSON (optional for Event Data)
How many events per minute can I make to my JSON event (op_start) before being throttled?
How many events per minute can I make to my JSON event (op_start) before being throttled?
How do I know if my JSON Event workflow fails?
How do I know if my JSON Event workflow fails?
What are workflows? / Where are actions?
What are workflows? / Where are actions?
There are no changes to workflow functionality as part of this update.
That's great! Thank you for your feedback!
Thank you for your feedback!