-

Qualtrics Platform -

Customer Journey Optimizer -

XM Discover -

Qualtrics Social Connect
Response Import & Export Automations
About Response Import & Export Automations
Response automations can be used to automatically export data from Qualtrics on a regular schedule, or import data into Qualtrics on a regular schedule. Response automations allow you to create, configure, update, test, and review your own automation jobs. The responses are delivered via a Secure File Transfer Protocol (SFTP). This means Qualtrics and your SFTP server establish a link to pass the responses between each other.
Setting Up Response Export Automations
Response export automations automatically export responses from Qualtrics and send them to your SFTP server. You can choose how often the responses are exported as well as what data is exported.
Qtip: When setting up an SFTP connection, we recommend your IT team Allowlist the Qualtrics IP Ranges.
- Make sure you’re in the Data section of the Data & Analysis tab of your survey.
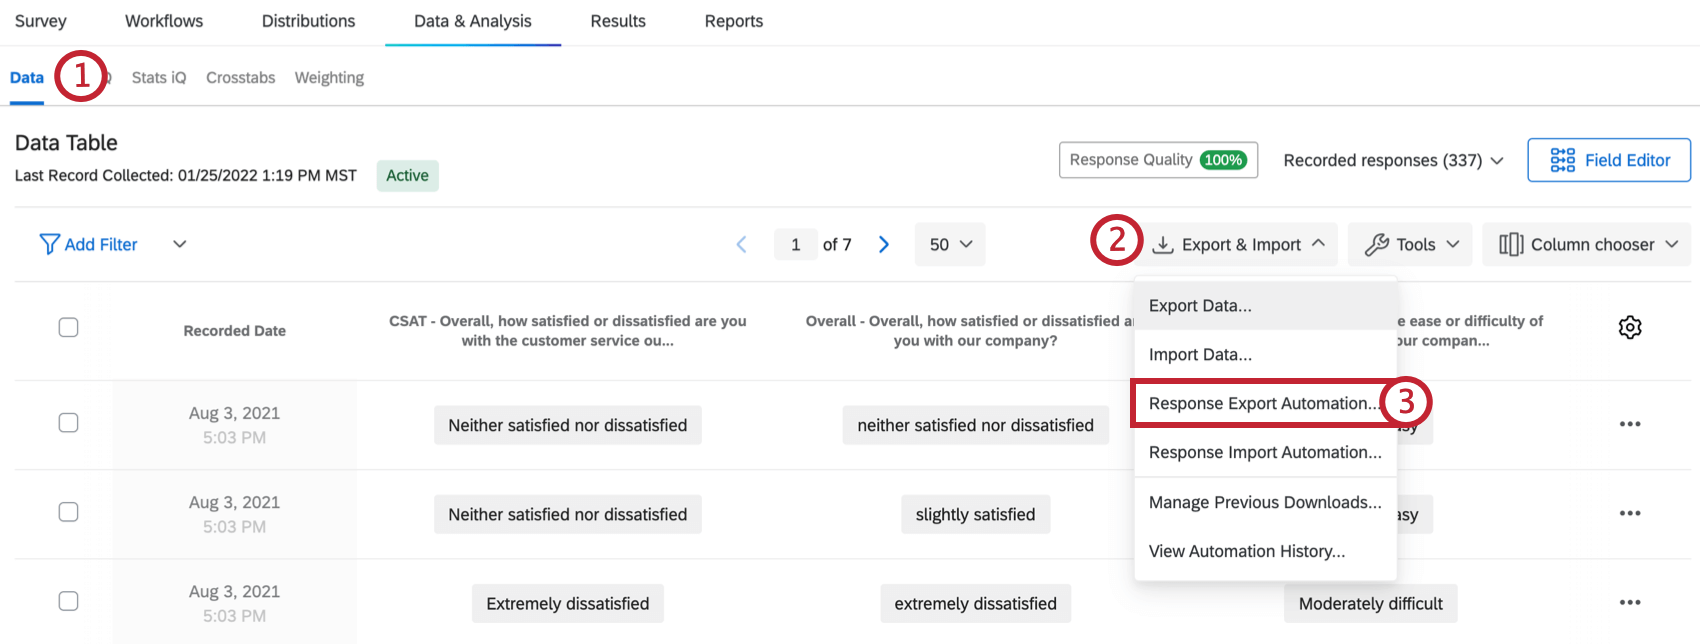
- Click Export & Import.
- Choose Response Export Automation.
Attention: Response export automations have a max file size limit of 500 MBs. If the total number of responses exceeds this file size limit, your export will not process, and you will receive an error message that reads, “File exceeds size limit.” If you run into this limit, please use an export filter to reduce the size of data that you are exporting.
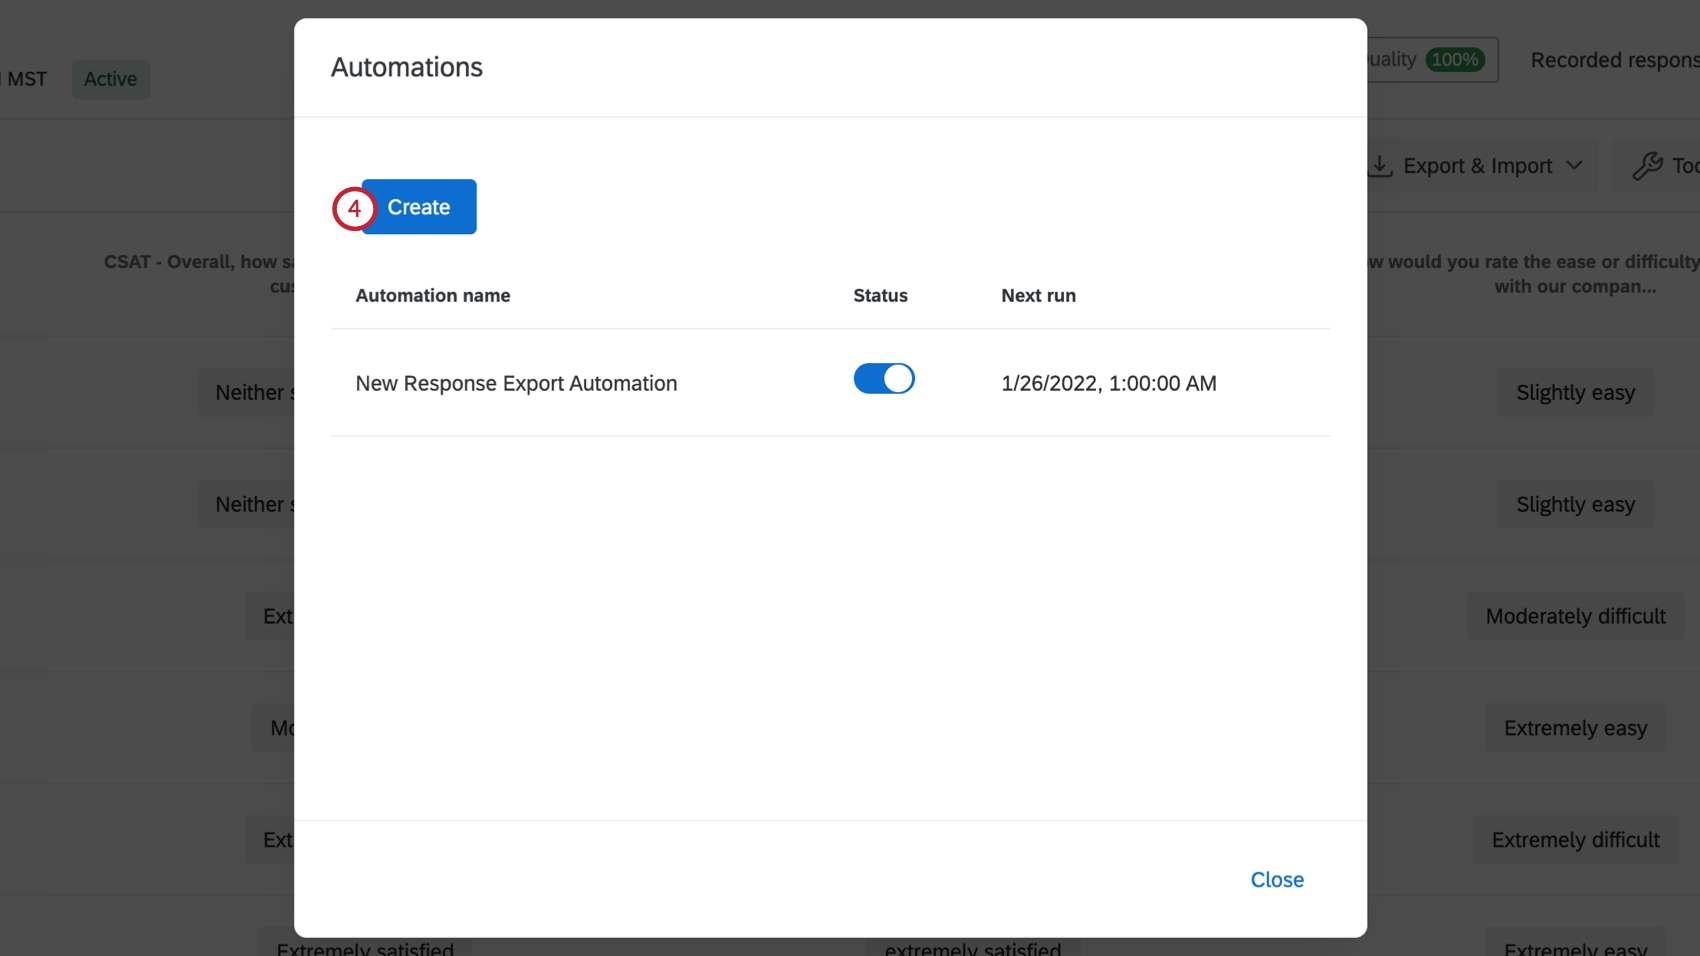
- Click Create.
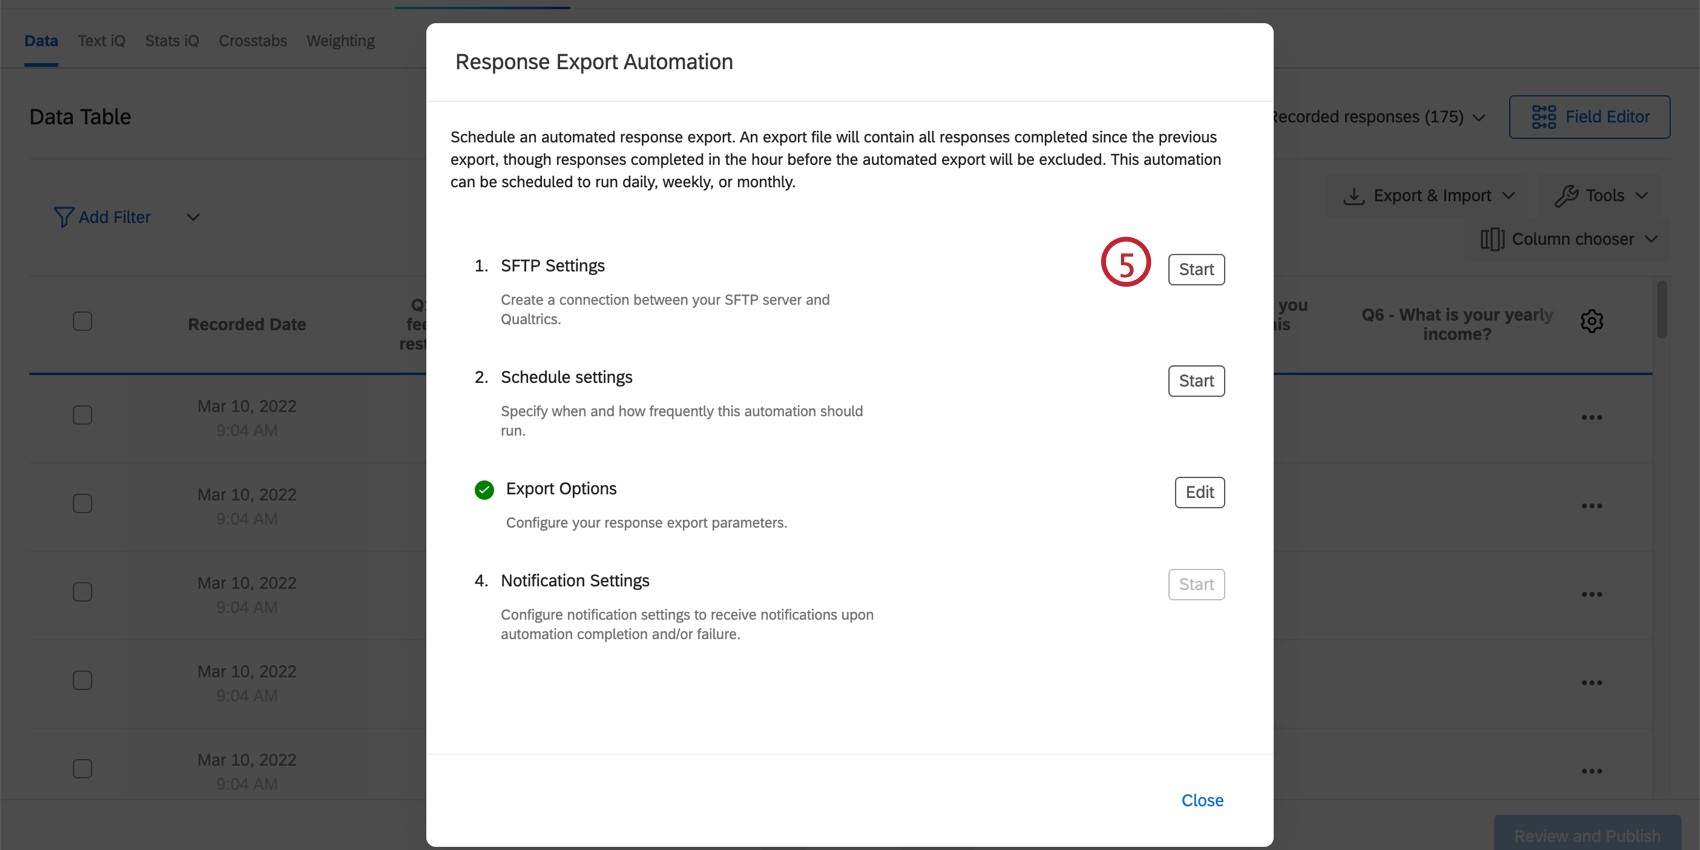
- Click Start next to the SFTP Settings.
- Enter the server’s Host name. This is the URL of the SFTP server.
 Qtip: The URL usually resembles sftp.example.com.
 - Enter the Port for your server. Usually, this is 22.
- Enter the Username of the user you’ve set up on your SFTP server for Qualtrics to authenticate into.
Qtip: We suggest creating a unique set of credentials for Qualtrics use only.
- Enter the Password of the user.
- Type a prefix to be prepended to the file name.
Qtip: A timestamp of when the file was exported will automatically be added to the end of the file name in the format of YYYY-MM-DD_hhmmssSSS. For example, a file exported on Jan 1, 2020 at 8 AM would have “2020-01-01_080000000” added to the file name.Example: For example, you could put the survey name as the prefix so you can easily identify your survey’s data files in your SFTP server.
- Enter the directory path of where the file should be deposited on your SFTP server, e.g. Central Folder/Survey Responses 2020.
Qtip: This directory path is case sensitive. This must be an existing folder, or the automation will fail. The folder path should also be relative to the default directory of the SFTP server.
- If desired, select Encrypt files using PGP. To learn more about this extra means of encryption and data protection, see PGP Encryption.
- Click Save.
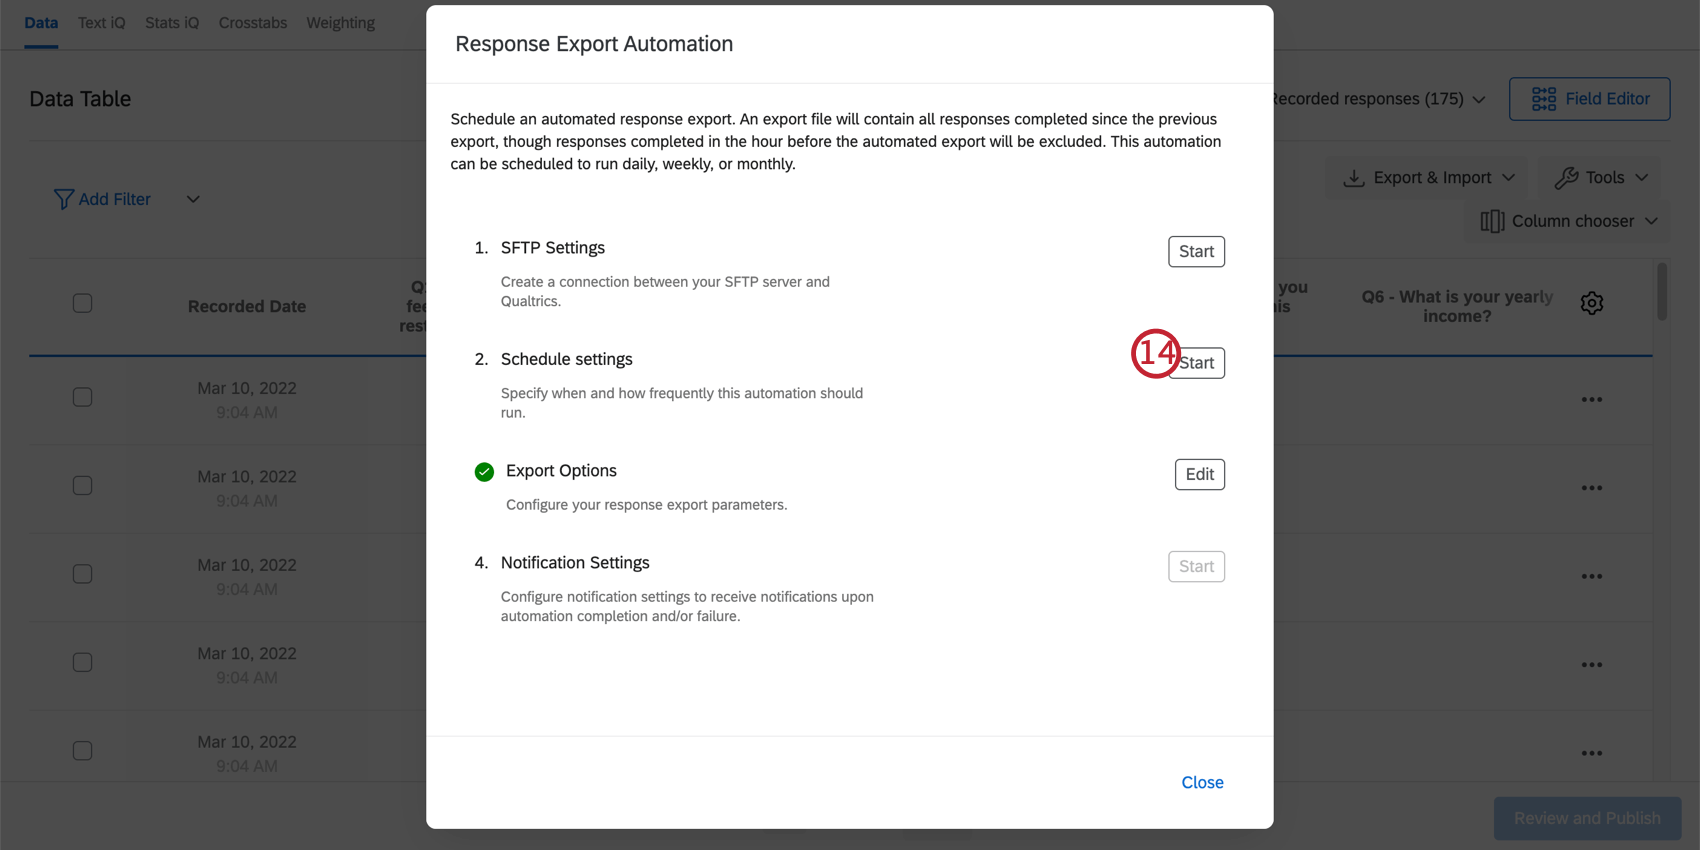
- Click Start next to the Schedule settings.
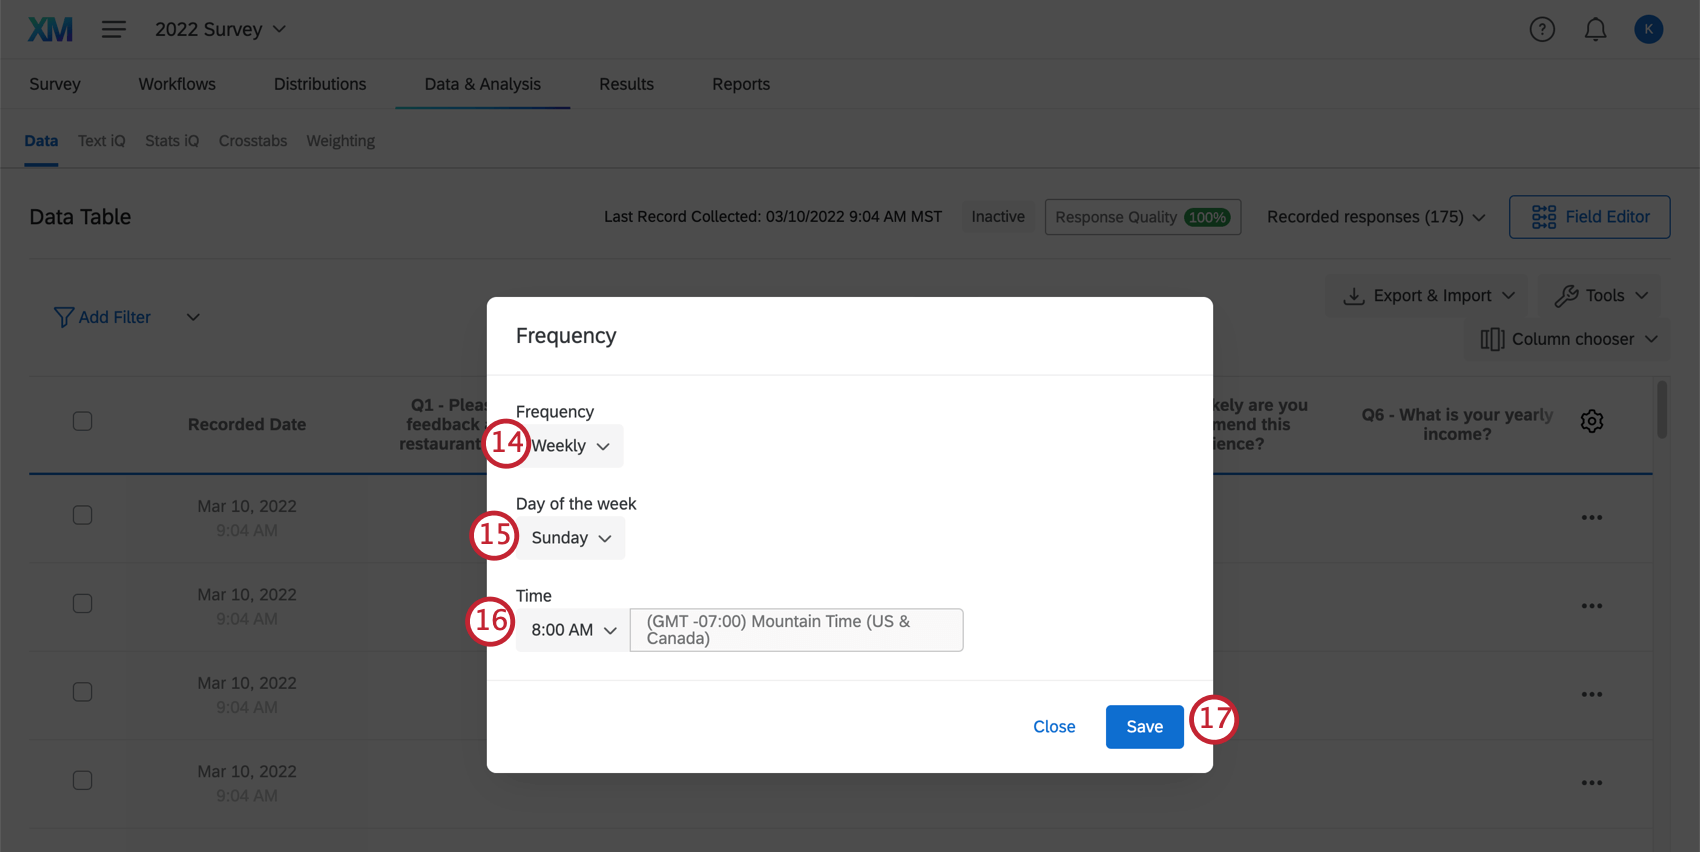
- Choose the Frequency of when the automation will run. You may choose Daily, Weekly, or Monthly.
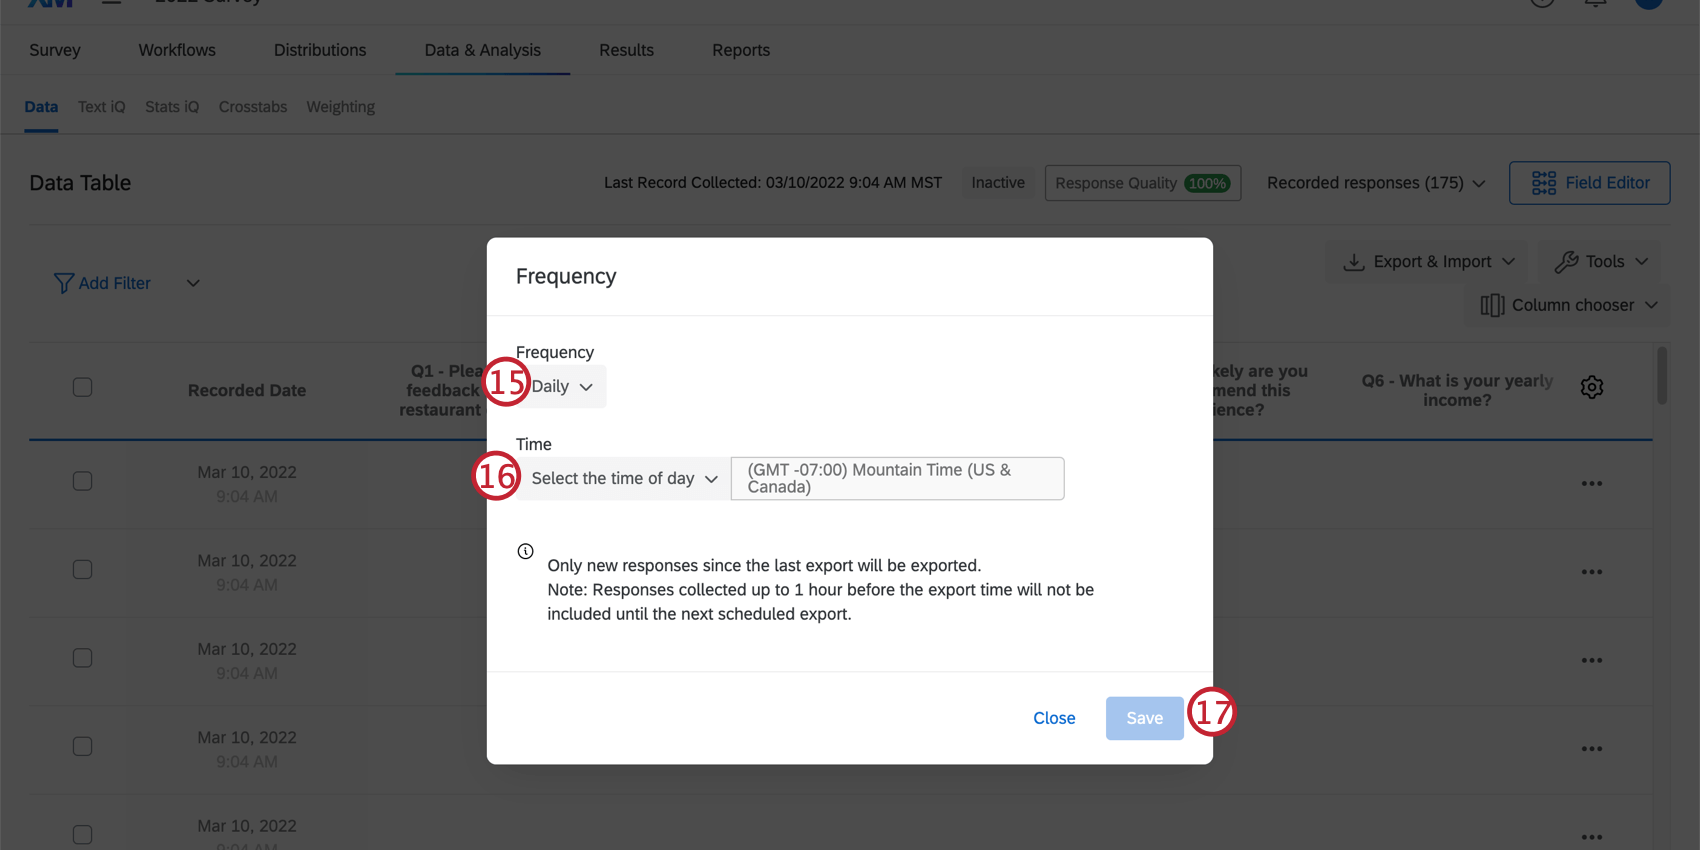 Qtip: If you choose Weekly or Monthly, a second option will appear to let you select what day of the week or day of the month, respectively, the automation will run.
 - Select the time of day the automation will run.
Qtip: Make sure to check the time zone! It will be the same as your account’s time zone in the user settings.
- Click Save.
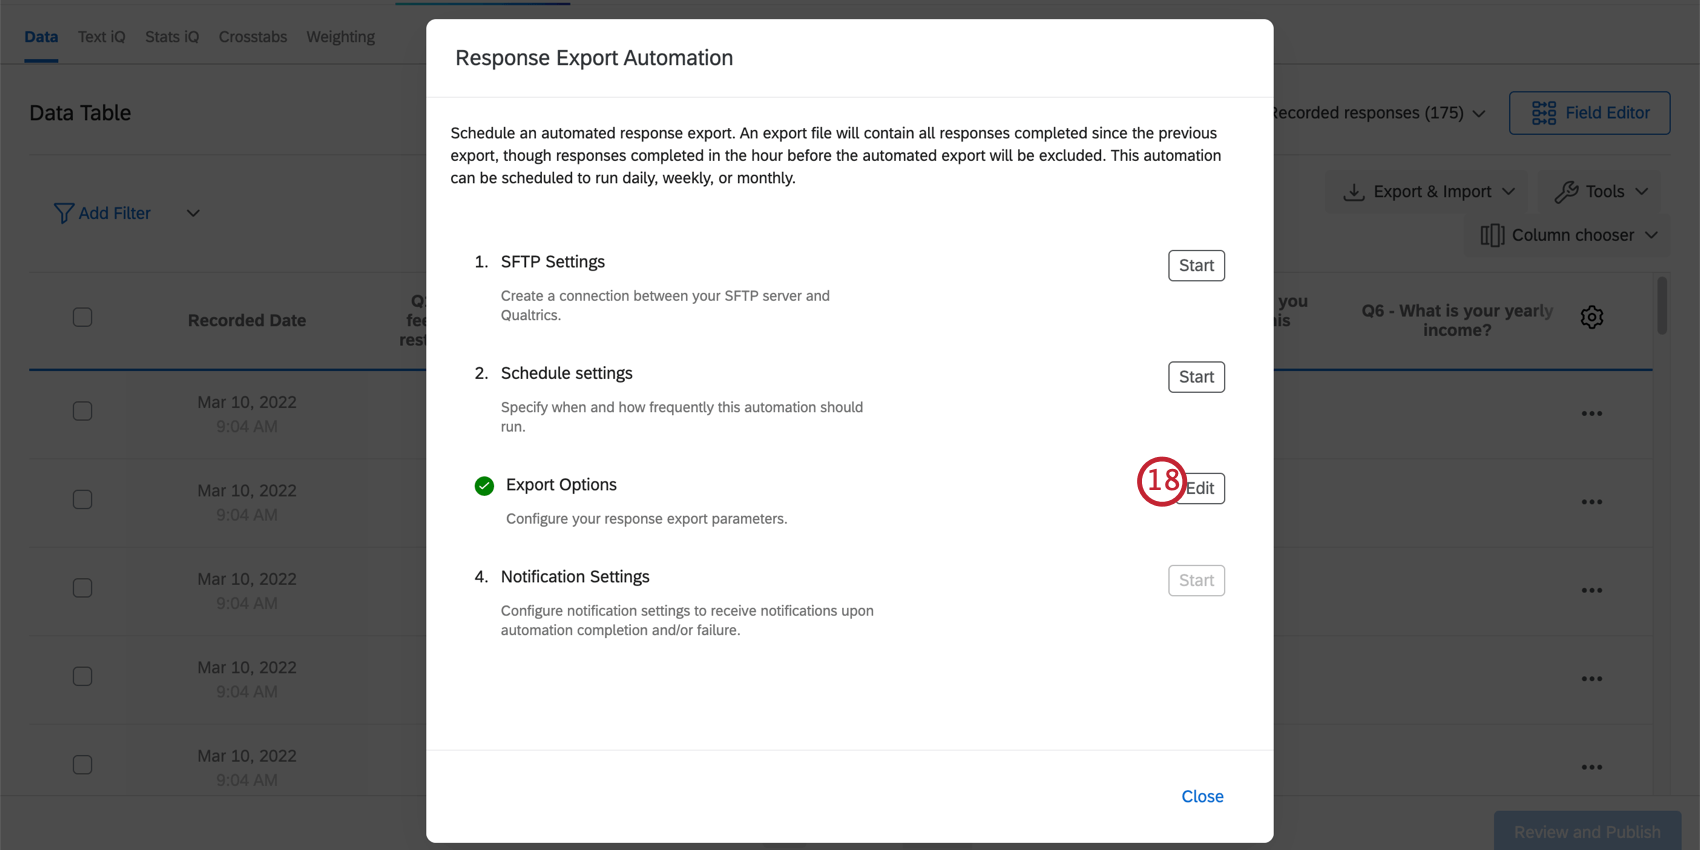
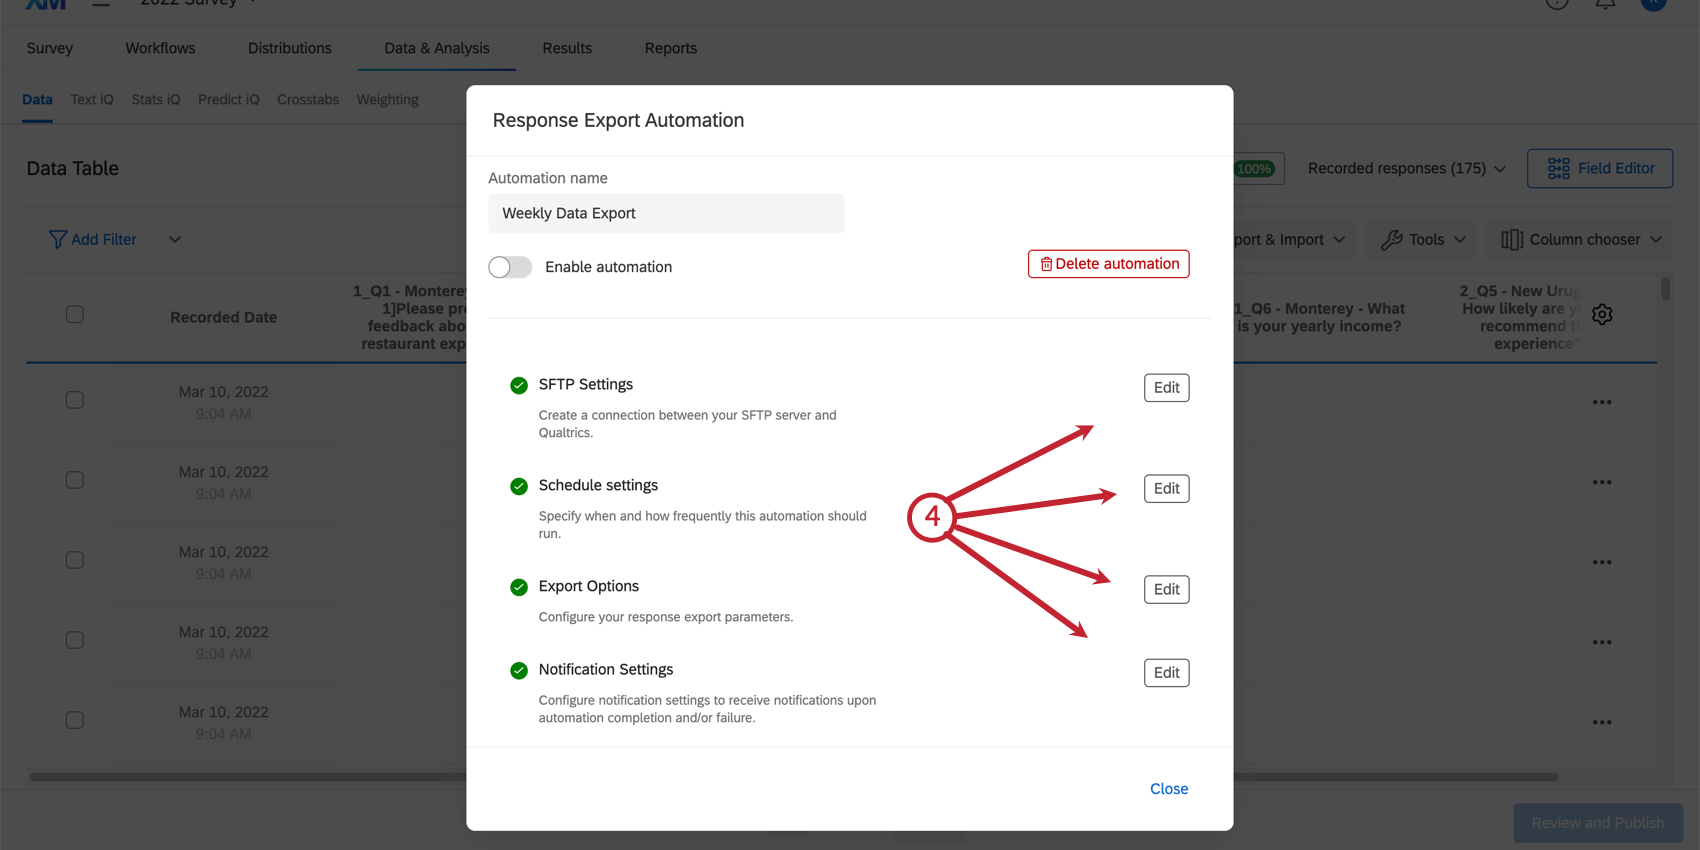
- Click Edit next to the Export Options.
- If desired, add a filter to the data that is exported. You can choose any of your previously saved filters for the survey.
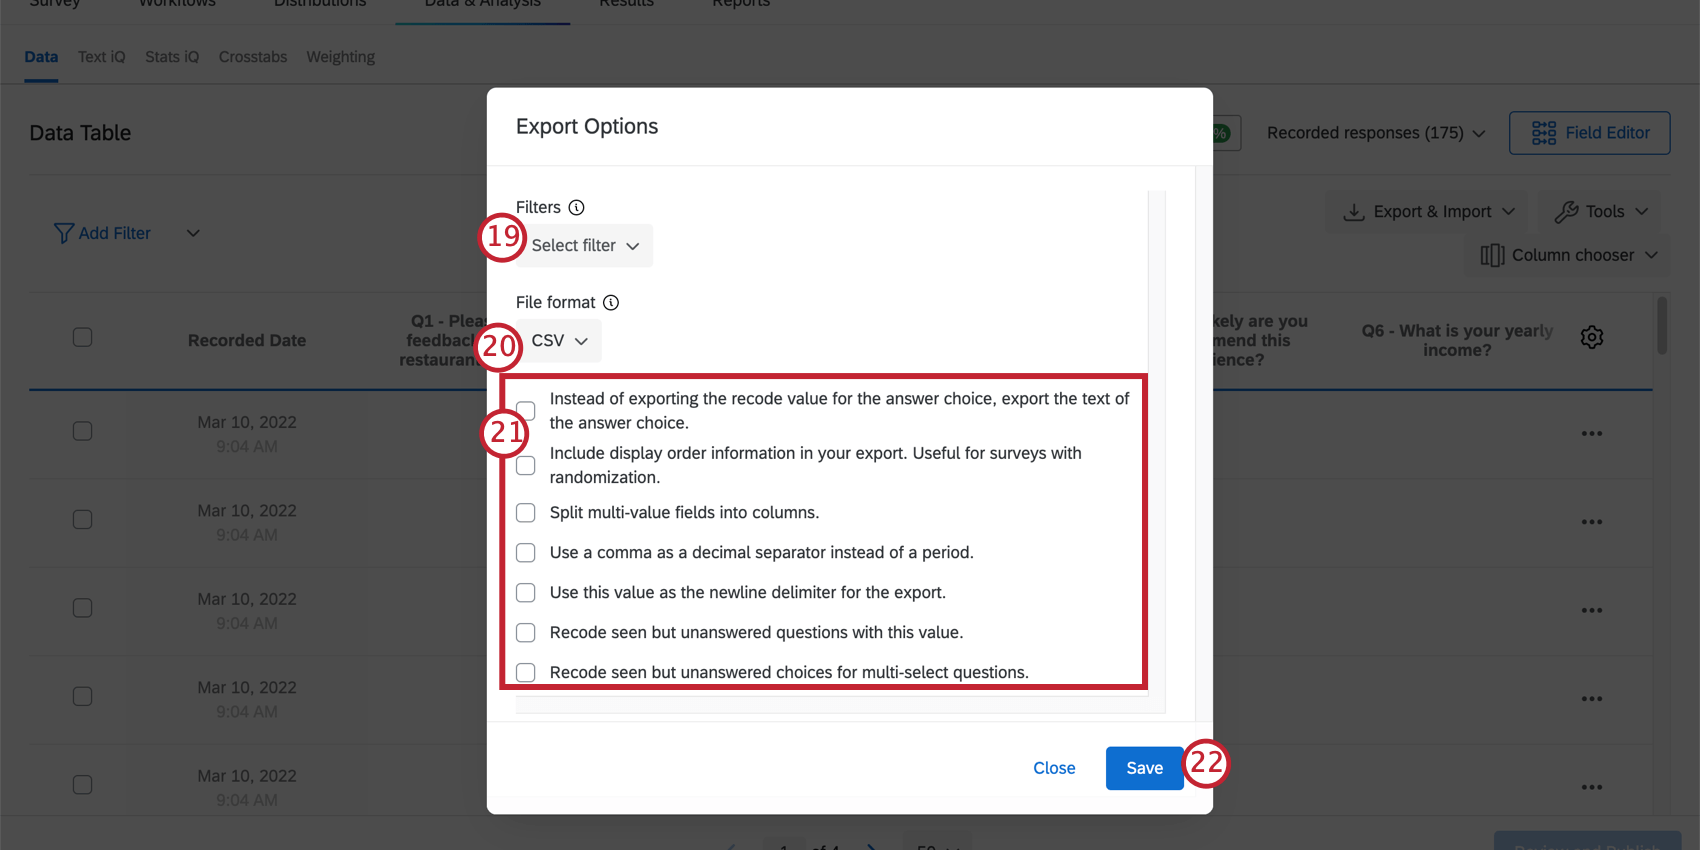 Warning: Response export automations are designed to export all newly recorded responses since the last automation run. Any filter added to this automation will only apply to newly recorded responses since the last automation run. Because of this behavior, please do not use any filters that filter on time fields, such as Start Date, End Date, or Recorded Date, as your exported dataset may not contain the responses you expect.
 - Choose the File format of the exported file. You may choose CSV, TSV, SPSS, JSON, NDJSON, or XML
- Enable additional export options based on your preferences. These include:
- Instead of exporting the recode value for the answer choice, export the text of the answer choice: This option exports your data as the text of the selected answer choice as opposed to the recode value of the answer choice.
- Include display order information in your export. Useful for surveys with randomization: This option will include additional information in your data export about the order in which respondents saw randomized questions. For help interpreting this data, read this support page.
- Split multi-value fields into columns: Certain question types allow for multiple answer choices to be selected for a single question. This option splits each possible answer to the question into a unique column, rather than combining every chosen answer into a single column.
- Use a comma as a decimal separator instead of a period: This option lets you use a comma as a decimal point for numbers.
Attention: If you enable this option, do not export your file as a CSV.
- Use this value as the newline delimiter for the export: This option is rarely needed. It allows you to specify a certain character that will act as the newline character in your exported data file. Newline characters indicate that a new line of text has started, usually by starting a new paragraph by pressing the Enter or Return key on your keyboard.
- Recode seen but unanswered questions with this value: This option allows you to assign a numeric value to questions that respondents saw but chose not to answer. By default, unanswered questions are empty in your data file. This helps you distinguish between unanswered questions from questions the respondent didn’t see
- Recode seen but answered questions for multi-select questions: This option is similar to the “recode seen but answered questions with this value” option. You should only enable this option if Split multi-value fields into columns is also selected.
- Click Save.
- Click Edit next to the Notification Settings.
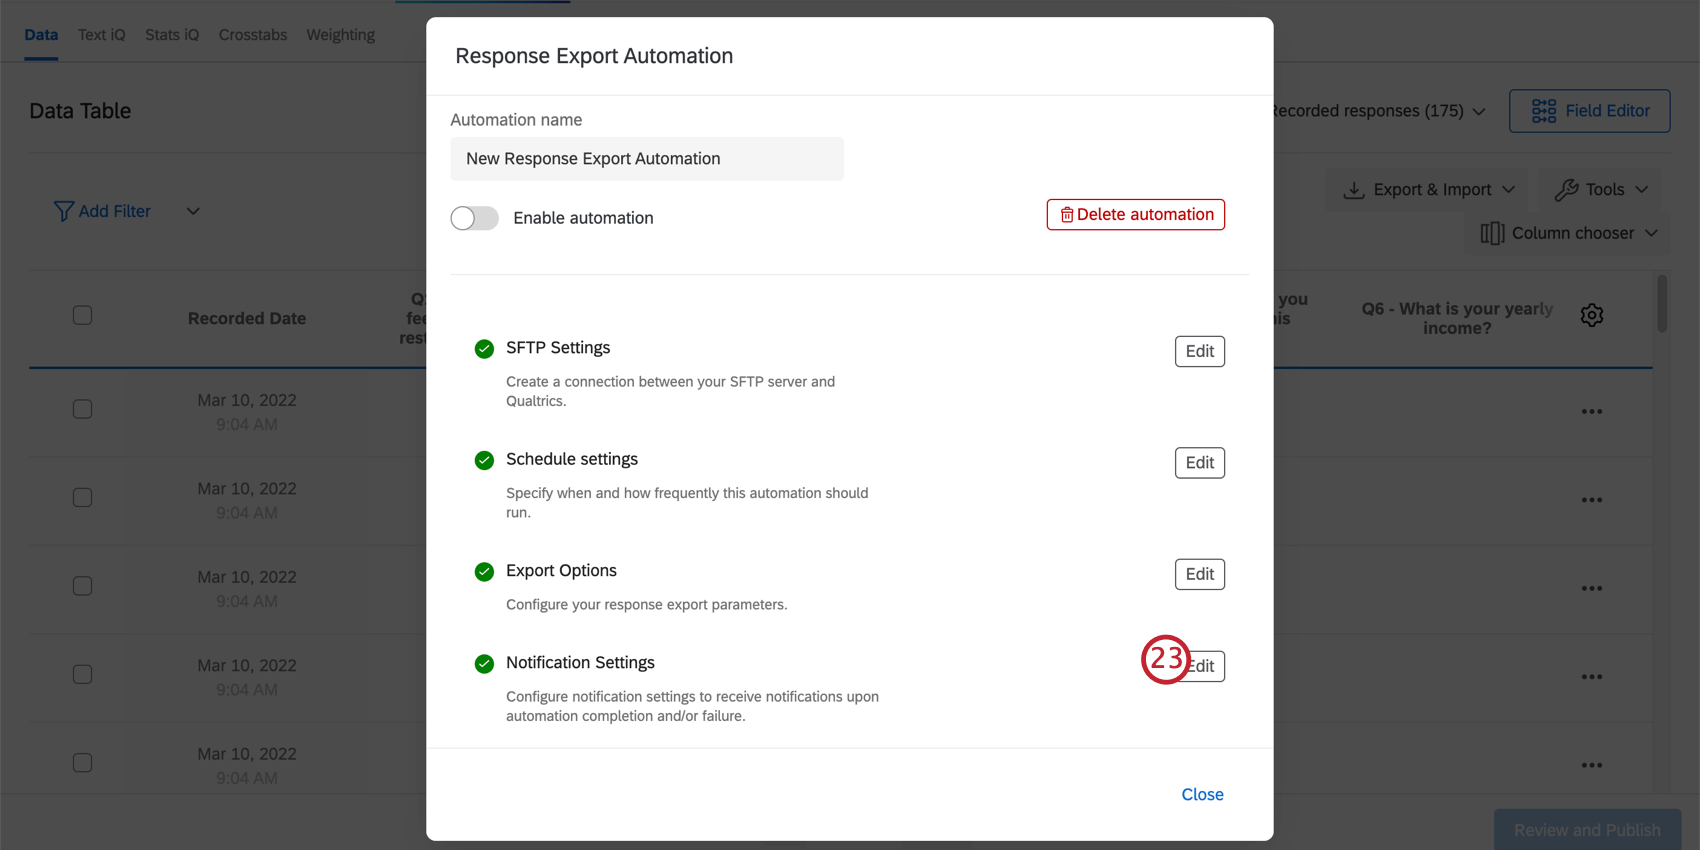
-
Type an email address to receive an email once the automation completes.
Qtip: When setting up notifications, you can only notify emails connected to your brand.
- Give your automation a name.

- Enable the automation so it begins running.
- Click Close.
Setting Up Response Import Automations
Response import automations are used to import data into Qualtrics from your SFTP server on a regular schedule.
Qtip: When setting up an SFTP connection, we recommend your IT team Allowlist the Qualtrics IP Ranges.
- Make sure you’re in the Data section of the Data & Analysis tab of your survey.
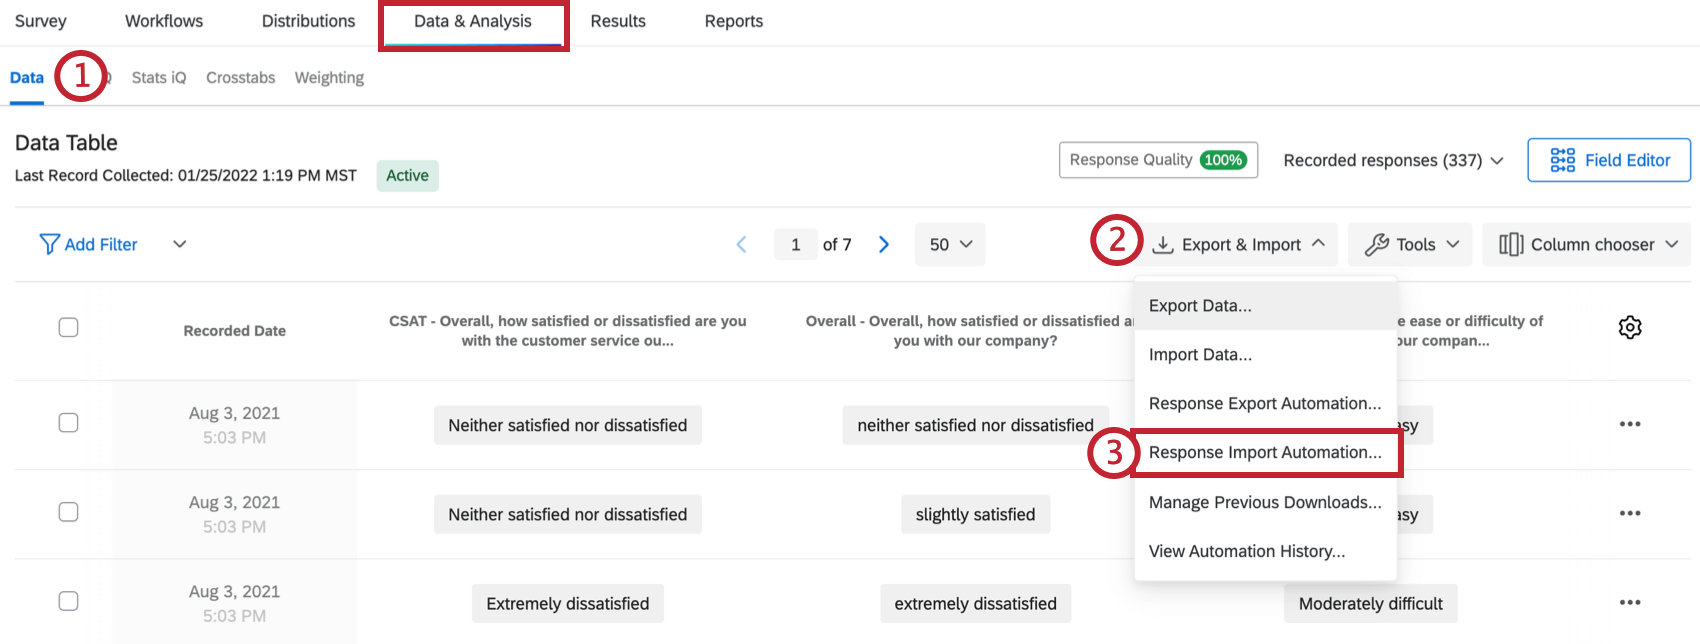
- Click Export & Import.
- Select Response Import Automation.
Attention: Response import automations allow for an import of up to 200 files per run, with each individual file having a 100 MB file size limit and a total file size limit of 2 GBs. Each file may have a maximum of 200 columns. If you exceed these limits, you will see an error message that reads, “The file you are trying to import is greater than the maximum supported size,” “Total size across %d matching files exceeds maximum size (%dMB),” “Too many files matching prefix %s in directory,” or “Could not create mapping into column %d.”
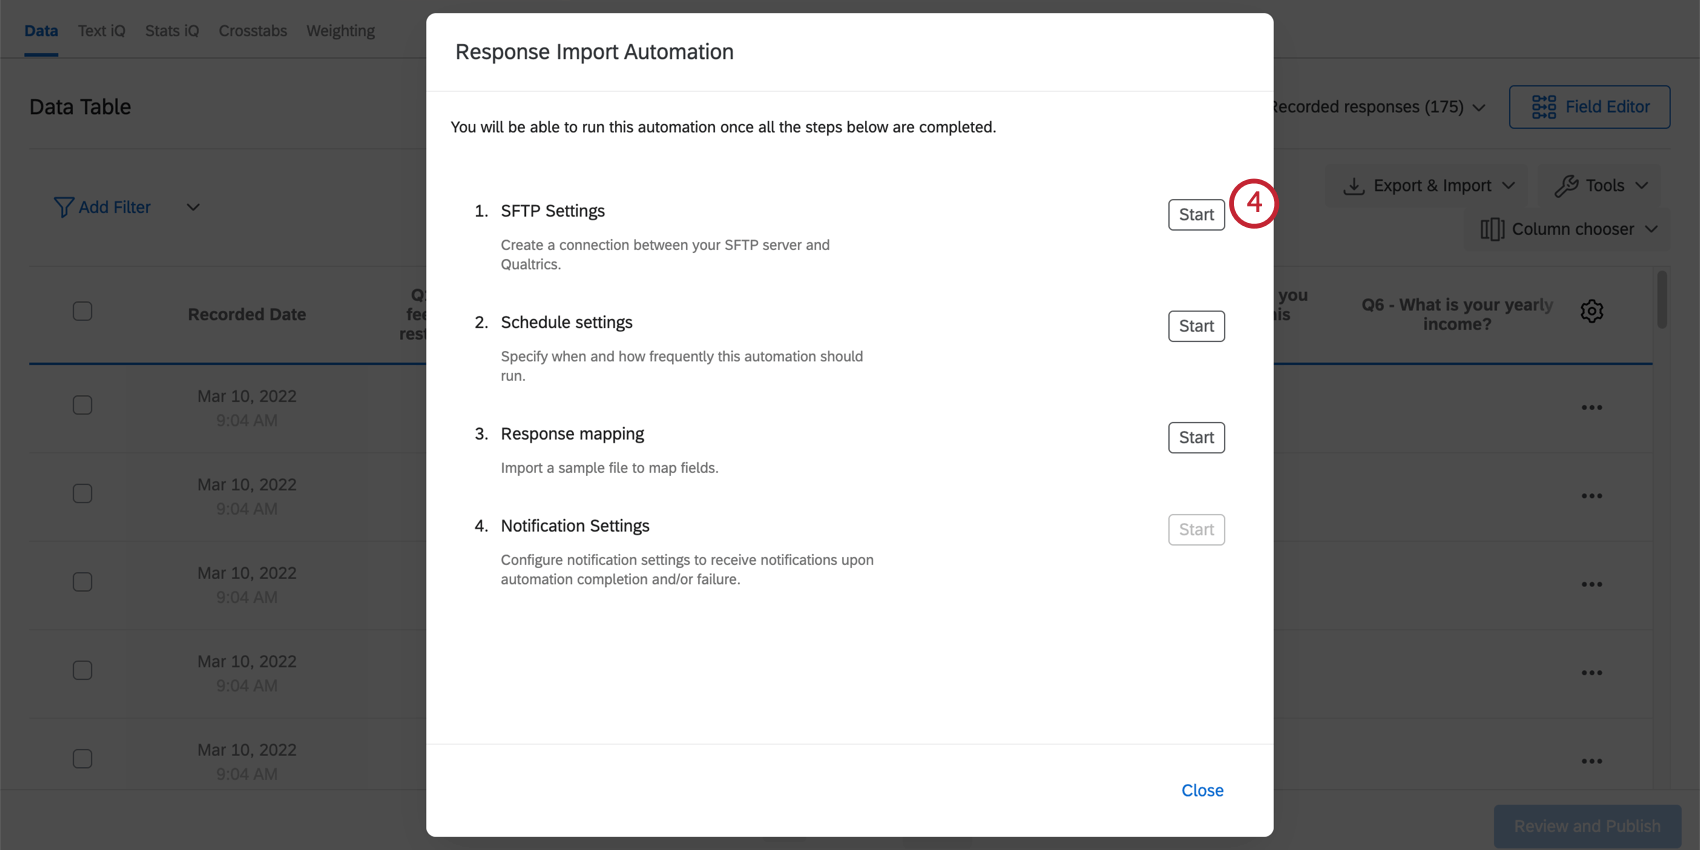
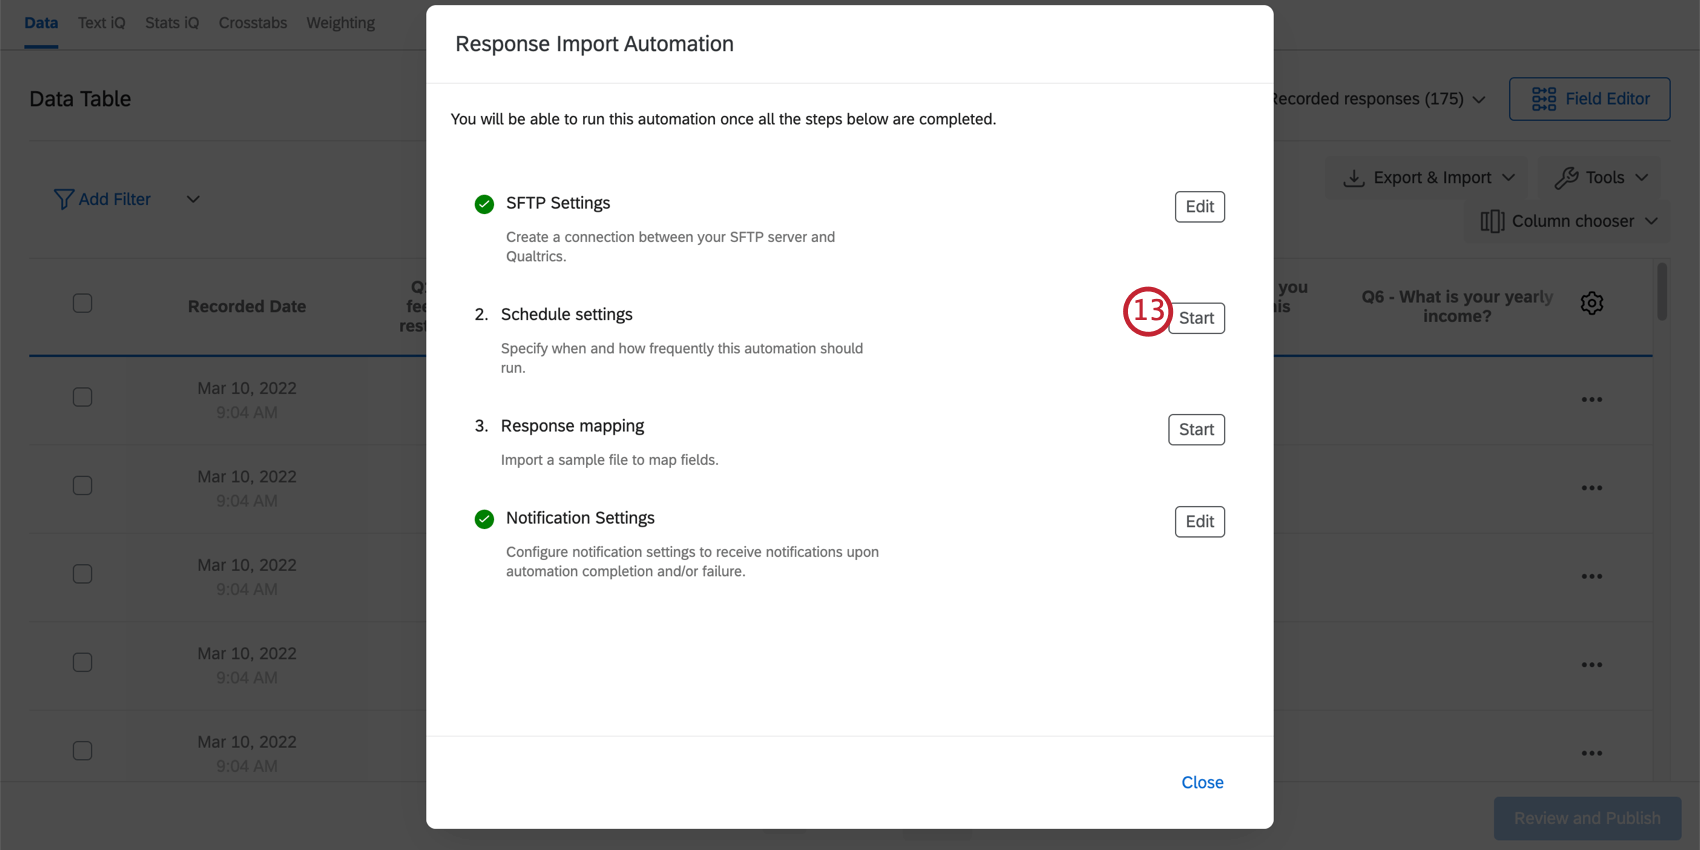
- Click Start next to SFTP Settings.
- Enter the server’s Host name. This is the URL of the SFTP server.
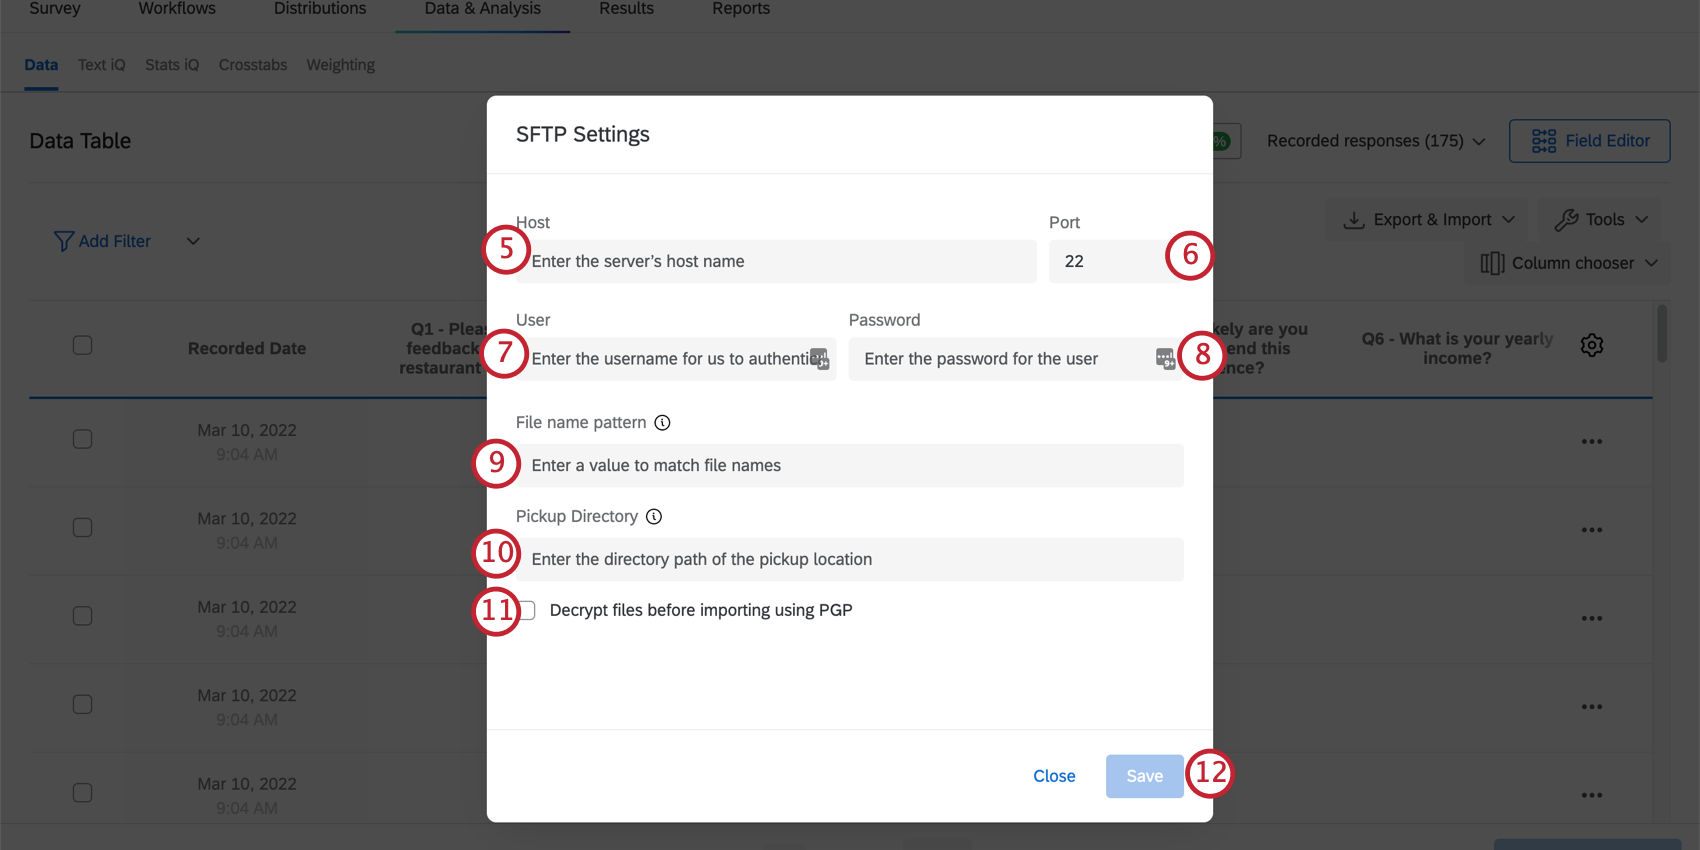 Qtip: The URL usually resembles sftp.example.com.
 - Enter the Port for your server.
- Enter the Username of the user you’ve set up on your SFTP server for Qualtrics to authenticate into.
Qtip: We suggest creating a unique set of credentials for Qualtrics use only.
- Enter the Password of the user.
- Enter the prefix that will identify files to be imported by Qualtrics.
Example: Since SFTP servers can contain many files, we only want to import our survey data file into Qualtrics. We decide to add “Qualtrics” to the beginning of each file name to be imported and enter that as the prefix when setting up the automation. For example, 1 file name could be “Qualtrics_Survey2_Data”. Since the prefix of our file matches the prefix entered here, this file will be imported. Be careful about what files are being imported! Any file in your pickup directory with the specified prefix will be imported.
- Enter the Pickup Directory, or the directory path, of where the file should be located on your SFTP server, e.g., Central Folder/Survey Responses 2020.
Qtip: This directory path is case sensitive. This must be an existing folder, or the automation will fail. The folder path should also be relative to the default directory of the SFTP server.
- If desired, select Decrypt files before importing using PGP. To learn more about this extra means of encryption and data protection, see PGP Encryption.
Qtip: Make sure the files you want to import are encrypted with Qualtrics’ public key before uploading them to your SFTP server. To do this, you may need to talk to your IT team.
- Click Save.
- Click Start next to Schedule settings.
- Choose the Frequency that the automation runs on. You can choose daily, weekly, or monthly.
- If you selected weekly or monthly, you will also need to choose what day of the week or day of the month, respectively, the automation runs on.
- Select the time of day that the automation will run.
Qtip: The time zone is based on your account’s time zone. You can change your time zone in your account settings.
- Click Save.
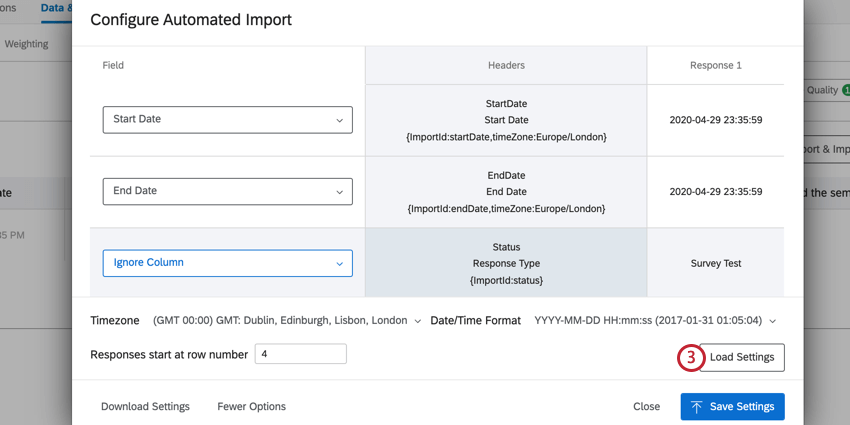
- Click Start next to Response mapping.
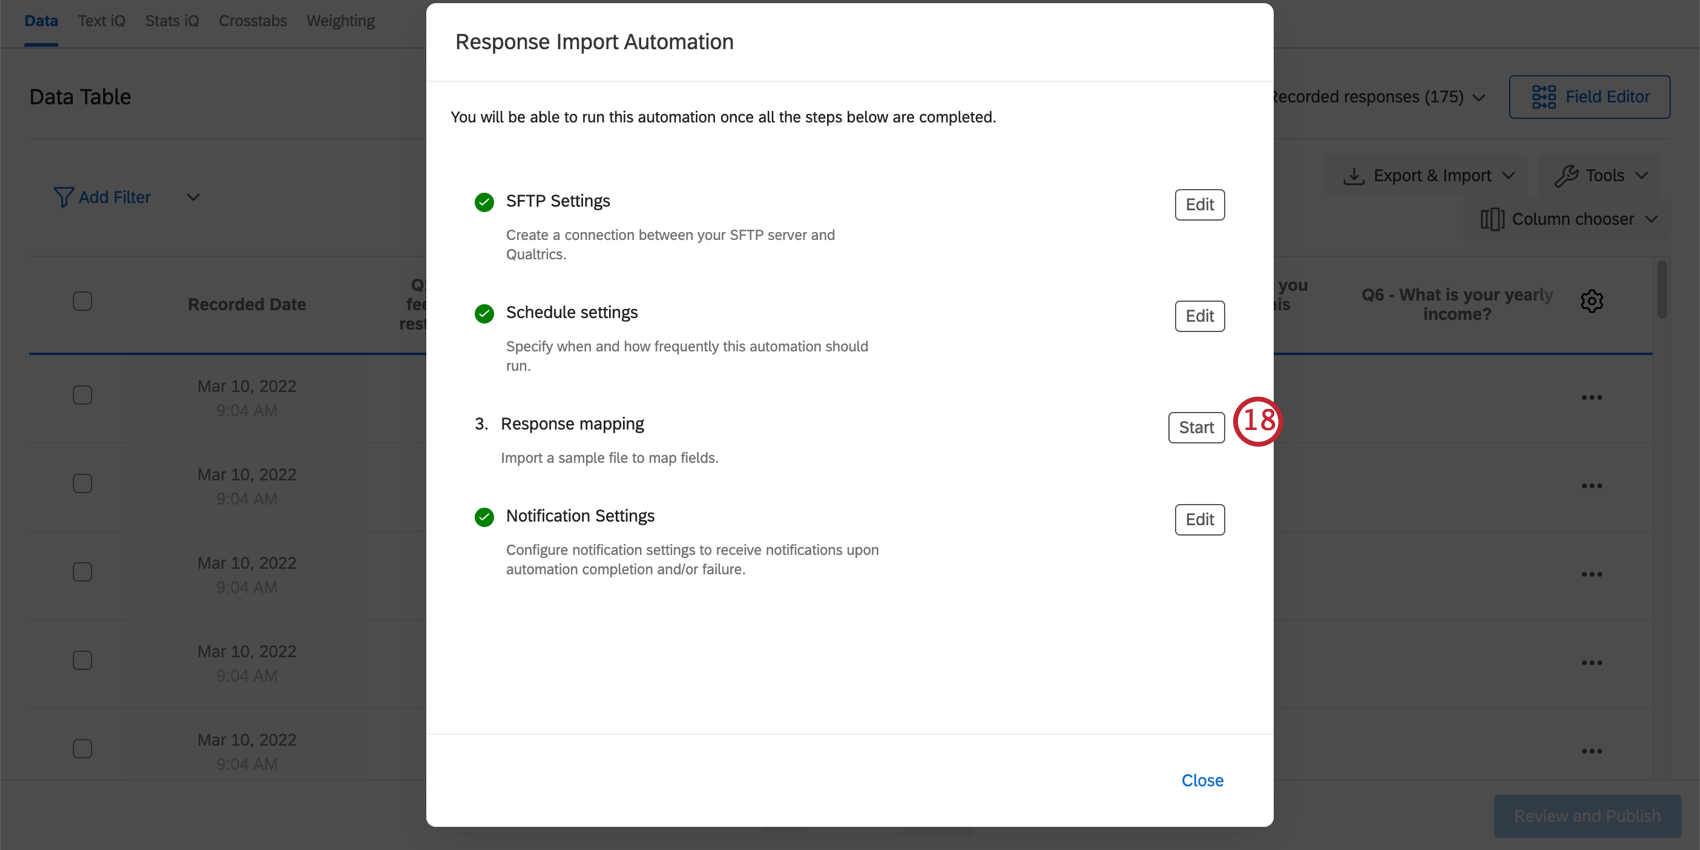
- In this step, you need to upload a sample file that has the same headers and formatting of the files the automation will import. Click Browse to select a file.
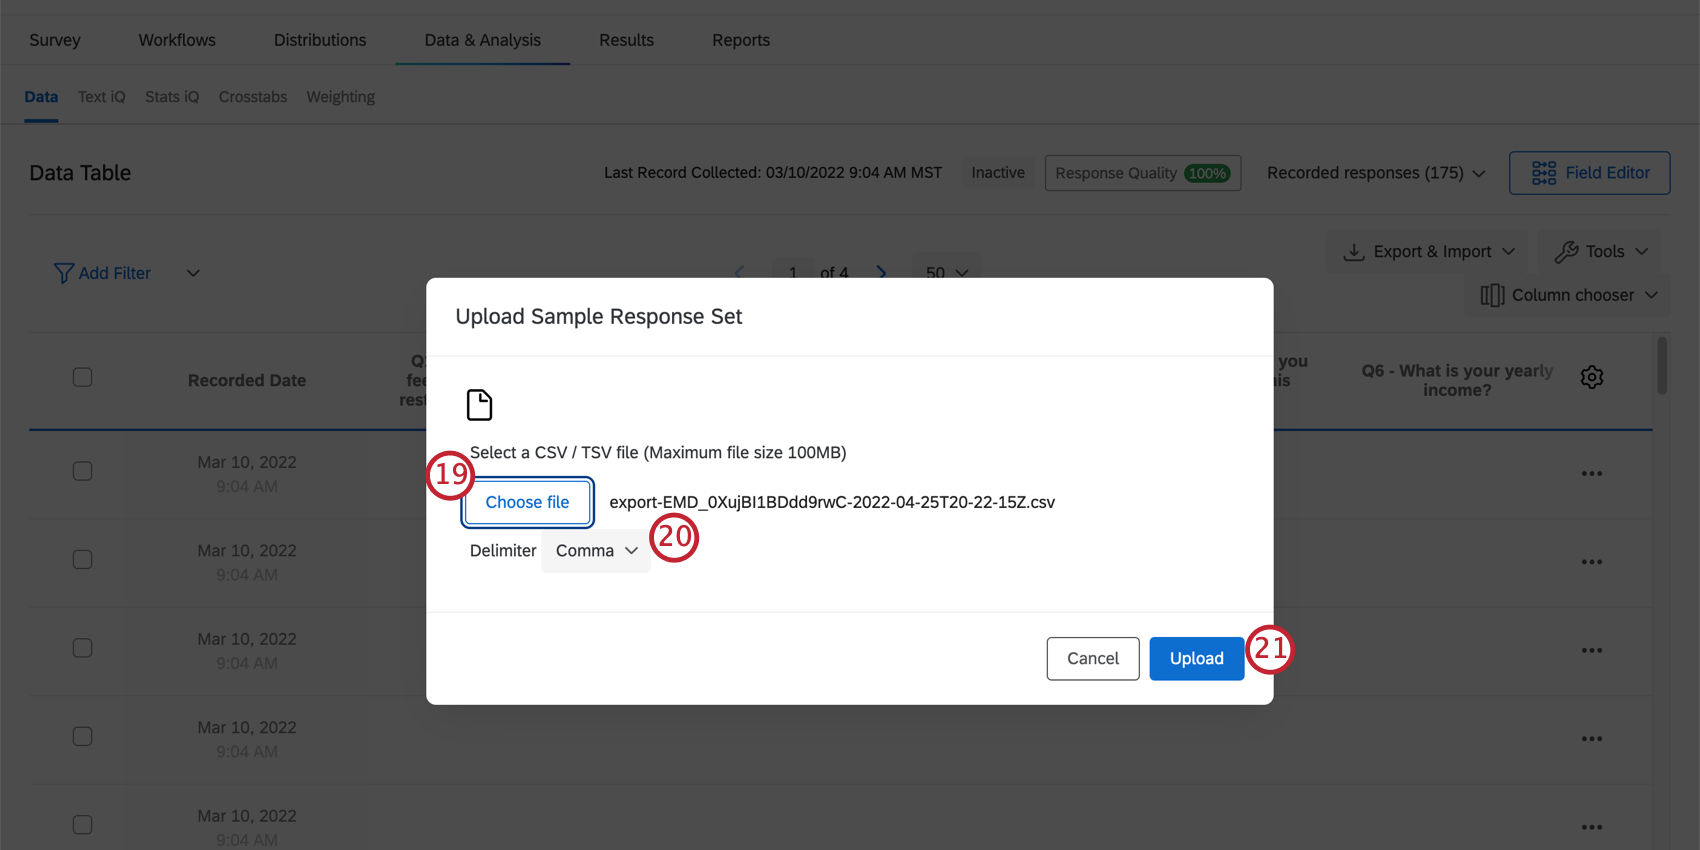 Qtip: Need help making an example file? You can export the data from your survey (make sure to generate at least 1 test response first) and use the exported file as your sample file.
 - Choose your file’s delimiter. Select comma if using a CSV file, or select tab if using a TSV file.
- Click Upload.
- Map the fields from your file to the fields in your survey. For more information on mapping your responses for import, check out Configuring Your Import.
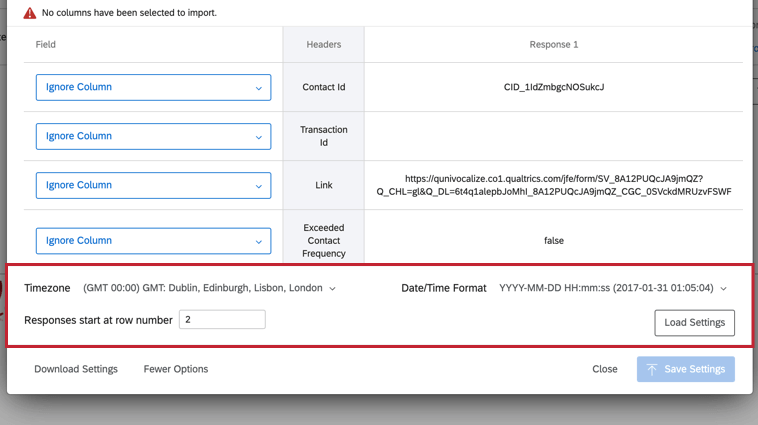
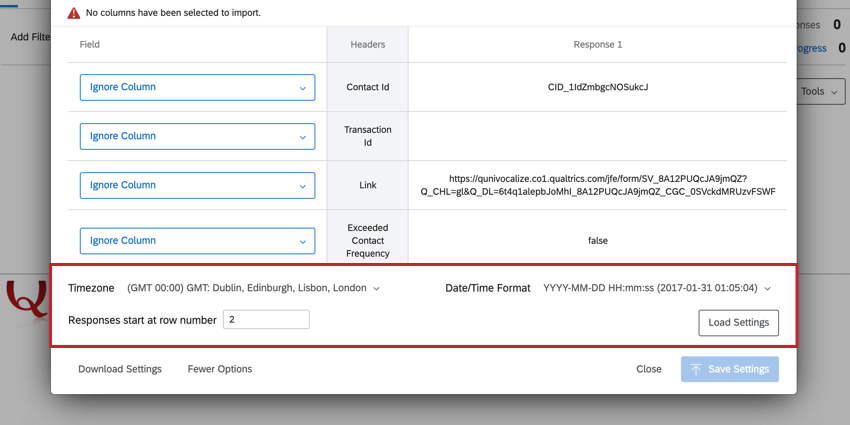
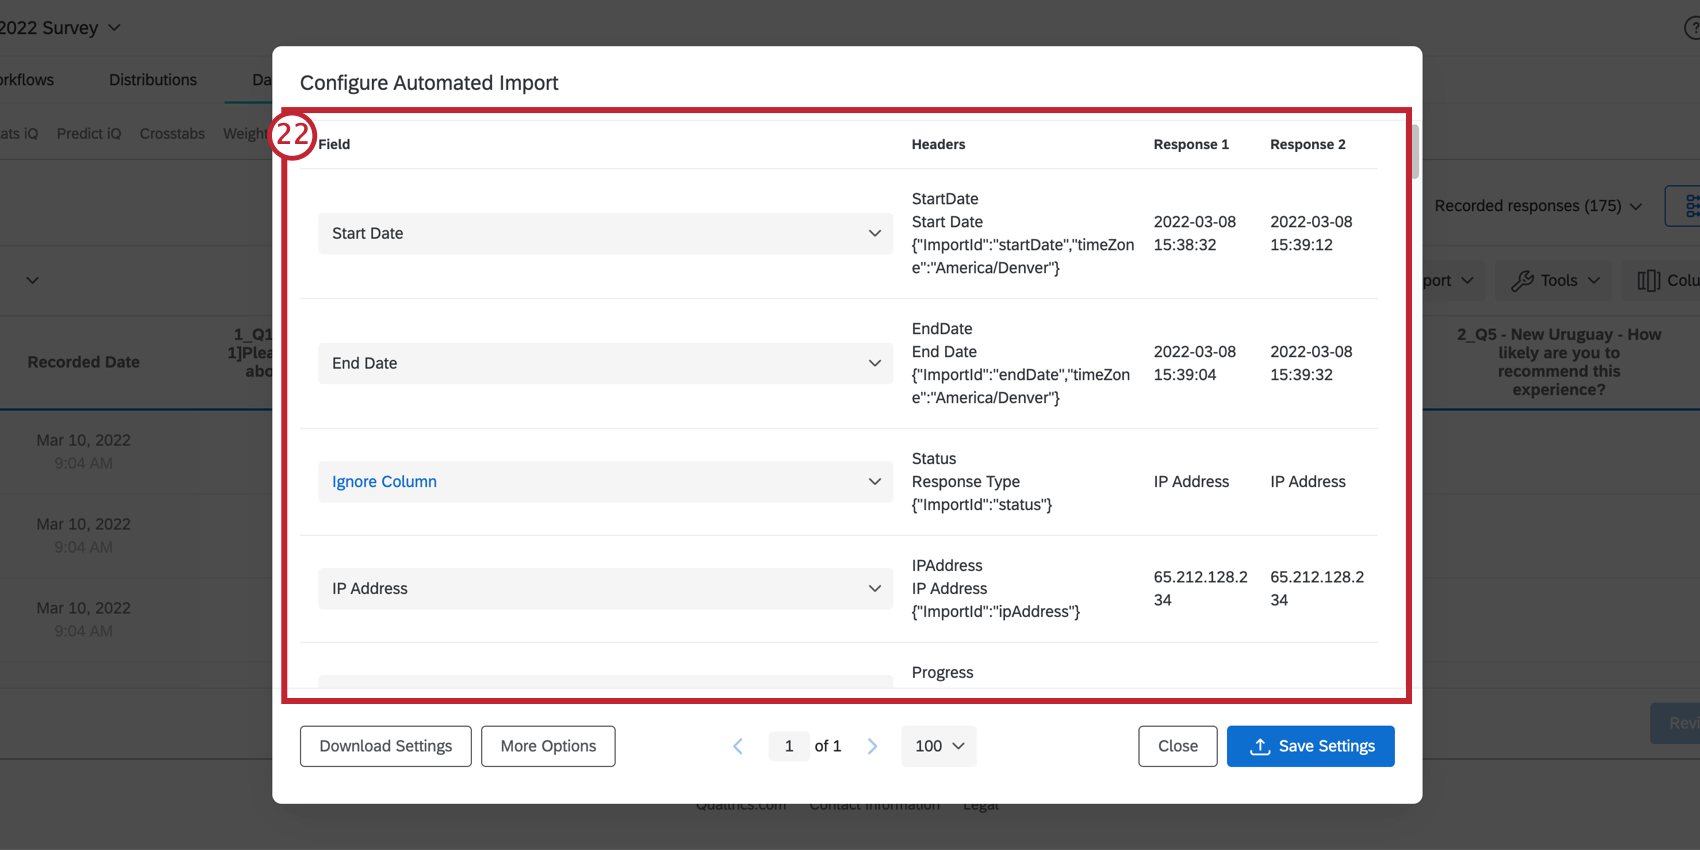 Qtip: If you’re running into trouble importing your file, check out our CSV/TSV Upload Issues page.Qtip: Click More Options to see additional options for the importer. This includes choosing which row in your file the responses start on, selecting the format and time zone of dates, and the saving the import settings so you can reuse them in the future.
- Click Save Settings.
- Click Edit next to Notification Settings.

-
Type an email address to receive an email once the automation completes.
- Give your automation a name.
- Enable the automation. Once enabled, the automation will run per the scheduled settings.
- Click Close.
Reusing Your Response Mapping Settings
You can save and reuse the settings from your response mapping to quickly set up future automations. This is especially useful if you’re running multiple surveys that are similar, or are copying the same survey to use multiple times.
- After mapping your responses, click Download Settings in the response mapping window. Do not modify the downloaded file in any way.

- To import your settings, click More Options in the response mapping window.
- Click Load Settings and then select the settings file on your computer.
Editing Automations
- Make sure you’re in the Data section of the Data & Analysis tab of your survey.

- Click Export & Import.
- Choose the automation you’d like to edit.
- Click Edit next to the settings you want to change and make any associated edits.
Pausing & Deleting Automations
- Make sure you’re in the Data section of the Data & Analysis tab of your survey.
- Click Export & Import.
- Choose the automation you’d like to pause or delete.
- Temporarily pause the automation by disabling the Enable automation option.
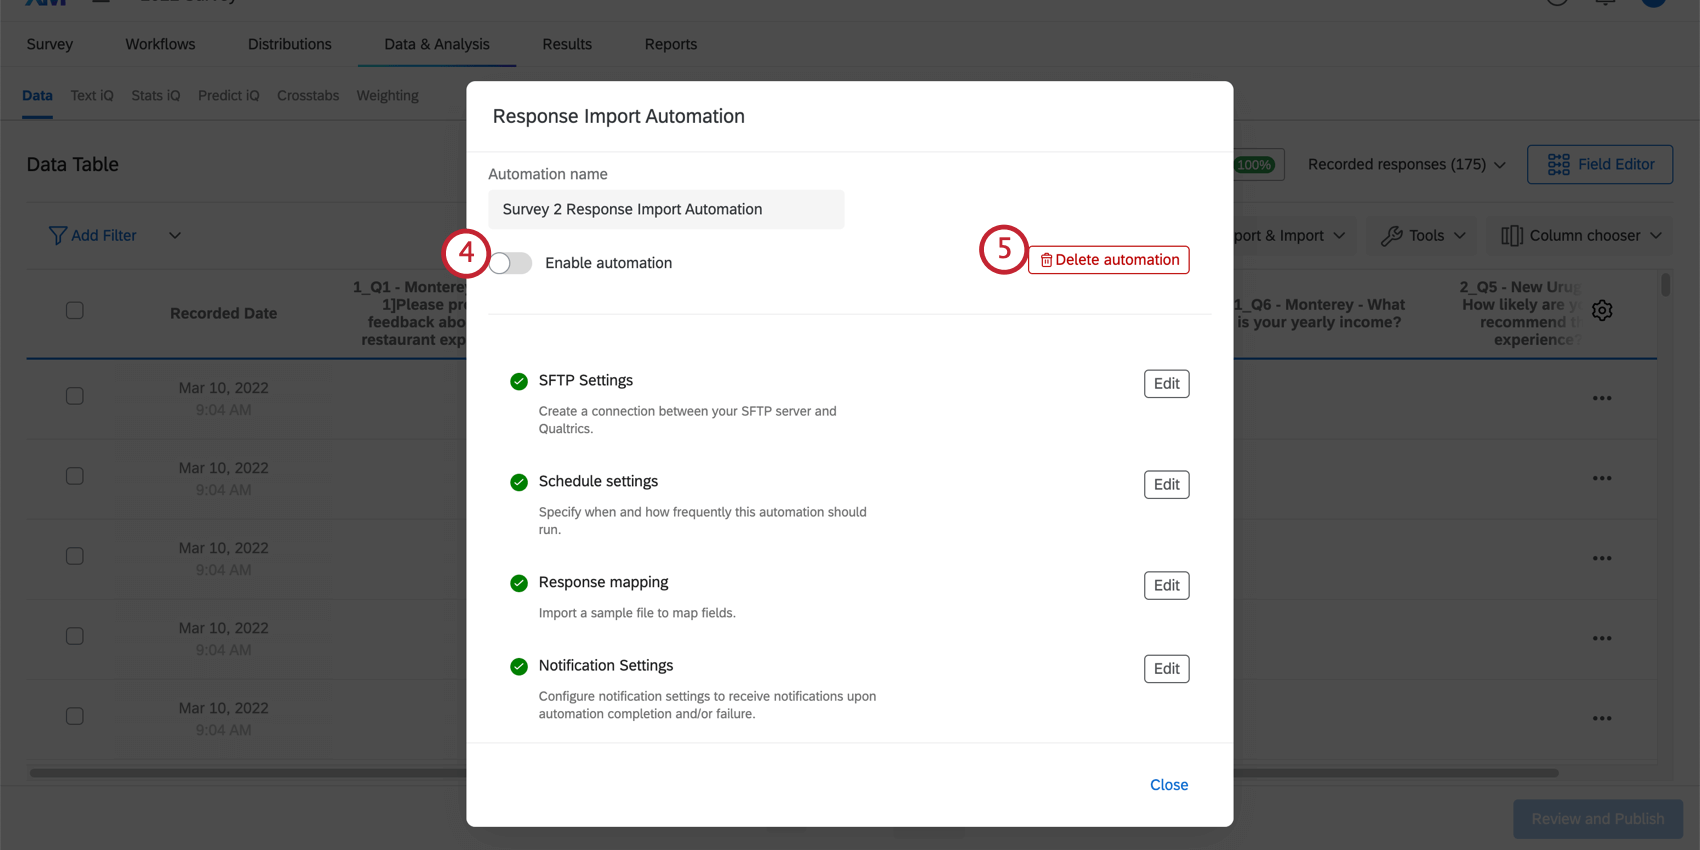
- Click Delete automation to permanently delete the automation. You’ll be asked to confirm the deletion before the automation is deleted.
Viewing Automation Run History
The Run History of your automations contains information about each time your automation executed. You can view a specific automation run to see more details about it.
- Make sure you’re in the Data section of the Data & Analysis tab of your survey.
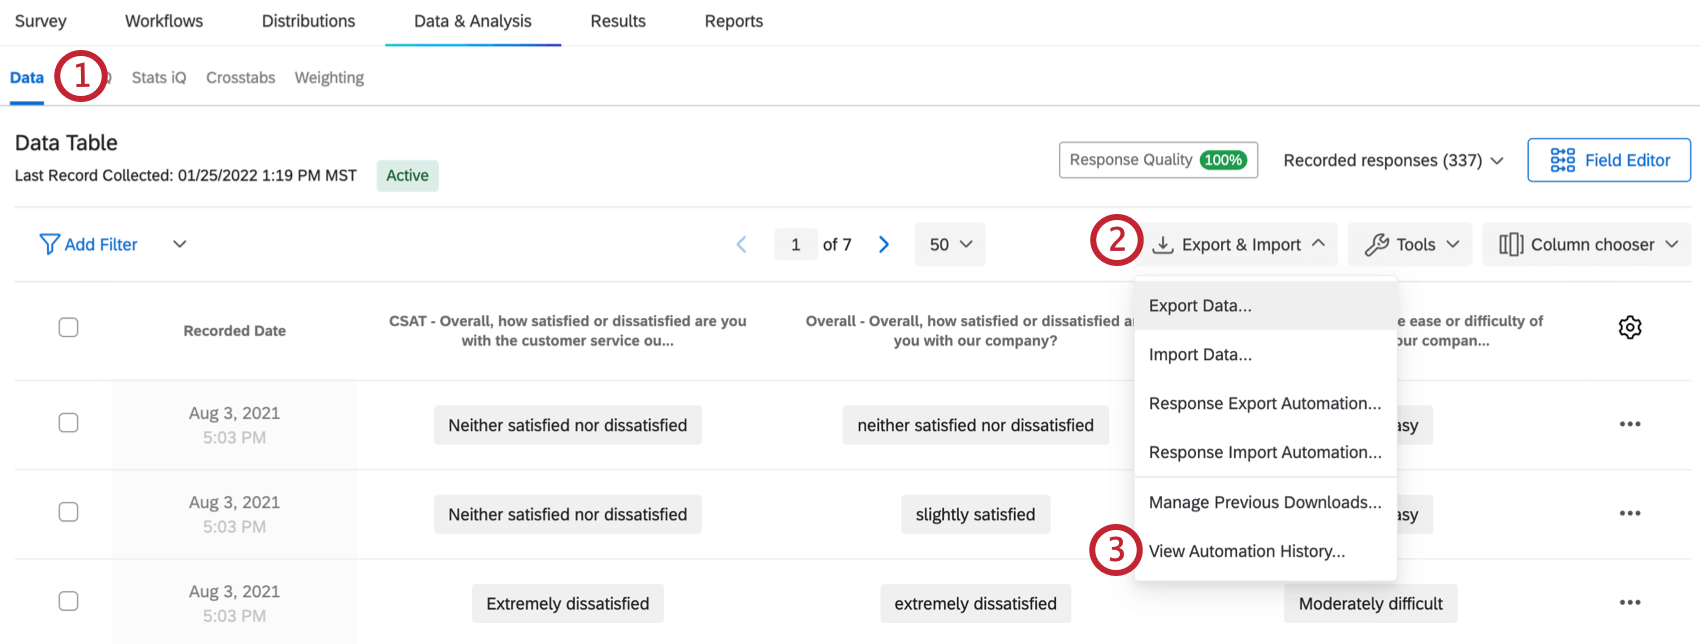
- Click Export & Import.
- Choose View Automation History.
You’ll see a table with information about the Name, Status, and Completion Time of each automation run, along with the ability to View more information about the run.
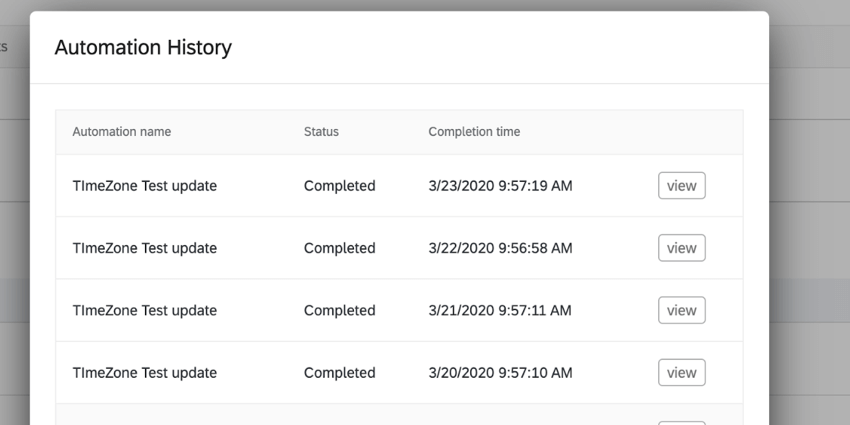
- Automation name: This is the name of automation that was completed.
- Status: This indicates the status of the automation. Values include
- Complete: The automation was completed.
- Failed: The automation attempted to run but failed and could not complete.
- Timed Out: The automation timed out. Oftentimes this means the Qualtrics server didn’t receive a response from the server. Automations that time out are retried 5 times with each attempt happening every 5 minutes. If the automation continues to time out after retrying, it will fail.
- Completion Time: The time and date that the automation was completed.
Click View on an individual entry to see more information about that automation run.
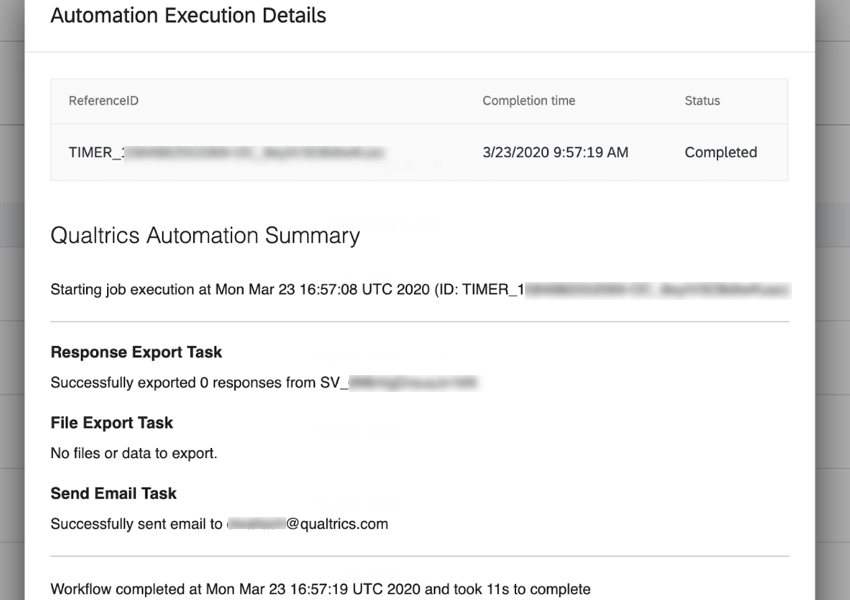
This window shows you various pieces of information about the run including how long it took to complete, how many responses were exported, the name of the file that was exported, and who received the confirmation email for the automation.
If your automation fails or times out, this window is particularly useful for troubleshooting why the automation could not complete.
Troubleshooting Response Import & Export Automations
If your automation fails, the first thing you should do is look at the Run History of your automation to see if there is a specific error message explaining why the automation failed. If you’re running into trouble getting your automation to run successfully, try the following:
- Ensure the URL you entered for the SFTP server is a valid SFTP host and can be reached at the specified port.
- Ensure the username and password credentials are valid.
- Ensure the SFTP server is not behind a firewall or that the appropriate Qualtrics IP addresses are allowlisted.
Qtip: If your account is within our FedRAMP environment, the IP addresses for allowlisting differ from those found on the linked page. To securely access your IP address information, please login to your FedRAMP Customer Success Hub.
- Ensure the SFTP server is configured to use one of our supported encryption ciphers.
- Ensure that Qualtrics is allowed to execute commands on your SFTP server. Specifically, the SFTP user you set up for Qualtrics needs to have the cp and ls permissions on your SFTP server.
- See SFTP Troubleshooting for additional tips.
If you follow these steps and are still running into trouble with your automation, contact Qualtrics Support.
Response Automations in Different Project Types
Response import and export automations are available in a few different types of projects. The steps and options described on this page apply to the following project types:
Although you can technically set up these automations in Conjoint and MaxDiff projects, we do not recommend doing this. You cannot import conjoint and MaxDiff-specific data, only extra survey questions, like demographics and screeners.
Imported data projects are not compatible with response automations.
Supported Ciphers
Connecting to an SFTP server requires a series of SSH handshakes to coordinate the encryption used between the server and the automation. In order to establish a connection, the SFTP server will need to have at least one cipher for each cipher type that matches a cipher supported by automations. Below is the list of ciphers supported by automations grouped by the cipher type.
Supported Key Exchange Ciphers:
- curve25519-sha256@libssh.org
- diffie-hellman-group14-sha1
- diffie-hellman-group1-sha1
- diffie-hellman-group-exchange-sha256
- ecdh-sha2-nistp256
- ecdh-sha2-nistp384
- ecdh-sha2-nistp521
Supported Mac Ciphers:
- hmac-sha2-256
- hmac-sha2-512
Supported Encryption Ciphers:
- aes128-ctr
- aes192-ctr
- aes256-ctr
- aes128-cbc
- Arcfour256
- Arcfour128
- Arcfour
- 3des-cbc
Supported Cipher Suites:
- chacha20-poly1305@openssh.com: Chacha20 is a symmetric encryption algorithm, while Poly1305 is an authenticating cipher.
- aes128-gcm@openssh.com: Advanced Encryption Standard (AES) with a 128-bit key using the Galois/Counter Mode (GCM).
If the SFTP server does not support the appropriate ciphers, we recommend using one of the other import sources presented on this page.