
Piped Text
What's on this page
About Piped Text
With piped text, you can customize question and answer choice wording for each respondent, allowing each of them to have a customized, dynamic, and personal survey experience. Piped text is a line of code you add to your survey that pulls information from different sources and displays that information to the respondent (or can be used in display logic, embedded data, and other areas).
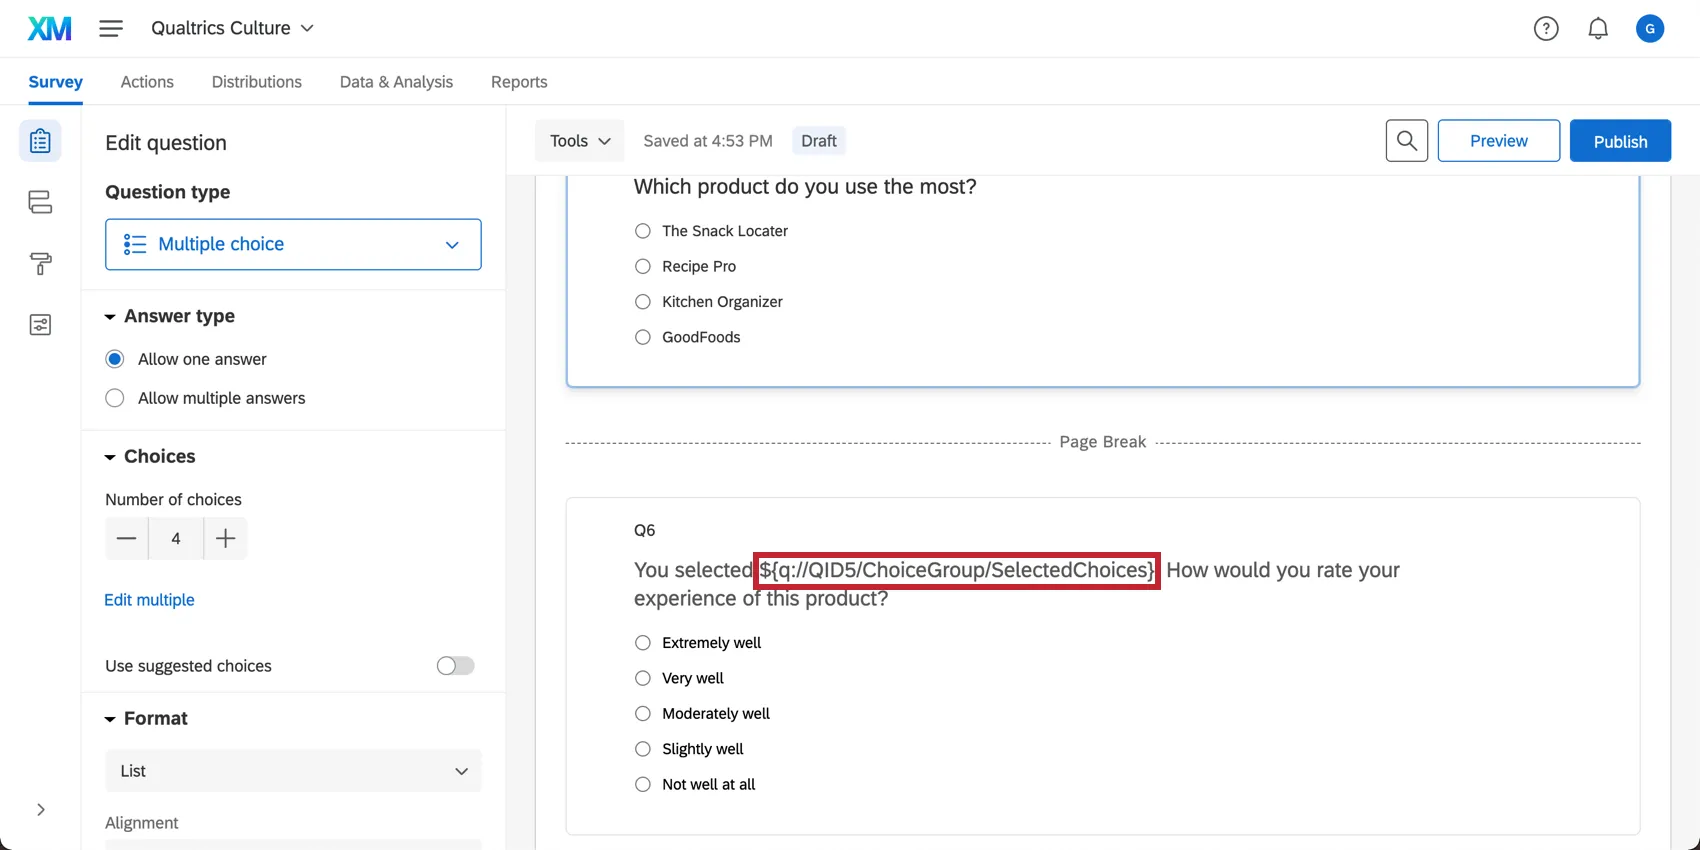
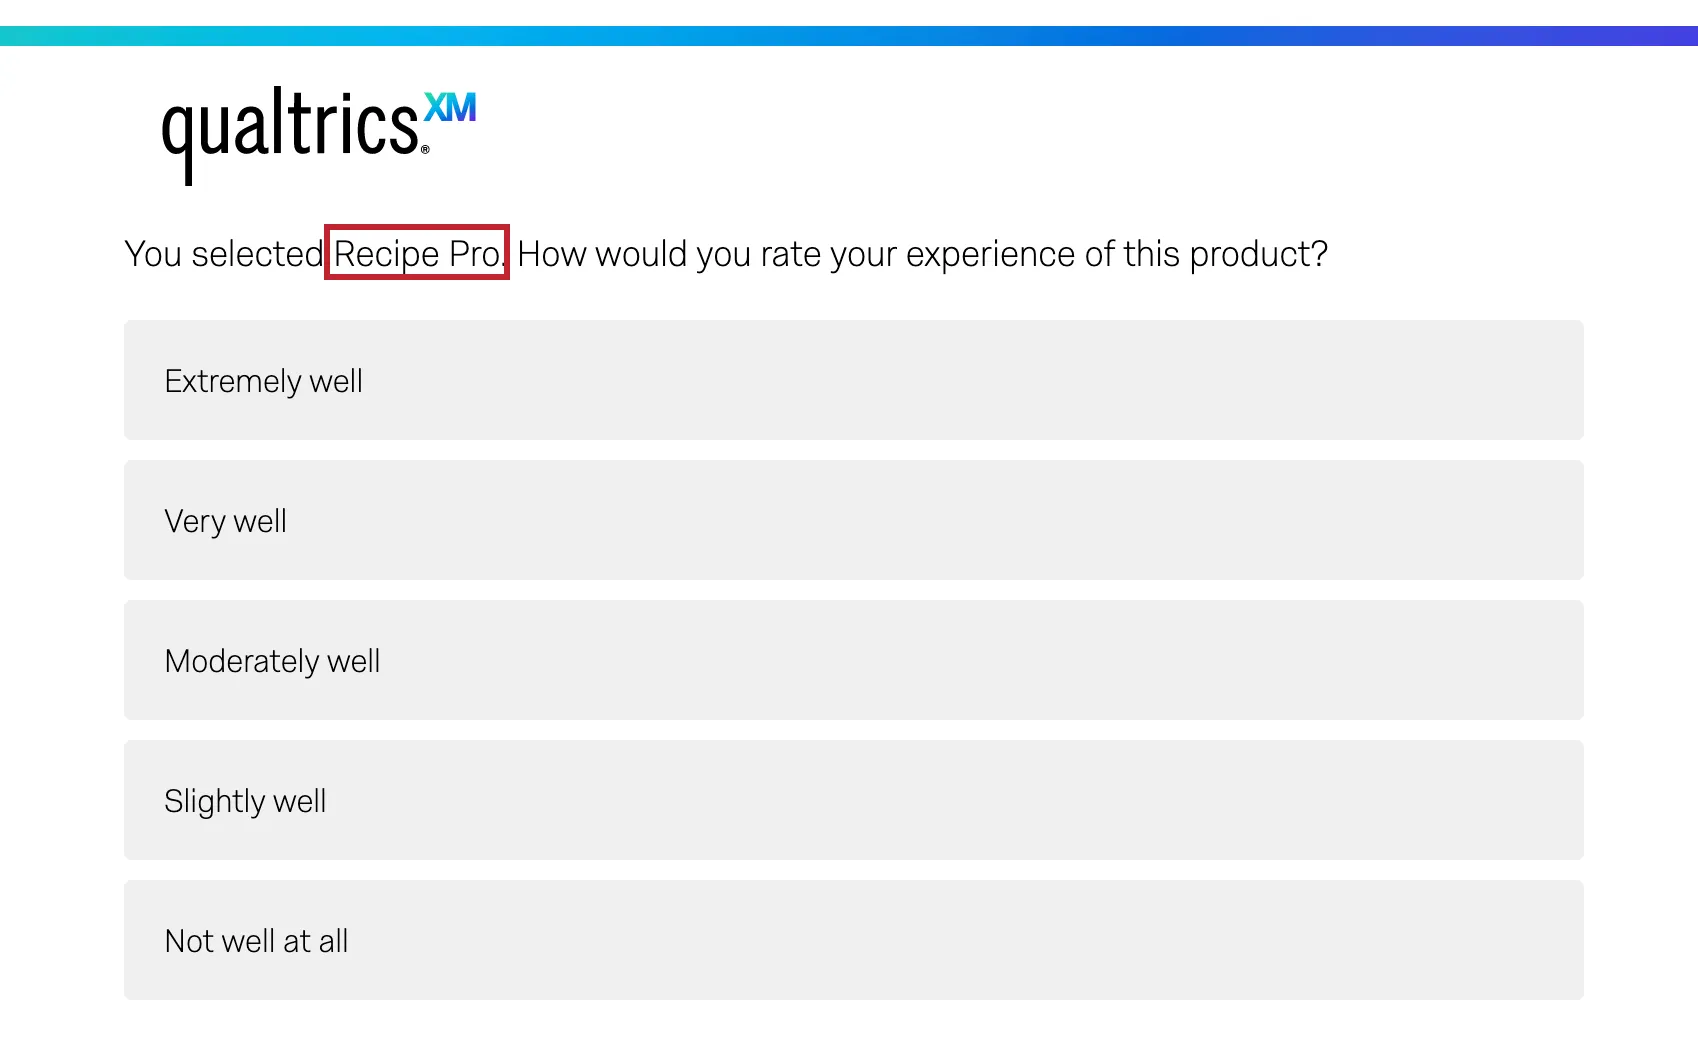
Example: After asking about a respondent’s preferred product, you can pull their selected answer into a follow up question and have it displayed in the question text.
Though piped text appears as a line of code in your survey editor, when respondents take the survey, this code will be replaced with the specified content.
Accessing the Piped Text Menu
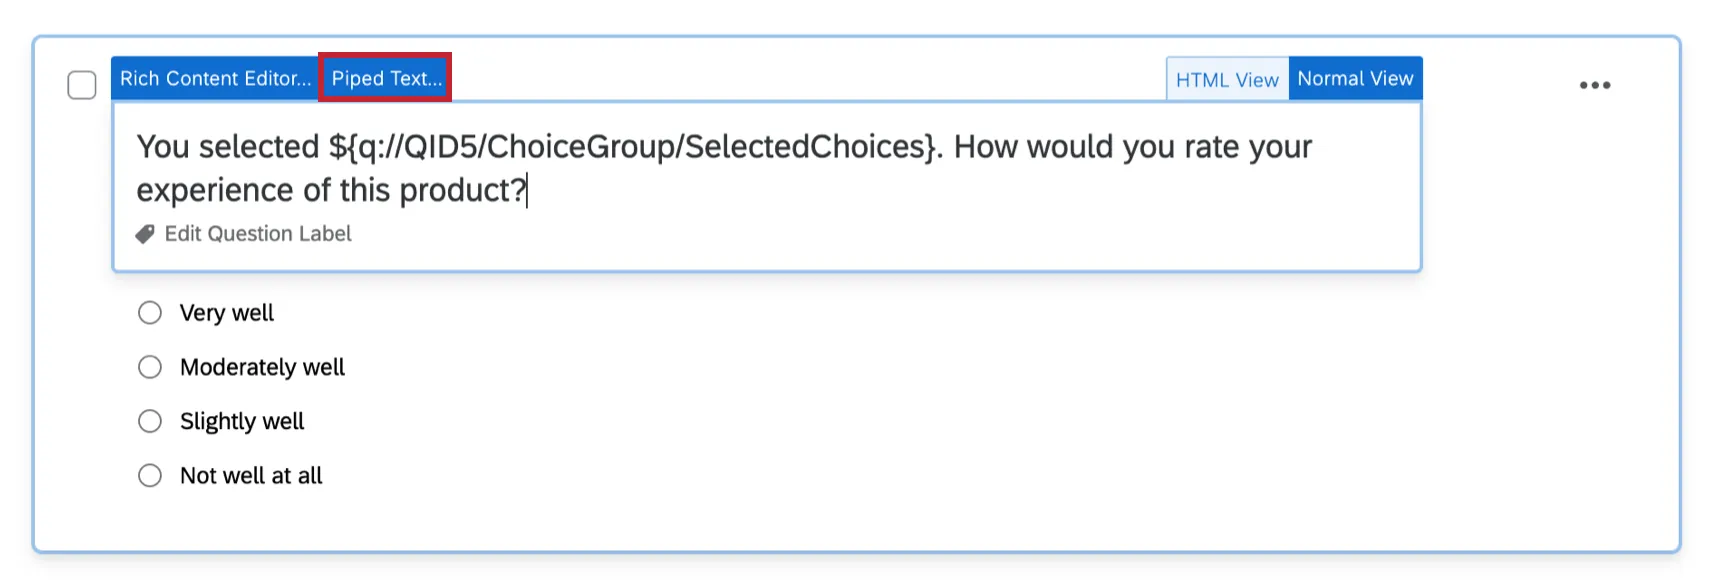
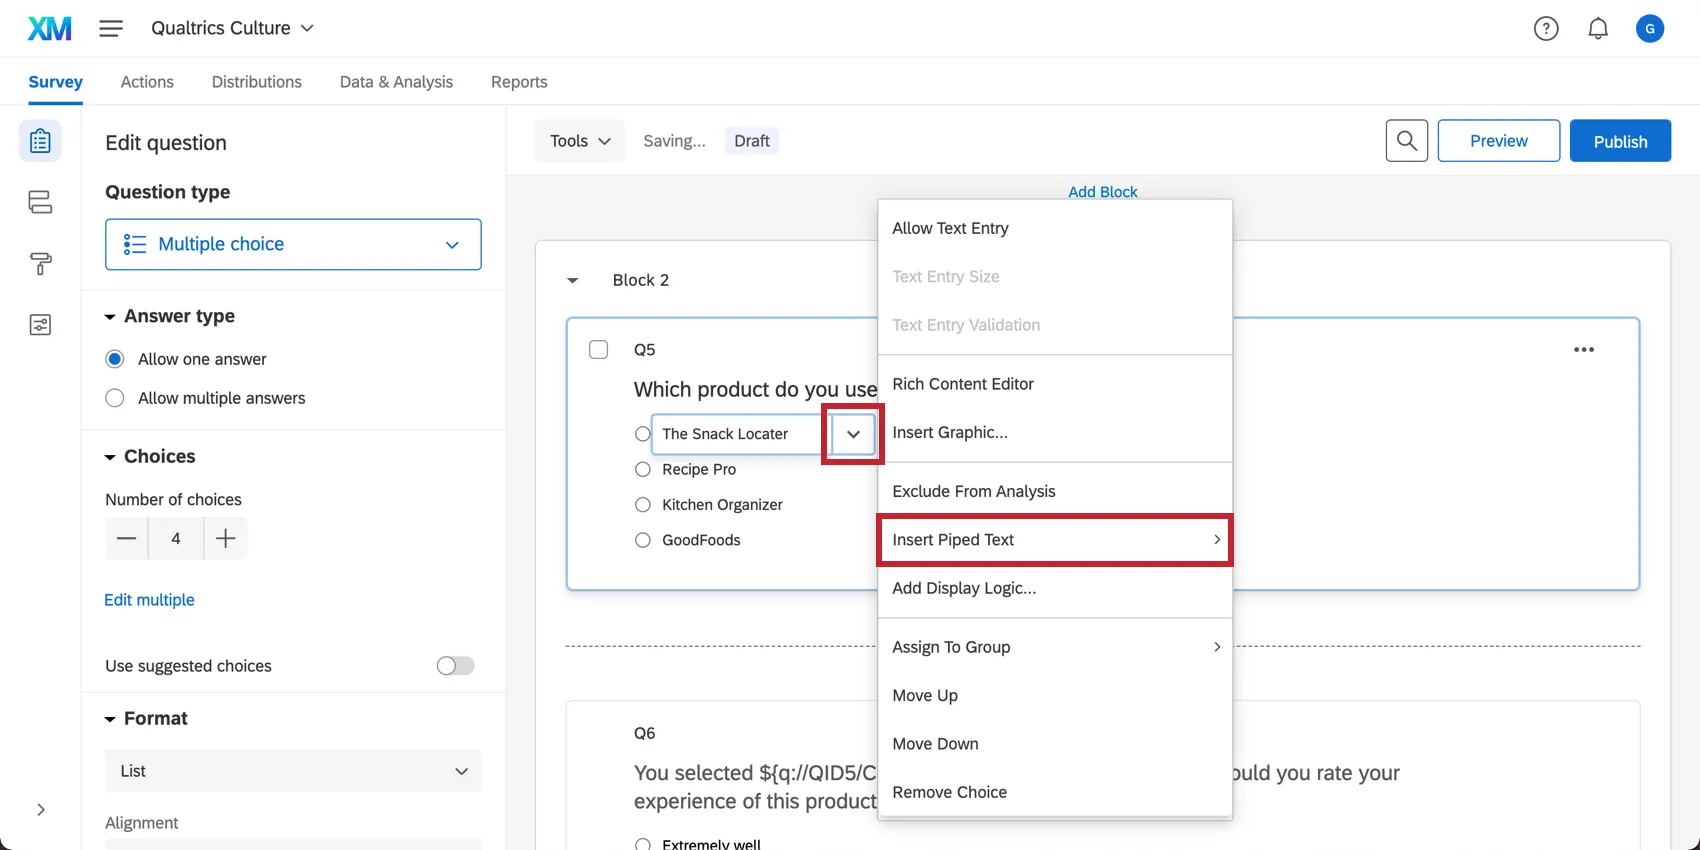
Piped text is generated using the Piped Text menu. This menu is found in many different places throughout Qualtrics.
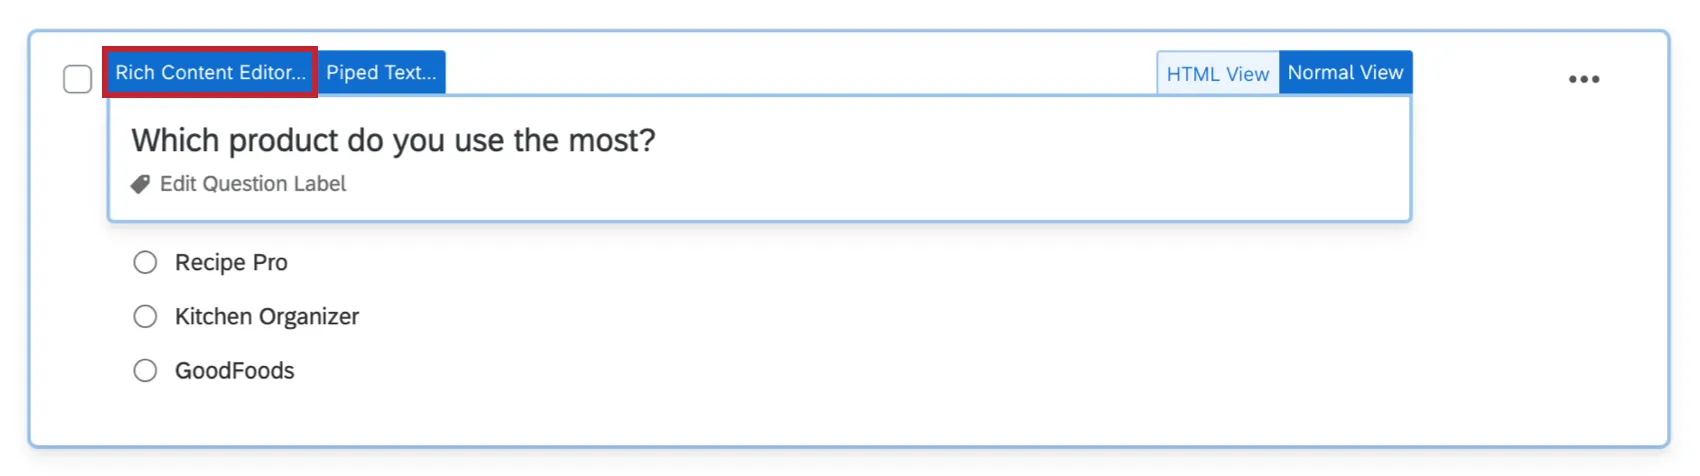
- Questions: Click the question text and click the blue Piped Text button.
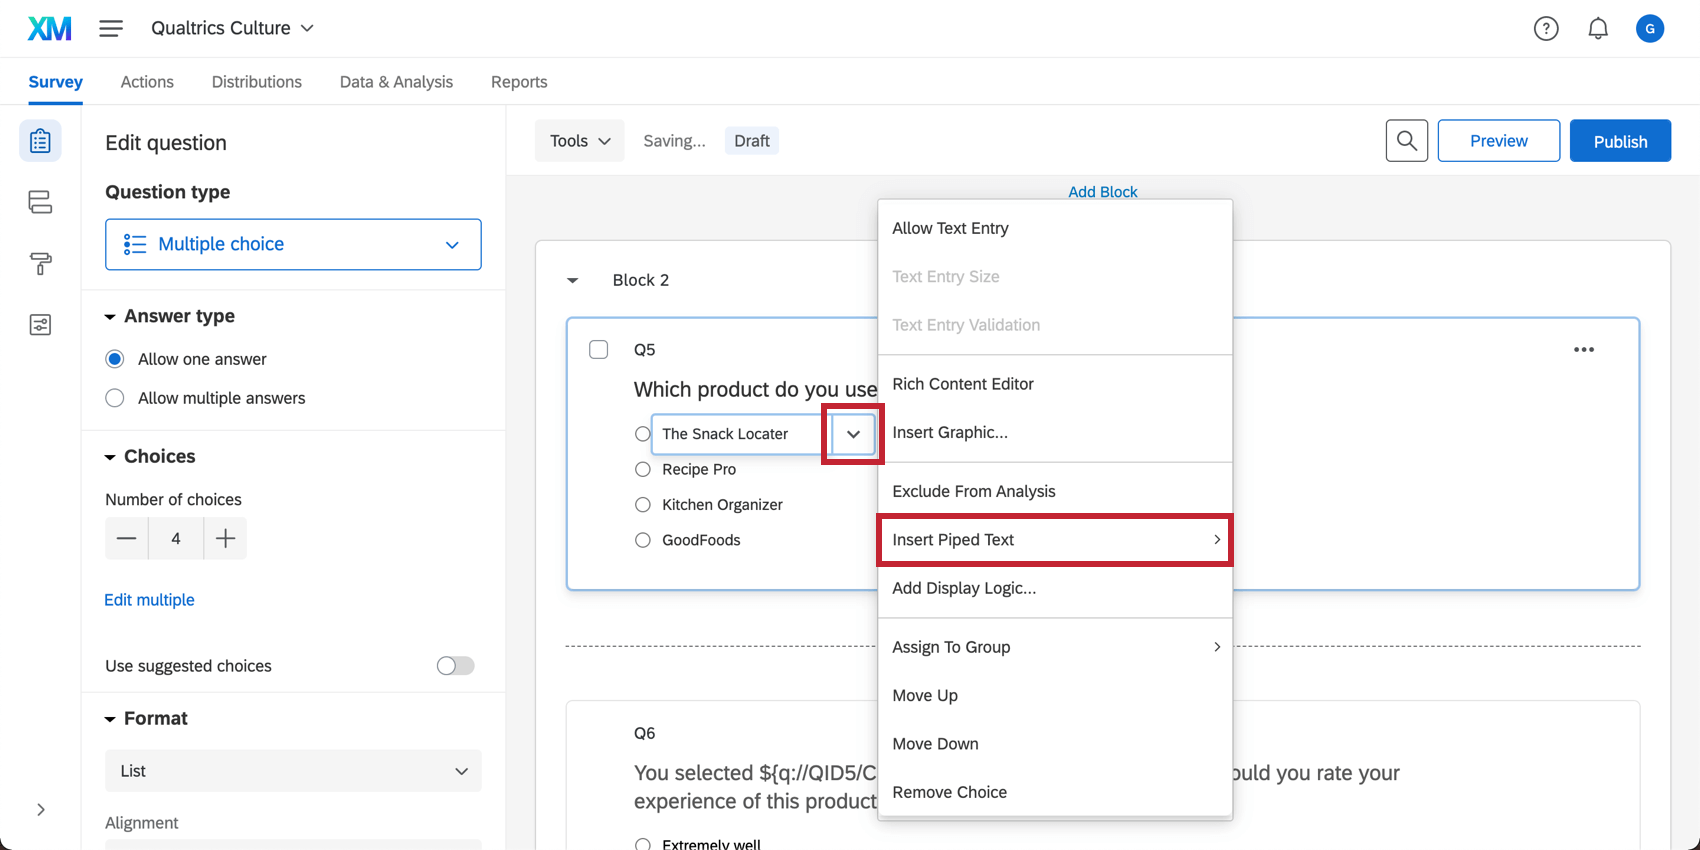
- Answer Choices: Click the answer choice text, then click the blue dropdown menu and select Insert Piped Text.
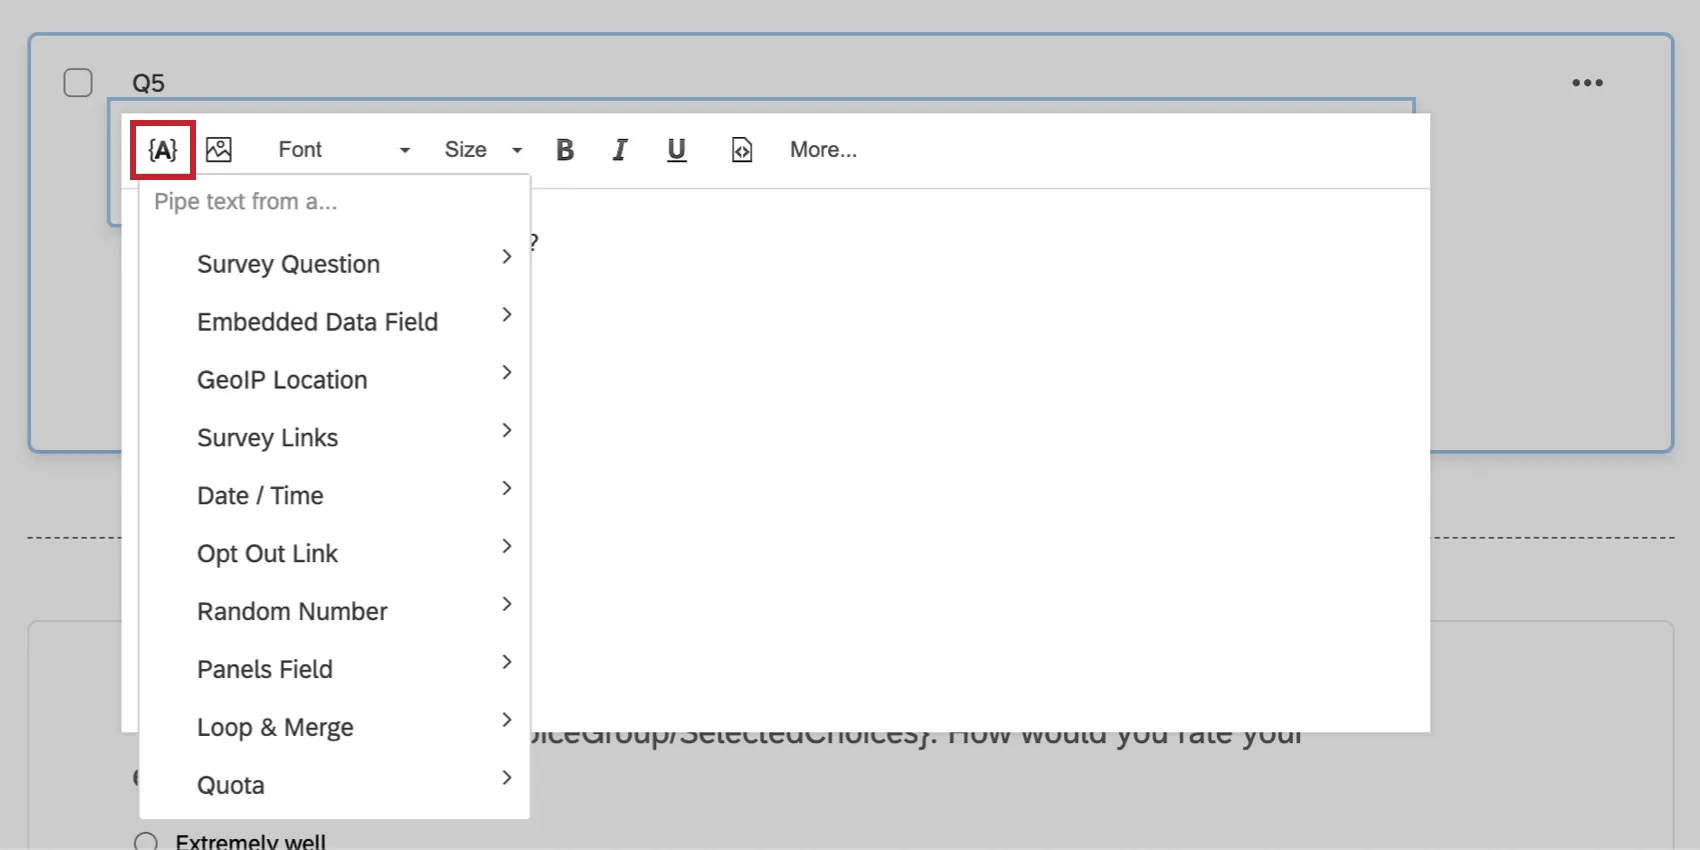
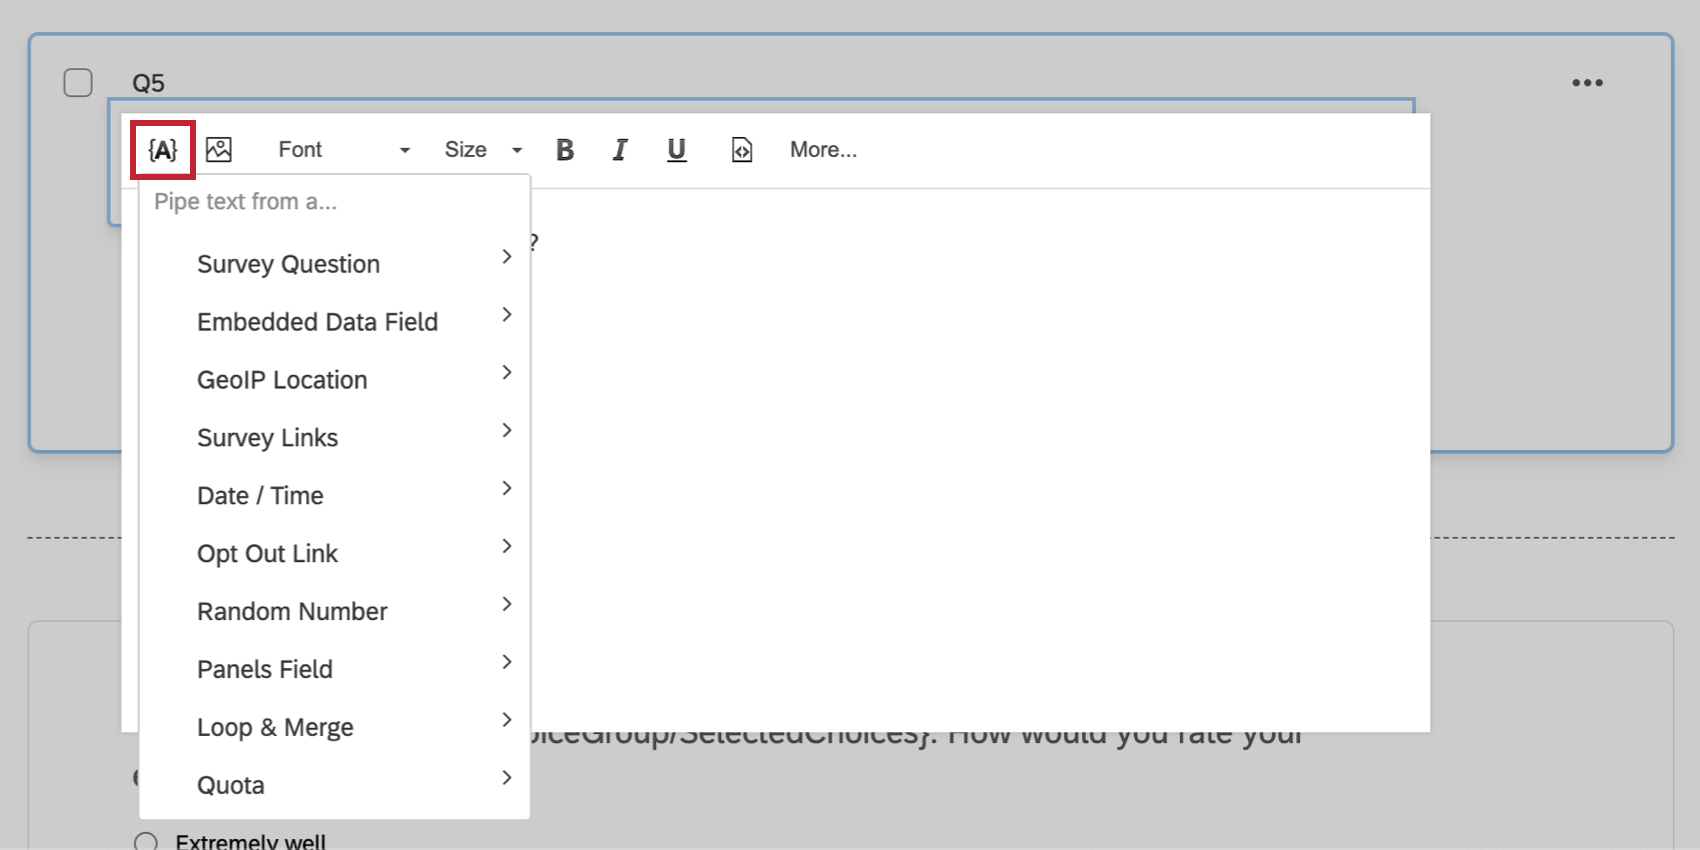
- Rich Content Editor: Click the {A} icon in the rich content editor located in many places throughout Qualtrics, such as when editing a question, writing an email, or creating other survey messages.
- Embedded Data: When adding embedded data to the survey flow, click Set a Value Now, then click the blue dropdown menu and select Insert Piped Text.


Qtip: If you’d like to use piped text in an area that does not have the piped text menu, simply generate the piped text in one of the above areas and then copy and paste the code into the desired location. For example, while you may need to set custom validation equal to a piped text value, you will need to generate this piped text in another location.
Generating Piped Text
Qtip: Using the rich content editor, you can style the piped text code with all the options available for regular text, such as bolding and italicizing.
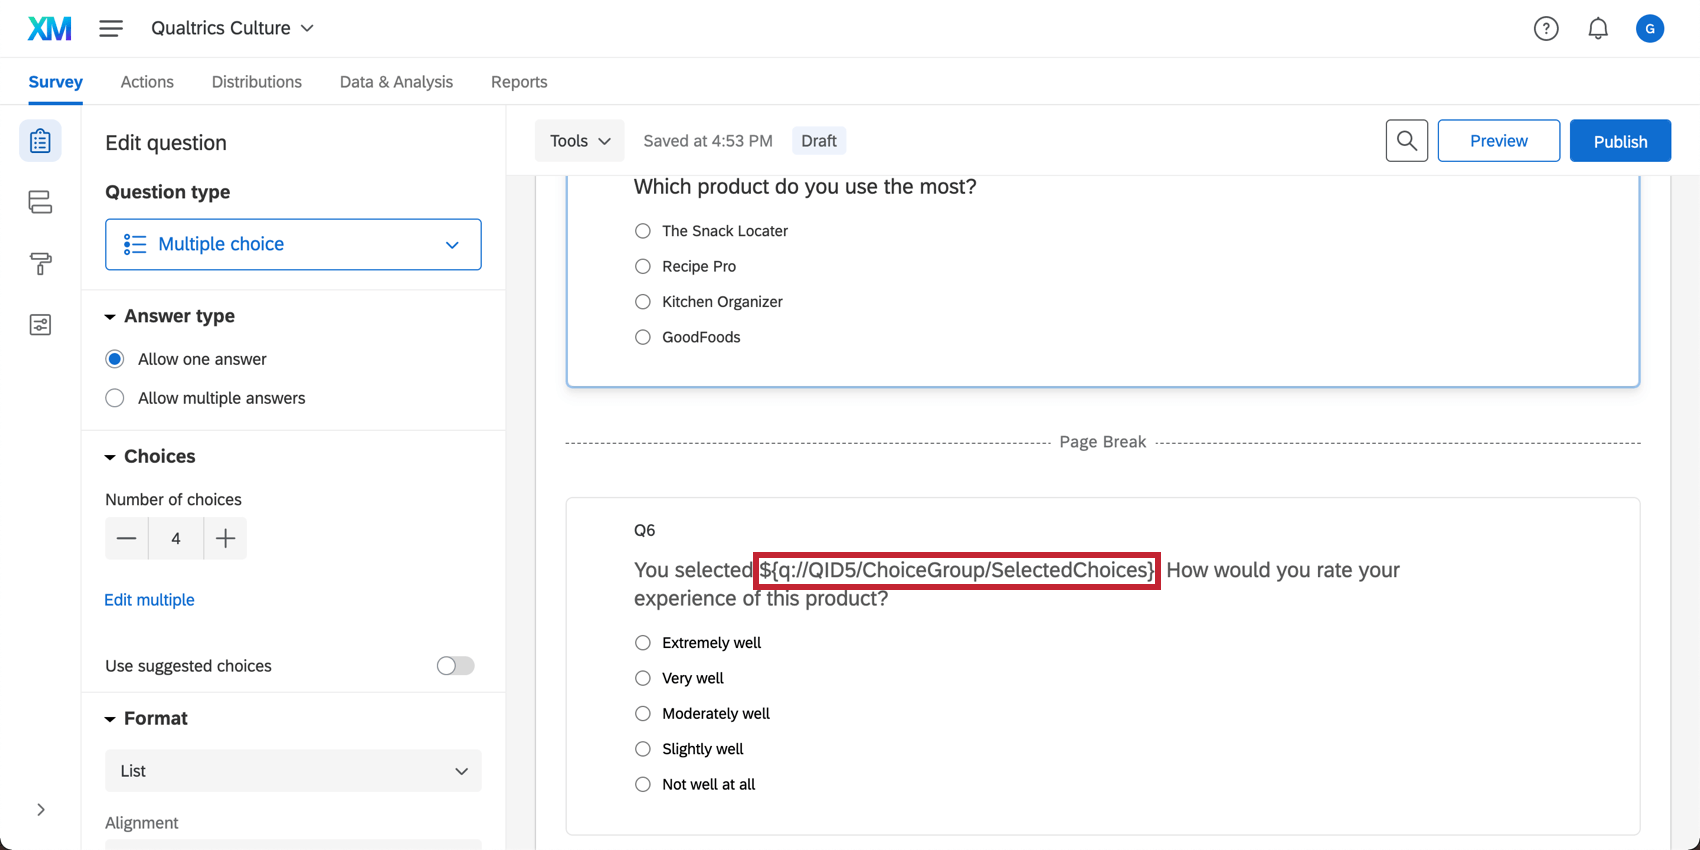
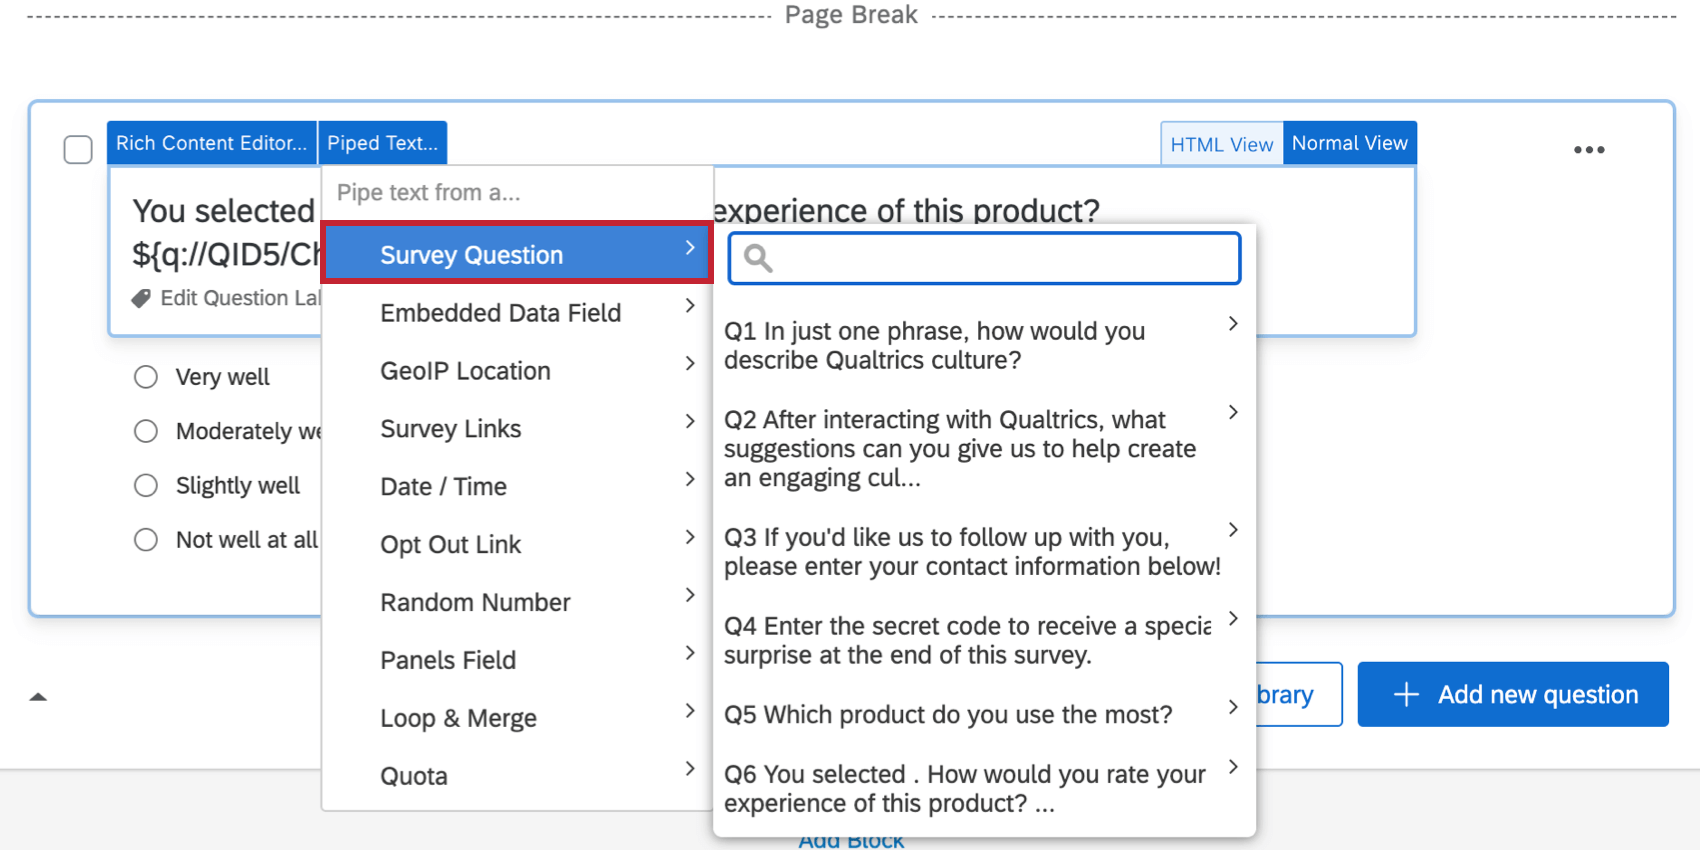
Piping from a Previous Question
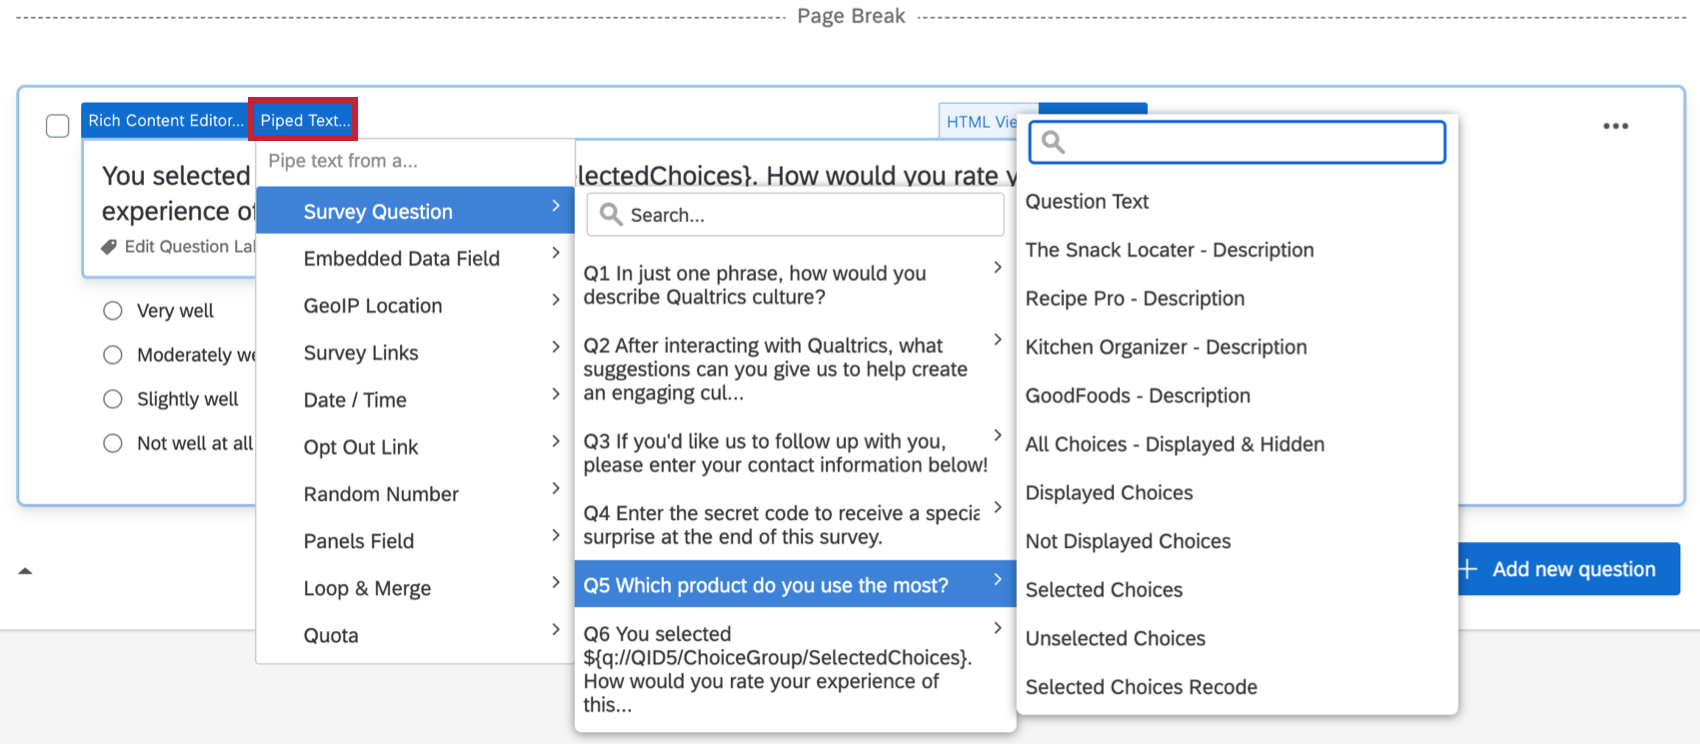
The Survey Question category in the piped text list allows you to pipe information such as the question’s text, a selected answer choice, and more.

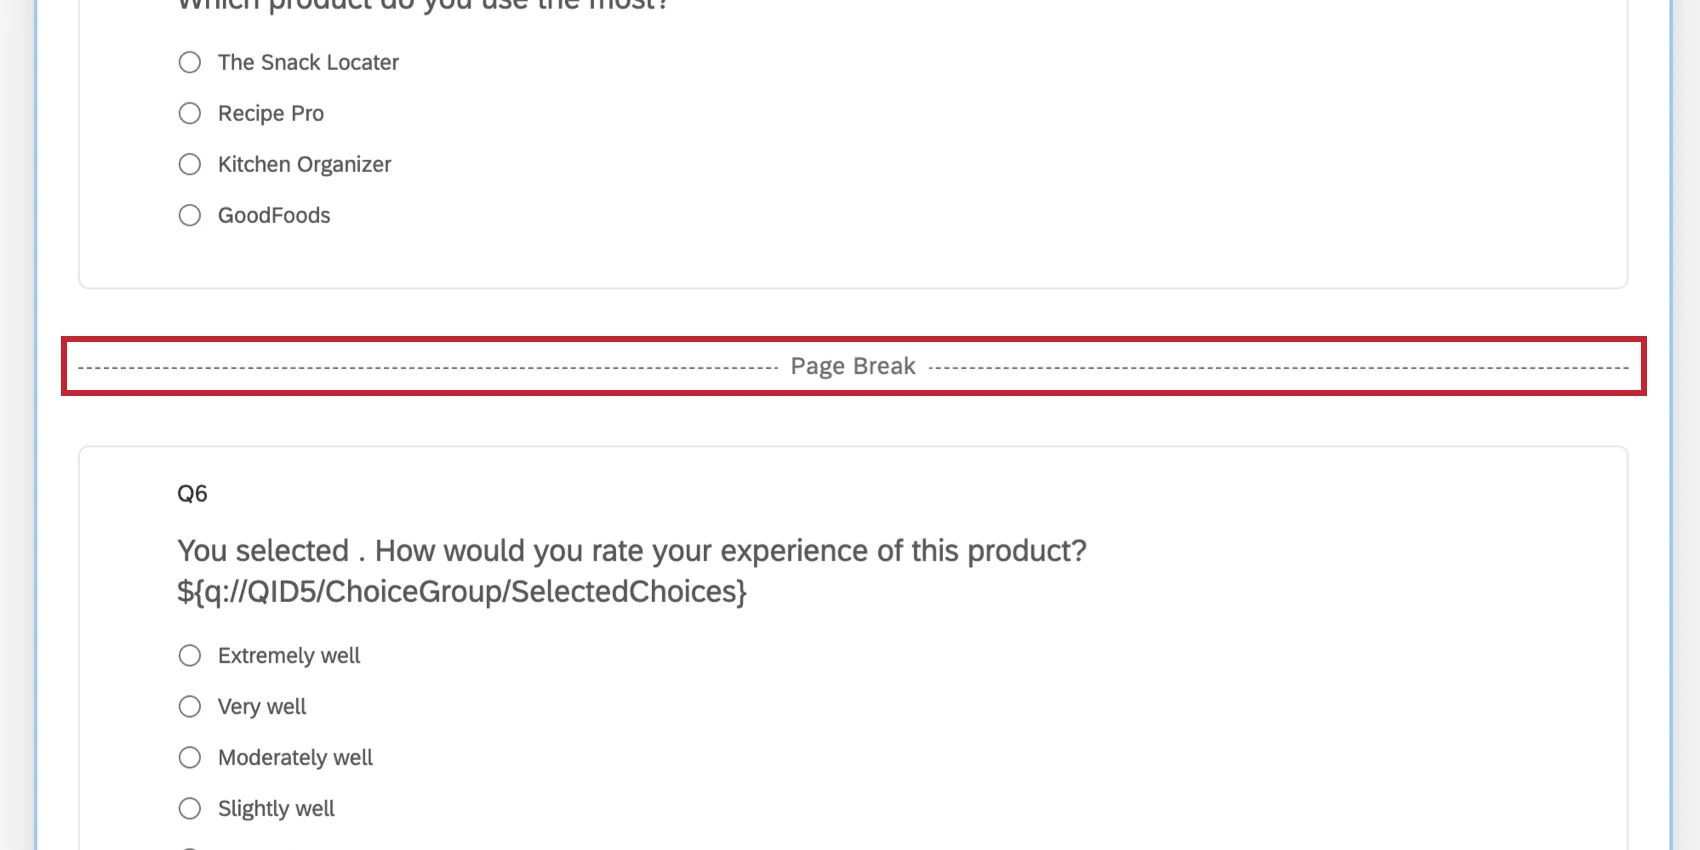
Attention: A question must be submitted by the respondent using the next button before piped text will work. If you pipe in the selected answer from one question to another, there must be a page break in between the two questions for the Piped Text to load.

To generate Piped Text from a question
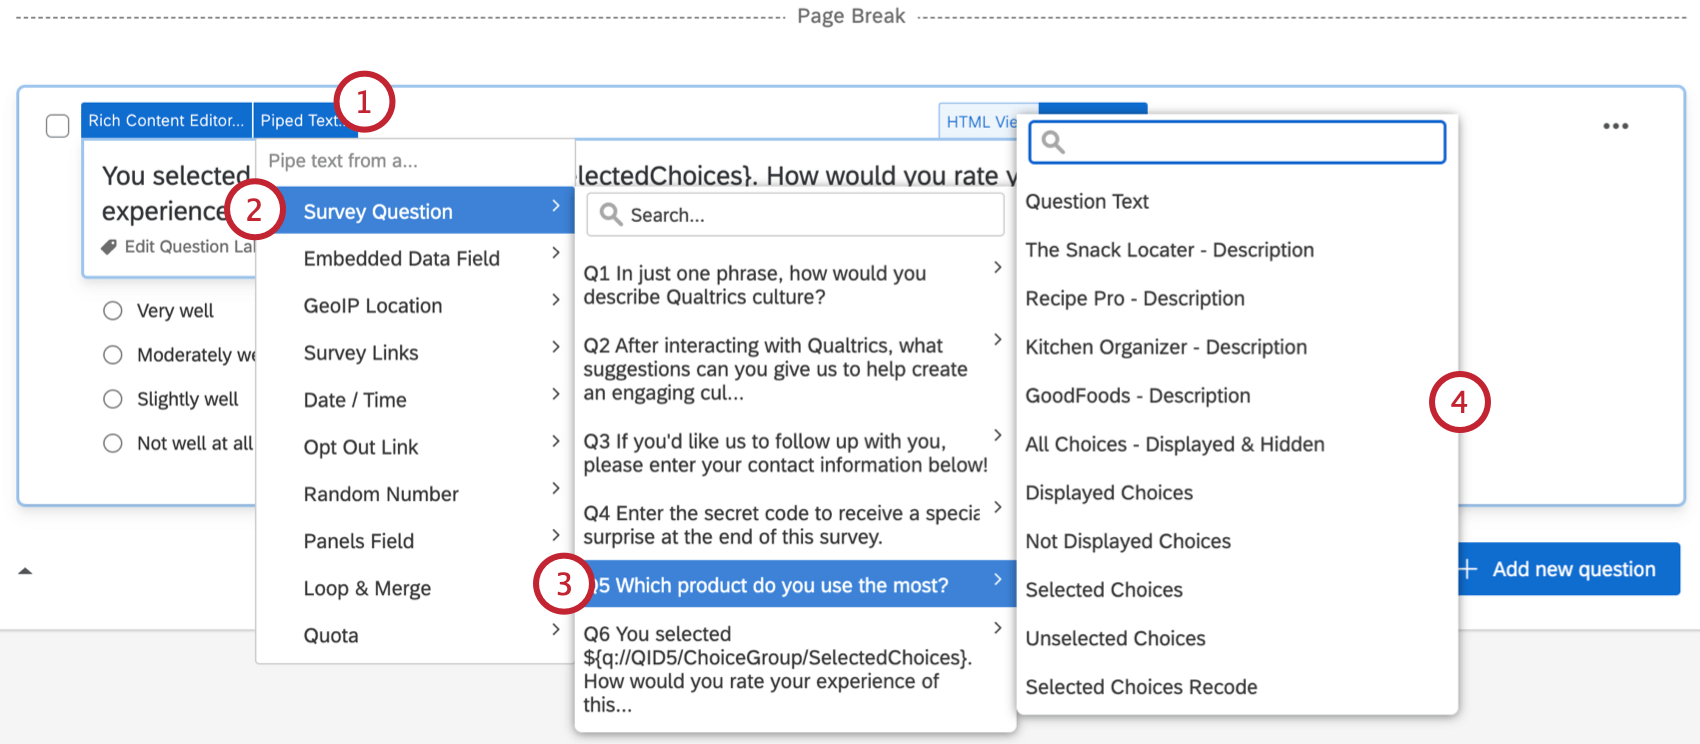
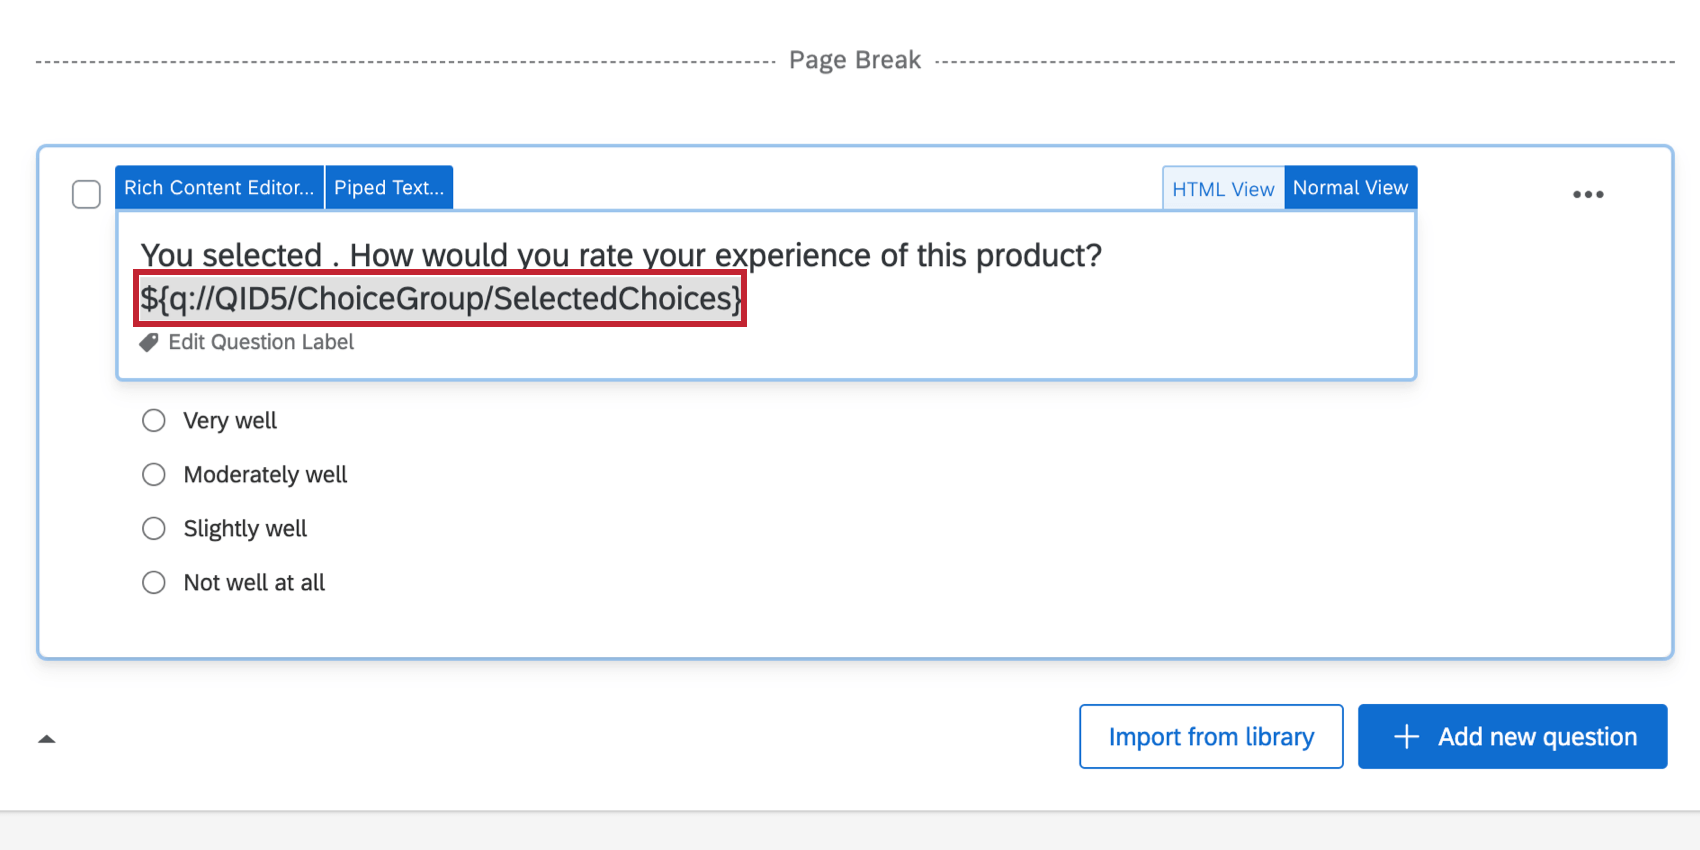
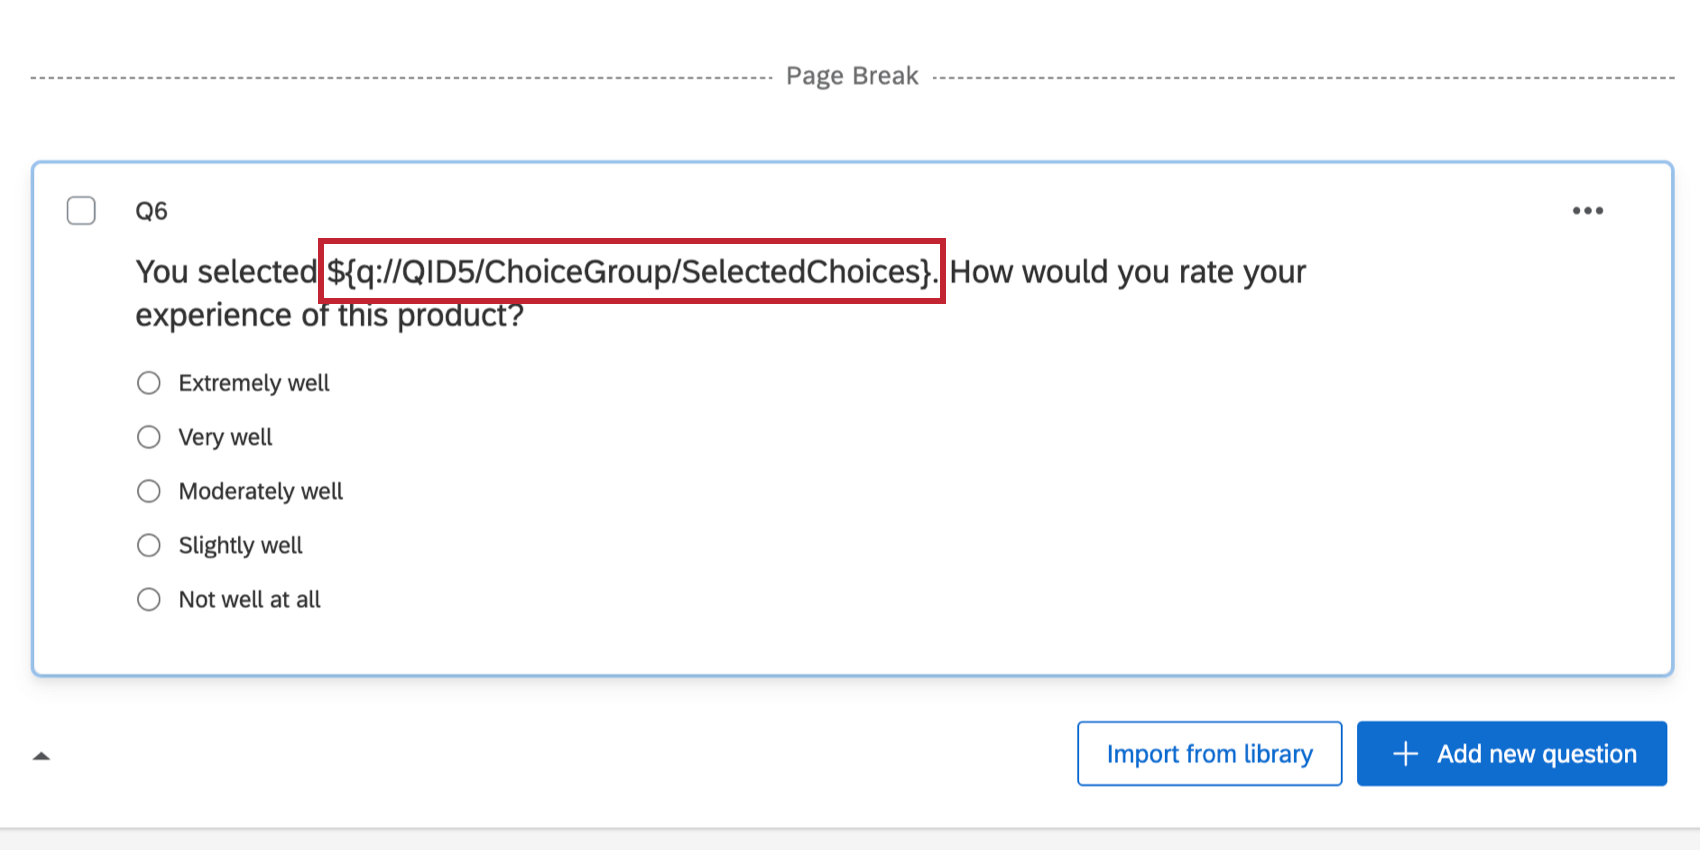
Qtip: When inserted into your survey, the piped text will be in the general format: ${q://QIDX/SelectedValue}. The field “QIDX” is the internal question ID for the selected question and should not be edited. Editing the question ID will cause the piped text to stop working.
Possible Values for Text Piped from a Question
In step 4 of the above example, you’ll notice a number of possible values that can be piped into your survey.
Qtip: When generating piped text for matrix tables, “Answers” refer to scale points and “Choices” refer to statements.
- Question Text: Pipes the question a respondent sees when taking the survey.
- Description: Refers to previous answer choice text. For example, if they select “Less than 1 month – Description,” the piped text would bring in “Less than 1 month.”
- Text Entry: Pipes any text a respondent enters. For example, if your respondent picks “Other” and types in “Three Years,” the “Other (Text Entry)” piped text would bring forward “Three Years.”
- All Choices – Displayed & Hidden: Pipes in every single answer choice in the question.
- Displayed Choices: Pipes in only the choices the respondent saw. See our page on adding display logic to answer choices for more information on hiding and revealing choices to respondents.
- Not Displayed Choices: Pipes in only the choices the respondent didn’t see. See our page on adding display logic to answer choices for more information on hiding and revealing choices to respondents.
- Selected Choices: Pipes in only the choices the respondent selected.
- Unselected Choices: Pipes in all the choices the respondent didn’t select.
- Selected Choices Recode: Pipes in the recode value assigned to any selected choice.
- Entered Text: Pipes in the text that the respondent entered in an answer choice text box.
- File Size: Pipes in the size of the file the respondent uploaded in a previous file upload question.
- File URL: Pipes in the link to the file the respondent uploaded in a previous file upload question. Attention: This URL is a temporary one that only works during the survey session. Once the response is submitted, a new URL is generated for any files submitted. Final file URLs can be found in the Data & Analysis tab.

- File Name: Pipes in the name of the file the respondent uploaded in a previous file upload question.
Qtip: There is 1 more option that is not in the piped text menu called Selected Choices Count, which shows the number of choices the respondent selected in a question where they can pick multiple answers. The format for the selected count piped text is ${q://QIDX/SelectedChoicesCount}. For example, if you want to show the number of selected answers for Q12, it’d be ${q://QID12/SelectedChoicesCount}. If Q12 is a matrix table and you want selected count for the second statement, the piped text is ${q://QID12/SelectedChoicesCount/2}. Since QID can differ from the question’s number (e.g., Q12), be careful to generate another line of piped text for that question to double-check the QID.
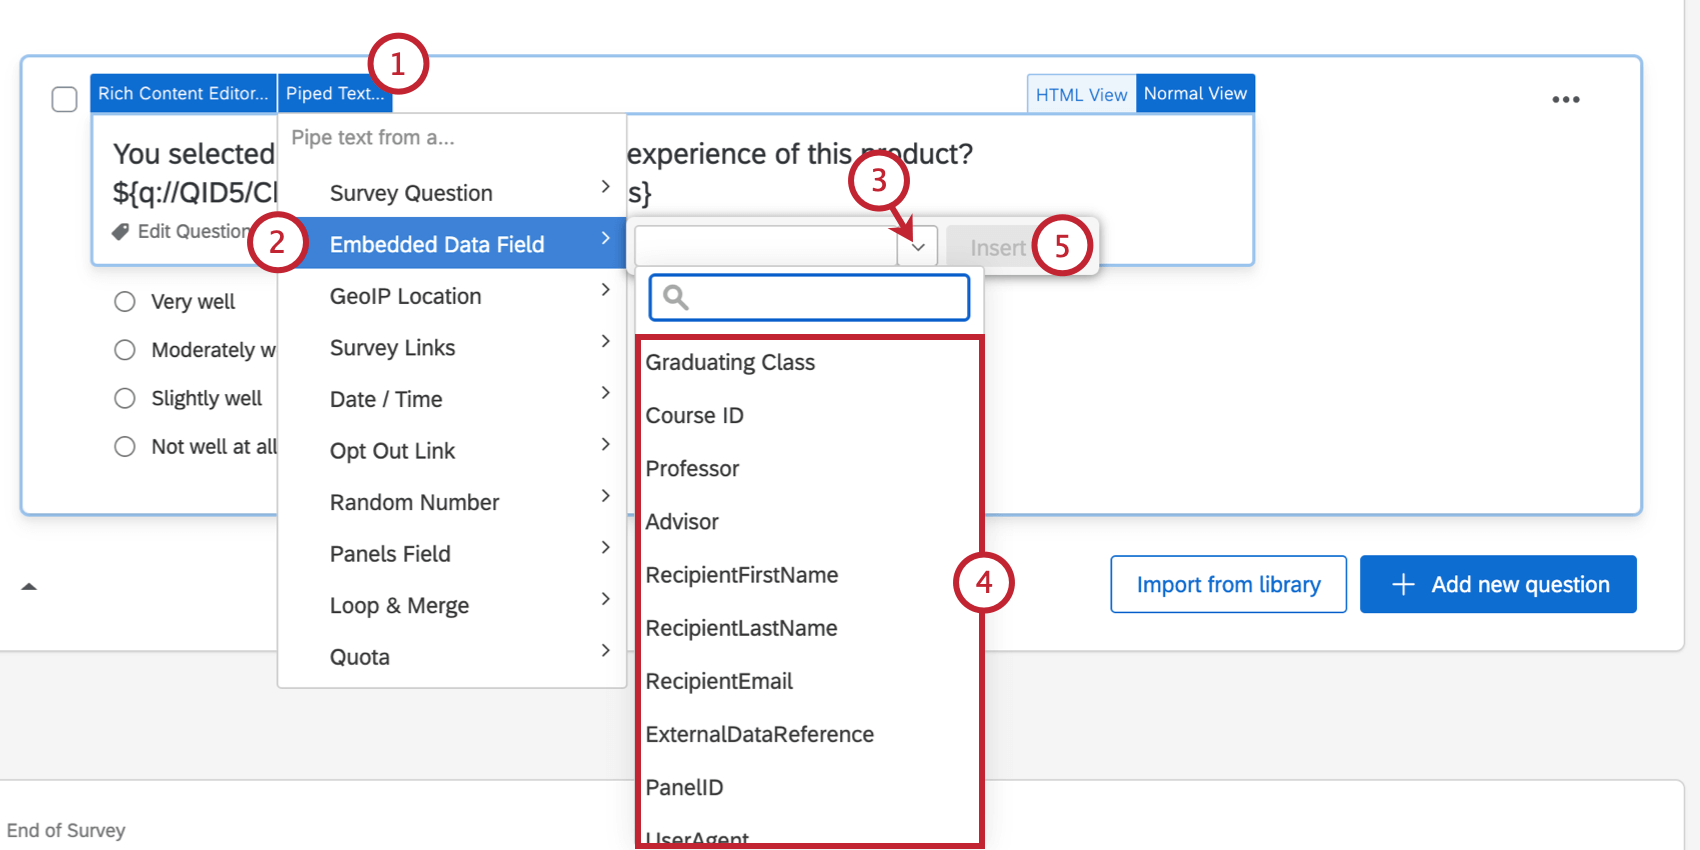
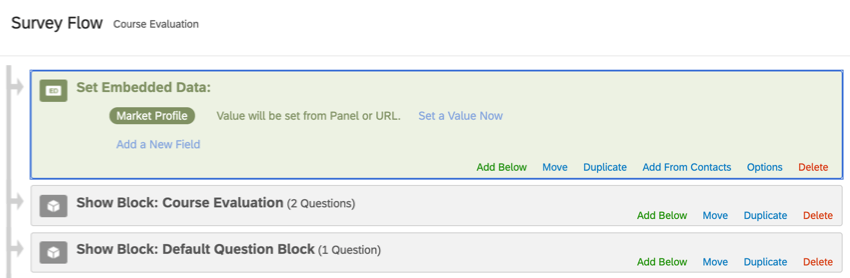
Piping from an Embedded Data Field
Embedded data fields allow you to store information about a respondent without actually asking a question, and that information can be piped into later sections of your survey or used in your data analyses.
![]()
To generate Piped Text from an Embedded Data field
The Importance of Survey Flow Order
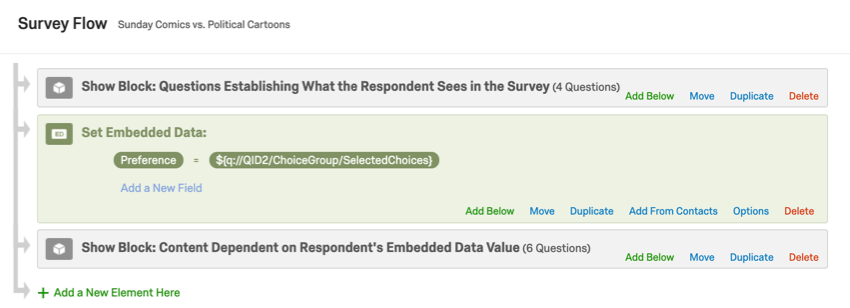
Earlier, we mentioned that when you pipe text from a previous question into a following question, you need to be careful of the order content appears, and of page breaks. These same rules apply when working with embedded data.
When putting your embedded data element in the survey flow, think carefully about the order of elements. If your embedded data is not reliant on the respondent answering questions to determine a value, it’s generally best practice to make sure the embedded data is at the top of the survey flow, so it is saved before the respondent reaches any piped text you have displayed.
Example:
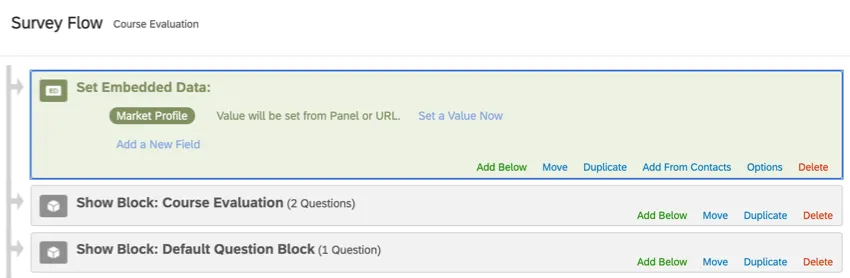
If the embedded data is reliant on the respondent answering certain questions before it can generate a value (as with math operations), then those questions need to appear in a block before the embedded data is set in the survey flow, and the questions where the embedded data is piped in and displayed to respondents must appear after the embedded data element. You may need to move questions to new blocks to achieve this.
Example:

A separation between 2 different blocks is automatically considered a page break.
For additional questions regarding embedded data, see Best Practices and Troubleshooting Embedded Data.
Piping from a GeoIP Location
By default, Qualtrics will record the IP address of the respondent as they enter the survey. Based on their recorded IP address, Qualtrics will calculate their geographical location down to the zip code.
Qtip: You can enable Anonymize Responses in the Survey Options to disable recording of the respondent’s IP address.
To generate Piped Text from a GeoIP Location
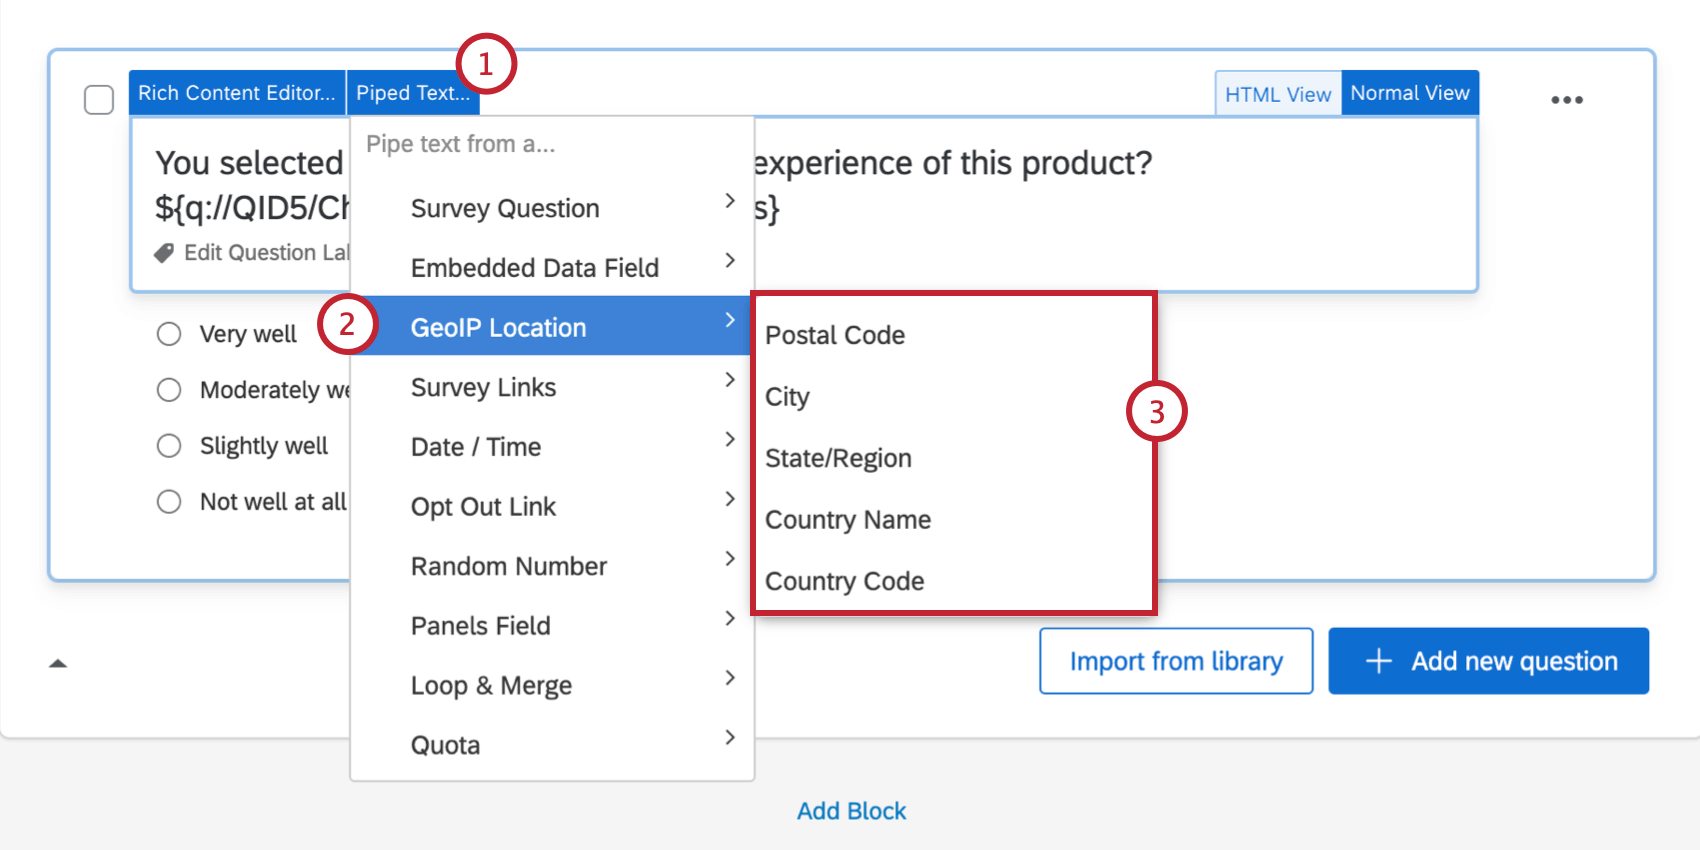
Qtip: Country codes are 2-Letter acronyms for each country. They are derived from ISO ALPHA-2 Code, a list of which can be found here. (Note that Qualtrics does not own and is not responsible for maintaining the content on the linked website, and we are merely providing the link as is.)
Qtip: You may need to use external resources to interpret the state/region GeoIP values as their format depends on their origin country.
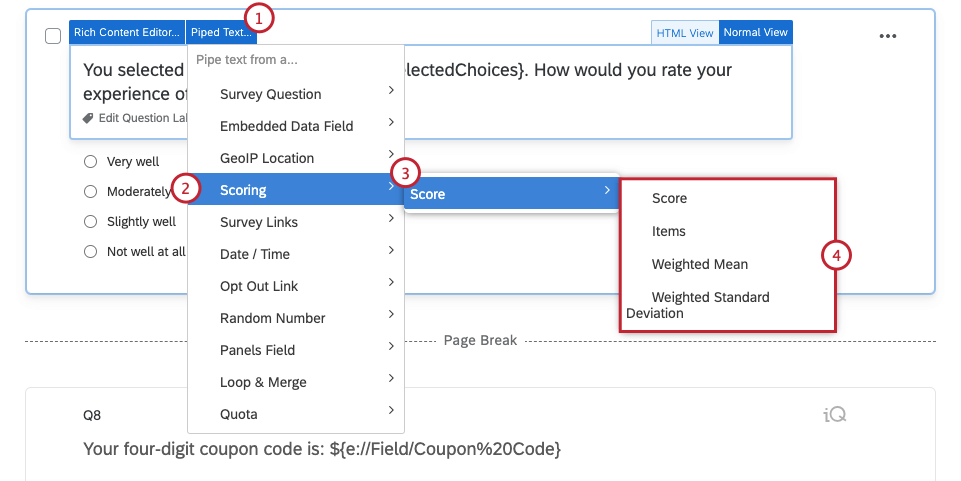
Piping from a Scoring Category
Qtip: Piped text is the most customizable way to display scores to respondents, but it is not the only way. See Displaying Scores to Respondents.
The scoring feature allows you to attach point values to each question answer. Qualtrics allows you to pipe in the following for each scoring category:
- Score: Total score, or the sum of all points a respondent earned in this category.
- Items: The number of scored items the respondent answered.
- Weighted Mean: A mean that excludes blank or unanswered values. Good for comparing scoring categories that add up to different total points.
- Weighted Standard Deviation: A standard deviation that ignores blank or unanswered values.
Qtip: Both the weighted mean and the weighted standard deviation are based on the number of points received per question, but they only use scored answer choices that were selected in the calculation. For example, on the weighted mean, if there are 3 questions in the survey and the participant answers only 2 of them, this is how their weighted mean would be calculated: (Score on the first question they answered + Score on the second question they answered) / 2
To generate Piped Text from a Scoring Category
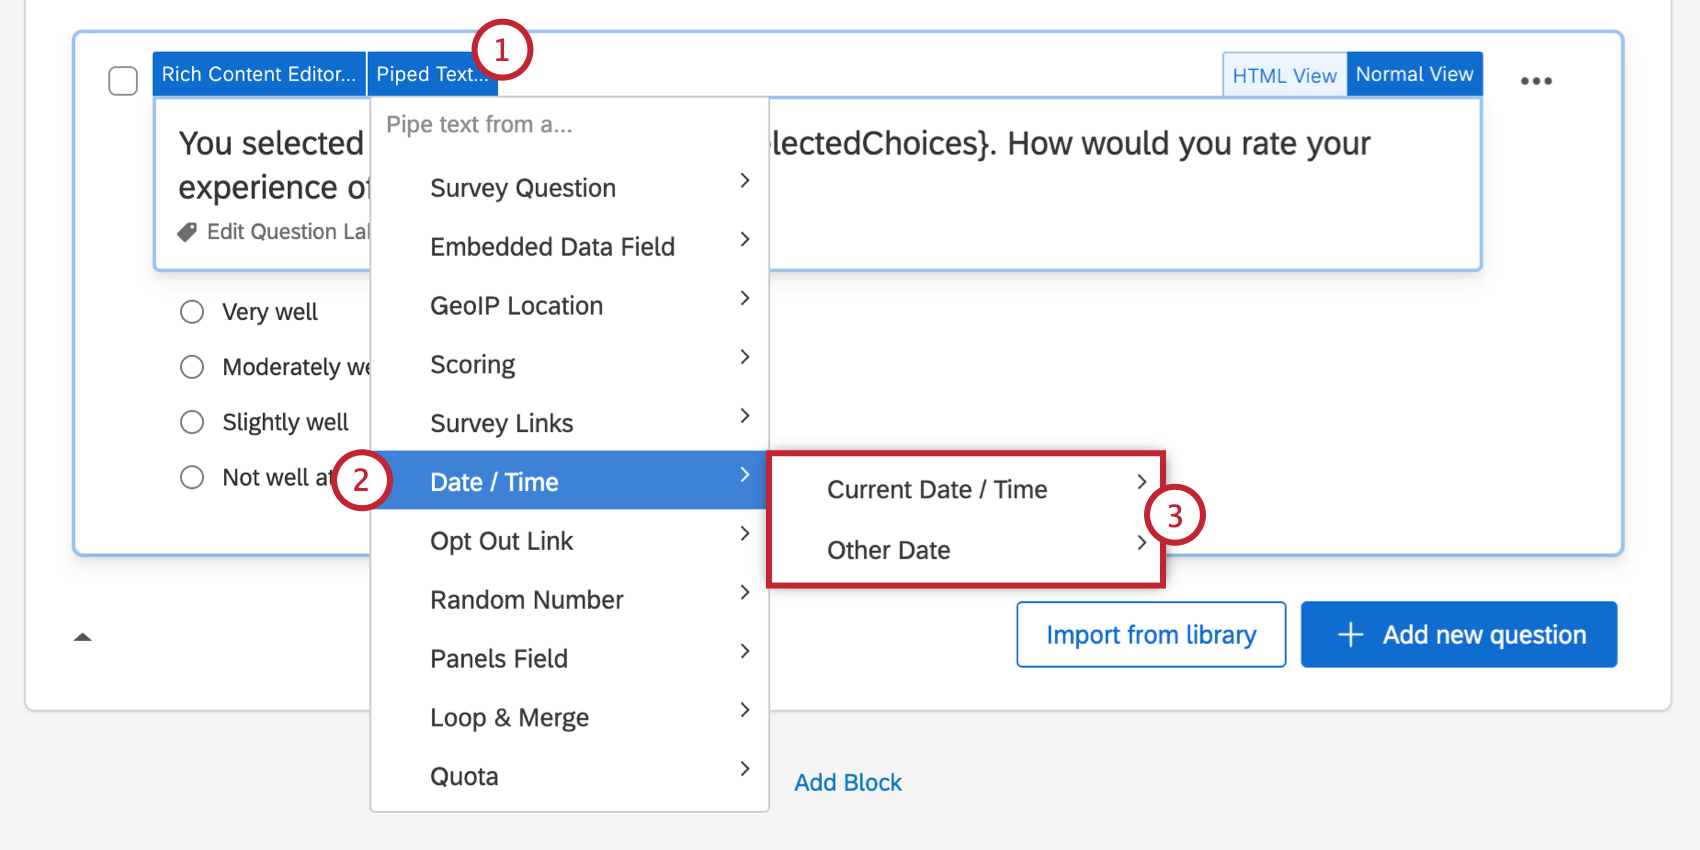
Piping Date / Time
Through the date / time piped text, you can display the current date and time in your survey, as well as other dates. This is useful to display in event registration surveys as a time reference for your respondents.
The time zone of date / time piped text is based off the time zone set in your account when the response was submitted. If you adjust the time zone in your account after responses are submitted, the data collected will not change.
To generate Piped Text for Date / Time
Examples of Piped Text for Current Date and Time
This is not an exhaustive list of date and time piped text formats. If a format you want isn’t listed here, make sure to follow the steps above to open the piped text menu.
Qtip: Be careful copying and pasting piped text from this list. There may be unintended font effects, like resizing, color changes, and hidden characters that carry over into the platform and affect how your piped text works. Always test piped text before distributing your survey.
Current Date Piped Text:
In the table below, “M” stands for month, “D” stands for day, and “Y” stands for year. “Leading zeroes” are zeroes that appear at the beginning of a number; for example, 03 instead of 3.
| Format | Example | Piped Text |
|---|---|---|
| MM/DD/YY (leading zeroes excluded) | 3/14/2024 | ${date://CurrentDate/SL} |
| YYYY-MM-DD (leading zeroes excluded) | 2024-3-14 | ${date://CurrentDate/DS} |
| MM/DD/YYYY (leading zeroes included) | 03/14/2024 | ${date://CurrentDate/m%2Fd%2FY} |
| DD/MM/YYYY (leading zeroes included) | 14/03/2024 | ${date://CurrentDate/d%2Fm%2FY} |
| YYYY/MM/DD (leading zeroes included) | 2024/03/14 | ${date://CurrentDate/Y%2Fm%2Fd} |
| DD Abbreviated month YYYY | 14 Mar 2024 | ${date://CurrentDate/PT} |
| Full month name DD, YYYY | March 14, 2024 | ${date://CurrentDate/FL} |
| Day of the week, Full month name DD | Thursday, March 14 | ${date://CurrentDate/DM} |
| Full ISO-8601 Format | 2024-03-14T20:27:33Z 2024-03-14T14:27:33-06:00 | ${date://CurrentDate/c} |
Qtip: The ISO-8601 piped text also gives a result in your account’s timezone. A time with Z at the end represents that your account is in the default UTC timezone.
There is no piped text for the name of the current weekday alone. (For example, just “Thursday.”) However, you can show a combination of the day of the week and the date. See table above.
Qtip: You may use the Other Date piped text to display any date in relation to the current date. For example, if you choose to display tomorrow’s date, the piped text will look like ${date://OtherDate/PT/+1%20day}. If you change the number before the percent sign, you can choose to display any date. Changing the piped text to ${date://OtherDate/PT/+50%20day} will show the date 50 days after today. This also works with “negative” days. ${date://OtherDate/PT/-10%20day} will show the date ten days before today. If you want to change the time zone in your piped text, you can use ${date://OtherDate/G:i/+1%20hours} as a model. The “+1” will make the time 1 time zone later. The same thing can be done using a minus sign to display an earlier time.
Current Time Piped Text:
| Format | Example | Piped Text |
|---|---|---|
| 12 hour clock, capitalized AM / PM | 1:27 PM | ${date://CurrentTime/ST} |
| 12 hour clock, lowercase am / pm with no space after time | 1:27pm | ${date://CurrentTime/TL} |
| 24 hour clock | 13:27 | ${date://CurrentTime/MT} |
| 24 hour clock with seconds | 13:27:33 | ${date://CurrentTime/MS} |
Locale
Qtip: The ?locale query string only works on piped text dates that begin with ${date://}. Piped text dates that begin with ${rm://} use a ?timezone query string instead.
You can change the language date / time piped text is recorded in. At the end of the piped text, but inside the last bracket, include a question mark ( ? ), the word locale, and set it equal to a language code of your choosing.
?locale=EN For example, ${date://CurrentDate/DM?locale=FR} would give you the current date in French.
Locale does not affect the time zone of the data recorded.
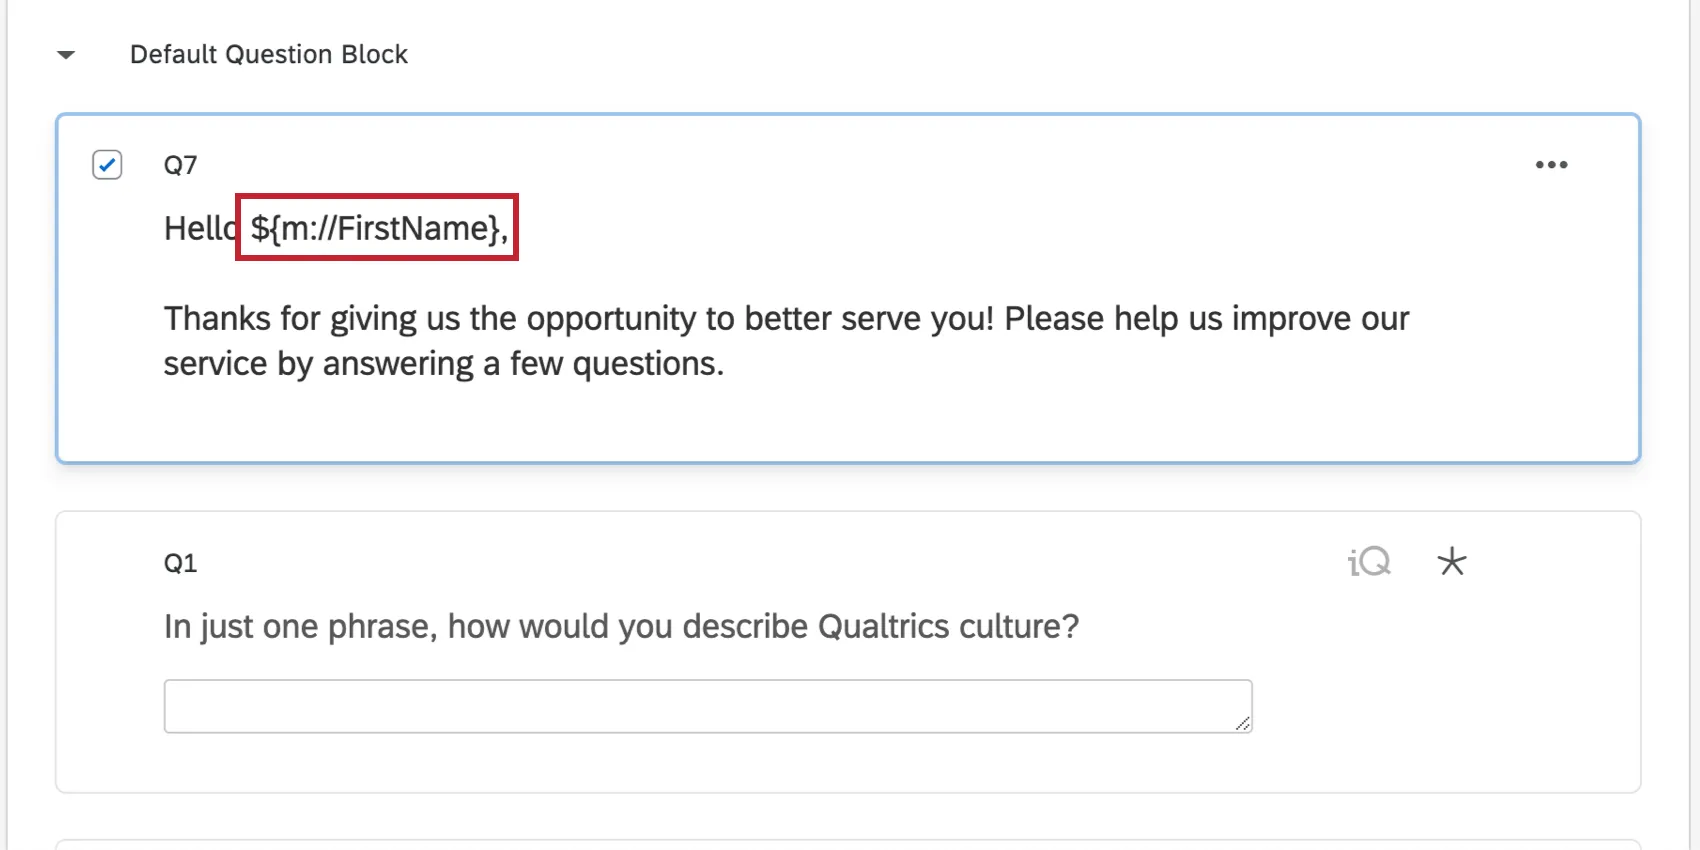
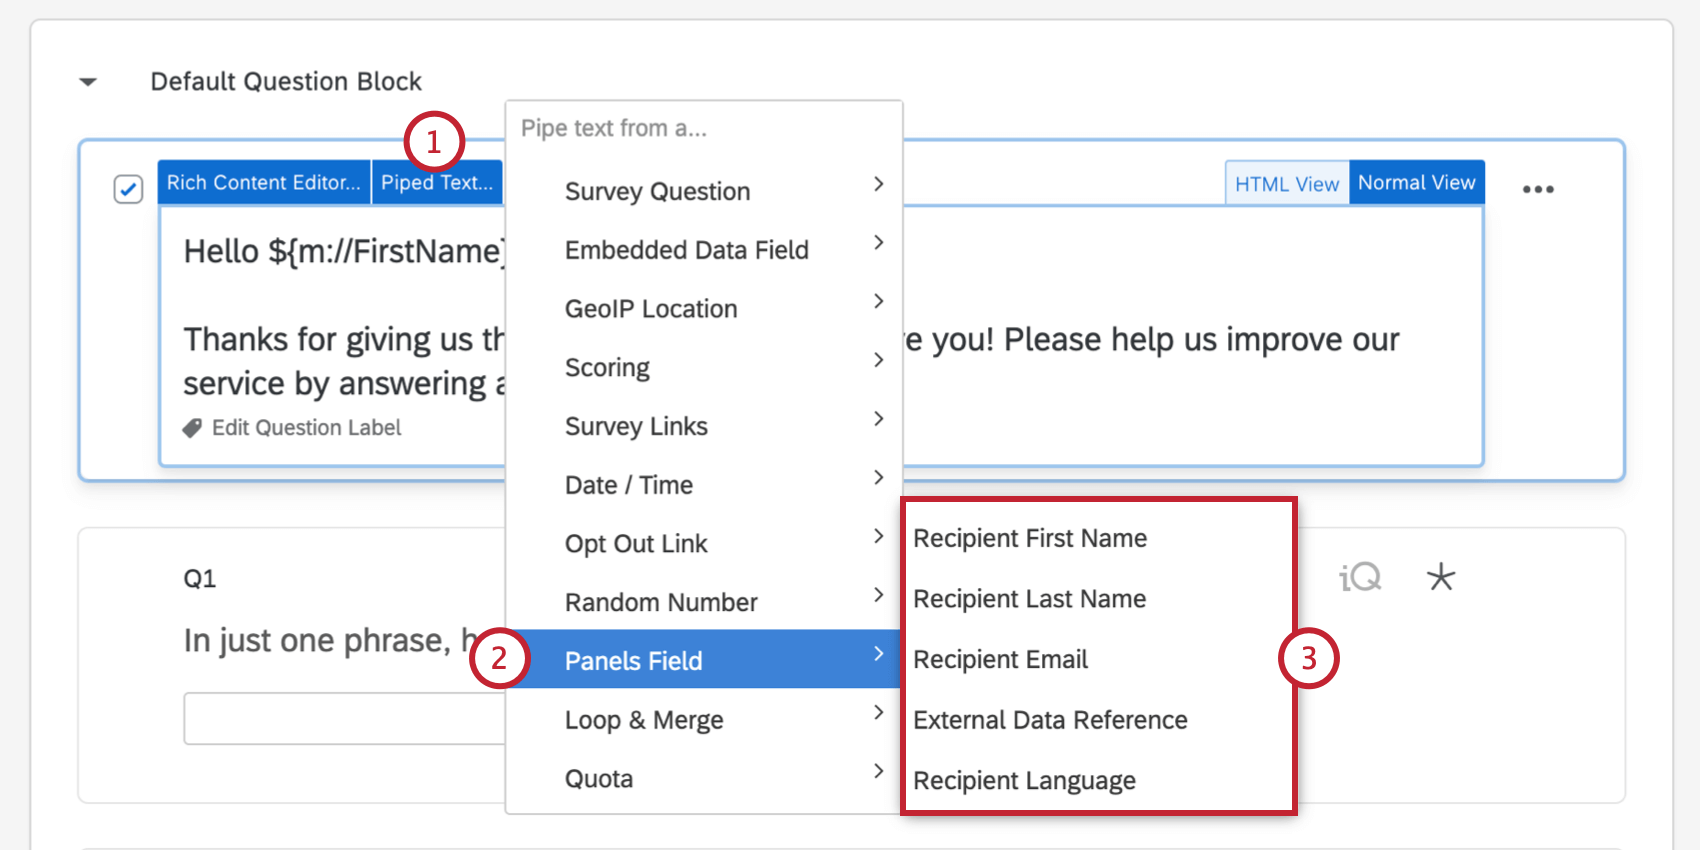
Piping from a Contact List Field
If you are sending your survey to a contact list (also sometimes known as a panel), you can pipe information from that contact list into your survey or email invitation. These fields include basic information like first name, last name, and email, as well as the specialty fields External Data Reference and Language.
Any custom fields you’ve added to the contact list beyond these standard fields are stored as embedded data and can be piped in using the steps described in the Piping from an Embedded Data Field section.
To generate Piped Text from a Contact List field
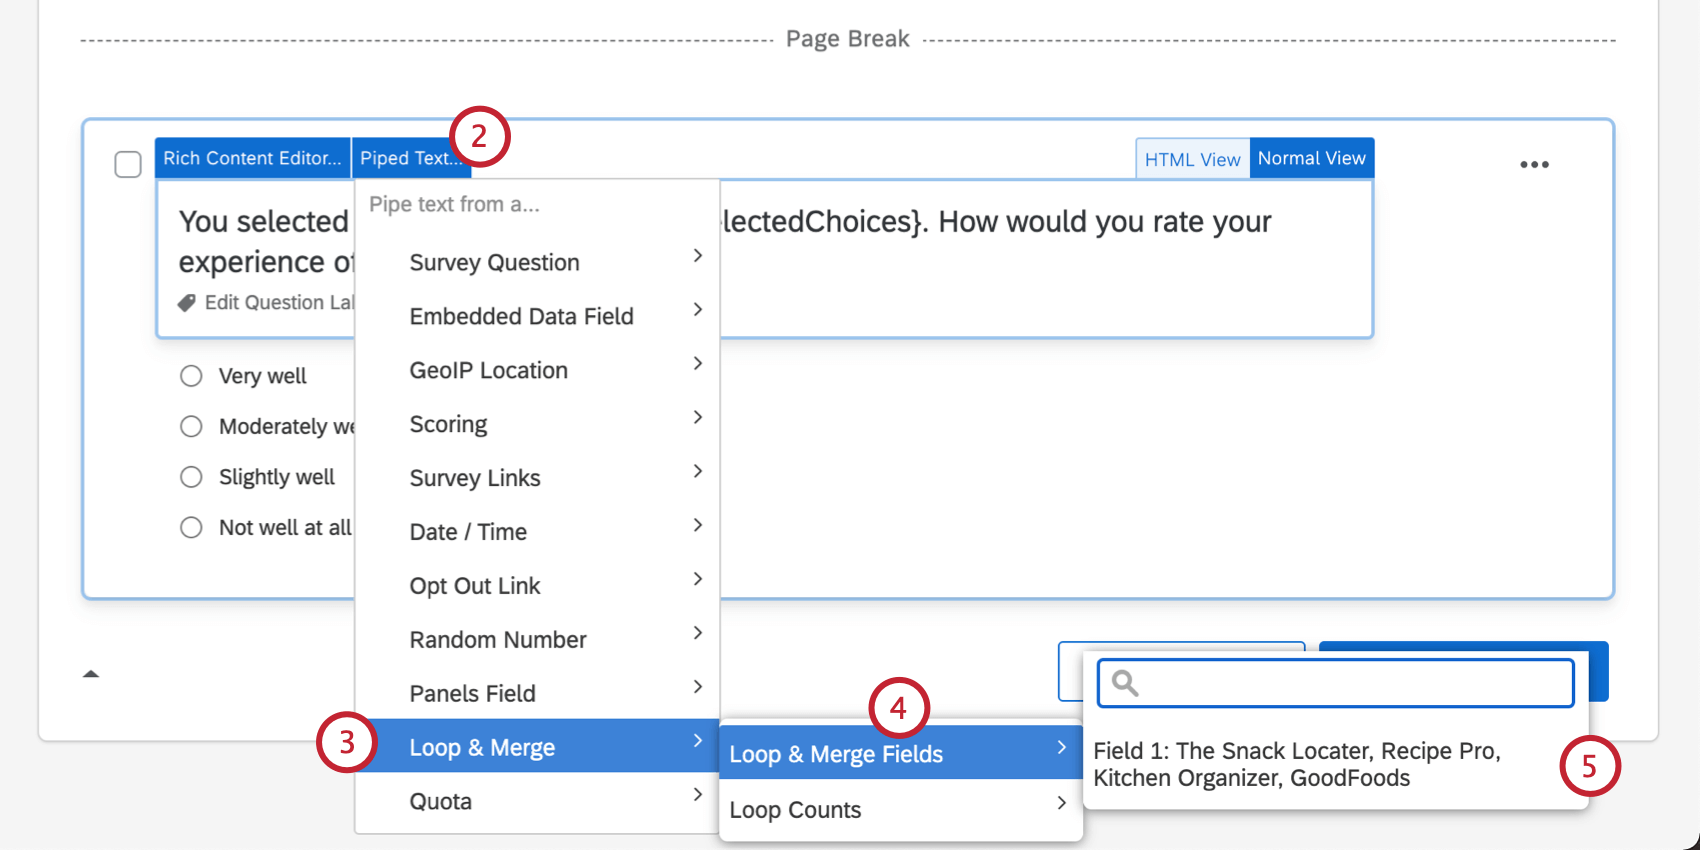
Piping from a Loop & Merge field
With loop & merge, you can repeat a series of questions for a respondent that asks about a different item each time. Piped text is critical for loop & merge so that the respondent knows which item they are responding about.
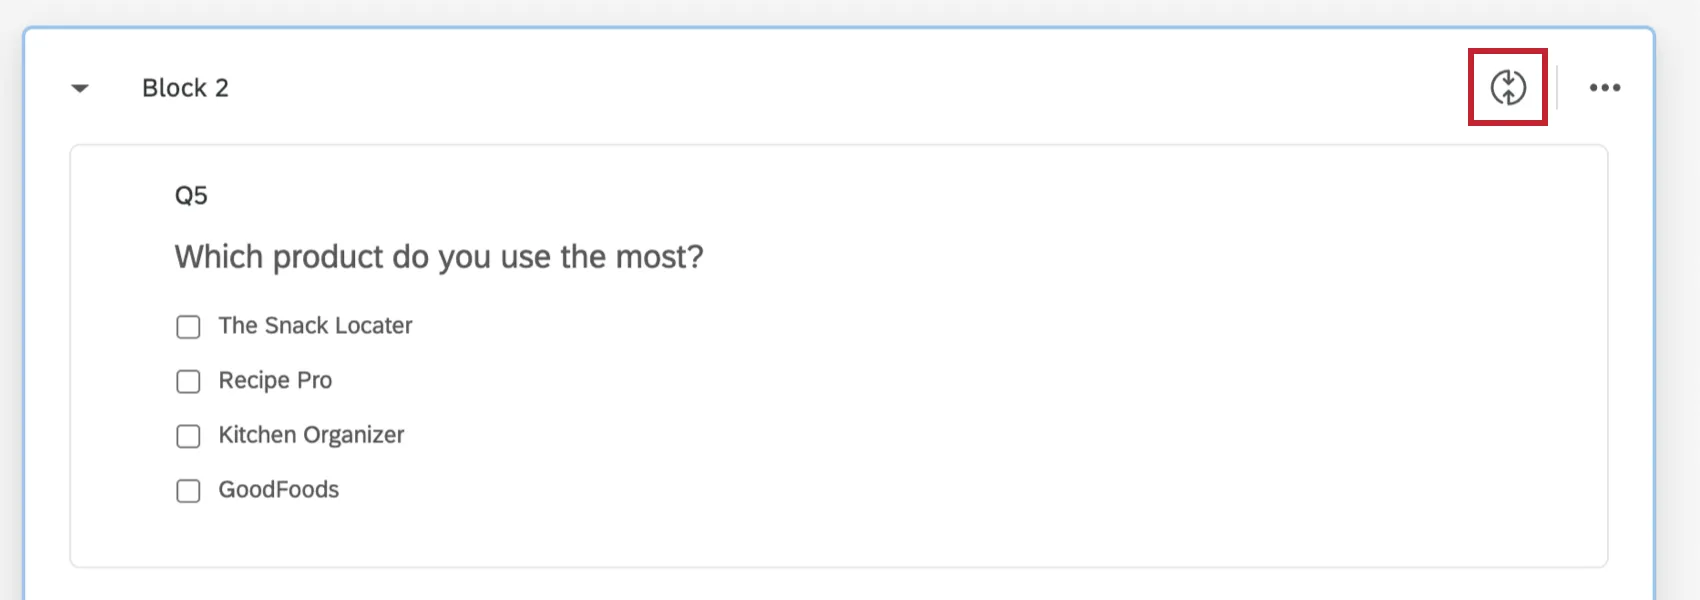
Using Piped Text, you can display three pieces of information about your loop & merge:
- Field: Loop & merge fields.
- Current Loop Number: Which loop the respondent is currently on.
- Total Number of Loops: The total number of loops the respondent will need to complete.
To generate Piped Text from a Loop & Merge field
Piping from a Quota
With quotas, you can make sure that you only gather the right amount of data required for your study. Using piped text, you can display three pieces of information about your quota:
- Count: The current number of responses that have incremented your quota.
- Has Not Been Met: Whether the quota has not been met (returns a 1 if true).
- Has Been Met: Whether the quota has been met (returns a 1 if true).
To generate Piped Text from a Quota
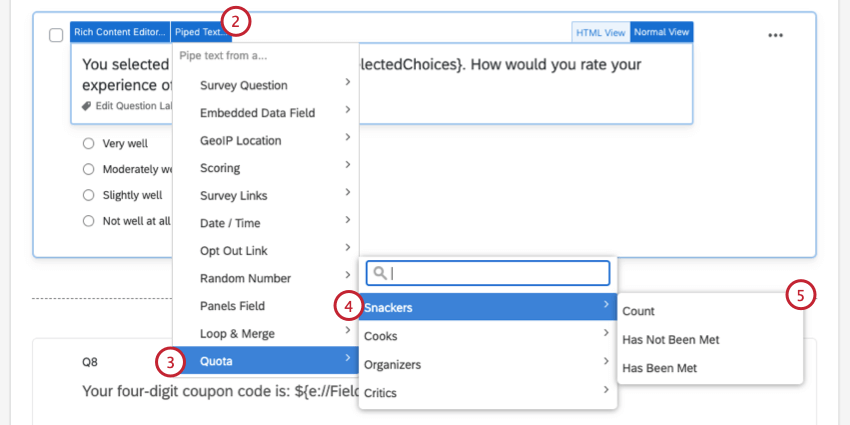
Qtip: You can also perform math operations on your piped values (e.g., multiply, divide, add, subtract). For example, you can show the percentage of the quota that is filled, rather than the actual count of the quota.
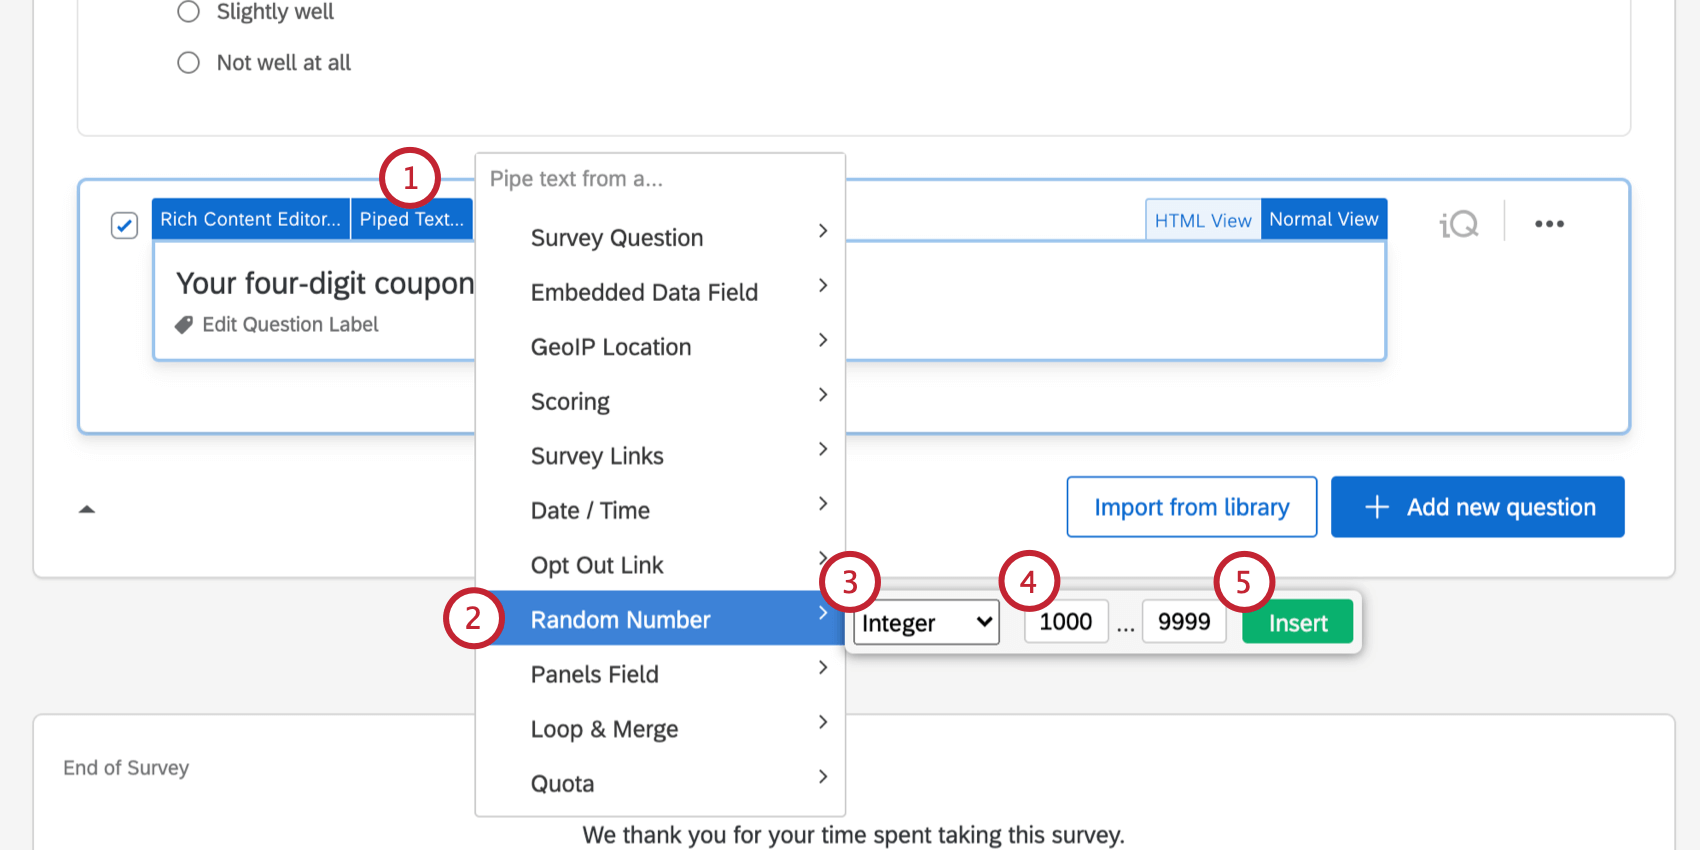
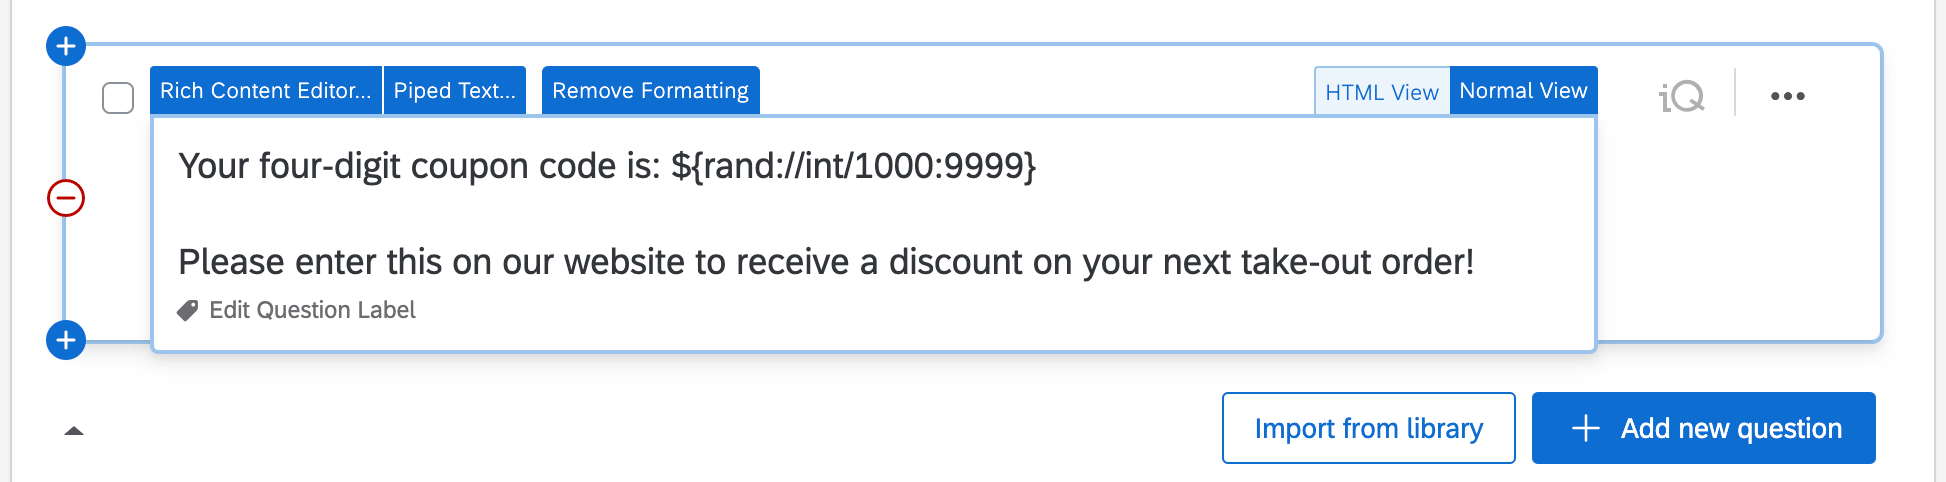
Random Number Generator
Piped text can be used to generate and display a random number to each of your respondents. When in the survey editor, it will appear as a line of code just like all other piped text. The algorithm that Qualtrics uses for randomization is called the Mersenne Twister.
Attention: The method described here does not check against existing IDs. That means that there is a chance that more than one respondent can have the same ID. This is extremely rare, and the chances are decreased by making your IDs longer. For example, try to make IDs 5 to 7 digits long instead of 4 or less. If you have programming knowledge, you can also build a custom web service element to check against IDs.

When respondents take the survey, this code will be replaced with a random number.
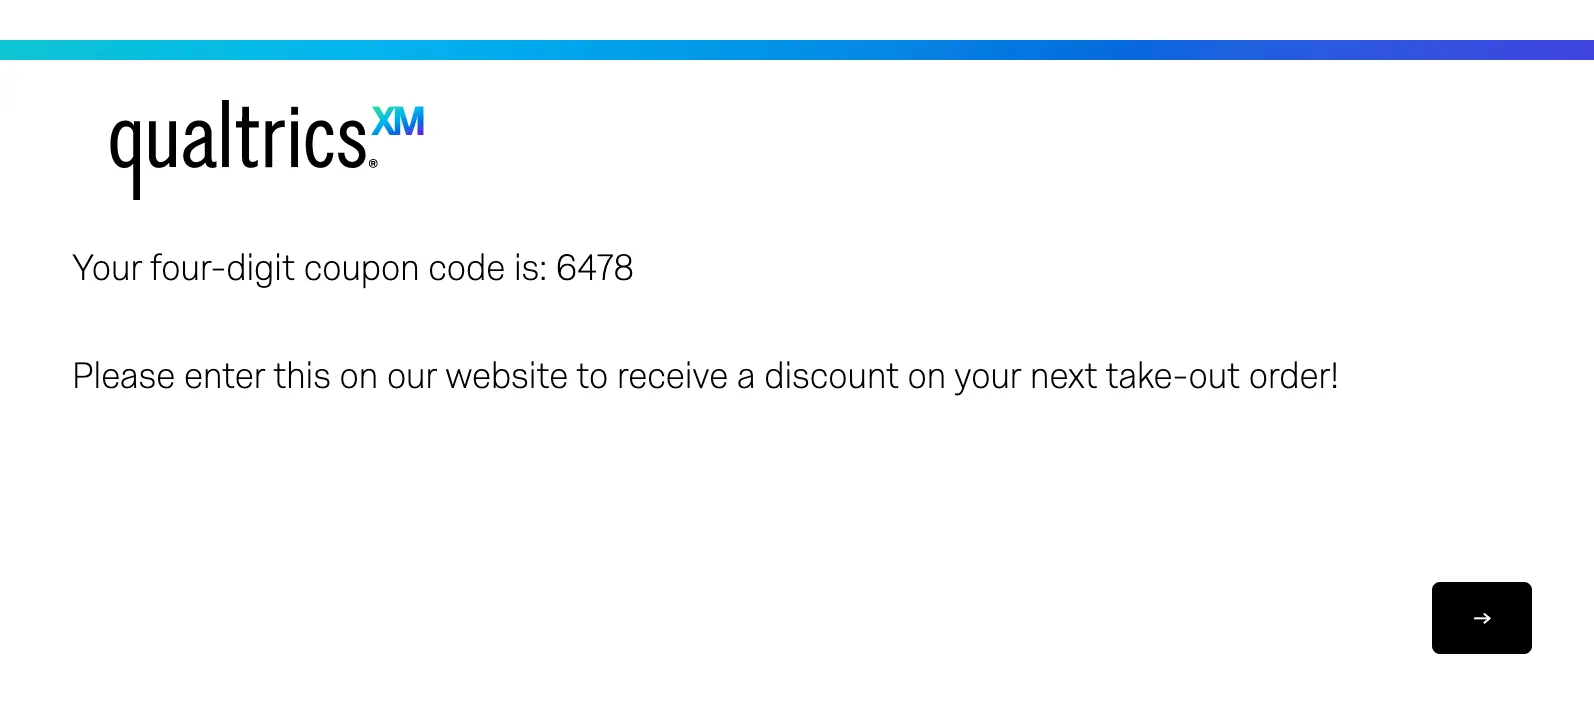
There are 3 types of random numbers that you can generate:
- Random Integer: A random whole number.
- Decimal: Float. A random number with 13 decimal places.
- True/False: Boolean. A 0 or 1 selected at random.
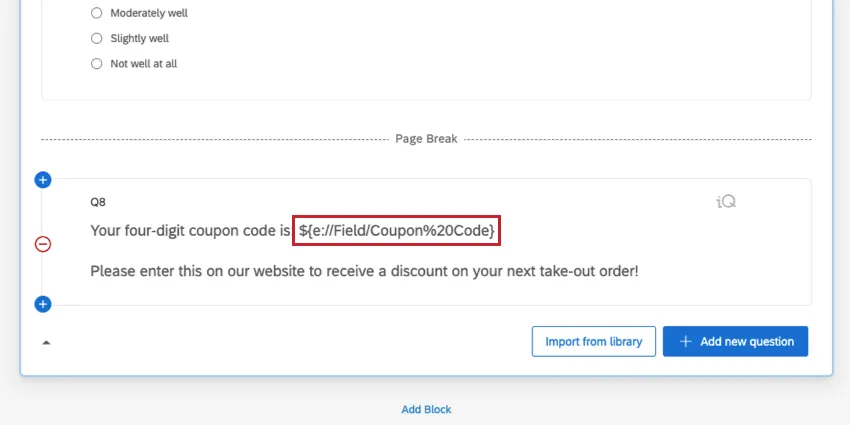
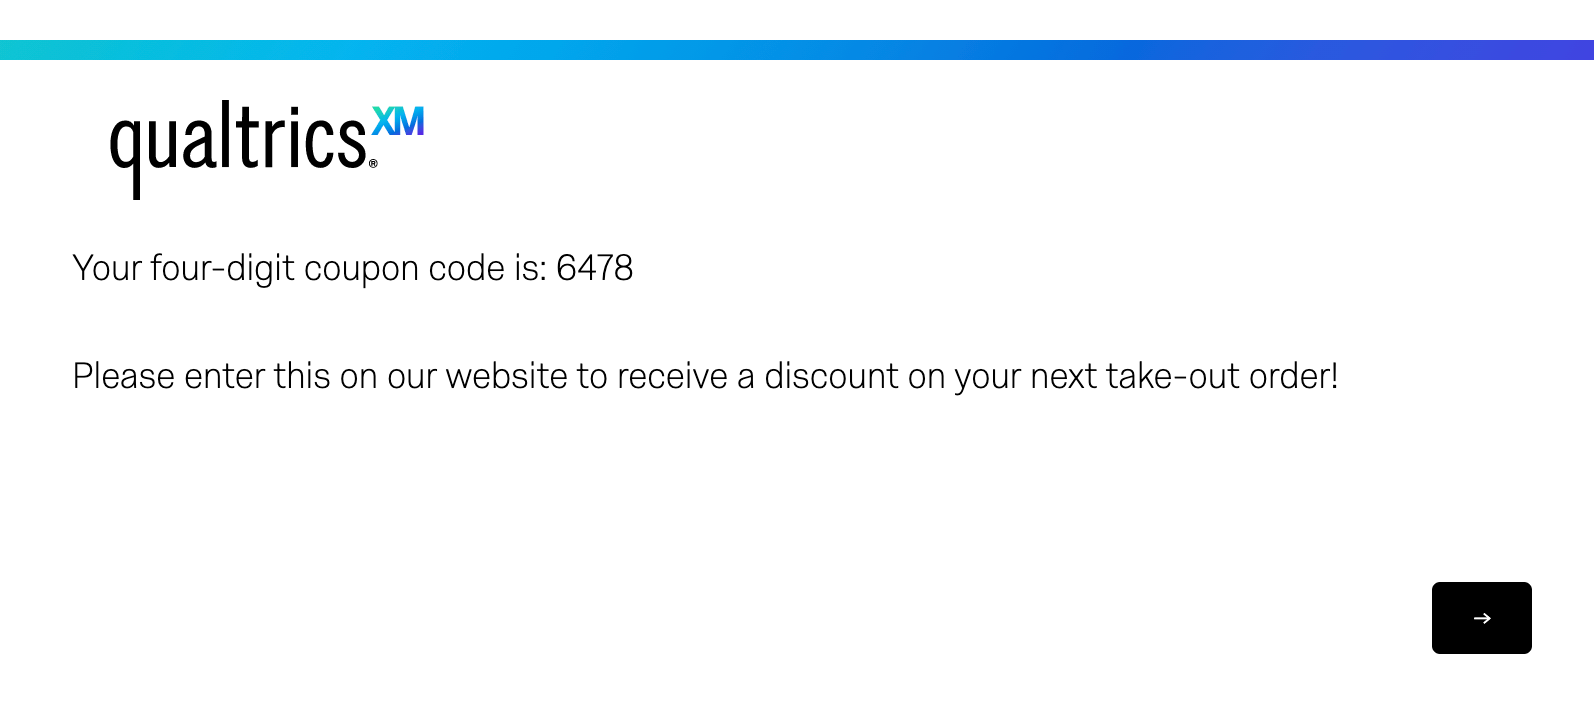
Example: You can use the random number generator code to create a random number for your respondents to use as a coupon code or as an ID number.
To generate a random number
Attention: Note that a number randomly generated this way will not automatically be saved in your data. To capture the random number in your data, you would need to set up an embedded data field in your survey flow where the value is set equal to the random number generator.

Then, return to your survey editor and pipe the embedded data into your question to display it to the respondent.


Piped Text in Different Project Types
Piped text is available in just about every types of project where you customize a survey. The options described on this page are available in:
Qtip: Piped text cannot pull in data from conjoint-specific questions or MaxDiff-specific questions.
Piped text can also be used in 360 projects, although there are additional options exclusive to 360. Learn more on the 360 piped text page.
FAQs
What are some of the most common uses for piped text?
What are some of the most common uses for piped text?
Here are some other common use cases:
- Math Operations
- When respondents fill out their email in a text entry question, pipe that email address into an Email Task to determine the recipient.
- When building query strings, pass over the answers your respondents provided. See also Pulling Data into a Second Survey.
- Setting up customized response reports in emails or at the end of surveys.
- Assigning Randomized IDs to Respondents
How do I save piped text so it's included with my survey data?
How do I save piped text so it's included with my survey data?
This is a great way to save date information, math operations, randomized IDs, and any other piped text you may want to save with your responses.
My piped text isn't showing up when I test it - what should I do?
My piped text isn't showing up when I test it - what should I do?
Next, make sure there's no formatting on your piped text. Stray HTML formatting can prevent piped text from working properly - for example, if the first bracket is a different font size or color from the rest of the piped text. You may need to paste your piped text into a text editor to strip the formatting, or remove the formatting of the question text.
I want the default answer of this question to be something the respondent entered in a previous question. How do I do this?
I want the default answer of this question to be something the respondent entered in a previous question. How do I do this?
Can I display the respondent's latitude and longitude to them?
Can I display the respondent's latitude and longitude to them?
- ${loc://Latitude}
- ${loc://Longitude}
That's great! Thank you for your feedback!
Thank you for your feedback!