
Participants Tools (360)
What's on this page
Qtip: This page shows user interface and naming changes that we intend to gradually release starting July 1, 2026, through July 22, 2026. Qualtrics may, in its sole discretion and without liability, change the timing of any product feature rollout, change the functionality for any in preview or in development product feature, or choose not to release a product feature or functionality for any reason or for no reason.
About Participant Tools
In every 360 project, there are tools you can use to manage the metadata and relationships of your participants. To get to these tools, navigate to the Participants tab, then select Tools.
You also have access to tools that you can use to manage the participants uploaded into your project. To get to these, do not select any participants, then click Bulk Actions.
Qtip: Unless otherwise noted, both the Feedback recipients and Feedback givers sections have tools and bulk actions.
Manage Metadata
You can delete metadata fields from your 360 project or check a metadata’s values using the Manage Metadata tool. Deleting metadata here won’t affect metadata in the employee directory, but it will affect metadata for the whole 360 project.
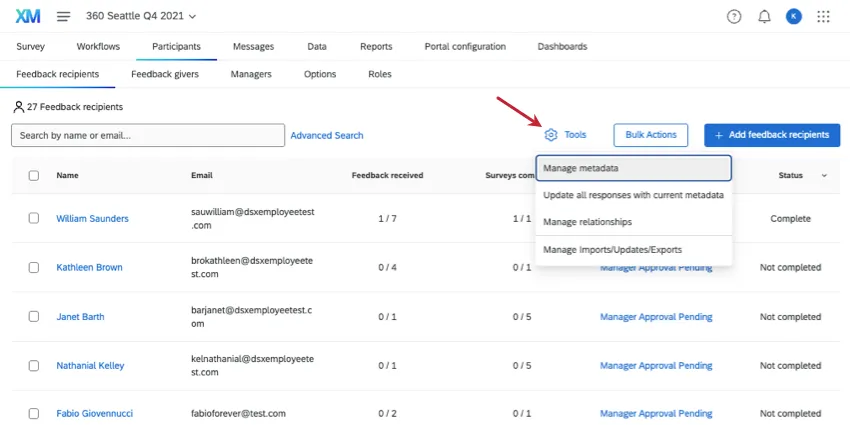
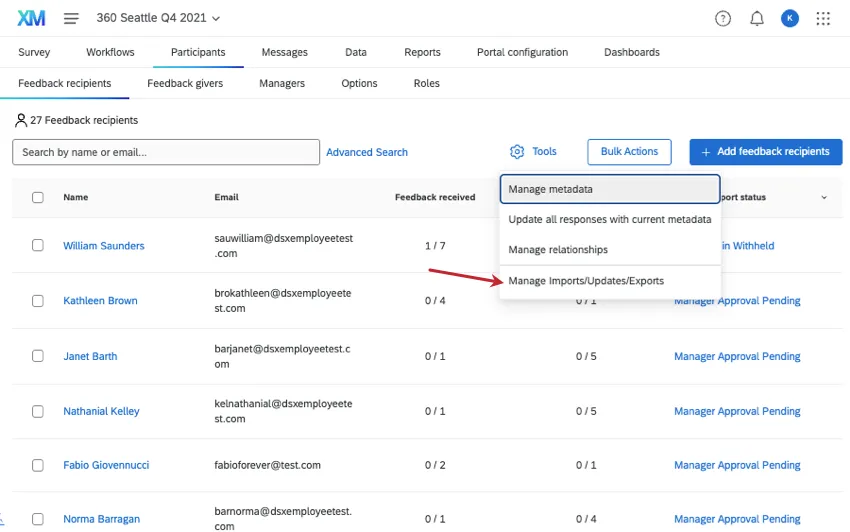
Navigate to the Participants tab.

Click Tools on the top-right.
Select Manage metadata.
Click on a metadata field to learn more about it.
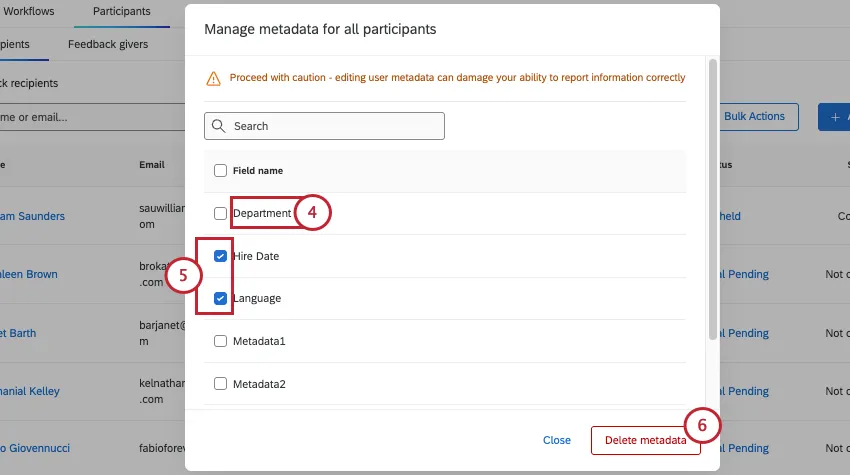
Qtip: Once you click on a metadata field, you’ll see the possible Values. Only the first 500 are displayed.
Select fields for deletion.
Click Delete metadata to permanently delete the selected metadata from your brand.
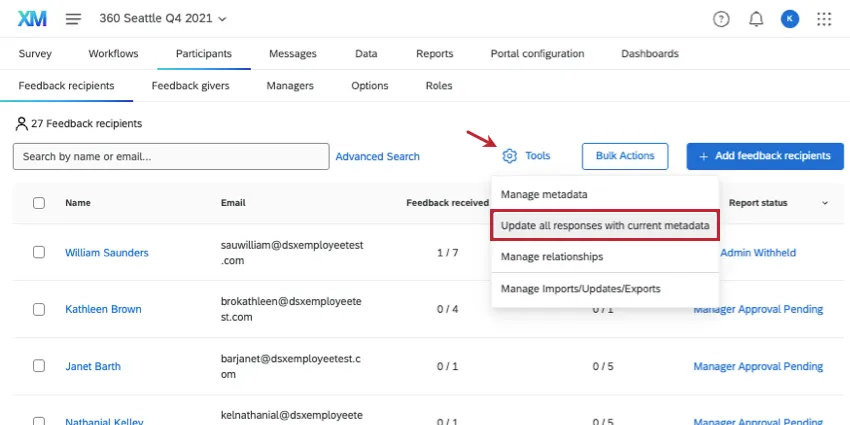
Update All Responses With Current Metadata
Warning: The following method can be used to update metadata. Do NOT use it to change existing relationships!
If you have made changes to your participants’ information by importing the same participants with new metadata (be careful to include the correct unique identifiers for each feedback recipient and feedback giver) or through the participant information window, you will want to make sure these updates are reflected in your responses, reports, and dashboards. Update All Responses With Current Metadata updates this information for every single one of your participants.
Attention: Updating all responses with current metadata will update the recorded date in the Data section.
Qtip: If the Update All Responses with Current Metadata job is stuck at the same percentage of completion for 2 or more hours, try running the job again.
Manage Relationships
Manage Relationships allows you to manage all the custom relationships in your 360 project. You cannot edit the built-in relationships. This includes Peer (employees on the same level) and Manager (direct report to manager).
Adding and Removing Relationships
Click Tools on the top-right.
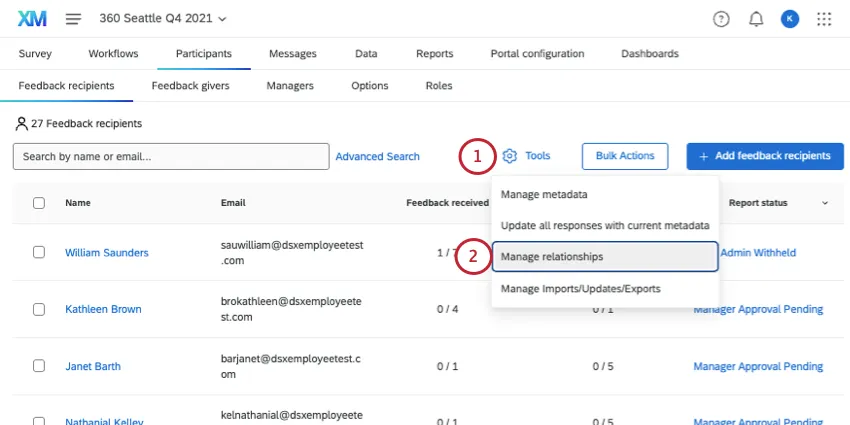
Select Manage Relationships.
Under Custom Relationships, click Add new.
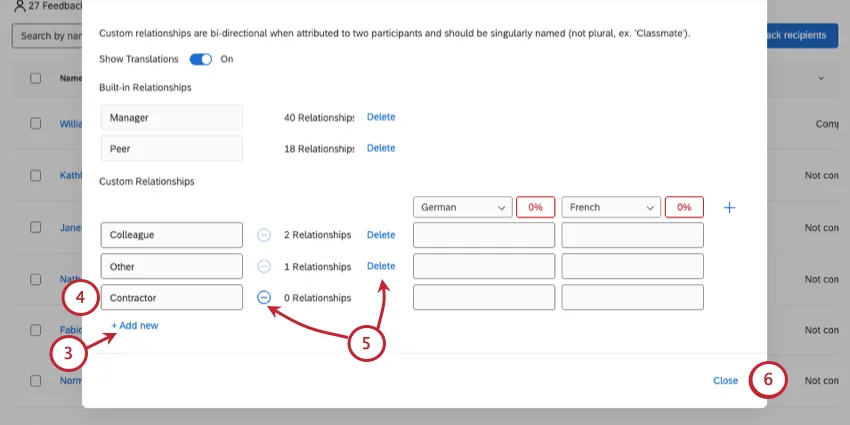
Type the relationship name in the field.
Click the minus ( – ) sign to remove a relationship with zero participants, or Delete to remove a relationship with participants.
Warning: If the relationship has participants, you will be asked to confirm your decision. Any responses associated with the relationship will be lost. This action is irreversible.
When finished with your edits, click Close.
Translating Relationships
Switch Show Translations to On.

Click the plus sign ( + ) and select your desired language. You may repeat this for as many languages as you need.
In the fields, enter the translated names of the relationships.
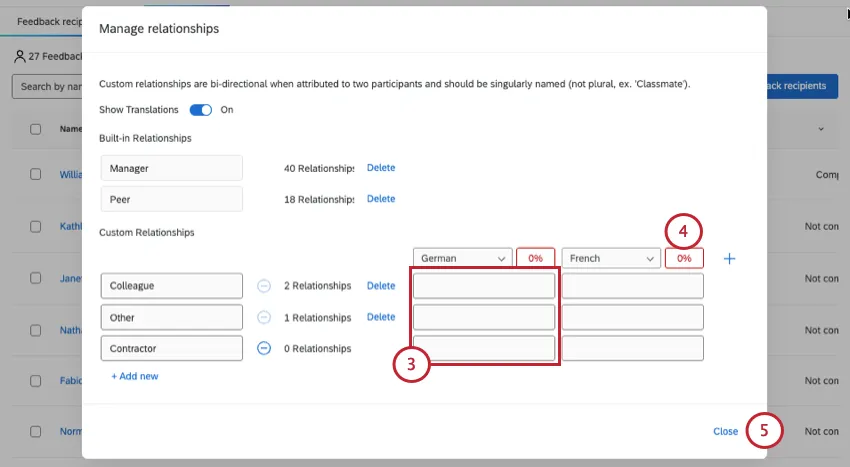
If desired, click the percentage to automatically translate the relationships. This translation is from Google Translate.
When you’re finished, click Close.
Translation Options
If you click on the header of any of your translation columns, you will have several options for managing your translations.
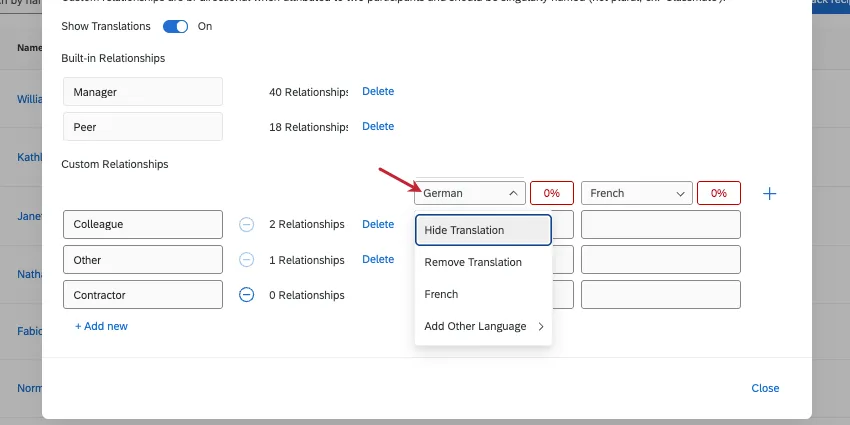
Hide Translation: Hide the translation. This can be helpful if you have many translations and need to create more room on the page.
Remove Translation: Delete the translation altogether.
Select which language displays in the column.
Add Other Language: Add another language to your list of custom relationship translations.
Manage Imports, Updates, and Exports
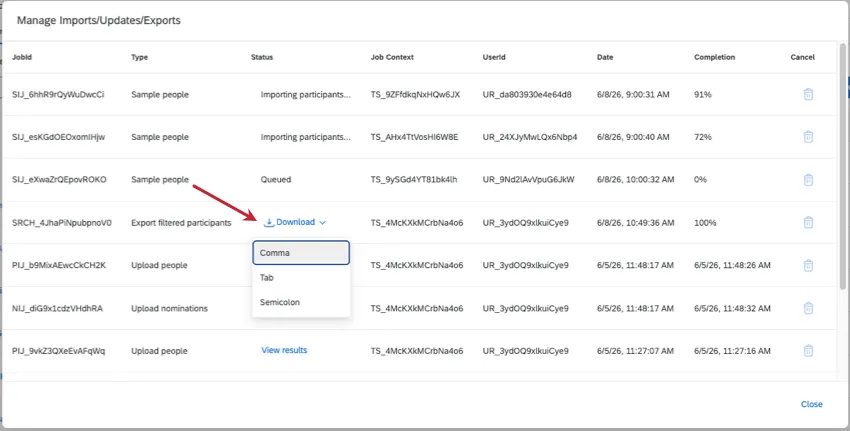
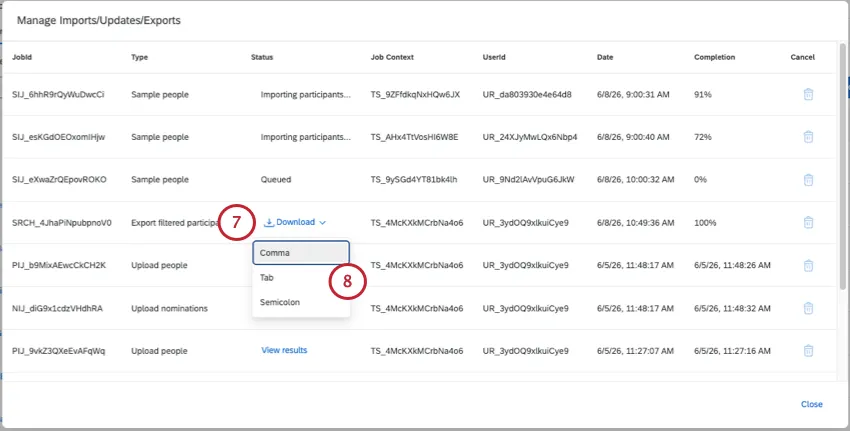
If you have recently imported your participants or chosen to Update All Responses With Current Metadata, the Manage Imports/Updates/Exports tool will allow you to look back on a history of your imports. This history shows the same content regardless of whether you are in the Feedback recipients, Feedback givers, or Managers section.
You can re-download any previously exported files from this menu by clicking Download next to a job. Exports are available in CSV (comma separated), TSV (tab separated), or SSV (semicolon separated) format.
Otherwise, this option works exactly the same in 360 as “Manage Imports/Updates/Exports” does in other Employee Experience projects. See also Job Queueing.
Export Participants
You can download a file containing the project’s feedback recipients (subjects), feedback givers (evaluators), or managers. This file can be in CSV, TSV, or semicolon-separated format.
Attention: This file does not contain information on feedback recipient and feedback giver relationships. For this reason, do not use this file as a template for uploading participants.
Go to the Participants tab.
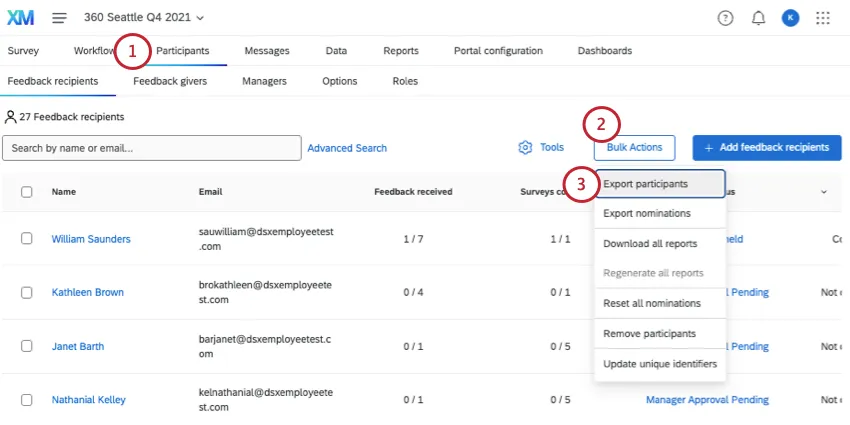
Click Bulk Actions.
Qtip: Do not select any participants. If you do, you won’t see the same bulk actions.
Select Export participants.
Choose the type of participant you want to export:
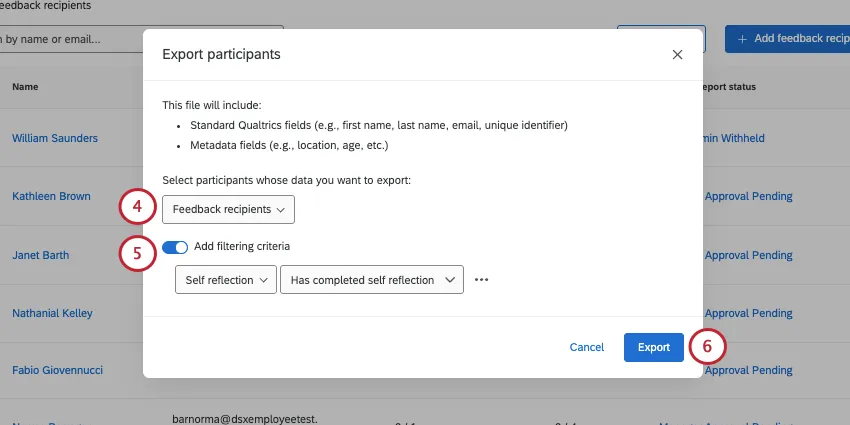
- Feedback recipients
- Feedback givers
- Managers
If you want, select Add filtering criteria to narrow down the participants you export. The options available are similar to advanced search.
Click Export.
Once the download is complete, click Download.
Qtip: It is safe to leave this page while it is loading. When it’s done, you can access the download at Manage Imports/Updates/Exports.
Choose the file format your want to download:
Comma (CSV)
Tab (TSV)
Semicolon
Understanding your exported participants list
Here’s a guide to the columns you’ll see in your exported file.
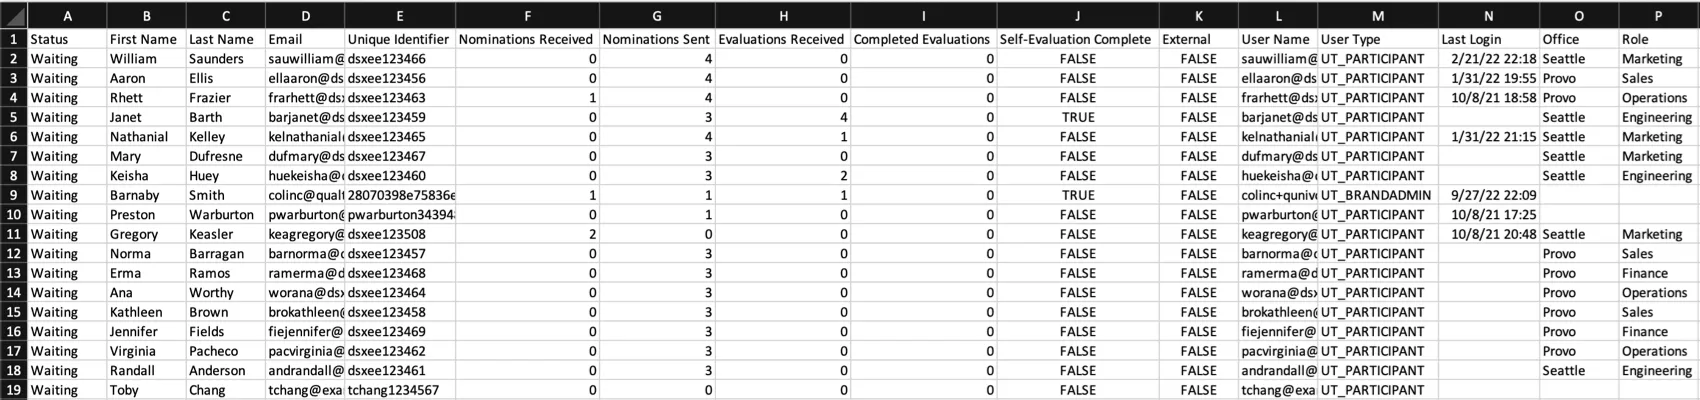
- Status: Whether the participant has completed their response, or if you are still waiting for them to respond.
- Nominations Received: How many people (excluding the self) the participant has been asked to evaluate.
- Nominations Sent: The number of people assigned to give feedback to the recipient, excluding the self.
- Evaluations Received: The number of feedback completed for this participant, including the self-reflection. This should be 0 for external feedback givers, because they are not feedback recipients.
- Completed Evaluations: How many assessments (excluding the self-reflection) the participant has completed.
- Self-Evaluation Complete: Whether a self-reflection still needs to be completed. This field will have a value of 0 if the recipient did not complete the self-reflection and a value of 1 if they did complete the self-reflection. External feedback givers will always have a value of 1 because they do not need to complete a self-reflection.
The export will also include each participant’s first and last name, unique identifier, username, user type, last login date and time, and metadata.
Qtip: All collected responses, including partial responses, are marked as completed in the participants tab.
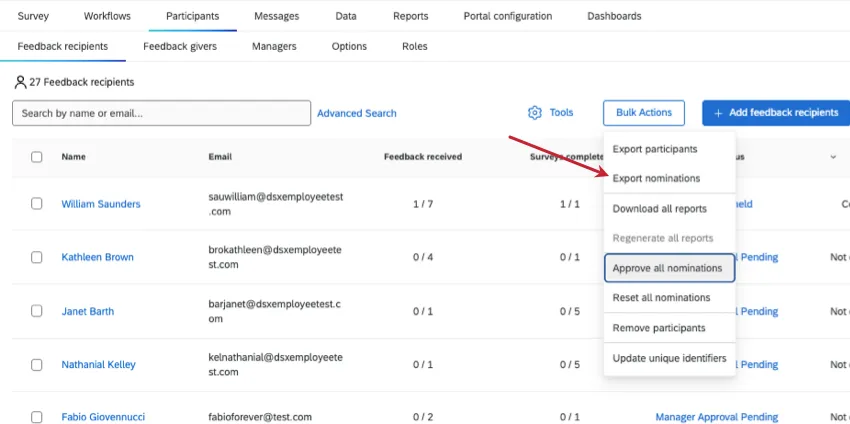
Export Nominations
Qtip: This file includes feedback recipients and feedback givers, and splits relationships onto separate rows. Because of this, the file can be reused as a template for uploading 360 participants.
You can export a list of all nominations by selecting Export Nominations under the Bulk Actions menu. Make sure you do not select any participants.
You can decide whether you’d like this file in CSV (comma separated), TSV (tab separated), or SSV (semicolon separated) format.
Columns in the exported file
- FirstName, LastName: The first and last name of the feedback giver who was nominated.
- EvaluatorEmail: The feedback giver’s email.
- EvaluatorUniqueIdentifier: The unique identifier of the feedback giver.
- SubjectUniqueIdentifier: The unique identifier of the feedback recipient they were nominated to assess.
- Relationship: The relationship of the feedback giver to the recipient.
- Solicited: “TRUE” if the nomination was solicited and “FALSE” if it was not solicited. Whether or not a project allows unsolicited nominations is configured in Participants Options.
- NominatedByUniqueId: The unique identifier of the person who made the nomination. This can be the feedback recipient themselves, but it may also be the administrator who created the project or a manager, depending on who you allow to make nominations.
- NominatedOn: The date and time the nomination was made.
- Method: How the nomination was made. These include:
- Imported: The nomination was imported.
- Added using automatically add evaluators option: When adding feedback recipients and feedback givers manually, the nomination was created due to the “automatically assign feedback givers based on relationships” option.
- Added unsolicited: The nomination was an unsolicited nomination.
- Added during response import: The nomination was created as a result of an imported response.
- Added by subject: The nomination was added by the feedback recipient.
- Added by admin: The nomination was added by a manager.
- Automatically generated: The nomination was created automatically; it is either a round-robin nomination or a self-reflection.
- Status: Indicates if the nomination was approved or declined. Statuses include approved, waiting, denied, and denied by evaluator. See Participant Options for more information about declining nominations.
- ResponseId: If a response has been submitted, the response’s ID.
- SubjectFirstName: The first name of the feedback recipient they were nominated to assess.
- SubjectLastName: The last name of the feedback recipient they were nominated to assess.
Reimporting Exported Participant Lists
You can import participant lists that have been exported, making updating many participants quick and easy. When reimporting an exported participant list, make sure to remove the columns listed below. These columns represent internal Qualtrics fields. If these columns are included in a participant import, then these fields will be saved as participant metadata. Usually, these fields aren’t useful for reporting purposes, so we recommend removing the columns from your import. The columns to remove are:
- Solicited
- NominatedByUniqueId
- NominatedOn
- Method
- Status
- ResponseId
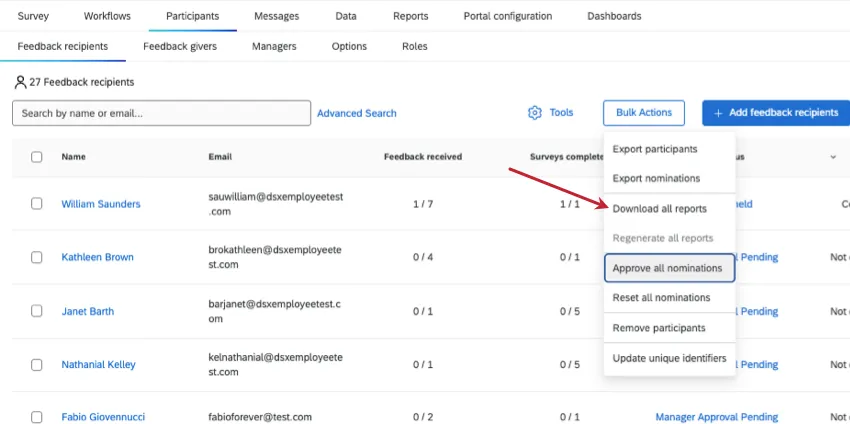
Download All Reports
You can download a PDF of every feedback recipient who has at least 1 response. Reports for feedback recipients with 0 responses (no data) will not be downloaded.
Qtip: Use the Search bar or select specific participants if you only want to download a few PDFs at a time.
Go to the Participants tab.
Go to the Feedback recipients section.
Qtip: “Download all reports” is not available on the Feedback givers section because feedback givers don’t have reports. This option also doesn’t display on the Managers section because not all managers are feedback recipients, although they can be.
Select Bulk Actions.
Select Download all reports.
Qtip: Report availability criteria does not impact the ability to download all reports.
Qtip: When you download reports, that version of the report becomes cached for a period of time. If there are edits to the report, they may not immediately reflect in your download. If the project is active, then the cache will update after 10 minutes, and you can download the edited report after the cache updates. If the project is closed, then you must regenerate reports for the edits to reflect in the download.
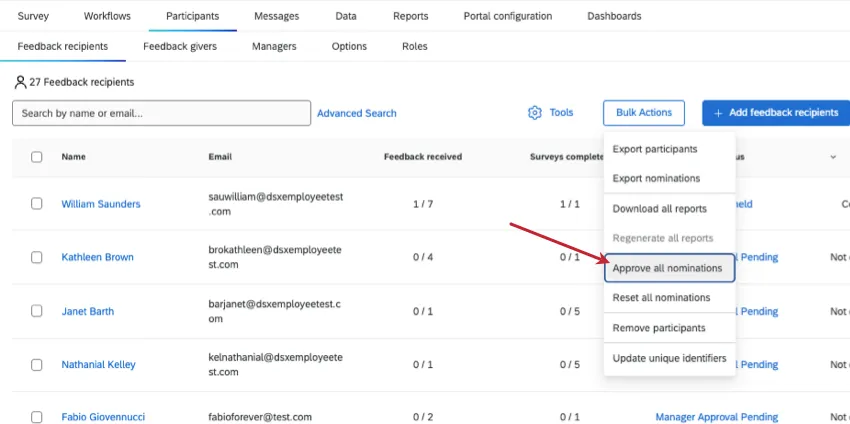
Approve All Nominations
The Approve All Nominations option allows you to approve all feedback givers that have been nominated by recipients. For this option to appear, the following settings must be enabled in your project’s Participant Options:
To use this option, do not select any participants, select Bulk Actions, then select Approve all nominations.
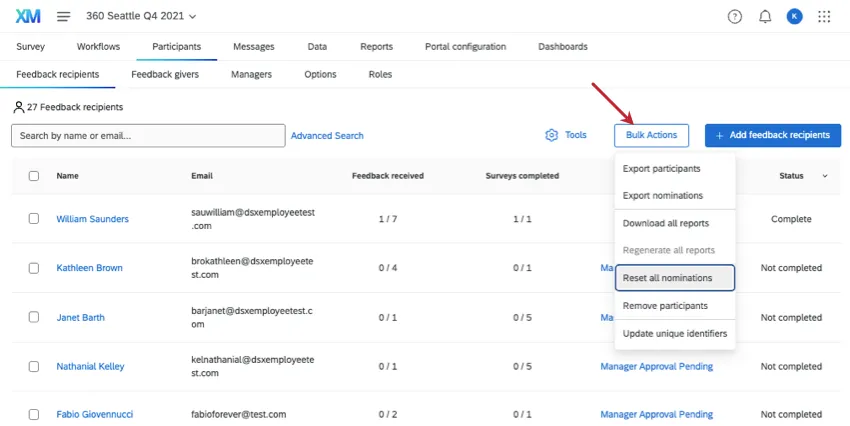
Reset All Nominations
Reset All Nominations You can remove all the feedback giver relationships from the project. This does not just count for nominations that feedback recipients set for themselves, but all feedback givers set for the feedback recipient.
To do this, do not select any participants. Click Bulk Actions, then select Reset all nominations.
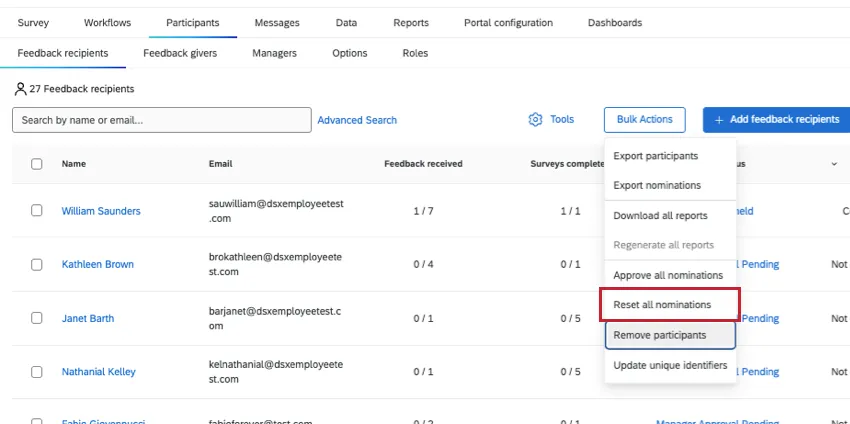
Warning: Once nominations are reset, they are not retrievable! Only select this option if you are absolutely sure!
Remove Participants
There are a couple different ways to remove participants. One is a manual approach where you select participants and remove them by pages of the Participants tab. The other is a convenient import process where you can upload a list of Unique IDs for the participants you’d like to remove.
Warning: Once participants are removed, the participants and their responses are not retrievable! Only select this option if you are absolutely sure!
Manual Removal
See also Managing Participants.
Go to the Participants tab.
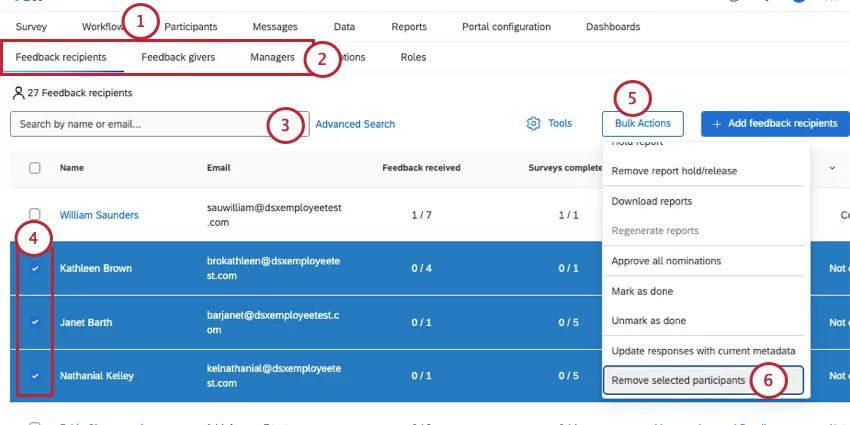
Go to the section matching the type of participant you want to remove:
- Feedback recipients
- Feedback givers
- Managers
If desired, search to narrow down the participants you see.
Select users you’d like to remove.
Click Bulk Actions.
Select Remove selected participants.
Type “remove.”
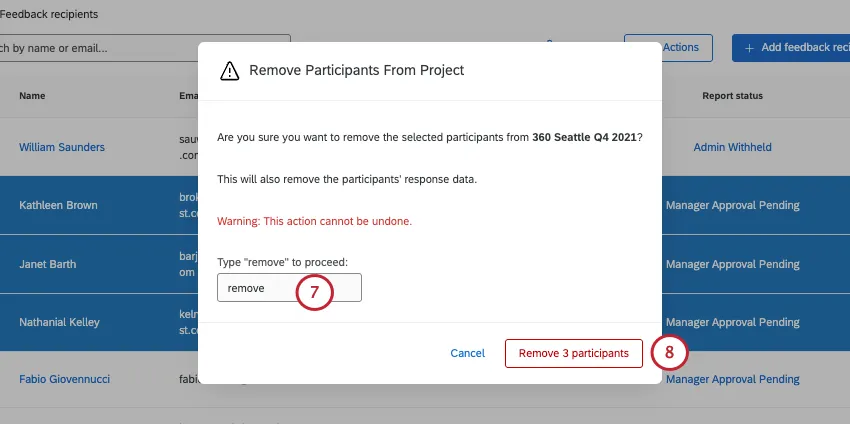
Click Remove participant(s).
Qtip: You can only delete users together if they are on the same page of the Participants tab. If you go to the next page, any selections you made on the previous page are deselected.
Bulk Removal Through Import
Qtip: Do not select any participants. If you do, you won’t see the same bulk actions.
Go to the Participants tab.
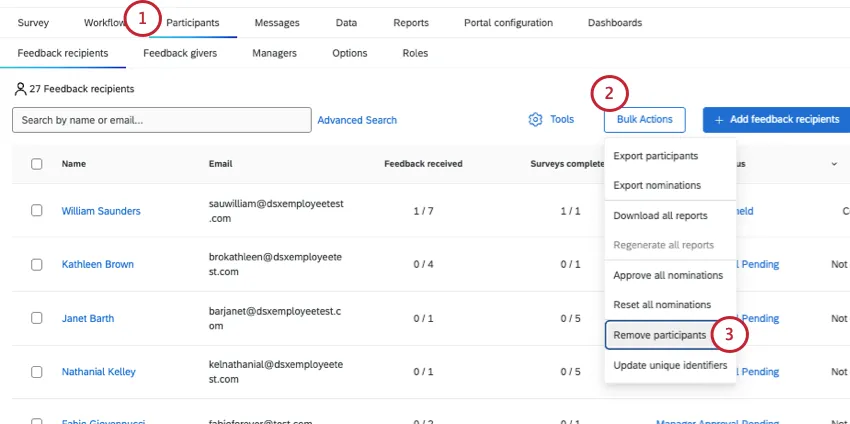
Go to Bulk actions.
Select Remove participants.
Download the example CSV file. Open the file and enter the corresponding IDs in the Unique Identifier column. Save your file as a UTF-8 encoded CSV.
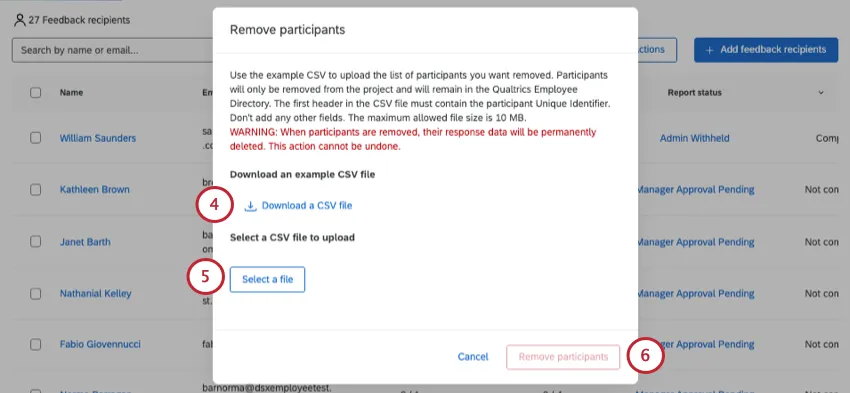
Qtip: If you’re not familiar with your participants’ unique IDs, you may want to export your participants list.
Click Browse and select the file you just created.
Click Remove participants.
Update Unique Identifiers
Qtip: Instead of updating unique identifiers in a project, we recommend doing it in the employee directory.
Update Unique Identifiers allows you to change the unique identifiers of the participants in your project. To do so, you need to know the participants’ current unique identifiers. If you’re unsure of this information, try looking up the participant you want to change or exporting your participants list.
Updating Participants
You may want to update, add, or delete participant metadata values for your 360 project. You can do so by importing an updated file.
See Adding Feedback Givers, Recipients, & Managers (360) for steps to import participants. Make sure your file contains the metadata changes you want to see.
FAQs
Who assigns relationships in a 360?
Who assigns relationships in a 360?
Depending upon the Participants Options enabled for the 360 project, a subject and/or manager can assign relationships to evaluators.
Managers can assign relationships if Managers may choose evaluators is turned enabled.
Subjects can only assign relationships if Subjects nominates evaluators and the sub option "Allow subjects to select relationships" are both enabled.
Please note that the relationships selected when nominating evaluators are only used to categorize the response and do not provide the evaluator with additional project permissions. Evaluators that are selected with a "manager" relationship will not be assigned into the manager role automatically and will not be able to perform manager-related tasks. Only a project administrator can define managers for users added to the 360 project.
Administrators (e.g., those with project-creation capabilities) can always assign relationships. Administrators can change relationships even after evaluations have been submitted. This is done by clicking on the name of the subject in the Subject subsection, viewing the Evaluators list for that subject, clicking on the relationship for a particular evaluator, and selecting the new relationship from the dropdown list.
How do you mass upload all of your subjects or evaluators into a 360 project?
How do you mass upload all of your subjects or evaluators into a 360 project?
Does order of the metadata matter when organizing your 360 participant file?
Does order of the metadata matter when organizing your 360 participant file?
How can you assign a manager to subjects without the manager being also assigned as an evaluator?
How can you assign a manager to subjects without the manager being also assigned as an evaluator?
I created new metadata fields, but they are not reflected in my 360 reports. What's happening?
I created new metadata fields, but they are not reflected in my 360 reports. What's happening?
For future reference, if you’d like to update metadata fields without then having to individually update participants, see the Updating Responses with New Metadata page.
That's great! Thank you for your feedback!
Thank you for your feedback!