
Participant Information Window (EX)
What's on this page
Qtip: This page describes functionality available to Engagement, Lifecycle, and Ad Hoc Employee Research projects. For more details on each, see Types of Employee Experience Projects. This functionality is also available in Pulse, although with some differences detailed here.
About the Participant Information Window
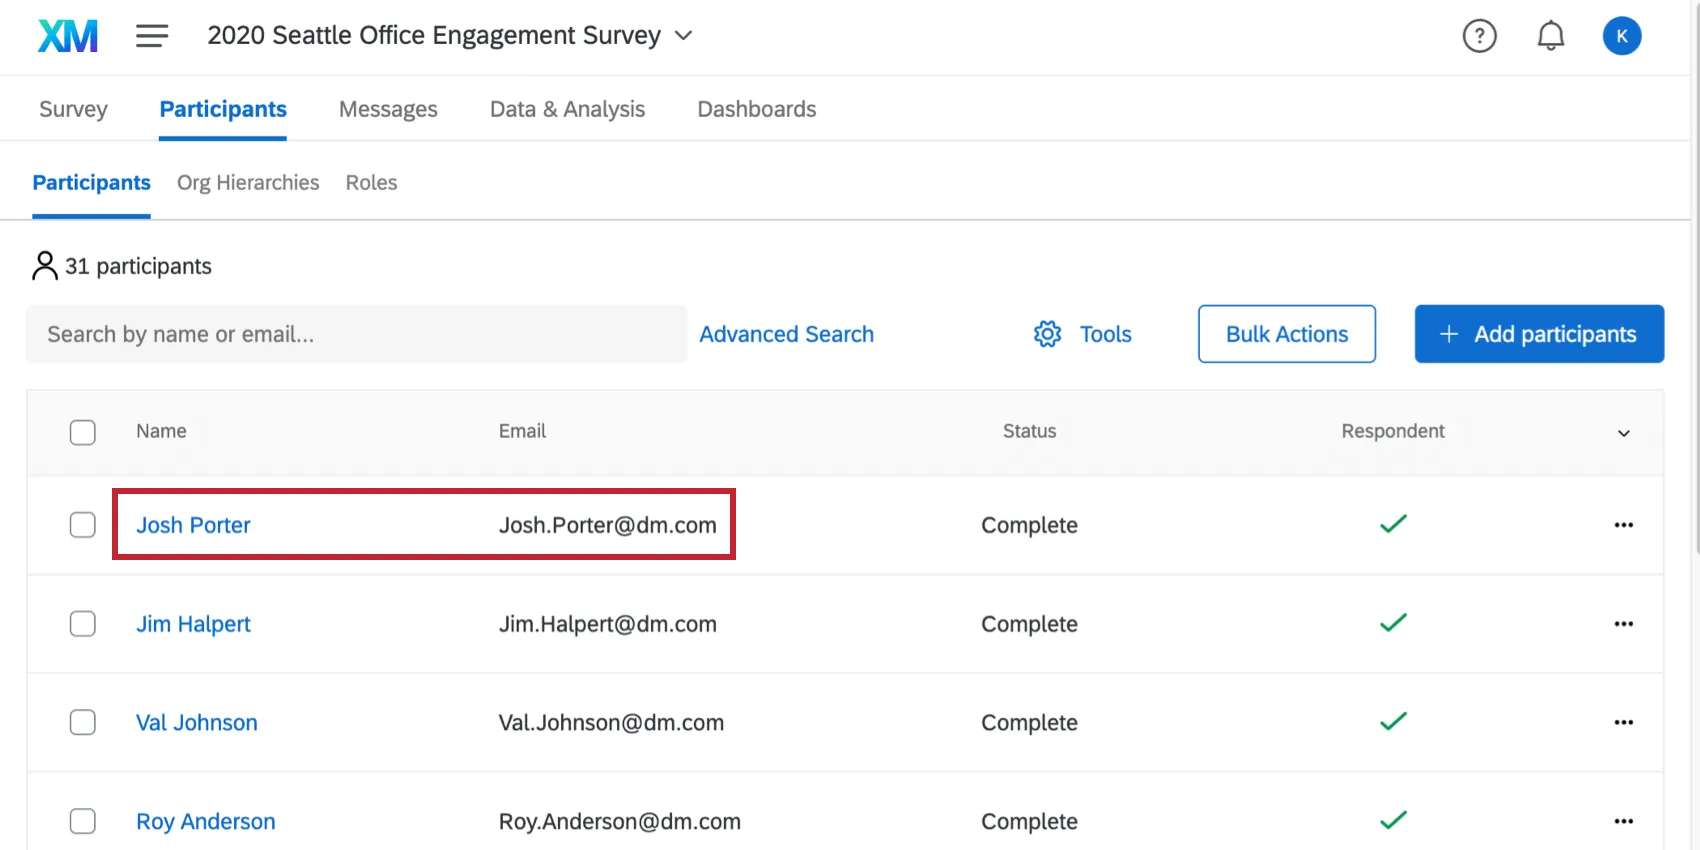
The participant information window contains information regarding the participant’s metadata, what hierarchies they belong to, the roles they belong to, and their user permissions. Here you can perform various tasks and edit information for the selected participant only. To access this window, click on a participant’s name or email while viewing the participant list in the Participants section.
Editing Participant Information & Metadata
Basic Information
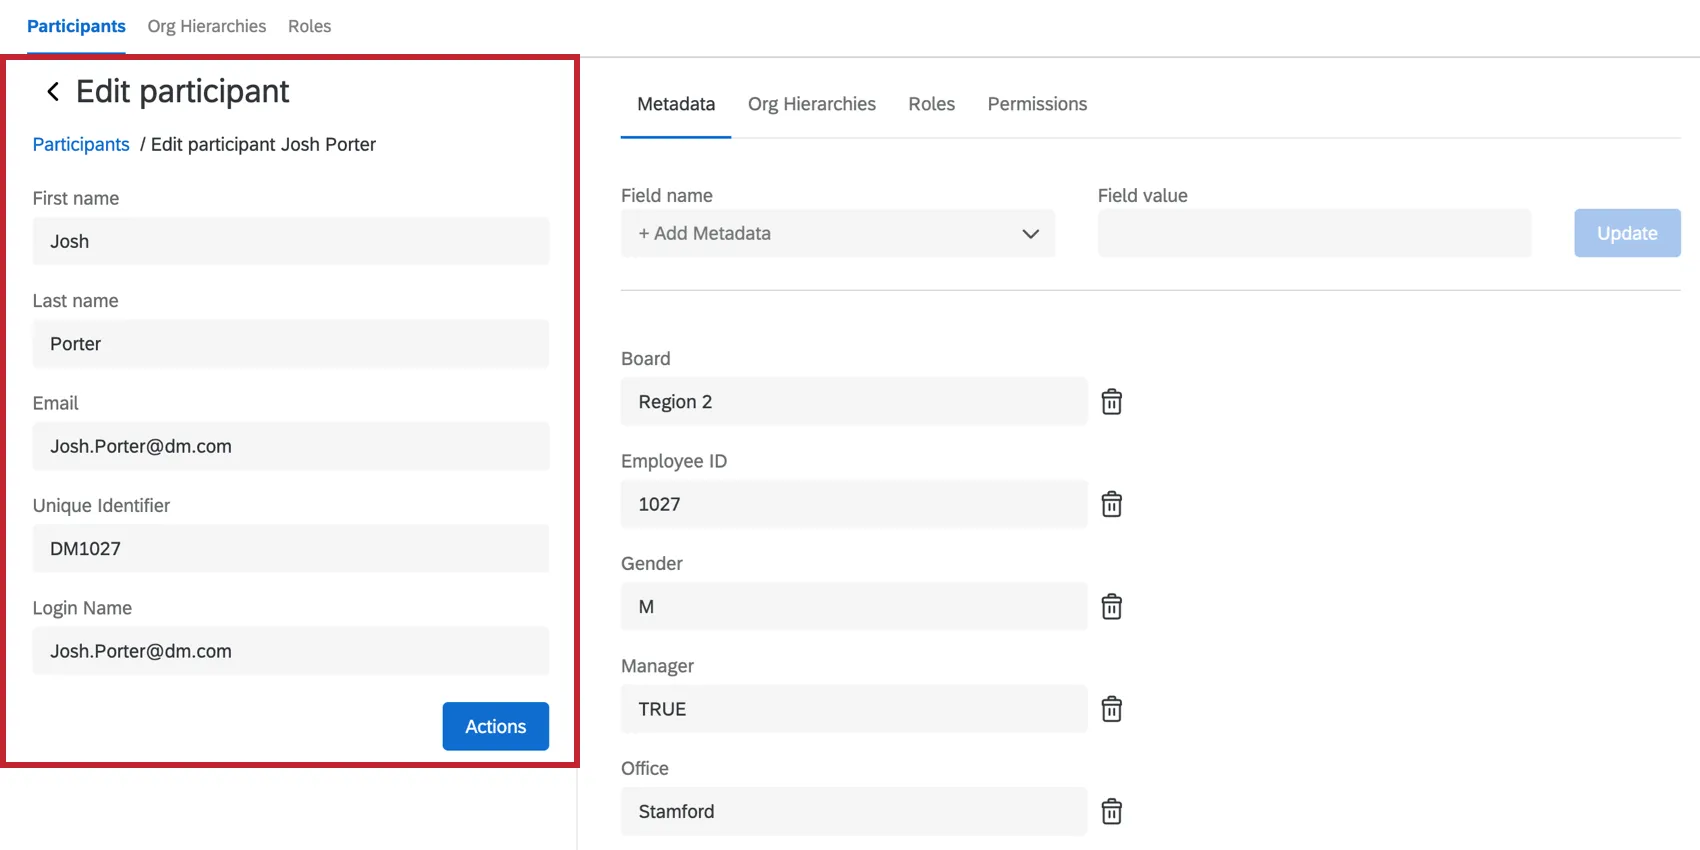
This section contains information about the first name, last name, email, unique identifier, and login name for the participant. To edit a field, type in the new value. This change will reflect both in the Admin page and Employee Directory.
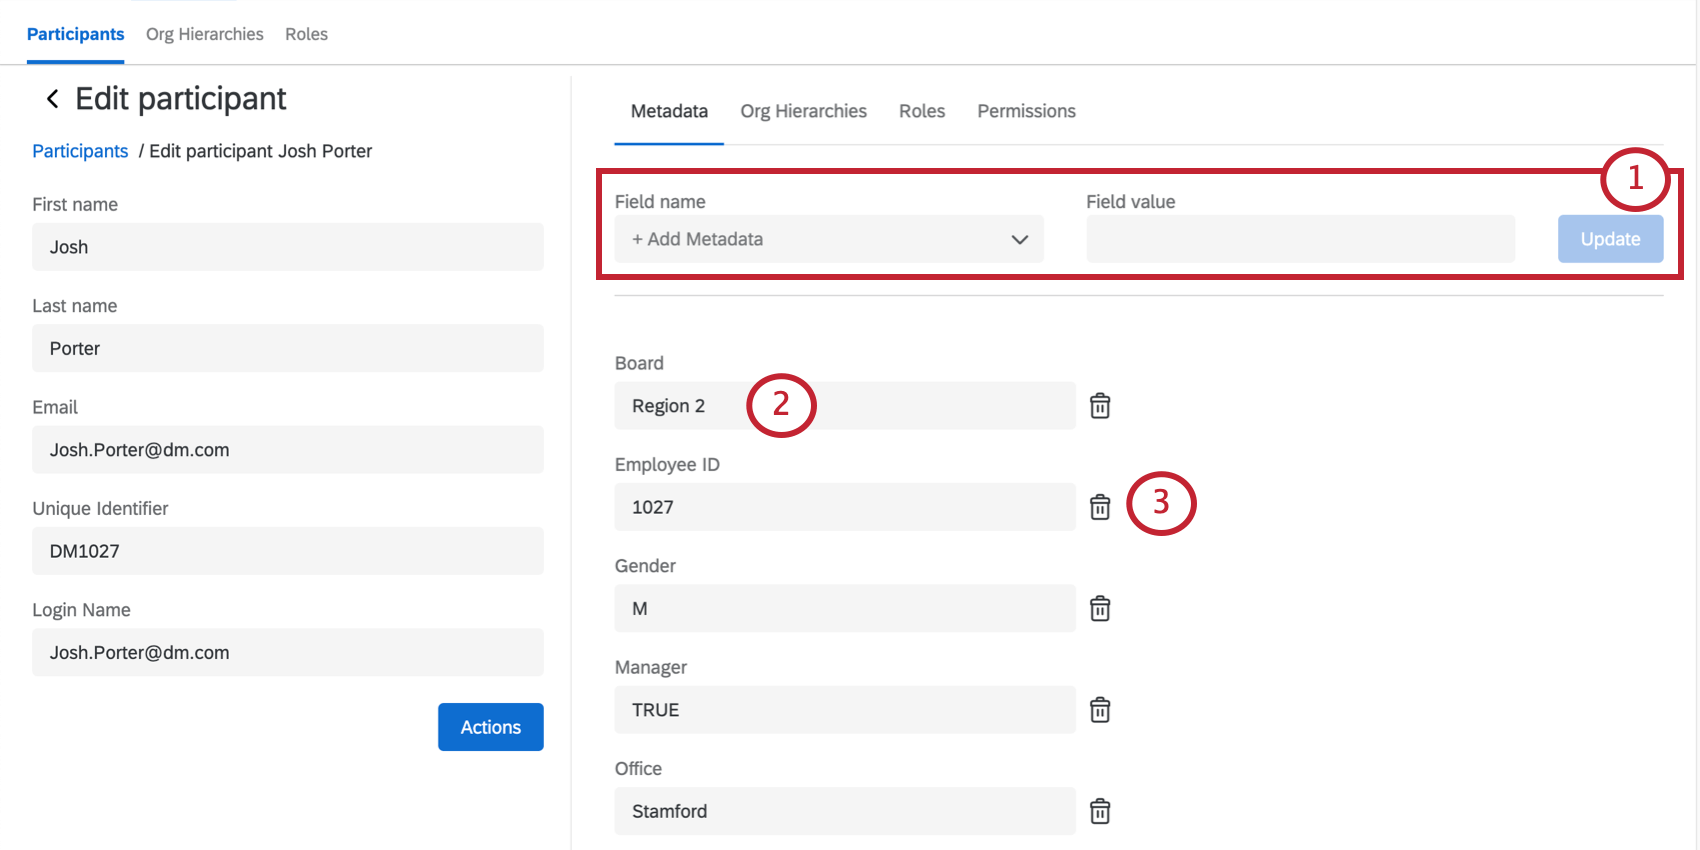
Metadata
This section contains information about the various pieces of metadata that have been assigned to the participant.
Actions
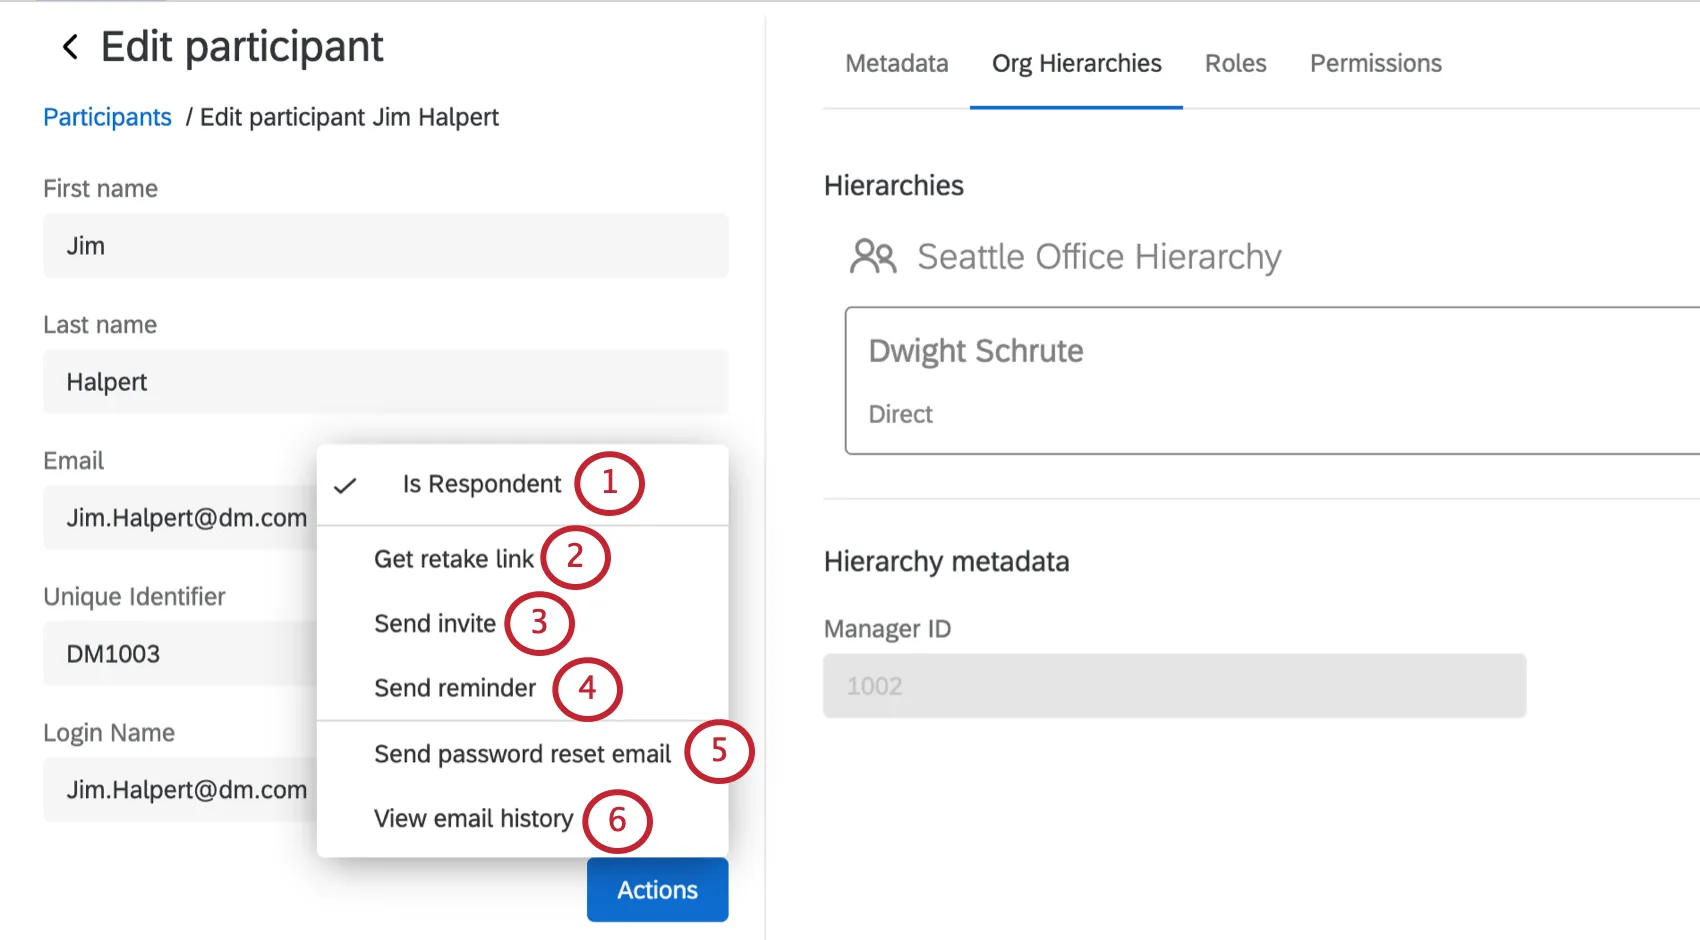
Qtip: Need to send a more customized message to one participant? When you send the invite or reminder from the Email Messages section, you can edit your message and then set a condition so that it only goes to a specified participant.
Org Hierarchies
This section of the participant information window has information about an Employee Engagement participant’s position in the hierarchy/hierarchies that they are a part of. Note that this tab is purely informational. If you would like to change any information here, it would have to be done by following the instructions in the Adding Participants support page.
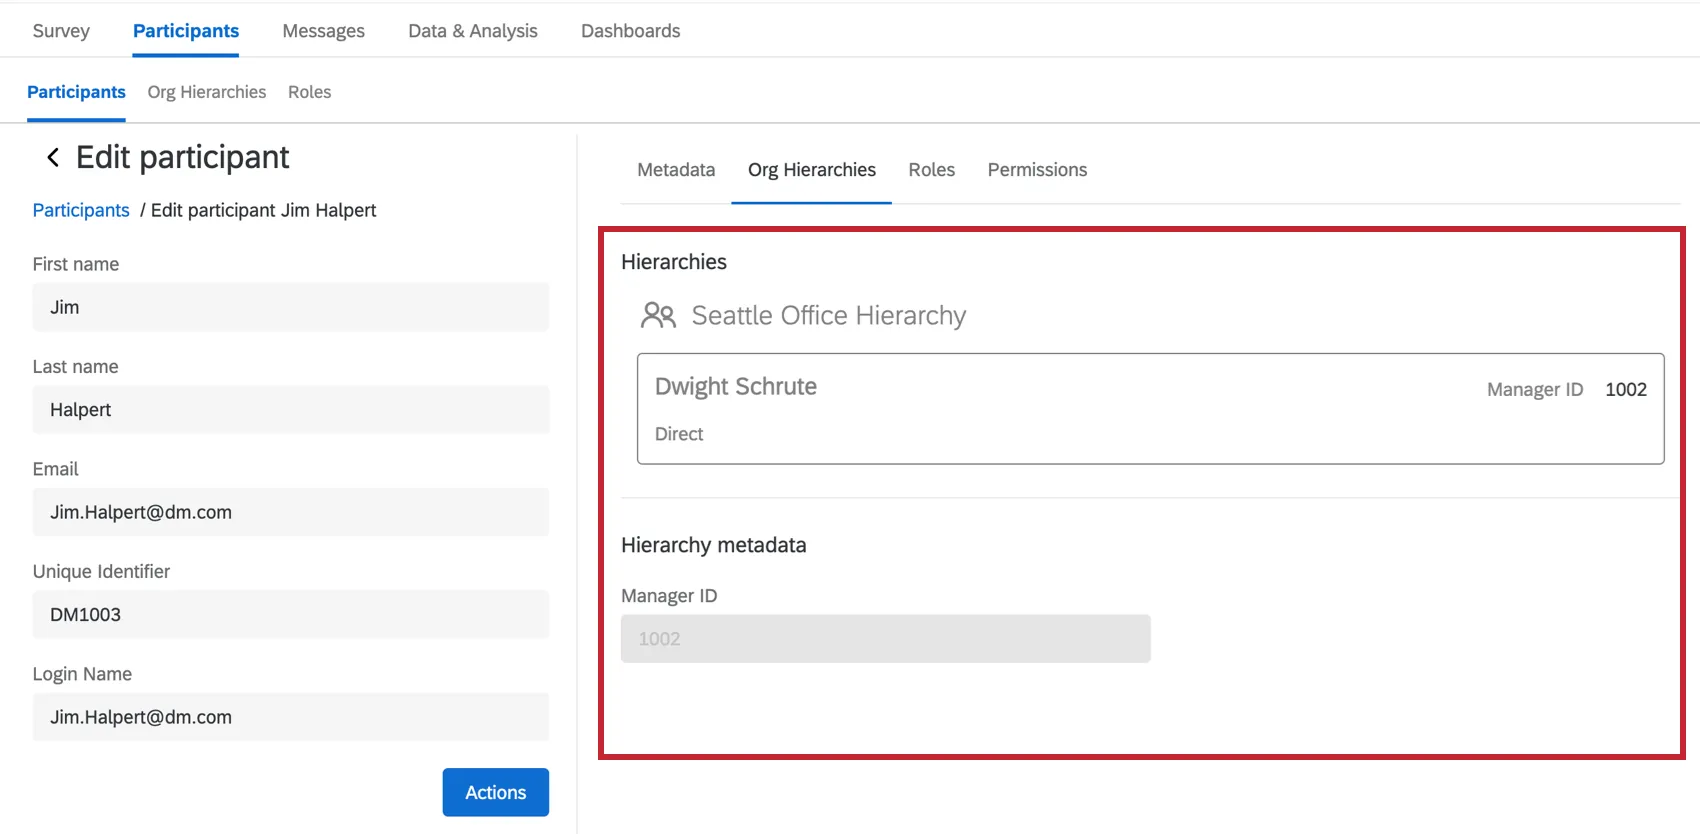
Qtip: If a hierarchy is deleted, any hierarchy metadata displayed here will be returned to person metadata and can be viewed in the Metadata tab.
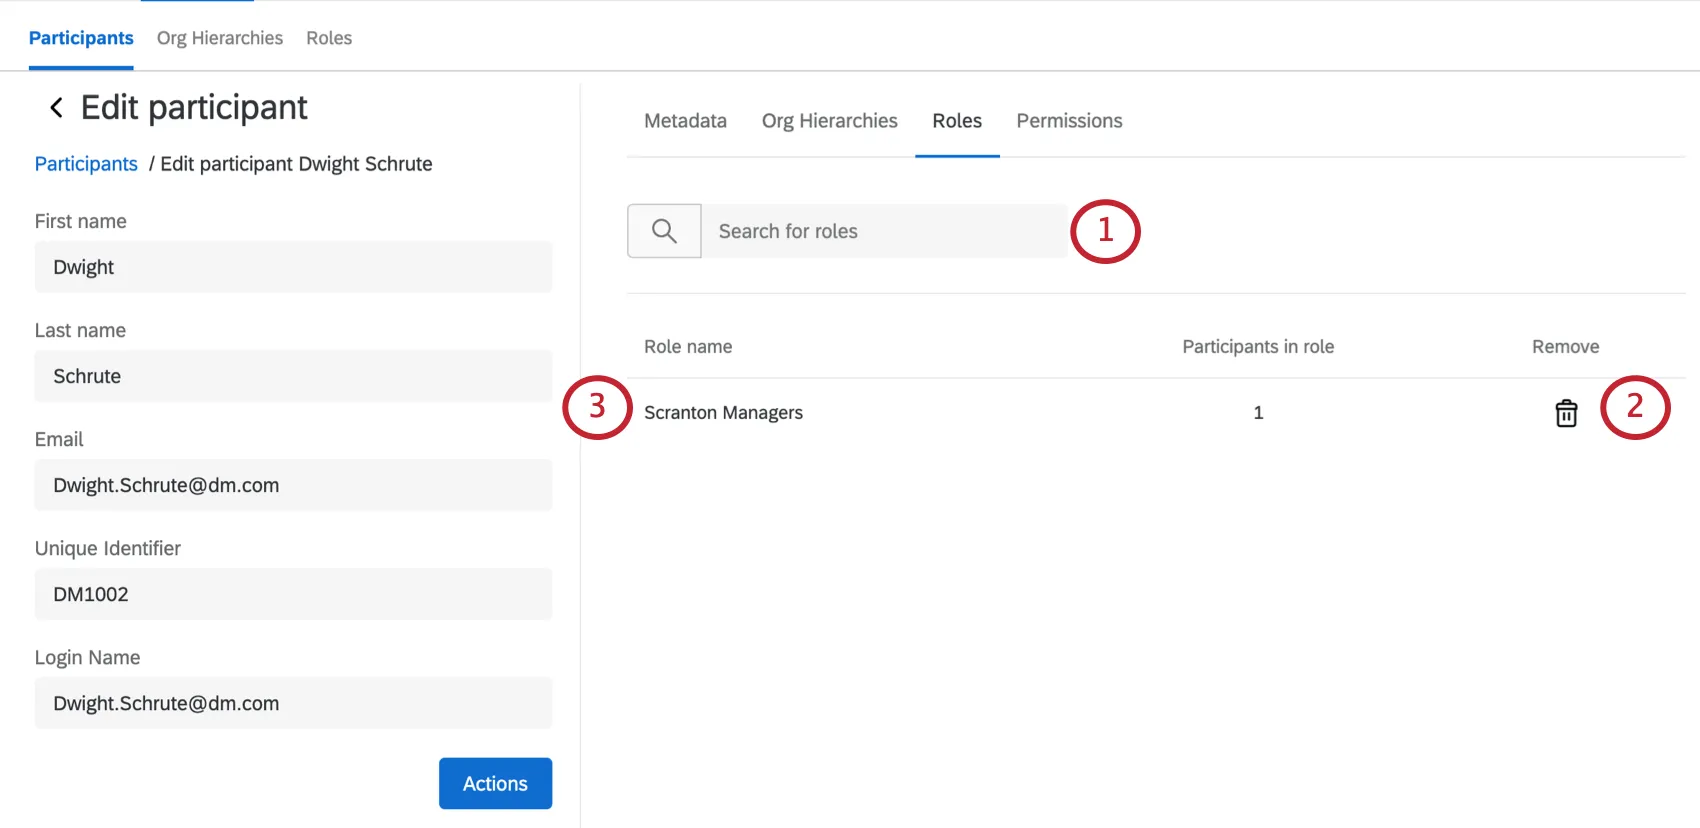
Roles
Permissions
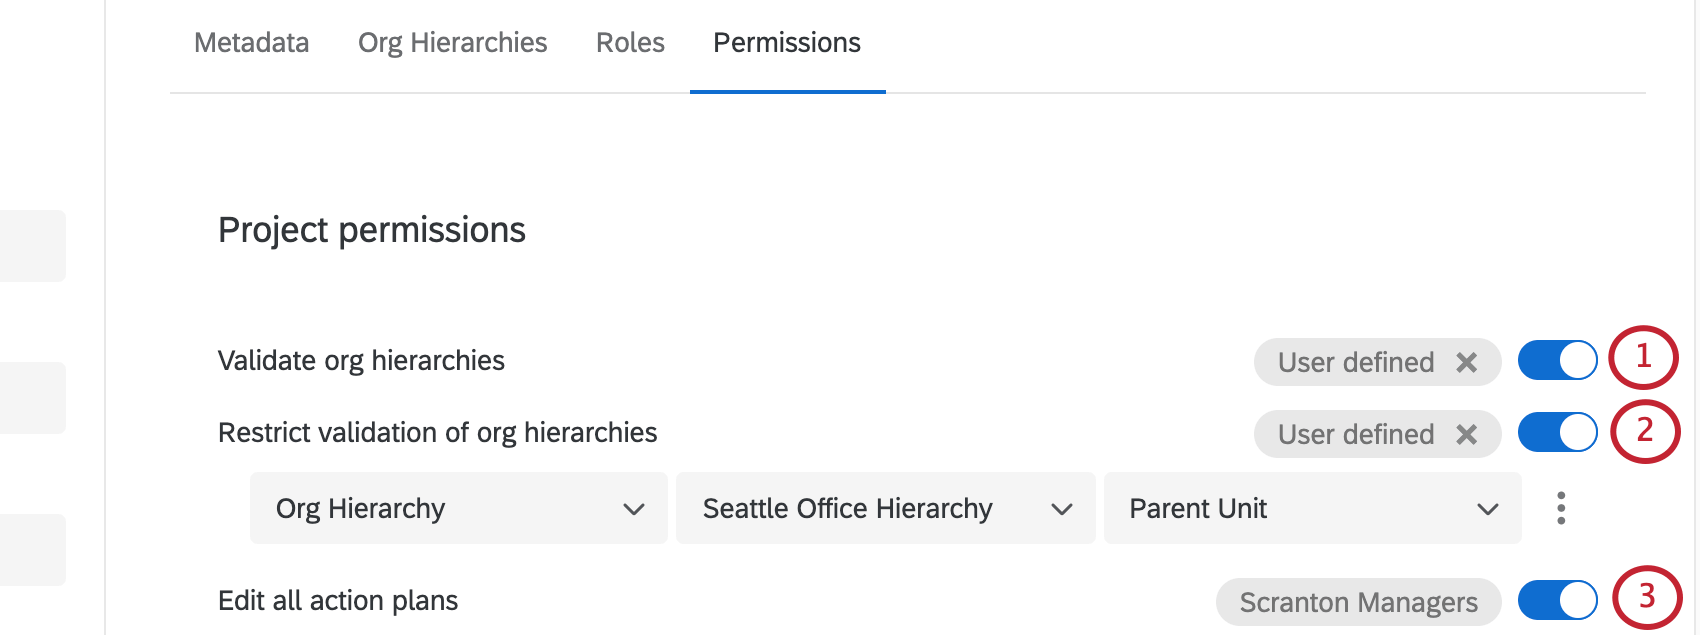
This section is used to control access to dashboards and data within those dashboards. Here you can enable and disable permissions on the participant level. However, it is best practice to manage permissions in the Roles section so you can edit multiple users’ permissions at a time and keep your participants’ permissions standardized.
Next to each permission it will specify how the permission is being set for the individual. “User defined” means the permissions was applied to the participant, and the role name means the participant was assigned the permissions by a role they belong to. Any manually adjusted user defined permission will always override a role permission. However, if you ever want to get rid of a user defined permission so it will default to the role permission instead, select the X next to where it says User Defined.

Project Permissions

Validate org hierarchies: Allows the participant to login to the platform and view/edit the org hierarchies section in an Engagement project. However, they will not be able to add or remove people until they are given login information. There is a specific invite message called Validate Org Hierarchy that will include a link and the participant’s login information. Note that the participant’s login credentials will be the same as for their dashboard, but the included URL for Validate Org Hierarchy will be different.
Attention: Participants with “Validate org hierarchies” enabled will be able to export a file containing every participant in the hierarchy. Make sure you are okay with the participant having access to this information before enabling this permission for them.
Restrict validation of org hierarchies: Appears only after “Validate org hierarchies” is enabled. If you want to restrict what the participant can validate in the hierarchies, here are the options you have:
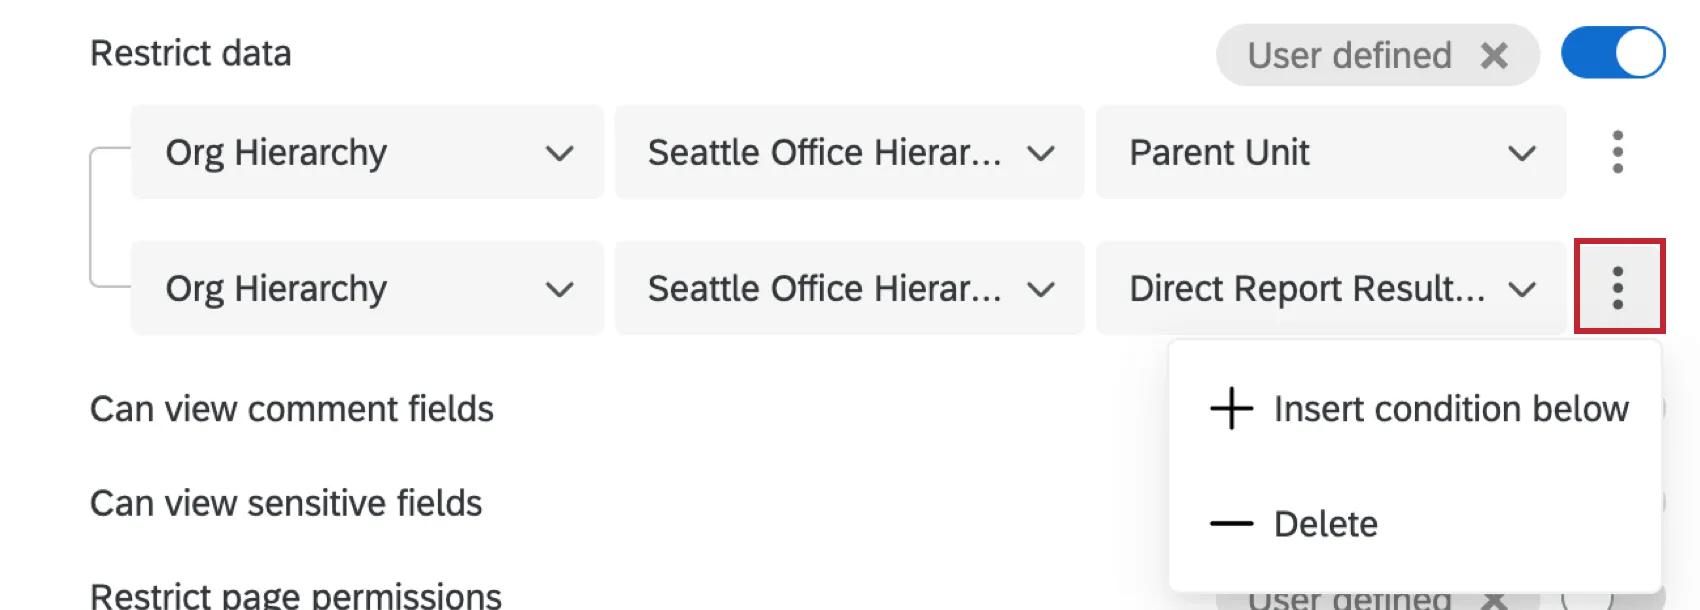
- Org Hierarchy: Allows you to restrict validation to the participant’s Parent Unit (including everyone who rolls up to the parent unit), All Results Below Them (includes data rolling up to the unit for which they are a manager), Direct Report Results Only (includes only the participant’s direct reports), or People at Same Level Only (includes responses from the same level of indentation in the hierarchy as the participant, in addition to all the responses below that unit).
- Org Hierarchy Units: Allows you to restrict validation to responses In or In Or Below a specific unit.
Qtip: You can add and remove additional restriction conditions by selecting Insert condition below (+) and Delete (–) signs next to each condition. You will only be able to add up to 10 conditions at this point in time.
Qtip: Participants with the Validate org hierarchies permission will not be able to open the participant information window. Therefore, they can not see or edit participant metadata.
Attention: If the participant is an Employee Insights Admin, Employee Experience Admin, or Brand Admin user, then you will need to collaborate the project with them so they can validate the org hierarchy. The validate org hierarchy link will not direct Admin users to validate the hierarchy unless the project has been collaborated with them.
Edit All Action Plans: See Action Plan Permissions.
Dashboard Permissions
After you give a participant access to a dashboard by selecting Add a dashboard, you will be able to set the permissions that the participant will have for that specific dashboard.
Qtip: By default, the user who creates a dashboard is given access to that dashboard on a user level.
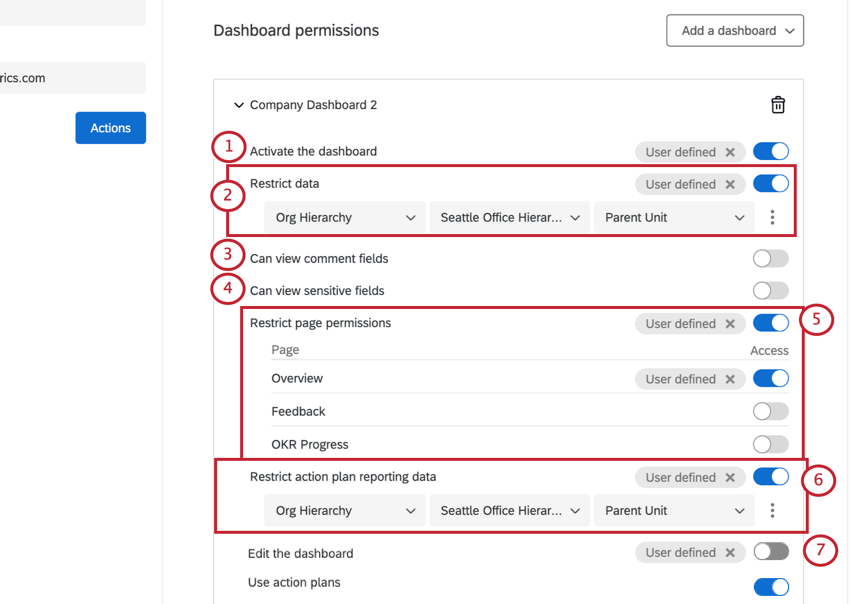
Activate the dashboard: Allows the participant to access the dashboard. If you have multiple dashboards added for an individual, this option can be turned on or off for each dashboard.
Restrict data: Specifies what responses the Employee Engagement dashboard user has access to within the dashboard, including actions plans (if Edit All Action Plans or Use All Action Plans is enabled). If you do not restrict data, the participant/role will have access to all data in the dashboard, regardless of their place in the org hierarchy. If you choose to restrict data, you have several options.
Org Hierarchy: Allows you to restrict data access to the participant’s Parent Unit (includes everyone who rolls up to the selected parent unit), All Results Below Them (includes data rolling up to the unit for which they are a manager), Direct Report Results Only (includes only the participant’s direct reports), or People at Same Level Only (includes responses from the same level of indentation in the hierarchy as the participant).

Attention: When limiting data by an org hierarchy and you have a historical hierarchy mapped, it’s important to understand how data access works for historical data. If your dashboard has historical hierarchies mapped, access to historical data is based on the participant’s permissions from the current project with respect to your mapping roll-up settings. If your org hierarchy changed between the historical and current project, it’s possible for the dashboard viewer to see data for one hierarchy unit but not the other. This is true for all 3 org hierarchy restrictions: Org Hierarchy, Org Hierarchy Units, and Org Hierarchy Metadata.
For example, let’s say your current hierarchy has 3 units: Unit C which reports to Unit B which reports to Unit A. In your historical hierarchy, the same 3 units exist, but instead both Units B* and C* report to Unit A*. If you map like units (A to A*, B to B*, and C to C*), then dashboard viewers with “In or Below” access to data in Unit B will not see data for Unit C* in the historical hierarchy due to how units are mapped. The dashboard viewer will be able to see data for Unit C in the current hierarchy (along with data for B and B*). “All Results Below Them” works slightly differently and will show data for Unit C* in the historical hierarchy. “All Results Below Them” gives permission to view data to each mapped unit.
- Org Hierarchy Units: Allows you to restrict data access to responses In or In Or Below a specific unit. If a participant is given multiple restrictions based on org hierarchy units, then the participant’s dashboard will default to the unit closest to the “root” of the hierarchy. For example, in a parent-child hierarchy, the CEO is the “root” of the hierarchy; in a level-based hierarchy, the “root” is the top-most level.
- Org Hierarchy Metadata: Allows you to restrict data access by metadata that was included as Org Hierarchy Metadata when generating a level-based hierarchy. This often correlates to the participant’s department within various levels of the organization.
Field: Allows you to restrict data access by metadata that either has the same value as the participant or matches a specified value. You can only restrict data by metadata fields that are mapped as a multi-answer text set in your dashboard data.

Qtip: If your dashboard has an org hierarchy filter and a participant has data access restricted only by non-org hierarchy metadata, the participant will not see the org hierarchy filter when they view the dashboard.
Attention: A maximum of 100 fields will appear in the dropdown menu. If you reach this maximum, type in the exact data you are looking for in order to manually choose a field.
Qtip: You can add and remove additional restriction conditions by selecting the dots next to each condition. You can only add up to 10 conditions at this point in time.

Attention: You cannot add data restrictions to dashboard viewers in Ad Hoc Employee Research projects.
Can view comment fields: Allows the participant to view response ticker comments, comment summaries, and word clouds in the dashboard.
Attention: Brand Administrators and EX Administrators will be able to view comment fields regardless of their dashboard permission. A user will be considered an EX Administrator if they have any of the following Employee Experience permissions enabled: 360, Employee Engagement, Employee Pulse, Employee Lifecycle, or Ad Hoc Employee Research.
Can view sensitive fields: Allows the participant to access sensitive field filters in the dashboard. Sensitive fields are specified in the dashboard data.
Attention: Brand Administrators and EX Administrators will be able to view sensitive fields regardless of their dashboard permission. Please note that these users will not be able to filter by sensitive fields if not given this permission, but will still be able to see sensitive field information in the widgets.
Restrict page permissions: Restricts the participant from seeing all pages of the dashboard. When you enable this option, you can pick and choose specific pages of the dashboard the participant should be allowed to view. When disabled, the participant can access all pages of the dashboard.
Restrict action plan reporting data: See Action Planning Permissions for details.
Edit the dashboard: Allows the participant to edit widgets, filters, and the Settings tab of the dashboard. This is typically used for your project team members only.
Qtip: If you share a project with another user, this will not automatically give the user dashboard editing access. For more details, see Sharing Dashboards on the Collaborating on Projects (EX) support page.
Attention: Users with the Edit the dashboard permission enabled will have full access to the dashboard. This setting will override any other view restrictions for roles assigned to that user.
Use action plans: See Action Planning Permissions for details.
Use Qualtrics Assist AI Chat: See Qualtrics Assist (EX) for details.
Use personalized action recommendations: See Personalized Action Recommendations for details.
To take away a participant’s access to a dashboard, select the trashcan icon. If the dashboard is Activated, you must Deactivate it before removing access. You can add multiple dashboards by using the Add a dashboard dropdown.

FAQs
My Employee Engagement participants want to retake their responses. How can they do this?
My Employee Engagement participants want to retake their responses. How can they do this?
That's great! Thank you for your feedback!
Thank you for your feedback!