
Email Messages (EX)
What's on this page
Qtip: This page describes functionality available to Engagement, Lifecycle, and Ad Hoc Employee Research projects. For more details on each, see Types of Employee Experience Projects.
About Sending Emails to EX Participants
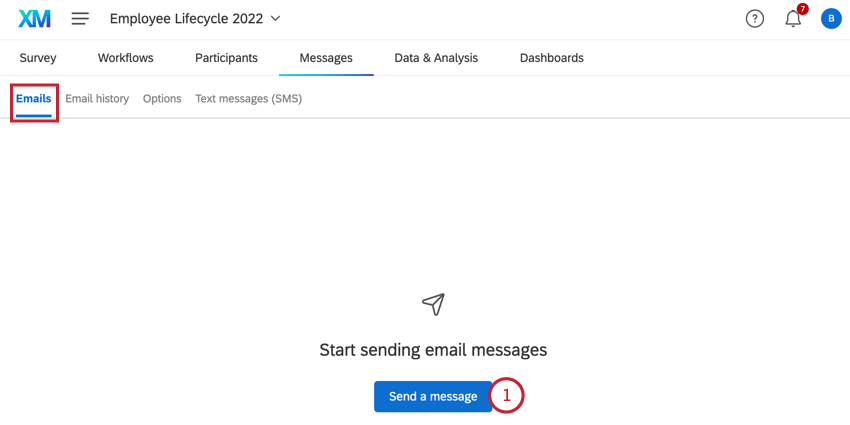
The Emails section of the Messages tab is where you can send emails to your Engagement, Lifecycle, and Ad Hoc Employee Research participants. You can send a variety of emails from this page, including survey invites, reminders, dashboard invites, org hierarchy emails (Engagement only), or recurring emails (Lifecycle only). After you’ve sent emails, you can view the history of your mailings.

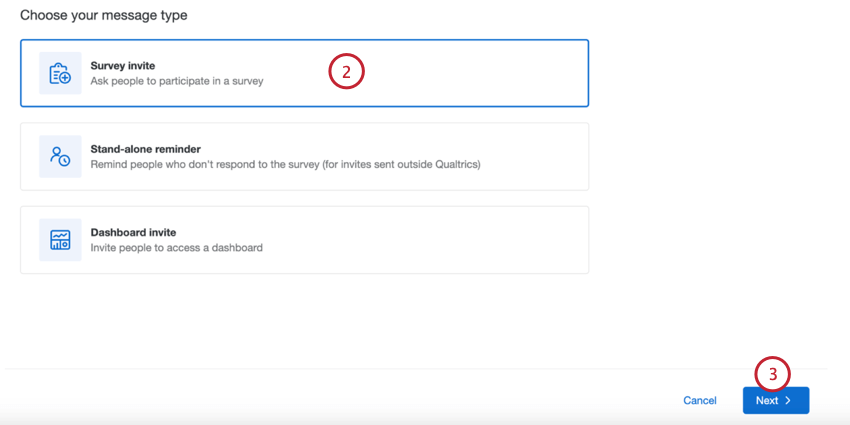
Sending an Employee Experience Survey Invite
Before sending an invite to your Engagement, Lifecycle, or Ad Hoc participants, make sure you’ve added participants to your project.

- All participants: Choosing this option will send the email to all participants in the project, regardless of whether they’ve already been invited. Non-respondents are excluded.
- All participants who haven’t received the email survey invite yet (Lifecycle only): Choosing this option will send the email to all participants in the project who have not yet been invited to the survey. Non-respondents are excluded. This option is exclusive to Lifecycle projects.
- Custom participants: Definite a subset of participants to receive the email. See Filtering Participants for more information.
- Work email: Send the email to the participant’s work email address. This is the default behavior for Engagement and Ad Hoc projects. Qtip: This is the email that appears for participants in the participant information window.

- Personal email: Send the email to the participant’s personal email address. Qtip: To distribute to a personal email, make sure you’ve added a Metadata field called Personal Email.
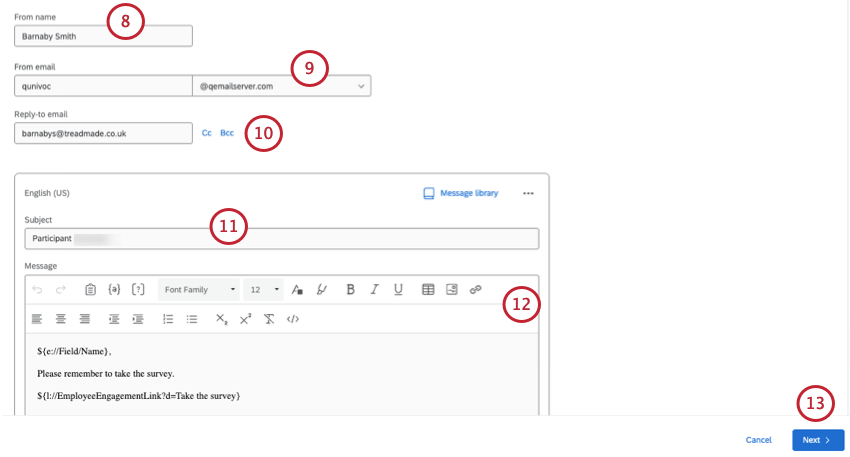
Qtip: When choosing a from email, you can type the username, then select from a list of approved domains. For information on registering custom domains, see Using a Custom From Address.
Qtip: If your participants respond to your email, those replies will be sent to the Reply-To Email Address.
Qtip: You can also add a CC and BCC email as needed.

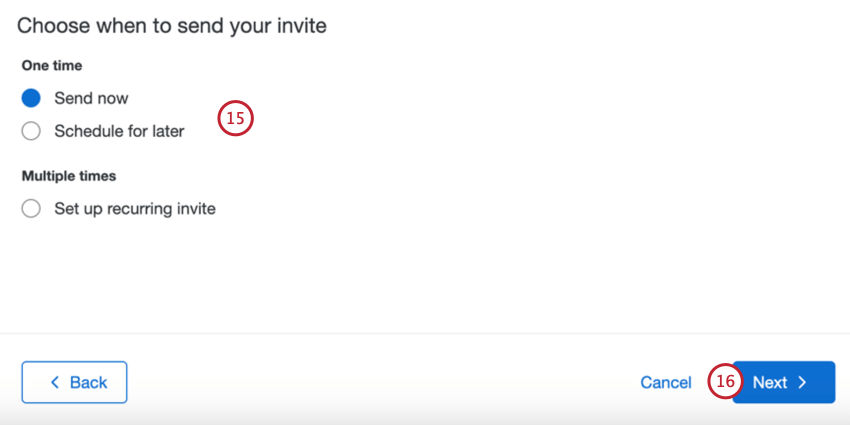
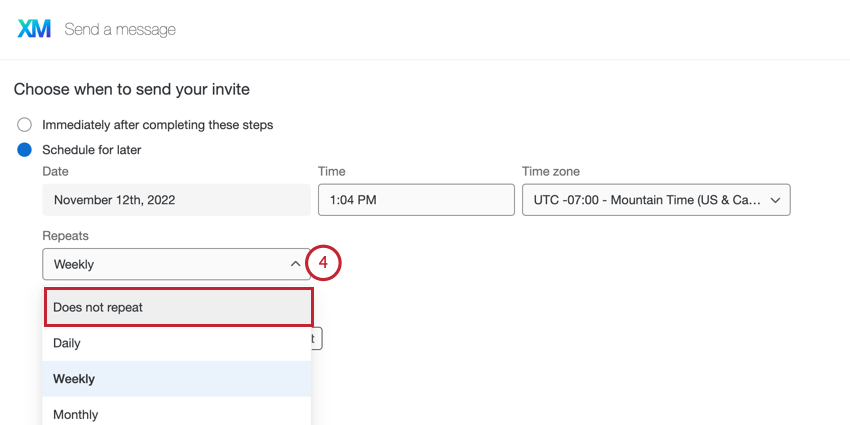
- Send now: The email will be sent after you complete the steps in this section.
- Schedule for later: The email will be sent at a specified later time and date.
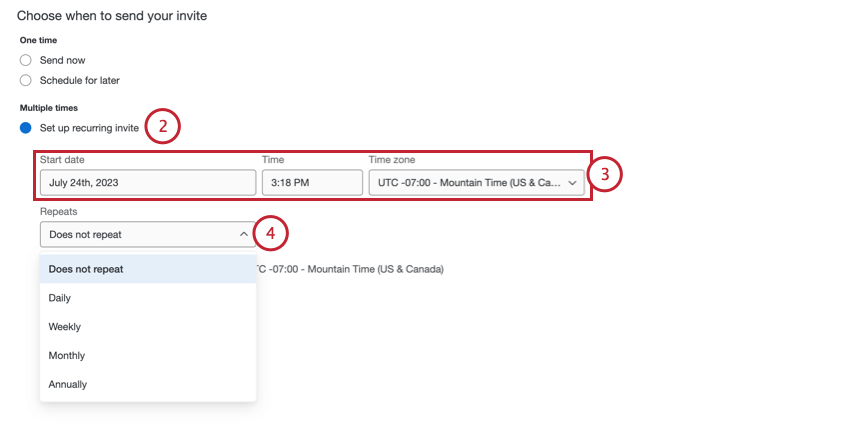
- Set up recurring invite: This option only appears for Lifecycle projects. The email will be sent at some later time and date and on a repeating schedule. This allows you to automate sending invites to newly added participants. See Recurring Lifecycle Emails for more information.
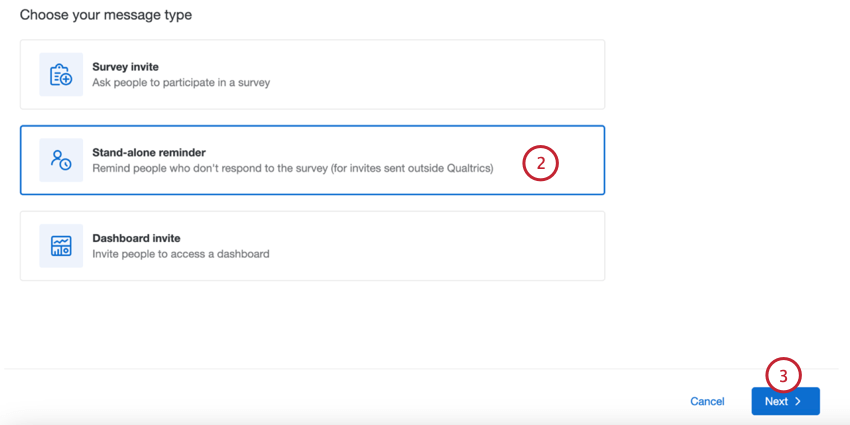
Sending a Stand-alone Reminder
Stand-alone reminders allow you to schedule a reminder to take your survey without having an initial survey invitation. This is most useful if you send your initial invitation through a third-party email client.
Qtip: See Sending a Reminder to an Invite for instructions on creating a reminder based on an initial invite.
Qtip: You can not create recurring reminders based on a stand-alone reminder.
Sending Reminders to Invites
Qtip: See Sending a Stand-alone Reminder for instructions on sending a reminder without an initial invite. If you have a recurring invite, see Recurring Lifecycle Emails for information on how to manage recurring reminders.
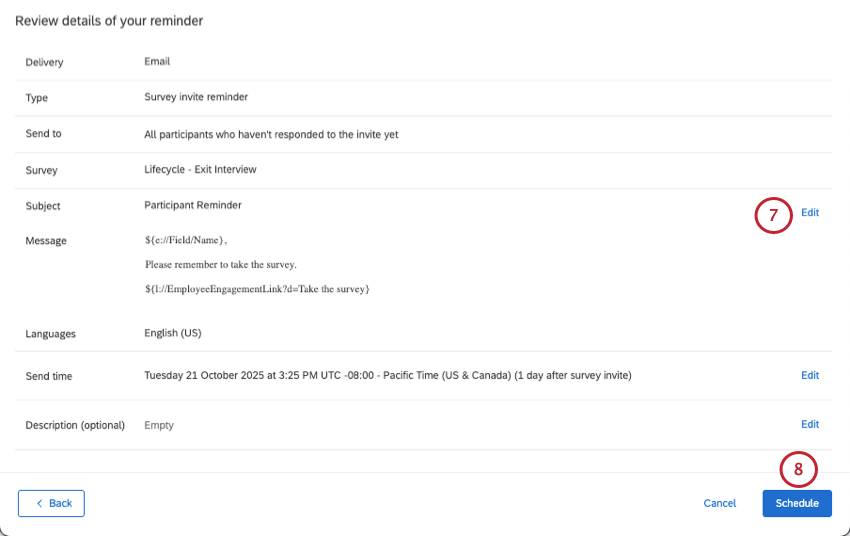
You can send a survey reminder email to all participants who have yet to take the survey. You only need to create the reminder schedule once.
You can schedule your reminder 2 different ways:

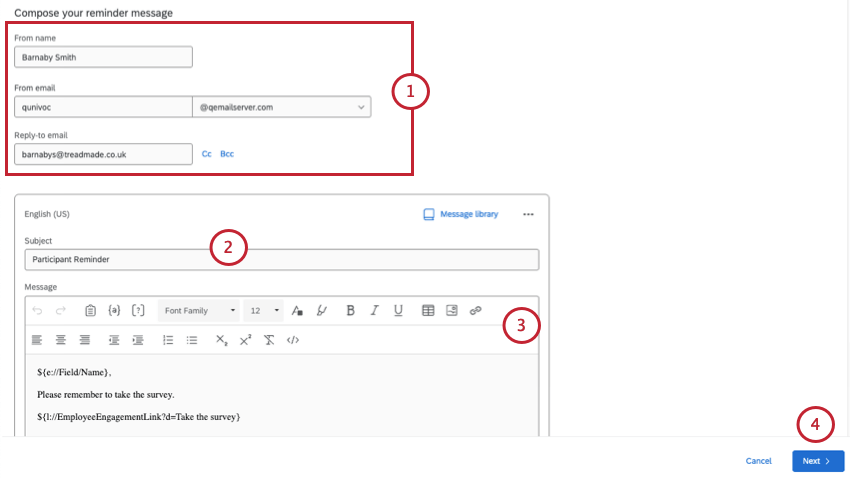
Customizing the reminder message
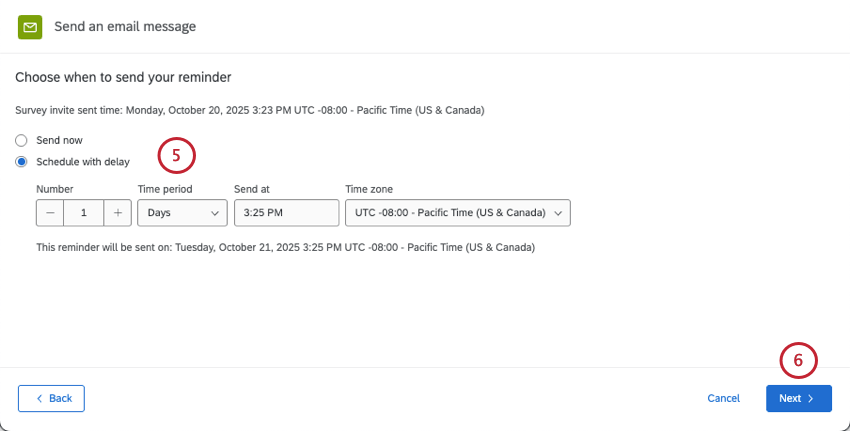
Qtip: If scheduling the reminder on a delay, the specified delay is the number of days after the initial invite. Double check the actual send date, which will appear underneath where you specify the delay. You can specify the time and time zone you want this delivery to happen.
Recurring Lifecycle Reminders
For Lifecycle projects, if you have an recurring survey invite, then your scheduled reminders will automatically be created after each scheduled invite.
Example: Let’s say you have an recurring survey invite that sends once a week on Mondays. You want participants to be reminded on Wednesdays and Fridays to take the survey. You can create 2 different reminders to accomplish this. The first has a 2-day delay after the invite, while the second has a 4-day delay after the invite. These recurring reminders will keep sending on this schedule long as the recurring survey invite is active.
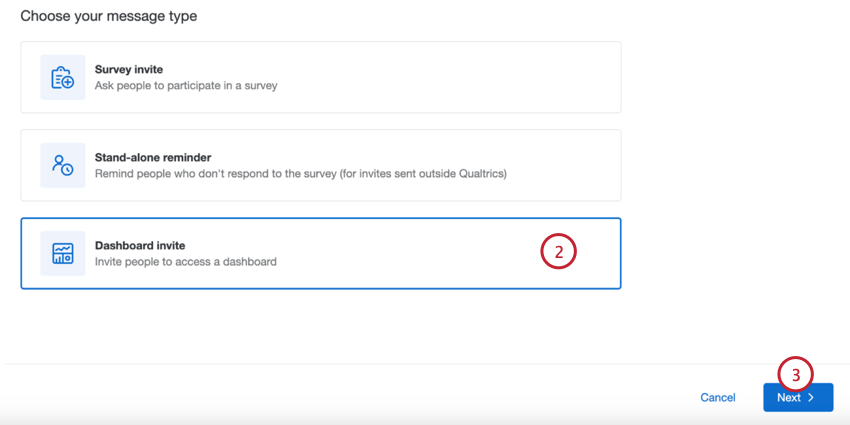
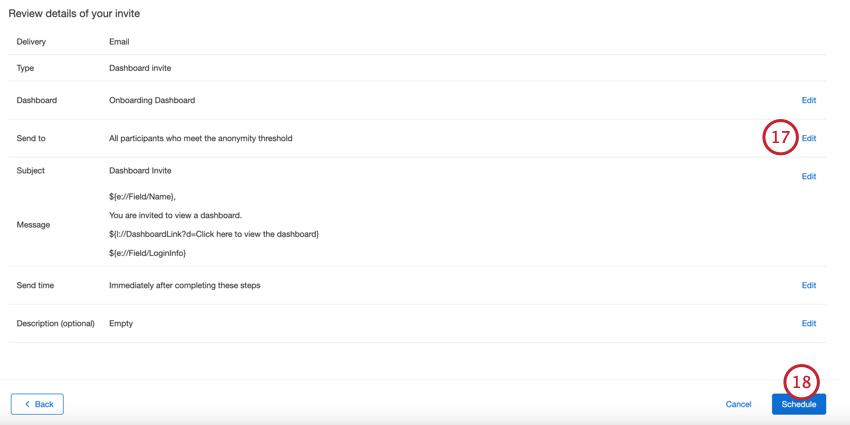
Sending a Dashboard Invite
You can invite participants in Engagement, Lifecycle, Ad Hoc Employee Research, and Employee Journey Analytics to log into their dashboard. These invites let users know that the dashboards are ready, and provide the login info they need.
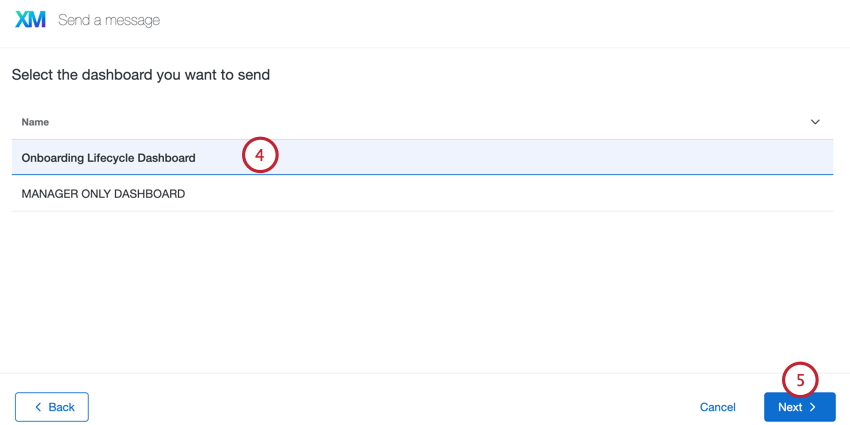
Qtip: Before sending a dashboard invite, make sure your participants have permission to access the dashboard you want to share with them.
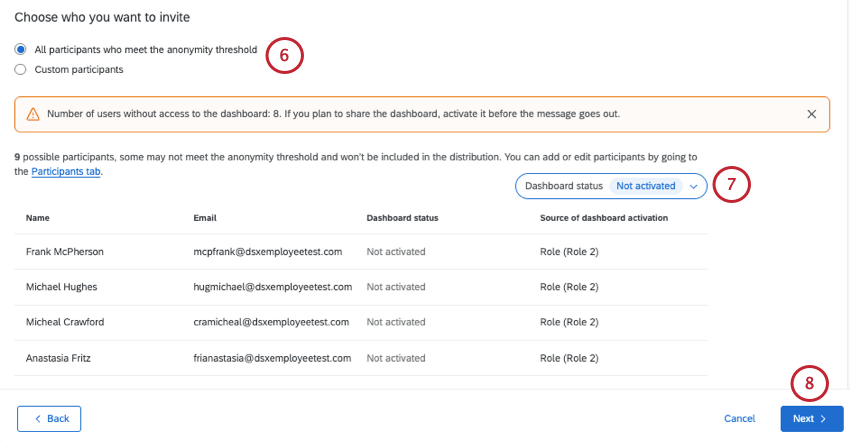
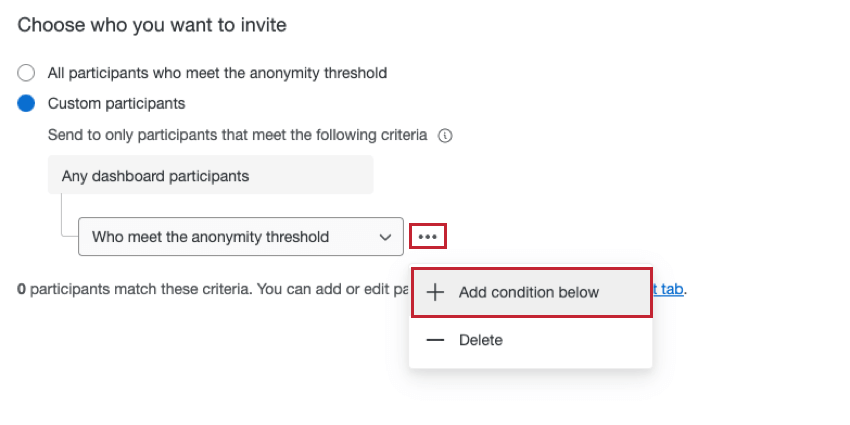
- All participants who meet the anonymity threshold: Choosing this option will send the email to all participants in the project who meet the anonymity threshold. The email will send to any eligible participant who has a dashboard permission added, even if the dashboard is not yet activated.
- Custom participants: Definite a subset of participants to receive the email. See Filtering Participants for more information.
Attention: This filter does not affect who receives the email. “All” participants will be included. The filter is just to check who needs their permissions adjusted.
- All: Show all of the participants who will be emailed the dashboard invite, based on the criteria chosen in Step 6. This is a mix of activated and not activated users.
- Activated: Only show users who have the role permissions they need to access the dashboard.
- Not activated: Only show users who do not have the role permissions they need to access the dashboard. Qtip: The table will show you each recipient’s name, email, and role, so you can easily adjust their permissions, if needed.
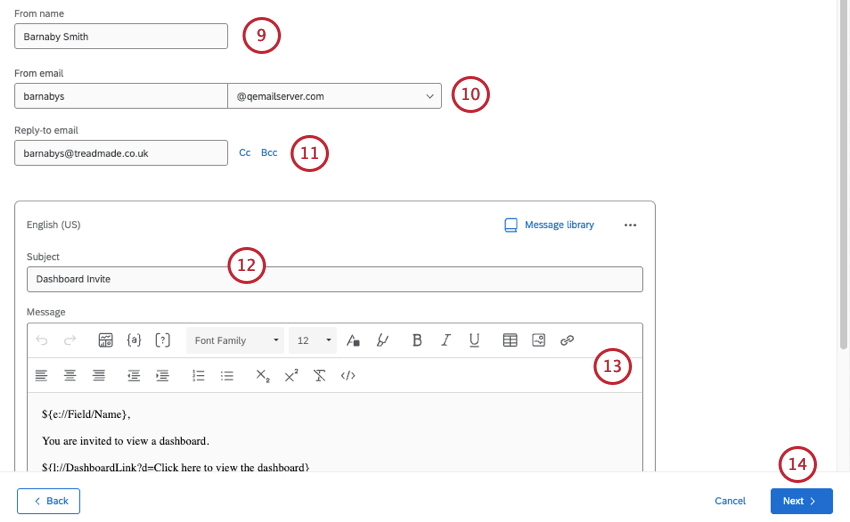
Qtip: When choosing a from email, you can type the username, then select from a list of approved domains. For information on registering custom domains, see Using a Custom From Address.
Qtip: If your participants respond to your email, those replies will be sent to the Reply-To Email Address.
Qtip: You can also add a CC and BCC email as needed.
Qtip: You can type a subject line directly in the text box, or click the library icon to choose a library message as your subject line. If you plan on sending an email that has translations, you should use a library message.
Qtip: Login information and a link to the dashboard are both included by default. However, you can also include this by going to piped text ( {a} ) and selecting Login Info. The option Login info paragraph will display all login information without you having to format it.
Qtip: You cannot include a survey link in a dashboard invite, or dashboard piped text in a survey invite.
Qtip: If your organization has SSO, you need a dashboard link, but not login information. Dashboard users will log into the dashboard using the organization’s login portal and their usual credentials.
- Send now: The email will be sent after you complete the steps in this section.
- Schedule for later: The email will be sent at a specified later time and date.
- Set up recurring invite: This option only appears for Lifecycle projects. The email will be sent at some later time and date and on a repeating schedule. This allows you to automate sending invites to newly added participants. See Recurring Lifecycle Emails for more information.
Qtip: Passwords are only displayed in the first invitation a user ever receives. All subsequent invites will omit the password. This is true even across projects. Participants should reset their password on the dashboard login page if they do not remember their password or cannot find the original invitation.
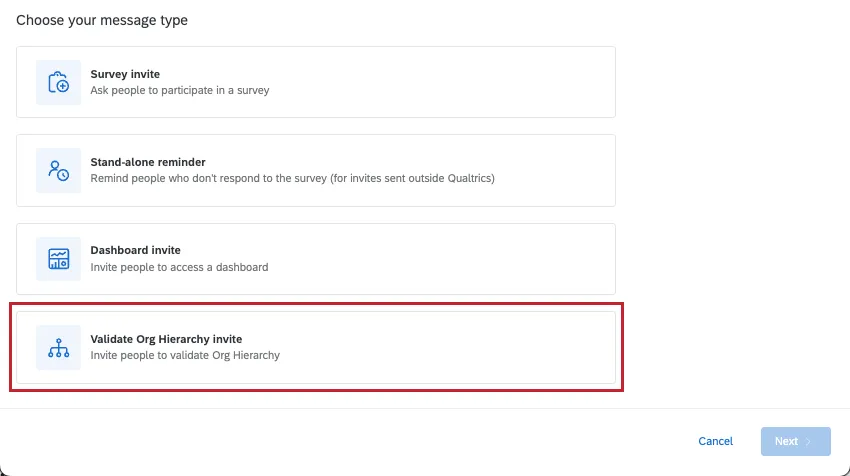
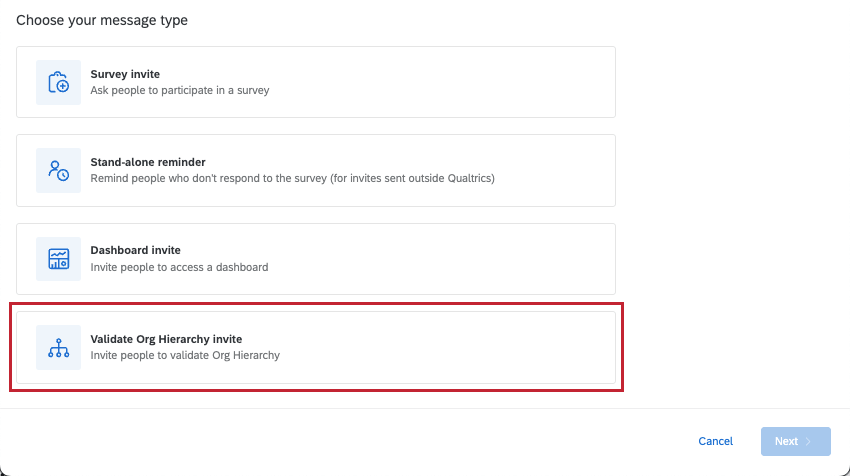
Sending a Validate Org Hierarchy Invite
Attention: Only Engagement projects have hierarchies, so only Engagement projects have the validate org hierarchy email type.
If you have given a user the permission to validate org hierarchies, this invite will let them know. Since participants must log in to edit the hierarchy, this message should include a link to log into, a username, and a password.
Qtip: Since a user must log in to edit the org hierarchy, best practice is to make sure this message includes piped text for a Project Link and for Login Info. This information is included by default, and can be added from the piped text menu ( {a} ).
Attention: If the participant is an Employee Insights Admin or Brand Admin user, then you will need to collaborate the project with them so they can validate the Org Hierarchy. The Validate Org Hierarchy link will not direct Admin users to validate the hierarchy unless the project has been collaborated with them.
Filtering Which Participants Receive Emails
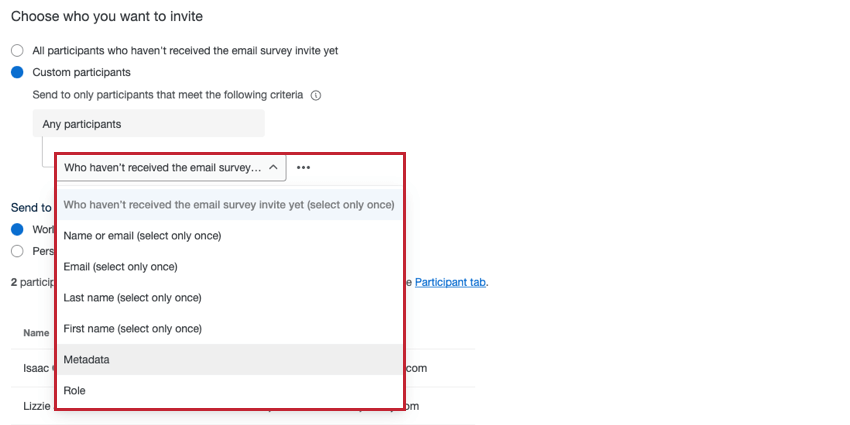
You can send your emails to a specific subset of participants using filter conditions. Use the Custom participants menu to choose what you’d like to filter by. Your options include:

- Who haven’t receive the email survey invite yet: Send the survey invite only to participants who have not yet received the email invite. You can only use this filter one time in your filter conditions. This condition is only available for survey invites.
- Who meet the anonymity threshold: Send the dashboard invite only to participants who meet the dashboard’s anonymity threshold. You can only use this filter one time in your filter conditions. This condition is only available for dashboard invites.
- Name or email: Send the email to participants whose name or email matches your specified criteria. You can only use this filter one time in your filter conditions.
- Email: Send the email to participants whose email address matches your specified criteria. You can only use this filter one time in your filter conditions.
- Last name: Send the email to participants whose last name matches your specified criteria. You can only use this filter one time in your filter conditions.
- First name: Send the email to participants whose first name matches your specified criteria. You can only use this filter one time in your filter conditions.
- Metadata: Send the email to participants who have a certain value for a given metadata. You can use this filter multiple times in your filter conditions.
- Role: Send the email to participants who are in a certain role. You can use this filter multiple times in your filter conditions.
- Org hierarchy metadata: Send the email to participants who have a certain value for metadata that was used to build a hierarchy. For example, Manager ID or Level. You can only select one value, an participants will have to match it exactly. This condition is only available for Engagement projects.
- Org hierarchy units: Send the email to participants who belong to a certain unit. You can choose to include only direct reports in the unit, or all people in and below. This condition is only available for Engagement projects. Qtip: “All people in and below” includes not just direct reports, but all child units of your selected units. This works similarly to “in and below” in other parts of the platform.
Multiple Filter Conditions
You can add multiple conditions to your filter by clicking the three dot menu and then Add a condition below.

When adding multiple filter conditions, keep in mind the following:
- One-use-only conditions: Some filter conditions can only be used one time. See the list above for more information.
- How conditions are combined:
- If criteria are different (for example, name and email), they are joined by an implicit “and,” so that both criteria must be true for a participant to receive the email.
- If criteria are the same (for example, 2 conditions based on the “Age” metadata field), they are joined by an implicit “or,” so that recipients can be in one age group or the other.
- Value limits: There is a limit of 10 values per filter condition when using the “equals” operator (e.g., “City” is “Seattle”).
- Condition limits: You can use up to 5 different filter conditions (e.g., filtering by metadata, first name, last name, etc). The exception is conditions based on roles, which have no limit. Example: For example, let’s say you create a filter using email and first name. You can still add up to 3 additional metadata filters. You can also add an unlimited number of role filters.

Recurring Lifecycle Emails
Qtip: This feature replaces Lifecycle message automations. You will see the new “Emails” tab for all new Lifecycle projects and any Lifecycle projects without existing distributions. For projects with existing distributions, you will see the legacy “Email Messages tab” until your next automation run, after which you will see the new Emails tab.
When you create a survey or dashboard invite in a Lifecycle project, you have the option to set up a recurring email on a schedule that you set. This allows you to automate invites for your project by automatically sending an invite to newly added participants.
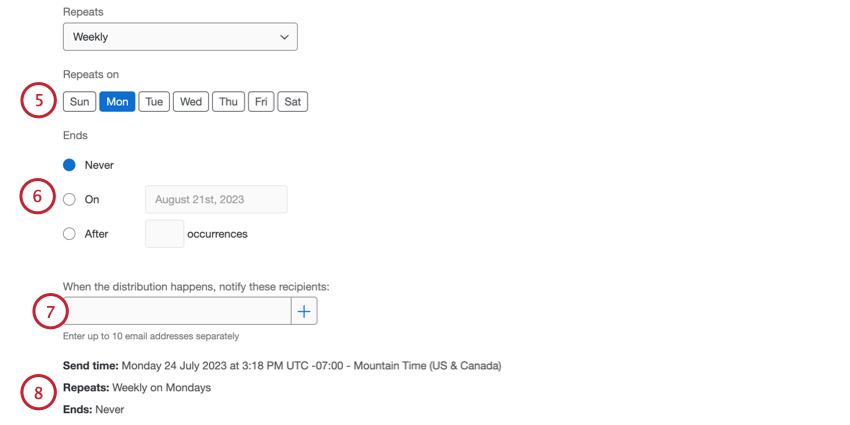
- Never: The automation will continue to send emails until you manually stop it.
- On: Choose a specific date that the automation should stop running.
- After X occurrences: Specify the number of times the automation should run before it stops.
Attention: For future reminders to be created automatically, make sure the reminder schedule is added for a recurring invite that hasn’t been sent yet (has “Scheduled” status). A reminder added for an already sent invite, will only be sent once.
Attention: If your account is disabled, any scheduled messages you have set up will fail to send. If your account is later re-activated, then your scheduled messages will resume sending successfully.
Stopping Recurring Emails
To stop an recurring email from sending:
Customizing Emails
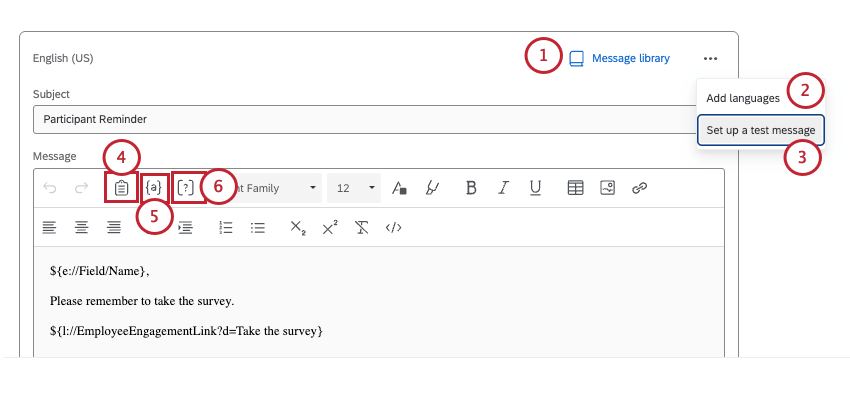
This section covers key features of the rich content editor available to you when building your emails. This section will cover features unique to the rich content editor in EX project emails.

Qtip: Org hierarchy metadata cannot be pulled in with piped text in the messages tab.
Qtip: For edits like font sizes and inserting images, see the Rich Content Editor for a general guide on using the text editor. While the rich content editor on the linked page may look different, its functionality is the same.
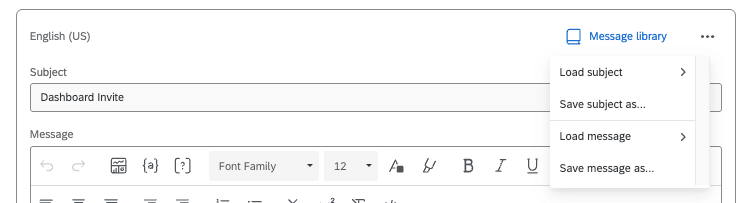
Loading Library Content
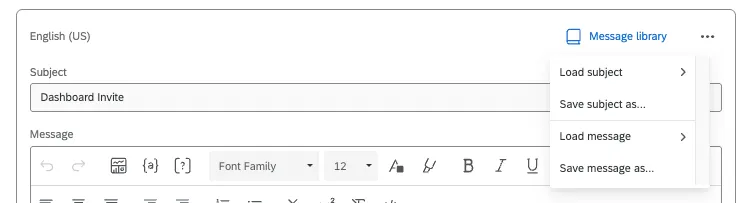
You can click the Message library icon to either load library content you want to use for your subject and email message, or to save what you already manually typed out as new library content.
If you don’t see the messages you want to use, make sure they’re saved as the correct EX message types.
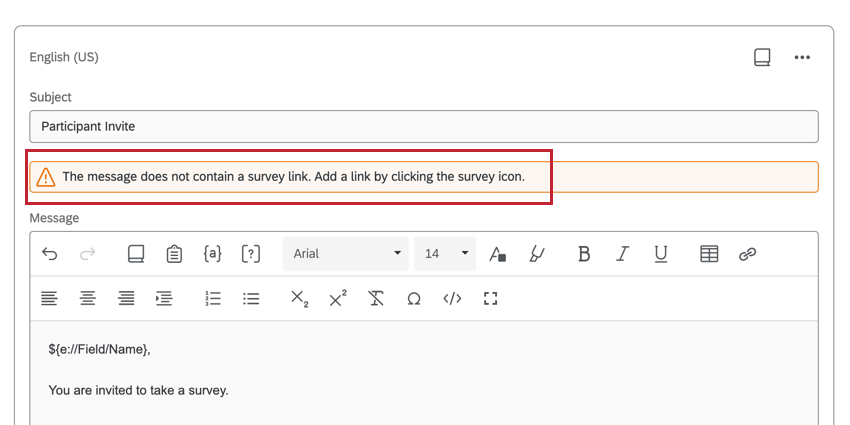
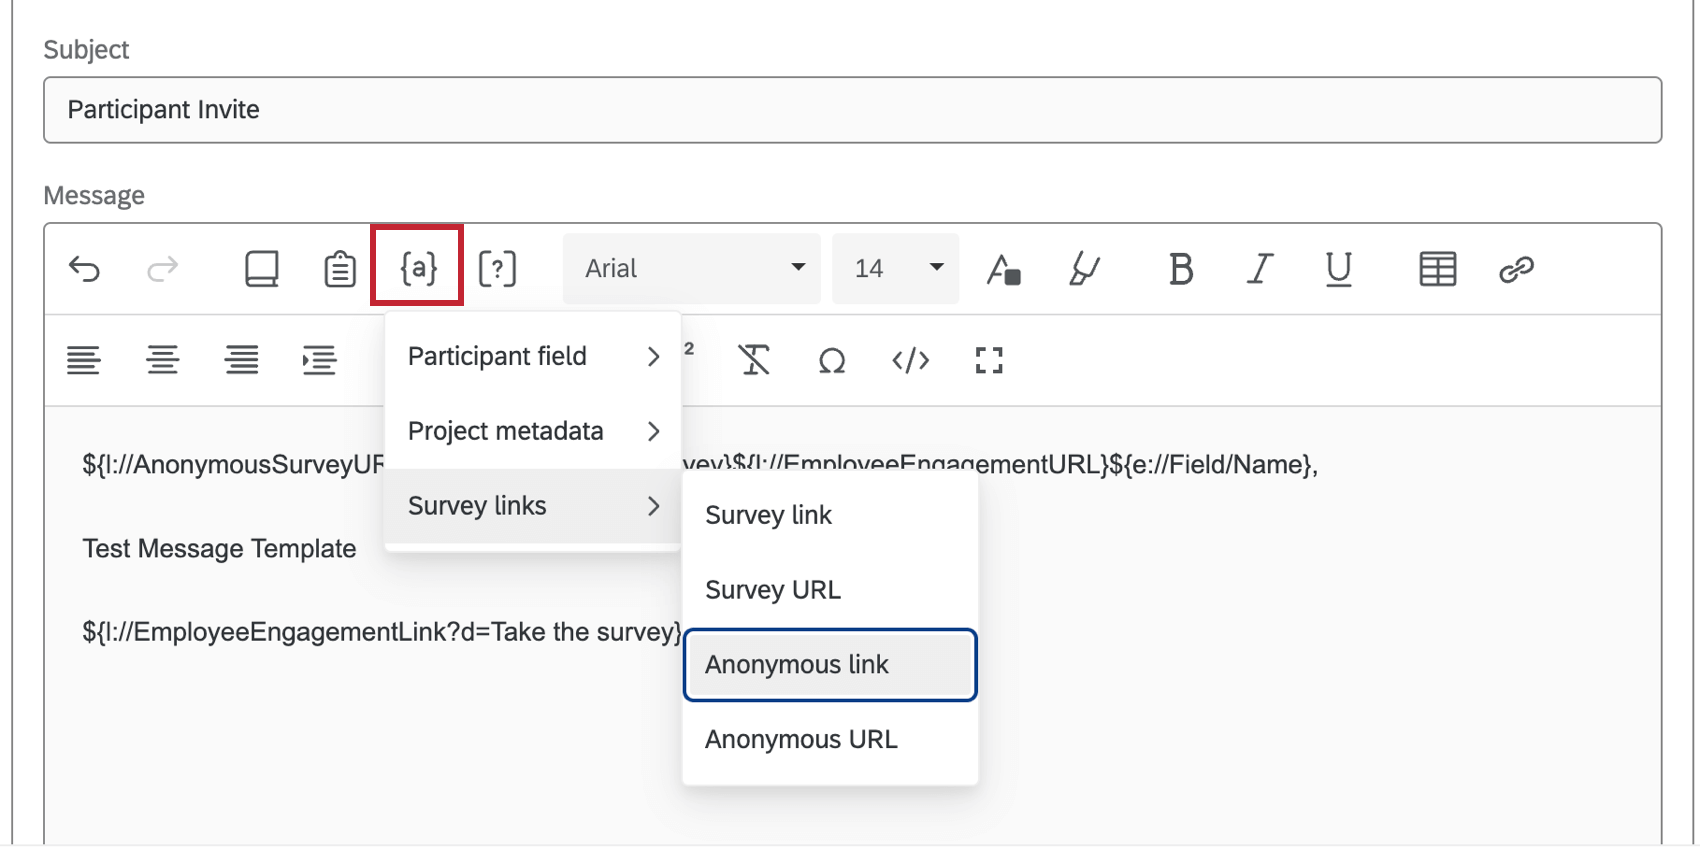
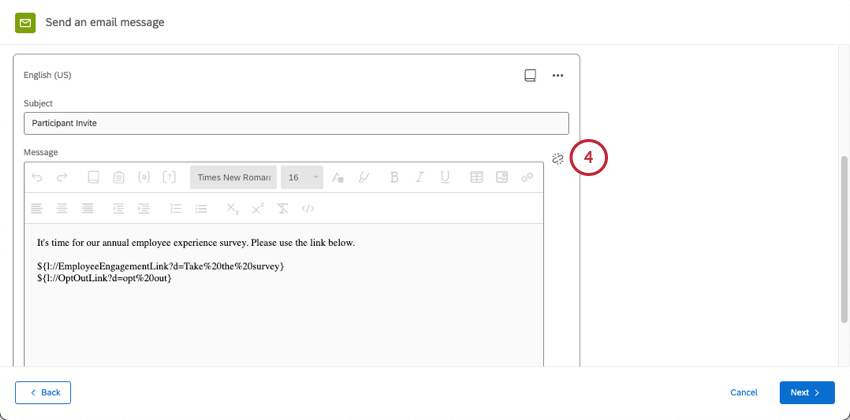
Adding Survey Links to Messages
Use the piped text menu ( {a} ) to insert survey links into messages. You can insert an anonymous survey link or the participants’ personal survey link. Do not copy and paste the live survey URL into your message; use the piped text menu.

Qtip: You will see an warning if your message is missing a survey link; however. you can send the message without the link.
Qtip: You cannot set an expiration for EX survey links. Links will work as long as the project is active. Instead, go to the survey options and try the incomplete response and survey availability settings.
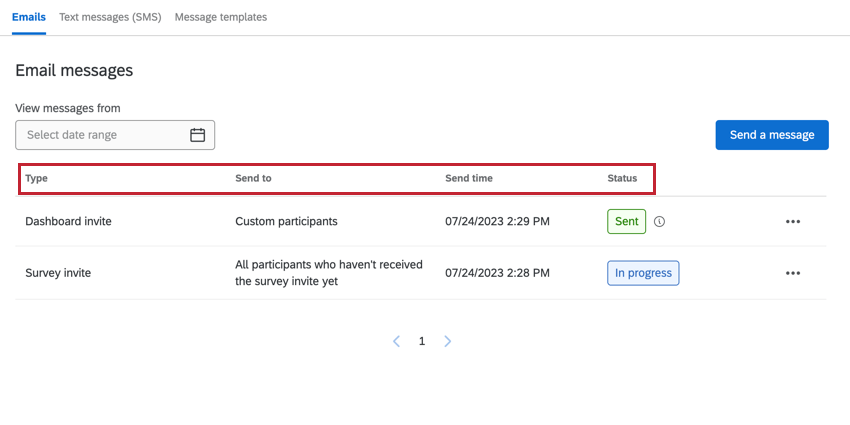
Managing Email Distributions
You can view your past email distributions and download distribution histories from the Emails tab.
The table displays the following information about your distributions:
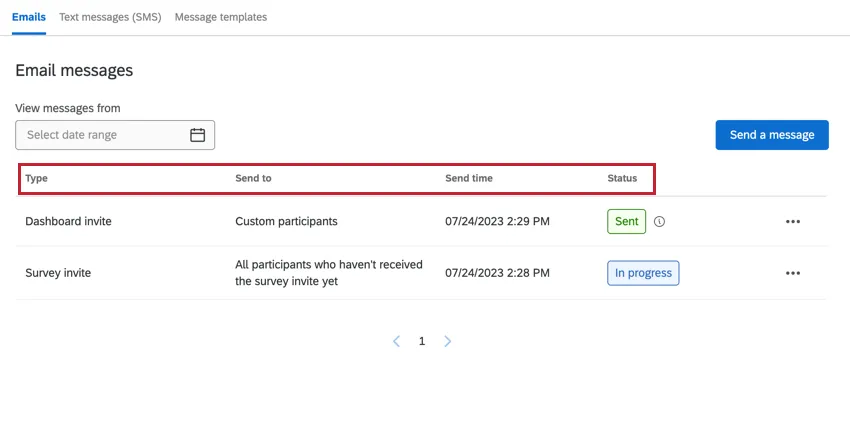
- Type: The type of email. Values include survey invite, weekly survey invite, dashboard invites, and survey reminder.
- Send to: The group of participants who the email was sent to.
- Send time: The date and time that the email was sent. This is displayed in your account’s time zone.
- Status: The status of the email distribution. Values include:
- In progress: The distribution is currently sending.
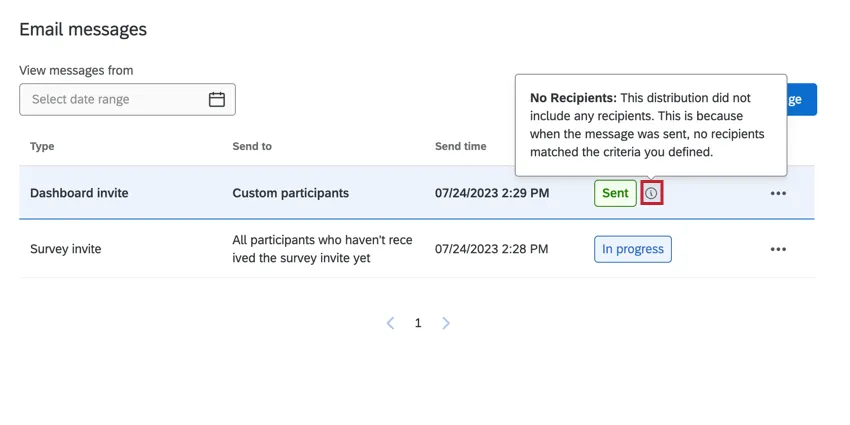
- Sent: The email distribution was sent. Qtip: If your distribution contains any issues, a tooltip will appear next to your status. Click this tooltip to see more information about your distribution.
- Scheduled: The email is scheduled to send but has not been sent yet.
- Failed: The email distribution did not send.

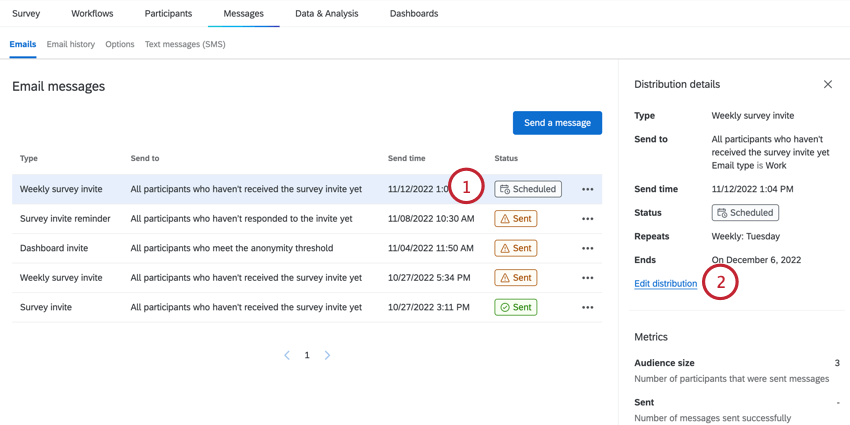
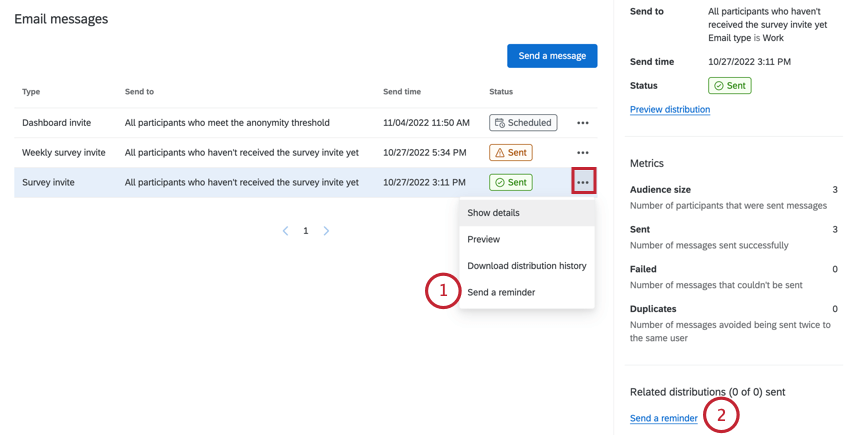
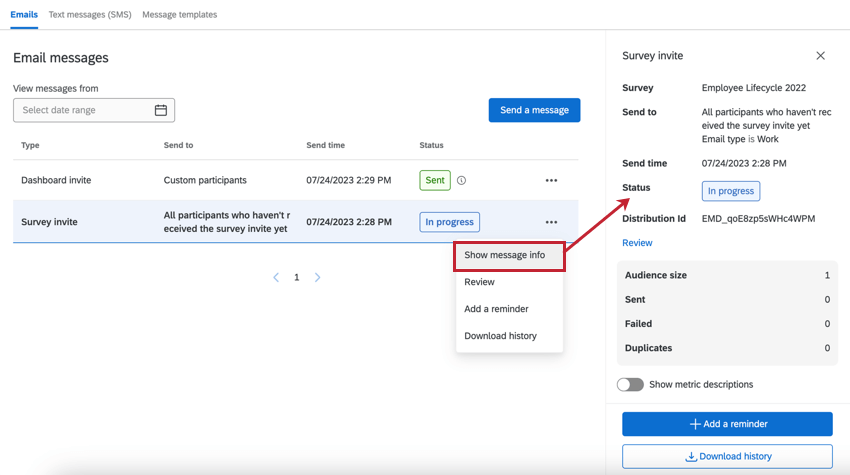
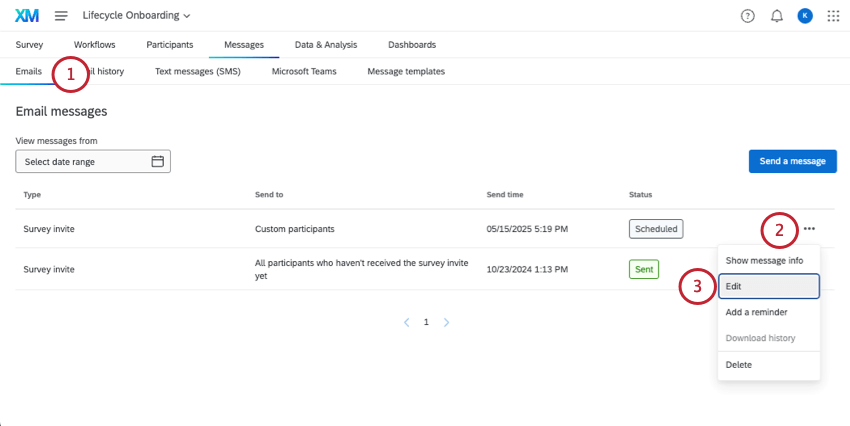
Click the three dot menu and then Show message info to pull up a side panel with additional information about your distribution. You can also pull up this side panel by clicking on a distribution in the table.

This side panel displays:
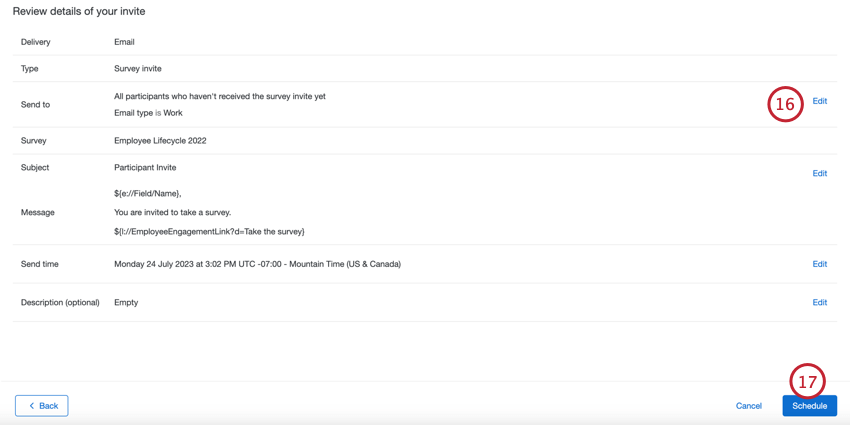
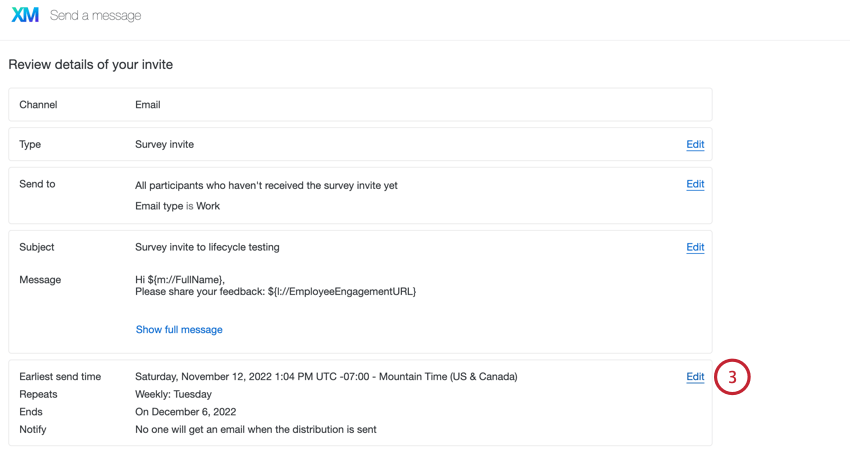
- Distribution Details: The distribution Type, Send to, Send time, and Status. Click Review to review these details and make any changes. You can only edit distributions that have not yet been sent.
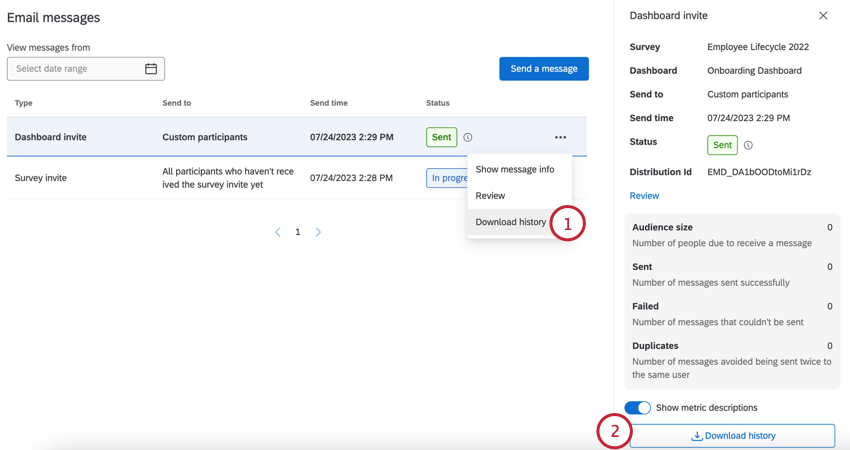
- Metrics: Includes key metrics for your distribution. Metrics include:
- Audience size: the number of participants who sent the email.
- Sent: the number of emails that were sent.
- Failed: the number of emails that failed to send.
- Duplicates: The number of duplicate emails prevented from sending. Duplicate emails are emails with the exact same message (distribution type, subject line, email body, and attachments) and recipient as another email that was sent. Qtip: Duplicate emails are screened-out if sent within a 12-hour window of each other. Any identical emails sent to the same recipient within 12 hours – even through different distributions – will be marked as duplicates and blocked.
Qtip: Use the Show metric descriptions option to hide or display explanations about these metrics. - Related distributions: If this distribution is linked to another distribution, the associated distributions will be listed in this section. When viewing invites, you will also have the option to schedule a reminder from this section.
Downloading Distribution History
You can download a file containing information about each recipient in your distribution. This is helpful for finding out which emails failed so you can send them again.
To download a distribution’s history:
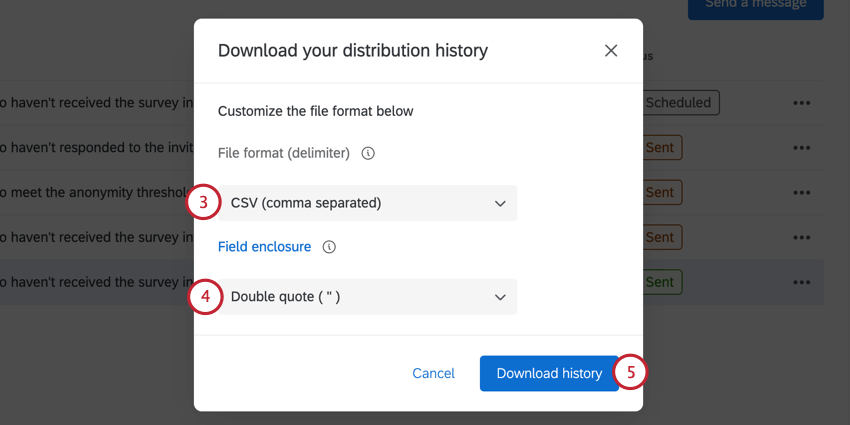
Your downloaded distribution history will contain the following fields:
- PersonID: A unique ID for the participant that is generated by Qualtrics. This can be used to search for the individual in the Participants tab. Just paste the PersonID into the Search bar.
Attention: PersonID will not be present in the downloaded file if the Pseudonymization policy is enabled. - First Name: The participant’s first name.
- Last Name: The participant’s last name.
- Email: The participant’s email as specified in the Participants tab.
- User Name: The participant’s user name as specified in the Participants tab.
Qtip: While a participant’s user name is often their email, this may not always be the case. Be sure to double check the participant’s information in the Participants tab to confirm this information.
- Status: The status column helps you monitor whether the recipient received the message. Below is a descriptive list of possible status conditions.
- Success: The email successfully left Qualtrics email servers.
- Bounced: The email did not reach the recipient’s inbox. This could be for a number of reasons: the email address doesn’t exist, the receiving server has a high security firewall, the receiving mailbox is full, the recipient server is offline, etc.
- Duplicate: The email was not sent because it was a duplicate. Duplicate emails are emails with the exact same message (distribution type, subject line, email body, and attachments) and recipient as another email that was sent. Qtip: Duplicate emails are screened-out if sent within a 12-hour window of each other. Any identical emails sent to the same participant within 12 hours – even through different distributions – will be marked as duplicates and blocked.
- Failed: The email failed to send. Usually, this is because the from address for the email is using an invalid email domain. To use a custom email domain in the from address, it must be configured for use in Qualtrics. See Using a Custom From Address for more information.
- Timestamp: The timestamp of when the participant’s status changed. This is displayed in ISO 8601 format in the UTC time zone.
Qtip: If a participant is deleted from a project, then they will not be included in the downloaded mail history. (Even if a participant is removed and subsequently re-added to a project, the distribution history created prior to their deletion will still no longer exist for that participant.) However, any emails sent to them will still be counted in the email stats displayed in the mail history tab. This can lead to a fewer number of emails in the downloaded mail history than what is shown in the mail history tab.
Message Templates
You can create message templates that allow you to quickly reuse email content for distributions within your project. These templates can be created for survey invites, reminders, dashboard invites, and validate org hierarchy invites.
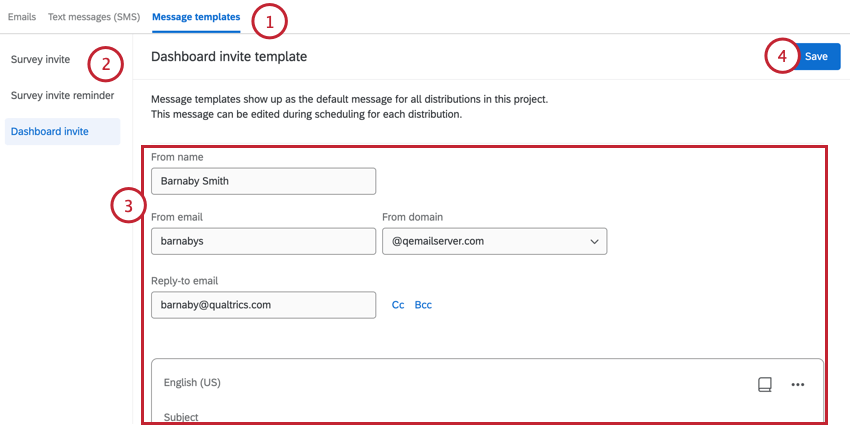
The next time you go to send an email, your template will be pre-populated in the email editor for you. You can then make any necessary changes to your email before it sends.
Qtip: Edits to message templates are not reflected in distributions that were already scheduled before the edits were made. (Distributions created after the message template edits will reflect the edits.) If you want to make edits that are reflected in already-scheduled distributions, try using library messages with your templates, as described below.
Library messages and EX message templates
Library messages can be a great way to reuse messaging and create consistency across your programs. You can even use messages saved in your library as your messages templates. To do so, click Message library and load a message.
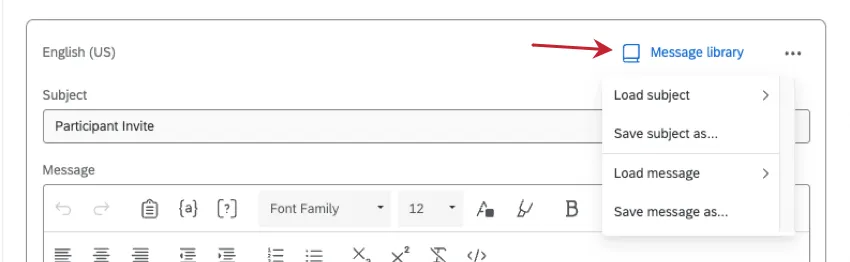
You can also click the 3 dots and select Save message as to save the message template you’re currently writing to your library.
Qtip: If you create a message from the library, the message type should match what type of distribution you’re creating a template for. For example, if this is an evaluator invite template, then it should be saved to the library as an Evaluator / Participant Invite. If you create your message right in the template editor and save it to your library, the message type is set automatically.
Library messages can be useful if you need to edit messages templates while your project is actively being sent to employees:
- If you edit a message template after scheduling a distribution, the scheduled distribution won’t be updated.
- However, if your message template instead uses a library message, and you edit that library message after scheduling a distribution, the scheduled distribution will be updated.
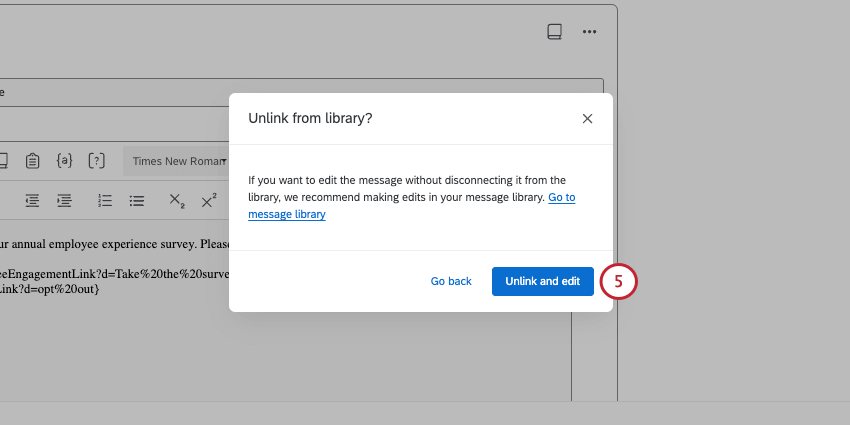
Unlinking Email Distributions from Library Messages
One benefit of using a library message in an email distribution is that you can schedule out multiple emails or messages, and any edits you make in the library will be reflected in connected distributions. If you’re running a program with similar messaging across projects, this can be an easy and fast way to make large-scale changes.
However, you may want to make edits to one of your Employee Experience emails independent of other emails. To disconnect your email from the library to make edits, do the following:
FAQs
When I look in the Mail History section, it says some of my respondents didn't receive their email. How do I see a list of who didn't get the message?
When I look in the Mail History section, it says some of my respondents didn't receive their email. How do I see a list of who didn't get the message?
I’m trying to send my participants dashboard invites, but when I try to schedule the message it says "No participants found for this subset." Why is this?
I’m trying to send my participants dashboard invites, but when I try to schedule the message it says "No participants found for this subset." Why is this?
I don't have the tab described on this page! What do I do?
I don't have the tab described on this page! What do I do?
Can I edit multiple scheduled distributions at the same time?
Can I edit multiple scheduled distributions at the same time?
That's great! Thank you for your feedback!
Thank you for your feedback!