-

Qualtrics Platform -

Customer Journey Optimizer -

XM Discover -

Qualtrics Social Connect
Guided Action Planning (EX)
About Guided Action Planning
Guided action planning allows you to close the loop with employee feedback, giving every leader and manager the power to drive impact in areas employees care about most. Admins can give managers best practice guidance and recommended actions specific to each focus area so they can create action plans. Furthermore, you can embed your own culture-specific content in any EX project, or leverage Qualtrics best practices content in the guided XM Employee Engagement Solution to associate with each recommended action.
The focus areas widget works hand-in-hand with guided action planning, surfacing top-level actions managers should focus on to drive improvement with their teams.
Enabling Action Planning
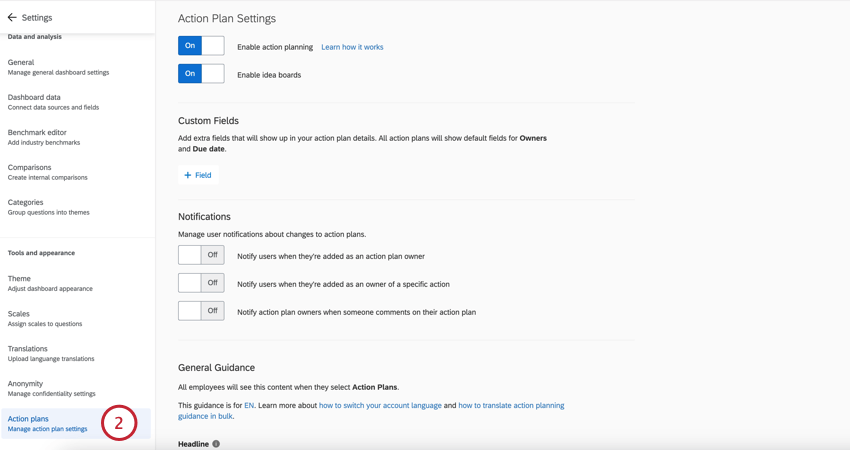
Action planning can be enabled on the dashboard level. Those with editing access over the dashboard and action plans can enable this feature.
- Go to the settings in your dashboard.
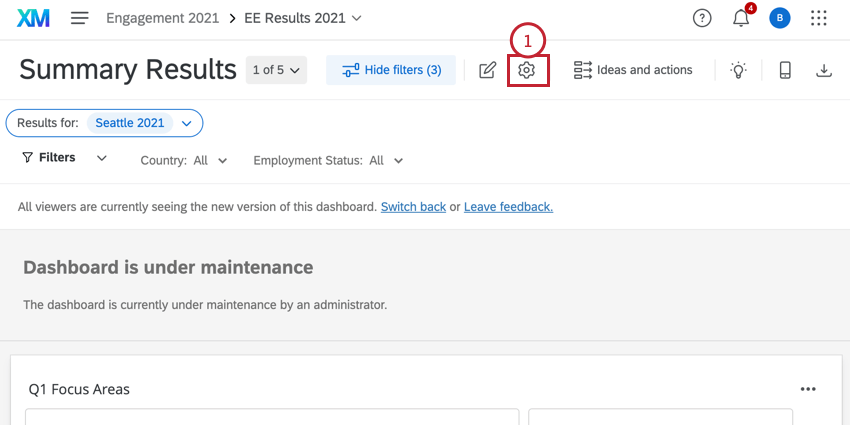
- Go to Action plans.
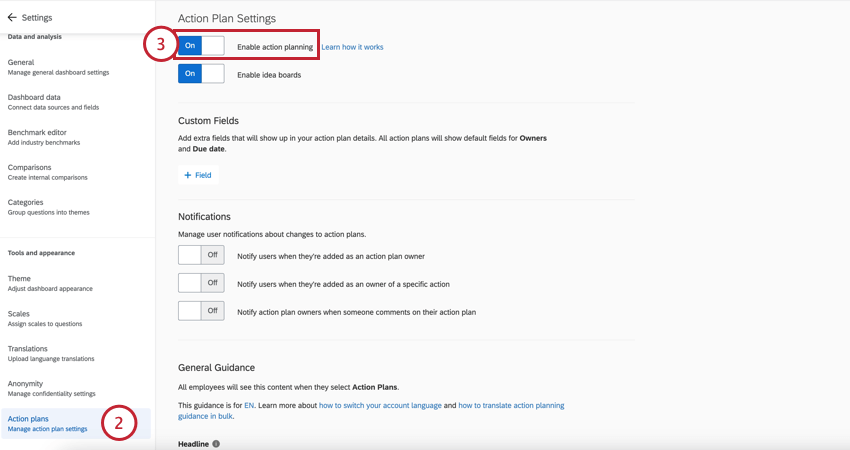
- Click the Enable action planning switch.
Customizing Action Plan Guidance
Users with editing access over the dashboard and the action plans can edit the guidance that comes with the action plans. To edit the action plan guidance, go to the Action plans section of your dashboard settings.
Adding Fields to Action Planning
You can add additional fields that users can fill out as they complete their action plans.
- Click Field.
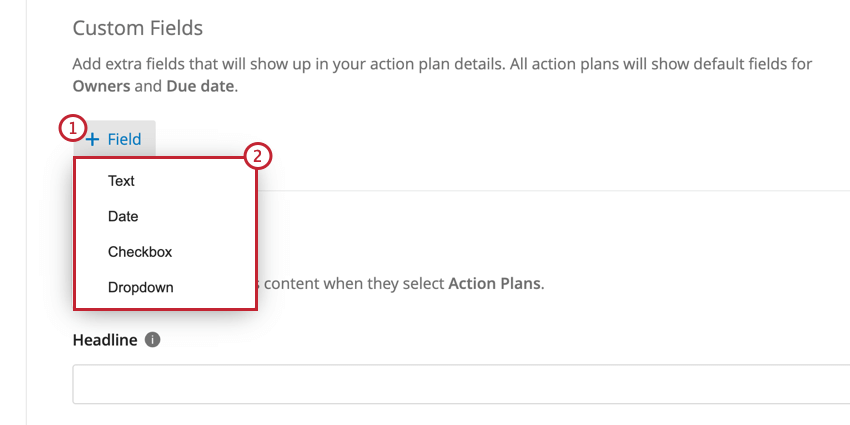
- Select the type of field to add. Your options include:
- Text: A field where the user can type an open-ended response. When used in action plan reporting, this acts like an Open Text field.
- Date: A field where the user can enter a date. When used in action plan reporting, this acts like a Date field.
- Checkbox: A field that functions like a multiple choice question where a user selects one or more options using checkboxes. When used in action plan reporting, this acts like a Text Set / Multi-Answer Text Set.
- Dropdown: A field that functions like a multiple choice question where a user selects one or more options using a dropdown menu. When used in action plan reporting, this acts like a Text Set / Multi-Answer Text Set.
- Depending on your selected field type, the setup you complete is different. See the below sections for more information.
Text and Date Fields
For Text and Date fields, you need to specify a label for the field. This will be the name of the field users see when creating an action plan. To add a label for a field, enter it into the label box associated with the field.

Checkbox and Dropdown Fields
Checkbox and dropdown fields are set up in the same way. After adding one of these fields, you’ll see a second screen for customizing the field. Your customization options are as follows:
- Click Label to add a new option. Specify the name of this option in the Label column.
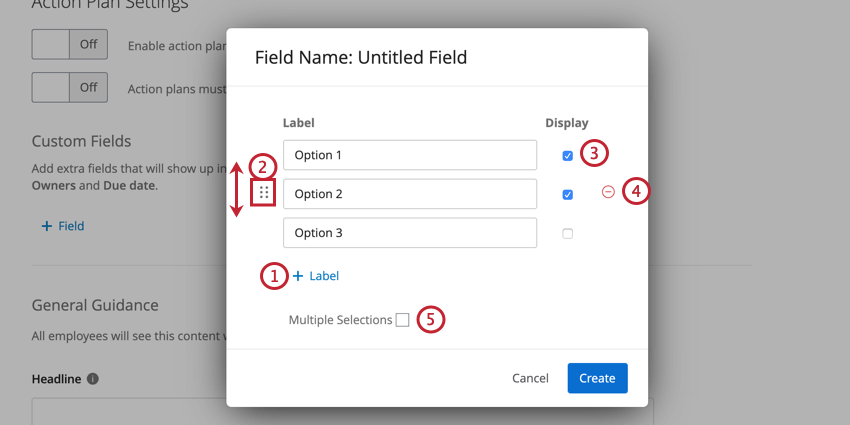
- Click and drag the dots to the left of an option to reorder it.
- Enable the Display checkbox to display an option, or disable it to hide an option. This feature is especially useful if you have an option you want to remove without losing previously collected data for the option.
- Click the minus sign (–) to remove an option. Data associated with deleted options is irretrievable!
- Enable Multiple Selections if you’d like users to be able to select multiple options for this field.
Managing Custom Fields
You can perform the following actions on your custom fields:
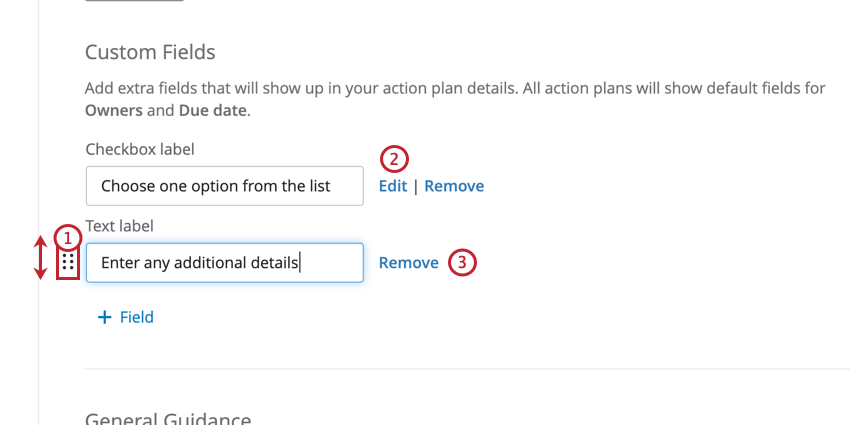
- Click and drag the dots to the left of a field to reorder it in the list.
- Click Edit next to a dropdown or checkbox field to edit the options for the field.
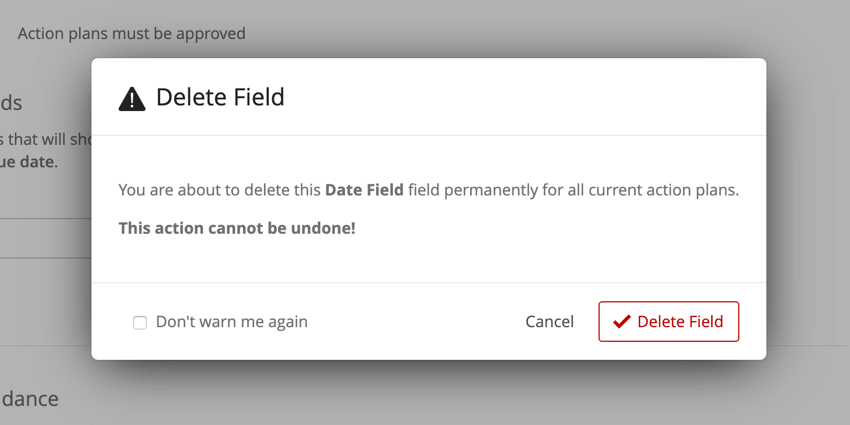
- Click Remove next to a field to delete it.
Qtip: After clicking Remove, you’ll be asked to confirm your decision. Once a field is deleted, any data associated with that field is also deleted and is irretrievable!
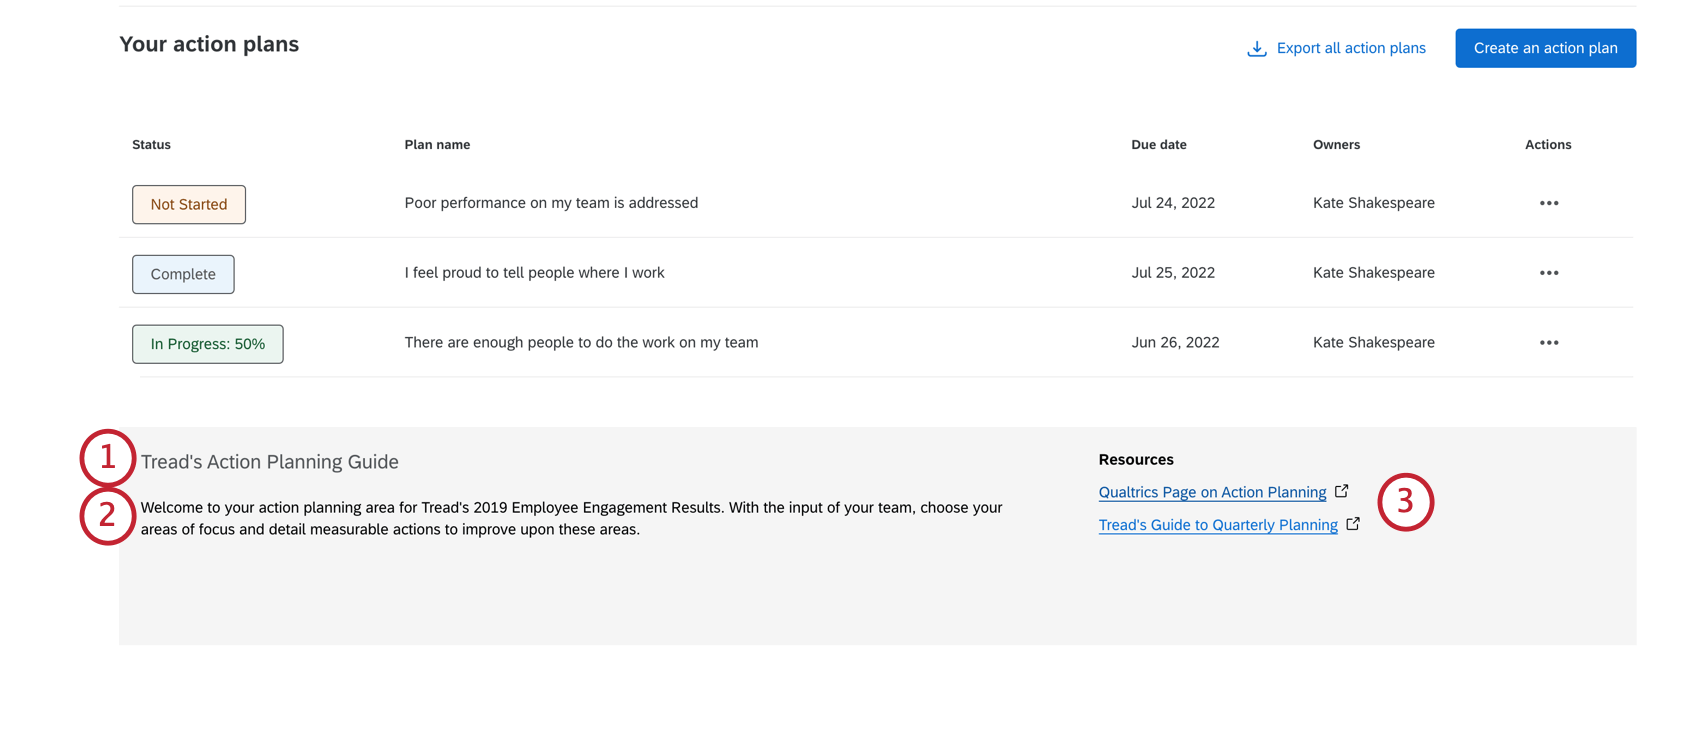
General Guidance
The General Guidance section is where you can provide information to your organization about action planning overall. Your organization will see this at the bottom of the page when they click on Action Plans.
- Add a headline. This is the title of your overall action planning guide.
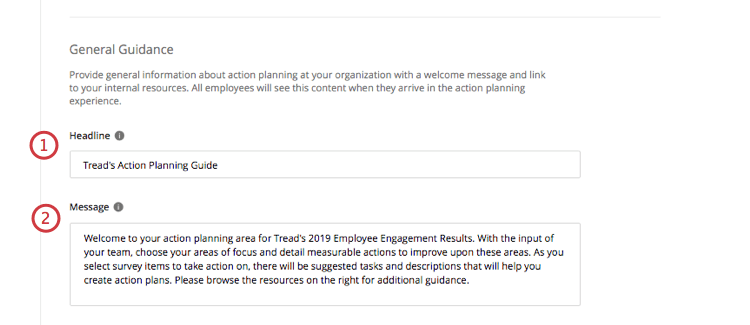
- Add a message. This is general guidance for your action-planning strategy.
Qtip: This field does not obey line breaks, rich text, or HTML.
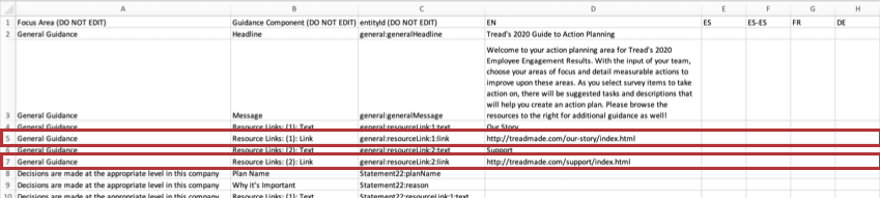
- Add a resource. The Text field is the name of the resource, and the Link is the URL of the resource.
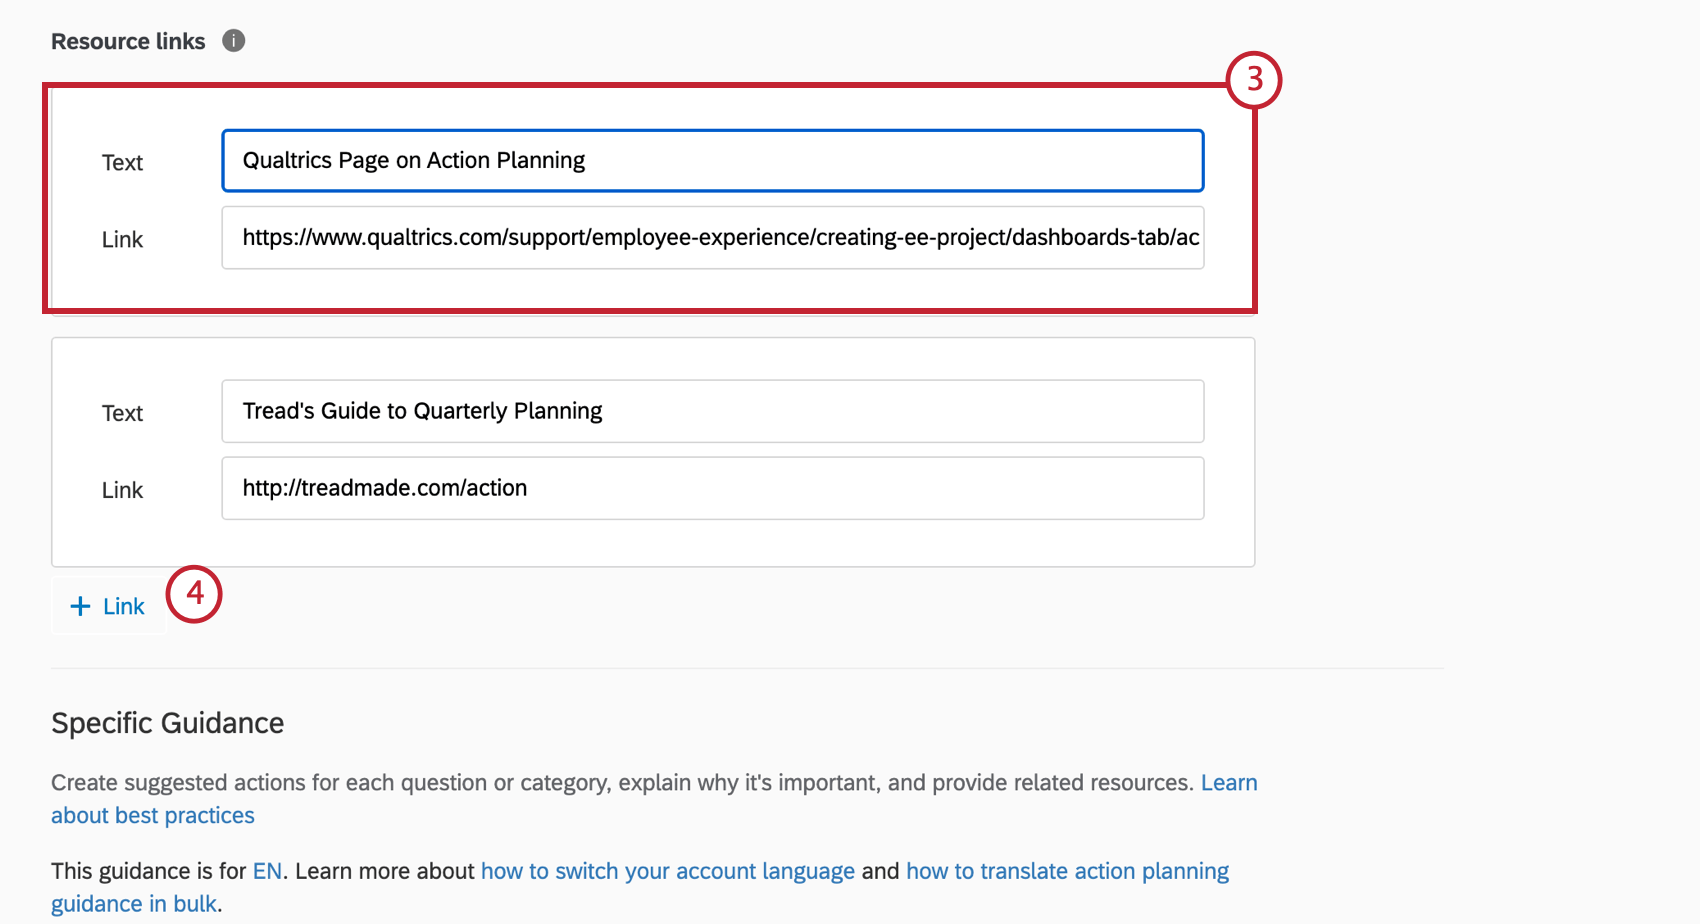
- Click + Resource Link to add another resource.
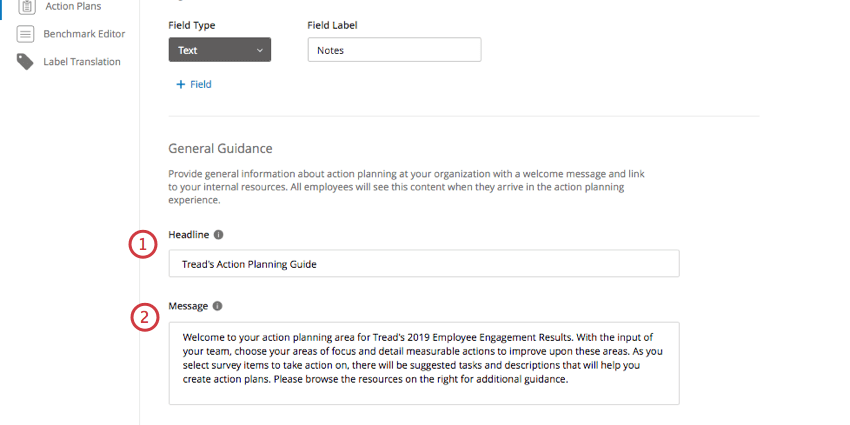
Here is what each of these fields looks like to your users, numbered the same as the steps they appear in.
Specific Guidance / Available Fields
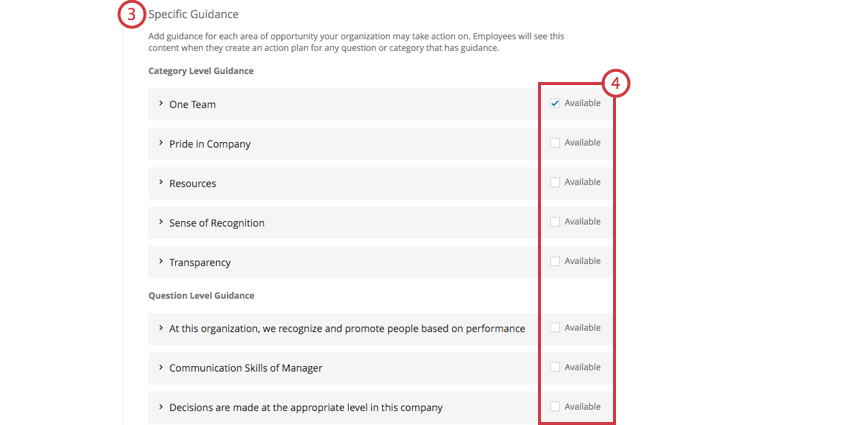
The Specific Guidance section is where you can add guidance for the manager to see when they create their action plan. After the manager tags their action plan to a category or survey item, they will see the suggested actions, resource links, and other guidance you provide them in their action plan to help them create one. This section also allows you to manage what items from your survey data are available for action planning.
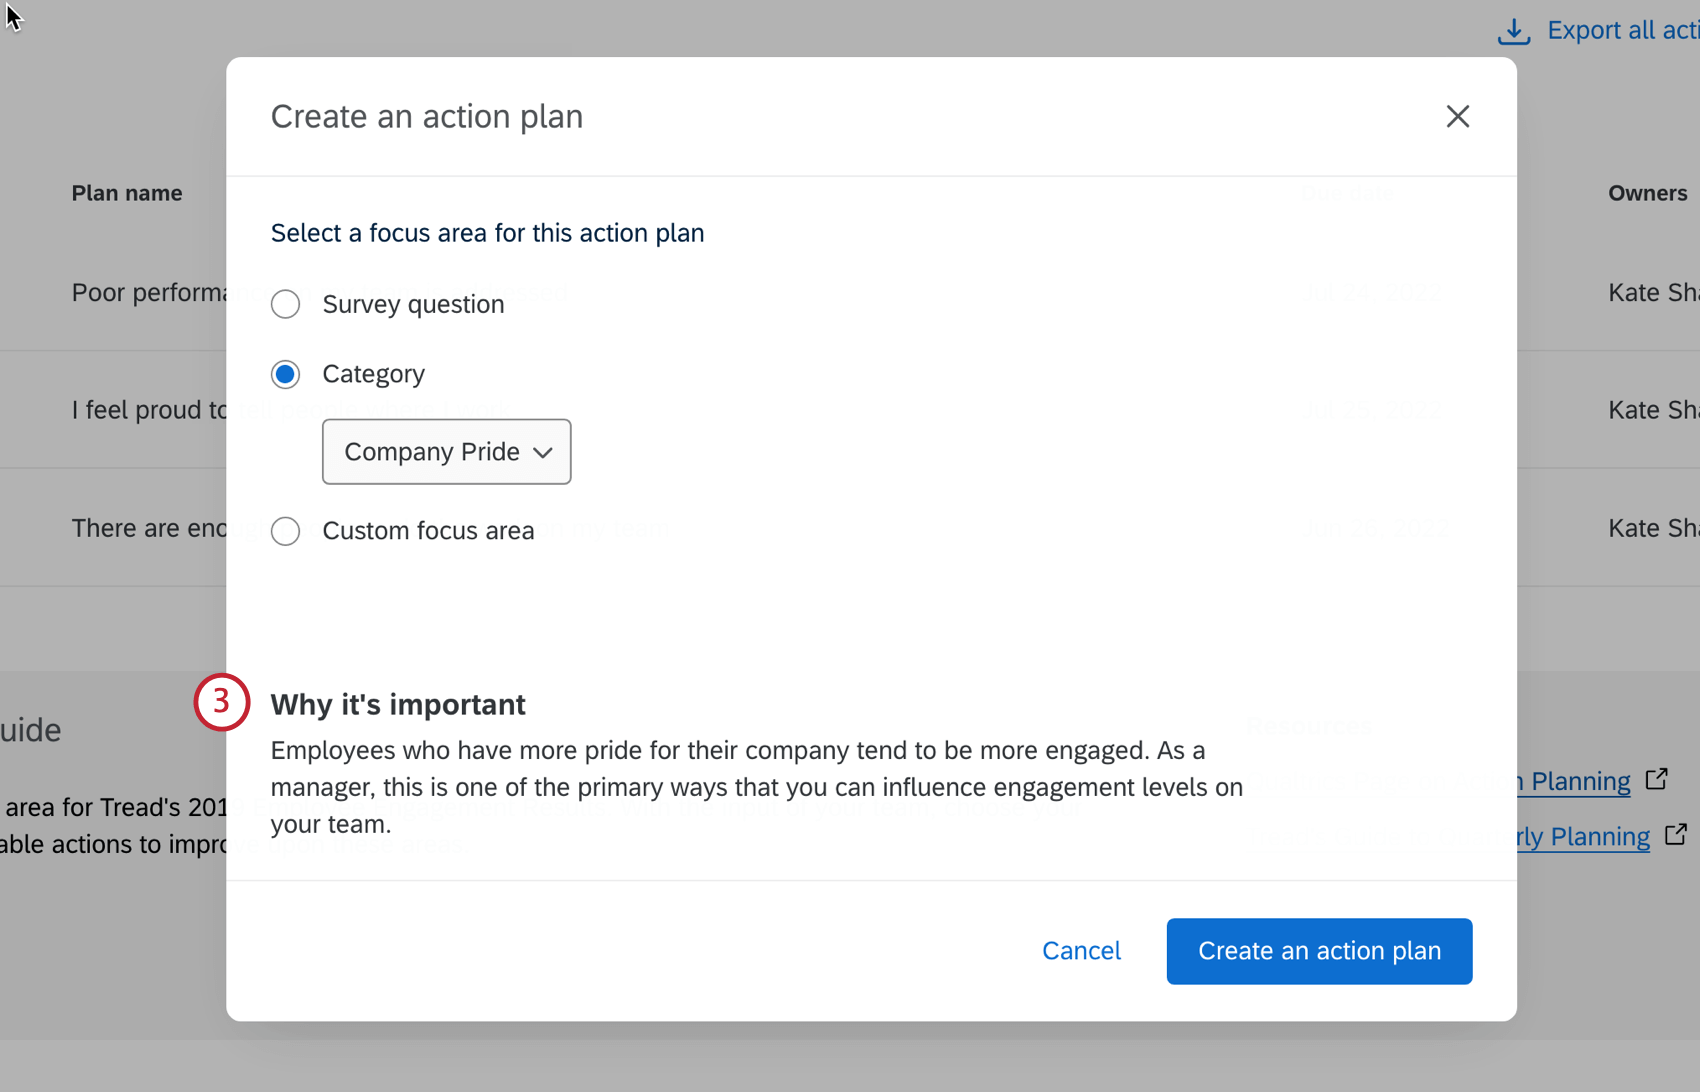
You can add specific guidance on the level of a category (Category Level Guidance) and/or survey questions (Question Level Guidance).
- If you’d like a manager to be able to tag their action plan on a certain category / question, make sure Available in selected the upper-right.
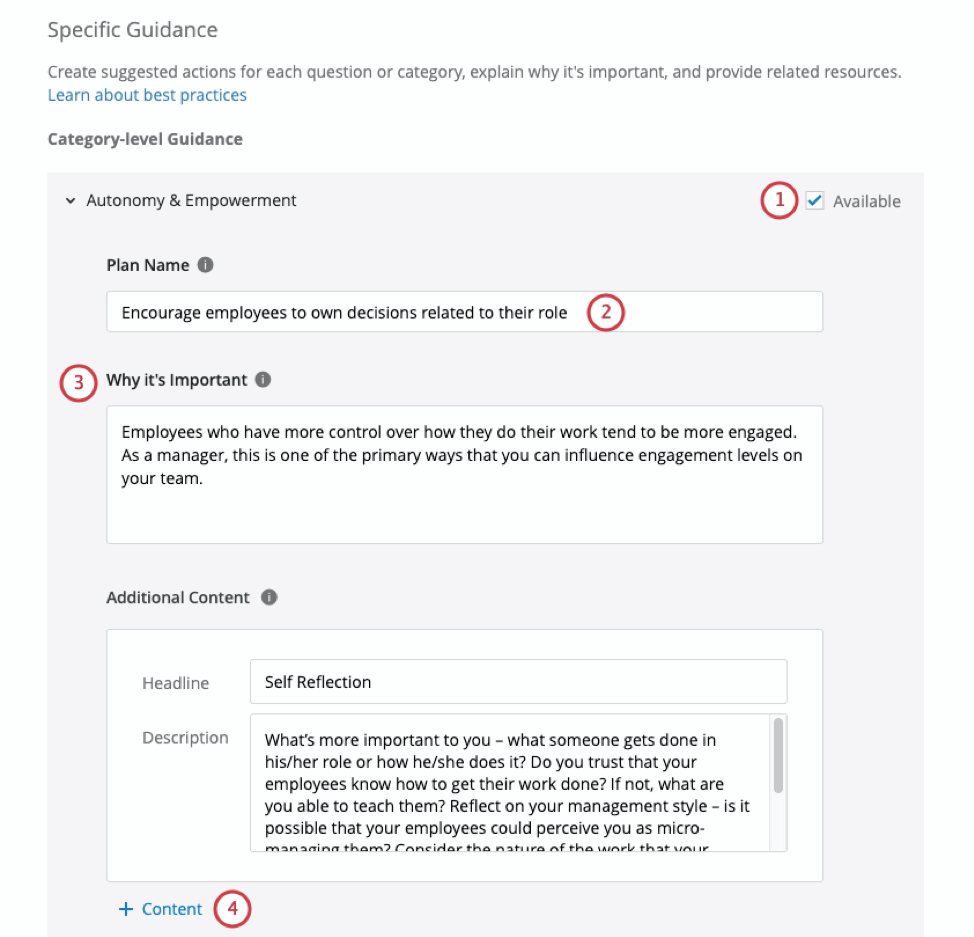
- Provide a short and actionable title for your action plan. This title should briefly describe the specific action that will be taken to address the selected survey item or category (e.g., Empower employees to share their roles).
- Explain why this category / question is important to your employees’ work experience.
Qtip: This field is optional, but it will show when a manager adds an action plan from the Focus Areas widget, so we recommend adding one.
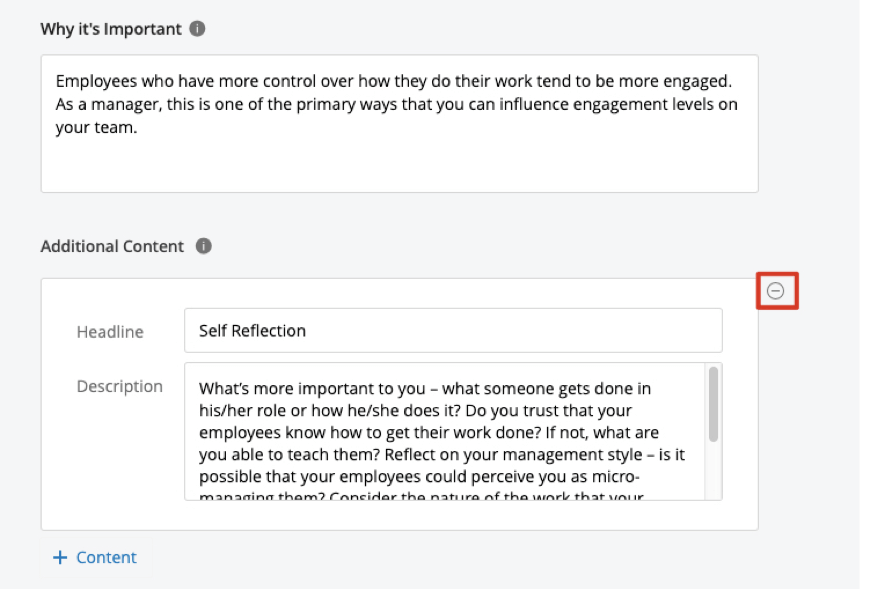
- If desired, click Content to add other guidance that may be helpful for a manager when creating an action plan, such as self-reflection questions or discussion topics.
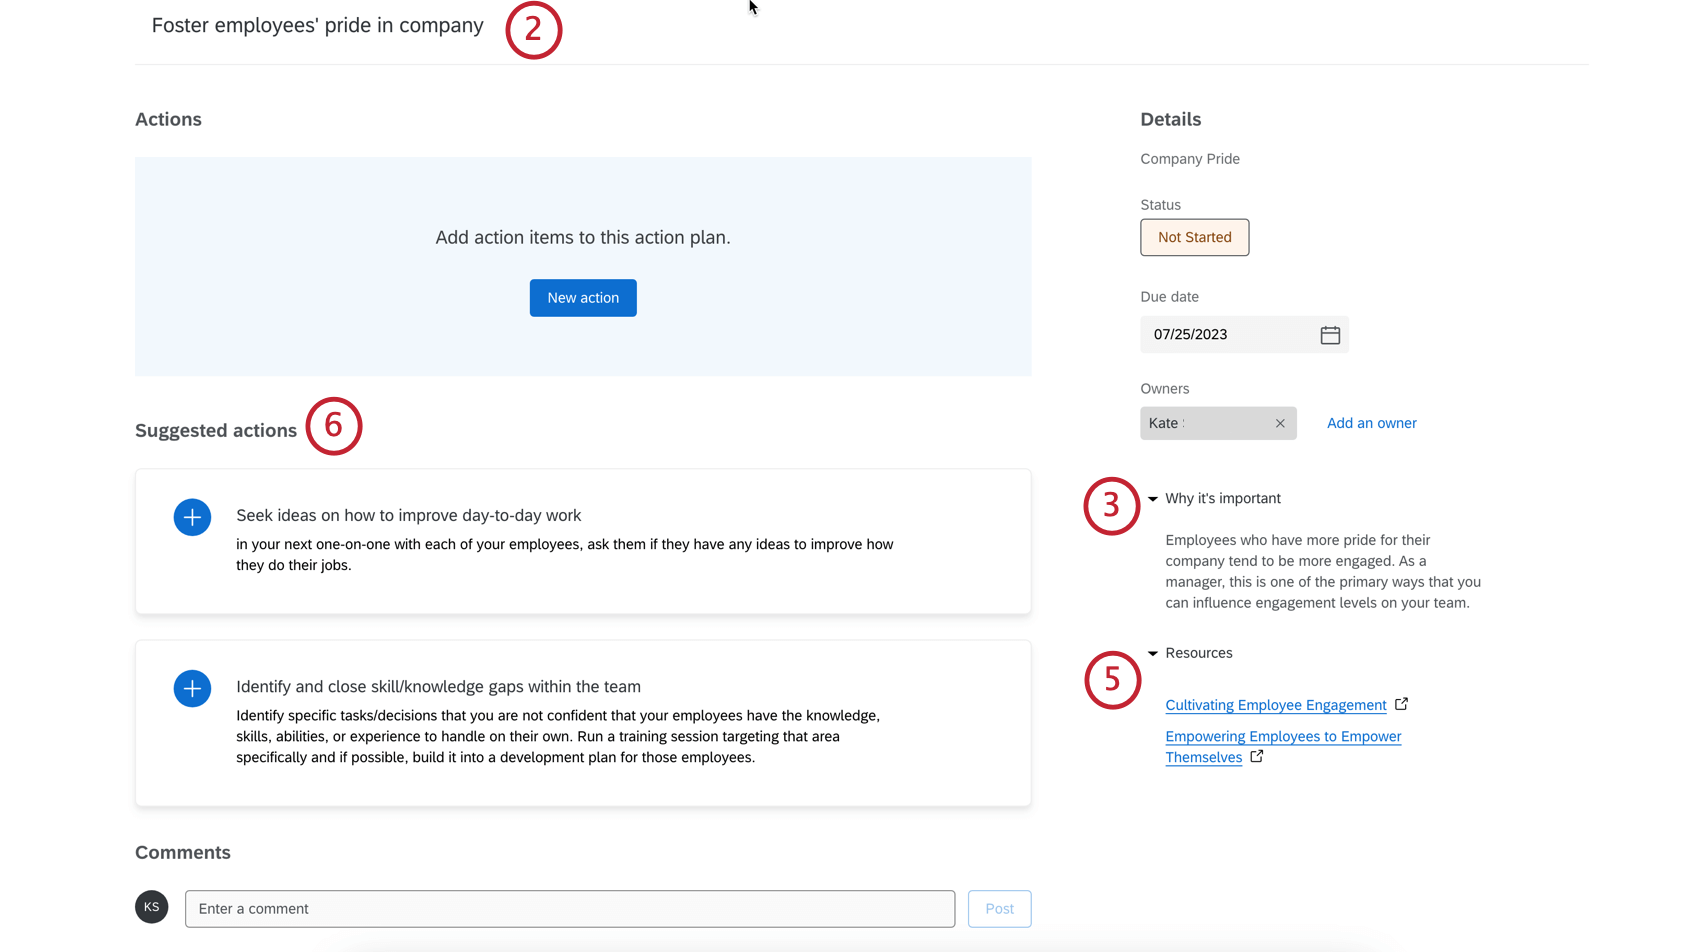
Qtip: After you create an action plan under this category / question, this content appears on the right under the importance you wrote in Step 3.
- Add links to internal or external resources here. The Text field is the name of the resource, and the Link is the URL of the resource.
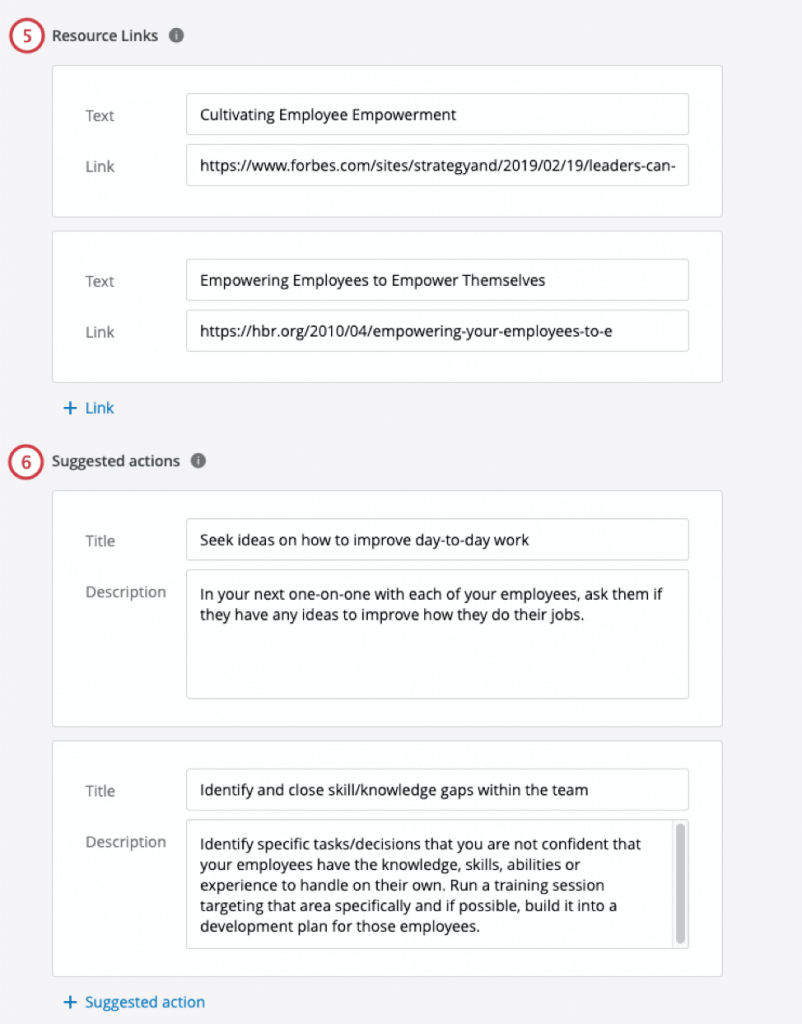 Qtip: Click + Link to add another link.
 - Add suggested actions. These are potential action ideas that provide leaders with ideas on how they can take action.
Qtip: These appear as bullet points on the action plan creation window, and once the action plan is created, it will show as Suggested Actions along the left of the plan.Qtip: Click Suggested action to add another suggested action.

Qtip: Hover over any content, suggested action, or resource link and click the minus sign ( – ) to delete it.
Here is what each of these fields looks like when you’re creating an action plan, numbered the same as the steps they appear in.
Here is what each of these fields looks like after you’ve created an action plan, numbered the same as the steps they appear in.
Translating Guided Action Planning
Once your action planning guidance is all set up, see Translating Guided Action Planning.
Available Fields
One of the major strengths of action planning is the ability to base it off of specific survey items and categories. As soon as you identify data points in your dashboard that could use improvement, you can create action plans to resolve these gaps.
- Go to Settings in your dashboard.
- Select Action plans.
- Scroll to the Specific Guidance.
- Select the Available checkbox next to an item to make it available for action planning.

Making Items Unavailable
If Available is unchecked, this means managers can’t add an action plan to that category or question. You may want to do this when the survey item isn’t something a manager can take action on or is outside of the manager’s control.
When an item is unavailable for action planning, the Improve button will disappear from the widget. 
Additionally, when an item is unavailable for action planning, you won’t be able to select the item when creating an action plan.
Translating Guided Action Planning
If you’ve added guided action planning to your dashboard, you can upload translations for all your guidance. This works similarly to how you upload dashboard translations.
- Click the dashboard settings gear.
- Go to the Translations tab.
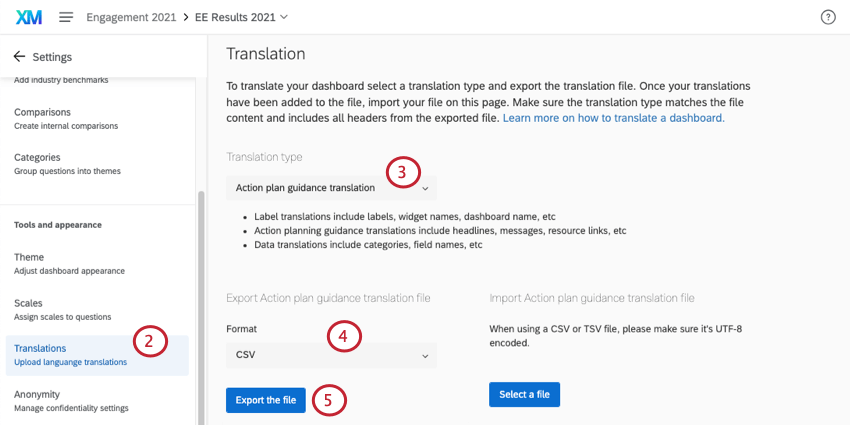
- From the Translation type dropdown, select Action plan guidance translation.
- Choose the file Format.
Qtip: We generally advise sticking to TSV, since this file type is better at handling special characters outside the English alphabet.
- Click Export the file.
- Open the file in a spreadsheet editor on your computer, such as Excel.
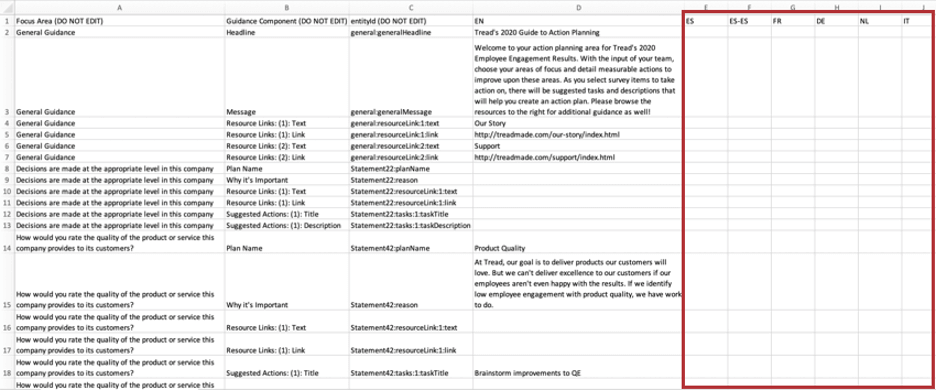
- Add your translations to their corresponding language column. Here are some general tips:
- See the List of Language Codes page for guidance about each language column.
- Follow the file’s exact formatting for creating your translations.
- Use the English column (EN) as a guide.
- Copy and paste to ensure formatting is correct. Do not delete or rearrange the columns, as this will cause the import to fail and translations to be lost.
- Do not delete the strings of numbers and letters – these are internal IDs that identify the parts of the dashboard you are translating.
- If part of your guidance includes links to employee resources, provide new links to the translated materials. Otherwise, you may want to include in your translations warnings that the linked materials aren’t translated, and copy over the same links.
- Save your file as a CSV file with UTF-8 encoding or as a TSV.
Warning: Once you’ve saved the file, do not open it again, as this could cause you to lose formatting for any special characters.
- In the Translation tab, click the Select a file button and select your translation file.
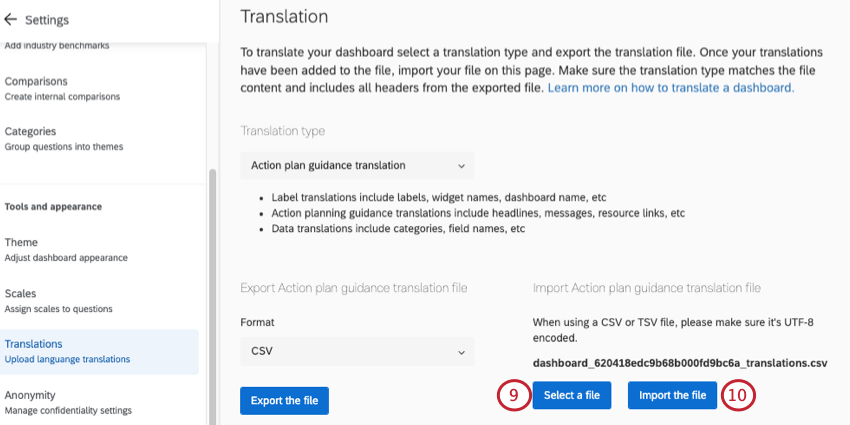
- Click Import the file.
Depending on the number of translations and the size of the dashboard, it may take a few minutes for the translations to fully load. You’re free to exit out of the dashboard and the translations will continue to process.
Translating Custom Action Planning Fields
When translating any custom fields associated with your action planning, use the regular label translation for the dashboard.
Troubleshooting Translations
See the Dashboard Translation page for help opening files, previewing translations, fixing file formatting, and more.