-

Qualtrics Platform -

Customer Journey Optimizer -

XM Discover -

Qualtrics Social Connect
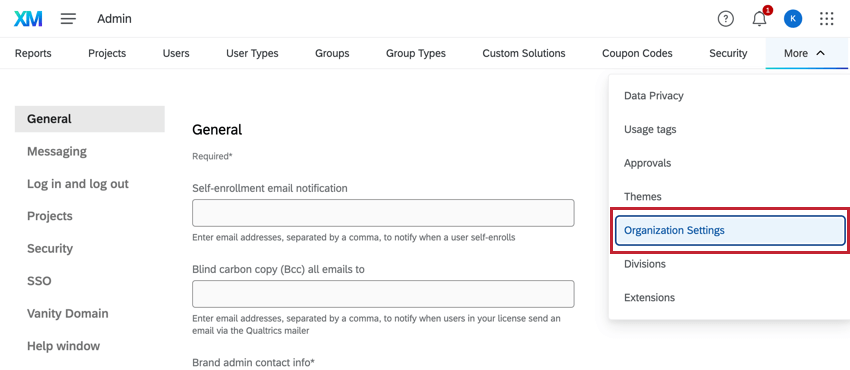
Organization Settings
About Organization Settings
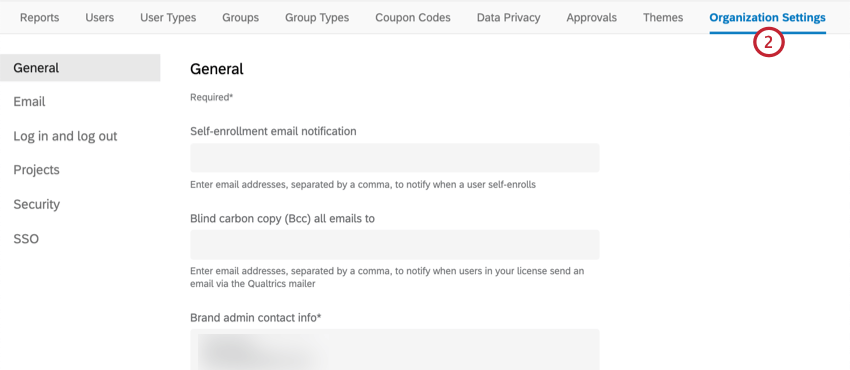
The Organization Settings tab, found in the Admin page, allows you to view and manage options that apply to all Qualtrics users in your organization. From here, you can set up contact info, password parameters, logout redirects, and more.
General
The General section holds settings for emails, notifications, and contact information.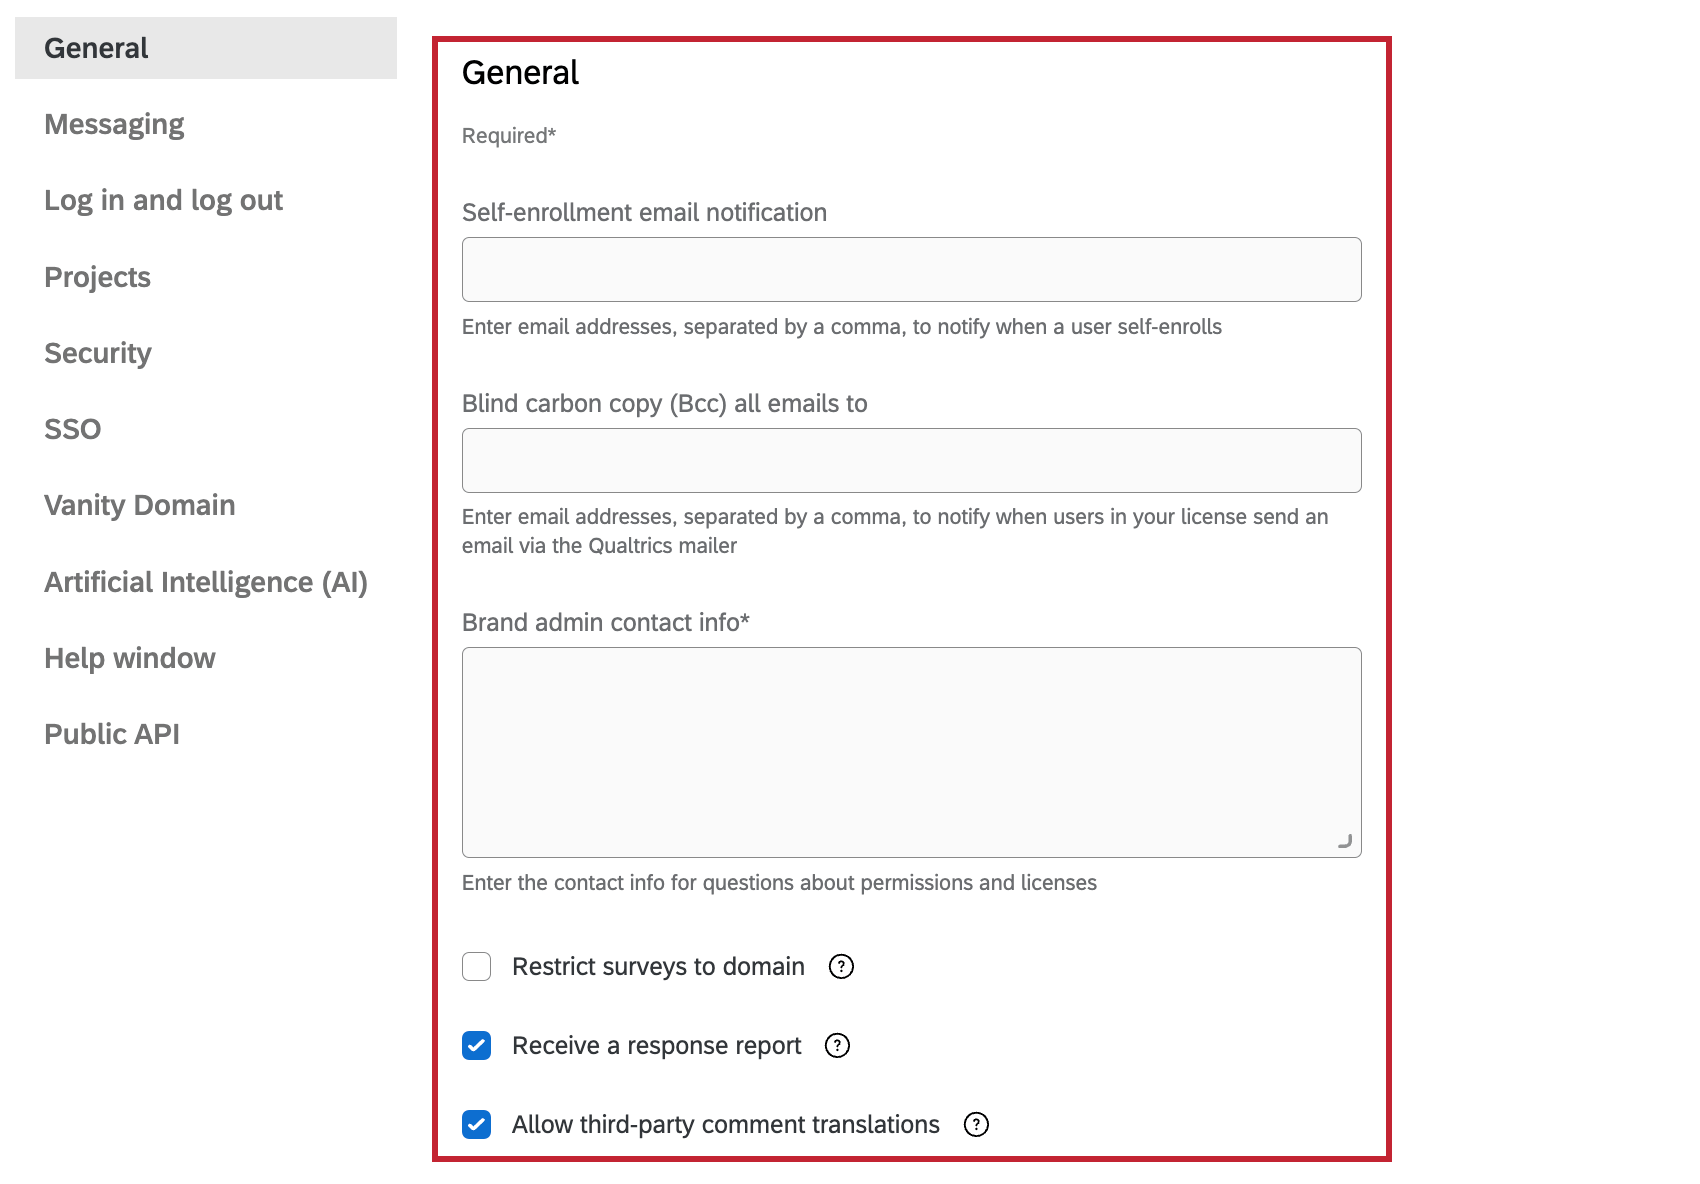
- Self-Enrollment email notification: Specify the email address(es) that should receive a notification whenever a user self-enrolls. Multiple emails should be separated with a comma (e.g., “example1@email.com, example2@email.com”). Note that this setting only applies if you have opted to allow self enrollment for your license and your license does not use Single Sign-On (SSO).
Qtip: If your license uses SSO and you’d like to receive email notifications when users self-enroll, please contact Qualtrics Support. Please note that if your license uses the SSO self-service feature, then you do not need to contact Qualtrics Support regarding self-enrollment email notifications.
- Blind carbon copy (Bcc) all emails to: Specify the email address(es) that should be a BCC of every email sent by users in your license via the Qualtrics mailer. This includes email distributions, email tasks, emails sent via the XM Directory task, ticketing emails, and sending emails to a contact list.
- Brand admin contact info: Specify the contact information users should follow to ask questions regarding their permissions and the overall license. Note that this is also where Qualtrics Support will direct users with permissions questions.
Warning: This field is required and cannot be left blank.
- Restrict surveys to domain: Requires the individual to use their organization’s ID/information in the survey URL.
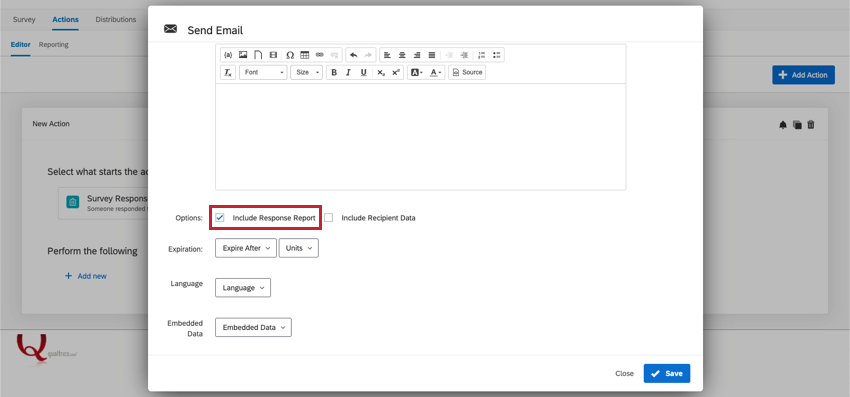
- Receive a response report: See the next section, Allow Response Report.
- Allow third-party comment translations: Enable Multi-Language Sentiment Analysis & Translate Comments in Text iQ. This will ensure responses that aren’t in English are analyzed in their native language, allowing for more accurate sentiment assignment. However, this feature requires sharing data with a third party software. See the linked support page for more information on this feature’s functions and the available languages.
Contact Information
The Contact Information section allows you to enter contact information if you’d like Qualtrics to reach out to alternative security and technical contacts. If you’d like Qualtrics to contact the Brand Administrator, feel free to leave these fields blank.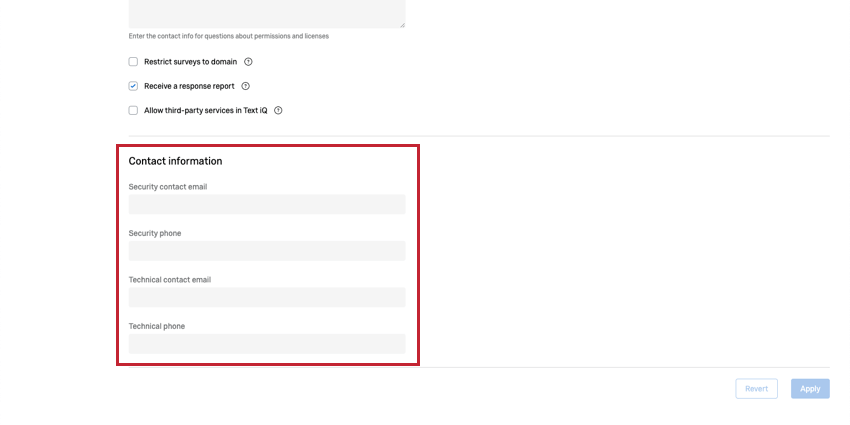
- Security contact email: The email of your organization’s security contact.
- Security phone: The phone number of your organization’s security contact.
- Technical contact email: The email of your organization’s technical contact.
- Technical phone: The email of your organization’s technical contact.
Allow Response Report
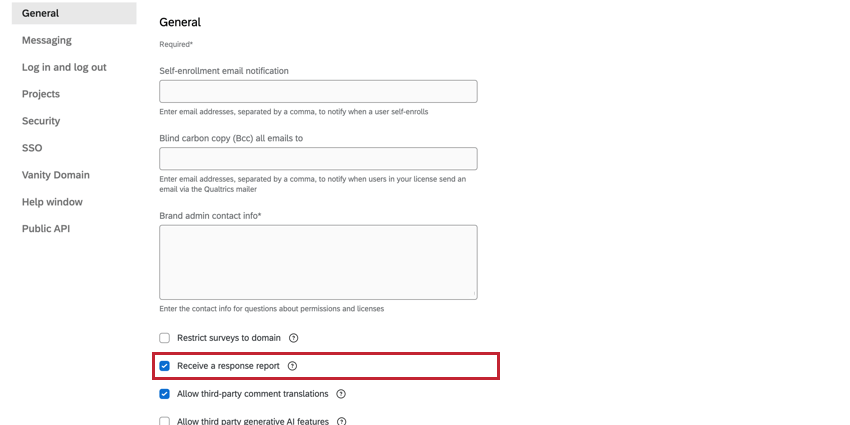
Response reports are a feature that your Qualtrics users can attach to their email task in the Workflows tab. They attach a copy of the participant’s entire survey response to an email a set period of time after it is submitted. When you deselect Receive a response report, you disable the ability for survey creators to display response reports in an email task.
However, the option will still appear in email tasks even after being disabled in the Organization Settings. It is advised you reach out to your users to let them know if you make this change.
Messaging
The messaging section holds settings for custom email settings and survey links for SMS and WhatsApp distributions. Click the header of each section to expand it and access the settings.
Custom Email Header
This set of options allows you to set custom headers on all the emails in your brand. These custom headers can contain any information you want relating to the sender, ESP, ISP, or recipient. Custom email headers are static and apply to the entire brand.
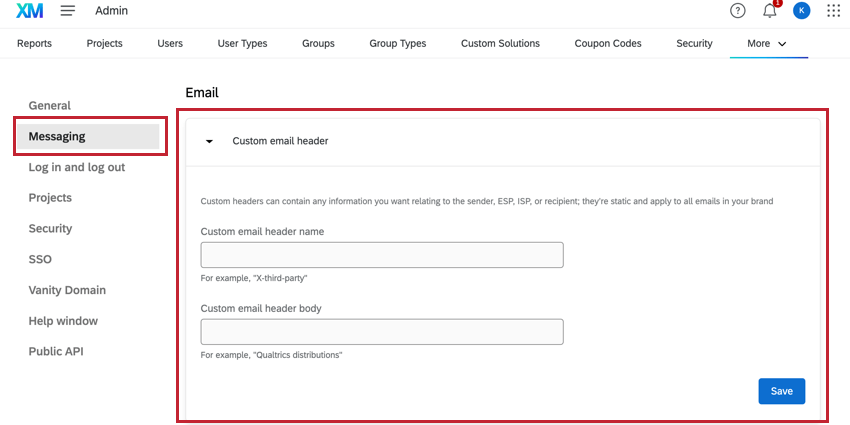
- Custom Email Header Name: The name of the email header.
- Custom Email Header Body: The body of the header. This is what the header’s value will be in every distribution coming from the brand.
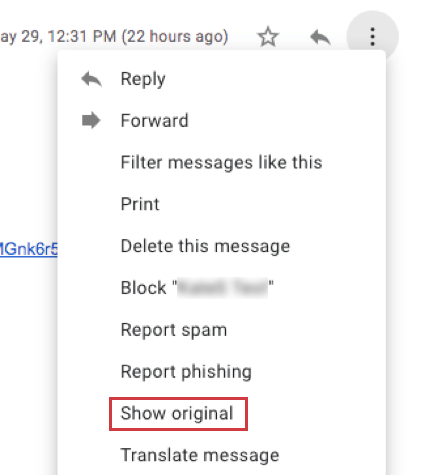
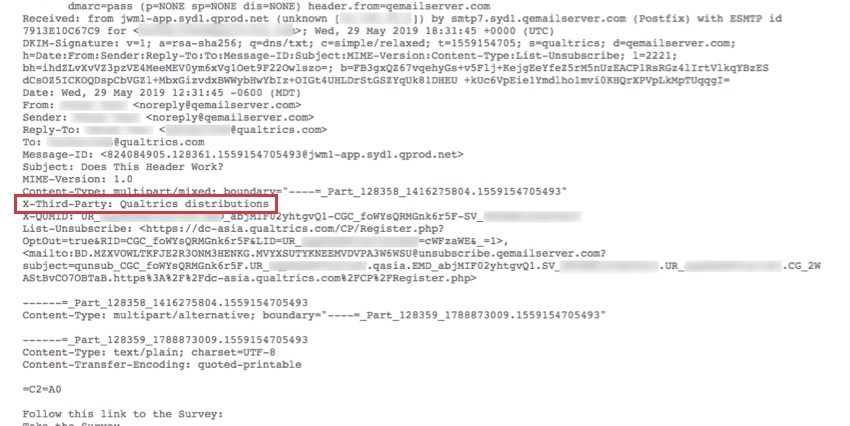
Custom email headers appear when you view the original text of the email. This can be accessed in many mailers by clicking a dropdown and selecting Show original.
Custom Email Domains
This section of the Organization Settings allows you to create custom email domains. This allows users in your brand to send emails through Qualtrics using your organization’s custom email address. To learn more about this, see Configuring a Custom From Domain.
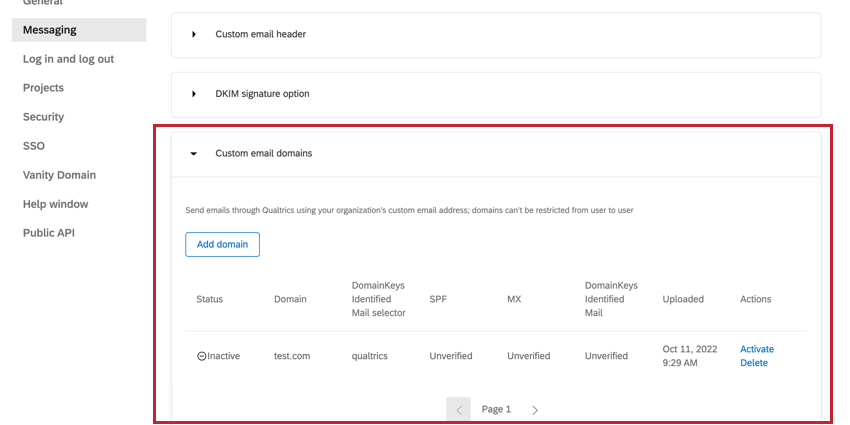
For more information, see Using a Custom “From” Address.
Survey Links
This set of options allows you to customize how your links are displayed in SMS and WhatsApp distributions.
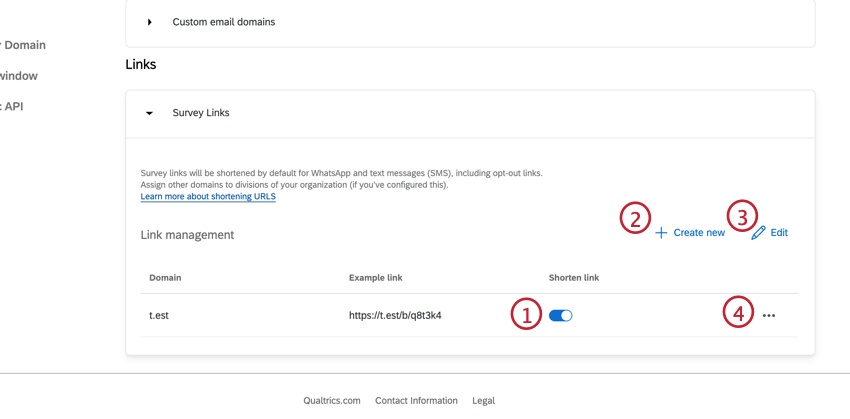
- Shorten link: Turning this setting on will shorten links by default for WhatsApp and SMS distributions. With the flexibility to shorten links, you can adapt to the regulations across different countries to ensure your distributions get delivered.
- Create new: Add a new survey link set-up for a different division in your brand. This allows you to change the domain for different divisions in your brand. When creating a new survey link set-up, you can select the Qualtrics default domain, brand domain, or vanity domain (if applicable).
Qtip: If divisions have not been set up for your brand, you will only be able to configure survey links on a brand level. If divisions have been set up, you are able to select which division to customize your links for.
- Edit: Edit the survey link set-up. You can change the domain and indicate whether or not you want to shorten the link.
- Click the 3-dot menu to edit or Delete link configurations.
Log in and Log out
The Log in and log out section allows you to set redirects for your brand’s login and logout experiences.

- Login redirect: Specify where a user is redirected upon going to your organization’s login URL.
- Logout redirect: Specify where a user is redirected upon logging out of their account.
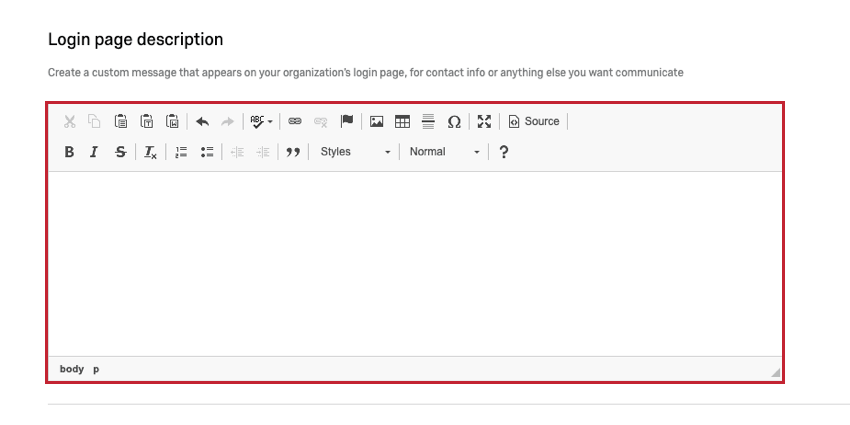
Login Page Description
You can create a custom message that will display on your organization’s login page. This could include contact information or any other instructions you may need to communicate to your users.
Projects
The Projects section allows your users to set additional information on each survey.
Survey Description
The Survey Description features function as a subtitle that a user is prompted to add when creating a survey. This subtitle information can be used when exporting your Summary Report since it will be added as an additional column in the export.
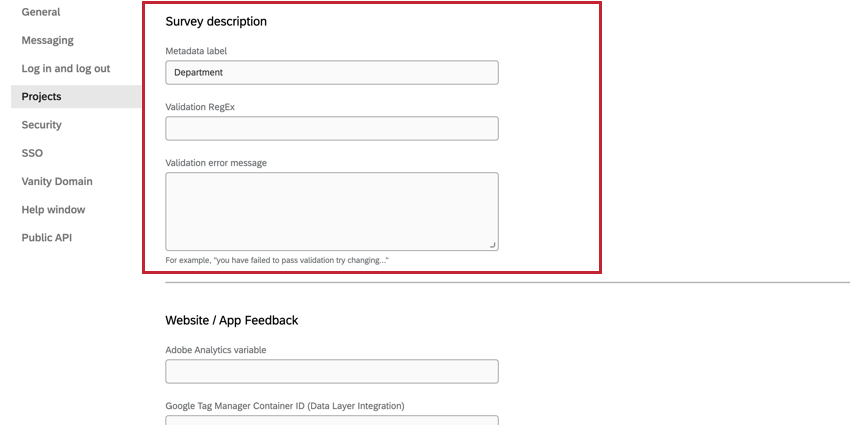
- Metadata Label: What the user is prompted to enter, in addition to the Project Name, when creating a project.
- Validation RegEx: Regex that can be used to make sure the entered description matches a certain format. If no validation is specified, the user will not be required to enter an additional description.
- Validation error message: The message that is displayed to the user if they fail the validation.
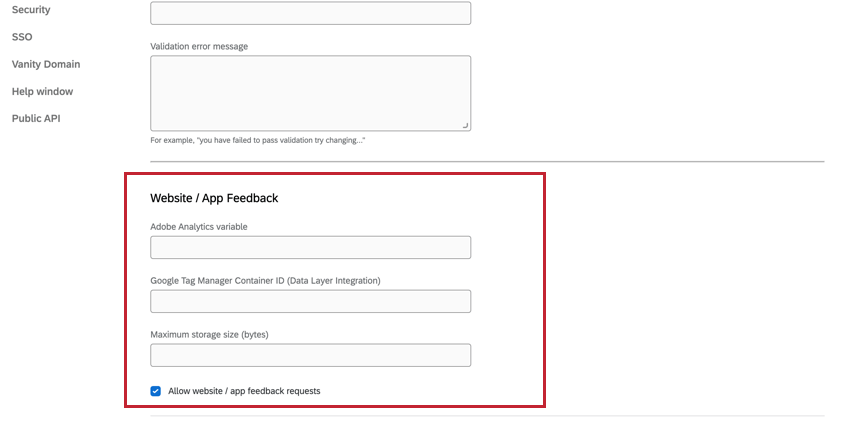
Website / App Feedback
The Website / App Feedback section provides an option to specify information for your Website / App Feedback users.
Adobe Analytics Variable
If you’re running Adobe Analytics on your website, there are usually several variables that Website / App Feedback can read and use for targeting visitors and embedded data. By default, these variables have an “s” preceding the variable name. For example: “s.eVar1”.
However, some organizations have set a different prefix in Adobe for their variables (i.e., “q.eVar1”) and may find that Website / App Feedback cannot utilize the Adobe Analytics variables on the webpage. If you do use a custom prefix in Adobe Analytics, you’ll need to also enter it here in the Organization Settings.
Maximum Storage Size (Bytes)
This setting allows you to set a cap on how large Website / App Feedback cookies or session storage can be when your Intercept’s action set logic is based off of Site History or Page Count. This is particularly important if you have several services running on your site utilizing their own cookies. To change these settings simply enter your desired maximum size, and then click the green Save button.
Enable Website / App Feedback
Security
Password
The Password section contains requirements for the types of passwords users must create for their accounts.
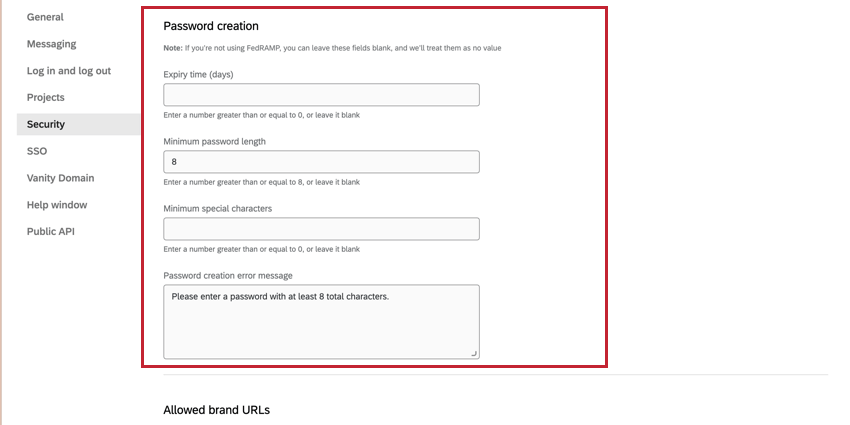
- Expiry Time (days): Designate (in days) when all account passwords will expire (e.g., type “365” if you would like users to redo their password every 365 days). At that time, users will be prompted to create new passwords.
- Minimum password length: Specify the minimum number of characters that can be used in a user password.
- Minimum special characters: Specify the number of non-alpha characters (anything other than a letter) that must be present in user passwords.
- Password Creation Error: Create a unique error message for when users’ passwords don’t fit the specified criteria.
Allowed Brand URLs
The Allowed brand URLs section allows Brand Admins to restrict what domains are allowed to be used in links within surveys.
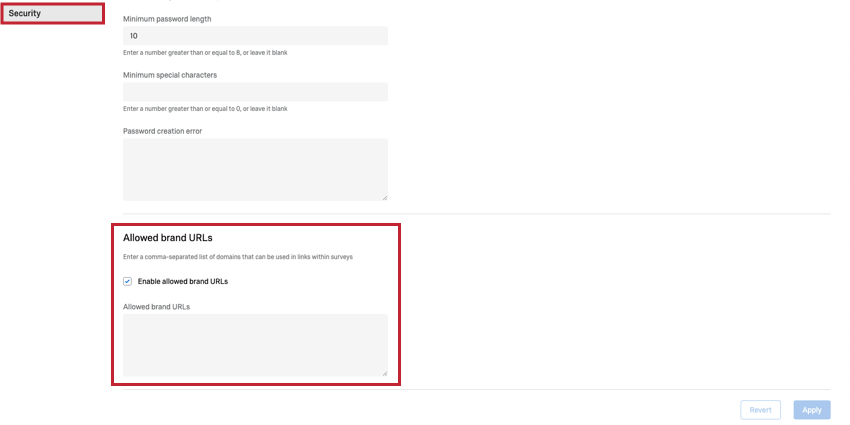
- Enable allowed brand URLs: Enables link domain restrictions for your brand. This setting is disabled by default.
- Allowed brand URLs: Specify the list of domains that can be used in links within surveys. Domains should be added in a comma separated list.
Qtip: Wildcards can be used to allow all subdomains for a given domain. For example, *.qualtrics.com would allow users to use surveys.qualtrics.com, research.qualtrics.com, etc. within links.
Allowed Email Domains
The Allowed email domains section allows Brand Admins to restrict what domains are allowed to be sent emails.
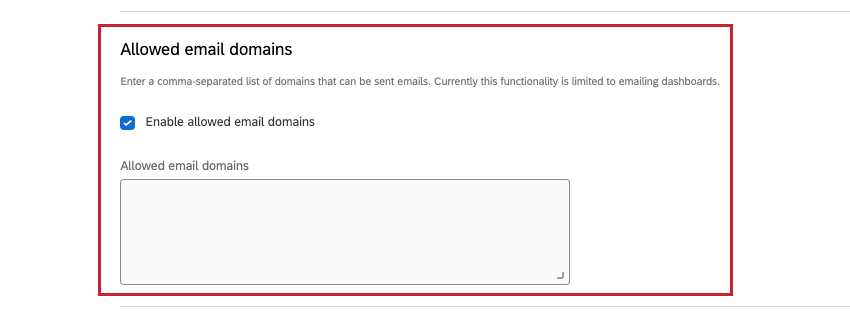
- Enable allowed email domains: Enables email domain restrictions for your brand. This setting is disabled by default.
- Allowed email domains: Specify the list of domains that can be sent emails. Domains should be added in a comma separated list.
Qtip: Wildcards can be used to allow all subdomains for a given domain. For example, *.qualtrics.com would allow users to use surveys.qualtrics.com, research.qualtrics.com, etc. within links.
Authentication
The Authentication section of organization settings allows you to customize the authorization requirements for users in your license. This includes setting up SSO configurations and controlling the login experience for standard Qualtrics logins.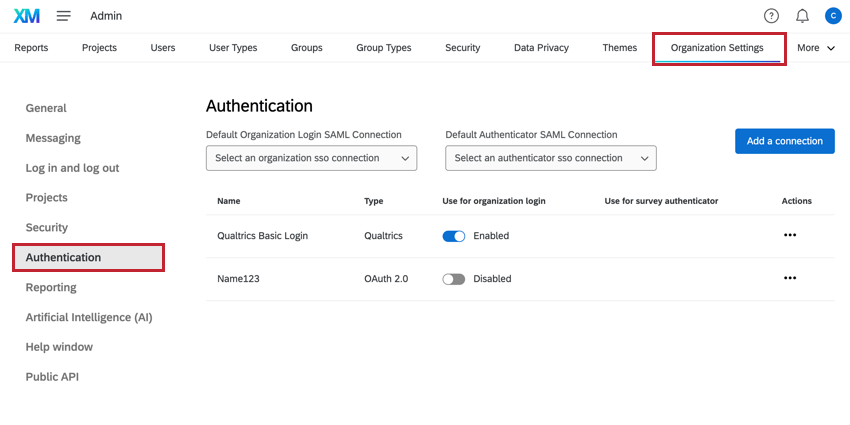
Login Types
When viewing login configurations on this page, there are 3 different types available: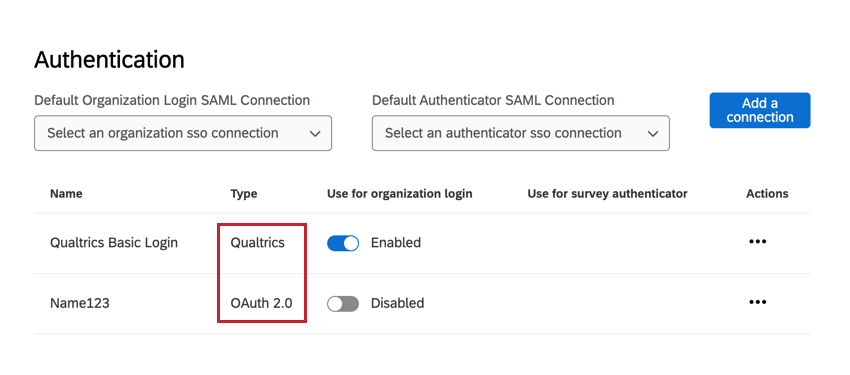
- Qualtrics: Controls login settings for standard Qualtrics login (with a Qualtrics username and password).
- OAuth 0: Controls login settings for an OAuth 2.0 SSO configuration.
- SAML: Controls login settings for a SAML SSO configuration.
See the below subsections for more information about each login type.
Qualtrics Login
The Qualtrics login controls the login experience for logging in with a unique Qualtrics username and password. Click Edit to change these settings.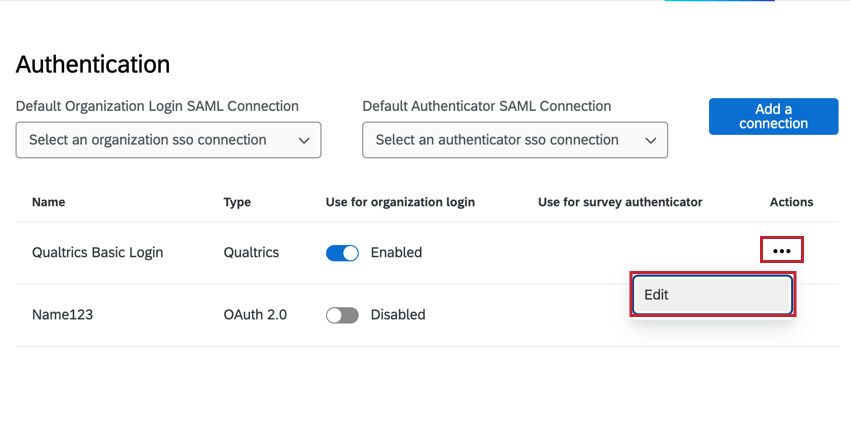
You can then customize the following:
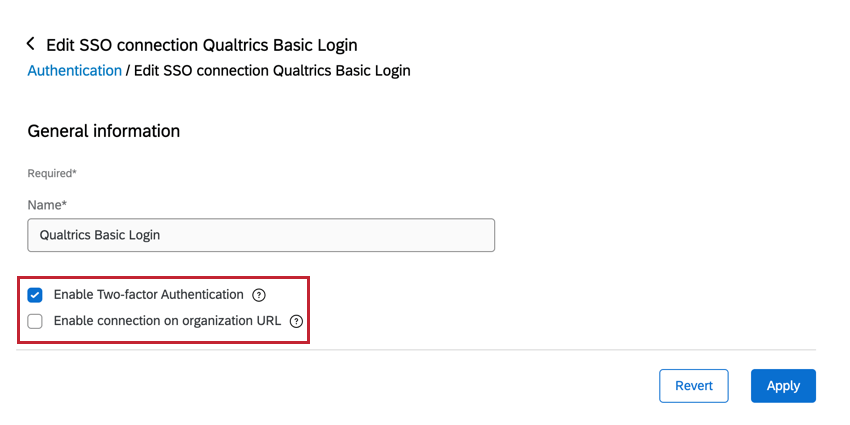
- Name: If desired, you can change the display name that’s shown in organization settings.
- Enable Two-factor Authentication: When enabled, users must provide a verification code after logging in. Users can set a preferred method of receiving this code – for example, through email or an authentication app on their phone. See the Logging into Your Account for more information about two-factor authentication.
Attention: Two-factor Authentication is disabled for SSO users on brands with SSO. If your brand has SSO enabled, then only non-SSO users will be able to use two-factor authentication.Qtip: Two-factor Authentication does not apply to Participant user types. For example, participants log into their dashboards and 360 portals without providing two-factor authentication.
- Enable connection on organization URL: When enabled, users can log in at your branded URL instead of the general Qualtrics login page (ex., https://brandID.datacenter.qualtrics.com/login). If this option is enabled and your brand uses SSO, then users will be able to choose which connection to log in with.
SSO Logins
OAuth 2.0 and SAML credentials allow you to create and manage your Single Sign-On (SSO) connections. You’ll be able to add new connections, update certificates on existing connections, modify settings such as Just In Time provisioning, and more.
For more information on how to implement your organization settings for SSO, see the Configuring Organization SSO Settings page.
Adding Two-Factor Authentication (2FA) to Your Organization
Two-factor authentication (2FA) adds an extra layer of security by requiring a second form of verification after you enter your username and password. As a Brand Administrator, you can adjust the two-factor authentication settings for your entire Qualtrics organization. Once enabled, users will be required to either use a message their email address or an authentication app to confirm their identity before they can log in.
Only Brand Administrators can adjust 2FA settings for the entire organization.
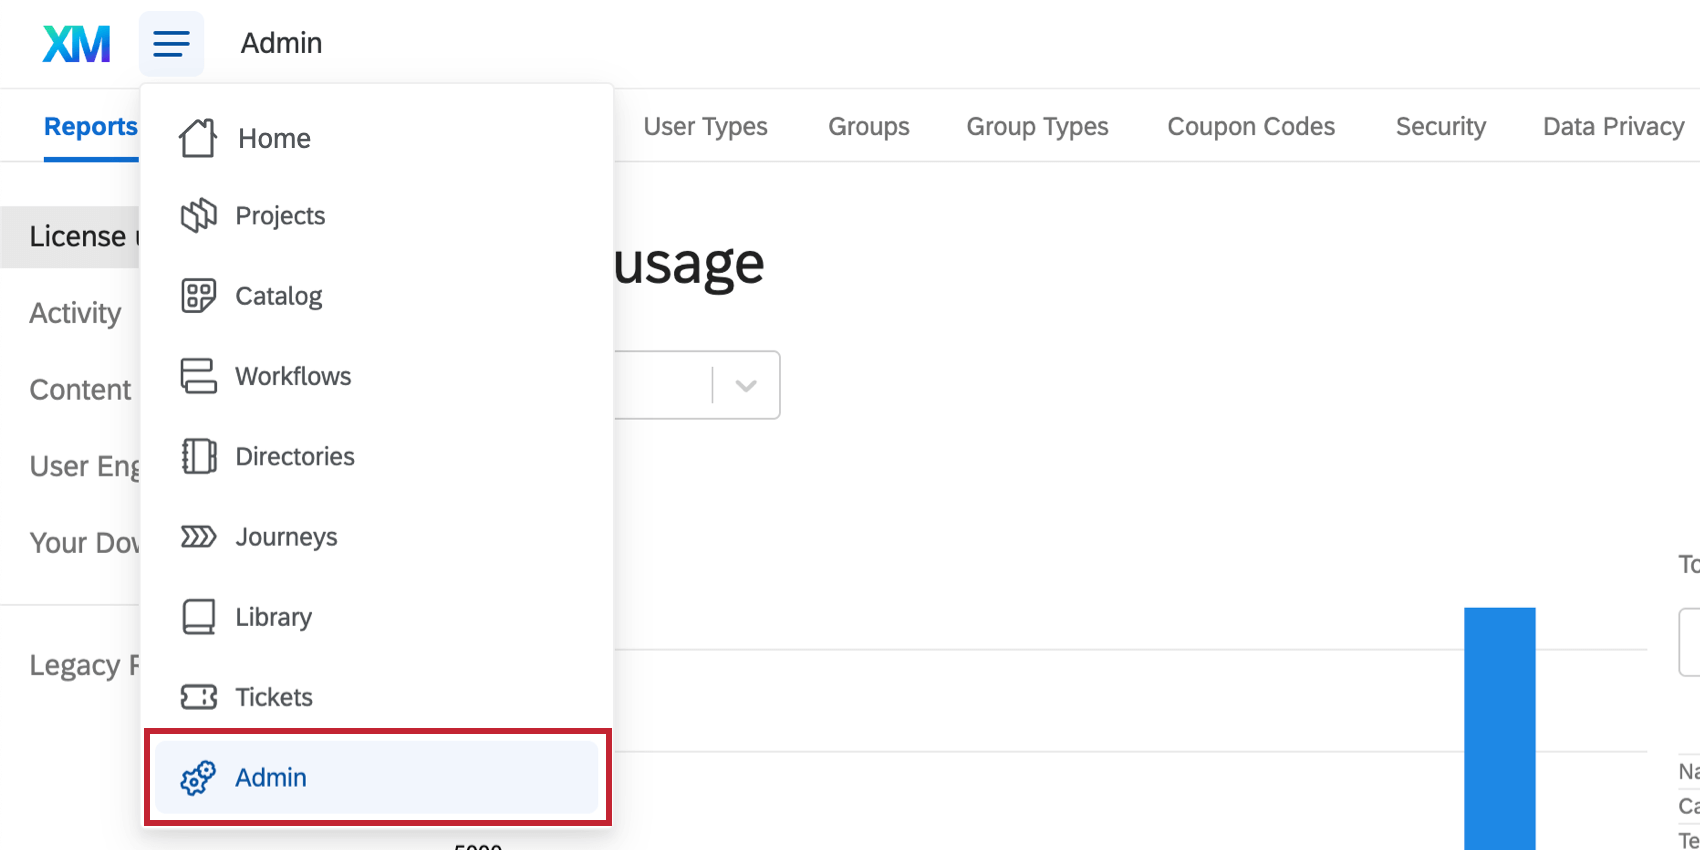
- Go to the global navigation.
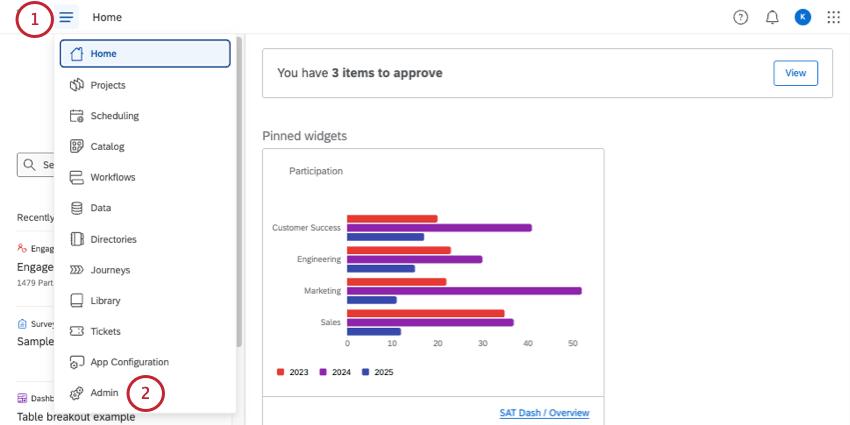
- Select Admin.
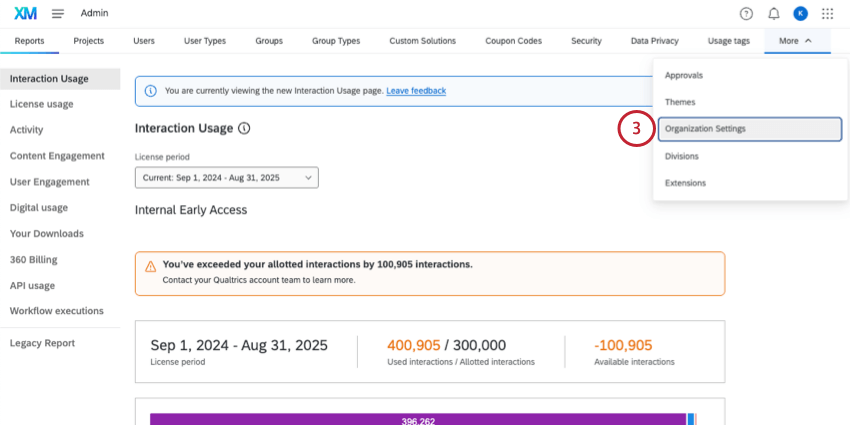
- Go to Organization Settings. (You may need to click “More.”)
- Select Authentication.
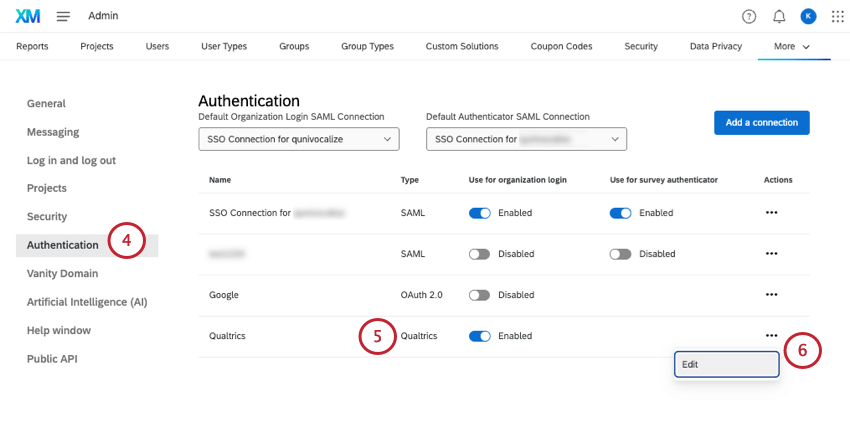
- If you have multiple connections, find the one with the type Qualtrics.
Qtip: This connection needs to be marked Enabled.
- Click the 3 dots and select Edit.
- Select Enable Two-factor Authentication.
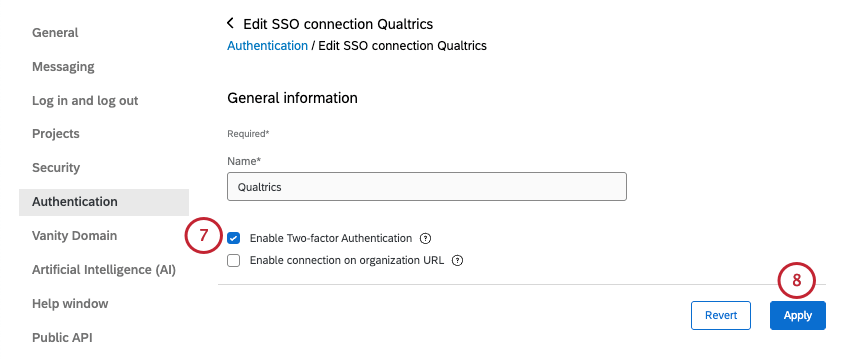
- Click Apply.
Vanity Domain
Vanity URLs are custom branded URLs for surveys, dashboards, and user accounts. Brand Administrators can create and manage vanity domains for the entire brand. For more information, see Vanity URLs.
Artificial Intelligence (AI)
As a Brand Administrator, you have the ability to turn features involving third-party generative models on or off for your entire organization, giving you autonomy over your data. You can also decide whether new third-party generative AI features are enabled by default for your organization. For more information, see Artificial Intelligence (AI) Administration.
Help Window
The help window gives you access to Qualtrics support resources right inside the product, including specialized recommendations based on what page you’re in. You can customize this help window for everyone in your organization by providing your own unique company resources for all of your users to see.
Help Window Customization
Go to your Organization Settings and select Help Window. Your custom content will consist of a body of text, with a custom button leading to a resource of your choice underneath.
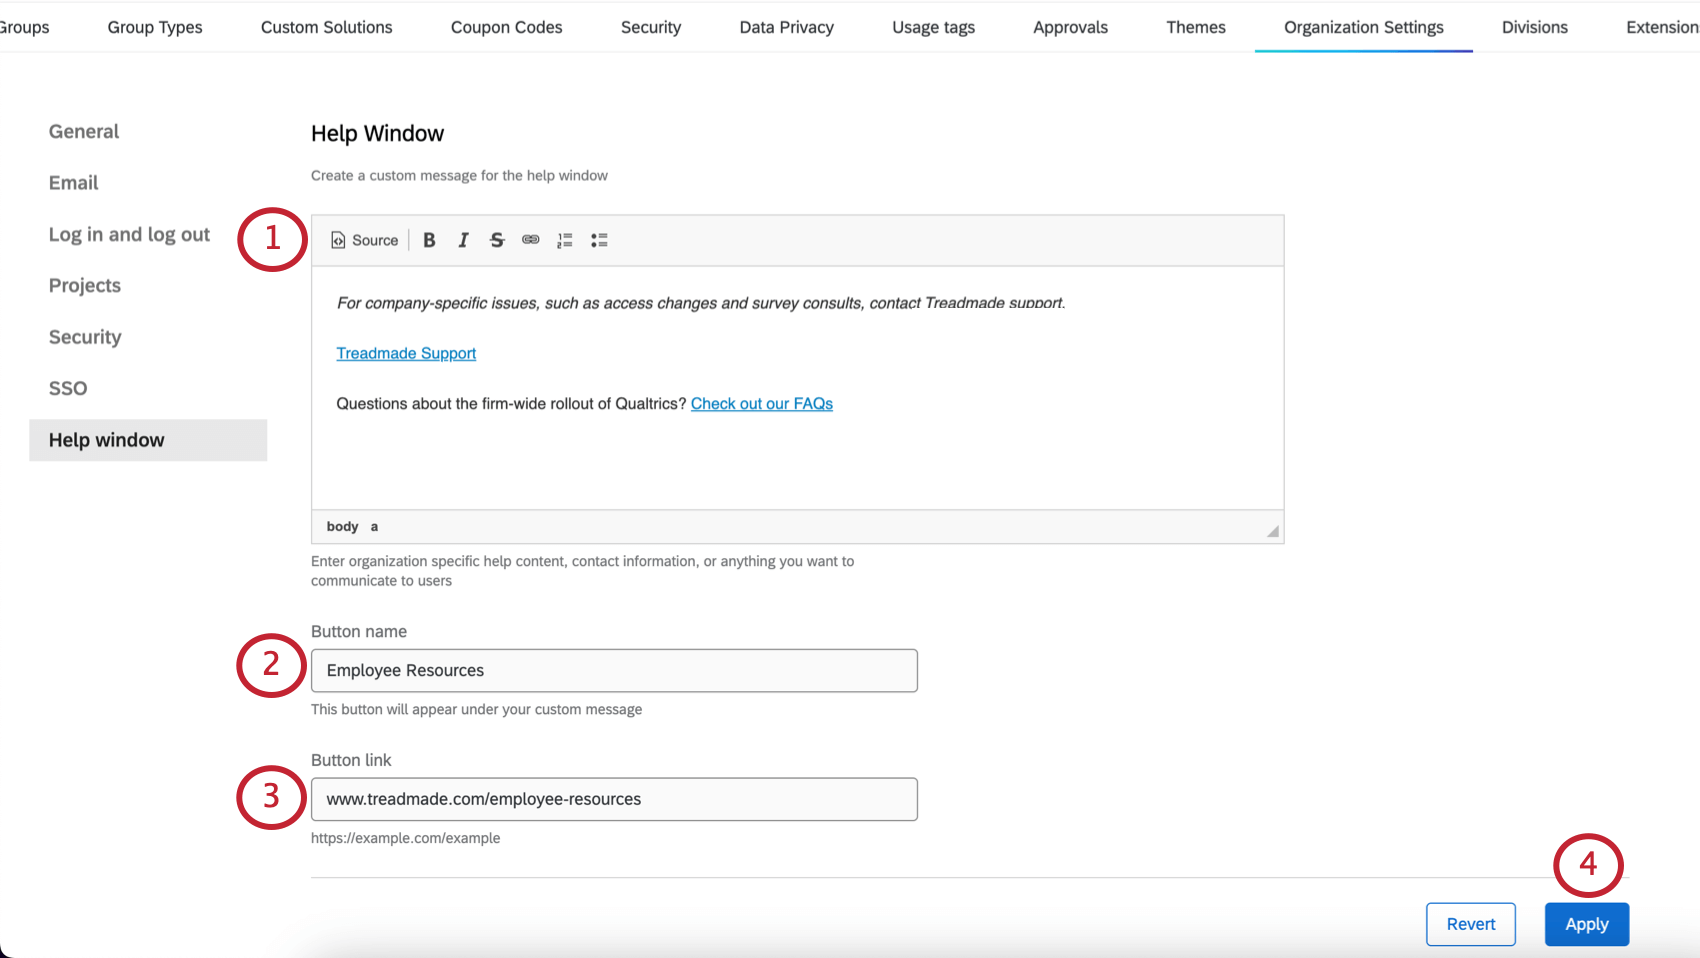
- Enter a message you’d like to appear in the help window. This can include organization specific help content, contact information, or anything you want to communicate to users. You can bold, italicize, or strike through text. You can also add hyperlinks, bullets, and numbered lists. To edit additional formatting, use the Source tab to switch to an HTML view.
Qtip: Not all formatting will be compatible with the custom help window.Qtip: You can drag and drop the corner if you need more room to format your message. However, this will not affect the width of the help window.
- Under Button name, add the text that should appear on your button. There’s an 80 character limit.
- Under Button link, add the full URL you want the user to visit when the button is clicked. This link will open in a new tab.
Qtip: Your link must start with http:// or https://
- When you’re finished editing, click Apply.
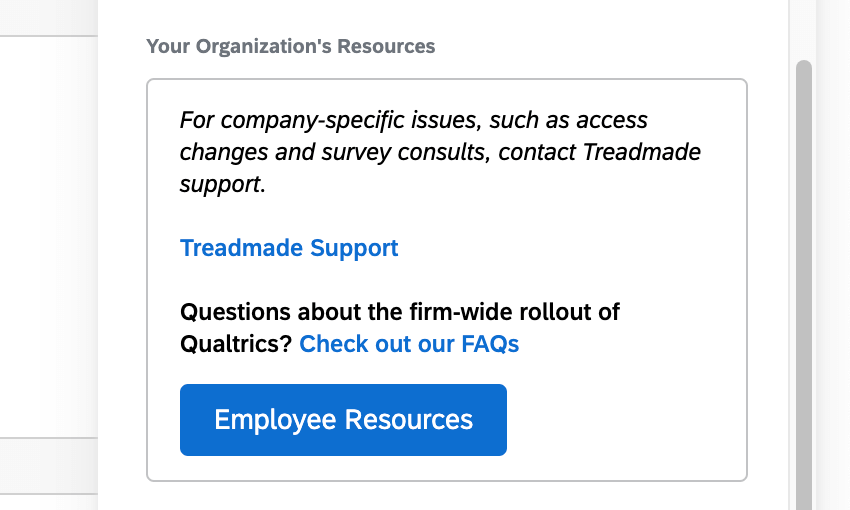
Example Help Window
Open the help window. Your content will appear under Your Organization’s Resources.
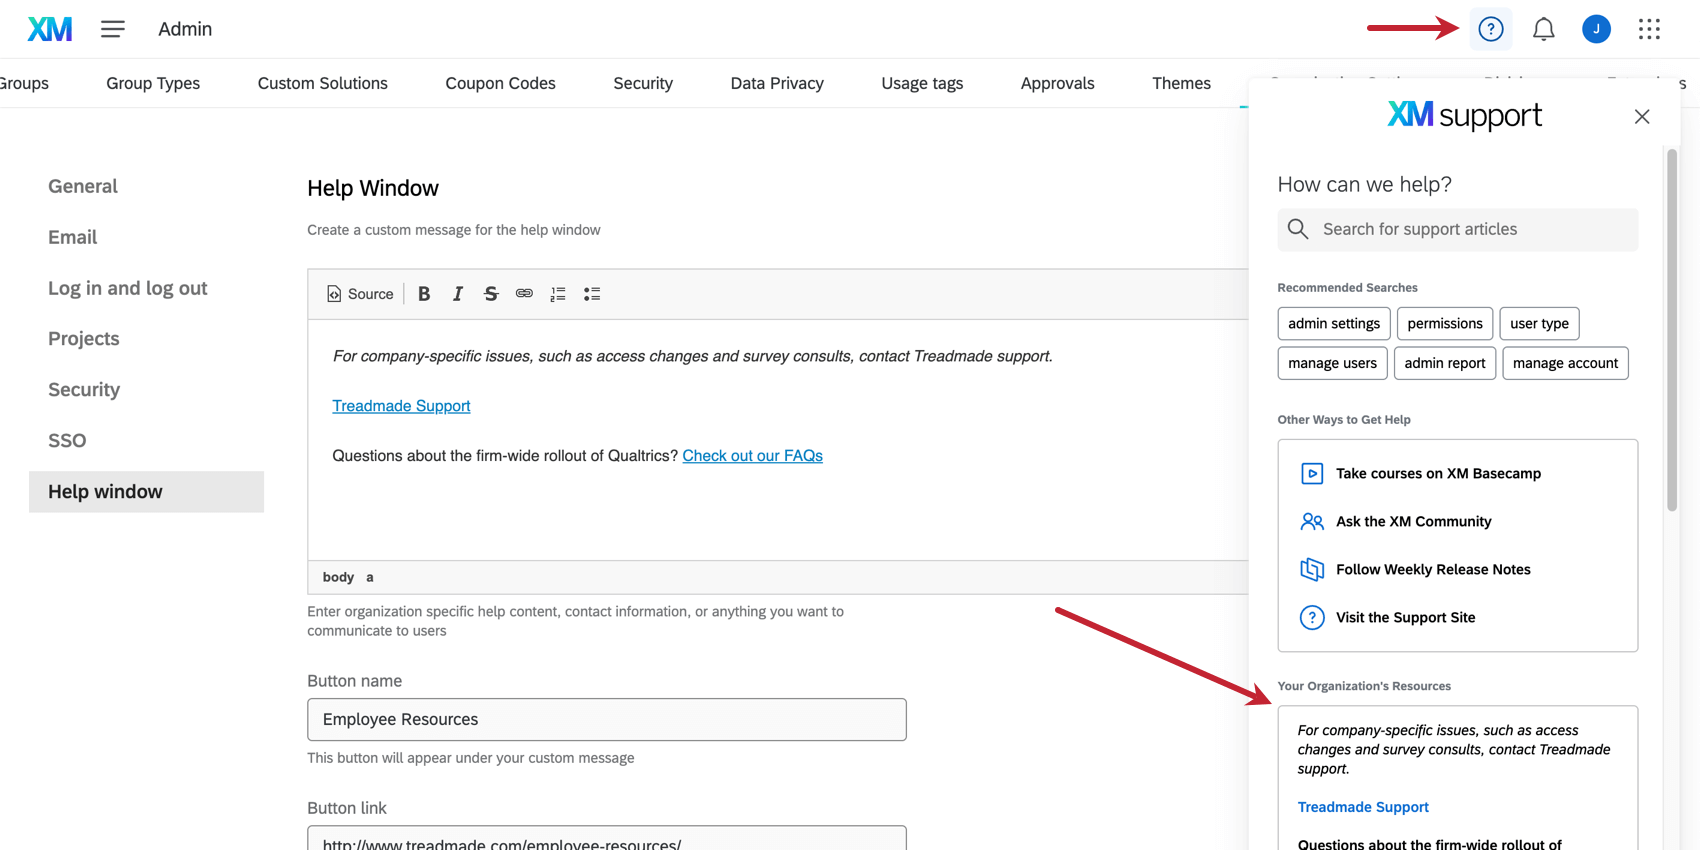
Here’s what this entire custom help content looks like:
App Help Windows
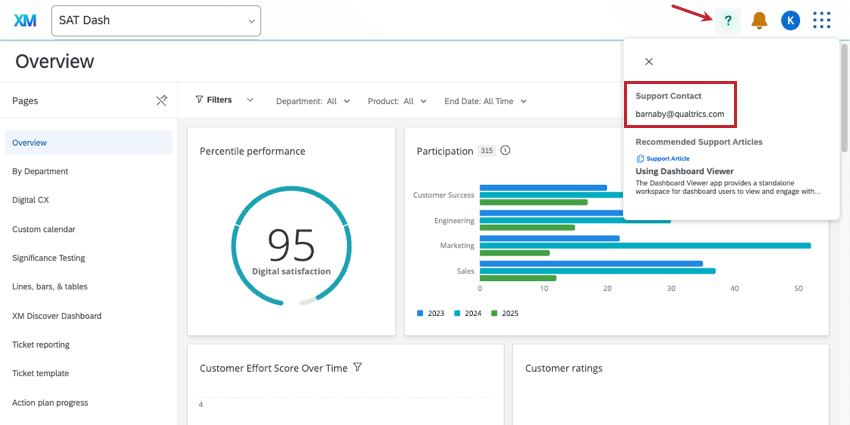
The help window cannot display the customized information in an app like Dashboard Viewer or Manager Assist. Instead, the only option is to add an email address.
To customize the help window, Got to App Configuration and select your app. Then go to Settings and fill out the Contact email.
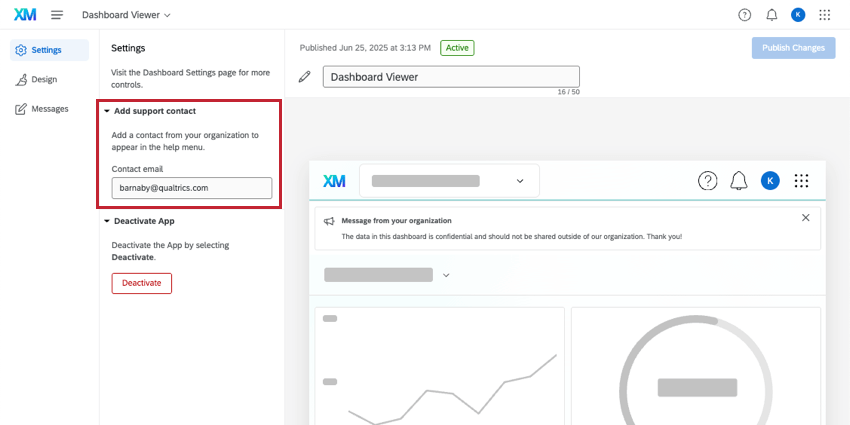
Here’s an example of how this help window looks in Dashboard Viewer, with only an email address:
Public API
Public API settings allow you to enforce additional security measures for API requests by users in your brand. These settings affect all users in your Qualtrics license.
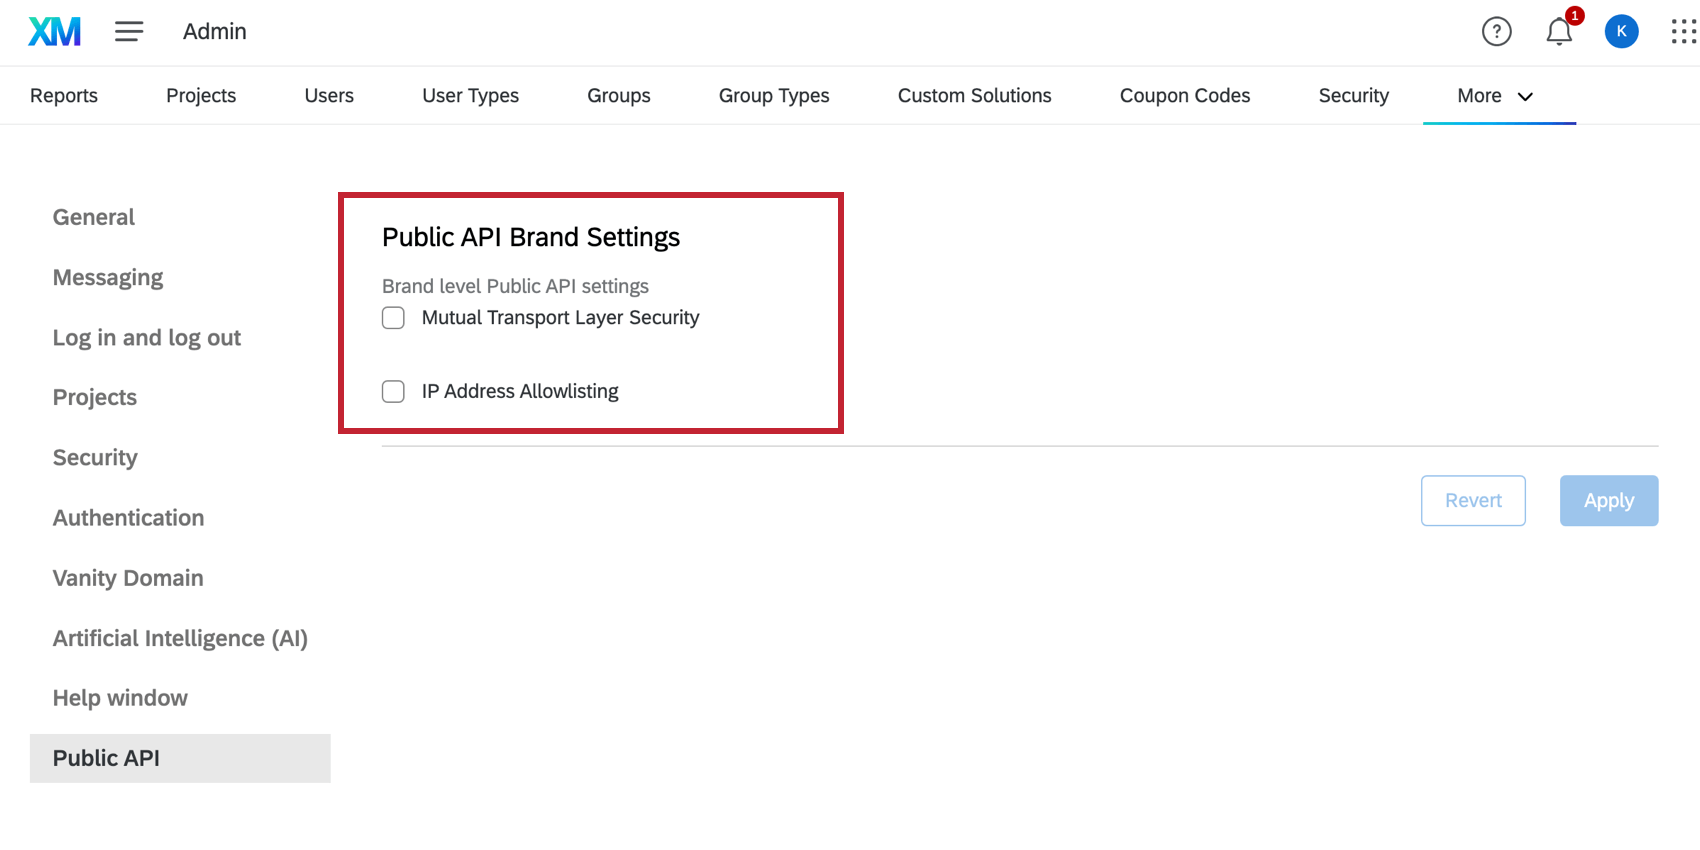
- Mutual Transport Layer Security: When enabled, public API calls from your brand must use mTLS authentication and include an mTLS certificate. If a public API call fails due to missing authentication, then it will return an AUA_1.1 error.
- IP Address Allowlisting: When enabled, users with IP address restrictions will have their public API calls rejected if sent from an IP address that isn’t included in the allowed IP addresses. If a public API call fails due to this reason, then it will return an ARH_15 error.
After changing one of these settings, click Apply to save the settings. If you’ve changed your mind and do not want to save your changes, click Revert.
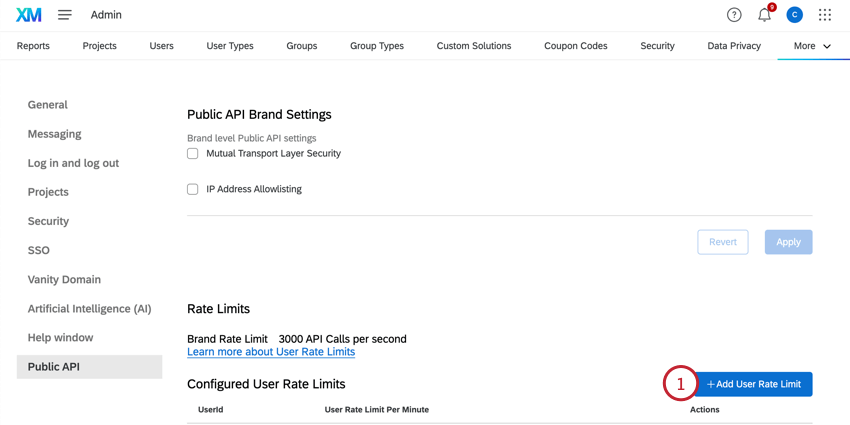
Setting API Rate Limits
By default, there is a limit to the number of API requests across all users in an organization, but there is no limit for any given user. You can create API rate limits for individual users, putting a cap on how many requests the user can call per minute.
- In the Public API section of organization settings, click Add User Rate Limit.
- Enter the User ID of the user you’d like to limit.
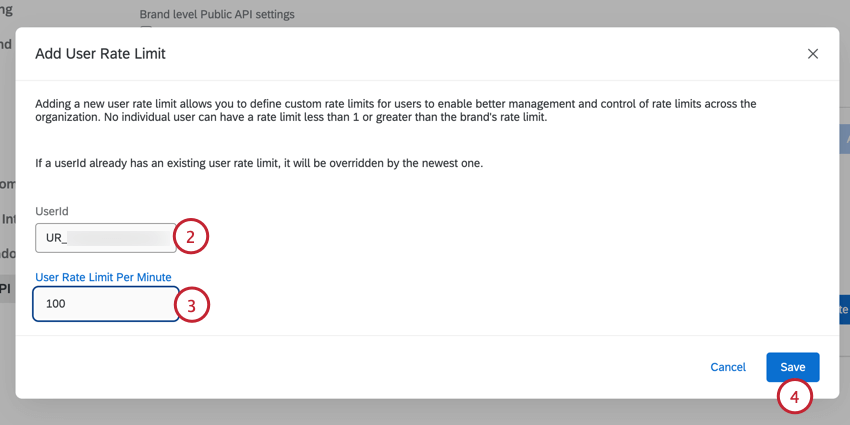 Qtip: You can get a list of all users in your organization by using the GET List User API call. You can also find the user ID of users who’ve called Public APIs by viewing the API Usage report.
 - Enter the desired rate limit.
- Click Save.
If needed, you can delete a user’s rate limit by clicking the menu in the Actions column and choosing Delete.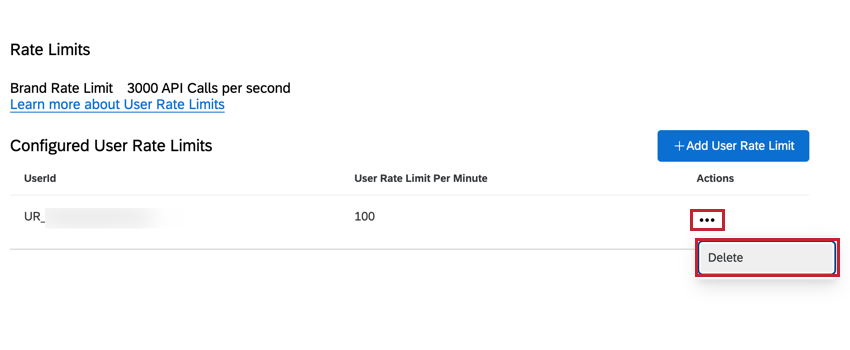
1st Party Applications Opt-In
If you are a Brand Administrator, you can control your users’ access to XM Basecamp. When this permission is enabled, users in your license can log into XM Basecamp using their Qualtrics accounts and access the resources there. When this permission is disabled, users will not be able to log into XM Basecamp this way.
ENABLING XM BASECAMP FOR YOUR USERS
- Navigate to the Admin tab.
- Go to Organization Settings.
- Enable the checkbox for Allow access to 1st party applications.

- Toggle on the option for XM Basecamp.
- Click Apply.
Please note that if you have already enabled XM Basecamp for your license and choose to disable it, any users currently logged into XM Basecamp will remain logged into XM Basecamp for 2 weeks before being automatically logged out.