
Personal Data
What's on this page
About the Personal Data Feature
Privacy laws such as GDPR at times require you to delete personal data when requested to do so. Within Qualtrics, personal data can be stored in a few different places, such as contacts, directories, survey responses, tickets, user accounts, and so on. You can locate data for an individual or a group of individuals by searching for their email address, and then delete this information as needed. You can also export survey responses linked to an email / multiple email addresses in a JSON file format.
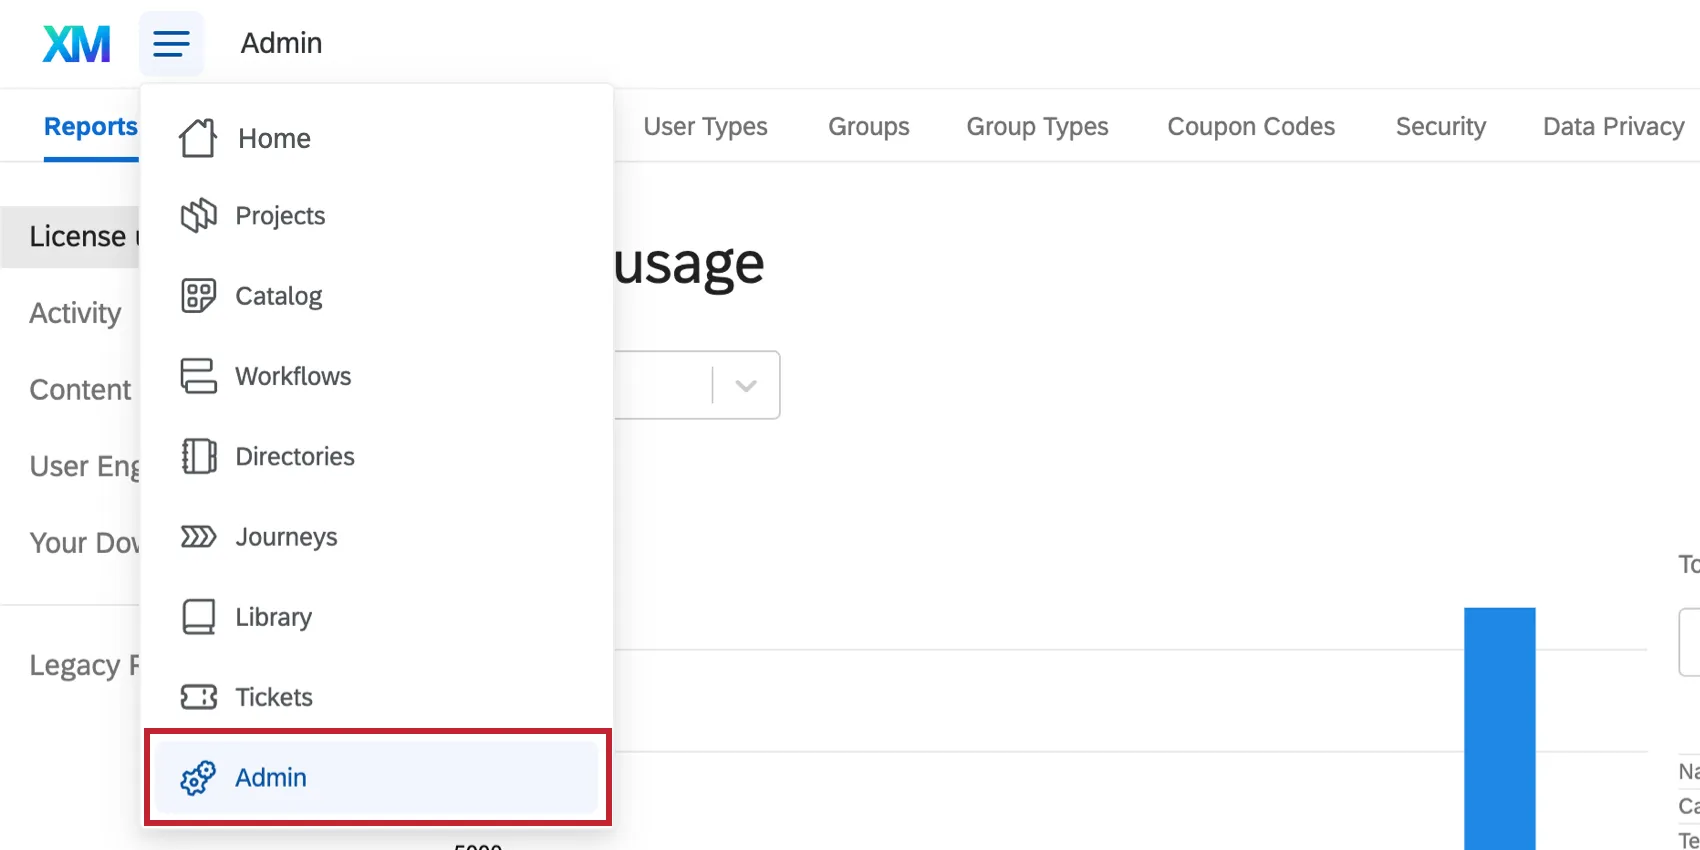
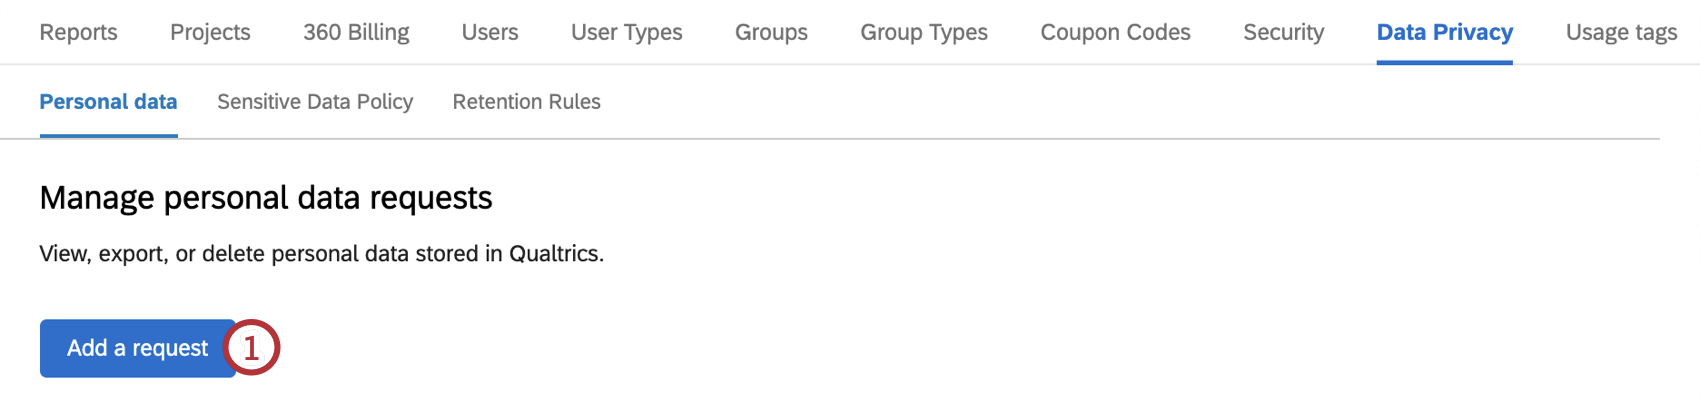
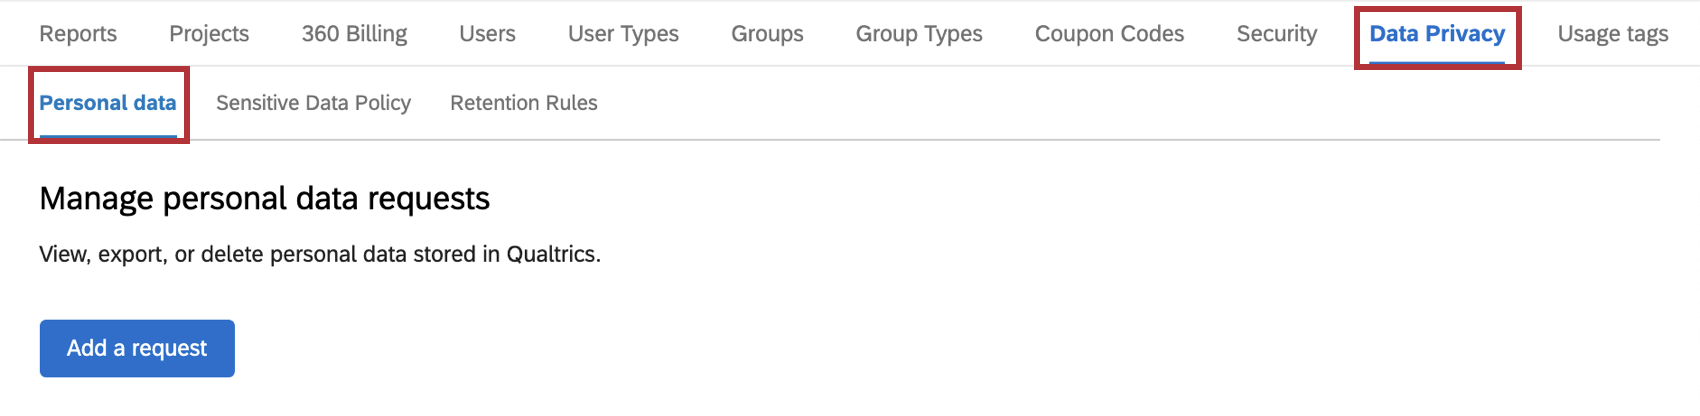
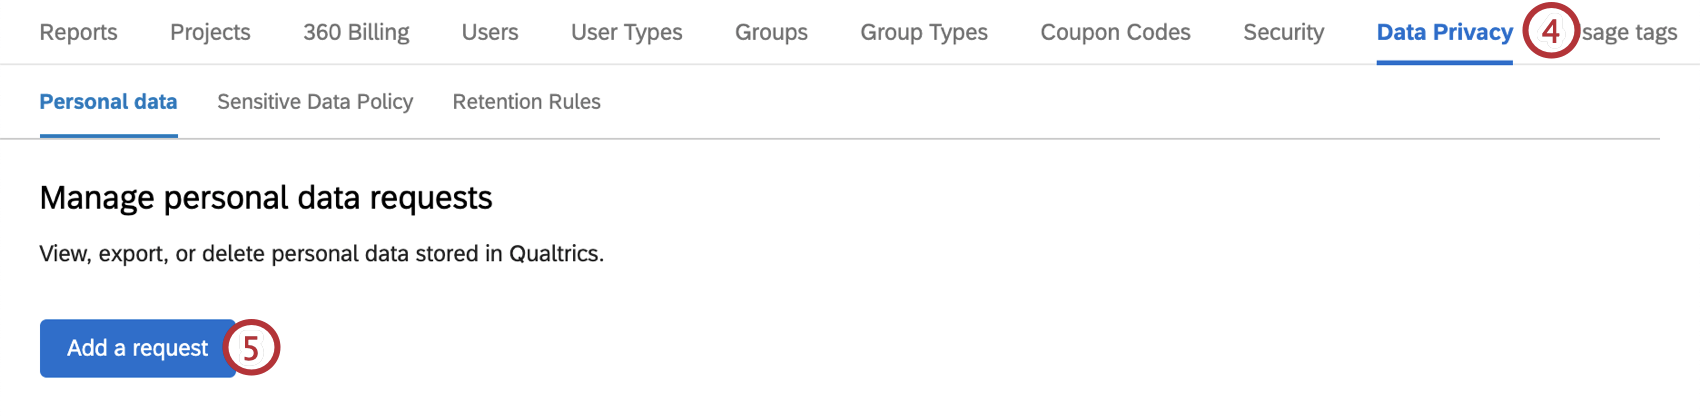
To get started, go to Admin, select Data Privacy, and make sure you are in the Personal Data section.

Records that can be located and / or deleted by email address include the number of:
- Survey responses (all recorded responses, including incomplete survey responses that were closed)
- Distributions (excluding personal/unique links)
- Partial survey responses (responses in progress)
- Contacts (original and XM Directory)
- Tickets
- Participants
- Users
Qtip: Brand Administrators have access to this feature, but Division Administrators do not.
Qtip: This tool does not delete responses in progress in the offline app, entire surveys, or SFTP server data. It also does not refresh Stats iQ data (although it does remove the data so that when Stats iQ is refreshed, the data will be gone). See the Qualtrics & GDPR Compliance support page for instructions on removing the listed data.
Attention: This tool only catches records that are clearly connected to a contact in the XM Directory (or contacts if you do not have XM Directory). This means, for example, if an email was typed into a text entry question asking for email address in a survey distributed via anonymous link, that survey response will not be deleted by the deletion request, since the response is not distributed using a contact list. In this scenario, you’d want to filter your data by the text entry question, and then delete the response.
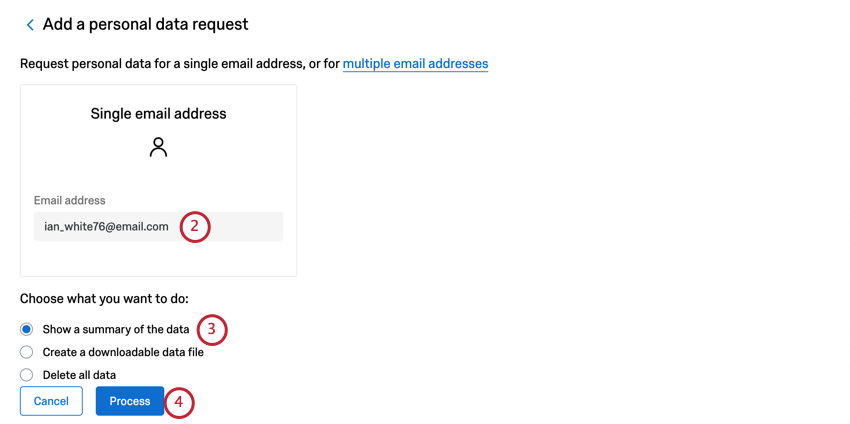
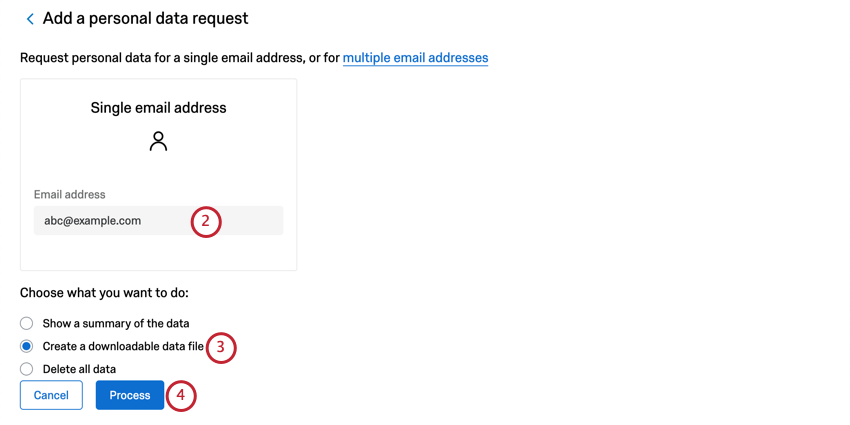
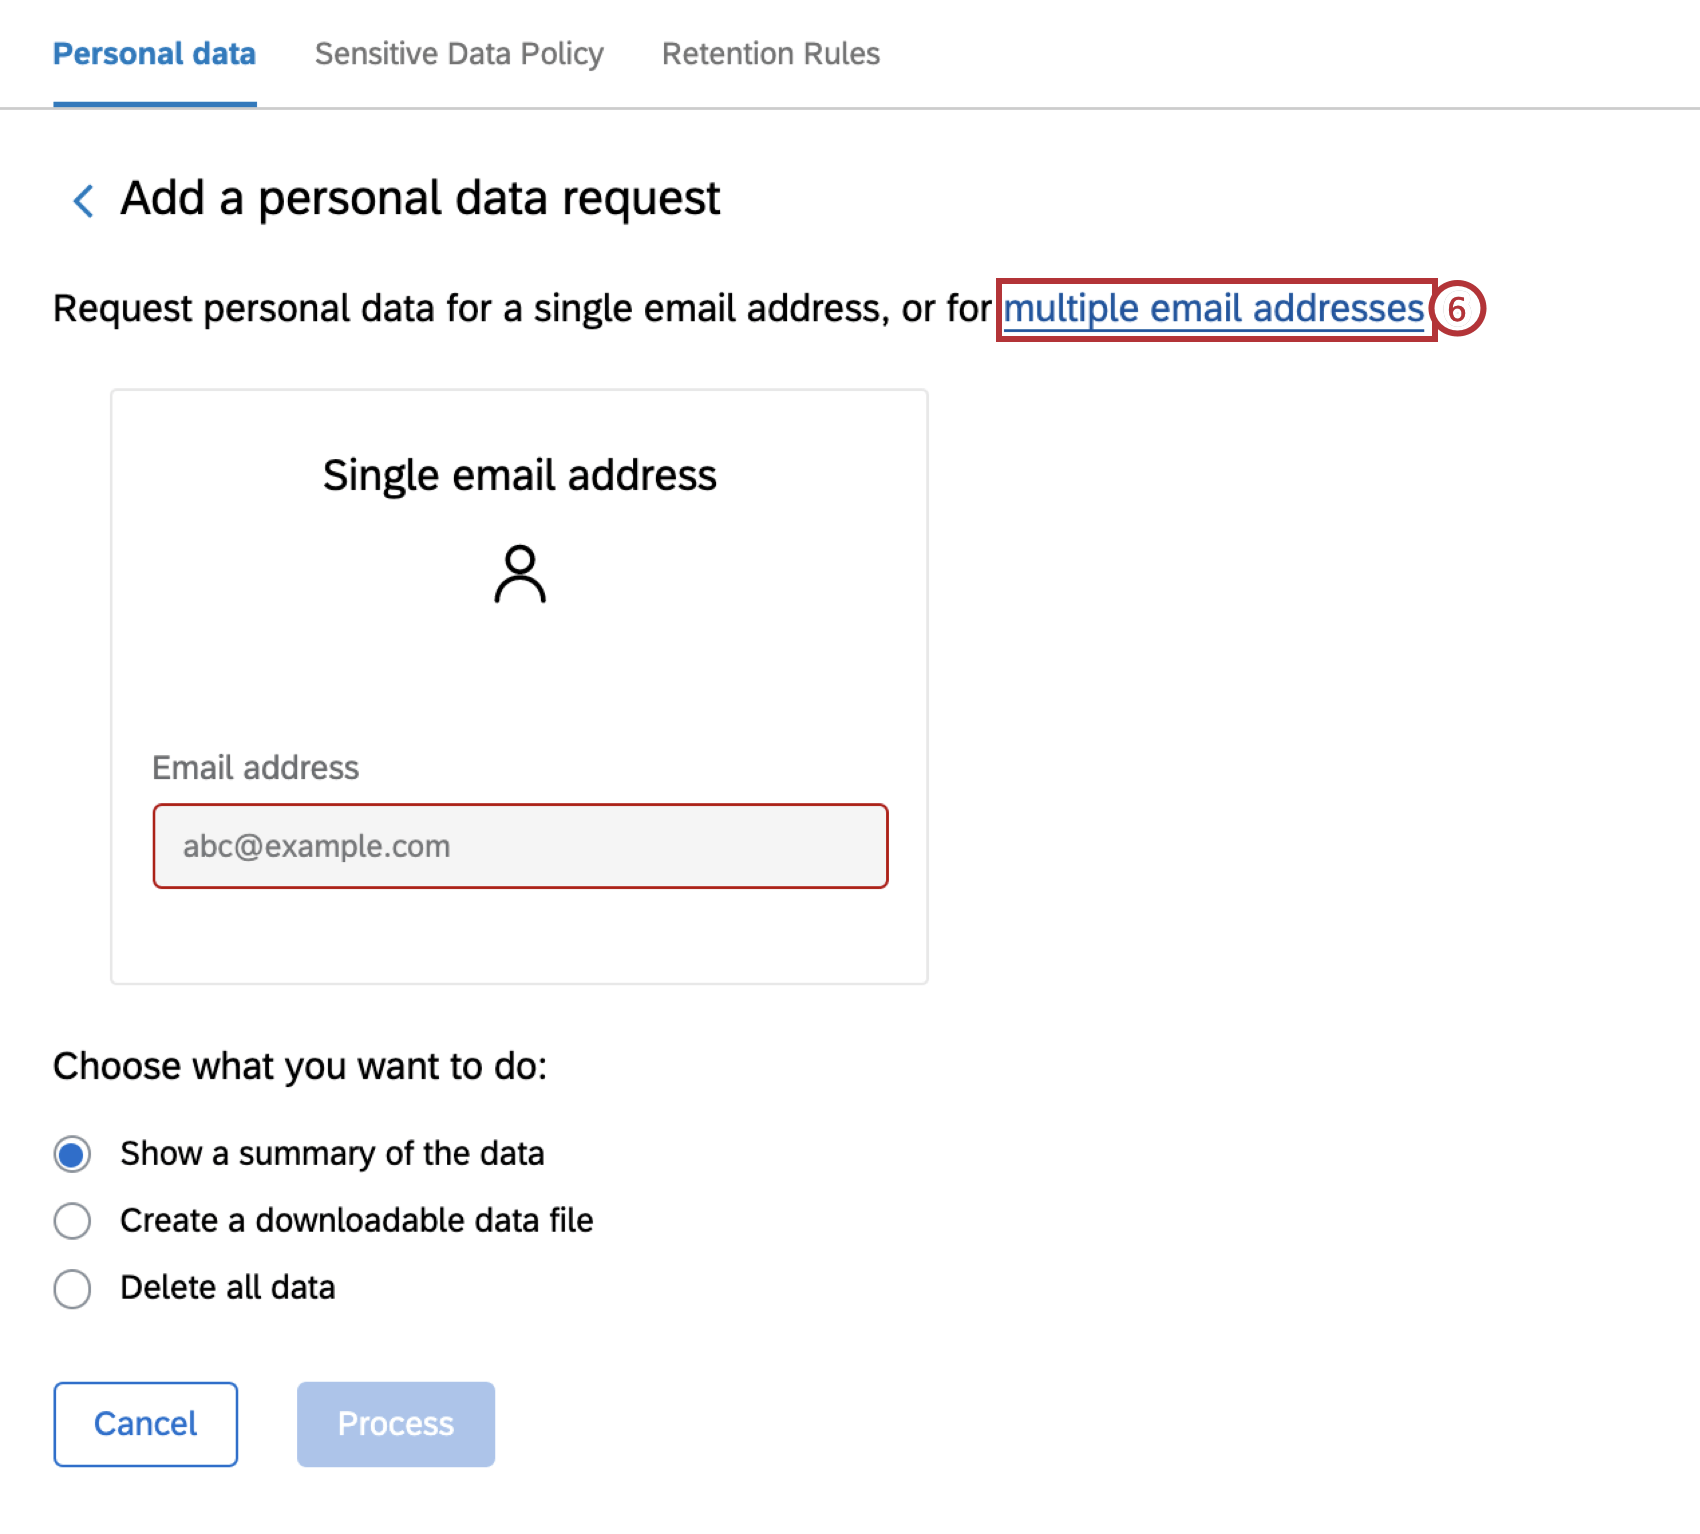
Show a Summary of All Records Associated with an Email
You can search all personal information linked to a certain email address. This summary allows you to locate records and figure out how much data in your Qualtrics brand is related to an email address before you perform a deletion.
Qtip: This search only shows the distributions (and and associated records) for emails that were specifically sent to the entered email address. A distribution can be sent to multiple contacts at the same time, but the recipient must have been entered manually for the record to appear in this search.
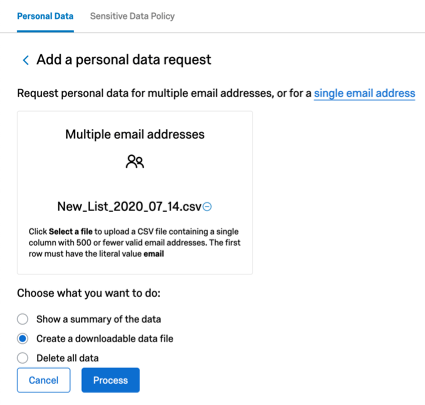
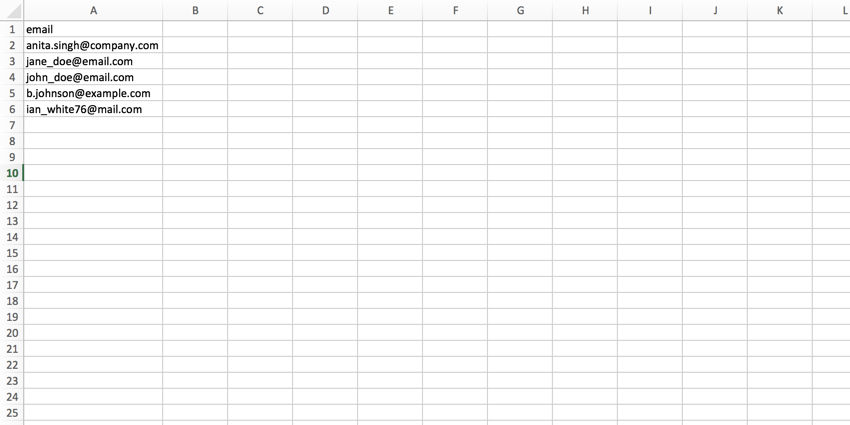
Qtip: Or, click multiple email addresses to find the survey responses associated with multiple people. Make sure your spreadsheet of email addresses fits the following requirements:

- One column named email
- No more than 500 email addresses
- Saved as a CSV in UTF-8 format
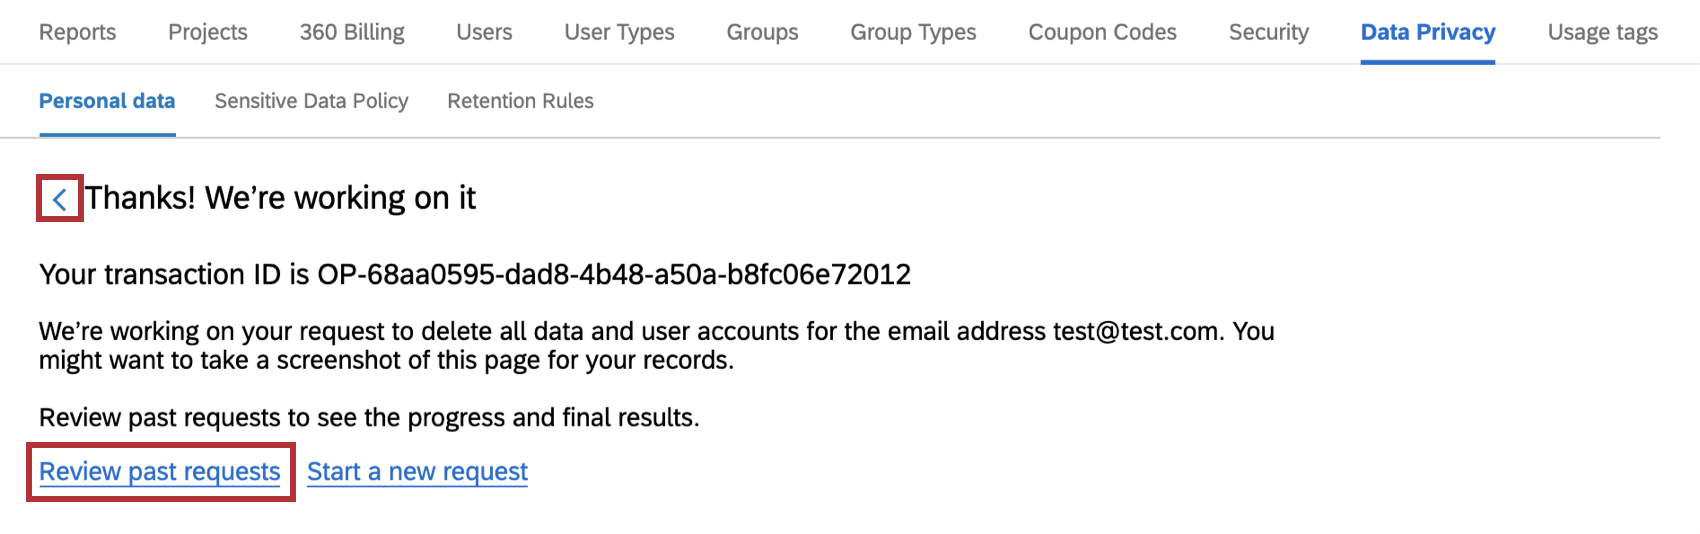
Qtip: You can also start a new request, or navigate elsewhere in the product while your request is processed. You may need to disable your ad blocker to view the review past requests summary.
Qtip: The request may be Pending or In Progress. It is okay to leave the page and work on other things while the system searches your brand’s records.
Qtip: The email addresses you searched are excluded from this entry to maintain your privacy from other Brand Administrators. Only email addresses we could not find in your system will be listed.
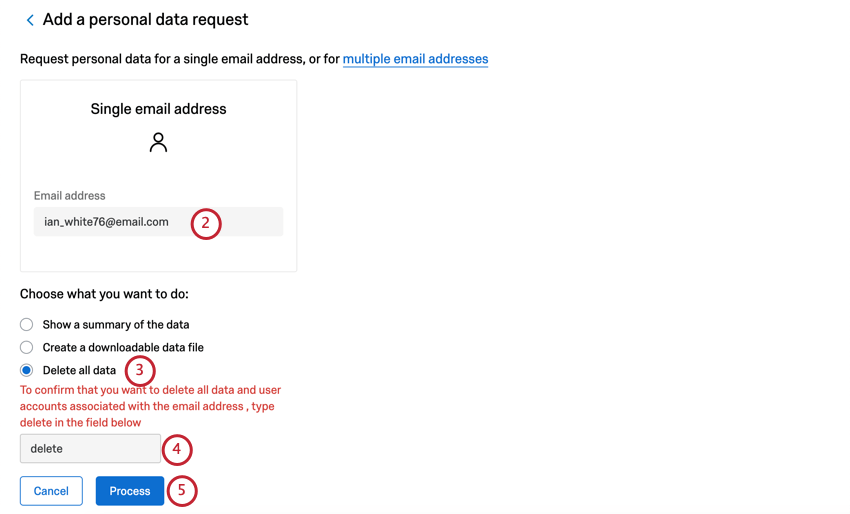
Deleting All Records Associated with an Email
Warning: Once these records are deleted, they cannot be retrieved. Do not delete records unless you are absolutely sure.
Qtip: Or, click multiple email addresses to find the survey responses associated with multiple people. Make sure your spreadsheet of email addresses fits the following requirements:

- One column named email
- No more than 500 email addresses
- Saved as a CSV in UTF-8 format
Qtip: You can also start a new request, or navigate elsewhere in the product while your request is processed.
Qtip: The request may be Pending or In Progress. It is okay to leave the page and work on other things while the system searches your brand’s records.
Qtip: The email addresses you searched are excluded from this entry to maintain your privacy from other Brand Administrators and to truly erase all records of that email. Only email addresses we could not find in your system will be listed. This information will be maintained for 60 days, after which we will erase any record of these emails.
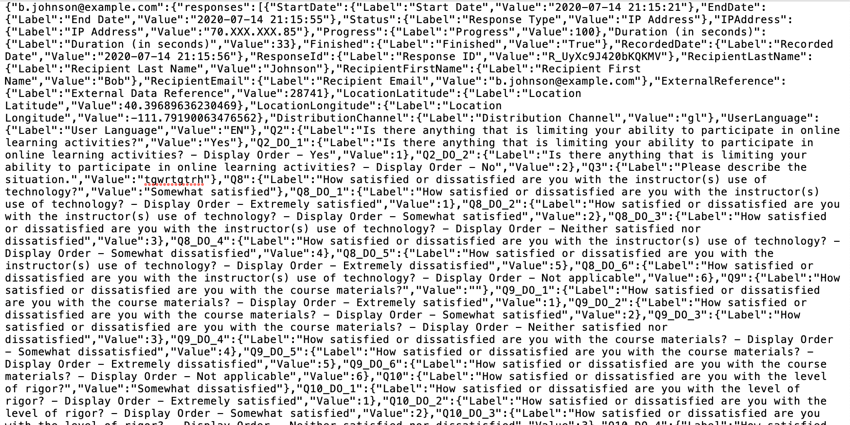
Creating a Downloadable JSON File
You can export all the survey responses associated with an email / multiple email addresses in a JSON file format. This file can be imported into other programs that accept JSON files, such as Intuit.
This export is only available in JSON format. To export data in other formats, please export data directly from individual surveys instead.
Example: This is what the JSON export looks like when opened in a text editor.

Qtip: Or, click multiple email addresses to find the survey responses associated with multiple people. Make sure your spreadsheet of email addresses fits the following requirements:
- One column named email
- No more than 500 email addresses
- Saved as a CSV in UTF-8 format
Qtip: You can also start a new request, or navigate elsewhere in the product while your request is processed.
Qtip: The request may be Pending or In Progress. It is okay to leave the page and work on other things while the system searches your brand’s records.
Qtip: The file will be zipped when you first download it. Click to unzip it before uploading it into another program.
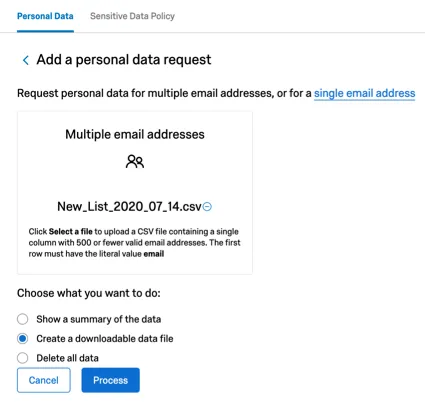
Preparing a File with Multiple Emails
You can search for, delete, or download records associated with multiple email addresses using a CSV. This section goes over how to format and upload a list of email addresses for this purpose.
Qtip: You cannot list more than 500 email addresses.
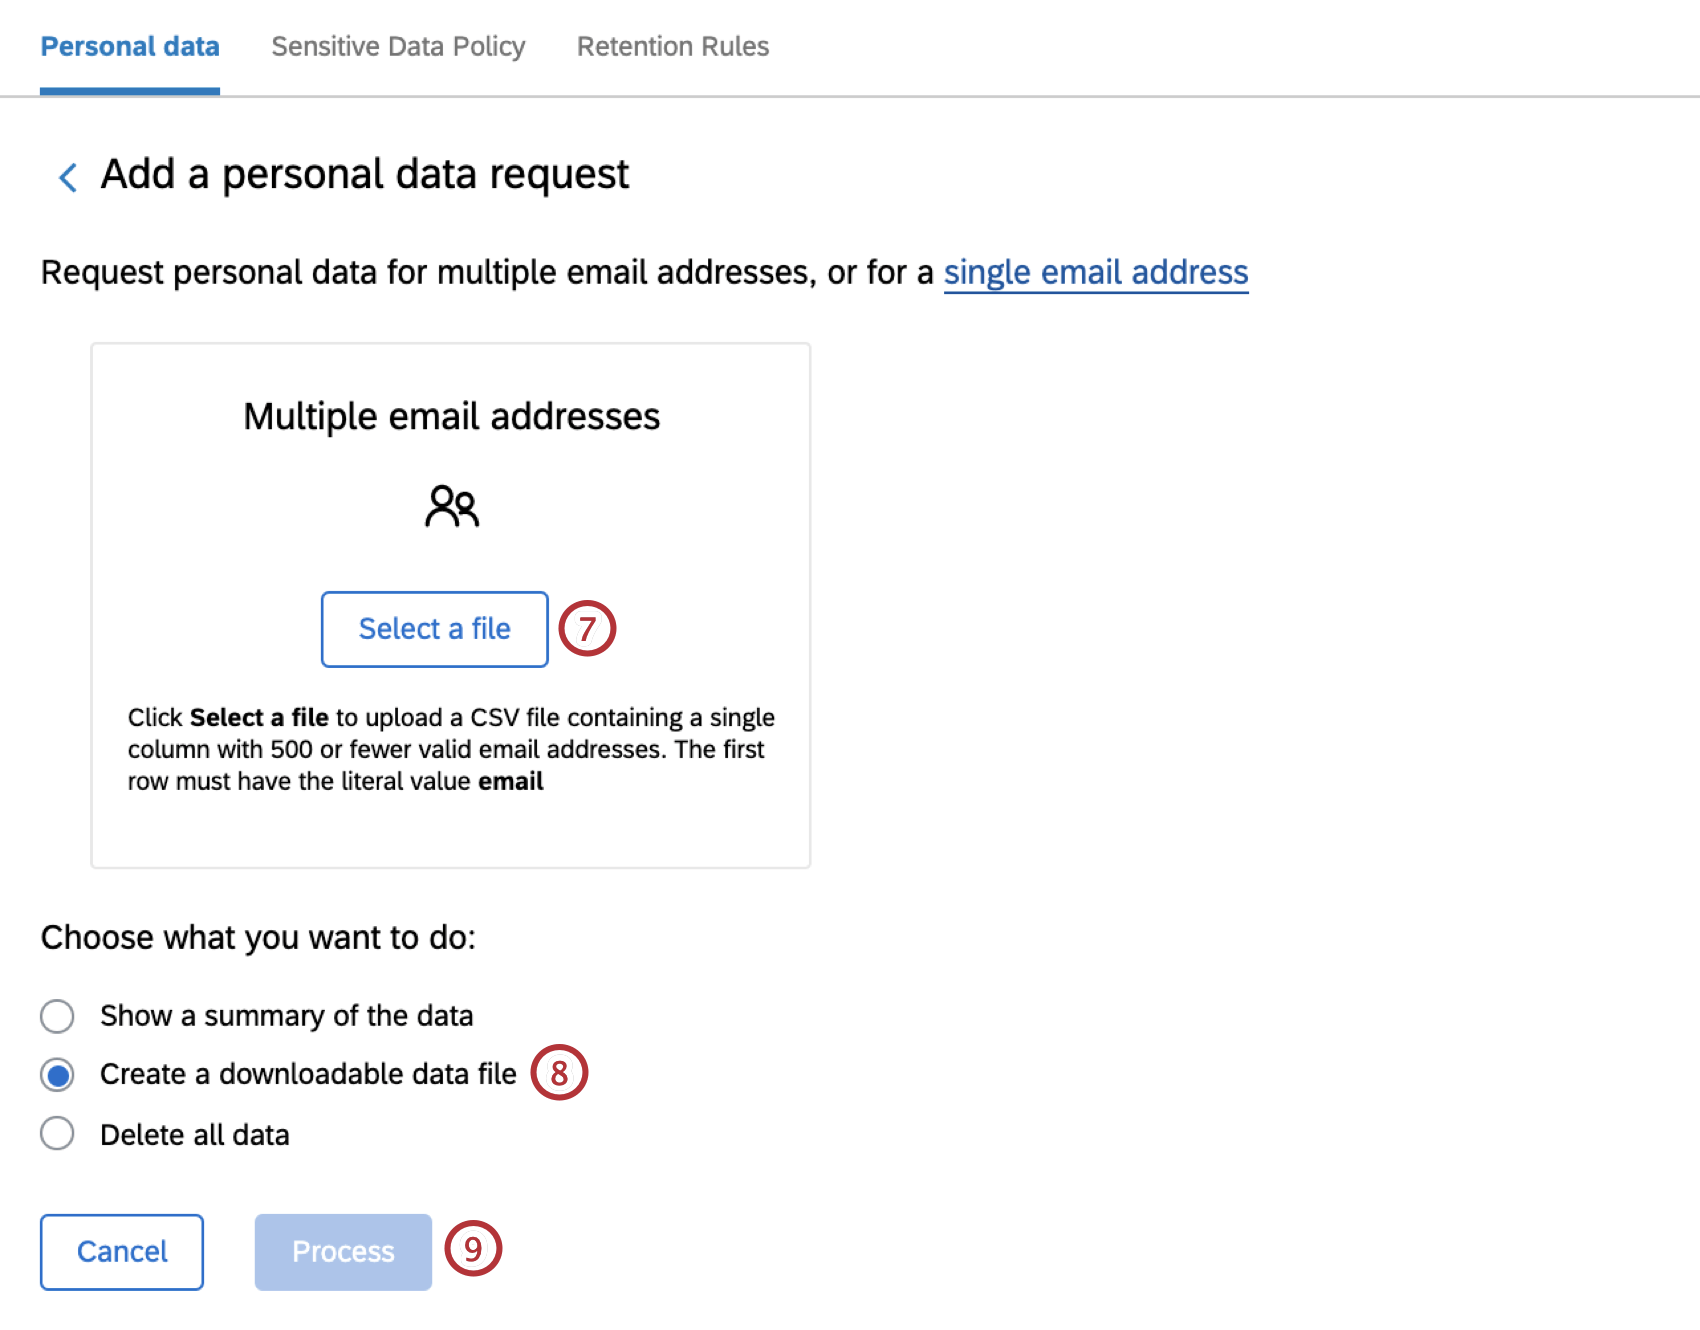
Qtip: To remove this file so you can add a new one instead (e.g., you selected the wrong file name), click the minus sign ( – ) next to the file name.
- Show a summary of the data: Search all personal information linked to the email addresses. This summary allows you to locate records and figure out how much data in your Qualtrics brand is related to an email address before you perform a deletion.
- Create a downloadable data file: Export all the survey responses associated with the email addresses in a JSON file format. This file can be imported into other programs that accept JSON files
- Delete all data: Delete all personal information stored in the Qualtrics brand that is linked to the email addresses.
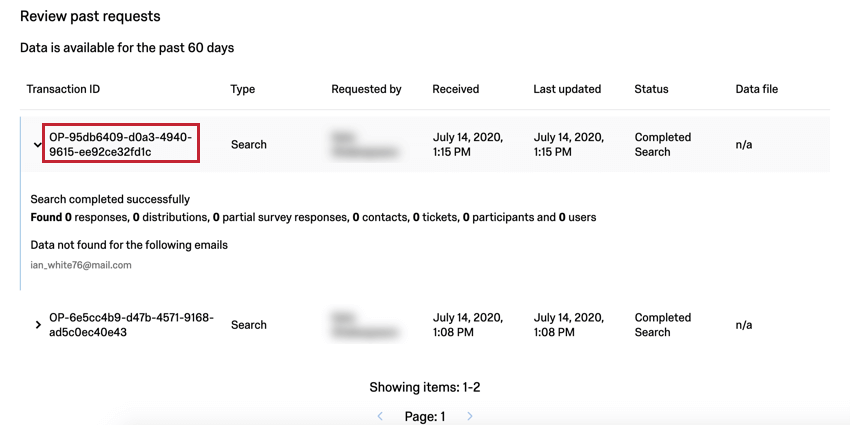
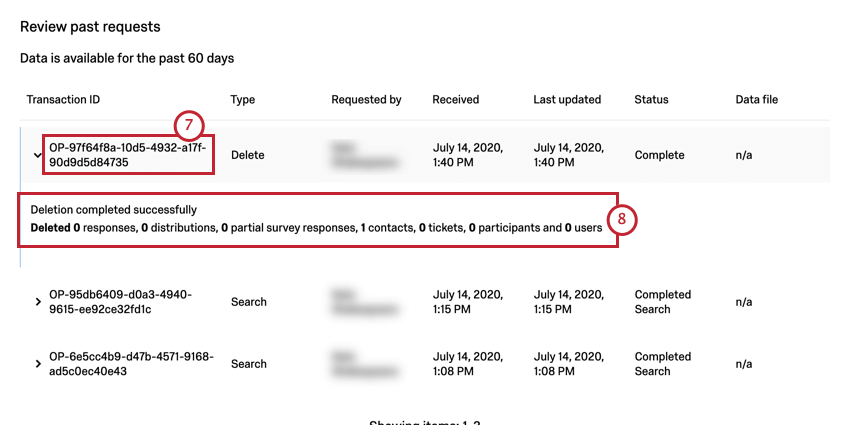
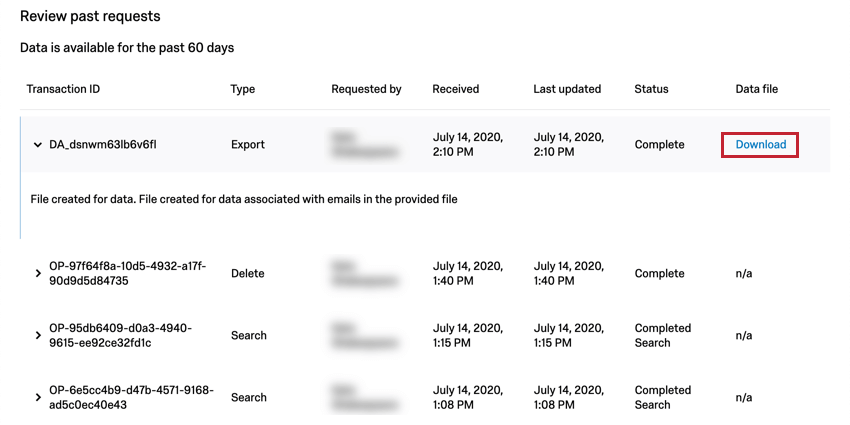
Past Requests
Although the emails searched are always excluded to comply with privacy and deletion demands, there are records of all past deletions and searches. This allows you to keep track of who is searching or deleting these records. The user’s name (not email or username) is in the Requested By column.
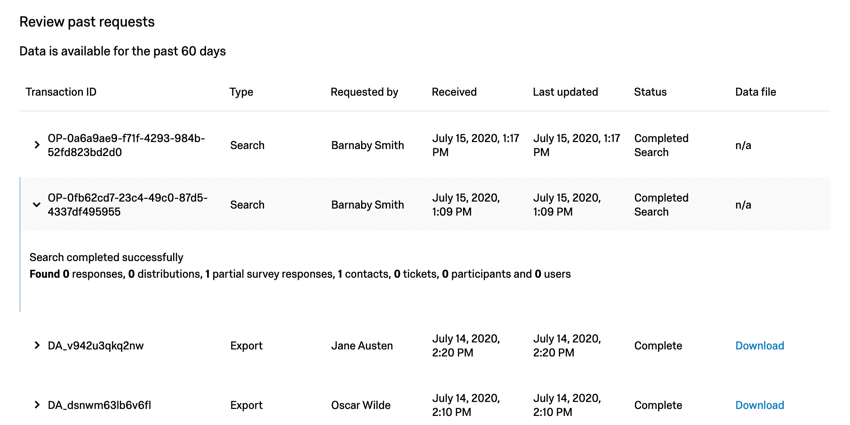
The Status column gives a quick view of whether it was a search (Completed Search) or a deletion (Complete). Click the header to get more details on the transaction.
All Brand Administrators will be able to export any downloadable files that have been prepared.
All records of past searches, deletions, and downloads are permanently removed from this list after 60 days.
Qtip: The email addresses you searched are excluded from these entries to maintain your privacy from other Brand Administrators. Only email addresses we could not find in your system will be listed.
FAQs
Do I need to purchase XM Directory to use the "Right to Erasure" tool?
Do I need to purchase XM Directory to use the "Right to Erasure" tool?
Do I have to purchase access to the "Right to Erasure" tool?
Do I have to purchase access to the "Right to Erasure" tool?
Does "Right to Erasure" deletion remove the entire response, or just personal data from the response?
Does "Right to Erasure" deletion remove the entire response, or just personal data from the response?
Are the features on the "Right to Erasure" tool also available from the Qualtrics API?
Are the features on the "Right to Erasure" tool also available from the Qualtrics API?
That's great! Thank you for your feedback!
Thank you for your feedback!