
Email Distribution Management
What's on this page
About Email Distribution Management
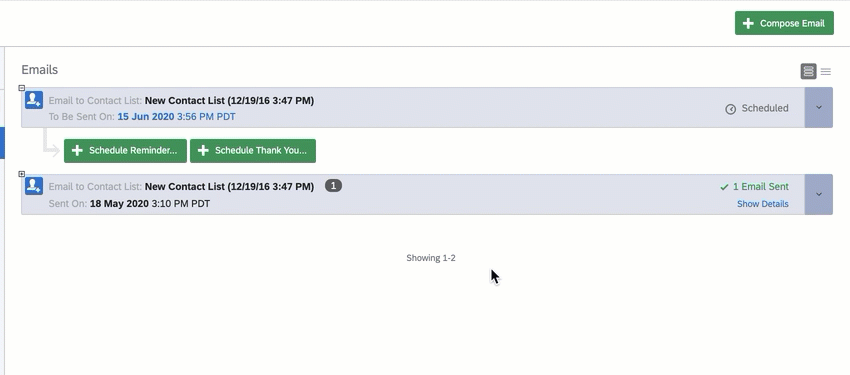
Once you have emailed survey invitations through Qualtrics, you will see a block with your distribution information and actions you can perform on them. Here you can view your distribution details, send Reminder and Thank You emails, cancel or delete distributions, and download the distribution history. These different options allow you to manage your email distribution and monitor progress.
Qtip: The contact's opt-in/opt-out status is not included in the distribution history or distribution status. To find this, see Viewing Subscription Status.
Overview of Distribution Information and Options
Each time an email distribution is scheduled to be sent, it is recorded as a separate distribution block in the Emails section. Within each distribution block, you’ll find relevant information about the status of the distributed emails and surveys.
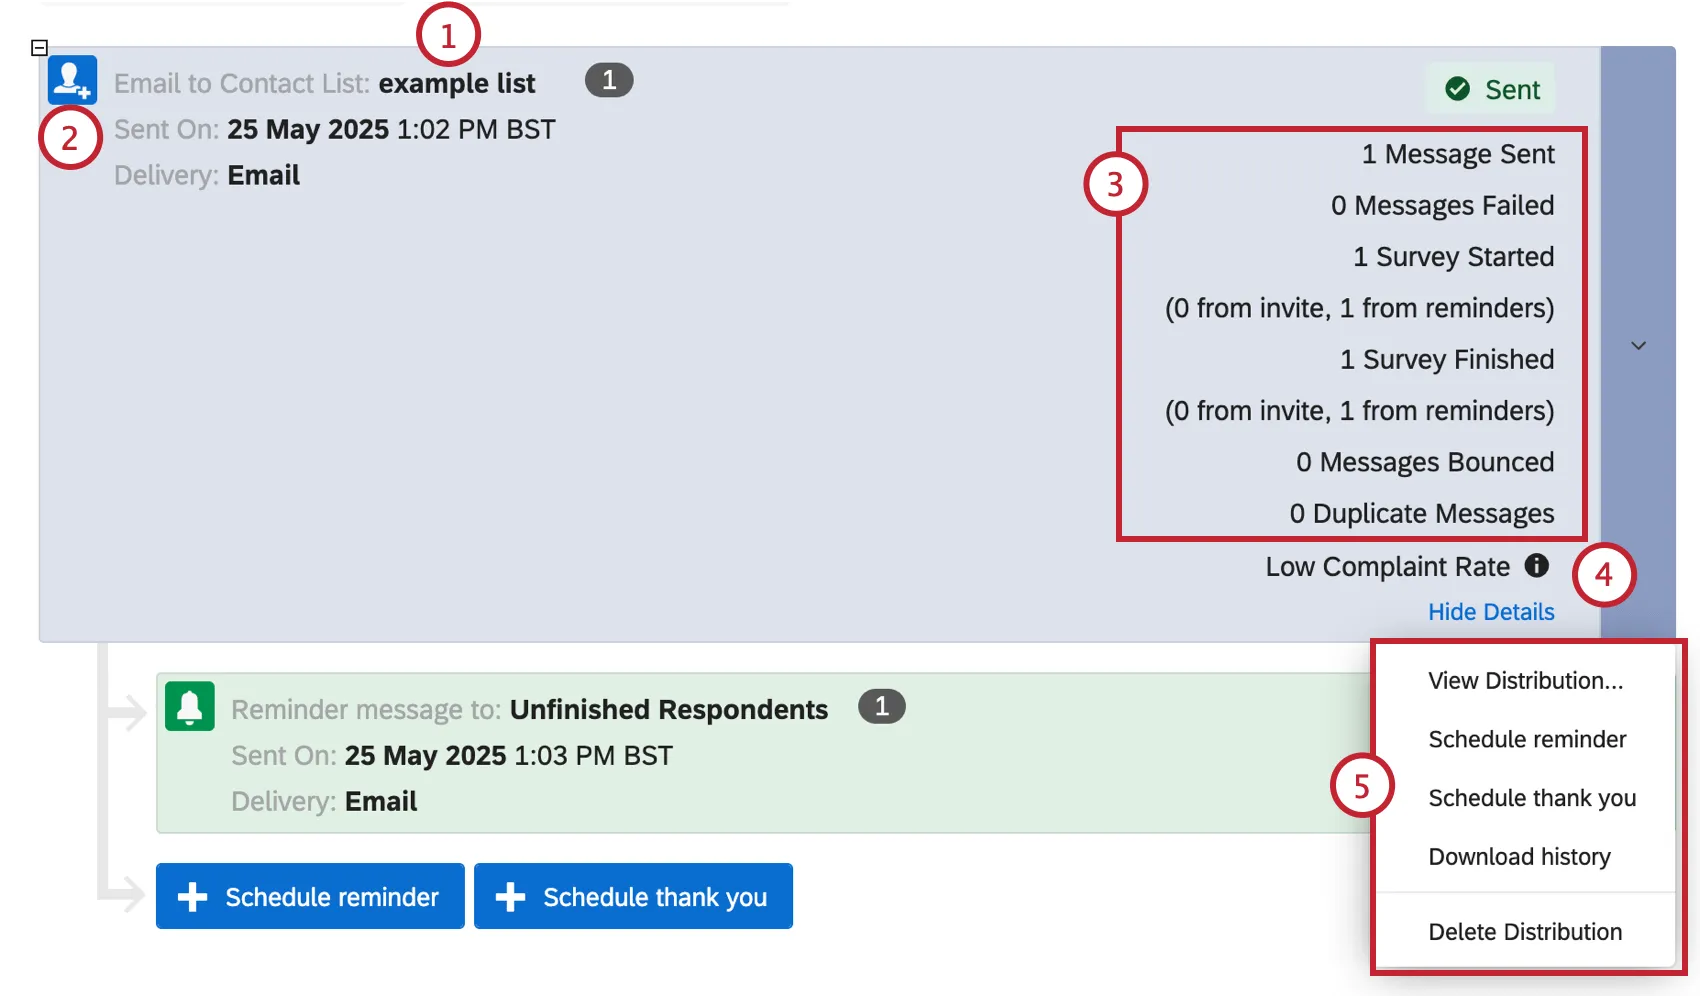
Qtip: In this example, the contact list has the date it was created in the name. This is unrelated to the date the distribution was sent / scheduled for.
- Emails Sent: The current number of emails delivered out of the total distribution. Attention: Occasionally, the distribution will show a larger number of Emails Sent than what shows up in the downloaded email history. This will happen when members of the contact list that were originally recipients have been deleted. Deleted contacts will not appear in the download, but deleting contacts has no effect on the Emails Sent statistic.
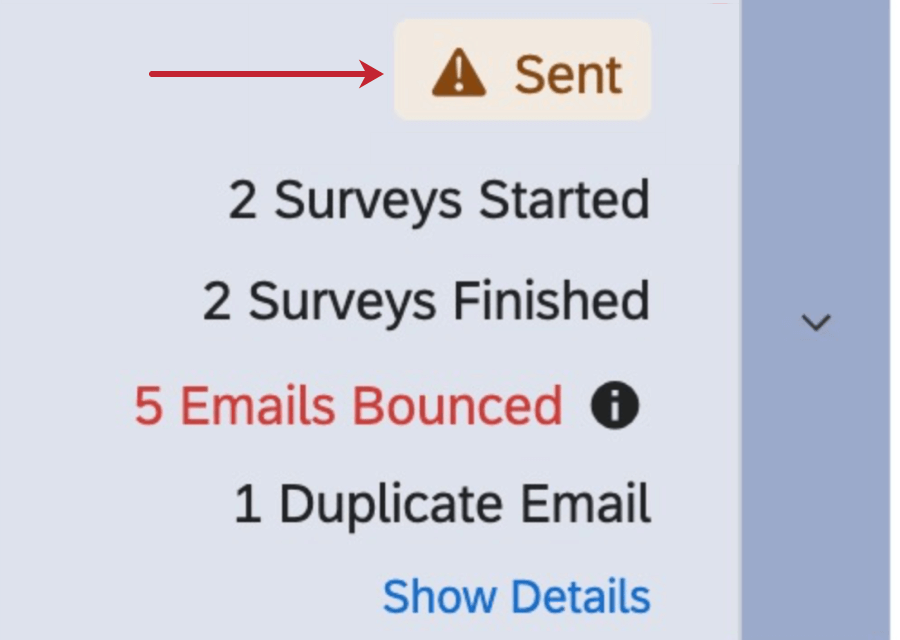
 Qtip: If you see a warning symbol next to Sent, some of your emails were not delivered successfully. This could be due to failed or bounced emails. See Distribution Statuses for more information on what each status means.

- Emails Failed: The number of emails that did not leave our servers. The most common cause of a failed email is an incorrectly formatted email address, such as a missing @. This number does not include bouncebacks.
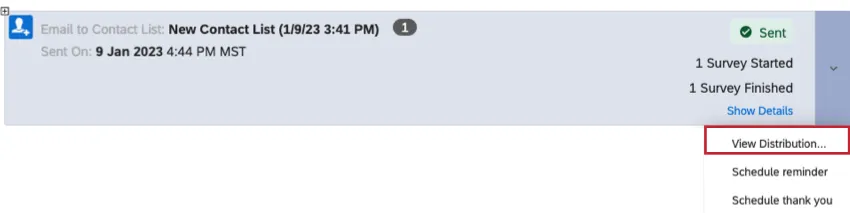
- Surveys Started: The number of surveys where the recipient has at least clicked on the link. This includes the number of people who have submitted the survey. You can track how many surveys were started by the initial invitation and how many were started by the reminders. Qtip: Reminder metric reporting is only available for reminders sent after May 21, 2025. Reminders sent before this date will have a dash (-) instead.
- Start Rate: The ratio of the number of started surveys to the number of delivered invite emails. This is calculated with the following formula: (Survey Started / (Invite Emails Sent – Invite Emails Bounced)).
- Surveys Finished: The number of surveys sent out in the distribution that have been submitted. You can track how many surveys were completed by the initial invitation and how many were completed by the reminders (e.g., if a survey was completed by a reminder, then the invite will has a status of “Email Sent” while the reminder will have a status of “Survey Finished). Qtip: Reminder metric reporting is only available for reminders sent after May 21, 2025. Reminders sent before this date will have a dash (-) instead.
- Emails Bounced: The number of emails that were rejected by the recipient server.
Qtip: There are 2 types of bounces: hard bounces and soft bounces.
Hard bounces are emails that can’t be delivered due to a permanent reason. This could include the email address not existing, the recipient server not accepting emails, or the domain not being a real email domain.
Soft bounces are emails that can’t be delivered due to temporary reasons. The recipient email inbox could be full, the email could be too large, or the recipient email server could be temporarily down. Qualtrics automatically attempts to resend soft bounces several times and the time between attempts can vary; during this time, the email is marked as “sending.” If the email still cannot be delivered, the email gets marked as a bounce.
- Duplicate Emails: The number of duplicate emails prevented from sending. Duplicate emails are emails with the exact same message and recipient as another email that went out. For example, if your contact list has the same email address on it multiple times, this will be seen as a duplicate, and to prevent your entire distribution from being flagged as spam, the Qualtrics mailer will not send these out. See the Editing Contacts in a List page for help consolidating duplicates in your contact list. Qtip: If you are sending repeated emails in different distributions, any emails that are identical must be sent out over 12 hours apart. Any identical emails sent to the same destination within 12 hours – even through different distributions – will be marked as duplicates and blocked.
Qtip: Click the information icon for more details. Distributions with a high complaint rate will display the rate for each high-complaint provider.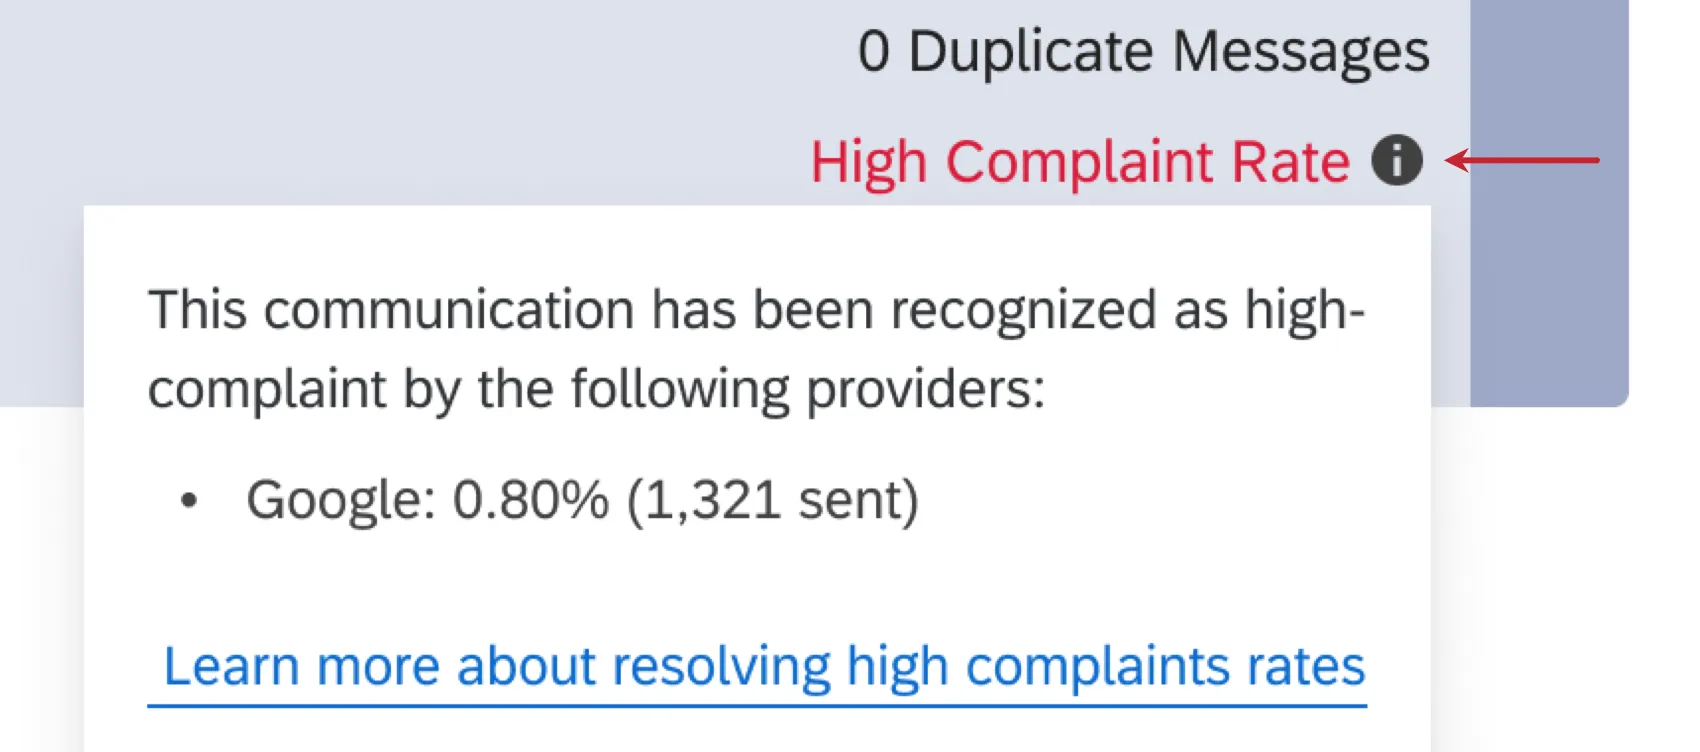
Attention: Not all email providers send reports to Qualtrics servers, so the actual number may be greater.
Attention: If your invite receives a high number of complaints, you won’t be able to create new reminder emails, and any scheduled reminders will fail.
Qtip: Your email is more likely to be blocked or put in a spam folder if you are sending distributions to low-quality email addresses. Make sure you know who your recipients are.
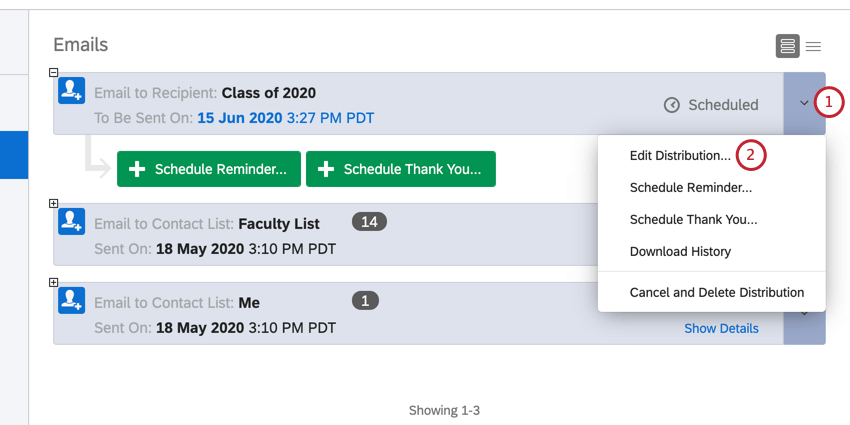
- Edit Distribution: This option only appears if you have scheduled your distribution to go out some time in the future. Edit your email message, your recipients, and more.
- View Distribution: This option only appears if the email distribution has already sent. Here, you can take a look at the message you sent out, including any advanced options you selected.
- Schedule Reminder: Schedule a reminder email to go out to your respondents who haven’t finished yet.
- Schedule Thank You: Schedule a thank you email to go out to all finished respondents.
- Download History: Download the links, link expirations, and status of all the email addresses in the distribution. See the Distribution Statuses page for a list of all the possible statuses and what they mean.
- Cancel Distribution: This option only appears if the email distribution is scheduled for the future. This option cancels the distribution so it never goes out.
- Halt and Delete Distribution: This option only appears if the email distribution has been sent, and is still in the process of sending. This gives you the opportunity to delete the distribution before it goes out. You only have as long as it takes the email to send before this option disappears.
- Delete Distribution: This option only appears if the email distribution has already sent. Deleting a distribution deletes the links that haven’t been clicked yet.
Qtip: For more information on email statuses, such as emails sent, bounced, or failed, see the Distribution Statuses page.
Attention: Distributions older than three years are not available.
Standard vs. Compact View
All of the same information, including the dropdown of distribution actions, can be viewed in a more compact, list-like form. Use the icons in the upper-right to switch between the standard view and a more list-like view.
Viewing and Editing a Distribution
Depending on whether your distribution has already been sent, you will be able to either view the message that was sent, or edit it before it goes out.
Viewing Sent Distributions
If your email has already been sent, you won’t be able to make any changes to it, but you will be able to see what contact list it went to, when it was sent, what message was used, and other settings you may have applied.
Click the dropdown menu on the right of the distribution block and select View Distribution.
You will be able to view many details of the message sent, including the From and Reply-to Emails, the time it was sent, the subject, the message in its entirety, and any additional advanced options you set.
This distribution summary does not include the language the email was sent in. This is because emails can be sent in multiple languages in the same distribution. Instead, check if your invite is a translated library message and if your recipients have their languages specified.
Attention: If you used a saved Library message in your email, but modified the message after the Distribution was sent, when you view the distribution, you will see the most recently saved version of the message instead of the message that was sent.
Attention: If you schedule an email with a Library message, and then delete the saved message from your library, the distribution will not send out, and you will receive an error. If you click on the distribution, you will see that the ‘Message has been deleted.’ You can delete library messages after the distributions are sent, but when viewing the distribution afterwards, it will still show as ‘Message has been deleted.’
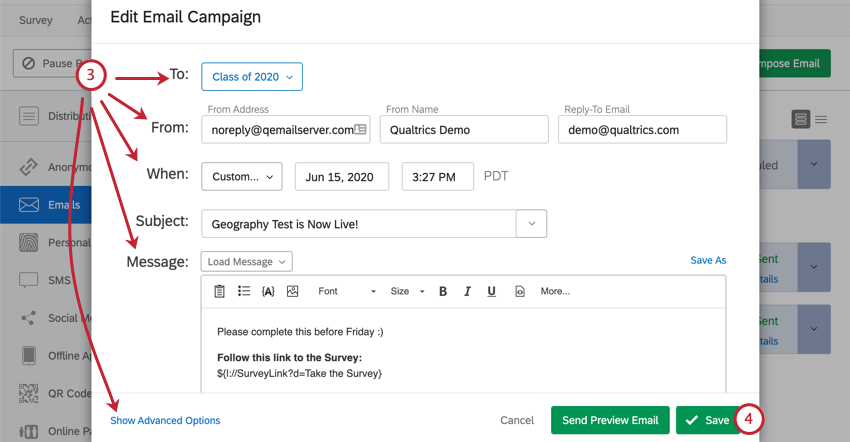
Editing Scheduled Distributions
If your email hasn’t been sent yet, you can make any changes you like, such as updating the message, send date, recipients, or link type.
Downloading the Distribution History
Attention: The ability to download the distribution history will be disabled if you set your email link type to Anonymous.
Attention: All users can download the distribution history of survey invitation emails. If you have access to XM Directory or the new contacts experience, then you will also be able to download the distribution history of reminder and thank you emails as well.
The distribution history is a list of all the recipients of a distribution along with the current status of each survey invitation and the individual link generated for them. This downloadable history allows you to investigate which specific recipients have started the survey, which have finished, and which are not receiving the survey invitation. You can download all of your distributions to one file, or you can download the history for a single distribution.
Qtip: The distribution history references the contact list at the moment you download the history. If contacts were deleted after distributing the survey, the downloaded distribution history will not be accurate for the deleted contacts.
Qtip: Downloading the history generates links with statuses for respondents based on their status when the distribution was created. Re-downloading the history will refresh the statuses. If a list or segment has changed since the distribution was originally sent, and you’d like to make new personal links for the updated list or segment, you should create a new distribution.
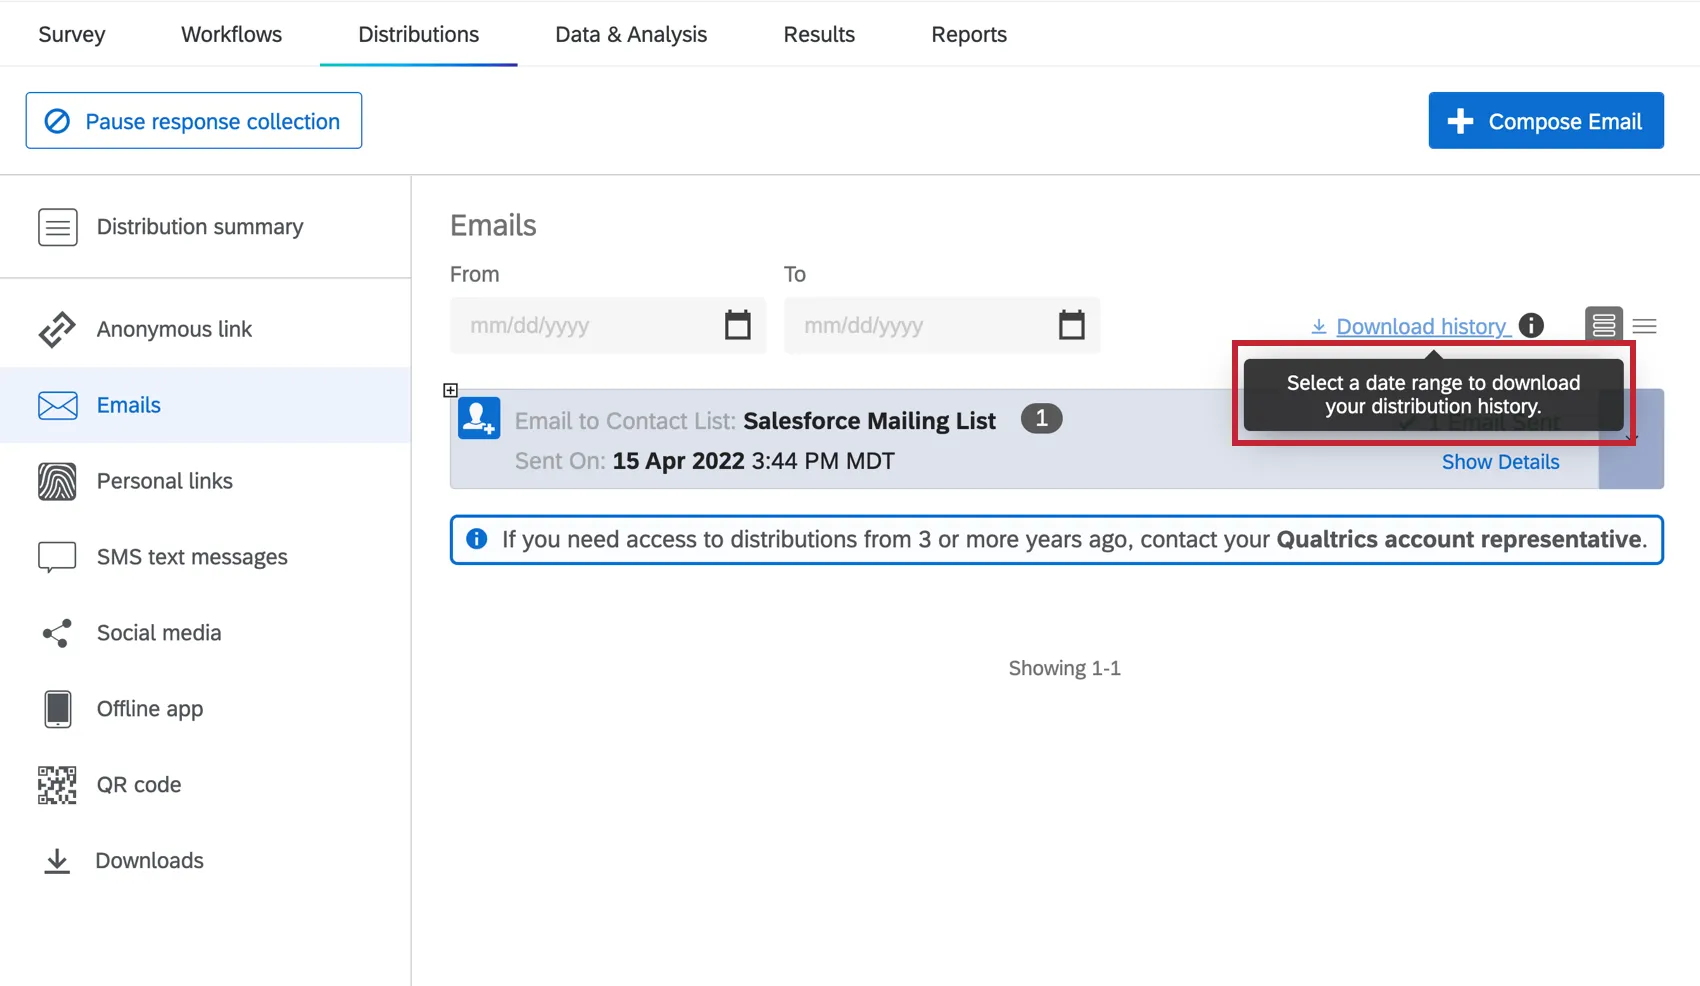
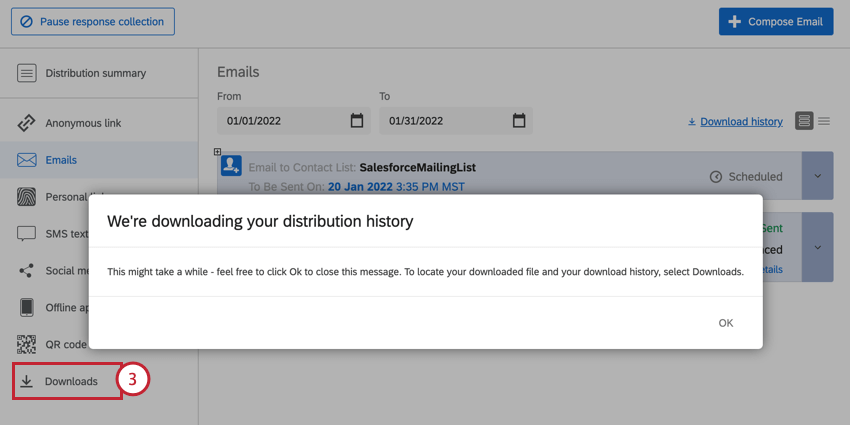
Downloading the History for Multiple Distributions
You can download the distribution history for multiple distributions at once:
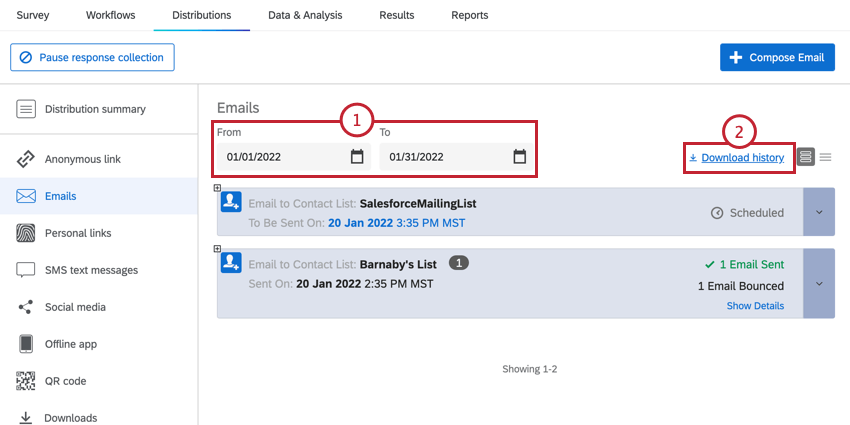
Qtip: You must choose a date range to download distribution histories in bulk. You can download the history from the last 15 months; if you select the date range more than 15 months, the distribution history export will fail.
This will generate a file containing the status of each recipient for all of the distributions of a survey. If you have access to XM Directory or the new contacts experience, then the option to Download History will allow you to download a file containing the status of each recipient in the distribution.
Attention: You can export a maximum of 10,000 distributions or a maximum of 1 million contacts in a single distribution history file. If your export is over this limit, your download will be split into multiple files.
Attention: You can’t download the history for multiple distributions if at least one of them has a list with more than 1 million contacts.
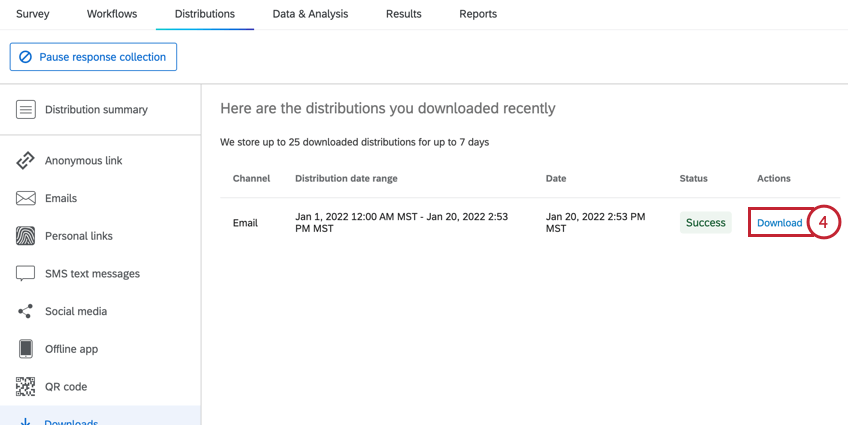
The Downloads section contains the following information about your distribution:
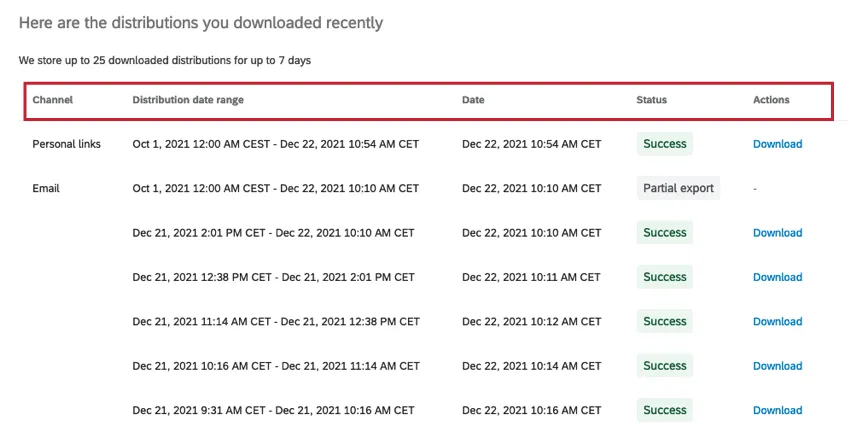
- Channel: The type of distribution that is associated with each recorded response. See Distributions for a list of the possible distribution channels.
- Distribution date range: This will show the selected date range for the distribution history export.
- Date: The date that the distribution history was downloaded.
- Status: The status of the distribution history download. Possible values include:
- Success: The download was successful.
- In Progress: The download is in progress. You will see a progress percentage in parentheses.
- Partial export: If your download exceeds the size limit, it will automatically be broken into multiple download files. The “partial export” displays the full date range for your selected download. Below the partial export will be the multiple download files that make up your selection.
On hold: The download is paused. Click Resume in the Actions column to continue downloading.
Qtip: Qualtrics will process up to three downloads at a time. If your export exceeds three download files (e.g., contains more than 30,000 distributions), then your additional downloads will be on hold, and you can resume downloading them once the initial three are completed.
- Failed: The download couldn’t be completed. Try downloading the distributions again.
- Actions: The distribution history file will be available in this column once the download is successful.
Qtip: In the Downloads tab, you can view any of the distribution history downloads from a multiple-distribution export.
The downloaded file for all distributions includes the following for each respondent:

- Distribution Id: The unique identification code assigned to each distribution. This will indicate which specific distribution the response is connected to.
- Distribution Sent Date: The date and time the distribution was initially sent.
- Directory Id: The ID for the directory used.
- Response Id: The unique identification code assigned to each recorded response. This field will only be filled once the recipient has finished their survey.
- Last Name: The recipient’s last name as it appears in the contact list.
- First Name: The recipient’s first name as it appears in the contact list.
- Contact Id: The ID for the contact on a directory level, regardless of mailing list.
- Lookup Id: The ID of a specific contact in a specific mailing list.
- Transaction Id: If this distribution is part of a transaction batch, this field will list the transaction ID.
- External Data Reference: The recipient’s External Data Reference, as it appears in the contact list. This is not a required field.
- Email Address: The recipient’s email address.
- Channel: The type of distribution that is associated with each recorded response. See Distributions for a list of the possible distribution channels.
- Message Type: The type of message sent to the recipient. This field will tell you whether the response is associated with an invite, reminder, or thank you. For more information, see Email Distributions and Reminder & Thank You Emails.
Status: The current condition of the respondent’s survey invitation. See the Distribution Statuses page for a list of all the possible statuses and what they mean.
Qtip: Export files may have an additional status, “Survey Reopened,” which indicates the respondent started the survey and closed it, but then reopened it to continue later.
- Bounce Reason: If the email bounced, this field will include the reason that the email bounced.
- Sent to: The email address the distribution was sent to.
- Contact Frequency Rule Id: The internal ID of the contact frequency rule, if in effect for this distribution.
- Exceeded Contact Frequency: Indicates if the distribution exceeded the contact frequency rules for the contact. This field will have a value of either TRUE (distribution exceeded contact frequency rules, therefore the contact did not receive the distribution), or FALSE (distribution did not violate any contact frequency rules).
- End Date: The date and time the recipient finished the survey.
- Link: The recipient’s personal survey link. The download distribution file will contain the exact links that were sent to survey recipients.
Link Expiration: The date and time the recipient’s survey link expires (for those who have not finished the survey).
Qtip: Even if this link hasn’t expired, you may notice a link is not working due to the response expiring under the incomplete survey settings or the survey availability date.
Qtip: The times in this file are presented in the UTC time zone and format, rather than matching the time zone selected in your account settings.
Downloading the History for One Distribution
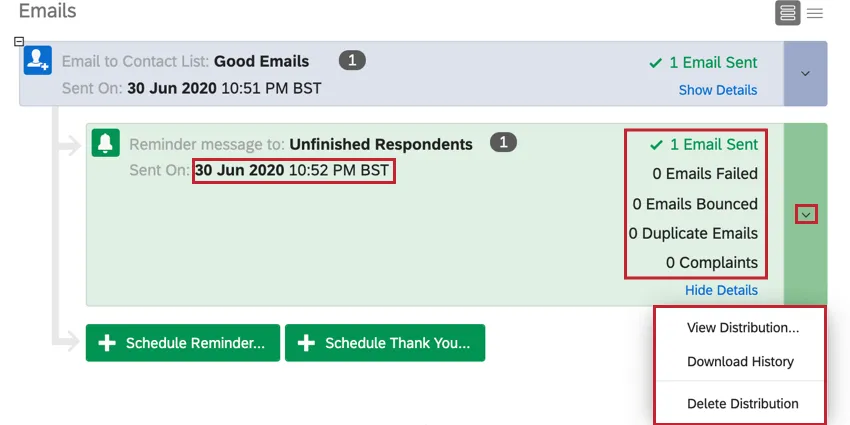
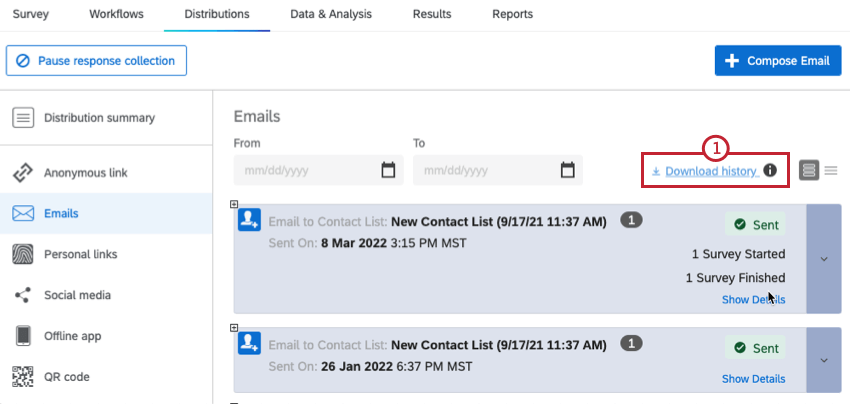
To download the distribution history, go to the dropdown menu to the right of any distribution block and choose Download History.

You can also view the Distribution History for Reminder and Thank You emails. If your Reminder or Thank You emails have been sent, you can see the distribution statistics to the right and the send time to the left. In addition, you can see what message was sent by clicking on the dropdown and choosing View Distribution. If you have access to XM Directory or the new contacts experience, then you will also have the option to Download History which will allow you to download a file containing the status of each recipient in the distribution. If your initial email distribution had a high complaint rate, your reminder will have a status of Failed. See Distribution Error Codes for more information.
Attention: Distribution histories for Reminder and Thank You emails only contains the email’s send status. It is not possible to determine whether a survey response came from an invite or a reminder link.
The distribution history for survey invites includes the following for each respondent:
- Response ID: The unique identification code assigned to each recorded response. This field will only be filled once the recipient has finished their survey.
- Last Name: The recipient’s last name as it appears in the contact list.
- First Name: The recipient’s first name as it appears in the contact list.
- Contact Id: The ID for the contact on a directory level, regardless of mailing list.
- Lookup Id: The ID of a specific contact in a specific mailing list.
- Transaction Id: If this distribution is part of a transaction batch, this field will list the transaction ID.
- External Data Reference: The recipient’s External Data Reference, as it appears in the contact list. This is not a required field.
- Email: The recipient’s email address.
- Channel: The distribution channel.
- Status: The current condition of the respondent’s survey invitation. See the Distribution Statuses page for a list of all the possible statuses and what they mean.
- Bounce Reason: The reason the distribution bounced, if it bounced.
- Sent To: Who the distribution was sent to.
- Contact Frequency Rule Id: The internal ID of the contact frequency rule, if in effect for this distribution.
- Exceeded Contact Frequency: Indicates if the distribution exceeded the contact frequency rules for the contact. This field will have a value of either TRUE (distribution exceeded contact frequency rules, therefore the contact did not receive the distribution), or FALSE (distribution did not violate any contact frequency rules).
- End Date: The date and time the recipient finished the survey.
- Link: The recipient’s personal survey link.
Link Expiration: The date and time the recipient’s survey link expires (for those who have not finished the survey).
Qtip: Even if this link hasn’t expired, you may notice a link is not working due to the response expiring under the incomplete survey response settings or the survey availability date.
Canceling or Deleting a Distribution
Each distribution gives you the option to either cancel or delete it, depending on the distribution status. For distributions that have not yet sent, you have the option to cancel and delete the distribution. For distributions that have already been sent, you have the option to remove the distribution record from your Emails section. If a distribution has already sent, then deleting the distribution will not remove the email you have sent from recipients’ inboxes.
Deleting the distribution will prevent individual survey links that have not yet been clicked on from being accessed. (Anonymous and multiple completes links are unaffected.) It will also remove the option to send reminder and thank you emails.
Warning: Be careful when deleting distributions. Once a distribution is deleted, it cannot be restored. That includes any unclicked links that were deactivated when the distribution was deleted.
To cancel or delete a distribution, open the dropdown menu to the right and select Cancel and Delete Distribution or Delete Distribution.
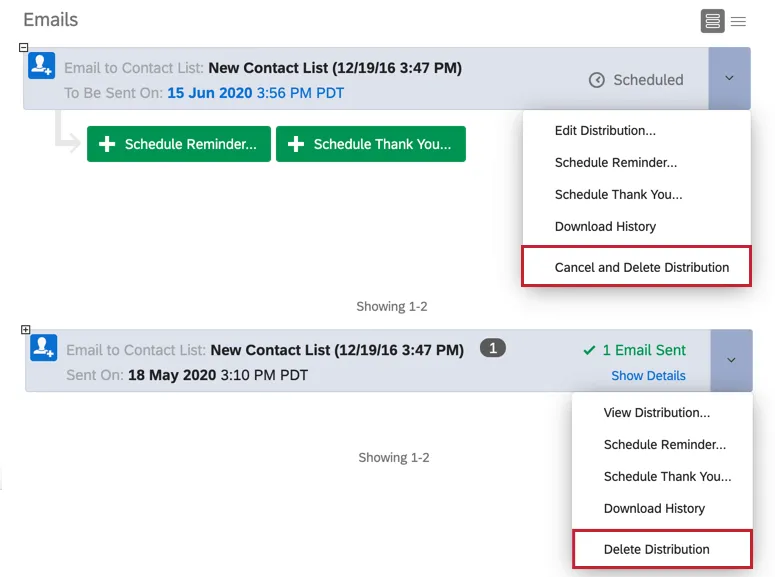
Qtip: Deleting a distribution will not reduce the Audience Size.
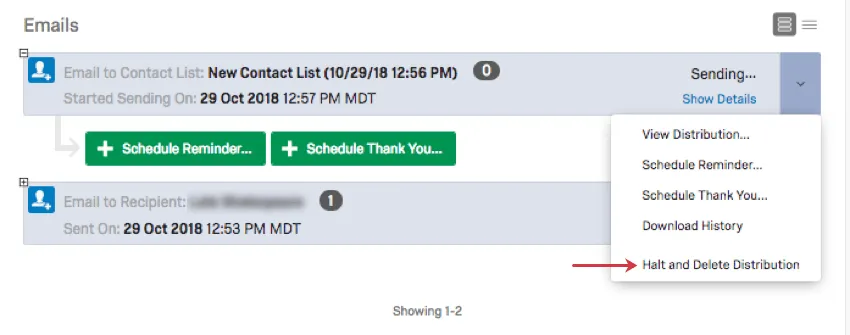
Halt and Delete Distribution
The Halt and Delete Distribution option only appears if the email distribution is currently Sending (see screenshot below), meaning you clicked Send, but the distribution hasn’t arrived at the recipients’ inboxes yet. This gives you the opportunity to delete the distribution before it goes out. You only have as long as it takes the email to send before this option disappears.
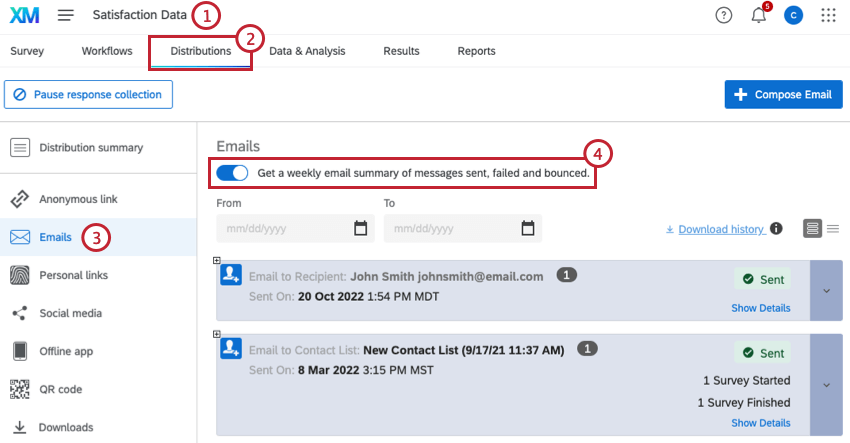
Enabling Distribution Health Notifications
Attention: This notification is enabled at the user level; any user wanting to receive a distribution notification for a specific survey will have to enable this feature within their own account.
Distribution health notifications allow you to receive a weekly email summary of all recent email distributions sent for a particular active survey, including reminder and thank you emails. This can be useful to see an overview of how effective your distributions are, and if there is anything you can do to improve them in the future. Notifications are sent on Tuesday mornings, and contain data from the previous week (Monday to Sunday).
Qtip: This notification is only sent for active surveys; if your survey is no longer active you will stop receiving a weekly email.
Qtip: Notifications will be sent to the email address associated with your Qualtrics user account.
Follow these steps to enable distribution notifications for a survey:
Qtip: If you have distribution notifications enabled for multiple surveys, you will only receive 1 email with metrics for all the surveys you are subscribed to.
The weekly summary displays how many emails with survey invitations were sent, failed or bounced in the last week, as well as the bounce rate and how it compares to the average for a given survey.
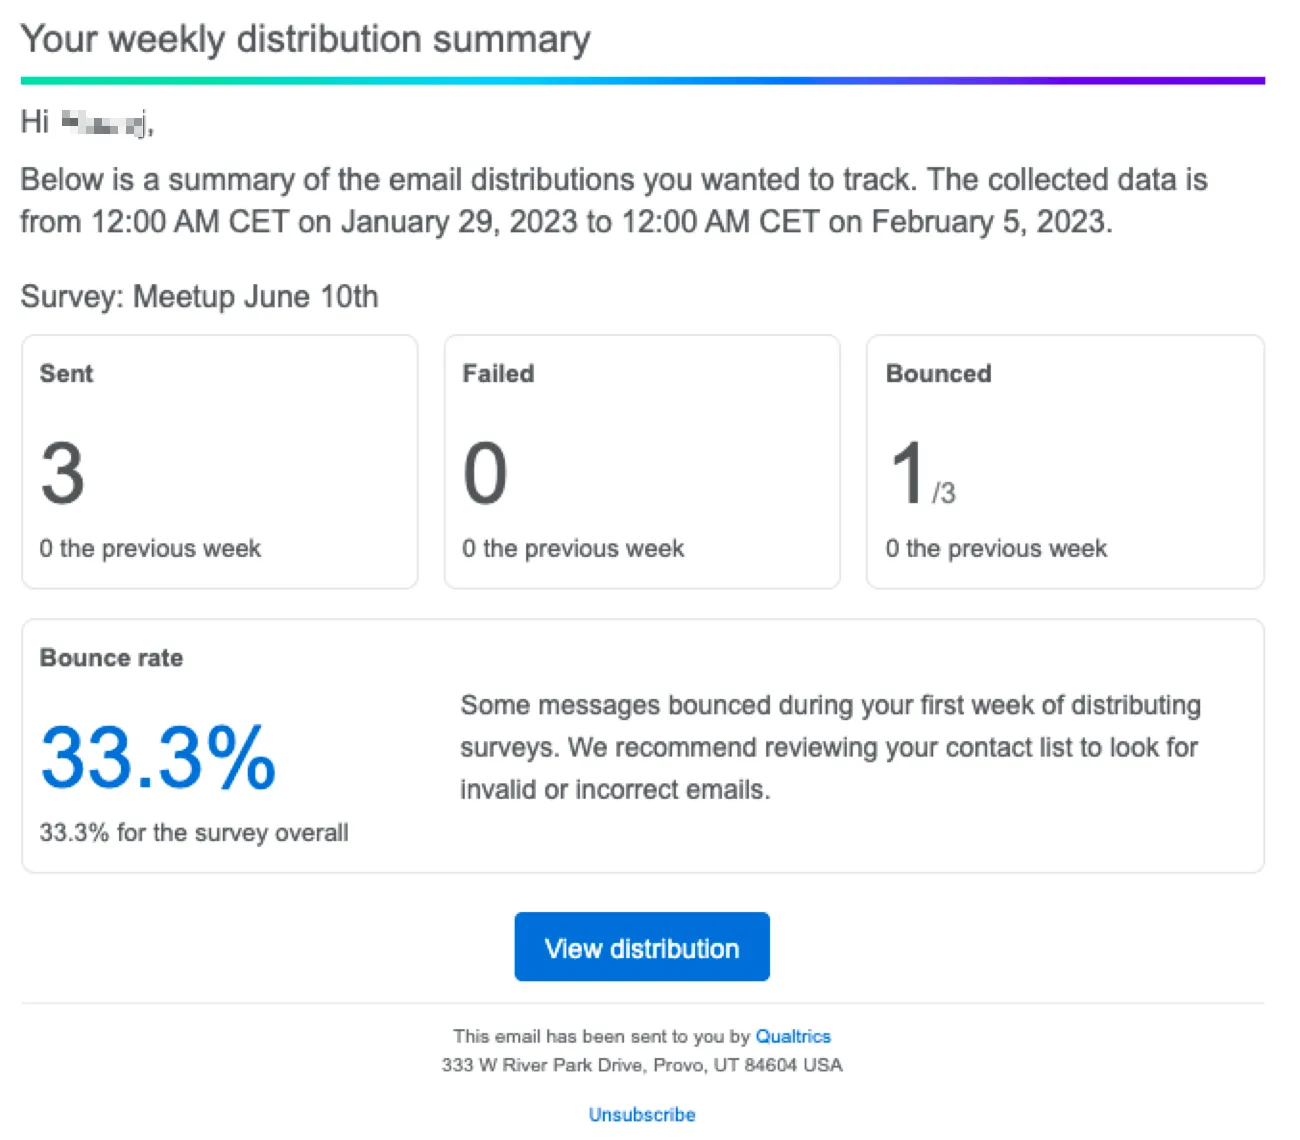
To unsubscribe from these notifications, turn off the setting within the Distributions tab or click Unsubscribe at the bottom of the email. Unsubscribing will stop you from receiving this notification for all surveys at once.
Removing Frequently Bounced Email Addresses
When you send a distribution that bounces, it can affect your sender score. Having a lower sender score means your emails are more likely to be automatically marked as spam. Management of bounced emails in your directory and mailing lists will protect your sender score to ensure reliable email deliverability. This section covers how to identify bounced emails so you can remove those addresses from your records.

- If the email is correct and valid, and you have confirmed that they can receive emails, contact Qualtrics Support for further assistance.
- If the email is incorrect or invalid, you have 2 options for stopping emails. You can either opt-out the contact from your directory, or delete the contact if you do not mind losing any associated data. More about these options are below.
The following pages contain more information about opting-out and deleting contacts:
- Editing Directory Contacts: To opt-out or delete contacts from your directory.
- Managing Contacts in a Mailing List: To opt-out or delete contacts from an XM Directory mailing list, but not the directory.
Additional Troubleshooting Resources
If you have questions about email deliverability, please make sure you also consult the following pages:
- Troubleshooting Email Distributions: A guide to improving email deliverability.
- Email Distribution Error Messages: Qualtrics has built in messages to let you know what you need to do to successfully send your emails. The errors described on this page occur for survey invitations, reminders, and thank you emails.
- Avoid Being Marked as Spam: If you find that your emails from Qualtrics are consistently being marked as spam, there are a few things you can do to prevent this.
- Using a Custom “From” Address: The email address you use to send email messages from Qualtrics has a large effect on your email deliverability and open rates. Using your own custom email address requires careful setup to ensure the best email deliverability possible.
- Finding Qualtrics IDs: Visit this page to learn how to find the ID of a distribution if you need the ID for troubleshooting or to use with the Qualtrics API,
FAQs
If someone unsubscribes from one of my contact lists, will they automatically be unsubscribed from all my other contact lists?
If someone unsubscribes from one of my contact lists, will they automatically be unsubscribed from all my other contact lists?
I am trying to email my survey, but I keep getting an error message that says my from address/reply-to address is "invalid." What does this mean?
I am trying to email my survey, but I keep getting an error message that says my from address/reply-to address is "invalid." What does this mean?
If you are a Brand Administrator, you can find solutions on Using a Custom From Address.
How can I avoid my emails being marked as spam?
How can I avoid my emails being marked as spam?
How can I see who has received an email or who has finished the survey?
How can I see who has received an email or who has finished the survey?
How do I increase my weekly email limit?
How do I increase my weekly email limit?
- The email limit being requested.
- A description of the project(s).
- A general description of who is being surveyed (student body, small business owners in Iowa, purchased panel, etc.).
- How long the limit needs to be in place (one time or multiple times per year).
Why are the emails in my contact list showing as invalid? I'm positive that the emails are real and exist.
Why are the emails in my contact list showing as invalid? I'm positive that the emails are real and exist.
How do I see which emails were sent, failed, and bounced after I send my survey via email?
How do I see which emails were sent, failed, and bounced after I send my survey via email?
How can I change my "From" address for email distributions?
How can I change my "From" address for email distributions?
Some of my respondents say that their survey session has expired. Why is this happening?
Some of my respondents say that their survey session has expired. Why is this happening?
How do I opt someone out of a contact list? I don't want them to receive emails from this list anymore.
How do I opt someone out of a contact list? I don't want them to receive emails from this list anymore.
You can also change a contact's subscription status in the product. See this page.
I’m trying to send an email, but there’s an error! What does it mean?
I’m trying to send an email, but there’s an error! What does it mean?
How does Qualtrics handle sending large distributions?
How does Qualtrics handle sending large distributions?
What do I do if I sent a distribution by accident? Is there any way to delete it or stop participants from filling out the links?
What do I do if I sent a distribution by accident? Is there any way to delete it or stop participants from filling out the links?
I've been notified about a high complaint rate associated with a specific domain, even though I haven't sent emails directly to this domain. Why is this happening?
I've been notified about a high complaint rate associated with a specific domain, even though I haven't sent emails directly to this domain. Why is this happening?
That's great! Thank you for your feedback!
Thank you for your feedback!