
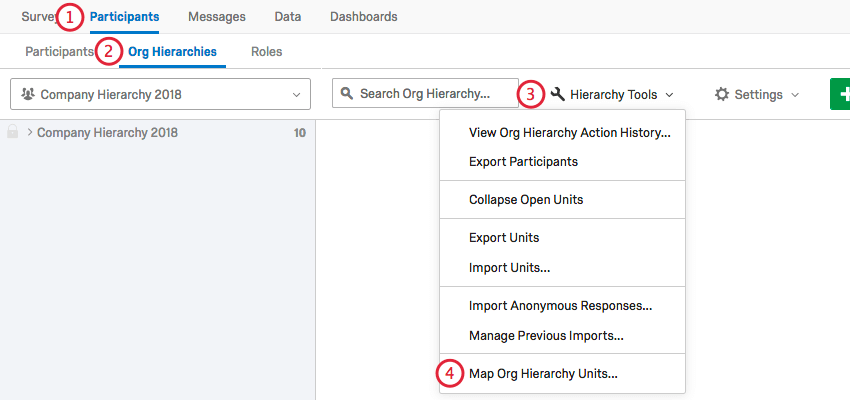
Map Org Hierarchy Units (EX)
What's on this page
About Mapping Org Hierarchy Units
After you’ve built your hierarchy, you may want to make sure it aligns with one you’ve built from a previous year. Mapping org hierarchy units lets you dynamically display historical data in your dashboards.
For example, maybe you want to create comparisons between 2 different engagement surveys, or you have a widget with an older survey as the source. You don’t want these widgets to stop displaying data when your dashboard is manually filtered by the hierarchy, or when accessed by someone whose permissions only lets them see their own hierarchy unit’s data. Therefore, you must map the old hierarchy to the new one so the widgets know how to adjust to the filtering.
Even if members of your company have left or been replaced, you can still map your current hierarchy to an older one. 2 mapped hierarchy units do not need to have the exact same people inside them – you just need to map over which employees are in the same position.
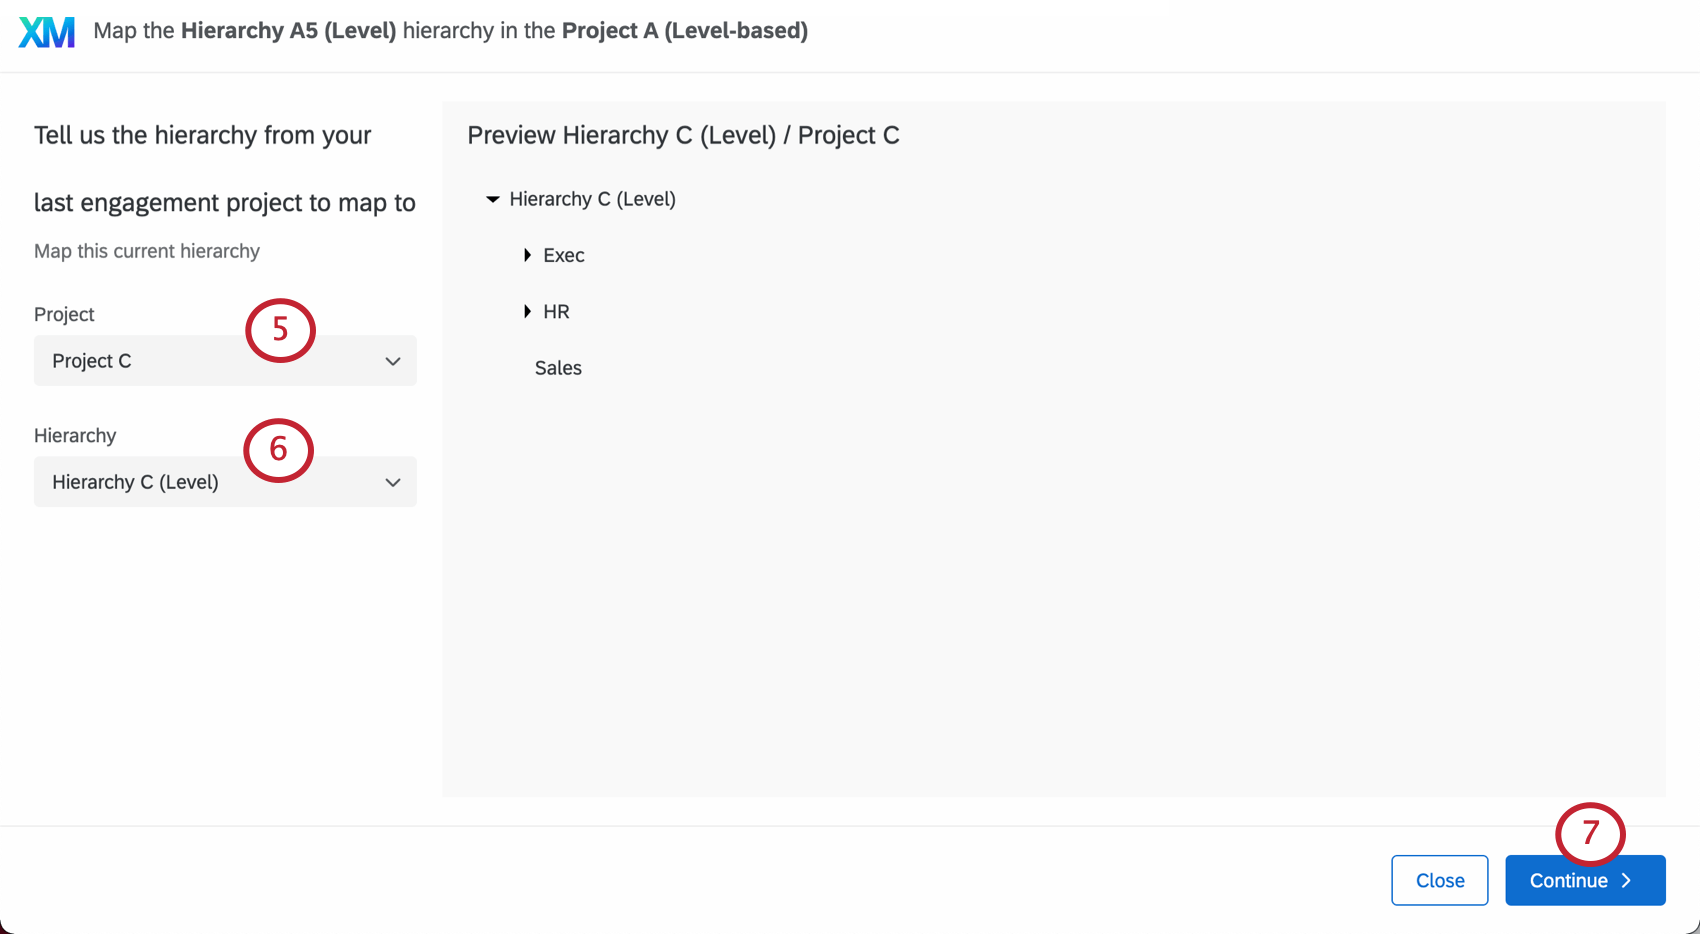
Qtip: Your hierarchies have to be built before you can map them! You cannot build an Ad Hoc hierarchy using the hierarchy mapper.
Qtip: This page describes functionality available to Engagement and Pulse projects, but not Lifecycle or Ad Hoc Employee Research projects. For more details on each, see Types of Employee Experience Projects.
How to Map to Historical Units
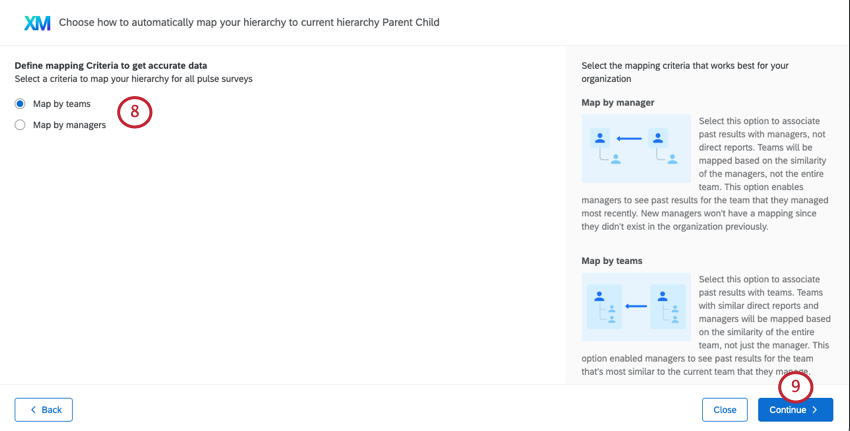
- Map by managers: Associate historical data with managers, not direct reports. Teams will be mapped based on the the manager of the team being the same, not team members. This means managers can see past results for the teams they managed. Example: Barnaby Smith went from a manager of sales to a manager of finance. When he looks at his engagement dashboard, he sees both his scores for the finance team he manages and then historical scores from the sales team he used to manage.
 Qtip: Managers who are new to the organization will not have historical data to pull from, since this is their first time being organized in a hierarchy.
 Qtip: This option is not recommended for level-based hierarchies with few or minimal managers.
 - Map by teams: Associate historical data with teams. Teams with similar direct reports and managers will be mapped based on the similarity of the entire team, not just the manager. This option lets managers see past results for the team that’s most similar to the one they currently manage – even if they did not always manage that team. See more under Org Hierarchy Default Mapping Behavior. Example: The marketing team’s manager has changed a lot, but the direct reports have not changed very much. We create a dashboard where the marketing manager can see comparisons of the marketing team’s engagement quarter over quarter, so the new manager can get an idea of how she performs compared to previous managers.
- Automatic mapping: If your hierarchy was mapped with org unit IDs, you will default to using org unit IDs as the recommended mapping option. However, you can select the manager or team based mapping discussed above if you prefer.
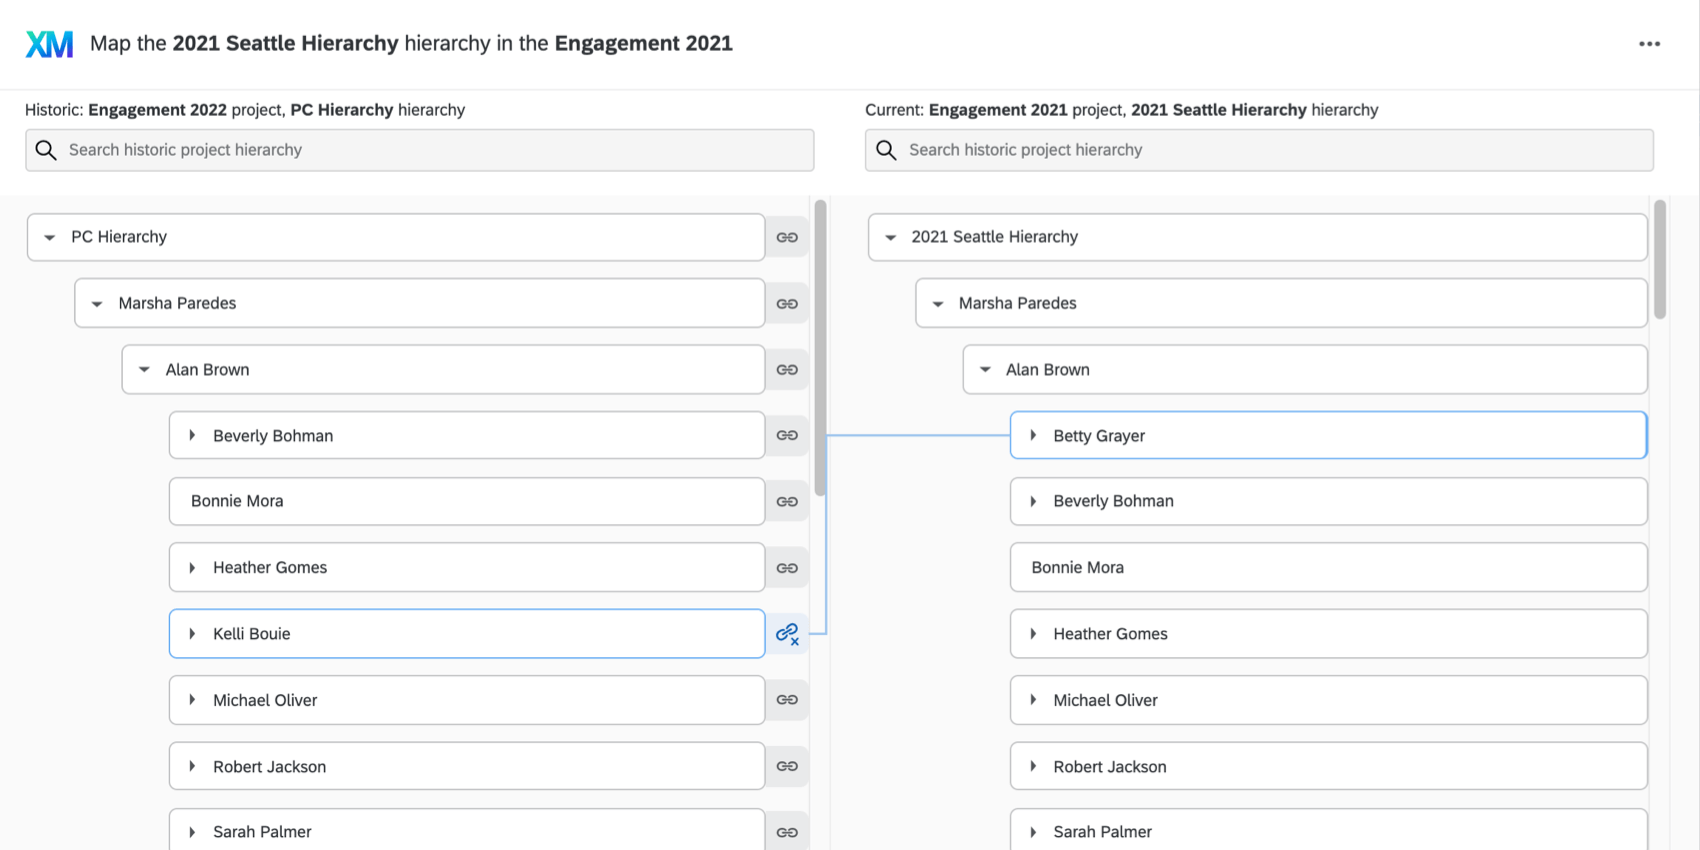
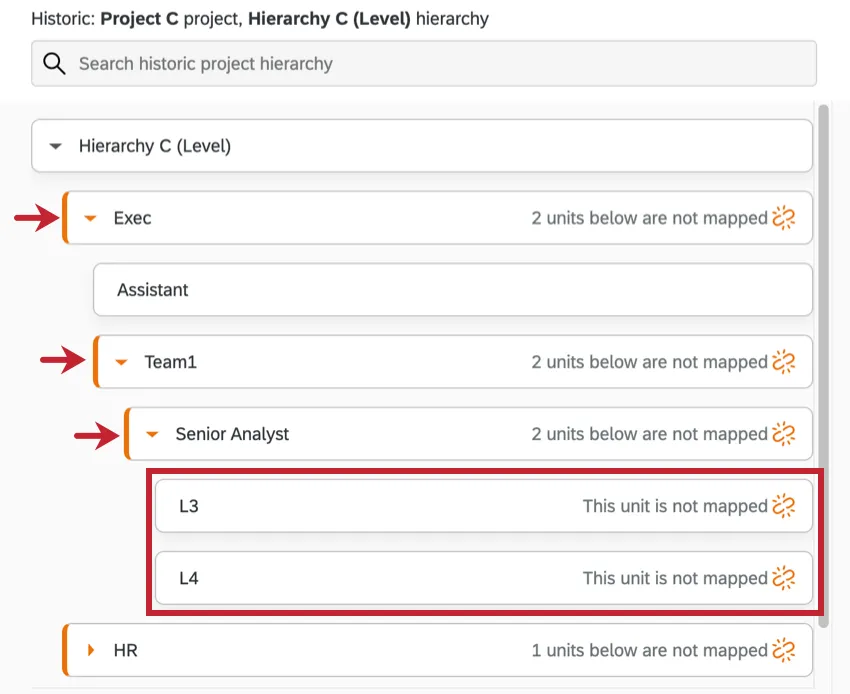
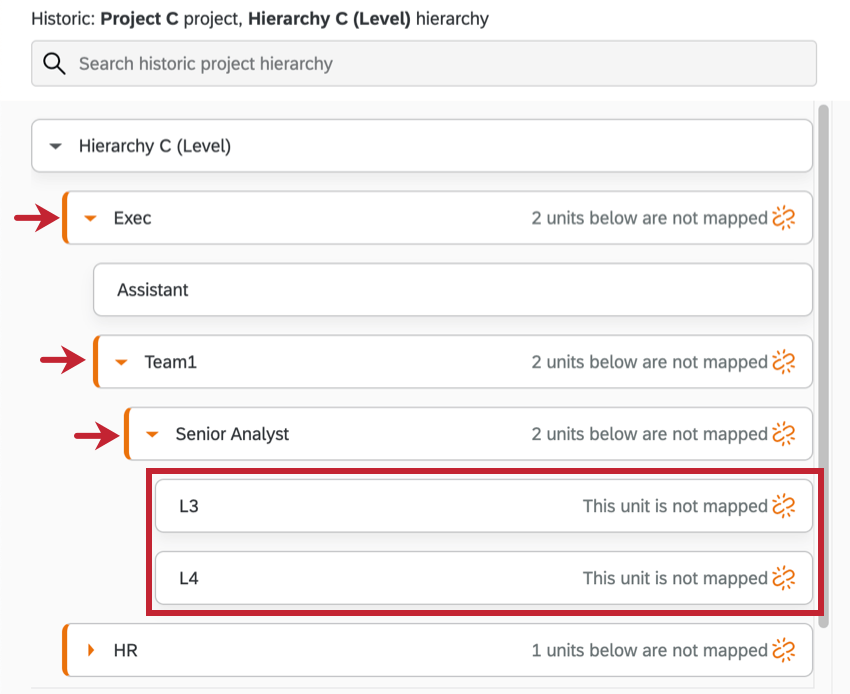
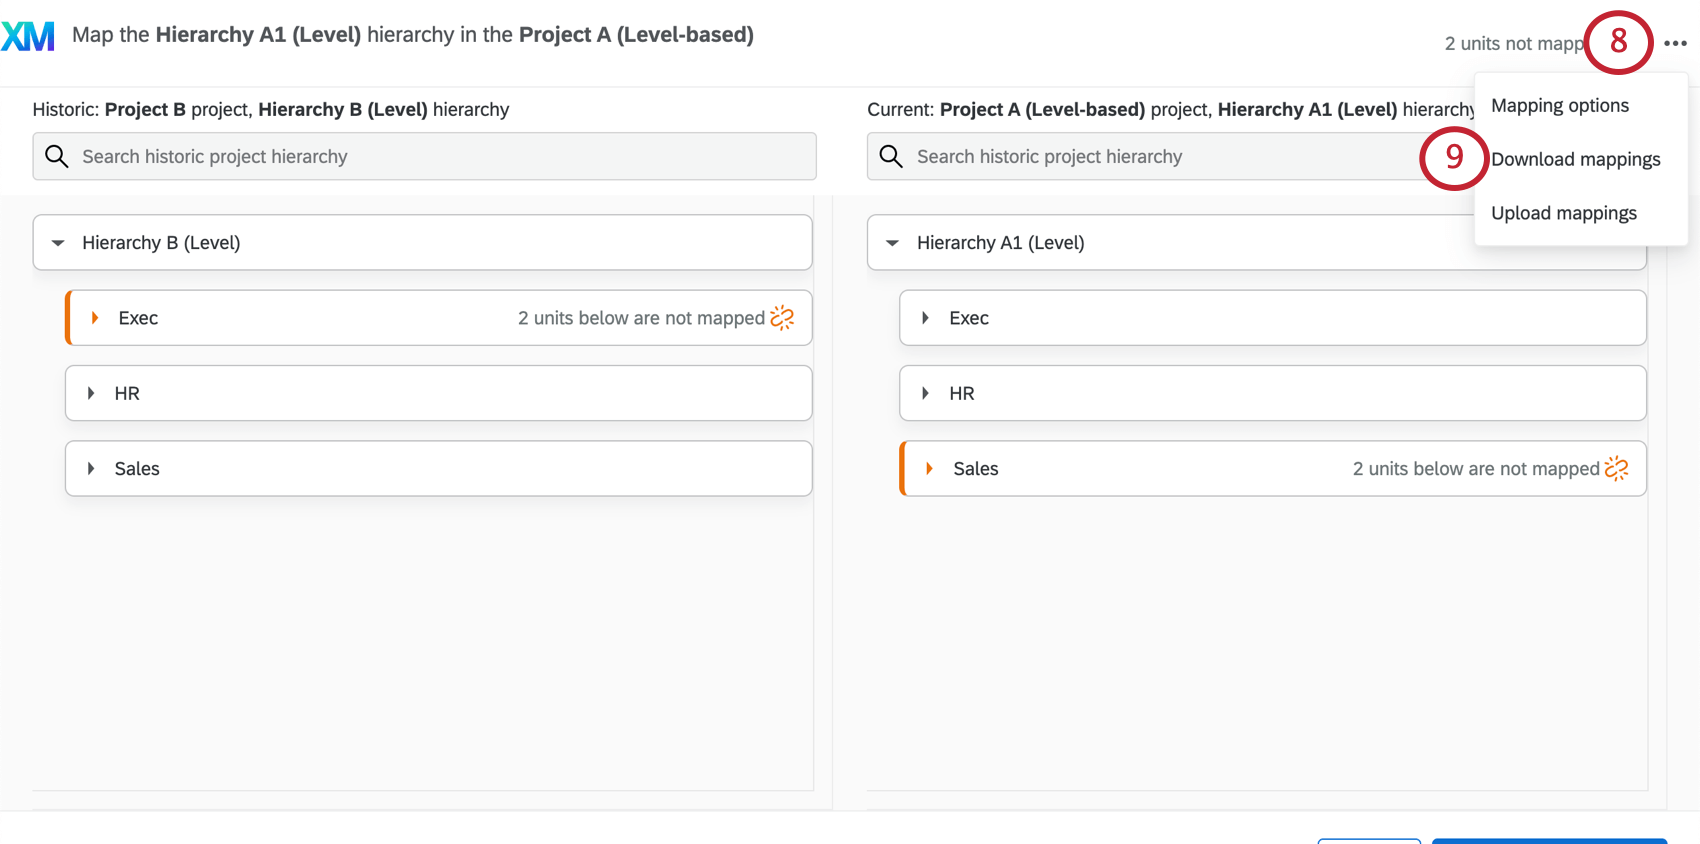
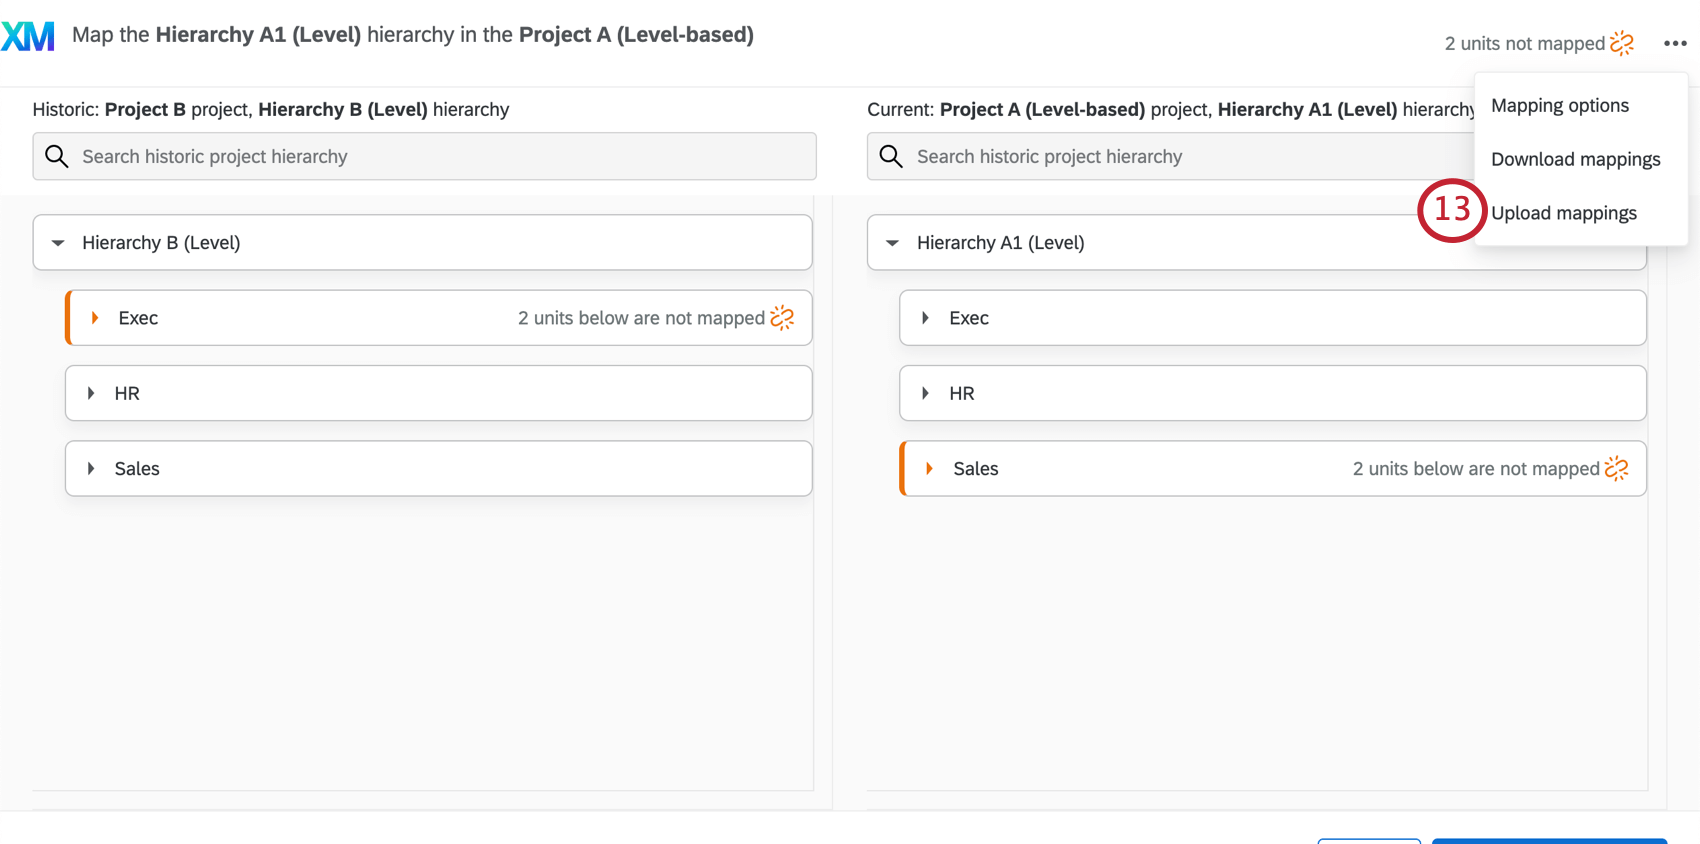
Qtip: If portions of the hierarchy are not automatically linked to each other, an icon will appear showing what units are not mapped. Click the units to expand them and find the unmapped portions.
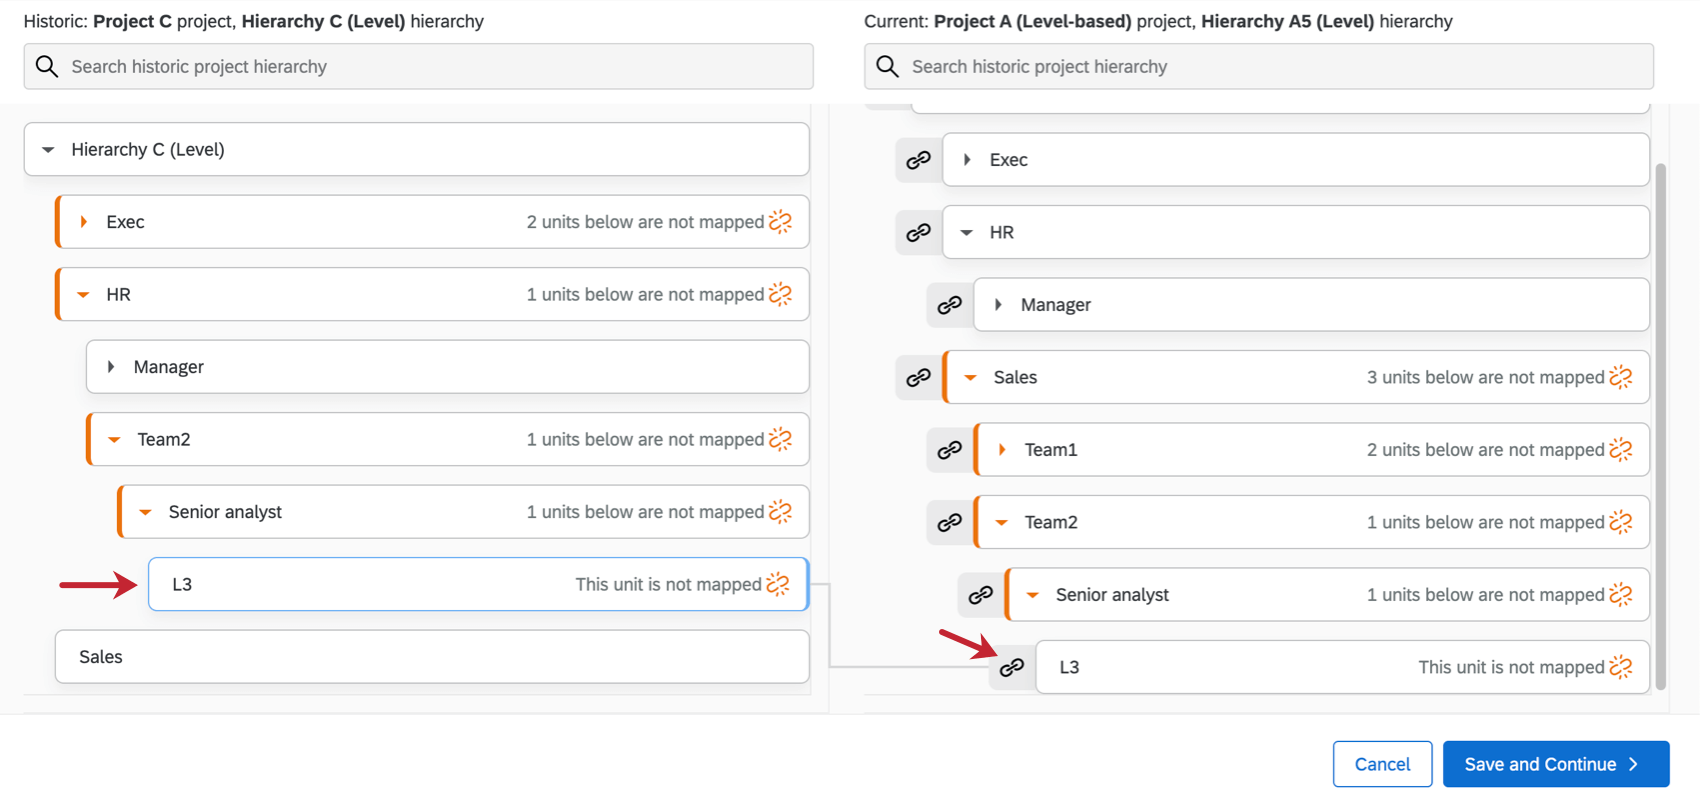
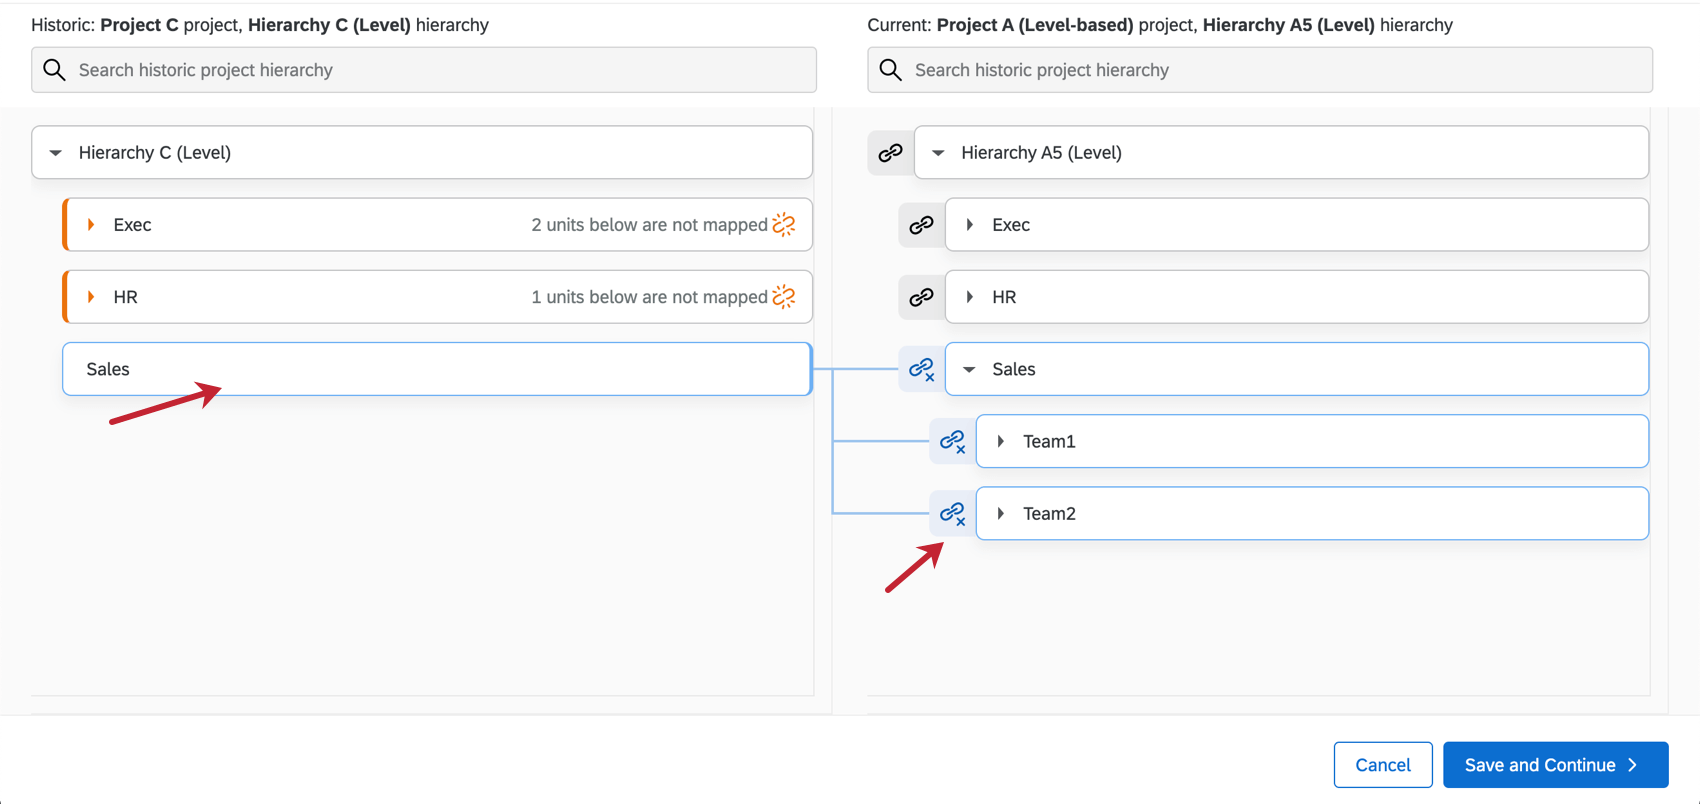
Qtip: You can map multiple units onto each other! In the example shown here, Sales split into two different teams the following year, so we mapped them together.


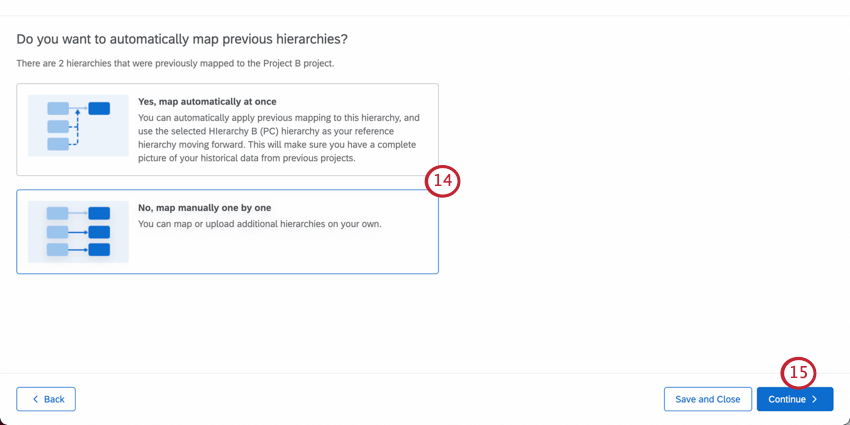
- Yes, map automatically at once: You can automatically apply previous mappings to your current hierarchy, and use the selected hierarchy (the one you’re trying to map to your current project) as your reference hierarchy moving forward. This will make sure you have a complete picture of your historical data from previous projects. Example: Let’s say you ran a pulse in August, July, and June. July and June are already mapped. Now you go to map August to July – the automatic mappings option would make it so that in that same instance, you could also map August to June, making your historical data more comprehensive.
- No, map manually one by one: You will not automatically map any additional hierarchies; anything additional you add will be done manually on your own. Qtip: Even if you choose to automatically map historical hierarchies, that doesn’t mean you can’t add additional, manual mappings.
Qtip: The number for “units not mapped” is generated based on what’s missing from the current hierarchy. For example, the current and historical hierarchy may both have a single unit unmapped, but rather than saying two units total are unmapped, because the current hierarchy only has one, it will say one.
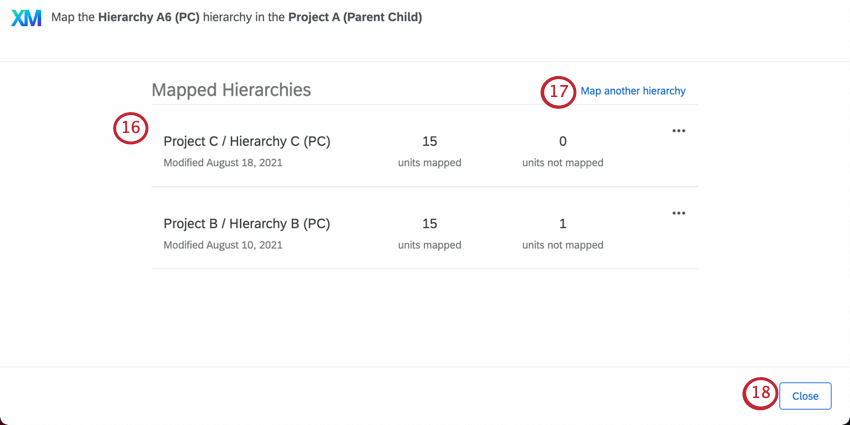
Once two hierarchies are mapped, you can reload this mapping for later and make changes. All you have to do is repeat steps 1-3 to reopen the Map Org Hierarchy Units window, and your mappings will be listed there.
Important considerations when mapping hierarchies
- Make sure all of your hierarchy units are mapped across both projects.
- You are allowed to map hierarchies of different types (such as Parent-Child to Level-Based), but in these cases, the automatic mapping feature will not work and you will have to do the mapping manually.
- If you make changes to a historical data source, including any changes to its org hierarchy mapping, make sure to update all responses with new metadata. This will update the dashboards connected to the data source.
Reference Hierarchies
You can more quickly map multiple hierarchies together at once using the automatic mapping feature. This can be useful in situations where you want multiple hierarchies to be linked for a fuller picture of the historical data, but don’t want to have to manually map everything one by one.
Example: You ran an employee pulse in June and July, and it is now August. You are setting up the hierarchy mappings for August, mapping your hierarchy to July’s. July was already mapped to June, so you’re asked if you’d like to link all these mappings, thus mapping August to June. If you say yes, all the hierarchies will be mapped, and July will become the reference hierarchy.
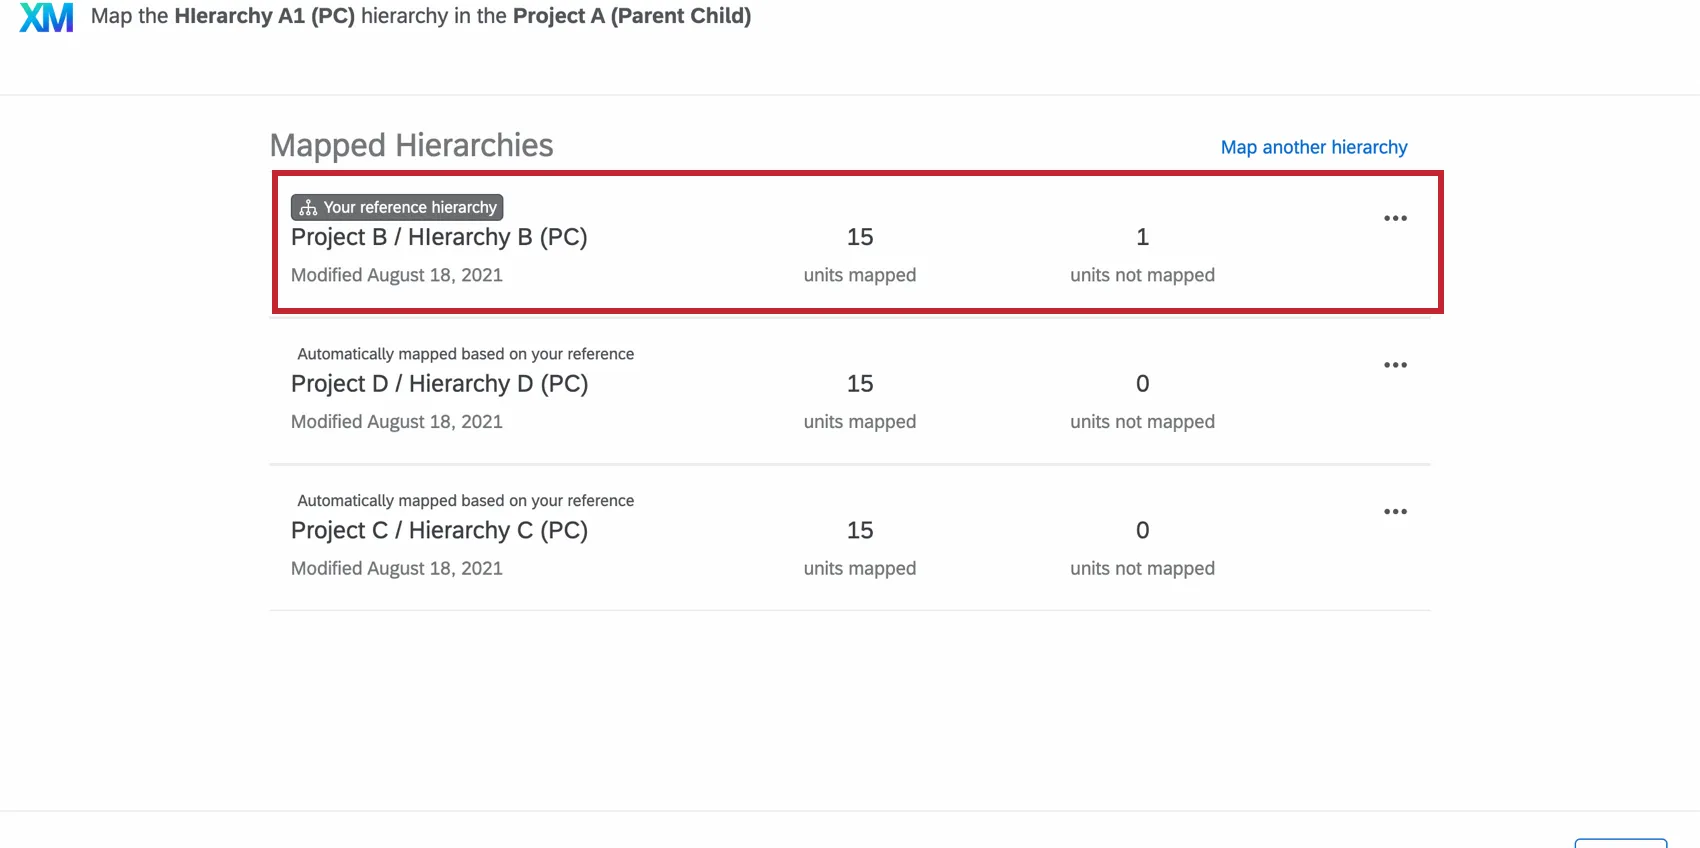
A reference hierarchy is thus a hierarchy with multiple mappings that becomes the reference for other automatic mappings in that family.
The limit of hierarchies you can reference is 25.
How to establish a reference hierarchy
If you choose to automatically map hierarchies, the hierarchy you were mapping to will become a reference hierarchy.
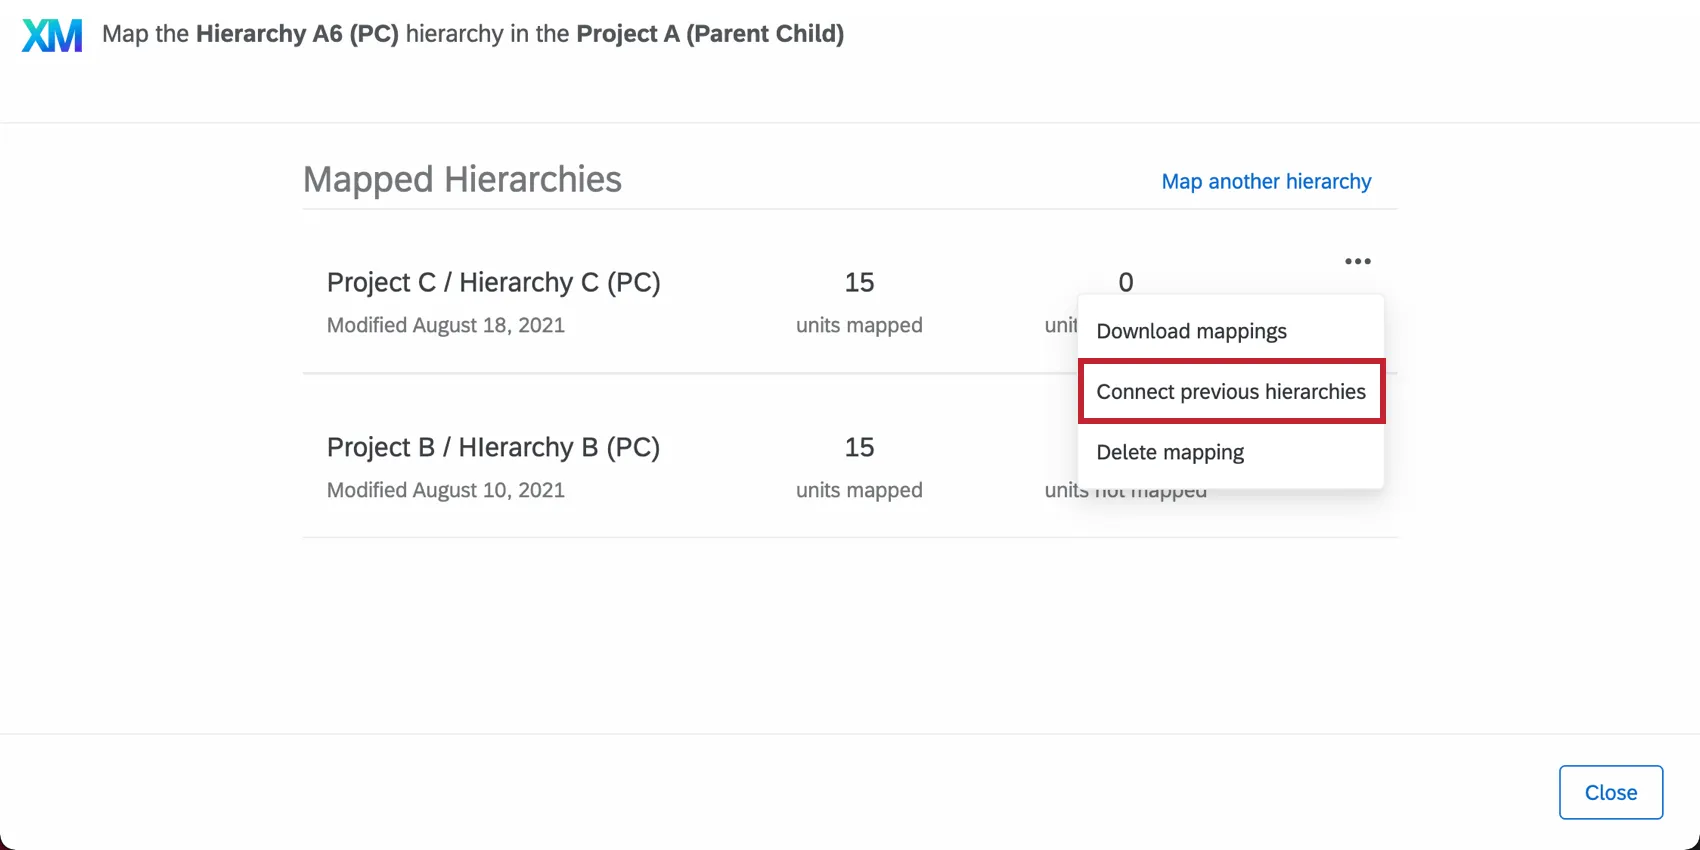
Qtip: If you do not choose to automatically map hierarchies during the setup process but later change your mind, that’s okay. You can connect related hierarchies by opening the Map Org Hierarchy units menu and clicking the dropdown next to a specific hierarchy. Then click Connect previous hierarchies. This option only appears if you don’t already have a reference hierarchy.
Edits to reference hierarchies
Let’s say that when you originally mapped your hierarchies, you realized your reference hierarchy was missing something. If your references has units unmapped or incorrectly mapped, your other automatic mappings re using that information, and will reflect similar errors. Luckily, you can edit your reference hierarchy and update all resulting mappings to match your fixes.
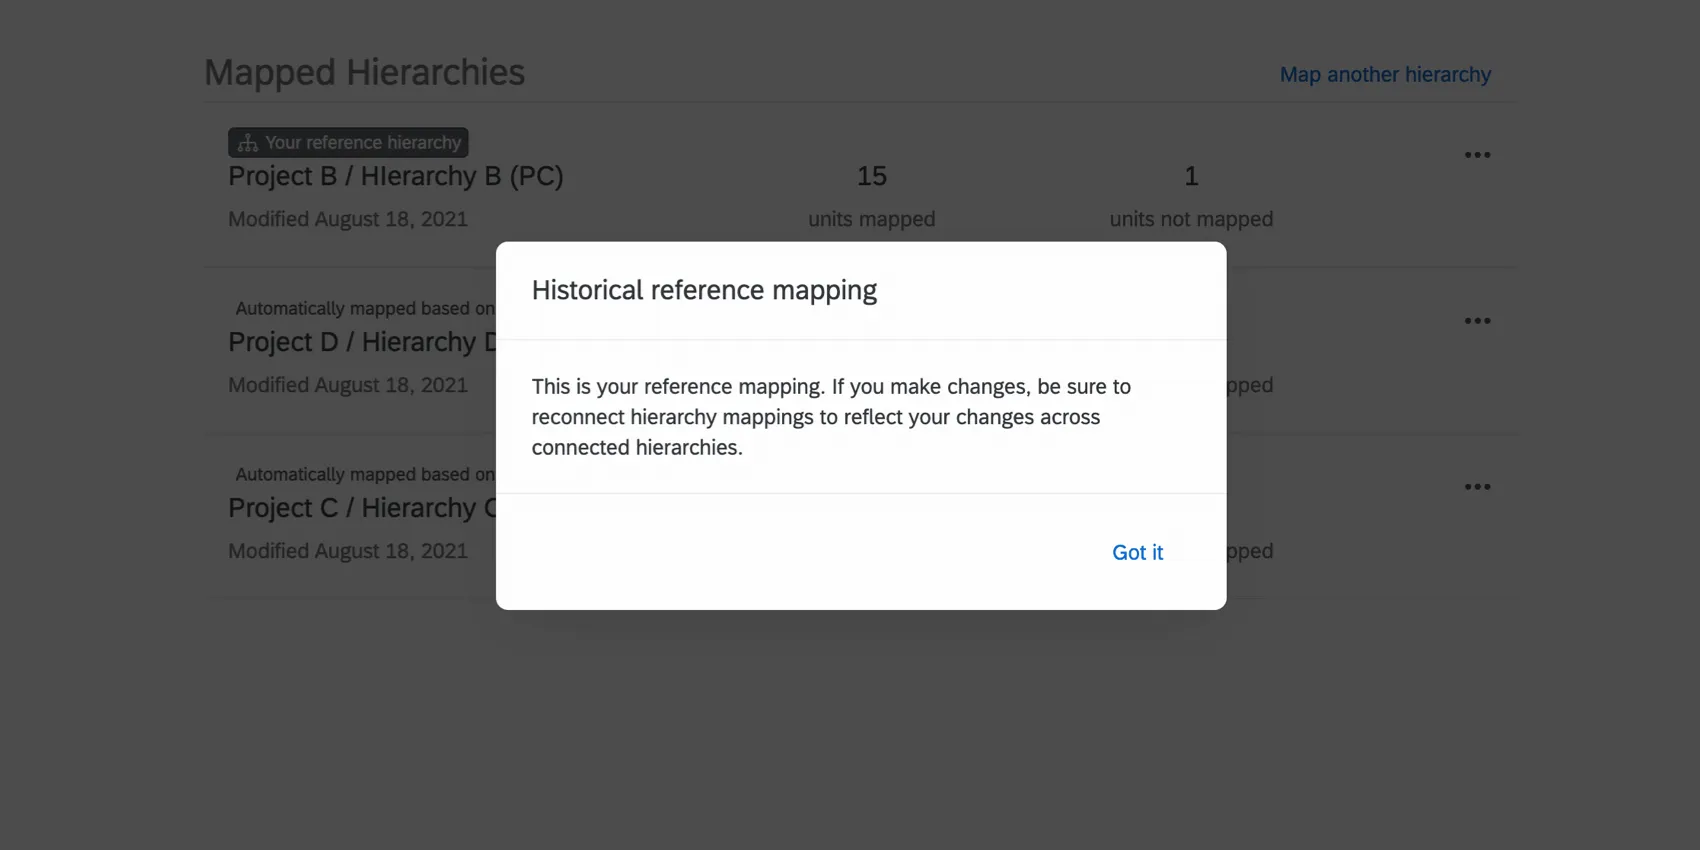
Any time you click your reference hierarchy to edit it, you will receive a pop-up explaining that if you make changes to your reference hierarchy, you will need to reconnect your hierarchy mappings to reflect changes across connected hierarchies.
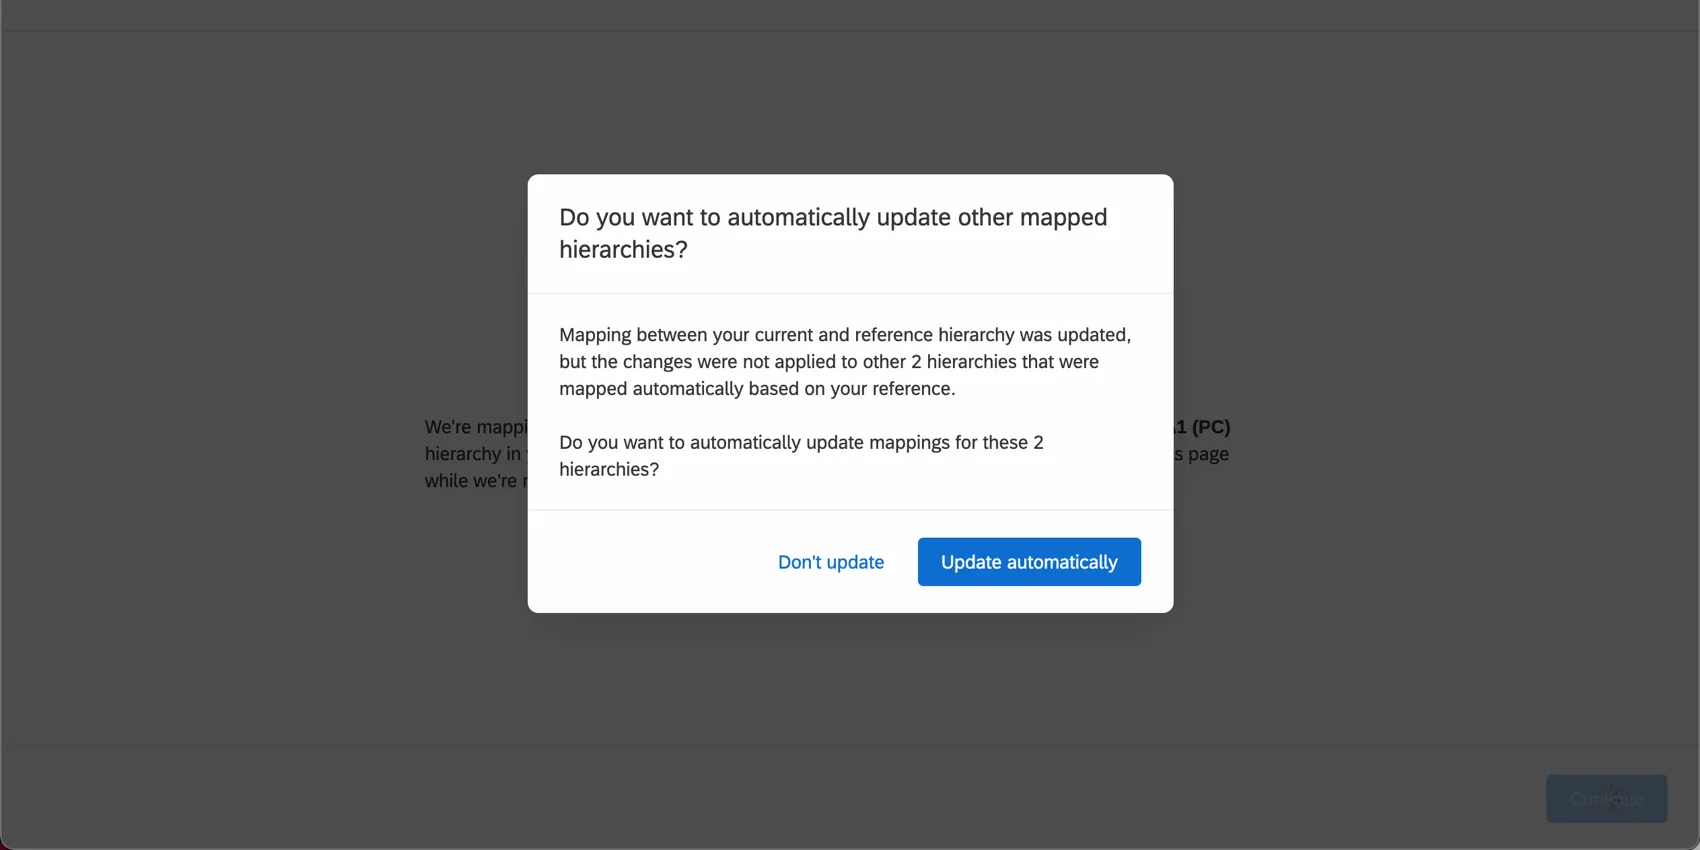
When you’re finished making edits to a reference hierarchy, you will be asked if you want to push those changes to the other hierarchies mapped to it. If you click Update automatically, those changes will be applied without you having to do anything else.
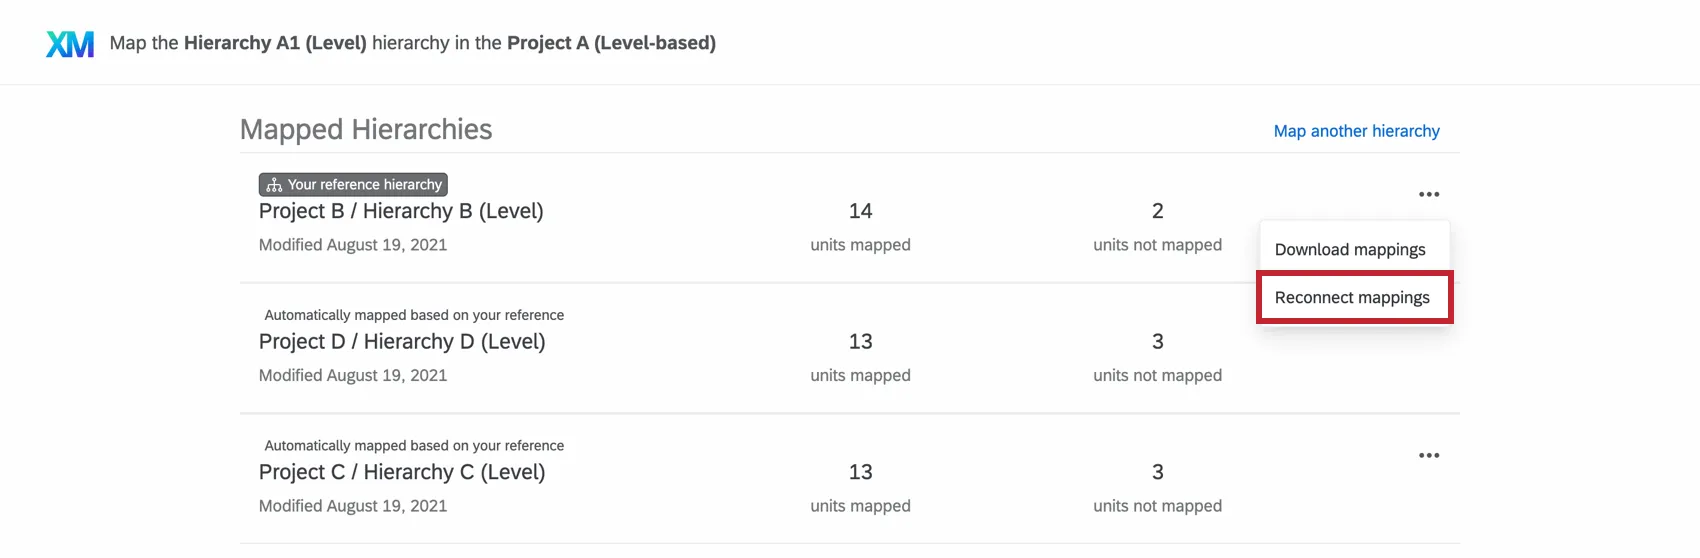
Qtip: You can also reconnect mappings later by opening the Map Org Hierarchy units menu and clicking the dropdown next to a reference hierarchy.
Org Hierarchy Default Mapping Behavior
Default org hierarchy mapping behavior is dependent on how your current and historical hierarchies are configured. This section will explain how the platform maps your hierarchy between data sources. Default mapping is only available if both the historical and current hierarchies share the same hierarchy type (parent-child or level-based) or both hierarchies use org unit IDs.
Both Hierarchies Use Org Unit IDs
If both the historical and current hierarchies use org unit IDs, then units with matching org unit IDs will be mapped, regardless of where those units appear in the hierarchy or what the names of the units are.
Mapping by Manager
Parent-child hierarchies are mapped based on units with the same Manager ID fields.
Level-based hierarchies are mapped by ensuring the unique IDs of the managers match between units.
Mapping by teams
When mapping by team, both parent-child and level-based hierarchies follow these formulas to decide whether to map 2 units together:
| Percent of direct reports that match | Manager doesn’t match | Manager matches |
|---|---|---|
| 67% or more | Map | Map |
| 33% to 67% | Don’t Map | Map |
| 0% to 33% | Don’t Map | Don’t Map |
For level-based hierarchies, after the above algorithm is completed, we then use unique unit names to map any unit that does not have direct reports.
Options
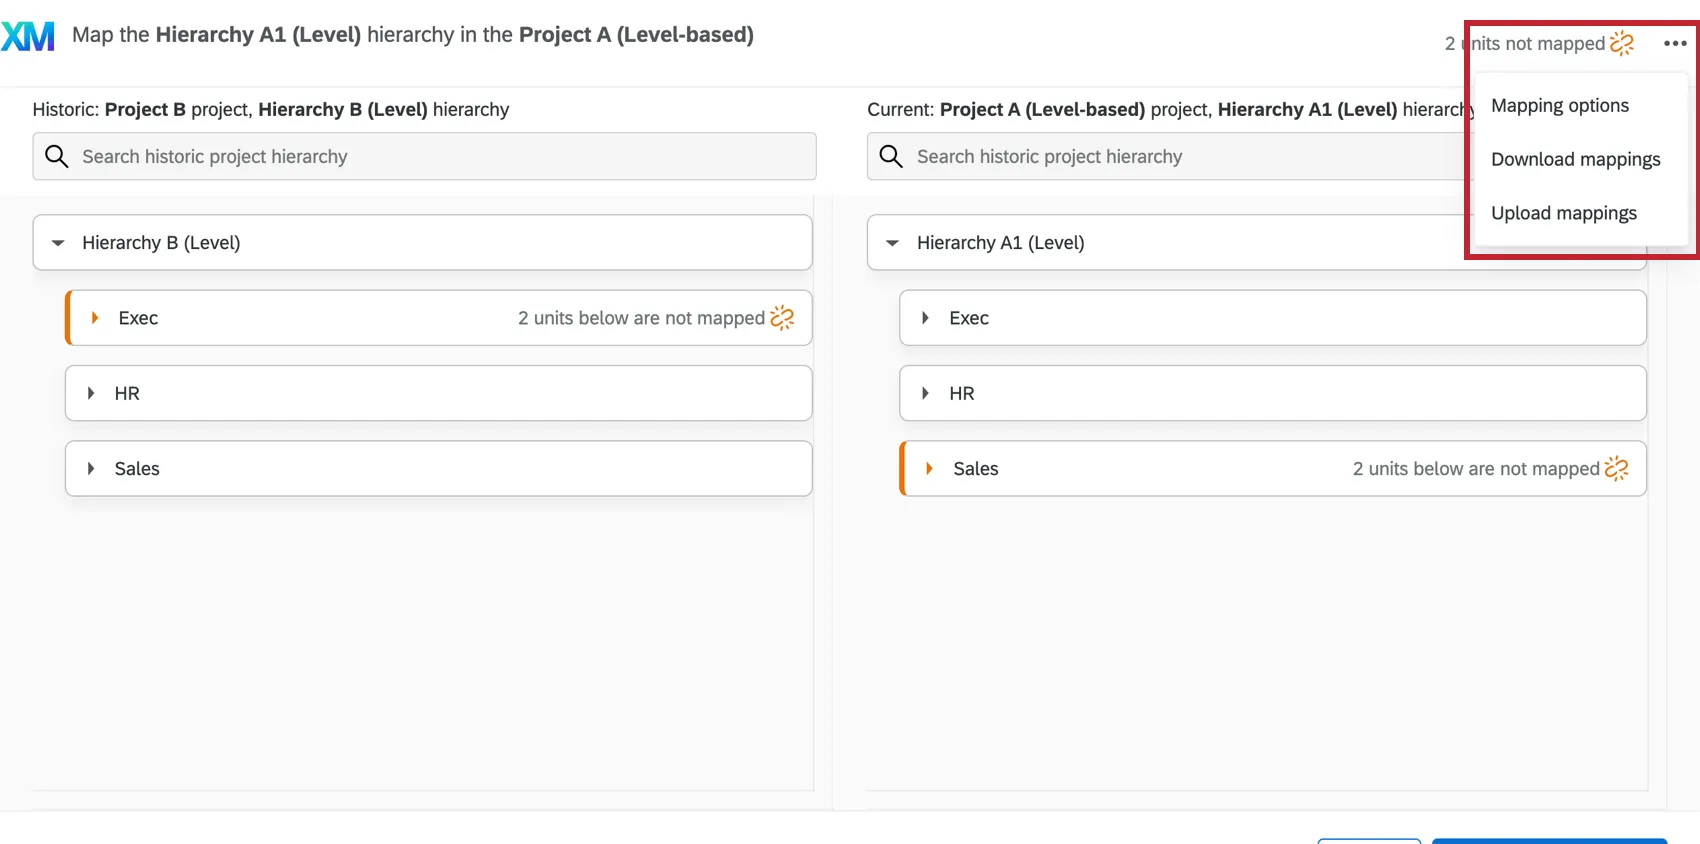
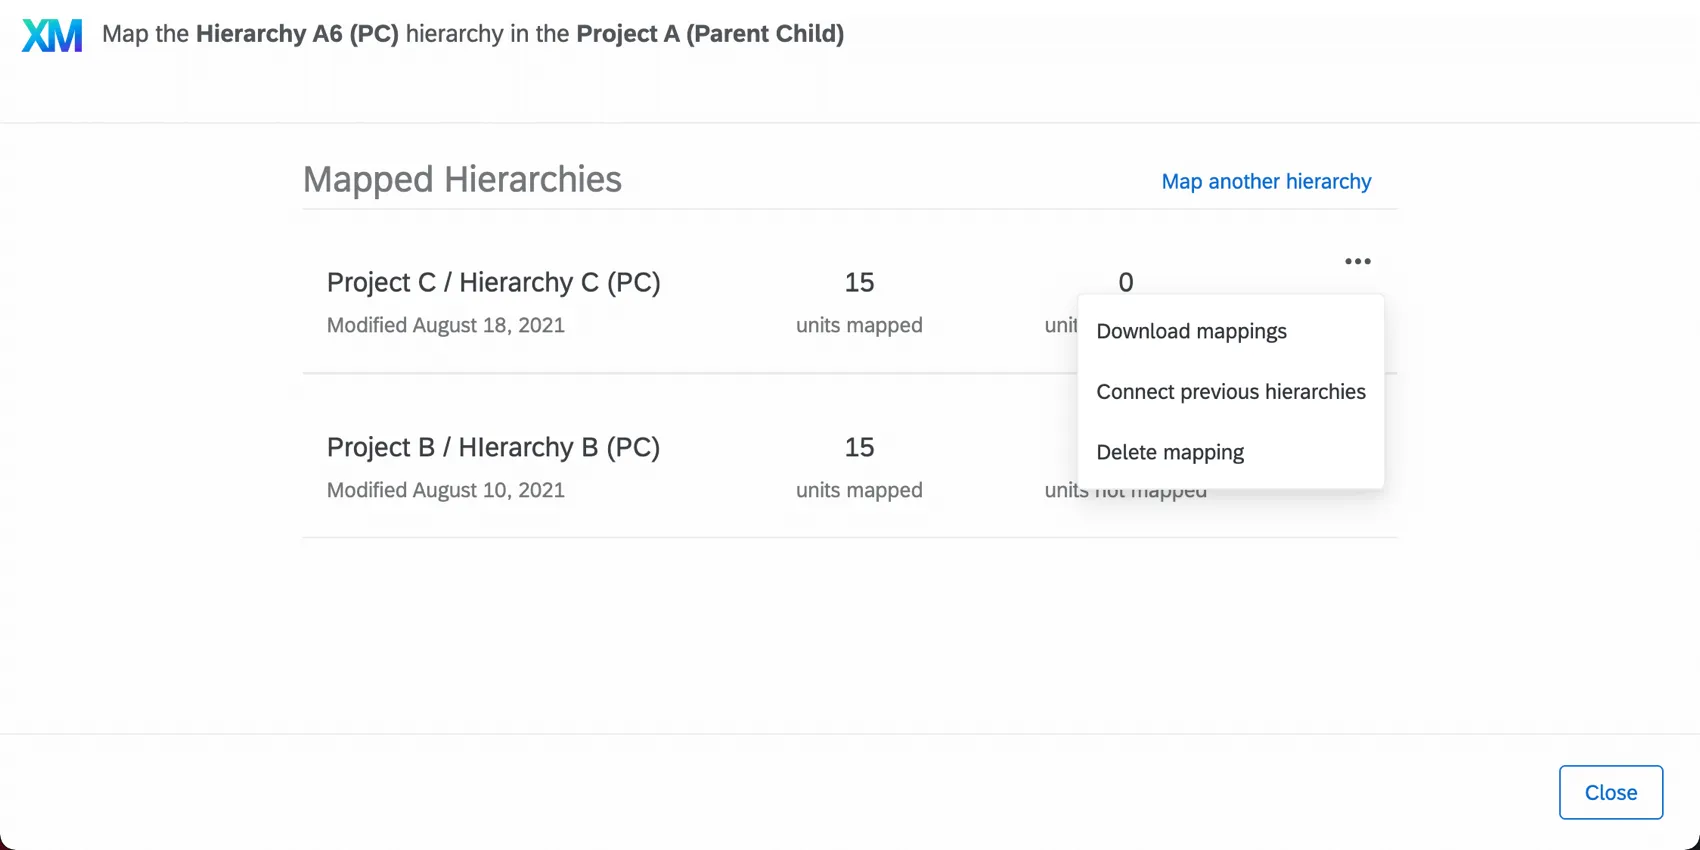
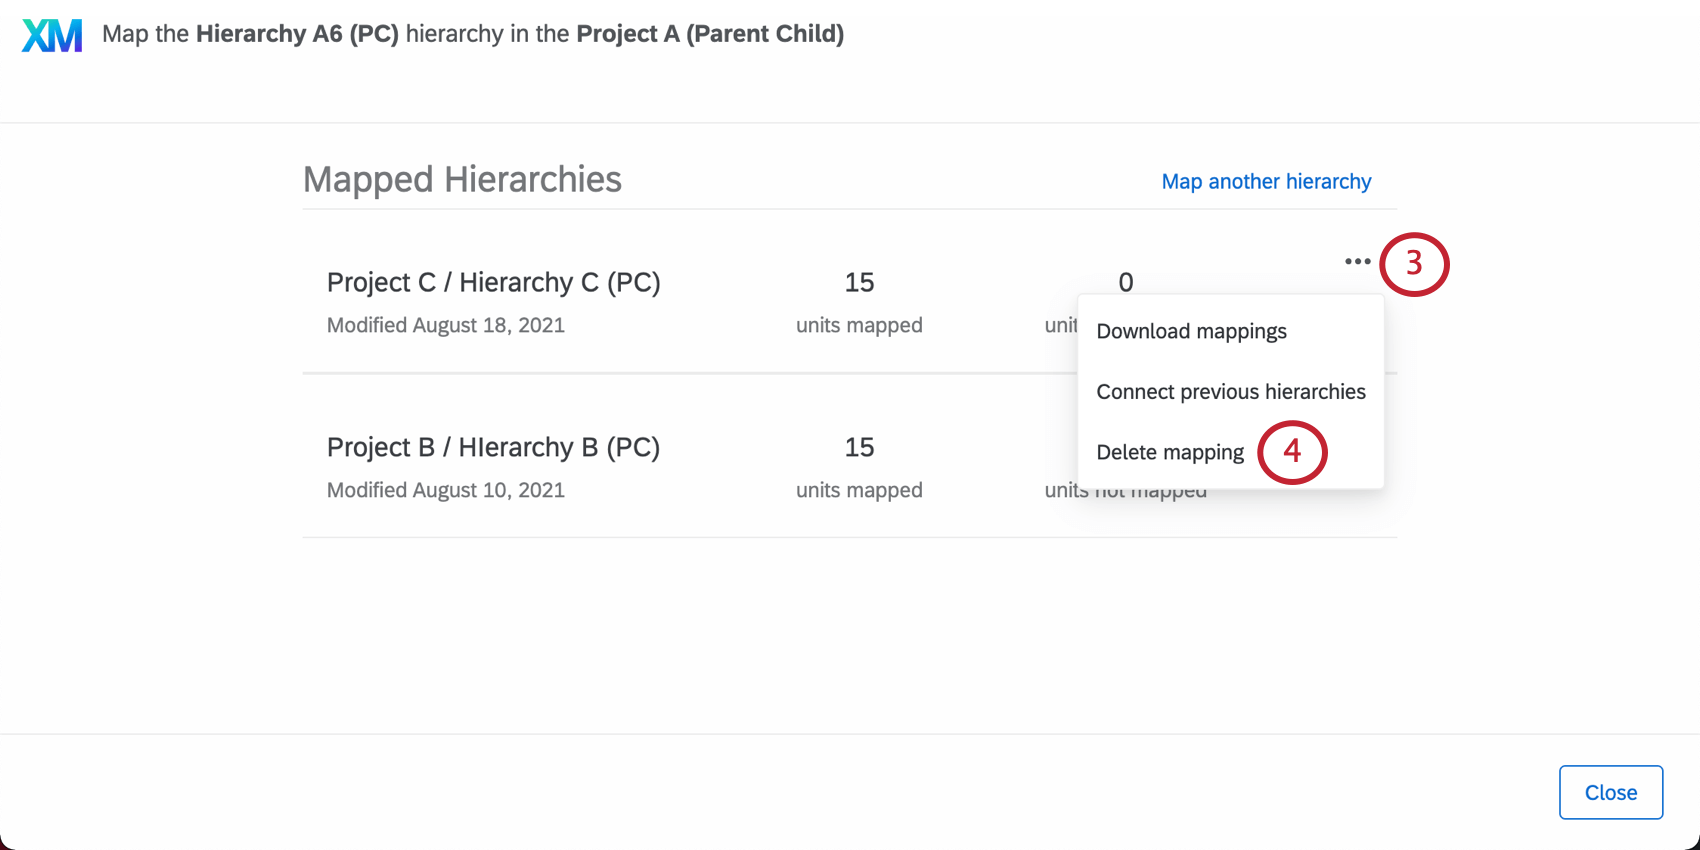
When mapping your hierarchies, you have several other options to explore in the upper-right, including the ability to download your mappings and upload them again.
Qtip: None of these options are available until you specify which historical hierarchy you want to map your current hierarchy to.
Mapping Options
When you click Mapping Options, you are given two options for how your historical data will be presented in the dashboards:
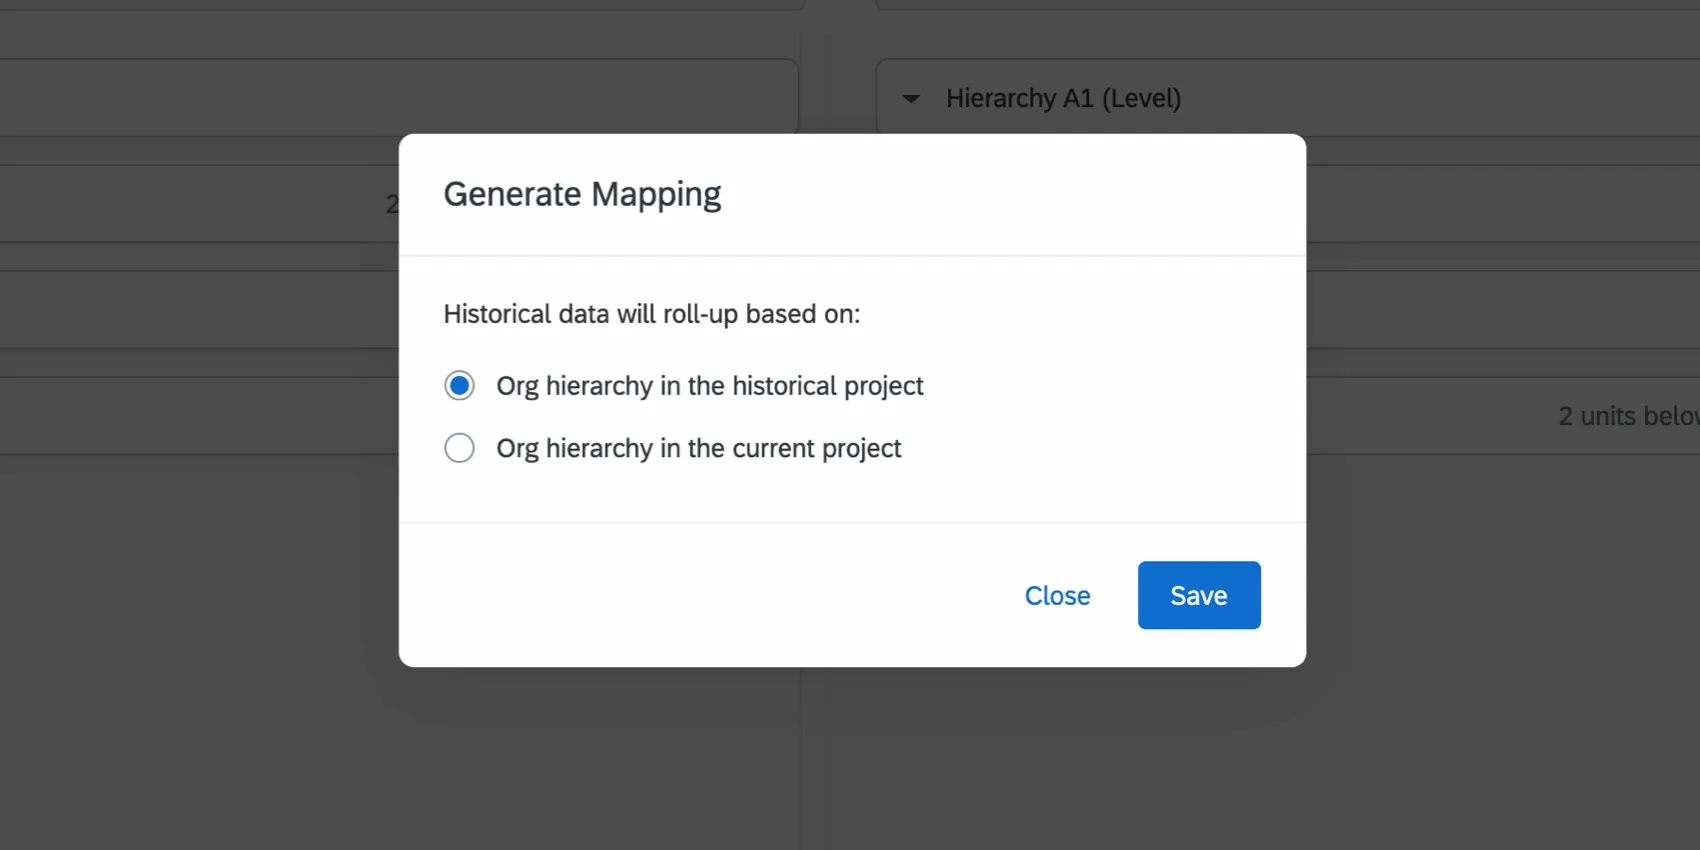
- Org hierarchy in the historical project: This option will make it so data shown in historical comparisons follows its hierarchy placement in the historical project. Another way of thinking about this is, “How does everything that rolled up to me this year compare to everything that rolled up to me last year?”
- Org hierarchy in the current project: This option will make it so that data shown in historical comparisons follow its hierarchy placement in the current project. Another way of thinking about this is, “Of those units who rolled up to me last year and who still roll up to me, how do the scores compare?”
Example: Let’s say that in your historical project, you have three units: A, B, and C. In the historical hierarchy, B and C both report to A. In your current hierarchy, B still reports to A, but C now reports to a new unit, D. If Org Hierarchy in the historical project is selected, C’s data will be included in the comparisons for unit A and excluded from the comparison for unit D. If Org Hierarchy in the current project is used, C’s data will be included from the comparison for unit D and excluded from the comparison for unit A.
Generally, selecting Org Hierarchy in the historical project will keep your historical scores the same as they were in the historical project because units will roll up to the same place they were in the historical org hierarchy. Any units that have moved to a new location in the hierarchy will not have their historical results roll up to their current hierarchy location.
Selecting Org Hierarchy in the current project will ensure the historical results of units that have moved in the hierarchy roll up to their new location in the hierarchy. This will change your historical scores for parts of the hierarchy where units moved because those units’ historical results will no longer roll up to where they were previously located.
Attention: If you later change your selection for this option, then your hierarchy mappings will be regenerated and any manual mappings will be lost.
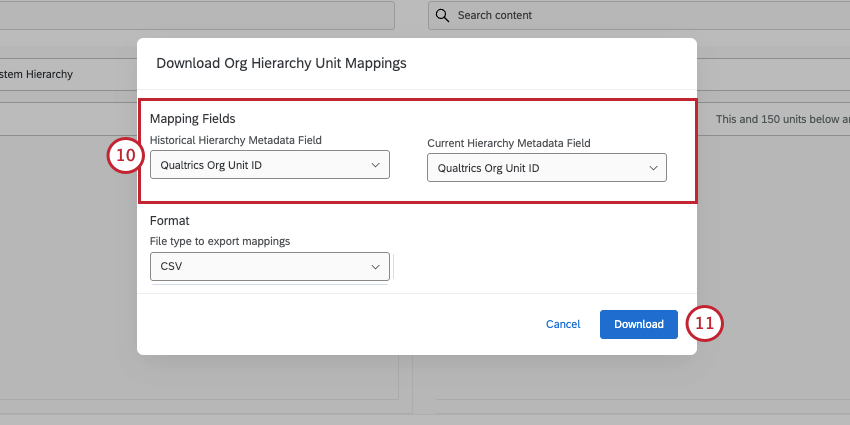
Download Mappings
When you select Download mappings, you can download a CSV of your mapped units. Direct reports and managers are not included in this file.
Choose the metadata fields you want to export from the historical hierarchy and the current hierarchy. Your options include:
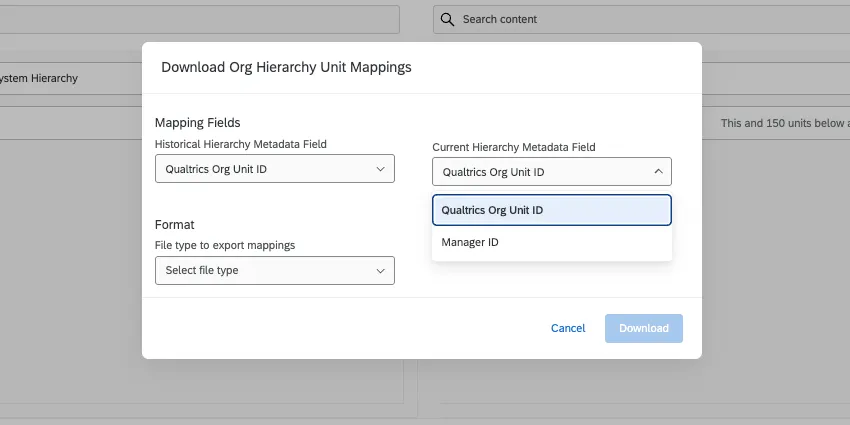
- Qualtrics Org Unit ID: Represent each unit with the internal IDs that Qualtrics assigns to units. This is an internally generated ID, different from any org unit metadata you might create and assign yourself. This format is helpful if you’d like to upload a mapping (see content below).
- Hierarchy Metadata: Download metadata that was important to building the hierarchy. For example, Parent-Child hierarchies let you download the Manager IDs and Skeleton hierarchies let you download the Parent Org Unit IDs. Level-Based hierarchies do not offer any additional metadata columns in this export.
For the format of the file, you can choose TSV or CSV.
Every file comes with a column for Left Unit Name, containing the historical hierarchy’s units’ names, and a Right Unit Name, containing the current hierarchy’s units’ names. This makes the file a good reference if you need to use the Qualtrics internal IDs elsewhere, such as when you upload mappings (see content below).
Qtip: You can also download mappings by opening the Map Org Hierarchy units menu and clicking the dropdown next to a specific hierarchy.
Upload Mapping
You have the opportunity to map your org hierarchy units in a CSV file and then upload this file into Qualtrics.
Qtip: Your mapping upload file should only contain units that you can map across projects. Any unmapped units should be excluded from the file. If the file has a row that does not have info in both columns, you will see an error. Each row needs to have a historical value and a current value in order to work.
Attention: If you want to update your mapping with another upload, you must include all existing hierarchy mapping in your upload. If you are missing information that is currently mapped in your upload, then those hierarchy mappings will be deleted upon uploading your file. To obtain your current mapping, download your mapping.
Qtip: If your hierarchy has org unit IDs, we highly recommend using these. You can also use manager IDs for parent-child hierarchies.
- Map columns on the left to columns on the right.
- Delete the unit name columns. You should only have 2 columns in your file, one for each hierarchy’s unit IDs.
- Make sure to save CSVs to UTF-8 encoding.
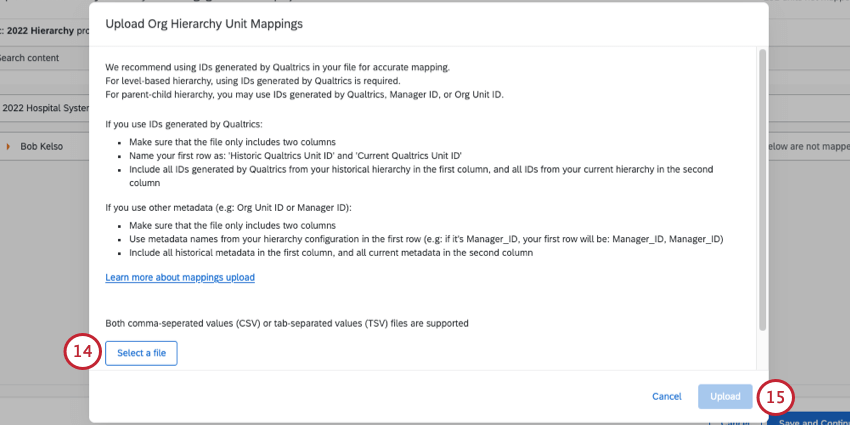
Qtip: If you’re running into issues uploading your file, make sure your file only has 2 columns, one for historical unit IDs, and the other for current unit IDs. You can find additional troubleshooting tips on the CSV/TSV Upload Issues page.
Clearing Org Hierarchy Mapping & Restoring Auto-Mapping
If needed, it’s possible to clear your org hierarchy mapping and restore the auto-mapping functionality to your project. You can clear your org hierarchy if you made a mistake when mapping, or if you want to restart mapping using the auto-mapping feature.
Qtip: You cannot delete a reference hierarchy until you delete the other connected mappings. For example, let’s say your reference is hierarchy B, and it facilitated the mapping of C and D to your current A hierarchy. You have to delete A’s mappings to C and D before you can delete B.
Warning: Be careful of clearing your mappings if your hierarchies are currently being used in live dashboards. Breaking the connection between hierarchy mappings will change the data that’s being pulled into your dashboards!
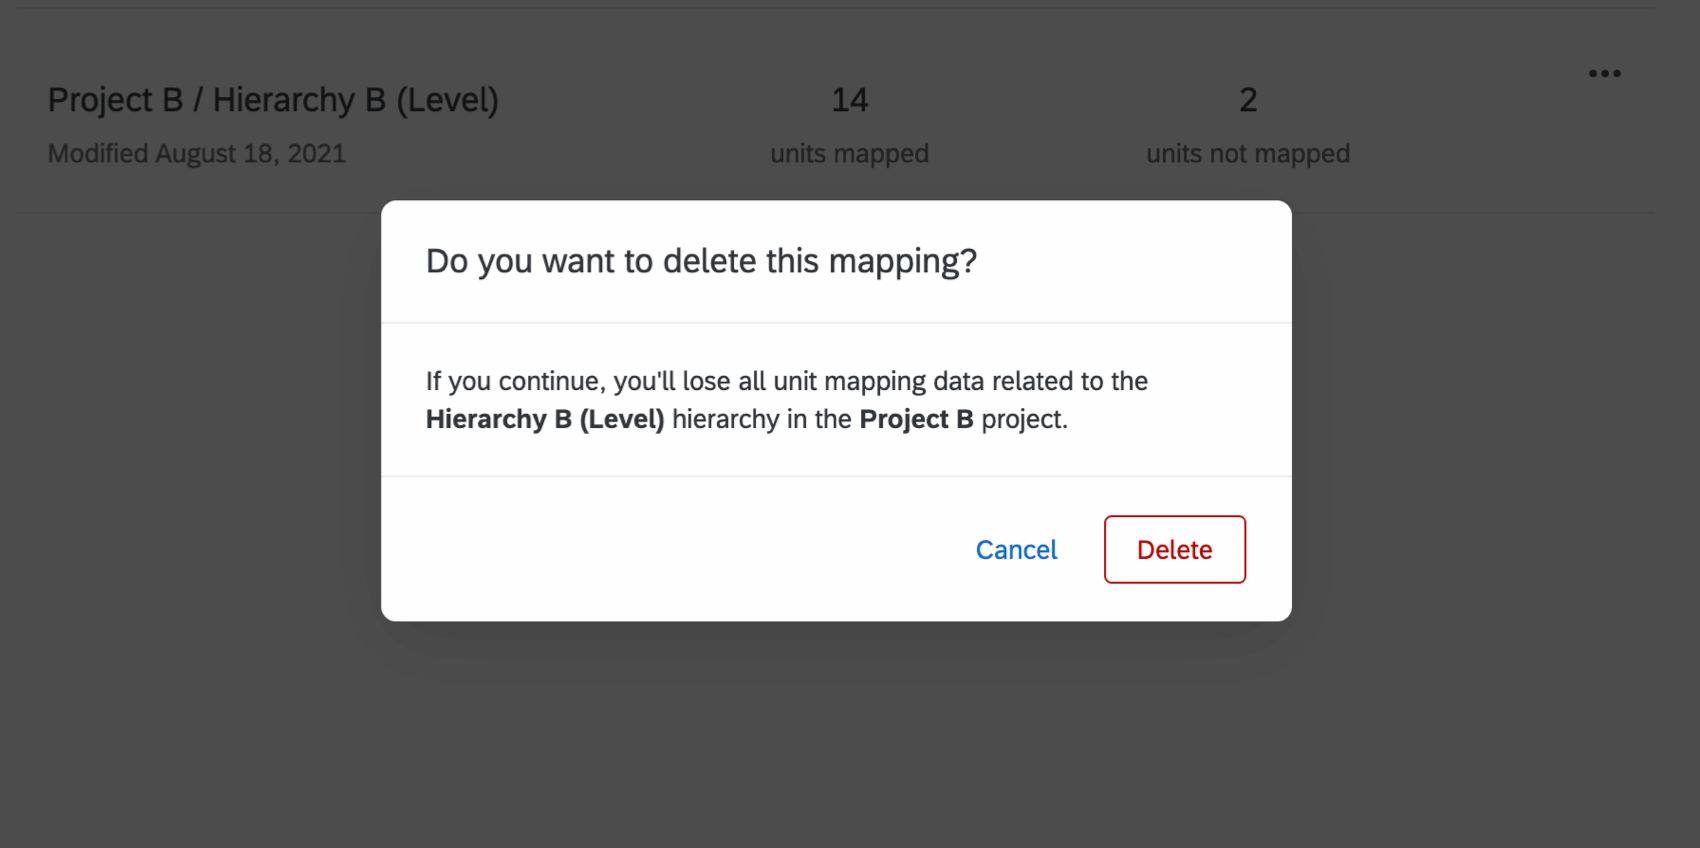
This method completely clears the mapping between two hierarchies. After clearing hierarchy mapping, you will have the option to use the auto-mapping feature when you reopen the hierarchy mapping window.
FAQs
I've already uploaded my participant file and collected data, but I need to make a change to my hierarchy. How do I do this?
I've already uploaded my participant file and collected data, but I need to make a change to my hierarchy. How do I do this?
How do I get historical data into my EX dashboard?
How do I get historical data into my EX dashboard?
Can I automate changes to my Engagement org hierarchy?
Can I automate changes to my Engagement org hierarchy?
To learn more about automating employee directory changes, see Load Users into EX Directory.
That's great! Thank you for your feedback!
Thank you for your feedback!