-

Qualtrics Platform -

Customer Journey Optimizer -

XM Discover -

Qualtrics Social Connect
Employee Directory Tools (EX)
About Employee Directory Tools
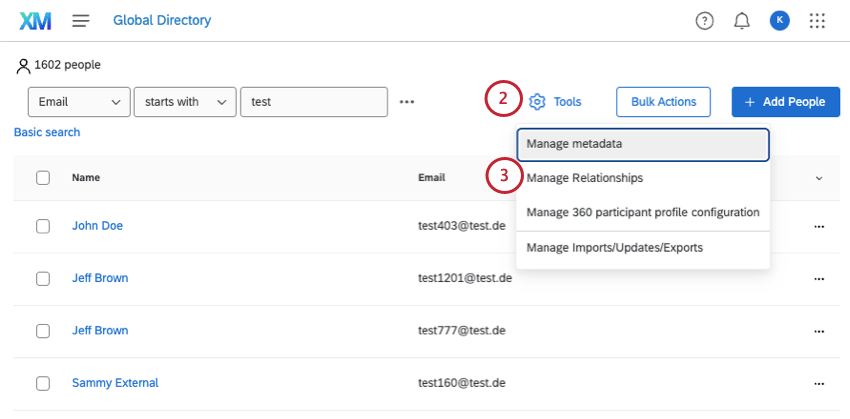
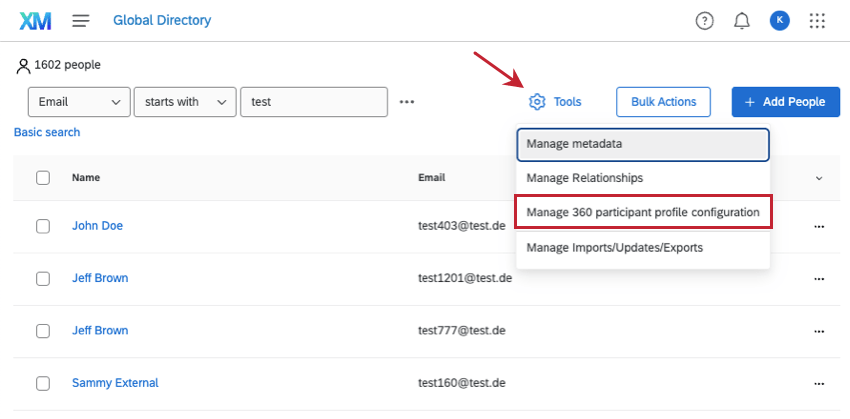
Once you navigate to your Employee Directory within the Directories page, you’ll have access to some tools that help you manage the people in your directory. These can be found under Tools and Bulk Actions.
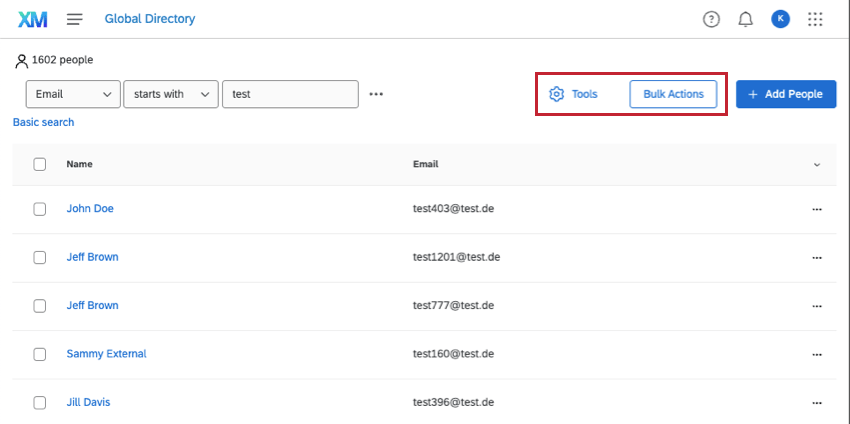
Manage Metadata
You can see all the metadata for your Employee Experience projects using the Manage Metadata tool. Use this tool to see the values used for a metadata field, or to permanently delete a field from all of the people in your employee directory.
Edits made here won’t affect participant metadata in projects, so you don’t have to worry about data being removed from responses you’ve collected.
- Navigate to the Employee Directory on the Directories page.
- Click Tools on the top-right.
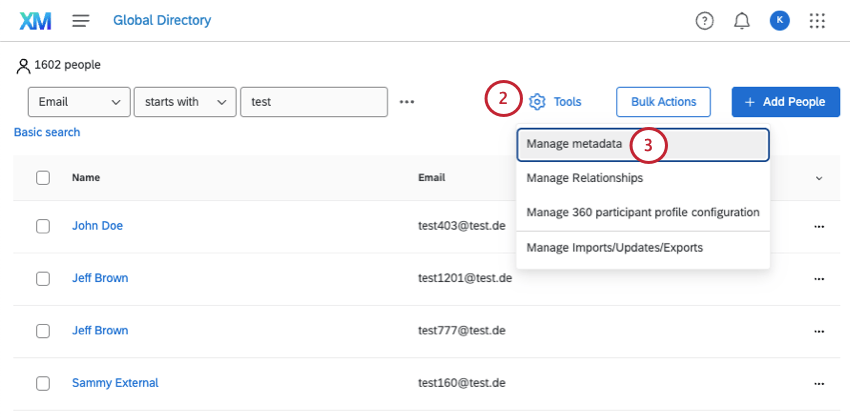
- Select Manage Metadata.
- Use the search to find fields.
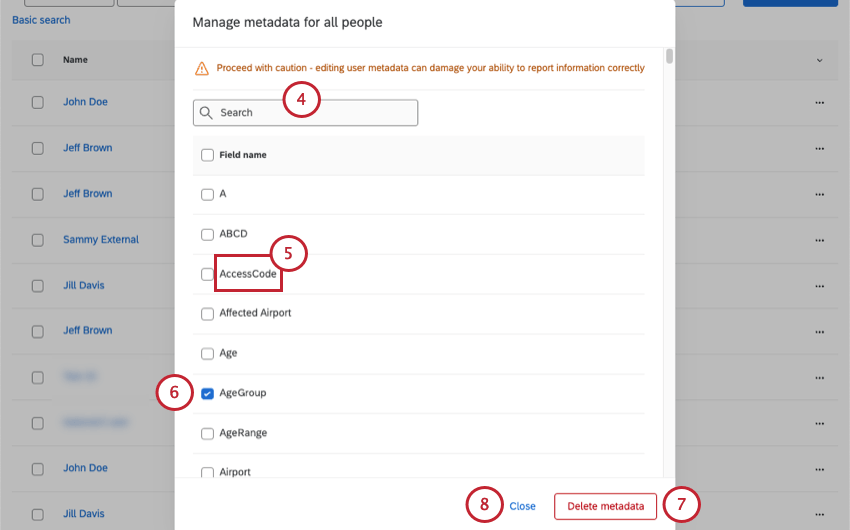
- Click the name of a metadata field to see its values.
- Select the box next to metadata fields to select them for deletion.
- Click Delete metadata to permanently delete selected metadata.
- To leave the window, click Close.
Manage Relationships
Manage Relationships is very useful to 360; it is not used in any other part of the Qualtrics platform. With this tool, you can manage all the custom relationships ever created in your brand’s 360 surveys.
Adding and Removing Relationships
- Navigate to the Employee Directory on the Directories page.
- Click Tools on the top-right.
- Select Manage Relationships.
- At the top, you will see Built-in Relationships. Do not delete these relationships.
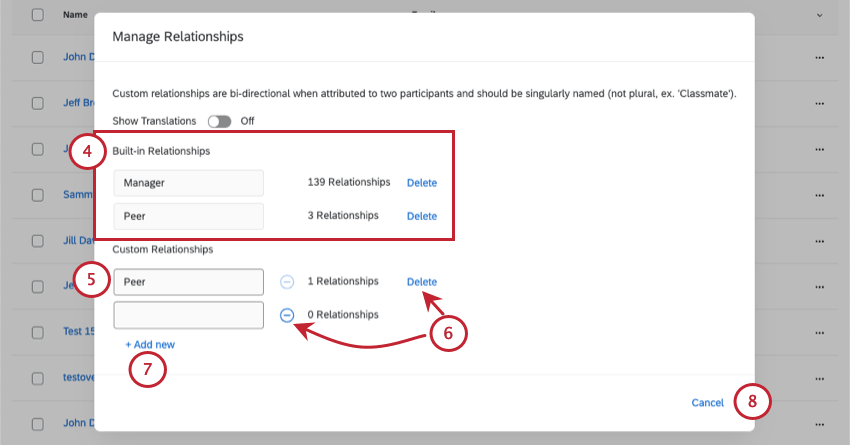
- To rename a custom relationship, type the new name in the box.
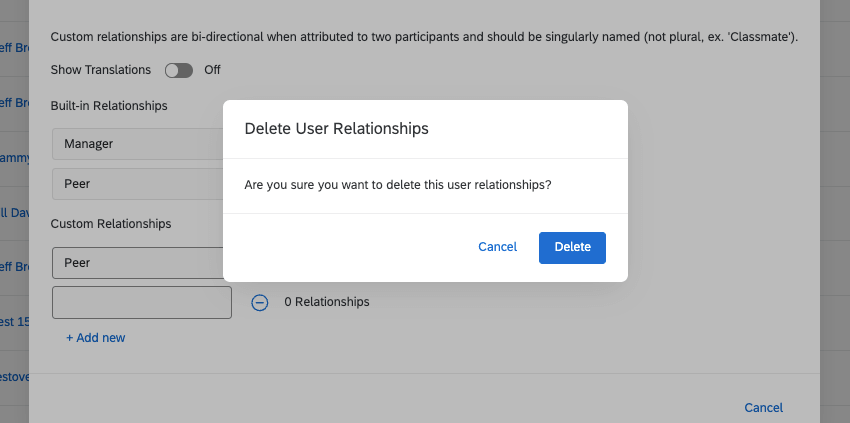
- There are two different ways to delete custom relationships, depending on whether the relationship has already been used in a 360 project.
- If the relationship has not been used, then click the minus (–) sign to delete the field. This action happens instantly and is irreversible.
- If the relationship has been used, then click Delete next to the field. You will be asked to confirm to delete the relationship. This will remove the relationship from any projects it is being used in. This action is irreversible.
- To create a new relationship, click Add new at the bottom of the list of custom relationships.
- When finished with your edits, click Cancel.
Translating Relationships
- Navigate to the Employee Directory on the Directories page.
- Click Tools on the top-right.
- Select Manage Relationships.
- Switch Show Translations to On.
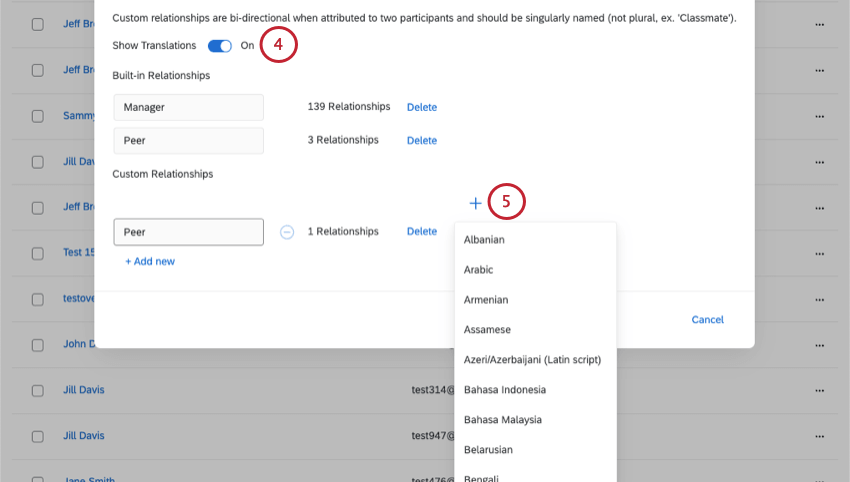
- Click the plus (+) sign and select the language you’d like to add.
Qtip: If your survey has a custom language, then select Add other language in the language menu and write the language’s display name.
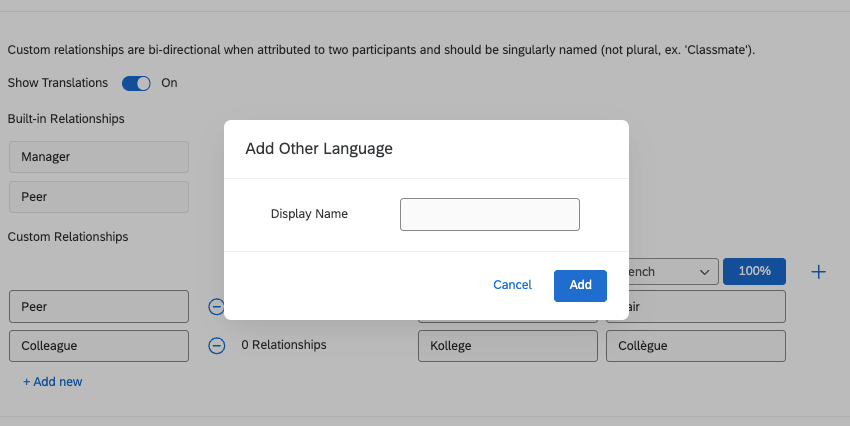
- Type your translations into the boxes.
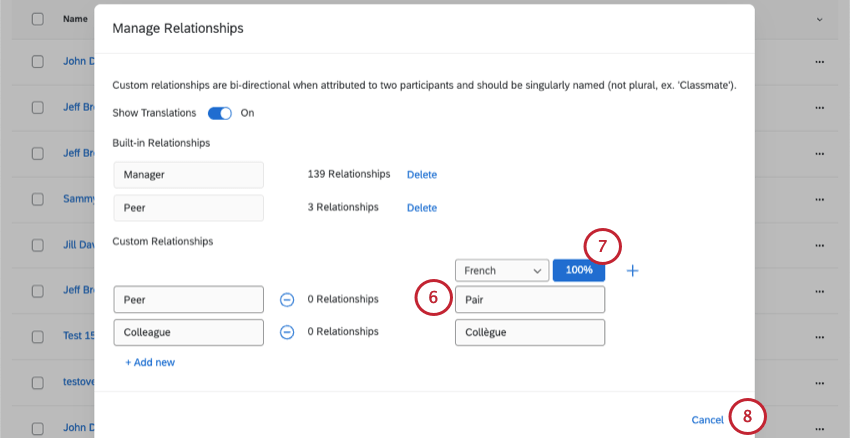
- If you’d like to have your relationships translated automatically, click the percentage sign.
Attention: The Qualtrics auto-translate feature is completed by Google Translate. The text of relationships is sent to Google Translate and will be returned in the language you select. Please be aware that your text may remain on Google servers. The Qualtrics auto-translate feature sends only your relationship text. Respondent data is not sent and remains secure at Qualtrics.
- When you’re finished, click Cancel.
Translation Options
If you click on the header of any of your translation columns, you will have several options for managing your translations.
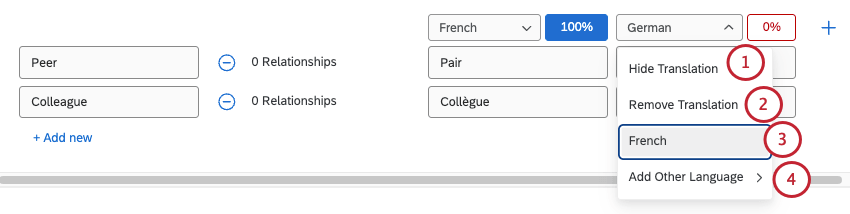
- Hide Translation: Hide the translation. This can be helpful if you have many translations and need to create more room on the page.
- Remove Translation: Delete the translation altogether.
- Select which language displays in the column.
- Add other language: Add another language to your list of custom relationship translations. This is the same as clicking the plus (+) sign to add a new translation.
Manage 360 Participant Profile Configuration
Under Tools, Manage 360 participant profile configuration gives you a couple options for customizing the 360 participant portal experience:
- Enable different language options for the 360 portal.
- Customize the personal data fields participants can edit, or fields required for login.
360 portal language options
- Go to the Language section.

- Select Allow 360 project participants to change their Participant Portal language.
- To change the available languages, select Edit.
Qtip: This will open a new modal where you can select all the languages you want to offer in the portal.
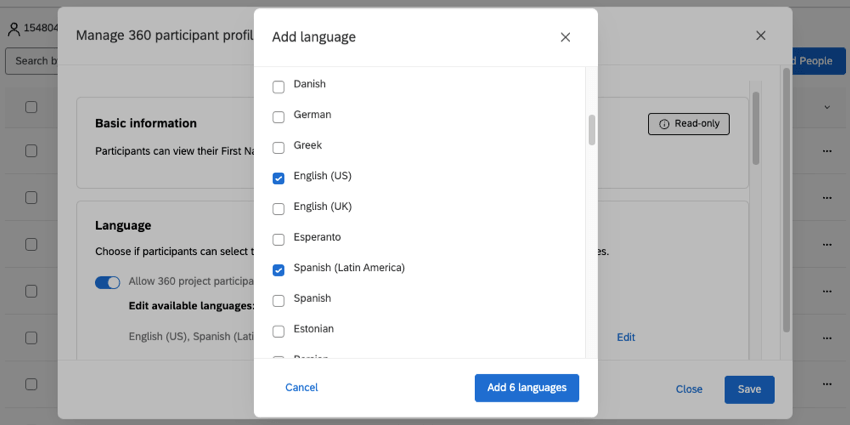
- You can also enable Require participants to select preferred language.
- When you’re finished, click Save.
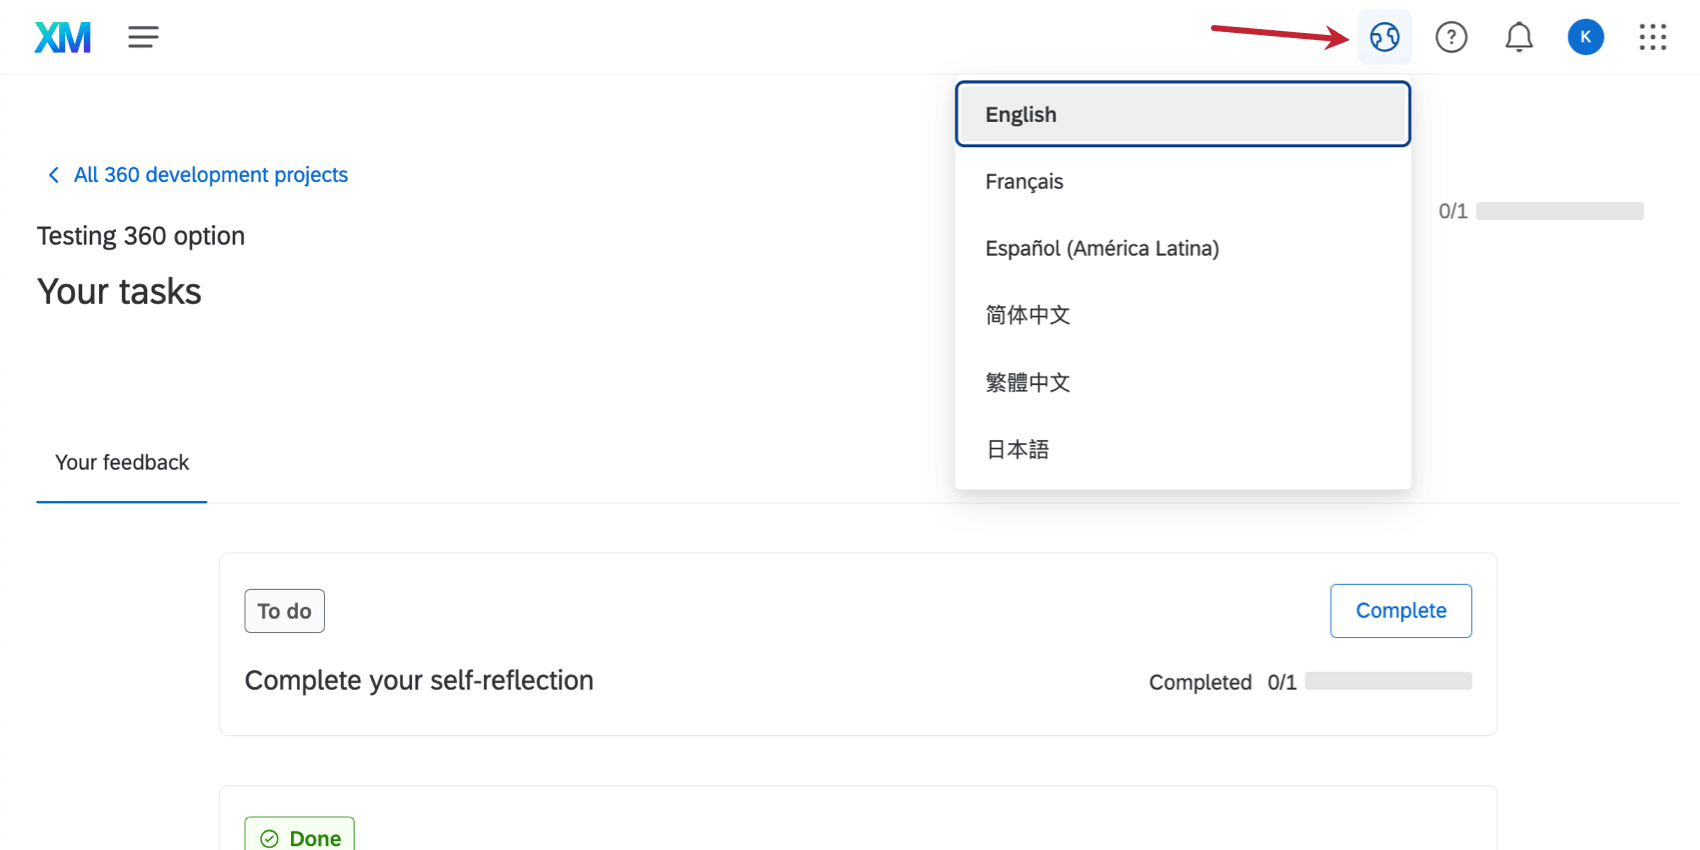
Participants will automatically see the portal in the language specified by their Language metadata field, if it is available. Users will be able to switch between any available languages by clicking the globe icon (“Language Switcher”) at the top of the portal.
Additional metadata
In the Additional metadata section, you can define metadata and values participants can adjust when they log into their portal. You can also require certain metadata when they login.
- Click Add metadata to select a field.
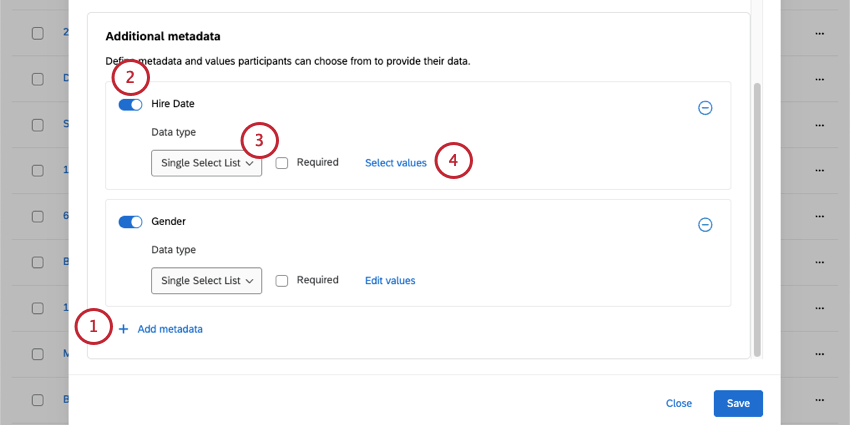
- Enable the field to let participants edit it.
- Change the data type. This can be either Text Entry, where the user can type out the fields, or a select box, where they have a finite number of choices.
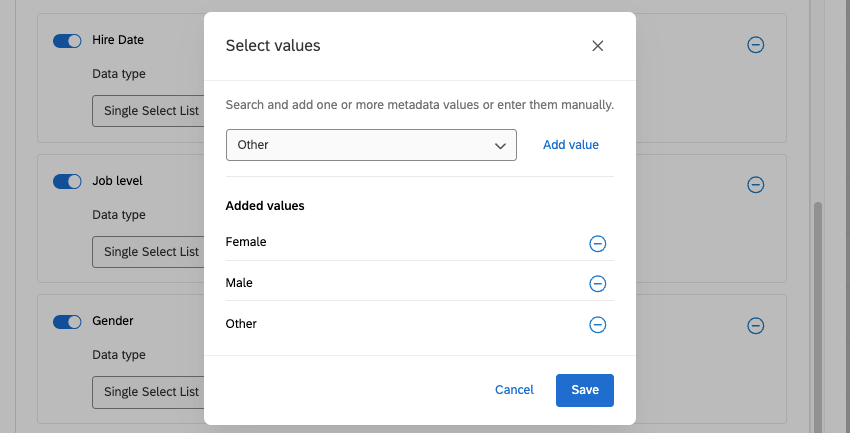
- If you choose Single select list as your data type, click Select values to set up the list participants choose from. You can either select existing values, or you can type a new value and hit Enter on your keyboard. Make sure you save changes.
- To require this information when the participant logs into the platform, select Required.
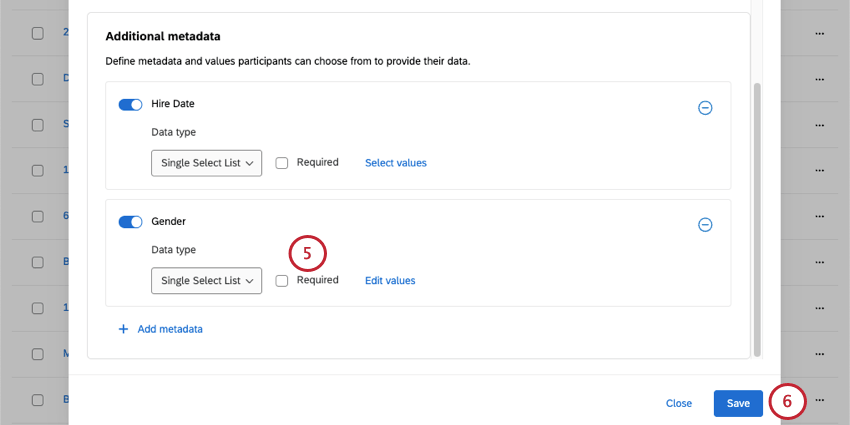
- When finished, click Save.
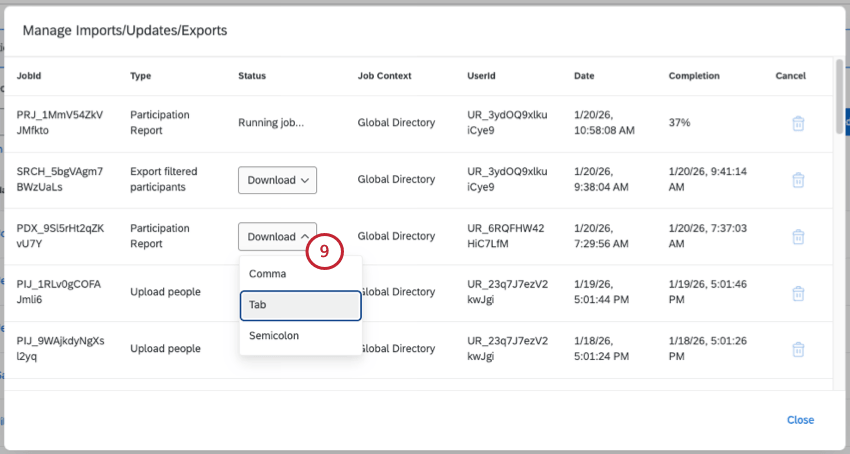
Manage Previous Imports/Updates/Exports
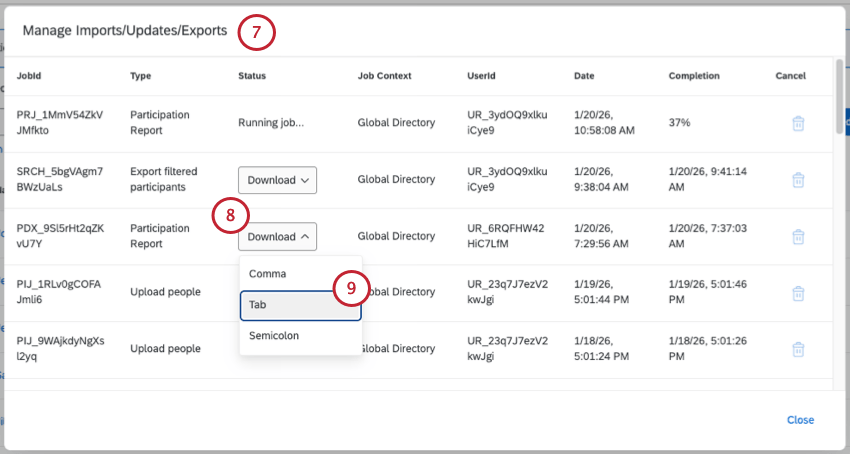
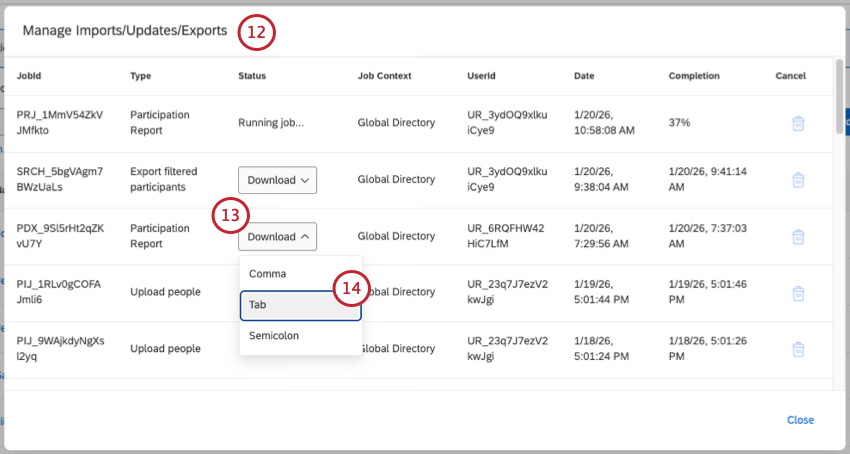
The Manage Imports/Updates/Exports option allows you to review when participants were imported to the directory, exported from the directory, deleted from the directory, or had their unique identifiers updated.
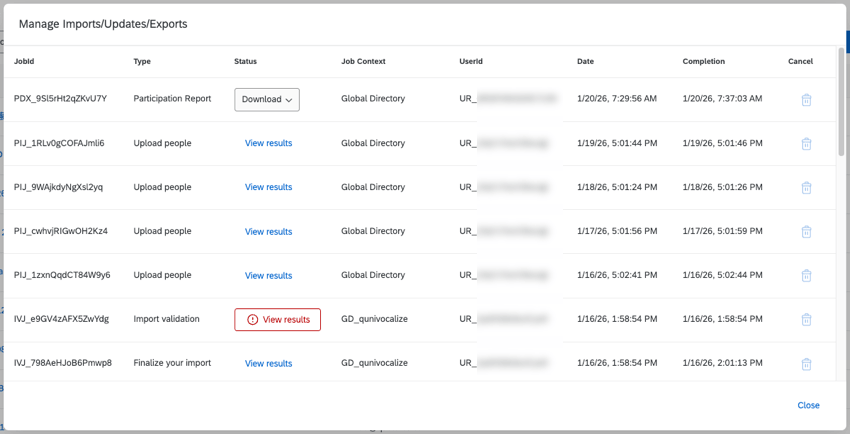
The following information is available for each job:
- Job Id: The JobId is an internal ID for this specific job run. This ID can be useful to provide to Qualtrics Support if you need help identifying why a job failed.
- Type: The type of job (such as uploading people to the directory, or exporting people from the directory).
- Status: Allows you to view the results of the job, or download the export file (if the job is an export job). See below for more information about using the data in this column.
- Job Context: Describes where the job took place, either in your directory or in a specific project.
- User Id: The UserId is the Qualtrics user ID of the user who requested the job.
- Date: The date and time that the job was requested.
- Completion: The date and time that the job completed. If the job is in progress, this column will show the job’s completion status as a percentage.
- Cancel: If your job is running or queued to run, you can click the trash icon in this column to cancel the job.
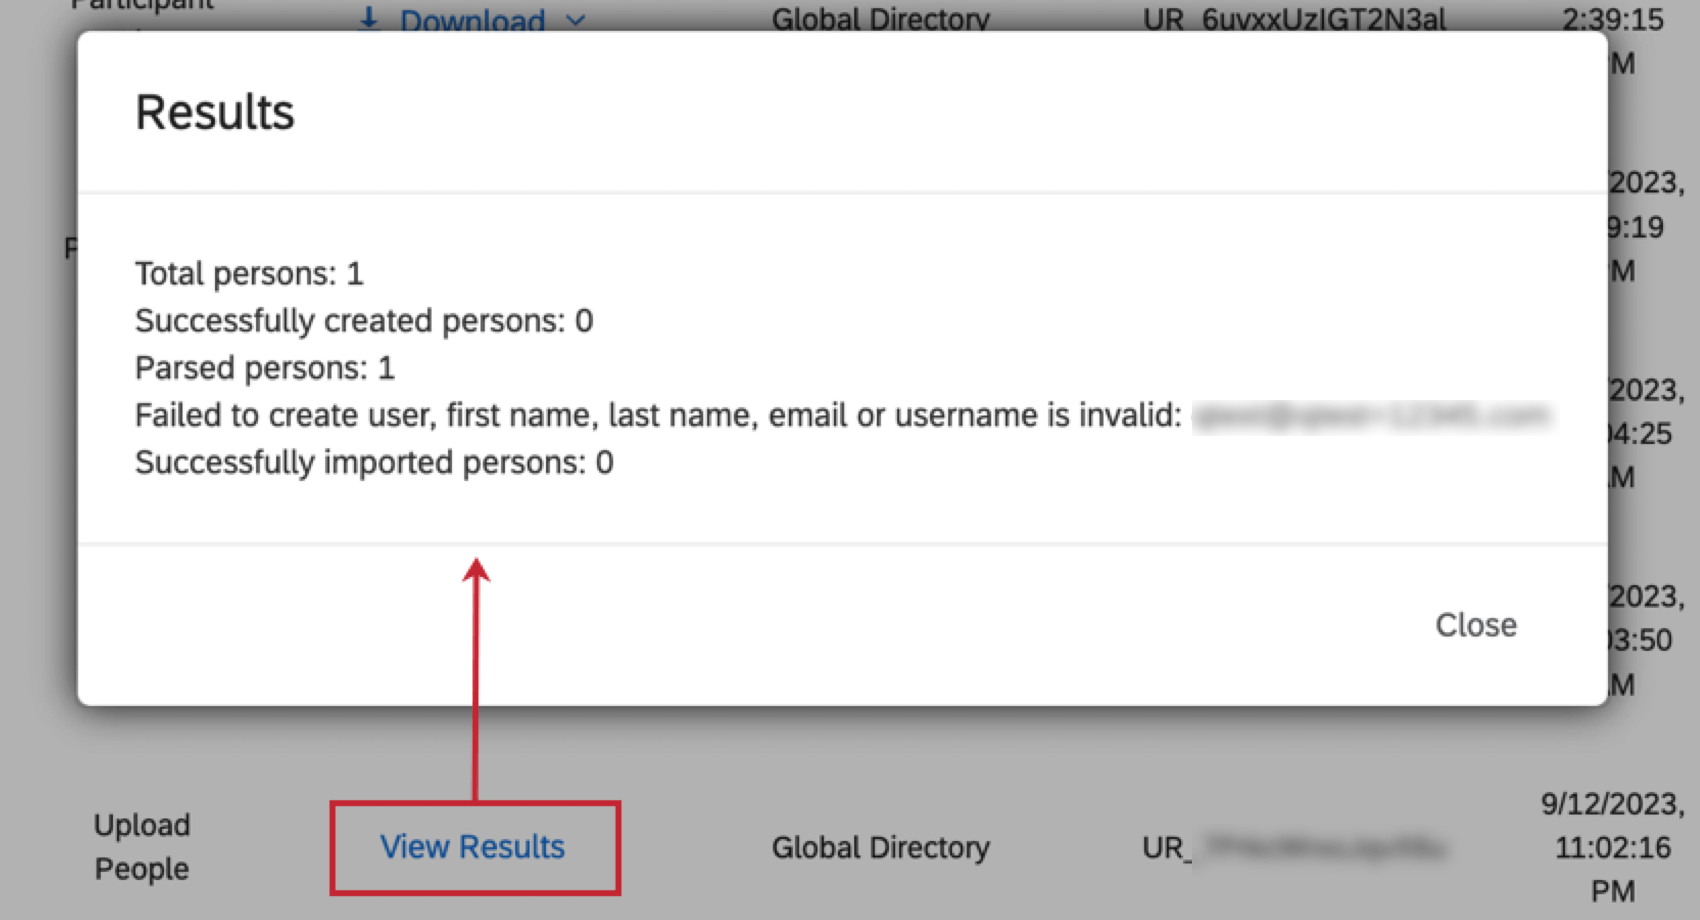
If you click View Results underneath the Status column, you will receive a report of what this upload accomplished. If there were any errors that prevented the upload, they will be mentioned here.
For any participant export jobs, you can click Download to download the exported participant list to your computer. Files can be downloaded in comma, tab, or semicolon separated formats.
Data Access Tagging
The Data Access Tagging tool determines which fields are assigned a data access tag, which prevents people who are not assigned to the data access role from viewing that data. For more information, see Data Access Settings.
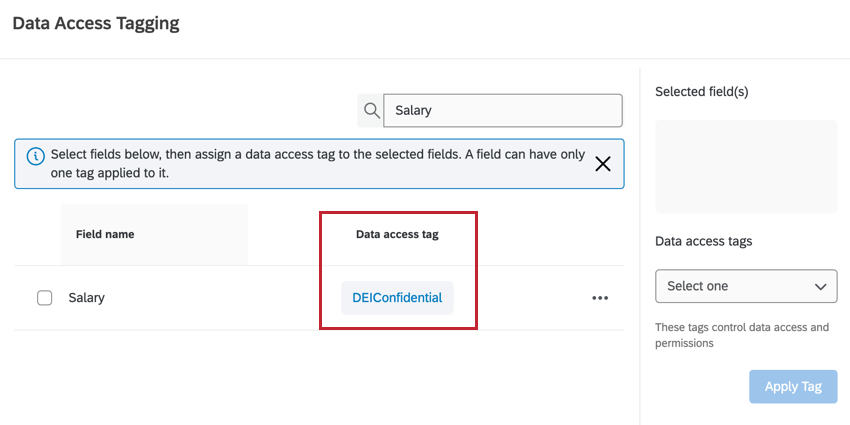
- Click the checkbox to the left of a field name to select it. You can select multiple fields, if you’d like.
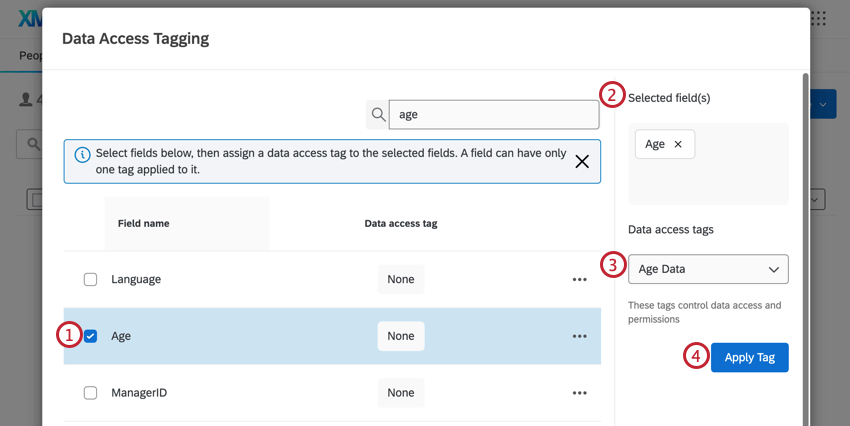
- View your fields in the Selected field(s) box. If you need to delete a field, click the X.
- Select a Data access tag from the dropdown.
- Click Apply Tag.
Update Unique Identifiers
The Update Unique Identifiers option allows you to update the unique identifiers for people in your employee directory by uploading a file containing their old unique identifier and their new unique identifier.
See this support page for step by step instructions on how to update unique identifiers.
Delete People From Directory
Delete People from Directory allows you to remove people from your employee directory in bulk. This feature works by uploading a CSV file containing the unique identifiers of every person you’d like to remove.
- Navigate to the Employee Directory on the Directories page.
- Click Bulk Actions.
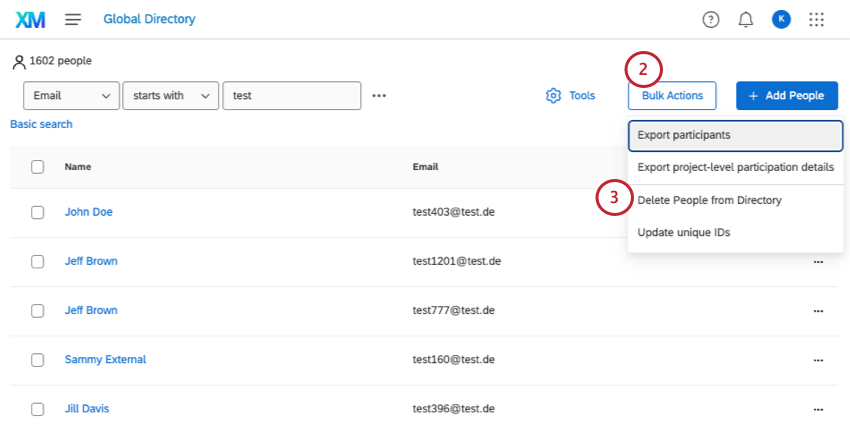 Attention: Make sure you do not have any people selected when you click Bulk Actions. If you select people, you will see a different deletion option.
 - Select Delete People from Directory.
- Click Example CSV to download a CSV file that contains the correct formatting.
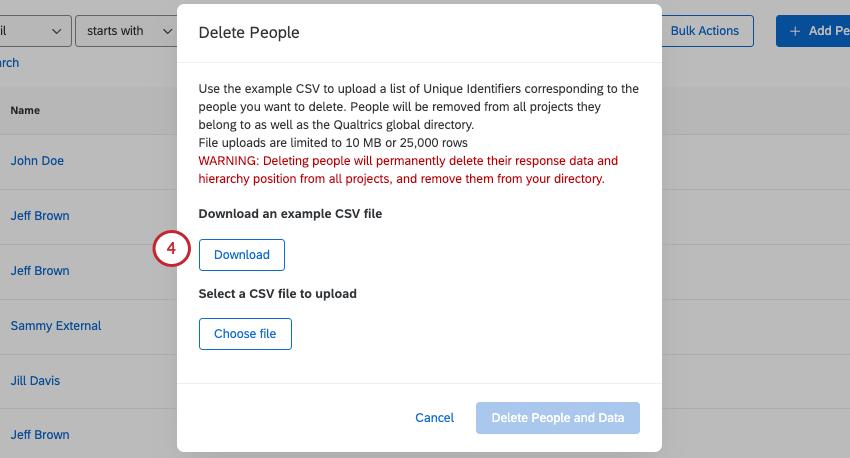
- Open the example file in a spreadsheet editor on your computer.
- Add the unique identifiers of the people you want to delete in the Unique Identifier column.
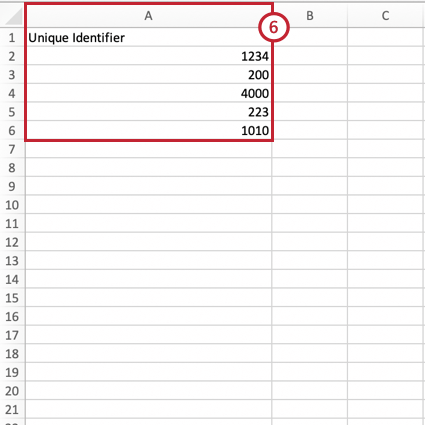
- Save your file as a CSV with UTF-8 encoding.
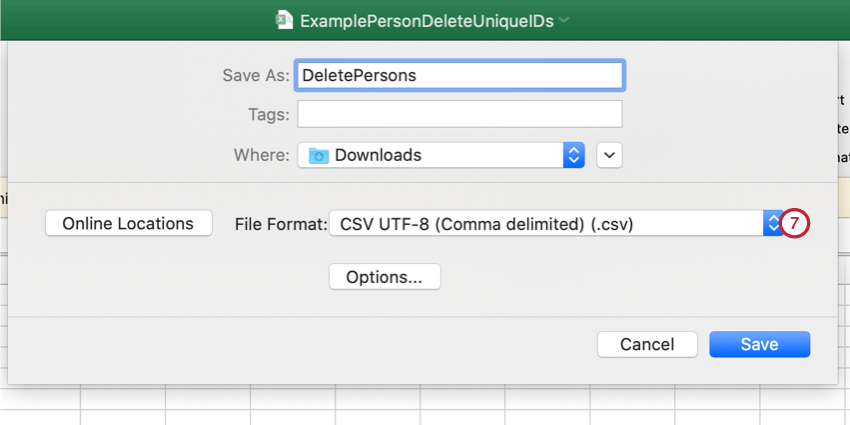
- Return to Qualtrics and click Choose file to upload your file.
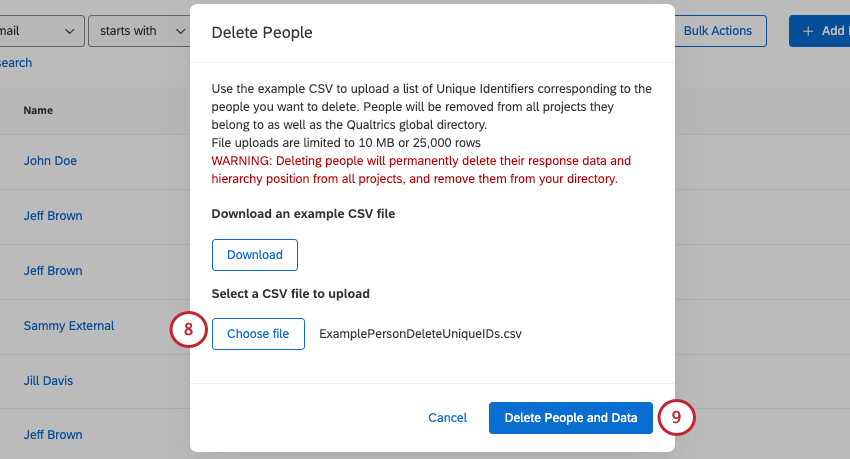
- When finished, click Delete People and Data.
Export Participants
You can export a CSV of your entire directory using the tools menu. This export will contain the columns for each member of the directory’s First Name, Last Name, Unique Identifier, User Name, User Type, Last Login, and all metadata columns ever added to a participant in the brand.
The User Type column shows a system-assigned ID (e.g., UT_XXXXX) for custom user types. For the default (and most common) user type Participant, the ID is UT_PARTICIPANT.
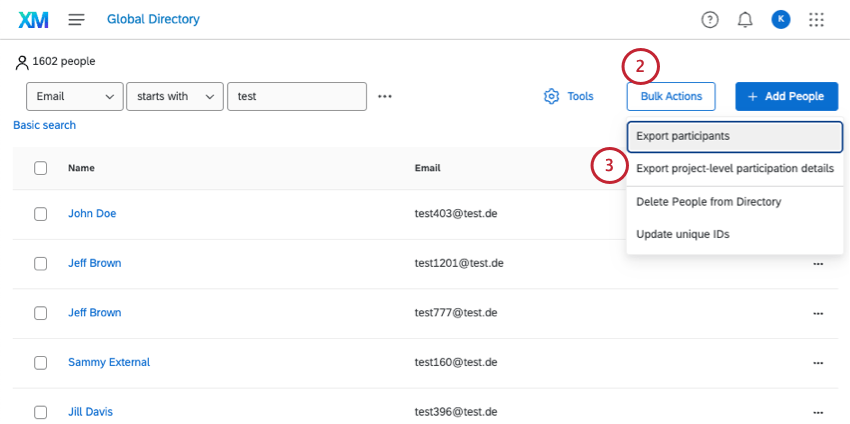
- Navigate to the Employee Directory on the Directories page.
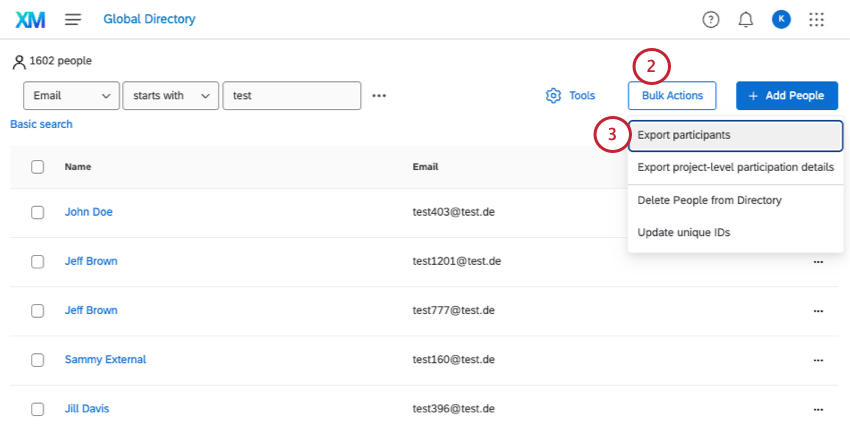
- Click Bulk Actions on the top-right.
 Attention: Do not select people before you click Bulk Actions. You cannot export selected participants; instead, see Export Filtered Participants.
 - Select Export Participants.
- Select Export all people in this directory.
Qtip: For more on the second option, see Export Filtered Participants.
- By default, the export only contains standard participant fields (name, email, and uniqueID) and metadata. If desired, you can enable the Additional available fields checkbox to include data about the projects that the participants are in.
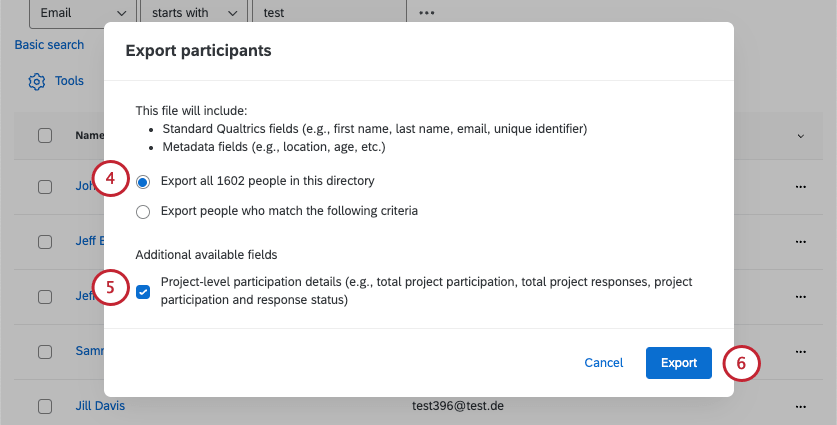
These additional fields include:- Total Project Participations: The number of projects they’ve been added to as a participant.
- Total Project Response: The number of EX responses submitted.
- Project Participation Detail: A list that contains each project they’re in, the ID of that project, and the number of responses submitted for that project.
- Click Export.
- Qualtrics will prepare the file. This can take a while depending on how many participants and fields are being exported. You can view the file by going to the Manage Previous Imports/Updates/Exports window.
- Click Download next to your export file.
Qtip: This file type is “Export Participants” if it excludes project data, and “Participation Report” if it includes project data.
- Select the file format for the export. You can choose CSV, TSV, or SSV.
Export Filtered Participants List
You can export a filtered list of the participants in your directory to a CSV file. This export file will contain the following participant data: First Name, Last Name, Unique Identifier, User Name, User Type, Last Login, and all metadata fields for the selected subset of participants.
The User Type column shows a system-assigned ID (e.g., UT_XXXXX) for custom user types. For the default (and most common) user type Participant, the ID is UT_PARTICIPANT.
- Navigate to the Employee Directory on the Directories page.
- Click Bulk Actions.
- Select Export Participants.
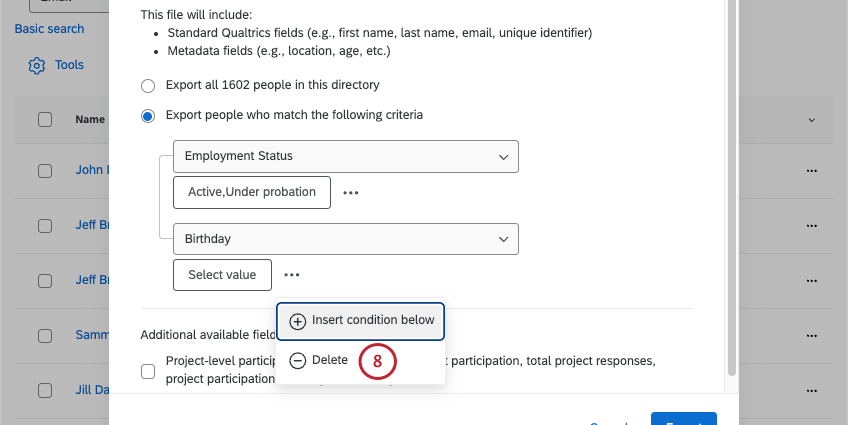
- Click Export people who match the following criteria.
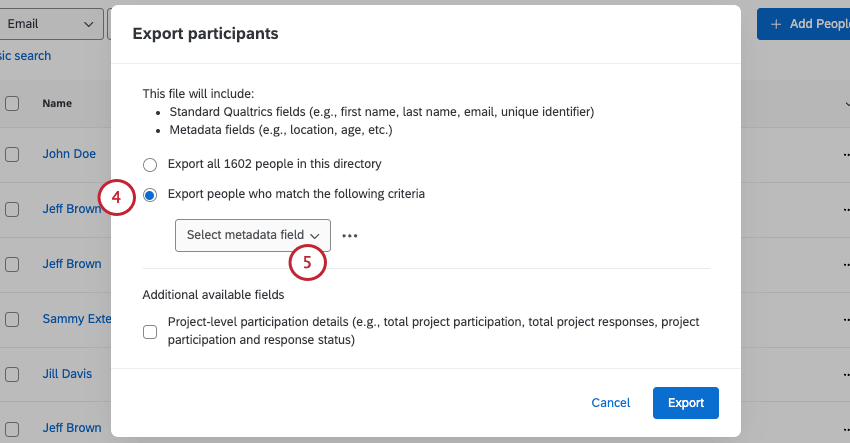
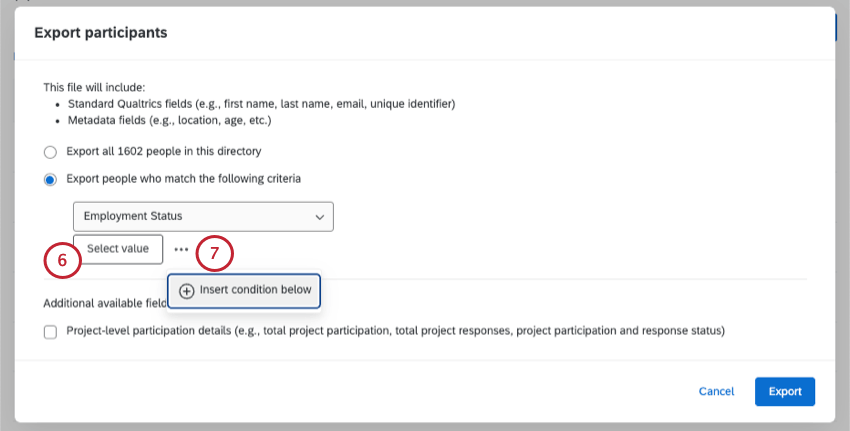
- Use the Select Metadata Field dropdown to choose a metadata field for filtering participants for export.
- Use the Select Value dropdown to choose the value participants must have for your selected metadata field to be included in the export. You can select multiple values, which will be treated with “OR” logic, meaning a participant must have only 1 of the values to be included in the export.
 Example: The condition “Department Accounting” will export any participants who have a value of “Accounting” for the “Department” metadata field.
 - You can add multiple conditions by clicking the 3 dots, then selecting Insert condition below.
Qtip: When adding multiple conditions, keep in mind that multiple conditions are separated by “AND,” meaning that a participant must meet all conditions to be exported.
- To remove a condition, click the 3 dots, then select Delete.
- By default, the export only contains standard participant fields (name, email, and uniqueID) and metadata. If desired, you can enable the Additional available fields checkbox to include data about the projects that the participants are in.
These additional fields include:
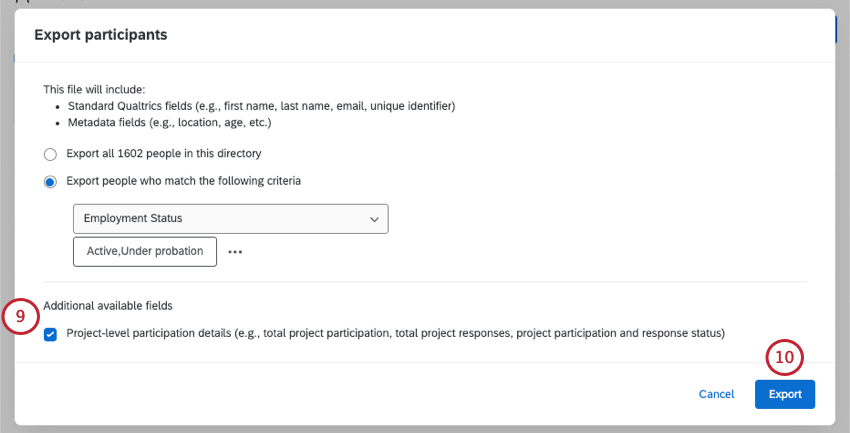
- Total Project Participations: The number of projects they’ve been added to as a participant.
- Total Project Response: The number of EX responses submitted.
- Project Participation Detail: A list that contains each project they’re in, the ID of that project, and the number of responses submitted for that project.
- Click Export.
- Qualtrics will prepare the file. This can take a while depending on how many participants and fields are being exported. You can view the file by going to the Manage Previous Imports/Updates/Exports window.
- Click Download next to your export file.
Qtip: This file type is “Participant List” if it excludes project data, and “Participation Report” if it includes project data.
- Select the file format for the export. You can choose CSV, TSV, or SSV.
Export Project-Level Participation Details
The Export Project-Level Participation Details option allows you to export a file containing project data about the EX projects your employees are participating in. You can export data for your entire EX directory, or just a subset of participants.
This file contains basic information about the included participants (Last Name, First Name, Email, Unique Identifier, and User Name) in addition to the project data. If a participant is in multiple projects, then there will be 1 unique row for each project the participant is in. Every row contains the following project-related columns:
- Project ID: The ID of the project.
- Project Name: The name of the project.
- Respondent Status: Indicates if the participant is marked as a respondent in the project (true or false).
- Response(s) Submitted: The number of responses submitted by the participant in the project.
- Response Date(s): The date(s) that the participant submitted their response(s).
- 360 Evaluations Received: The number of evaluations received. This column only contains data for 360 projects.
- 360 Evaluations Given: The number of evaluations submitted. This column only contains data for 360 projects.
To download participation data for EX projects in bulk:
- Navigate to the Employee Directory on the Directories page.
- Click Bulk Actions.
- Select Export Project-Level Participation Details.
- Choose the participants you’d like included in the export:
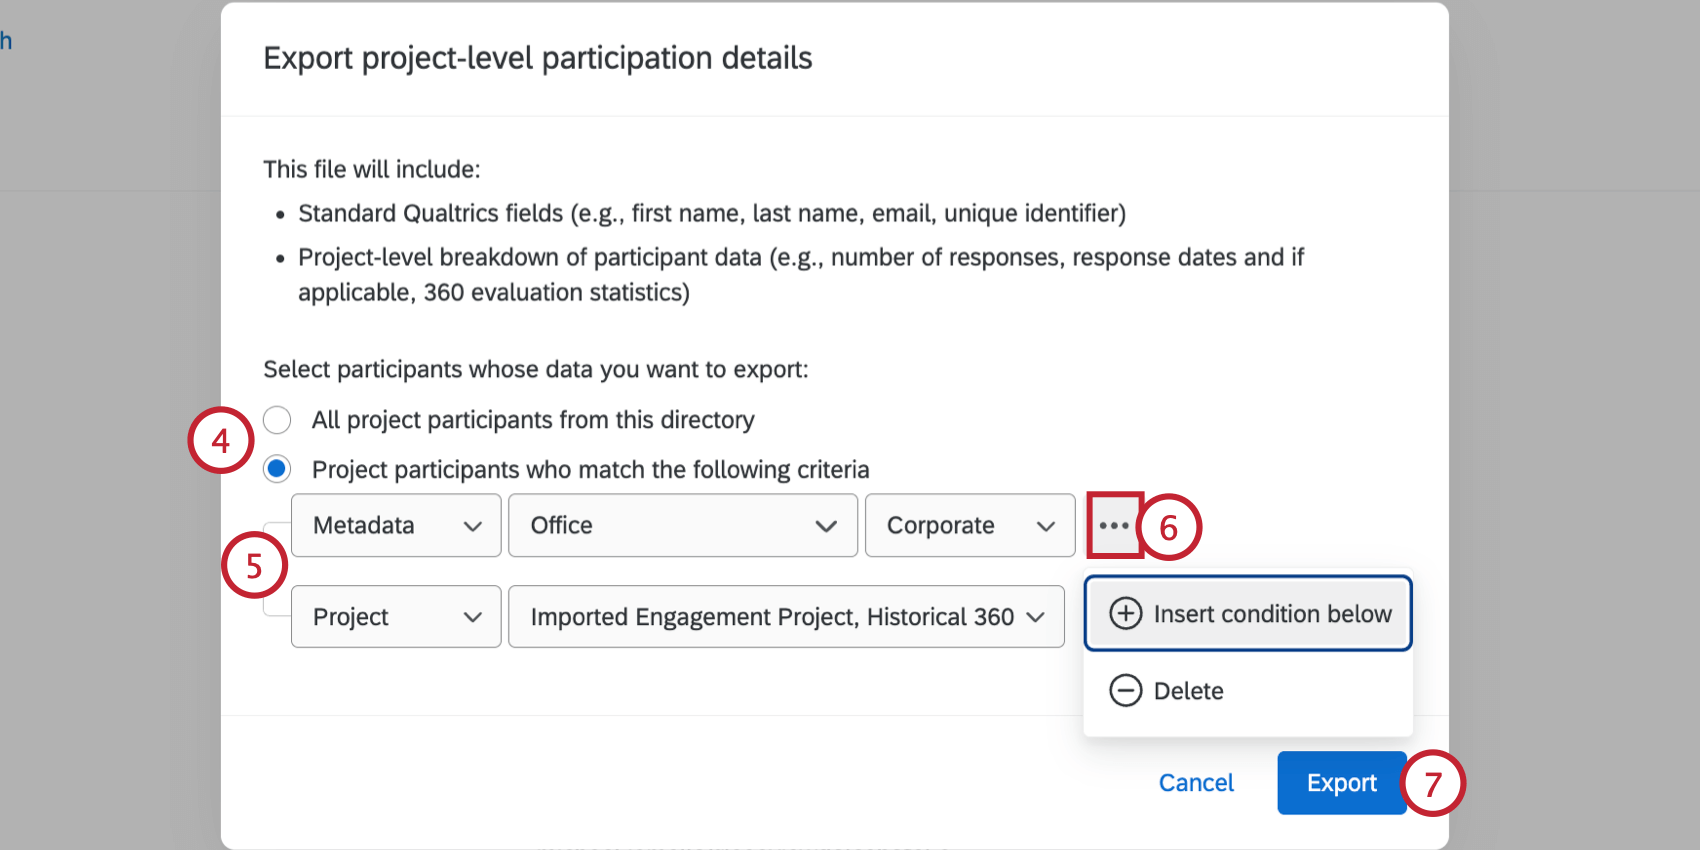
- All project participants from this directory: Include every participant from your directory who is in at least 1 project.
- Project participants who match the following criteria: Only include project participants who meet the criteria that you set.
- If exporting a subset of participants, define the criteria for the participants you’d like to include. This criteria can be based on participant metadata, or you can choose specific projects the participant must be in. You can select multiple values for each criteria, which are treated with “OR” logic, meaning a participant must have only 1 of the values to be included in the export.
- If desired, you can add multiple conditions that the participant must meet to be included in the export. Multiple conditions are separated by an implicit “AND,” meaning that a participant must meet all conditions to be exported.
Example: In the above example, participants will be included if they have the value “Corporate” for the “Office” metadata field. Additionally, they must be a participant in either the “Imported Engagement Project” or the “Historical 360” project.
- Click Export.
- Your export will process, which may take a while depending on the size of the export (the number of participants and projects). You can track its progress by monitoring the Participation Report in the Manage Previous Imports/Updates/Exports section of the EX directory.
- Once finished, click Download and select your desired export format (CSV, TSV, or SSV). You can then open this file in the file editor of your choice (for example, MS Excel).