
Participant Information Window (360)
What's on this page
About the Participant Information Window
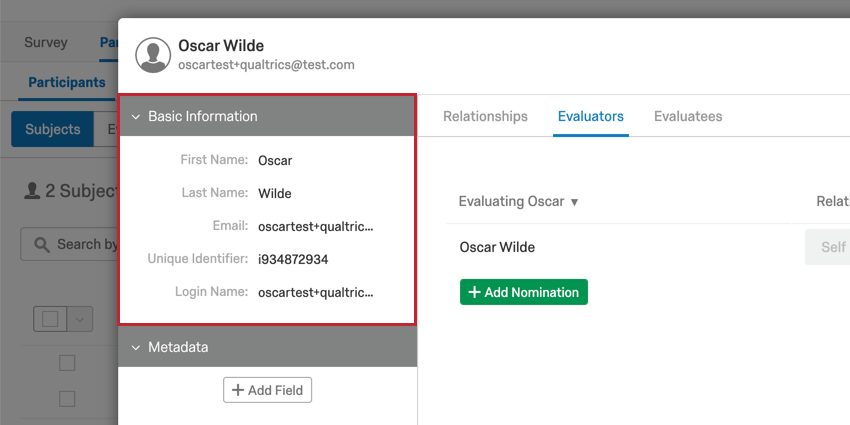
In the Participants tab of a 360 project, you can click on a participant to open a new window. This window contains information regarding the participant’s metadata, their relationships, who is evaluating them (evaluators), and who they are evaluating (evaluatees). Here you can perform various tasks and edit information for the selected participant only.
Editing Participant Information & Metadata
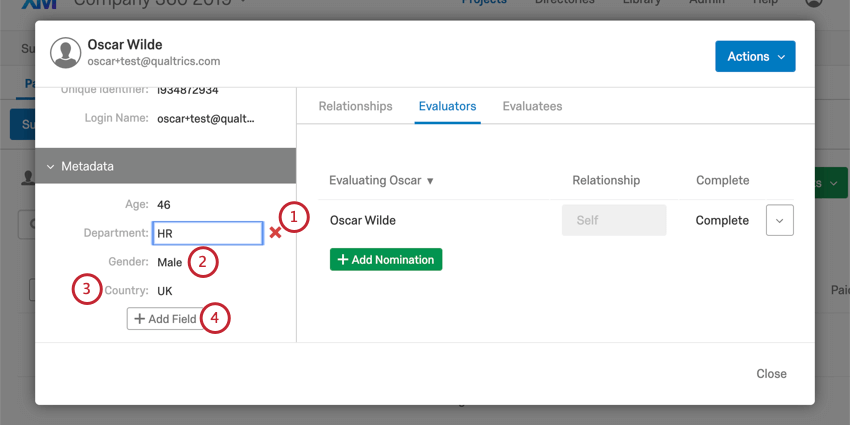
Basic Information
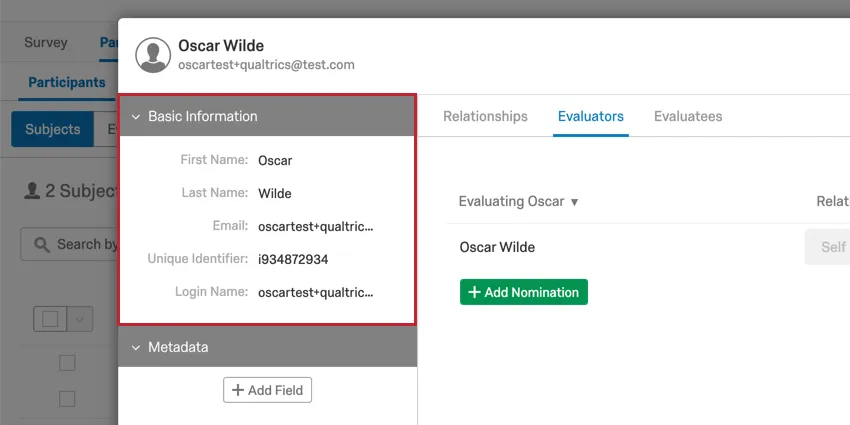
This section contains information about the First Name, Last Name, Email, Unique Identifier, and Login Name for the participant. To edit a field, click directly to the right of the field name and type in the new value. This change will reflect both in the Admin page and Employee Directory.
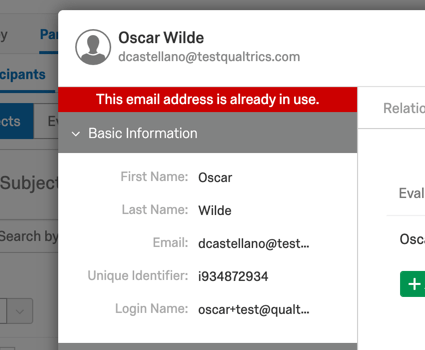
Qtip: You cannot have multiple participants with the same email address, even if they have different unique identifiers or usernames. If you try to change a subject’s email and get the This email address is already in use message, that means this person is already a subject in the project.

Qtip: If you try to add a participant with the same unique identifier as an existing participant, the existing participant will be updated with the new information you have uploaded.
Metadata
This section contains information about the various pieces of metadata that have been assigned to the participant.

Warning: Once a project is active, changes made to a participant’s metadata in the Participants tab will not reflect in the Employee Directory. Similarly, once a project is active, changes made to a participant’s metadata in the Employee Directory will not reflect in the Participants tab.
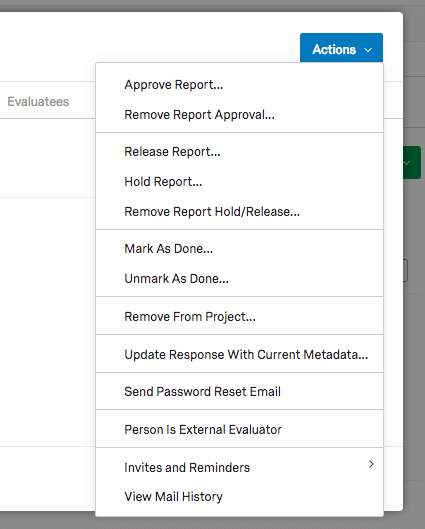
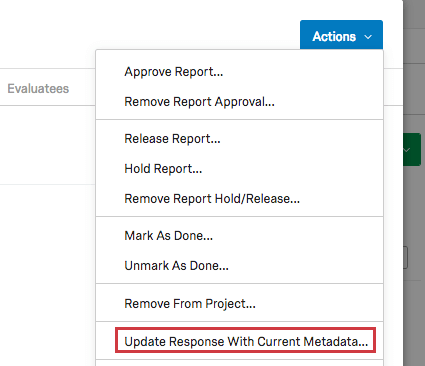
Actions
- Approve Report: This option will only appear if you have Manager/Administrator approves reports turned on in your Report Options. When these settings are turned on, subjects cannot see their reports until they are approved. Here you can choose to approve a report so that it is released to the subject.
- Remove Report Approval: If you approved a report and need it to be hidden again, click Remove Report Approval.
- Release Report: For reports with release requirements that haven’t been met yet, you can release a report early.
- Hold Report: For reports with release requirements, you can prevent the report from being released when it’s ready.
- Remove Report Hold/Release: If you chose to hold or release a report despite the release requirements, this option reverses that selection.
- Mark as Done: Prevents further evaluations being completed and emails from
being sent to the subject’s evaluators. - Unmark as Done: Remove the “Done” status from the subjects, allowing emails to be sent to the evaluator again.
- Remove from Project: Remove this participant from the project. Warning: Removing the participant from the project deletes any response they’ve provided. If you want the participant to redo their response, send them a retake survey link instead of removing them and re-adding them.

- Update Responses With Current Metadata: Once a participant submits a response, their metadata information is recorded with their response and will not update automatically if you make changes later. If you need to make changes to a participant’s metadata after their response is submitted, first update the desired information and then select the Update Responses With Current Metadata option so the updated metadata information is pushed to the individual’s survey response.
- Send Password Reset Email: Sends a password reset email to the selected participant. The email will be sent to the email listed for the participant under the Basic Information section to the left.
- Person is External Evaluator: Make the participant an external evaluator. This means they will only be an evaluator and not a subject. This option removes all the evaluations completed for the participant and any outstanding nominations they’ve made.
- Invites and Reminders: Allows you to send an invite or reminder to the selected participant or their evaluators. These messages will use the templates that are set in the Email Messages section of the Messages tab. Qtip: Need to send a more customized message to one participant? When you send the invite or reminder from the Email Messages section, you can edit your message and then set a condition so that it only goes to a specified participant.

- View Mail History: Will display the Mail History for the selected participant only.
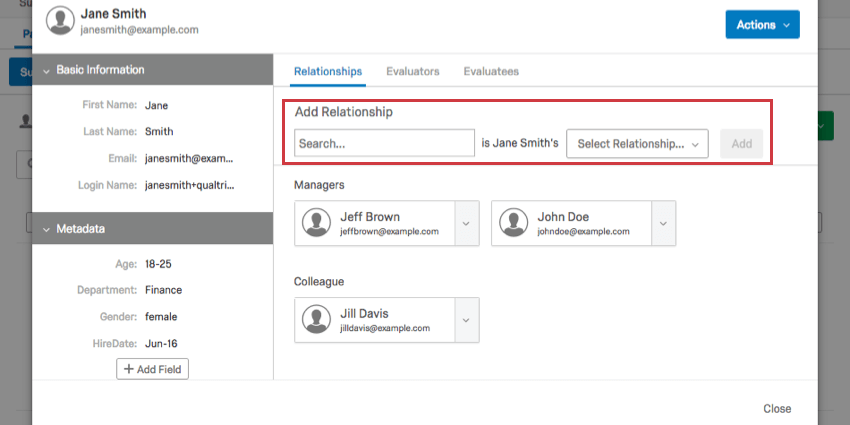
Relationships Tab
The Relationships tab displays all the relationships the participant is in on the directory level. It also displays the current relationships they have with their evaluators and evaluatees.
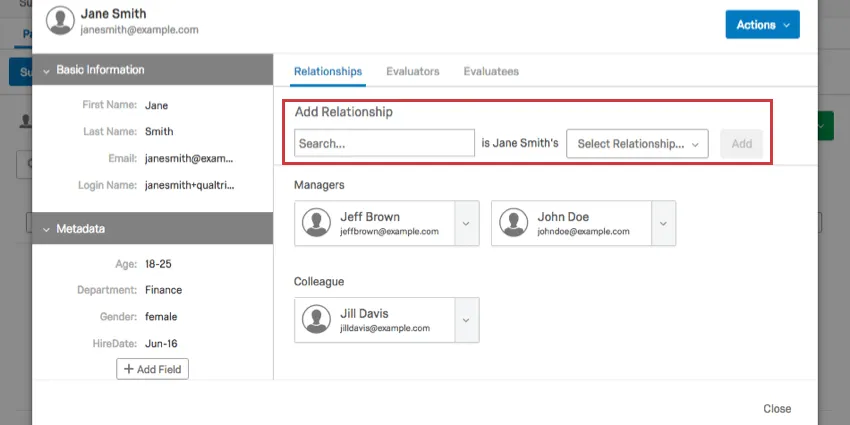
Type in the name of an existing participant, select their relationship, and click Add. This will only add them to the directory level – if you want to add a participant as an evaluator, add them in the Evaluator tab instead.
Qtip: This is a great way to add managers that you want to be able to approve and view reports, but do not want to actually evaluate any subjects.
Warning: Do not change relationships here! Do that in the Evaluator tab of the Participant Window!
Evaluators and Evaluatees Tabs
The Evaluators tab displays all the participants who are going to evaluate the subject and their relationship. The Evaluatees tab displays all the participants the subject will evaluate and their relationship to the subject.
Qtip: Unsolicited evaluators will not appear in the Evaluators tab of the subject’s participant information window.
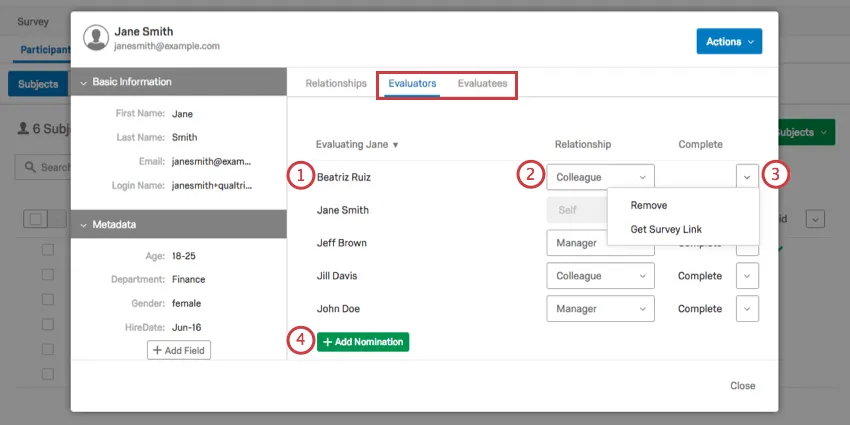
Qtip: Be careful when changing relationships! If a relationship is changed while an evaluator is in the middle of writing their response, their response in progress will be removed. You can add this response in progress back by switching the relationship back to what it was.
- Remove: Remove any completed evaluation from the subject. This relationship will disappear from the Evaluators/Evaluatees tab.
- Get Survey Link: This only appears for incomplete evaluations and self-evaluations.
FAQs
Who assigns relationships in a 360?
Who assigns relationships in a 360?
Managers can assign relationships if Managers May Choose Evaluators is turned on.
Subjects can only assign relationships if Subjects Nominates Evaluators and the sub option Allow subjects to select relationships are both turned on.
Administrators (e.g., those with project-creation capabilities) can always assign relationships. Administrators can change relationships as well after evaluations have been submitted. This is done by clicking on the name of the subject in the Subject subsection, viewing the Evaluators list for that subject, clicking on the relationship for a particular evaluator, and selecting the new relationship from the dropdown list.
How can you assign a manager to subjects without the manager being also assigned as an evaluator?
How can you assign a manager to subjects without the manager being also assigned as an evaluator?
How can I make my report available to my managers? Subjects?
How can I make my report available to my managers? Subjects?
When are 360 reports released?
When are 360 reports released?
When I create participants, are there any metadata limits I should consider?
When I create participants, are there any metadata limits I should consider?
That's great! Thank you for your feedback!
Thank you for your feedback!