-

Qualtrics Platform -

Customer Journey Optimizer -

XM Discover -

Qualtrics Social Connect
Testing Status Manager
About the Testing Status Manager
The Testing Status Manager helps you ensure your employees who are not fully vaccinated against COVID-19 submit to weekly testing to demonstrate that they are not infected with the coronavirus. This XM solution will generate a program with the following components:
- COVID Test Submission Project: A weekly survey that allows information about employee test results to be uploaded individually or in bulk. The testing results and associated documentation can then be used to understand if employees are allowed entry into the workplace.
- COVID Status Check Project: Allows employees to check a status that tells them if they can return to the workplace. The status project will compare between the expiration dates of the employee’s test and today’s date to let the employee know if they are cleared to enter the workplace, or if they need to submit another test result.
- Testing Status Dashboard: Allows for aggregate reporting on testing results, including a comprehensive employee roster for employees who are not yet fully vaccinated. The dashboard also includes the same dashboard pages as the Vaccination Status Dashboard in the Vaccination Status Manager, in case you would like to report all results in just one place.
Creating a Testing Status Manager
Attention: Before you create a Testing Status Manager, please read the following:
- This project should be created by a user who is a Brand Administrator. This user will have access to all employee data collected by this program.
- You must create a Vaccination Status Manager before you create the testing solution.
- The Vaccination Status Manager and the Testing Status Manager must be created by the same user.
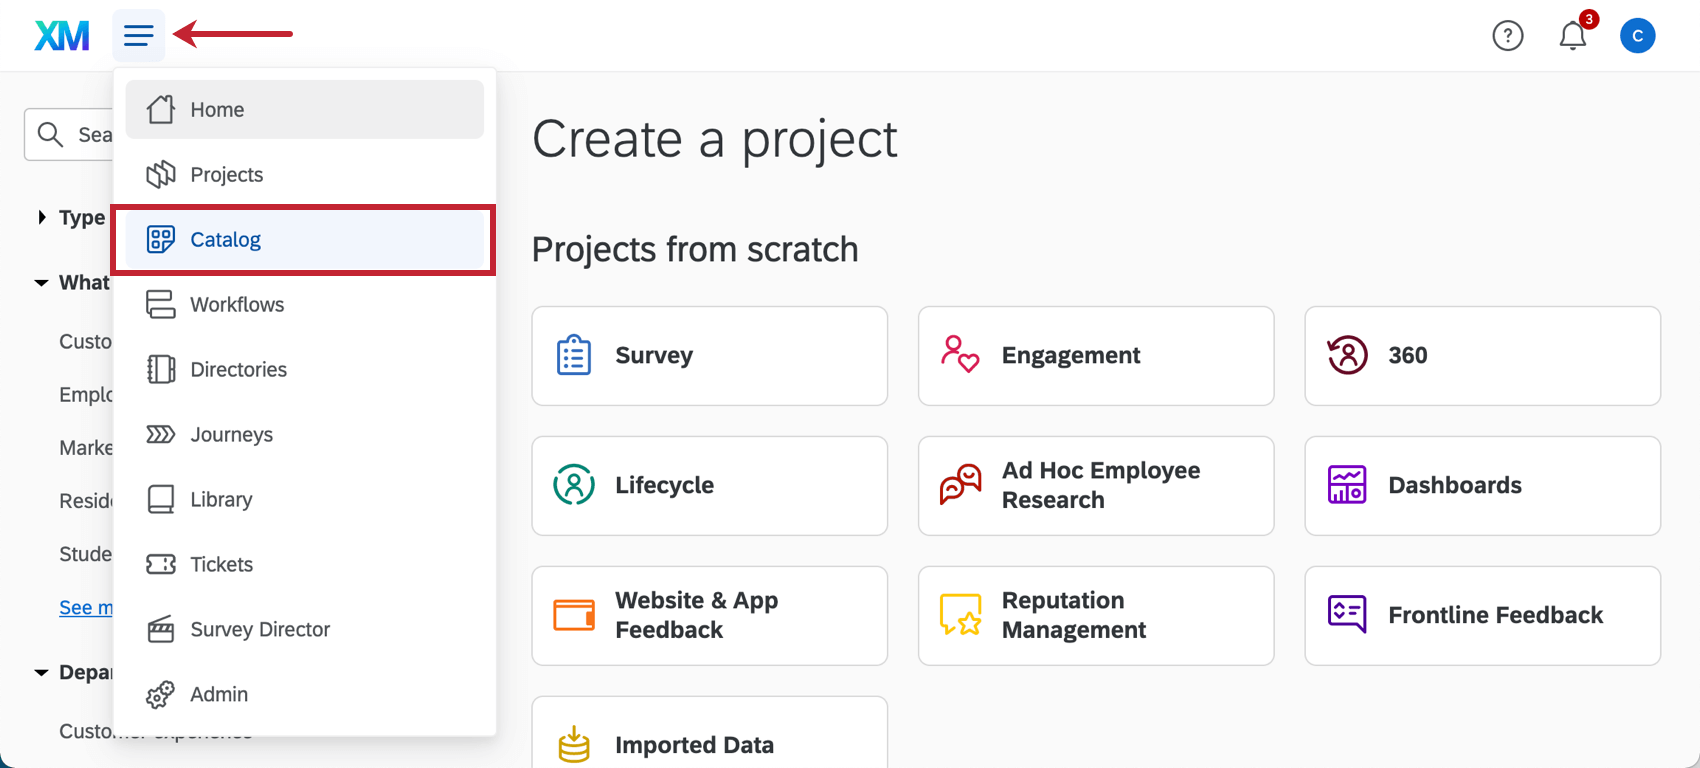
You can create a Testing Status Manager by going to the catalog and either searching it by name, or looking under COVID-19 Projects.
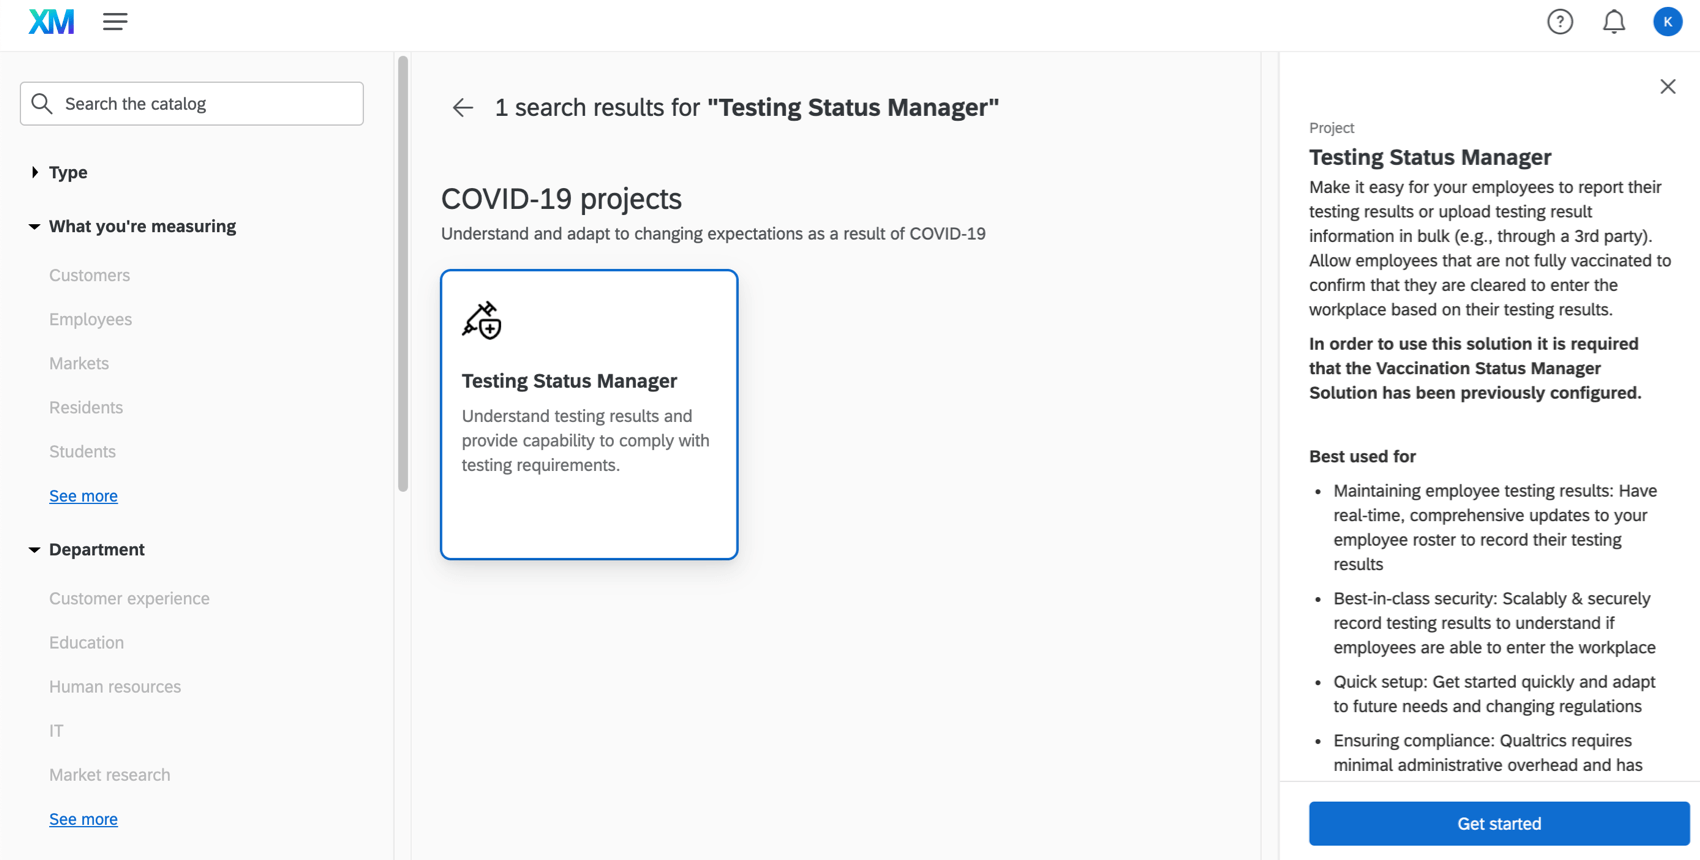
You will be asked to name your project. Then once you click Start customizing, the guided setup will begin.
In order to prepare your program and enable the appropriate automated workflows, you must perform the steps described in the following sections in their entirety:
- Complete Full Setup of the Vaccination Status Manager Solution
- Prevent Duplicate Employee Records
- Prepare Your Employee Roster File
- Upload Employee Data
- Provide a Mailing List
- Provide Details for Optional Configurations
- Email Your Employees Their Testing Status
- Finish the Testing Status Manager Solution Setup
The setup assistant will include links to key pages you need to complete tasks on, which will automatically open in a new tab. We recommend completing these tasks in a separate window or tab of your browser so that you do not lose your place in the setup assistant.
1. Complete Full Setup of the Vaccination Status Manager Solution
To make sure the Testing Status Manager Solution works properly, you must first complete the setup of the Vaccination Status Manager Solution, as these solutions share important automated workflows.
Once you have created your Vaccination Status Manager and completed its setup, fill out the following fields inside your Testing Status Manager.
Select your WebService credentials
You should have already created your web service credentials when completing the Vaccination Status Manager solution. Add these same credentials inside your Testing Status Manager.

Enter your Vaccination Attestation and Employee Status Project IDs
In these steps, you will get the survey ID for the Vaccination Attestation and Employee Status projects that were created in your Vaccination solution. Then you will paste the ID in your Testing solution. That allows us to link important workflows together that the programs share.
- Open a new tab or window. Open your Qualtrics account there.
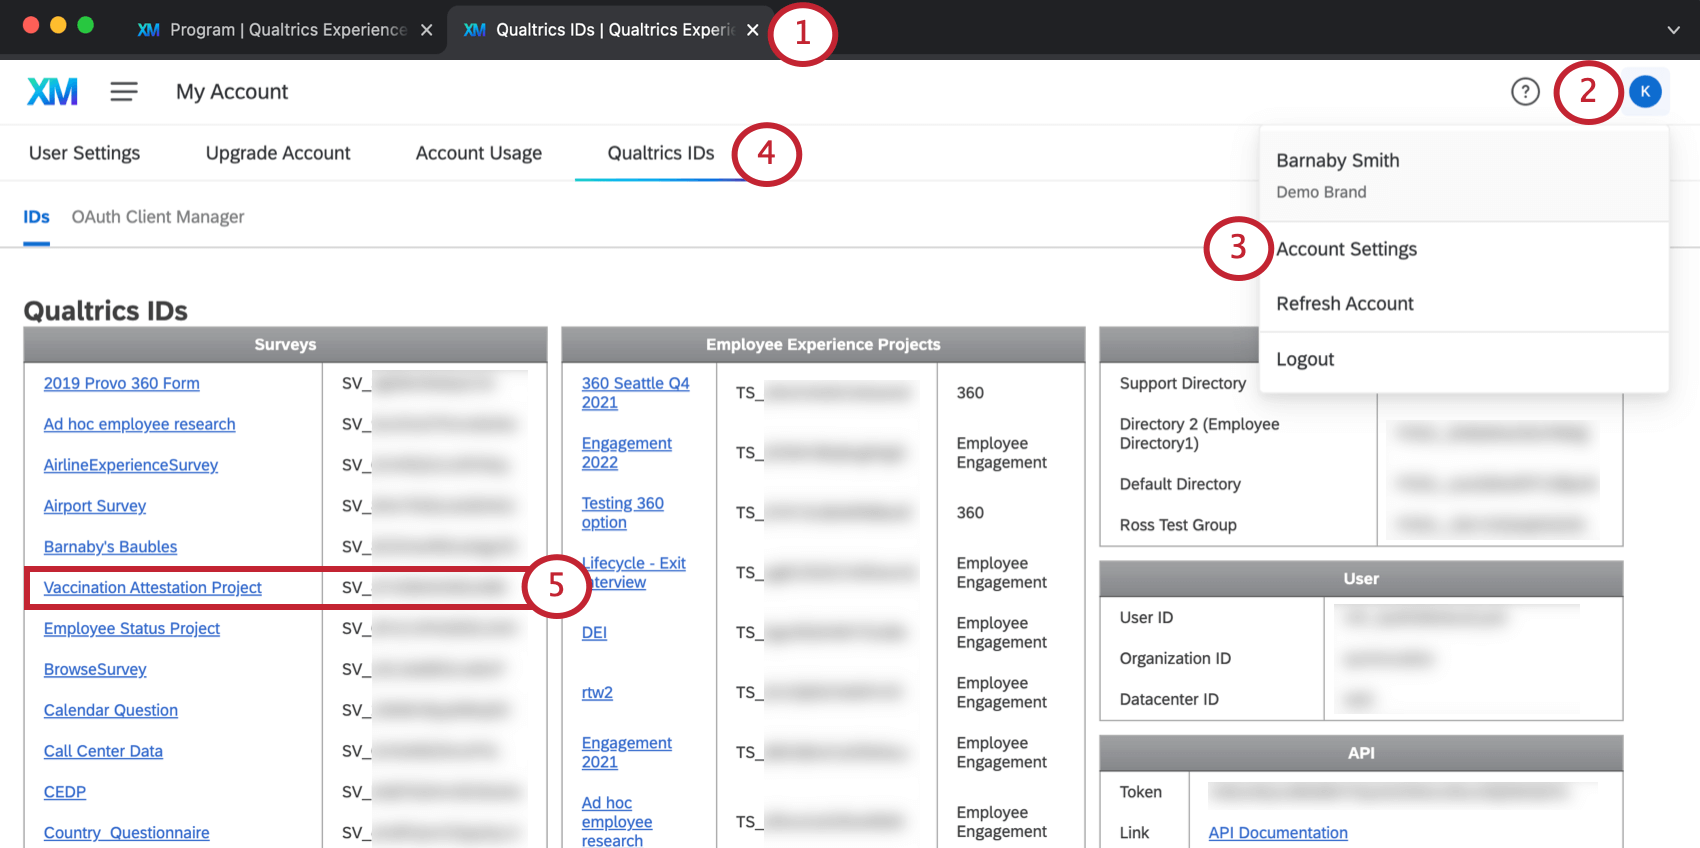
- Go to the My Account icon.
- Select Account Settings.
- Go to Qualtrics IDs.
- In the Surveys list, find the Vaccination Attestation Project. Copy the survey ID. (e.g., SV_xXxXXxxX)
Qtip: Surveys are listed in alphabetical order.
- Return to the tab where your Testing Status Manager is.
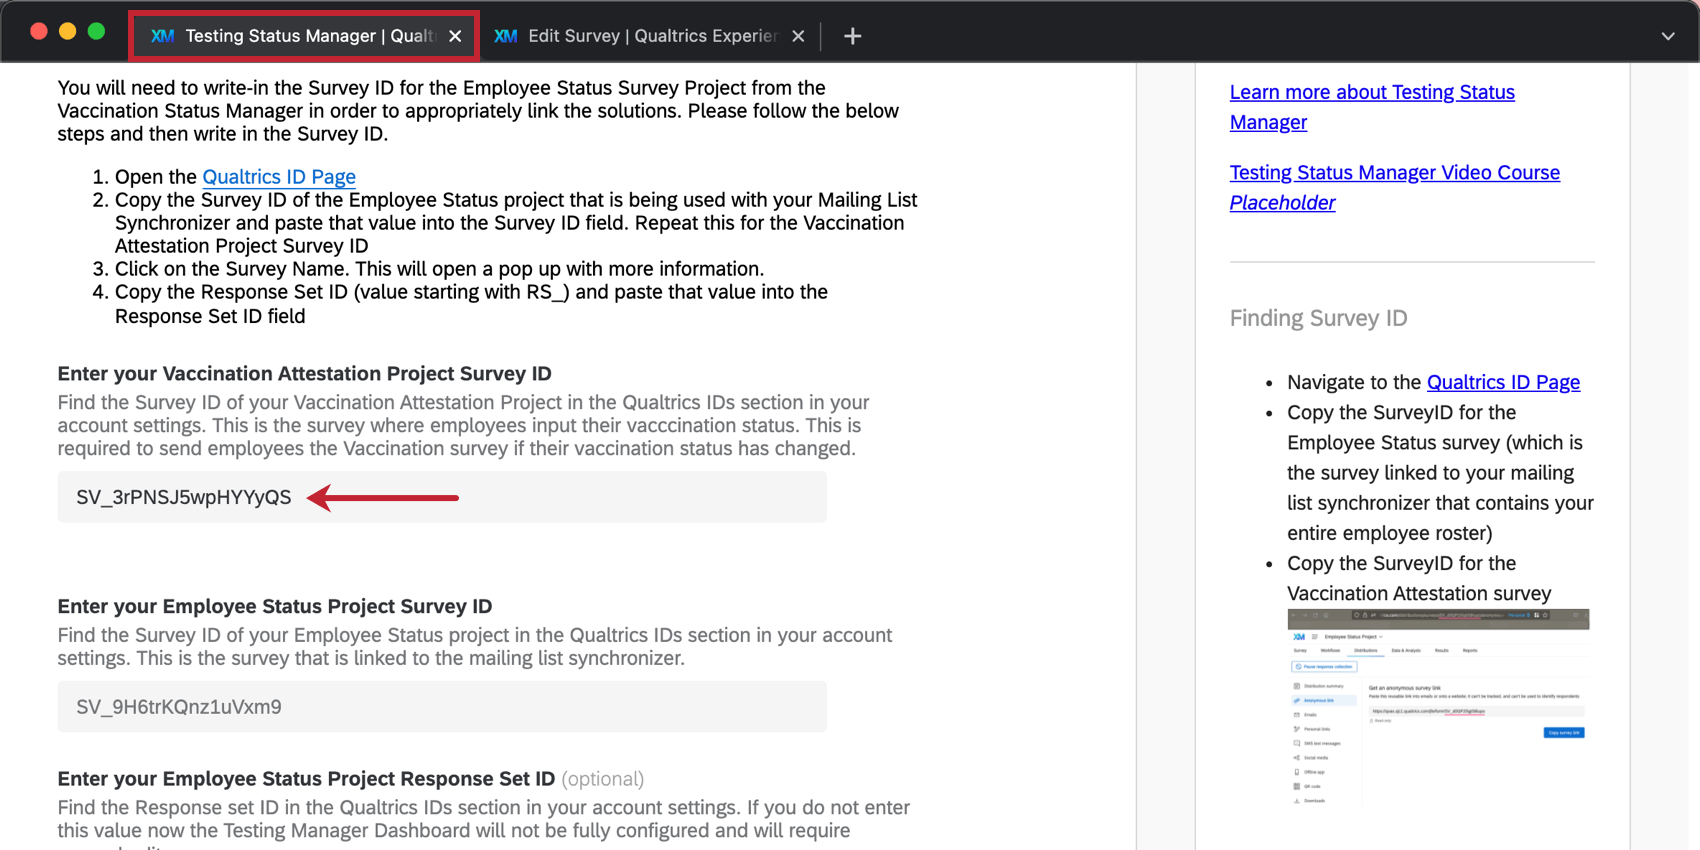
- Paste the ID where it says Enter your Vaccination Attestation Project Survey ID.
- Go back to the tab where your Qualtrics IDs are.
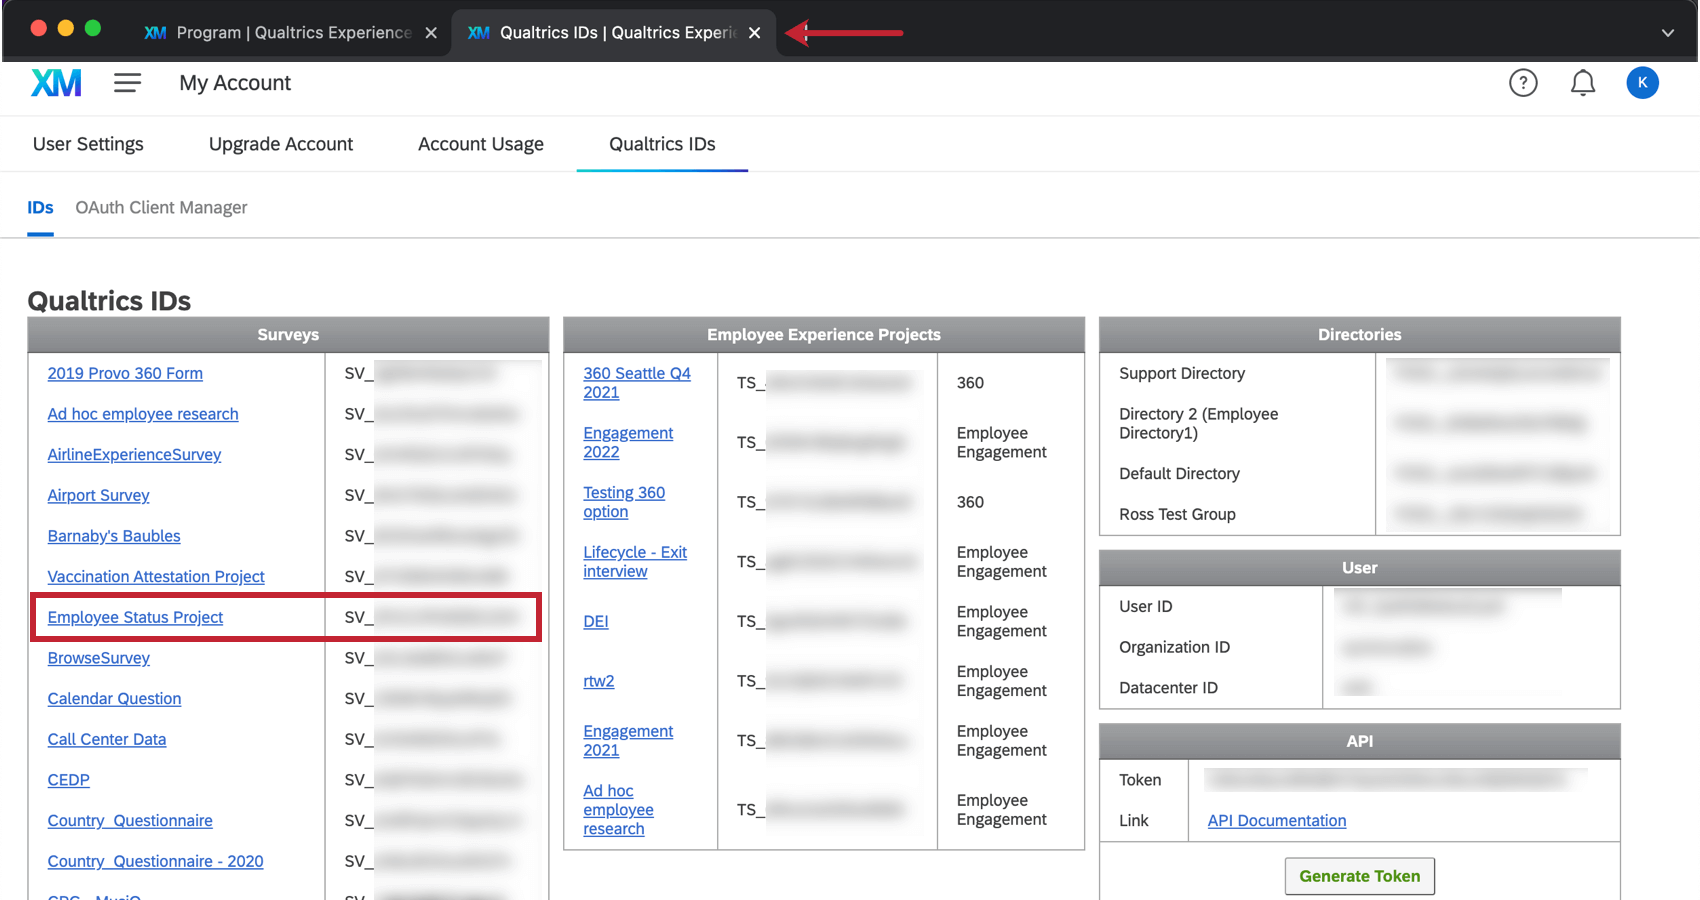
- Copy the survey ID for the Employee Status Project.
- Return to the tab where your Testing Status Manager is.
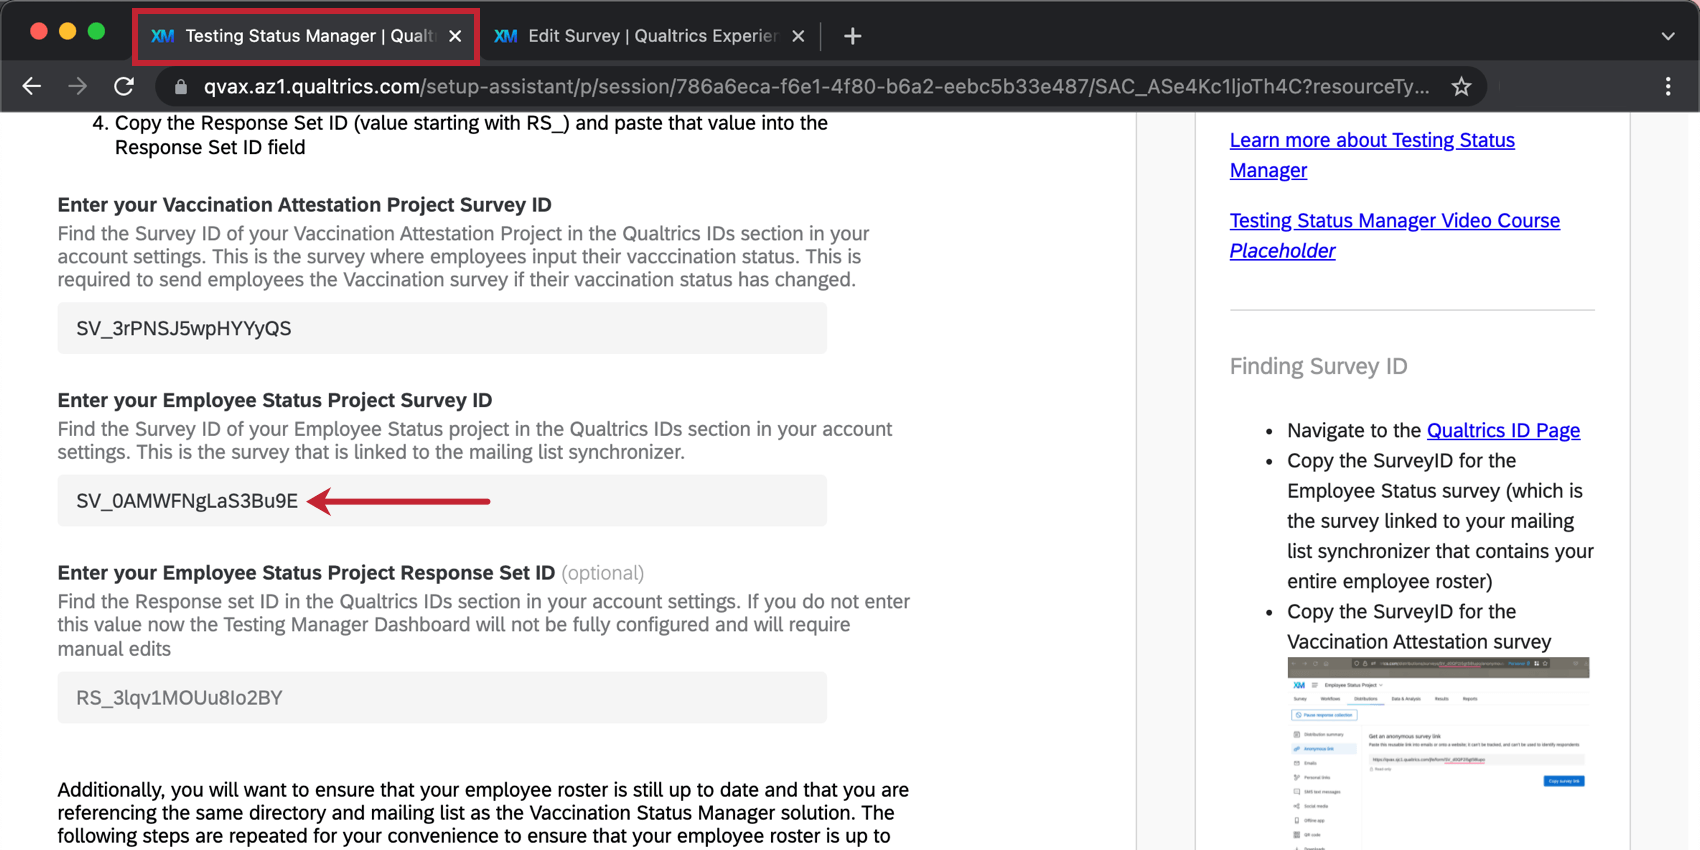
- Paste the ID where it says Enter your Employee Status Project Survey ID.
Enter your Employee Status Project Response Set ID
- Go to the tab with the Qualtrics IDs.
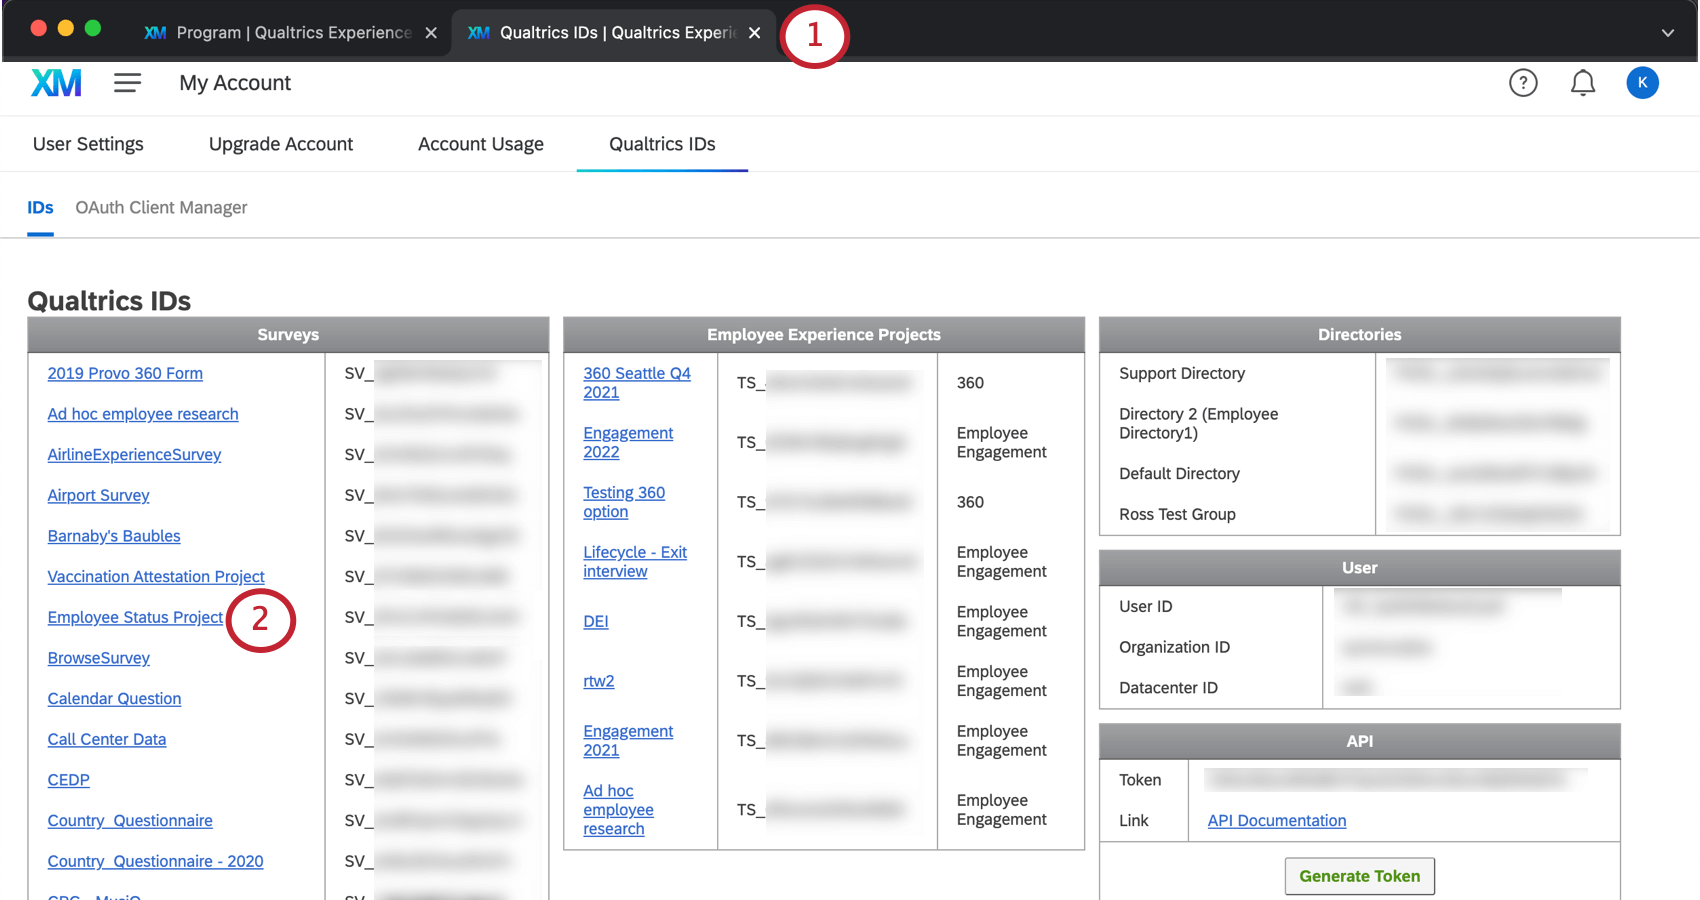
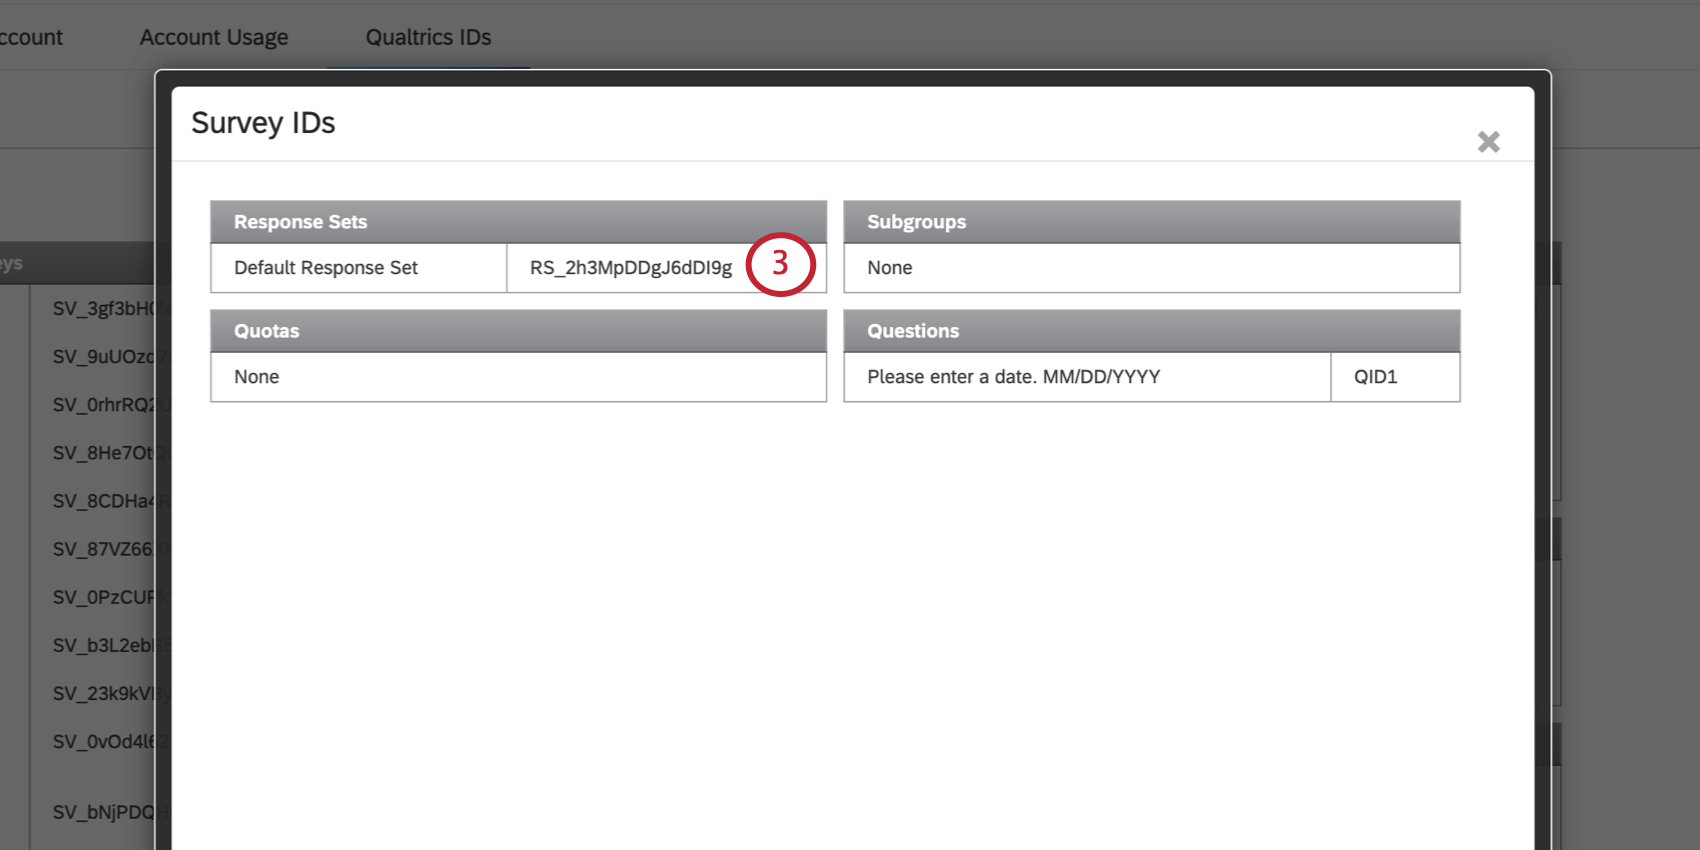
- Find the Employee Status Project in the Survey ID list and click on its name.
- Copy the Default Response Set ID (e.g., RS_XXxXXXxxx).
- Return to the tab where your Testing Status Manager is.
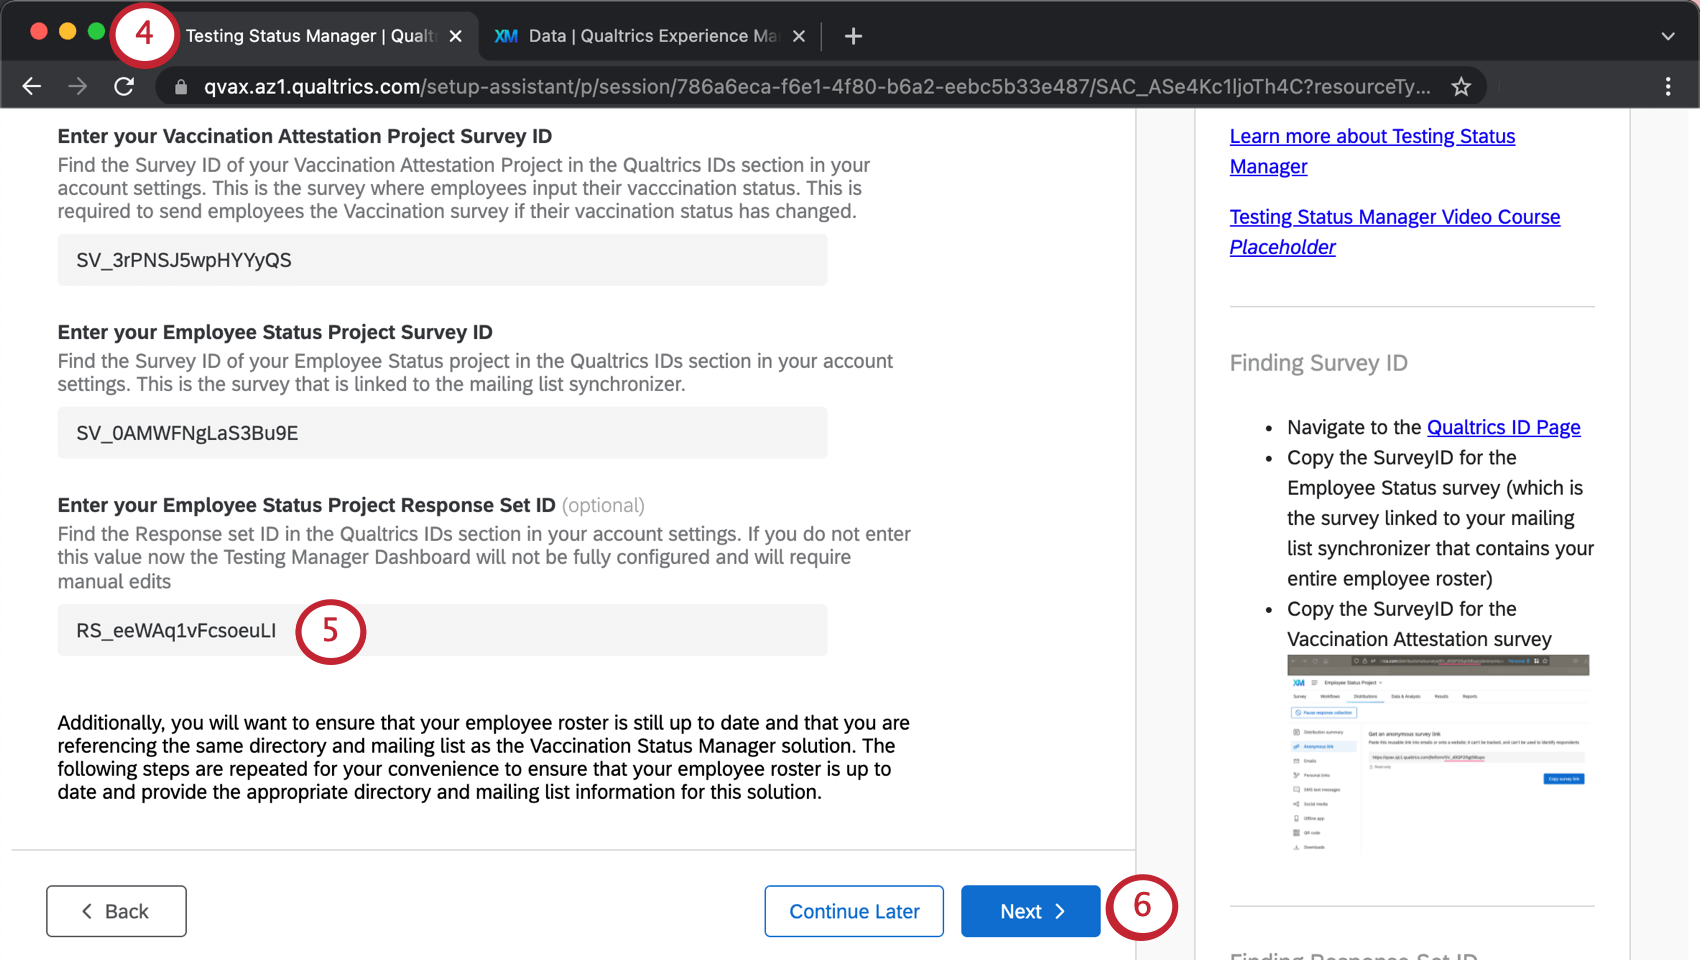
- Paste the response ID in the field.
- Click Next to proceed to the next steps in your Testing Status Manager setup.
You may now close the tab with your Qualtrics IDs inside.
2. Prevent Duplicate Employee Records
In order to make sure each employee is being updated with the correct status, make sure the directory you created to house your employee roster knows how to identify and merge duplicate contacts.
See the Vaccination Status Manager page for the exact same steps.
3. Prepare Your Employee Roster File
Now it’s time to create a list of your employees. For this solution to work as intended, there are some required fields that are unique to this program.
See the Vaccination Status Manager page for the exact same steps.
4. Upload Employee Data
To complete your employee roster, make a mailing list in your newly created directory, and upload the file you made to it.
See the Vaccination Status Manager page for the exact same steps.
5. Provide a Mailing List
In the solution setup assistant, get to the page that says Select your Mailing List and add the list you created in the previous steps.
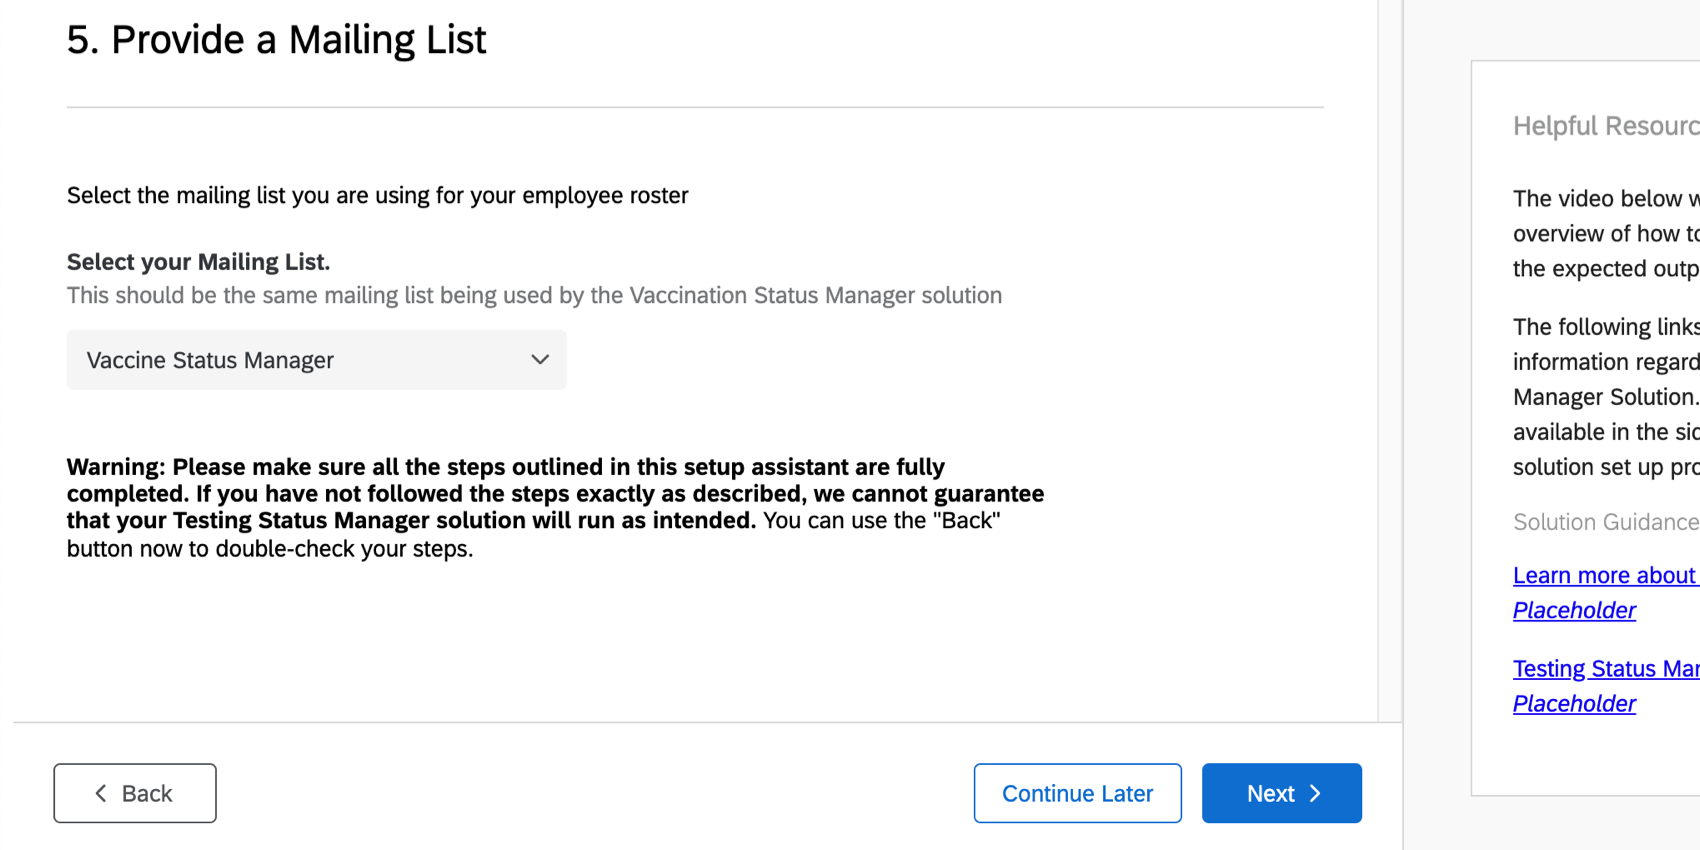
Qtip: If nothing appears in this dropdown, go back and make sure you completed the previous steps correctly. You may need to go back a page in the setup assistant and re-submit.

6. Provide Details for Optional Configurations
At the end of the setup assistant, you’ll be presented with a few optional features.
- Enter the URL to your company policy: Include a link to your company’s vaccination and testing policy in your survey. We recommend that you host your company policy on an internal website that all employees can access.
Attention: If you do not include this link, we recommend finding Q1 in your survey and editing it to remove the hyperlink.
- Enter the email address best suited to receive accommodation requests: An email can be sent to a team of your choice if employees request an accommodation from submitting to weekly testing. See more at Granting Accommodations.
This solution also includes an automated email distribution to employees who indicate that their vaccination status has changed. The email will go out immediately after their testing status submission and will contain a link to the vaccination attestation survey so the employee can update their status to indicate they are now partially or fully vaccinated. This survey distribution can be found in the Workflows tab of the COVID Test Submission Project, under “Send Vaccine Survey.”
7. Email Your Employees Their Testing Status
As one last note, the solution will tell you about a couple of workflows you’ll find in your program.
The solution will automatically email each employee that submits a testing result their test expiration date. These emails are intended to help employees understand when they need to be retested and/or can be used as proof for entering the workplace. This email can be found in the Workflows tab of the COVID Test Submission Project, under “Positive/Negative COVID Result Notification.”
Additionally, the solution will also send an automated email to an employee 6 days after their submission of a negative test result and 85 days after their submission of a positive test result. This email is intended to remind the employee to submit another test result to ensure they can enter the workplace. These emails can be found in the Workflows tab of the COVID Test Submission Project. They are all built using survey response events with conditions that lead to email tasks.
8. Finish the Testing Status Manager Solution Setup
You can use the Back button to check your answers. Otherwise, when you’re done setting up your Testing Status Manager, click Finish.
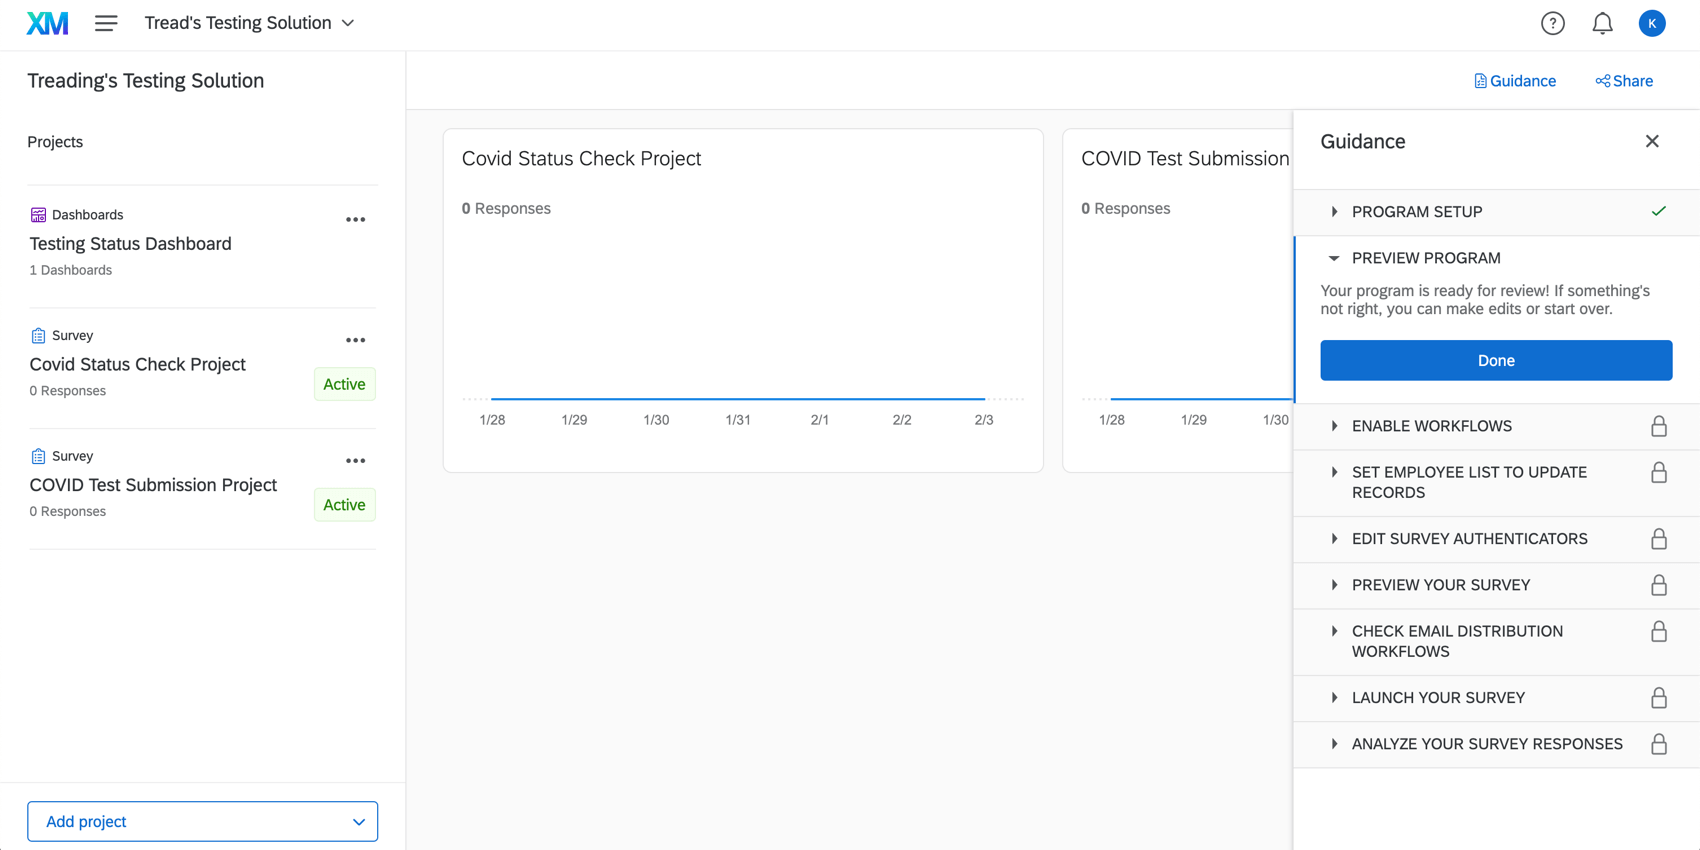
You’ll be taken to a program that holds your COVID Status Check, weekly COVID Test Submission survey, and Testing Status Dashboard in one place. The guidance sidebar will provide instructions on the next steps, which will be to launch your project.
Launching the Testing Status Manager
Now that you’ve completed the initial setup, there are some things you must do to successfully launch your solution:
Edit Survey Authenticators
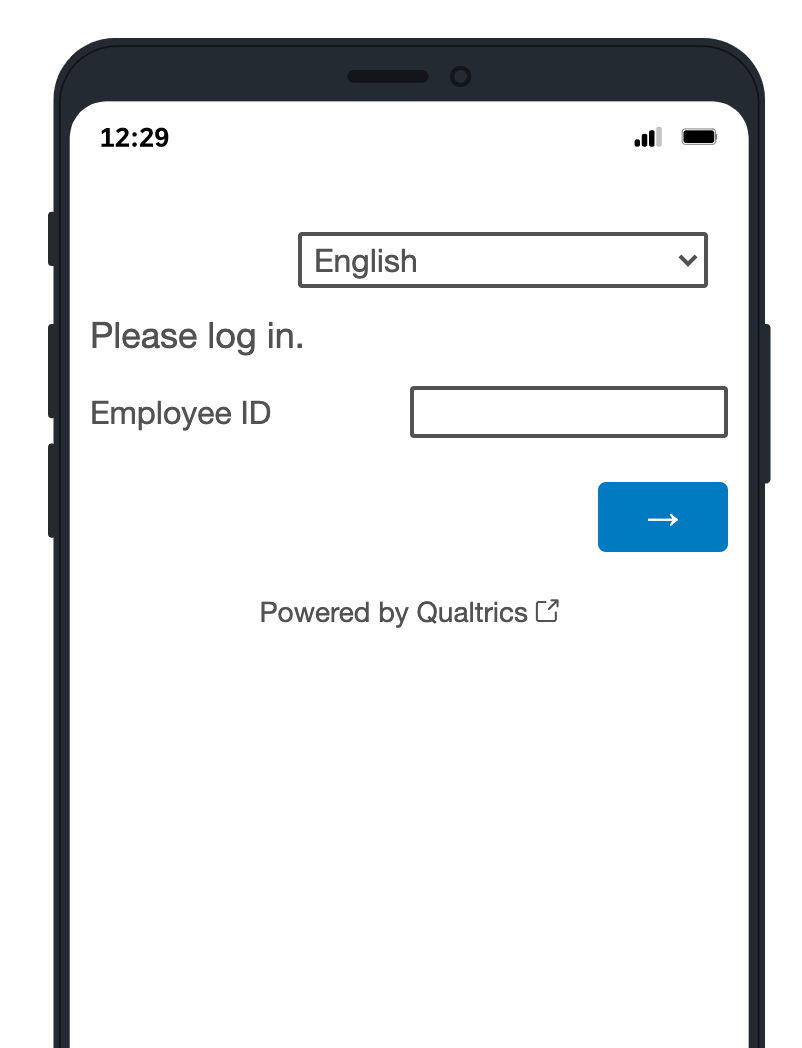
When employees visit the COVID Test Submission Project and the COVID Status Check, they are prompted to log in. This is due to the presence of an authenticator in the survey flow.
By default, your authenticators are based on a mailing list. If your organization has single sign-on (SSO), you can change your setup to an SSO authenticator. Whatever you choose, you should set up all of your authenticators the same way.
Mailing List-Based Authenticator
This section explains how the authenticator is set up by default, based on a mailing list. This kind of authenticator can be supported by any organization. It will use information you already set up in XM Directory in earlier steps.
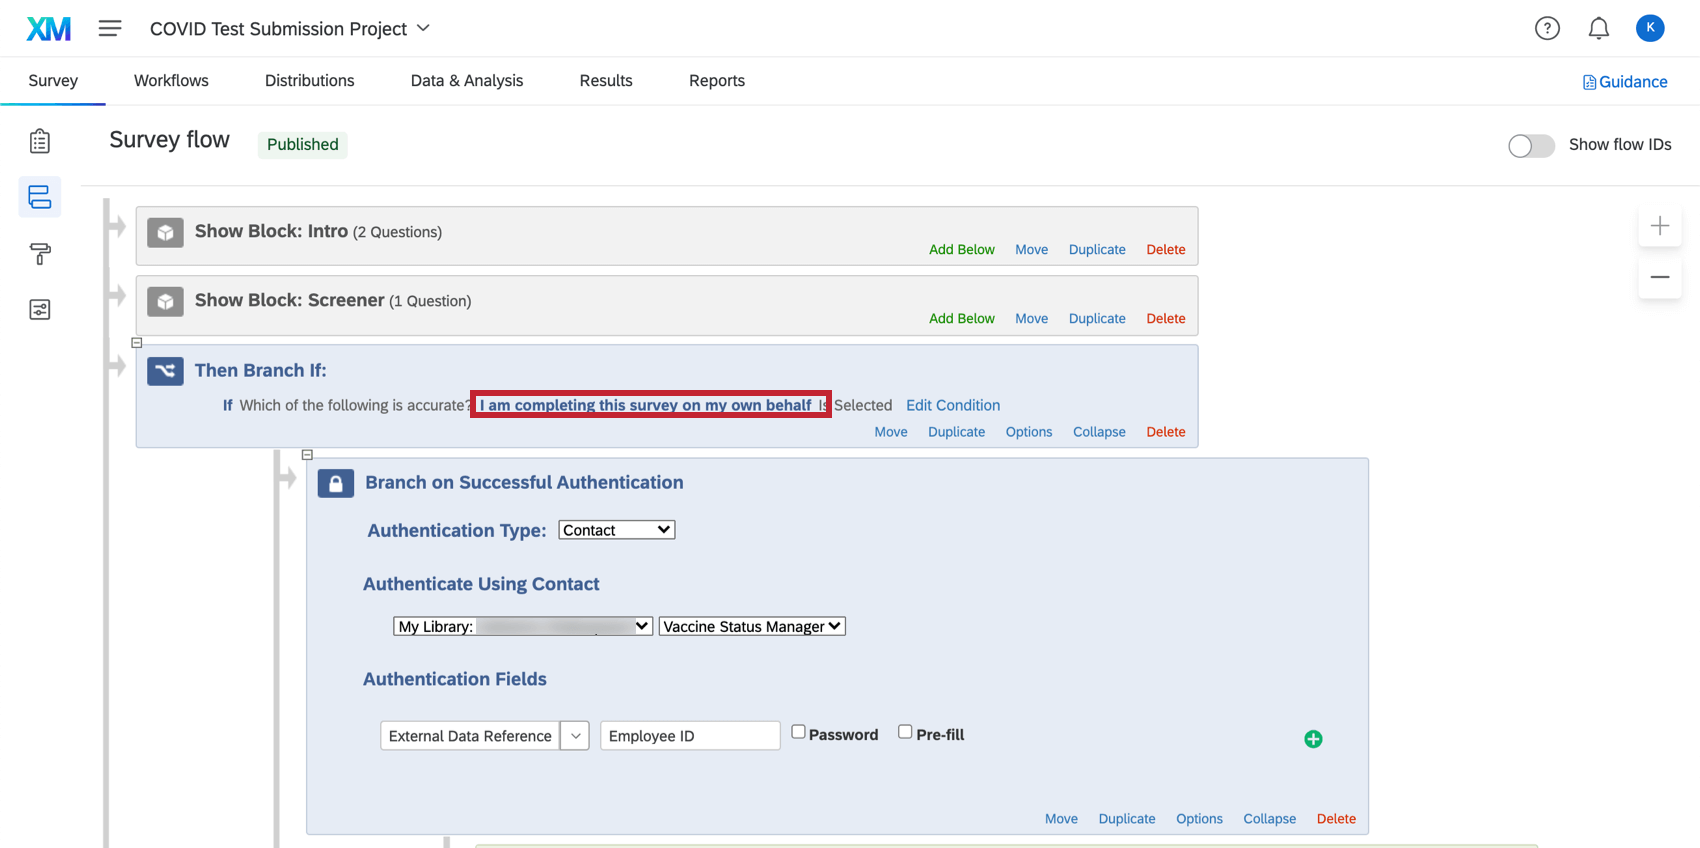
- For all three authenticators, the Authentication Type is set to Contact.
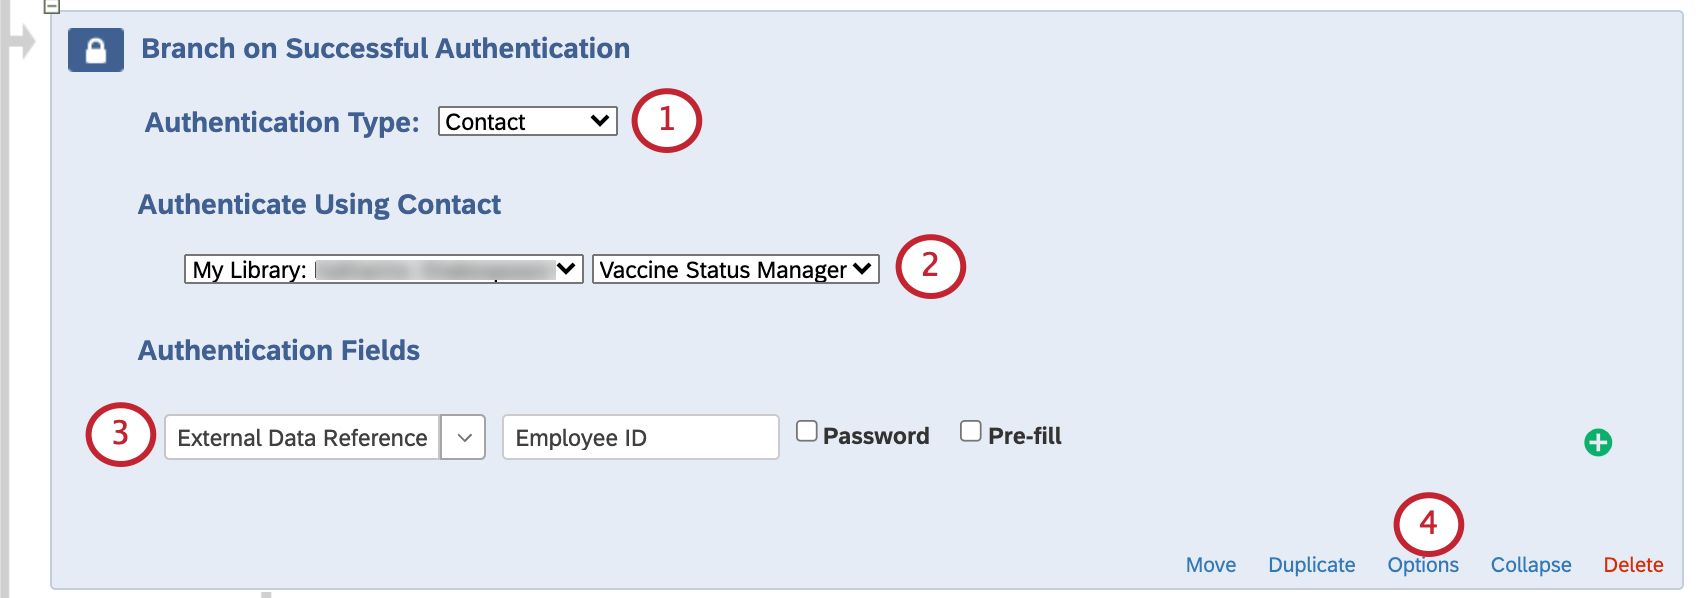
- The mailing list that contains your employee roster should be selected. This is the same list you specified during the setup, earlier.
Example: Here, we named our mailing list “Vaccine Status Manager”.
- The Authentication Field is set to External Data Reference.
Qtip: We use the optional label to tell the person logging into the survey that they should enter their “Employee ID.” That’s because that’s the information we saved as the External Data Reference in the mailing list.
- Click Options on the authenticator to view more settings.
- We have Allow authenticating respondents to retake authenticated section enabled.
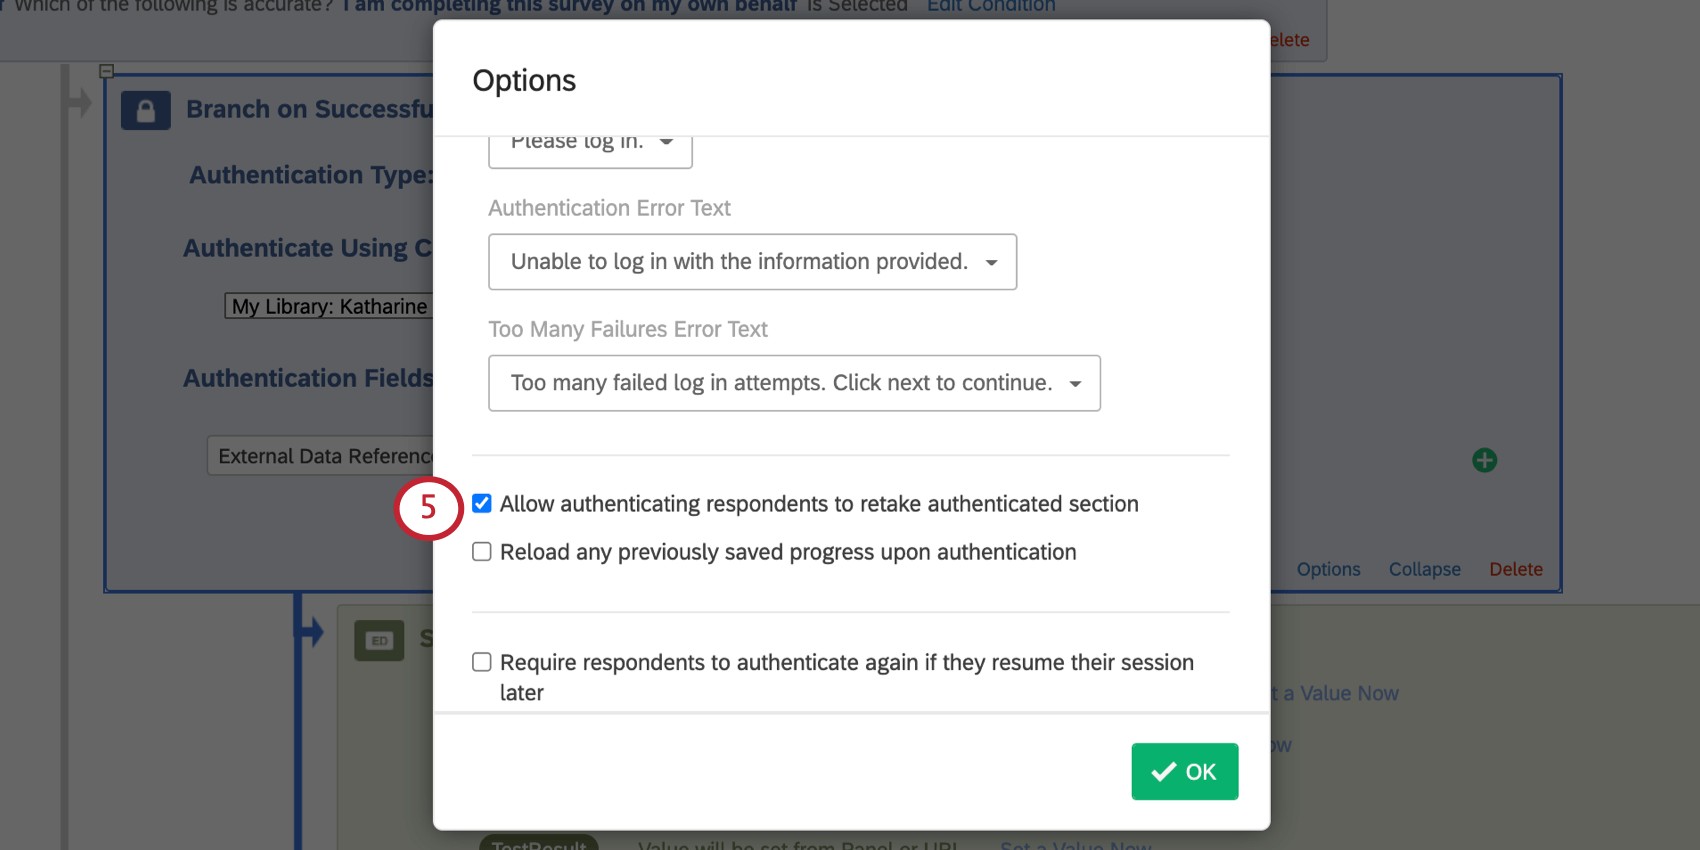
- Optional: You can set either the message in the branched end of survey element or the error messages in the authenticator options to provide additional instructions on how employees can find their employee ID. This is not included by default.
- Save your survey flow when you’re done making changes.
SSO Authenticator
This kind of authenticator can only be set up if you have single sign-on (SSO) set up for your organization’s Qualtrics license. Keep in mind that you may need to be in close contact with a member of your organization’s IT team to set this up.
See the SSO Authenticator support page for detailed steps for each type of SSO connection. Make sure you also do the following:
- Select Associate Respondent With Panel.
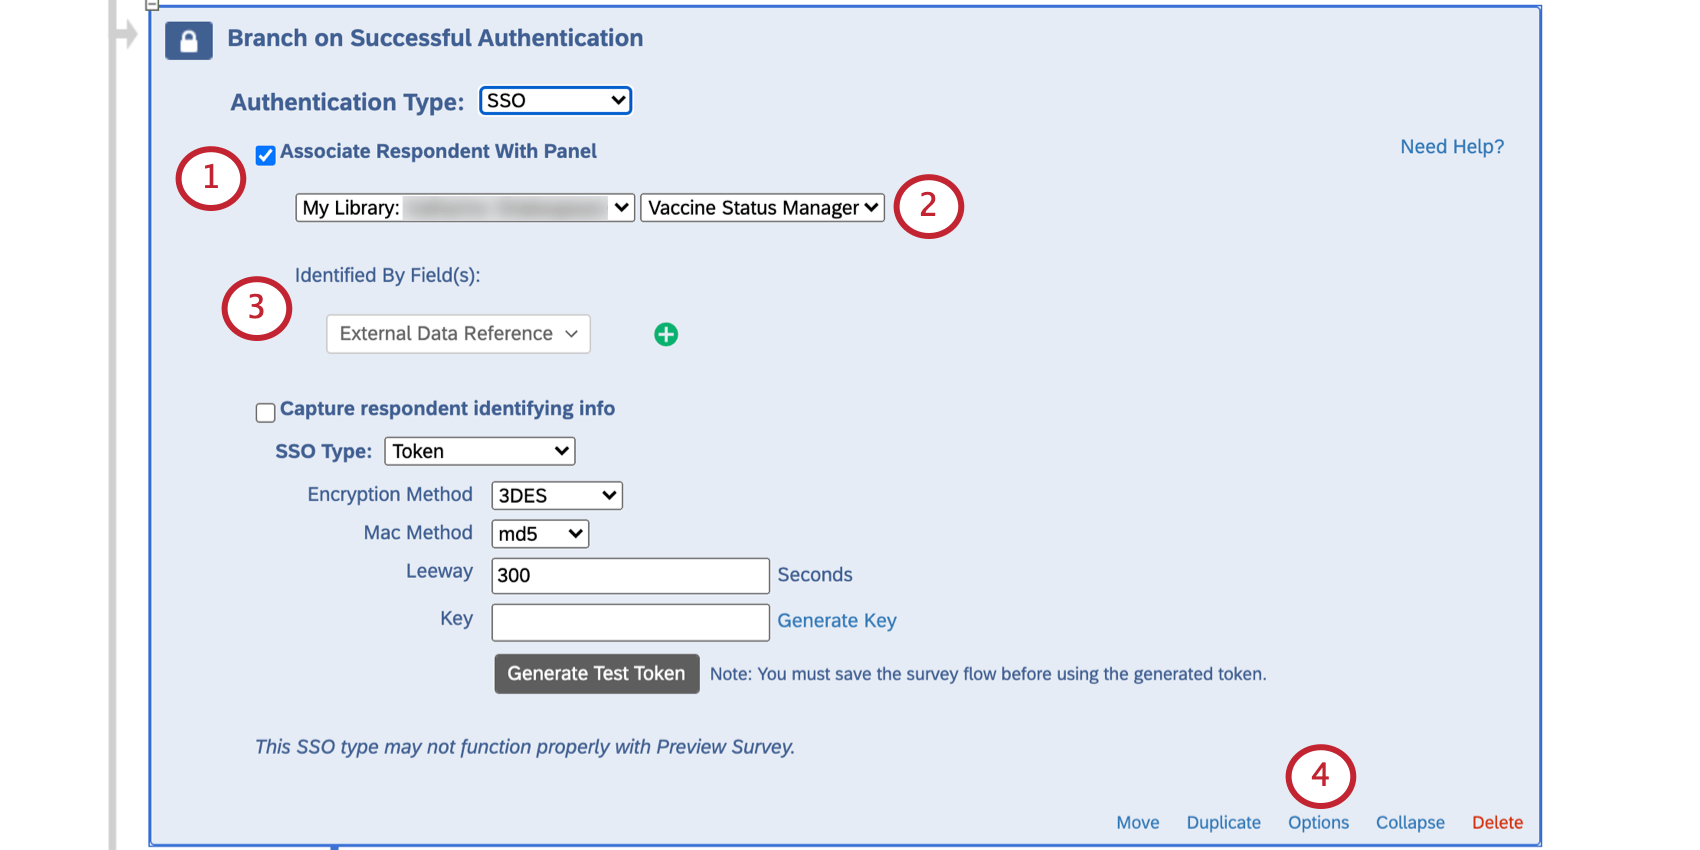
- Select the mailing list that contains your employee roster. In this example, it is the “Vaccine Status Manager” list.
- Under Identified by Field(s), select External Data Reference.
- Click Options on the authenticator.
- Select Allow authenticating respondents to retake authenticated section.
- Optional: Set either the message in the end of survey element or the error messages in the authenticator options to provide additional instructions on how employees can find their employee ID.
- Save your survey flow.
- Go to your other surveys and repeat the same steps for each authenticator.
Schedule Your Distribution
Once you have synchronized your employee list and configured your email messages, you can start sharing your surveys with your employees.
Making both surveys easy for employees to find
The COVID Test Submission lets employees submit their weekly test, and the COVID Status Check lets them check their current status. You’ll want to make sure it’s easy for employees to find both of these surveys.
- Anonymous links: This is a general link to the survey you can post on an internal company website / intranet. Despite the name, responses won’t be anonymous, because employees will log into the survey with their ID.
- QR Codes®: Print this code so employees can scan it with their phones to access the survey on their mobile browser.
Sending employees weekly emails reminding them to upload test results
One of the best ways to remind your employees to fill out their tests is to email them. This section describes how you can set up automated emails that will go out to eligible employees every week.
- Create a segment in XM Directory.
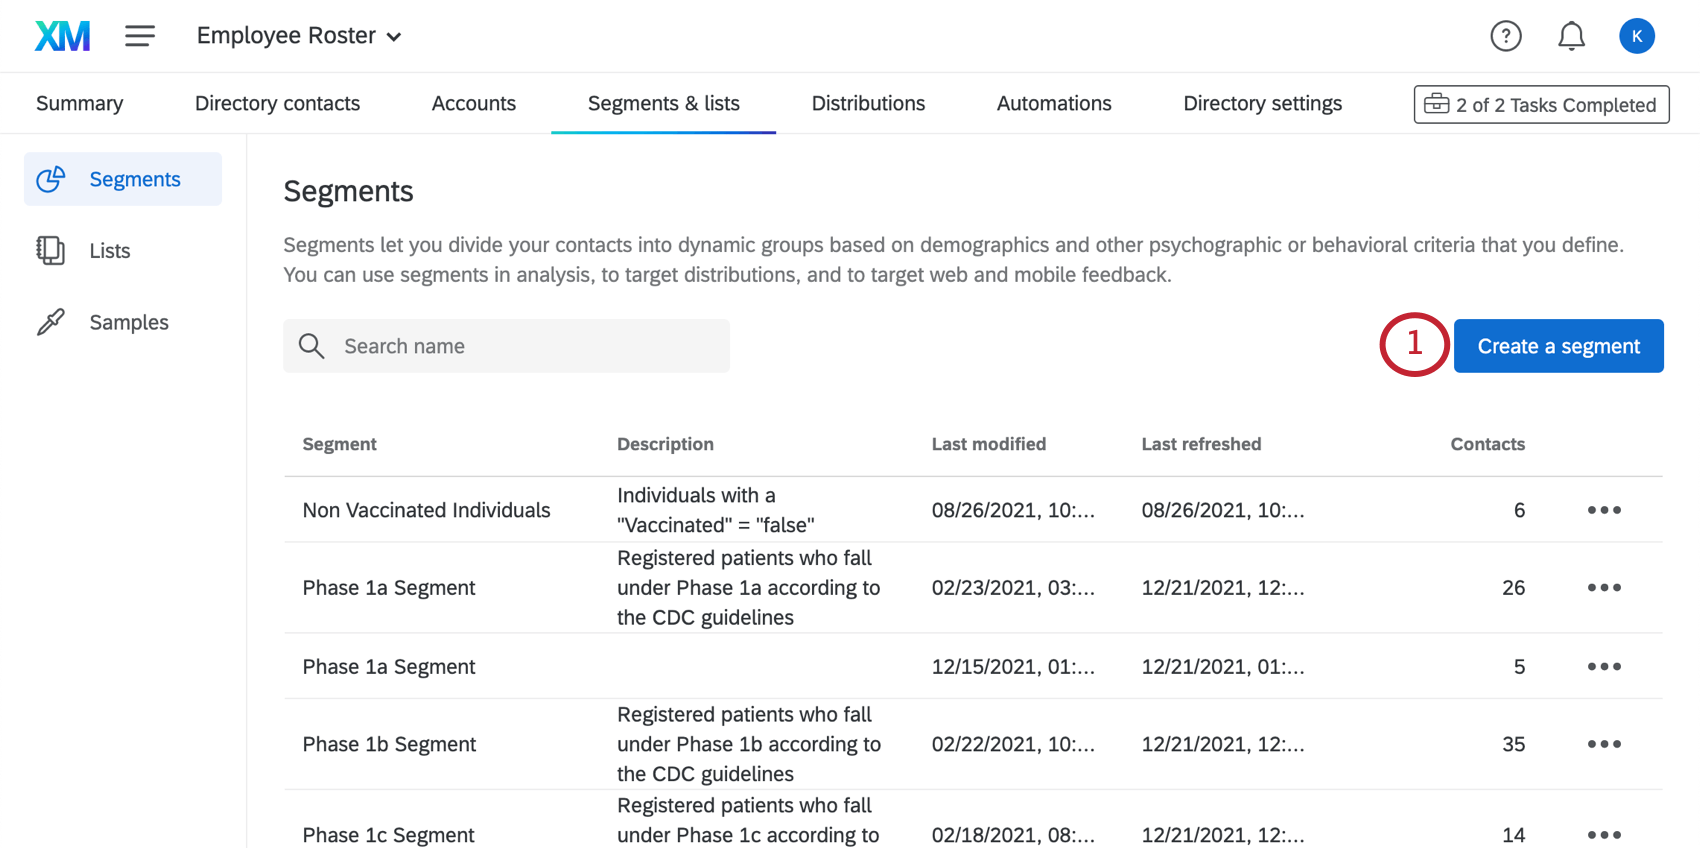 Qtip: Make sure this is in the employee roster directory you created for the Vaccination Status Manager.
 - Name this segment “Testing Required.”

- Under Show only the contacts who meet the criteria, add the following condition:
- Embedded data “TestingRequired” is equal to “Yes.”
- Create your segment. It may take time to generate.
- Next, set up a Send Survey via Email Task in workflows.
- Configure this task so it goes out every week on the same day.
- Make the Testing Required segment the recipient.
- Set the survey to the COVID Test Submission Project.
- Finish creating your workflow.
Sending employees weekly text reminders to upload test results
You may want to send a link to the test submission survey to your employees over text (SMS) rather than email. In order to do this, you will need to ensure that you have purchased SMS credits through Account Services. How many credits you have can be checked right inside the platform.
If you have SMS credits available, you can begin setting your SMS distribution up.
- Open XM Directory. Make sure this is in the employee roster directory you created for the Vaccination Status Manager.
- For every contact you wish to send SMS distributions to, make sure you upload phone numbers in the formats described here.
- Follow the steps to distribute survey invitations through SMS.
Using this XM Solution to Confirm Employees’ COVID Testing Status
Use the resources created by this solution to determine if your employees are eligible to return to the office.
Using the COVID Status Check Survey
The COVID Status Check project can be used to confirm whether an individual employee is eligible to enter the office. We recommend posting a link to the COVID Status Check on the company’s intranet, sharing it via QR code, or emailing a link directly to employees. (See distribution options.)
When they’ve opened the survey, employees will log in with their Employee ID or with single sign-on.
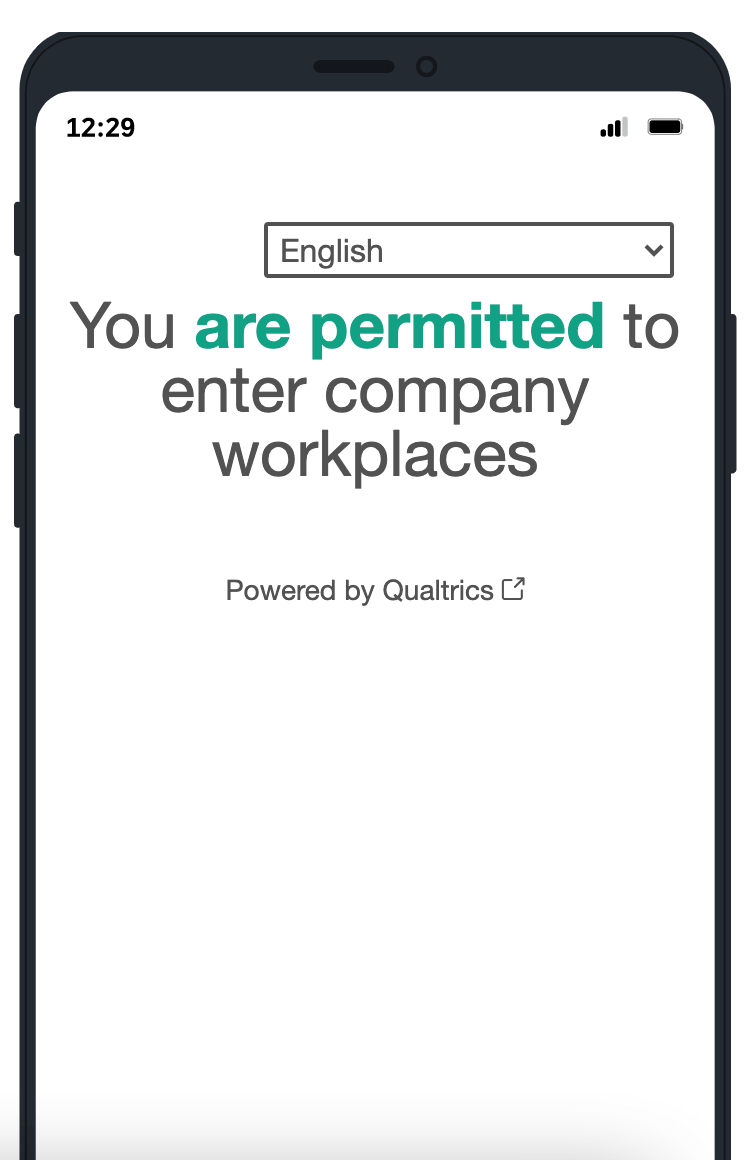
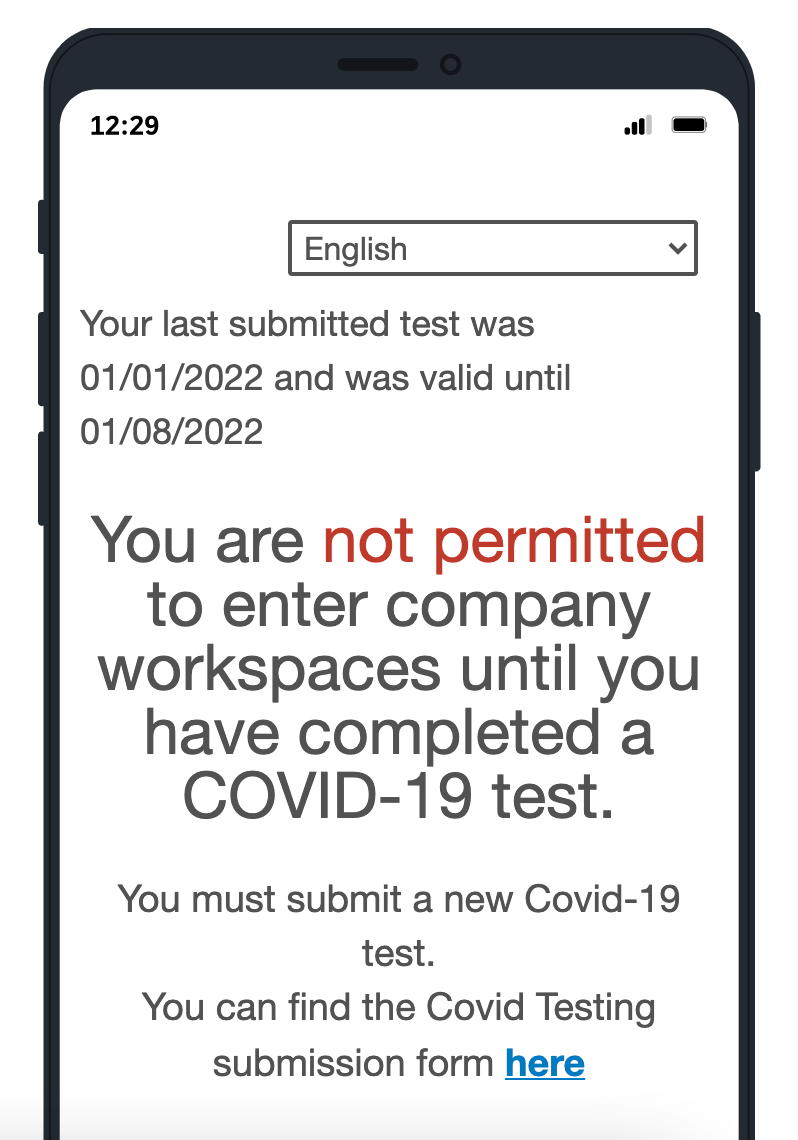
Once signed in, employees will be presented with their current vaccination status. This can be used to perform real-time checks on testing status on-site.
Using the Testing Status Dashboard
HR and security operations can leverage the Testing Status Dashboard to track the number of individuals who are eligible to enter the office.
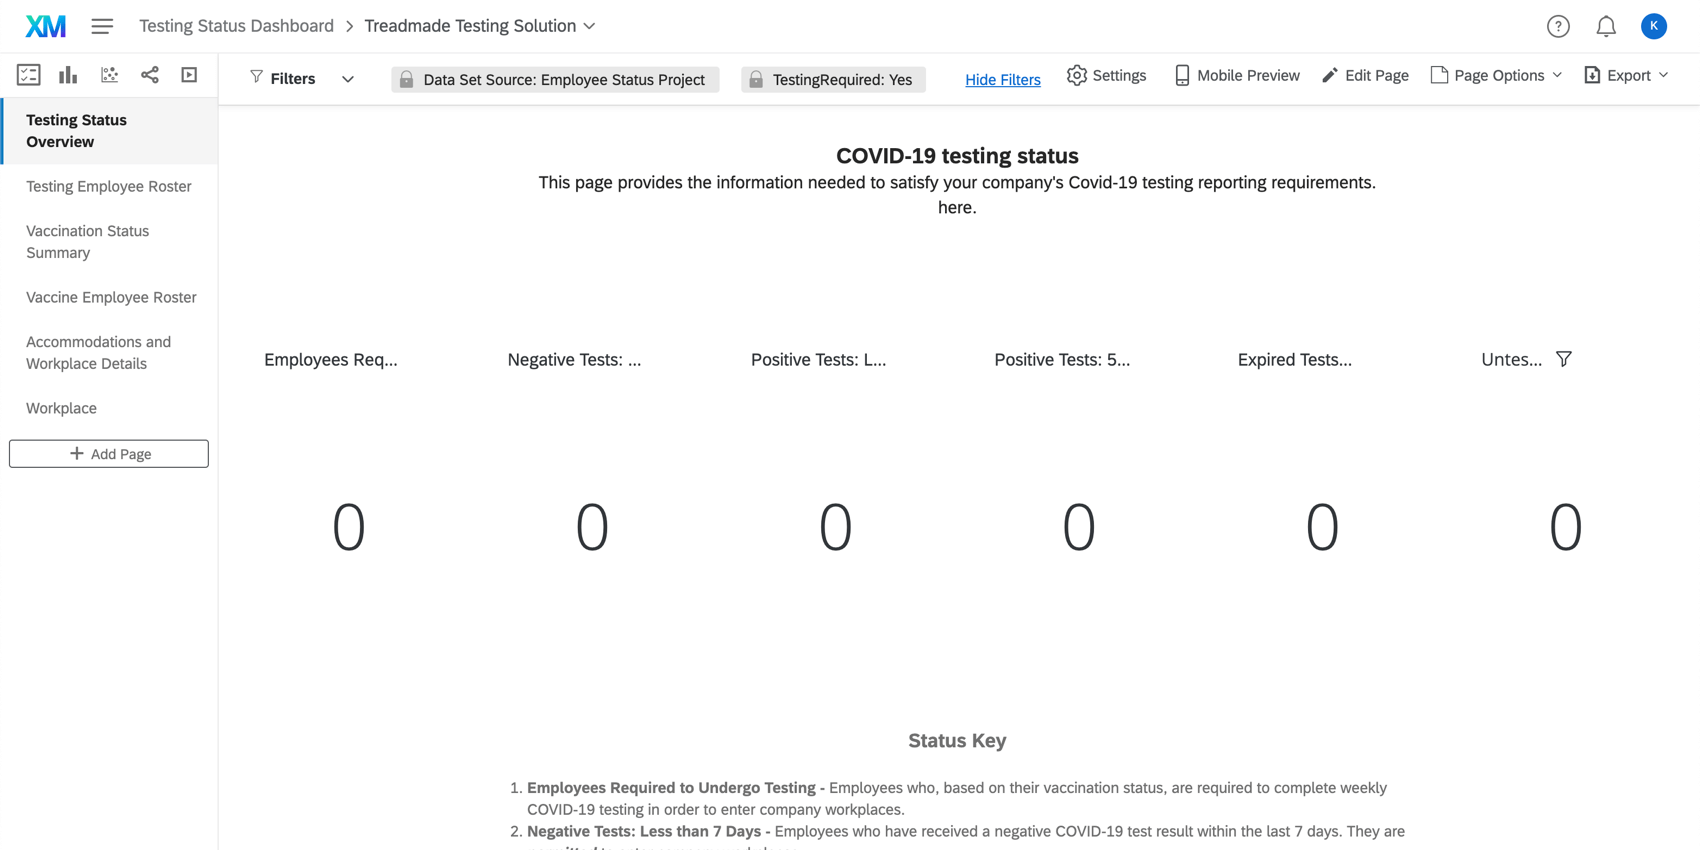
Hover over text to see the full name. The following employee counts are available in the dashboard:
- Employees Required to Undergo Testing: Employees who, based on their vaccination status, are required to complete weekly COVID-19 testing in order to enter company workplaces.
- Negative Tests: Less than 7 Days: Employees who have received a negative COVID-19 test result within the last 7 days. They are permitted to enter company workplaces.
- Positive Tests: Less than 10 Days: Employees who have received a positive COVID-19 test result within the last 10 days. They are not permitted to enter company workplaces.
- Positive Tests: 10-90 Days: Employees who have received a positive COVID-19 test result between 10 and 90 days. They may be permitted to enter company workplaces.
Qtip: CDC guidance encourages companies to prohibit employees from returning to company workplaces for a certain number of days after the employee first experienced symptoms. Consult the official CDC website for the most up-to-date guidance.
- Expired Tests: Employees whose last test was more than 7 days ago (Negative result) or more than 90 days ago (Positive result). They are not permitted to enter company workplaces.
- Untested: These are employees who have never submitted test results. They are not permitted to enter company workplaces.
Download COVID Test Result Documents
Your employees will upload an image of their COVID-19 test result to the COVID Test Submission Project. It’s easy to download all of the uploaded tests at once.
- Go to the Vaccination Attestation survey.

- Go to the Data & Analysis tab.
- Export data.
- Select User-submitted Files along the top.
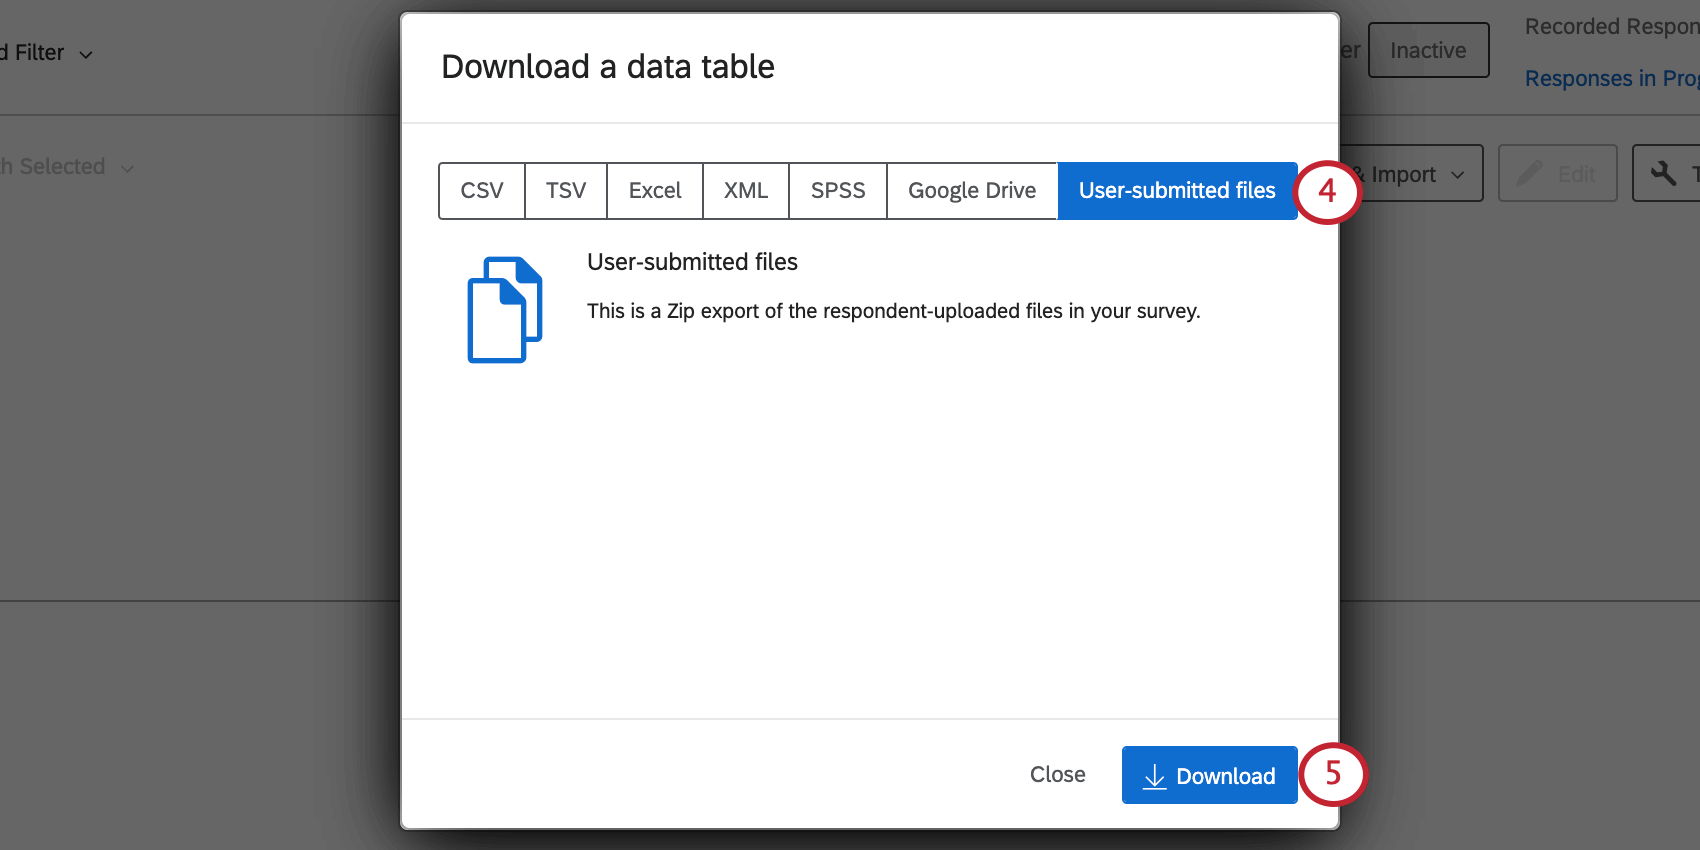
- Click Download.
See the Exporting Response Data page for more detailed steps.
Testing Status Dashboard
The Testing Status Dashboard can be found on the Projects page or inside your Testing Status Manager program by searching its name, “Testing Status Dashboard.”
In this project is a premade dashboard designed by our top subject-matter experts. It includes the following pages:
- Testing Status Overview: Track the number of individuals allowed to enter the office. This page shows how many employees need to submit to testing, how many positive or negative test results have been reported, and more. (See Using this XM Solution to Confirm Employees’ COVID Testing Status.) This page also has a list of employees who have reported positive test results, split by whether or not they are experiencing symptoms.
- Testing Employee Roster: In order to maintain the health and safety of employees, you may be required to provide a roster of current employees, along with Covid-19 test status. This page provides that roster, which can be easily downloaded, if needed.
- Vaccination Status Summary: See how many employees fit each vaccination status, how many have been granted special workplace situations, and how many people are either seeking or have been granted an accommodation.
- Vaccine Employee Roster: A roster of all current employees and their vaccination statuses.
- Accommodations and Workplace Details: This page breaks down details on employees who state they have either:
- Requested or been granted a reasonable accommodation under civil rights laws; or
- Work from home, outdoors, or in a workplace where no other individuals such as coworkers or customers are present.
- Workplace: This page gives information similar to the Vaccination Status Summary, but broken out by workplaces.
You are welcome to add more pages or make edits as needed. If you delete premade dashboard content, it will not be retrievable, and you will have to rebuild it from scratch.
Dashboard Editing
Check out these introductory pages to get started.
- Getting Started with CX Dashboards
- Step 1: Creating Your Project & Adding a Dashboard
- Step 2: Mapping a Dashboard Data Source
- Step 3: Planning Your Dashboard Design
- Step 4: Building Your Dashboard
- Step 5: Additional Dashboard Customization
- Step 6: Sharing & Administering Users
Granting Accommodations
When an employee requests an accommodation, a team of your choice that you specified during setup (e.g., Human Resources) will be notified over email. If that individual’s accommodation has been approved, the team can update that employee’s record in XM Directory to reflect that approval. To do this,
- Navigate to the Directories page.
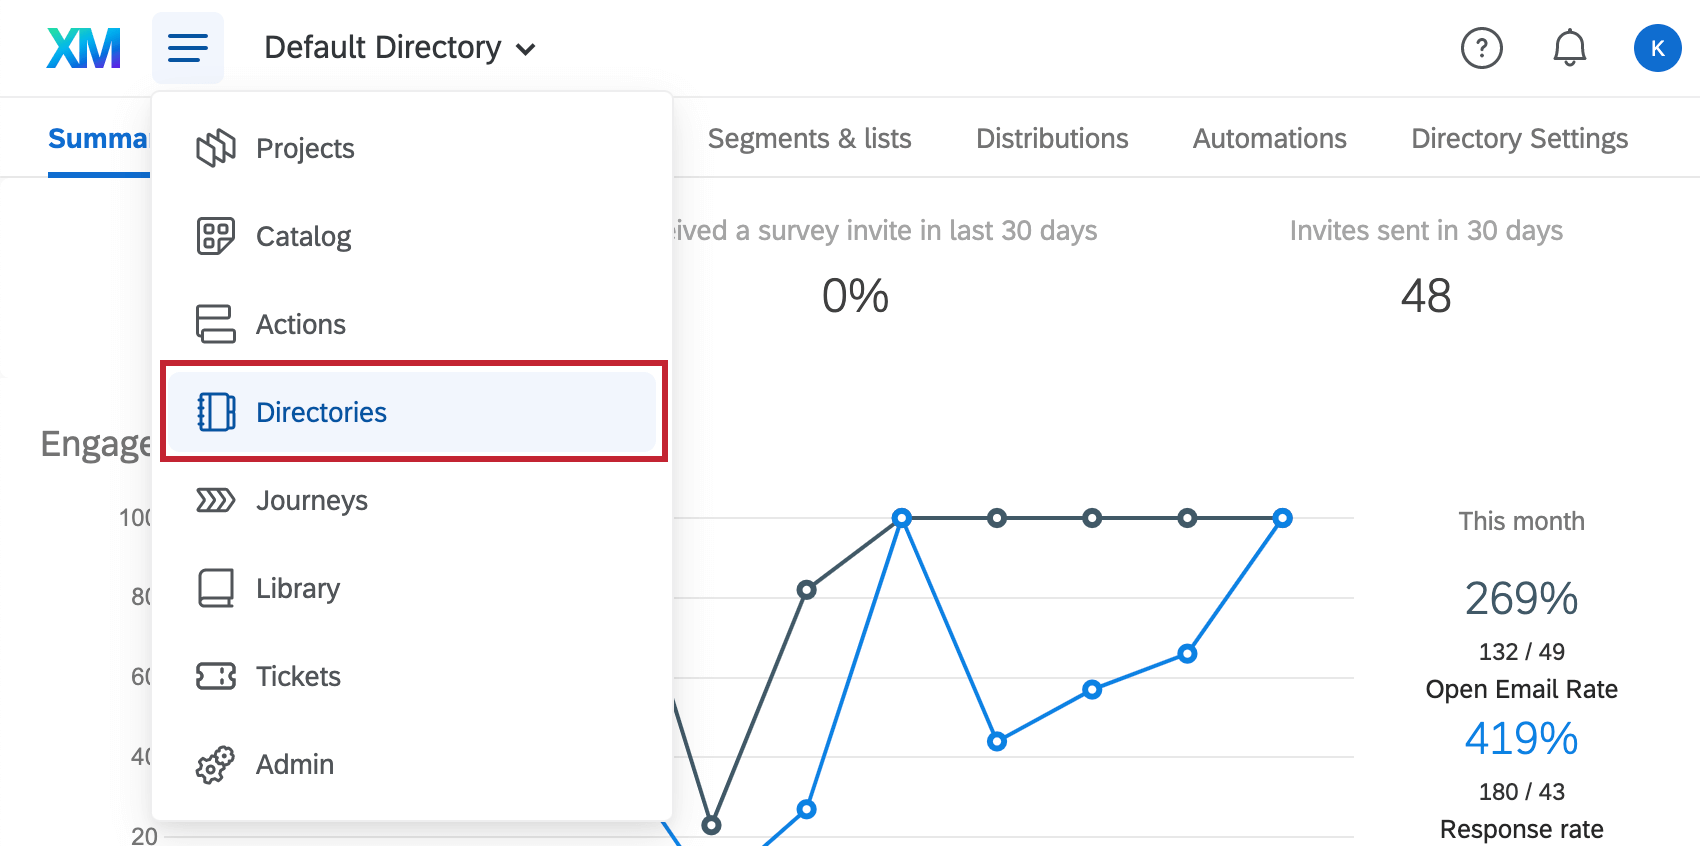
- Open your new directory.
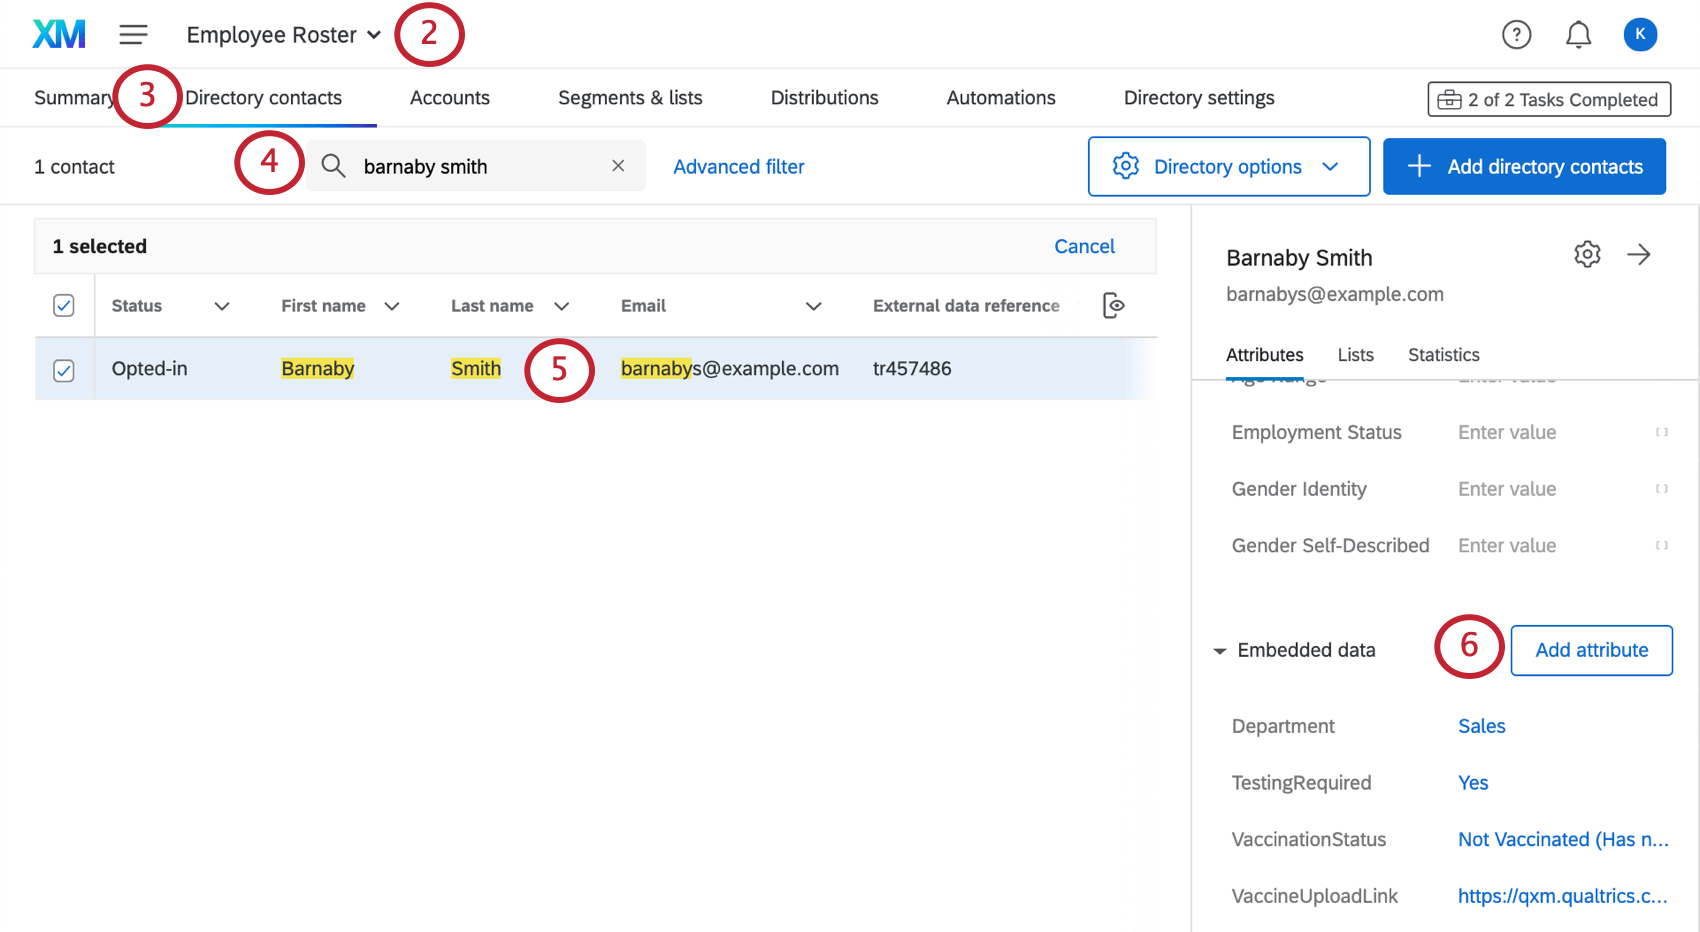
- Go to the Directory contacts tab.
- Search the employee’s name.
- Click the employee’s name.
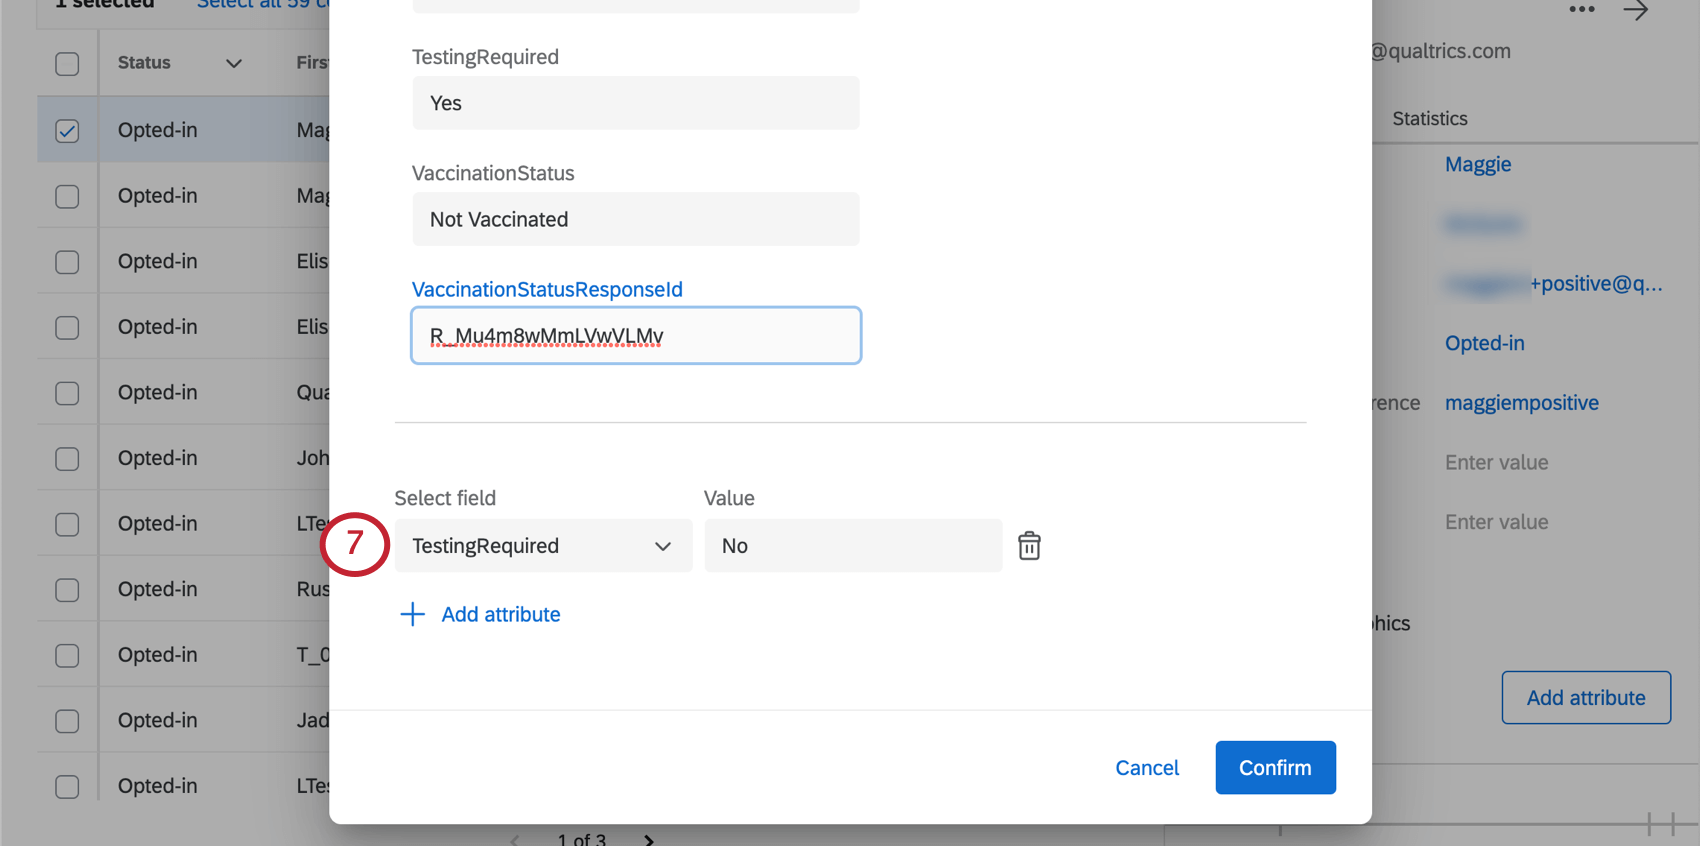
- Follow the steps linked here to edit the contact.
- Adjust the TestingRequired field to say “No” to show a testing accommodation has been granted for this employee.
Other Important Program Maintenance and Information
Here is a list of relevant steps that are not covered on this page. They are the same in both the Testing Status Manager and the Vaccination Status Manager:
In addition, the permissions required to create the Testing Status manager are the same as the permissions required for the Vaccination solution.
FAQs
QR Code is a registered trademark of DENSO WAVE INCORPORATED.