-

Qualtrics Platform -

Customer Journey Optimizer -

XM Discover -

Qualtrics Social Connect
Configuration Tab (Product Testing)
About the Configuration Tab
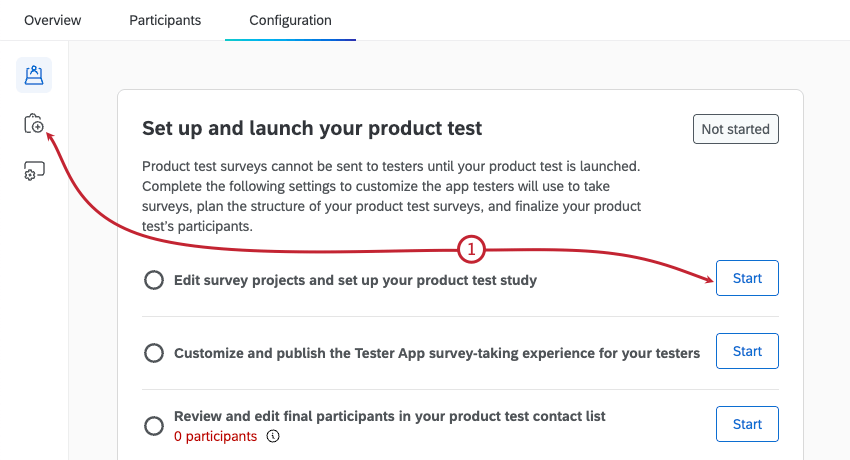
In the Configuration tab you can set up and launch your product test. This includes editing your product test surveys, customizing the app testers will use to take surveys, and finalizing your participants.
There are 3 sections within the Configuration tab:
- Product test overview: See an overview, including next steps for configuring your product test surveys, product test contact list, and tester app.
- Product test details: Add surveys to your product test.
- Tester app setup: Customize the tester app where participants will access your product test surveys.

For more information on Product Testing projects, see Product Testing Overview.
Adding Surveys to Your Product Test
Before your product test is launched, you have to select which surveys to include. At this stage you should also make sure any survey projects you plan to include are finalized and ready to be distributed. Any surveys you add will be available to testers in the tester app.
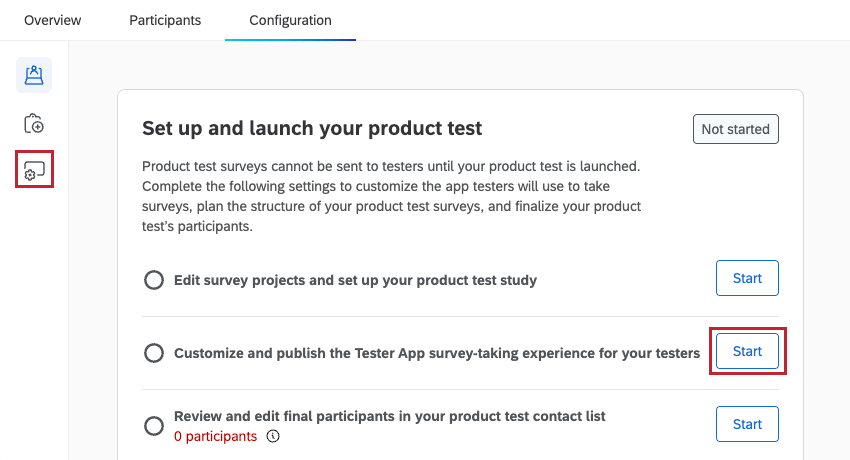
- Select the Product test details section, or click Start next to “Edit survey projects and set up your product test study” within the Product test overview section.
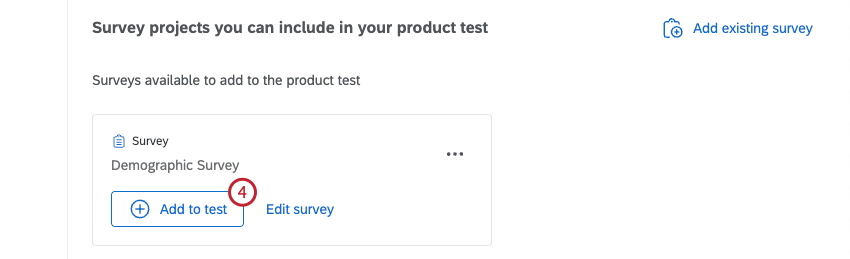
- You will see a list of surveys that are available to be added to your product test. Any surveys that were automatically generated when you created your product test will show up within the Qualtrics templates section. Click Edit survey to make any edits to a survey, including adding additional questions.
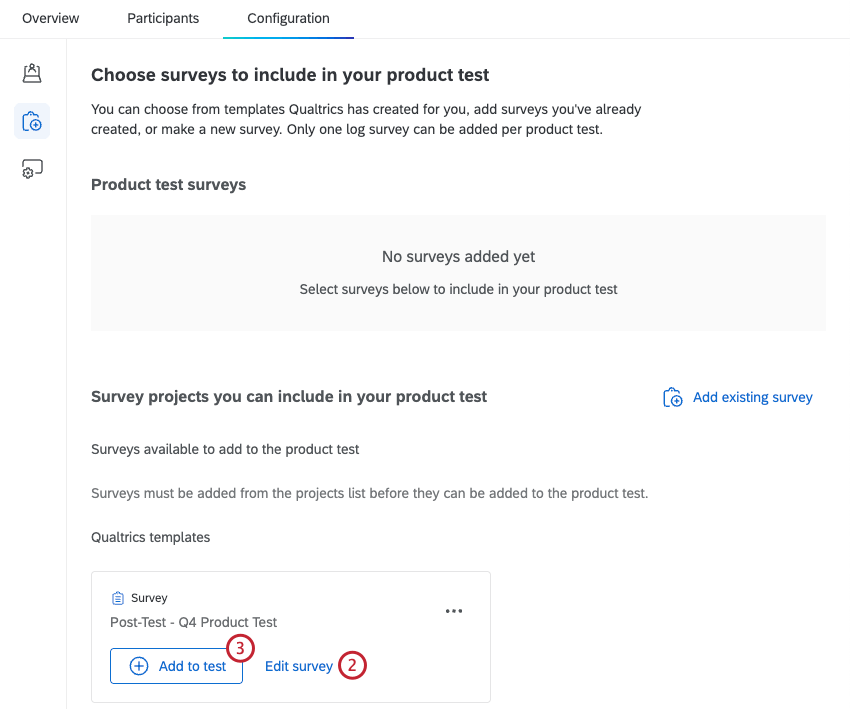 Qtip: text here
 - Click Add to test to add a survey to your product test.
- Decide how the survey should be used in your product test:
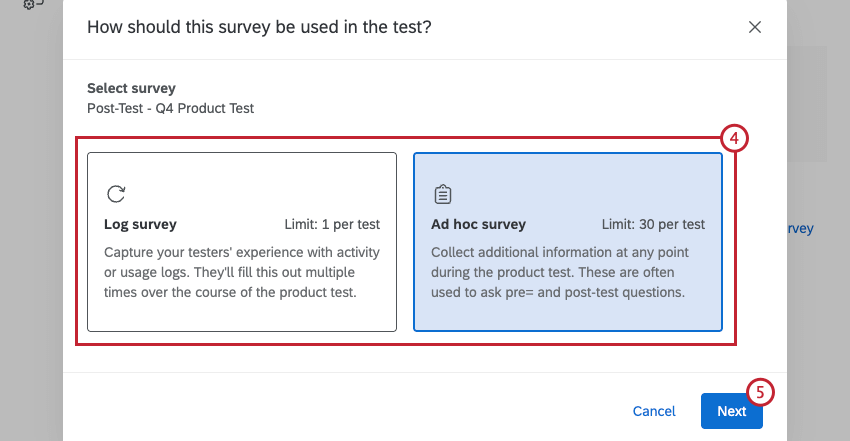
- Log survey: Capture testers’ experience with activity or usage logs. This survey will be filled out multiple times during the product test.
Attention: You can only have 1 Log survey within your product test. The survey you use here should be the Activity / Usage log survey created when you set up your project.
- Ad hoc survey: Capture additional information from testers at any time during the product test.
Qtip: You can have up to 30 Ad hoc surveys within your product test. These often ask pre or post-test questions.
- Log survey: Capture testers’ experience with activity or usage logs. This survey will be filled out multiple times during the product test.
- Click Next.
- Enter a Survey display name. This is how testers will see your survey within the tester app.
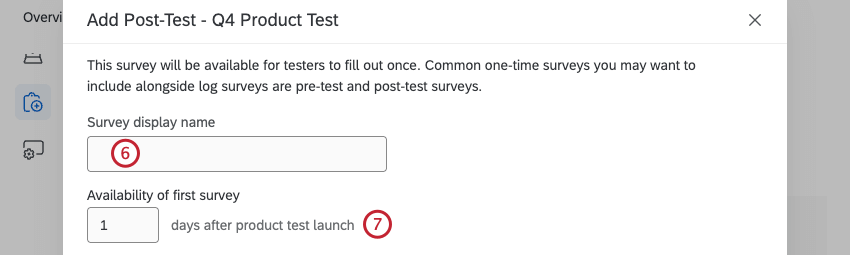
- Enter how many days after the product test launch this survey will be available.
Qtip: To make your survey available on the same day the product test launches, enter 0 here.
- If you are configuring a Log survey, select the number of logs your testers will fill out. This value can range from 2-30.
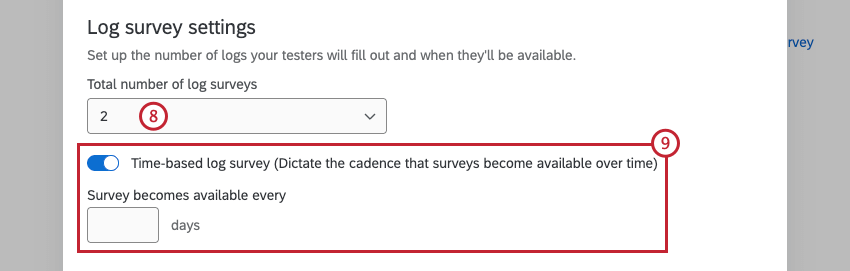
- Select Time-based log survey and enter a number of days if you want a set number of days between each time your testers fill out the survey.
- Select Send an email notification if you want to notify product testers when the survey becomes available.

- If you are sending an email notification, compose the email subject and email message.
- Click Add to product test.
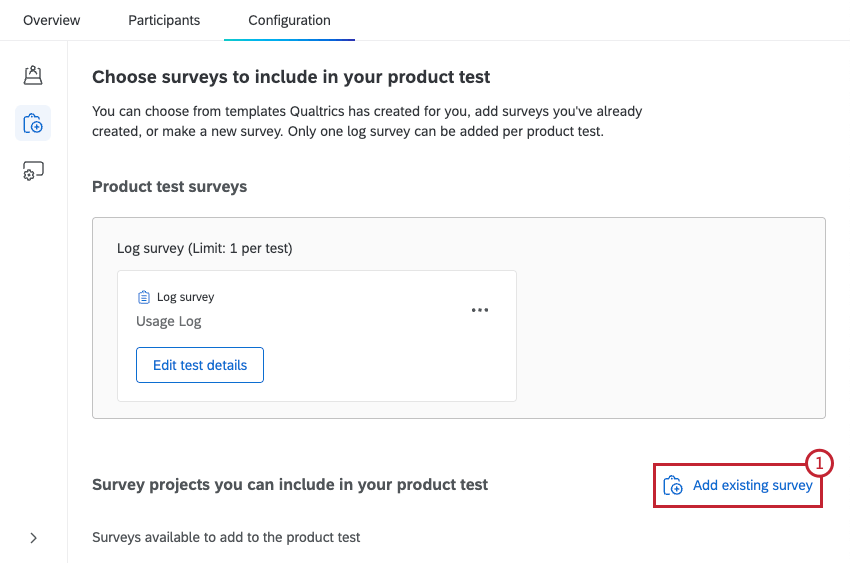
Adding Existing Surveys
Any surveys generated when you create your product test project will automatically show up within the Configuration tab. To use other existing surveys in your product test, you have to add them manually from the projects page.
- Select Add existing survey.
- Use the dropdown to select a survey you have access to.
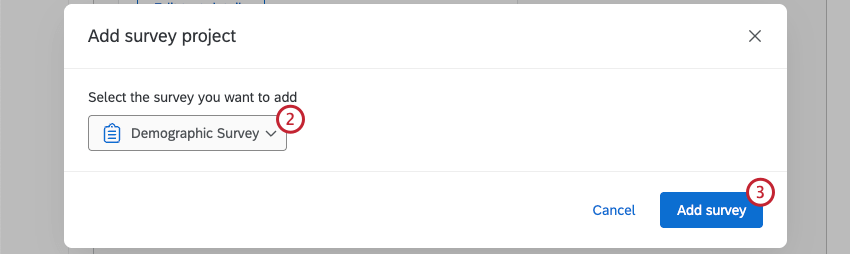
- Click Add survey.
- You can now click Add to test and follow the steps at the beginning of this section to add this survey to your product test.
After surveys have been added to your product test, click the 3 horizontal dots next to one to edit the survey or remove it from the product test.
Customizing the Tester App
Before launching your product test, you can customize the app that testers use to see available surveys. Once the app is set up, product testers can use it as a centralized place to view all surveys available to them.
To start editing the tester app, select the Tester app setup section, or click Start next to “Customize and publish the Tester App survey-taking experience for your testers” within the Product test overview section. For step-by-step instructions on how to configure each component of the app, see Customizing the Product Test App support page.
Finalizing Your Product Test Contact List
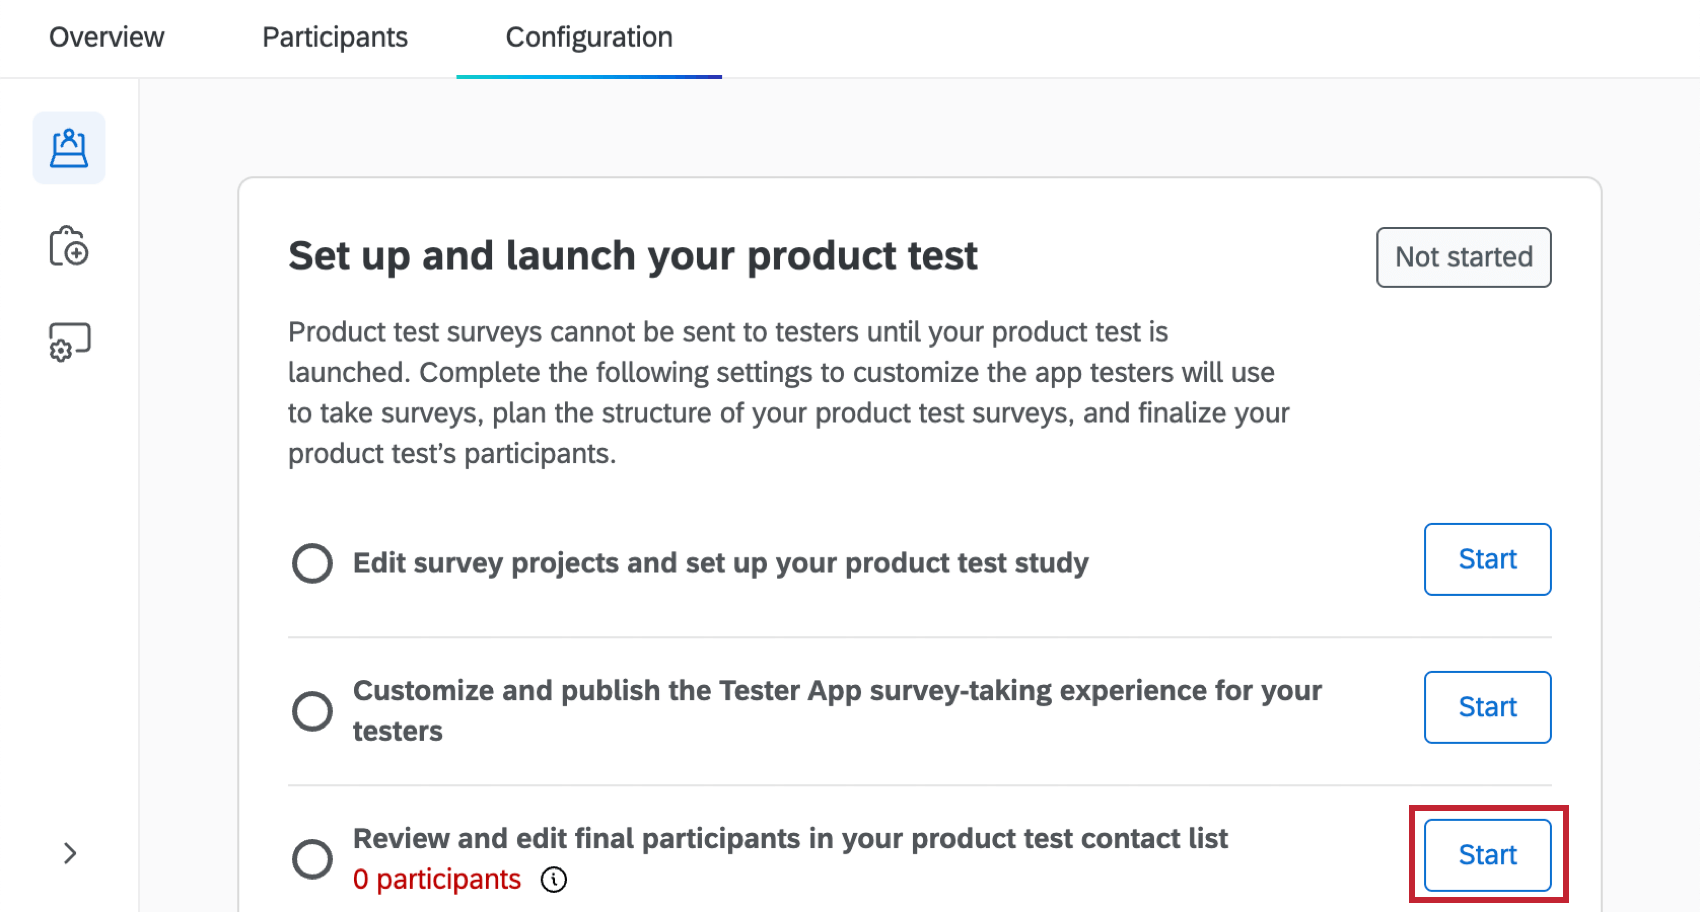
When you’ve finished configuring your product test project, the last step is finalizing the contact list of testers who will be using your product. In this step you can view the contact list that was automatically created from the results of your screener survey, and make any necessary edits.
While you can access your product test contact list by clicking Start next to “Review and edit final participants in your product test contact list” within the Configuration tab, this list is finalized within the Participants tab. For instructions on finalizing the list, see Finalizing Your Product Test Contact List on the Participants Tab support page.
Launching Your Product Test
Once you’ve finished configuring your product test and tester app, you can confirm the details of your test and launch it to testers.
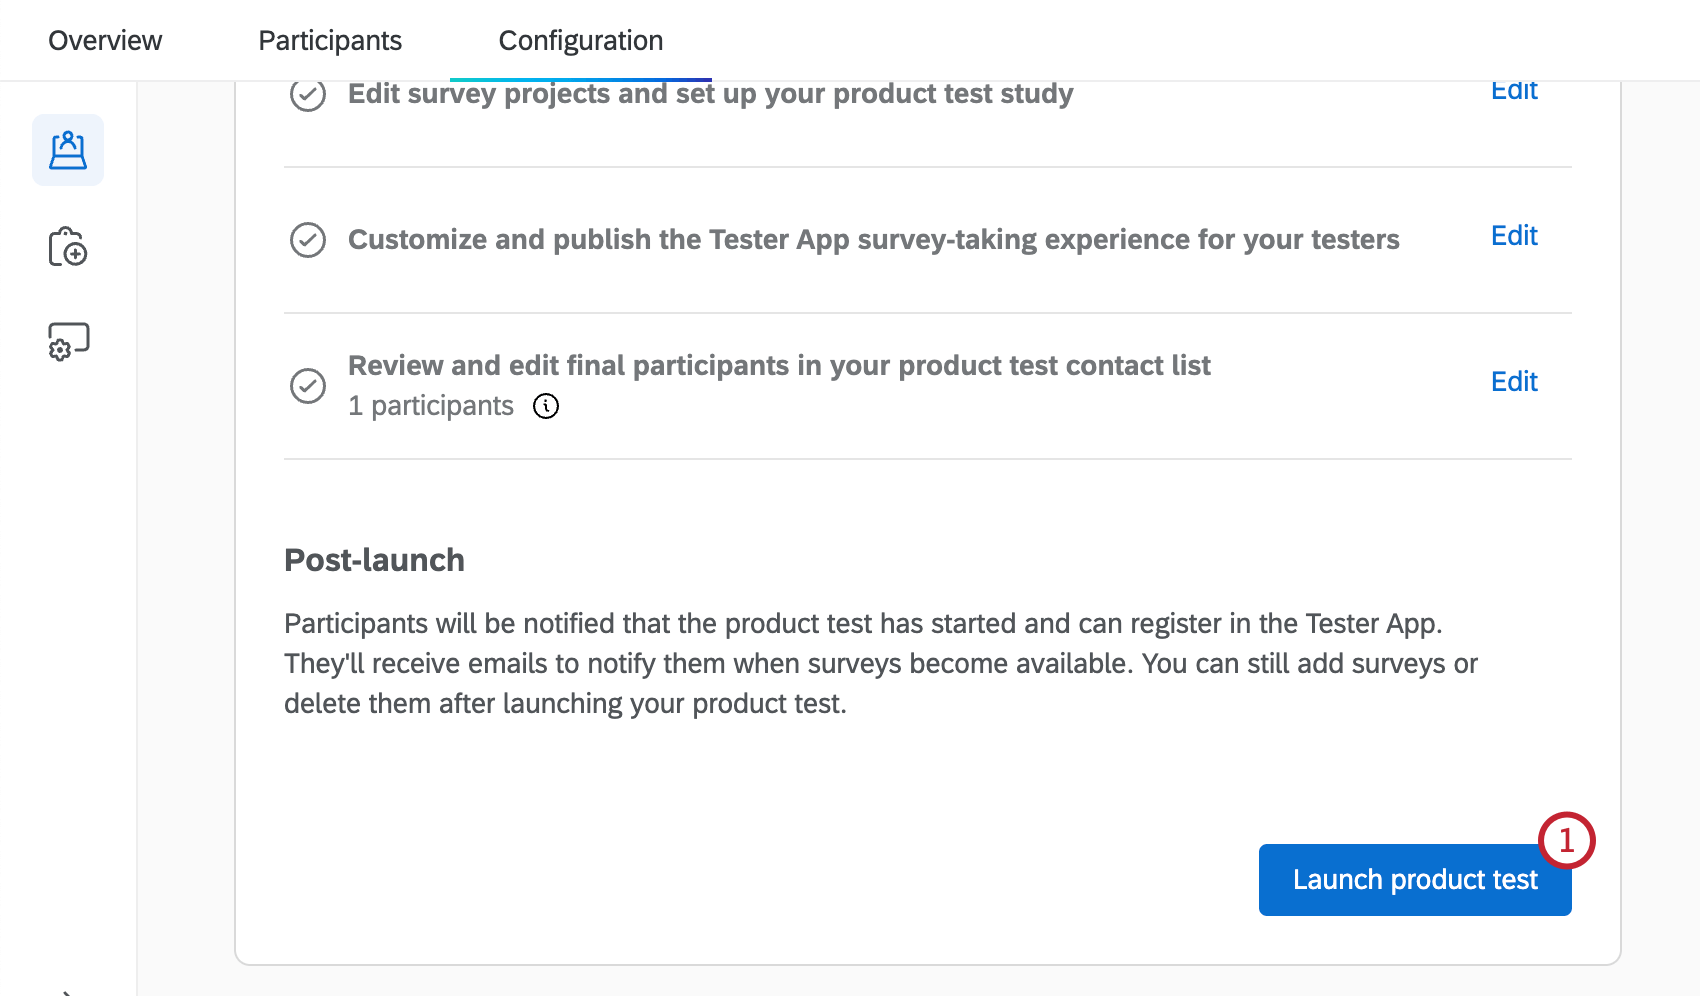
- At the bottom of the Product test overview section of the Configuration tab, click Launch product test.
- Select Finalize.
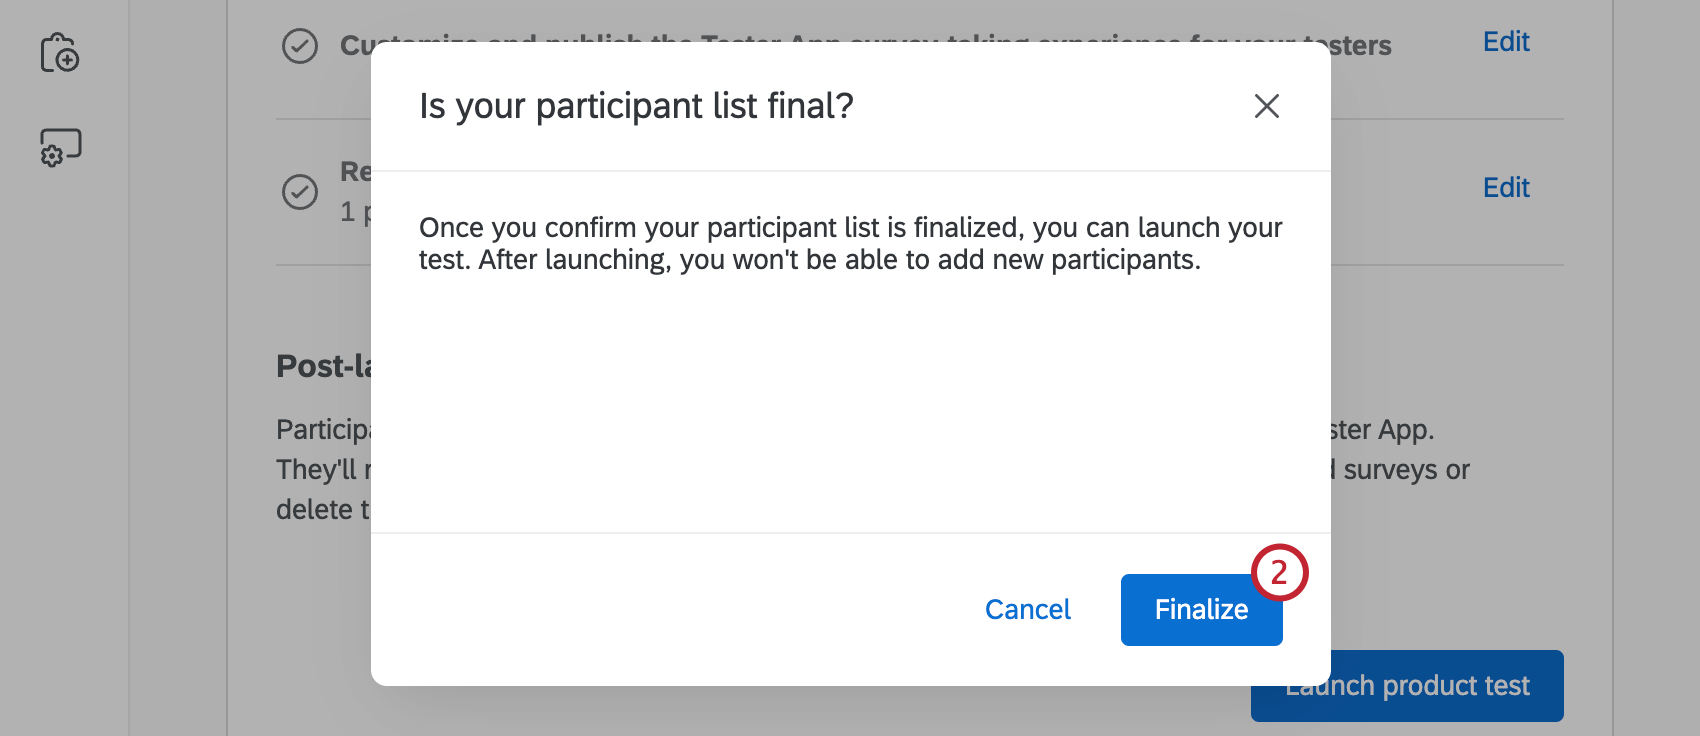 Attention: Once you finalize your participant list, you won’t be able to add new participants.
 - Confirm the details of your product test.
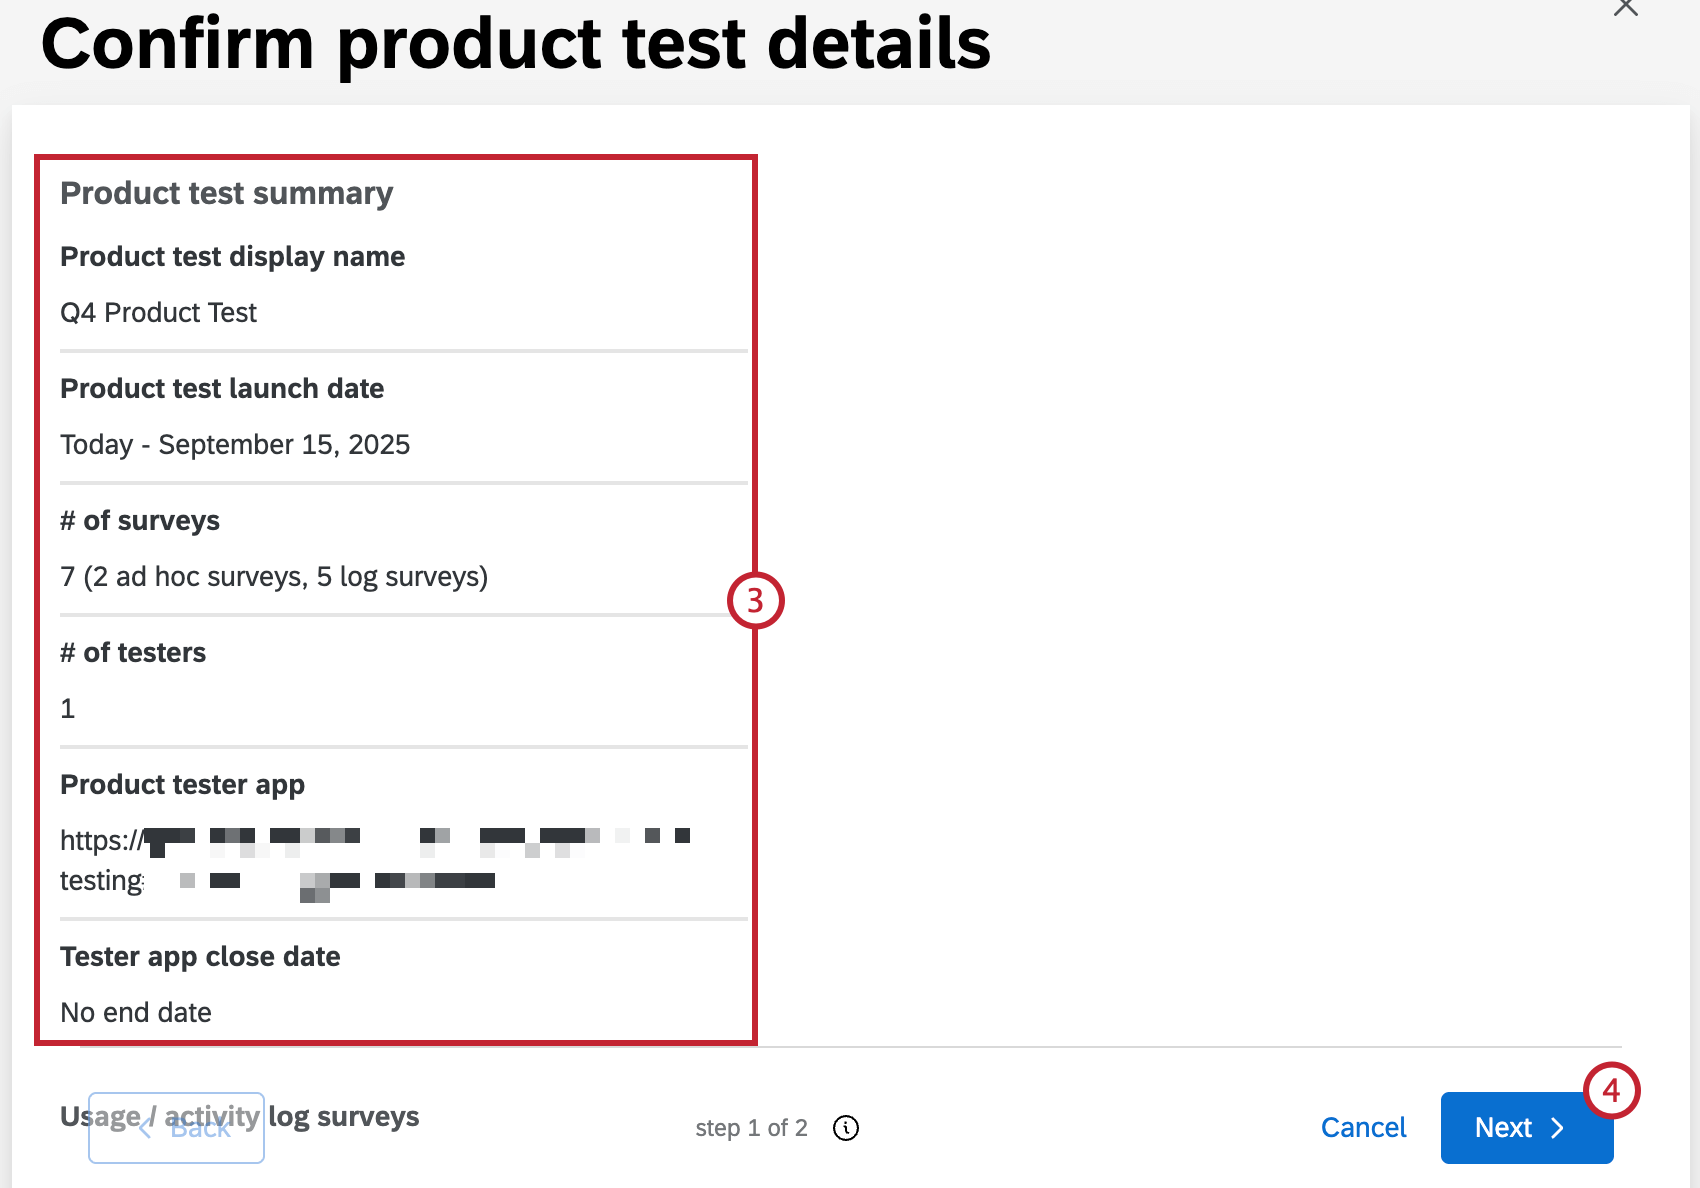
- Click Next.
- Enable Send an email notification to send an email to your testers.
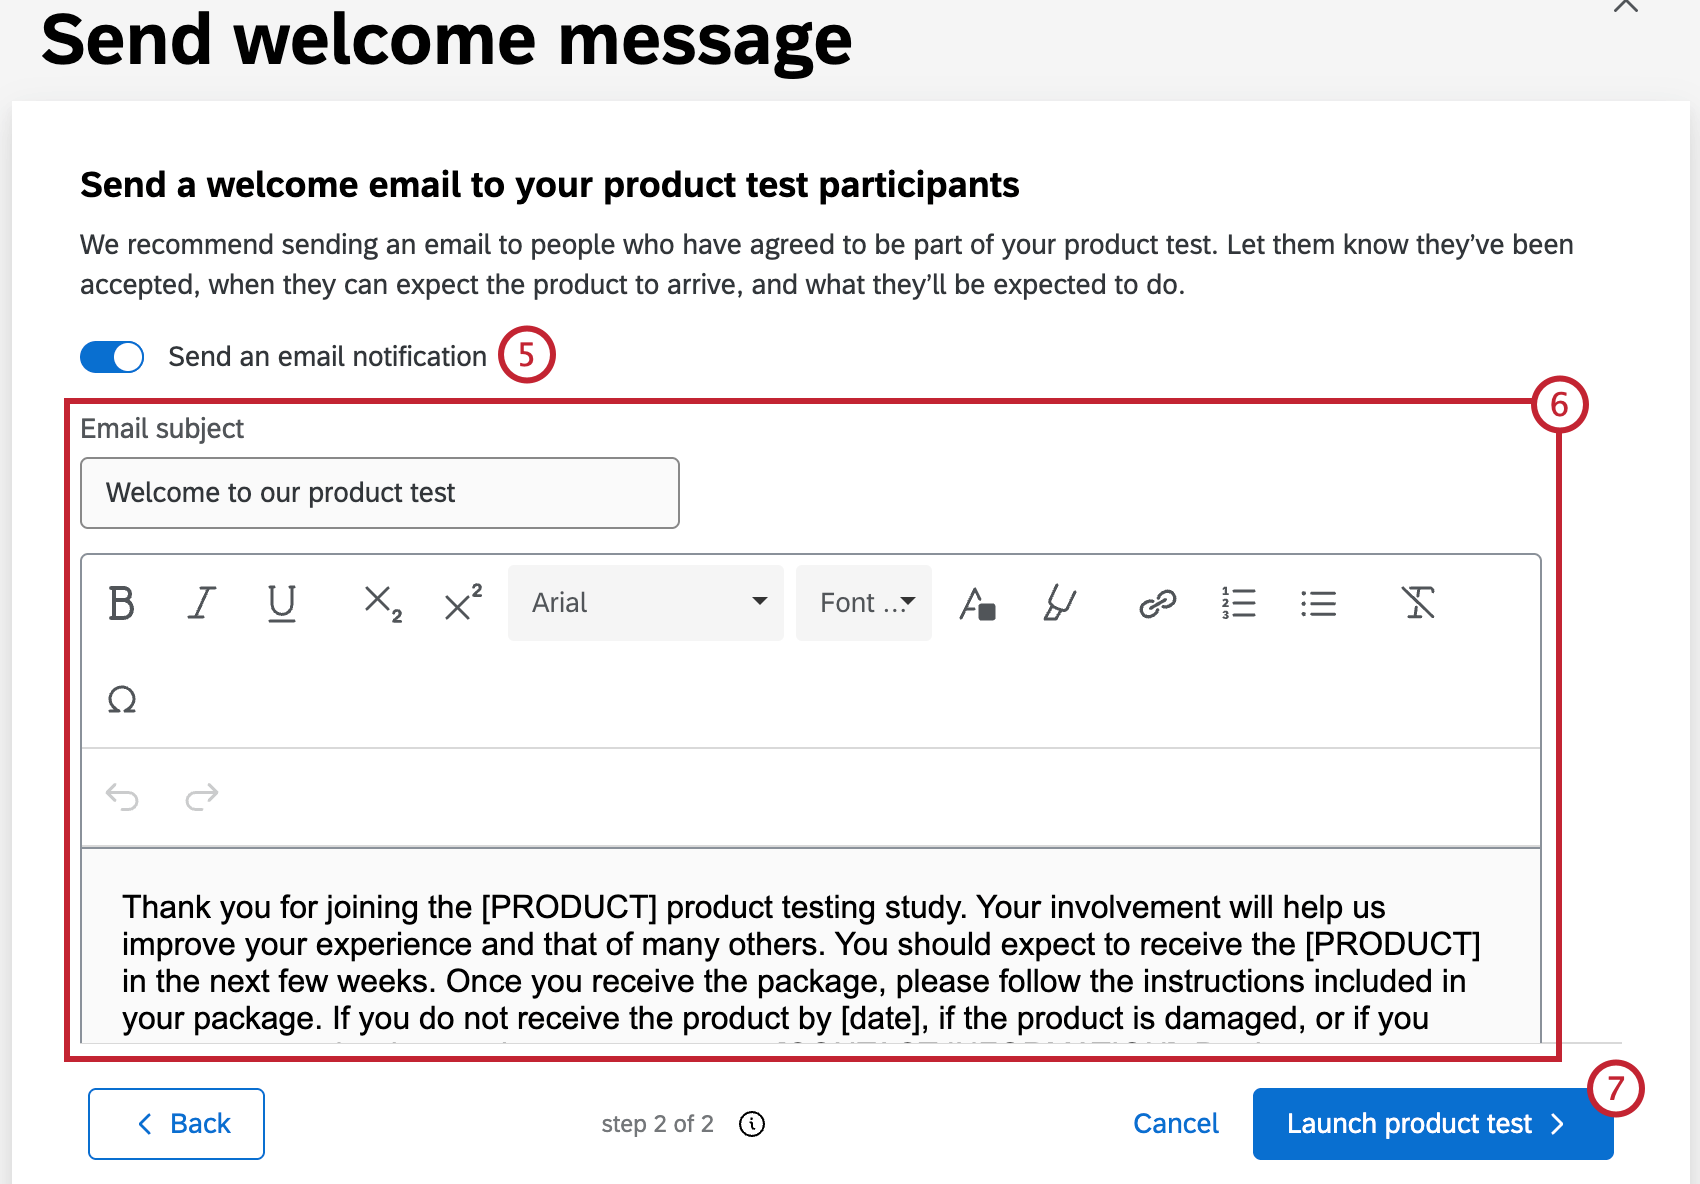 Qtip: This is recommended, because it lets testers know they’ve been accepted, when they can expect the product to arrive, and what they’ll be expected to do.
 - Compose your email and email subject.
- Click Launch product test.
Participants will be notified that the product test has started and can register in the Tester App. They’ll receive emails to notify them when surveys become available. You can still add surveys or delete them after launching your product test.
After Launching Your Product Test
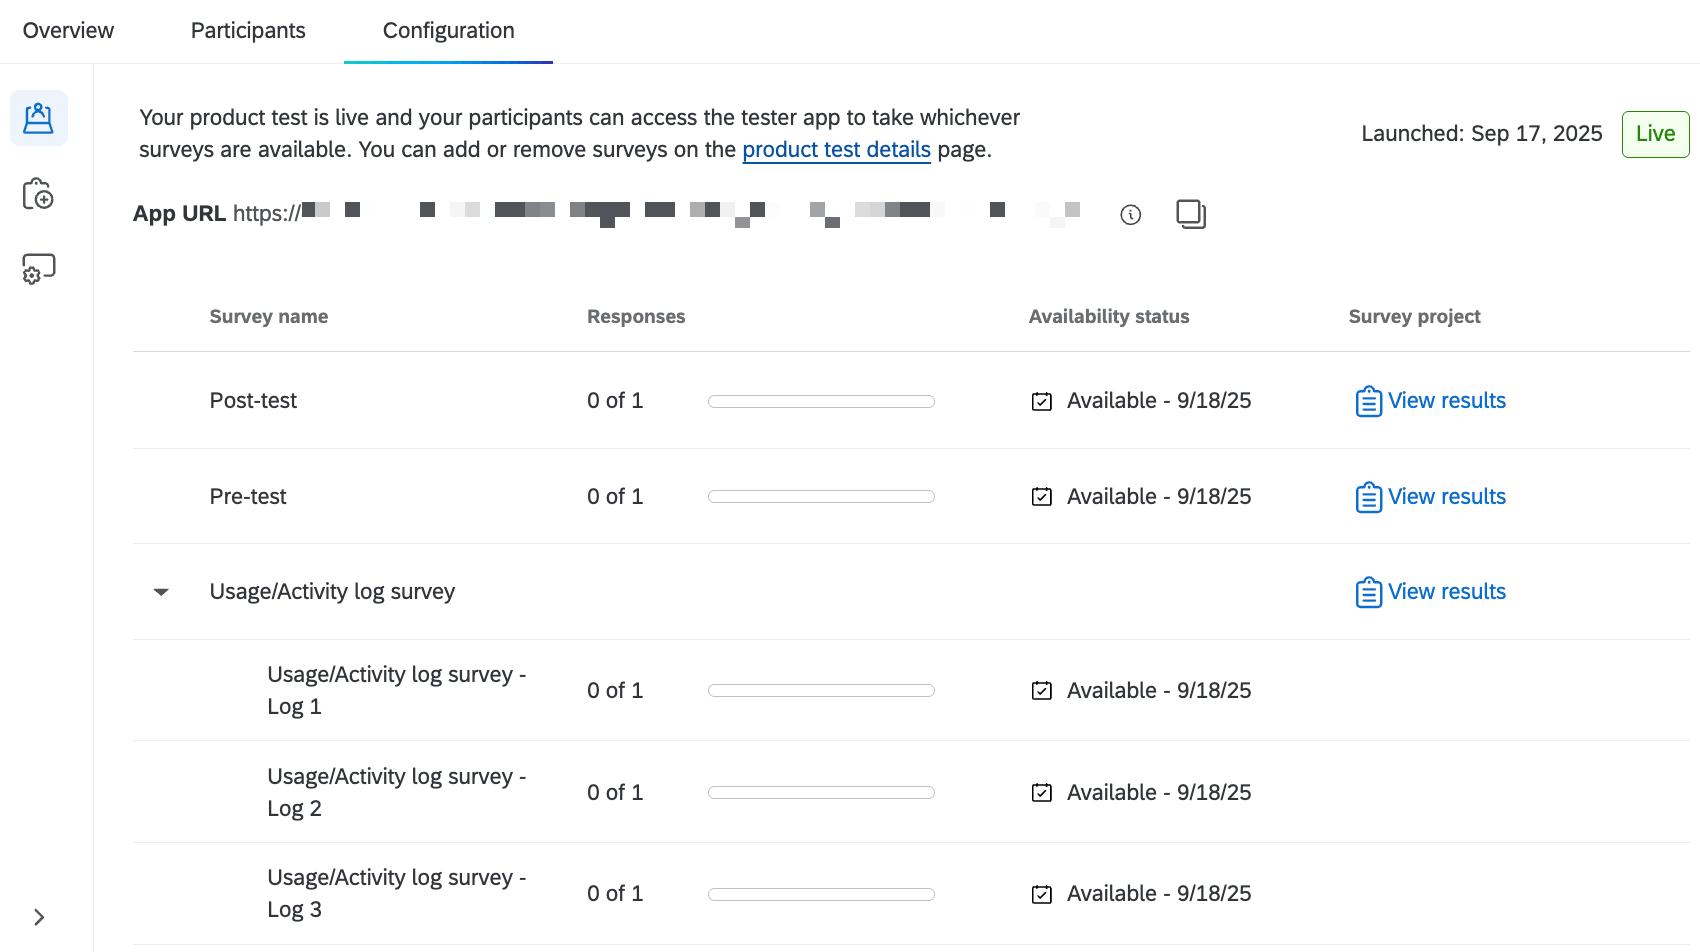
Once your product test is launched, you can still add additional surveys or make changes to the tester app. The Product test overview section will now display a summary of all the surveys involved in your product test, including how many responses you’ve collected.
You can also copy the tester app URL at the top of the page to share with participants. For more information, see Sharing the Tester App.