
Quotas
What's on this page
About Quotas
Quotas allow you to keep track of how many respondents meet a condition in your survey. You can also specify what will happen to your respondents once a quota has been met, such as ending the survey prematurely or deleting the extra responses.
The purpose of a quota is to make sure that you gather only the exact amount of data required for your study.
Example: You could use a quota to keep track of how many customers from each region of your market have taken your survey to make sure you have gathered a balanced sample.
Warning: Quotas aren’t always foolproof. Quota information is not saved until the respondent submits their survey, giving respondents time to change their answers or deliberate over their choices. Because more than 1 person can enter the survey at a time, there is a chance that multiple people submit answers at the same time, possibly resulting in going over quota. For this reason, we caution against users relying exclusively on quota data for providing any monetary rewards or compensation to survey respondents.
Quotas save automatically as you make changes. A timestamp will appear along the top next to the quota’s name to show the last time it was saved.
Qtip: Quotas can be used in survey projects, Conjoints, MaxDiff, and assorted XM Solutions. Quotas cannot be used in any Employee Experience projects. See more on Project Types.
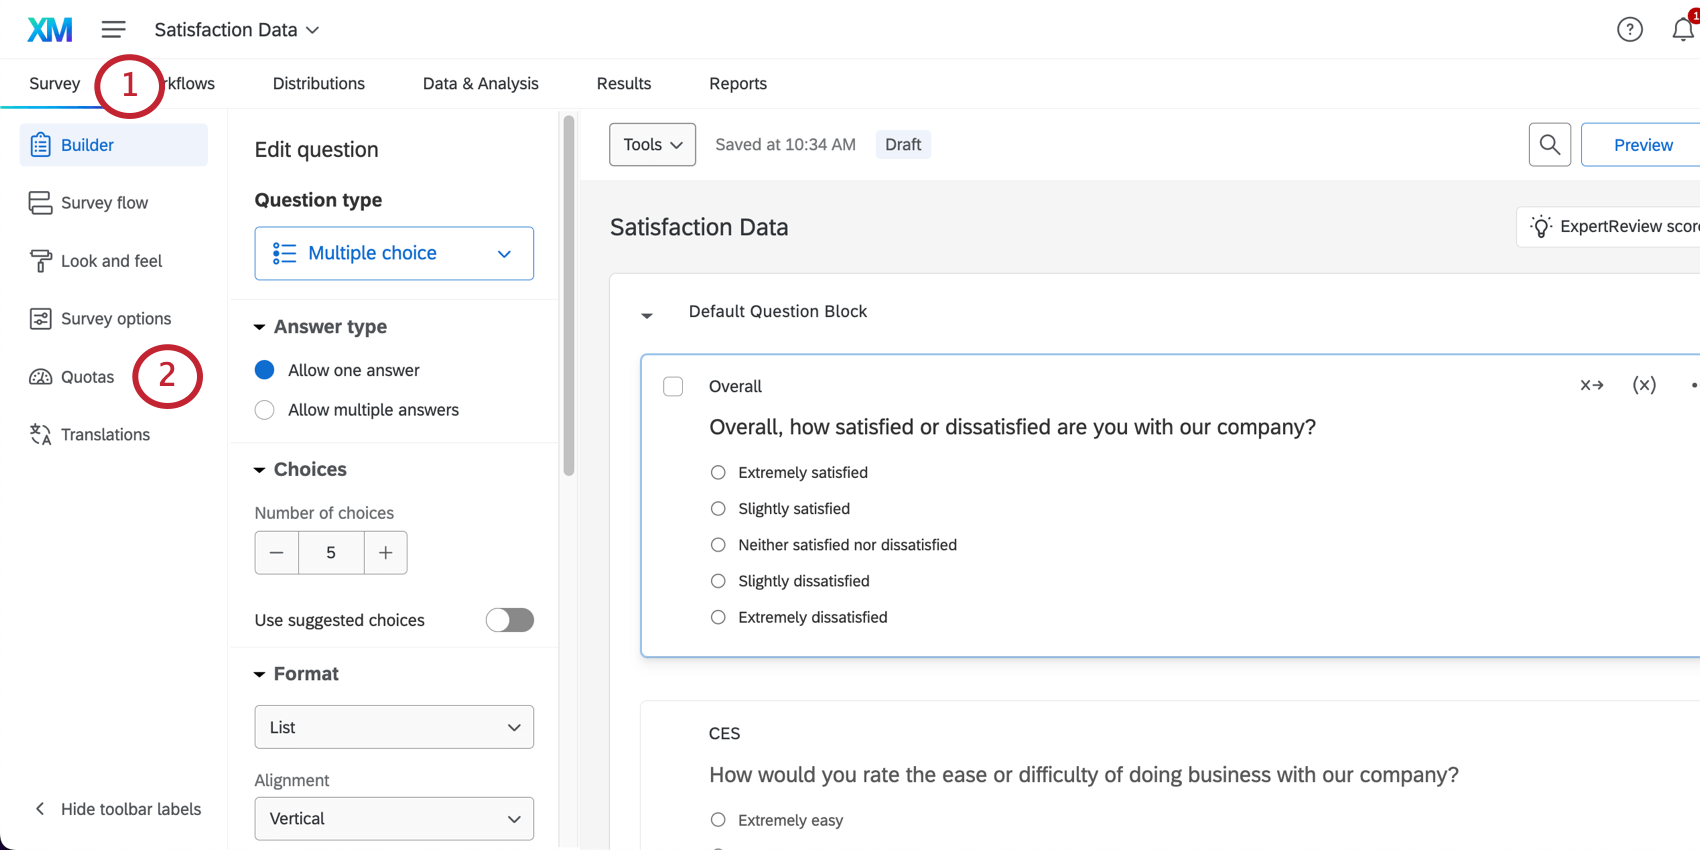
Creating Quotas
Attention: Quotas are not retroactive. Quotas will not include any responses collected before they were created.

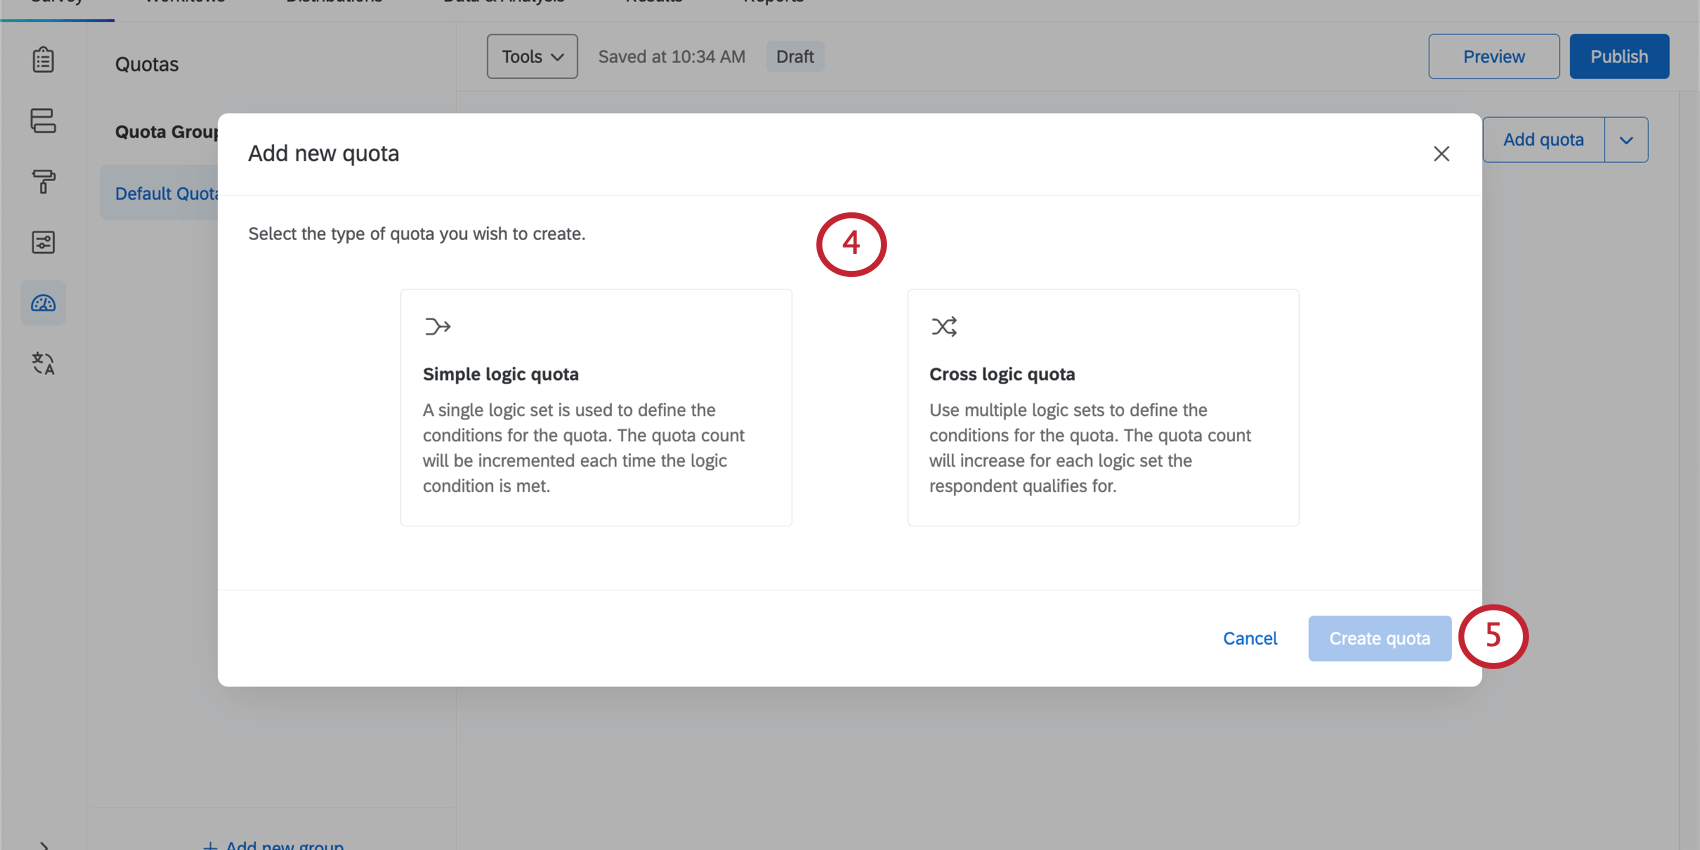
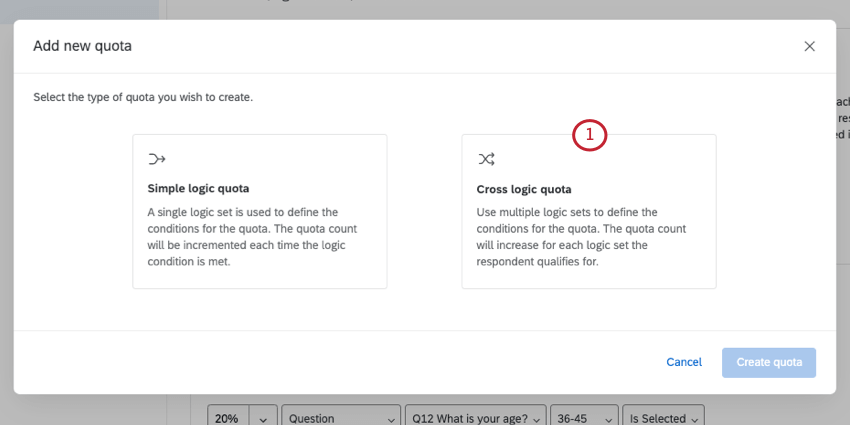
- Simple logic quota: Define when a respondent meets your quota. The quota count will be incremented each time a respondent comes into the survey who meets the conditions you set. Despite the name, you can actually build quite complex conditions, if you need to; however, simple logic quotas won’t have the percentage-based capabilities of the cross logic quota.
- Cross logic quota: Use percentages to define how respondents are distributed in your quota. Specify which percentage of respondents should match each criteria, and then Qualtrics will do the heavy lifting of figuring out how many respondents are needed for each combination of conditions.
Qtip: You can also make new quotas from copies of existing ones. Click the dropdown next to any quota and click Duplicate quota.
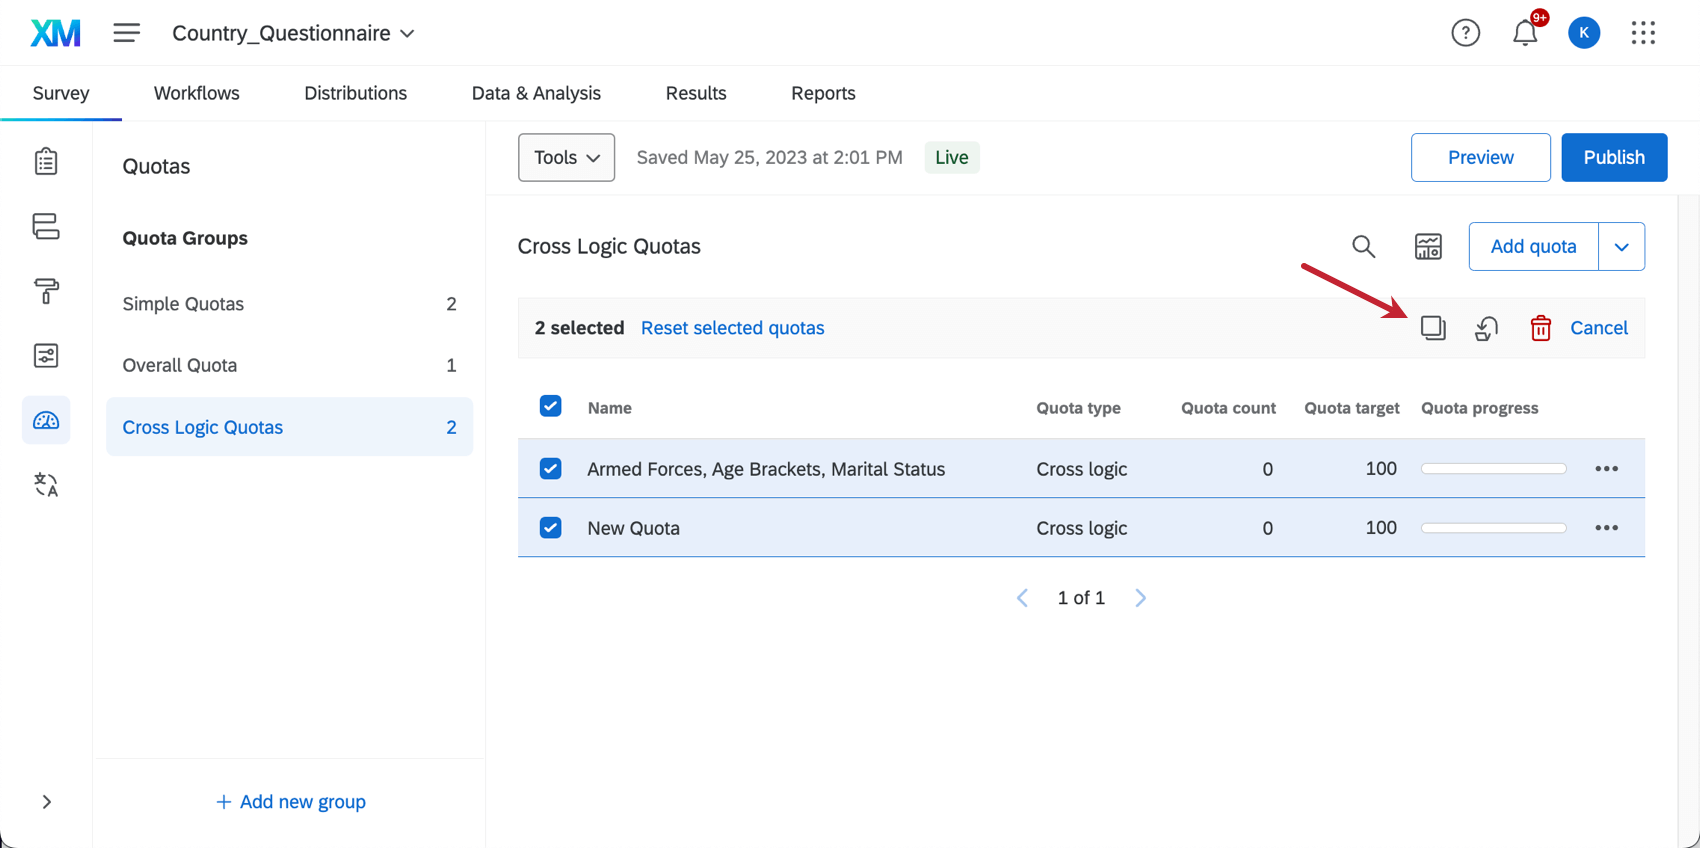
You You can also copy multiple quotas at a time by selecting them and clicking the Duplicate icon.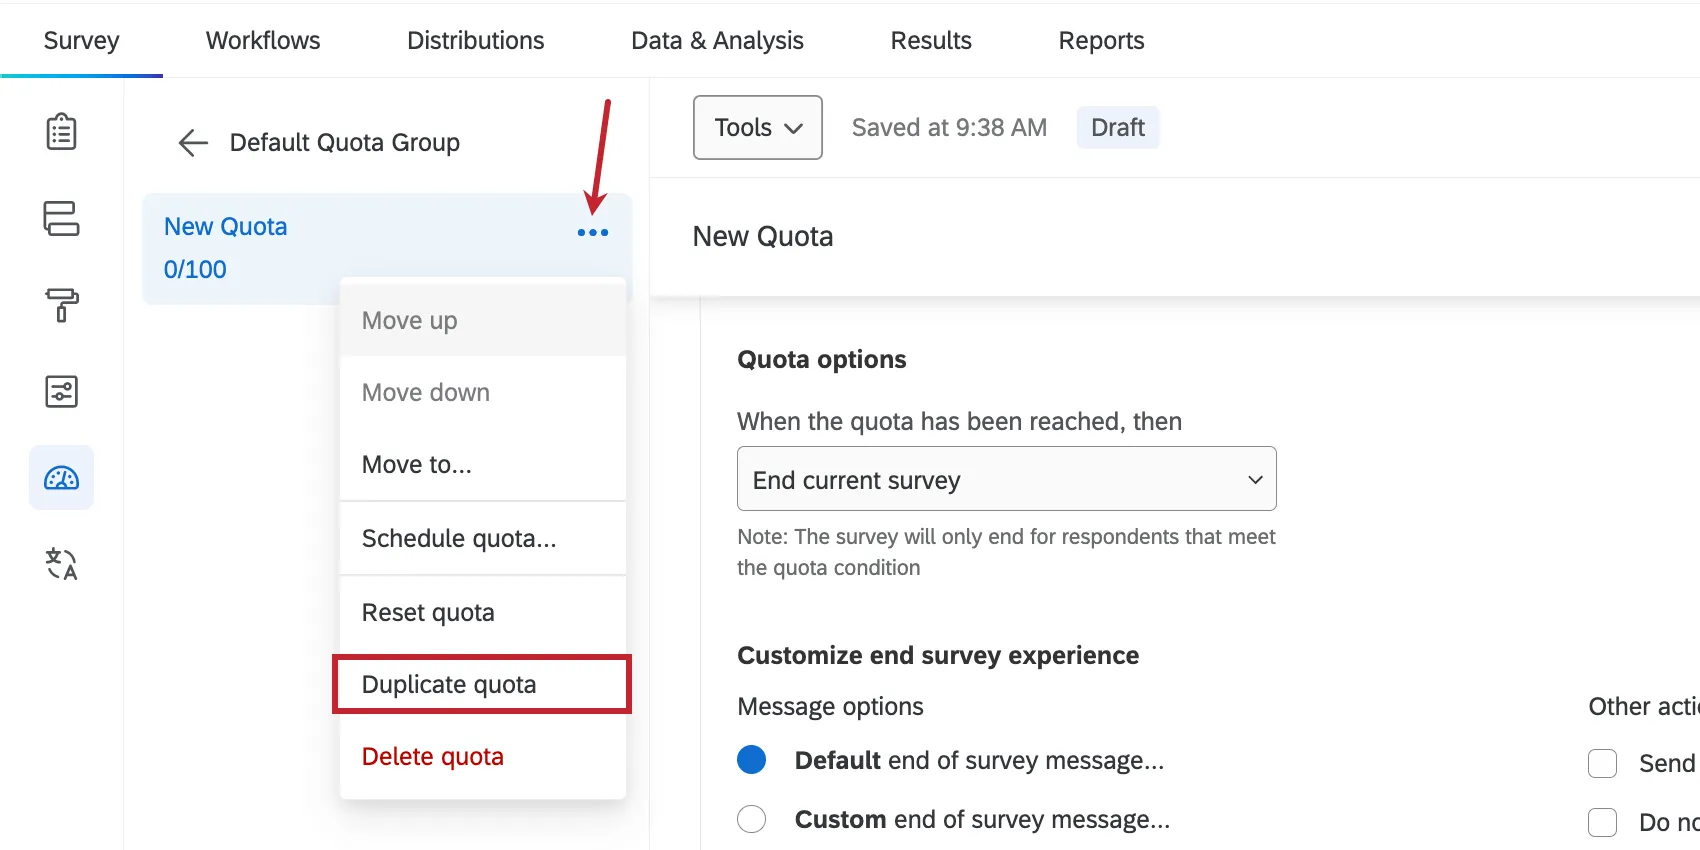


Setting Quota Counts and Targets
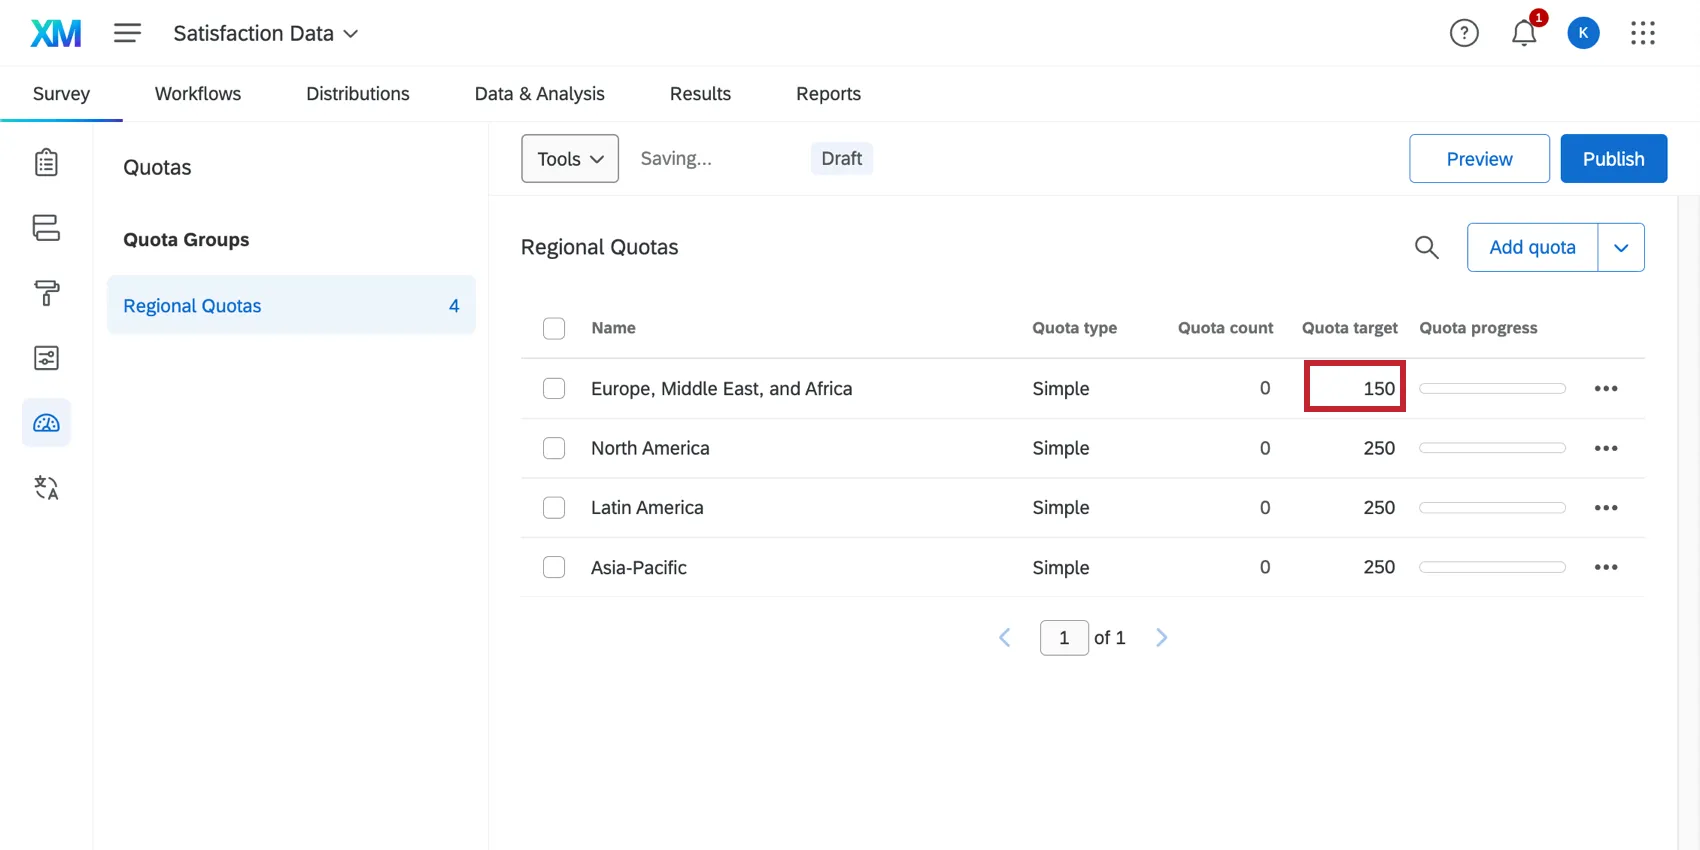
Next to every quota, you’ll see a pair of numbers – for example, 0/100. The number on the left of the slash (e.g., 0) is the quota count. The number on the right (e.g., 100) is the quota target.
Quota Target
To ensure that you gather only the exact amount of data you require for your study, it is important to set a number limit for your quota. The quota target is the maximum number of respondents you want to take your survey who fulfill the quota conditions.
To set the quota target, all you need to do is click the current quota target and change it.
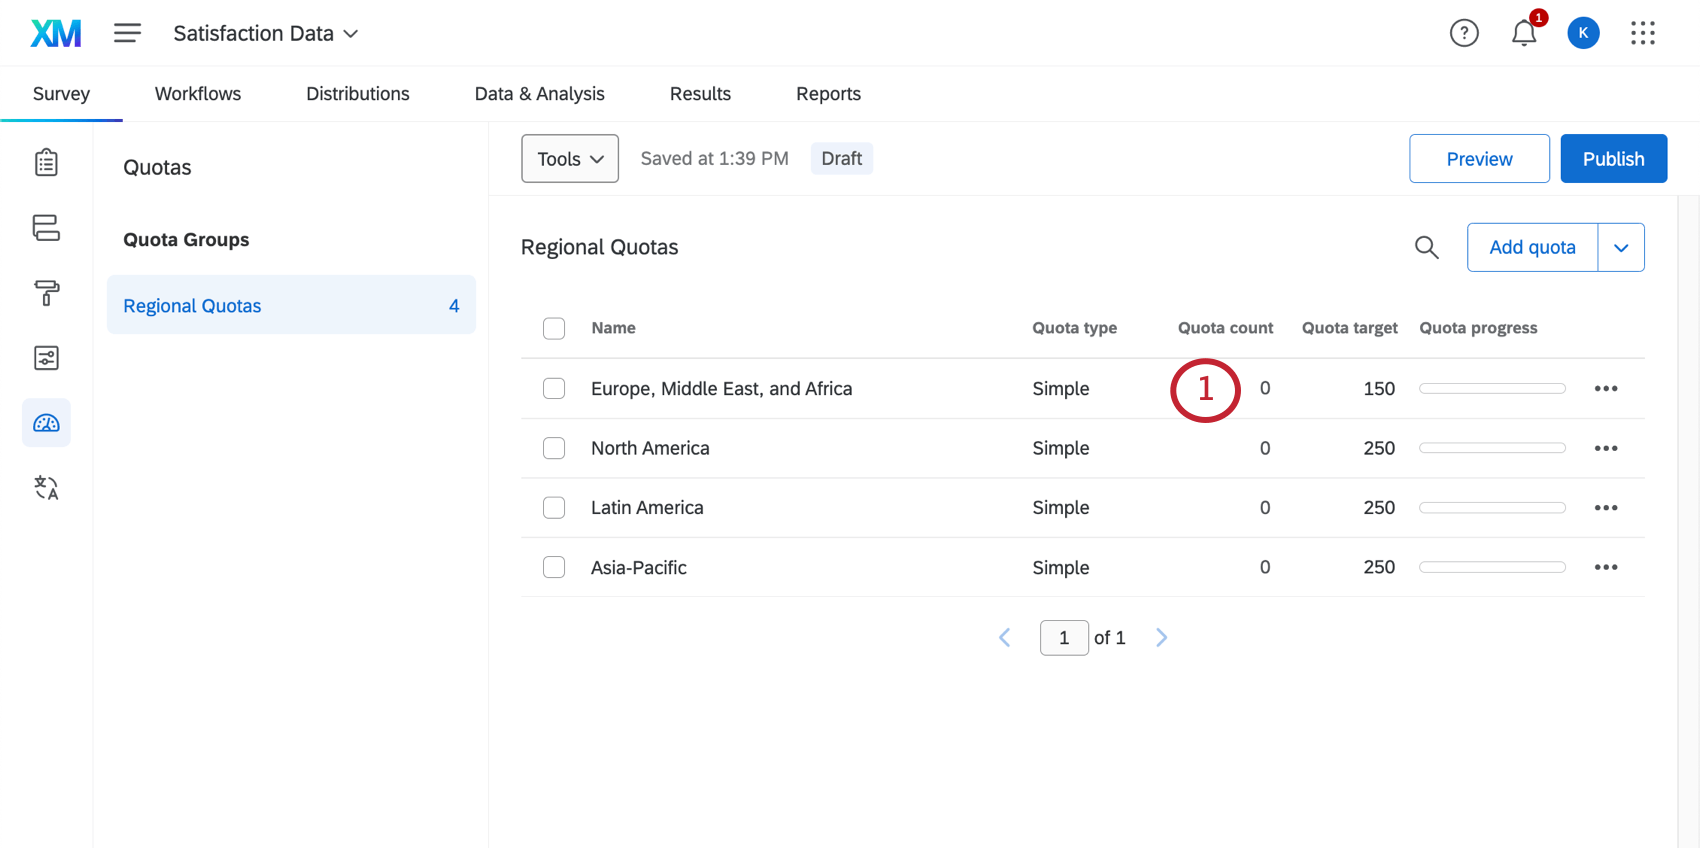
Quota Count
The quota count is the number that indicates how many respondents have taken your survey and met the conditions for the quota. This number automatically changes as new respondents take your survey and meet the specified conditions.
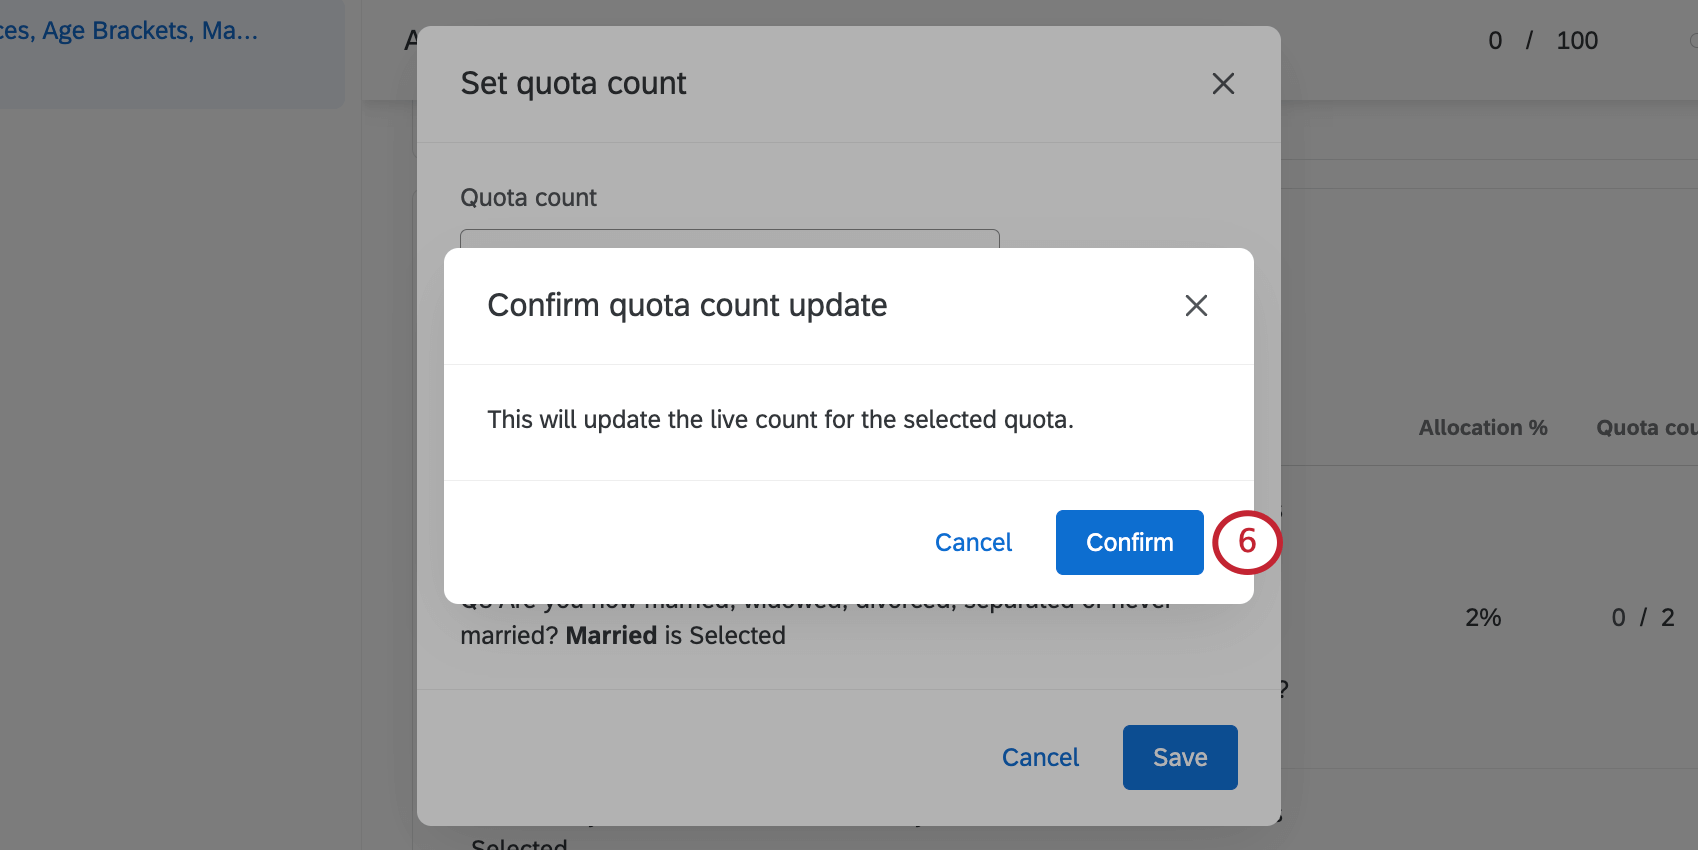
You can also manually adjust the quota count. This can be useful in circumstances where the quota was added after you already started collecting responses, or where the quota was created before launching the survey, but it was set up incorrectly. You might also use this option to reset your quotas to zero before starting another round of your study, or if you need to remove preview responses that incremented a quota.
Adjusting Simple Quota Counts

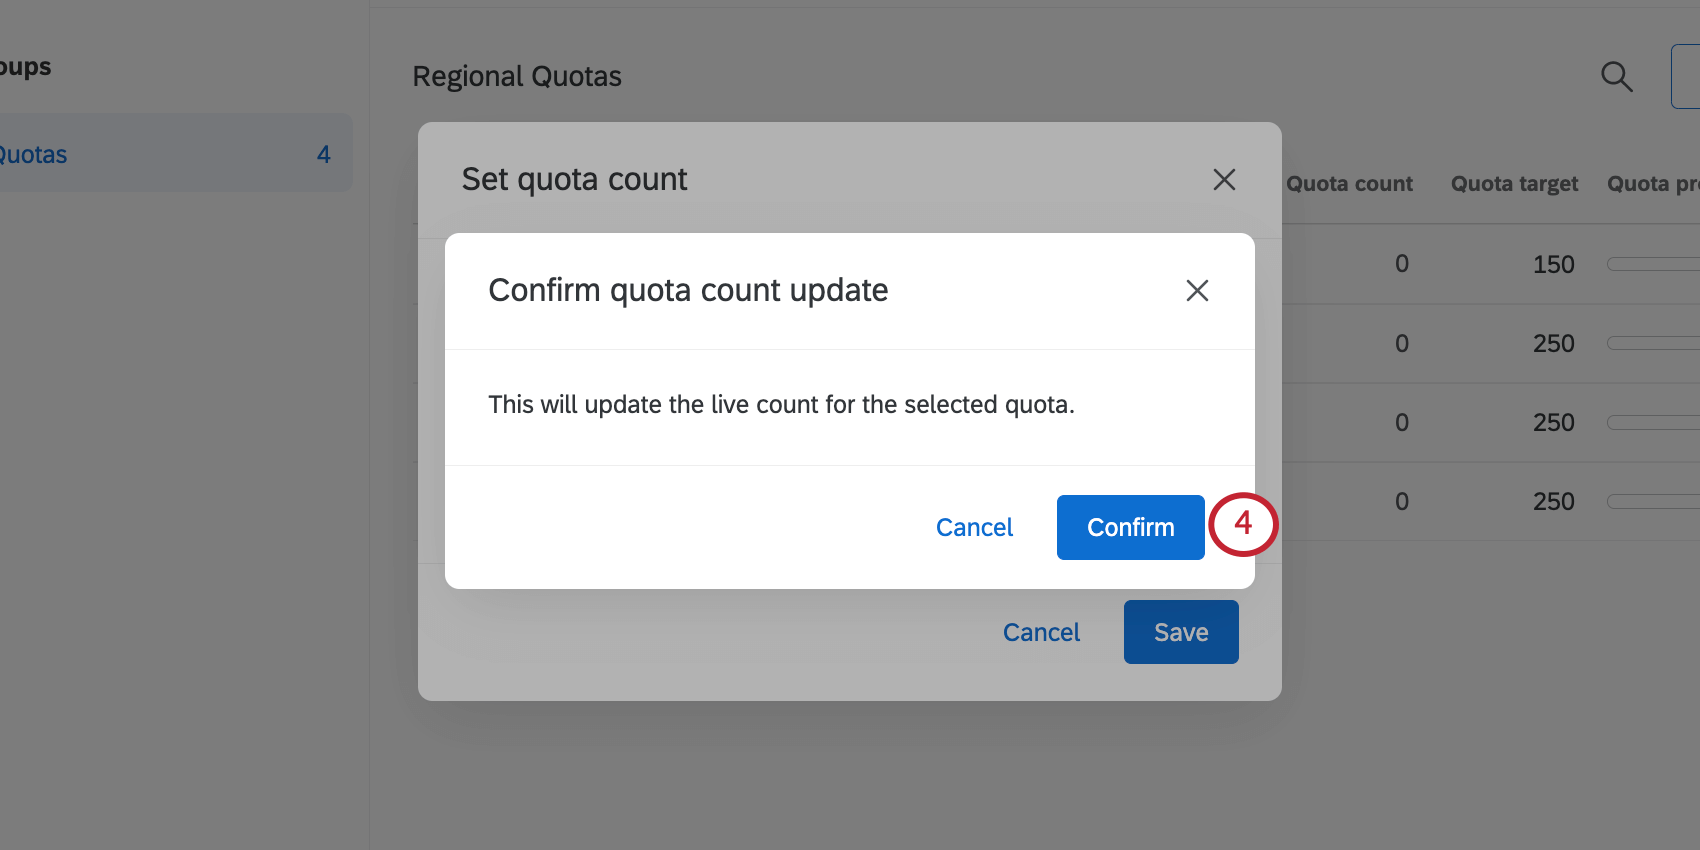
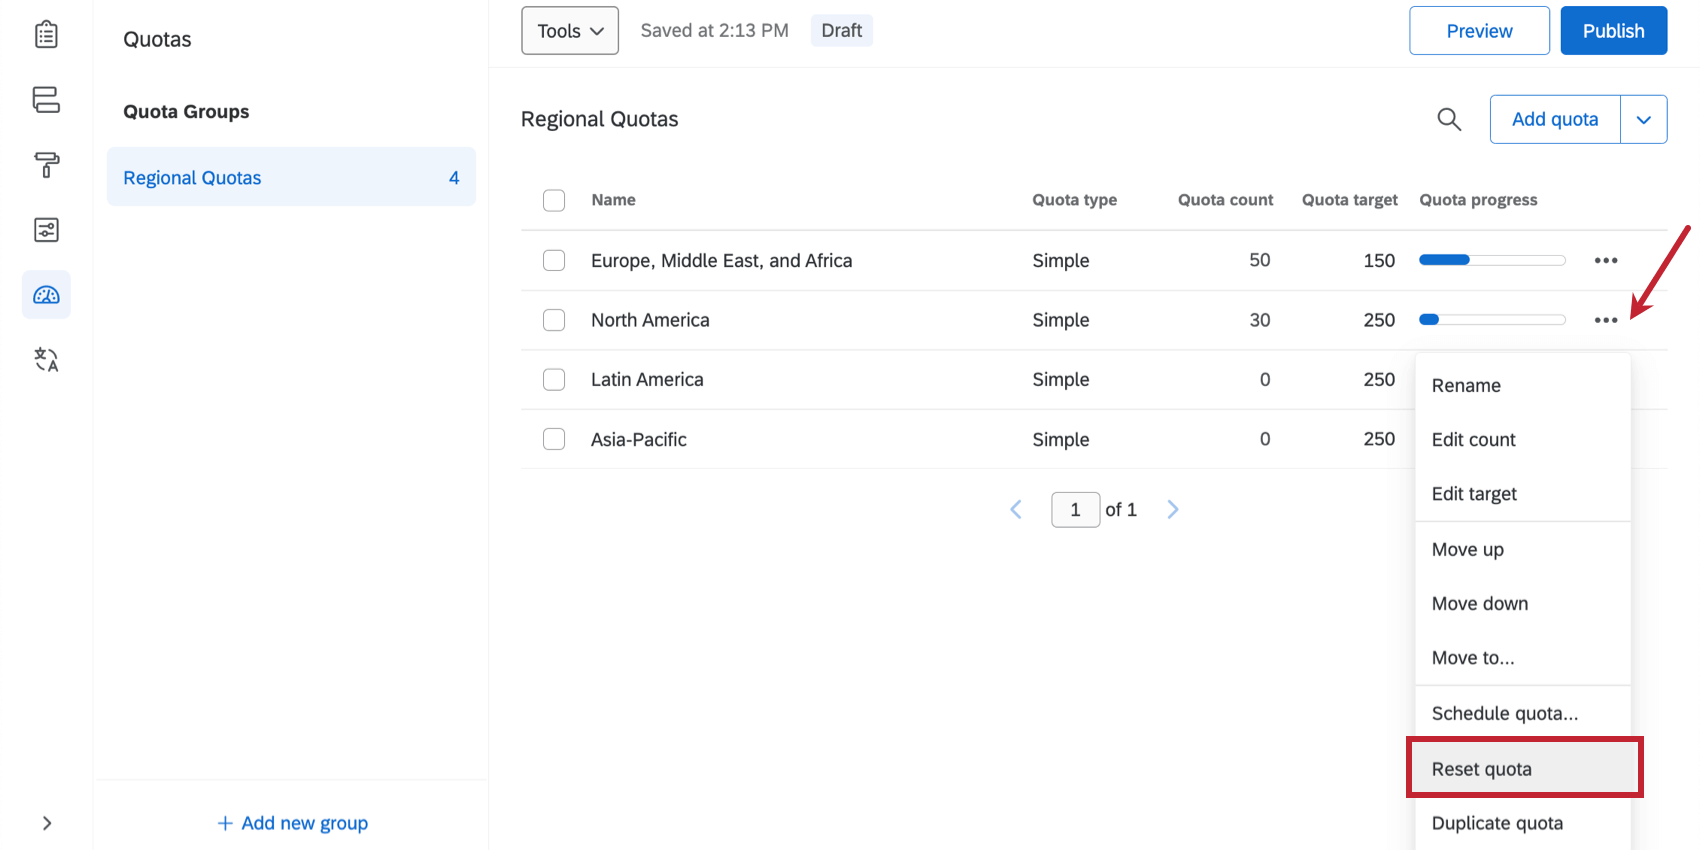
Qtip: To set a quota back to zero ( 0 ), click the dropdown next to a quota and select Reset quota. You’ll be asked to confirm this choice.

Adjusting Cross Logic Quota Counts
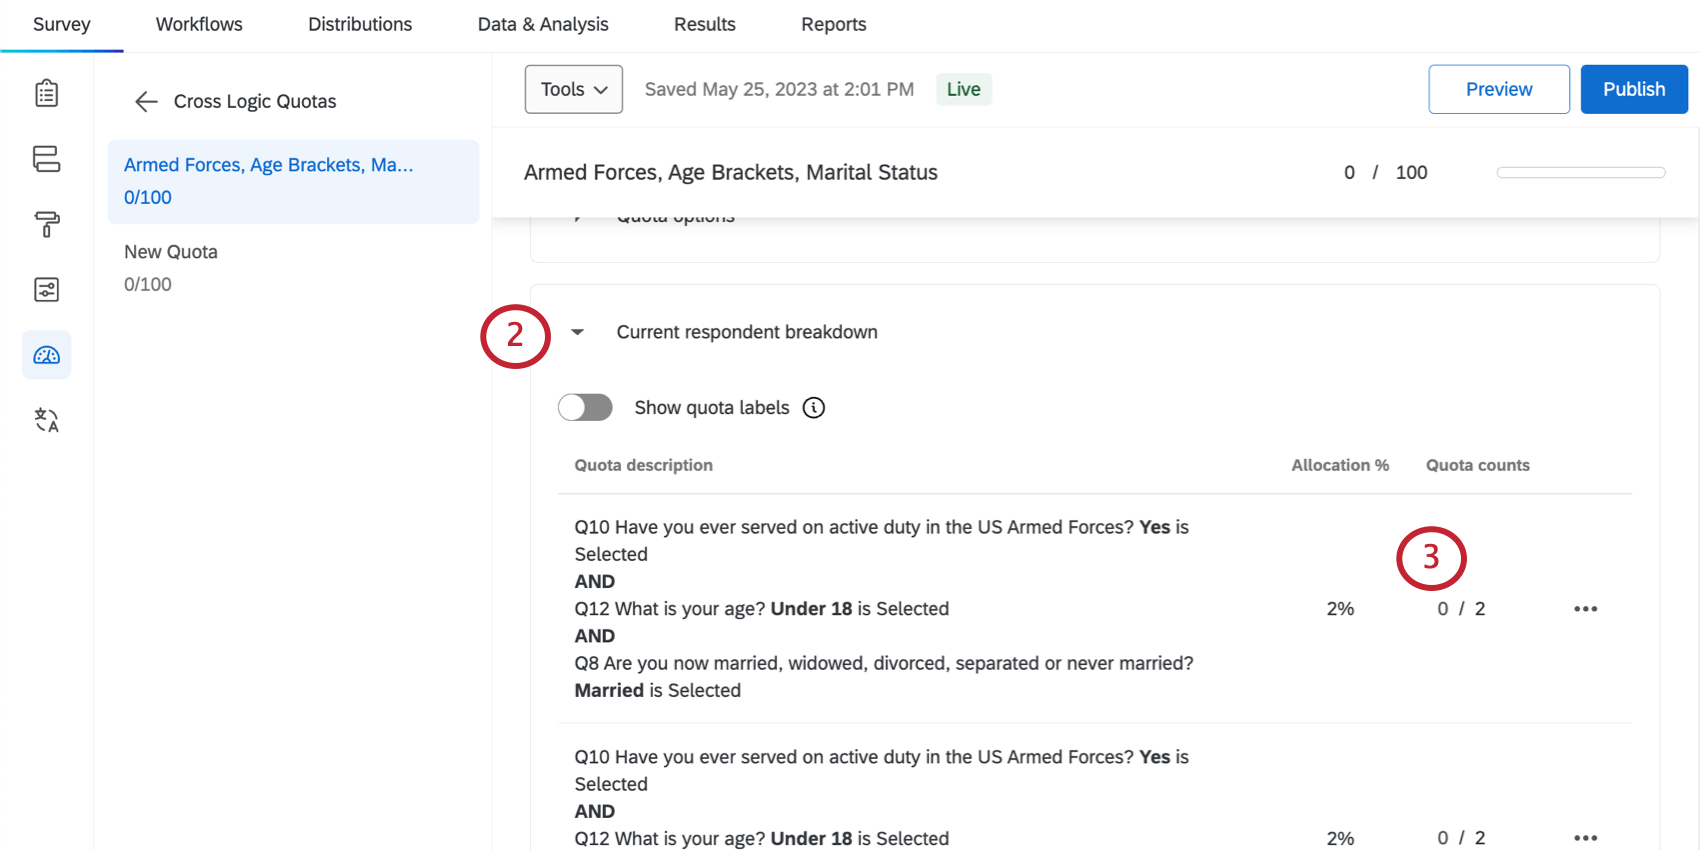
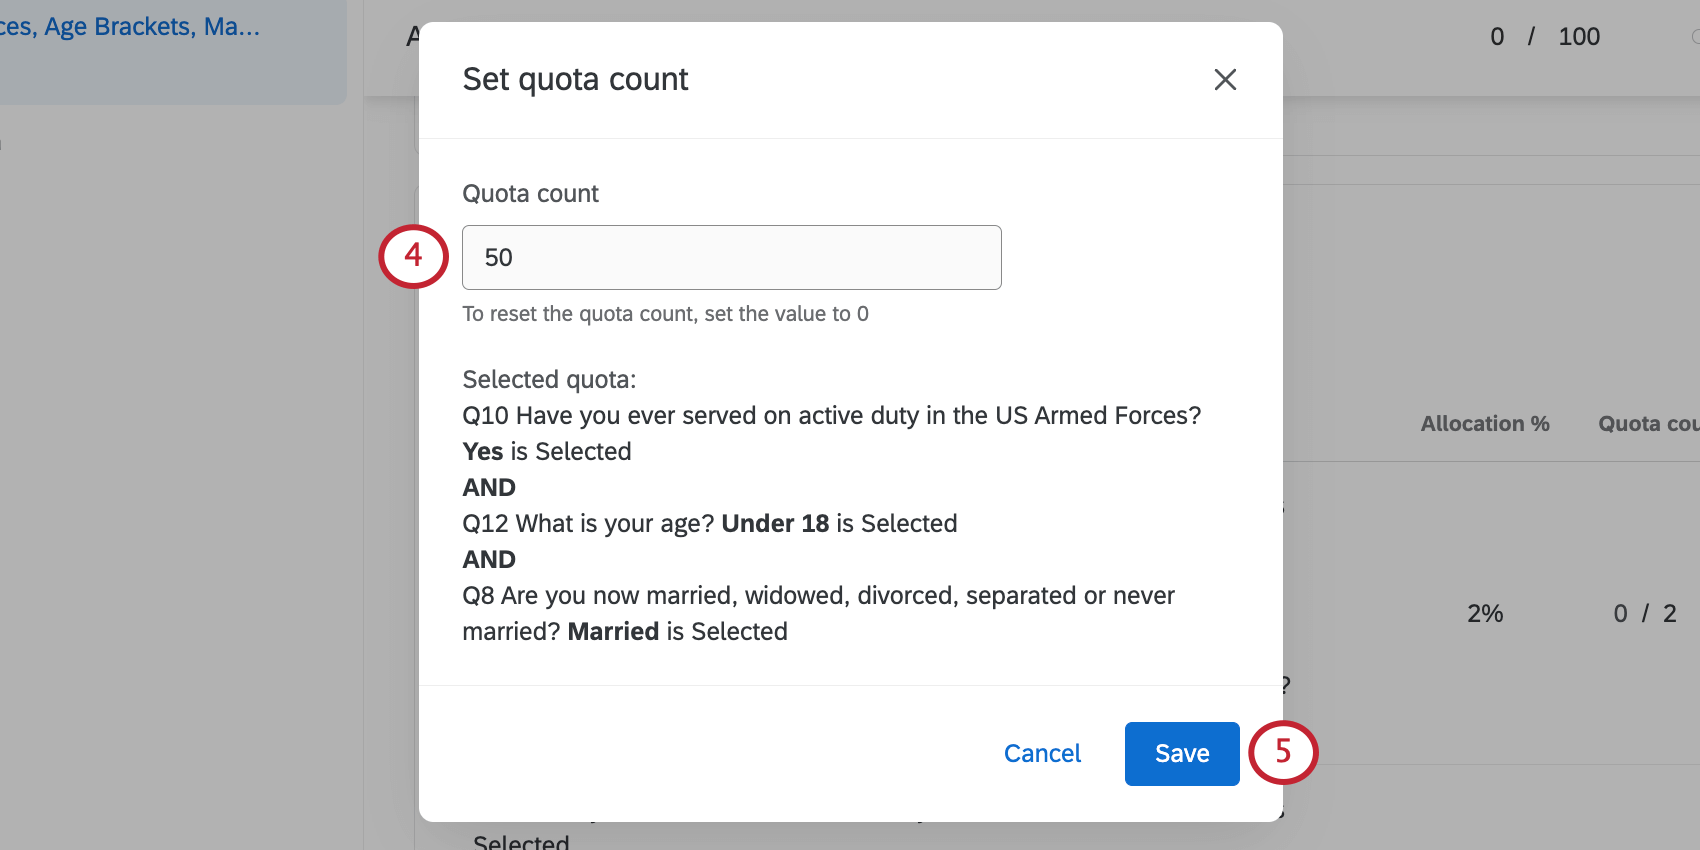
For cross logic quotas, you cannot adjust one overall quota count, because it is not just one quota, but technically a combination of many demographic quotas. Instead, you need to individually adjust each segment of the cross logic quota.

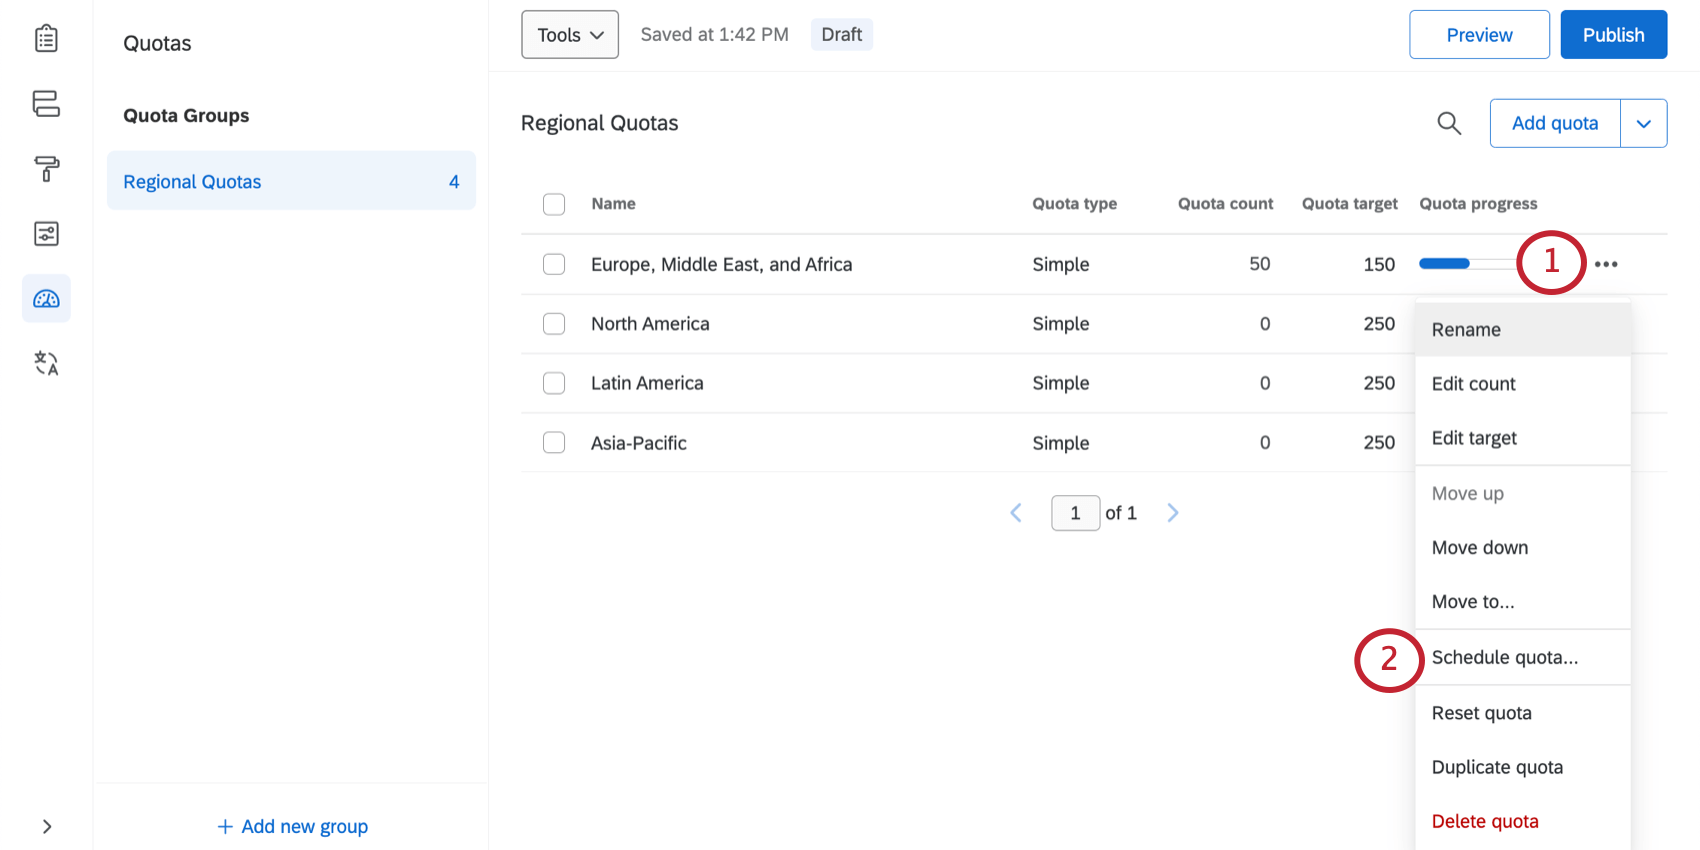
To schedule an automatic Quota reset
You can also automatically reset your quotas after a certain amount of time. This can be useful if, for example, you need to collect a specific number of responses each month.
Qtip: Scheduled quotas are included with the Advanced Quotas feature. Advanced Quotas are an add-on feature not included in the standard Qualtrics license; please contact your Qualtrics Account Executive for more information.
Attention: Scheduled quotas are only available when using simple logic quotas. Scheduled quotas cannot be used with cross logic quotas.
You can schedule when your quota resets its count to zero. This can be useful for studies where you send the same survey and plan to use the same quotas over and over again.
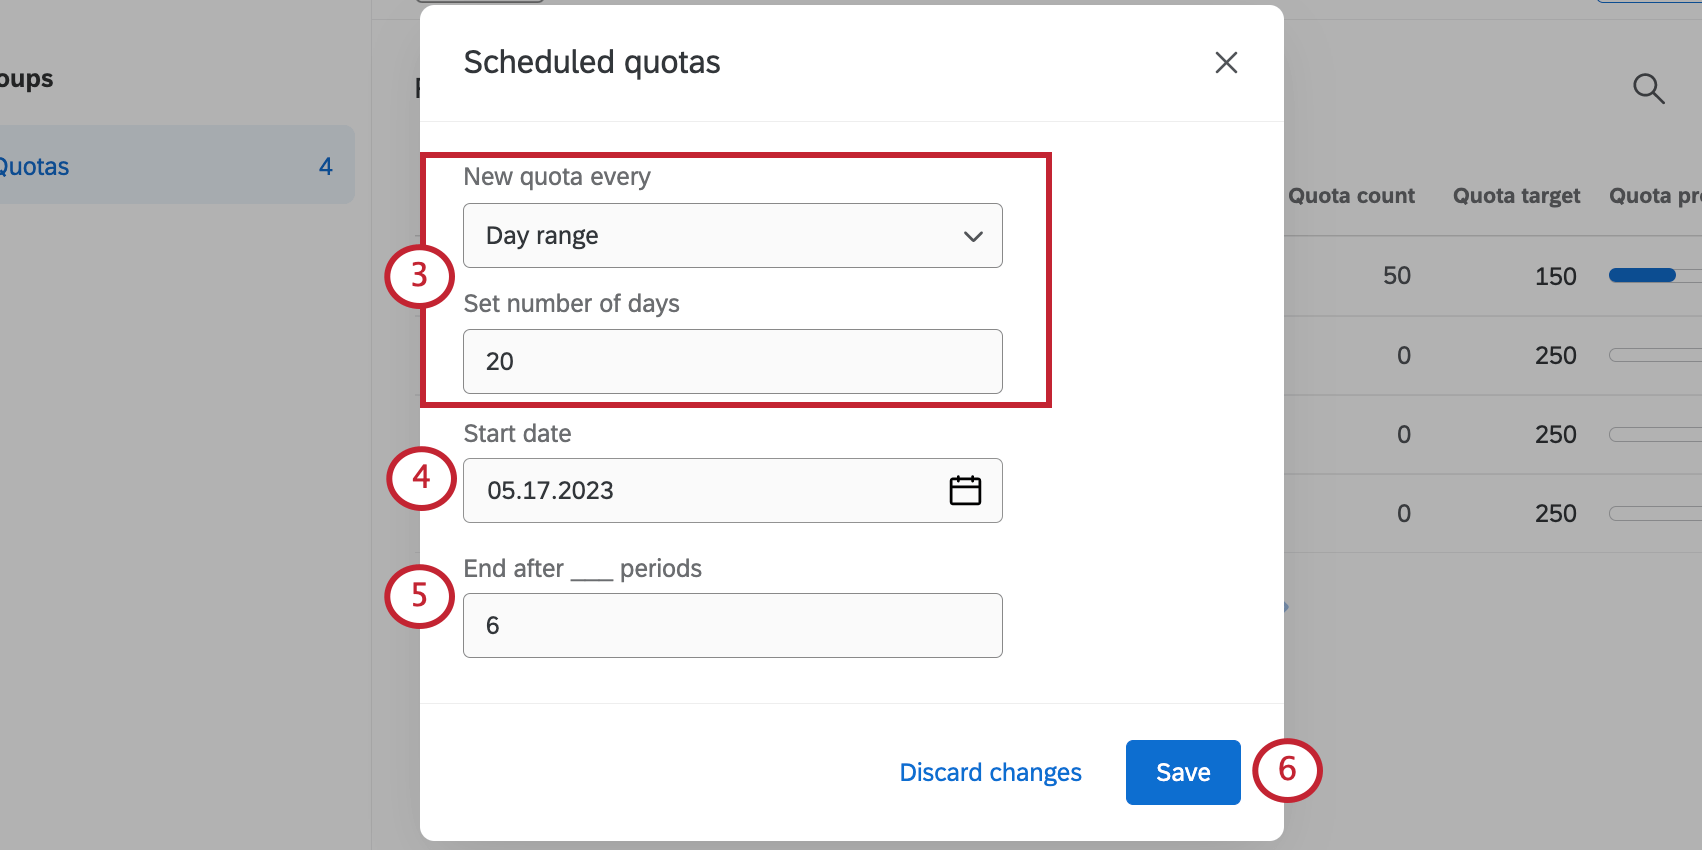
Qtip: Quotas will reset at midnight on this date according to the time zone set in your account.
Example: For example, if you reset the quota count every month, then you can say the quota stops resetting after 6 months. If the quota resets every 20 days, you can say the quota stops resetting after five 20 day periods have passed.
Warning: You may change your scheduled quota frequency and dates at any time. However, changing the conditions will reset your quota counts to zero.
Attention: When the quota resets, it will not reactivate a deactivated intercept.
Setting Simple Quota Conditions
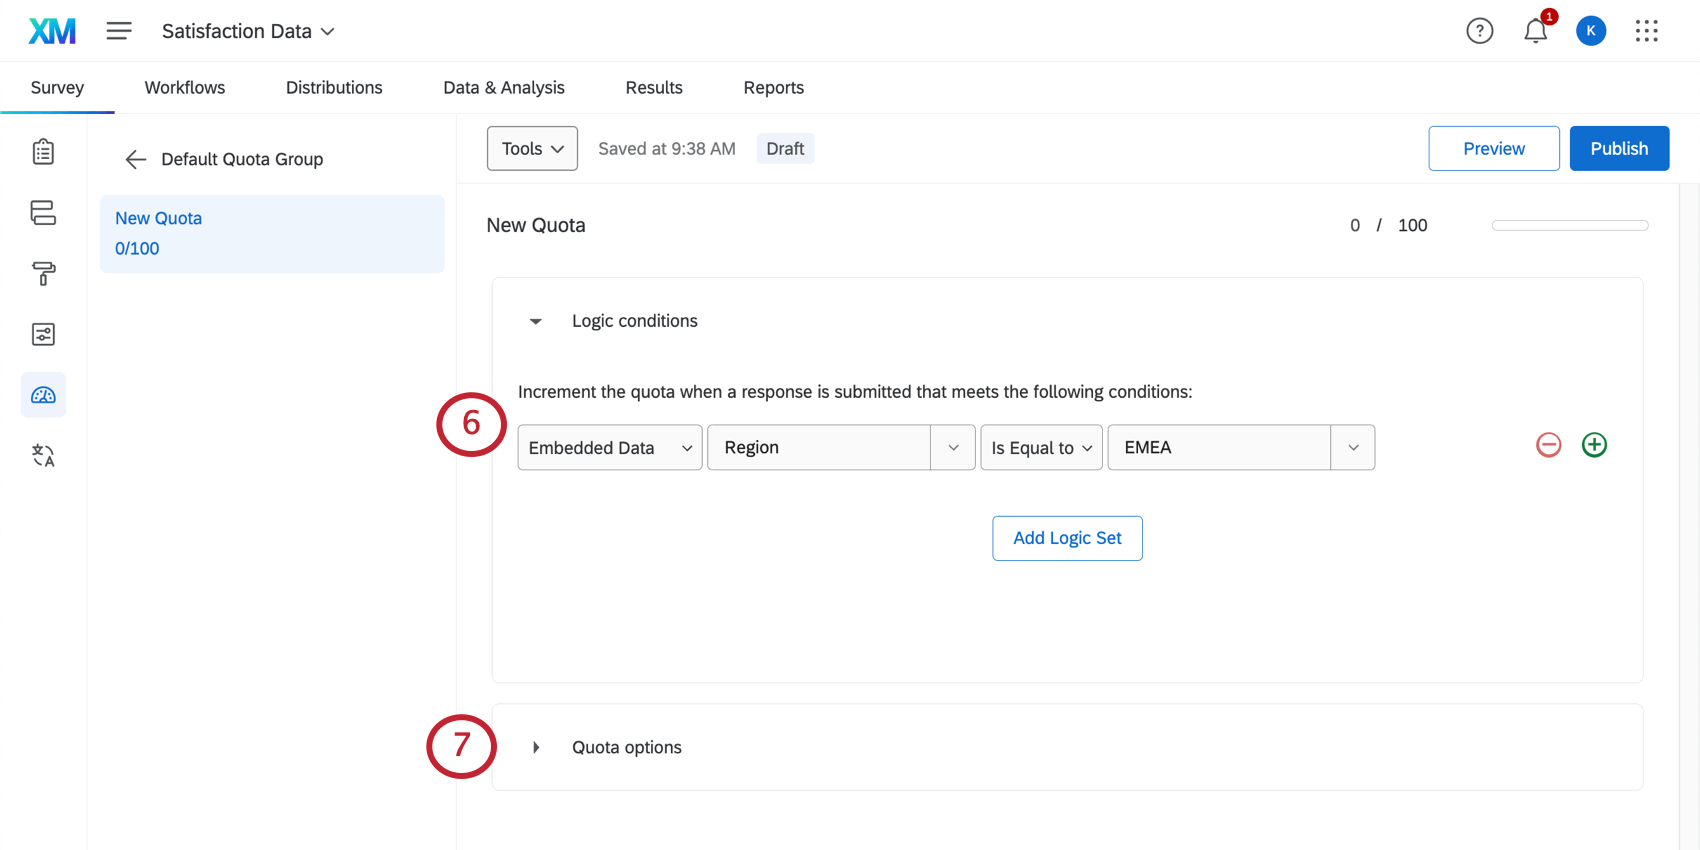
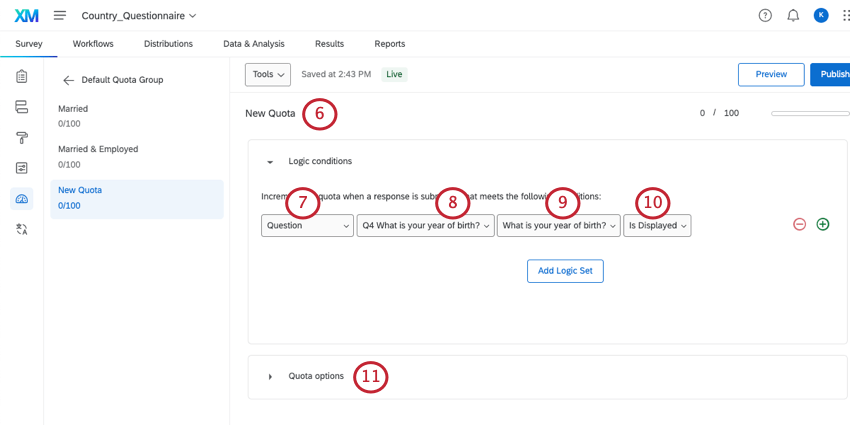
The next step in setting up a quota is to specify conditions that must be true for a respondent to increment the quota. Your quota will be incremented when a respondent meets the condition(s) you have set and finishes the survey.
Qtip: Incomplete responses and imported responses will not increment the quota count.
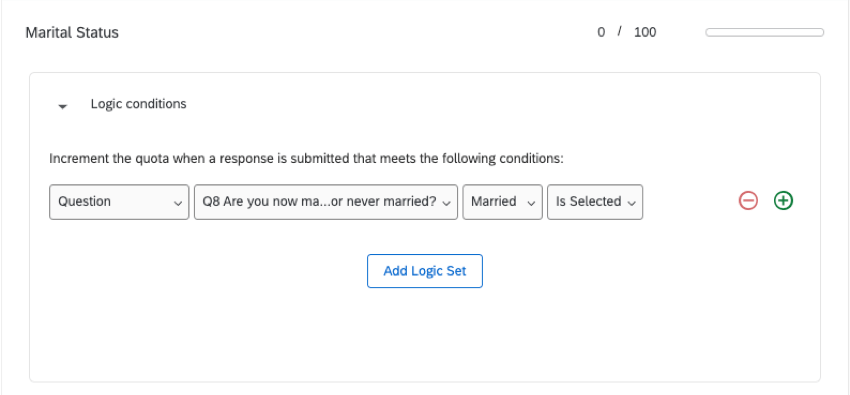
Example: Only respondents who say they’re married will increment this quota.

This section will discuss setting conditions for simple logic quotas. Your account might also include the option to create what is called a cross logic quota. Refer to the Cross Logic Quotas section below for information on setting logic for this type of quota.
To set Quota conditions

Example: We want to limit how many married people come into the survey. So first, we choose the question where we ask the respondent’s marital status, Q8. Then the next fields specify that if “Married” is what the respondent “Selected,” they will count towards the quota.
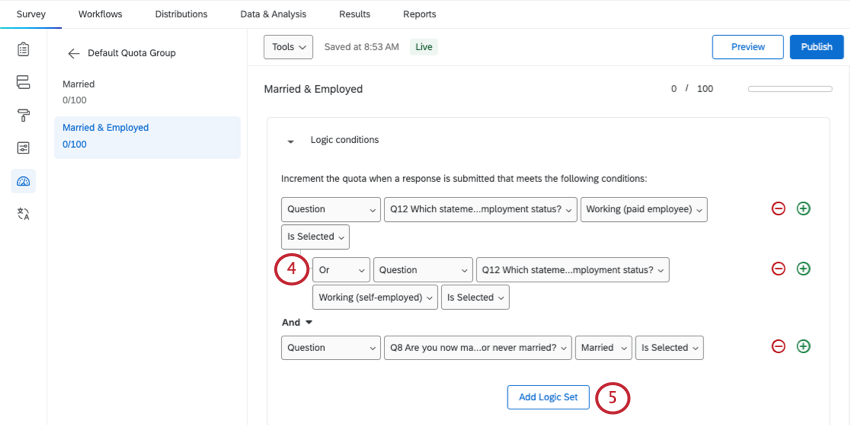
Example: In the screenshot above, we’re making a quota for people who are married and employed. The respondent can select 1 of 2 answers to indicate they are employed, but they must also indicate that they’re married to qualify for this quota. Therefore, we separate the employment status conditions from the marital status condition into different logic sets.
Qtip: Need help setting up more complex quota logic? Check out our page on Using Logic. Here you can learn about how to set up multiple conditions, troubleshooting, and advanced condition sets.
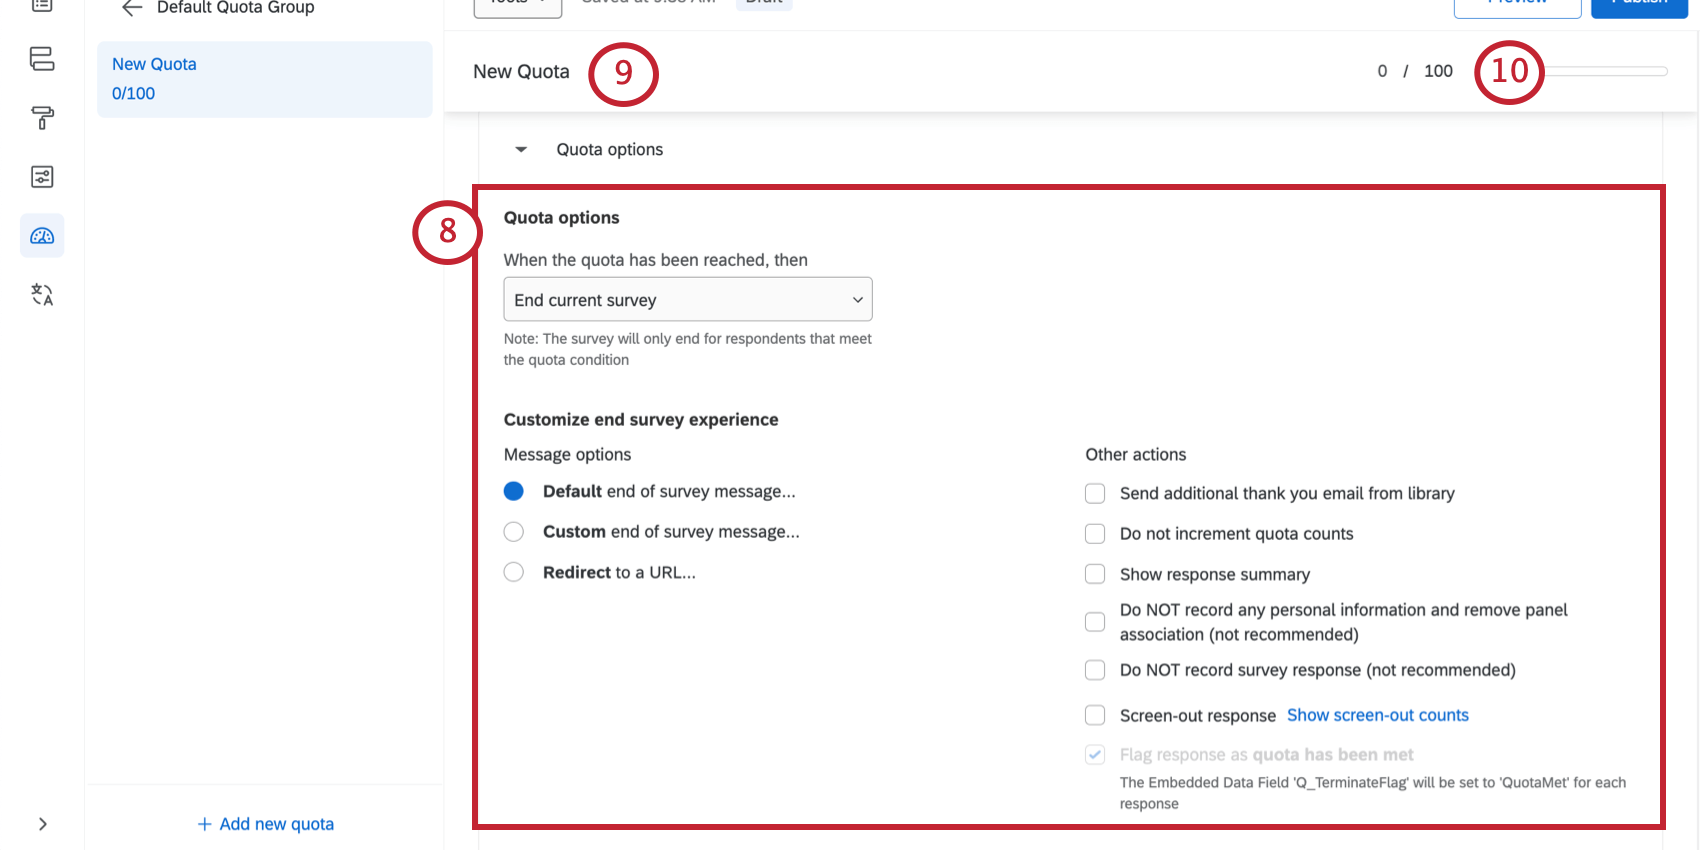
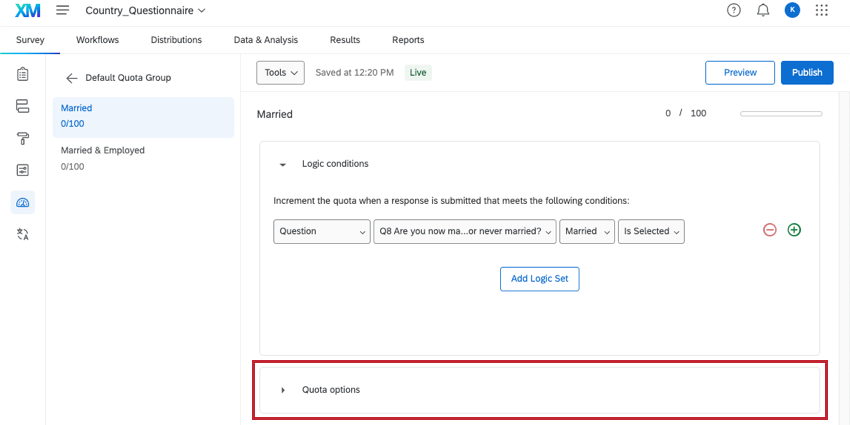
Specifying What Happens When a Quota is Met
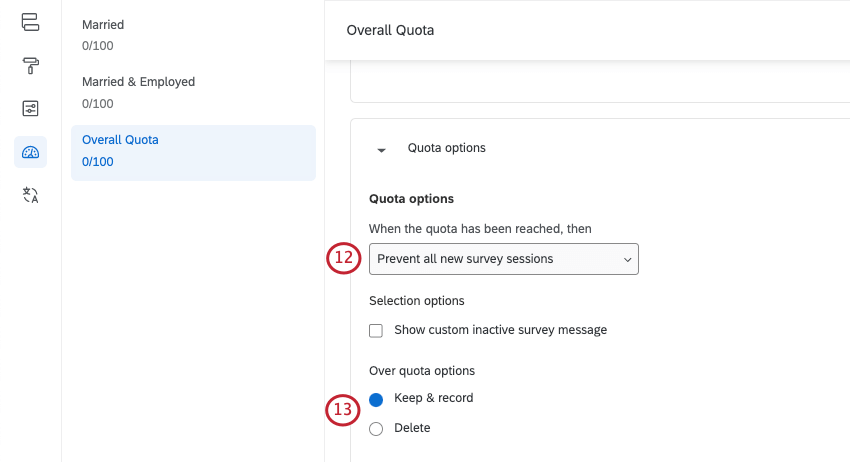
Under Quota options, you can decide what should happen to your respondents once your quota has been met. Here, we’ll describe all of the options available.

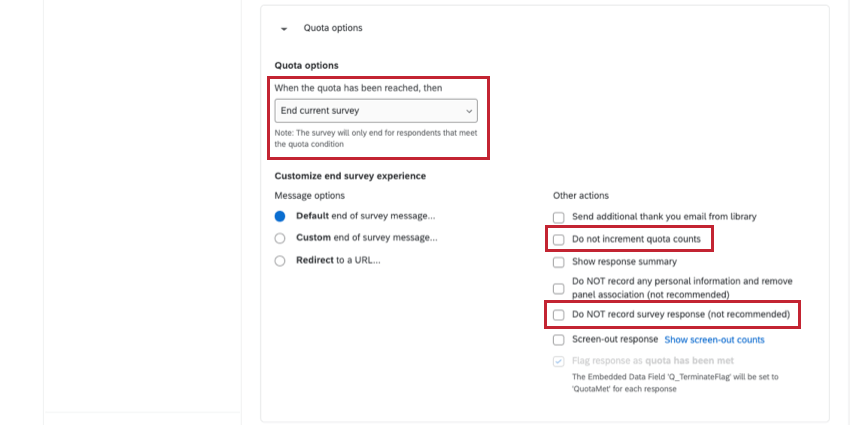
End Current Survey
“End current survey” does exactly what its name tells you. If a respondent meets the conditions for a quota and that quota has already been filled, the respondent will immediately be directed out of the survey.
Example: You can set a customized end of survey experience for respondents who leave the survey because a quota is full. For example, you could show a message that says something like, “Thanks for your willingness to participate. Unfortunately, we have already filled our target response limit.”
Under Customize end of survey experience, you’ll be able to customize what happens when respondents get to the end of the survey. These are same message options and actions available in an end of survey element.

Although there are many options available, there are 2 settings in particular that you may want to consider:
- Do not increment quota counts: By default, a respondent who is terminated from the survey due to the quota being full will still cause the quota to increment. Check this box to prevent over-quota respondents from incrementing quota counts.
- Do not record survey response: Selecting this option will prevent all over-quota responses from being recorded in your data, potentially saving you from using up unwanted responses. Responses removed this way cannot be retrieved. For more information on screening out respondents, see Screen-Out Management.
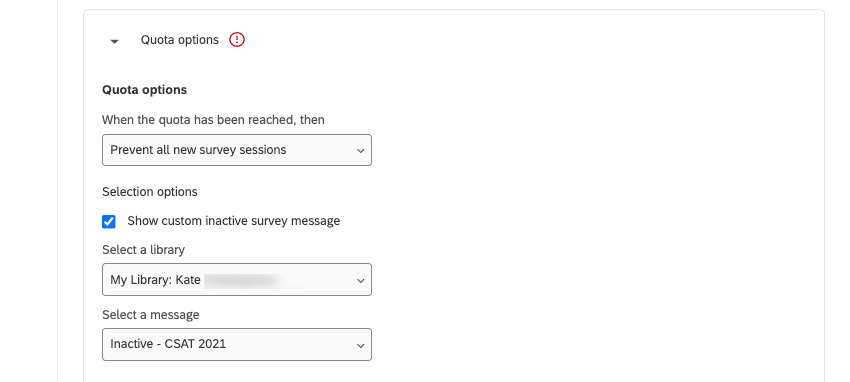
Prevent All New Survey Sessions
“Prevent all new survey sessions” stops new respondents from entering the survey once the quota is filled. You can select Show custom inactive survey message to adjust what message is shown to respondents trying to enter the survey.
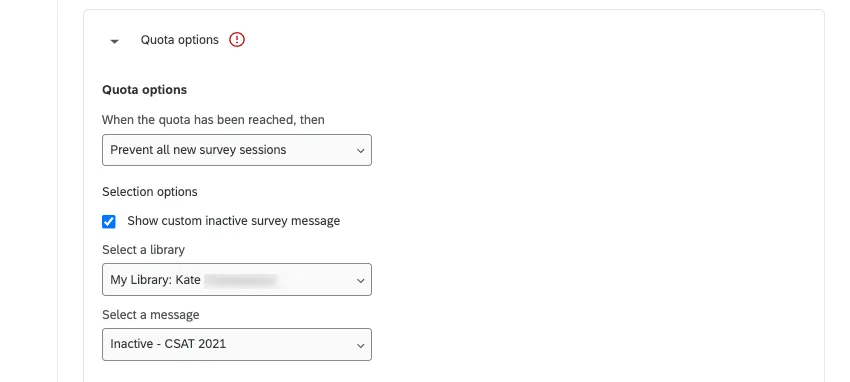
You can add a new message in this window, or you can create a message in your library with the message type set to Inactive Survey.
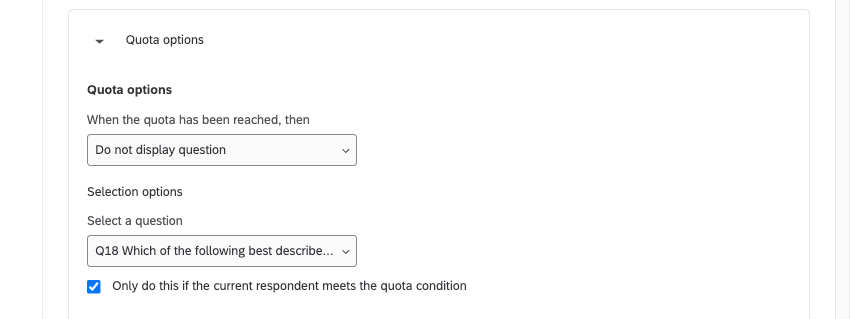
Do Not Display a Question
“Do not display question” hides a question of your choice once the quota has been filled. You can hide this question for all respondents or check the box to only hide it for respondents who meet the quota condition.

Qtip: For more advanced question display options, such as hiding multiple questions or adding multiple conditions for a question to be shown, consider setting your quota action to “None” and hiding your questions using display logic.
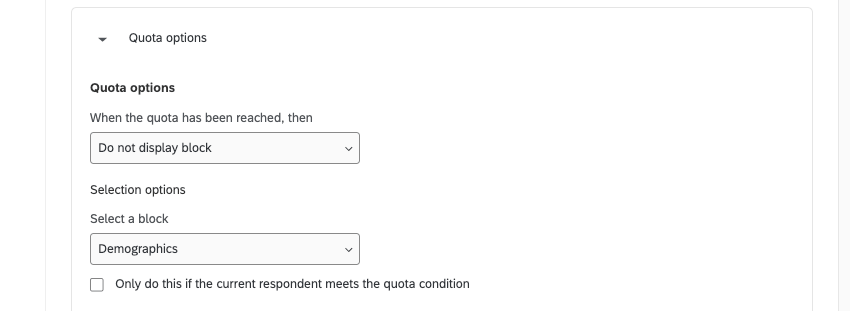
Do Not Display a Block
“Do not display block” lets you hide a question block once the quota has been filled. You can hide this block for all respondents or check the box to only hide it for those that meet the quota condition.

Qtip: For more advanced block display options, such as hiding multiple blocks or adding multiple conditions for a block to be shown, consider setting your quota action to “None” and hiding your block using branch logic.
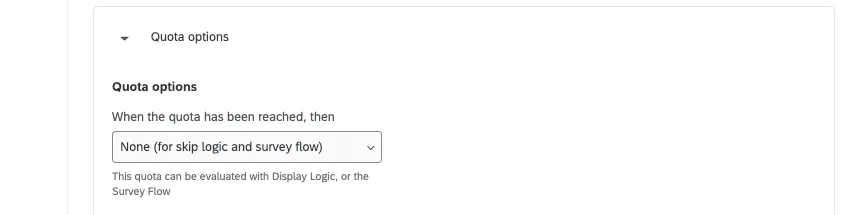
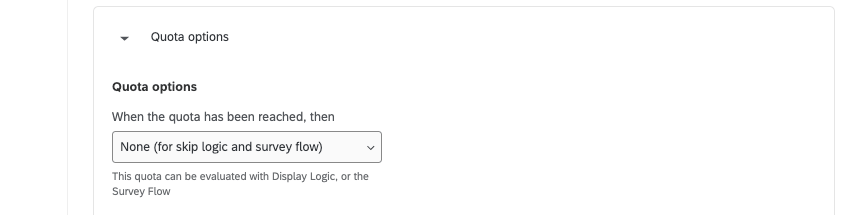
None (For Skip Logic and Survey Flow)
If “None” is selected, no preset action will occur when the quota is filled. This option is designed to let you use branch logic, skip logic, or display logic to determine what happens once the quota is filled.
The most common use for this setting is in a situation where you need to mimic the behavior of the “End current survey” or “Prevent all new survey sessions,” but would also like to record embedded data in the response.
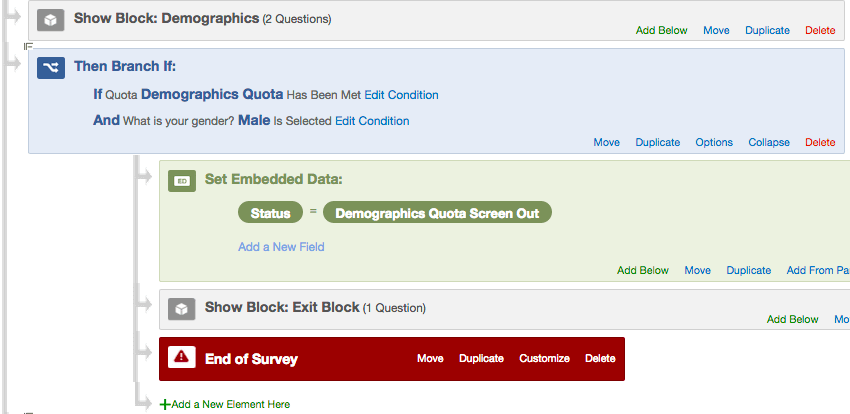
Example: We’re screening out respondents who meet our demographic conditions once the quota has been filled. Normally, “End current survey” would meet this need, but in this case shown below, we want to record embedded data about the response. Therefore, we’d use “None” as our quota option.

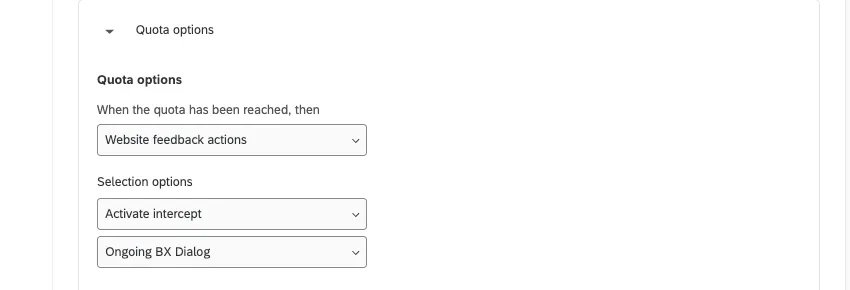
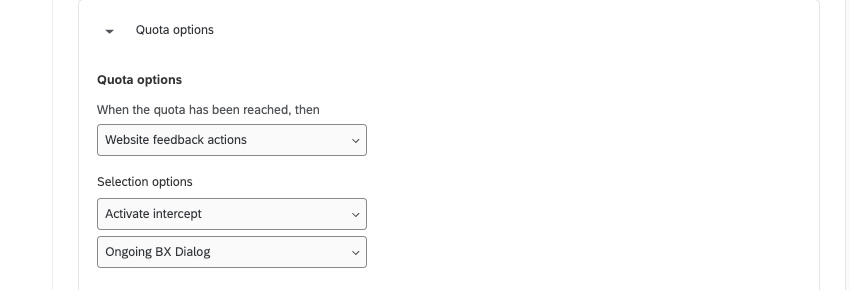
Website Feedback Actions
“Website feedback actions” will only be available to a user if they have access to the Website / App Feedback project type. For more information, visit the Survey Quotas section in the Website / App Feedback pages.
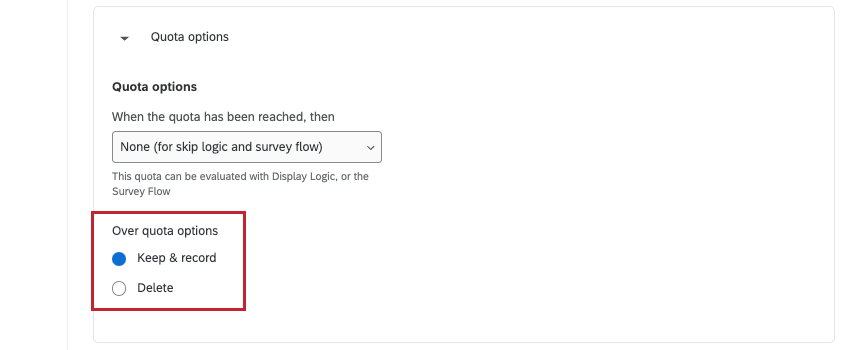
Over quota options
In addition to specifying what happens when your quota is met, you also get a chance to specify what should happen to over quota responses. Over quota responses are responses that meet the requirements of your quota after it has been filled. You can either keep and record these responses, or delete them. This allows you to be more efficient when setting up branch logic for your quotas.
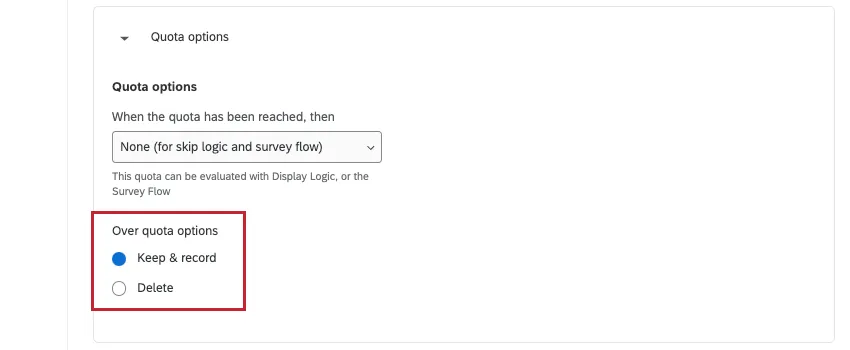
“Over quota options” appear for all possible quota outcomes except “End Current Survey.” This feature is available to any users with access to quotas.
Adding Quotas to Groups
Qtip: Quota groups part of Advanced Quotas, which is not available to all customers. If you have questions about getting this feature enabled, reach out to your Brand Administrator.
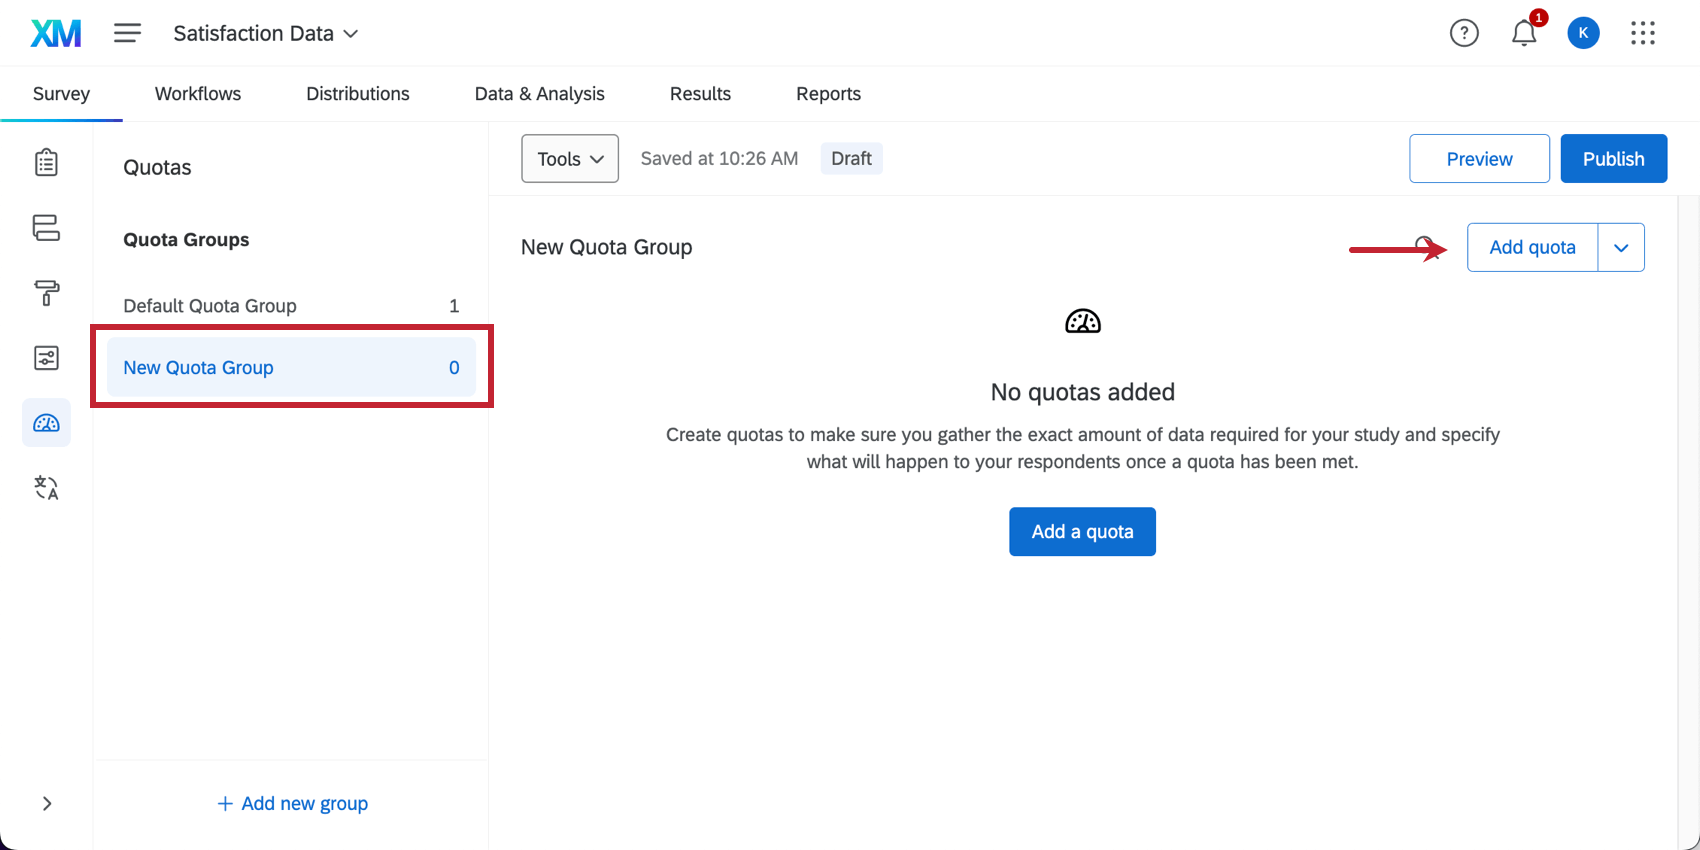
Quota groups let you organize your quotas. They are also important to setting up multiple match handling and public quota dashboards.
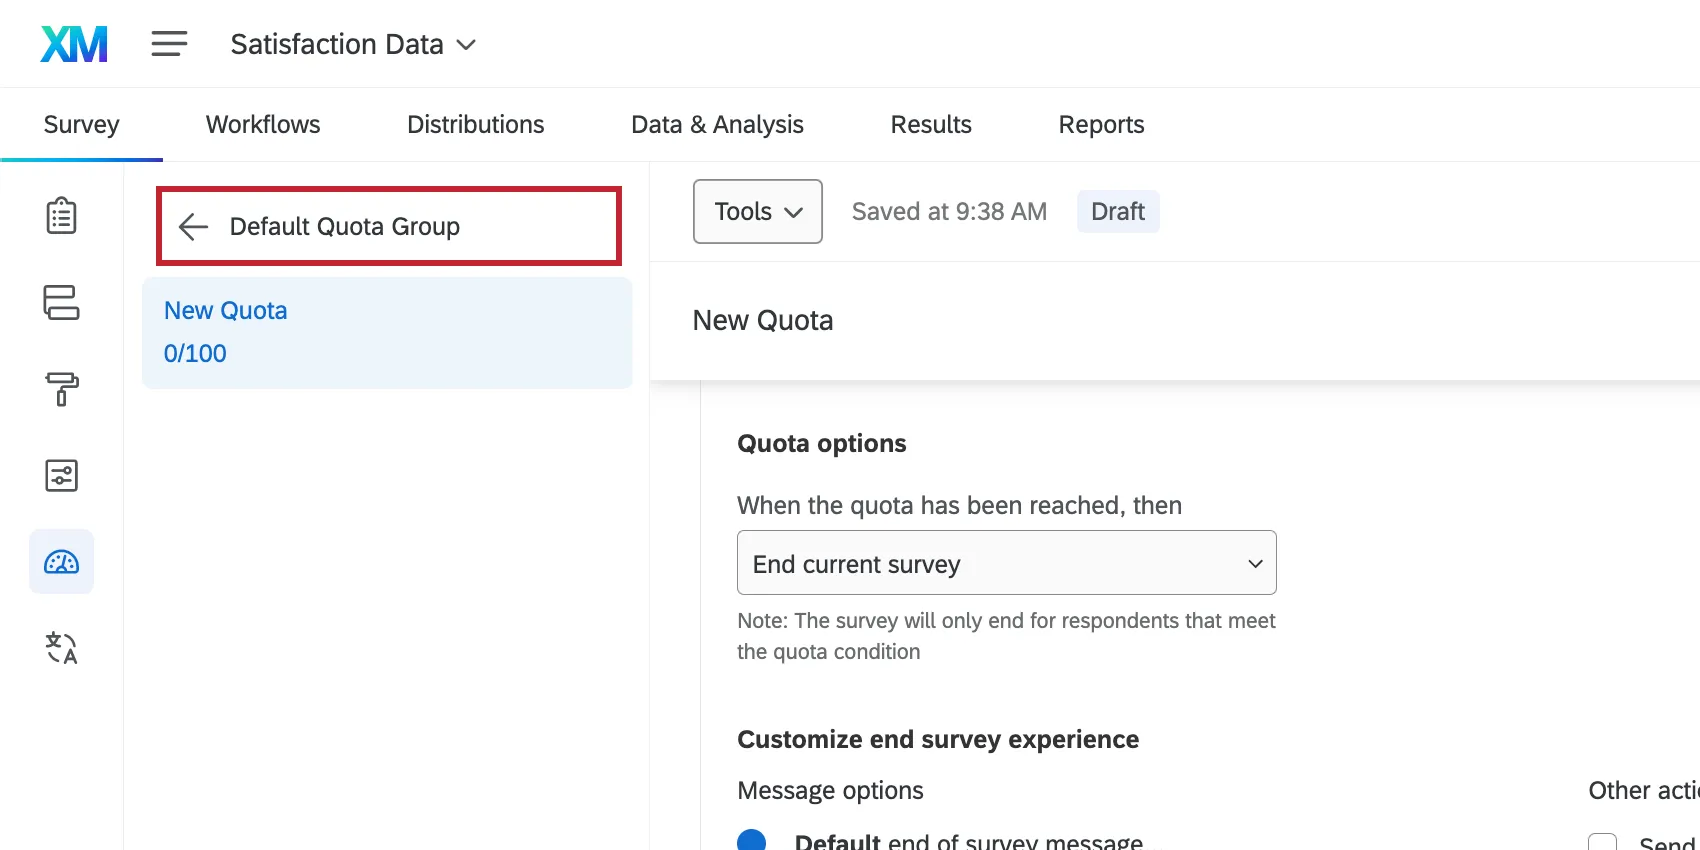
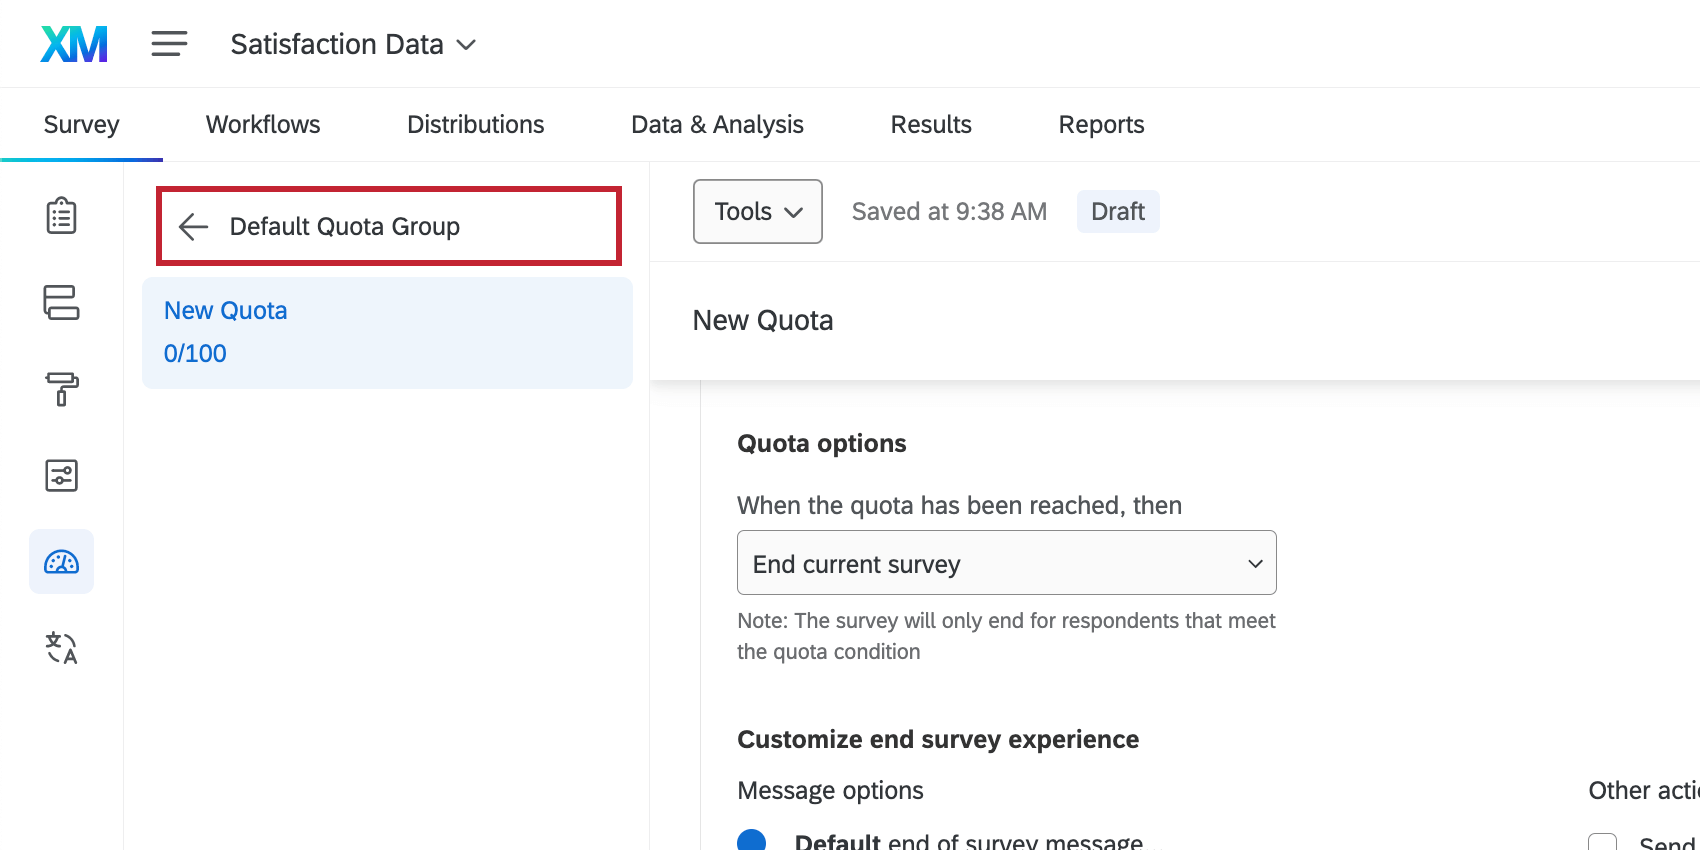
To create a quota group, click Add new group.

Click a group to start creating quotas inside it.
Qtip: If you do not see Add new group, use the arrow to navigate out of the quota group you’re currently inside.
Moving Quotas to Groups
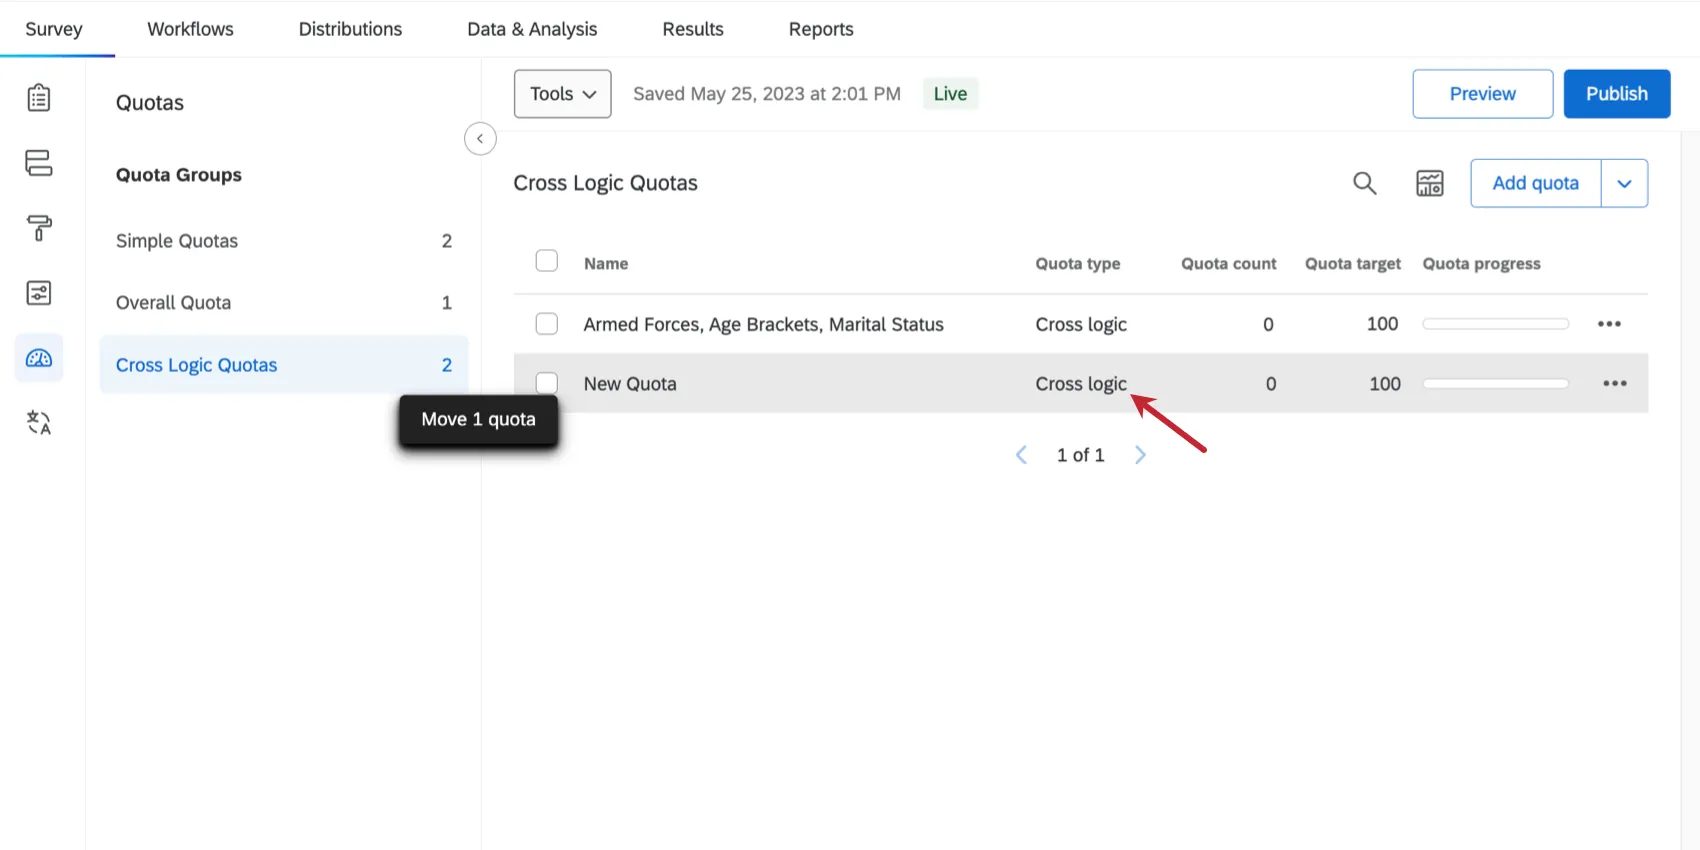
You can move an existing quota into a different group by dragging and dropping quotas into the desired groups.
You can also move a quota by doing the following:
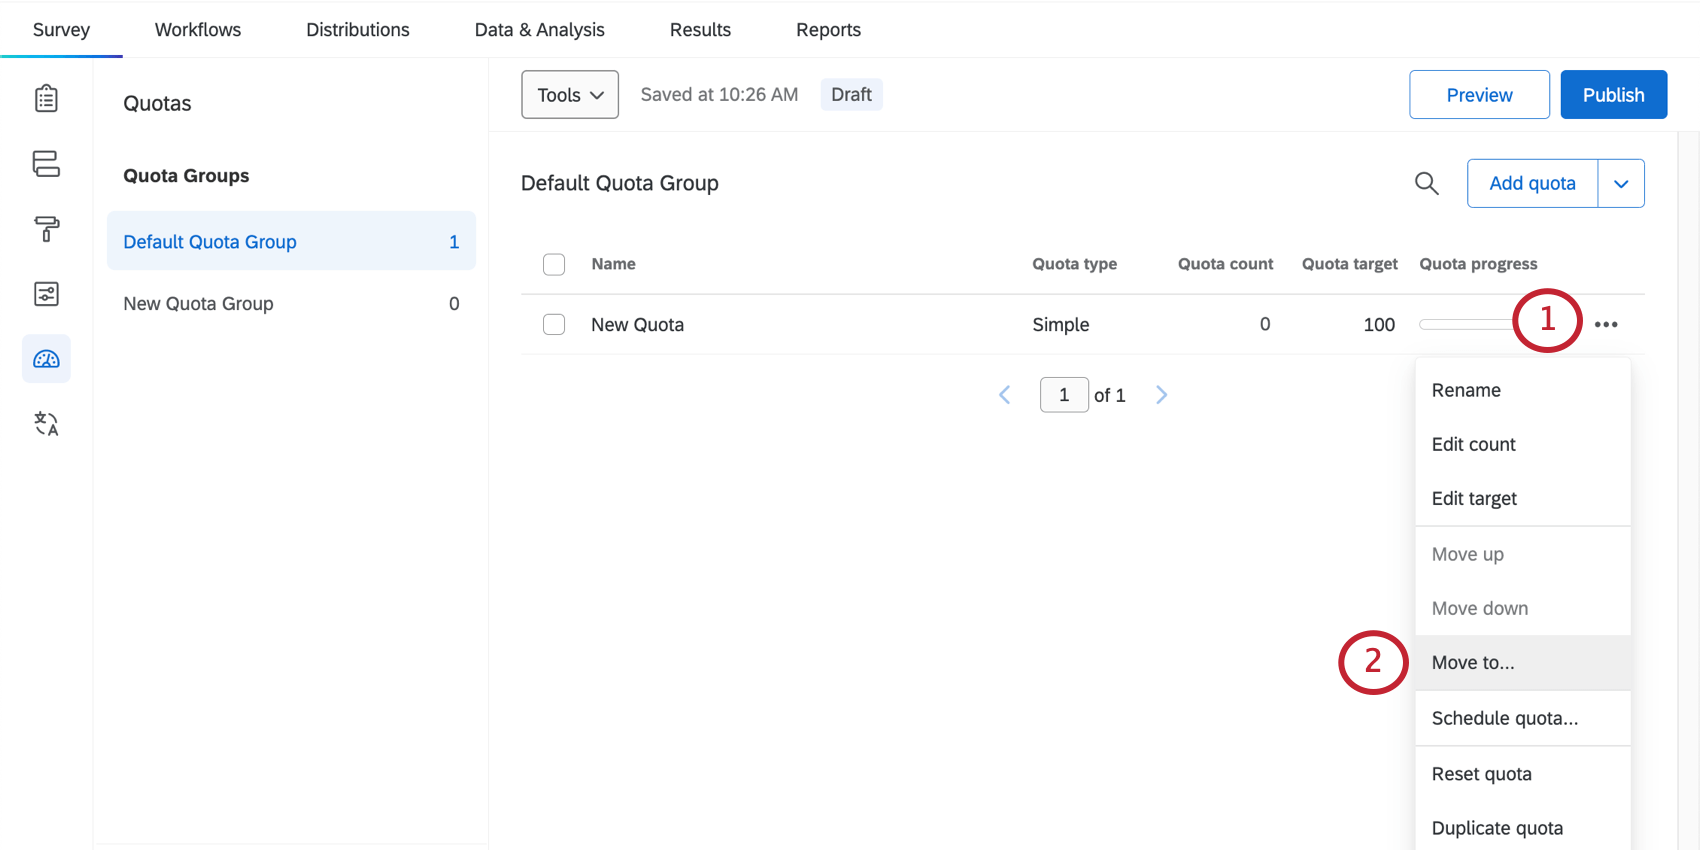

- First in the list
- Last in the list
- Before a selected quota in the group
- After a selected quota in the group Qtip: By default, a respondent will increase the count for all of the quotas they meet the conditions for. However, the order of quotas matters for multiple match handling.

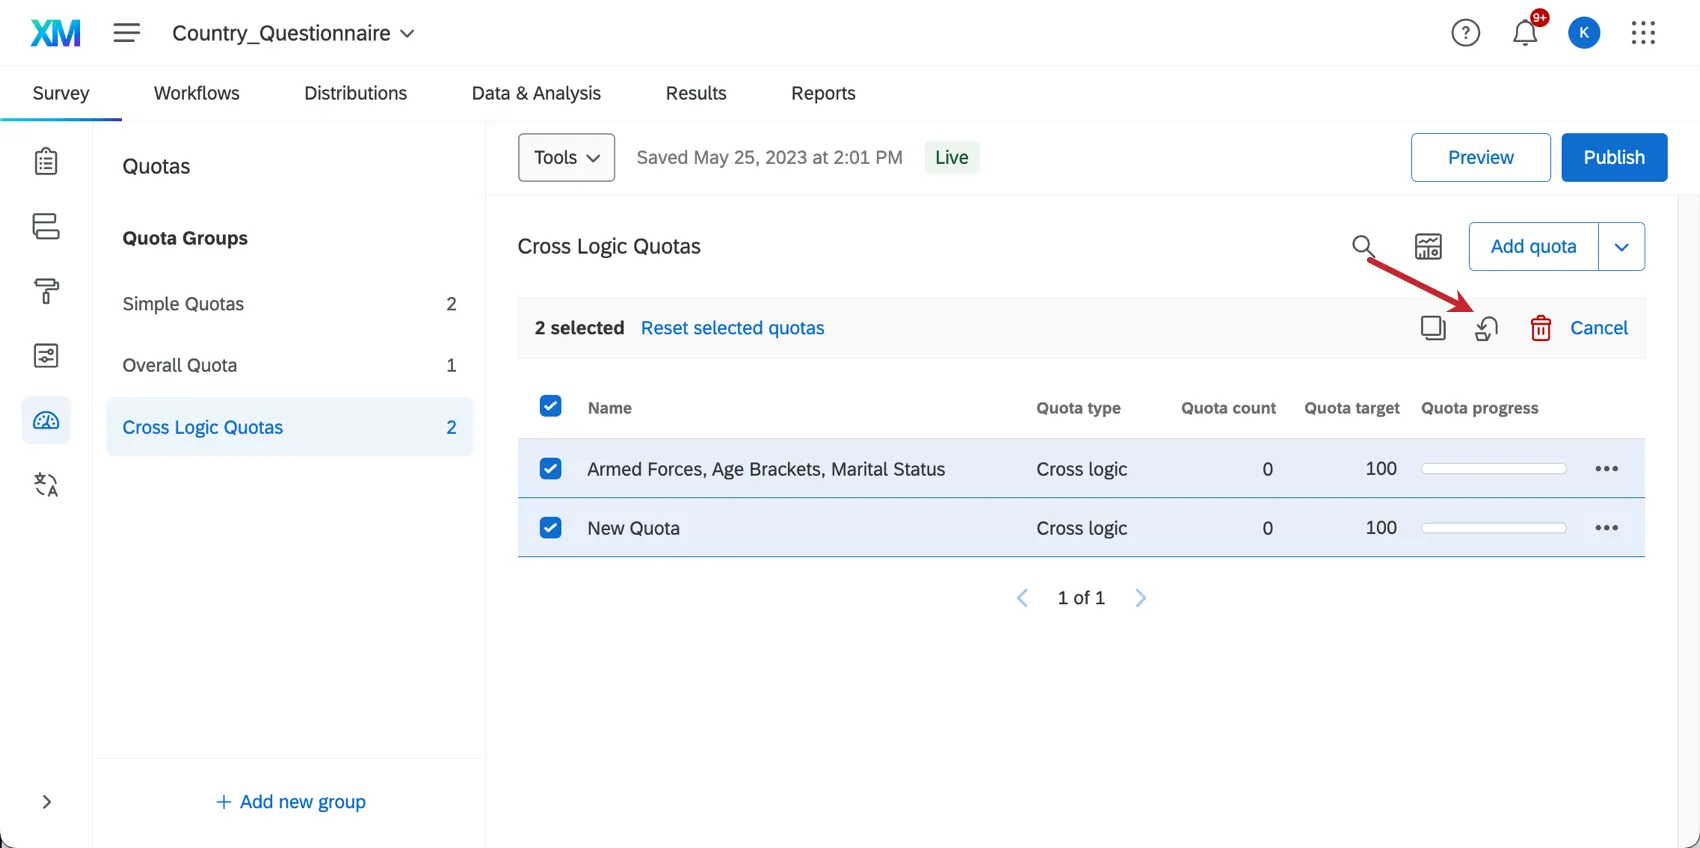
Qtip: You can move multiple quotas at once by selecting quotas and then clicking the Move selected quotas icon at the top.
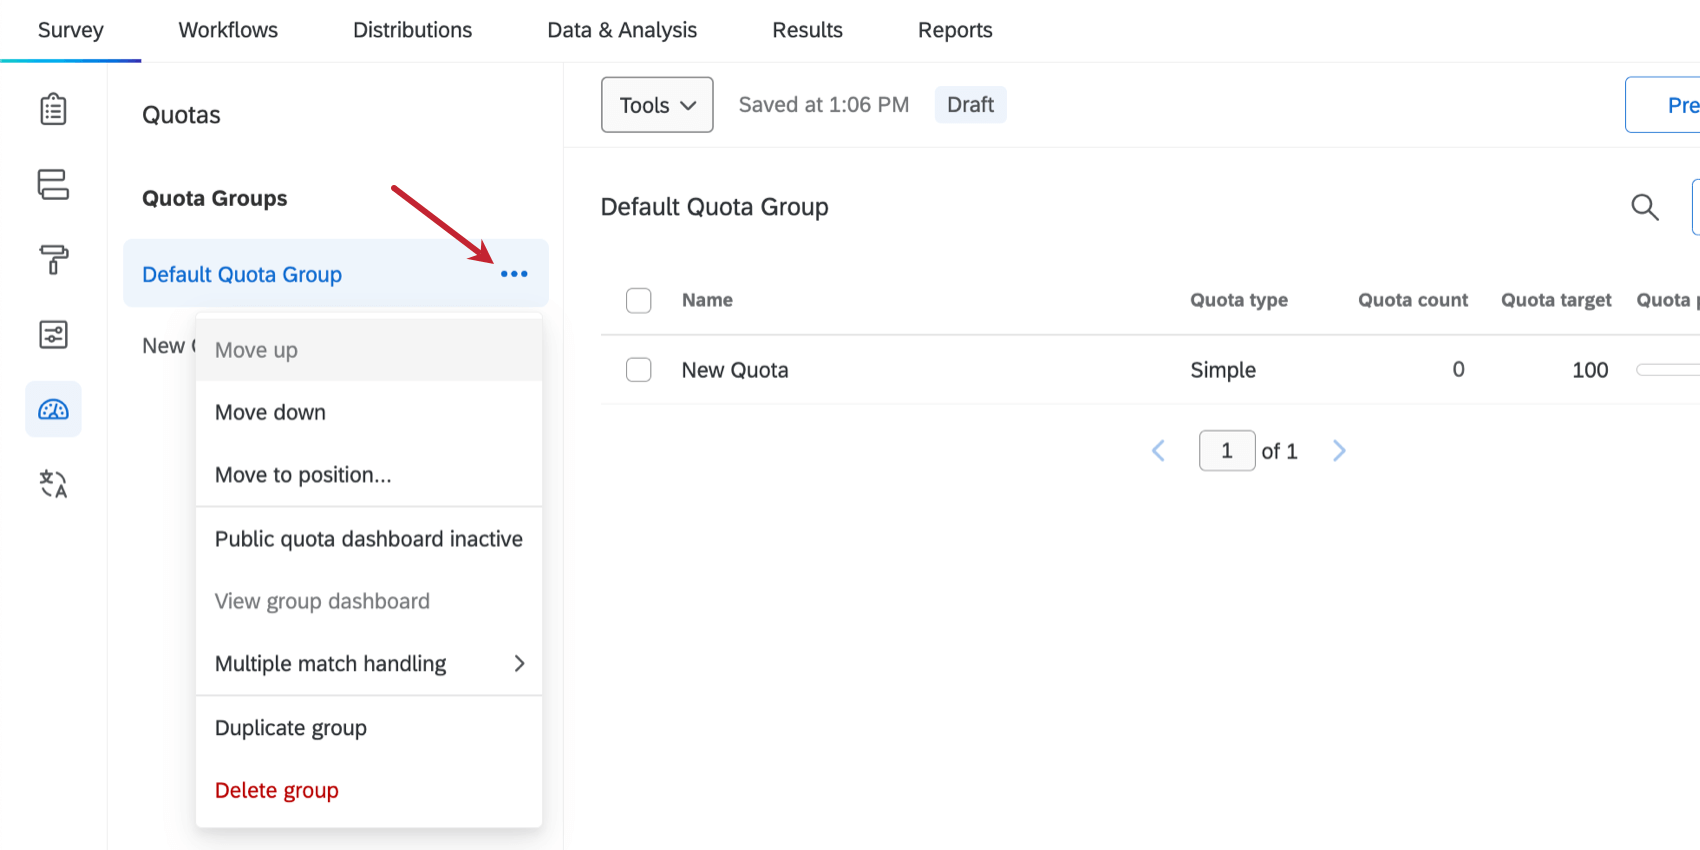
Quota Group Actions
If you click the dropdown next to a quota group, you can perform the following actions:
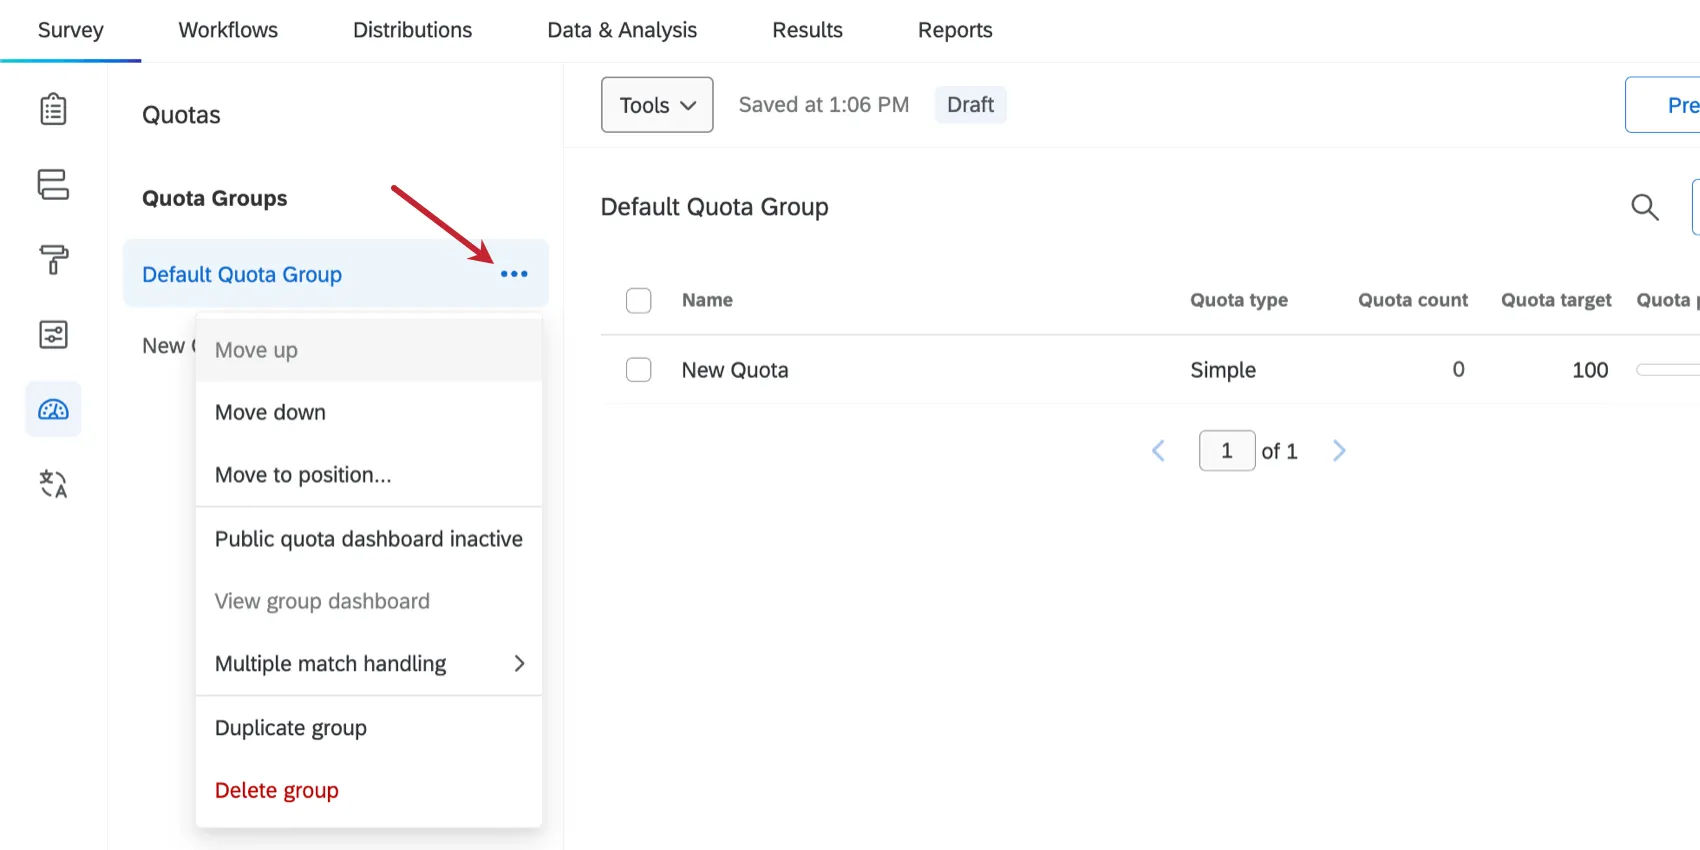
- Move Up / Move Down: Change the order of quota groups in the list. Qtip: You can also drag and drop quotas to reorder them.
- Move to position: Choose a specific position for your quota group in the list. You can choose from:
- First in the list
- Last in the list
- Before a selected quota in the group
- After a selected quota in the group
- Public quota dashboard active / inactive: See Public Quota Dashboards.
- View group dashboard: See Public Quota Dashboards.
- Multiple match handling: See Multiple Match Handling.
- Duplicate group: Create a copy of the quota group, with copies of the same quotas inside.
- Delete group: Delete the group. All quotas in the group will be deleted, too.
Warning: Once you delete a group, you cannot undo this action.
Using Quotas in Other Parts of Qualtrics
In addition to specifying what happens to respondents in the quota editor, you can also use quotas in other contexts.
- As a condition in your branch logic.
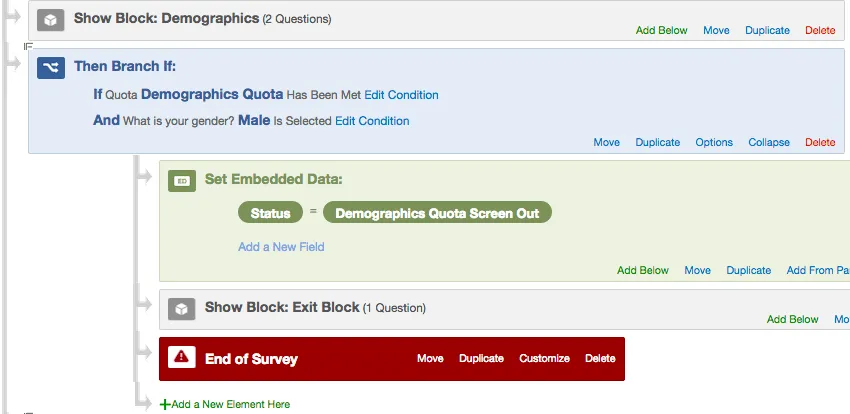 Example: If the demographics quota has been met and the respondent qualifies for that quota, then end the survey for that respondent and tag the response with a special embedded data field.
- As a condition in your display logic.
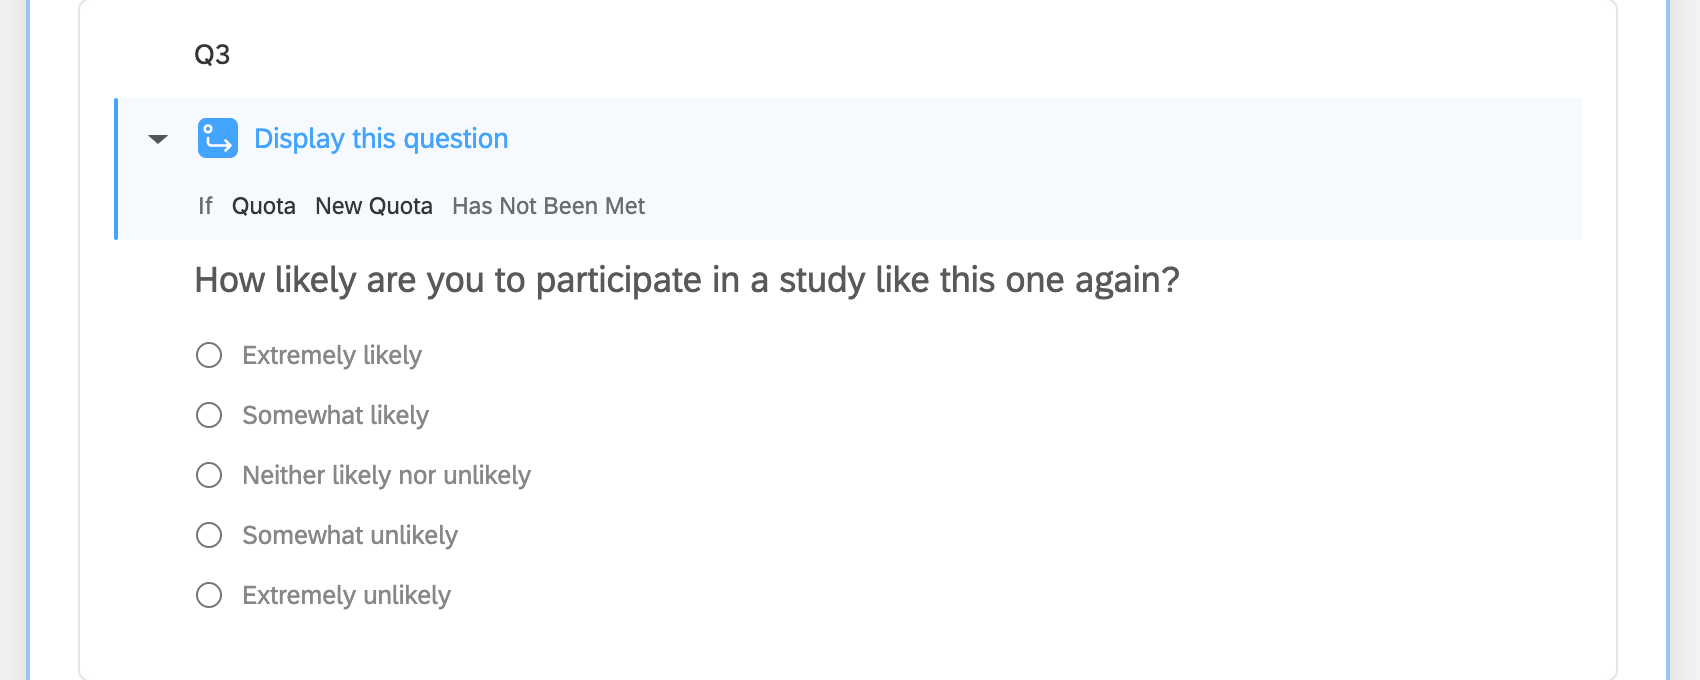
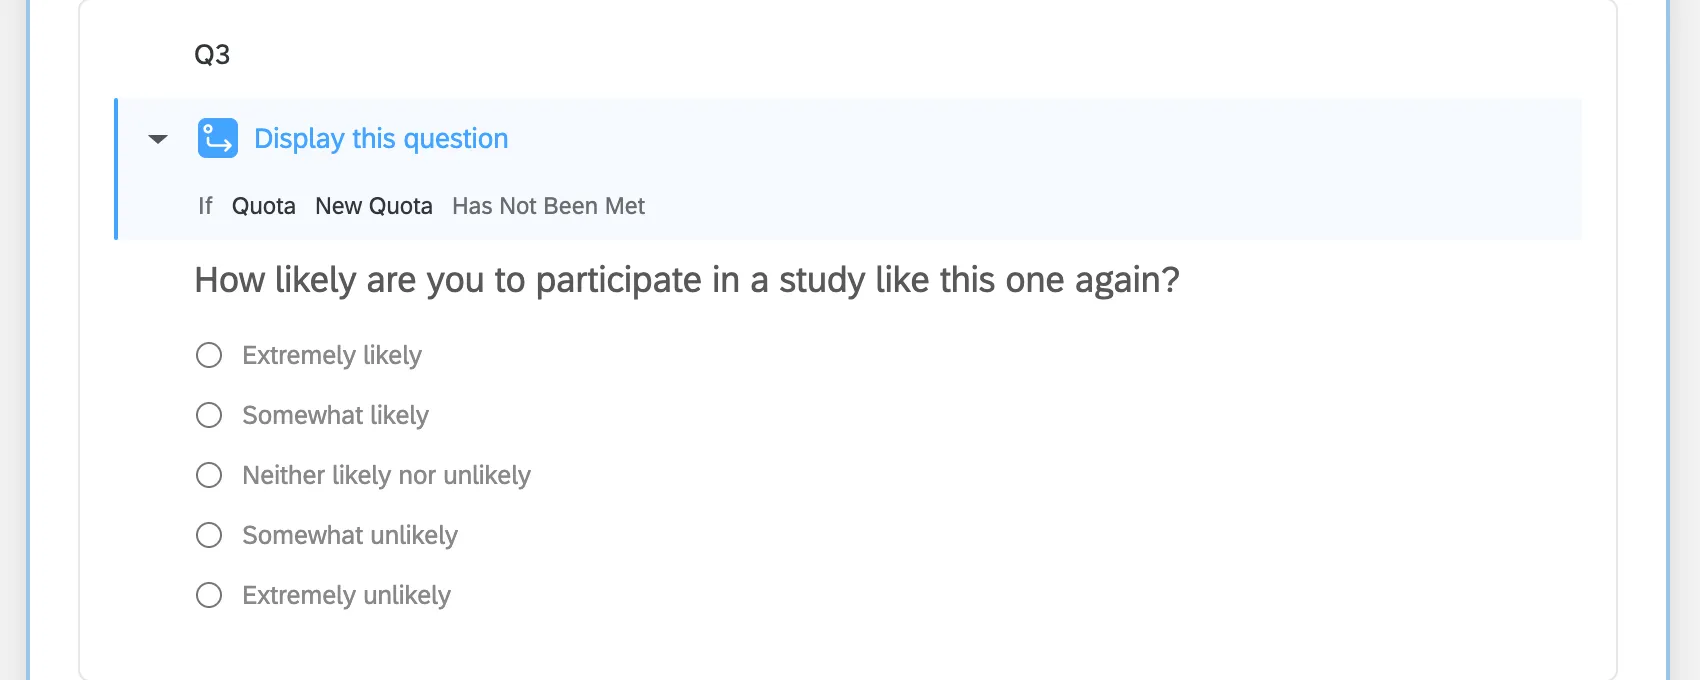 Example: Using our quota as a condition in display logic, we can specify that this question only displays if our survey’s quota hasn’t been met yet.
 - As a way to limit the number of total responses for your survey. See the Limiting Total Responses to a Survey section.
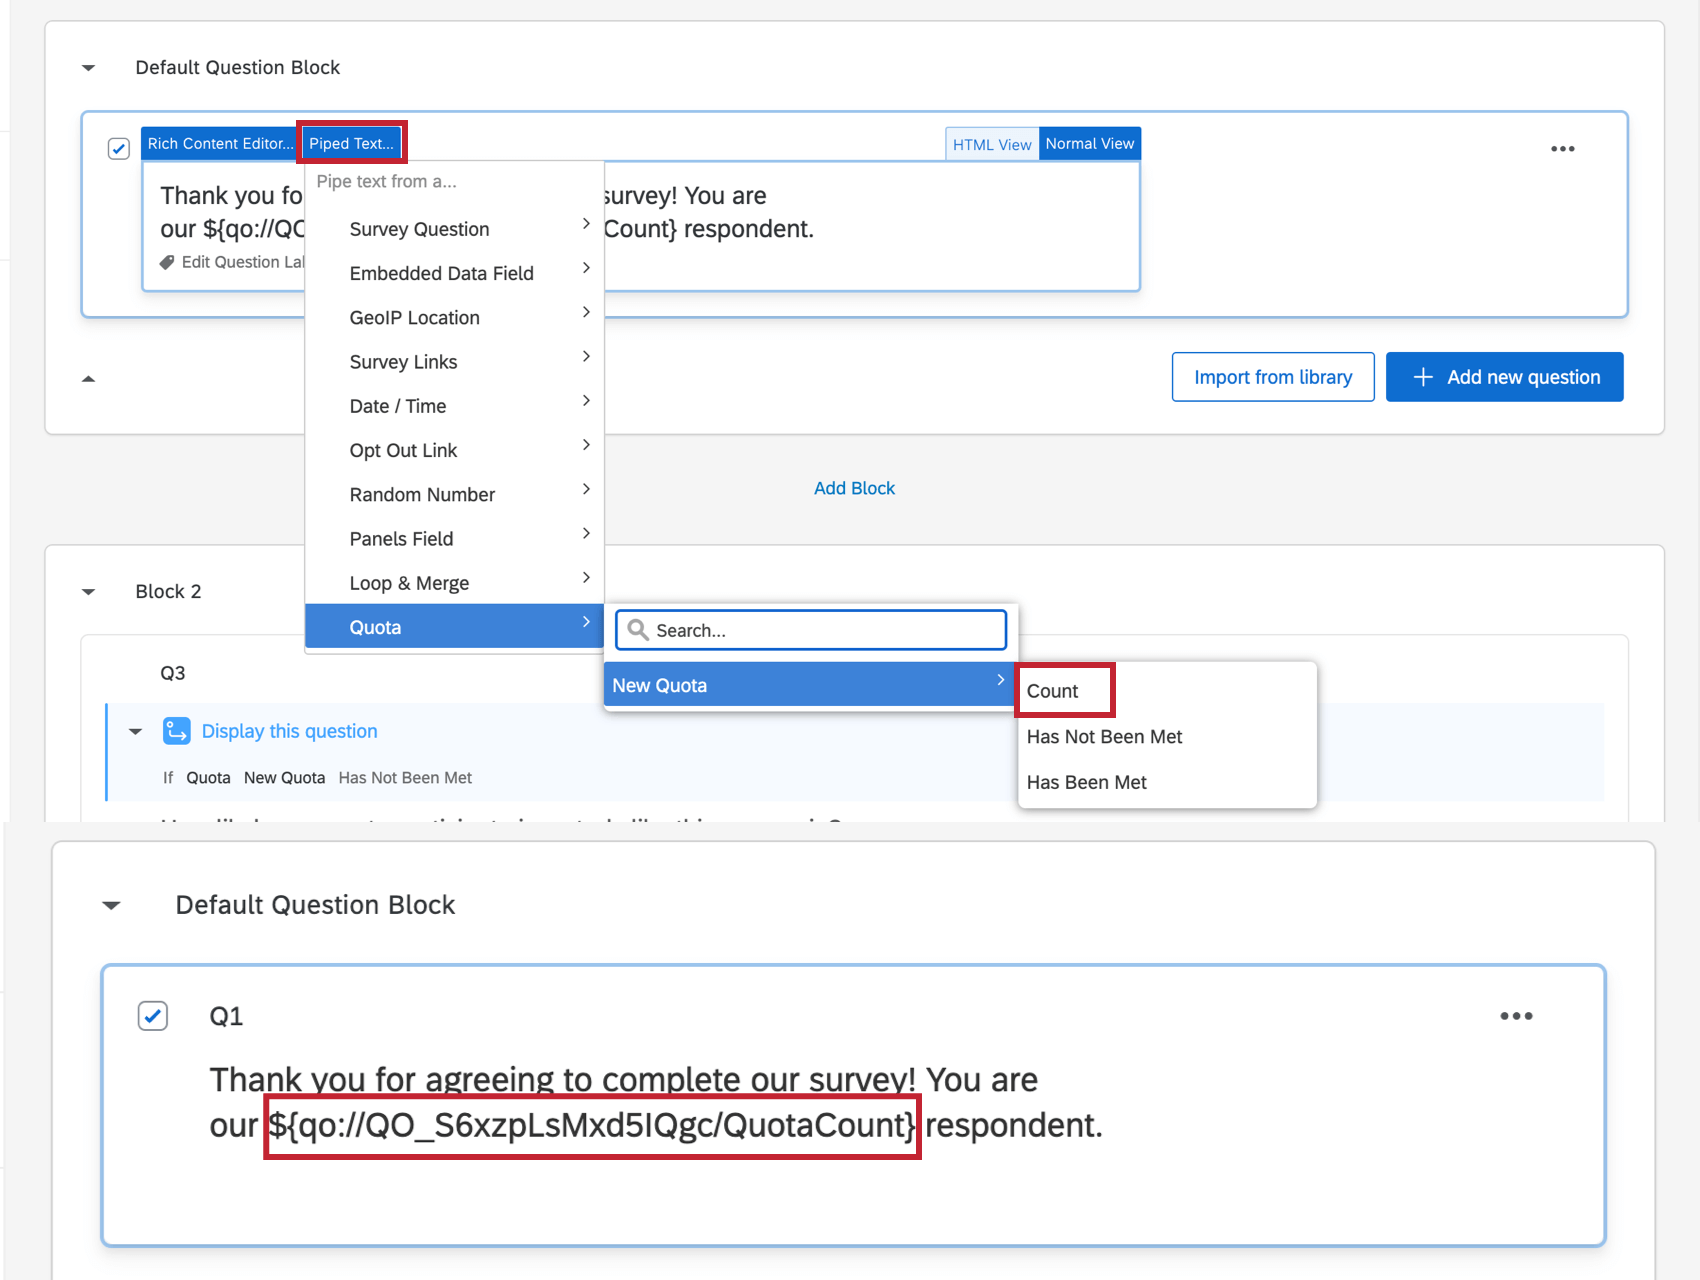
- As a way to show a current quota count to your respondents via piped text.
 Example: We can use a Total Visitor quota count to keep track of the number of respondents. This number will be displayed to the respondent so they know how many other visitors the survey has had.
Qtip: Are you looking for examples of how other Qualtrics users commonly use quotas? Check out these support pages:
- Panel Company Integration: Guide to setting up your survey for use with an online panel.
- Appointment / Event Registration Survey: Create a survey where users can sign up for an event or an appointment. Time slots no longer appear to new respondents as they are reserved by other respondents.
- Create an Anonymized Raffle: Learn how to run a raffle in a Qualtrics survey, using quotas to limit the prize’s distribution.
Limiting Total Responses to a Survey
Quotas can be used to limit the total number of individuals who respond to your survey. This may be helpful if your account has a response limit. In the below example, we set a quota for a survey that can only have 100 responses, regardless of the respondents’ demographics or how they answered the other questions in the survey.
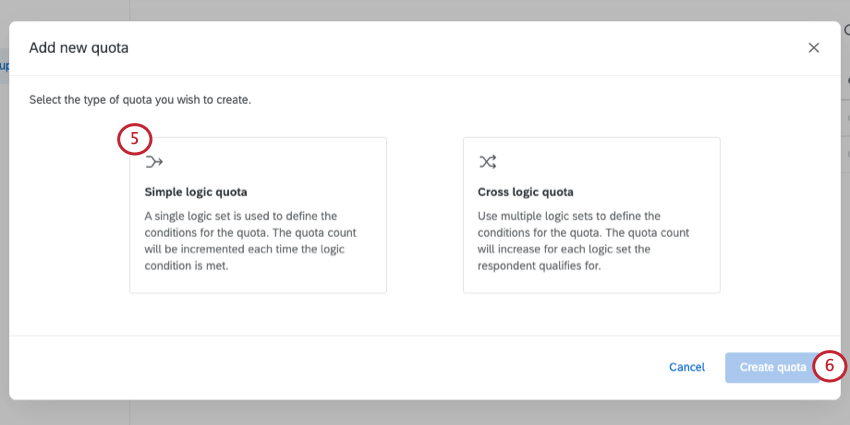
Qtip: If you are not given a choice between simple logic and cross logic, then you are working with simple logic quotas.
Qtip: Quotas are incremented upon survey submission. Although unlikely, it is possible to over-quota. This may occur if 2 individuals submit their survey at the exact same time.
Creating a Public Quota Dashboard
There may be situations where you wish to allow others to keep track of your quota counts. Public quota dashboards are webpages that display your quotas’ progress. You can link anyone to this page, regardless of whether they have a Qualtrics account.
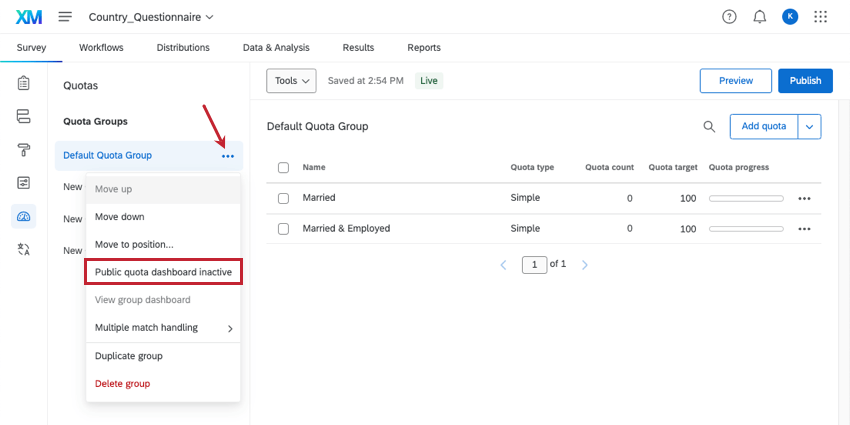
To create a Public Quota Dashboard
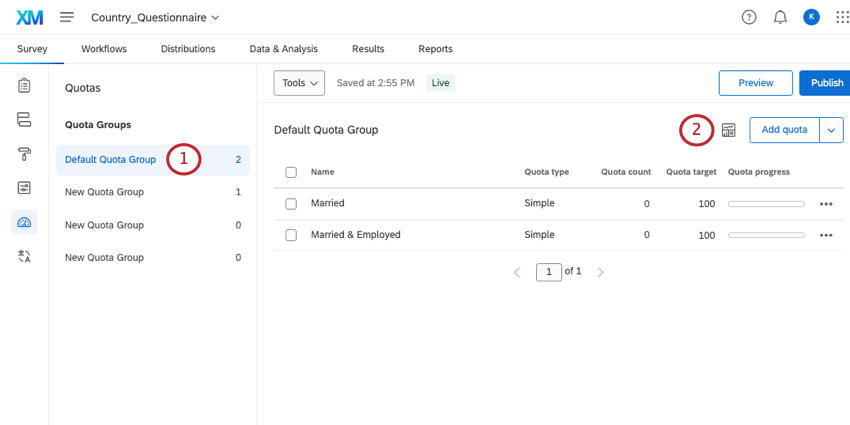
Each group of quotas can have its own public quota dashboard.
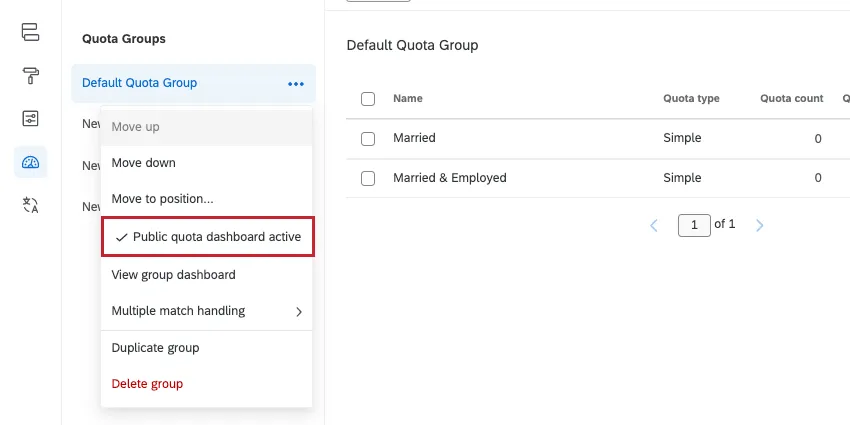
Click the dropdown next to a quota group, then select Public quota dashboard inactive.
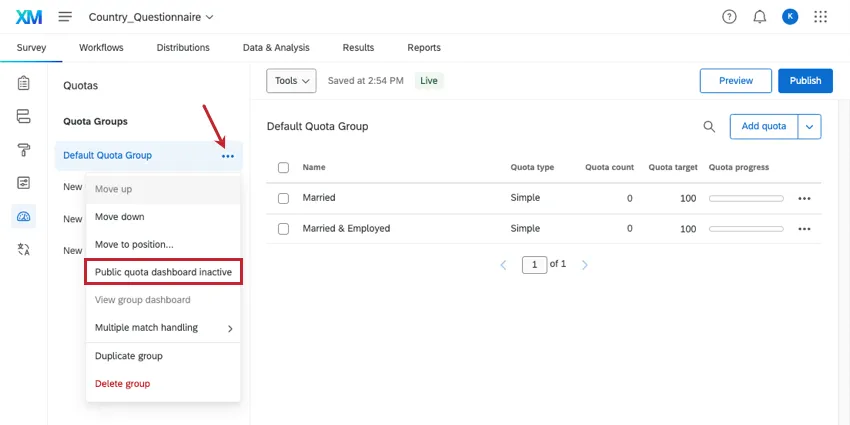
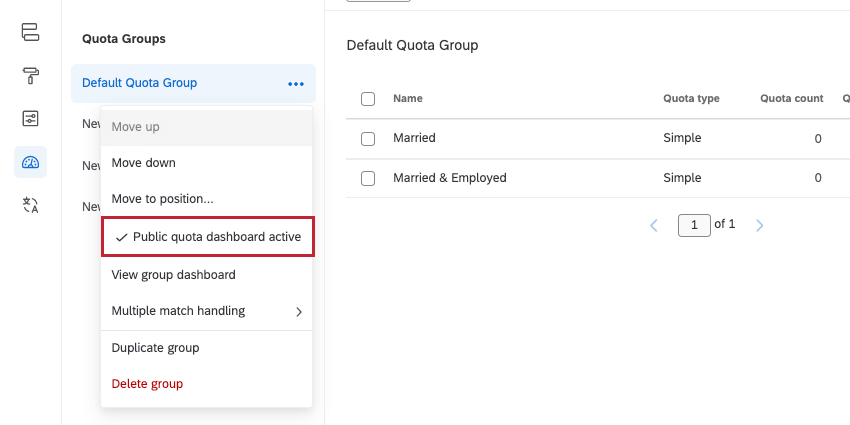
As soon as this is selected, your public quota dashboard is activated.
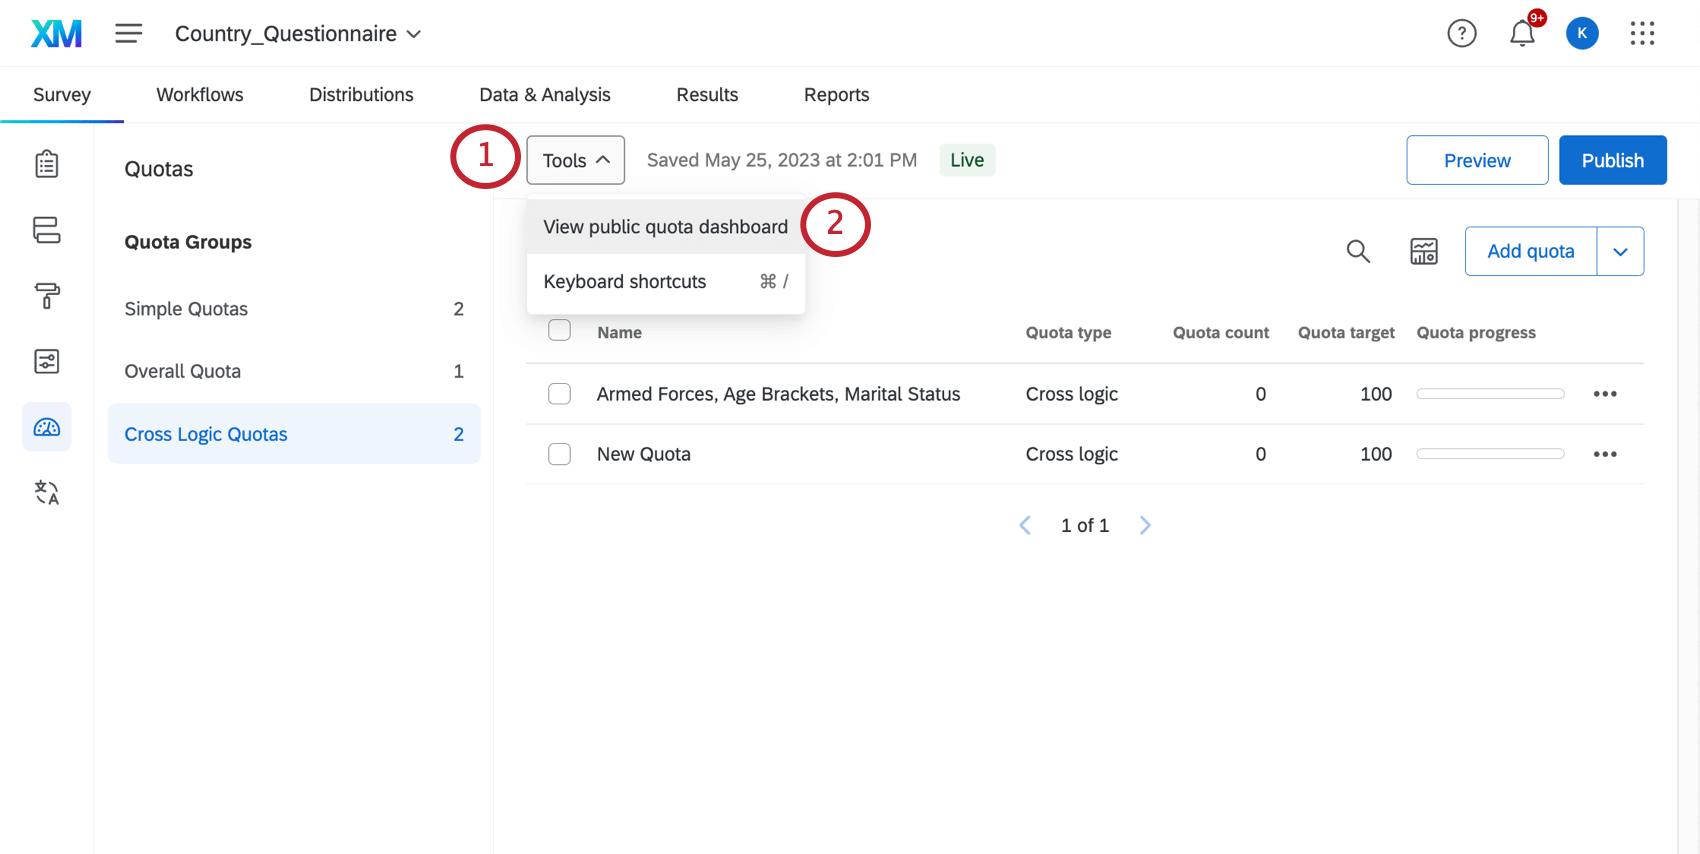
To access a Public Quota Dashboard
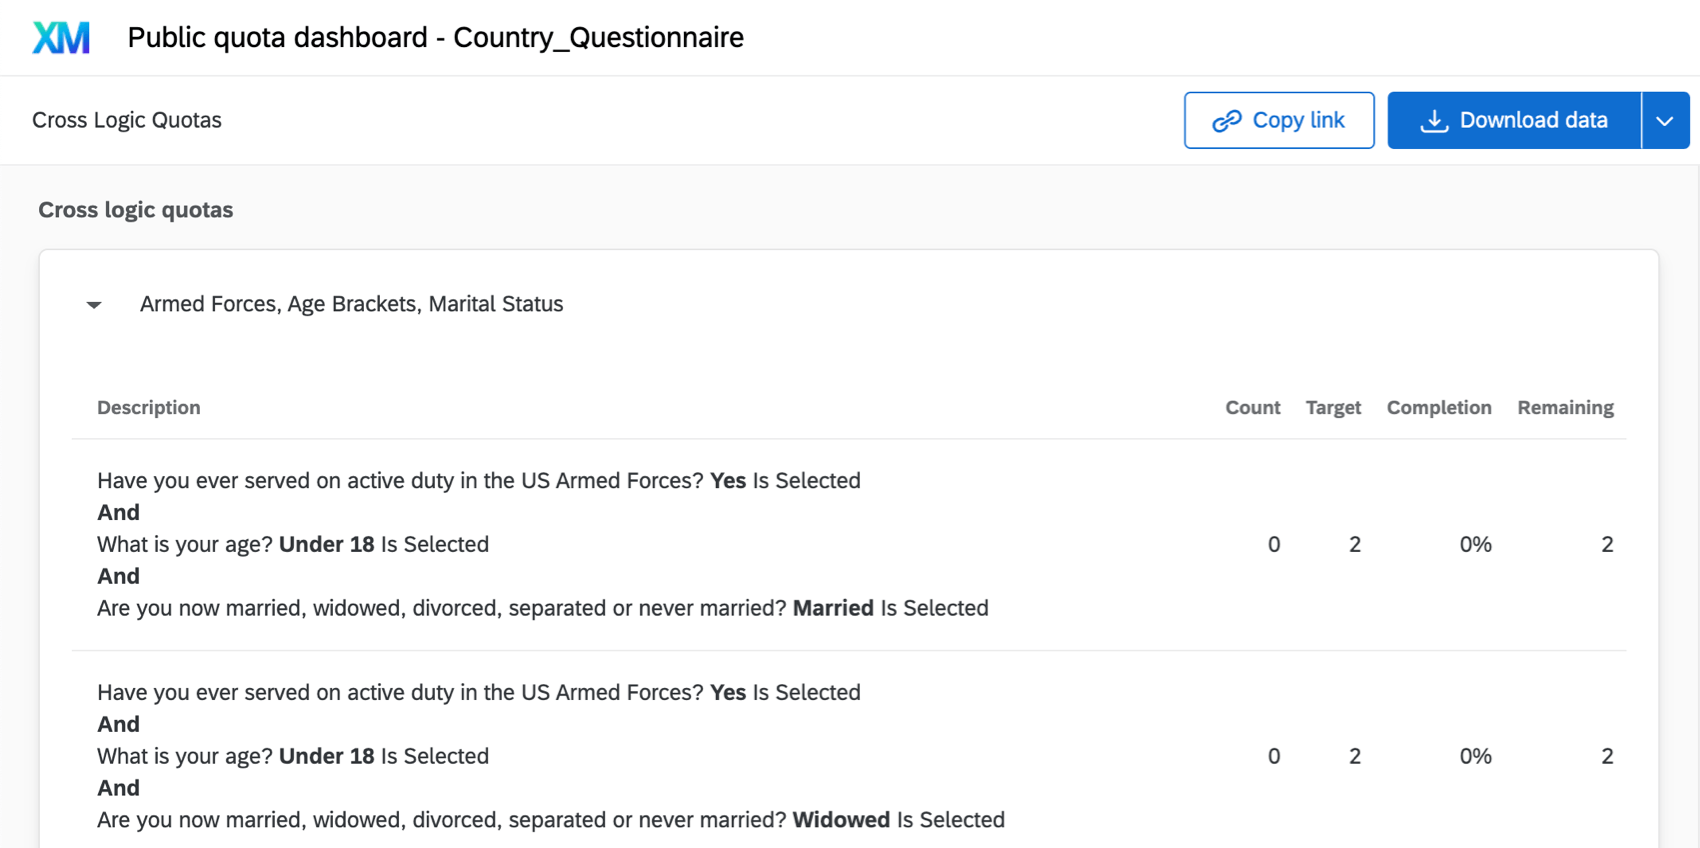
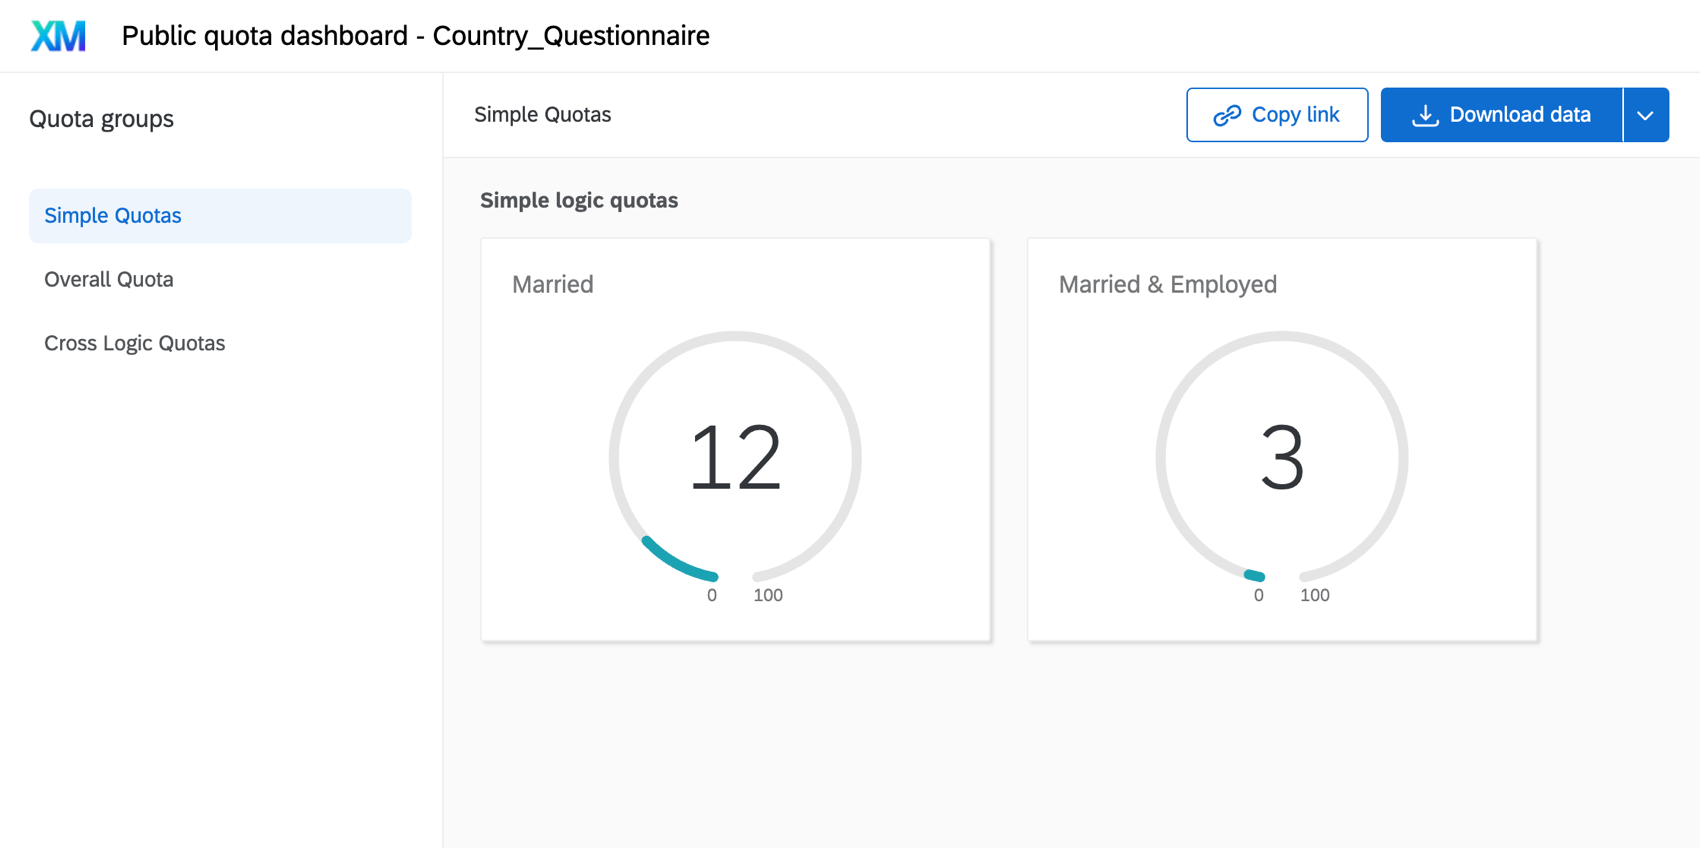
Simple and cross logic quotas are shown in separate sections on the dashboard. Simple logic quotas are displayed as gauge charts, while cross logic quotas are displayed as a table breaking down the counts of each quota segment.
There are 2 versions of your dashboard you can view and share: a version with all of your quota groups and a version with just one group of quotas.
Qtip: The name of the quota groups and the quotas themselves are displayed exactly as written on the public quotas dashboard, so be sure to name these clearly and professionally!
To open an individual quota group’s dashboard,
Qtip: You can also select View group dashboard from the group dropdown.


You can also open a version of the dashboard with all of your quota groups inside. Each quota group will be a separate page of the dashboard. To view this,
To share Public Quota Dashboards

- Click Copy Link to copy the report’s URL so you can share it.
Qtip: This link includes exactly what you see, including all the same report pages and download options. - Clicking the dropdown next to Download data, you can download a CSV or TSV of your quota progress.
- Download CSV / TSV for group: Download data just for the quota group you’ve selected to the left.
- Download CSV / TSV for all groups: Download data for all of the quota groups included in the dashboard. This option is only available for the public quota dashboard that contains all of your groups.
Using Advanced Quota Options
Qtip: Advanced Quota features are only available to Strategic Research customers. If you’re a Brand Administrator, please contact your Account Executive if you’re interested in getting access.
The following features are only included with Advanced Quotas:
- Cross Logic Quotas: Use advanced logic based on percentages when setting up your Quota.
- Multiple Match Handling: Specify how your quotas should be incremented if a respondent meets the conditions of multiple quotas.
- Scheduled Quotas: You can schedule quotas to automatically reset after a certain period of time. See the To Schedule an Automatic Quota Reset heading under the Setting Quota Counts and Limits
Qtip: Once enabled in your Qualtrics license, access to these features is controlled by the Use Advanced Quotas permission. By default, this permission is only enabled for Brand Administrators, but administrators can enable this permission for other users, types, groups, or divisions as needed.
Setting Conditions in Cross Logic Quotas
Qtip: This feature is part of Advanced Quotas, which is not available to all customers. If you have question about getting this feature enabled, reach out to your Brand Administrator.
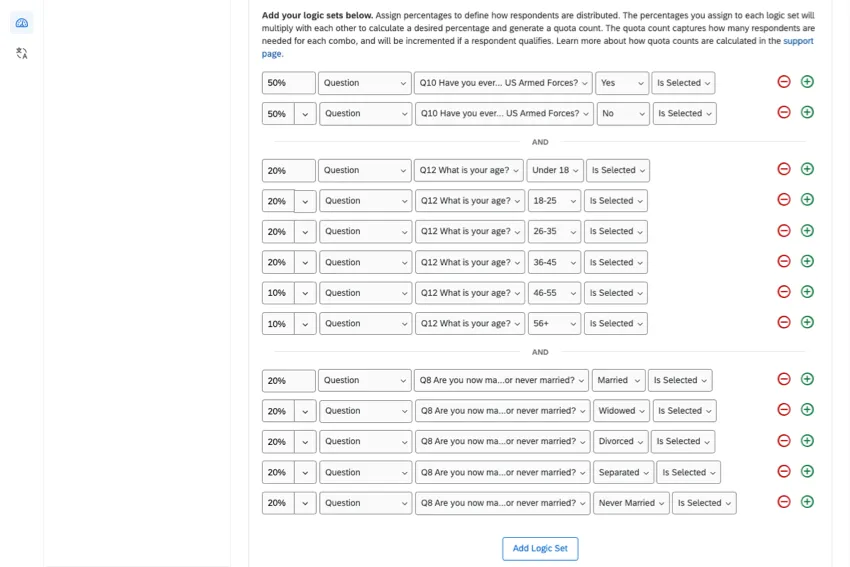
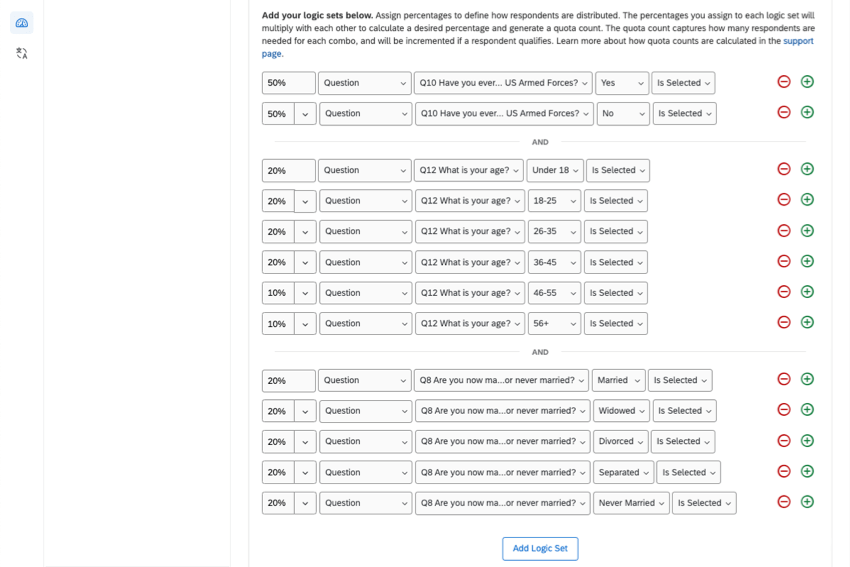
Unlike a simple logic quota, a cross logic quota uses percentages to define how respondents are distributed in your quota. This quota type is ideal when you have multiple groups of conditions. With cross logic quotas, you simply specify which percentage of respondents should match each criteria, and then Qualtrics will do the heavy lifting of figuring out how many respondents are needed for each combination of conditions.
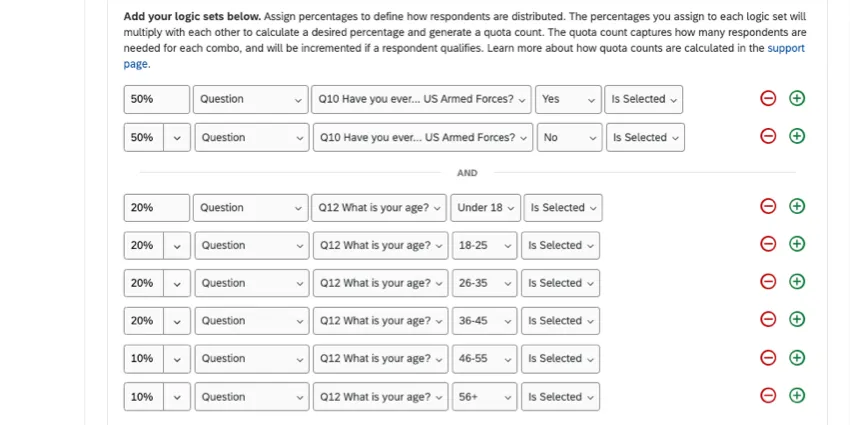
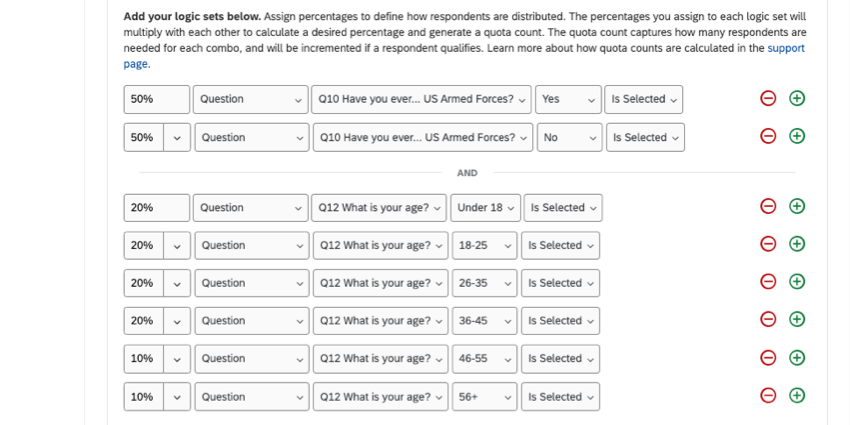
Example: If you wanted to create quotas that would keep track of respondents who are and are not enlisted in the armed forces, 6 age brackets, and 5 marital statuses, simple logic quotas would need 84 separate quotas to track these groups. With cross logic quotas, we can condense all of these into 1 comprehensive quota, as shown in the following screenshot.
To create a Cross Logic Quota
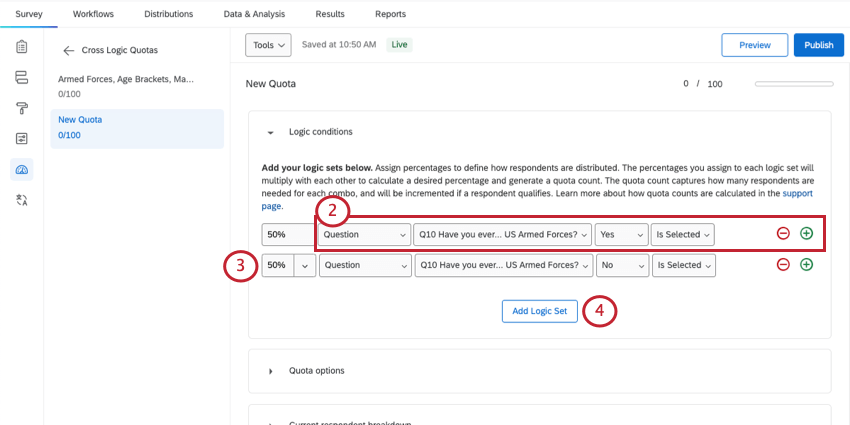
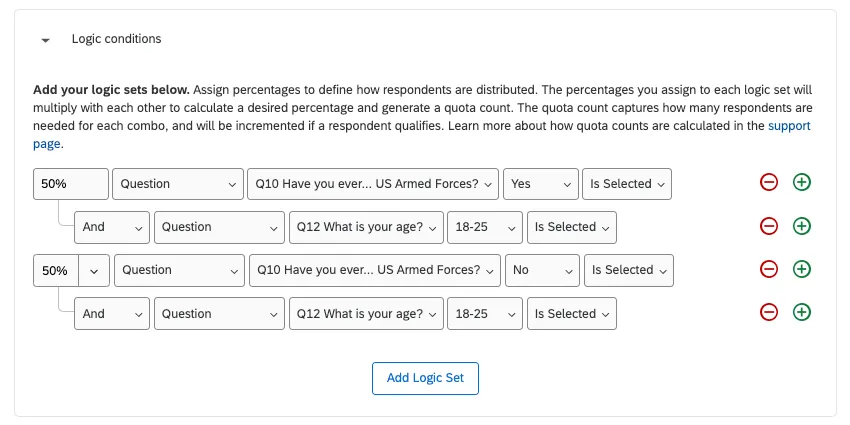
Example: Let’s start off with adding 2 conditions in our first set: enrolled in the armed forces, and not enrolled in the armed forces.
Example: In this case, 50% of the total respondents for this quota will end up being enrolled in the armed forces and 50% will not be enrolled.
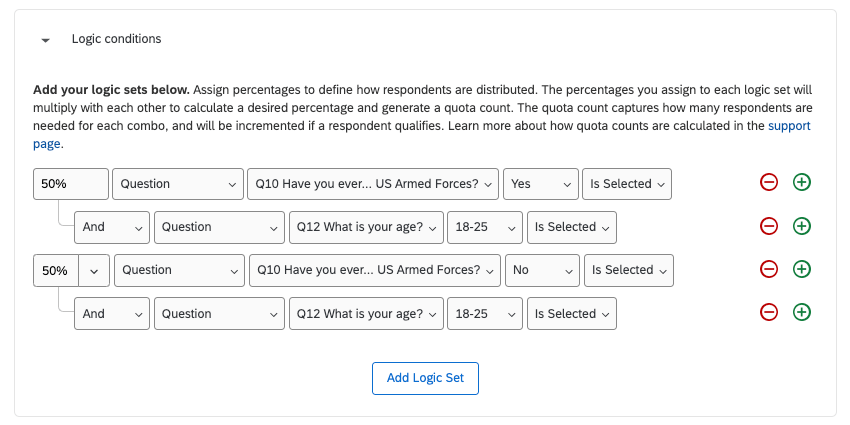
Example: Here, we’ve added another logic set focused on age groupings.
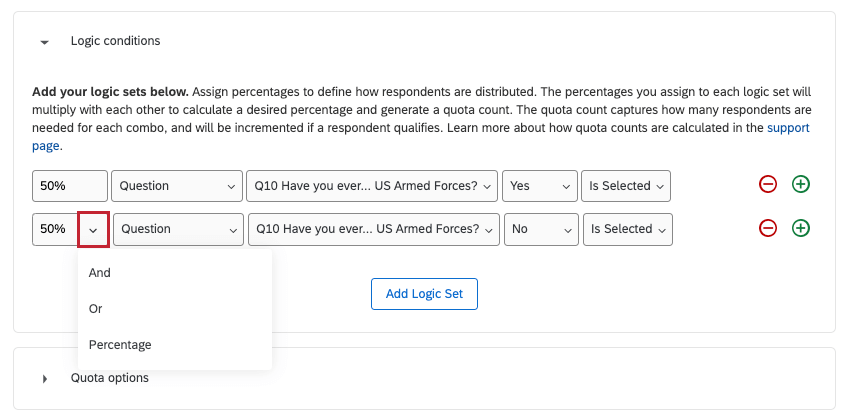
Qtip: By clicking the dropdown arrow, you can adjust whether you are connecting statements by And, connecting statements by Or, or specifying a percentage.
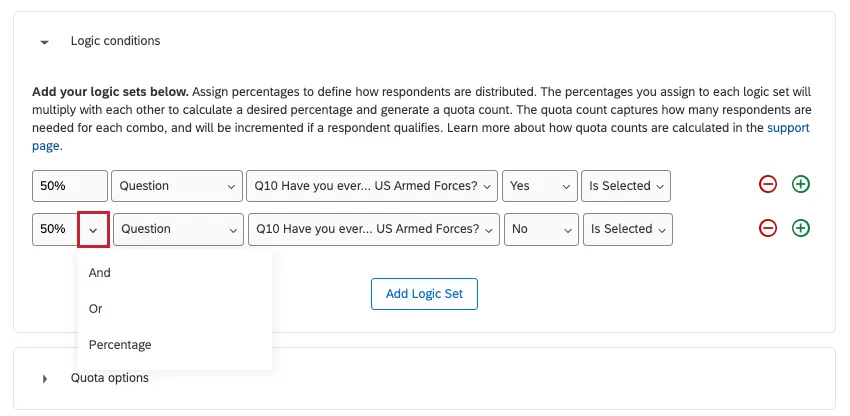
For example, this allows you to build percentages for more dynamic conditions, as seen below.
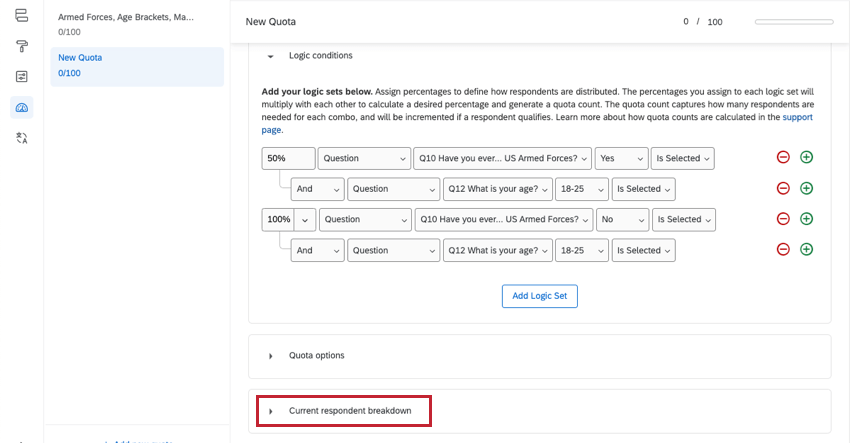
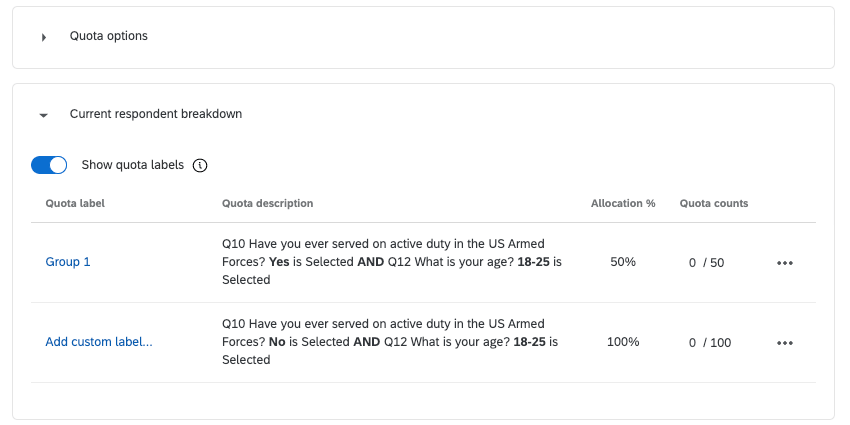
Current Respondent Breakdown
At the bottom of your logic is a distribution table showing how many respondents each combination of conditions gives you, based on the total quota limit and the percentages set above.


You can also add custom labels to each cross logic set to make them easier to differentiate. These labels will appear in public quota dashboards.
Example: If a group only includes unmarried people with 1 or more children, you could rename it “Single parents” for shorthand.
Click Show quota labels, then click Add custom label next to the group you want to rename.

Qtip: Adjusting the conditions in a quota can change the label. Make sure to add custom labels when you are finished with edits.
Use the dropdown next to a group to edit or reset the quota’s counts and targets.
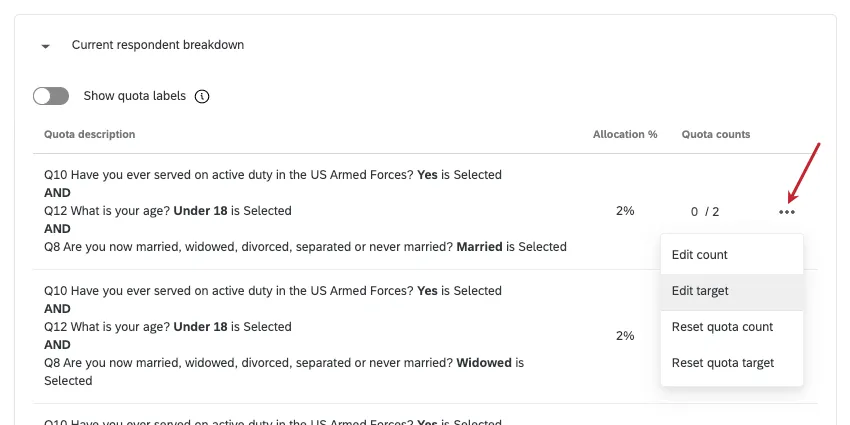
Attention: Be careful when editing your quota counts in a cross logic quota! If you change the overall quota total for a cross logic quota, then the “Current Counts” numbers will adjust as appropriate for your quota conditions. However, if you manually edit 1 of the “Current Counts” numbers, then this number will no longer adjust automatically if you change the overall total.
Setting Up Multiple Match Handling
Qtip: This feature is part of Advanced Quotas, which is not available to all customers. If you have question about getting this feature enabled, reach out to your Brand Administrator.
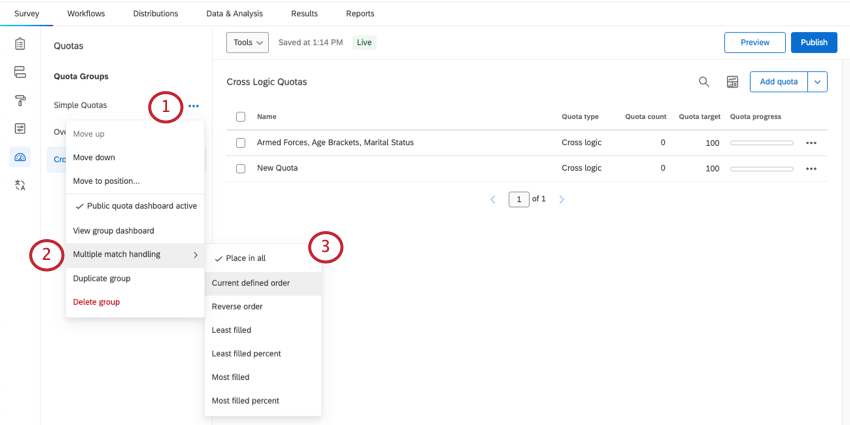
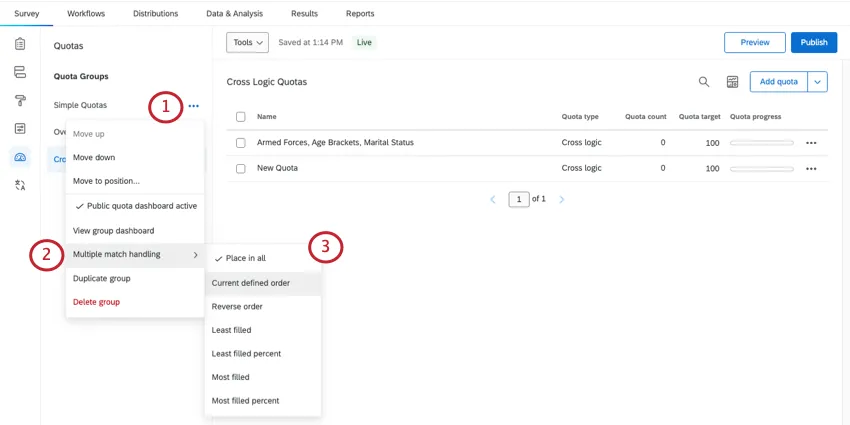
Sometimes your respondents may meet the conditions for multiple quotas. By default, a respondent will increase the count for all of the quotas they meet the conditions for. Multiple match handling can adjust how Qualtrics handles these multiple-match respondents.
Qtip: Make sure all the quotas you want to set multiple match handling for are in the same quota group.
To change how multiple matches are handled
Troubleshooting Quotas
We’ve designed this section for those who have read the material covered in this page and are still having issues with their quotas. Even though quotas can seem complicated, most problems can be diagnosed by checking a few basic things.
- Make sure that the current quota count and limit are set to the correct number.
- Check that the conditions are set up to record the correct respondents.
- The Using Logic page has a comprehensive guide to building conditions. Qtip: Anyone can use this guide. You don’t need access to Advanced Quotas / cross logic quotas to build the condition sets described on the Using Logic page.
- When working with multiple conditions joined by AND / OR, keep in mind the order of operations.
- If testing your quotas, remember you can delete test responses to de-increment quotas, and that you can manually reset or edit your quota counts.
- The Using Logic page has a comprehensive guide to building conditions.
- Double-check your quota actions. If you chose “None,” you need to have additional customization set up elsewhere in the survey before anything will happen.
- Review branch logic and display logic that use your quotas in their conditions.
FAQs
What do I need to do to make sure that only people who finish my survey increase the quota’s count?
What do I need to do to make sure that only people who finish my survey increase the quota’s count?
Why is my quota count still going up even though my quota has been filled?
Why is my quota count still going up even though my quota has been filled?
I am working with an outside sample provider and they gave me an "over-Quota" link. What do I do with it?
I am working with an outside sample provider and they gave me an "over-Quota" link. What do I do with it?
Keep in mind that most companies will require you to customize the link they have sent you so that it captures and sends some kind of participant identifier.
To learn more about the process of formatting an over-quota link correctly, visit our Panel Company Integration page.
I used my quota as a condition in Branch Logic, but instead of kicking out just the respondents who meet the conditions, it is kicking all of my respondents out. What is going on?
I used my quota as a condition in Branch Logic, but instead of kicking out just the respondents who meet the conditions, it is kicking all of my respondents out. What is going on?
You will notice that in this logic, once the quota is filled, we end the survey for everyone who gets to this branch. If we want to only end the survey for respondents who meet the conditions of the filled quota, we would need to add additional conditions into our Branch Logic. The revised logic would look something like this:
Keep in mind that this setup is only necessary if you need to record Embedded Data before redirecting your respondents out of the survey. If you do not need to record this information, an easier way to meet your needs would be by using the End Current Survey quota option.
I am creating many quotas that have similar logic conditions. Is there any way to speed up this process?
I am creating many quotas that have similar logic conditions. Is there any way to speed up this process?
I have filtered my results and they say that I have 45 people who meet my condition, but my Quota says I have 50. Why is there a discrepancy?
I have filtered my results and they say that I have 45 people who meet my condition, but my Quota says I have 50. Why is there a discrepancy?
You do have the option to decrement your quota when you delete a response. To do this, select Decrement all Quotas associated with deleted responses when confirming deletion of your responses. Doing this will help your quota count remain accurate.
That's great! Thank you for your feedback!
Thank you for your feedback!