
Health Connect Extension
What's on this page
About Health Connect
With Health Connect, you can make sure that the patient info in your Electronic Medical Record (EMR) system is synced with Qualtrics XM Directory. With patient and administrative information kept constantly up-to-date in your directory, you ensure that you can include the most important information in your survey results, dashboards, and overall Qualtrics patient experience program. Health Connect uses the Health Level Seven (HL7) messaging standard for transmitting clinical and administrative data.
Attention: Health Connect requires implementation, either via the Qualtrics Implementations team or a third-party implementations partner. To get started, reach out to your Account Executive.
Attention: Integration with Rhapsody is required for Health Connect.
Qtip: If you have questions about your existing Health Connect implementation, please reach out to your Technical Success Manager.
Once Health Connect has been added to your license, any users will need the Brand Administrator user type to edit or create Health Connect connections.
Information Required for Rhapsody Integration
Your Qualtrics Implementation Specialist will help with integrating Health Connect to Rhapsody. Rhapsody will need the following information:
- Endpoints: Health Connect endpoints for both testing and production directories (see Creating New Connections and Endpoints).
- OAuth token: An OAuth token from the same Qualtrics user account where the connection is created (see Generating an API Token)
- Connection type: What type of secure connection you’d like to use to connect your EMR to Rhapsody. Your Implementation Specialist can provide more information on possible connection types.
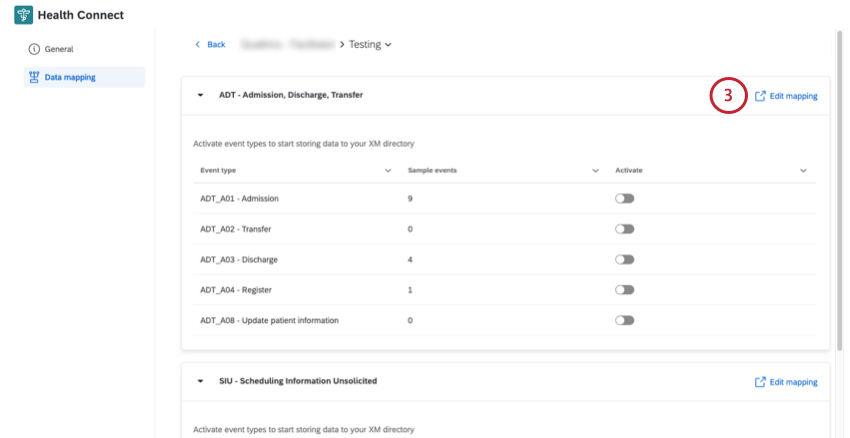
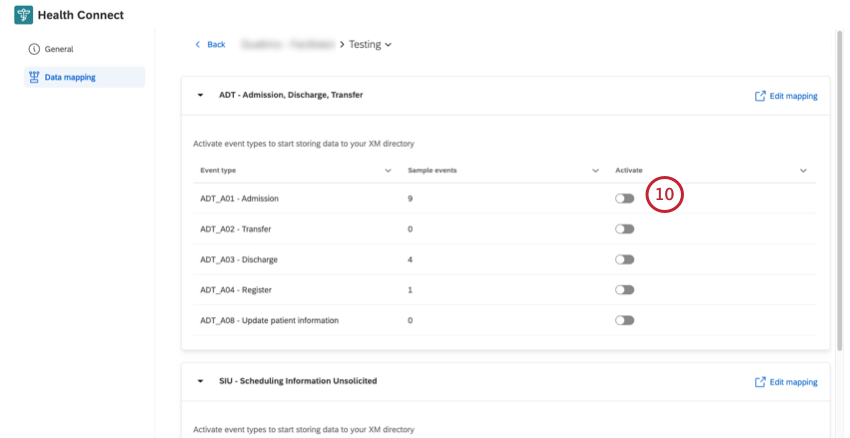
- HL7 event types: All event types you plan to use. Health Connect supports two HL7 event feeds: ADT and SIU. Within each of these feeds are a few supported event types.
ADT (Admit, Discharge, Transfer) Events
The ADT event type tracks the administrative lifecycle of a patient in a healthcare facility, such as changes in a patient’s demographics, insurance, administrative status, or physical location (bed/room). ADT messages are important in ensuring key patient information is consistent across the hospital’s entire record-keeping system.
The type of data segments you’d see in an ADT message can include Patient Identification (PID), Visit Information (PV1), Next of Kin (NK1), Diagnosis (DG1), and Insurance (IN1).
We only support the following ADT event types:
- ADT^A01: Patient Admit/Inpatient Visit
- ADT^A02: Patient Transfer
- ADT^A03: Patient Discharge
- ADT^A04: Patient Registration (Outpatient)
- ADT^A08: Update Patient Information
SIU (Scheduling Information Unsolicited) Events
SIU events detail the creation, change, or cancellation of a patient’s appointment or the booking of a resource (like an operating room or piece of equipment). SIU messages are important in ensuring all scheduling systems and calendars have matching, up-to-date information.
Example: An SIU event could be created while booking a follow-up appointment, changing the time of a radiology scan, or canceling a physical therapy session.
The type of data segments you’d see in an SIU message can include Patient Identification (PID), Schedule Activity Information (SCH), and Appointment Resource Groups (RGS, AIG, AIL, AIP).
We only support the following SIU event types:
- SIU^S12: Notification of New Appointment Booking
- SIU^S14: Notification of Appointment Modification
XM Directory Setup
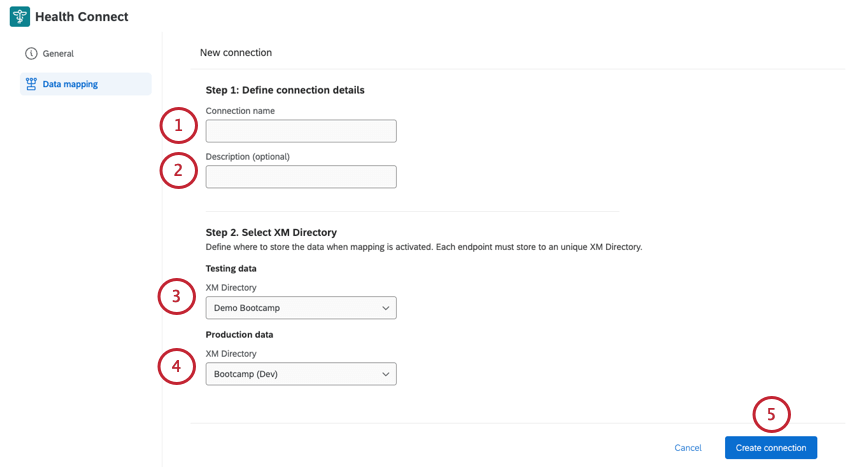
With every EMR connection you create in Health Connect, you can differentiate between a testing and production environment. By creating one directory for each, you can more easily test your setup, ensuring only the most complete field settings are pushing live to your Qualtrics programs.
Qtip: To create directories and manage their settings, make sure you have the correct account permissions.
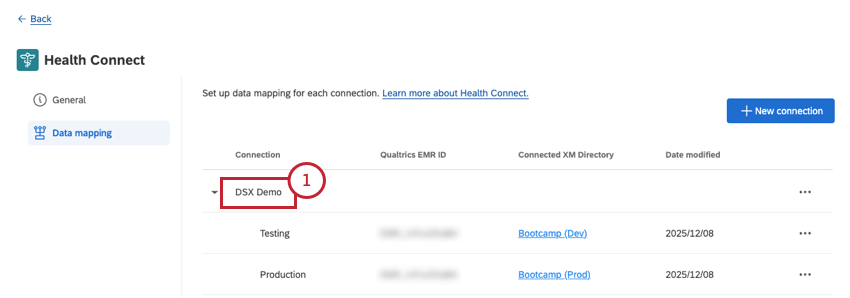
Once XM Directory has been set up, you can create a new connection from the Health Connect extension’s page.
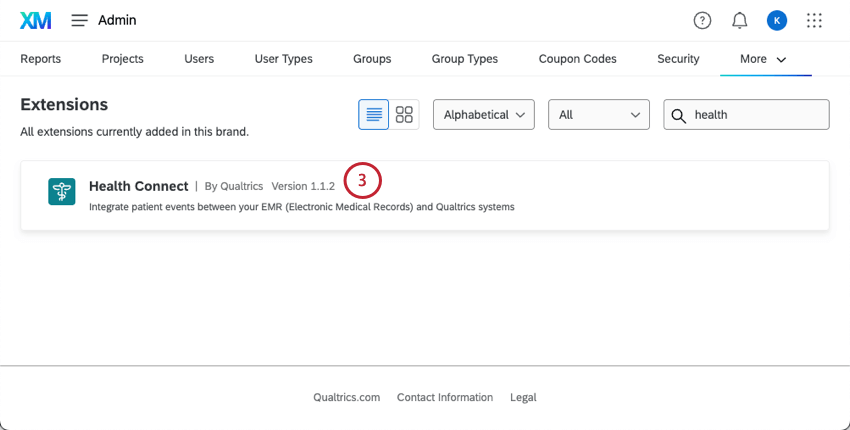
Managing the Health Connect Extension
Qtip: All Brand Administrators in your organization can access the Health Connect extension.
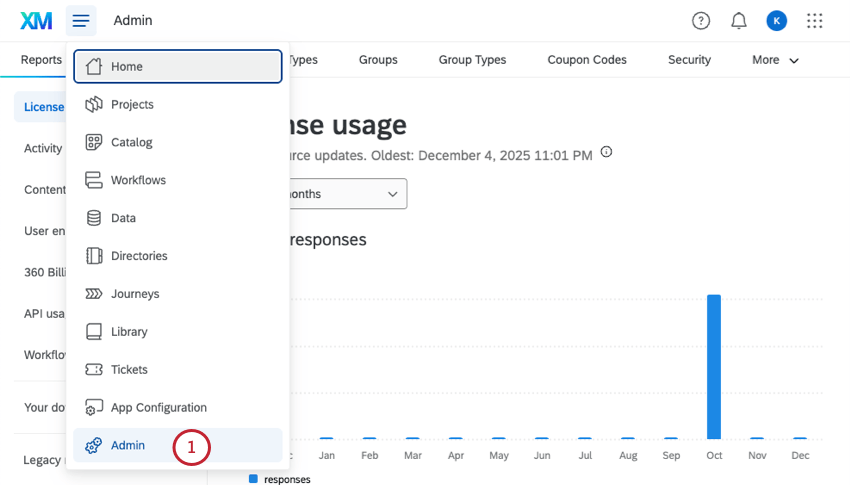
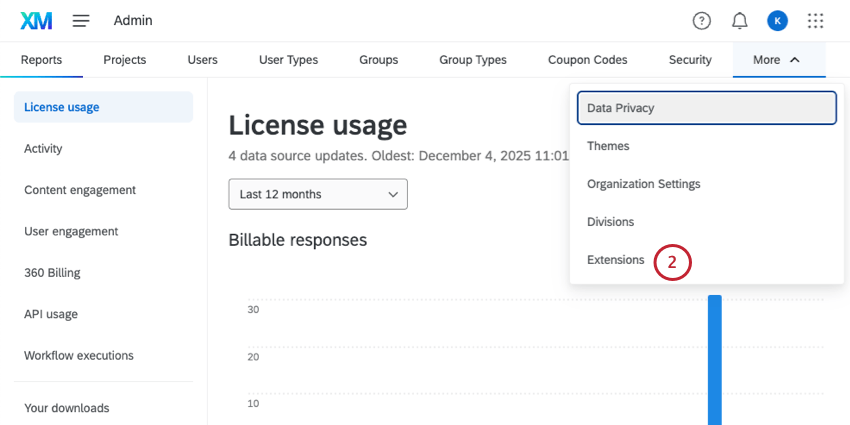
Qtip: You may have to click More to see the Extensions option.
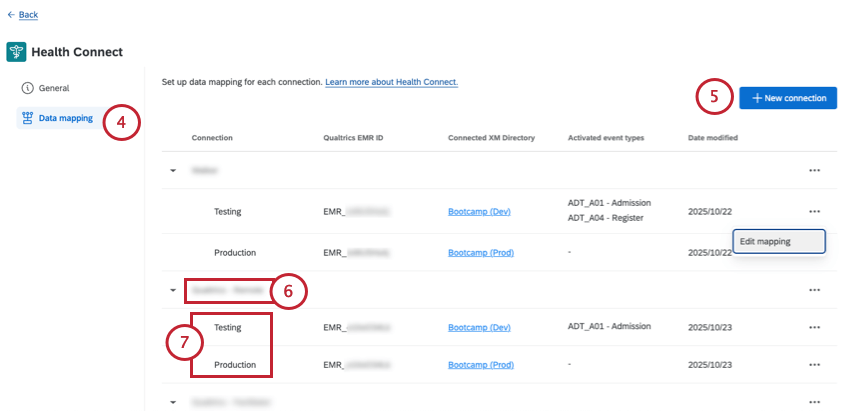
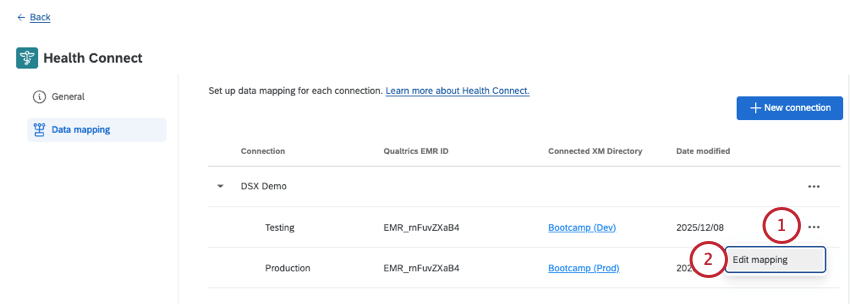
Qtip: You can also edit a connection’s details by selecting the 3 dots and choosing Edit connection.
Qtip: You can also edit data mapping by clicking the 3 dots and choosing Edit mapping.
New Connections and Endpoints
Qtip: Your Qualtrics Implementation Specialist will generally create new connections for you.
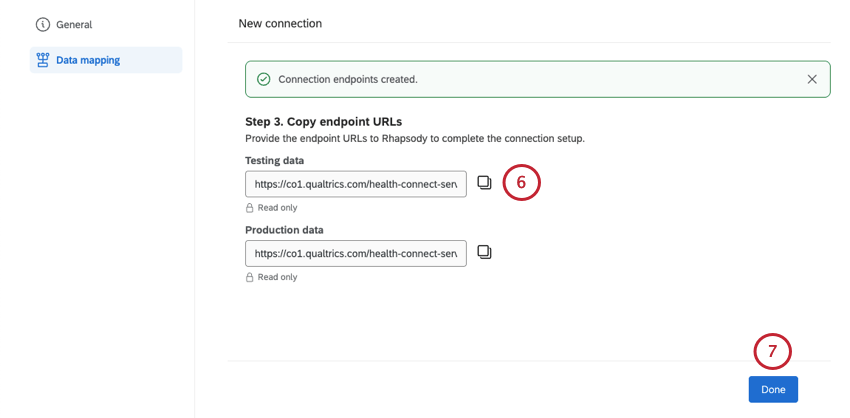
Qtip: If you ever need to access these endpoints again, click the connection’s name.
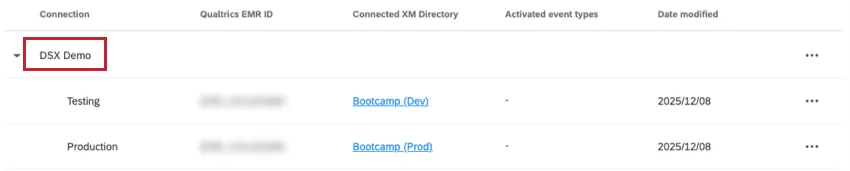
You can also click the 3 dots next to the connection name (not the nested test and production) and select Edit connection.
Data Mapping for Health Connect
Attention: Some features in the mapper will not be available until the first HL7 message has been sent to Qualtrics. Once a message shows up in the JSON preview, all features will be available.
Endpoints for the testing environment and the production environment are mapped separately.
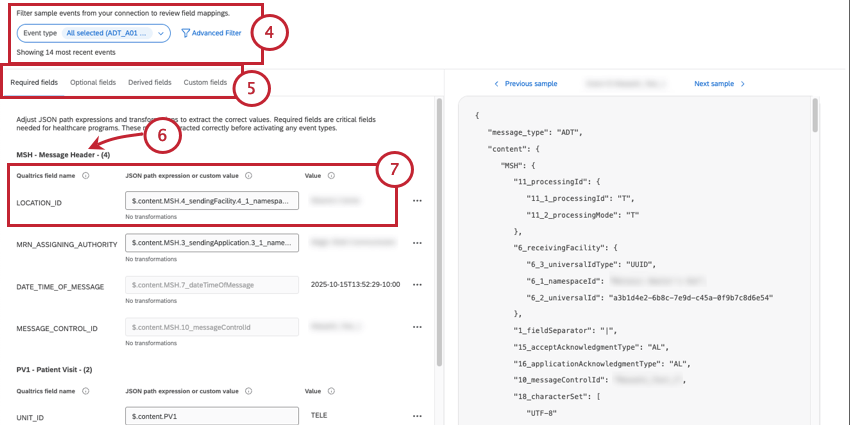
- Required Fields: Fields required for the ADT or SIU feed to work. If required fields are missing, the message will fail, and the information from your EMR will not be updated in Qualtrics.
- Optional Fields: Fields that aren’t required, but come already mapped in the extension (e.g., FIRST_NAME, VISIT_DATE).
- Derived Fields: Fields calculated automatically by the extension (e.g., AGE, LENGTH_OF_STAY).
- Custom Fields: New fields you create to map specific data that aren’t covered by required, optional, or derived fields.
Qtip: For more on segments, see HL7’s documentation.
- Qualtrics field name: What the field is called in XM Directory and any connected surveys or dashboards.
- JSON path expression or custom value: You can either define a field’s value using JSON or by entering a custom value.
- JSON path expression: Defines where to pull the information from a JSON message. Must start with a $.
- Custom value: A hard-coded/static value.
- Value: As you pull in sample data, this column shows the value pulled in for the selected example event. Example: If you’re looking at the “FIRST_NAME” field, the value might be “Maria.”
 Qtip: The values of derived fields cannot be edited, because they’re automatically calculated by Qualtrics.
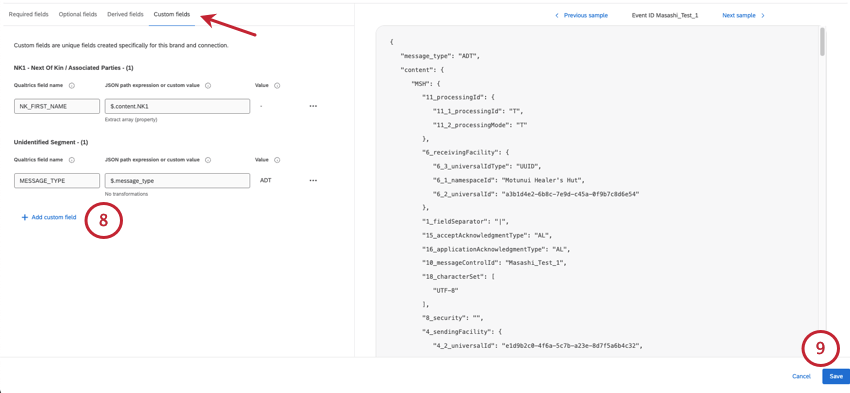
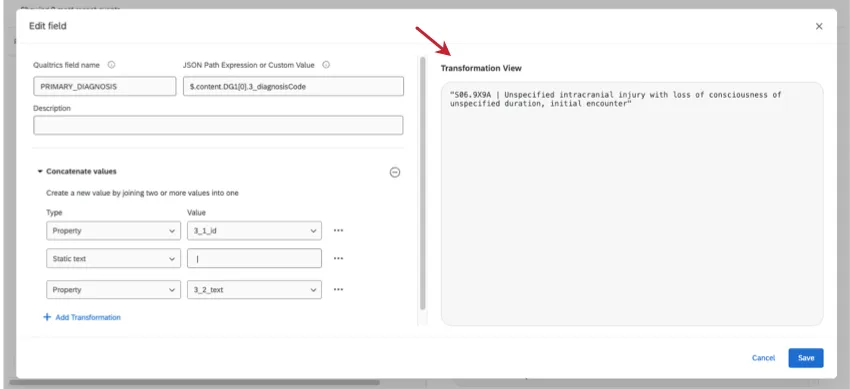
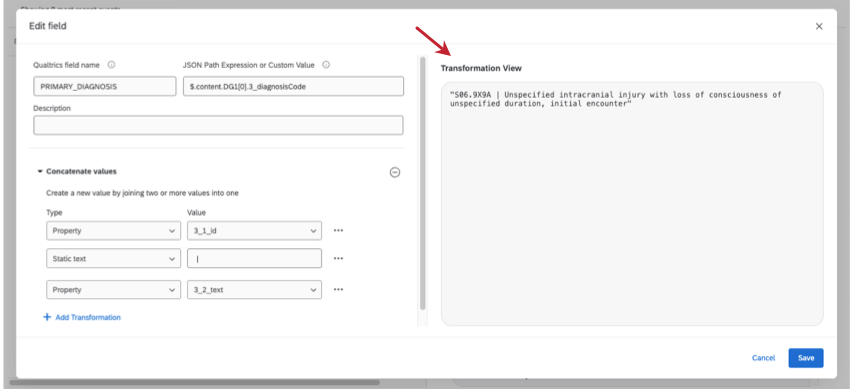
Qtip: Set a name for your new field as it should appear in Qualtrics, and either the JSON path it should derive its value from, or a hard-coded value. From there, you can even add transformations.
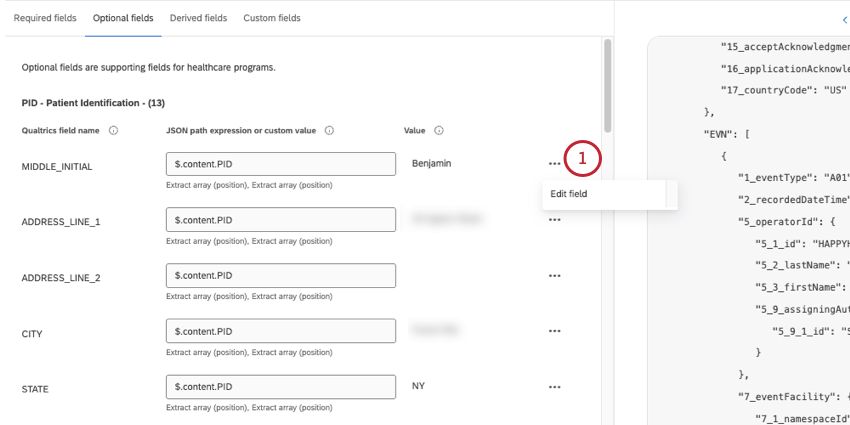
Qtip: There’s a way to test whether the JSON path you entered is displaying the correct value. Click the 3 dots next to your field, and select Edit field.
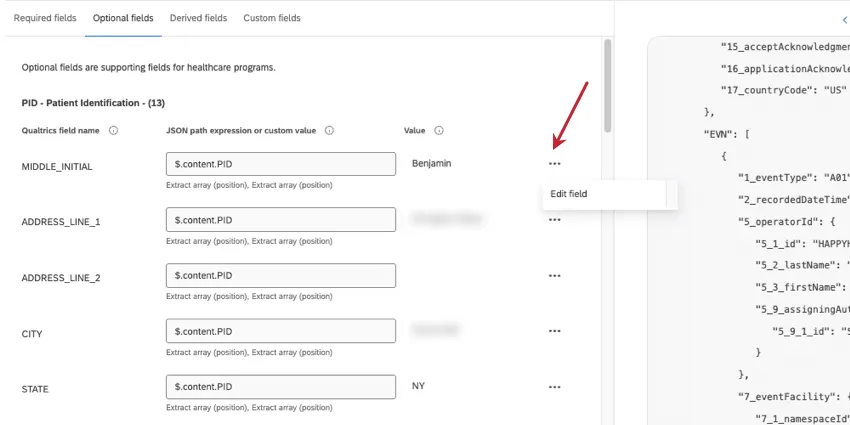
Using sample JSON data, this new window will show you what value was pulled based on the expression you entered.
Data Transformations
Attention: Some features in the mapper will not be available until the first HL7 message has been sent to Qualtrics. Once a message shows up in the JSON preview, all features will be available.
To transform data is to reformat or recode it so it fits a more readable and user-friendly format when it’s saved to Qualtrics.
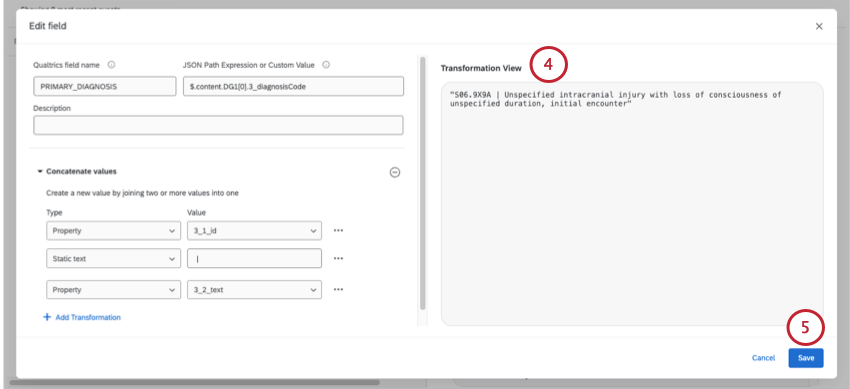
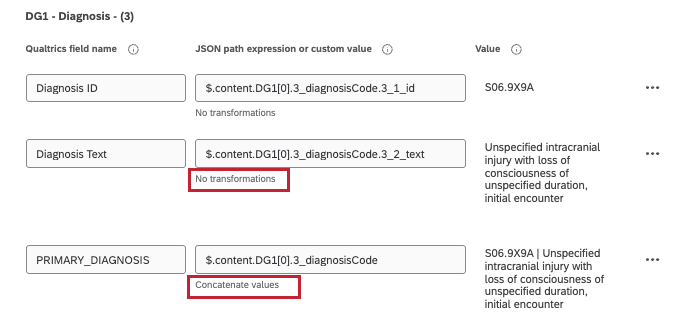
Example: Combining a diagnosis code and the text for the diagnosis into one collective field.
Example: Changing all people and location names to title case for consistency.
Transformation Types and Examples
| Transformation | Description | Example |
|---|---|---|
| Extract array (position) | Extracts an element from an array using its numeric position (index). Useful when you want a specific element from array data. | [“apple”, “banana”, “cherry”] Extract array (position = 2) would be “cherry”. |
| Extract array (property) | Filters the current array to objects where the selected property equals a specified value. If no elements match, it will be “null.” | [{“firstName”: “Alice”, “lastName: “Smith”}, {“firstName”: “Bob”, “lastName”: “Hopkins”}, {“firstName”: “Carol”, “lastName”: “Jones”}] Extract array (“firstName” = “Carol”) would be [{“firstName”: “Carol”, “lastName”: “Jones”}] |
| Concatenate values | Combines multiple string values end-to-end with delimiters in between (such as spaces or commas). Used to create full names, addresses, or combine data fields. | If the values are: “John”, “Doe” They’d be concatenated to “John Doe” |
| Title case | Converts a string so that the first letter of each word is capitalized and the rest are lowercase. Helps standardize names, titles, or labels. | “the quick BROWN fox” would become “The Quick Brown Fox”. |
Adding Transformations
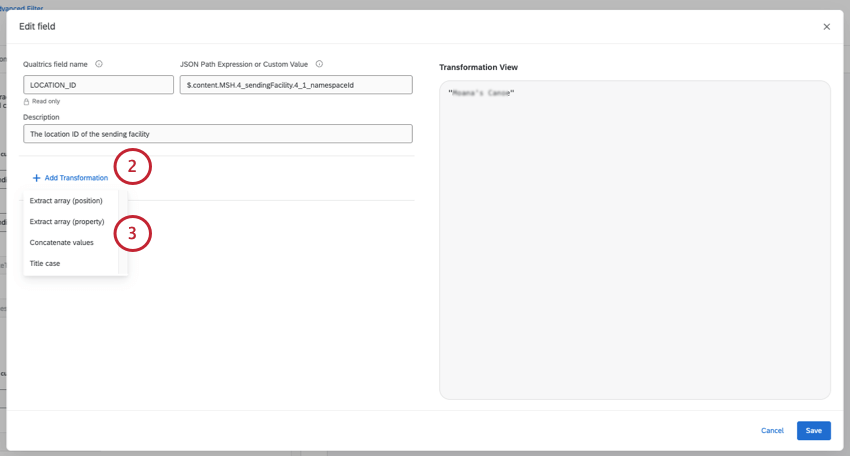
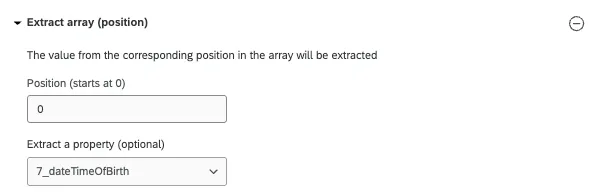
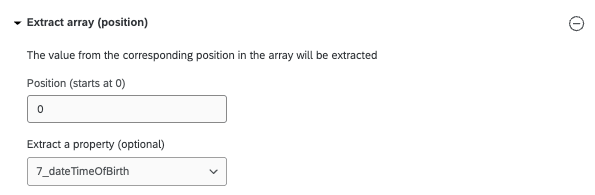
- Extract array (position): Starting from 0, enter the position of the array you want to pull. If desired, you can also extract a specific property.
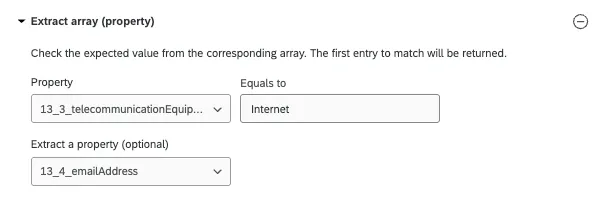
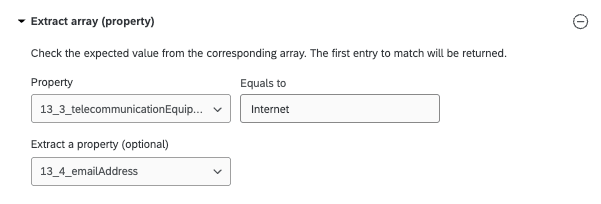
- Extract array (property): Select an exact property you want to pull, and set it equal to a specific value you want to target. If desired, you can also extract a specific property.
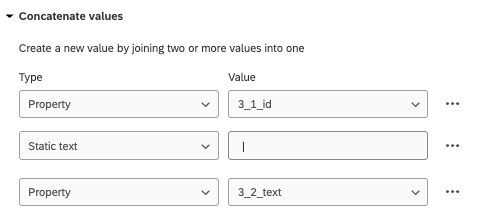
- Concatenate values: In general, the format will be property, static text, then property. The property is the specific value amongst the array you want to pull, and “static text” refers to the delimiter you want to separate these by. To use a space instead of a delimiter, you can exclude “static text” altogether.

- Title case: No extra steps are needed.
Viewing Existing Transformations
If a field has a transformation applied, it’ll be summarized by its type of transformation right under the field.

You can also view and edit existing transformations in the Edit field window.
Viewing JSON Message Samples
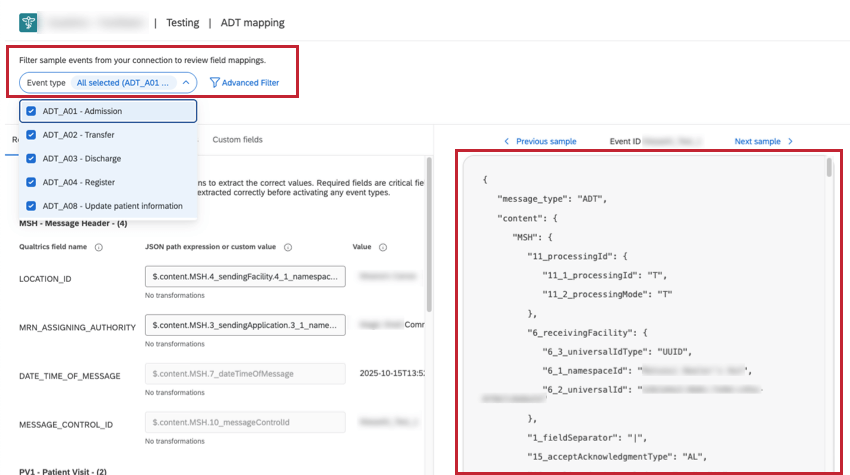
Once your EMR has been connected to Qualtrics using Rhapsody, messages from your EMR system will appear on the right side of the screen in a JSON format.
The event type filter and the advanced filter can be used to narrow down the specific messages you want to see.
- Event type: Choose any of the event types to see the raw JSON content on the right.
- Advanced Filter: Build advanced filters to find past messages transmitted from your EMR to Qualtrics, based on information they contain. Filter by Qualtrics Field or by JSON Path Expressions.
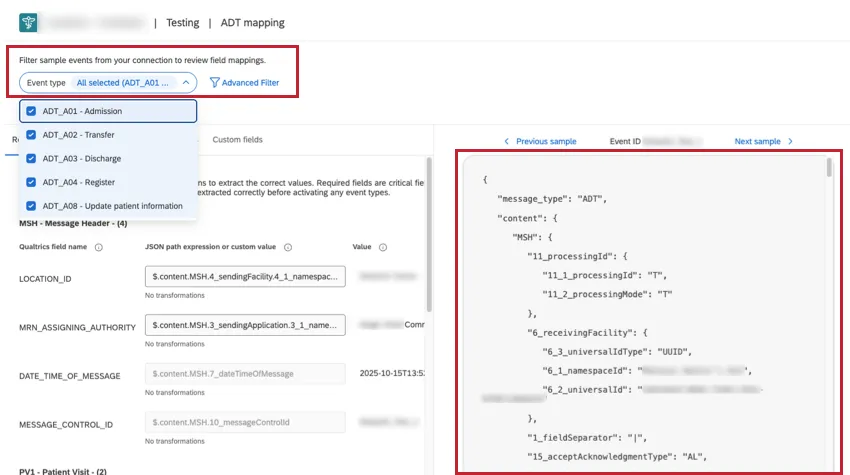
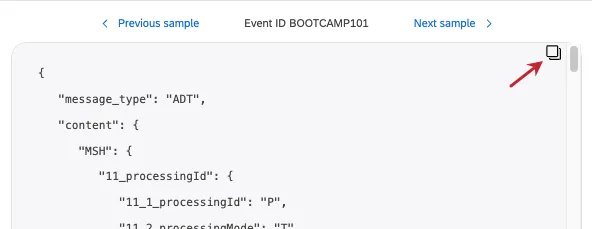
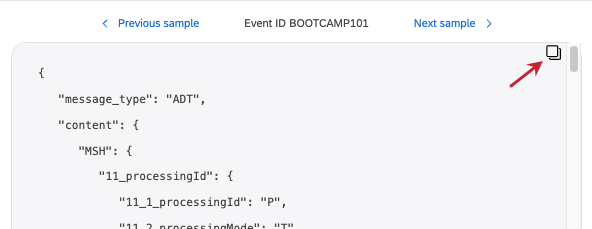
Navigate recently received messages by using the previous sample and next sample buttons along the top.
Qtip: You can copy the body of a JSON message by hovering over the sample and clicking the icon.
Examples of JSON Path Expressions
The table below has a few examples of JSON Path Expressions you can use in advanced filters.
| Field | JSON Path | Use Case |
|---|---|---|
| MESSAGE_CONTROL_ID | $.content.MSH.10_messageControlId | This is the unique id for a specific HL7 message. |
| VISIT_ID | $.content.PATIENT[0].PV1[0].19_visitNumber.19_1_id | Also known as the Contact Serial Number (CSN). |
| UNIT_ID | $.content.PV1[0].3_assignedPatientLocation.3_1_pointOfCare | This is also known as the department ID. |
Qtip: Filters are built using “any/all” conditions that can be separated into multiple sets. For general instructions not specific to Health Connect, see:
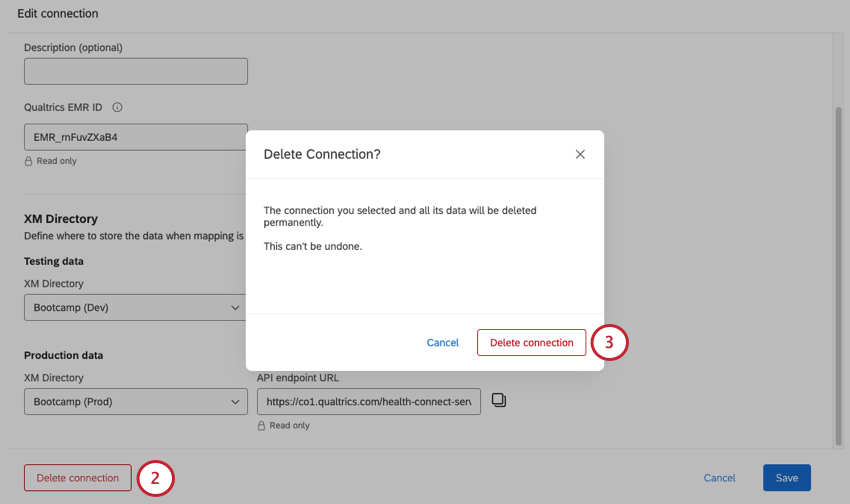
Deleting a Connection
Warning: Deletion is permanent. Once a connection is deleted, those endpoints can never be recovered, and your EMR will no longer sync to Qualtrics. You will need to reconnect to Rhapsody with a new set of endpoints to resume your data sync.
FAQs
How fast does EMR data sync to Qualtrics?
How fast does EMR data sync to Qualtrics?
What’s an EMR?
What’s an EMR?
What’s HL7?
What’s HL7?
By working within HL7’s formats and guidelines, Qualtrics Health Connect meets not only the industry standard for healthcare data handling, but HIPAA requirements for data exchange.
What’s a segment ID?
What’s a segment ID?
What does this segment ID mean?
What does this segment ID mean?
How do I read JSON output?
How do I read JSON output?
What is Rhapsody?
What is Rhapsody?
That's great! Thank you for your feedback!
Thank you for your feedback!