-

Qualtrics Platform -

Customer Journey Optimizer -

XM Discover -

Qualtrics Social Connect
Text Analytics Overview
About Text Analytics
The Text Analytics section of your account allows you to build and manage topic models. Here, you can use unstructured text data from the Qualtrics platform or XM Discover, and combine the data from multiple projects together for easier analysis.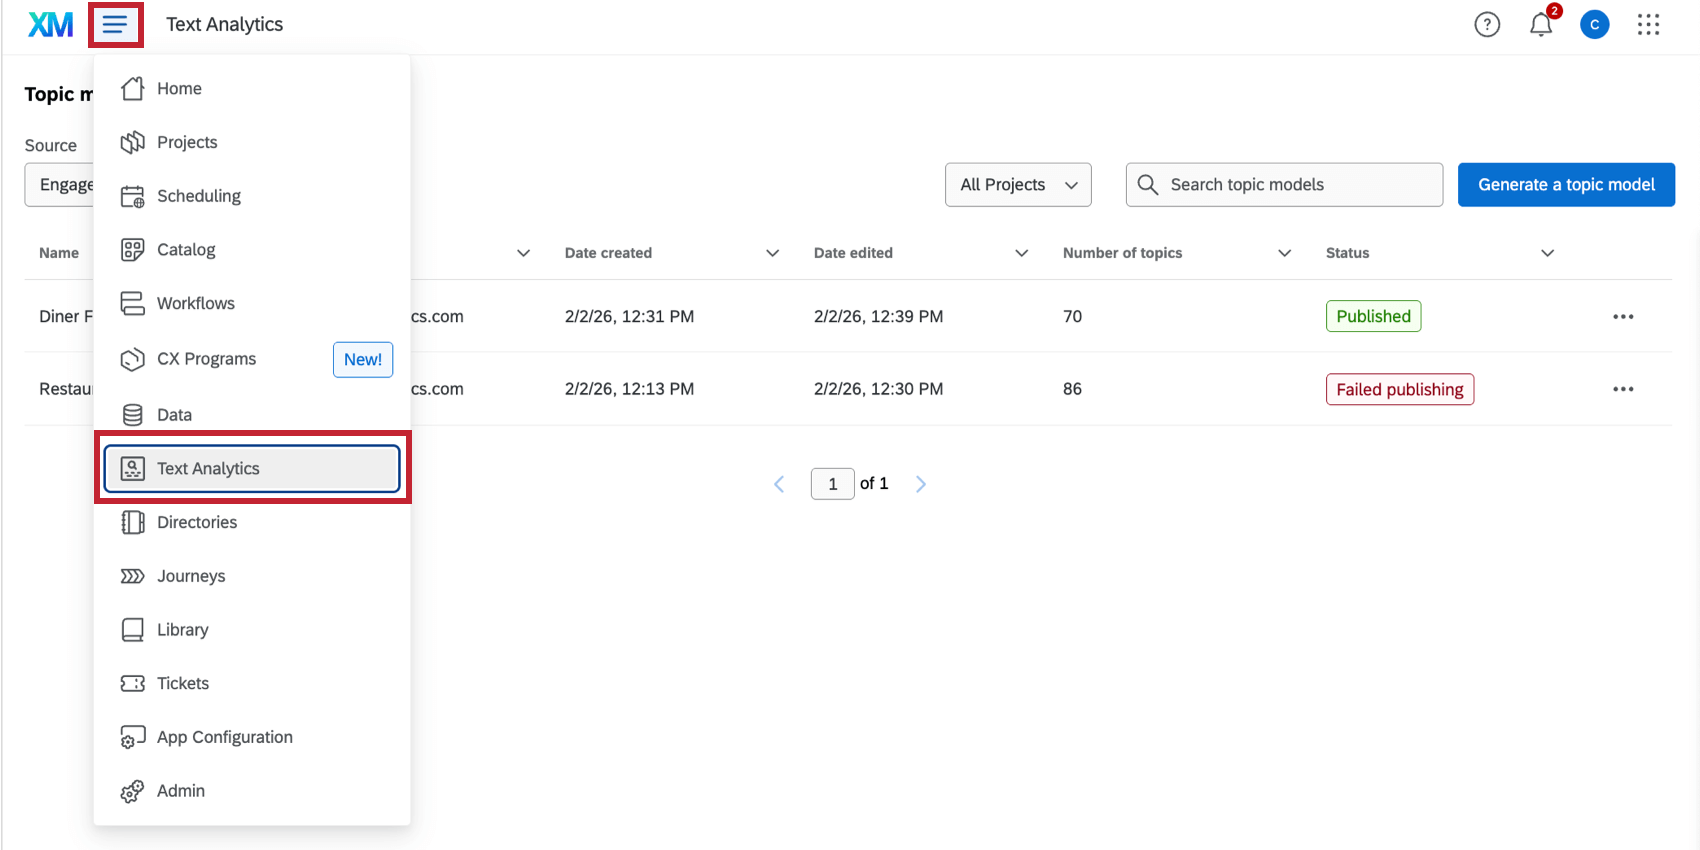
To create a model, you can either import a JSON file (to base a model off an existing Text iQ one), or use Artificial Intelligence (AI) to generate a model as a starting point.
Once you’ve created a model, you can edit it as needed, and share it with other users in your Qualtrics license. Additionally, once a model has been tagged to the source data, it can be displayed in a Qualtrics dashboard for reporting.
Creating a New Topic Model
To build a new model, click Generate a topic model.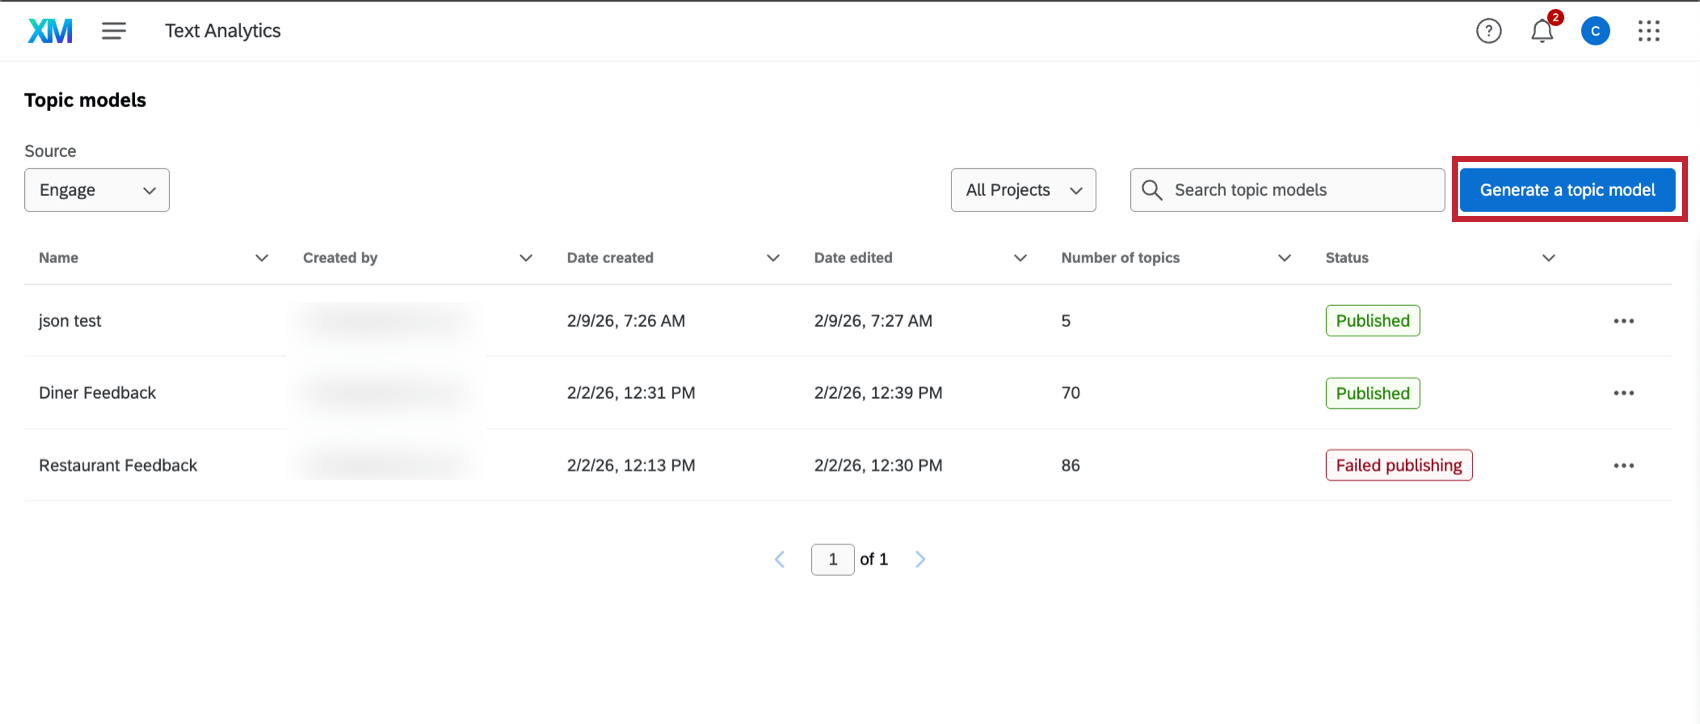
Then, follow the steps in the linked sections to build your model, depending on your data source and how you’d like to create the model:
Topic Hierarchy Options
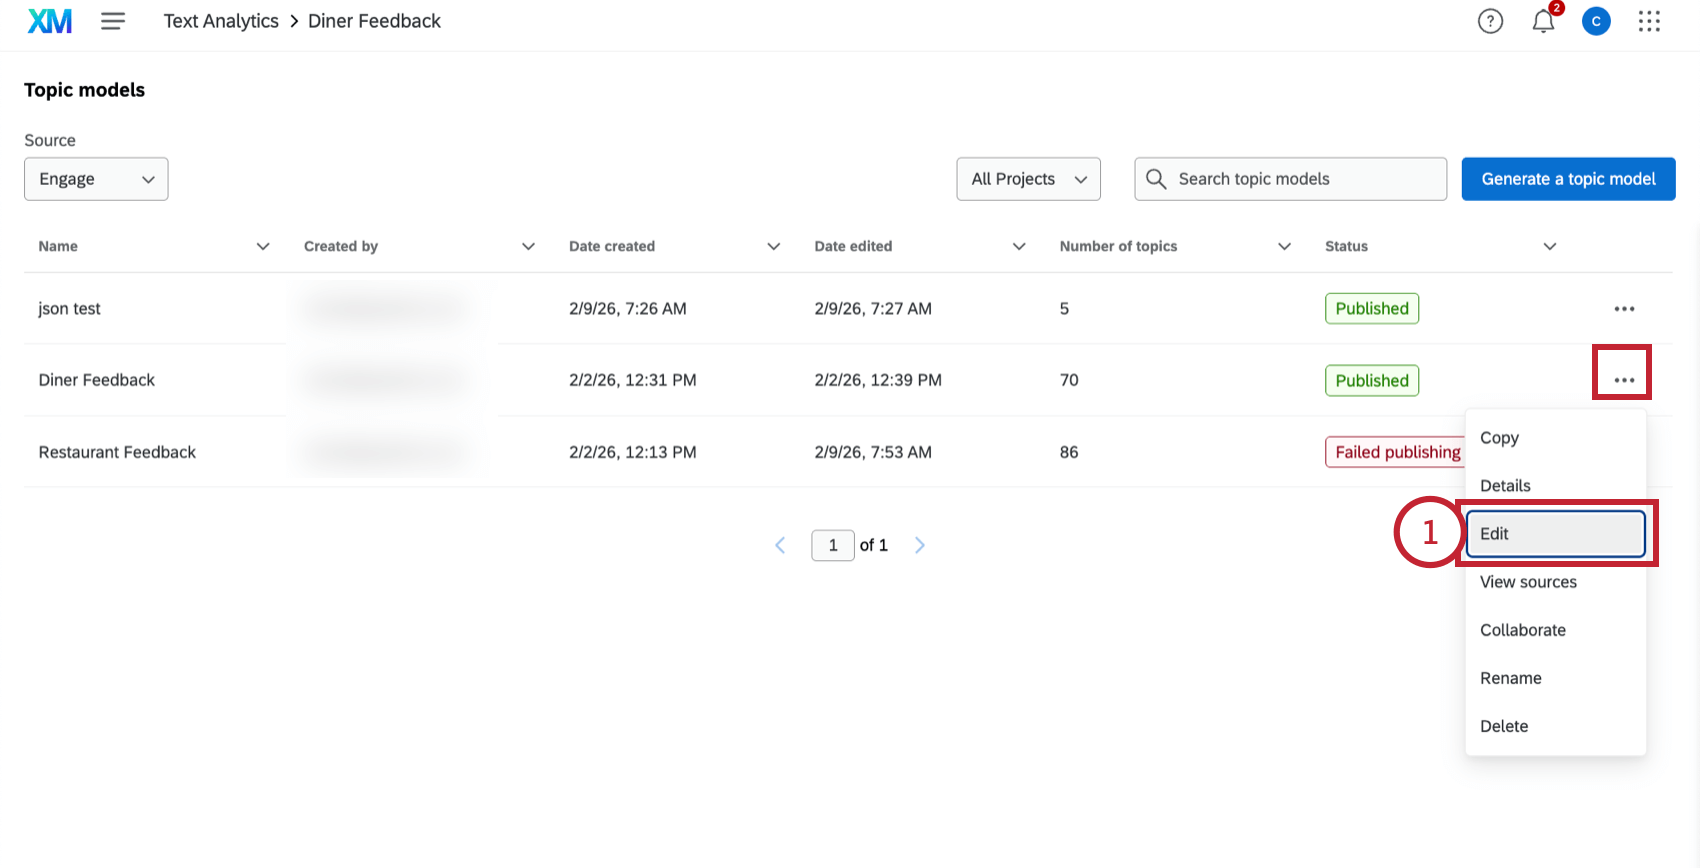
After you’ve created a model, it will be available on the Text Analytics page. Click the menu to the left of a model to see the options available for managing it:
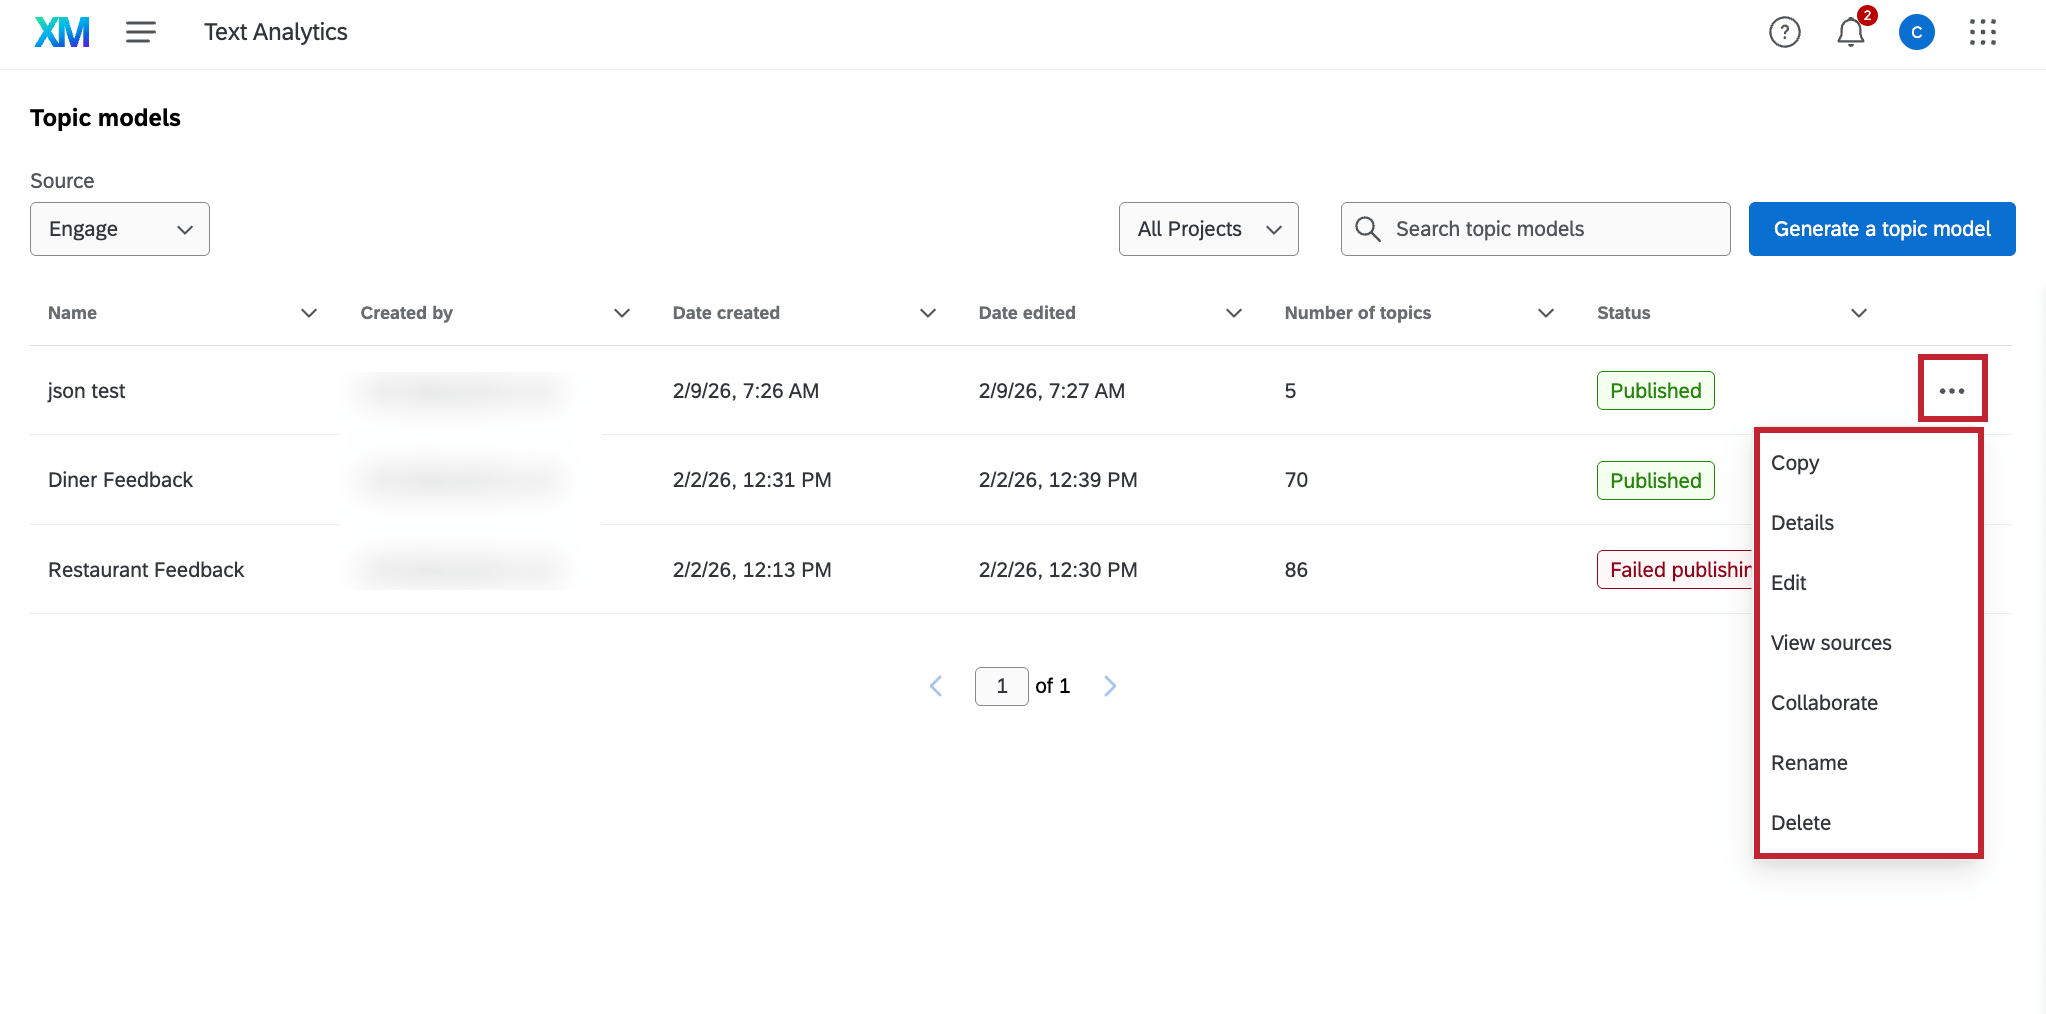
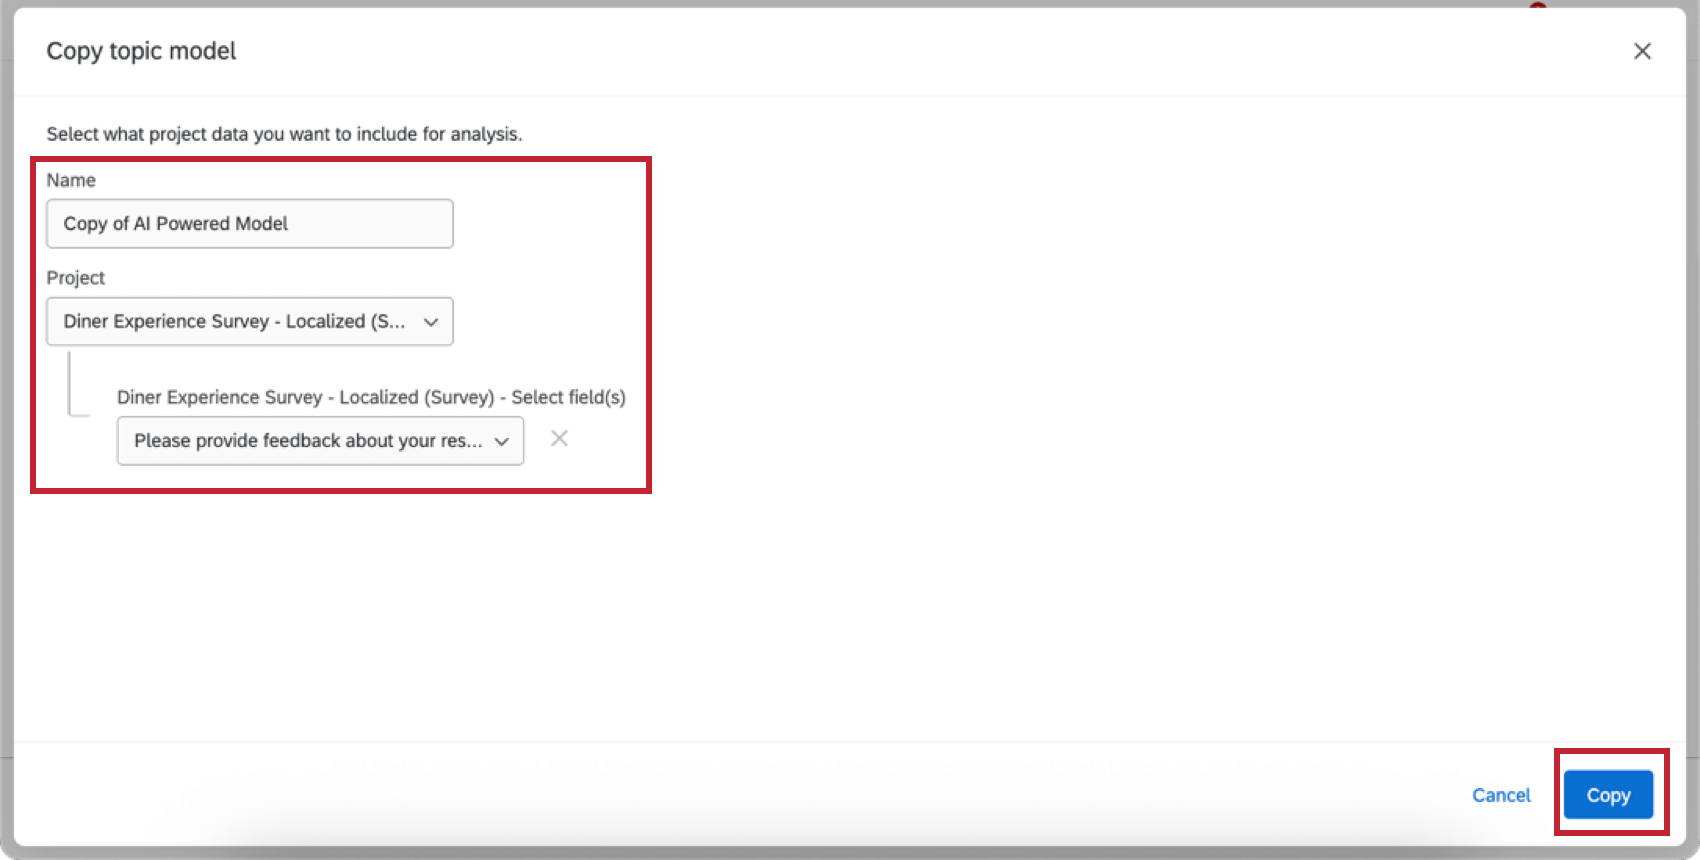
- Copy: Copy the topic model structure to another data source. You’ll give your copy a name, and select the project(s) you’d like to use as the data source.
- Details: View details about the model, including the Source, Created by, Date created, Last edited by, Last edited date, Last published date, Number of topics, and Status. You can also drill down into the different levels of the model here, or click Edit topic model to make edits to your model.
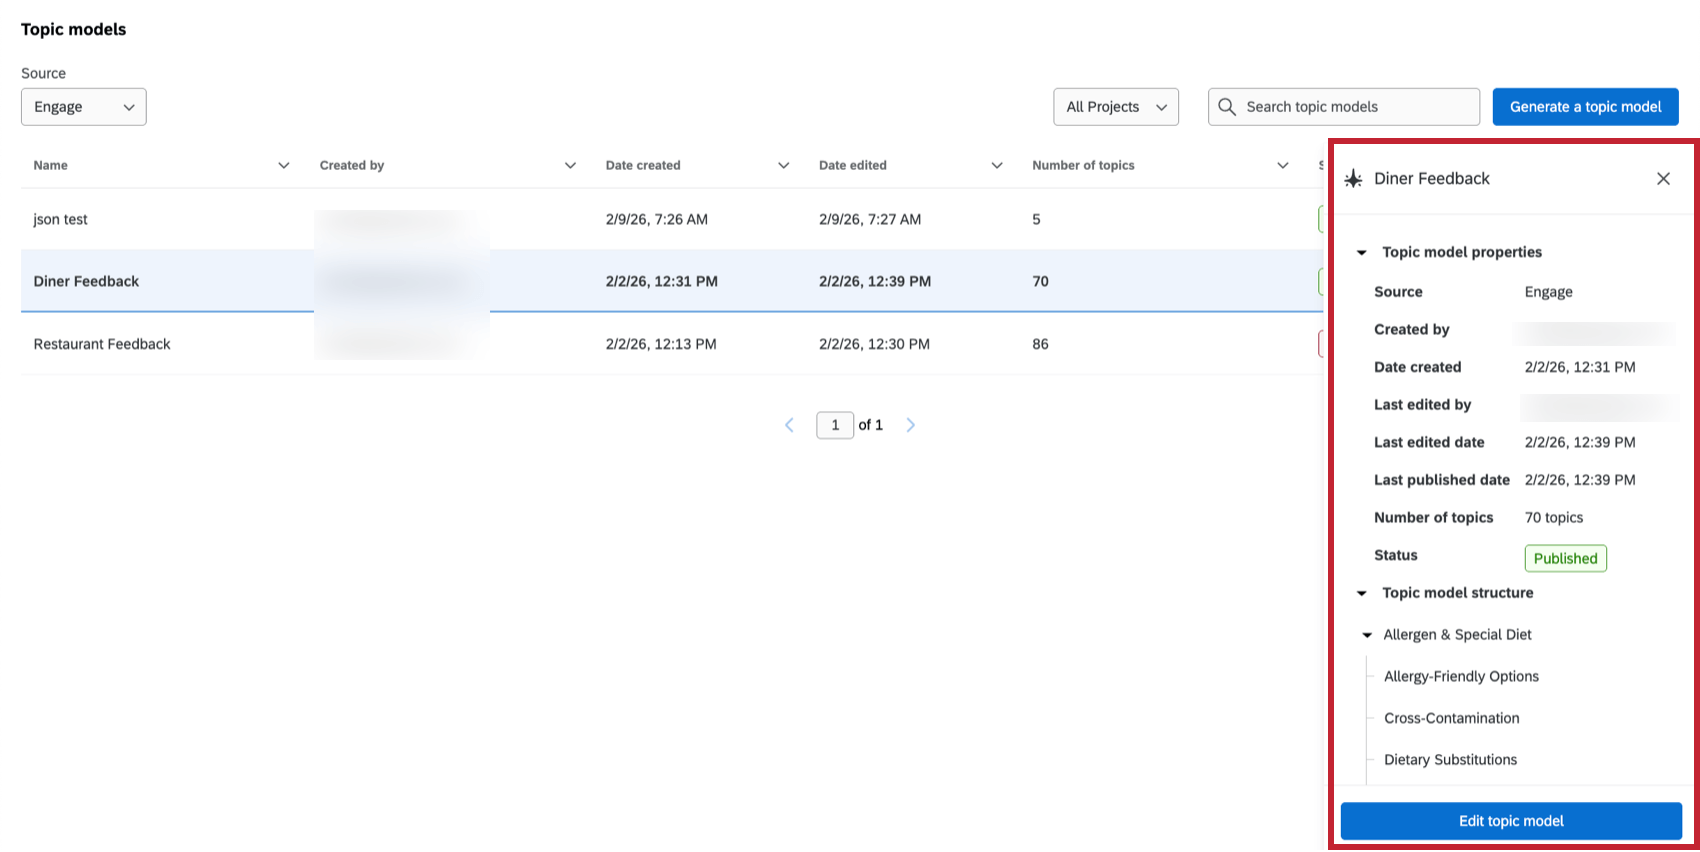
- Edit: View the sentences tagged with each topic, and manually edit the topics in your hierarchy. See Editing a Topic Model for more information.
- View sources: View and manage the data sources associated with the topic model. See Managing Topic Model Sources for more information.
- Collaborate: Share your model with other users in your Qualtrics license. See Sharing a Topic Model for more information.
- Rename: Rename the topic model.
- Delete: Delete the topic model.
Attention: Deleting a topic model will remove its topics and enrichments from your attached source(s). This action cannot be undone.
Editing a Topic Model
You can edit a topic model once it has been created. This includes adding, deleting, and rearranging topics. You can also use this view to see what topics have been tagged to each sentence in your data source.
- From the options menu, click Edit.
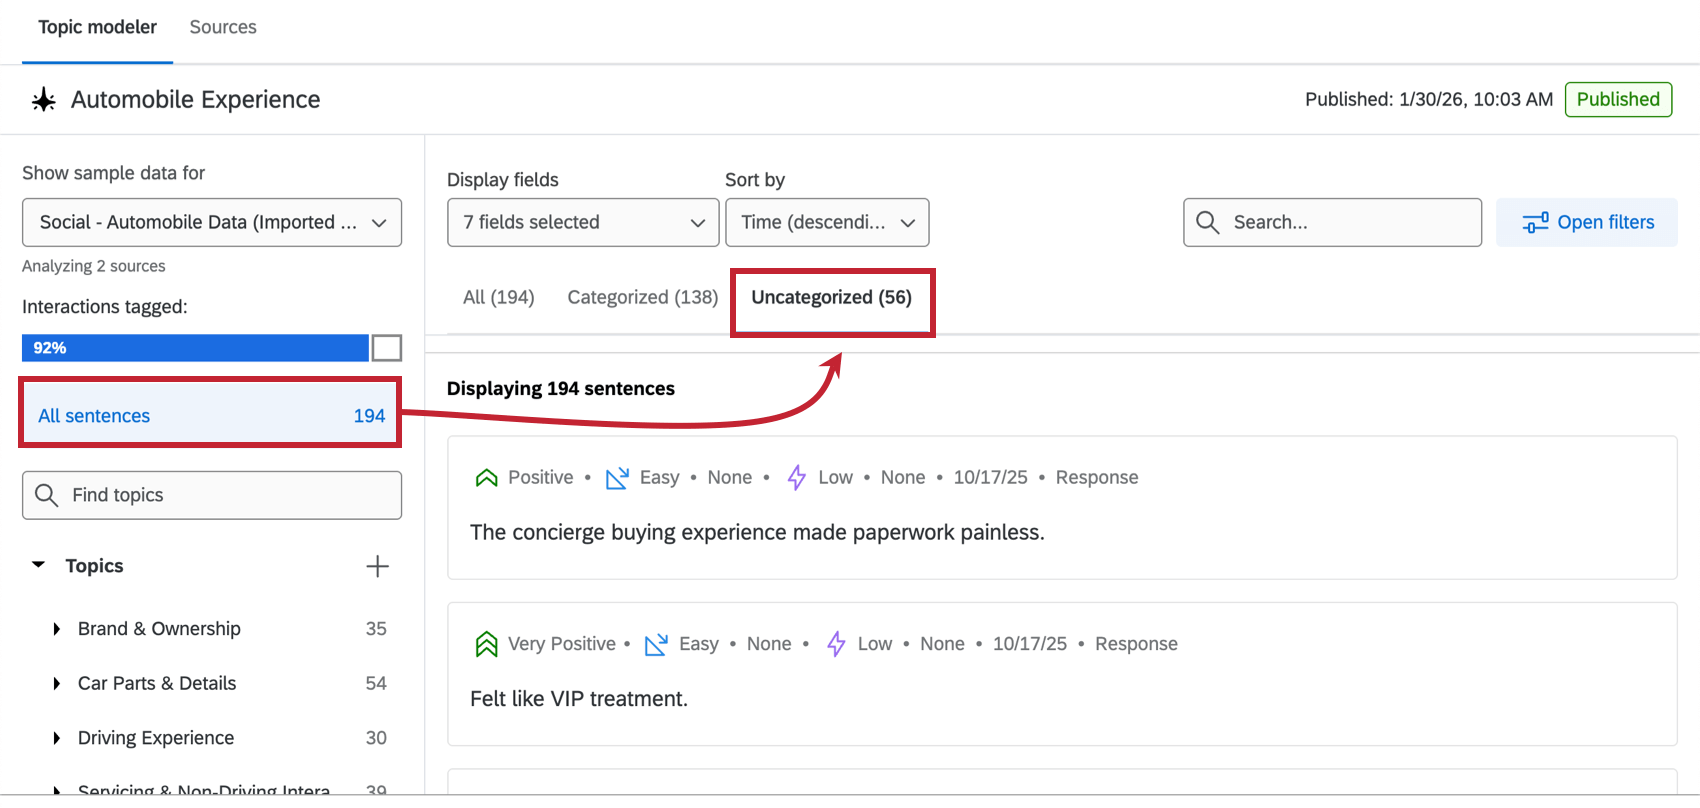
- At the top of the page, you can see how many interactions in your data source have been tagged. You can use the dropdown here to change the source, if your model uses multiple.
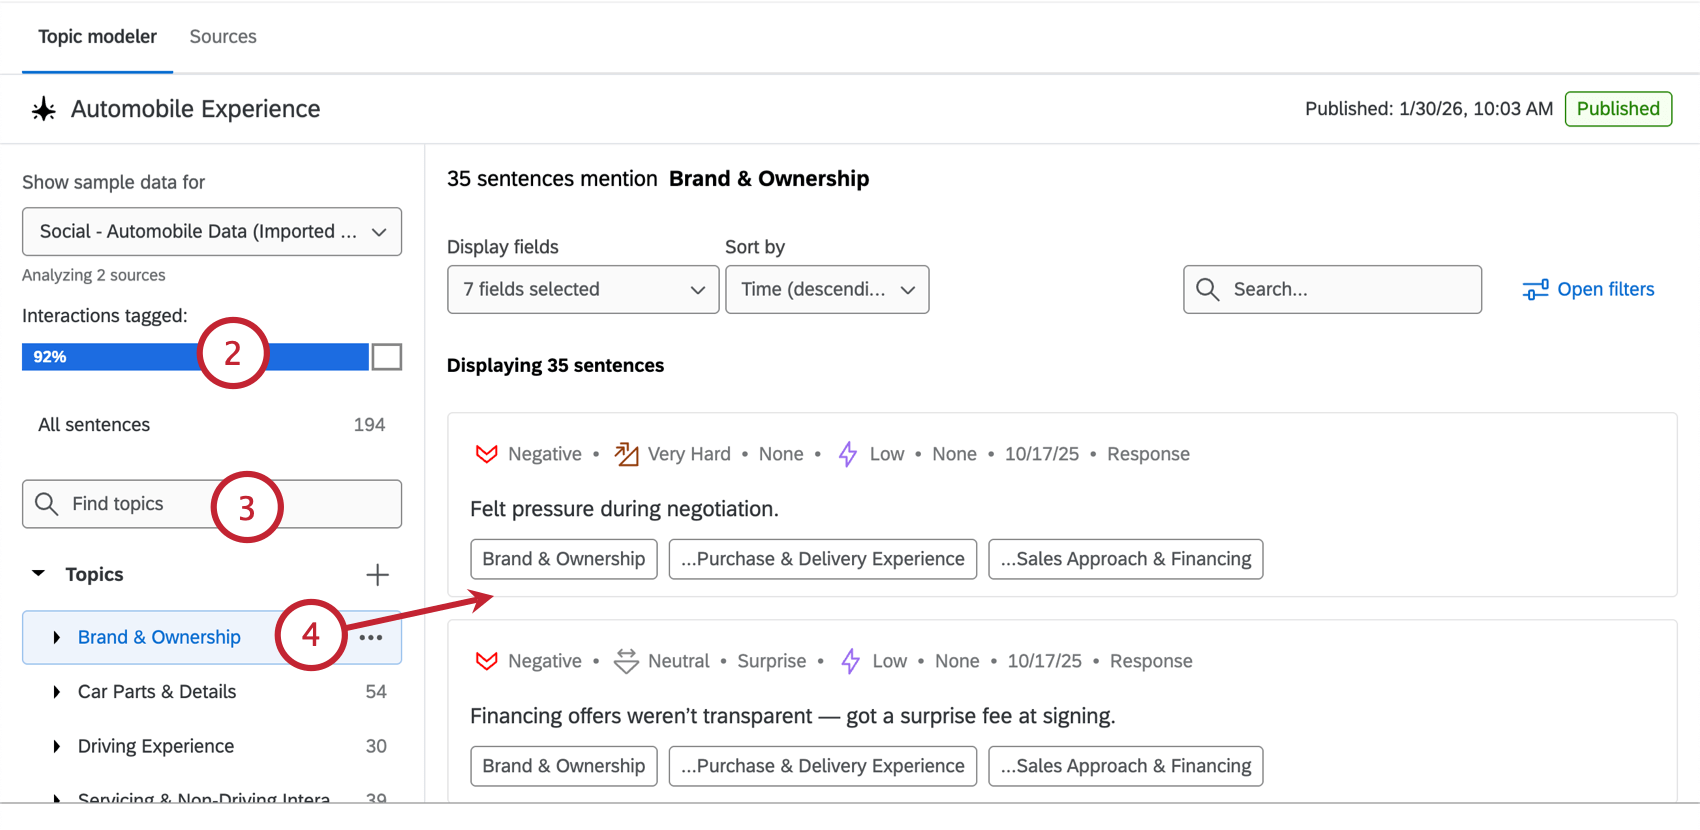
- Below you will see your topic hierarchy. You can search for a specific topic, or click on the topics to drill down into the hierarchy.
- After selecting a specific topic, any sentences that are tagged to that topic will appear.
Qtip: Click “All sentences” and then “Uncategorized” to see any sentences that are not tagged with a topic. This can help you identify gaps in your topic model.
- You can add a new topic to your hierarchy by clicking the plus sign ( + ). Then, you’ll give the topic a name, and choose its place in the hierarchy. Once you publish this new topic, Qualtrics will assign sentences to the new topic using the topic name and its path in the hierarchy.
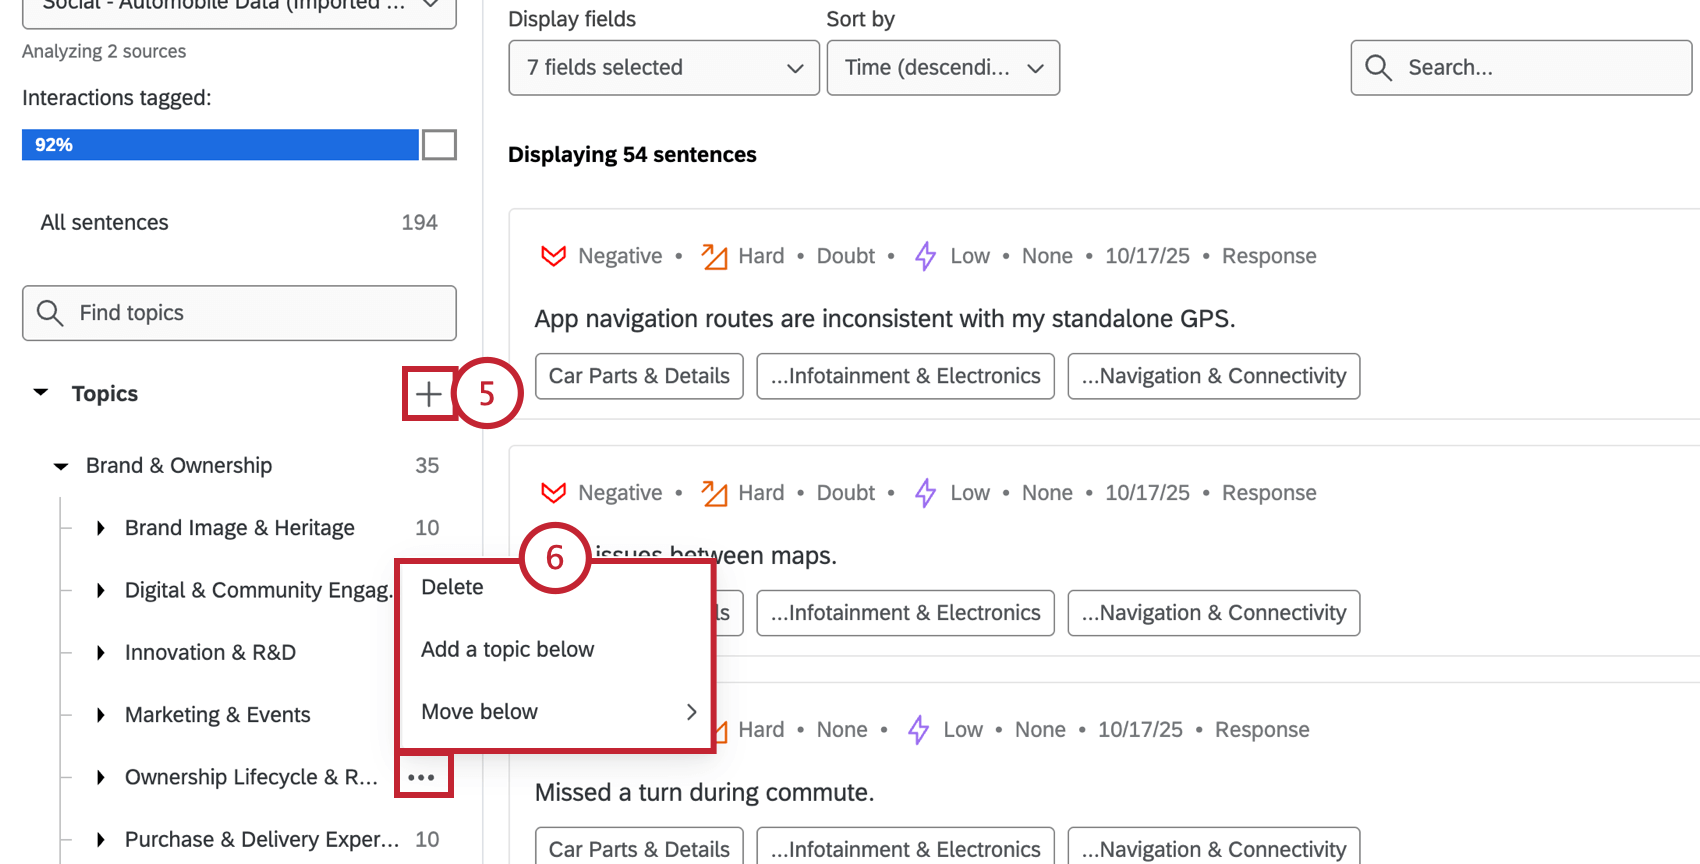
- Click the menu next to a topic to see the following options:
- Delete: Delete the topic.
Attention: Deleting a topic will remove its topics and enrichments from your attached source(s). This action cannot be undone.
- Add a topic below: Add a new manual topic to the hierarchy. You can then choose exactly where the new topic should go in the hierarchy.
- Move below: Move the selected topic to somewhere else in the hierarchy. If the topic has any children topics, they will be moved as well.
- Delete: Delete the topic.
- After making any changes to your model, you’ll need to click Review and publish to save the changes.
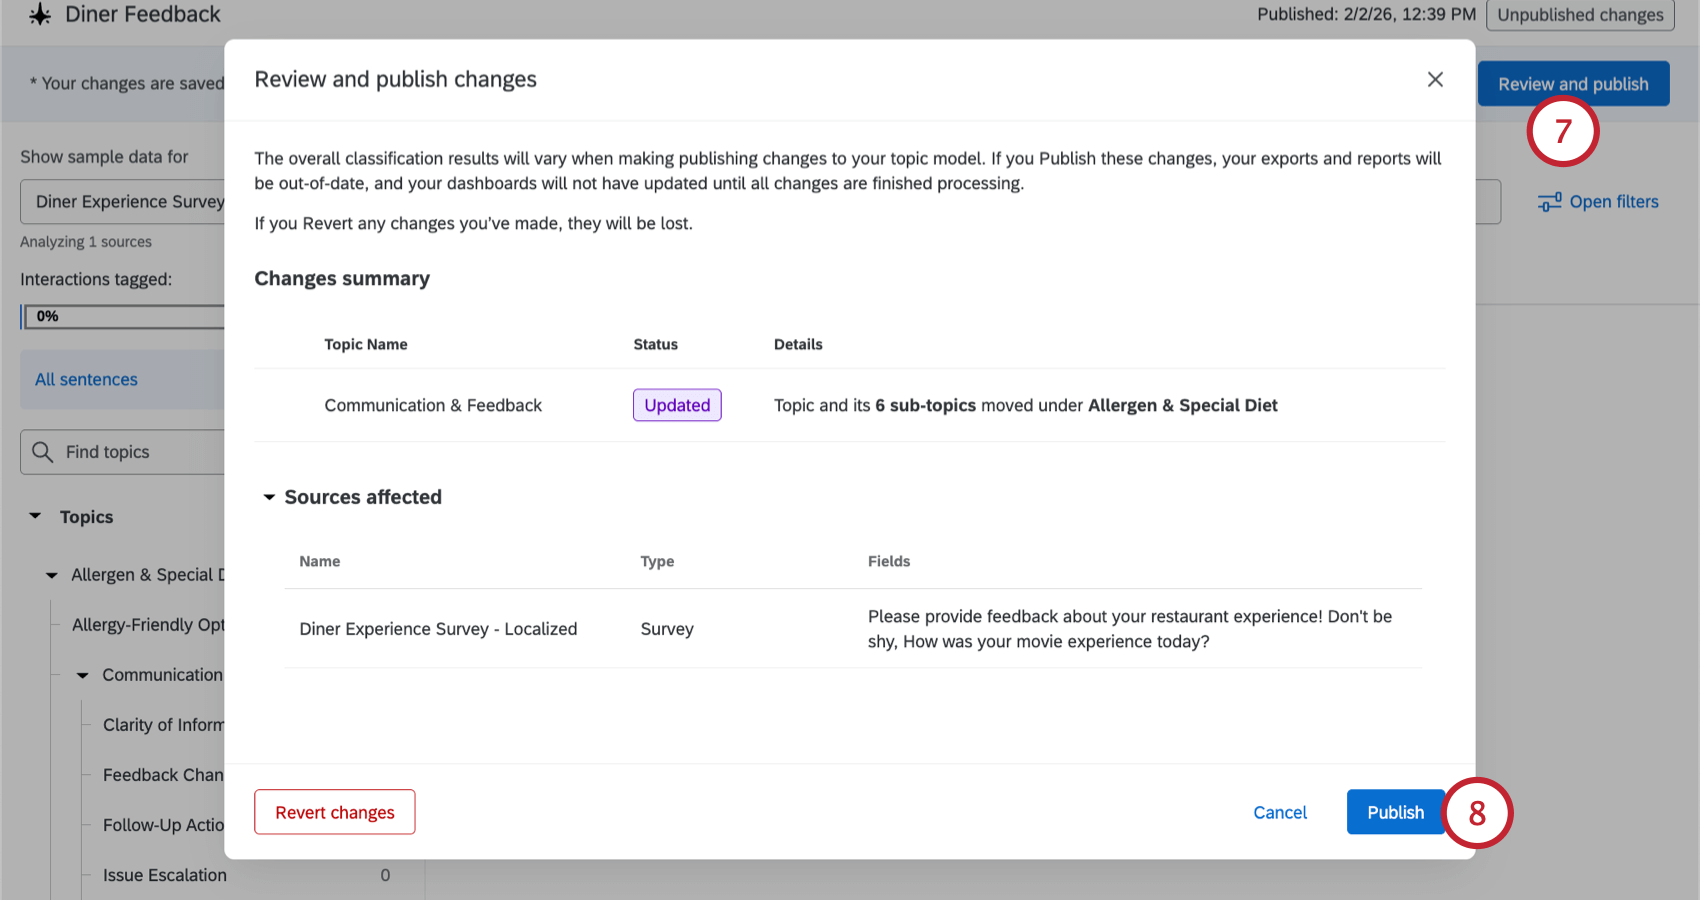
- Review the changes. If everything looks good, click Publish, which will apply the topic model changes to your data sources.
Qtip: Click Revert changes if you wish to discard your edits. This will remove any edits you’ve made since the last time your model was published. If you’d like to continue making changes before reviewing again, click Cancel instead.
Customizing Your View
You can customize your view using the options at the top of the page: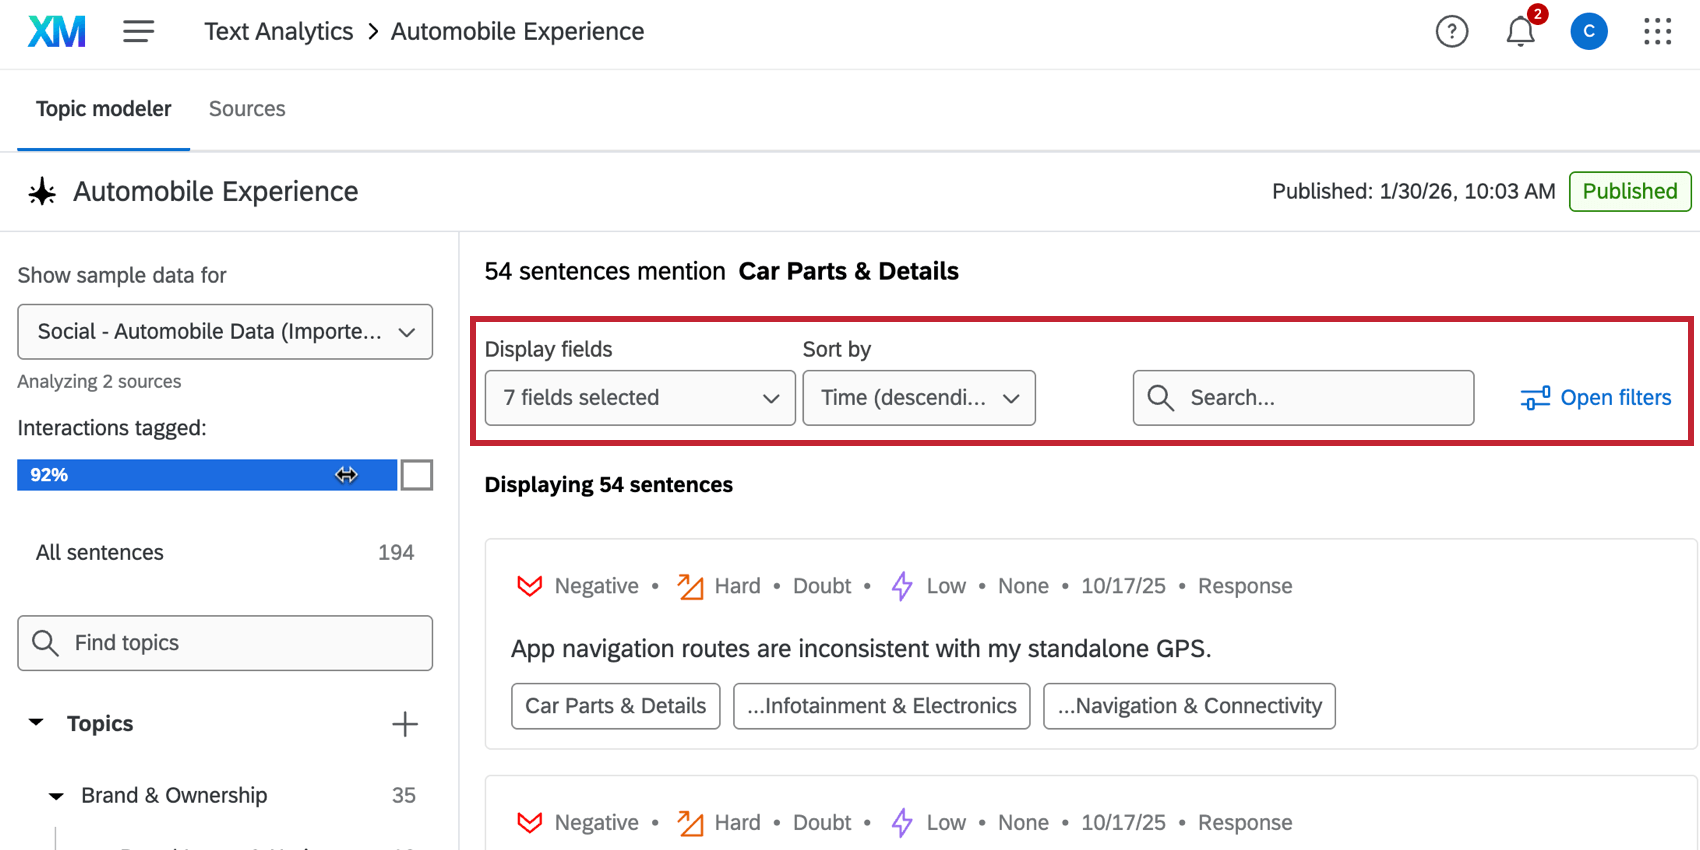
- Display field: Choose the fields you’d like to display alongside tagged sentences. This includes enrichment fields (like sentiment and effort) and project metadata fields (like record ID and created date).
- Sort by: Sort the displayed sentences.
- Search: Search for sentences that contain a certain word or phrase.
- Open filters: Filter the sentences by enrichment fields (for example, only show sentences with negative sentiment)
Managing Topic Model Sources
You can view and manage the different sources attached to your model.
- From the options menu, select View sources.
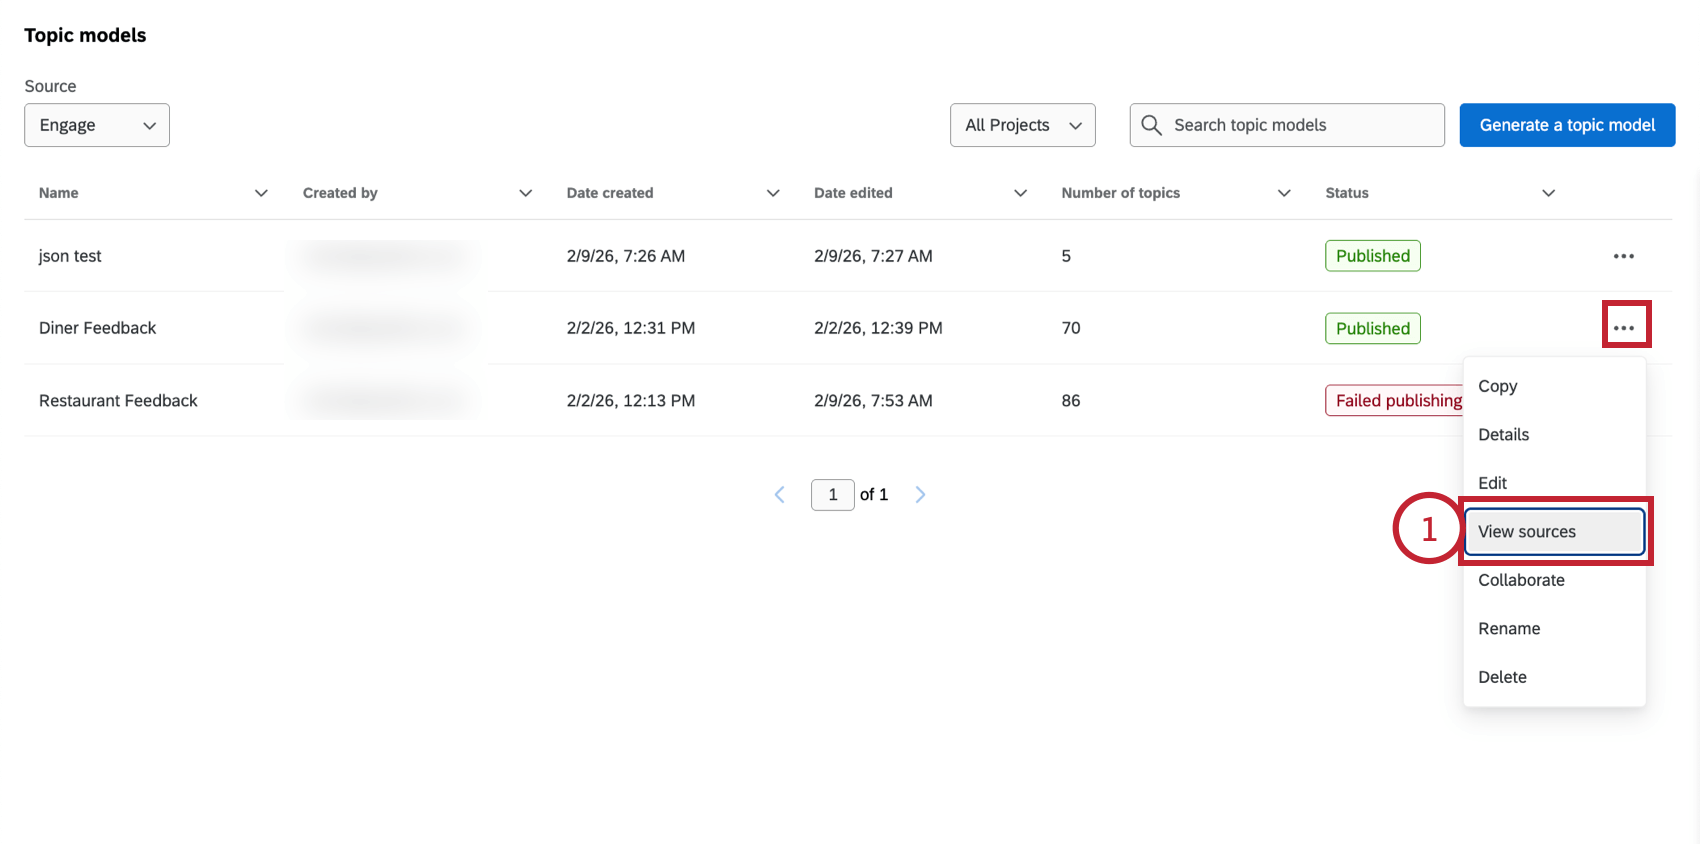
- Listed below are the different sources that are tagged to this model. This includes the type of sources (survey, voice, etc), the fields being analyzed, the percent of interactions tagged, and the source’s classification status.
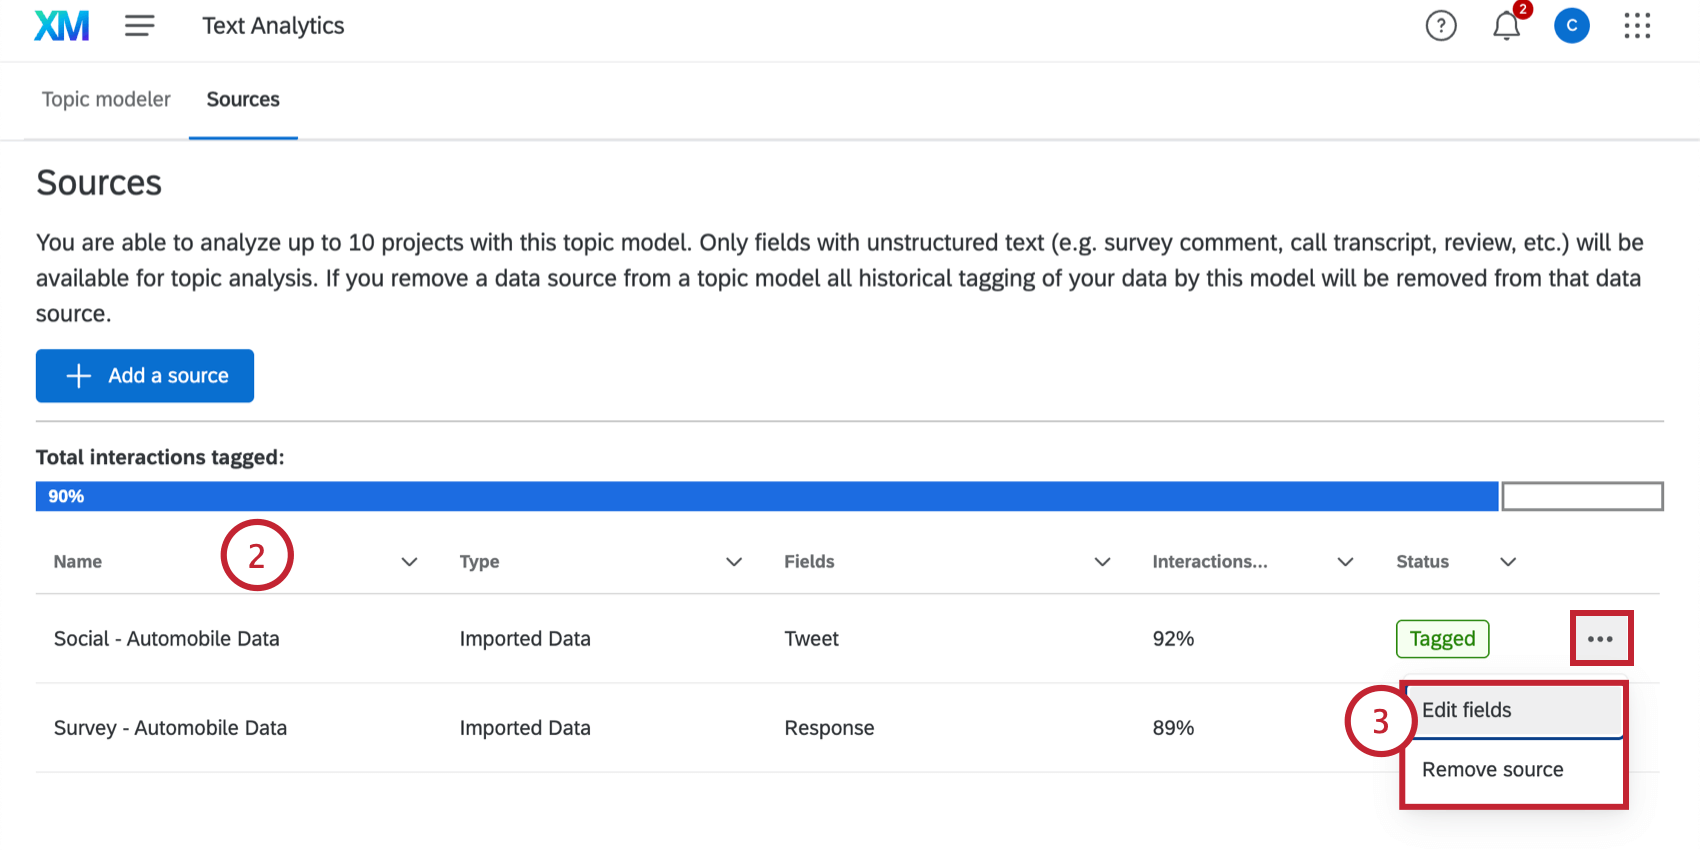
- You can manage an already connected source using the options menu:
- Edit fields: Choose fields to analyze. You can select any fields you may have missed earlier, or remove any fields.
- Remove source: Remove the source from analysis.
Attention: Changing the selected fields or removing a source will affect the tags that were applied to the data source (i.e., newly added fields will be tagged, and removed fields will be untagged). This action cannot be undone.
- To add a new source, click Add a source.
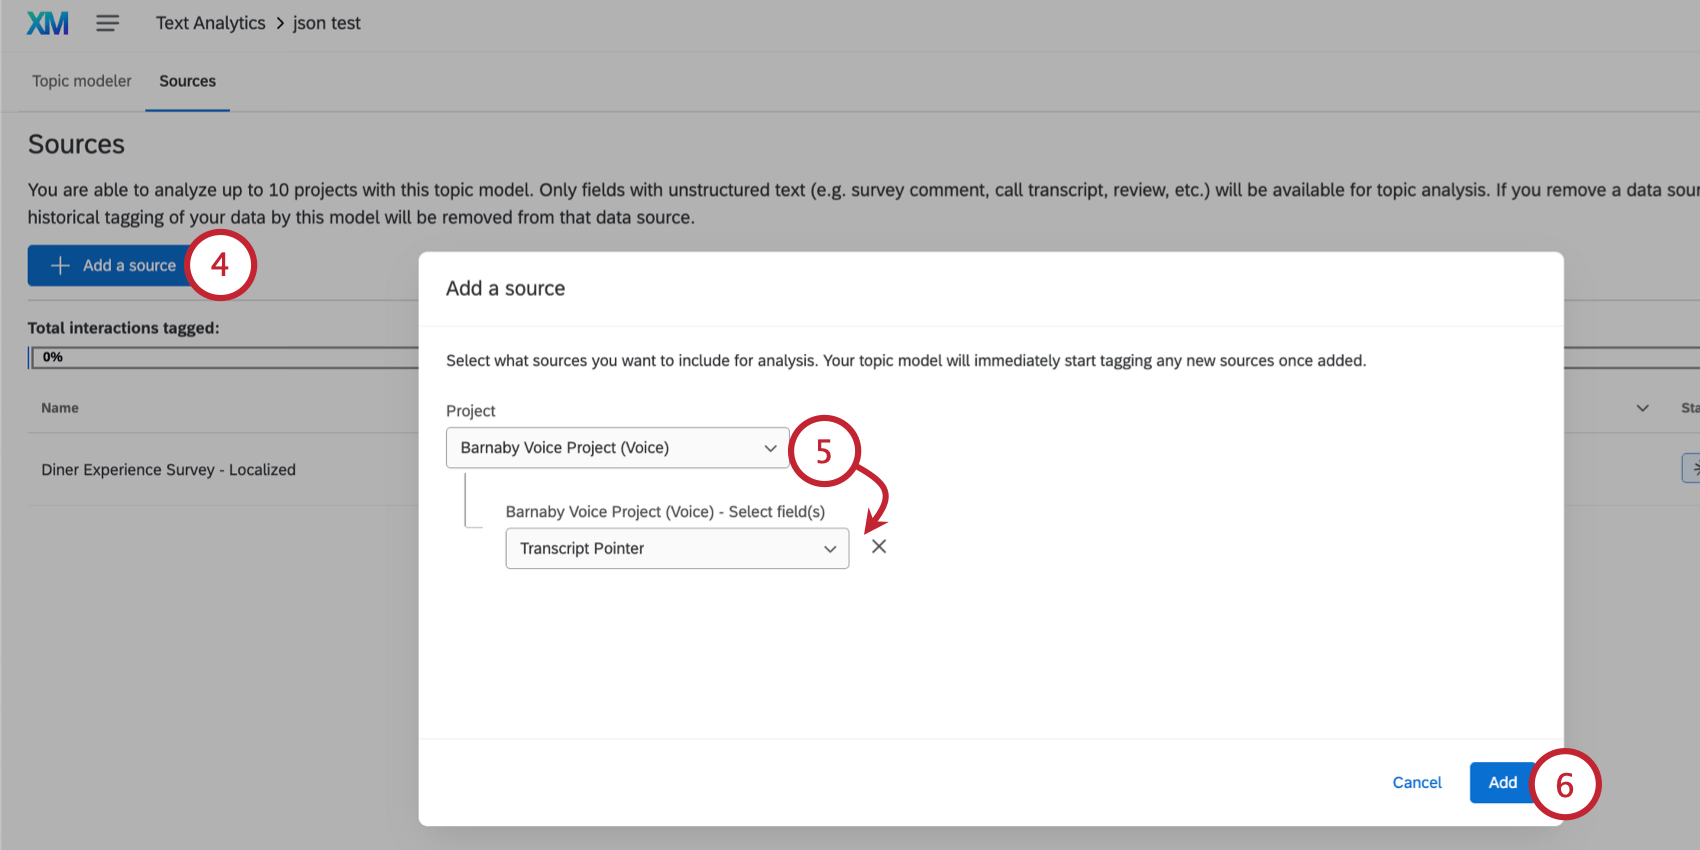 Qtip: You can analyze up to 10 projects with an automated topic model.
 - Select the project and field(s) you’d like to analyze. See Requirements for more information about the projects you can select here.
- Click Add.
Sharing a Topic Model
Follow these steps to share a model you’ve created with another user in your license:
- Select Collaborate from the topic model options menu.

- Search for the user you’d like to collaborate with, either by name or email address.
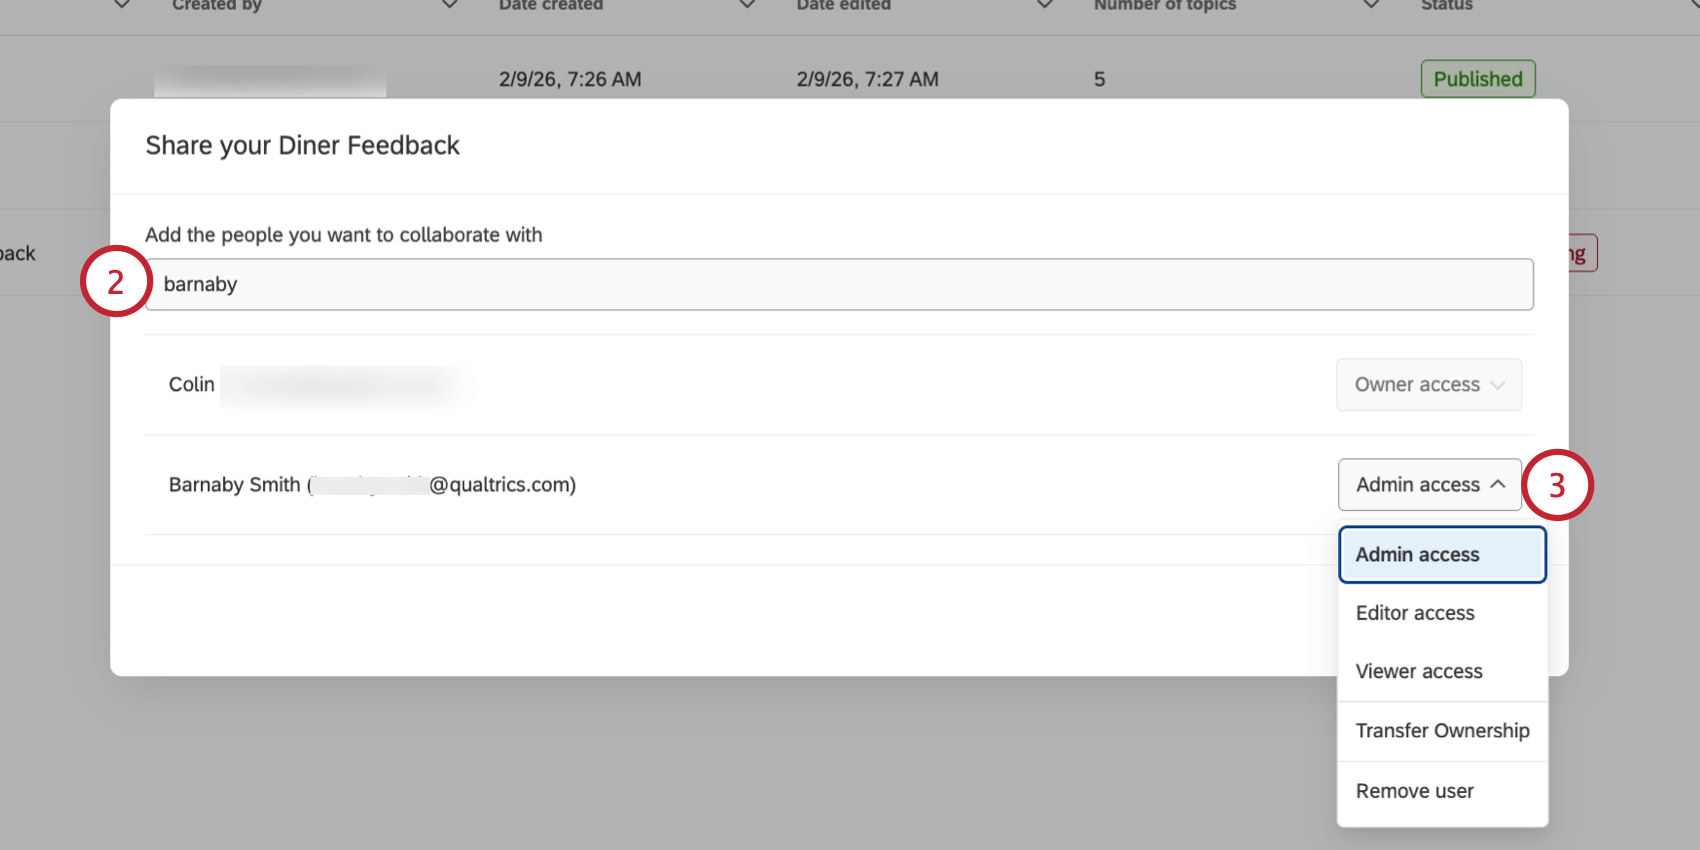
- Choose the level of access for the collaborator:
- Admin access: Give the user full admin access to the model, including the ability to add other collaborators or edit any aspect of the model (including data sources).
- Editor access: Gives the user edit access to the model so they can make changes to the individual topics.
- Viewer access: Gives the user view-only access to the model and allows them to use it in dashboards.
- Transfer Ownership: Transfer ownership of the model to this user. Owners have full control over a model and only the owner of a model can delete it. When you transfer ownership to another user, you will retain “Admin” level access.
Qtip: Make sure the new owner also has access to any relevant data sources for the model.
- Remove user: Remove access to the model for this user.
- You can repeat steps 2 & 3 to add multiple collaborators.
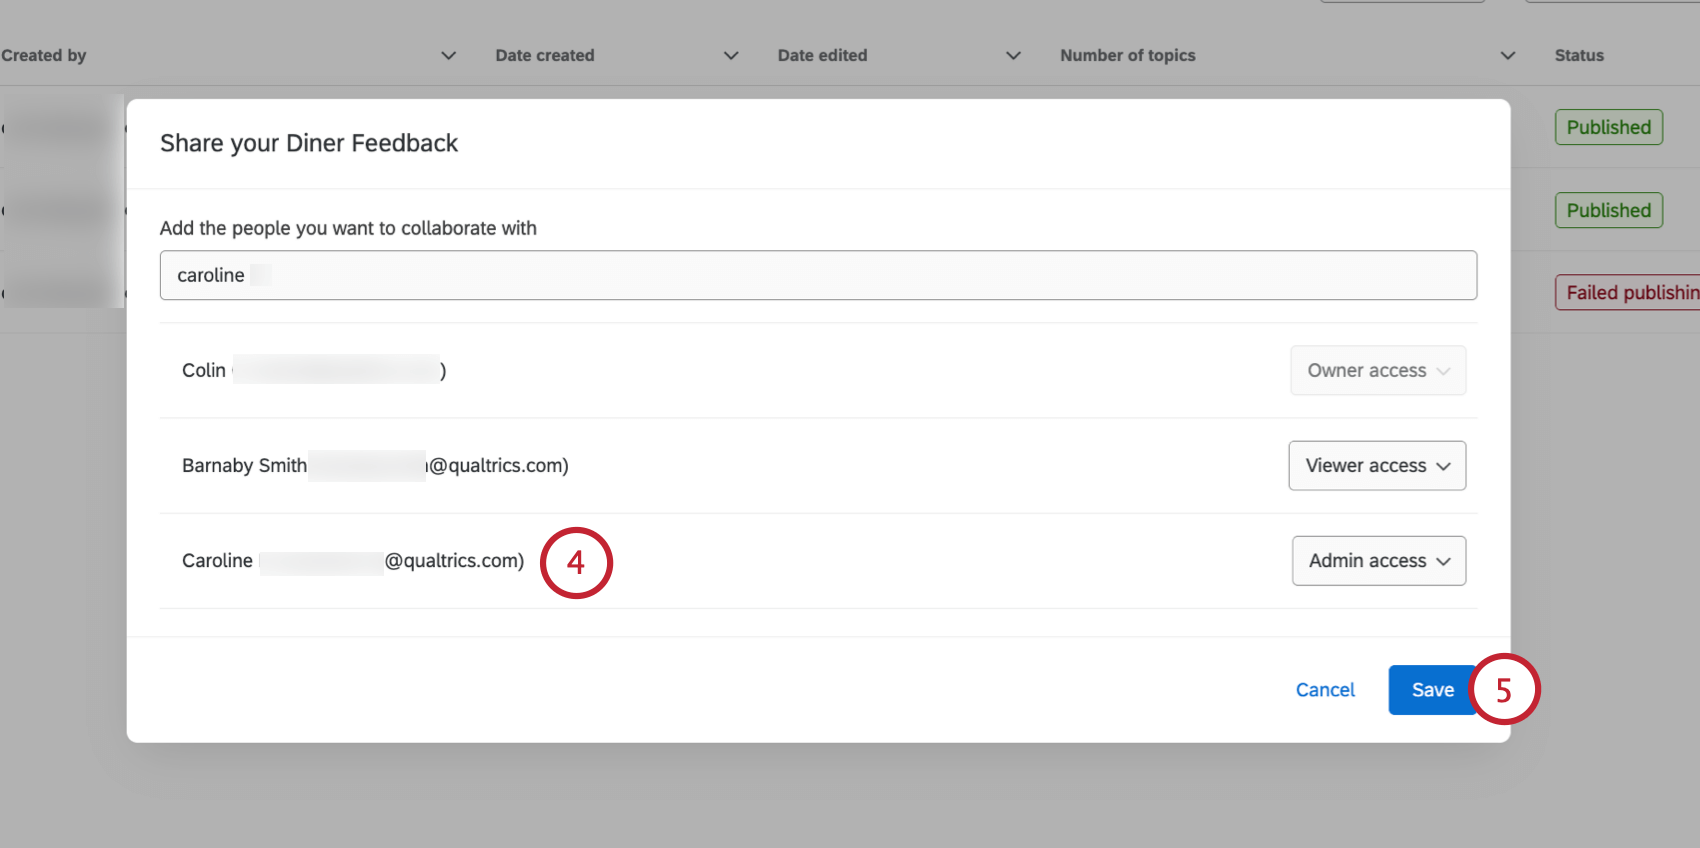
- Click Save.