
Job Options (Connectors)
What's on this page
About Job Options
When in the Jobs tab, you can take various actions on your existing jobs via the job options menu, including:
- Editing job details, including job name, data mapping, filter conditions, and more
- Copying and deleting jobs
- Watching jobs and adding notifications
- Viewing the job summary and change log
- Terminating a running job
- Viewing a job’s change log and summary
Qtip: Some options are only available for certain jobs.
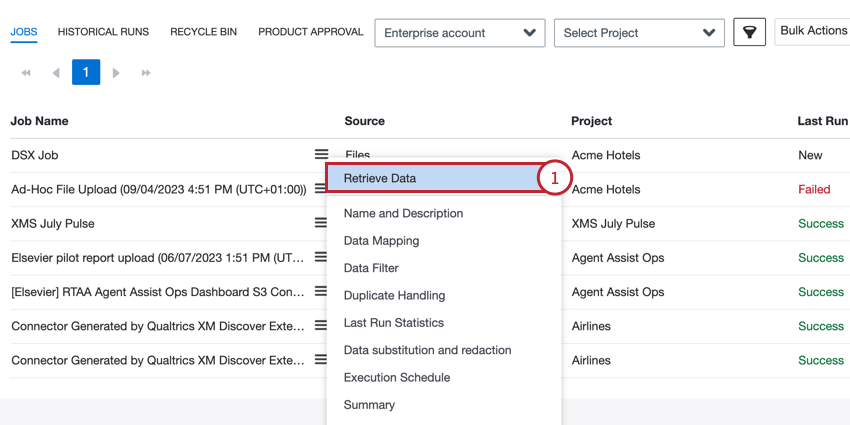
Available Job Options
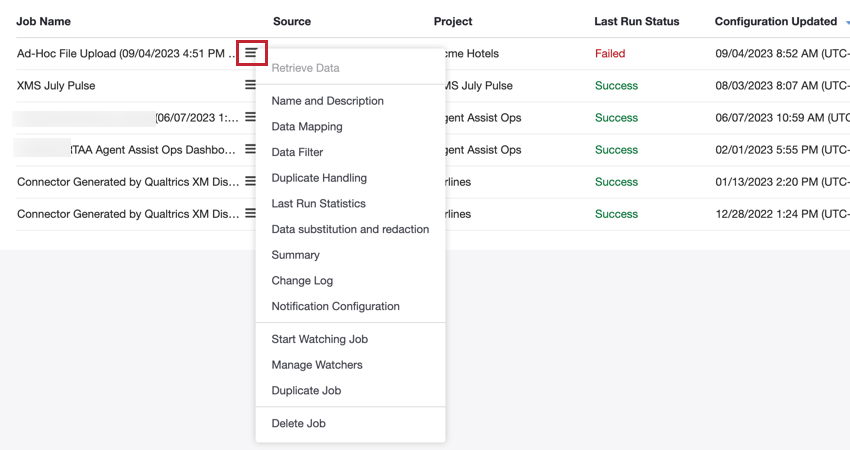
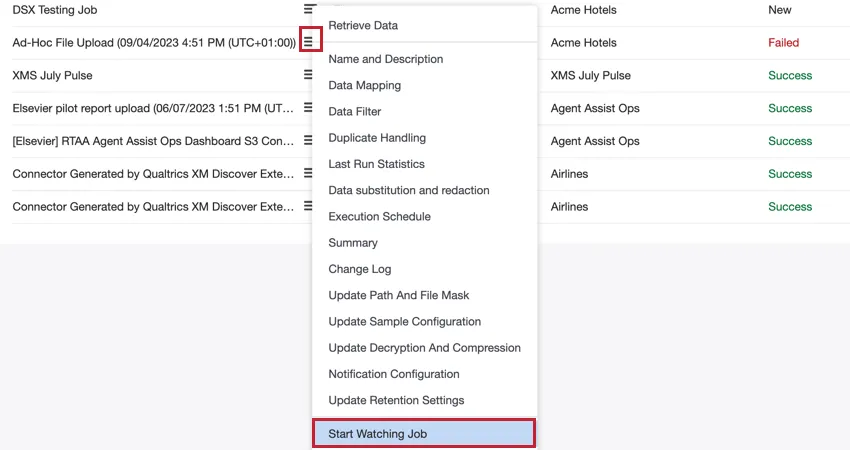
To access job options, click the menu next to any job name. The following options are available:
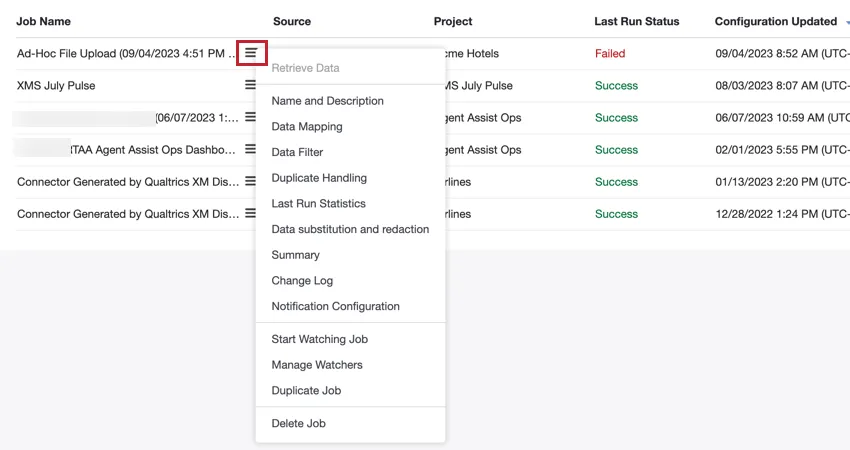
- Retrieve Data: Manually retrieve data for scheduled jobs.
- Name and Description: Edit the job’s name and description.
- Data Mapping: Edit the data mapping used for the job. See Data Mapping for more information.
- Data Filter: Edit the job’s connector filter and record limit.
- Data Source Filter: Edit the job’s data source filter.
- Duplicate Handling: Determining how duplicate documents are handled. See Duplicate Handling for more information.
- Last Run Statistics: View statistics about the job’s last run. See Viewing Job Run Statistics for more information.
- Data substitution and redaction: Create rules to automatically hide or replace sensitive information in imported data. See Data Substitution and Redaction for more information.
- Summary: View a job summary that provides information about the data processed by the job. See Viewing a Job Summary for more information.
- Change Log: View a log of every edit done to this job. See Job Change Log for more information.
- Notification Configuration: Choose when job watchers are notified. See Job Notifications for more information.
- Start/Stop Watching Job: Receive a notification when the job fails or times out. See Watching a Job for more information.
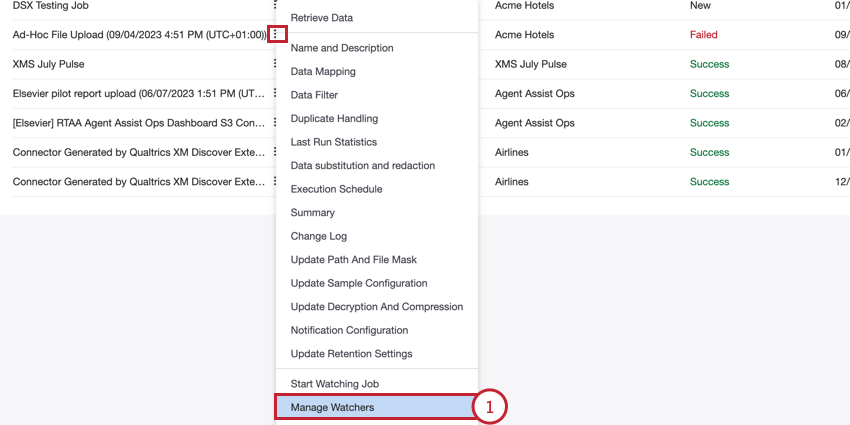
- Manage Watchers: Assign other users as watchers for the job. See Watching a Job for more information.
- Duplicate Job: Copy the job. See Copying & Deleting Jobs for more information.
- Delete Job: Delete the job. See Copying & Deleting Jobs for more information.
- Execution Schedule: For scheduled jobs, edit the job’s schedule. See Job Scheduling for more information.
- Update Path And File Mask: This option is only available for the files inbound connector. After creating a job, you can update the path and file mask.
- Update Sample Configuration: This option is only available for connectors that allow you to upload a sample file, such as the files inbound connector. After updating your field mapping, you can use this option to upload a new sample file.
- Update Decryption and Compression: This option is only available for connectors that allow decryption and compression, such as the files inbound connector.
- Update Retention Settings: Change how XM Discover handles processed files. This option is only available for files inbound and organization hierarchy inbound connectors. See Editing a Job for more information.
- Query Configuration: Allows you to change the query configuration for certain inbound connectors.
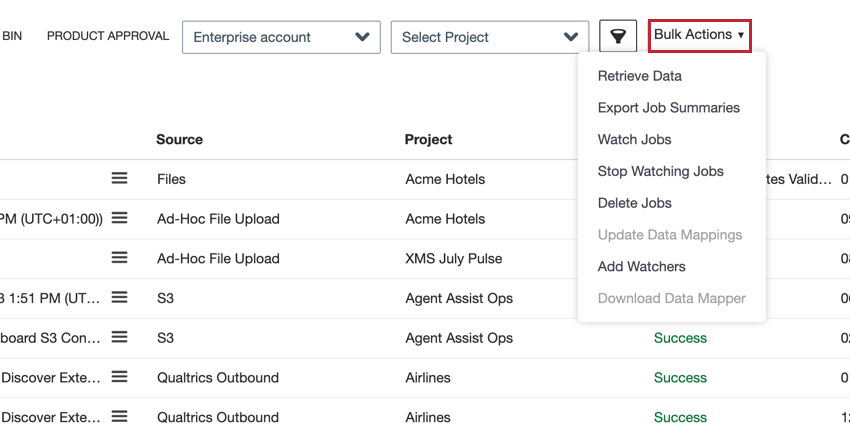
Bulk Actions
The following options are available in the Bulk Actions menu. These options work like the standard job options, except that they apply to all jobs displayed on the page instead of just a single job. You can filter your jobs to change which jobs appear on the page.
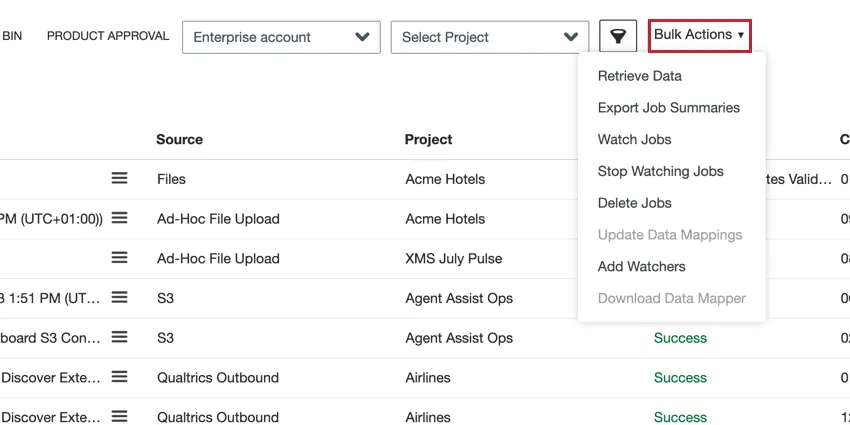
- Retrieve Data: Manually pull data for multiple scheduled jobs. For details, please see Retrieving Data.
- Export Job Summaries: Download a summary of your jobs.
- Watch Jobs: Start watching several jobs at once to get notified if any of them fails. For details, please see Watching a Job.
- Stop Watching Jobs: Stop watching jobs to no longer be notified if they fail. For details, please see Watching a Job.
- Delete Jobs: Delete multiple jobs at once. For details, please see Deleting a Job.
- Update Data Mappings: Update the data mapping configuration for several jobs from the same source. For details, please see Data Mapping.
- Add Watchers: Add and remove users from the job watchers list. This enables you to control who should get notifications in case a job fails or times out. For details, please see Watching a Job.
- Download Data Mapper: Download the data mapper for your projects and jobs to verify cross-source mappings using an automatically generated single source of truth. The output is a data mapper spreadsheet. For details, please see Data Mapper Report.
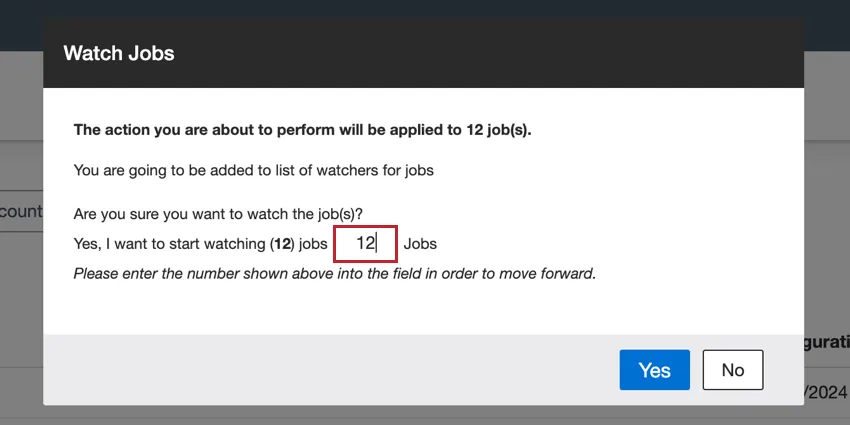
Qtip: When performing a bulk action, you’ll get a pop-up window asking you to confirm the number of jobs that will be affected by the action. Enter the number that appears to you in the window to confirm the action.
Retrieving Data
You can manually retrieve data for any scheduled jobs to import pending data immediately.
Qtip: You can retrieve data for multiple jobs at once via the Bulk Actions menu.
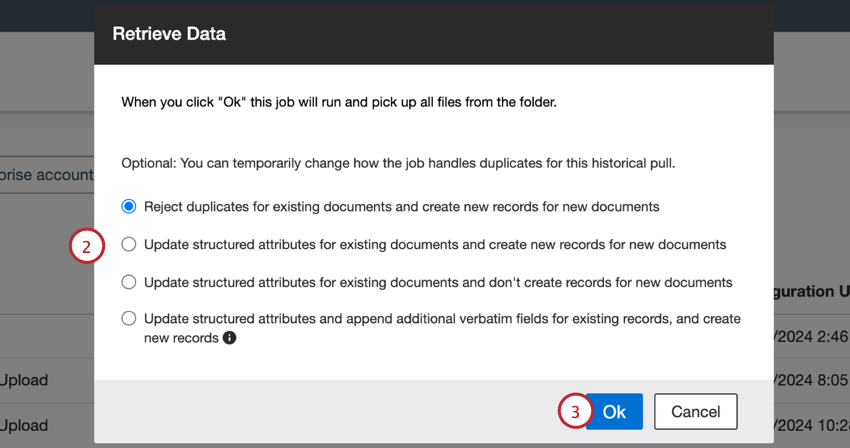
- Reject duplicates for existing documents and create new records for new documents: This is the default option. When a duplicate document is found, it is rejected. Non-duplicate documents are processed as new records.
- Update structured attributes for existing documents and create new records for new documents: When a duplicate document is found, the following happens:
- Current structured attributes are updated with non-empty values.
- New structured attributes are added to the current document.
- Existing verbatim fields are not updated.
- New verbatim fields are not added.
- Non-duplicate documents are processed as new records.
- Update structured attributes for existing documents and don’t create records for new documents: When a duplicate document is found, the following happens:
- Current structured attributes are updated with non-empty values.
- New structured attributes are added to the current document.
- Existing verbatim fields are not updated.
- New verbatim fields are not added.
- Non-duplicate documents are rejected.
- Update structured attributes and append additional verbatim fields for existing records, and create new records: When a duplicate document is found, the following happens:
- Non-duplicate documents are processed as new records.
- New structured attributes are added to the current document.
- Current structured attributes are updated with non-empty values.
- New verbatim fields are added to the current document.
- Existing verbatim fields are not updated.
Qtip: For this option to work properly, you must unmap existing verbatim fields in your job’s data mapping.
Qtip: For some connectors, like the organization hierarchy inbound connector, there are no duplicate options to select. Simply click Ok in the popup window to retrieve the most recent data.
Editing a Job
The following options allow you to edit various parts of your job’s setup.
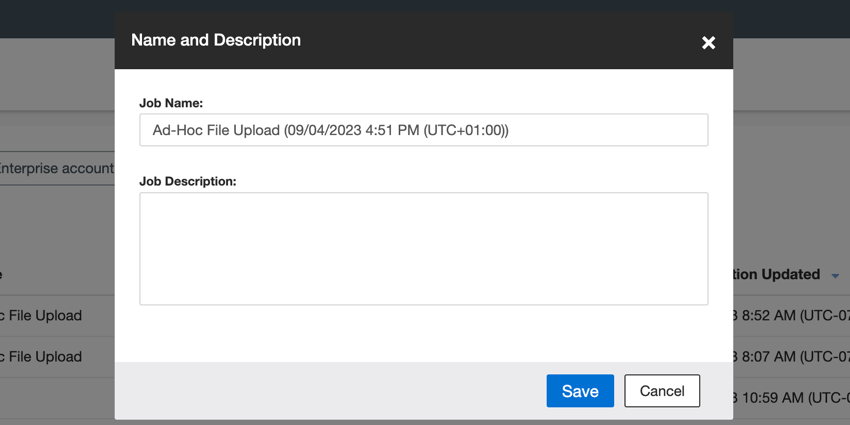
- Name and Description: Change your job’s name and description. Enter a new Job Name and Job Description.
 Qtip: This option does not update historical runs. Only newly created runs will have the new name and description. To reprocess data and update historical job runs, select Retrieve Data after updating your job name and description.
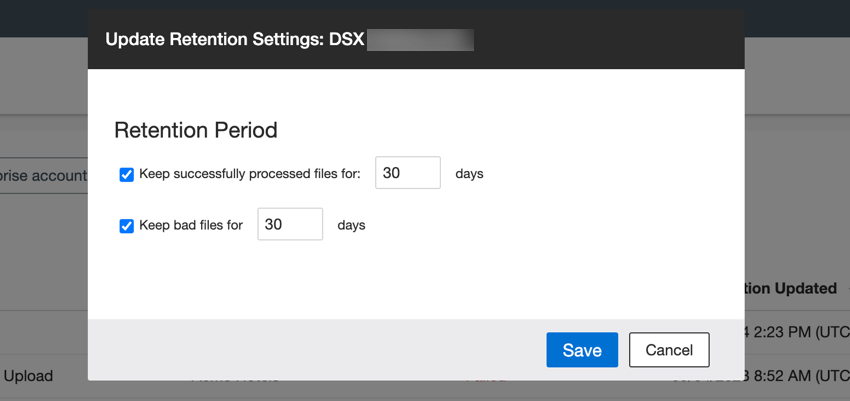
 - Update Retention Settings: This option is only available for files inbound and organization hierarchy inbound connectors. You can use this option to change how long XM Discover holds onto processed data before deleting it. Enter a value between 1 and 365 to choose how long XM Discover holds on to processed files before deleting them.
 Qtip: If files are kept, then they are moved to the 1 of following locations on the SFTP server, depending on the type of file: files-location-folder/archive/job-specific-subfolder or files-location-folder/bad/job-specific-subfolder.
Duplicate Handling
XM Discover can recognize duplicate documents and then process them based on your settings. Documents are identified by their Natural ID field. If 2 documents have the same Natural ID value, then they are considered duplicates.

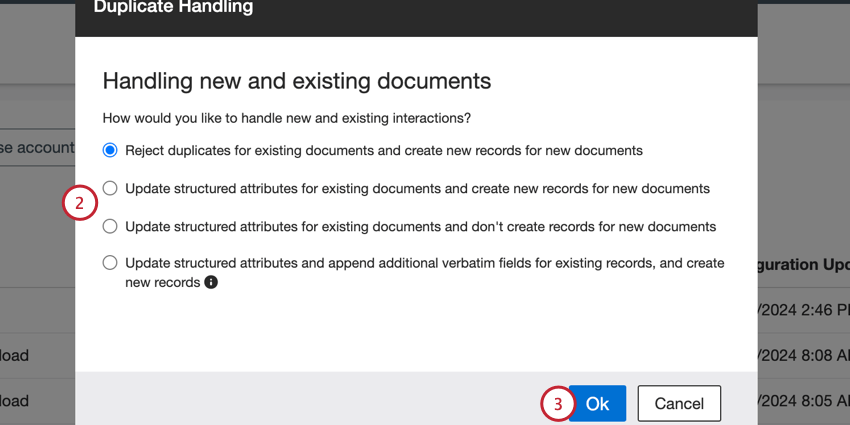
- Reject duplicates for existing documents and create new records for new documents: This is the default option. When a duplicate document is found, it is rejected. Non-duplicate documents are processed as new records.
- Update structured attributes for existing documents and create new records for new documents: When a duplicate document is found, the following happens:
- Current structured attributes are updated with non-empty values.
- New structured attributes are added to the current document.
- Existing verbatim fields are not updated.
- New verbatim fields are not added.
- Non-duplicate documents are processed as new records
- Update structured attributes for existing documents and don’t create new records for new documents: When a duplicate document is found, the following happens:
- Current structured attributes are updated with non-empty values.
- New structured attributes are added to the current document.
- Existing verbatim fields are not updated.
- New verbatim fields are not added.
- Non-duplicate documents are rejected.
- Update structured attributes and append additional verbatim fields for existing records, and create new records: When a duplicate document is found, the following happens:
- Non-duplicate documents are processed as new records.
- New structured attributes are added to the current document.
- Current structured attributes are updated with non-empty values.
- New verbatim fields are added to the current document.
- Existing verbatim fields are not updated.
Qtip: This option is not recommended for incremental runs. For this feature to work, ensure that no other verbatim fields are populated with data prior to starting the retrieval process. If existing verbatim fields are populated, you must unmap the existing verbatims in your job’s data mapping to retrieve new data. Once the retrieval process is complete, you may remap the other verbatim types.
Qtip: You can delete specific documents from XM Discover using either Studio’s Interactions Explorer or Designer’s data cleaning dataflow.
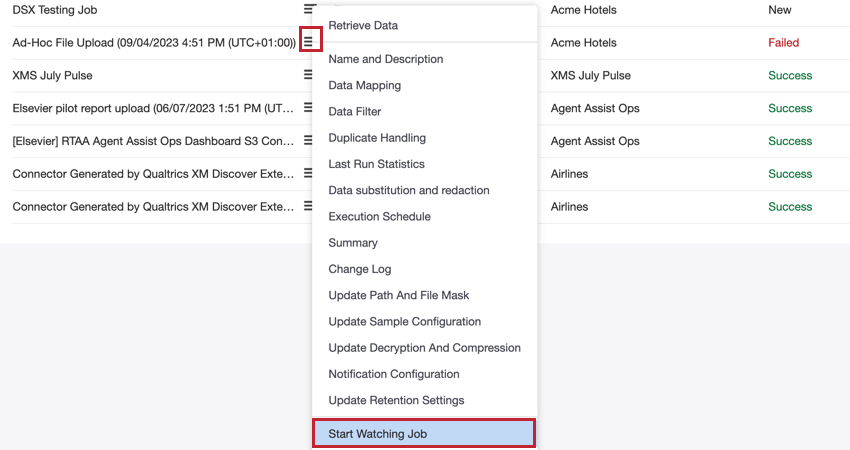
Watching a Job
Qtip: You are automatically added as a watcher for jobs you create.
You can watch a job to be notified whenever the job fails or times out. To watch a job, select Start Watching Job from the job options menu. If you are already watching the job and no longer wish to receive notifications, you can instead select Stop Watching Job.
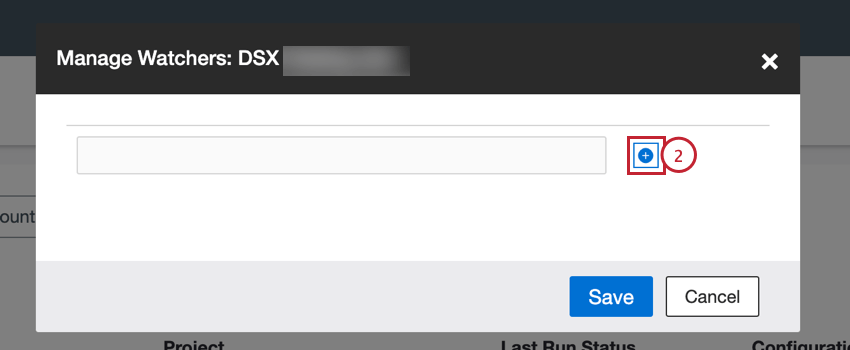
Managing Job Watchers
You can assign others users as watchers for a job:
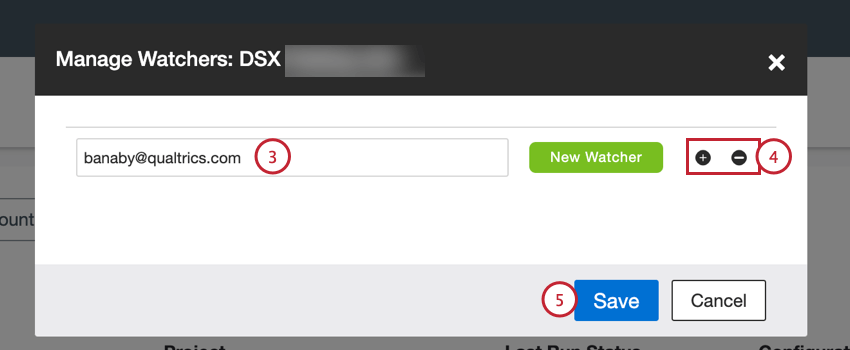
Qtip: Newly added users will have a “New Watcher” label next to them while existing users will have an “Existing Watcher” label next to them.
Job Notifications
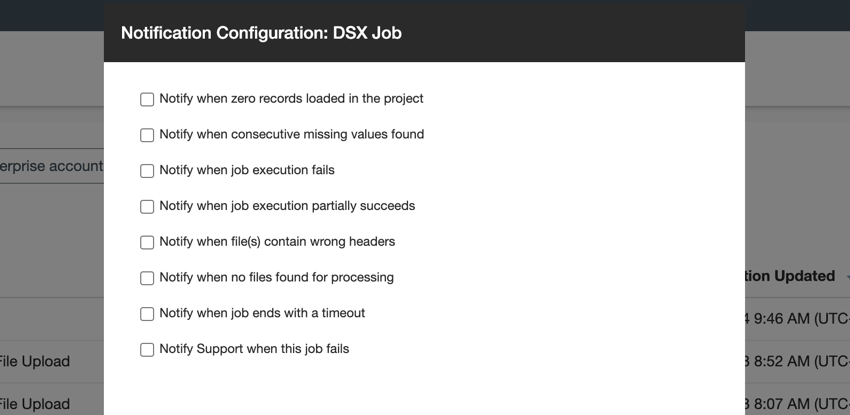
After adding job watchers, you can specify when watchers should be notified. To manage the notification settings, select Notification Configuration from the job options menu.
The following notification types are available:

- Notify when zero records loaded in the project: Receive a notification if the job processes at least one file but does not load any records into the project. Qtip: Duplicate documents are considered a “partial” success and will send a notification.
- Notify when consecutive missing values found: Receive a notification if the job encounters a mapped field with null values for all documents.
- Notify when job execution fails: Receive a notification if the job fails or is terminated.
- Notify when job execution partially succeeds: Receive a notification if the job succeeds only partially. For example, this can happen if the job fails to unzip or decrypt certain files.
- Notify when file(s) contain wrong headers: Receive a notification if the job finds at least one file with an incorrect header. Qtip: This option is only available for files connectors jobs using Excel or CSV formats.
- Notify when file(s) contain wrong JSON conversation structure: Receive a notification if the job finds at least one JSON file that doesn’t match Qualtrics Conversational Format for digital interactions or call transcripts. Qtip: This option only appears for files connector jobs when importing conversational data via JSON format.
- Notify when no files found for processing: Receive a notification when the job finds no files to process and the job fails. If you don’t select this checkbox, the job succeeds and the job watcher does not receive a notification. Qtip: This option only applies for files connector jobs.
- Notify when job ends with a timeout: Receive a notification if the job takes excess time to load records and times out.
- Notify Support when this job fails: When enabled, the XM Discover Support team will receive a notification if the job does not complete successfully for S3, Files, and Postgres connectors. A single support ticket with consolidated information for failed jobs from those connectors will be sent daily and to the Support team.
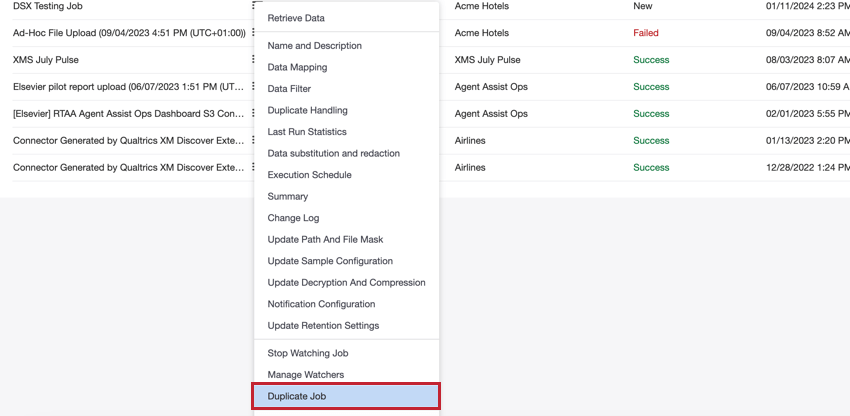
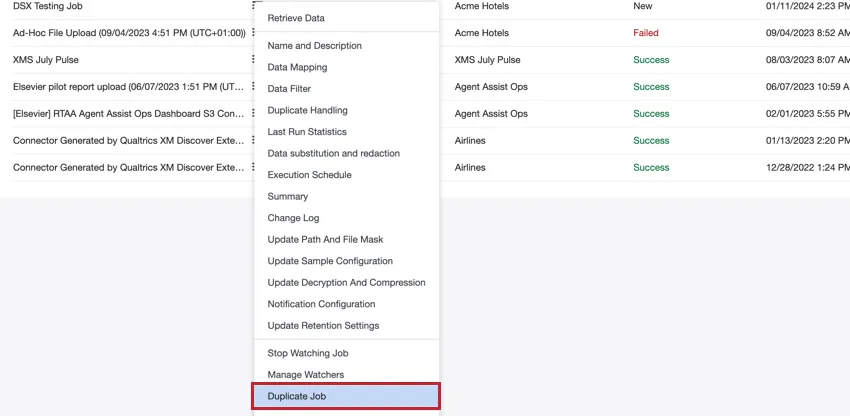
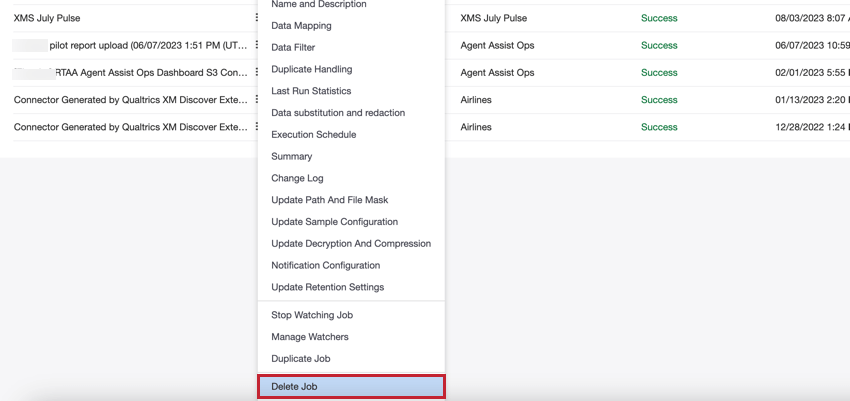
Copying & Deleting Jobs
You can copy a job to quickly duplicate its settings for a new job, or delete jobs you no longer need.
Copying a Job
To copy a job, select Duplicate Job in the job options menu. The newly copied job will have the same name as the original job with “Copy” appended to its name.
Deleting a Job
To delete a job, select Delete Job in the job options menu.

If needed, you can restore deleted jobs in the Recycle Bin. See Deleting & Restoring Jobs for more information.
Terminating a Job
You can stop a job that is currently running.
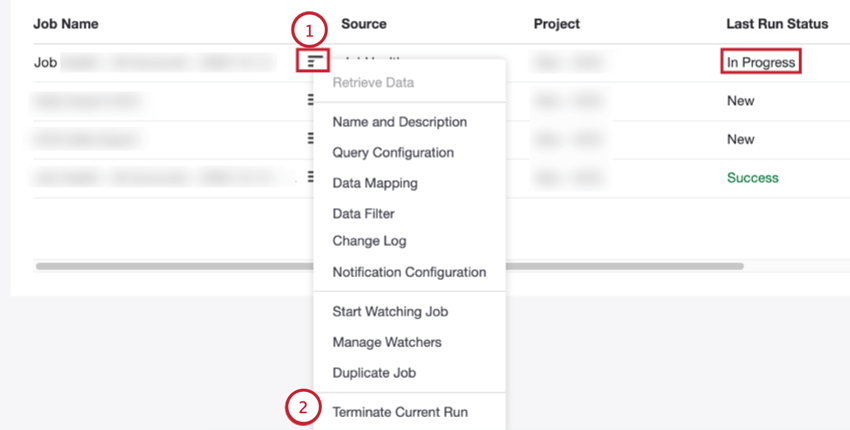
Qtip: Running jobs have the In Progress status.
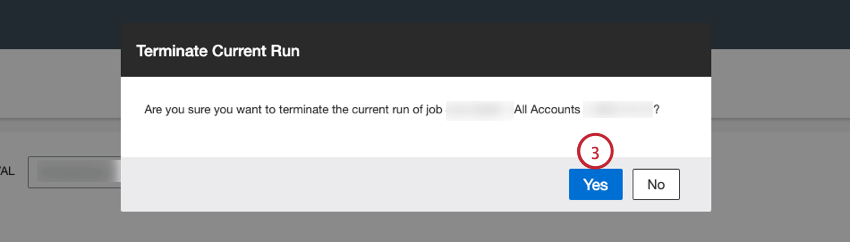
Once you terminate a job, it stops pulling the remaining records and its status is set to “Failed.”
Job Change Log
Select Change Log from the job options menu to view a table containing information about every action performed on the job. This table includes:
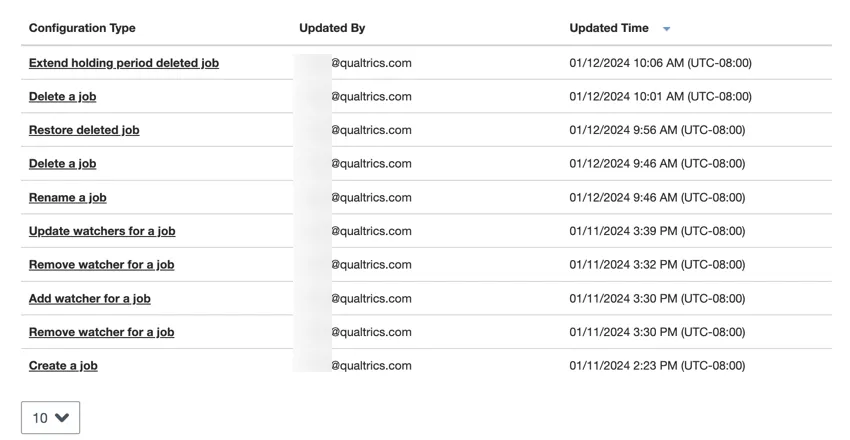
- Configuration: The edit performed on the job (changing the job details, deleting the job, adding watchers, etc).
- Updated By: The email address of the user who performed the action.
- Updated Time: The date and time that the action was performed.
Qtip: You can sort this table by clicking one of the fields at the top of the table. You can adjust the number of records displayed on the table by using the dropdown at the bottom of the table.
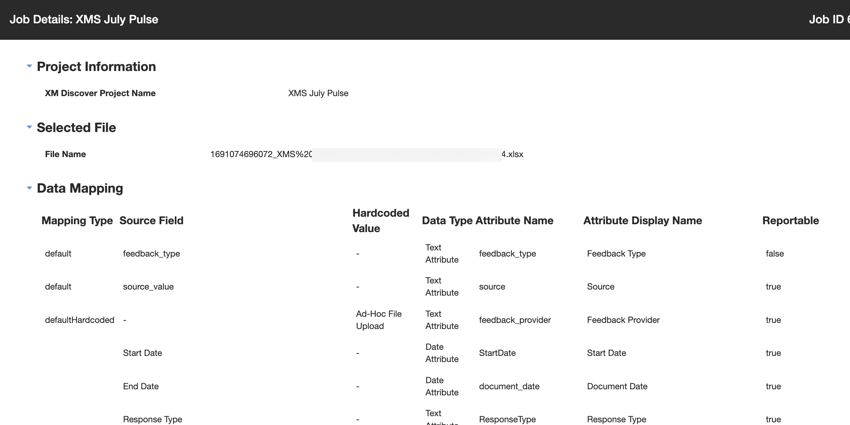
Viewing a Job Summary
You can view a job summary to review the data processed by that job. This is especially useful if you want to review how your data fields are imported into XM Discover. To view the summary, either select Summary in the job options menu or click the job’s name.

Qtip: If you use the Bulk Actions menu to view job summaries for multiple jobs, these summaries will be exported to CSV.
That's great! Thank you for your feedback!
Thank you for your feedback!