-

Qualtrics Platform -

Customer Journey Optimizer -

XM Discover -

Qualtrics Social Connect
Transforming Data (Connectors)
About Transforming Data in Discover
You can transform your incoming data before it is imported into XM Discover. This is useful if you need to clean your data or modify your data’s format.
To access data transformations:
- When setting up the import job, click the gear icon in the Transformations column next to the data field you want to transform.
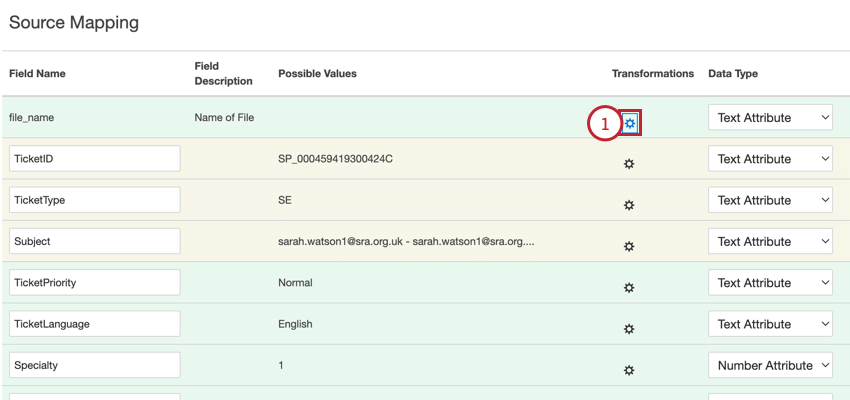 Qtip: If you want to update data transformations for an existing job, select Data Mapping from the jobs options menu.Attention: If the gear icon has a number next to it, that means there is already a transformation applied to the field. If you add a new transformation, it will replace the old one.
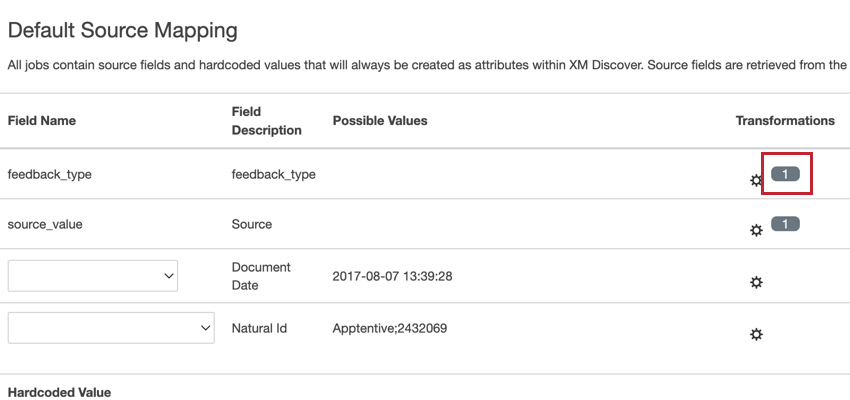
- Choose your data transformation. Visit the linked sections for more information about each transformation.
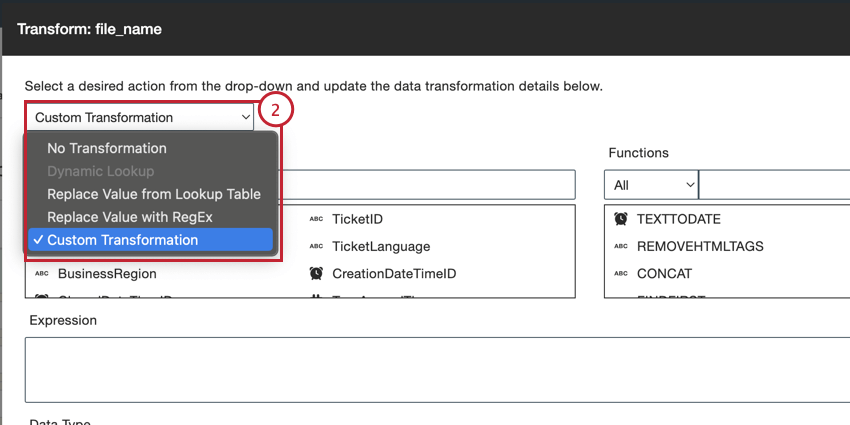
- No Transformation: Do not transform the imported field.
- Dynamic Lookup: This option is only available for lookup fields. When selected, this field will apply the latest lookup values for the field from the lookup table.
- Replace Value from Lookup Table: Define pairs of source values and replacement values.
- Replace Value with RegEx: Define regular expressions (regex) for pattern matching and replacement values.
- Custom Transformation: Build your own transformation using different functions and expressions.
Dynamic Lookup
This option is only available for data fields that reference a lookup table from the connected data source. You can specify a dynamic lookup expression so that the correct data is imported into XM Discover.
Replace Value from Lookup Table
You can add lookups to any source field to have greater control over the exact values being sent to your XM Discover project. A lookup table lets you define source values to be replaced when saved in XM Discover.
- Make sure Replace Value from Lookup Table is selected as your transformation.

- Click Export Lookup to export a lookup file in .XLSX format.
Qtip: We recommend adding lookups via a lookup file. If you’d like to add lookups manually, skip to step 8.
- Open your file in a spreadsheet editor and begin adding your lookup values to the file.
- In the match column, add the incoming values from your data connector.
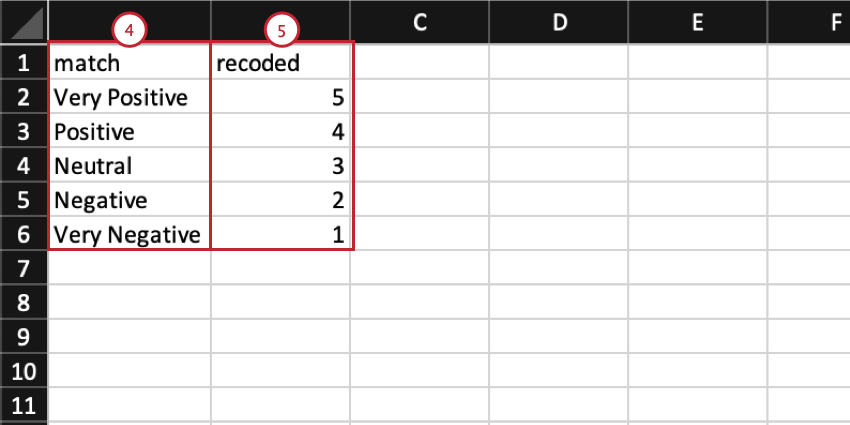
- In the recoded column, add the corresponding values you want saved in XM Discover.
- Save your file as an XLS or XLSX file.
- In XM Discover, click Import Lookup and select the lookup file saved on your computer.
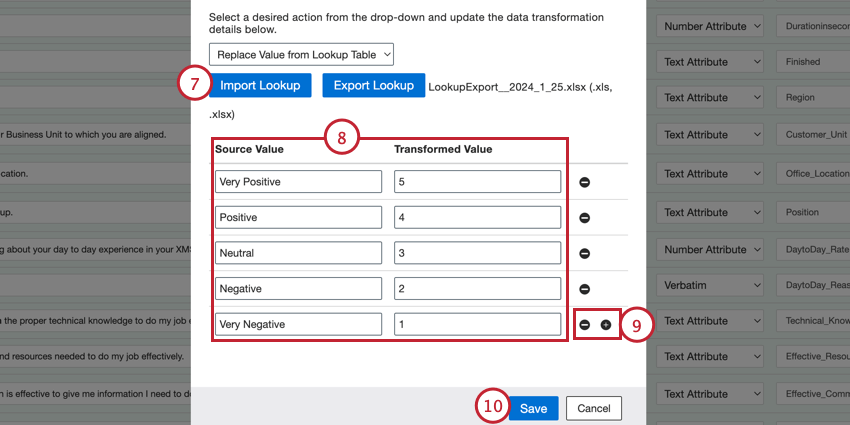
- If desired, you can edit your lookups. The Source Value column contains the value from your data connector while the Transformed Value column contains the value you want saved in XM Discover.
- You can add additional lookup pairings by clicking the plus sign ( + ), or you can remove pairings by clicking the minus sign ( – ) next to the pairing.
- Click Save.
Replace Value with RegEx
You can replace incoming data values using regular expressions, or regex, allowing you to clean data prior to loading it into your XM Discover project.
- Make sure Replace Value with RegEx is selected as your transformation.
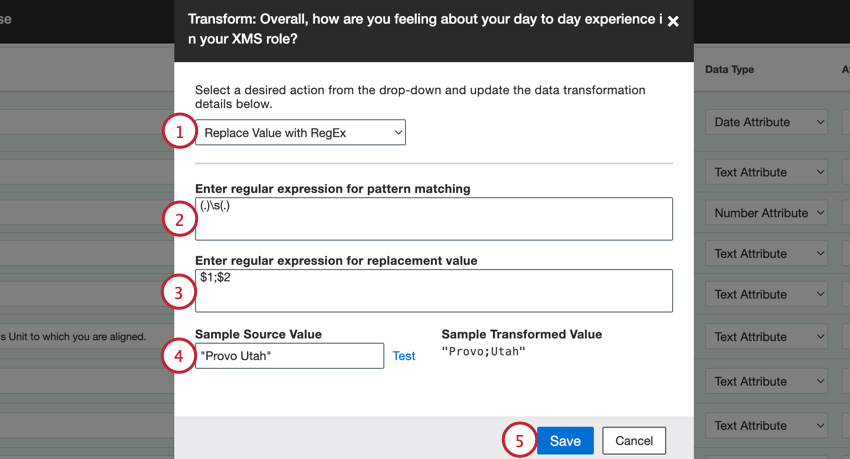
- Specify the search pattern regex in the Enter regular expression for pattern matching field.
- Specify the replacement string regex in the Enter regular expression for replacement value field.
- To test the transformation, enter an example from your dataset into the Sample Source Value field and click Test. The result of the transformation is displayed in the Sample Transformed Value box.
- Click Save.
Custom Transformation
You can transform incoming data using your own custom expressions. Custom transformations enable many types of data manipulation, including changing date formats, joining fields, removing leading zeros, and more.
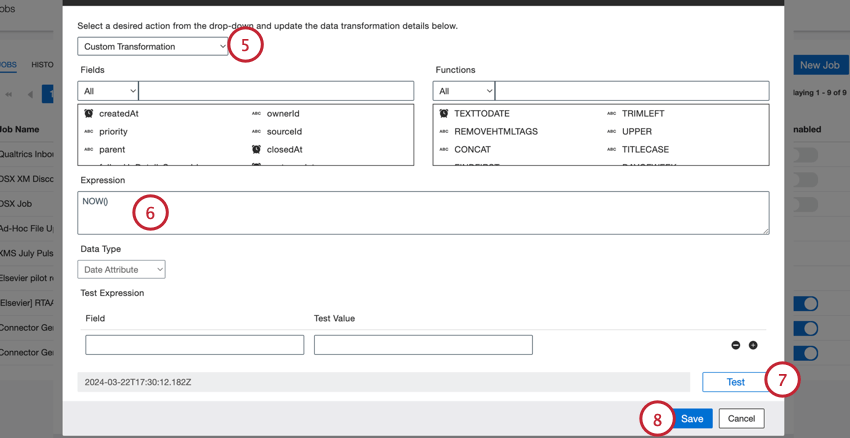
- Make sure Custom Transformation is selected as your data transformation.
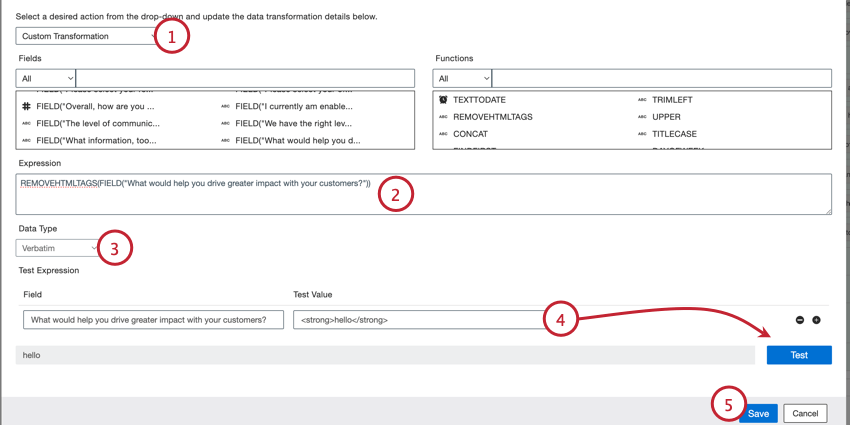
- Build you data transformation expression. Your expression will vary depending on your incoming data and the desired output. See the Building Expressions support page for more information on how to build your expression.
- If you’re creating a new field, you can change the field’s Data Type. If transforming an existing field, then you cannot change the data type.
- To test your transformation, enter a test data valu in the Test Value field and then click Test. The result will appear next to the “Test” button.
- When finished building and testing your expression, click Save.
Automatically Generating Natural IDs
When you upload data to XM Discover, the documents may not contain an unique ID for you to use as the natural ID, which is an important field because it helps you identify duplicate documents. Your uploaded data must have an unique identifier to use as the natural ID. This section covers how to set a natural ID when mapping data by using custom transformations.
- While mapping data, click the plus sign ( + ) in the Source Mapping section to add a new custom field.
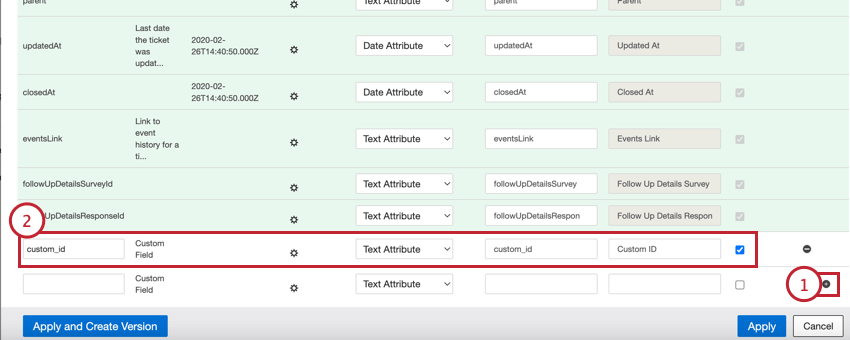
- Provide the following information for the custom field:
- Field Name: Provide the name for the field.
- Data Type: Select Text Attribute from the dropdown menu.
- Attribute Name: Leave it the same as “Field Name.”
- Attribute Display Name: If desired, enter a more user-friendly display name for the field.
- Reportable: Enable this checkbox. This must be selected so you can use the natural ID in reporting.
- In the Default Source Mapping section, select the attribute you created in step 2 for the Natural ID mapping.
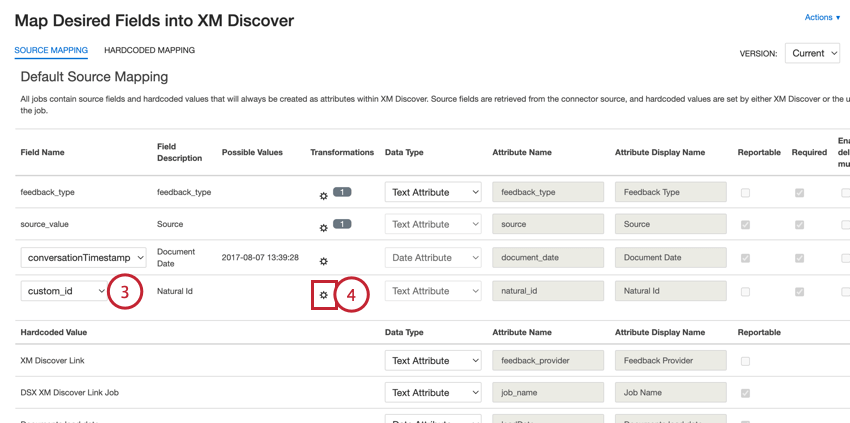
- Click the gear icon in the Transformations column.
- Select Custom Transformation.
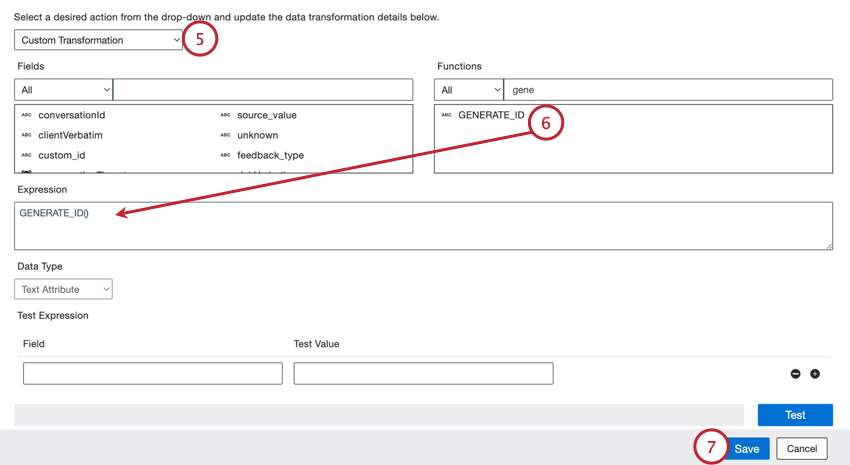
- Search for the GENERATE_ID() function and drag it from the Functions section into the Expression box.
- Click Save.
Qtip: Make sure you click Apply to save your mappings.
Now, your document will have a randomly generated ID when it is uploaded.
Setting a Specific Document Date
When you upload data to XM Discover, the documents may contain several date fields, or none at all. Your uploaded data must have a date field to use as the document date. This section covers how to set a document date when mapping data by using custom transformations.
- While mapping data, click the plus sign ( + ) in the Source Mapping section to add a new custom field.
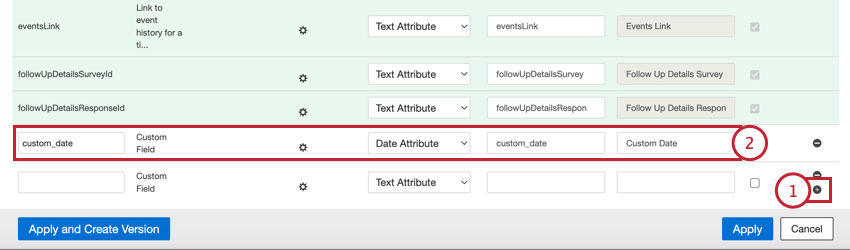
- Provide the following information for the custom field:
- Field Name: Provide the name for the field (for example, custom_date).
- Data Type: Select Date Attribute from the dropdown menu.
- Attribute Name: Leave it the same as “Field Name” (for example, custom_date).
- Attribute Display Name: If desired, add a more user-friendly display name for the field.
- Reportable: Enable this checkbox. This must be selected to document date is used in Discover reporting.
- In the Default Source Mapping section, select the attribute you created in step 2 for the Document Date mapping.
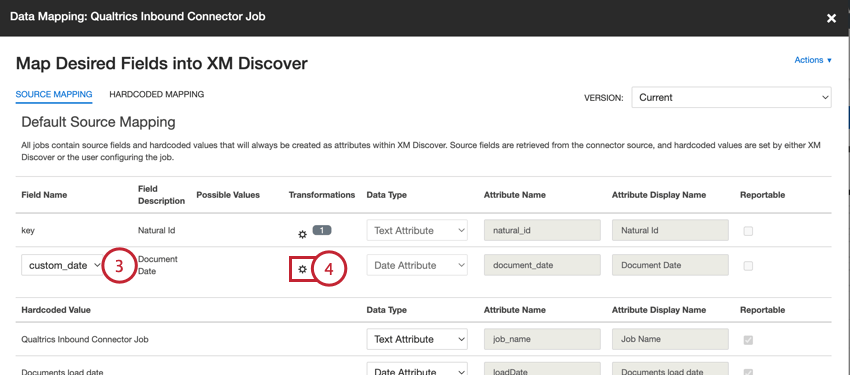
- Click the gear icon in the Transformations column.
- Select Custom Transformation.
- In the expression builder, you have several options to set a date based on your needs:
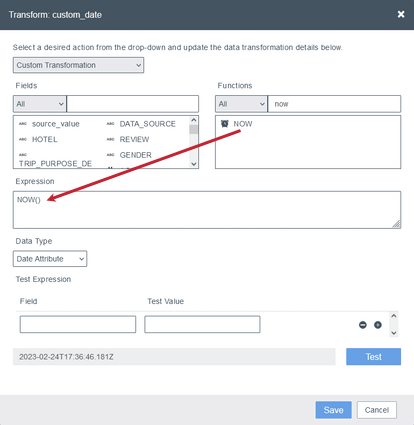
- Use load time: To use the date when the documents are uploaded into XM Discover, drag the NOW() function from the Functions section onto the Expression box.
- Use hardcoded value: To use a specific date, drag the TEXTTODATE() function from the Functions section onto the Expression box and provide the date and the date format inside the parenthesis.
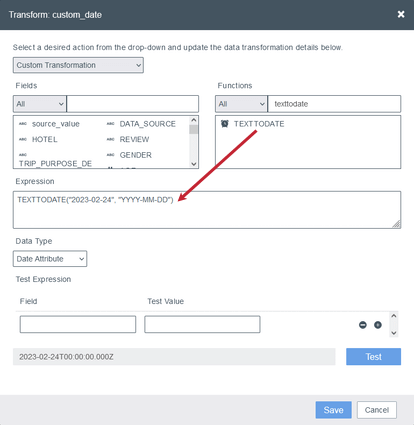 Qtip: In both cases, the resulting date will use the YYYY-MM-DDThh:mm:ssZ format.
- Use load time: To use the date when the documents are uploaded into XM Discover, drag the NOW() function from the Functions section onto the Expression box.
- Click Test to see the result of the transformation. If needed, adjust your expression until the test gives you the desired result.
- Click Save when finished.
Custom Transformation Examples
This section covers some examples of how you can manipulate your data using custom transformations.
Assign a Custom Source Value
Goal: Assign a custom text value (“April Surveys”) to the “Source” attribute.
How: Apply the following transformation to the “Source” field (simply put the text value inside quotation marks):
Change “Last Name,First Name” to “First Name Last Name”
Goal: Change the name format from “last name,first name” to “first name last name” and capitalize the first letter of every word.
How: Apply the following transformation to the name field:
PROPERCASE(REPLACEBYREGEXP(NAME, “(.*),(.*)”, “$2 $1”))
Convert a Date from UTC to CST
Goal: Convert a date field from a UTC time zone to CST.
How: Apply the following transformation to the END_DATE field:
CONVERT_TO_TIMEZONE(END_DATE, “Etc/UTC”, “America/Chicago”)
Convert hh:mm:ss to Minutes
Goal: Convert time from the hh:mm:ss format to the number of minutes.
How: Apply the following transformation:
GETMINUTESBETWEEN(TEXTTODATE(“1970-01-01”, “YYYY-MM-DD”), CONCAT(“1970-01-01T”, MY_TIME))
Convert Unix Epoch Time in Seconds to ISO 8601
Goal: Convert a Unix epoch timestamp in seconds to ISO 8601 date format.
How: The following transformation does two things: it turns seconds into milliseconds and then turns the milliseconds into an ISO 8601 date:
NUMBERTODATE(TEXTTONUMBER(CONCAT(MY_DATE, “000”)))
Derive Value Based on Whether Something Is in an Array
Goal: Check the state name and assign a “DMV Area” value if it matches any of the listed states. Otherwise, set as “Other States.”
How: Add a custom text field called AREA and apply the following transformation:
IF(LOWER(STATE) in [“md”, “dc”, “va”], “DMV Area”, “Other States”)
Extract Article Name from a Page Title
Goal: Extract the name of the article after the last “|” divider in a page title.
How: Apply the following transformation to the page title field:
TRIMRIGHT(MID(PAGE_TITLE,FINDLAST(PAGE_TITLE,”|”)+1,1000))
Join First and Last Name into a Single Field
Goal: Combine FIRST_NAME and LAST_NAME fields into a new FULL_NAME field and capitalize the first letter of every word.
How: Add a custom text field called FULL_NAME and apply the following transformation:
PROPERCASE(CONCAT(FIRST_NAME, ” “, LAST_NAME))
Join Two Verbatims and Load Only the Combined Verbatim
Goal: Join two verbatim fields VERBATIM1 and VERBATIM2 into a new VERBATIM3 field and load only the combined verbatim into XM Discover.
How: Perform these steps:
- Create a verbatim field called VERBATIM3 and apply the following transformation to it:CONCAT(VERBATIM1, ” “, VERBATIM2)
- For VERBATIM1 and VERBATIM2 fields, set Data Type to Do Not Map.
Multi-Variable Rollup
Goal: Create a multi-variable rollup for answers to a single question that are split across several attributes. Suppose the dataset contains multiple “yes or no” attributes to indicate different levels of membership a customer may have:
- QID2_1 for Silver
- QID2_2 for Gold
- QID2_3 for Platinum
You can roll all the “yes” answers into a single new attribute to indicate the customer’s membership level.
How: Apply the following transformation:
TRIMRIGHT(CONCAT(IF(QID2_1==”Yes”, “Silver”, “”), IF(QID2_2==”Yes”, “Gold”, “”), IF(QID2_3==”Yes”, “Platinum”, “”)))
Remove Leading Character
Goal: Remove the first character in a string.
How: Apply the following transformation:
REPLACEBYINDEX(MY_NUMBER, 1, 1, “”)
Trim Leading Zeros
Goal: Trim leading zeros in a number.
How: For a text value, apply the following transformation:
CONCAT(TEXTTONUMBER(MY_NUMBER), “”)
For a numeric value, apply the following transformation:
TEXTTONUMBER(MY_NUMBER)