Loading...
Skip to article
  • Qualtrics Platform
    Qualtrics Platform
  • Customer Journey Optimizer
    Customer Journey Optimizer
  • XM Discover
    XM Discover
  • Qualtrics Social Connect
    Qualtrics Social Connect

Submitting & Managing Feedback


Was this helpful?


This site is protected by reCAPTCHA and the Google Privacy Policy and Terms of Service apply.

The feedback you submit here is used only to help improve this page.

That’s great! Thank you for your feedback!

Thank you for your feedback!


About Submitting & Managing Feedback

Qtip: Frontline Feedback projects are an additional purchase. Please contact your Account Executive for more information about this product.

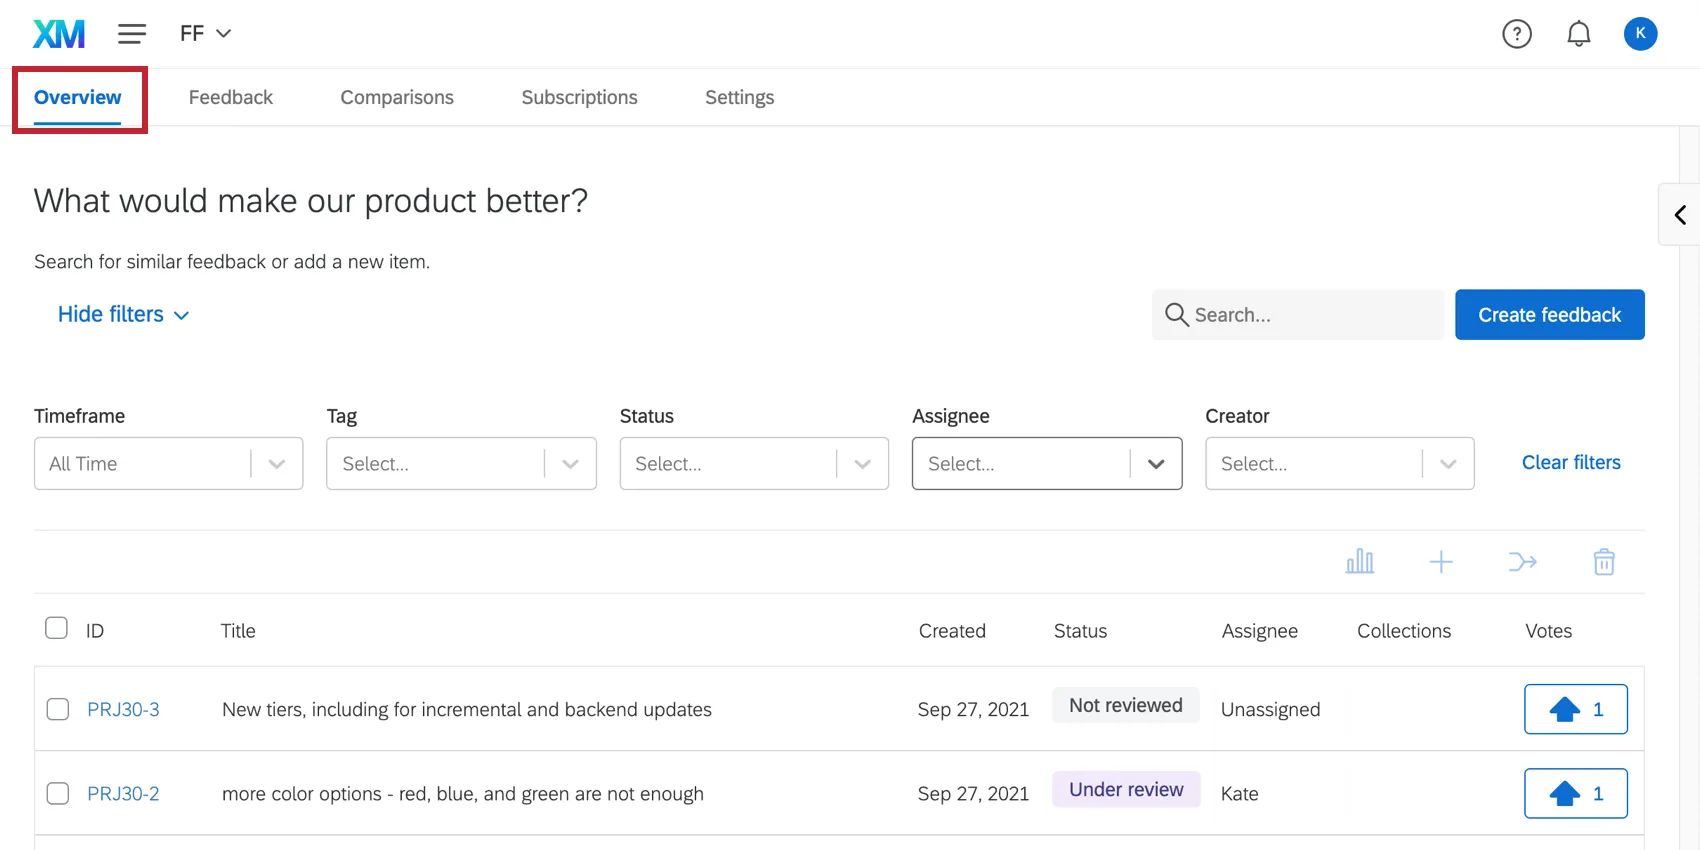
Users will be able to submit and interact with feedback once they’ve been given access to the Frontline Feedback project. The Overview tab is used to submit new feedback requests along with viewing and interacting with submitted requests.
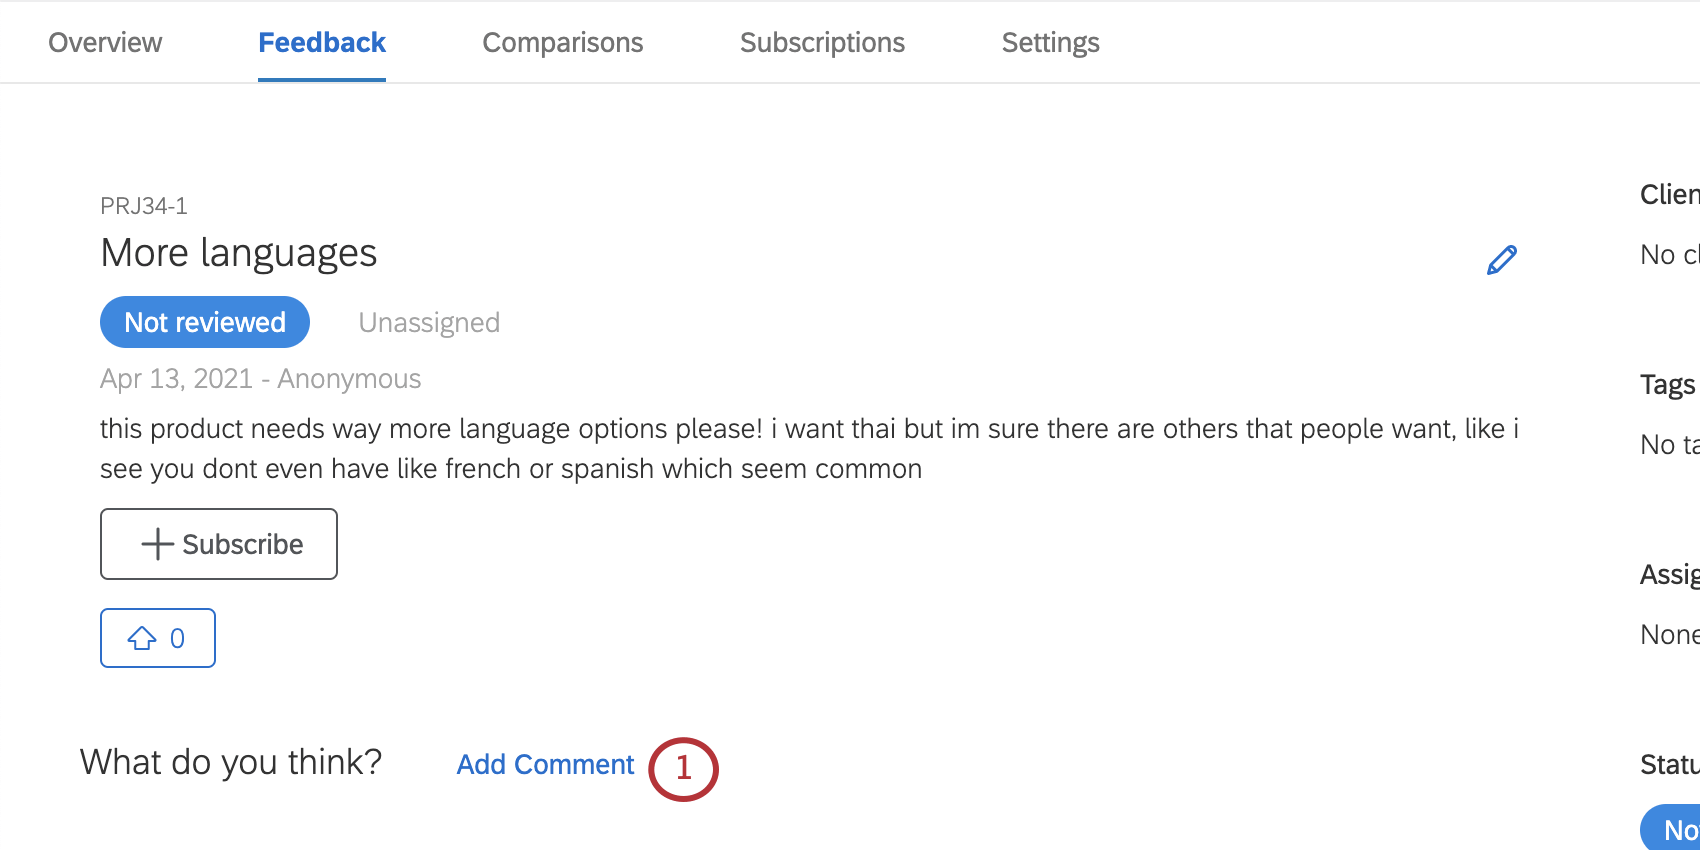
the overview tab

Submitting Feedback

Attention: At this time, Frontline Feedback projects do not support submitting feedback requests in multiple languages. We recommend creating a different project for each language in which you plan on collecting feedback.
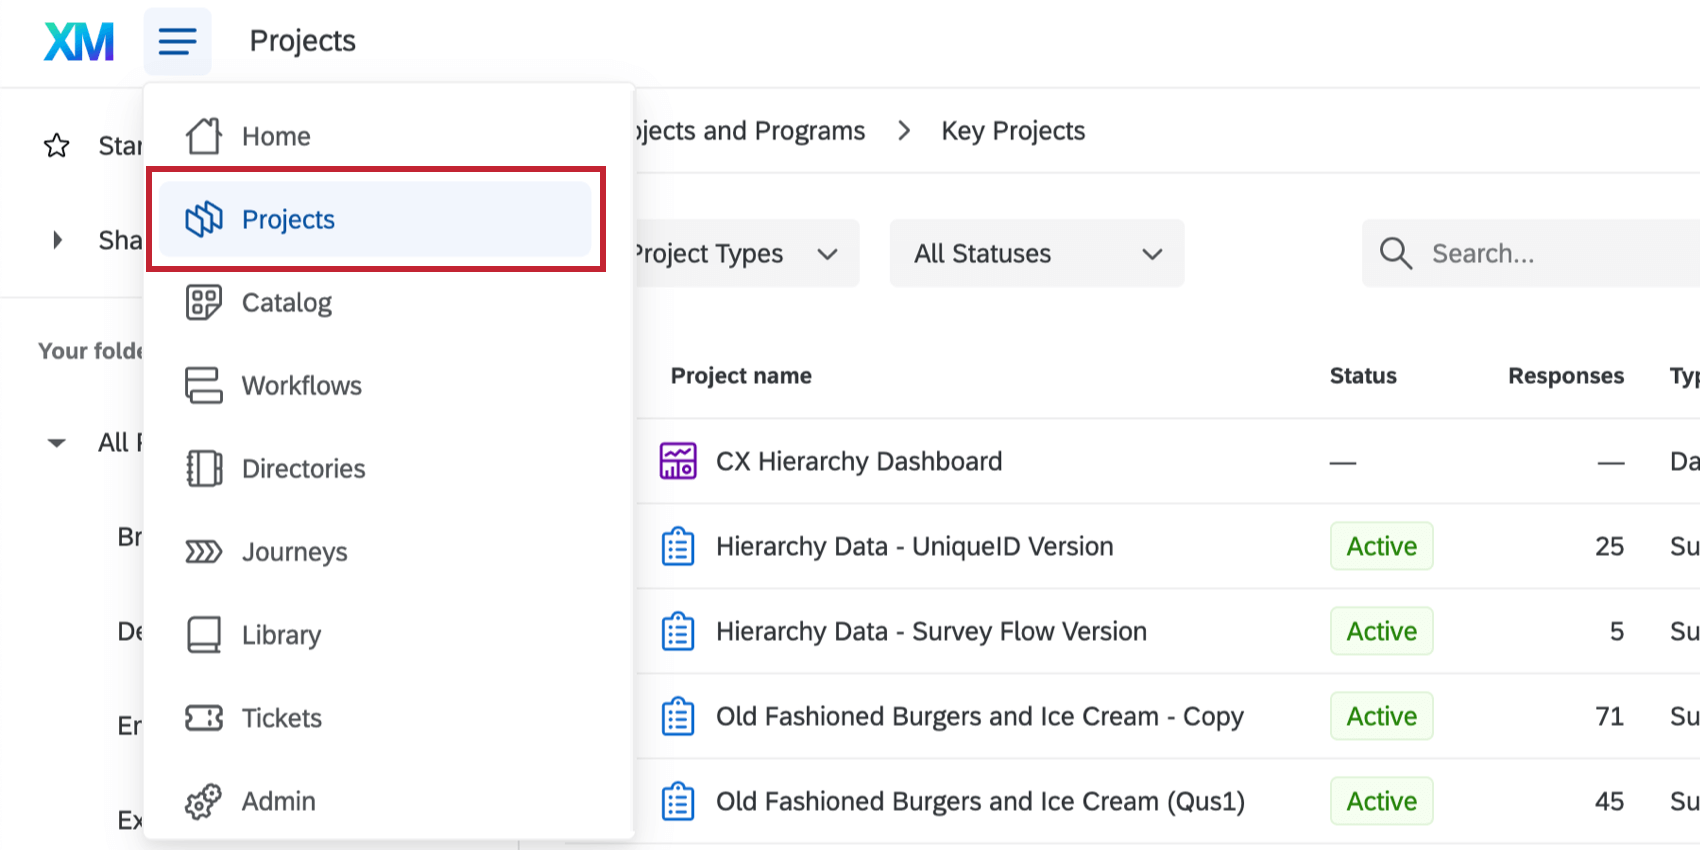
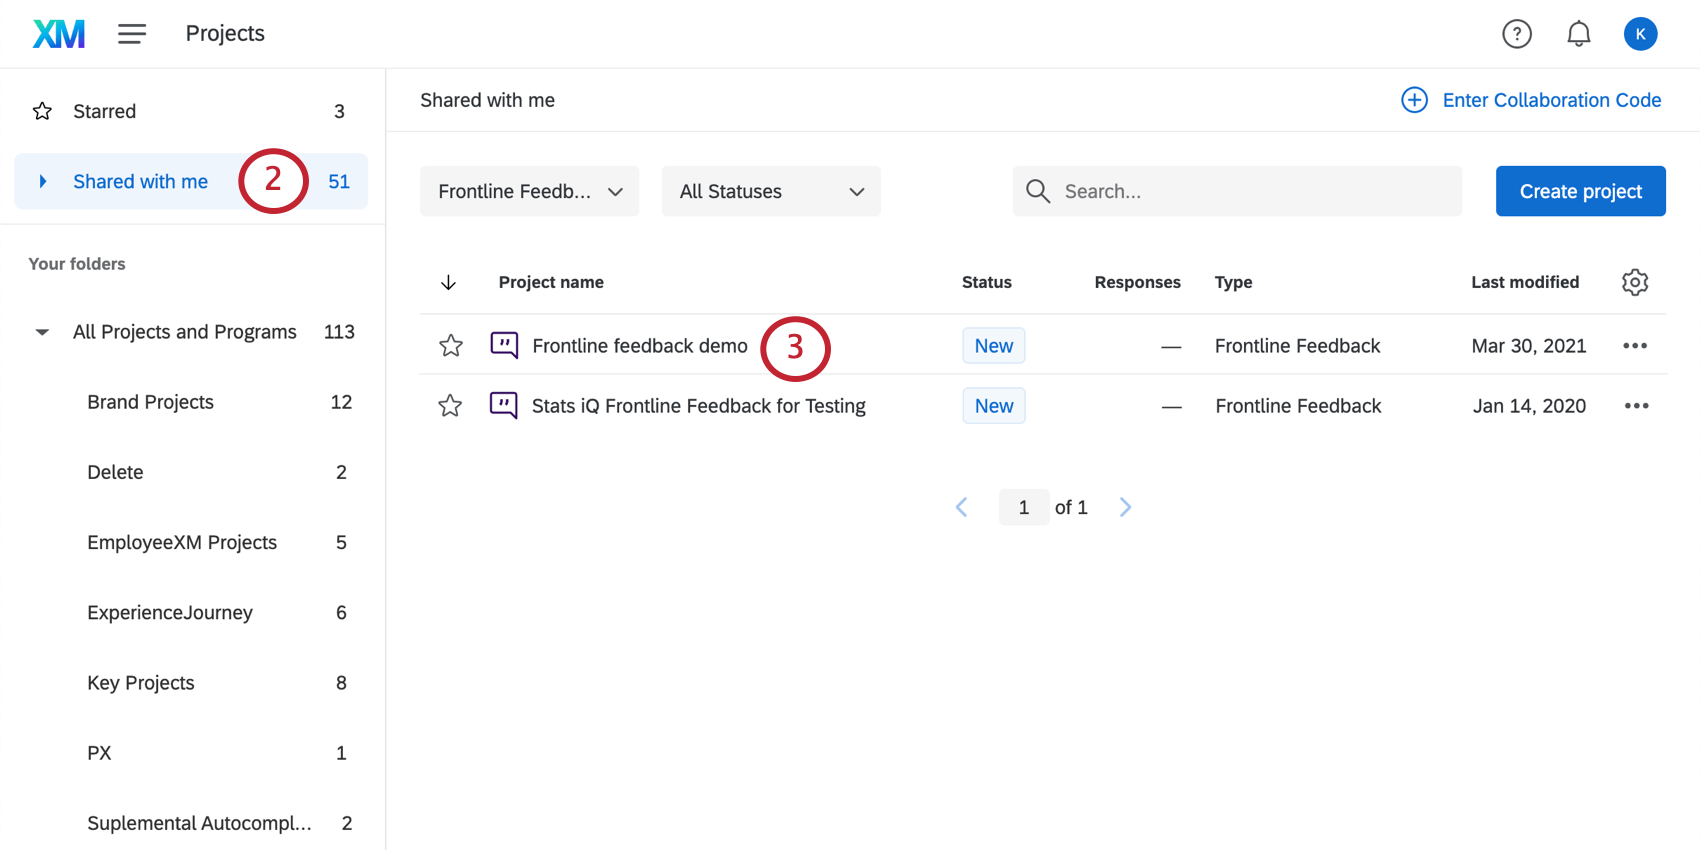
To submit feedback:

  1. In your Qualtrics account, navigate to the Projects page.
    Projects being selected from the navigation menu
  2. Click the folder icon.
    navigating to the shared with me folder and selecting the frontline feedback project
  3. Go to the Shared with me folder.
  4. Find the Frontline Feedback project that has been shared with you. You can use the Project type filter to quickly narrow this down.
  5. Navigate to the Overview tab.Searching for and submitting feedback from the overview tab
  6. Enter a short description of the feedback. What you enter here will pre-populate as your feedback request’s title.
  7. Similar feedback requests will appear as you create your feedback. Double check that your feedback hasn’t already been submitted.
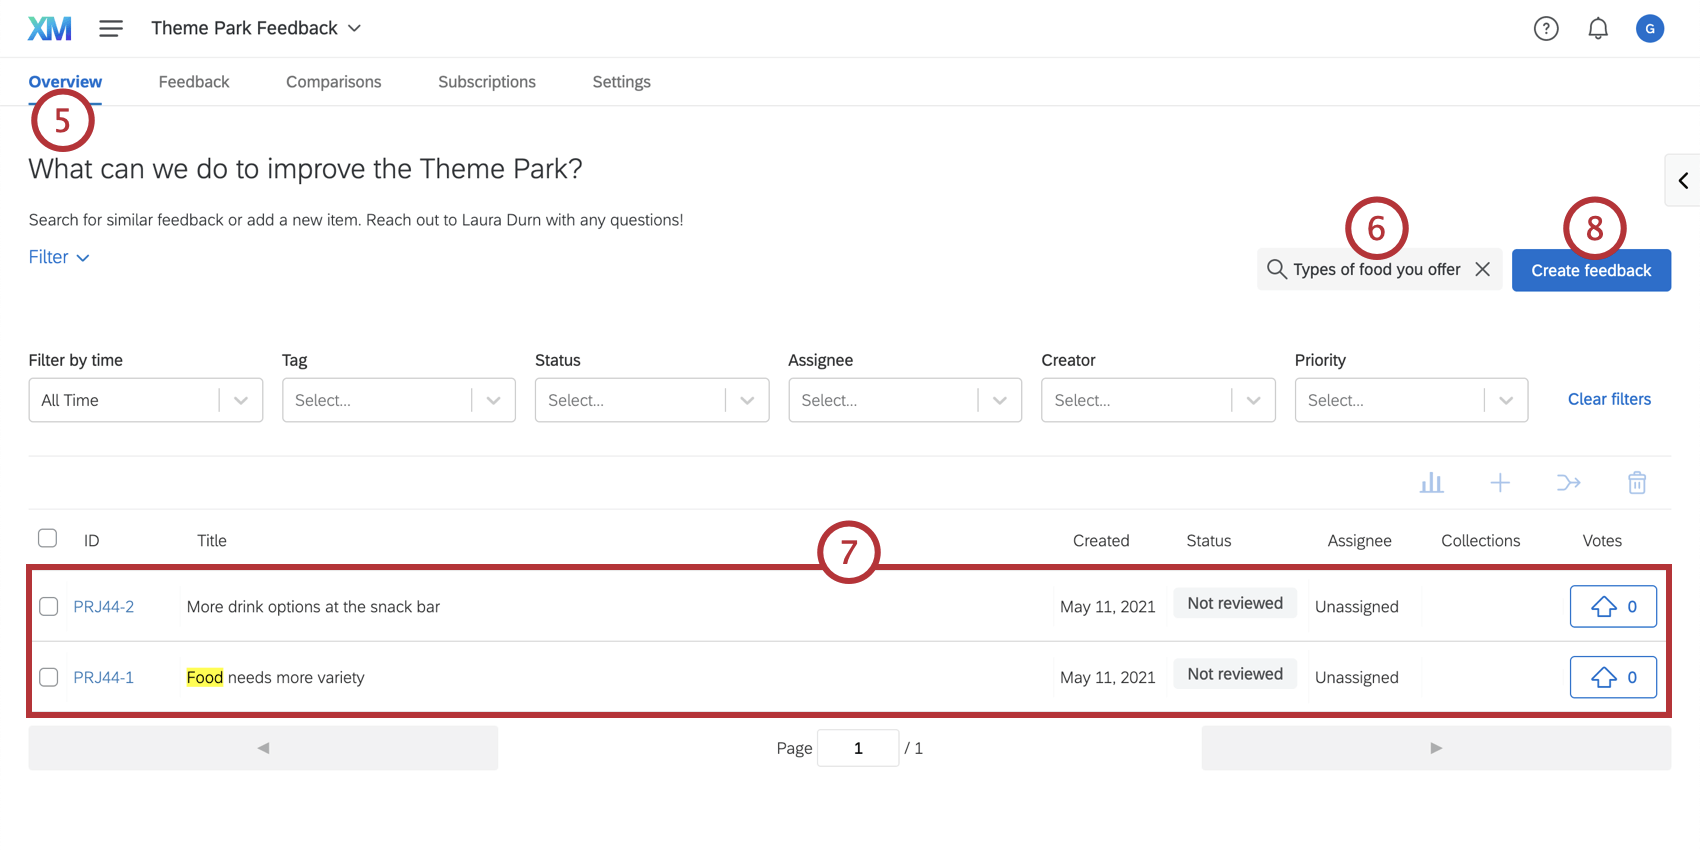
    Qtip: If your feedback has already been submitted, try upvoting and commenting on it instead of submitting new feedback.
  8. Click Create feedback.
  9. If you want to submit the feedback anonymously, check the Submit feedback anonymously box. If you do not check this box, then the feedback will be linked to your name.Submitting feedback with a feedback form; each field is indicated
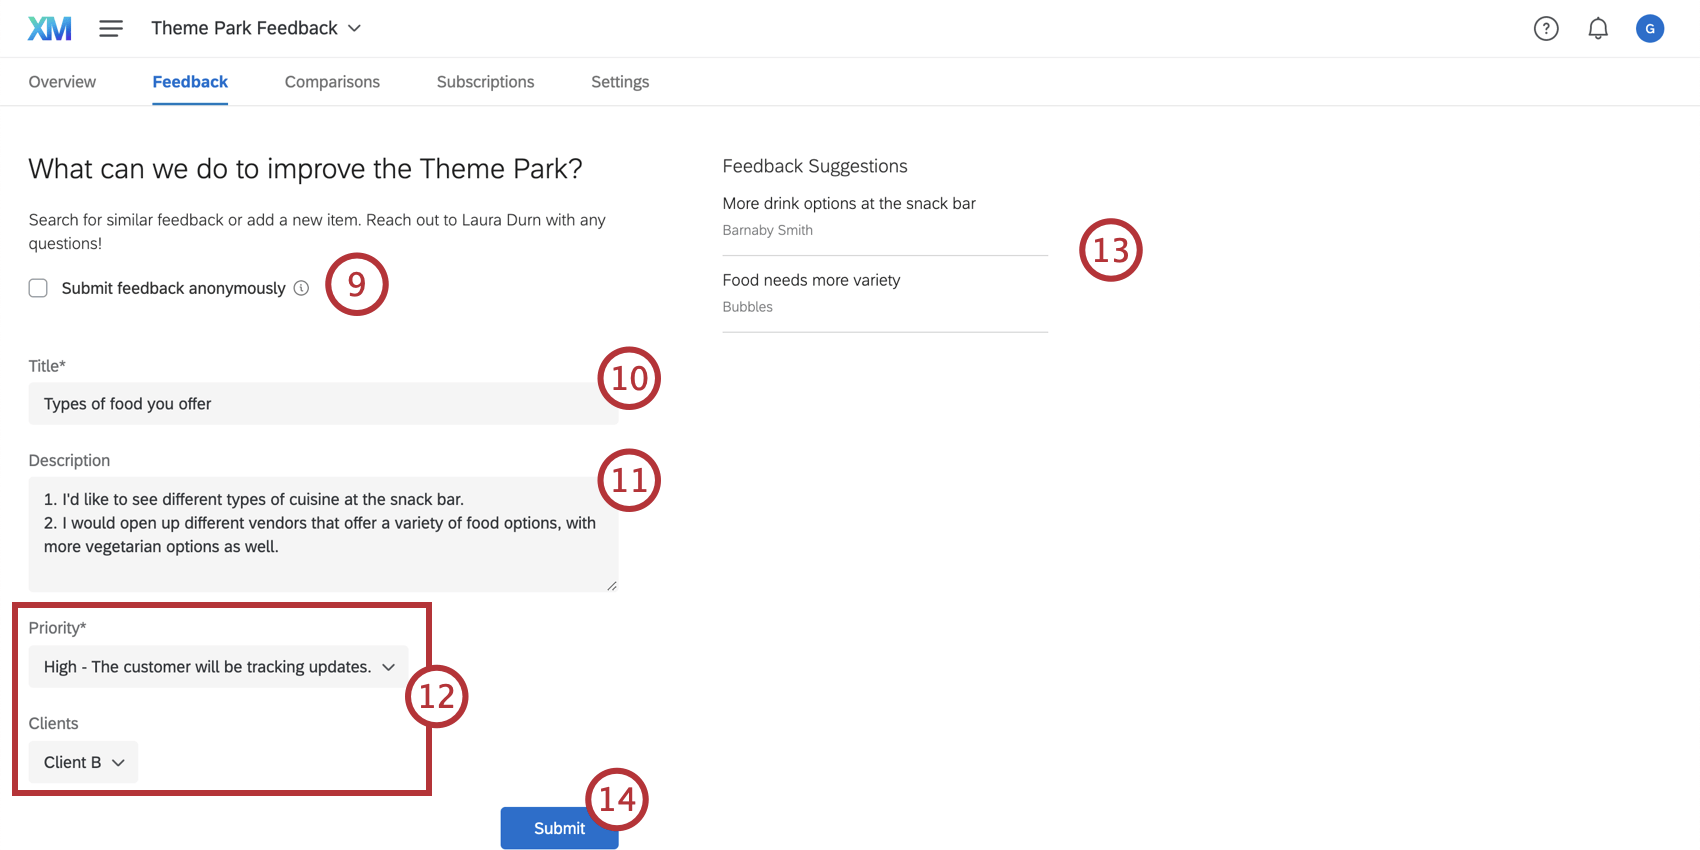
    Qtip: If you don’t see this option, then the project owner has not enabled anonymous submissions in the project settings.
  10. Give your feedback a Title. This title should be short and to the point since it will be the first thing other users see about your feedback request.
  11. Enter a Description for your feedback.
  12. Select values for any custom fields that are included on the form. Required fields will be indicated with an asterisk ( * ).
    Qtip:  If you don’t see this option, then the project owner has not included any fields in the project settings.
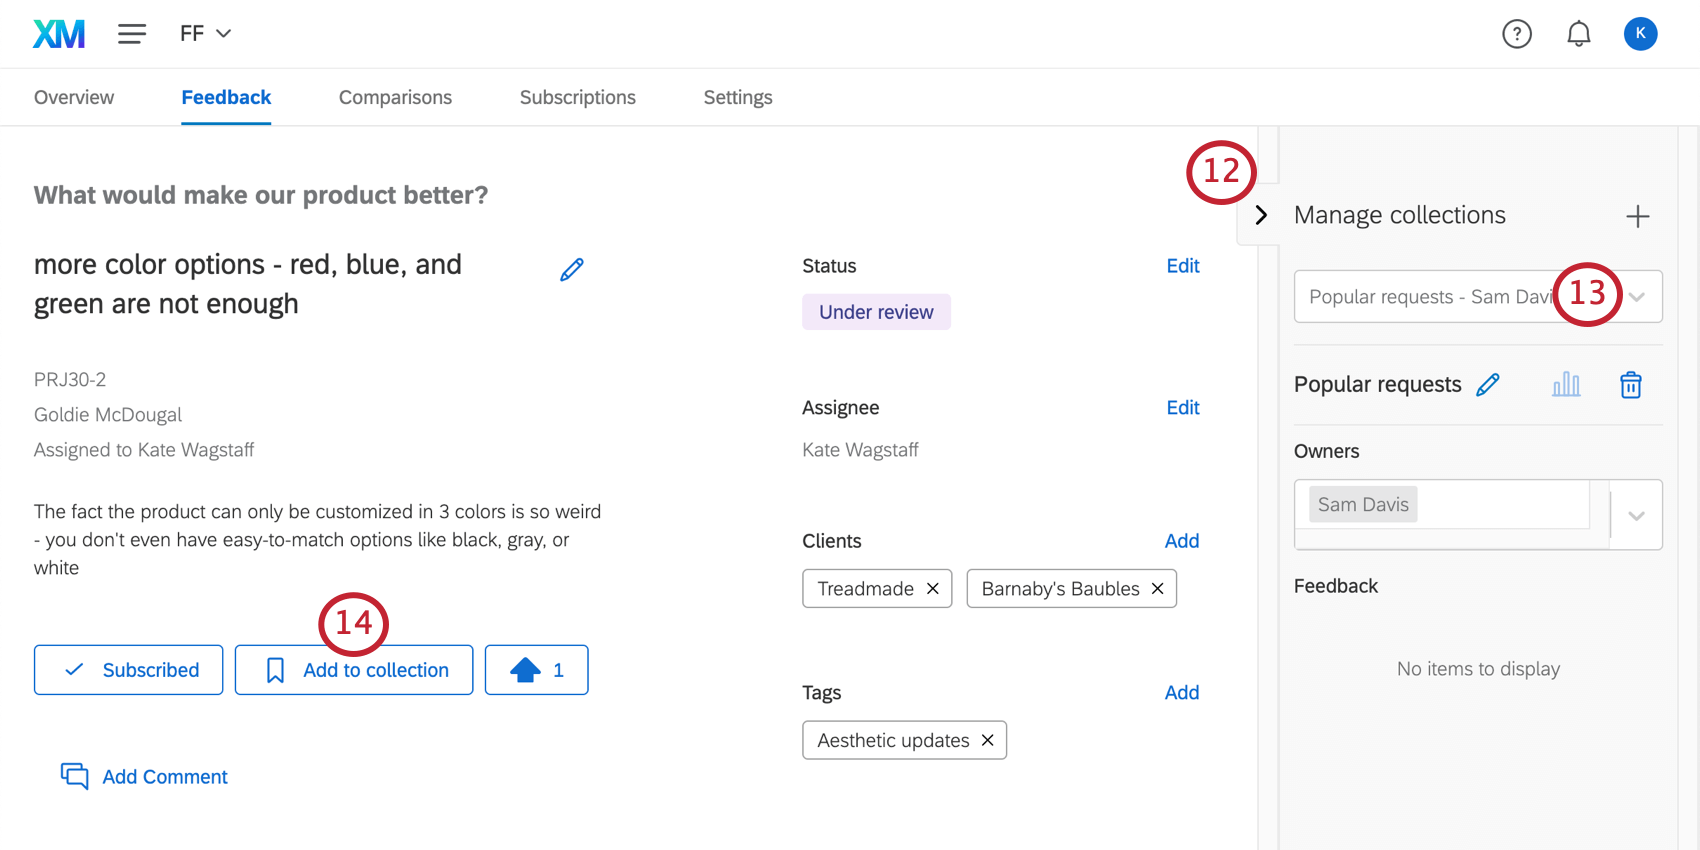
  13. Double check the feedback suggestions to make sure your feedback request hasn’t already been submitted.
  14. Click Submit.

Managing Feedback

Once feedback has been submitted, users with access to the project will be able to vote, comment, tag, and assign feedback to team members who will respond to them. This section outlines how to manage and respond to feedback.

  1. Navigate to the Overview tab.
    in the overview tab, searching for a feedback item and choosing it
  2. Search for existing feedback by typing in a description of the feedback or filter by feedback attributes.
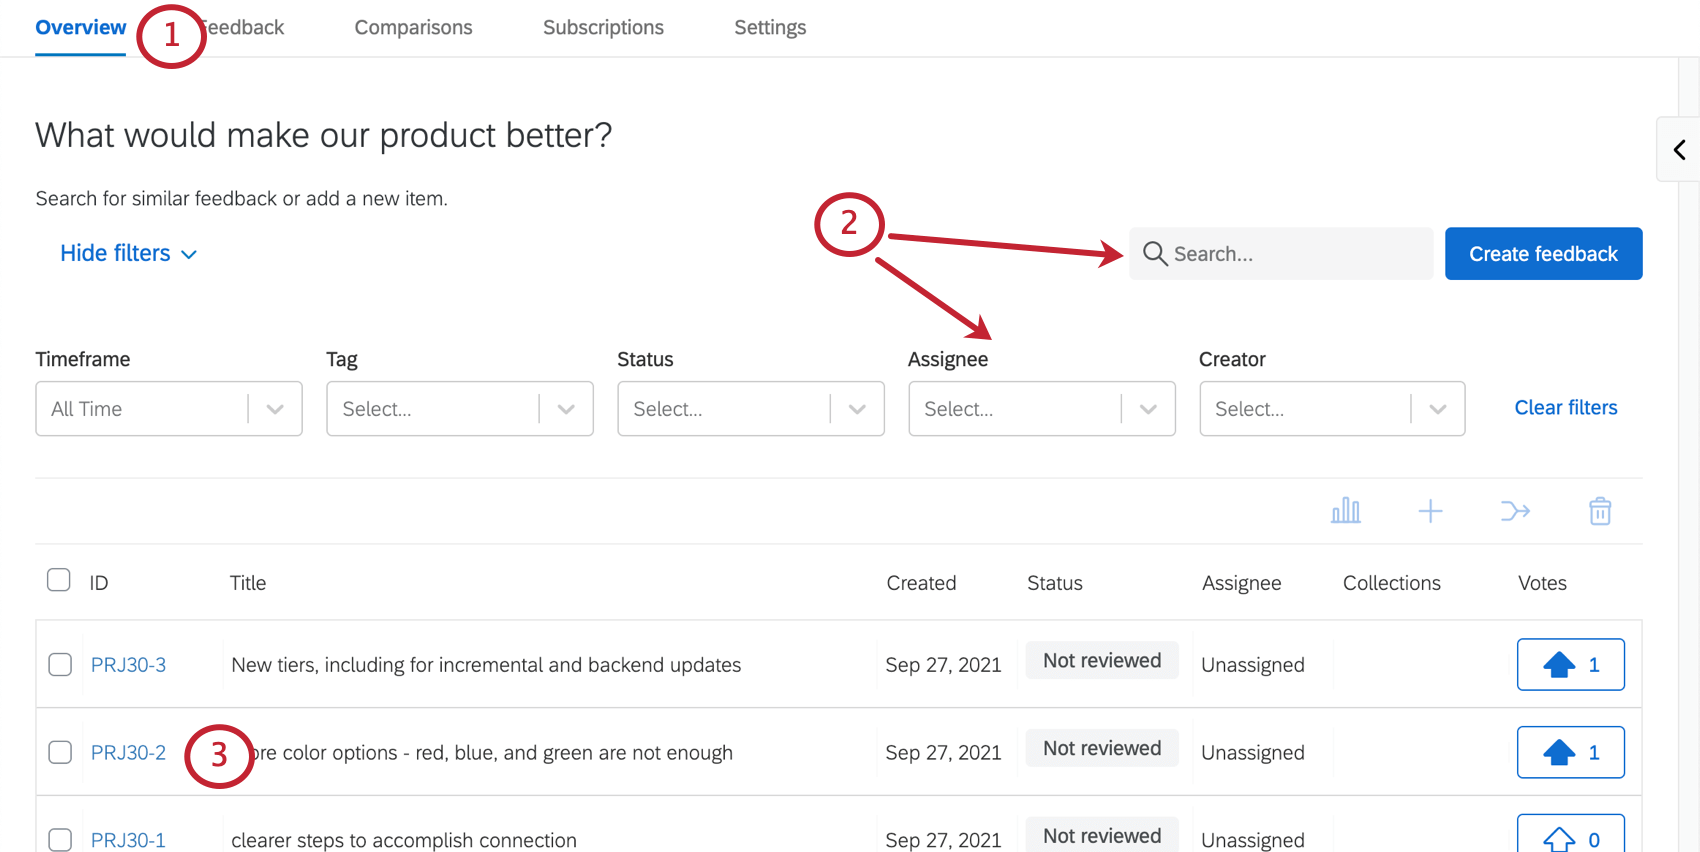
    Qtip: For more information on using filters, read the Filtering Feedback section.
  3. Select the ID of the desired feedback.
  4. Here, you’ll find basic information about the feedback. Click the pencil item to edit the feedback name and description.
    A picture of a feedback request. On the left are the name, description, basic info that cannot be edited, subscription settings, the ability to upvote, and the ability to add comments. On the right are the editable status, assignee, clients, and tags
  5. Subscribe to the feedback request to receive email notifications when it is actioned. For more information on managing notifications and what actions cause notifications, read the Subscribing to Feedback page.
  6. The feedback request’s score. Click the up arrow to upvote the feedback request.
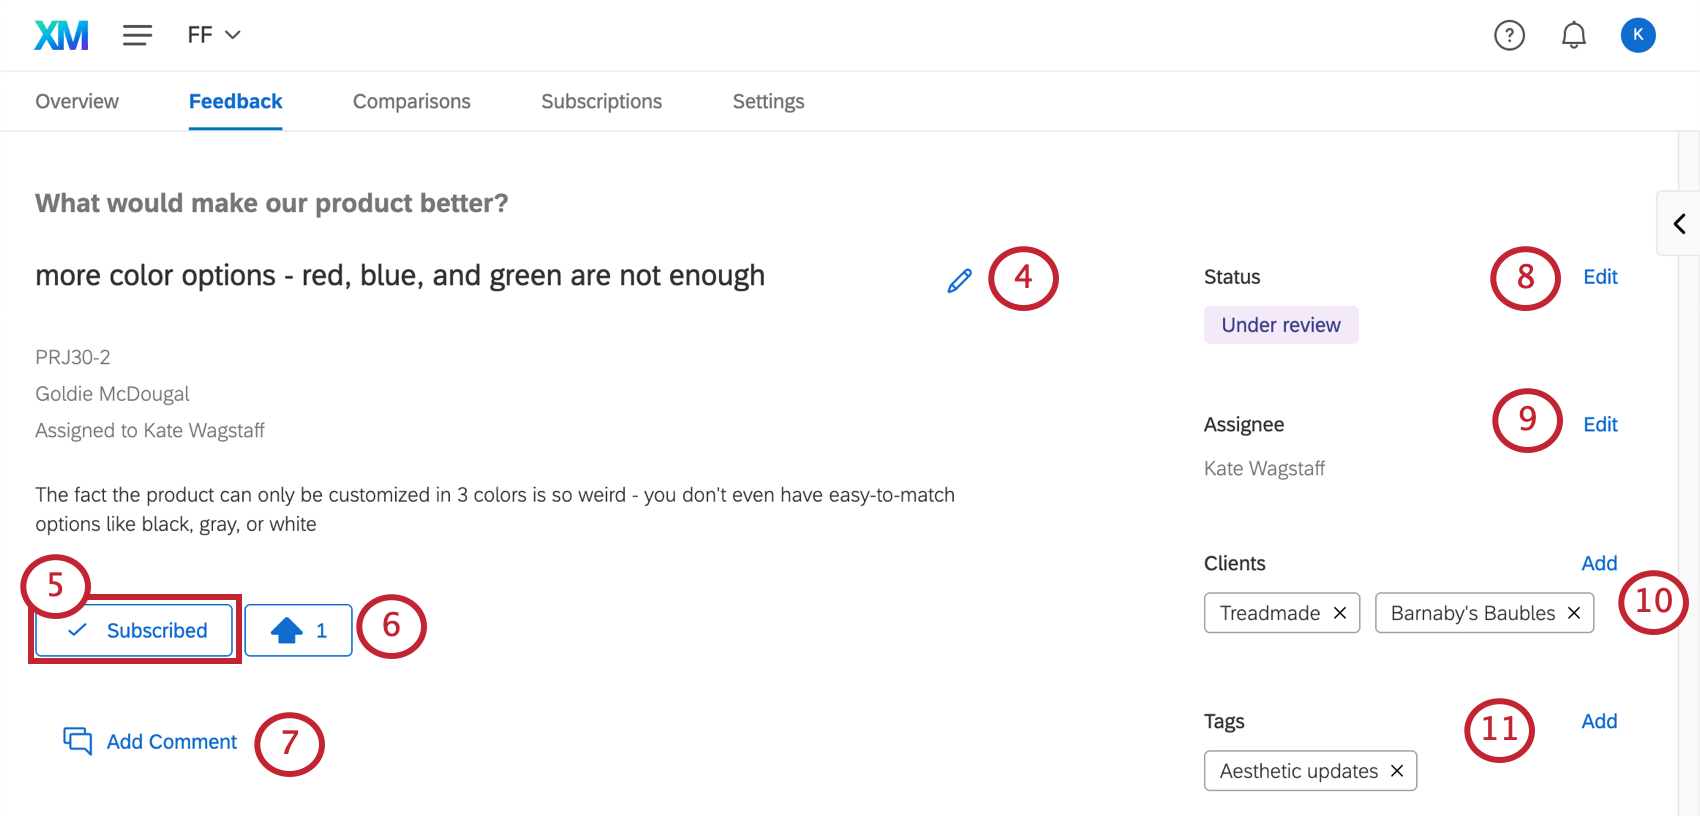
    Qtip: Users may only upvote a feedback request once (i.e. you can’t submit multiple upvotes for the same request). You may remove your upvote at any time.
  7. Click Add Comment to add comments to the feedback. Existing comments will appear below this button. See Commenting on Frontline Feedback for more details.
  8. The status of the task. Click Edit to change it.
  9. The assignee of the task. Click Edit to change who it is. Only users that have previously entered feedback for this brand be selected as assignees.
  10. In the Clients section, track which customers are interested in the feedback. Click Add to add clients.
  11. Tags can be used to categorize your feedback and easily find them with filtering. Click Add to add tags. If a project administrator has added custom fields, then you will be able to select values for your custom fields as well.
    Qtip: Only users in the Owner role can create tags. Once tags have been created, users in the Contributor, Moderator, and Owner role can assign existing tags to feedback.
  12. Click the arrow on the right to open the collections menu. You can read more about how to use collections on the Comparisons & Collections page.
    Feedback with gray menu to right expanded to reveal Collections info. "Add to collections" button is added just under the feedback description
  13. Use the dropdown to select a collection.
  14. Click Add to collection to add the feedback to a selected collection.

Commenting on Frontline Feedback

Commenting on feedback allows you to add additional notes or even mention other users you’d like to discuss the suggested changes with.

A frontline feedback request with comments on the bottom

Qtip: Users can only comment on feedback if the project has been shared with them or if brand-wide sharing is enabled. Learn more on the Customizing a Frontline Feedback Project page.
  1. Click Add Comment.
    Add comment button at bottom of a feedback request
  2. Type your comment.
    Commenting on frontline feedback
  3. You can mention users by typing “@” and then at least three letters of the target user’s name. This will search a list of users that match this criteria. Click on the user you want to mention, and they will be added to your comment.
    Qtip: See more information about @mentions below!
  4. If you do not want your display name added to the comment, select Submit comment anonymously.
  5. When finished, click the button to submit the comment, or press enter / Return on your keyboard.

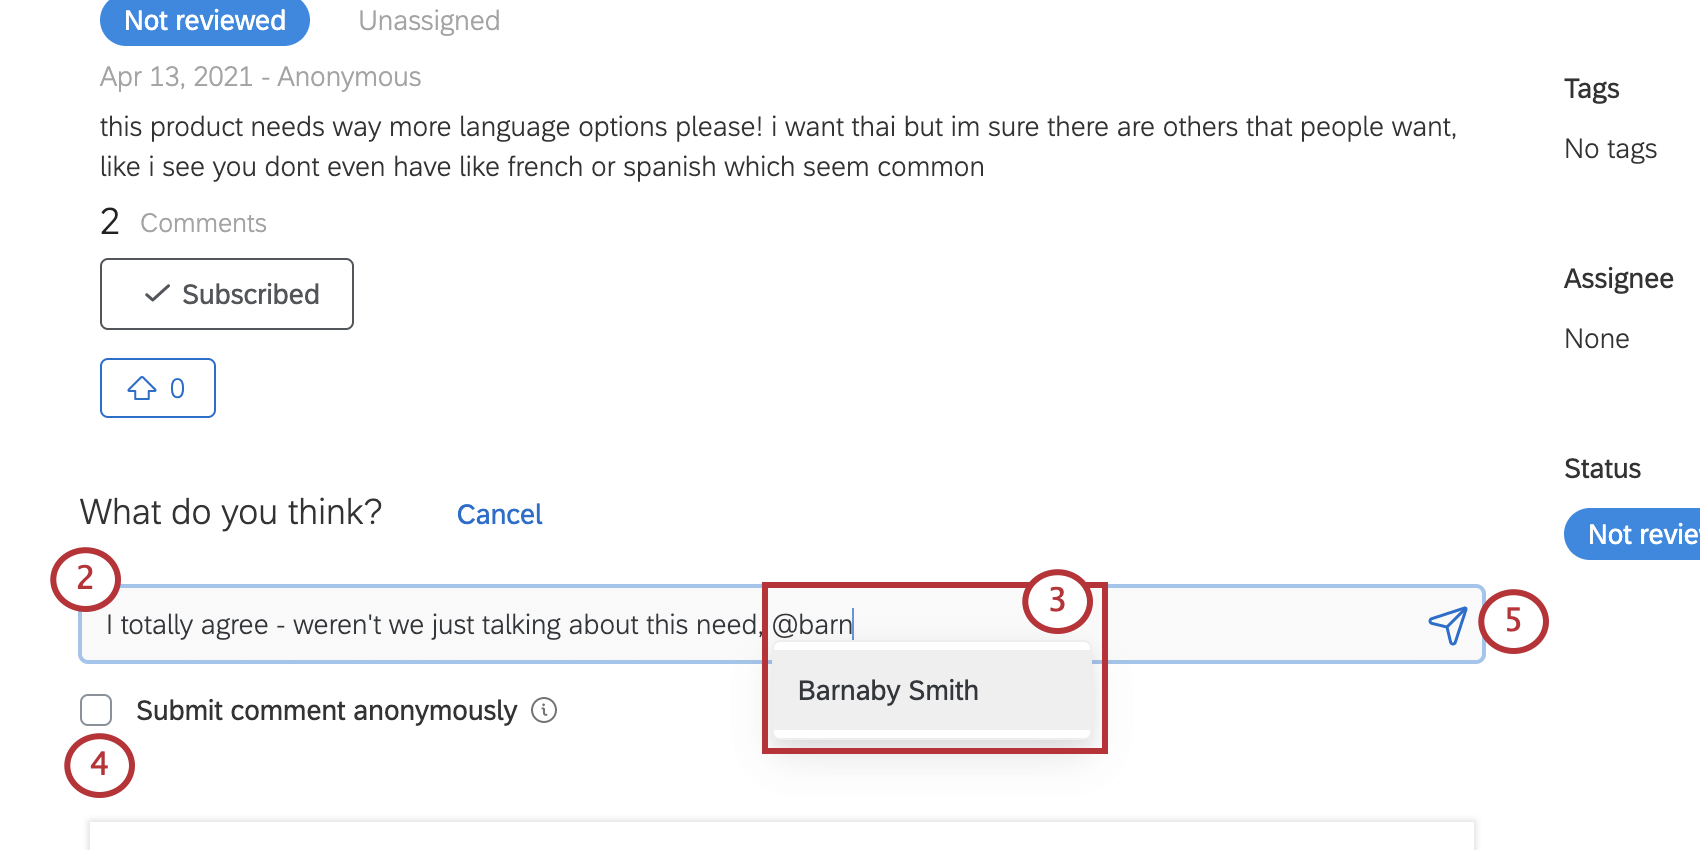
Mentioning Users in Comments

@Mention allows you to tag or mention other Frontline Feedback users in a comment. Mentioned users will automatically become subscribed to the request, and will also receive an email notification that they’ve been mentioned.

If a user doesn’t appear when you’ve typed at least three letters of their name, it may be that you need to adjust the sharing settings on your project. If you do not want to enable brand-wide sharing, ensure the specific user you’re looking for has been added with a display name. Learn more on the Customizing a Frontline Feedback Project page.

Qtip: Editing a comment that contains a mention will not send a notification. Editing an existing comment to include a new mention will not send a notification, either.

Prioritizing Feedback with MaxDiff Analysis

Once you’ve collected feedback, it can be difficult to determine which requests to prioritize. Frontline Feedback projects allow you to perform MaxDiff analysis on your feedback requests to determine what requests are the most preferable to action.