-

Qualtrics Platform -

Customer Journey Optimizer -

XM Discover -

Qualtrics Social Connect
Other Salesforce Distribution Methods
About Other Salesforce Distribution Methods
The most commonly used method for distributing Salesforce integrated surveys is with Trigger and Email Survey. However, there are many cases where you may need an alternative way to distribute your survey. Below are some examples of what else you can use to distribute surveys with Salesforce.
Distributing Through the Qualtrics Mailer
In some cases, you may only need to distribute one large email blast rather than many small transactional distributions. In those instances, distributing through the Qualtrics Mailer may be a good solution for you. Use the steps below to ensure your distribution will work well with your Salesforce extension.
- Use an application such as data loader to export from Salesforce the list of individuals you need to email, and save them in a CSV or TSV file. Make sure to include every piece of data from Salesforce that you may need later on, including any data you want to use in the survey and the IDs of related objects you might want to map back to in Salesforce later (for example, if you are exporting a list of contacts you will likely want to include their Contact and Account IDs).
- Create a new mailing list in Qualtrics.
Qtip: Alternatively, you can automatically store Salesforce data in a Qualtrics contact when a Salesforce Workflow Rule is triggered. For more information on how to set this up, see our page on Saving Record Changes in Salesforce as Contact Information.
- Set up the response mapping for your survey. Make sure you specify which IDs Qualtrics should use to update any existing records, or if you are creating new records, which IDs Qualtrics should use to relate the new record to existing records.
- Distribute your survey via email in the Distributions tab. See our page on email distribution management for more information about email distributions.
Creating a Link to the Survey in Salesforce
You may also find it useful to create a link to your survey directly inside Salesforce. This link can easily be set up to dynamically pass information from any given record into a Qualtrics survey. This can be useful in several cases:
- You would like your employees to answer a few questions about a record from within Salesforce, then map the response directly into Salesforce. This functionality can be useful when implemented in a call center or if you’d like someone to give feedback on an account before they make changes to it.
- You are planning on distributing your survey with a third party Salesforce extension, such as Marketo.
This is fairly simple to accomplish using a Formula Field in Salesforce, the Concatenate function in the Salesforce formula field editor, and query strings at the end of your survey URL. In the examples below, we’ll focus primarily on using the Contact and Account objects, but the principle applies to any of your Salesforce objects (default or custom).
Setting up your link:
- Copy your anonymous survey link from Qualtrics.
- In Salesforce, determine which object you’d like to add the survey link to. Navigate to the Fields page for that object. (For the Contact object, go to Setup then Customize. Select Contact and then Fields).
- Create a new Formula field titled Survey Link.
- For the Formula field, use the hyperlink function, concatenation, and query strings to create a link that will pass any variables through to your survey from your record. For example, the link below would pass the internal Salesforce ID of the contact, the ID of their parent account, their first and last name, and a custom field that tracks whether or not they’ve already completed the survey. This will result in a hyperlink with the text “Click here to take this survey!”HYPERLINK(“https://qcorp.qualtrics.com/jfe/form/SV_1FZQNHPV6V?sfId=” & Id & “&sfAccountId=” & Account.Id & “&FirstName=” & FirstName & “&LastName=” & LastName & “&ST=” & Survey_Taken__c , “Click here to take this survey!” ).
- In your survey, make sure to add the name of each of your query string values to your survey flow as embedded data fields (in the example above, this includes sfId, sfAccountId, FirstName, LastName, and ST). Once this is done you can use these values for anything you want in your survey, including piped text for a more dynamic survey experience, or branch logic and display logic.
Creating your response mapping:
When building out your response mapping, you’ll want to be mindful of which fields you have passed through your URL. In the example link above, the link passed the ID of the contact record, but it also sent the ID of its parent account. This means that you can update the contact, the parent account, or both. You can also create new survey response records that are related to both the contact and its parent account.
- Select Update Object.
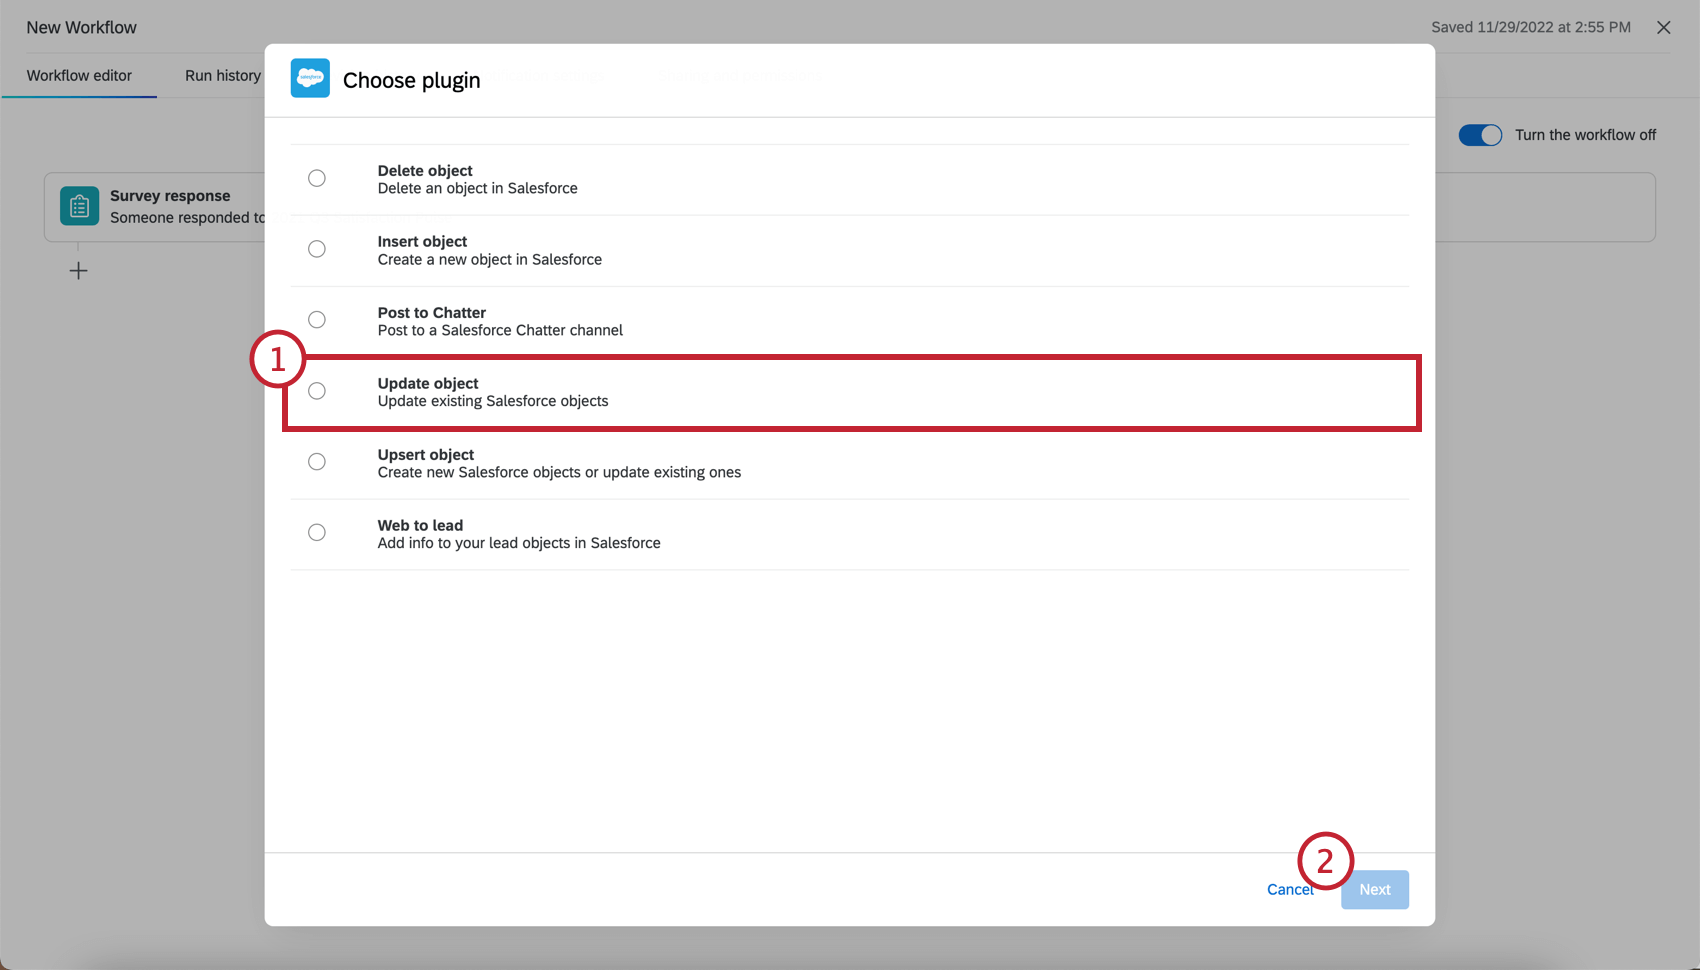
- Click Next.
- Select your Salesforce account, or add a user account.
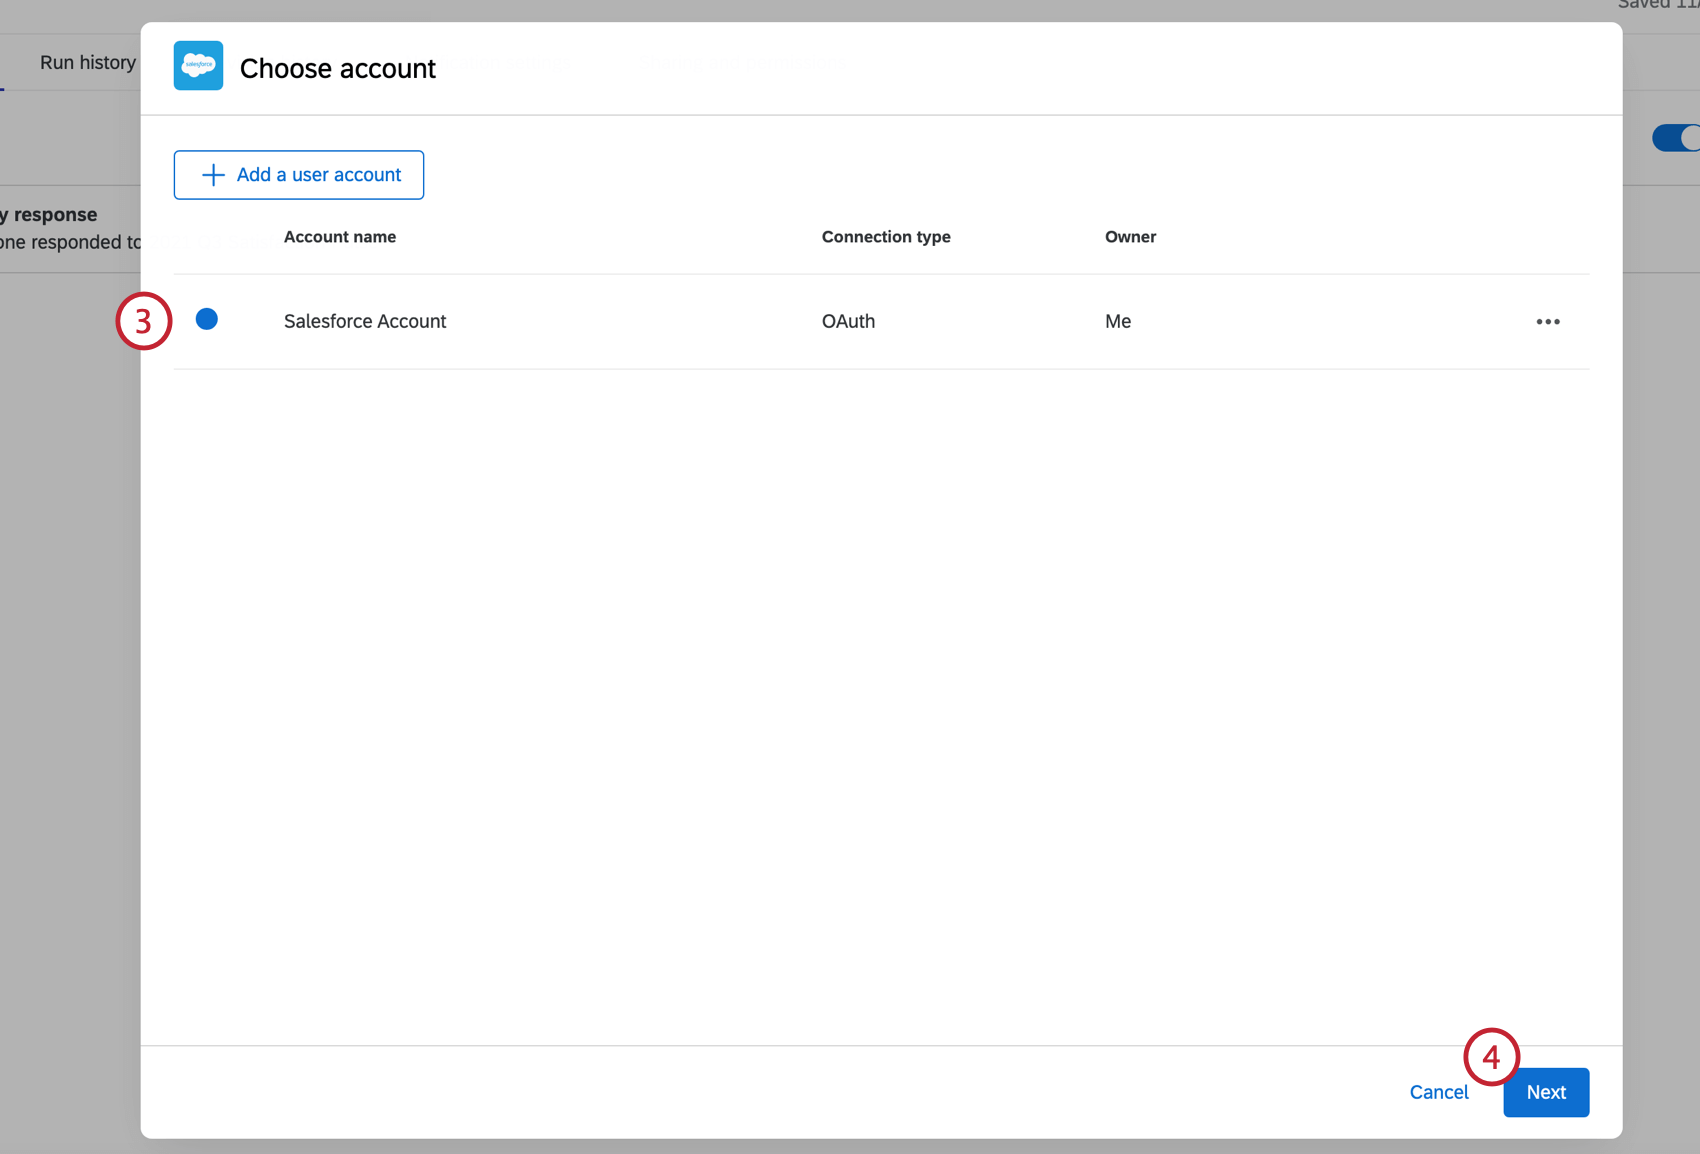
- Click Next.
- Select Contact as the Salesforce object.
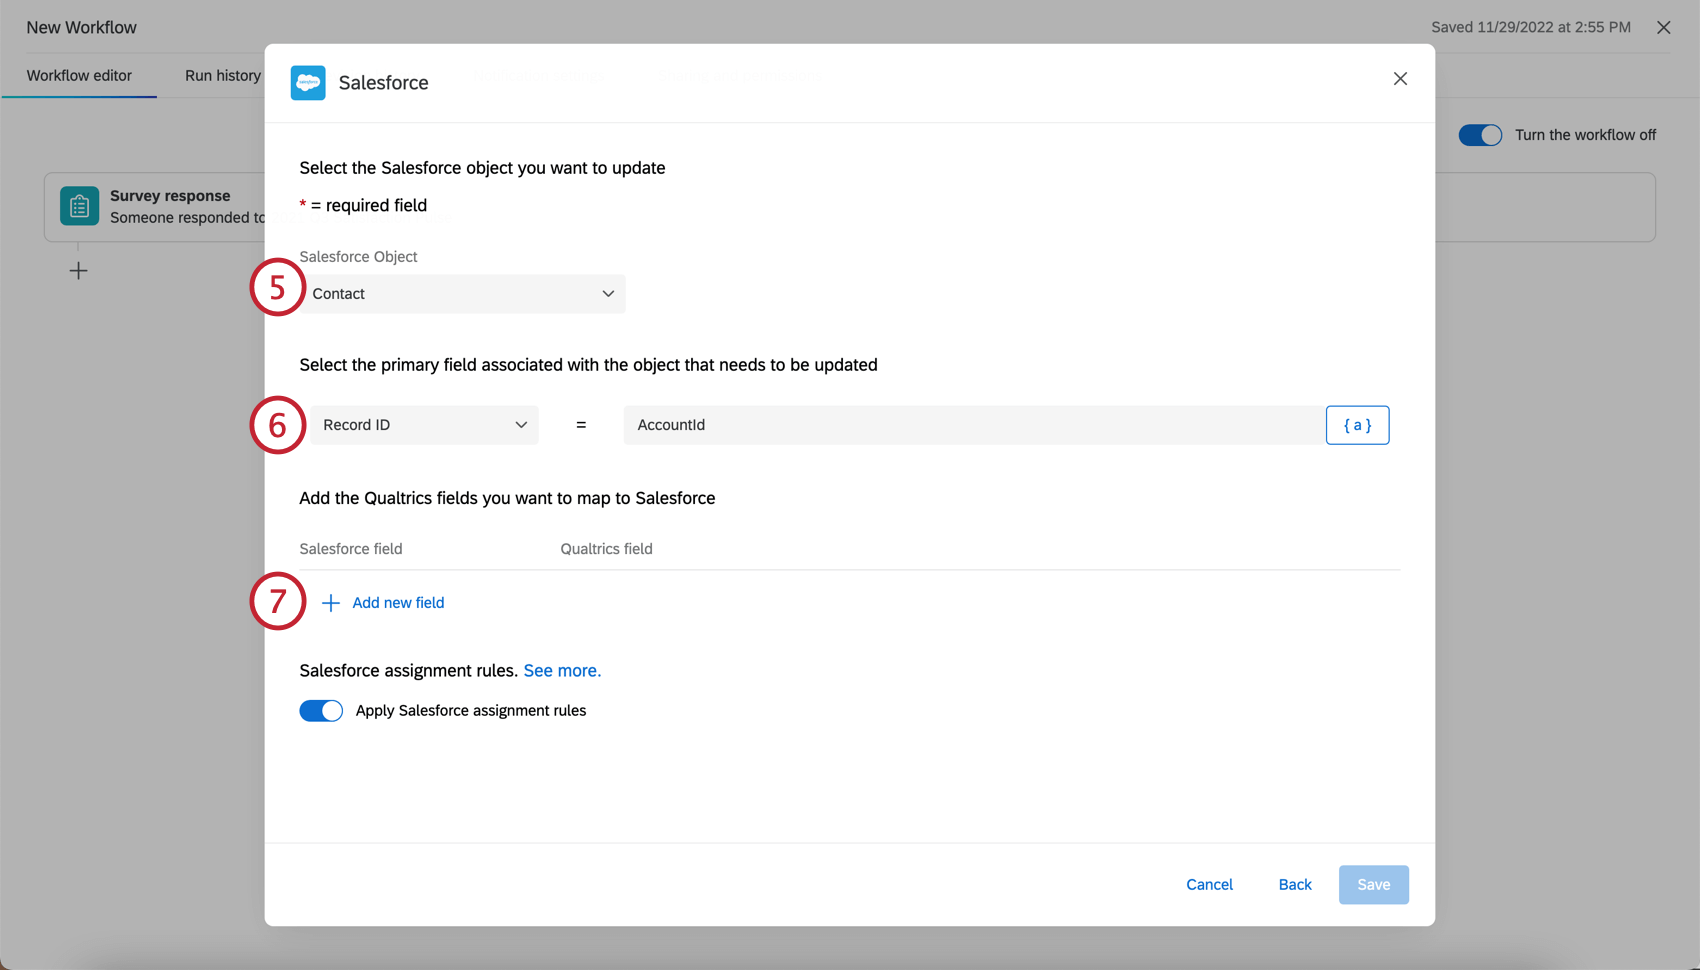
- Set the Record ID equal to the query string (in the example above, AccountID) or use the piped text button ( { a } ) to pipe in the embedded data field from the survey flow. Make sure this matches the case of what you specified in your query string.
- To relate your new record back to the contact and parent account, click Add new field and map the Salesforce response field.
- Select embedded data for each of the lookup fields, and for the value select whatever you named each respective ID in your query string. Make sure both of the embedded data fields are in the survey flow as well. See mapping to a lookup field for more details.